- Печать
Страницы: [1] Вниз

Тема: Saeco Talea Giro Plus — мигает восклиц. знак (Прочитано 8803 раз)
0 Пользователей и 1 Гость просматривают эту тему.
Добрый день.
Помогите разобраться с машинкой.
После включения мигает восклицательный знак и загорается капелька.
пробовал пролить воду, чтобы вышел воздух — не помогает.
в тестовом режиме вроде все работает.
Подскажите, в чем может быть проблема?

Записан
Поддон пробовад на 5 секунд вынимать? Кран полностью закрыт? Все герконы соаботали?
Записан
Авторизация: Delonghi, Bork, Ariette, Jura, Nivona
Поддон вынимал.
Кран закрыт, но он давно уже пропускает немного… когда варил кофе, из носика для пара вода капала. может из за него быть?
герконы это что?
« Последнее редактирование: Март 07, 2019, 02:57:34 от osja »
Записан
Нет, изза капания не может. Герконы, это Герметичные Контакты, управляемые магнитом. Магниты находятся в поддоне, крышке зерен, в кране, дверце. Грубо говоря это концевые выключатели.
Записан
Авторизация: Delonghi, Bork, Ariette, Jura, Nivona
После включения мигает восклицательный знак и загорается капелька.
Во-первых — моргает быстро или медленно?
Во-вторых — на поворачивание ручки пара хоть какая-то реакция есть?
Записан
Профессионализм заключается не в ИМЕНИИ кучи знаний и навыков, а в УМЕНИИ применять имеющееся максимально качественно и эффективно.
Учись учиться! 
моргает быстро
на поворачивание крана реагирует, начинает лить воду, причем если пару раз пролить, начинают попеременно моргать «спираль» и «отходы» и тогда уже только ребут.
« Последнее редактирование: Март 07, 2019, 02:57:01 от osja »
Записан
В тестовом режиме при проливе воды светодиод импульсов флоуметра моргает?
« Последнее редактирование: Март 07, 2019, 02:56:39 от osja »
Записан
в тестовом при проливе ничего не моргает, просто льет воду.
« Последнее редактирование: Март 07, 2019, 02:56:19 от osja »
Записан
Ну вот и причина — расход воды не считает Либо флоуметр сдох, засорился и турбинка не вращается, либо с проводкой, платой чтото. Для начала снять с него патрубки и продуть — когда турбинка вращается хорошо слышно жужжание. Если с этим все ок, тогда уже цепочку смотреть.
Записан
« Последнее редактирование: Март 07, 2019, 02:55:54 от osja »
Записан
Всем спасибо за помощь.
Разобрал, почистил флоуметер, собрал, пролил воду и она заработала. )))
Записан
yeskoles
почисти от накипи! иначе через месяц бойлер встанет!
« Последнее редактирование: Март 07, 2019, 02:55:18 от osja »
Записан
Хочу поблагодарить, всех, кто выше писал, был такой-же случай на saeco talea giro, мигал восклицательный знак горело зернышко и капля, сробатывал кран подачи воды после двух, трех сливов начинали быстро мигать спираль и отходы. Разбирал несколько раз, проверил счётчик воды все норм, но т. к. торопился не заметил окисления на фишке и даже один контакт развалился, после восстановления контакта и замены датчика все заработало, вопрос только в том откуда там взялось окисление, что даж ножка флоуметра практически отржавела.
Записан
- Печать
Страницы: [1] Вверх
- Manuals
- Brands
- Saeco Manuals
- Coffee Maker
- TALEA GIRO
- Operation and maintenance manual
-
Contents
-
Table of Contents
-
Troubleshooting
-
Bookmarks
Quick Links
Operation and maintenance manual
Before using the machine, please read the attached operating instructions.
Carefully read the safety rules
Mode d’emploi
Veuillez lire attentivement le mode d’emploi
(notamment les consignes de sécurité) avant d’utiliser l’appareil.
FOR HOUSEHOLD USE ONLY
Related Manuals for Saeco Talea Giro
Summary of Contents for Saeco Talea Giro
-
Page 1
Operation and maintenance manual Before using the machine, please read the attached operating instructions. Carefully read the safety rules Mode d’emploi Veuillez lire attentivement le mode d’emploi (notamment les consignes de sécurité) avant d’utiliser l’appareil. FOR HOUSEHOLD USE ONLY… -
Page 2: Important Safeguards
IMPORTANT SAFEGUARDS When using electrical appliances, basic safety precautions should always be followed to reduce the risk of fire, electric shock, and/or injury to persons, including the following: 1 Read all instructions and information in this instruction book and any other literature included in this carton referring to this product before operating or using this appliance.
-
Page 3
CAUTION This appliance is for household use only. Any servicing, other than cleaning and user maintenance, should be performed by an authorized service centre. Do not immerse machine in water. To reduce the risk of fire or electric shock, do not disassemble the machine. There are no parts inside the machine serviceable by the user. -
Page 4: Table Of Contents
CONTENTS GENERAL INFORMATION ………………..5 APPLIANCE ……………………6 ACCESSORIES …………………………6 INSTALLATION ……………………7 STARTING THE MACHINE ……………………..7 “AQUA PRIMA” FILTER ………………………8 CONTROL PANEL ………………….9 ADJUSTMENTS ………………….10 COFFEE VOLUME ADJUSTMENT PER CUP ………………..10 «AROMA» (OPTI-DOSE) INDICATES THE GROUND COFFEE QUANTITY ……….10 DRIP TRAY HEIGHT ADJUSTMENT ………………….10 COFFEE STRENGTH ………………………11 COFFEE GRINDER ADJUSTMENT ………………….11 COFFEE BREWING AND HOT WATER DISPENSING ……….12…
-
Page 5: General Information
GENERAL INFORMATION This coffee machine is suitable for preparing espresso coffee using coffee beans, and it is equipped with a device to dispense steam and hot water. The machine is designed for domestic use only and is not suitable for heavy or professional use. Warning: no liability is assumed for any damage caused by: •…
-
Page 6: Appliance
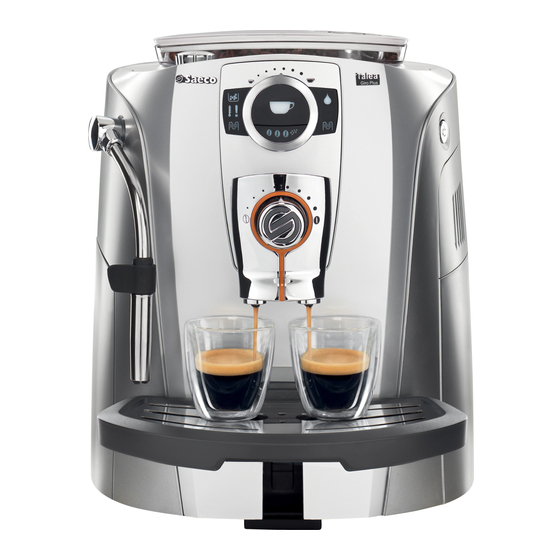
APPLIANCE Coffee bean hopper Cup stacking surface Coffee bean hopper cover Control panel Power button SBS knob Service door Dispensing head Coffee grounds drawer Hot water / steam knob Hot water / steam spout Water tank Brew Group Drip tray “Milk Island”…
-
Page 7: Installation
INSTALLATION STARTING THE MACHINE Make sure the power button is not pressed and the machine is turned off. Check the machine features on the label on the bottom of the appliance. Lift the cover of the coffee bean Fill the container with coffee Remove the water tank.
-
Page 8: Aqua Prima» Filter
“AQUA PRIMA” WATER FILTER Turn the knob until it is in the Press the water button again. comes out of the spout. rest position ( ). The indicator light turns off. Remove the container. The machine is ready for use. When the correct temperature is reached, the machine performs a rinse cycle of the internal circuits.
-
Page 9: Control Panel
CONTROL PANEL Alarm light to empty the coffee grounds drawer: • permanently on: signals the need to empty the grounds drawer; this operation must be performed with the machine turned on (steps 4 and 5, page 18). Coffee dose adjusting knob (see page 10). Coffee button: 1 coffee has been selected (the button has been pushed once).
-
Page 10: Adjustments
ADJUSTMENTS COFFEE VOLUME ADJUSTMENT PER CUP The coffee volume knob adjusts the amount of coffee brewed per cup. This adjustment has an immediate effect Medium coffee on the selected type of brewing. Espresso coffee Long coffee «AROMA» (OPTI-DOSE) INDICATES THE GROUND COFFEE QUANTITY By pressing the key, it is possible to choose either a mild, a medium or…
-
Page 11: Coffee Strength
The SBS dial has been carefully designed to give your coffee the fullness and intensity you desire. Simply turn the knob and you will notice that the coffee brewed will adjust to the setting selected. SBS – SAECO BREWING SYSTEM The Saeco Brewing System (SBS) adjusts the fullness of the brewed coffee.
-
Page 12: Coffee Brewing And Hot Water Dispensing
COFFEE BREWING COFFEE BREWING The coffee brewing cycle can be interrupted at any moment by pushing the button. order to grind the second serving of coffee. Coffee dispensing is then restarted and completed. Adjust the drip tray according to Place one cup if you want one Place two cups if you want two the height of the cup/s.
-
Page 13: Hot Water Dispensing
HOT WATER DISPENSING HOT WATER DISPENSING Dispensing may be preceded by short sprays of hot water, and scalding is possible. The hot water/steam spout may reach high temperatures: do not touch it with bare hands. Use the appropriate handle only. Adjust the height of the drip tray.
-
Page 14: Cappuccino
CAPPUCCINO CAPPUCCINO Dispensing may be preceded by short sprays of hot water, and scalding is possible. The hot water/steam spout may reach high temperatures: do not touch it with bare hands. Use the appropriate handle only. Adjust the height of the drip tray. Fill 1/3 of the cup with cold milk.
-
Page 15: Milk Island (Optional)
MILK ISLAND (OPTIONAL) This device, which may be purchased separately, enables you to easily and comfortably prepare delicious cappuccinos. Warning: before using the Milk Island, read the manual and all precautions carefully for correct use. Important note: the quantity of milk in the jug must never be below the “MIN” minimum level nor exceed the “MAX”…
-
Page 16: Descaling
Caution! Do not use vinegar as a descaler. The descaling must be done when indicated by the machine. Use a non-toxic, non-harmful descaling solution. Saeco descaling solution is recommended. The used solution should be disposed according to the manufacturer instructions and/or regulations in the country of use.
-
Page 17
Empty the container with the Press the button to turn off the Repeat steps 3 — 8 until all the used descaling solution. machine. After 10 minutes, turn descaling solution in the tank on the machine again. has been dispensed. Press the hot water button. -
Page 18: Cleaning And Maintenance
CLEANING AND MAINTENANCE HOW TO CLEAN THE MACHINE The machine must be cleaned at least once a week. Do not immerse the machine in water or place any of its parts in a dishwasher. Do not use alcohol, solvents, benzene and/or abrasive objects to clean the machine. The water left in the tank for several days must be disposed of.
-
Page 19: Cleaning The Brew Group
CLEANING THE BREW GROUP The Brew Group must be cleaned at least once a week. Before removing the Brew Group, remove the Group, insert the grounds drawer and close the service door. Press the “PUSH” button to Wash the Brew Group with Make sure the Brew Group is in remove the Brew Group.
-
Page 20: Troubleshooting
TROUBLESHOOTING ROBLEMS AUSES OLUTIONS The machine does not turn on. The machine is not connected to the Connect the machine to the power power source. source. The plug has not been plugged into Insert the plug into the machine’s power the back of the machine.
-
Page 21: Safety Rules
SAFETY RULES N CASE OF EMERGENCY Immediately unplug the cable from the outlet. SE THE APPLIANCE ONLY — Indoors. — To prepare coffee, dispense hot water, froth milk or heat beverages using steam. — For domestic use only. — By adults in non altered psycho-physical conditions. EVER USE THE APPLIANCE For purposes other than those indicated above, in order to avoid danger.
-
Page 22
SAFETY RULES AILURES — Do not use the appliance in case of sure or suspected faults such as after falls. — Any repairs must be performed by an authorized customer service centre. — Do not use the appliance with a defective power cable. If damaged, the power cable must be replaced by the manufacturer or authorized service centre. -
Page 23: Technical Data
TECHNICAL DATA TECHNICAL DATA • Nominal voltage See label on the appliance • Power rating See label on the appliance • Power supply See label on the appliance • Shell material ABS — Thermoplastic • Size (w x h x d) 320 x 370 x 400 mm — 12.60 x 14.57 x 15.75 in •…
-
Page 26
Tel: + 39 0534 771111 Fax: + 39 0534 31025 www.saeco.com The manufacturer reserves the right to change the features of the product without prior notice. Le producteur se réserve le droit d“apporter toutes modifications sans préavis. © Saeco International Group S.p.A.
поиск
Ш ¥СТРЙНЕНИЕ НЕИСПРАВНОСТЕИ
Проблемы
Причины
Решения
Машина не включается
Машина не подсоединена к источнику
Подсоедините машину к источнику
питания
питания
Вилка не вставлена в заднюю часть
Вставьте вилку в штепсельную ро-
машины
зетку машины
Кофе недостаточно горячий
Чашки холодные
Подогрейте чашки посредством го
рячей воды
Нет подачи горячей воды или пара
Отверстие трубки пара закупорено
Очистите
отверстие
трубки
пара
посредством иглы
В кофе недостаточно сливок
Сорт кофе неподходящий или кофе
не свежесвареннь(й
Смените сорт кофе
Регулятор 5В5 повернут влево
Поверните регулятор ЗВЗ вправо
Машине нужно много времени,
Контур машины закупорен известко-
Очистите машину от накипи
чтобы
нагреться,
или
количество
воды, подаваемое из трубы, слиш
ком маленькое
вым налетом
Устройство приготовления не вы-
Устройство приготовления не на
Включите машину. Закройте сер-
ходит
месте
висную
дверцу.
Устройство
при
готовления
будет
автоматически
установлено
в правильное
поло
жение
Вставлен контейнер для использован-
Вынуть сначала контейнер для
ного кофе
использованного кофе, затем уст
ройство приготовления
Кофе не варится
Контейнер для воды пуст
Заполните контейнер для воды
и запустите контур вновь
Устройство приготовления
Очистите устройство
загрязнено
приготовления
Контур не запускается
Вновь попробуйте запустить кон
тур, пустив воду из паровой трубки
Ручка-дозатор количества кофе нахо-
Поверните ручку-дозатор по часо-
дится в неправильном положении
вой стрелке
Кофе готовится медленно
Кофе слишком большая порция
Измените сорт кофе
Уменьшите дозировку
Контур не запускается.
Вновь попробуйте запустить кон
тур, пустив воду из паровой трубки
Устройство приготовления
Очистите устройство
загрязнено.
приготовления
Утечка кофе из диспенсера
Диспенсер засорен
При помощи сухой ткани прочисти
те отверстия диспенсера
Приготовление не начинается
Крышка контейнера для зёрен кофе
Установите крышку контейнера для
находится в неправильном
кофейных зерен в правильное по-
положении
ложение и нажмите с усилием
При наличии каких-либо неисправностей, не упомянуть1х в вышеприведенной таблице, либо в случае если пред
ложенные здесь решения не помогают устранить неисправность, пожалуйста, обратитесь в сервис-центр.
ТЕХНИЧЕСКИЕ ДАННЫЕ
TEXHÍ4ECÜE ДАННЫЕ
Номинальное напряжение
См. ярлык на аппарате
Потребляемая мощность
См. ярлык на аппарате
Питание
См. ярлык на аппарате
Материал корпуса
ABS — термопласт
Габариты (длина х высота х ширина)
320x370x400 мм
Масса
9 кг
Длина
ЭЛ.
провода
1200 мм
Панель управления
Фронтальная панель
Контейнер для воды
1,7 литров / Съемный
Давление помпы (бар)
15
Бойлер
Нержавеющая сталь
Емкость контейнера для кофейных зерен
250 г / кофе-зерна
Количество кофе на порцию
7-10,5 г
Емкость контейнера для использованного кофе
14
Защитные устройства
Предохранительный клапан бойлера-
двойное предохранительное термореле.
в результате совершенствования технологии возгложны конструктивные или производственные изменения.
Машина соответствует требованияги директивы Европейского Союза 89/336/ ЕЭС (Указ итальянского законо
дательства 476 от 04/12/92 г.) в отношении электромагнитной совместимости,
119270, Москва, Лужнецкая набережная, ц. 2/4, корп. 23
Тел.: (495) 730-65-50
Факс: (495) 730-65-51
iMww.saeco.ru
ABTopisoeanHbiM сервмсным центр юфемашмн
127018, р. 1 -я Ямская, д. 8
Тел.: (495) 730-65-48,689-51-56, 68Н-35-Н8,
E-mail: service@saeco.ru
эксклюзизнь!и дистрибьютор кофемашин и кофе
www.saeco.ry

поиск и
УСТРАНЕНИЕ НЕИСПРАВНОСТЕЙ
Проблемы
Причины
Решения
Машина не включается.
Машина не подсоединена к
источнику питаний.
Подсоедините машину к истоЧШкГ—^
питания. /
Вилка не вставлена в заднюю
часть машины.
Вста вьте вил ку в псельн ую^>озет ку ‘
машины. /
Кофе недостаточно горячий.
Чашки холодные.
Подогрейте чашкг(лосредсЬом горл1)ей
воды. _____________________
у
Нет подачи горячей воды
или пара-
Отверстие трубки пара закупорено. Очистите^тв^р
10
ти^Уту
6
ки пара у
ПОСрдаТВОМ
ИГ1^
/
в
кофе недостаточно сливок. Сорт кофе неподходящий или кофе
несвежесваренный.
Смейте сор^офе. ^ ^
Машине нужно много
времени, чтобы нагреться,
или количество воды,
подаваемое из трубки
слишком маленькое
Контур мэшинь! закупорен
известковым налетом.
/
Оч
11
|стите маЬшушХакиги.
Устройство приготовления
Устройство приготовления не (на / ‘БкпК)чите мш^ину. Закройте сервисную
не выходит.
месте.
1
/
двдрцууустройство приготовления будет
;!^втоматиче^и установлено в правильное
положений
Вставлен^тейнер
дл;
исголь^ваиного кофе.
Вывди:начала контейнер для
использованного кофе, затем устройство
приготовления.
Кофе не варится.
Контейнер для воды
■оиствй41риртов!
загрязнено.
¡аполните контейнер для воды и
запустите контур вновь.________
Очистите устройство приготовления.
Вновь попробуйте загустить контур,
пустив воду из трубки пара._______
Руука-доэатор количества кофе
находдася в неправильном
mwx&vm.
Поверните ручку-дозатор по часовой
стрелке.
офе спитом мелкий.
Измените сорт кофе.
Уменьшите дозировку.
Контур не запускается.
Вновь попробуйте загустить контур,
пустив воду из трубки пара._______
Устройство приготовления
загрязнено._____________
Очистите устройство приготовления.
Диспенсер засорен.
При помощи сухой ткани прочистите
отверстия диспенсера.____________
Приготовление не
начинается.
Крышка контейнера для кофейных
зерен находится в неправильном
положении.
Разместите крышку контейнера для
кофейнь
1
х зерен в правильное положение
и нажмите с усилием.
При наличии каких-либо неисправностей, не упомянутых в вышеприведенной таблице, либо в
случае если предложенные здесь решения не помогают устранить неисправность, пожалуйста,
обратитесь в сервис-центр.
Все права защищены. OOO «Проксима» ©
Страницы и текст этой инструкции
 Руководство пользователя кофемашины Saeco Talea Giro Plus V2
 Информация отображена на картинке
 Информация отображена на картинке
 Информация отображена на картинке
 Информация отображена на картинке
Как использовать наш сайт инструкций OnlineManuals.ru
Наша цель состоит в том, чтобы предоставить вам быстрый доступ к содержанию инструкции для кофемашины Saeco Talea Giro Plus V2.
С помощью онлайн просмотра, Вы можете быстро просмотреть содержимое инструкции и найти решение проблемы с кофемашины Saeco Talea Giro Plus V2.
Для Вашего удобства
Если листать руководство пользователя кофемашины Saeco Talea Giro Plus V2 прямо на сайте, не очень удобно для Вас, есть два возможных решения:
• Просмотр в полноэкранном режиме — легко просмотреть руководство пользователя (без загрузки его на свой компьютер), Вы можете использовать режим полноэкранного просмотра.
Для просмотра инструкции пользователя кофемашины Saeco Talea Giro Plus V2 на полном экране, используйте кнопку «Открыть в Pdf-viewer».
• Загрузка на компьютер — Вы можете также скачать Руководство пользователя кофемашины Saeco Talea Giro Plus V2 на свой компьютер и сохранить его в файлах.
Многие люди предпочитают читать документы не на экране, а в печатной версии.
Возможность печати руководства пользователя также была предусмотрена на нашем сайте,
и вы можете использовать ее, нажав на иконку «печать» в Pdf-viewer.
Нет необходимости печатать все руководство кофемашины Saeco Talea Giro Plus V2, можно выбрать только нужные страницы инструкции.
Кофеварки и кофемашины как любое оборудование требуют к себе должного внимания и ухода. Если у вас более современная кофемашина и ошибки показываються только цифрами, то вам нужна другая статья. Все знают и понимают, что если вовремя не обслуживать кофемашину, то она рано или поздно начнёт плохо работать или варить невкусный кофе. Для того чтоб не довести кофемашину до плачевного состояния, они оборудованы сигналами, которые помогут вам понять, что с вашим кофейным аппаратом не так. Ниже представлен основной перечень ошибок саеко и как с ними бороться.
Если вам не поможет данная статья, обратитесь к нашим мастерам.
Так же вы можете получить бесплатную консультацию по телефону:
Life:) (093) 4963131
МТС (095) 4963131
Kyivstar (097) 4963131
Основные ошибки кофемашины Saeco Royal, Saeco incanto, Saeco Magic и других
Дисплей не горит или нет никаких надписей на нём:
Проверить подключена ли кофемашина в сеть, проверить кнопку включения/выключения, проверить плотно ли закрыта дверца кофемашины, так как она нажимает предохранитель, который не позволяет кофемашине работать в открытом состоянии.
VENTILATE
В гидро-систему попал воздух. Необходимо прогнать воду через краник. Скорее всего сразу после включения, вместо воды пойдут брызги с паром, но постепенно должна появиться вода и ошибка пропадёт. Если ошибка всё равно осталась, то необходимо более серьёзное вмешательство во внутренности кофемашины.
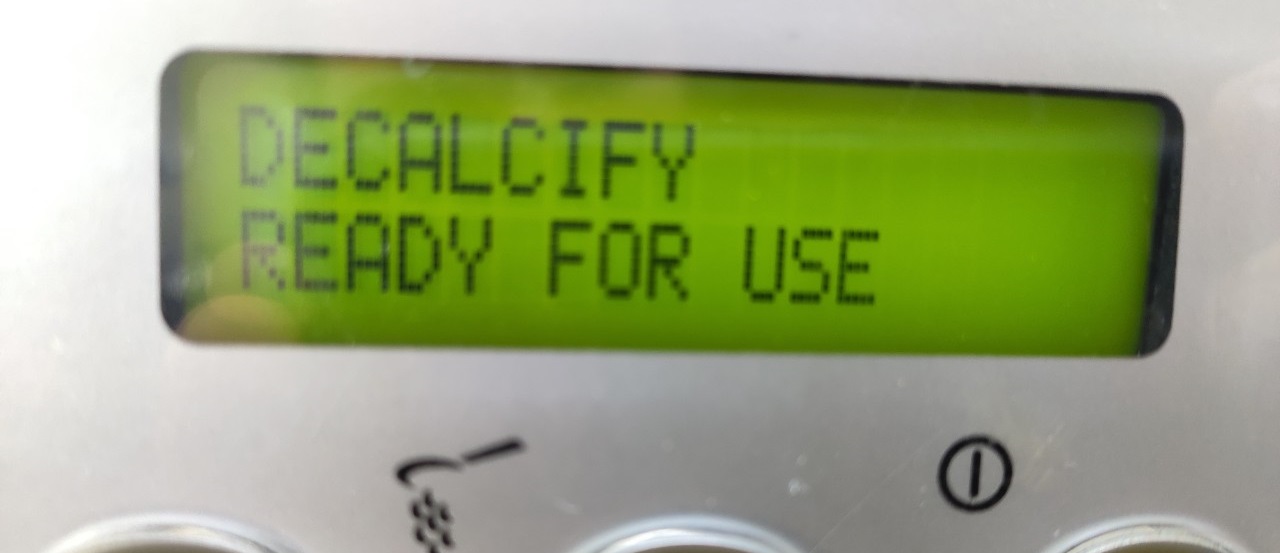
DECALCIFY
Кофемашина может работать и варить вкусный кофе, но желательно сделать чистку и декальцинацию, если вы и дальше хотите пользоваться кофеваркой.
WARMING UP
Кофемашина нагревается. Если надпись не пропадает в течение 10 минут, необходимо обратиться в сервисный центр, потому что возможны поломки в системе нагрева воды.
SELECT PRODUCT, READY FOR USE
УРА! Оборудование полностью готово к использованию. Наслаждайтесь вкусным кофе
.jpg)
COF.BEANS EMPTY
Кофеварка исправна и готова к работе, но нужно засыпать кофе. Насыпьте кофе, перезагрузите кофемашину. Если надпись всё равно осталась, необходимо обратиться в сервисный центр Brayval-coffee
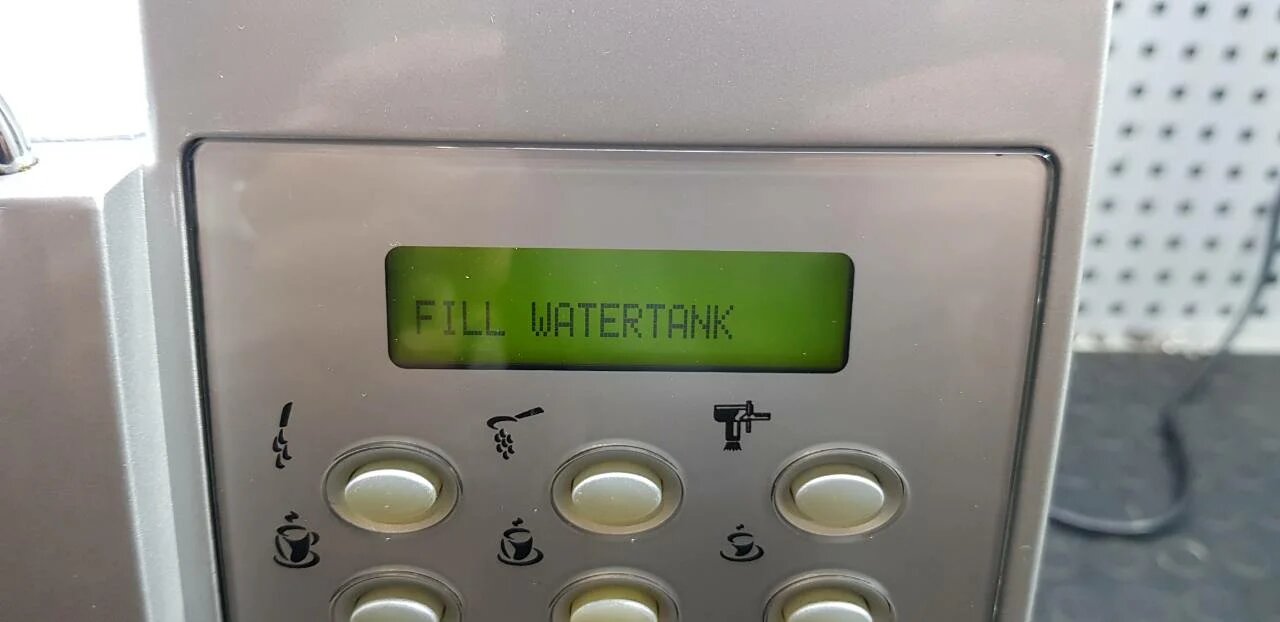
FILL WATER TANK или WATER TANK EMPTY
Необходимо наполнить бак водой, правильно его установить в нужное положение. Если надпись не исчезла, нужно прогнать воду через систему. Для этого откройте подачу воды через краник. Если и это не помогло, обратитесь в сервисный центр. возможно у вас проблеммы с гидро-системой кофеварки.
DREGDRAWER FULL
Контейнер жмыха для отработанного кофе – заполнен. Нужно очистить бункер для жмыха. Если он не заполнен и горит данная надпись, то нужно достать бункер на 30 секунд и вставить обратно. Если после этого надпись не исчезла, необходимо сдать машинку в сервисный центр.
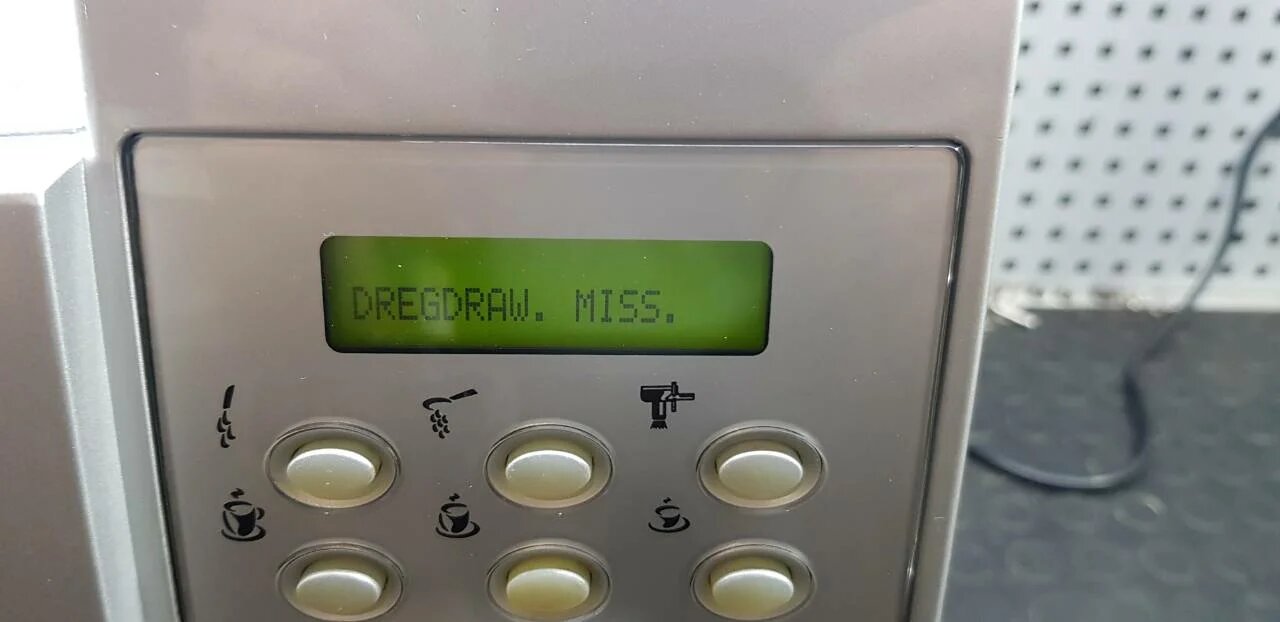
DREGDRAWER MISS
Кофемашина не видит бункер для отработанного кофе. Такое может быть при неправильной установке бункера или при поломке датчика. Попробуйте поправить бункер отработанного кофе, если это не помогло, то придётся сдавать кофемашину в ремонт. Скорее всего у вас сломан датчик наличия бункера.
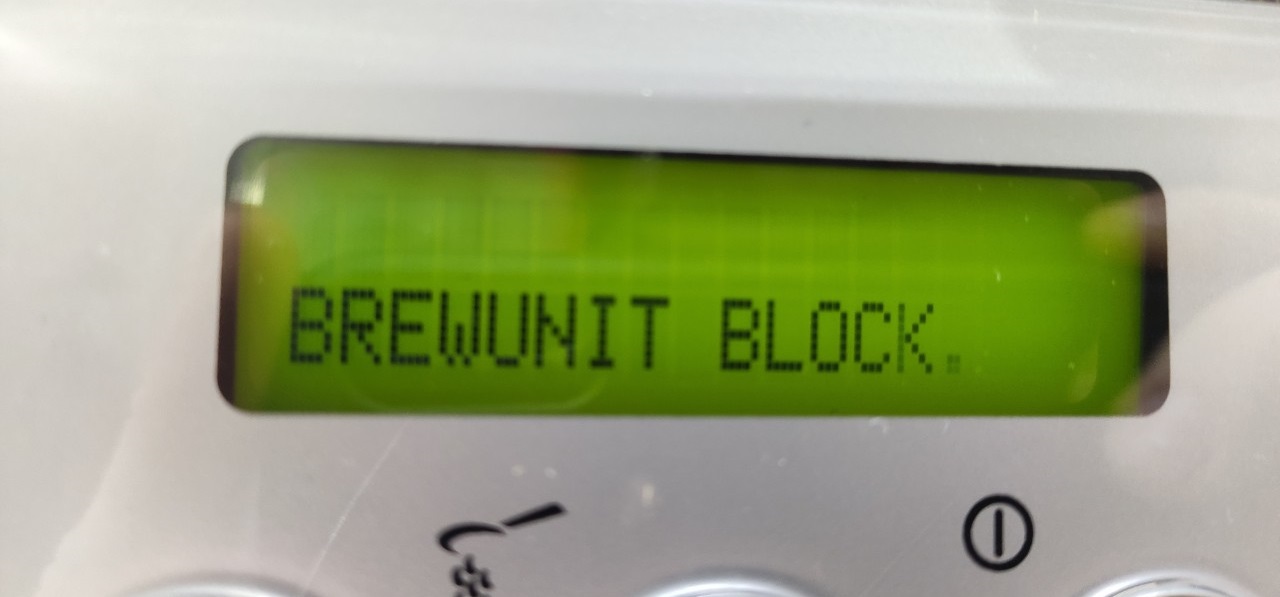
BREW UNIT BLOCK
Рабочий блок (пресс) заблокирован. Необходимо перезагрузить кофемашину, чтоб рабочая группа прошла полный цикл и встала в правильное положение. Если рабочая группа не проворачивается или ошибка не исчезает, то необходим ремонт кофемашины.
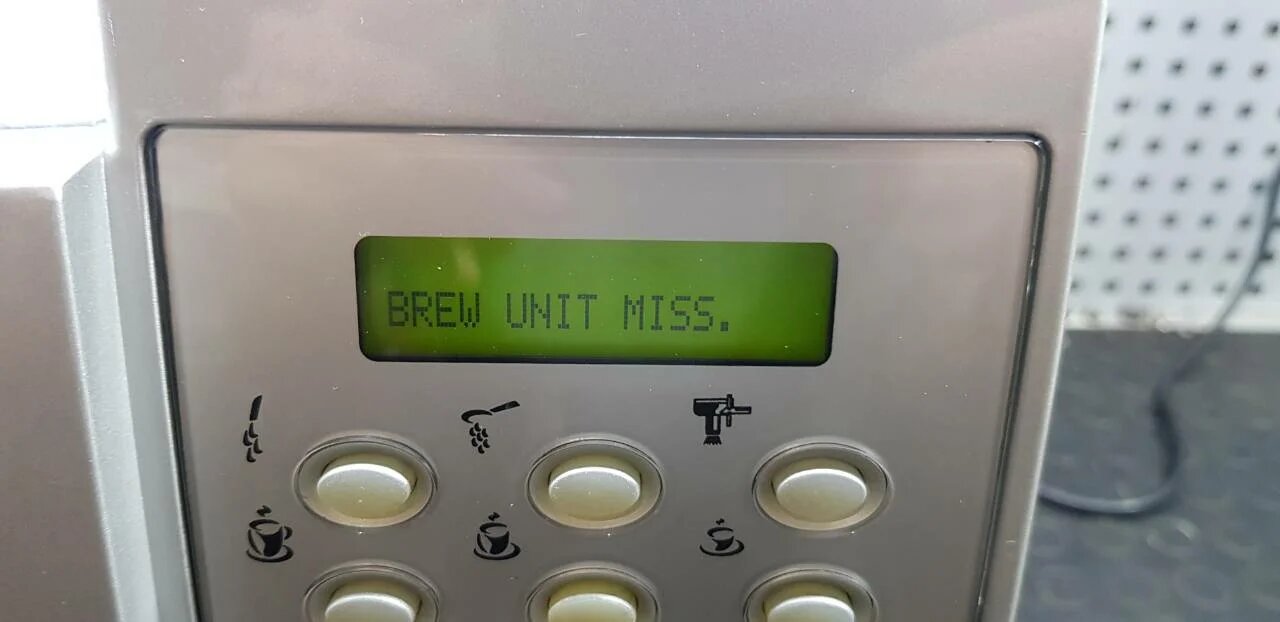
BREW UNIT MISS
Рабочий блок (пресс) вставлен неправильно, попробуйте вставить его правильно. Если он установлен корректно, то скорее всего что-то с электроникой или датчиками. Нужно обратиться в сервисный центр Брайвал
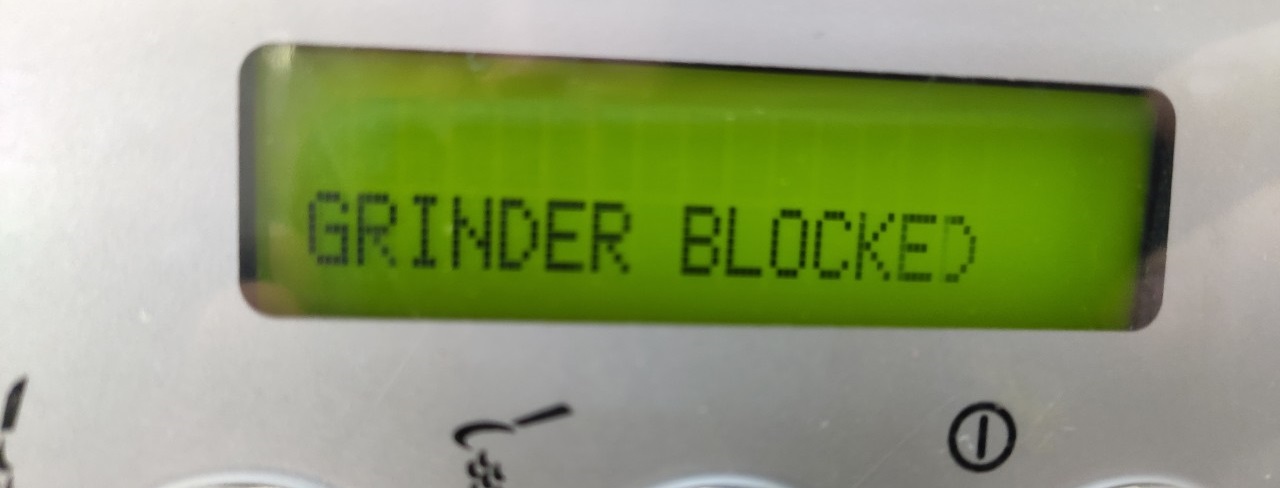
GRINDER BLOCKED
Заблокирована кофемолка. Возможно в нее попал мусор, веточка или камешек. Необходимо выключить кофемашину и очистить кофемолку пылесосом, по возможности достать всё лишнее. Если видимых причин нет, можно запустить кофемашину заново.
ENERGY SAVING
Кофемашину вышла в энергосберегающий режим. Это помогает сэкономить потребление электричества в период, когда вы долго не используете кофемашину, например ночью или на выходные. Нажмите кнопку включения и машинка начнёт нагреваться. Данную функцию можно отключить или изменить время её активации.
OVERTEMPERATURE
Кофемашина перегрета, необходимо слить воду с помощью краника. Такая надпись может появиться после использования функции пара или при поломке. Если пролив не помогает, то нужно разбираться, в чем причина, такого поведения кофемашины.
.jpg)
STEAM WARMING UP
Идёт процесс нагрева пара. Нажмите кнопочку «пар», если он вам не нужен. Или дождитесь пока он нагреется.
Устранение ошибок кофемашин Saeco в Киеве
Если вам не помогла данная статья, то мы с радостью бесплатно проконсультируем вас по телефону. Всегда поддерживайте кофемашину в чистом виде и вовремя делайте сервисное обслуживание и тогда оборудование будет вас радовать долгое время.
П.С.
Никогда не оставляйте кофемашину в помещение, где температура может опуститься ниже нуля, это может привести к серьезным и дорогостоящим поломкам. Если всё-таки у вас нет возможности убрать кофемашину с такого помещения, то оставьте её включённой. Возможно тепла от бойлера будет достаточно, чтоб не замерзли трубки и шланги внутри кофемашины. Либо полностью слить всю воду из системы.
- Manuals
- Brands
- Saeco Manuals
- Coffee Maker
- Odea Giro Plus
- Operation and maintenance manual
-
Contents
-
Table of Contents
-
Troubleshooting
-
Bookmarks
Quick Links
Operation and maintenance manual
Before using the machine, please read the attached operating instructions.
Carefully read the safety rules
Mode d’emploi
Veuillez lire attentivement le mode d’emploi
(notamment les consignes de sécurité) avant d’utiliser l’appareil.
FOR HOUSEHOLD USE ONLY
Related Manuals for Saeco ODEA GIRO
Summary of Contents for Saeco ODEA GIRO
-
Page 1
Operation and maintenance manual Before using the machine, please read the attached operating instructions. Carefully read the safety rules Mode d’emploi Veuillez lire attentivement le mode d’emploi (notamment les consignes de sécurité) avant d’utiliser l’appareil. FOR HOUSEHOLD USE ONLY… -
Page 2: Important Safeguards
IMPORTANT SAFEGUARDS When using electrical appliances, basic safety precautions should always be followed to reduce the risk of fire, electric shock, and/or injury to persons, including the following: 1 Read all instructions and information in this instruction book and any other literature included in this carton referring to this product before operating or using this appliance.
-
Page 3
CAUTION This appliance is for household use only. Any servicing, other than cleaning and user maintenance, should be performed by an authorized service centre. Do not immerse machine in water. To reduce the risk of fire or electric shock, do not disassemble the machine. There are no parts inside the machine serviceable by the user. -
Page 4: Table Of Contents
CONTENTS GENERAL INFORMATION ………………..5 APPLIANCE ……………………6 ACCESSORIES …………………………6 INSTALLATION ……………………7 STARTING THE MACHINE ……………………..7 “AQUA PRIMA” FILTER ………………………8 CONTROL PANEL ………………….9 ADJUSTMENTS ………………….10 COFFEE VOLUME ADJUSTMENT PER CUP ………………..10 «AROMA» (OPTI-DOSE) INDICATES THE COFFEE DOSE PER CUP …………10 DRIP TRAY HEIGHT ADJUSTMENT ………………….10 COFFEE GRINDER ADJUSTMENT ………………….11 COFFEE BREWING ………………….12 HOT WATER DISPENSING …………………13…
-
Page 5: General Information
GENERAL INFORMATION This coffee machine is suitable for preparing espresso coffee using coffee beans, and it is equipped with a device to dispense steam and hot water. The machine is designed for domestic use only and is not suitable for heavy or professional use. Warning: no liability is assumed for any damage caused by: •…
-
Page 6: Appliance
APPLIANCE Coffee bean hopper Cup stacking surface Coffee bean hopper cover Power button Control panel Service door Dispensing head Coffee grounds drawer Drip tray + grill and fl oat Hot water / steam knob Hot water / steam spout Water tank Drip tray Brew Group Socket for power cable…
-
Page 7: Installation
INSTALLATION STARTING THE MACHINE Make sure the power button is not pressed and the machine is turned off. Check the machine features on the label on the bottom of the appliance. Lift the cover of the coffee bean Fill the container with coffee Remove the water tank.
-
Page 8: Aqua Prima» Filter
“AQUA PRIMA” WATER FILTER Wait until a steady fl ow of water Turn the knob until it is in the Press the water button again. comes out of the spout. rest position ( ). The indicator light turns off. Remove the container. The machine is ready for use.
-
Page 9: Control Panel
CONTROL PANEL Alarm light to empty the coffee grounds drawer: • permanently on: signals the need to empty the grounds drawer; this operation must be performed with the machine turned on (steps 4 and 5, page 17). Coffee dose adjusting knob (see page 10). Coffee button: •…
-
Page 10: Adjustments
ADJUSTMENTS COFFEE VOLUME ADJUSTMENT PER CUP The coffee volume knob adjusts the amount of coffee brewed per cup. This adjustment has an immediate effect Medium coffee on the selected type of brewing. Espresso coffee Long coffee «AROMA» (OPTI-DOSE) INDICATES THE COFFEE DOSE PER CUP By pressing the key, it is possible to choose either a mild, a medium or…
-
Page 11: Coffee Grinder Adjustment
COFFEE GRINDER ADJUSTMENT The machine enables a slight adjustment of the coffee grinder. Coffee may be ground according to your own tastes. The adjustment must be performed turning the pin – located inside the coffee container – by means of the supplied key only.
-
Page 12: Coffee Brewing
COFFEE BREWING COFFEE BREWING The coffee brewing cycle can be interrupted at any moment by pushing the button. To brew 2 cups, the machine dispenses half of the entered quantity and briefl y interrupts dispensing in order to grind the second serving of coffee. Coffee dispensing is then restarted and completed. Adjust the drip tray according to Place one cup if you want one Place two cups if you want two…
-
Page 13: Hot Water Dispensing
HOT WATER DISPENSING HOT WATER DISPENSING Dispensing may be preceded by short sprays of hot water, and scalding is possible. The hot water/steam spout may reach high temperatures: do not touch it with bare hands. Use the appropriate handle only. Adjust the height of the drip tray.
-
Page 14: Cappuccino
CAPPUCCINO CAPPUCCINO Dispensing may be preceded by short sprays of hot water, and scalding is possible. The hot water/steam spout may reach high temperatures: do not touch it with bare hands. Use the appropriate handle only. Adjust the height of the drip tray. Fill 1/3 of the cup with cold milk.
-
Page 15: Descaling
DESCALING DESCALING When performing a descaling cycle, it is necessary to be present during the entire process (about 40 minutes). Caution! Do not use vinegar as a descaler. The descaling must be done when indicated by the machine. Use a non-toxic, non-harmful descaling solution.
-
Page 16
DESCALING Empty the container with the Press the button to turn off the Repeat steps 3 — 8 until all the used descaling solution. machine. After 10 minutes, turn descaling solution in the tank on the machine again. has been dispensed. Rinse and fi… -
Page 17: Cleaning And Maintenance
CLEANING AND MAINTENANCE HOW TO CLEAN THE MACHINE The machine must be cleaned at least once a week. Do not immerse the machine in water or place any of its parts in a dishwasher. Do not use alcohol, solvents, benzene and/or abrasive objects to clean the machine. The water left in the tank for several days must be disposed of.
-
Page 18: Cleaning The Brew Group
CLEANING AND MAINTENANCE CLEANING THE BREW GROUP The Brew Group must be cleaned at least once a week. Before removing the Brew Group, remove the coffee grounds drawer as shown in fi g. 4 on page 17. Once you have washed and inserted the Brew Group, insert the grounds drawer and close the service door.
-
Page 19: Troubleshooting
TROUBLESHOOTING ROBLEMS AUSES OLUTIONS The machine does not turn on. The machine is not connected to the Connect the machine to the power power source. source. The plug has not been plugged into Insert the plug into the machine’s power the back of the machine.
-
Page 20: Safety Rules
SAFETY RULES N CASE OF EMERGENCY Immediately unplug the cable from the outlet. SE THE APPLIANCE ONLY — Indoors. — To prepare coffee, dispense hot water, froth milk or heat beverages using steam. — For domestic use only. — By adults in non altered psycho-physical conditions. EVER USE THE APPLIANCE For purposes other than those indicated above, in order to avoid danger.
-
Page 21
AILURES — Do not use the appliance in case of sure or suspected faults such as after falls. — Any repairs must be performed by an authorized customer service centre. — Do not use the appliance with a defective power cable. If damaged, the power cable must be replaced by the manufacturer or authorized service centre. -
Page 22: Technical Data
TECHNICAL DATA TECHNICAL DATA • Nominal voltage See label on the appliance • Power rating See label on the appliance • Power supply See label on the appliance • Shell material ABS — Thermoplastic • Size (w x h x d) 290 x 370 x 385 mm — 11.41 x 14.57 x 15.18 in •…
20
P
ROBLEMS
The machine does not turn on.
Coffee is not hot enough.
Hot water or steam is not
dispensed.
Coffee has little crema.
The machine takes a long time to
warm up or the amount of water
dispensed from the spout is too
little.
Brew Group
The
does not come
out.
Coffee is not brewed.
Coffee is brewed slowly.
Coffee leaks out of the dispensing
head.
Brewing does not start.
Please contact the service centre for any problems not covered in the above table or when the
suggested solutions do not solve the problem.
C
AUSES
The machine is not connected to the
power source.
The plug has not been plugged into
the back of the machine.
The cups are cold.
The hole of the steam spout is
clogged.
The coffee blend is unsuitable or
coffee is not freshly roasted.
SBS system knob turned towards
the left
The machine circuit is obstructed by
limescale build-up.
Brew Group
The
is out of place.
Dregs drawer is inserted.
Water tank is empty.
Brew Group
is dirty.
Circuit is not primed.
Knob to adjust the quantity of coffee
per cup is in wrong position.
Coffee is too fi ne.
Circuit is not primed.
Brew Group
dirty.
Dispensing head is clogged.
Coffee bean hopper cover is in
wrong position.
S
OLUTIONS
Connect the machine to the power
source.
Insert the plug into the machine’s power
socket.
Warm the cups with hot water.
Clean the hole of the steam spout using
a pin.
Change coffee blend.
Turn the SBS system knob to the right
Descale the machine.
Turn the machine on. Close the service
Brew Group
door. The
is automatically
placed in the correct position.
Remove the dregs drawer fi rst, then the
brew group.
Fill the water tank and prime the circuit
again.
Brew Group
Clean the
.
Prime the circuit again by dispensing
water from the steam spout.
Turn the knob clockwise.
Change coffee blend.
Decrease the dose.
Prime the circuit again by dispensing
water from the steam spout.
Brew Group
Clean the
.
Clean the dispensing holes with a soft
cloth.
Correctly place the cover on the coffee
bean hopper and press it fi rmly.
Espresso Italia PTY LTD
www.espressoitalia.com.au
Freecall 1300 660 976
(Ocr-Read Summary of Contents of some pages of the Saeco TALEA GIRO Document (Main Content), UPD: 30 April 2023)
-
3, 3 CAUTION This appliance is for household use only. Any servicing, other than cleaning and user maintenance, should be performed by an authorized service centre. Do not immerse machine in water. To reduce the risk of fire or electric shock, do not disassemble the machine. There are no parts inside the machine serviceable by the user. Repair should be done by authorized service personnel only. 1 Check voltage to be sure that the voltage indicated on the namepla…
-
7, 7 7 1 2 8 9 3 4 5 6 INSTALLATION STARTING THE MACHINE Make sure the power button is not pressed and the machine is turned off. Check the machine features on the label on the bottom of the appliance. Lift the cover of the coffee bean hopper. Remove the water tank. We recommend installing the “Aqua Prima” water fi lter (see page 8). Fill the container with coffee beans. Close the cover placing it correctly on the hopper. Fill the tank with fres…
-
8, Saeco TALEA GIRO 8 12 1 2 3 5 10 11 4 Wait until a steady fl ow of water comes out of the spout. Press the water button again. The indicator light turns off. Remove the container. The machine is ready for use. Turn the knob until it is in the rest position ( ). Remove the “Aqua Prima” fi lter from its packaging. Enter the date of the current month. Fill the tank with fresh water. Let the fi lter soak for 30 minutes. After 30 minutes disca…
-
23, 23 TECHNICAL DATA TECHNICAL DATA • Nominal voltage See label on the appliance • Power rating See label on the appliance • Power supply See label on the appliance • Shell material ABS — Thermoplastic • Size (w x h x d) 320 x 370 x 400 mm — 12.60″ x 14.57″ x 15.75″ • Weight 9 Kg — 19.8 lbs • Cable length 1200 mm — 47.24″ • Control panel Front • Water tank 1.7 liters — 57.5 oz / Removabl e �…
-
14, 14 3 5 7 4 6 2 1 CAPPUCCINO Immerse the steam spout in the milk. Froth the milk by gently rotating the container. When the spout has cooled down, disassemble it and wash it carefully. After frothing the milk, brew coffee into the cup for a creamy cappuccino. Turn the knob until the position is reached. Turn the knob until it is in the rest position ( ). CAPPUCCINO Dispensing may be preceded by short sprays of hot water, and scalding is possible. The hot…
-
22, Saeco TALEA GIRO 22 SAFETY RULES FAILURES — Do not use the appliance in case of sure or suspected faults such as after falls. — Any repairs must be performed by an authorized customer service centre. — Do not use the appliance with a defective power cable. If damaged, the power cable must be replaced by the manufacturer or authorized service centre. (Caution! Electrical current). — Turn off the appliance before opening the service door. CLEANING / DESCALING — Before cleanin…
-
1, Operation and maintenance manual Before using the machine, please read the attached operating instructions. Carefully read the safety rules Mode d’emploi Veuillez lire attentivement le mode d’emploi (notamment les consignes de sécurité) avant d’utiliser l’appareil. FOR HOUSEHOLD USE ONLY The manufacturer reserves the right to change the features of the product without prior notice. Le pr…
-
6, Saeco TALEA GIRO 6 APPLIANCE ACCESSORIES “Aqua Prima” water fi lter Power cable Cleaning brush Brew Group Dregs drawer Socket for power cable Coffee bean hopper Cup stacking surface Power button Service door Coffee bean hopper cover Drip tray Control panel SBS knob Dispensing head Drip tray + grill and fl oat Hot water / steam spout Water tank Hot water / steam knob “Milk Island” connection Grinder adjustment key Espresso Italia PTY LTD www.espressoitalia.com.au Freecall 1300 660…
-
16, 16 2 3 4 1 5 6 DESCALING DESCALING When performing a descaling cycle, it is necessary to be present during the entire process (about 40 minutes). Caution! Do not use vinegar as a descaler. The descaling must be done when indicated by the machine. Use a non-toxic, non-harmful descaling solution. Saeco descaling solution is recommended. The used solution should be disposed according to the manufacturer instructions and/or regulations in the…
-
21, 21 IN CASE OF EMERGENCY Immediately unplug the cable from the outlet. USE THE APPLIANCE ONLY — Indoors. — To prepare coffee, dispense hot water, froth milk or heat beverages using steam. — For domestic use only. — By adults in non altered psycho-physical conditions. NEVER USE THE APPLIANCE For purposes other than those indicated above, in order to avoid danger. Do not introduce any substances other than those indicated in the instruction manual. During the no…
-
2, 2 IMPORTANT SAFEGUARDS When using electrical appliances, basic safety precautions should always be followed to reduce the risk of fire, electric shock, and/or injury to persons, including the following: 1 Read all instructions and information in this instruction book and any other literature included in this carton referring to this product before operating or using this appliance. 2 Do not touch hot surfaces. Use handles or knobs. …
-
20, 20 PROBLEMS CAUSES SOLUTIONS The machine does not turn on. The machine is not connected to the power source. Connect the machine to the power source. The plug has not been plugged into the back of the machine. Insert the plug into the machine’s power socket. Coffee is not hot enough. The cups are cold. Warm the cups with hot water. Hot water or steam is not dispensed. The hole of the steam spout is clogged. Clean the hole of the steam s…
-
18, 18 8 1 2 3 4 5 6 7 CLEANING AND MAINTENANCE Turn off the machine and unplug it. Remove the drip tray and wash it under running water. Remove the fi lter, if fi tted, and wash the water tank. Remove the dregs drawer. Remove and wash the steam spout. Wash all external components. Empty the coffee grounds and the residual liquids separately. Wash all containers. HOW TO CLEAN THE MACHINE The machine must be cleaned at least once a week. Do not immerse the machine in wate…
-
19, Saeco TALEA GIRO 19 2 3 4 6 7 5 1 Press the “PUSH” button to remove the Brew Group. Make sure the Brew Group is in rest position; the two references must match. Wash the Brew Group with running water. Wash fi lters carefully. CLEANING THE BREW GROUP The Brew Group must be cleaned at least once a week. Before removing the Brew Group, remove the dregs drawer as shown in fi g. 4 on page 18. Once you have washed and inserted the Brew Group, insert t…
-
17, 17 8 97 11 1210 13 14 15 3 8 Empty the container with the used descaling solution. Press the button to turn off the machine. After 10 minutes, turn on the machine again. Repeat steps 3 — 8 until all the descaling solution in the tank has been dispensed. Rinse and fi ll the tank with fresh drinking water. Press the hot water button. Place a large container beneath the steam spout. Turn the knob until th…
-
15, 15 1 7 2 3 64 5 8 MILK ISLAND (OPTIONAL) This device, which may be purchased separately, enables you to easily and comfortably prepare delicious cappuccinos. Warning: before using the Milk Island, read the manual and all precautions carefully for correct use. Important note: the quantity of milk in the jug must never be below the “MIN” minimum level nor exceed the “MAX” maximum level. After having used the Milk…
-
5, 5 GENERAL INFORMATION This coffee machine is suitable for preparing espresso coffee using coffee beans, and it is equipped with a device to dispense steam and hot water. The machine is designed for domestic use only and is not suitable for heavy or professional use. Warning: no liability is assumed for any damage caused by: • incorrect use not in accordance with the intended uses; • repairs not carried o…
-
11, 11 MEDIUM COFFEE STRONG COFFEE LIGHT COFFEE The Saeco Brewing System (SBS) adjusts the fullness of the brewed coffee. The coffee may even be adjusted while it is brewing. This adjustment has an immediate effect on the selected type of brewing. COFFEE STRENGHT SBS – SAECO BREWING SYSTEM The SBS dial has been carefully designed to give your coffee the fullness and intensity you desire. Simply turn the knob and you will notice tha…