Reinstall Razer Synapse to troubleshoot this BSoD error
by Loredana Harsana
Loredana is a passionate writer with a keen interest in PC software and technology. She started off writing about mobile phones back when Samsung Galaxy S II was… read more
Updated on
- Overclocking your PC can trigger the rzudd.sys Blue Screen of Death.
- Installing an incompatible driver to function with Razer Synapse can lead to conflicts in operations and periodic crashes.
- A PC with corrupt essential or critical files can lead to occasional crashes and blue screens.
XINSTALL BY CLICKING THE DOWNLOAD FILE
Fix all BSoD events and keep them away:
SPONSORED
Fortect is a tool that checks your Windows OS for bad or corrupted system files. Once found, it can replace these versions with a fresh one from its repository with original Windows System files. Thus, it will restore your system to a fully functional state.Here is how to do it in 3 easy steps:
- Download and Install Fortect on your PC
- Launch the tool and Start scanning to find broken files that are causing the problems
- Right-click on Start Repair to fix issues affecting your computer’s security and performance
- Fortect has been downloaded by 0 readers this month, rated 4.4 on TrustPilot
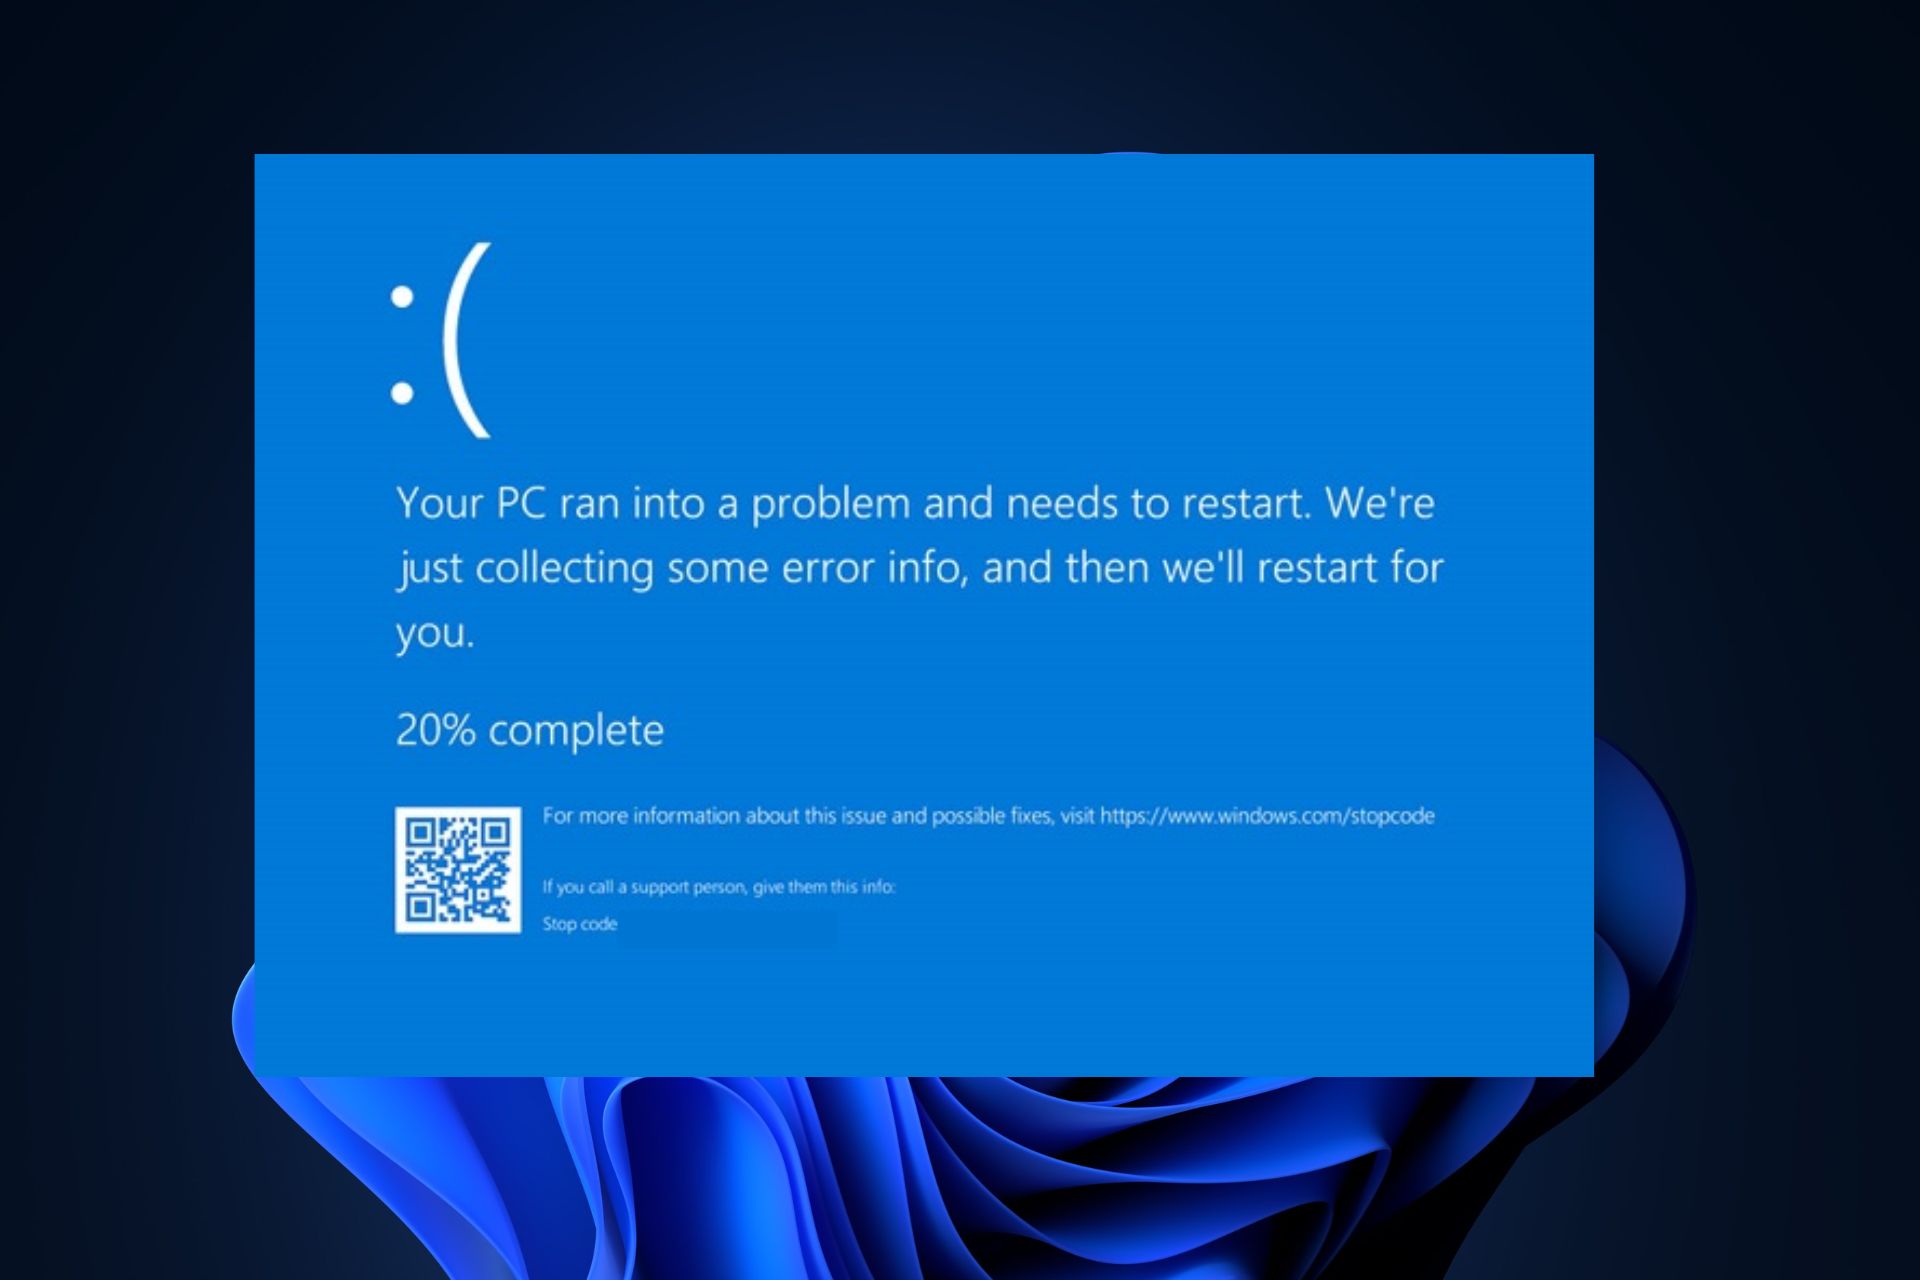
As a Windows user, you’re likely to see at least one occasional Blue Screen of Death error during your time with Windows. One such error commonly reported is the rzudd.sys BSoD error which is associated with Razer device drivers.
Hence, we will provide quick fixes for the error here. Further, you can check out our extensive recommended list of BSoD fixers.
- What causes the rzudd.sys BSoD error?
- How do I fix the rzudd.sys BSoD error?
- 1. Update the Razer device driver
- 2. Reinstall Razer Synapse
- 3. Perform a System Restore
What causes the rzudd.sys BSoD error?
Here are some of the most common causes of the rzudd.sys blue screen error:
- Outdated/Incompatible drivers – Running outdated or incompatible Drivers for your Razer Synapse software can lead to system conflicts and instability, causing a BSoD error.
- Hardware conflicts – The Razer software can sometimes clash with the existing PC hardware, triggering the rzudd.sys BSoD error.
- Overclocking – Overclocking your PC pushes its functionality beyond its natural capacity and limits. This can make your PC unstable and lead to a blue screen error.
- Corrupt system files – If your PC’s critical files get corrupted by malware or third-party reasons, it can cause blue screen errors and crashes.
- Virus or Malware – If your PC is infected with malware, it can interfere with the normal operations of the Razer Synapse software, potentially leading to a BSoD error.
No matter the causes of the error, try the following steps below to troubleshoot it.
How do I fix the rzudd.sys BSoD error?
Before trying any of the advanced steps, kindly apply the following preliminary checks:
- Perform an SFC/DISM scan.
- Scan for Malware with any decent antivirus software to identify and quarantine harmful files.
If the issue persists, try the tweaks below to fix the error.
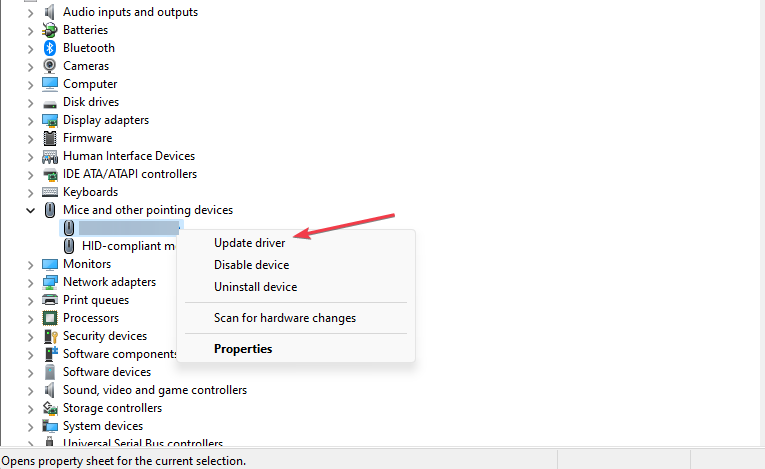
1. Update the Razer device driver
- Press the Windows key, type in device manager, and hit Enter.
- Expand Mice and other pointing devices, right-click the Razer driver, and select Update driver.

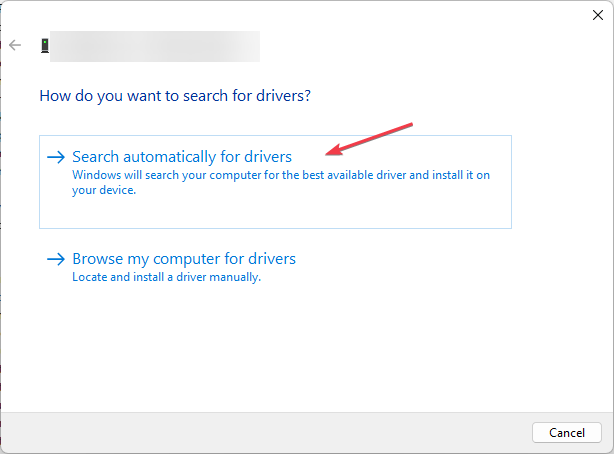
- Click on search automatically for drivers.

- Repeat this step till you’ve updated all the drivers.
Further, you can also check out our guide on how to manually update drivers on Windows for more information.
Sometimes, malfunctioning drivers can cause multiple system errors. If this happens to your PC, you may need to update or reinstall certain drivers entirely. As the process is not quite straightforward, we recommend using a reliable driver updater for the job.
Here’s how to do it:
- Download and install Outbyte Driver Updater.
- Launch the software.
- Wait for the app to detect all faulty drivers.

- Now, it will show you all the malfunctioning drivers listed to select the ones to Update or Ignore.
- Click on Update & Apply Selected to download and install the newest versions.
- Restart your PC to ensure the applied changes.


Outbyte Driver Updater
Secure your Windows PC with Outbyte from various errors caused by problematic drivers.
Disclaimer: this program needs to be upgraded from the free version in order to perform some specific actions.
2. Reinstall Razer Synapse
- Right-click the Synapse icon on your Desktop, and click Exit all apps.
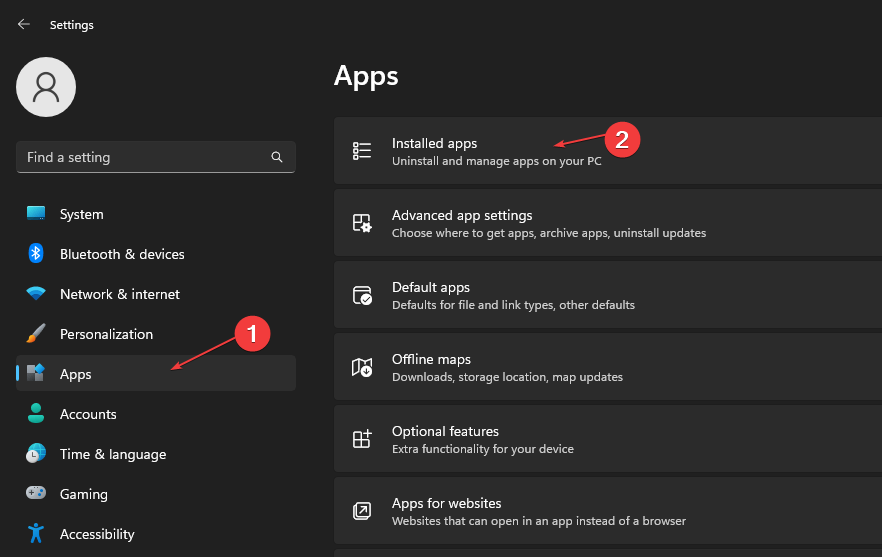
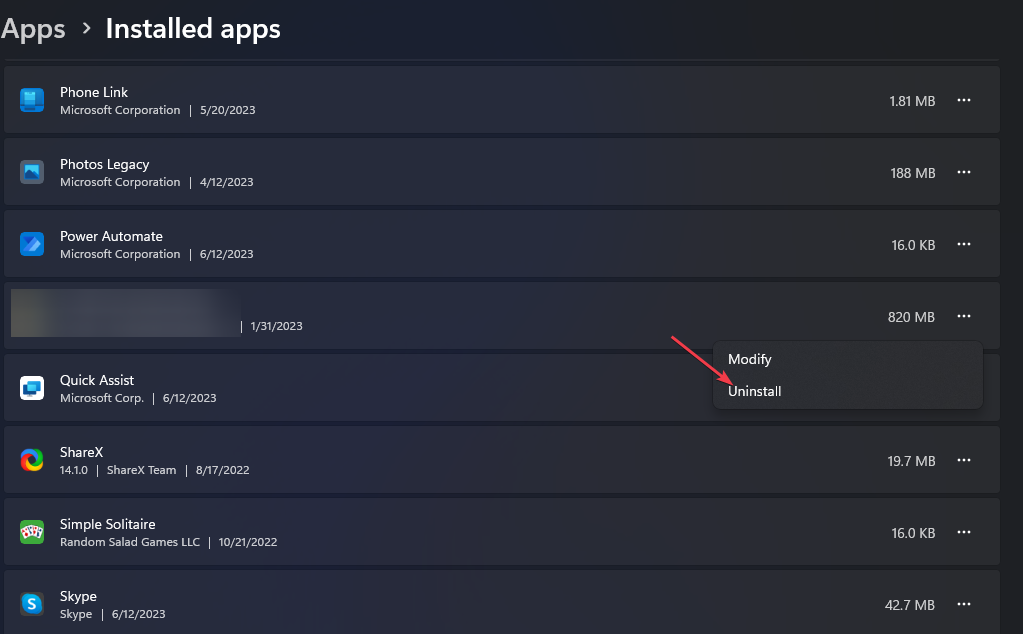
- Press the Windows key + I to open the Settings app.
- Click on Apps and select Installed apps.

- Then, type Razer in the search bar, click on the options icon, and click Uninstall.
- Now click Uninstall again to confirm your actions.

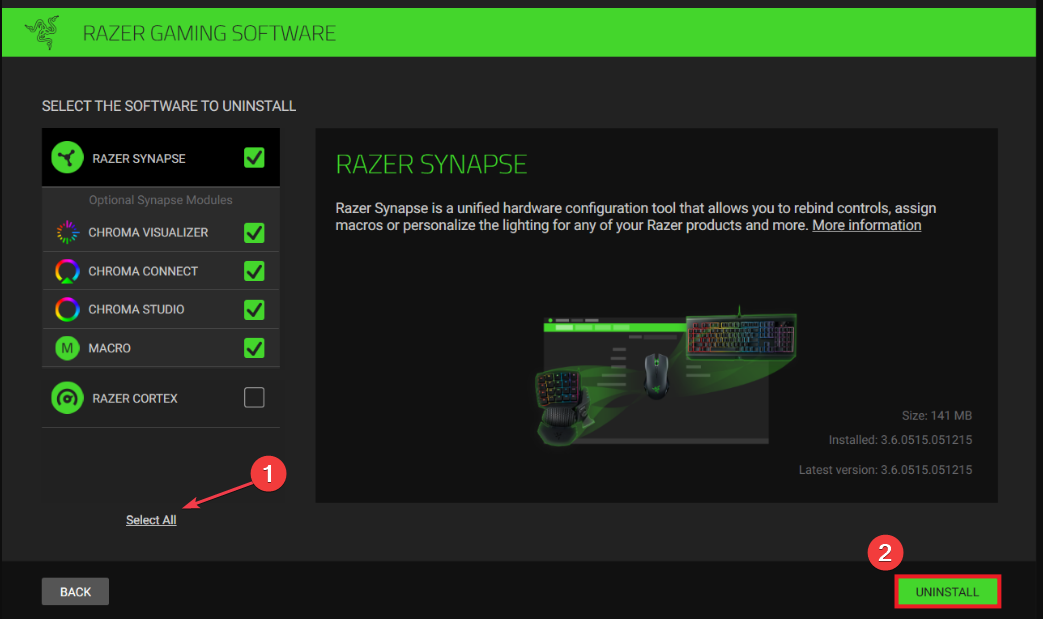
- Click Yes in the User Account Control prompt.
- Under the Software to Uninstall section, click the Select All button, and click Uninstall.

- Click on Yes Remove, and click Close. Repeat the steps until you’ve deleted all the Razer programs.
- Restart your PC, and download the latest version of Synapse 3 after the restart.

NOTE
If you’re experiencing a recurring rzudd.sys BSoD error, reinstalling the Razer Synapse is recommended as it deletes all old and corrupt data.
- 5 Ways to Force a Blue Screen of Death (BSoD) on Windows 11
- 4 Ways to Fix PCL XL Error Subsystem Kernel on Windows
- My Keyboard is Automatically Doing Shortcuts: How to Quickly Fix it
- Fix: Clock_Watchdog_Timeout BSOD in Valorant
3. Perform a System Restore
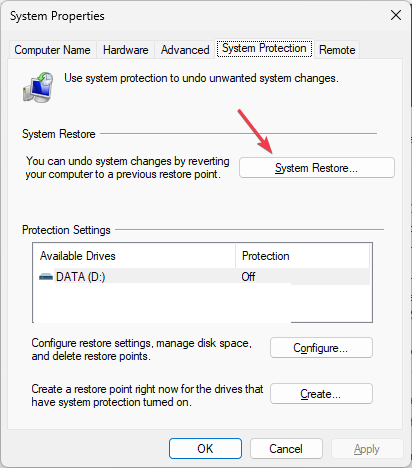
- Left-click the Start menu, type restore and click Create a restore point.
- Select System Properties and choose System Restore button.

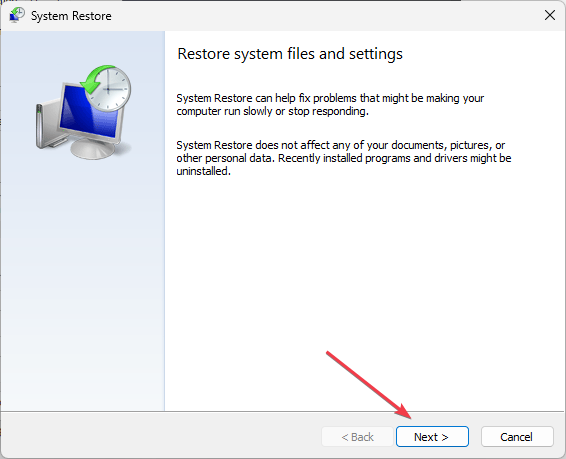
- In the Restore Files and Settings box, click Next.

- Select the Restore point and click Next.
- Then, click Finish to complete the system restore.
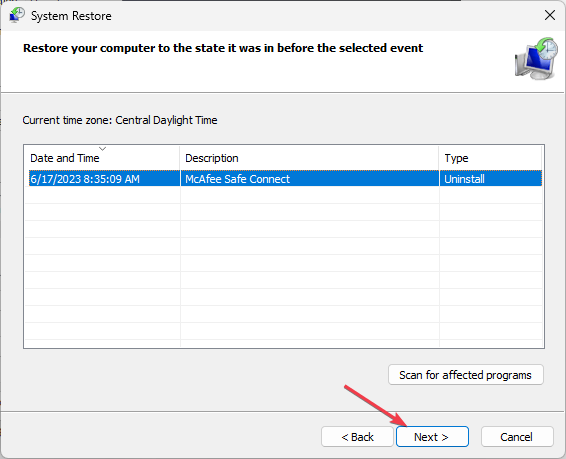
If you noticed the BSoD recently and created a restore point before the error started, you can easily restore your PC to that version to quickly fix the rzudd.sys BSoD error.
However, you’ll lose files during a system restore, so it’s essential to back up your PC thoroughly.
Blue screen of death errors are pretty standard among Windows machines; knowing how to fix them will save you much time and effort. Luckily, with the steps outlined in this article, you should be able to fix the rzudd.sys BSoD error.
Alternatively, you can check out our guide on fixing the Netadaptercx.sys BSoD error.
If you have further questions and suggestions regarding this guide, kindly drop them in the comments section.
![]()
Ошибки типа «синий экран смерти» довольно распространены в Windows 10. Большое количество этих ошибок BSOD вызвано поврежденными, устаревшими, несовместимыми драйверами.
В этом посте мы сосредоточимся на трех из таких драйверов, а именно: FaceIt.sys, rzudd.sys и AcmeVideo.sys.
Прежде, чем мы перейдем к делу. давайте определим эти драйверы в зависимости от приложений и процессов, которым они принадлежат.

FaceIt.sys — это античит-драйвер для игр с цифровой подписью FACE IT LIMITED.
Rzudd.sys — этот файл принадлежит продукту Razer Rzudd Engine. Драйвер разработан компанией Razer USA Ltd.
AcmeVideo.sys — видеодрайвер для оборудования от ACME Video Solutions.
Если вы столкнулись с ошибкой BSOD, указывающей на сбой драйвера FaceIt.sys, rzudd.sys или AcmeVideo.sys , вы можете попробовать наши рекомендуемые решения ниже.
Если вы можете войти в систему как обычно, загрузитесь в безопасном режиме.
Посмотрите, какое из этих решений может применяться в вашем случае:
1] Запустить средство проверки драйверов
По оценкам, около трех четвертей синих экранов вызваны неисправными драйверами. Driver Verifier — это инструмент, который работает в режиме реального времени для проверки поведения драйверов. Например, Driver Verifier проверяет использование ресурсов памяти, таких как пулы памяти.
Если он обнаруживает ошибки в выполнении кода драйвера, он заранее создает исключение, позволяющее изучить эту часть кода. Driver Verifier менеджер встроен в ОС Windows 10.
Вы можете настроить, какие драйверы вы хотели бы проверить. Скрипт проверяющий драйверы, добавляет накладные расходы при запуске, поэтому постарайтесь проверить как можно меньшее количество драйверов.
2] Обновить драйвер
Неисправные или устаревшие драйверы также могут вызвать эту ошибку BSOD. В этом случае вы можете обновить драйвер вручную через Диспетчер устройств или получить обновления драйвера в разделе «Дополнительные обновления» в Центре обновления Windows. Вы также можете скачать последнюю версию драйвера с сайта производителя.
3] Откатить драйвер
Если вы начали сталкиваться с ошибкой BSOD после обновления драйвера, вы можете откатить драйвер до более ранней версии и посмотреть, поможет ли это.
4] Удалить драйвер
Если обновление или откат драйвера не помогли решить проблему, следующим лучшим логическим решением будет удалить драйвер через диспетчер устройств и перезагрузить компьютер. При загрузке Windows 10 автоматически устанавливается универсальный драйвер, который работает в большинстве случаев.
Кроме того, вы можете удалить драйвер через командную строку. Вот как:
- Нажмите клавишу Windows + R, чтобы вызвать диалоговое окно «Выполнить».
- В диалоговом окне «Выполнить» введите cmd и нажмите CTRL + SHIFT + ENTER, чтобы открыть командную строку в режиме администратора.
- В окне командной строки введите команду ниже и нажимайте Enter после каждой строки. Замените «ProblematicDriver sys» фактическим именем драйвера.
cd C:/Windows/System32/drivers
del <ProblematicDriver.sys>
После выполнения команды перезагрузите компьютер и посмотрите, устранена ли конкретная ошибка BSOD.
5] Чистая установка драйвера
Перед тем, как начать этот процесс, вам нужно знать, где программа установки драйвера хранит свои временные файлы. Другие пакеты драйверов могут использовать другие расположения, но вам необходимо знать эту информацию, чтобы очистить эти файлы, иначе Windows может попытаться установить старые драйверы из этого расположения.
Чтобы заново установить драйвер в Windows 10, выполните следующие действия:
- Убедитесь, что у вас установлена последняя версия драйвера.
- Щелкните правой кнопкой мыши «Пуск», выберите «Приложения и возможности» и удалите все приложения, связанные с драйверами, которые вы будете переустанавливать.
- Перезагрузите компьютер, выбрав Пуск > Питание > Перезагрузить. Не используйте кнопку питания вашего устройства. Эта кнопка часто связана с функцией «Сон» и не служит той же цели.
- Перезагрузка компьютера удаляет все запущенные процессы, которые могут быть привязаны к файлам во временных папках.
- Удалите все временные установочные файлы для драйвера устройства.
- Щелкните правой кнопкой мыши « Пуск» и выберите «Диспетчер устройств».
- Нажмите «Вид» и «Показать скрытые устройства» (примечание: это покажет многие устройства, которые больше не подключены к вашей системе).
- Найдите устройство, драйвер которого вы удаляете или переустанавливаете.
- Щелкните устройство правой кнопкой мыши и выберите «Удалить».
- Установите флажок Удалить программное обеспечение драйвера для этого устройства, если такая возможность существует.
- Щелкните кнопку Удалить.
- Удалите все дубликаты этого устройства, даже если они неактивны.
- Когда диспетчер устройств завершит удаление драйверов, щелкните голубой значок Обновить конфигурацию оборудования в верхней части диспетчера устройств. Устройство, вероятно, снова появится.
- Повторяйте шаг удаления до тех пор, пока вы не перестанете видеть параметр Удалить программное обеспечение драйвера для этого устройства.
- Перезагрузите систему еще раз.
На этом этапе вы удалили все установленные драйверы из хранилища. Если в Windows есть драйвер по умолчанию, он все равно переустановит этот драйвер, но обычно вы можете оставить этот драйвер на месте, поскольку он поставляется с Windows.
6] Отключить принудительное использование подписи драйверов.
Это решение требует, чтобы вы отключили принудительное использование подписи драйверов. Сделайте это и посмотрите, поможет ли это.
7] Запустите онлайн-средство устранения неполадок синего экрана.
Запустите онлайн-средство устранения неполадок синего экрана от Microsoft. Это помогает новичкам и начинающим пользователям устранять проблемы с синими экранами и автоматически исправлять BSOD.
8] Сканирование ПК с помощью программы для защиты от руткитов.
Синие экраны в некоторых редких случаях могут быть вызваны заражением руткитом, конфликтующими с Антируткитом. Обязательно просканируйте свой компьютер с помощью программного обеспечения для защиты от руткитов.
9] Отключить автоматическое управление размером файла подкачки
Размер файла подкачки — это схема управления памятью, позволяющая регулировать размер памяти при входе в компьютер. Это может вызвать ошибку rzudd.sys. В этом случае вы можете отключить автоматическое управление размером файла подкачки и указать ему более высокое значение и посмотреть, решит ли это проблему.
10] Запустите CHKDSK
Некоторая проблема BSOD, возможно, возникает из-за системной ошибки или наличия поврежденных секторов на жестком диске. В этом случае вы можете запустить CHKDSK из командной строки и проверить, решает ли он проблему, или скачайте одну из программ проверки жесткого диска на ошибки.
11] Запустить проверку ОЗУ Windows
Повреждение ОЗУ потенциально может сделать Windows 10 нестабильной и, таким образом, вызвать ошибку «Синий экран смерти». Поэтому, если вы добавили новую карту памяти RAM, удалите ее и проверьте, не вызывает ли она ошибку. Если нет, то вам нужно запустить тест памяти. Windows инициирует проверку на наличие аномалий в ОЗУ.
12] Выполните восстановление системы
Вполне возможно, что вы столкнетесь с ошибками BSOD, вызванными проблемами с драйверами, чему способствовало изменение, которое ваша система недавно претерпела.
Это решение требует, чтобы вы восстановили систему до более раннего состояния.
13] Удалите стороннее программное обеспечение безопасности.
Это решение требует, чтобы вы удалили все сторонние антивирусные программы с вашего ПК с помощью специального инструмента для удаления всех файлов, связанных с вашей антивирусной программой.
Если удаление антивируса устраняет эту ошибку, теперь вы можете снова установить тот же антивирус, или вы можете переключиться на альтернативное программное обеспечение или придерживаться собственной антивирусной программы Windows 10 — Защитника Windows.
14] Проверьте и устраните проблему с оборудованием.
Аппаратные проблемы, неисправность или конфликт или просто сбой могут вызвать ошибку BSOD AcmeVideo.sys. Аппаратный сбой можно исправить, например при слишком высокой температуре микросхема может отключиться из-за ее системы аварийного отключения. Улучшение охлаждения чипа каким-то образом решит проблему.
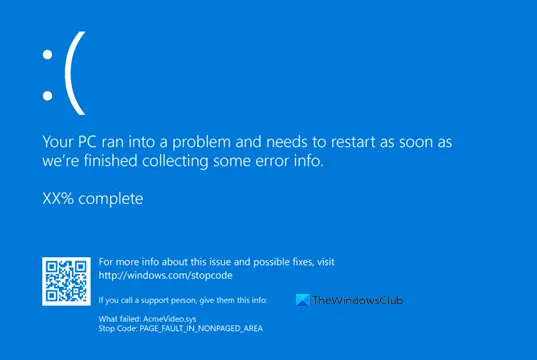
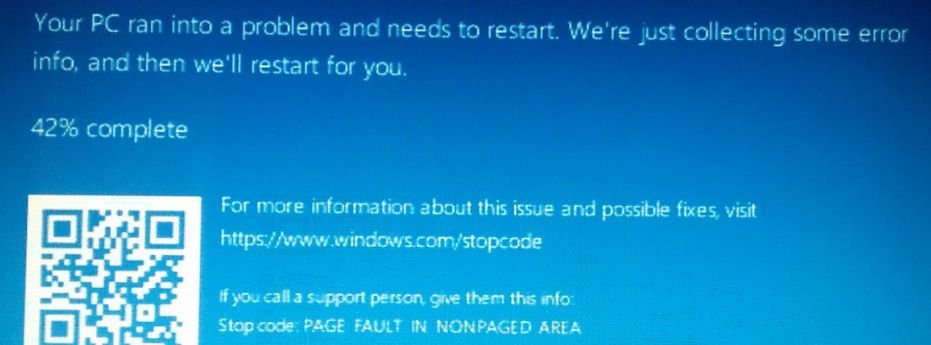
Today, we will discuss all the possible workarounds to resolve PAGE FAULT IN NONPAGED AREA, another Blue Screen of Death error in Windows 10. The Stop code indicates a failure in rzudd.sys. Basically, “rzudd.sys” is a Razer Rzudd Engine driver, a part of Razer Synapse software which crashed down and leads to the BSOD screen. Experts are with a view that this issue is triggered when Driver Verifier is enabled.
However, as per some other techies, PAGE FAULT IN NONPAGED AREA (rzudd.sys) may also occur because of memory corruption. So, if you get the same rzudd.sys Blue Screen issue, then you should perform certain troubleshooting methods. The Razer Support team suggests to disable and enable Driver Verifier to get rid of the problem. Furthermore, you should also check the memory as well as disk, remove third-party antivirus, or update drivers to fix the issue.
PAGE FAULT IN NONPAGED AREA (rzudd.sys) –
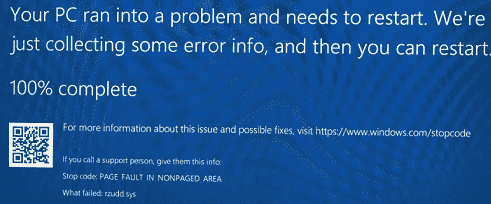
Here is how to fix PAGE FAULT IN NONPAGED AREA (rzudd.sys) Blue Screen Error Windows 10.
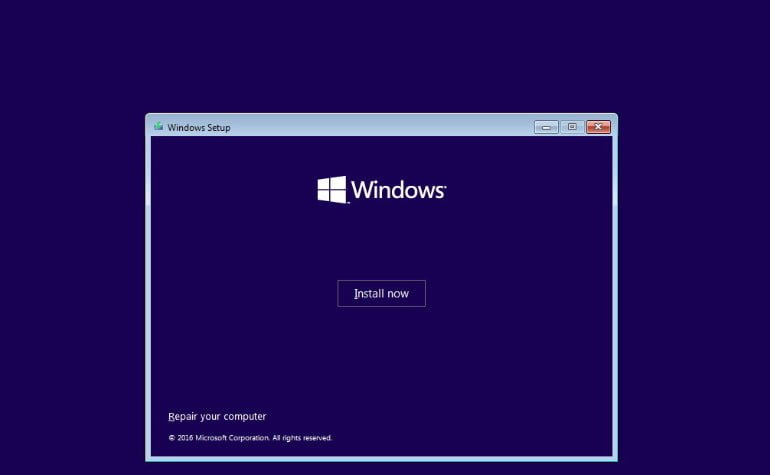
When BSOD error appears on your PC, you cannot access the login screen. It becomes difficult to perform any of the fixes, therefore, you must Boot into Safe Mode then try the solutions.
To begin with, you need to disconnect all external devices. Then insert “Windows 10 installation media”. You can use DVD or USB into the respective port of the device and restart the system.
Simultaneously make a hit on any of the function keys such as Esc, Delete, F2, F8, F10, F12 or Backspace repeatedly. The function key completely depends upon your PC’s model. Continuously pressing it will open your system into boot mode.
Henceforth select a preferred language and hit Next.
Click on Repair your computer option which appears on the bottom left of the screen.
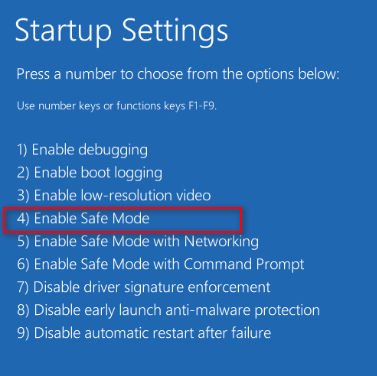
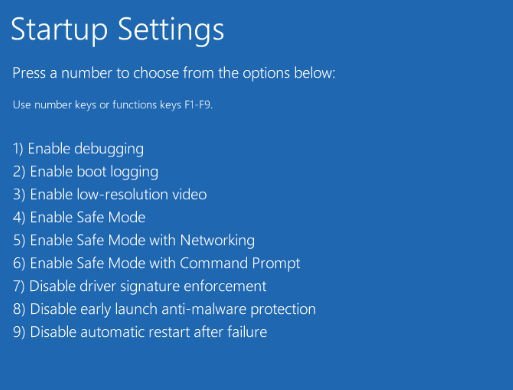
Now, navigate to Troubleshoot => Advanced Options => Startup Settings.
Finally, select Enable Safe Mode from the list of options that show up on the following screen. Click Restart and wait until the PC enters the Safe Mode.
Perform a Disk and Memory Check
The BSOD error is caused due to the fault in the disk drive or associated components such as RAM or NTFS volume. So you should check the system files to avert the PAGE FAULT IN NONPAGED AREA issue.
Here are the steps-
Step-1: Go to the Start Menu and type cmd. Here right click on Command Prompt and select Run as administrator option.
Step-2: Click Yes to give authentication to the UAC prompt.
Step-3: Now on the elevated Command Prompt copy-paste or type the following syntax and hit Enter to execute it.
chkdsk /f /r
The structure of this code is like chkdsk [Drive:] [parameters] where f denotes to avoid the issue found on the volume. In a similar way, r catch the fault from poor sections on the volume and retrieve the readable data.
Step 4: Since your PC is busy to complete other processes, press Y key to schedule this task after rebooting.
Step-5: Press Win logo & R hotkeys altogether and write mdsched.exe in the Run dialog box and hit Enter.
Step-6: Now, make a click on the first option Restart now and check for problems (recommended) to instantly restart Windows 10 PC.
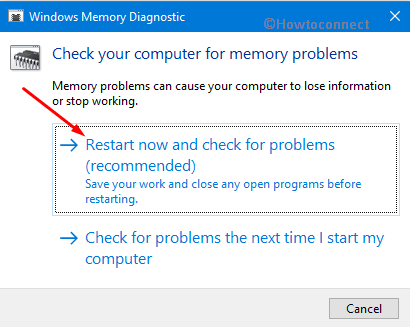
Step-7: This process will take approx. 15 minutes to complete the task, therefore, wait patiently.
Once you finish the process, hopefully, the issue rzudd.sys will disappear from the system. If you still face it, follow the next workaround.
Uninstall and Reinstall Driver Verifier
The Driver Verifier is the Microsoft’s app generated for Windows user to distinguish between original and third party driver installed on your PC. It also helps to recognize the faulty and missing hardware driver inside the system. Razer Stargazer’s camera driver crashes when Driver Verifier is enabled which eventually leads to PAGE FAULT IN NONPAGED AREA (rzudd.sys) Blue Screen Error Windows 10.
See our article on How to Identify if a Driver is Causing Issues in Windows 10 with Verifier.
As per the several users’ report, you can uninstall and re-install this software to avert the issue in your computer. Here is the process to follow –
Disable Driver verifier
As you are unable to access the desktop, you need to insert Windows 10 installation media. Start your PC after inserting the media.
Choose the Language preferences on the subsequent screen and click Next. On the Setup dialog, click Repair your computer.
Click on Troubleshoot and henceforth perform a hit on Advanced options.
Thereafter in the “Advanced Options”, click on the Startup Settings.
Now, move the cursor down and make a click on Restart button.
Finally, select “Disable driver signature enforcement” from the list of options.
Enable Driver verifier
Press “Windows and R” hotkeys and type cmd then hit Enter to access the Command Prompt.
On prompt area type verifier then hit Enter. Keep patience until the Operation is completed successfully message appears.
Once the verifier code is completed, open this app and activate the checkbox Create custom settings (for code developers).
Move down and click on Next button.
On the following screen, check the below-given options.
- I/O Verification
- Force pending I/O requests
- IRP logging
Then again make a click on Next.
Moving on, choose the option Select driver names from the list and hit Next.
Go ahead and tap the Provider header. It will sort the driver providers name alphabetically. Here select all the drivers which don’t have the provider name as Microsoft Corporation.
Finally, reboot the system and you will notice that the Driver Verifier is enabled on your computer. Now check the issue PAGE FAULT IN NONPAGED AREA has been resolved on your PC.
Undo Recent Changes
The apps or device which you have recently installed on your PC might be one of the reasons for the occurrence of PAGE FAULT IN NONPAGED AREA error. Thus you need to identify the changes which have been performed. If it is an installation of a software, then uninstall it right away and check for the issue. Or if any hardware modification is done, then try to revert back the changes. If this fix does not help you to resolve the rzudd.sys then follow below methods.
Remove antivirus program if installed
Antivirus software is a security program used to protect your PC from unwanted threats. However, the anti-malware app prevents the working of some system files which could be the culprit behind BSOD rzudd.sys issue. Hence uninstall any third-party antivirus program. Here is how to proceed:
Press Windows and I keys jointly to open Windows Settings and click the Apps category.
Under Apps and features menu go to the right pane and scroll down the cursor to locate third-party software.
When you find the app, click on the same and hit the Uninstall button.
Finally, close the windows and try to login on your PC in normal mode.
Note: You can use Windows Security (the built app) instead of other third-party programs for a safe and secure purpose.
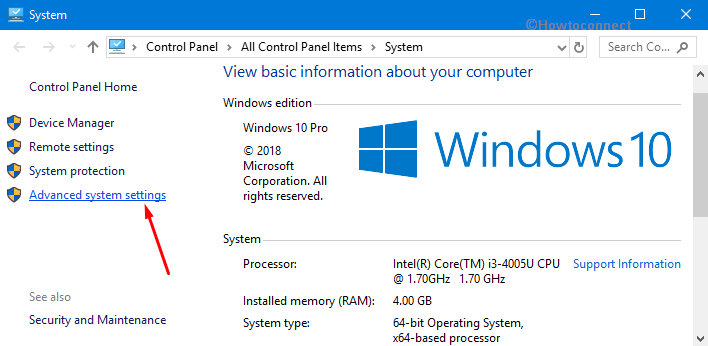
Disable Automatic Paging File Size Management
Paging file size is a memory management scheme to adjust the memory size when you have logged into your computer. The less extent might cause the rzudd.sys error with BSOD. So adjust the paging management by following these steps.
Go to the Taskbar and click on the File Explorer icon. If you are unable to locate the icon then press Windows and E keys jointly to open the same.
In the left pane, perform a right click on This PC option and select Properties from the context menu.
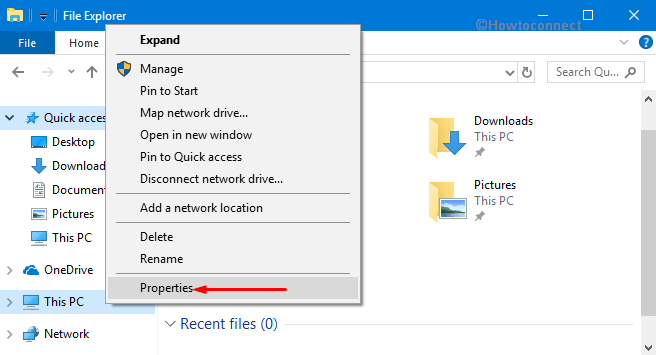
Succeeding this, hit Advanced system settings in the new window.
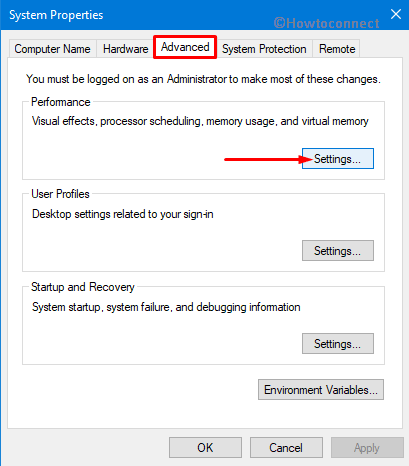
While proceeding ahead, in the Advanced tab, under the “Performance” section click on the Settings button.
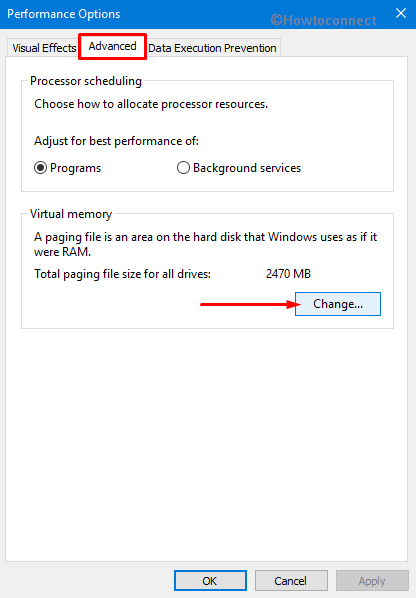
This will prompt up Performance Options dialog. Switch to the Advanced tab and click on Change.
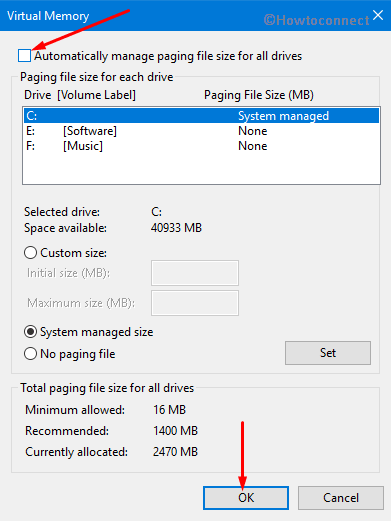
Here you have to make sure the first option “Automatically manage paging file size for all drives” is unchecked. Click OK to implement the modifications on the Paging File.
Lastly, Reboot the device and check whether the issue PAGE FAULT IN NONPAGED AREA is rectified or continue to persist.
Update device drivers
The faulty and missing device drivers in the computer also lead to several types of issues which also includes PAGE FAULT IN NONPAGED AREA error. Thus identify the corrupt drivers and try to update them according to your system model.
Do a right-click on Start icon and click “Device Manager” from the Win+X Menu.
Here, expand each category and see which device displays a yellow exclamation mark. Right-click on that specific device and choose “Update driver“.
On the following wizard, choose the option namely “Search automatically for updated driver software” and go through the guidelines to finish the update.
Hopefully, you will be able to bypass PAGE FAULT IN NONPAGED AREA (rzudd.sys) Blue Screen Error in Windows 10.
That’s all
Repair any Windows problems such as Blue/Black Screen, DLL, Exe, application, Regisrty error and quickly recover system from issues using Reimage.
Содержание
- Как исправить ошибку Video_TDR_Failure в Windows 10
- Исправить ошибку atikmpag.sys, nvlddmkm.sys, igdkmd64.sys в Windows 10
- Ошибка PAGE FAULT IN NONPAGED AREA в Windows 10
- Исправить ошибку PAGE FAULT IN NONPAGED AREA
- Fix FaceIt.sys, rzudd.sys or AcmeVideo.sys BSOD error on Windows 10
- FaceIt.sys, rzudd.sys or AcmeVideo.sys BSOD error
- 1] Run Driver Verifier
- 2] Update driver
- 3] Rollback driver
- 4] Uninstall/Delete driver
- 5] Fresh install driver
- 6] Disable driver signature enforcement
- 7] Run the Blue Screen Online Troubleshooter
- 8] Scan PC with anti-rootkit software
- 9] Disable Automatic Paging File Size Management
- 10] Run CHKDSK
- 11] Run Memory Test
- 12] Perform System Restore
- 13] Uninstall 3rd-party security software
- 14] Check and fix hardware issue
- Related Posts
- Free Fake Blue Screen of Death generator apps for Windows 10
- SYSTEM_SERVICE_EXCEPTION (ks.sys) Blue Screen error on Windows 10
- Fix intelppm.sys Blue Screen error on Windows 10
- [email protected]
Как исправить ошибку Video_TDR_Failure в Windows 10
Atikmpag.sys, nvlddmkm.sys и igdkmd64.sys — это сообщение об ошибке, которое вы обнаруживаете на синем экране смерти (BSOD) в Windows 10. Это сообщение появляется в основном при обновлении Windows с более старой версии до последней. Как правило, возникает конфликт между аппаратными и внешними драйверами графических карт во время обновления. Иногда эта ошибка переходит в цикл перезапуска и процесс заканчивается тем, что отображает следующее сообщение об ошибке:
При желании вы можете найти в Интернете информацию по этому коду ошибки: Video TDR Failure (atikmpag.sys) (nvlddmkm.sys) (igdkmd64.sys).
- atikmpag.sys — Системный файл драйвера видеокарты AMD Readon.
- nvlddmkm.sys — Системный файл драйвера видеокарты GeForce.
- igdkmd64.sys — системный файл драйвера Intel Graphics.
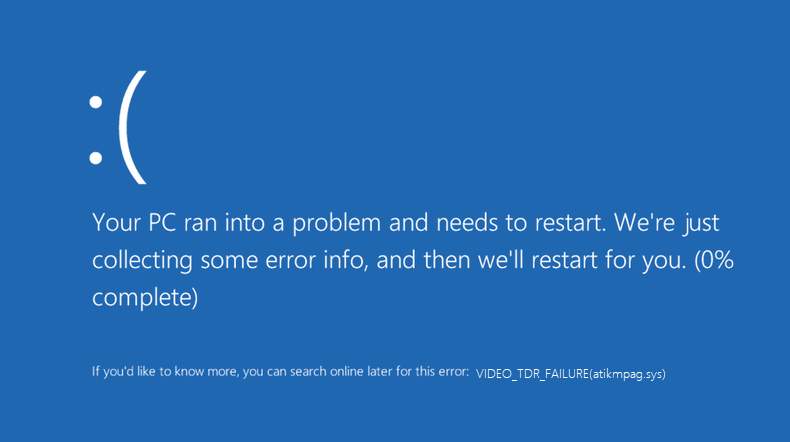
Ошибка BSOD (синего экрана) всегда вызывает тревогу и настораживает. Большинство пользователей с видеокартами AMD, GeForce и Intel Graphics, жалуются, что встречают эту ошибку. Существует системный файл с именем atikmpag.sys, nvlddmkm.sys и igdkmd64.sys, который заставляет компьютер показывать «синий экран смерти». Если это произойдет в вашем случае, вы можете попробовать сначала обновить драйверы. Есть еще одно эффективное решение, чтобы исправить ошибку atikmpag.sys, nvlddmkm.sys, igdkmd64.sys на синем экране с сообщением Video TDR Failure в Windows 10, которое мы рассмотрим ниже.
Исправить ошибку atikmpag.sys, nvlddmkm.sys, igdkmd64.sys в Windows 10
Поскольку конфликт между оборудованием и драйверами создает проблему, удаление проблемных драйверов в безопасном режиме приведет к устранению ошибки. Следующие шаги помогут вам легко исправить ошибку:
1. Нажмите меню «Пуск«, затем нажмите на иконку «Выключение«.
2. Зажмите кнопку Shift + Перезагрузка. Вам нужно нажать и удерживать кнопку Шифт, затем мышкой нажат на пункт «Перезагрузка«.

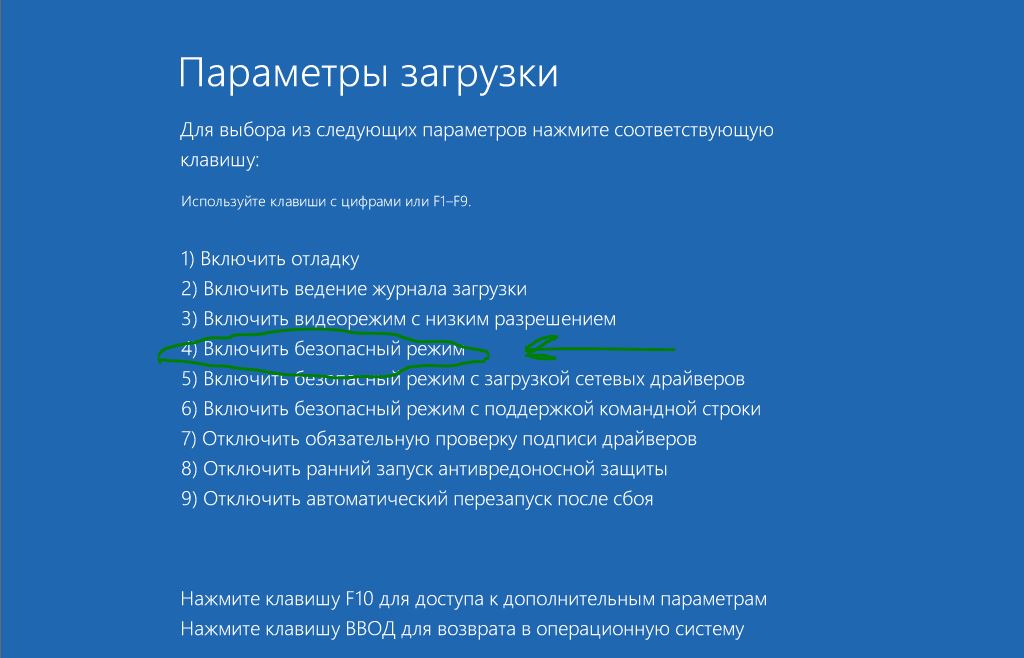
3. В следующим окне синем окне «среда восстановления» перейдите по параметрам «Поиск и устранение неисправностей» > «Дополнительные параметры» > «Параметры загрузки» > «Перезагрузить«.
4. После перезапуска, выберите вариант загрузки в «безопасном режиме«. Нажмите на кнопку F4, F5 или F6, чтобы Включить безопасный режим с вашими потребностями.
5. После перезагрузки в безопасном режиме вам необходимо удалить уязвимые драйверы, создающие ошибку. Зажмите горячие кнопки Windows + X и выберите «Диспетчер устройств» из списка.
6. Найдите строку «Видеоадаптеры«, затем раздвиньте дерево и вы увидите свою видеокарту. Нажмите на ней правой кнопкой мыши и «Удалить устройство«.
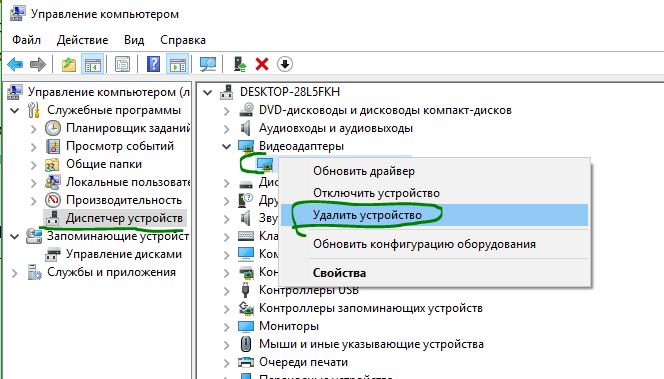
7. Если вам будет предложено «Удалить программы драйверов для этого устройства«, то поставьте галочку и нажмите «Удалить«.
Ошибка PAGE FAULT IN NONPAGED AREA в Windows 10
Разберем решения ошибки PAGE FAULT IN NONPAGED AREA, еще одной проблемы синего экрана в Windows 10. Код указывает на сбой в rzudd.sys. rzudd.sys — это драйвер Razer Rzudd Engine, входящий в состав программного обеспечения Razer Synapse, которое сломалось и привело к BSOD. В большинстве случая эта проблема возникает, когда включен Driver Verifier. Однако, по мнению некоторых отзывов на форумах Microsoft, ошибка PAGE FAULT IN NONPAGED AREA (rzudd.sys) также может произойти из-за повреждения памяти. Команда поддержки Razer предлагает отключить и включить Driver Verifier, чтобы избавиться от проблемы. Кроме того, вы должны также проверить память, жесткий диск, удалить сторонний антивирус или обновить драйверы, чтобы устранить проблему.
Исправить ошибку PAGE FAULT IN NONPAGED AREA
Когда на вашем ПК появляется ошибка BSOD, вы не можете получить доступ к рабочему столу. Трудно выполнить какие-либо исправления, поэтому вы должны создать установочную Windows 10 на флешку и зайти в безопасный режим, через установку систему. Перед процедурой отключите все лишние USB устройства.
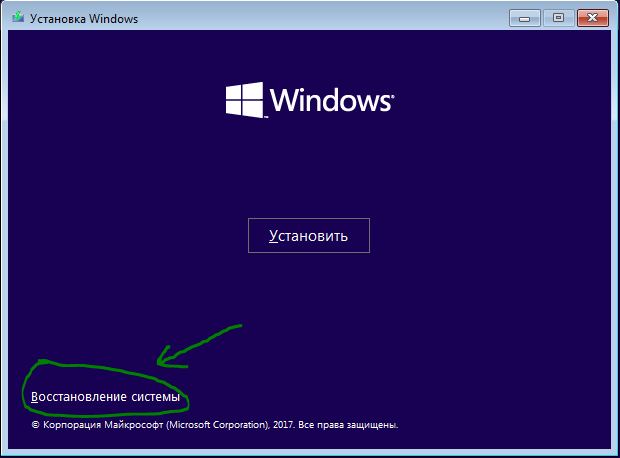
Шаг 1. Вставьте установочный носитель Windows 10 и запустите установку. Следуйте до пункта установки и нажмите снизу на «Восстановление системы», чтобы попасть в дополнительные настройки Windows.
Шаг 2. Далее можете ориентироваться по картинкам в этой статье, как запустить безопасный режим , но а я кратко опишу. Перейдите по следующим параметрам «Поиск и устранение неисправностей» > «Дополнительные параметры» > «Параметры загрузки» > «Перезагрузить» > «Нажмите на клавиатуре F4«. Загрузились на рабочий стол и следуем ниже пунктам.
Если у вас ошибка PAGE FAULT IN NONPAGED AREA с кодом rzudd.sys, то вам нужно «Отключить обязательную проверку подписи драйвера». Смотрите на картинку ниже, это F7. Далее удалите и обновите драйвер от Razer. Перезагрузите ПК.
Шаг 3. Когда загрузились на рабочий стол, то выполните следующие пункты, чтобы исправить ошибку PAGE_FAULT_IN_NONPAGED_AREA:
- Проверьте драйверы и обновите их в диспетчере устройств.
- Проверьте жесткий диск на ошибки.
- Проверьте целостность системных файлов.
- Проверьте оперативную памяти на ошибки .
- Удалите сторонние антивирусы.
- Попробуйте вспомнить, может вы недавно установили какую-либо программу и ошибка начала появляться. Удалите ту программу.
- Сделайте фиксированный файл подкачки , а не автоматический.
- Попробуйте откатить систему назад к рабочей точке .
- Сбросить Windows на заводские настройки с сохранением файлов.
Fix FaceIt.sys, rzudd.sys or AcmeVideo.sys BSOD error on Windows 10
Blue Screen of Death errors are fairly common on Windows 10. Quite a significant number of these BSOD errors are caused by corrupted, outdated, incompatible drivers. In this post, we focus on three of such drivers viz; FaceIt.sys, rzudd.sys and AcmeVideo.sys. This post will offer the most suitable solutions to BSOD errors that you might encounter on your Windows 10 device, triggered by these aforementioned drivers.
Before we get right to it. let’s ID these drivers in relation to which apps and processes they belong to.
FaceIt.sys
The FaceIt.sys is an anti-cheat driver for games digitally signed by FACE IT LIMITED.
Rzudd.sys
This file most often belongs to the product Razer Rzudd Engine. The driver is developed by company Razer USA Ltd.
AcmeVideo.sys
This file is a video driver for hardware by ACME Video Solutions.
FaceIt.sys, rzudd.sys or AcmeVideo.sys BSOD error
If you’re faced with a BSOD error indicating FaceIt.sys, rzudd.sys, or AcmeVideo.sys driver failed, you can try our recommended solutions below. See which of these solutions may apply in your case.
- Run Driver Verifier
- Update driver
- Rollback driver
- Uninstall/Delete driver
- Fresh install driver
- Disable driver signature enforcement
- Run the Blue Screen Online Troubleshooter
- Scan PC with anti-rootkit software
- Disable Automatic Paging File Size Management
- Run CHKDSK
- Run Memory Test
- Perform System Restore
- Uninstall 3rd-party security software
- Check and fix hardware issue
Let’s take a look at the description of the process involved concerning each of the listed solutions.
If you can log in normally, good; else you will have to boot into Safe Mode, enter the Advanced Startup options screen, or use the Installation Media to boot to be able to carry out these instructions.
1] Run Driver Verifier
It is estimated that about three-quarters of blue screens are caused by faulty drivers. Driver Verifier is a tool that runs in real-time to examine the behavior of drivers. For example, Driver Verifier checks the use of memory resources, such as memory pools. If it sees errors in the execution of driver code, it proactively creates an exception to allow that part of the driver code to be further scrutinized. The Driver Verifier Manager is built into Windows 10. You can configure which drivers you would like to verify. The code that verifies drivers adds overhead as it runs, so try and verify the smallest number of drivers as possible.
2] Update driver
Faulty or outdated drivers may trigger this BSODerror as well.
In this case, you can either update your driver manually via the Device Manager, or you can get the driver updates on the Optional Updates section under Windows Update. You may also download the latest version of the driver from the manufacturer’s website.
3] Rollback driver
If you started encountering the BSOD error after a driver update, you can rollback the driver to an earlier version and see if that helps.
4] Uninstall/Delete driver
If updating or rolling back the driver fails to resolve the issue, the next best logical solution is to uninstall the driver via Device Manager and restart your computer. When Windows 10 boots, it will automatically install the generic driver which works in most cases.
Alternatively, you can delete the driver via command prompt. Here’s how:
- Press Windows key + R to invoke the Run dialog.
- In the Run dialog box, type cmd and then press CTRL + SHIFT + ENTER to open Command Prompt in admin/elevated mode.
- In the command prompt window, type the command below and hit Enter after each line. Replace the
placeholder with the actual name of the driver.
Once the command executes, restart your PC and see if the particular BSOD error is resolved.
5] Fresh install driver
Before you begin this process, you need to know where the driver installer stores its temporary files. Other driver packages may use other locations, but you will need to know this information to clear these files, or Windows may attempt to install old drivers from this location.
To fresh/clean install a driver on Windows 10, do the following:
- Make sure you have the latest driver installer for the driver you will be installing.
- Right-click Start and click Apps and Features and uninstall any applications associated with the drivers that you will be reinstalling.
- Restart your machine using Start > Power > Restart. Do not use your machine’s power button. This button is often mapped to the “Sleep” function and does not serve the same purpose. Restarting your machine clears any running processes that may be tied to files in the temporary folders.
- Delete all temporary installation files for the device driver.
- Right-click Start and click Device Manager.
- Click View and click Show hidden devices (Note: this will reveal many devices that are no longer attached to your machine, as well as devices that should not be touched. If in doubt, leave it alone).
- Find the device whose driver you are uninstalling or reinstalling.
- Right-click the device and click Uninstall.
- Check the box for Remove the driver software for this device, if the option exists.
- Click the Uninstall button.
- Uninstall any duplicates of this device, even if they are grayed out.
- Once the Device Manager has completed uninstalling the drivers, click the light-blue Scan for hardware changes icon at the top of Device Manager. The device will probably reappear. If there were multiples, only one should appear.
- Repeat the step to uninstall until you no longer see the option to Remove the driver software for this device. At this point, you have removed all installed drivers from the driver store. If Windows has a default driver, it will still reinstall that driver, but you can generally leave that driver in place as it ships with Windows.
- Restart your machine once more.
- Run the installer for the latest drivers.
6] Disable driver signature enforcement
This solution requires you to disable driver signature enforcement. Do this and see if that helps.
7] Run the Blue Screen Online Troubleshooter
Run the Blue Screen Online Troubleshooter from Microsoft. It helps beginners & novice users troubleshoot their Blue Screens and fix the stop error automatically.
8] Scan PC with anti-rootkit software
Blue screens, can in some rare cases be caused by a rootkit infection conflicting with the Anti-cheat. Make sure to scan your PC with with an anti-rootkit software.
9] Disable Automatic Paging File Size Management
Paging file size is a memory management scheme to adjust the memory size when you have logged into your computer. This might cause the rzudd.sys BSOD error. In this case, you can disable the automatic paging file size management and give it a higher figure and see if that resolves the issue.
10] Run CHKDSK
Some BSOD issue possibly occurs due to system error or having bad sectors on the hard drive. In this case, you can run CHKDSK using the command prompt and check if it resolves the issue.
11] Run Memory Test
Corruption in RAM can potentially make Windows 10 unstable and thus trigger Blue Screen Of Death errors. So if you added a new RAM stick, remove it and check if that is causing the error. If not, then you need to run a memory test. Windows will initiate checking for the abnormalities in RAM. If it finds any, you need to replace the affected RAM.
12] Perform System Restore
It’s entirely possible that you encounter BSOD errors caused by drivers’ issues facilitated by a change that your system has gone through recently.
This solution requires you to restore your system to an earlier point. This will restore your system to an earlier point when the system was working correctly.
13] Uninstall 3rd-party security software
This solution requires you to remove all third-party antivirus programs from your PC using the dedicated removal tool to remove all files associated with your antivirus program.
If removing the antivirus fixes this error, you can now install the same antivirus again, or you can switch to an alternative software or better still stick to Windows 10 native AV program – Windows Defender.
14] Check and fix hardware issue
Hardware problems, faulty or conflicting or simply failed can cause the AcmeVideo.sys BSOD error. Hardware failing might be correctable. For example, if temperature are too high, the chip might shut down due to its emergency shutdown system. Improving the cooling to the chip in some way, will solve the problem.
The solutions provided in this post can help you resolve most BSOD errors caused by drivers on Windows 10.
Date: January 7, 2021 Tags: Stop Errors
Free Fake Blue Screen of Death generator apps for Windows 10
SYSTEM_SERVICE_EXCEPTION (ks.sys) Blue Screen error on Windows 10
Fix intelppm.sys Blue Screen error on Windows 10
[email protected]
Obinna Onwusobalu, has studied Information & Communication Technology and is a keen follower of the Windows ecosystem. He runs a computer software clinic. He says it’s best practice to create a System Restore Point before making any changes to your PC. You can contact him on Twitter @ChidumOsobalu.
Let us analyze the solution of the PAGE FAULT IN NONPAGED AREA error, another blue screen problem in Windows 10. The code indicates a crash in rzudd.sys. rzudd.sys is the Razer Rzudd Engine driver included with the Razer Synapse software, which broke down and resulted in a BSOD. In most cases, this problem occurs when Driver Verifier is enabled. However, according to some reviews on Microsoft forums, PAGE FAULT IN NONPAGED AREA (rzudd.sys) error can also occur due to memory corruption. The Razer support team suggests disabling and enabling Driver Verifier to get rid of the problem. In addition, you should also check the memory, hard drive, uninstall a third-party antivirus, or update the drivers to fix the problem.
When a PAGE FAULT IN NONPAGED AREA error appears on your PC, you cannot access the desktop. It is difficult to make any corrections, so you have to create the installation Windows 10 on the USB flash drive and go into safe mode, through the installation system. Disconnect any extra USB devices before the procedure.
Step 1. Insert the Windows 10 installation media and run the installation. Follow to the installation point and click below on “Repair your computer” to get into advanced Windows settings.
Step 2. Then you can navigate through the pictures in this article, how to start the safe mode, but I will briefly describe. Go to the following options “Troubleshoot”> “Advanced options”> “Startup settings”> “Enable Safe Mode”> “Press F4 on the keyboard”. We downloaded to the desktop and follow the points below.
Important: If you have an error PAGE FAULT IN NONPAGED AREA with the code rzudd.sys, then you need to “Disable driver signature enforcement “. Look at the picture below, this is F7. Next, remove and update the driver from the Razer. Reboot the PC.
Step 3. When you have downloaded to the desktop, follow these steps to correct the error PAGE FAULT IN NONPAGED AREA:
- Check the drivers and update them in the device manager.
- Check hard disk for errors.
- Check the integrity of system files.
- Check the RAM for errors.
- Remove third-party antiviruses.
- Try to remember if you recently installed a program and the error began to appear. Remove that program.
- Make a fixed paging file, not automatic.
- Try to roll back the system to the operating point.
- Reset Windows to factory settings with saving files.