Перейти к контенту

Все чаще пользователи игры Valorant сталкиваются с проблемой запуска игры из-за отказа работы Riot Vanguard, который является частью самой игры и выступает в качестве системы безопасности, которая предотвращает попытки читеров участвовать в матчах с обычными игроками. Если Вангуард не запустился, это не означает, что нужно забыть о самой игре. Просто нужно использовать альтернативные методы запуска античита.
Первый способ запуска Vanguard
Прежде, чем приступить к первому способу запуска Вангуарда, необходимо перезагрузить компьютер и перезапустить клиент античита. Если ошибка запуска Вангуарда не исчезла – нужно удалить античит через панель управления программ, после чего перезапустить игру, она автоматически установит античит заново. Также можно попробовать отключить брандмауэр Виндовс.
Итак, для запуска античита игры необходимо:
- Выйти в «Безопасный режим» операционной системы и удалить все папки и файлы, связанные с Valorant, в том числе и инсталлятор игры (если он сохранен на компе).
- Обновить драйвера системы. Для удобства можно использовать программы Driver Booster или DriverHub.
- Скачать с официального сайта инсталлер игры и установить Valorant. Riot Vanguard установится в процессе инсталляции игры. Важно не заходить в учетную запись Валорант.
- Перезапустить ПК.
- Запустить игру.
Второй способ запуска Riot Vanguard
Если первый способ не сработал, стоит попробовать другой метод решения проблемы.
- Отключить антивирус и перезагрузить компьютер.
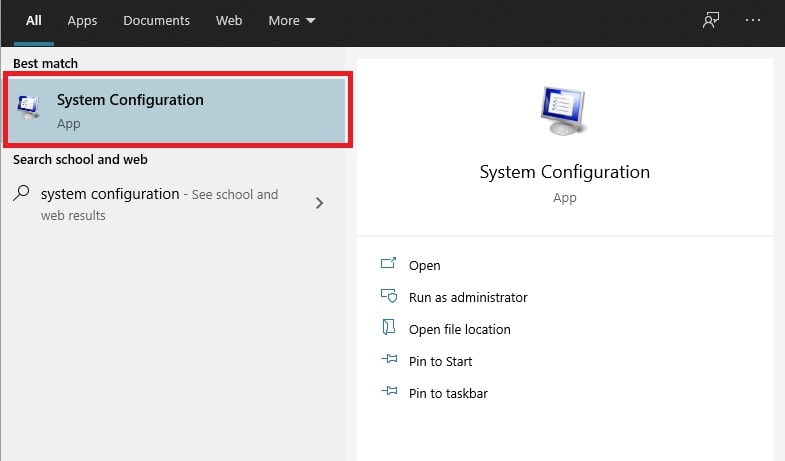
- Открыть параметр «Конфигурация системы».
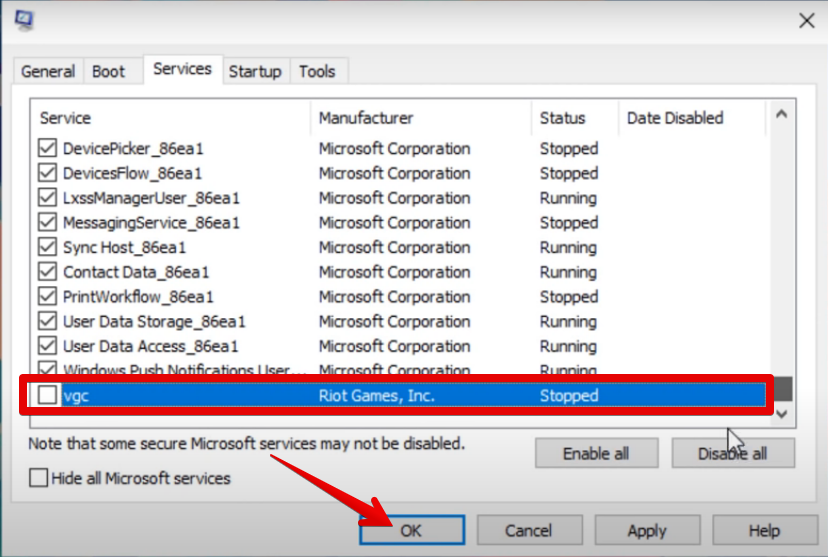
- Перейти на вкладку «Сервисы» и нажать на пункт «Не показывать службы Microsoft» после чего нажать на пункт «Отключить все». Если в списке есть служба «vgc», то ее необходимо включить.
- Перейти на вкладку «Автозагрузка» и клацнуть на пункт «Открыть диспетчер задач».
- В диспетчере отключить все действующие приложения кроме античита Riot Vanguard.
- Вернуться в «Конфигурации системы» Виндовс и нажать на кнопку «ОК».
- Перезагрузить компьютер и запустить игру.
Если это не помогло, то, как всегда, техподдержка Valorant пользователям в помощь.
Многие столкнулись с разными глюками и проблемами античита Vanguard, да так что даже официалы в лице Пола Чемберлена (главы разработки античита VALORANT) решили выступить с обращением:
Мы услышали отзывы игроков о том, что Vanguard слишком усердствует😒 в обеспечении безопасности, поэтому решили несколько изменить подход к вопросу. С прошлой недели мы расширили совместимость Vanguard с другими уязвимыми приложениями. И хотя небольшое количество драйверов все еще блокируется, теперь почти все приложения, которые в прошлом конфликтовали с Vanguard, будут исправно работать, пока действует система защиты.
Присоединяйся к нам в телеграм 💸
Мы создали телеграм канал, поддержи нас 👉 Подпишись на наш канал в Telegram🙏 Мы зарабатываем на трейдинге и инвестициях в криптовалюту. Будем зарабатывать вместе!
В будущем мы постараемся выбирать решения, которые бы минимально сказывались на функционале компьютеров, чтобы Vanguard, VALORANT и тот странный RGB-драйвер могли сосуществовать в мире и гармонии.
Если же у нас это не получится, то мы скорее отключим саму игру, вместо того чтобы вмешиваться в работу других программ. Только в самых крайних случаях мы можем попытаться заблокировать работу приложения на вашем компьютере. Мы продолжаем совершенствовать Vanguard и призываем вас делиться с нами отзывами и дальше, чтобы мы могли принимать оптимальные решения.
Так что, пожалуйста, не забывайте делиться с нами своим мнением о наших мерах борьбы с читами, а мы постараемся, чтобы все (кроме читеров) остались довольны.
Решение проблем с античитом Valorant
- Гайд №1 «Не устанавливается Valorant — Проблемы с установкой игры«
- Гайд №2 «Vanguard античит Valorant — Способы решения проблем«
Ошибка 44 Valorant: «Программа Vanguard не была запущена»
Для начала перезапустите компьютер и клиент, если ошибка не исчезла, то требуется переустановка античита Vanguard. Удалите античит через Пуск/«Установка и удаление программ», а затем запустите игру снова.
Ошибка 45 Valorant: «Необходим перезапуск Vanguard»
Перезагрузите клиент Riot. Если ошибка не будет устранена, то удалите античит и перезапустите VALORANT.
Не удалось установить необходимые зависимости Valorant
Данный баг лечиться, аналогично, полным удалением античита, папки и файлов из командной строки, как описано здесь: https://play-valorant.ru/zavisimosti-valorant-oshibka/
Как удалить Vanguard Valorant
Удалить античит Valorant очень просто, для начала, отключаем его, а затем удаляем, как это сделать пошагово, мы описали ниже
Отключение Vanguard
Недавно Vanguard была немного усовершенствована. Мы получили множество ценных отзывов от игроков и добавили возможность отключать ее при помощи значка на панели задач.
Это позволит запускать различные программы, отмеченные системой Vanguard как потенциальные угрозы.
Вы не сможете запустить VALORANT, пока отключена система Vanguard, так что не забудьте снова включить ее перед входом в игру.
Удаление Vanguard
ШАГ 1
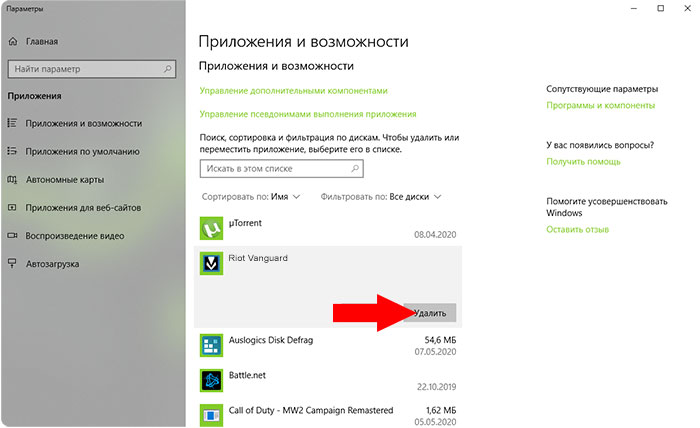
Нажмите клавишу Windows (или щелкните по значку Windows на панели задач), введите «Установка и удаление программ» и нажмите Enter.
ШАГ 2
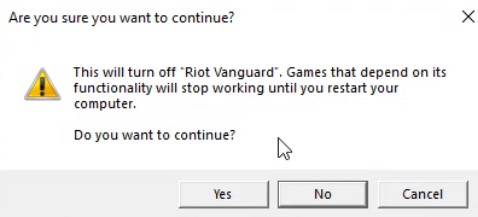
Найдите в списке программ Riot Vanguard, щелкните по ее названию, а затем нажмите «Удалить». Действие нужно будет подтвердить во всплывающем окне.
 ШАГ 3
ШАГ 3
Готово! Программа Riot Vanguard успешно удалена. Теперь после рестарта и запуска клиента, античит автоматически скачается и установиться заново и ошибки пропадут.
Если не помогло, удаляем так-же остатки в Командной строке и папке, как описано здесь: https://play-valorant.ru/zavisimosti-valorant-oshibka/
Ошибки вызваные брандмауэром Windows в Valorant
Если вы столкнулись с кодом ошибки 29, то это может быть связано с проблемой взаимодействия VALORANT и брандмауэра Windows. Также осложнения могут возникнуть в связи с работой антивируса, защищающего ваш компьютер. К счастью, существует ряд шагов, которые вы можете предпринять для исправления ошибки с кодом 29.
Для начала стоит проверить, распознает ли брандмауэр Windows VALORANT и разрешает ли он работу приложения (довольно важный шаг). Вот как это сделать:
- Введите «Брандмауэр защитника Windows» в поисковой строке Windows и щелкните по нему.
- Нажмите «Разрешение работы программы через брандмауэр Windows».
- Нажмите «Изменить параметры».
- Удалите любые строки, связанные с VALORANT и клиентом Riot, а затем добавьте новую с помощью кнопки «Разрешить другое приложение».
- Выберите файл C:\Riot Games\VALORANT\live\VALORANT.exe, чтобы добавить его в исключения брандмауэра, и нажмите ОК.
- Поставьте флажки во всех полях напротив VALORANT в списке исключений брандмауэра и нажмите ОК в нижней части страницы.
- Повторите процесс еще раз, чтобы добавить в число исключений античит (C:\Program Files\Riot Vanguard\vgc.exe), а затем нажмите ОК.
- А теперь повторите его в последний раз, чтобы добавить в виде исключения программу запуска C:\Riot Games\Riot Client\RiotClientServices.exe, а затем нажмите ОК.
Также может помочь запуск приложения от имени администратора или его добавление в исключения антивируса, чтобы тот не нарушал работу игры.
Если предыдущие шаги не сработали, то вы можете попробовать полностью переустановить игру, обязательно запустив установку от имени администратора. Если после выполнения указанных выше шагов вы все еще сталкиваетесь с проблемами, то можете /отправить запрос в нижней части страницы.
Вариант лечения ошибки Vanguard (сработало подробнее в комментах)
1. Удалить все файлы игры и все папки связанные с игрой и античитом в «Безопастном режиме Windows»;
2. Удалить так-же инсталлер игры;
3. Обновить все драйвера на ПК (прогами DriverHub и Driver Booster.);
4. Установил игру и античит,но так же не заходил на учетку;
5. Перезапустил комп и О ЧУДО!!!!! он заработал.
Варианты лечения ошибки Vanguard (не проверенно)
Данные варианты, собраны как рабочие у некоторых людей и не являются фактическим решением для всех.
Вариант №2 Решение проблемы с Vanguard Anti-cheat
1. Удалить антивирус и перезагрузить ПК;
2. Открыть «Конфигурация системы»;
3. Перейти во вкладку «Сервисы» и нажать «Не показывать службы Майкрософт», затем нажать «Отключить все». Если есть служба «vgc», то включить;
4. Во вкладке «Автозагрузка» нажать «Открыть диспечер задач»
5. В диспечере задач во вкладке «Автозагрузки» отключить все приложения, кроме античита, затем закрыть диспечер;
6. Вернуться в «Конфигурация системы» и нажать «OK»
7. Перезагрузить компьютер.
Присоединяйся к нам в телеграм 💸
Мы создали телеграм канал, поддержи нас 👉 Подпишись на наш канал в Telegram🙏 Мы зарабатываем на трейдинге и инвестициях в криптовалюту. Будем зарабатывать вместе!
Ты молодой и перспективный, займись своим будущем прямо сейчас, начни зарабатывать на инвестициях. Вкладывай и приумножай свой капитал и вот статья которая тебе точно поможет: Куда вложить деньги в 2020 году чтобы заработать. Правильные инвестиции помогут приумножить твой капитал уже в ближайшее время. Действуй.
🏆 Во-первых, узнайте Вашу ошибку и посмотрите популярные коды ошибок Valorant, чтобы быстрее найти решение, подходящее именно для вас.
Во-вторых поищите материалы у нас на сайте через поиск, в правом верхнем углу, ибо еще много материалов которые не вошли в эту статью, по тему ошибок, багов с античитом, вылетами и др в Валорант. Если ни одно решение вам не помогло, не отчаивайтесь, напишите нам в комментарии и ждите ответа (он придет вам на почту), так-же ожидайте Фикса от Riot (~месяц), поиграв пока в аналоги (Counter Strike и др.) купив его в магазине Steam, пополнив счет для покупки игры через карту или электронный кошелек: лучший электронный кошелек в 2020 — 2021 году
Вариант №3 Отключаем брандмауэр Windows для запуска Valorant
Если кто-то найдет рабочий метод лечения данной ошибки, пожалуйста напишите его в комментариях, мы его добавим, он поможет таким-же как Вы.
- Запуск Valorant Vanguard
- Ошибки с Riot Vanguard
- Ошибка 44
- Ошибка 45
- Valorant программа Vanguard не запущена
- Не удалось установить необходимые зависимости
- Обновите все драйвера
- Как удалить Riot Vanguard
Если вы играете в Valorant, то наверняка сталкивались с проблемами анти-чита от Riot — Vanguard. У него есть спектр ошибок, о которых нужно знать. Ещё мы расскажем, как справиться с ошибкой, чтобы быстрее зайти в игру.
Запуск Valorant Vanguard
Первая проблема, которая может возникнуть у пользователя — это запуск Riot Vanguard. По умолчанию он включается сразу после запуска компьютера, если вы не меняли этого пункта у него в настройках.

Если вы просто испытываете проблемы с запуском Riot Vanguard, то обратитесь к диспетчеру задач (CTRL + Alt + Delete). Найдите в списке процессов Vanguard, а после этого отключите все его действующие процессы. После этого в любом случае придется перезагружать компьютер. Когда ПК снова включится, то Riot Vanguard должен запуститься без проблем. Если же этого не происходит, то придется решать проблему другими способами.
Ошибки с Riot Vanguard
Сразу стоит сказать, что ничего серьезного в плане ошибок нет. Крайний способ решения любой проблемы — это переустановка игры. А вот самый серьезный способ решения проблемы с самой игрой (если она даже после переустановки не работает, как и Riot Vanguard) — это техническая поддержка пользователей.
Ошибка 44
Она просто сообщает вам, что программа анти-чита не была запущена. Для решения этой проблемы потребуется перезагрузить компьютер, предварительно выключив анти-чит полностью.

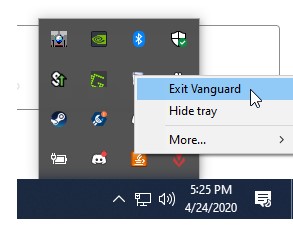
Справа, внизу, около часов на экране, кликаем на стрелочку, у вас открывается бар запущенных приложений. Находим Vanguard, кликаем на него правой кнопкой мыши и закрываем. Либо можно сделать то же самое через Диспетчер Задач. Если это не помогло, то:
- Зайдите в: «Пуск — Установка и удаление программ».
- Найдите Riot Vanguard.
- Удалите его.
- Запустите игру снова.
После этого игра скачает анти-чит, а ошибка должна пропасть.
Ошибка 45
Аналогично такая же ошибка, но она в прямом смысле решается простым перезапуском игры. Если после этого ошибкка осталась, то придется переустановить Vanguard.
Valorant программа Vanguard не запущена
Та же самая 44 ошибка, но игроки отмечали, что эта надпись появляется в тот же момент, когда игра только-только запускается, а сигналов об ошибке нет.
Не удалось установить необходимые зависимости
С этой ошибкой придется немного повозиться. Она не решается простой переустановкой игры или перезагрузкой компьютера.
- Сперва нам нужно выключить Riot Vanguard. Около часов в Windows кликаем на стрелочку, находим Riot Vanguard. Кликаем по нему правой кнопкой мыши и нажимаем на «Exit Vanguard».
- Теперь идем в Пуск — Установка и удаление программ — находим Riot Vanguard — удаляем его.
- Открываем Пуск, в поиске вводим «cmd», либо с помощью сочетания клавиш Win + R.
- Вводим туда фразу «sc delete vgc». Нажимаем Enter.
- Теперь запускаем Valorant. Ждем, пока он немного обновиться и скачает анти-чит заново.
Готово! Теперь ошибки с отсутствием зависимостей точно не будет. С другой стороны, новоиспеченный анти-чит может познакомить вас с новыми проблемами, но ответы для их решения вы точно найдете на нашем сайте
Также предлагаем вам ознакомиться со статьей про коды ошибок в Valorant. Всегда полезно знать, почему у вас появилась та или иная ошибка:
Обновите все драйвера
Иногда Riot Vanguard не запускается из-за того, что у вас на компьютере есть устаревшие драйвера. Причем это может быть старый драйвер для аудиокарты, для поддержки вентиляторов на корпусе и так далее. Порой уточнить это невозможно.
Мы рекомендуем вам узнать модель своей материнской планы (легче всего через бесплатную версию AIDA64), а после этого найти её в интернете и скачать все последние драйвера.
Важно! По хорошему, лучше переустанавливать все драйвера хотя бы раз в полгода. Производитель материнской платы заботится о том, что у пользователей постоянно был прирост к производительности
Другой вопрос — драйвера видеокарты. Игра запустится даже без них, но потенциал видеокарты не будет раскрыт. Как следствие, вы будете играть с 15-30 FPS. Поэтому, если у вас видеокарта от NVIDIA, скачайте себе GeForce Experience. Если у вас карточка от AMD, то качайте AMD Catalyst. Желательно не ставить у них автозапуск, поскольку обе программы потребляют оперативную память из-за достаточно громоздкого оверлея.
Как удалить Riot Vanguard
Уже описали это выше, но повторим.
- С помощью «Установка и удаление программ». Находим в списке Riot Vanguard и удаляем. Игра автоматически скачает программу сама после следующего запуска.
- С помощью cmd (командной строки). Открываем её на Win + R. Вписываем туда «sc delete vgc». Дополнительно, перед этим, придется кликнуть по значку вангуарда внизу экрана и нажать «More» — «Uninstall Vanguard».
Готово! Не бойтесь удалять эту программу, потому что без неё Valorant не запустится. Следовательно, лаунчер сам скачает её.
Similar to other online-focused first-person-shooter games, Valorant isn’t exempt from running into its fair share of error codes. The Valorant Error Code Van 68 debacle is sheer proof of the latter statement, not to mention other problems where the game crashes completely. Another notorious matter is when players start experiencing the Valorant error code 57 which renders their game useless. Fret not though, since this article will go over all the possible fixes to this problem that you’re facing.
Key Highlights
The error code 57 arises when Riot Vanguard, which is tied to the main configuration of the game, fails to start up properly. In addition to a mere faulty startup, a glitch might be causing the game not to identify Vanguard and assume that it’s simply missing.
Here’s how it’s fixed:
-
- Restart the game, as most errors can be fixed by simply restarting.
- Remove unwanted background processes that could be bogging down your system, making it difficult for Riot Vanguard to start properly.
- Reboot your PC to give it some breathing room and allow it to shed some load.
- Flush the cache of your DNS to configure your network settings for better performance.
- Optimize the VGC Service’s startup type, as it’s often not set up properly by default.
- Enable VGC from the System Configuration application if it’s not enabled already.
- Reinstall the VGC and VGK Services if the previous solutions do not work.
- Reinstall the game if all else fails.
How To Fix Valorant Error Code 57
It’s important that you know what exactly is the cause of the Valorant error code 57 before you get into fixing it. Understanding the problem makes it easier to solve it, so we’re going to do cover just that now.
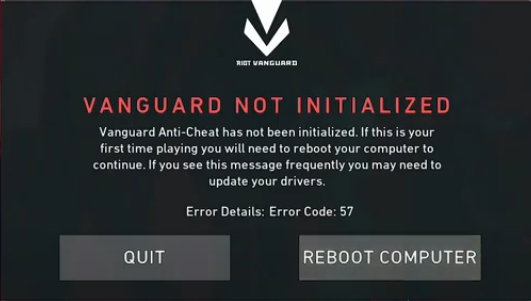
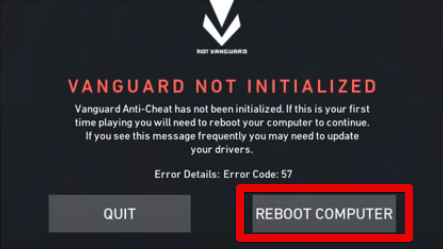
Whenever you try launching the game, an error prompt shows up that says, “Vanguard Not Initialized.” This statement is accompanied by an explanation, which is, “Vanguard Anti-Cheat has not been initialized. If this is your first time playing you will need to reboot your computer to continue. If you see this message frequently you may need to update your drivers.”
Restart Valorant
To address the error code 57, you can start with a simple and straightforward fix. This error can sometimes occur due to a glitch or fault in the Riot Vanguard anti-cheat tool. Riot Vanguard may appear missing, but it could simply be a false indication.
Here’s what to do:
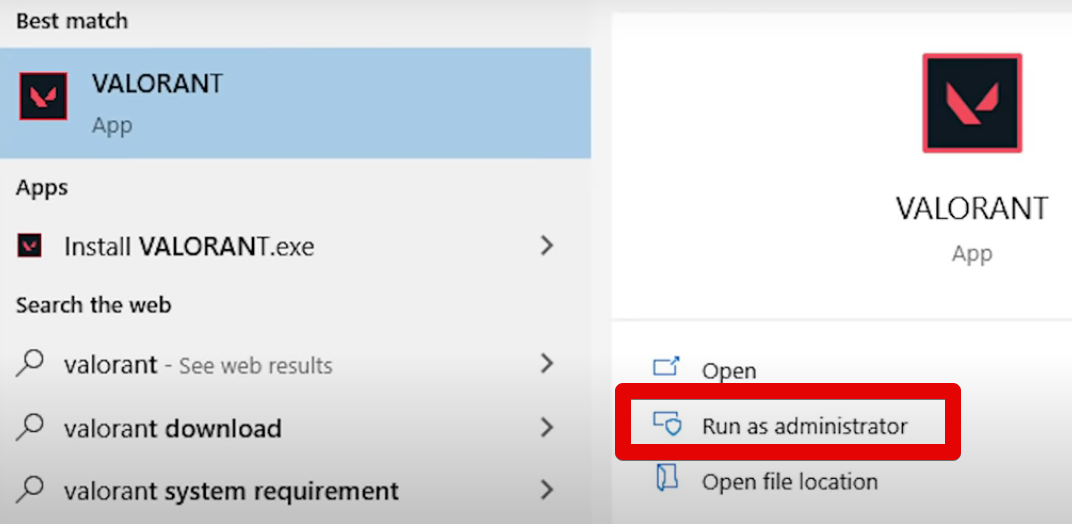
- Restart Valorant: Close the Valorant game client and restart it. You can do this by searching for Valorant in the Windows Start menu and launching it again. Ensure you run it as an administrator by right-clicking on the application and selecting “Run as administrator.”
Running Valorant as an administrator can help avoid potential errors. This simple restart often resolves issues related to the Riot Vanguard anti-cheat tool. If the error persists, move on to the next solution.
Remove Unwanted Background Processes
Background processes running on your computer can sometimes cause issues with Valorant. If you have too many applications running simultaneously, it can overload your system and lead to problems like the Valorant error code 57.
To address this:
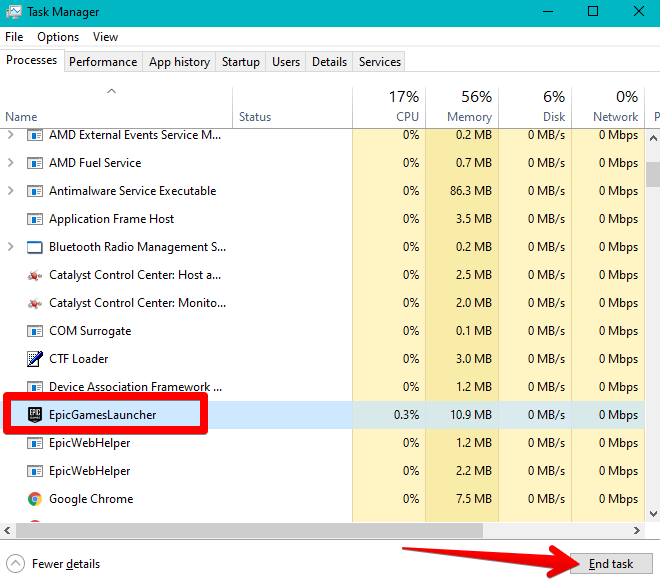
- Open Task Manager: You can open Task Manager by pressing the “Ctrl,” “Shift,” and “Esc” keys simultaneously or by right-clicking on the taskbar and selecting “Task Manager.”
- Check CPU and RAM Usage: In Task Manager, check the CPU and RAM usage by various processes. If you see that CPU or RAM usage is consistently high, it indicates that your system is under heavy load.
- End Unnecessary Processes: Identify processes that are using a significant amount of CPU or RAM and aren’t essential for your current tasks. Select those processes and click on “End task” to terminate them.
By reducing the load on your system, you can improve the performance of Valorant and potentially resolve the error code 57 issue. If the error persists, proceed to the next solution.
Reboot the PC
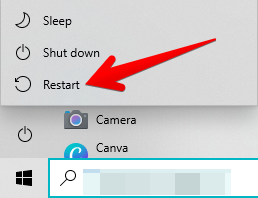
Many users have fixed the error code 57 just by restarting their PC, so there’s no reason that you shouldn’t do the same. Click on the Windows icon present at the bottom-left corner of the screen and select the “Power” button. That should present you with multiple options, but clicking on “Restart” will do just fine.
Doing so should now be giving you a working fix to the Valorant error 57. You have to follow the solutions listed ahead if rebooting your PC didn’t work out as well.
- Excited to play Call Of Duty: Modern Warfare but just encountered the Dev Error 6178? Find out how to fix it here.
Flush the Cache of Your DNS
Flushing your DNS is another way that can potentially solve the error. This has worked for a niche number of users, so there is a possibility that it will work for you as well. Flushing the cache of the DNS basically configures your network settings and makes them perform more optimally. Any unwanted DNS records or IP addresses simply go down the drain, leaving you with a crisp and clean DNS that works like a charm.
The following is a step-by-step tutorial that will show you how to flush your DNS on your Windows PC.
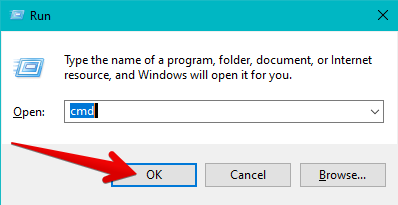
- The first step is to open up the Command Prompt as all of the work is going to carry on from there. You can do this painlessly as you bring up the “Run” program by simultaneously pressing the “Windows” and “R” keys. Type in “cmd” next and let the “Enter” key do its job to get to the next step.
2. Type in the following command in the Command Prompt and press the “Enter” key to continue.
ipconfig /flushDNS

3. You’re quite not done yet. The next command that you have to enter is given below. Use it to get to the next step.
ipconfig /renew
![]()
That’s about it for this step. Flushing the DNS on your device can come in handy for a number of reasons. It can also fix the FFXIV Launcher Error 30413, should you ever get unfortunate enough to run into it on the action RPG. After you’re done, try launching Valorant again to see if it works now. Has the issue still not gone away? Keep on reading for more fixes.
Optimize the VGC Service’s Startup Type
Make sure you have the Vanguard service enabled on your PC. It’s an essential anti-cheat tool for Valorant. To check and enable it:
- Press “Win + R” to open the Run dialog.
- Type “services.msc” and press Enter.
- Look for “VGC” or “Vanguard” in the list of services.
- Right-click on it and select “Properties.”
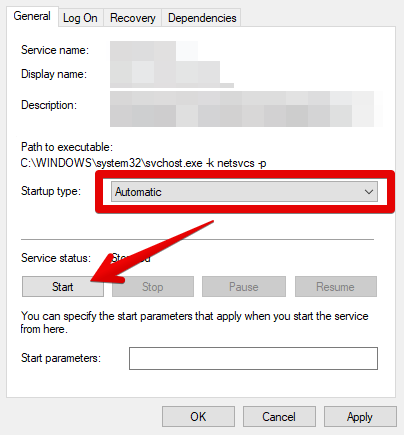
- Set the “Startup type” to “Automatic.”
- Click “Apply” and then “OK” to save the changes.
This should ensure Vanguard is running and help resolve any related errors.
How to Optimize VGC’s Startup on a Windows PC
The steps listed ahead are going to take it from here.
- Begin by launching the Services app on your Windows 10 PC. You can do that by searching for it through the Windows Start menu. Run the application as an administrator for the best results. Check out the following screenshot for a visual explanation.
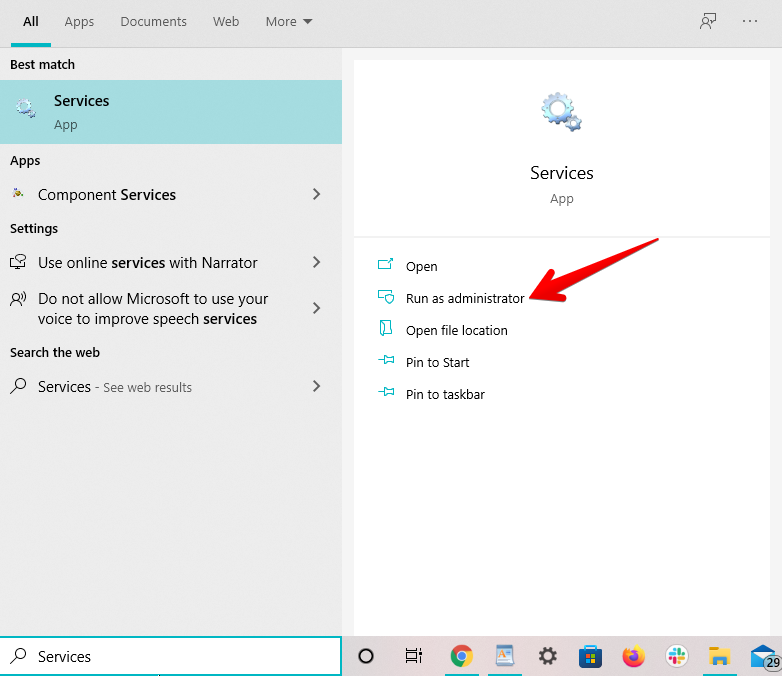
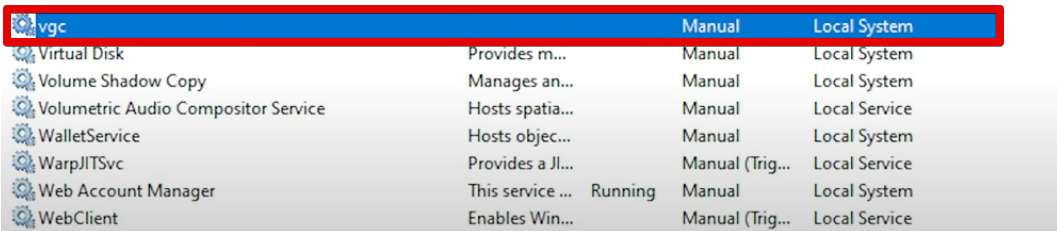
2. A window comprising many different types of services will launch after you click on the “Services” application. You will have to look for VGC here so scroll down all the way down until you find the service. All the entries are listed alphabetically order so checking out the services whose names are starting with the letter “V” can turn out to be helpful. Right-click the VGC service and click on “Properties” as soon as you find it to get to the next step.
3. The rest of the procedure is simple and undemanding. All you have to do now is to click on the bar beside “Startup” and that would reveal a drop-down menu. Click on “Automatic” next and then select “Start.” If the VGC service had been stopped earlier, it will now be rendered to start just like before again. A small prompt will appear that will supposedly turn the service on.
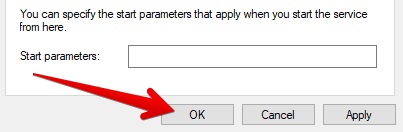
4. Click on “OK” next to finish the process. You’re now free to close the window that you’re on to check out whether the game works now or not.
That is all about optimizing the VGC service’s startup type on your Windows 10 PC. Many players have fixed the error code by making sure their VGC settings check out. You really shouldn’t be having much of a problem now that you’ve directly tended to the Riot Vanguard program.
Enable VGC From the System Configuration Application
There’s another way to check whether VGC is functional on your computer or is it still staying dormant. This fix is in collaboration with that of the previous one, so it should be pretty quick to deal with on your end. The gist of it is that you have to open a specific application on your Windows PC, scour it for the Riot Vanguard service, and confirm if it’s enabled and working.
The following steps are going to take you through the whole procedure.
- Begin by going to the Windows Search bar and looking up a program called “System Configuration.” Be sure to run it as an administrator to achieve the best results.
2. You now have to click on the “Services” tab on the window and scroll down the list of services until you find “vgc.” Make sure that the box beside it is checked. If you’re seeing “Stopped” under the “Status” column, you’ve diagnosed what was causing the error. Once you’ve ticked the box, click on “Apply” and then select “OK.” Continue reading below for what to do next.
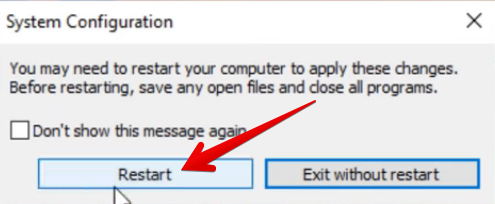
3. A “Restart Your PC” prompt will appear as soon as you click on the “OK” button. Simply follow what the instructions tell you to and reboot your device. That’s about it for this fix.
Try launching Valorant again to see if the issue has been resolved now. There’s a fat chance that you won’t be seeing the error code 57 prompt from here on out, but you never know how bull-headed an error can sometimes get. If doing none of the above has fixed the game for you, then it appears you have to uninstall the install the VGC service on your PC back again. Let’s talk about that in the following section.
Reinstall the VGC and VGK Services on Your Windows PC
We’re now going to get ourselves into a fairly complicated solution of the Valorant error 57. Rest assured though because the instructions you’ll be given are going to be easy-to-understand.
- Begin by opening up the Command Prompt on your Windows PC. This program can be dug out using the Windows Search bar, so type in “Command Prompt” in there and get it done. Click on “Run as administrator” just in case since we truly don’t want any other hurdles at the moment.

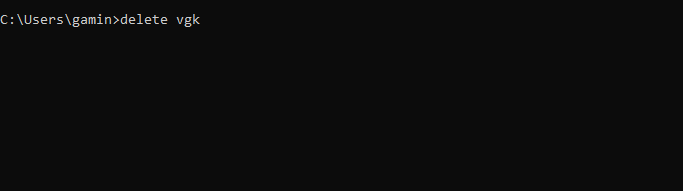
2. You should now have the application launched on your device. Type in the following command to delete Riot Vanguard from the system.
delete vgc

3. The next step is to input another command in the program to accompany the deletion of Riot Vanguard. Use the command given below and insert it directly into the Command Prompt. Press the “Enter” key when you’re done.
4. Once the command line operation responds to you with successful feedback, close the Command Prompt since its work is done here. You now have to restart your PC to apply the changes that you have just made. Click on the “Power” button in your Windows Start menu and then choose “Restart” to forward this tutorial.
5. Once you have your PC restarted and fully functional, the next step is to venture into your “File Explorer” application and find a folder called “Program Files.” You’ll typically find it in your Local Disk (C:) section, but the folder can be present in other areas of your device depending on whether you’ve changed the file destination yourself or not. Click on “Program Files” once you’ve found it to continue.

6. The next step is to look for a folder called Riot Vanguard within your Program Files. You’ll have to scroll a bit down to pinpoint it precisely, but don’t worry about not finding it at all. If you’ve had Valorant installed on your PC, the Riot Vanguard folder is bound to be on the device. Right-click on it and simply select “Delete” to remove all of its contents and rid the system off Valorant’s anti-cheat tool.
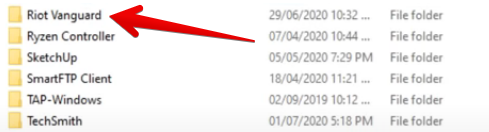
7. Some players have had a minor issue at this present. Despite restarting the PC in one of the preceding steps, the system prompts them that one or two processes that are currently using the Riot Vanguard folder are still opened. This means that you have to close any relevant programs to continue from here on out. If you get a similar prompt, which you might will, click on “Cancel” to close the prompt and move to the next step.
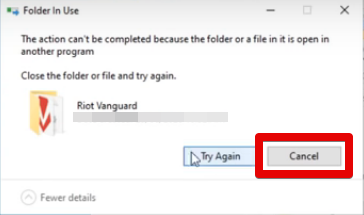
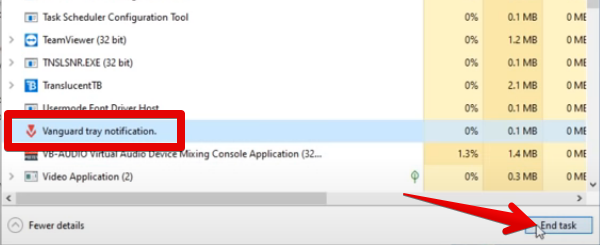
8. You’ll now simply open the Task Manager on your PC using the aforementioned shortcut keys and look for a process called “Vanguard tray notification.” Once done, click on it and then select “End task.” This will close the relevant program that was previously hindering the Riot Vanguard folder from being deleted. Simply repeat Step 6, get to the folder in question again, and delete it. The process should now be trouble-free.
9. Having done every step that has been listed above, move on to launching Valorant now. Be sure to run it as an administrator—we keep repeating this simple step since many players often forget it. Search for Valorant using the Windows Start menu or launch it using the desktop shortcut to get to the next step.
10. You’re going to notice the “Installing Riot Vanguard” prompt as soon as you start the game in the bottom-right corner of the screen. This more or less affirms that you successfully deleted Vanguard from your system and it’s now being downloaded from scratch.
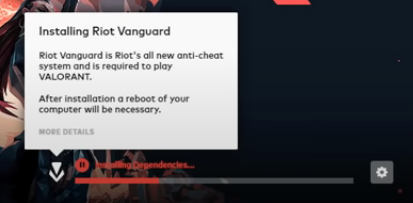
11. You can click on the vividly apparent “Play” button within the game launcher when Riot Vanguard finishes installing. As soon as you do, you will be met with the Valorant error prompt again, but don’t get on pins and needles just yet. You’ll do exactly what the error tells you to do now for the changes to take effect. Click on “Reboot Computer” to finally get to the bottom of this issue.
That’s about it for this long, lengthy fix to the error. You should be greeted with positive results when you’ve done rebooting your computer and are about to launch the game. Deleting VGC and letting the game install it back again is a working fix for the issue at hand. However, in the exceptionally unlikely case that you still haven’t found your way with the game, continue reading for one final solution.
FAQs About Valorant Errors
How Do I Fix Valorant Vanguard Error?
You can fix the Valorant Vanguard error by restarting the game client, rebooting your PC, enabling the VGC service, or by reinstalling the game.
What Does Vanguard Anti-Cheat Do?
The Vanguard Anti-Cheat analyzes your PC if any other application is running parallel to Valorant and introducing gameplay changes in the game. It runs in the kernel and has access to all the software and hardware processes of the PC.
Does Uninstalling Valorant remove Vanguard?
No, uninstalling Valorant does not remove Vanuard. You will have to remove the anti-cheat tool from your PC separately in order to uninstall it. This includes using the Command Prompt and deleting the Riot Vanguard system files.
Other Valorant Error Guides covered on eXputer:
- Fixing Valorant Platform Error
- Valorant Crashing Fix
- Valorant Error Code 39
- Valorant: A Critical Error Has Occurred
- Valorant Error Code Van 68
- Valorant Error Code Van 6
Was this article helpful?
Thanks! Do share your feedback with us. ⚡
How could we improve this post? Please Help us. ✍
Некоторые игроки на ПК, пытающиеся запустить Valorant, видят код ошибки Valorant 57 (Vanguard не инициализирован) после того, как античит игры не может инициализироваться. В основном сообщается, что эта проблема возникает в Windows 10.
Как исправить ошибку Valorant 57
После тщательного изучения этой проблемы выясняется, что существует несколько довольно распространенных сценариев, которые вызывают именно эту ошибку на ПК. Вот краткий список потенциальных виновников, которые могут нести ответственность за код ошибки Valorant 57:
- Сбой античит-движка. В большинстве случаев эта проблема возникает из-за довольно распространенного сбоя, который заставляет программу запуска игры полагать, что античит-движок отсутствует, даже если он правильно установлен. В этом случае вы можете решить проблему, перезагрузив компьютер и запустив игру после завершения следующего запуска.
- Повреждение файлов Vanguard. Если проблема не исчезнет после перезапуска, скорее всего, вы имеете дело с каким-либо повреждением файлов, которое влияет на файлы античитерского движка. В этом случае вам необходимо удалить установку Riot Vanguard из командной строки с повышенными привилегиями, прежде чем заставить программу запуска Valorant переустановить недостающие зависимости.
- Служба VGS отключена — ручное вмешательство пользователя или средство оптимизации системы также могут отключить службу Vanguard Anti-Cheat (VGS), даже если Valorant активно вызывает эту зависимость. Если этот сценарий применим, вы сможете решить эту проблему, изменив тип запуска службы VGS через экран «Службы» или экран MSConfig.
- Несогласованный DNS. Как оказалось, этот код ошибки также может быть связан с неправильным диапазоном DNS, который влияет на способность вашего ПК устанавливать соединения с определенными игровыми лобби. Другие пользователи, столкнувшиеся с той же проблемой, сообщили, что им удалось решить эту проблему, очистив или переключив ваш DNS в диапазон, предоставленный Google.
Теперь, когда вы знакомы со всеми потенциальными причинами, которые могут вызывать этот код ошибки, вот краткий список методов, которые другие затронутые пользователи успешно использовали для устранения кода ошибки 57 и запуска Valorant в обычном режиме:
1. Перезагрузите компьютер.
Проблема, скорее всего, связана с несоответствием, связанным с античит-движком, разработанным Riot. Если проблема возникает из-за сбоя, а не из-за какого-либо типа поврежденных системных файлов, простая перезагрузка системы должна помочь и позволить вам запустить игру, не столкнувшись с той же ошибкой Vanguard Not initialized.
Несколько затронутых пользователей сообщили, что после перезапуска своего ПК они смогли запустить Valorant без тех же проблем — обычно считается, что это иногда происходит из-за конфликта между основной службой Vanguard по борьбе с читами и другой сторонней службой.
Если вы уже перезапустили свой компьютер, но при попытке запустить игру вы по-прежнему получаете тот же код ошибки, перейдите к следующему потенциальному исправлению ниже.
2. Переустановите Riot Vanguard через CMD с повышенными правами.
Поскольку проблема, скорее всего, связана с несоответствием с движком Vanguard Anti-Cheat, и описанный выше метод не сработал для вас, следующим шагом должна быть переустановка всех зависимостей Riot Vanguard, чтобы гарантировать, что повреждение файла не является причиной ошибки. код 57.
Вы можете удалить античит-движок через меню графического интерфейса, но мы рекомендуем делать это из командной строки с повышенными привилегиями, чтобы убедиться, что у вас есть необходимые разрешения для выполнения удаления.
Следуйте приведенным ниже инструкциям, чтобы временно удалить античит-движок на Valorant из командной строки с повышенными привилегиями, прежде чем заставлять игру переустанавливать его с нуля:
- Перво-наперво убедитесь, что Valorant, его программа запуска и все связанные фоновые процессы закрыты.
- Нажмите клавишу Windows + R, чтобы открыть диалоговое окно «Выполнить». Внутри текстового поля введите cmd и нажмите Ctrl + Shift + Enter, чтобы открыть командную строку с повышенными привилегиями.Открытие приглашения CMD с повышенными правами
- Когда вы увидите UAC (Контроль учетных записей пользователей), нажмите Да, чтобы предоставить доступ администратора.
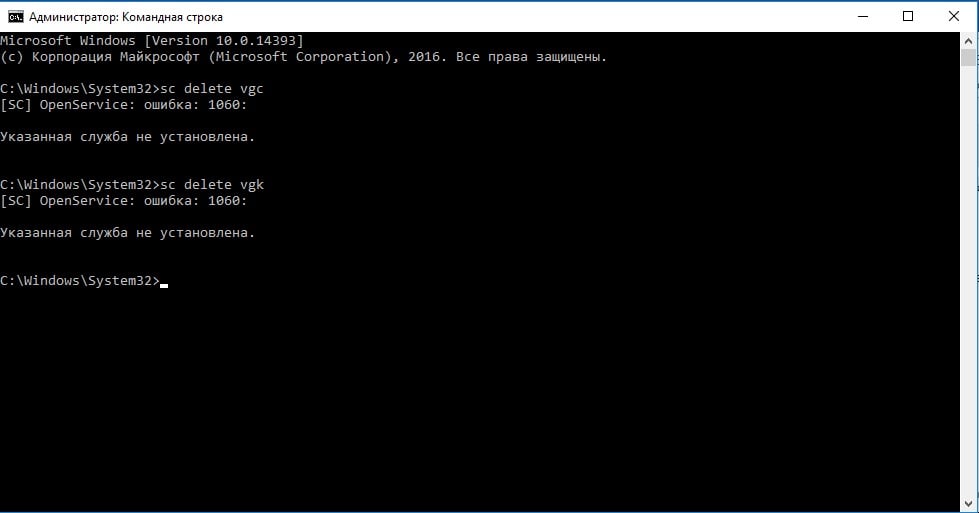
- В командной строке с повышенными привилегиями введите следующие команды и нажмите Enter после каждой, чтобы удалить установку античита Vanguard и все связанные зависимости: sc delete vgc sc delete vgk
- После того, как обе команды будут успешно обработаны (и вы увидите сообщение об успешном выполнении обеих команд), закройте командные строки с повышенными привилегиями.
- Откройте проводник и перейдите к программным файлам (в драйвере ОС), чтобы найти папку Riot Vanguard. Эта папка должна содержать некоторые остаточные файлы, которые вам необходимо удалить, прежде чем запускать переустановку античит-движка.
- Когда вы окажетесь в нужном месте, щелкните правой кнопкой мыши папку Riot Vanguard и выберите «Удалить» в только что появившемся контекстном меню.Удаление папки Riot Vanguard
Примечание: если система не позволяет удалить папку, скорее всего, это означает, что некоторые процессы, принадлежащие античит-движку, уже используются. Чтобы решить эту проблему, нажмите Ctrl + Shift + Esc, чтобы открыть диспетчер задач, затем перейдите на вкладку «Процессы» и закройте службу уведомлений Vanguard Tray.
Отключение процесса Vanguard
- После удаления папки Vanguard перезагрузите компьютер, а затем снова откройте Valorant после завершения следующего запуска.
Примечание. Чтобы убедиться, что у установщика есть необходимые разрешения, откройте программу запуска с правами администратора, щелкнув ее правой кнопкой мыши и выбрав «Запуск от имени администратора». - Когда это произойдет, Valorant автоматически обнаружит, что движок Vanguard Riot Anti-Cheat отсутствует, загрузит последнюю версию и снова установит ее.Установка двигателя Авангард
- Дождитесь завершения этой операции, затем перезагрузите компьютер в последний раз и посмотрите, сохраняется ли проблема.
Если та же ошибка все еще появляется на начальном экране запуска Valorant, перейдите к следующему потенциальному исправлению ниже.
3. Изменение типа запуска службы VGS.
Если вы убедились, что переустановили всю зависимость VGC, и тот же код ошибки все еще возникает, скорее всего, вы имеете дело со службой VGC, которая не может быть запущена при необходимости (даже после установки античита).
Это довольно частое явление среди игр, использующих сторонние оптимизаторы ресурсов, такие как SystemCare, Piriform, WinOptimizer и т. Д.
В большинстве случаев происходит то, что сторонний инструмент в конечном итоге изменяет поведение службы VGS по умолчанию для экономии системных ресурсов. — Хотя это не проблема для большинства приложений, Vanguard Riot работает иначе, поэтому его основная служба легко доступна и настроена на автоматический режим.
Если этот сценарий выглядит возможным, следуйте приведенным ниже инструкциям, чтобы получить доступ к экрану Services и изменить тип запуска по умолчанию для службы VGS:
- Нажмите клавишу Windows + R, чтобы открыть диалоговое окно «Выполнить». В текстовом поле введите services.msc и нажмите Enter, чтобы открыть экран Services.Доступ к экрану служб
- Когда вам будет предложено UAC (Контроль учетных записей пользователей), нажмите Да, чтобы предоставить доступ администратора.
- Оказавшись на экране «Службы», прокрутите список активных служб вниз и найдите службу vgs.
- Когда вы его увидите, щелкните его правой кнопкой мыши и выберите «Свойства» в только что появившемся контекстном меню.Доступ к сервису VGS
- Как только вы окажетесь на экране «Свойства» службы vgc, перейдите на вкладку «Общие» в меню вверху.
- В меню «Свойства» установите для параметра «Тип запуска» значение «Автоматический» (если он еще не установлен), затем нажмите «Пуск», чтобы принудительно запустить службу.Принудительный запуск службы VGS
- Убедившись, что служба VGS запущена, запустите Valorant еще раз обычным способом и посмотрите, устранена ли проблема.
Если вы все еще видите тот же код ошибки Valorant 57 при попытке запустить игру, перейдите к следующему потенциальному исправлению ниже.
4. Включение службы VGS из MSConfig
Если включение службы VGS на экране «Службы» в вашем случае не помогло, возможно, служба (VGS) остановлена на системном уровне (скорее всего, на системном уровне).
Несколько пользователей, с которыми мы также сталкиваемся с этой проблемой, сообщили, что им, наконец, удалось решить эту проблему, обратившись к служебной программе MSConfig и включив службу VGC на экране «Службы».
Если вы ищете конкретные инструкции о том, как реализовать это самостоятельно, выполните следующие действия:
- Нажмите клавишу Windows + R, чтобы открыть диалоговое окно «Выполнить».
- В появившемся окне «Выполнить» введите «msconfig» и нажмите клавишу «Ввод», чтобы открыть служебную программу настройки системы.Открытие MsConfig
- Если вы видите запрос UAC (Контроль учетных записей пользователей), нажмите Да, чтобы предоставить доступ администратора.
- Как только вы окажетесь в меню «Конфигурация системы», перейдите на экран «Службы», прокрутите список активных служб и найдите запись с именем vgc.
- После того, как вы найдете правильную запись, установите соответствующий флажок, чтобы включить ее, затем нажмите «Применить», чтобы применить только что внесенные вами изменения.Включение службы VGS
- Убедившись, что служба VGS запущена, запустите игру еще раз и посмотрите, устранена ли проблема.
5. Очистка или переключение DNS
Если ни одно из вышеперечисленных исправлений не помогло в вашем случае, остается исследовать только одну возможную причину — несогласованность адреса доменного имени (DNS).
Этот сценарий еще более вероятен, если вы сталкиваетесь с аналогичными ошибками при запуске других многопользовательских игр при подключении к той же сети.
Возможно, ваш интернет-провайдер назначил вашему маршрутизатору DNS-адрес, из-за чего вашему компьютеру сложно поддерживать соединение с определенными серверами.
В этом случае вы можете решить проблему двумя способами:
- Очистите DNS, а затем перед обновлением IP / TCP из командной строки с повышенными привилегиями.
- Переключитесь на DNS, предоставляемый Google, чтобы повысить надежность сети.
Мы рекомендуем начать с вспомогательного руководства A (Очистка и обновление DNS) и посмотреть, решит ли оно проблему с запуском Valorant. Если проблема не устранена, перейдите к дополнительному руководству B (переключитесь на DNS, предоставленный Google).
A. Очистка и обновление конфигурации DNS
- Нажмите клавишу Windows + R, чтобы открыть диалоговое окно «Выполнить». Затем введите cmd и нажмите Ctrl + Shift + Enter, чтобы открыть командную строку с повышенными привилегиями. Когда вам будет предложено Управление учетными записями пользователей (UAC), нажмите Да, чтобы предоставить доступ администратора.Открытие командной строки
- Как только вы войдете в командную строку с повышенными привилегиями, введите следующую команду и нажмите Enter, чтобы очистить текущий DNS: ipconfig / flushdns
- Затем введите следующую команду и еще раз нажмите Enter, чтобы обновить IP-конфигурацию: ipconfig / Renew.
- После обновления IP-адреса вы можете закрыть командную строку с повышенными привилегиями и снова запустить Valorant, чтобы проверить, устранена ли проблема. Если не перейти к варианту Б.
Б. Переход на Google DNS
- Начните с нажатия клавиши Windows + R, чтобы открыть диалоговое окно «Выполнить».
- В поле «Выполнить» введите ncpa.cpl и нажмите Enter, чтобы открыть меню «Сетевые подключения».Открытие меню сетевых подключений
- В меню «Сетевые подключения» щелкните правой кнопкой мыши сеть, которую вы активно используете. Если вы в настоящее время подключены к беспроводной сети, щелкните правой кнопкой мыши «Беспроводное сетевое соединение (Wi-Fi)», затем выберите «Свойства» в только что появившемся контекстном меню.
Примечание. Если вы подключены с помощью проводного кабеля, вместо этого щелкните правой кнопкой мыши Ethernet (Подключение по локальной сети). - В окне «Свойства» перейдите на вкладку «Сеть» в меню вверху.
- Затем перейдите к модулю с именем Это соединение использует следующие элементы, выберите Интернет-протокол версии 4 (TCP / IPv4) и нажмите кнопку «Свойства».
- Перейдите на вкладку «Общие», затем включите переключатель, связанный с «Использовать следующий адрес DNS-сервера».
- Затем замените предпочтительный DNS-сервер и Альтернативный DNS-сервер следующими значениями: 8.8.8.8 8.8.4.4
- После соответствующей корректировки значений для TCP / IPV4 сделайте то же самое с Интернет-протоколом версии 6 (TCP / IPv6) и убедитесь, что вы используете вместо них следующие значения: 2001: 4860: 4860 :: 8888 2001: 4860: 4860: : 8844
- Сохраните изменения, затем снова откройте Valorant и посмотрите, устранена ли проблема.Настройка DNS Google
Ошибки в играх возникают не так уж часто. В большинстве случаев они связаны с обновлениями игры, драйверов, операционной системы или установкой новых программ. При вылете программа всегда показывает код ошибки, иногда и сообщение. Это помогает идентифицировать проблему и решить её.
Возникновение ошибки
Обычно сбой происходит во время загрузки игры. У некоторых вылетает сразу же, как она начнется, а у некоторых долго висит загрузка или черный экран, и только потом вылетает ошибка 57 валорант. К сожалению, это одна из проблем, когда сообщения о решении не показывается, как и другая дополнительная информация. Обычно разработчики советуют перезапустить и ГРУ и все. Действительно, в некоторых случаях такой подход помогает.
Однако, помогает он не всегда. Опытным путем было вычислено, что код ошибки 57 в Валорант вызывается сбоем античита. Обычно он запускается вместе и игрой, когда игра завершается, то и он прекращает свою работу. Именно поэтому и помогает перезапуск игры. Но если он не помог, то нужно полностью отключать его, ведь в пассивном режиме он продолжает работу.
Решение проблемы

Для начала попробуйте все же просто перезапустить Riot Client. Если не поможет, то перезагрузите компьютер и запустите игру еще раз. Перезагрузка решает большинство таких вот «плавающих» ошибок, которые происходят непонятно из-за чего. Если ни одно из действий не помогло, то пора переходить к отключению и удалению Riot Vanguard.
Для удаления придется совершить следующие действия:
- закройте игру полностью (проверьте через Диспетчер задач Windows);
- Зайдите в «Панель управления» Windows , сделать это можно через Пуск;
- далее переходим в раздел «Установка и удаление программ»;
- Здесь ищите Riot Vanguard, нажмите на него и на верхней панели выберите «Удалить». Подтвердите действие;
- Перезагрузите компьютер;
- Запустить Riot Client;
- Попробуйте запустить игру, она потребует установки античита;
- Соглашайтесь и ждите окончания установки.
Этот способ должен полностью решить проблему. Если не помогло, то можно полностью переустановить игру и заодно просканировать антивирусом систему. Обычно хватает переустановки самого антивируса. К сожалению, пока что неясно какая ошибка вызывает такую проблему и что становится причиной.
Исправляем ошибку 57 Valorant Vanguard
Ошибка с кодом 57 в Valorant вызвана тем, что встроенной системе Anti-Cheat под названием RIOT VANGUARD не удается запуститься. Система блокирует дальнейшую обработку игровых файлов без данного модуля, который призван отсеивать и блокировать ботов, а также читы. Полный текст сообщения выглядит так:
RIOT VANGUARD
VANGUARD НЕ ИНИЦИАЛИЗИРОВАН
Vanguard Anti-Cheat не был инициализирован. Если вы играете впервые, вам необходимо перезагрузить компьютер, чтобы продолжить. Если вы часто видите это сообщение, возможно, вам нужно обновить драйверы.
Сведения об ошибке: Код ошибки: 57
Несмотря на то, что разработчики указывают на проблему в драйверах, это не всегда так. Есть и другие виновники данного сбоя, среди них:
- лаги в движке античита;
- повреждение файлов Vanguard;
- неактивная служба VGC;
- проблемы в DNS.
Как исправить ошибку?
В первую очередь нужно последовать совету разработчиков и перезапустить компьютер. Если игра была установлена по новой или впервые, это действие обязательно. Только после этого можно идти далее.
Решение 1: переустановка Riot Vanguard
Вот пошаговое руководство по процедуре переустановки Riot Vanguard:
- Клавишами Ctrl + Shift + Esc вызываем Диспетчер задач и завершаем процесс Vanguard, а также связанные с ними задачи.
- Запускаем командную строку с правами администратора и последовательно вводим 2 команды: sc delete vgc и sc delete vgk.
- Закрываем консоль и с помощью Проводника переходим в Program files и ищем папку Riot Vanguard.
- Удаляем каталог Riot Vanguard полностью и перезагружаем компьютер.
- Запускаем установщик Valorant c правами администратора. Valorant обнаружит, что в нем отсутствует движок Vanguard Riot Anti-Cheat, поэтому загрузит и установит актуальную его версию.
- Перезапускаем компьютер.
Решение 2: включаем службу VGC
Чтобы ее активировать, нужно:
- Клавишами Win + R запускаем окно Выполнить, вводим туда msconfig и жмем на кнопку Ок.
- Переходим в меню «Конфигурация системы», где выбираем «Службы».
- Ищем сервис VGC, устанавливаем флаг возле него и жмем на кнопку «Включить».
- Применяем изменения и перезапускаем ПК.
Мы точно не знаем, что именно, но какой-то из способов должен сработать в вашем случае. Разве что проблема в DNS и вам стоит установить более стабильные IP-адреса, например, Google DNS – 8.8.8.8 и 8.8.4.4.
Некоторые игроки на ПК, пытающиеся запустить Valorant, видят код ошибки Valorant 57 (Vanguard не инициализирован) после того, как античит игры не может инициализироваться. В основном сообщается, что эта проблема возникает в Windows 10.
Как исправить ошибку Valorant 57
После тщательного изучения этой проблемы выясняется, что существует несколько довольно распространенных сценариев, которые вызывают именно эту ошибку на ПК. Вот краткий список потенциальных виновников, которые могут нести ответственность за код ошибки Valorant 57:
- Сбой античит-движка. В большинстве случаев эта проблема возникает из-за довольно распространенного сбоя, который заставляет программу запуска игры полагать, что античит-движок отсутствует, даже если он правильно установлен. В этом случае вы можете решить проблему, перезагрузив компьютер и запустив игру после завершения следующего запуска.
- Повреждение файлов Vanguard. Если проблема не исчезнет после перезапуска, скорее всего, вы имеете дело с каким-либо повреждением файлов, которое влияет на файлы античитерского движка. В этом случае вам необходимо удалить установку Riot Vanguard из командной строки с повышенными привилегиями, прежде чем заставить программу запуска Valorant переустановить недостающие зависимости.
- Служба VGS отключена — ручное вмешательство пользователя или средство оптимизации системы также могут отключить службу Vanguard Anti-Cheat (VGS), даже если Valorant активно вызывает эту зависимость. Если этот сценарий применим, вы сможете решить эту проблему, изменив тип запуска службы VGS через экран «Службы» или экран MSConfig.
- Несогласованный DNS. Как оказалось, этот код ошибки также может быть связан с неправильным диапазоном DNS, который влияет на способность вашего ПК устанавливать соединения с определенными игровыми лобби. Другие пользователи, столкнувшиеся с той же проблемой, сообщили, что им удалось решить эту проблему, очистив или переключив ваш DNS в диапазон, предоставленный Google.
Теперь, когда вы знакомы со всеми потенциальными причинами, которые могут вызывать этот код ошибки, вот краткий список методов, которые другие затронутые пользователи успешно использовали для устранения кода ошибки 57 и запуска Valorant в обычном режиме:
1. Перезагрузите компьютер.
Проблема, скорее всего, связана с несоответствием, связанным с античит-движком, разработанным Riot. Если проблема возникает из-за сбоя, а не из-за какого-либо типа поврежденных системных файлов, простая перезагрузка системы должна помочь и позволить вам запустить игру, не столкнувшись с той же ошибкой Vanguard Not initialized.
Несколько затронутых пользователей сообщили, что после перезапуска своего ПК они смогли запустить Valorant без тех же проблем — обычно считается, что это иногда происходит из-за конфликта между основной службой Vanguard по борьбе с читами и другой сторонней службой.
Если вы уже перезапустили свой компьютер, но при попытке запустить игру вы по-прежнему получаете тот же код ошибки, перейдите к следующему потенциальному исправлению ниже.
2. Переустановите Riot Vanguard через CMD с повышенными правами.
Поскольку проблема, скорее всего, связана с несоответствием с движком Vanguard Anti-Cheat, и описанный выше метод не сработал для вас, следующим шагом должна быть переустановка всех зависимостей Riot Vanguard, чтобы гарантировать, что повреждение файла не является причиной ошибки. код 57.
Вы можете удалить античит-движок через меню графического интерфейса, но мы рекомендуем делать это из командной строки с повышенными привилегиями, чтобы убедиться, что у вас есть необходимые разрешения для выполнения удаления.
Следуйте приведенным ниже инструкциям, чтобы временно удалить античит-движок на Valorant из командной строки с повышенными привилегиями, прежде чем заставлять игру переустанавливать его с нуля:
- Перво-наперво убедитесь, что Valorant, его программа запуска и все связанные фоновые процессы закрыты.
- Нажмите клавишу Windows + R, чтобы открыть диалоговое окно «Выполнить». Внутри текстового поля введите cmd и нажмите Ctrl + Shift + Enter, чтобы открыть командную строку с повышенными привилегиями.Открытие приглашения CMD с повышенными правами
- Когда вы увидите UAC (Контроль учетных записей пользователей), нажмите Да, чтобы предоставить доступ администратора.
- В командной строке с повышенными привилегиями введите следующие команды и нажмите Enter после каждой, чтобы удалить установку античита Vanguard и все связанные зависимости: sc delete vgc sc delete vgk
- После того, как обе команды будут успешно обработаны (и вы увидите сообщение об успешном выполнении обеих команд), закройте командные строки с повышенными привилегиями.
- Откройте проводник и перейдите к программным файлам (в драйвере ОС), чтобы найти папку Riot Vanguard. Эта папка должна содержать некоторые остаточные файлы, которые вам необходимо удалить, прежде чем запускать переустановку античит-движка.
- Когда вы окажетесь в нужном месте, щелкните правой кнопкой мыши папку Riot Vanguard и выберите «Удалить» в только что появившемся контекстном меню.Удаление папки Riot Vanguard
Примечание: если система не позволяет удалить папку, скорее всего, это означает, что некоторые процессы, принадлежащие античит-движку, уже используются. Чтобы решить эту проблему, нажмите Ctrl + Shift + Esc, чтобы открыть диспетчер задач, затем перейдите на вкладку «Процессы» и закройте службу уведомлений Vanguard Tray.
Отключение процесса Vanguard
- После удаления папки Vanguard перезагрузите компьютер, а затем снова откройте Valorant после завершения следующего запуска.
Примечание. Чтобы убедиться, что у установщика есть необходимые разрешения, откройте программу запуска с правами администратора, щелкнув ее правой кнопкой мыши и выбрав «Запуск от имени администратора». - Когда это произойдет, Valorant автоматически обнаружит, что движок Vanguard Riot Anti-Cheat отсутствует, загрузит последнюю версию и снова установит ее.Установка двигателя Авангард
- Дождитесь завершения этой операции, затем перезагрузите компьютер в последний раз и посмотрите, сохраняется ли проблема.
Если та же ошибка все еще появляется на начальном экране запуска Valorant, перейдите к следующему потенциальному исправлению ниже.
3. Изменение типа запуска службы VGS.
Если вы убедились, что переустановили всю зависимость VGC, и тот же код ошибки все еще возникает, скорее всего, вы имеете дело со службой VGC, которая не может быть запущена при необходимости (даже после установки античита).
Это довольно частое явление среди игр, использующих сторонние оптимизаторы ресурсов, такие как SystemCare, Piriform, WinOptimizer и т. Д.
В большинстве случаев происходит то, что сторонний инструмент в конечном итоге изменяет поведение службы VGS по умолчанию для экономии системных ресурсов. — Хотя это не проблема для большинства приложений, Vanguard Riot работает иначе, поэтому его основная служба легко доступна и настроена на автоматический режим.
Если этот сценарий выглядит возможным, следуйте приведенным ниже инструкциям, чтобы получить доступ к экрану Services и изменить тип запуска по умолчанию для службы VGS:
- Нажмите клавишу Windows + R, чтобы открыть диалоговое окно «Выполнить». В текстовом поле введите services.msc и нажмите Enter, чтобы открыть экран Services.Доступ к экрану служб
- Когда вам будет предложено UAC (Контроль учетных записей пользователей), нажмите Да, чтобы предоставить доступ администратора.
- Оказавшись на экране «Службы», прокрутите список активных служб вниз и найдите службу vgs.
- Когда вы его увидите, щелкните его правой кнопкой мыши и выберите «Свойства» в только что появившемся контекстном меню.Доступ к сервису VGS
- Как только вы окажетесь на экране «Свойства» службы vgc, перейдите на вкладку «Общие» в меню вверху.
- В меню «Свойства» установите для параметра «Тип запуска» значение «Автоматический» (если он еще не установлен), затем нажмите «Пуск», чтобы принудительно запустить службу.Принудительный запуск службы VGS
- Убедившись, что служба VGS запущена, запустите Valorant еще раз обычным способом и посмотрите, устранена ли проблема.
Если вы все еще видите тот же код ошибки Valorant 57 при попытке запустить игру, перейдите к следующему потенциальному исправлению ниже.
4. Включение службы VGS из MSConfig
Если включение службы VGS на экране «Службы» в вашем случае не помогло, возможно, служба (VGS) остановлена на системном уровне (скорее всего, на системном уровне).
Несколько пользователей, с которыми мы также сталкиваемся с этой проблемой, сообщили, что им, наконец, удалось решить эту проблему, обратившись к служебной программе MSConfig и включив службу VGC на экране «Службы».
Если вы ищете конкретные инструкции о том, как реализовать это самостоятельно, выполните следующие действия:
- Нажмите клавишу Windows + R, чтобы открыть диалоговое окно «Выполнить».
- В появившемся окне «Выполнить» введите «msconfig» и нажмите клавишу «Ввод», чтобы открыть служебную программу настройки системы.Открытие MsConfig
- Если вы видите запрос UAC (Контроль учетных записей пользователей), нажмите Да, чтобы предоставить доступ администратора.
- Как только вы окажетесь в меню «Конфигурация системы», перейдите на экран «Службы», прокрутите список активных служб и найдите запись с именем vgc.
- После того, как вы найдете правильную запись, установите соответствующий флажок, чтобы включить ее, затем нажмите «Применить», чтобы применить только что внесенные вами изменения.Включение службы VGS
- Убедившись, что служба VGS запущена, запустите игру еще раз и посмотрите, устранена ли проблема.
5. Очистка или переключение DNS
Если ни одно из вышеперечисленных исправлений не помогло в вашем случае, остается исследовать только одну возможную причину — несогласованность адреса доменного имени (DNS).
Этот сценарий еще более вероятен, если вы сталкиваетесь с аналогичными ошибками при запуске других многопользовательских игр при подключении к той же сети.
Возможно, ваш интернет-провайдер назначил вашему маршрутизатору DNS-адрес, из-за чего вашему компьютеру сложно поддерживать соединение с определенными серверами.
В этом случае вы можете решить проблему двумя способами:
- Очистите DNS, а затем перед обновлением IP / TCP из командной строки с повышенными привилегиями.
- Переключитесь на DNS, предоставляемый Google, чтобы повысить надежность сети.
Мы рекомендуем начать с вспомогательного руководства A (Очистка и обновление DNS) и посмотреть, решит ли оно проблему с запуском Valorant. Если проблема не устранена, перейдите к дополнительному руководству B (переключитесь на DNS, предоставленный Google).
A. Очистка и обновление конфигурации DNS
- Нажмите клавишу Windows + R, чтобы открыть диалоговое окно «Выполнить». Затем введите cmd и нажмите Ctrl + Shift + Enter, чтобы открыть командную строку с повышенными привилегиями. Когда вам будет предложено Управление учетными записями пользователей (UAC), нажмите Да, чтобы предоставить доступ администратора.Открытие командной строки
- Как только вы войдете в командную строку с повышенными привилегиями, введите следующую команду и нажмите Enter, чтобы очистить текущий DNS: ipconfig / flushdns
- Затем введите следующую команду и еще раз нажмите Enter, чтобы обновить IP-конфигурацию: ipconfig / Renew.
- После обновления IP-адреса вы можете закрыть командную строку с повышенными привилегиями и снова запустить Valorant, чтобы проверить, устранена ли проблема. Если не перейти к варианту Б.
Б. Переход на Google DNS
- Начните с нажатия клавиши Windows + R, чтобы открыть диалоговое окно «Выполнить».
- В поле «Выполнить» введите ncpa.cpl и нажмите Enter, чтобы открыть меню «Сетевые подключения».Открытие меню сетевых подключений
- В меню «Сетевые подключения» щелкните правой кнопкой мыши сеть, которую вы активно используете. Если вы в настоящее время подключены к беспроводной сети, щелкните правой кнопкой мыши «Беспроводное сетевое соединение (Wi-Fi)», затем выберите «Свойства» в только что появившемся контекстном меню.
Примечание. Если вы подключены с помощью проводного кабеля, вместо этого щелкните правой кнопкой мыши Ethernet (Подключение по локальной сети). - В окне «Свойства» перейдите на вкладку «Сеть» в меню вверху.
- Затем перейдите к модулю с именем Это соединение использует следующие элементы, выберите Интернет-протокол версии 4 (TCP / IPv4) и нажмите кнопку «Свойства».
- Перейдите на вкладку «Общие», затем включите переключатель, связанный с «Использовать следующий адрес DNS-сервера».
- Затем замените предпочтительный DNS-сервер и Альтернативный DNS-сервер следующими значениями: 8.8.8.8 8.8.4.4
- После соответствующей корректировки значений для TCP / IPV4 сделайте то же самое с Интернет-протоколом версии 6 (TCP / IPv6) и убедитесь, что вы используете вместо них следующие значения: 2001: 4860: 4860 :: 8888 2001: 4860: 4860: : 8844
- Сохраните изменения, затем снова откройте Valorant и посмотрите, устранена ли проблема.Настройка DNS Google
Ошибки в играх возникают не так уж часто. В большинстве случаев они связаны с обновлениями игры, драйверов, операционной системы или установкой новых программ. При вылете программа всегда показывает код ошибки, иногда и сообщение. Это помогает идентифицировать проблему и решить её.
Возникновение ошибки
Обычно сбой происходит во время загрузки игры. У некоторых вылетает сразу же, как она начнется, а у некоторых долго висит загрузка или черный экран, и только потом вылетает ошибка 57 валорант. К сожалению, это одна из проблем, когда сообщения о решении не показывается, как и другая дополнительная информация. Обычно разработчики советуют перезапустить и ГРУ и все. Действительно, в некоторых случаях такой подход помогает.
Однако, помогает он не всегда. Опытным путем было вычислено, что код ошибки 57 в Валорант вызывается сбоем античита. Обычно он запускается вместе и игрой, когда игра завершается, то и он прекращает свою работу. Именно поэтому и помогает перезапуск игры. Но если он не помог, то нужно полностью отключать его, ведь в пассивном режиме он продолжает работу.
Решение проблемы
Для начала попробуйте все же просто перезапустить Riot Client. Если не поможет, то перезагрузите компьютер и запустите игру еще раз. Перезагрузка решает большинство таких вот «плавающих» ошибок, которые происходят непонятно из-за чего. Если ни одно из действий не помогло, то пора переходить к отключению и удалению Riot Vanguard.
Для удаления придется совершить следующие действия:
- закройте игру полностью (проверьте через Диспетчер задач Windows);
- Зайдите в «Панель управления» Windows , сделать это можно через Пуск;
- далее переходим в раздел «Установка и удаление программ»;
- Здесь ищите Riot Vanguard, нажмите на него и на верхней панели выберите «Удалить». Подтвердите действие;
- Перезагрузите компьютер;
- Запустить Riot Client;
- Попробуйте запустить игру, она потребует установки античита;
- Соглашайтесь и ждите окончания установки.
Этот способ должен полностью решить проблему. Если не помогло, то можно полностью переустановить игру и заодно просканировать антивирусом систему. Обычно хватает переустановки самого антивируса. К сожалению, пока что неясно какая ошибка вызывает такую проблему и что становится причиной.
Ошибка 57 валорант одна из самых распространённых и если вы с ней столкнулись, то ничего удивительного здесь нет. Данная ошибка связана с работой античит системы валоранта, а точнее с Valorant Vanguard и службами, которые с ним связаны. Простая перезагрузка в данной ситуации точно не поможет, а вот переустановка игры вполне может исправить ситуацию, однако мы предлагаем иное решение, которое помогает значительно чаще.
Для исправления ошибки 57 в валоранте необходимо полностью удалить античит и службы, которые к нему относятся. После этого игра сама всё восстановит исправив ошибки.
1 этап исправления ошибки 57
Итак, для начала вызываем командную строку. Для этого нажимаем клавиши Win +R и вводим команду cmd в появившемся окне. После ввода нажимаем на выполнить и перед вами появится окно с чёрным фоном — это и есть командная строка. Кстати, если вы не знаете что такое клавиша Win, то это та клавиша, которая имеет значок Windows и располагается между клавишами Ctrl и Alt в левой части клавиатуры.
Сейчас перед вами открыта командная строка и вам необходимо вписать в неё две команды. Каждую команду вписывайте отдельно и не забывайте после ввода нажимать на клавишу Enter, чтобы привести команду в действие.
- sc delete vgc
- sc delete vgk
Две эти команды удалят службы, которые являются частью античита Valorant Vanguard. Если вы всё сделали верно, то увидите окно следующего содержания:
После этого вам необходимо перезапустить компьютер и приступить к следующему этапу решения проблемы с ошибкой, код которой 57 в валоранте.
2 этап
Теперь нам необходимо удалить папку с античитом. Для этого откройте папку Program Files на корневом диске вашей системы. Чаще всего папка находится по адресу C:Program Files.
В данной папке вам необходимо найти папку с названием Riot Vanguard. В этой папке находятся все оставшиеся файлы от античита валорант. Поэтому вызываем контекстное меню и удаляем данную папку с вашего ПК.
По завершению удаления Вам необходимо запустить Валорант. Игра установит Античит заново, но попросит перезагрузить компьютер. Не стоит отказывать игре, поэтому перезагружаем компьютер.
Ну вот и всё, теперь осталось просто запустить игру и вы уже не увидите и следа от ошибки 57 в валоранте. Однако, если вы хотите обезопасить себя от подобных ошибок в дальнейшем, то проведите манипуляции по автоматическому включению служб античита. Подробная инструкция имеется в гайде по решению ошибки val 51.
Ну а с ошибкой 57 мы уже разобрались и вы можете спокойно играть в любимую игру.
В продолжение темы об ошибках и багах в Valorant, вкратце о еще одной, которая давеча тоже попалась на глаза. В данном посте — речь о проблемке, которая в игре называется ошибка 57 (она же Error code 57), и о том, как с нею бороться.
Судя по отзывам, проблема в игре не самая частая. Но, тем не менее, за последний месяц в Valorant с нею успели познакомиться достаточно много игроков.
Если кто еще не в курсе, то уточним на всякий случай, ошибка с кодом 57, а точнее PlayerAffinityInitFailure, в подавляющем большинстве случаев возникает на этапе загрузки Valorant.
что делать, когда в Valorant появляется ошибка 57 и игра не загружается?
Опять же, в подавляющем большинстве случаев данная проблемка легко устраняется самым стандартным способом. То есть, именно так, как рекомендует служба поддержки Riot.
Не пропустите: ОШИБКА 40 В VALORANT: ПЕРЕЗАПУСКАЕМ КЛИЕНТ, А ТАКЖЕ…
Проще говоря, когда видим ошибку с кодом 57, то просто закрываем игру, перезапускаем клиент Riot и затем снова открываем Valorant и играем нормально.
В процессе перезапуска и клиента, и игры, напомним, перезапускается также Vanguard, благодаря чему Valorant, как показывает практика, тоже потом запускается корректно и без упомянутой ошибки PlayerAffinityInitFailure. Как правило…
Но, к сожалению, бывает и так, что стандартная метода должного эффекта не дает. То бишь, даже после перезапуска клиента Riot Valorant по-прежнему выдает ошибку 57 и запускаться не желает.
В таком случае устранять проблему приходится чуть более сложным путем. А именно, через переустановку приложения Vanguard. Однако отметим, что если после одной перезагрузки клиента ошибка снова появляется, то, возможно, надо перезагрузить его еще раз, предварительно закрыв игру и клиент через Диспетчер задач.
Не пропустите: ОШИБКА VAN 1067 В VALORANT: РАЗБИРАЕМСЯ И УСТРАНЯЕМ
Если без результата, то тогда в качестве дополнительной меры пробуем также очистить кэш DNS (в ряде случаев это тоже помогает устранить ошибку 57 в игру).
А для этого:
- открываем командную строку Windows (жмем «Пуск», в строке поиска пишем cmd, в результатах выше кликаем правой кнопкой мыши по строке cmd и в открывшемся меню жмем «Запуск от имени администратора«);
- в командную строку по очереди вводим следующие команды (после каждой жмем Enter):
ipconfig /flushdns
ipconfig /registerdns
ipconfig /release
ipconfig /renew
netsh winsock reset
После желательно перезагрузить комп.
Не пропустите: БЕСКОНЕЧНЫЙ ЗАГРУЗОЧНЫЙ ЭКРАН В VALORANT: ЕСЛИ С СЕВЕРОМ ВСЕ ОК
Если же снова не помогло, то переустанавливаем Vanguard. Процедура переустановки тоже стандартная:
- закрываем игру полностью (желательно, проверить через Диспетчер задач Windows);
- удаляем античит Vanguard, а для этого:
-
- открываем «Панель управления» Windows (кнопка «Пуск» или Win+X > Панель управления);
-
- далее переходим в раздел «Установка и удаление программ«;
-
- в списке приложений находим Riot Vanguard, кликаем по названию, затем жмем «Удалить» и подтверждаем команду (раз, а потом еще раз).
- перезагружаем комп;
- запускаем игру;
- без античита Valorant не запустится (и не должна), а автоматом запросит установку Vanguard;
- подтверждаем, дожидаемся завершения процедуры установки античита, перезапускаем игру и проверяем результат.
Должно заработать нормально…
Similar to other online-focused first-person-shooter games, Valorant isn’t exempt from running into its fair share of error codes. The Valorant Error Code Van 68 debacle is sheer proof of the latter statement, not to mention other problems where the game crashes completely. Another notorious matter is when players start experiencing the Valorant error code 57 which renders their game useless. Fret not though, since this article will go over all the possible fixes to this problem that you’re facing.
How To Fix Valorant Error Code 57
It’s important that you know what exactly is the cause of the Valorant error code 57 before you get into fixing it. Understanding the problem makes it easier to solve it, so we’re going to do cover just that now.
Whenever you try launching the game, an error prompt shows up that says, “Vanguard Not Initialized.” This statement is accompanied by an explanation, which is, “Vanguard Anti-Cheat has not been initialized. If this is your first time playing you will need to reboot your computer to continue. If you see this message frequently you may need to update your drivers.”
The error code 57 arises when a specific application that’s tied to the main configuration of the game fails to start up properly. This particular service is the developer’s very own anti-cheat engine called Riot Vanguard. In addition to a mere faulty startup, a glitch might be causing the game not to identify Vanguard and assume that it’s simply missing.
If the latter is the case, your game won’t start until Vanguard is initialized. Riot Games has made it mandatory to couple their anti-cheat tool with the game to keep everything as fair and just as possible. PC gamers tend to exploit whatever multiplayer game they can get their hands on, so it’s only sensible that game developers deliver a fitting reply.
Some players might even get the error code 57 if they are trying to remove the anti-cheat engine from their copy of the game. Other causes include corruption of game files, and a defective DNS range on your Windows PC. The most sizable chances are that the Riot Vanguard service is malfunctioning, so fixing that isn’t too difficult. Speaking of which, let’s kickstart our list of fixes now. Do follow each solution as instructed for the best results.
Restart Valorant
We’re going to start off with something quite plain here. This is in accordance with one of the causes of the error code and that is a glitched, faulty anti-cheat tool. Riot Vanguard might have gone missing according to the analysis of your game client, but that could be flat-out false. All that this issue warrants is a simple restart of the Valorant game client and that should do the trick for us.
A restart would prompt the anti-cheat engine to load up again and this is recommended to do so by the official support page of Riot Games as well. Therefore, close the application and start it up again by searching for it in the Windows Start menu. We recommend not using the desktop shortcut key of Valorant because we’re trying to run it as an administrator now, as specified in the screenshot below. Admin privileges are bound to take away half the potential errors a game or an application could face moving forward and we need all the help we can get at the present.
Restarting the game client should do the trick for the vast majority of the players since the error code 57 isn’t exceedingly deep-rooted. However, if doing so hasn’t worked for you and the error prompt still appears on your PC, it’s time to take other measures.
Remove Unwanted Background Processes
A hefty number of background processes might be bogging down the Valorant application that you have on your PC. If you’ve got too many applications fired up at one given time, the game client might be having an exceedingly tough time loading up properly. This is one of the reasons you’ll see the Valorant error popping up on your screen.
Fixing this is nothing but difficult. All you have to do is launch the Task Manager on your PC by either using the “Ctrl,”Shift,” and “Esc” shortcut key combination or by accessing it from the Taskbar if you have it pinned there. Once done, evaluate how much CPU and RAM is being utilized by the various system processes. Anything above 70% of CPU and Memory usage is undesirable. Evaluate what process can be removed from the background in the Task Manager and make changes accordingly.
The following image is an example of how to end a task in the Task Manager. You’ll first have to select a process from the list embedded and then click on “End task” to finalize the process.
That’s all about the second possible solution for fixing the Van error code 57. Freeing up some space on your PC always bodes well for performance, not to mention being a problem-solver for the title in question. However, if your system resources weren’t under heavy load or clearing out the background processes hasn’t done the trick for you, read on as we explore other options that we have.
Reboot the PC
Rebooting your PC is one of the most definite fixes for a multitude of problems on Windows 10 or the relatively recent Windows 11. Giving your device a little breathing room lets it perform better and also eliminates existing and potential errors right from the get-go. If you cannot find your way with eliminating unnecessary background processes or simply cannot choose which ones to pick, let rebooting work its way out automatically.
Many users have fixed the error code 57 just by restarting their PC, so there’s no reason that you shouldn’t do the same. Click on the Windows icon present at the bottom-left corner of the screen and select the “Power” button. That should present you with multiple options, but clicking on “Restart” will do just fine.
Doing so should now be giving you a working fix to the Valorant error 57. You have to follow the solutions listed ahead if rebooting your PC didn’t work out as well.
- Excited to play Call Of Duty: Modern Warfare but just encountered the Dev Error 6178? Find out how to fix it here.
Flush the Cache of Your DNS
Flushing your DNS is another way that can potentially solve the error. This has worked for a niche number of users, so there is a possibility that it will work for you as well. Flushing the cache of the DNS basically configures your network settings and makes them perform more optimally. Any unwanted DNS records or IP addresses simply go down the drain, leaving you with a crisp and clean DNS that works like a charm.
The following is a step-by-step tutorial that will show you how to flush your DNS on your Windows PC.
- The first step is to open up the Command Prompt as all of the work is going to carry on from there. You can do this painlessly as you bring up the “Run” program by simultaneously pressing the “Windows” and “R” keys. Type in “cmd” next and let the “Enter” key do its job to get to the next step.
2. Type in the following command in the Command Prompt and press the “Enter” key to continue.
ipconfig /flushDNS
3. You’re quite not done yet. The next command that you have to enter is given below. Use it to get to the next step.
ipconfig /renew
![]()
That’s about it for this step. Flushing the DNS on your device can come in handy for a number of reasons. It can also fix the FFXIV Launcher Error 30413, should you ever get unfortunate enough to run into it on the action RPG. After you’re done, try launching Valorant again to see if it works now. Has the issue still not gone away? Keep on reading for more fixes.
Optimize the VGC Service’s Startup Type
VGC is a specialized anti-cheat tool, as you’ve understood by now that can be easily found in the “Services” application. It will be installed on those PCs that have Valorant installed on them. This essential feature is now required to make the game run since the developer wants to keep everything fair and square. Therefore, it’s imperative that we have Vanguard or VGC on the ready.
We are going to verify whether the error is surfacing because of the VGC service being disabled. Several players were able to fix this situation by simply enabling this program from the Services section of your Windows PC, so there’s no reason you shouldn’t confirm this right away too.
The following is a tutorial that will walk you through the process of optimizing the VGC service’s startup type, so you won’t have to get confused during any step of the way. Be sure to follow each process as advised to boost your chances of fixing the “Vanguard Not Initialized” error.
How to Optimize VGC’s Startup on a Windows PC
The steps listed ahead are going to take it from here.
- Begin by launching the Services app on your Windows 10 PC. You can do that by searching for it through the Windows Start menu. Run the application as an administrator for the best results. Check out the following screenshot for a visual explanation.
2. A window comprising many different types of services will launch after you click on the “Services” application. You will have to look for VGC here so scroll down all the way down until you find the service. All the entries are listed alphabetically order so checking out the services whose names are starting with the letter “V” can turn out to be helpful. Right-click the VGC service and click on “Properties” as soon as you find it to get to the next step.
3. The rest of the procedure is simple and undemanding. All you have to do now is to click on the bar beside “Startup” and that would reveal a drop-down menu. Click on “Automatic” next and then select “Start.” If the VGC service had been stopped earlier, it will now be rendered to start just like before again. A small prompt will appear that will supposedly turn the service on.
4. Click on “OK” next to finish the process. You’re now free to close the window that you’re on to check out whether the game works now or not.
That is all about optimizing the VGC service’s startup type on your Windows 10 PC. Many players have fixed the error code 57 by making sure their VGC settings check out. You really shouldn’t be having much of a problem now that you’ve directly tended to the Riot Vanguard program. However, it’s advised to restart your computer after the procedure above to apply the changes you’ve made. Have you finally got the game to work now or is still giving you the same, stubborn issue as before? Continue reading for more thorough fixes and don’t lose hope just yet.
Enable VGC From the System Configuration Application
There’s another way to check whether VGC is functional on your computer or is it still staying dormant. This fix is in collaboration with that of the previous one, so it should be pretty quick to deal with on your end. The gist of it is that you have to open a specific application on your Windows PC, scour it for the Riot Vanguard service, and confirm if it’s enabled and working.
The following steps are going to take you through the whole procedure.
- Begin by going to the Windows Search bar and looking up a program called “System Configuration.” Be sure to run it as an administrator to achieve the best results.
2. You now have to click on the “Services” tab on the window and scroll down the list of services until you find “vgc.” Make sure that the box beside it is checked. If you’re seeing “Stopped” under the “Status” column, you’ve diagnosed what was causing the error code 57. Once you’ve ticked the box, click on “Apply” and then select “OK.” Continue reading below for what to do next.
3. A “Restart Your PC” prompt will appear as soon as you click on the “OK” button. Simply follow what the instructions tell you to and reboot your device. That’s about it for this fix.
Try launching Valorant again to see if the issue has been resolved now. There’s a fat chance that you won’t be seeing the error code 57 prompt from here on out, but you never know how bull-headed an error can sometimes get. If doing none of the above has fixed the game for you, then it appears you have to uninstall the install the VGC service on your PC back again. Let’s talk about that in the following section.
Reinstall the VGC and VGK Services on Your Windows PC
We’re now going to get ourselves into a fairly complicated solution of the Valorant error 57. Rest assured though because the instructions you’ll be given are going to be easy-to-understand. The game isn’t able to detect that Riot Vanguard is running on your PC and that can be due to a number of reasons not worth investing our time and effort into. What we can do, in this case, is to simply uninstall Vanguard from our system and prompt the game client to install it again.
This is one of the best fixes for this Valorant error code and has worked for a ton of people. You’ll have to do everything manually though, so let’s get started without any further delay. The following steps are going to take it from here.
- Begin by opening up the Command Prompt on your Windows PC. This program can be dug out using the Windows Search bar, so type in “Command Prompt” in there and get it done. Click on “Run as administrator” just in case since we truly don’t want any other hurdles at the moment.
2. You should now have the application launched on your device. Type in the following command to delete Riot Vanguard from the system.
delete vgc
3. The next step is to input another command in the program to accompany the deletion of Riot Vanguard. Use the command given below and insert it directly into the Command Prompt. Press the “Enter” key when you’re done.
4. Once the command line operation responds to you with successful feedback, close the Command Prompt since its work is done here. You now have to restart your PC to apply the changes that you have just made. Click on the “Power” button in your Windows Start menu and then choose “Restart” to forward this tutorial.
5. Once you have your PC restarted and fully functional, the next step is to venture into your “File Explorer” application and find a folder called “Program Files.” You’ll typically find it in your Local Disk (C:) section, but the folder can be present in other areas of your device depending on whether you’ve changed the file destination yourself or not. Click on “Program Files” once you’ve found it to continue.
6. The next step is to look for a folder called Riot Vanguard within your Program Files. You’ll have to scroll a bit down to pinpoint it precisely, but don’t worry about not finding it at all. If you’ve had Valorant installed on your PC, the Riot Vanguard folder is bound to be on the device. Right-click on it and simply select “Delete” to remove all of its contents and rid the system off Valorant’s anti-cheat tool.
7. Some players have had a minor issue at this present. Despite restarting the PC in one of the preceding steps, the system prompts them that one or two processes that are currently using the Riot Vanguard folder are still opened. This means that you have to close any relevant programs to continue from here on out. If you get a similar prompt, which you might will, click on “Cancel” to close the prompt and move to the next step.
8. You’ll now simply open the Task Manager on your PC using the aforementioned shortcut keys and look for a process called “Vanguard tray notification.” Once done, click on it and then select “End task.” This will close the relevant program that was previously hindering the Riot Vanguard folder from being deleted. Simply repeat Step 6, get to the folder in question again, and delete it. The process should now be trouble-free.
9. Having done every step that has been listed above, move on to launching Valorant now. Be sure to run it as an administrator—we keep repeating this simple step since many players often forget it. Search for Valorant using the Windows Start menu or launch it using the desktop shortcut to get to the next step.
10. You’re going to notice the “Installing Riot Vanguard” prompt as soon as you start the game in the bottom-right corner of the screen. This more or less affirms that you successfully deleted Vanguard from your system and it’s now being downloaded from scratch.
11. You can click on the vividly apparent “Play” button within the game launcher when Riot Vanguard finishes installing. As soon as you do, you will be met with the Valorant error prompt again, but don’t get on pins and needles just yet. You’ll do exactly what the error tells you to do now for the changes to take effect. Click on “Reboot Computer” to finally get to the bottom of this issue.
That’s about it for this long, lengthy fix to the error. You should be greeted with positive results when you’ve done rebooting your computer and are about to launch the game. Deleting VGC and letting the game install it back again is a working fix for the issue at hand. However, in the exceptionally unlikely case that you still haven’t found your way with the game, continue reading for one final solution.
Reinstall the Game
If nothing else has worked so far, then it appears that we have to turn to the good old reinstall method that almost always works for a ton of games, including Street Fighter V and Destiny 2. Reinstalling Valorant has helped resolve the error code 57 for several players, so if you’ve exhausted other options and are left with no silver linings, better give reinstall a shot.
You can easily remove the application from your Windows PC by going into your device’s settings and clicking on “Apps.” It will be almost effortless to uninstall Valorant from there on out. You’ll hopefully fix the error code 57 by implementing this measure.
Conclusion
Valorant is measuring up to be quite the showstopper in the free-to-play games space. It’s teeming with fanatic elements and a wide variety of ways to play. You’re going to have a whale of a time on this game: well, that is until you run into the Valorant error code 57 that makes playability a nightmare on PC. If you’ve been in a similar boat as other players in this regard, let this solution-rich guide be a sight for sore eyes.
We’ve covered the best working fixes for the error code in question that are certainly going to solve the issue for you. If any of the listed solutions have worked, please let us and other answer-seekers know down in the comments section.
We’d love to hear your feedback. As always, eXputer wishes you happy gaming!
- Similar Read: Fix Modern Warfare Dev Error 6068.
FAQs About Valorant Errors
How Do I Fix Valorant Vanguard Error?
You can fix the Valorant Vanguard error by restarting the game client, rebooting your PC, enabling the VGC service, or by reinstalling the game.
What Does Vanguard Anti-Cheat Do?
The Vanguard Anti-Cheat analyzes your PC if any other application is running parallel to Valorant and introducing gameplay changes in the game. It runs in the kernel and has access to all the software and hardware processes of the PC.
Does Uninstalling Valorant remove Vanguard?
No, uninstalling Valorant does not remove Vanuard. You will have to remove the anti-cheat tool from your PC separately in order to uninstall it. This includes using the Command Prompt and deleting the Riot Vanguard system files.
Was this article helpful?
Thanks! Do share your feedback with us. ⚡
How could we improve this post? Please Help us. ✍
Riot Games«Valorant становится одной из популярных игр среди бесплатных шутеров. Хотя Valorant игроков вполне устраивает его графика, элементы управления, частые обновления патчей и т. д., в нем действительно есть несколько ошибок или ошибок. Valorant Error Code 57 — одна из них, и если вы столкнулись с ней на своей Windows 10, вы можете следовать этому руководству.
Согласно многочисленным сообщениям в Интернете, несколько игроков Valorant сталкиваются с «Авангард не инициализирован» сообщение об ошибке вместе с конкретным кодом ошибки. Если быть очень точным, эта ошибка появляется всякий раз, когда античит-система игры не может инициализироваться по каким-то неожиданным причинам. Это в основном происходит на платформе Windows и может быть полностью исправлено.

Содержание страницы
- Исправлено: код ошибки Valorant 57 в Windows 10
- 1. Перезагрузите ваш компьютер
- 2. Force Close Riot Vanguard
- 3. Включить службу Vanguard
- 4. Очистите кеш DNS
- 5. Использовать Google DNS Address
- 6. Переустановите Vanguard System
Исправлено: код ошибки Valorant 57 в Windows 10
Говоря о полном сообщении об ошибке, затронутые игроки Valorant получают «Авангард не инициализирован. Vanguard Anti-Cheat не инициализирован. Если вы играете впервые, вам необходимо перезагрузить компьютер, чтобы продолжить. Если вы часто видите это сообщение, возможно, вам нужно обновить драйверы. Сведения об ошибке: Код ошибки: 57 ”.
Он предлагает вам Перезагрузите компьютер а также Покидать возможность выбрать с помощью. Высоки шансы, что Riot Vanguard У античит-системы есть некоторые проблемы, файлы Vanguard отсутствуют или повреждены, служба Vanguard отключена или остановлена, проблемы с вашим адресом DNS и т. д. Итак, не теряя больше времени, давайте перейдем к делу.
1. Перезагрузите ваш компьютер
Иногда простая перезагрузка компьютера может устранить множество потенциальных ошибок или ошибок, связанных с играми. Хотя этот метод может работать не для всех, мы рекомендуем вам перезагрузить компьютер один раз, чтобы проверить, в чем проблема.
2. Force Close Riot Vanguard
Возможно, что каким-то образом служба Riot Vanguard конфликтует с некоторыми другими фоновыми службами или временно имеет сбой на вашем компьютере. Принудительно закрыв античит-систему, вы сможете использовать ее правильно.
- Убедитесь, что служба Riot Vanguard полностью закрыта и не работает в фоновом режиме. Сделать это:
- Перейти к системный трей значок на панели задач> Щелкните правой кнопкой мыши на Riot Vanguard икона.
- Нажмите на Выйти из Авангарда.
- Далее откройте Диспетчер задач нажав клавиши Ctrl + Shift + Esc> Перейти к Процессы > Тогда проверьте, запущен ли Riot Vanguard.
- Если все еще работает, нажмите Vanguard и выберите Завершить задачу.
- Наконец, перезагрузите компьютер и снова запустите игру Valorant, чтобы проверить, исправлен ли код ошибки 57 или нет.
3. Включить службу Vanguard
Также возможно, что ваша служба Riot Games Vanguard не работает должным образом в вашей системе Windows. Vanguard — одна из систем защиты от мошенничества для компьютерных игр, которая предотвращает хакеров или читеров в игровом процессе.
Есть два способа включить службу Riot Vanguard в вашей системе Windows. Если в этом случае эта служба не работает должным образом, может появиться ошибка авангарда не инициализирована. Чтобы проверить это:
- Нажмите Windows + R ключи, чтобы открыть Запустить чат.
- Тип services.msc и нажмите Enter, чтобы открыть Услуги.
- Теперь ищите VGC из списка и щелкните правой кнопкой мыши в теме.
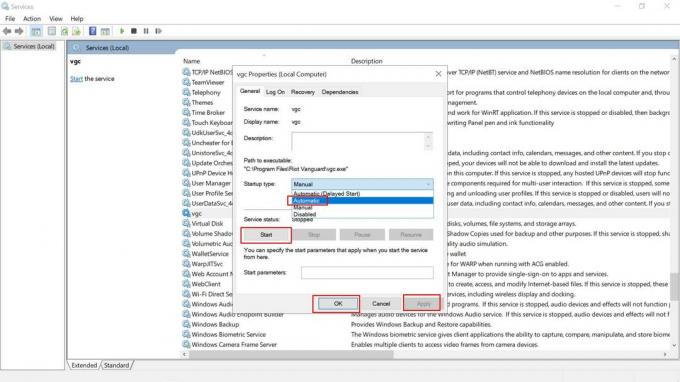
- Перейти к Характеристики > Установите «Тип запуска» к «Автоматический». [Если еще не выбрано, обязательно выберите его]
- Если на всякий случай он не работает, нажмите Начинать > Выбрать Применять а также ОК сохранить изменения.
- Наконец, перезагрузите компьютер, чтобы изменения вступили в силу.
Когда вы закончите с первым методом, пора перейти ко второму методу ниже, используя Конфигурация системы вариант.
- Нажми на Начинать меню> Тип msconfig и нажмите на Конфигурация системы из результатов поиска.
- Когда появится окно конфигурации системы, нажмите кнопку Услуги таб.
- Теперь узнайте VGC сервис из списка Riot Games.
- Нажми на VGC флажок, чтобы включить его.
- Далее нажмите на Применять а потом ОК сохранить изменения.
- Перезагрузите компьютер и попробуйте снова запустить Valorant, чтобы проверить ошибку.
4. Очистите кеш DNS
Если в этом случае описанные выше методы не решают проблему, обязательно очистите кеш DNS на своем компьютере, выполнив следующие действия:
- Нажми на Стартовое меню > Тип cmd.
- Щелкните правой кнопкой мыши на Командная строка из результатов поиска.
- Выбирать Запустить от имени администратора > При появлении запроса от UAC нажмите да продолжать.
- Теперь выполните следующие команды по отдельности, чтобы сбросить конфигурацию сети:
ipconfig / flushdns
- Затем выполните следующую команду, чтобы снова обновить IP-конфигурацию на вашем компьютере:
ipconfig / обновить
- Когда все будет готово, закройте окно командной строки.
- Наконец, не забудьте перезагрузить компьютер, чтобы изменения вступили в силу.
5. Использовать Google DNS Address
Изменение DNS-сервера Google вместо частного DNS может быстро решить несколько проблем с подключением к игровому серверу или даже проблему с неинициализированной Riot Vanguard на вашем ПК с Windows. Для этого:
- Нажми на Стартовое меню > Искать Панель управления и щелкните, чтобы открыть его.
- Теперь нажмите на Сеть и Интернет > Выбрать Центр коммуникаций и передачи данных.
- Перейти к Смените настройки адаптера > Нажмите на активную сеть, которую вы используете.
- Щелкните правой кнопкой мыши в сведениях о подключении Wi-Fi / Ethernet> Выбрать Характеристики.
- При появлении запроса от UAC нажмите да чтобы разрешить права администратора.
- Далее перейдите к Сети вкладка> дважды щелкните Интернет-протокол версии 4 (TCP / IPv4).
- Нажмите на Используйте следующие адреса DNS-серверов. (Если там указаны какие-либо адреса DNS, запишите их для использования в будущем и удалите)
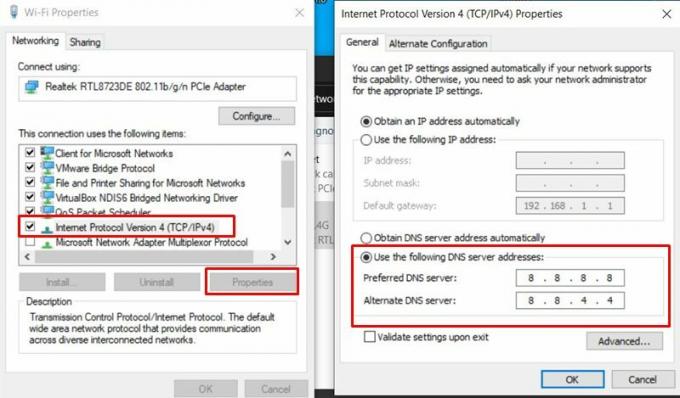
- Вход 8.8.8.8 для Первичный DNS а также 8.8.4.4 для Вторичный DNS.
- Точно так же перейдите в Интернет-протокол версии 6 (TCP / IPv6) option> Введите указанные значения в поле — 2001:4860:4860::8888 а также 2001:4860:4860::8844 соответственно.
- После этого перезагрузите компьютер и попробуйте снова запустить Valorant, чтобы проверить наличие проблемы.
6. Переустановите Vanguard System
Если ни один из методов не помог вам, попробуйте просто удалить систему Vanguard на своем компьютере, чтобы обновить ее. Излишне говорить, что даже если вы удалите игру Valorant, она не отключит и не удалит Riot Vanguard с вашего компьютера. Итак, вам нужно сначала отключить его вручную, а затем удалить.
Отключить Авангард:
- Нажми на Системный лоток значок> Щелкните правой кнопкой мыши на Riot Vanguard икона.
- Выбирать Выйти из Авангарда.
- Может появиться всплывающее окно с предупреждением. Нажмите на да подтвердить.
Удалите Vanguard:
- Нажми на Начинать меню> Тип Добавить или удалить программы и щелкните по нему в результатах поиска.
- Прокрутите вниз и нажмите Riot Vanguard.
- Нажми на Удалить кнопка.
- Он попросит вас подтвердить еще раз. Просто нажмите на Удалить очередной раз.
- При появлении запроса от UAC нажмите да для подтверждения изменений.
- Наконец, перезагрузите компьютер и проверьте игру Valorant. Он автоматически переустановит Vanguard.
Вот и все, ребята. Мы предполагаем, что вы нашли это руководство полезным. Для дополнительных запросов вы можете оставить комментарий ниже.