 A while back I wrote about troubleshooting and resolving Windows 10 Always On VPN errors 691 and 812. There are numerous issues that can result in these errors, and in that post I pointed out they can be caused by disabling TLS 1.0 on Windows Servers prior to Windows Server 2016. However, administrators may encounter a another scenario in which they receive errors 691 or 812 which is related to Active Directory user account configuration.
SSTP and Error 691
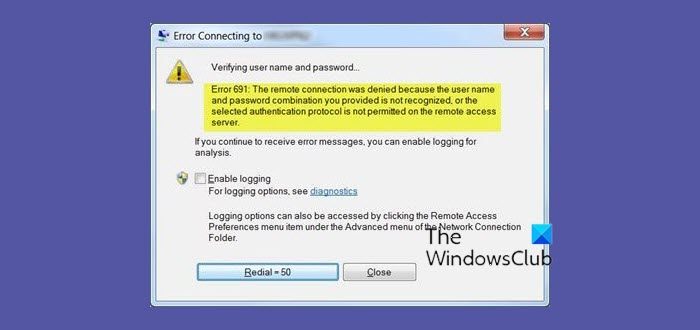
When attempting to establish an Always On VPN connection using the Secure Socket Tunneling Protocol (SSTP), administrators may encounter the following error message.
“The remote connection was denied because the user name and password combination you provided is not recognized, or the selected authentication protocol is not permitted on the remote access server.”

In addition, an error 691 with event ID 20227 from the RasClient source can be found in the Application event log on the client.
“The user <domain\user> dialed a connection named which has failed. The error code returned on failure is 691.”

IKEv2 and Error 812
When attempting to establish an Always On VPN connection using Internet Key Exchange version 2 (IKEv2), administrators may encounter the following error message.
“The connection as prevented because of a policy configured on your RAS/VPN server. Specifically, the authentication method used by the server to verify your username and password may not match the authentication method configured in your connection profile. Please contact the Administrator of the RAS server and notify them of this error.”

In addition, an error 812 with event ID 20227 from the RasClient source can be found in the Application event log on the client.

NPS Event Log
On the NPS server the administrator will find an entry in the application event log with event ID 6273 from the Microsoft Windows security auditing source and the Network Policy Server task category indicating the network policy server denied access to the user. Looking closely at this event log message shows Reason Code 65 and the following reason.
“The Network Access Permission setting in the dial-in properties of the user account in Active Directory is set to Deny access to the user. To change the Network Access permission setting to either Allow access or Control access through NPS Network Policy, obtain the properties of the user account in Active Directory Users and Computers, click the Dial-in tab, and change Network Access Permission.”

Resolution
There are two options available to address this issue. The user account in Active Directory can be configured to grant access or allow access to be controlled via NPS network policy, or the NPS network policy can be configured to ignore user account dial-in properties.
User Account
Follow the steps below to change Network Access Permission on an individual user’s Active Directory account.
- Open the Active Directory User and Computers (ADUC) management console (dsa.msc) and double-click the user’s account.
- Select the Dial-in tab.
- In the Network Access Permission section select the option to Allow access or Control access through NPS Network Policy.

Note: If you do not see the dial-in tab, open the ADUC console on a domain controller. The dial-in tab is not displayed when using the Remote Server Administration Tools (RSAT) for Windows clients.
Network Policy
Follow the steps below to configure NPS network policy to ignore user account dial-in properties.
- Open the NPS management console (nps.msc) and double-click the Always On VPN network policy.
- In the Access Permission section select Ignore user account dial-in properties.
- Click Ok to save the changes.

Additional Information
Windows 10 Always On VPN Troubleshooting Error 691 and 812
This post was updated on February 13th, 2021.
There are many issues that can happen while configuring and using an Always On VPN solution. In this post I’ll be covering the common errors I’ve encountered while setting up Always On VPN. In addition, I’ll share some useful commands and show to how monitor VPN connections. Also, make sure to check out the troubleshooting section of the official Microsoft Documentation.
Links to each individual post in this series can be found below.
Always On VPN – Basic Deployment Guide
Always On VPN – Certificates and Active Directory
Always On VPN – VPN and NPS Server Configuration
Always On VPN – User Tunnel
Always On VPN – Device Tunnel
VPN Connection Error Codes
The first thing I want to cover is the error codes you might encounter when attempting to establish a VPN connection. These errors can be found by looking in the Application event log on the client. The events will have a source of RasClient. A full list of RRAS error codes can be found here.
Error code: 691
This error can be caused by TLS 1.0 being disabled (Windows Server 2012 R2 and earlier) or by settings configured on the Dial-In tab of a user’s AD account. See this post and this post and this post for more information.
Error code: 800
This error is usually caused when a custom IKEv2 security policy is specified and the VPN connection type is set to automatic. See these links for more information. Microsoft, Richard Hicks
Error code: 809
This error is usually caused by the VPN client not being able to communicate with the VPN server. See these links for more information. Microsoft, Richard Hicks
Error code: 812
This is an error covered on the troubleshooting page of the Microsoft Documentation, but I wanted to add a few notes not mentioned there.
- If attempting to connect a user tunnel, ensure the user account is a member of the AD group specified in the VPN policy on the NPS server
- Ensure the VPN server is able to communicate with the NPS server. If the NPS server is running on Windows Server 2019, there is a bug where the Windows Firewall rules may not work correctly. To fix this bug, run this command from an administrative command prompt on the NPS server.
sc.exe sidtype IAS unrestricted
For more information about this bug and the solution, see this post.
Error code: 858
This error is caused by the certificate on the NPS server being expired. See this post for more information.
Error code: 864
This error is caused by an invalid or missing certificate on the NPS server. See this post for more information.
Error code: 902
- Error description
- The specified protocol identifier is not known to the router.
- Possible cause
- This error can occur when IPv6 has been disabled on the VPN server
- Possible solutions
- Ensure there is not a group policy object deployed to the VPN server that is disabling IPv6
- Re-enable IPv6
- In the registry on the VPN server, navigate to HKLM\SYSTEM\CurrentControlSet\Services\Tcpip6\Parameters and look for the value DisabledComponents
- If this value exists, it should be set to either 0 (IPv6 enabled) or 32 (IPv6 enabled but IPv4 is preferred). If this value is set to anything other than 0 or 32, the Routing and Remote Access service will not work. After changing this value, reboot the VPN server.
- For more information about this registry value, refer to this article.
- If the error persists after re-enabling IPv6
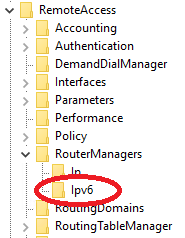
- In the registry on the VPN server, navigate to HKLM\SYSTEM\CurrentControlSet\Services\RemoteAccess\RouterManagers There should be a key under RouterManagers named ipv6.
- If this key does not exist, re-create it and then restart the Routing and Remote Access service
Error code: 13801
This error is usually caused by a missing, expired, or incorrectly configured machine certificate on the client or VPN server. See this post for more information.
Error code: 13806
This error is usually caused when using a device tunnel connection and the machine certificate is missing on either the client or server side. See this post for more information.
Error code: 13868
- Error description
- Policy match error
- Possible cause
- This error can occur when using the IKEv2 protocol and the IKEv2 security settings configured on the client don’t match the settings configured on the server.
- Possible solutions
- Ensure the IKEv2 security settings on the client and server match
- Check the server settings by running this PowerShell command
- Get-VpnServerIPsecConfiguration
- Check the client settings by running this PowerShell command
- Get-VpnConnection -Name “VPN Name” | Select-Object -ExpandProperty IPsecCustomPolicy
- Check the server settings by running this PowerShell command
- If you’ve been following my guide and implemented the improved IKEv2 security settings on the server, then running this command on the client should resolve the issue.
- Ensure the IKEv2 security settings on the client and server match
Set-VpnConnectionIPsecConfiguration -ConnectionName "VPN Name" -AuthenticationTransformConstants SHA256128 -CipherTransformConstants AES128 -DHGroup Group14 -EncryptionMethod AES128 -IntegrityCheckMethod SHA256 -PFSgroup PFS2048 -Force
For more information about this error and my source for these commands, refer to this post.
Error code: 13899
- Error description
- Error in assigning inner IP address to initiator in tunnel mode
- Possible cause
- This error can occur when the VPN server is unable to assign an IP address to the VPN tunnel
- Possible solutions
- If the VPN server is configured to assign IP addresses from a static pool, check if all available addresses have been allocated. If so, add additional IP address space to the pool.
- If the VPN server is configured to assign IP addresses using DHCP
- Ensure a DHCP server is reachable from the VPN server
- Ensure the DHCP scope has available IP addresses to allocate
- If the VPN server is running Windows Server 2019 and is configured to assign IP addresses using DHCP, there is a bug that can cause this issue.
- To resolve this issue, run the following command to create a new registry value, then reboot the VPN server
- For more information about this bug, refer to this TechNet post.
reg add "HKLM\SYSTEM\CurrentControlSet\Services\Dhcp" /v RequiredPrivileges /d "SeChangeNotifyPrivilege"\0"SeCreateGlobalPrivilege"\0"SeImpersonatePrivilege"\0 /t REG_MULTI_SZ /f
Error code: 0x80070040
This error is caused by a missing or incorrectly configured certificate on the VPN server. See this post for more information.
Error code: 0x80092013
This error is caused when using SSTP and the CRL of the SSL certificate installed on the VPN server is not publicly available. See this post for more information.
Error code: 0x800B0109
This error is caused when the root CA certificate that issued the client certificate is not installed in the Trusted Root Certification Authorities store on the client computer. See this post for more information.
VPN Connection Reliability (Sleep / Hibernate)
Many users have experienced issues with Always On VPN connections not reliably re-connecting when a device comes out of a sleep or hibernate mode. There is a lengthy TechNet forum post on the topic. Richard Hicks also has a post on the subject.
Device Tunnel with Multiple Root Certificates
It’s possible to have multiple copies of the same root certificate installed in the trusted root certificates store on the VPN server. This can cause issues with the authentication process for device tunnel connections. To resolve this issue, remove the duplicate certificates. Read more about this issue in this post by Richard Hicks.
VPN Creation Errors
These are errors you may encounter when using the New-AovpnDeviceTunnel.ps1 or New-AovpnUserTunnel.ps1 scripts to install a new VPN tunnel on a computer.
Both of these scripts write to a log file located in ProgramData\AOVPN. Make sure to check this log file for more details about why one of the scripts may have failed.
- Error Message – Unable to get user SID. User may be logged on over Remote Desktop: A constructor was not found. Cannot find an appropriate constructor for type System.Security.Principal.NTAccount
- This error is caused because the user tunnel cannot be created for a user that is logged in through a remote desktop session. The user must be locally logged into the computer or connected via a remote console session.
- Error Message – Unable to create VPN Name profile: A general error occurred that is not covered by a more specific error code
- This error is usually caused by invalid syntax in the XML file that was provided to the script. Review the XML file and correct any typos or incorrect formatting.
Name Resolution Policy Table (NRPT)
The Name Resolution Policy Table is used to specify DNS names or namespaces that require special handling during DNS lookups. In an AOVPN configuration, the NRPT is configured by specifying the <DomainNameInformation> element in the ProfileXML file. This can be a useful feature, however, there are a few things to be aware of when using the NRPT.
Troubleshooting Tools
When attempting to troubleshoot DNS with the NRPT enabled, be careful about using nslookup. Nslookup will bypass the NRPT and use the DNS servers configured on the network adapter. Instead of nslookup, use the Resolve-DNSName PowerShell cmdlet.
There are a few PowerShell cmdlets that can be used to view NRPT settings. (Get-DnsClientNrptPolicy, Get-DnsClientNrptGlobal, Get-DnsClientNrptRule)
#View the currently applied NRPT settings
Get-DnsClientNrptPolicy

#View the NRPT settings for a specific namespace
Get-DnsClientNrptPolicy -Effective -Namespace "example.corp.com"

#View the global NRPT settings on a device
Get-DnsClientNrptGlobal

#View currently configured NRPT rules
Get-DnsClientNrptRule
DNS Registration Issue
There is an issue when the NRPT is used and the ProfileXML has the <RegisterDNS> element set to True. In this case, the client may register 2 DNS entries, one for the IP of the VPN, and one for the public IP of the system. Microsoft has released patches to resolve this issue, but even with the patches, a registry key may still need to be created to stop this issue from happening.
New-ItemProperty -Path 'HKLM:SYSTEM\CurrentControlSet\Services\Dnscache\Parameters\' -Name DisableNRPTForAdapterRegistration -PropertyType DWORD -Value 1 -Force
For more information on this issue, refer to this post.
NRPT and DirectAccess
If you’re migrating from DirectAccess to Always On VPN, you may run into an issue where the NRPT rules seem to be ignored on the device. A symptom of this issue is when running the Get-DnsClientNrptPolicy cmdlet, no results are returned, but running the Get-DnsClientNrptRule cmdlet does show results. To resolve this issue, remove the registry key that is used to store DirectAccess NRPT entries.
Remove-Item -Path 'HKLM:\SOFTWARE\Policies\Microsoft\Windows NT\DNSClient\DnsPolicyConfig' -Recurse -Force
Other Useful Commands
This is a list of some commands I’ve found useful for troubleshooting Always On VPN connections.
#Attempt to connect a VPN tunnel
rasdial "Tunnel Name"

#Attempt to disconnect a VPN tunnel
rasdial "Tunnel Name" /d

#List all user VPN connections
Get-VpnConnection

#List all device VPN connections
Get-VpnConnection -AllUserConnection

#Delete a user tunnel
Get-VpnConnection | Where Name -eq "Tunnel Name" | Remove-VpnConnection

#Delete a device tunnel
Get-VpnConnection -AllUserConnection | Where Name -eq "Tunnel Name" | Remove-VpnConnection
Monitor Active VPN Connections
There are 3 main ways to monitor active VPN connections when using Windows Server as a VPN server.
- The Remote Access Management console
- Open the Remote Access Management console and select Remote Client Status. This view gives the most information about the connected clients.
- The Routing and Remote Access console
- Open the Routing and Remote Access console and select Remote Access Clients. This view is like the first option, but less information is displayed.
- PowerShell
- Open PowerShell and run the Get-RemoteAccessConnectionStatistics cmdlet.
The problem was that my VPN connection was using Secure Socket Tunneling Protocol (SSTP)

and RASDIAL can’t connect to such VPN connection as:
RASDIAL.EXE provides unattended dialing. It does not support the
following features available in RASPHONE.EXE: prefix/suffix,
auto-redial, change password, retry authentication, statistics,
operator assisted dialing, and connections requiring Terminal mode
input.
RASPHONE and RASDIAL: Tips and Differences
After i’ve figured that out i’ve used RASPHONE to make a connection passing the location of my Remote Access Phonebook (Rasphone.pbk)
rasphone -d MyVPNConnection -f %userprofile%\AppData\Roaming\Microsoft\Network\Connections\Pbk\rasphone.pbk
And everything worked fine.
To disconnect you can still use RASDIAL
rasdial MyVPNConnection /disconnect
Если появляется интернет-ошибка 691 при попытке подключения к VPN, она мешает подключаться к Internet и это сильно раздражает. Поэтому стоит выяснить, как исправить и устранить ошибку Windows VPN 691.
Содержание
Если вы пользуетесь ОС Windows 7 / 8 / 10 / XP и у вас быстрый интернет в частный дом от провайдеров Beeline, Ростелеком, Дом.ру, Мегафон и МТС, то рано или поздно у вас появится вопрос, что означает и как справиться с проблемой, если появляется интернет-ошибка 691 при попытке подключения к VPN. Действительно, такая ошибка мешает подключаться к Internet и это сильно раздражает. Поэтому стоит выяснить, как исправить и устранить ошибку Windows VPN 691.
Что означает ошибка 691
Обычно ошибка VPN 691 возникает, когда клиентскому устройству не удается подключиться к серверу. Сообщение об ошибке гласит: «Ошибка 691: удаленное соединение было отклонено, так как указанная комбинация имени пользователя и пароля не распознается или выбранный протокол аутентификации не разрешен на сервере удаленного доступа».
Это означает, что подлинность соединения не может быть подтверждена клиентским сервером.
Ошибка может быть вызвана одним или несколькими из следующих действий:
- ввод неверных учетных данных (логин и пароль);
- неправильные настройки сети;
- использование двух VPN-клиентов на одном компьютере;
- неправильно настроенные параметры безопасности подключения;
- брандмауэр Windows или сторонняя антивирусная программа, блокирующая VPN, пытается войти в VPN, используя неправильный домен.
Исправляем проблему
Необходимые для исправления ошибки 691 действия зависят от причин, которыми она вызвана. Поэтому устранение этой проблемы стоит начать с диагностики состояния своего компьютера и сети.
Проверка целостности сетевого оборудования
Надежная стратегия мониторинга может помочь поддерживать работу локальных сетей. Инструменты мониторинга LAN чрезвычайно разнообразны. Для начала нужно проверить, не произошли ли обрыв кабеля или повреждение разъемов.
Также специалисты отмечают, что часто происходит сбой ПО (прошивки) или сброс настроек. Следует не забыть проверить сетевой кабель или блок питания на предмет повреждения. Бывает, что происходит перегорание микросхем, или появляются другие дефекты. Не всегда пользователям удается исправить положение, когда выскакивает ошибка 691 при подключении к интернету, однако хороший мастер может помочь выполнить ремонтные работы сетевого оборудования качественно и в оптимальные сроки. Стоит помнить, что иногда перезагрузка оборудования может решить все проблемы.
Проверка правильности логина и пароля
Следует убедиться, что идентификатор входа и пароль верны. Для этого стоит произвести такие действия:
- Задействуйте Microsoft CHAP версии 2.
- Снимите галочку «Включить домен входа в Windows».
- Осуществите проверку настройки безопасности подключения.
- Измените параметры LANMAN.
Далее проверьте правильность идентификатора входа и пароля. Чтобы проверить, что пароль правильный, советуем использовать опцию «Показать пароль», а также проверить, не включена ли опция CAPS LOCK по ошибке.
Также можно попробовать использовать Microsoft CHAP версии 2. Выполните такие действия:
- Удерживайте «Win Key + X» для открытия меню Windows.
- Выберите «Сетевые подключения».
- В открывшемся окне укажите свое «VPN-соединение», «щелкните правой кнопкой мыши» и выберите «Свойства» в меню.
- Перейдите на вкладку «Безопасность».
- Выберите «Разрешить эти протоколы» и отметьте «Microsoft CHAP Version 2 (MS-CHAP v2)».
- Нажмите «ОК», чтобы сохранить изменения. После разрешения Microsoft CHAP версии 2 проверьте, появляется ли по-прежнему ошибка VPN 691.
Иногда может помочь отключение опции «Включить домен входа в Windows». Это исправление работает, если VPN-соединение настроено некорректно. Здесь нужно отключить параметр «Включить домен входа в Windows» в свойствах сетевого подключения.
Чтобы устранить проблему, нужно выполнить следующие действия:
- Нажать «Win Key + X» для открытия меню Windows.
- Выбрать «Сетевые подключения». В них найти свое VPN-соединение, кликнуть на него правой кнопкой мышки и выбрать «Свойства».
- Перейти на вкладку «Параметры» и снять флажок «Включить домен для входа в Windows».
- Сохранить изменения, нажав «ОК».
Также ошибка VPN 691 может появиться, если настройки безопасности подключений настроены неправильно. Чтобы решить эту проблему,
выполните такие манипуляции:
- Нажмите «Win Key + X», чтобы открыть меню Windows.
- Выберите «Сетевые подключения».
- В «Сетевые подключения» найдите свое VPN-соединение, кликните его правой кнопкой мыши и выберите «Свойства».
- Перейдите на вкладку «Безопасность» и убедитесь, что выбраны стандартные (рекомендуемые настройки) параметры.
- В разделе «Подтвердить мою личность следующим образом» убедитесь, что выбран параметр «Разрешить незащищенный пароль».
- Перейдите на вкладку «Параметры», уберите флажок «Включить домен для входа в Windows».
- Для сохранения изменений нажмите «ОК» и проверьте, решена ли проблема.

Обновление драйверов сетевой карты
Бывает, что выплывающая ошибка 691 интернет на даче в Подмосковье Билайн означает, что нужно обновить драйвера сетевой карты. Производители беспроводных устройств регулярно выпускают новые обновления драйверов для решения проблем совместимости с точками доступа и для устранения ошибок ПО. Наличие новейшего программного обеспечения или драйверов для беспроводного адаптера обеспечит максимальную производительность, надежность и функциональность.
Для Android нужно:
- Перейти в меню настроек устройства. На большинстве устройств Android это можно сделать через меню приложения или панель уведомлений. Как правило, приложение «Настройки» имеет логотип, напоминающий шестеренку.
- Прокрутить меню «Настройки» вниз и нажать «О телефоне», «О планшете», «Система» или «Обновления системы» (в зависимости от устройства и версии Android). Если у вас есть меню настроек с вкладками, эта опция появится в разделе «Общие». Меню может незначительно отличаться от устройства к устройству, следует нажать кнопку «Обновление программного обеспечения», «Обновление системы» или аналогичную кнопку. В этом разделе меню также будет указано, какая версия Android работает на вашем устройстве. Телефон или планшет будет искать доступное обновление. Если вы попали в другое меню, нужно нажать кнопку «Проверка обновлений программного обеспечения» или аналогичную.
Если для вашего устройства доступно обновление, появится вопрос, хотите ли вы его установить. Если вы выберете «Да», система загрузит и установит новое ПО, а затем перезагрузится.
Для Windows 10 или Windows 8.x центр обновления Windows зачастую не предоставляет последние версии драйверов для беспроводного адаптера. Чтобы получить самые последние обновления, нужно посетить веб-сайт производителя вашего беспроводного адаптера.
Чтобы найти его, нужно:
- Нажать на клавиатуре одновременно кнопки Windows и Pause / Break (Пауза / Прервать) или щелкнуть правой кнопкой мыши на рабочем столе иконку Компьютер (Мой компьютер, Этот компьютер в зависимости от версии Windows) и выбрать Свойства.
- В меню слева выбрать Диспетчер устройств, открыть.
- Развернуть «Сетевые адаптеры». Если беспроводная карта идентифицирована, будет показано ее имя. Если не идентифицирована, возможно, в списке есть неизвестное устройство. Чтобы идентифицировать устройство, нужно щелкнуть правой кнопкой мыши список в разделе «Сетевые адаптеры», выбрать «Свойства», кликнуть вкладку «Сведения». В разделе «Свойство» выбрать идентификаторы оборудования.
Почти у всех производителей есть страницы поддержки, на которых можно загружать файлы для своих драйверов по мере необходимости. Если драйвер на компьютере старше, чем драйвер на веб-сайте производителя, следует загрузить более новые версии.
Проверка баланса
Если появилась ошибка 691 при подключении к Билайн интернет на даче, стоит выполнить проверку остатка трафика на телефоне.
При постоплате нужно:
- Авторизоваться в разделе «Мой Beeline» или в Мобильном приложении.
- Далее появится информация о балансе остаточных минутах пакета, смс и интернет-трафика. В тот день, когда будет начисляться трафик, эти сведения обновятся.
Используя на своем смартфоне USSD-команду *102#, можно быстро узнать баланс. Применив команду *110*901#, можно подключить услугу «Баланс на экране». Это удобно для тех, кто любит все контролировать, поскольку баланс будет всегда выводиться на экран. Прежде нужно удостовериться, что телефон поддерживает услугу (*110*902# вызов).
При предоплате нужно посмотреть в Личном кабинете или Мобильном приложении «Мой Билайн» счета, которые были оплачены, а также проверить текущие расходы и увидеть остатки пакета минут, SMS и интернет-трафика.
Команда *110*45# позволяет получить на телефон детализацию расходов текущего периода. Услуга называется «Контроль баланса». Информация приходит в виде SMS.
С помощью команды *110*321#, которая называется «Финансовый отчет», можно узнать сведения о доступном остатке до блокировки, размере кредитного лимита, платежах, которые были внесены авансом. Вся информация также приходит в виде SMS.
Проверка работы брандмауэра Windows
Брандмауэр блокирует любые подозрительные и вредоносные соединения в зависимости от уровня угрозы. ПО Restore Windows позволяет исправить распространенные компьютерные ошибки, защитить от потери файлов, вредоносных программ, сбоев оборудования. Также это программное обеспечение оптимизирует ПК для максимальной производительности.
Для решения проблемы нужно:
- Загрузить Restoro PC Repair Tool.
- Начать сканирование.
- Нажать «Восстановить все» для исправления проблемы.
Проверка Wi-Fi
Перед проверкой состояния Wi-Fi нужно перезагрузить роутер. Далее можно попробовать:
- Удалить Wi-Fi сеть и снова выполнить подключение.
- Переустановить адаптер Wi-Fi сети.
- Обновить драйвера Wi-Fi адаптера.
- Сбросить сетевые параметры.
- Проверить /перезапустить службу DHCP-клиент.
Остановка работы антивируса
Для корректной работы оборудования иногда требуется временно отключить антивирусную программу. Нужно найти значок антивируса в области уведомлений Windows, кликнуть на него правой кнопкой мыши и выбрать «Отключить» / «Остановить» / «Завершить работу». В некоторых случаях может потребоваться открыть программу и отключить ее с помощью меню. Если проблема исчезает – нужно включить логи, снова включить антивирус и попробовать найти в логах, что именно блокирует защитное ПО. После этого нужно внести соответствующие изменения в правила безопасности антивируса, разрешив соединения по определенным адресам и протоколам и внеся свои браузеры и сетевые программы в список доверенных.
Перезагрузка модема или роутера
Если веб-страницы не загружаются или потоковое видео продолжает буферизоваться, стоит попробовать сброс настроек маршрутизатора и модема. Это может решить проблемы с Wi-Fi или подключением к Интернету. Сначала следует отключить питание от устройства, а затем подождать 10-30 секунд перед повторным подключением.
Повторное создание подключения
Подключиться к беспроводной сети тоже нужно правильно. Прежде чем включить модем, нужно подключить его к ПК и к телефонной розетке или розетке кабеля.
Для этого нужно:
- Вставить один конец кабеля Ethernet в порт Ethernet или LAN на задней панели модема, а затем вставить другой конец в порт Ethernet на задней панели компьютера;
- Проверить подключение к Интернету.
- Настроить модем и сеть. Нужно перейти в панель администрирования модема, введя IP-адрес модема в адресную строку. Общие IP-адреса администратора модема: 192.168.0.1 и 192.168.1.1. IP-адрес администратора чаще всего находится на задней панели модема.
- Перейдите в панель администрирования модема, введя IP-адрес модема в адресную строку. Общие IP-адреса администратора модема включают 192.168.0.1 и 192.168.1.1. Обычно IP-адрес администратора находится на задней панели модема.
- Установить пароль и протокол безопасности.
- Переименовать сеть. Выбрать новый SSID или имя сети, которое легко идентифицировать.
- Обновить прошивку роутера.
- Подключиться к беспроводной сети.
Звоним в службу поддержки провайдера
Звонок в службу техподдержки поставщика услуг – последняя надежда, когда не удалось выполнить исправление ошибки 961 и осуществить подсоединение к сети. Специалисты вашего провайдера помогут вам найти причину, почему сетевое оборудование может отказать в подключении. Также звонок в техподдержку – единственный способ исправить ошибку 961 в случаях, когда она вызвана неполадками с инфраструктурой вашего провайдера.
A Virtual Private Network (VPN) is an important online tool that helps in enhancing your online privacy and security. Although VPN tools are great, it comes with their own set of problems which can cause lost VPN connections and error messages. Several users reported Connection failed with VPN Error 691. This can be a hindrance when you want to use a VPN, luckily there are few ways in which you can independently solve this issue.
The remote connection was denied because the user name and password combination you provided is not recognized, or the selected authentication protocol you selected is not permitted on the remote access server.
The VPN Error 691 is a Dial-Up error that occurs even when the connection you have is not a Dial-Up. This error can occur when the settings aren’t correct on the client or the server device and it cannot confirm the authenticity of the connection. The most common cause of Error 691 is an incorrect username or password. Sometimes it may also occur when you are using a Public VPN and attempting to login to the VPN with a domain that isn’t allowed, or domains are not allowed at all, or the security protocols required mismatched.
The remote connection was denied because the user name and password combination you provided is not recognized
Normally, VPN error 691 occurs when there are problems with network protocol settings, remote access permission issues, firewall blocks, connectivity issues, etc. The most prominent causes can be clubbed as below:
- Incorrect Username and Password
- Incorrect connection security settings
- Problems with Networking settings
Here are a few options that will help you troubleshoot VPN error 691
- Verify the logon ID and password are correct
- Use Microsoft CHAP Version 2
- Uncheck ‘Include Windows logon domain’ option
- Check connection’s security settings
- Change the LANMAN parameters.
Let’s look at these options in detail:
1] Verify the logon ID and password are correct
This might sound like a basic fix but works in most of the cases. Sometimes a VPN Connection failed with error 691 message appears when your username or password isn’t correct. To guarantee that your password is correct, we advise you to use the Show Password option and also check if you mistakenly have CAPS LOCK option turned on.
2] Use Microsoft CHAP Version 2
Sometimes, to fix error 691 you may need to use Microsoft CHAP Version 2; since VPN uses different protocols. You can use it by following these steps:
1] Press ‘Win Key + X’ to open the Windows Menu
2] Select ‘Network Connections’
3] Once the window opens, identify your ‘VPN connection’, ‘right-click’ and select ‘Properties’ from the menu
4] Click on the ‘Security’ tab
5] Select ‘Allow these protocols’ and check ‘Microsoft CHAP Version 2 (MS-CHAP v2)’
6] Save changes by hitting ‘OK’
After permitting Microsoft CHAP Version 2, check if VPN Error 691 still appears.
3] Uncheck ‘Include Windows logon domain’ option
This fix works if your VPN connection isn’t configured properly. Here you will need to disable the ‘Include Windows logon domain’ in your network connection properties. To fix the issue, follow the below steps:
1] Press ‘Win Key + X’ to open the Windows Menu
2] Select ‘Network Connections’
3] In ‘Network Connections’ locate your VPN connection, right-click it and select ‘Properties’
4] Click the ‘Options’ tab and uncheck ‘Include Windows logon domain’ option
5] Save changes by clicking ‘Ok’
4] Check connection’s security settings
The VPN Error 691 can appear if your connections security settings are not configured properly. To fix this issue, follow these steps:
1] Press ‘Win Key + X’ to open the Windows Menu
2] Select ‘Network Connections’
3] In ‘Network Connections’ locate your VPN connection, right-click it and select ‘Properties’
4] Navigate to the ‘Security’ tab and check that the Typical (recommended settings) options are selected
5] In ‘Validate my identity as follows’ section ensure the ‘Allow unsecured password’ option is selected
6] Click on the ‘Options’ tab and uncheck ‘Include Windows logon domain’ option
7] To save changes click ‘Ok’
Now check if the problem is resolved.
5] Change the LANMAN parameters
Many users confirmed, changing LANMAN parameters helped in fixing error 691. This is fairly simple, follow these steps:
1] Hold the ‘Win Key’ and press ‘R’
2] In the Run Dialog, type ‘gpedit.msc’ and click ‘OK’; this will start the Local Group Policy Editor
3] In the left pane, follow this path – Computer Configuration > Windows Settings > Security Settings > Local Policies > Security Options
4] In the right pane locate and double click ‘Network security: LAN Manager authentication level’
5] Click ‘Local Security Settings’ tab and select ‘Send LM & NTLM responses’ from the drop-down menu
6] To save changes ‘OK’ and ‘Apply’
7] Now, double-click ‘Network Security: Minimum Session Security for NTLM SSP’
8] Disable ‘Require 128-bit encryption’ and enable ‘Require NTLMv2 session security’ option
9] Click ‘Apply’ and ‘OK’ and save these changes
Now, restart your PC to apply these changes and check if the issue is fixed.
Having any VPN error popping up and restricting you from connecting to the internet can be extremely frustrating. If VPN error 691 has been exasperating you, we recommend you try some of our solutions.
Read:
- VPN Error 868, The remote connection was not made because the name of the remote access server did not resolve
- VPN Error 609, A device type was specified that does not exist
- Error 633, The modem or other connecting device is already in use
- VPN Error 720, Error connecting to a VPN Connection
- Error 13801, IKE authentication credentials are unacceptable
- VPN Error 800, The remote connection was not made because the attempted VPN tunnels failed.