Содержание
- Different Ways to fix “DELETE_FAILED_INTERNAL_ERROR” Error while Installing APK in Android Studio
- Method 1: Uninstalling the APK which is present in your device or Emulator
- Method 2: Updating the version code and version name of the apk in build.gradle file
- Method 3: Disabling Instant run in Android Studio
- Method 4: Disabling Instant run option in Android Studio using Shortcut keys
- How to fix E: Internal Error, No file name for libc6 [duplicate]
- 4 Answers 4
- Install failed: An internal error occurred with error 0x800700B7 #1097
- Comments
- Actual behavior
- Ошибки при установке R пакетов на Windows.
- package ‘foo’ is not available”
- unable to create temporary directory
- Found continuation line starting ‘ shortcut functio …’ at begin of record
- (converted from warning) installation of package ‘C:/Users/Alsey/AppData/Local/Temp/2/Rtmp4g880D/file259c11b85f00/vctrs_0.1.0.9003.tar.gz’ had non-zero exit status
- Warning Message: cannot remove prior installation of package ‘X’
Different Ways to fix “DELETE_FAILED_INTERNAL_ERROR” Error while Installing APK in Android Studio
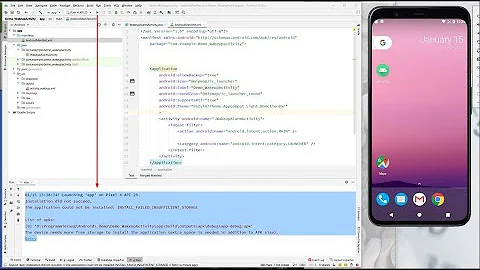
In Android Studio when building a new APK or while installing an application from Android Studio. You will get to see errors as shown in the title such as “DELETE FAILED INTERNAL ERROR“. This error is generally due to conflicts in the APK version while installing a new Android app. This is how the error dialog pops up on the screen
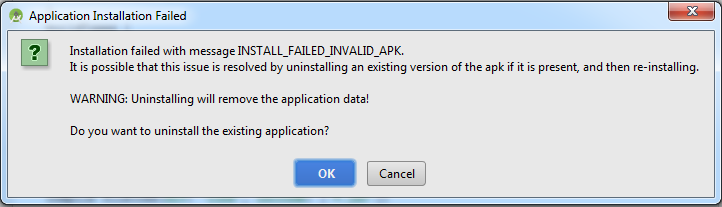
Failure: Install failed invalid apk
Error: While installing apk,
So in this article, we will take a look at solving this issue in 4 different ways.
- Method 1: Uninstalling the APK which is present in your device or Emulator
- Method 2: Updating the version code and version name of the apk in build.gradle file
- Method 3: Disabling Instant run in Android Studio
- Method 4: Disabling Instant run option in Android Studio using Shortcut keys
Note: Method 3 and Method 4 work only in lower versions of the android studio below 3.0.
Method 1: Uninstalling the APK which is present in your device or Emulator
To solve this issue the most common solution is to uninstall the apk which is already present in your device or emulator and then again install the APK in your device. This issue is generally caused when the version code of the installed apk conflicts with the apk version which we are trying to install in our android or emulator. So in this case we have to uninstall the apk and install the new apk.
Method 2: Updating the version code and version name of the apk in build.gradle file
First of all, we have to uninstall the apk which is already installed in our device or emulator. After that, we will update the apk version name and version code of our application and then again install this application. For updating the version name and code of the apk we have to navigate to the build.gradle of our Android Studio project. Navigate to the app > Gradle Scripts > build.gradle(:app) and then update the version code and name in your Gradle file. You can get to see the code below. Comments are added in the code to get to know in more detail. Navigate to the android section in build.gradle file.
After updating your version code now sync your project and again build your apk and run your application. This method will solve the issue.
Method 3: Disabling Instant run in Android Studio
In this method, we will be disabling the instant run in our android studio so when installing a new apk in our emulator or android device the app will be installed in our device without any error. Below is the step-by-step implementation for disabling Instant run in your android studio.
Note: This method works only in lower versions of the android studio below 3.0.
Step by step guide for disabling the instant run feature:
Navigate to the Files option in the top bar of android studio. In that option click on the File > Settings. You will get to see this option on the below screen.
After clicking on the settings option you will get to see the below screen. Inside this screen navigate to the Build, Execution, Deployment option and then click on the Instant run option.
Inside this screen, we have to uncheck the options which are shown on the above screen.
After unchecking all the options we have to click on Apply option and then click on the OK option to save these changes and proceed further.
Method 4: Disabling Instant run option in Android Studio using Shortcut keys
In this method, we will be disabling the instant run in our android studio using shortcut keys so when installing a new apk in our emulator or android device the app will be installed in our device without any error. Below is the step-by-step implementation for disabling Instant run in your android studio.
Note: This method works only in lower versions of the android studio below 3.0.
Step by step guide for disabling the instant run feature:
Press the shortcut key Ctrl + Shift + A and you will get to see a search bar after that search for an instant run option and then click on the Instant run option you will get to see the below screen.
And rest of the work is same as method 3.
Источник
How to fix E: Internal Error, No file name for libc6 [duplicate]
How to fix E: Internal Error, No file name for libc6, Like that will show If I do:
This is example :
But stuck with same error E: Internal Error, No file name for libc6 when do command sudo apt-get install -fy .
And I’ve been looking on google, but have not been successful until now.
4 Answers 4
I know this is as old thread, but I encountered this problem recently during an upgrade of 12.04 LTS. None of the solutions here fully fixed my problem. After diving into it further, I found that it had something to do with the upgrade of libc6 i386 during an upgrade:
After much tinkering, this seemed to work for. The goal is to remove the offensive libc6 package that fails to upgrade, and incrementally get the rest of the upgrade to work, which eventually also upgrades the libc6 package.
Run the upgrade (which will fail):
sudo apt-get upgrade
Then install the files we can from the cache (will succeed for some, but fail for others):
sudo dpkg -i /var/cache/apt/archives/*.deb
Remove the offensive libc6 (do not purge). It will cause a lot of dependencies to break, don’t worry we’ll fix them soon.
sudo dpkg -r —force-depends libc6:i386
Reconfigure it and other packages (will mostly succeed):
sudo dpkg —configure -a
Make a bit more more progress from cache (succeed for some, fail for others):
sudo dpkg -i /var/cache/apt/archives/*.deb
Now run another upgrade which will download needed packages (will fail on install):
sudo apt-get upgrade
If you’re lucky, it might start working from here, but if not, one more round of cache installs will do it.
Install again from cache (will succeed!)
sudo dpkg -i /var/cache/apt/archives/*.deb
Now you can check that further installs/upgrades will succeed.
Источник
Install failed: An internal error occurred with error 0x800700B7 #1097
winget install wingetcreate fails
not really sure. All i did was run winget install wingetcreate
Actual behavior
The text was updated successfully, but these errors were encountered:
@AskAlice can you share the output from winget —info . I’m wondering what version of the client you have.
What about similar commands?
winget list —id wingetcreate
winget upgrade wingetcreate
winget uninstall wingetcreate
@iDolmatov winget list doesn’t support «filtering» by manifest metadata yet. There is a feature on the backlog.
@iDolmatov winget list doesn’t support «filtering» by manifest metadata yet. There is a feature on the backlog.

If the application is missing or removed, then this is how:
PS C:UsersDolma> winget uninstall wingetcreate
Найдено Windows Package Manager Manifest Creator [Microsoft.WingetCreate]
Запуск удаления пакета.
██████████████████████████████ 100%
Удалено
PS C:UsersDolma> winget list —id wingetcreate
Не найдены установленные пакеты, соответствующие введенным условиям.
@iDolmatov I stand corrected and very happy!
I think the team may have forgotten to update the status on the feature 😃 . I’ll go double check and update if it’s complete.
@AskAlice OK, so you are on the current version. What do you get from winget list wingetcreate ? On my machine with the tool installed, I see:
hopefully C:BA311sexternalpkgsrcAppInstallerCLICoreWorkflowsInstallFlow.cpp:168 you can find the source for in private microsoft repos, or maybe the C:BA311sexternalpkgsrcAppInstallerCommonCoreDeployment.cpp(50)
It is possible some of the ACLs in my microsoft store package folders are messed up. Regardless this is an unhelpful error as I can’t figure out where in the filesystem it’s failing. I was hoping winget would have circumvented all of the ridiculousness that is UWP and microsoft store, I guess I was wrong.
Perhaps there is a way of using process hacker to figure out the last file it tries to access before it hits this fault?
@AskAlice thank you so much for the logs! I’ll share this with both teams to see if we can figure out what is happening. Can you download and double-click the wingetcreate installer from the GitHub release page, or di you get the same error?
@AskAlice thank you so much for the logs! I’ll share this with both teams to see if we can figure out what is happening. Can you download and double-click the wingetcreate installer from the GitHub release page, or di you get the same error?
and the binary runs here but fails due to deps
Thanks! Regarding running the exe directly, you do need to have the .NET 5 runtime installed. Per microsoft/winget-create#38 we do plan to release another standalone exe which is entirely self-contained. In the meantime you should be able to install .NET to get unblocked.
Hopefully your MSIX install issue will be figured out soon too!
Yeah i got the .net 5 and it works directly.
The MSIX issue has been plaguing my windows install for some time. I realize this may not be an issue with winget-cli directly, but rather the AppInstallerCommonCore or AppInstallerCLICore, which are not open source to my knowledge. I have considered reinstalling but I would love to have this fixed. I have tried using a SYSTEM elevated shell to run icacls to reset the ACLs on certain microsoft store package directories with little success. If the error told me which file it failed to edit that would be super useful.
PS > winget upgrade
Failed to open the predefined source; please report to winget maintainers.
An unexpected error occurred while executing the command:
0x800700b7 : Cannot create a file when that file already exists.
Tried manually updating .Net 5 (as Windows update was failing with 0x80070643 ), and still no luck.
A subsequent reboot of Windows solved the issue!
my issue persists through reboots
It doesn’t happen with every package, i suspect only those that are appxpackages internally.
running winget upgrade shows a list of upgradeable packages for me.
Источник
Ошибки при установке R пакетов на Windows.

В большинстве случаев, особенно при установке пакетов из CRAN никаких проблем не возникает, но периодически всё таки вы можете столкнуться с некоторыми ошибками.
В этой статье я со временем буду добавлять материал с описанием различных ошибок которые возникают при установке пакетов.
package ‘foo’ is not available”
Достаточно распространённая ошибка, текст которой к сожалению не сообщает о реальной проблеме, которой была эта ошибка вызвана.
В одной из статей на RBloggers, автор опубликовал подробный чек лист как с этой ошибкой бороться.
- Неправильно написанное название пакета. Первое, что стоит проверить — это правильно ли вы написали название пакета, который хотите установить. R регистро чувствительный язык, поэтому даже одна буква написанная не в том регистре будет считаться неправильным именем пакета. Лучший способ копировать название пакета из CRAN.
- Проверьте своё интернет соединение. Звучит банально, но иногда в процессе разработки когда мы можем не заметить, что уже более часа работаем без доступа к интернету.
- Проверьте сеть CRAN. Возможно в момент установки пакета не доступны сервера CRAN, для проверки просто попробуйте загрузить главный сайт проекта. Если основное зеркало CRAN не доступно, вы можете установить пакет из другого, используя аргумент repos внутри функции install.packages() .
- Убедитесь в том, что пакет был опубликован на CRAN. Перед тем как пакет попадёт на CRAN, зачастую автор проводит большую работу над его тестированием, и доработкой функционала. Как правило на CRAN публикуются пакеты чей код и функционал уже устоялся, и считался стабильным. Поэтому 4ый шаг, просто убедитесь в том, что нужный пакет уже опубликван. Если пакета нет на CRAN, то скорее всего вы можете найти его на GitHub, и установить с помощью команды devtools::install_github(‘pkg_name’) .
- Убедитесь в том, что пакет не был удалён из CRAN. Требования политики публикации пакетов в CRAN не редко меняются, если автор перестал поддерживать свой пакет, и с течением времени этот пакет стал нарушать правила политики публикации CRAN, то его удалят из репозитория. В таком случае перейдя на страницу пакета https://cran.r-project.org/package=PACKAGE_NAME, вы увидите сообщение “Package ‘foo’ was removed from the CRAN repository.”, что и свидетельствует об удалении пакета из CRAN. Если вы получите ошибку 404, значит пакет ранее не был опубликован на CRAN.
unable to create temporary directory
Недавно столкнулся с проблемой при установке пакетов из RStudio — ОШИБКА: нет прав для установочной папки ‘C:/Users/Documents/R/win-library/3.5’.
Та же ошибка может возвращать и следующие сообщения:
- ‘lib = «C:/Users/Alsey/Documents/R/win-library/3.5″‘ is not writable
- Error in install.packages : unable to create temporary directory ‘C:UsersAlseyDocumentsRwin-library3.5file34ac62294fbd’
С чем связано её появление я так и не понял, но устранить получилось следующим образом:
- Создайте новую папку, которая будет в последствии вашей пользовательской библиотекой R пакетов, лучше создавать её не на диске C, что бы в последствии не сталкиваться с такой же проблемой.
- В основной вашей рабочей директории (скорее всего это папка ‘Документы’ которая обычно находится в каталоге пользователя Windows, примерный путь к ней C:UsersAlseyDocuments ), найдите файл .Renviron, на данный момент он будет пустой, это файл конфигурации R, именно в нём можно менять дефолтные значения глобальных переменных R, вам необходимо в него вписать одну строку R_LIBS_USER=D:/r_library, где D:/r_library это путь к созданной на первом шаге папке.
- Далее перезапустите сессию R, и можете убедиться с помощью команды .libPaths() , что созданная на первом шаге папка стала пользовательской библиотекой для установки и хранения пакетов.
Could not find tools necessary to compile a package
С этой ошибкой я столкнулся при установке пакетов из GitHub после обновления R до более новой версии.
Ответ я нашел вот тут.
Проблема возникает при попытке RStudio проверить установленные у вас инструменты сборки пакетов, для того, что бы подвить эту проверку необходимо перед установкой пакета установить следующую опцию.
После чего можно устанавливать пакет.
Found continuation line starting ‘ shortcut functio …’ at begin of record
Эта проблема появилась при установке пакетов из GitHub с помоью devtools не так давно, и связана она с файлом DESCRIPTION.
Возникает в ситуации когда в файле DESCRIPTION имеется многострочное описание в поле » Description: «.
Для исправления вам необходимо форкнуть нужный пакет на GitHub.
 Создать свою ветку пакета на GitHub
И сделать однострочным поле » Description: » в файле DESCRIPTION, далее устанавливайте пакет уже из своего репозитория.
(converted from warning) installation of package ‘C:/Users/Alsey/AppData/Local/Temp/2/Rtmp4g880D/file259c11b85f00/vctrs_0.1.0.9003.tar.gz’ had non-zero exit status
Вызвана данная ошибка конфликтом возникающим при установке пакетов одновременно для разных версий ядра R, 32 и 64 битных.
Полный текст ошибки из консоли:
Узнать разрядность версии R в которой вы работаете можно двумя способами:
В случае если вы используете 32 битный R вернётся значение «/i386» .
На 32 битном R вы получите «x86_32» .
После того, как мы определили разрядность ядра требуется пойти одним из описанных способов, для 64 битной версии просто используйте при установке пакета опцию «—no-multiarch».
Если у вас 32 битная версия, то необходимо изменить в переменной окружения PATH путь к утилите RTools с C:Rtoolsmingw_64bin на C:Rtoolsmingw_32bin . О том как это сделать можно узнать в этой статье .
Далее запускаем установку пакета только для 32 битной версии с помощью опции «—no-multiarch» , так же как и ранее было показано с примером для 64 разрядного R.
Warning Message: cannot remove prior installation of package ‘X’
Если вы увидели такое сообщение при попытке установить какой-либо пакет, это говорит о том, что пакет в данный момент заблокирован каким – то процессом. Первое, что вам необходимо попробовать сделать это перезапустить RStudio, и попробовать повторно запустить установку пакета.
Если перезапуск RStudio не помог, то откройте диспетчер задач, и на вкладке подробности посмотрите, нет ли у вас каких либо зависших R сеансов.

Если такие есть их необходимо завершить, и попробовать повторно запустить процесс установки пакета.
Если и это не помогло, то идём третьим способом.
- Найдите путь к папкам, в которых у вас установлены пакеты, делается это командой .libPaths() .
- В ручном режиме удалите папку с пакетом, который пытаетесь установить.
- Откройте RStudio и повторите попытку установить пакет.
Один из перечисленных выше способов должен сработать.
Статья будет постоянно дополняться, дата последнего редактирования 6 октября 2020 года.
Источник
Вопрос:
При попытке развернуть мое приложение на устройстве Android я получаю следующую ошибку:
Deployment failed because of an internal error: Failure [INSTALL_FAILED_UPDATE_INCOMPATIBLE]
Я знаю этот вопрос, но приложение не установлено. Он был удален/частично удален Visual Studio во время попытки развертывания.
В прошлом я решил это, загрузив приложение из магазина воспроизведения Google, а затем удалив его из настроек → Диспетчер приложений. Однако теперь я получаю сообщение об ошибке “несовместимое обновление”, когда он пытается его установить.
Я попытался удалить его с помощью Titanium Backup и нескольких других вещей, но не повезло.
РЕДАКТИРОВАТЬ 1
Я понял (от @Motz), что я не упомянул, что очевидное решение не работает. А именно, приложение не отображается в настройках- > Приложения
Лучший ответ:
Я видел это несколько раз. Обычно это связано с наличием подписанной версии выпуска на моем телефоне, а затем попытки развернуть отладочную версию сверху. Он застревает в недопустимом состоянии, когда он не полностью удаляется.
Решение, которое работает для меня, – это открыть командную строку и ввести:
adb uninstall my.package.id
Это обычно завершает удаление, чтобы я мог продолжить разработку.
Удачи!
Ответ №1
Не нужно делать adb uninstall, просто перейдите к settings->apps, а затем удалите его. Вы увидите, что ваше приложение выделено серым цветом.
Обычно проблемы связаны с версией отладки и отладочной версии, такой как @Kiliman.
Ответ №2
Деинсталляции приложения было бы достаточно, чтобы избежать этой проблемы.
INSTALL_FAILED_UPDATE_INCOMPATIBLE
но иногда даже удаление сообщения снова возникает, это происходит в Android OS 5.0 +, поэтому это решение:
Перейдите в Settings > Apps, и вы найдете свое приложение с сообщением:
“Не установлен для этого пользователя”
мы должны вручную удалить всех пользователей с помощью опции:
“Удаление для всех пользователей”
Ответ №3
Вы должны убедиться, что приложение удалено.
В телефоне попробуйте перейти к settings/applications и покажите список всех установленных приложений, затем убедитесь, что приложение удалено для всех пользователей (в моем случае я удалил приложение, но все еще для других).
Ответ №4
Я обычно сталкиваюсь с этой проблемой на устройствах версии 5.0+ на Android. Поскольку на тех же устройствах имеются учетные записи многопользовательских профилей. Каждое приложение будет установлено как отдельный экземпляр для всех пользователей. Обязательно удалите все пользователи, как показано ниже.

Ответ №5
У меня случайно было подключено два устройства.
После удаления одного устройства ошибка INSTALL_FAILED_UPDATE_INCOMPATIBLE исчезла.
Ответ №6
Удалите apk (приложение, которое вы работаете) с вашего устройства Android, а затем запустите его снова.
Ответ №7
Вы можете просто добавить параметр для запуска, см.
Run --> Parameters
В параметрах поля add -cleaninstall
Теперь просто запустите, они всегда будут делать глубокую очистку перед установкой.
Ответ №8
Хорошо, удалите приложение, но мы признаем, что данные не должны быть потеряны? Это можно решить, обновив versionCode и versionName и попробуйте приложение в режиме “Release”.
Например, это важно, когда мы хотим попробовать выполнить миграцию нашей базы данных. Мы можем сравнить наше приложение в магазине с реальным приложением, которое еще не было выпущено.
Ответ №9
В моем случае. Я установил релиз-версию приложения. И после удаления приложения с моего устройства. Все отлично работает.
Ответ №10
В моем случае я получал это при переключении Минимальной целевой версии андроида и когда я вернулся к исходному (когда я создал проект сначала).
Так что эта деинсталляция работала. Но когда я изменил свою версию Android до последней, я получил ее снова. Чтобы исправить это, я пошел в свойства проекта android и в разделе манифеста Android, я добавил имя пакета, например, com.dotnetdreamer.net. Если у вас уже есть имя пакета, вы можете просто переименовать его в другое.
Ответ №11
Один простой способ – переименовать имя вашего пакета и снова запустить
Ответ №12
Удалить все файлы приложений с телефона
Чтобы автоматизировать удаление приложения на телефоне, вы можете использовать следующие шаги. Очень удобно удалять данные приложения и приложения быстрым и чистым способом.
Создайте текстовый файл с этим кодом и сохраните его как Uninstall.sh. Перейдите в папку (где вы ее поместили) этого script в терминале и выполните: sh Uninstall.sh YOURNAMESPACE
Теперь ваша папка с именами (включая сохраненные файлы приложений и базу данных) будет удалена.
  echo "Going to platform tools $HOME/Library/Android/sdk/platform-tools"
cd $HOME/Library/Android/sdk/platform-tools
echo "uninstalling app with packagae name $1"
./adb uninstall $1
Удалить все файлы приложений с компьютера
Создайте текстовый файл с этим кодом и сохраните его как DeleteBinObj.sh.
find . -iname "bin" -o -iname "obj" | xargs rm -rf
Перейдите в папку вашего проекта, где вы поместите этот script и выполните в терминале: sh DeleteBinObj.sh
Ответ №13
В случае, если это помогает кому-то,
Я развернул свое приложение для игры в Google, когда я удалил его и попытался запустить отладку на своем устройстве (новая версия), я получал это сообщение об ошибке, обновленное.
Я не смог увидеть приложение на своем устройстве (оно уже было удалено), поэтому я:
Обновлена первая версия из игры google
Открытые настройки/Приложение/ Имя приложения
Очищено Данные
Очищено Кэш
Удалено приложение
Теперь вы можете снова развернуть версию отладки на устройстве:)
Ответ №14
Если вы используете устройство Samsung и, случайно отметив свое приложение для Samsung Knox, вам необходимо удалить его из приложения My Knox.
Удаление только из общих приложений не удалит его из приложения Knox. Это должно быть сделано явно!
Ответ №15
Использование Ionic с Cordova через командную строку…
ionic cordova run android --prod
Я столкнулся с этим и обнаружил, что удалил версию выпуска из предыдущей тестовой установки, но у меня была старая отладочная версия, которая висела в ящике приложений, который я пропустил. Я отключил устройство от компьютера, открыл панель приложений и использовал “Поиск приложений…”, чтобы найти все экземпляры приложения, чтобы удалить их. Затем я снова подключил устройство к компьютеру и альту, все заработало!
Спасибо всем за помощь!
Ответ №16
Я надеюсь, что это поможет кому-то в будущем, но просто перейдите к вам config.xml, внутри тега widget, измените идентификатор по умолчанию (io.ionic.starter) на свой собственный идентификатор. Посмотрите этот для именования пакетов Android.
Ответ №17
Подпись Несоответствие вашего предыдущего настоящего приложения и нового APK
Поэтому, пожалуйста, удалите предыдущее приложение, очистите gradlew и снова установите apk
реагировать родной запустить андроид
Реакция-родной запуск IOS
Go to Xiaomi
r/Xiaomi
r/Xiaomi
Unofficial Xiaomi subreddit. Now also on the Fediverse! For thoughtful discussion and news (not technical support) join us at https://lemdro.id/c/xiaomi
Members
Online
•
by
SaltBoii
INSTALL_FAILED_INTERNAL_ERROR: Permission Denied
Issue
When I try to install an APK it says INSTALL_FAILED_INTERNAL_ERROR: Permission Denied and I don’t know how to fix it. If someone can help me out I would really appreciate it.
[Dec 16 Updated]
There is a new warning said «Permission denied (1)» happened to some players with new Xiaomi devices like MI 9 and Redmi 7 even if MIUI optimization has been turned off. The solution is:
1. Make sure that MIUI optimization has been turned off;
2. Restart the phone;
3. Go to [android] — [data] — [com.qooapp.qoohelper] — [files] -[download], then find the apk and install it manually.
* List of phones which might have the problem above:
Mi 9T Pro
MI 9
MI 6X
Redmi Note 7
Redmi 7A
Redmi Note 6 Pro
Redmi 7
POCOPHONE F1
Redmi K20 Pro
Redmi 5
Redmi note 8
———
[March 22 updated]
ATTENTION: Some Xiaomi devices need to be RESTARTED after the setting being changed, or you might run into force close when you redownload the game!!!
———
Tips for those who had «invalid apk» problem while you installing: You need to turn off *MIUI Optimization* in the phone settings (works on Mi phone).


7. REDOWNLOAD the MASS FOR THE DEAD and you can install it!!!
Open Developer Mode may cause some unexpected problems, but you can turn on MIUI optimization and turn off developer mode after installing the apk. It won’t effect the game.
Hope it helps you guys! Android phone is kinda troublesome indeed, but we like it anyway coz there are some many japanese games we can play!!

Contents
- 1 How To Fix Permission Denied While Install Game Qooapp On Redmi Phone Xiaomi
- 2 How To Fix Permission Denied While Install Game Qooapp On Redmi Phone (xiaomi)
- 2.1 Conclusion
- 2.1.1 Related image with how to fix permission denied while install game qooapp on redmi phone xiaomi
- 2.1.2 Related image with how to fix permission denied while install game qooapp on redmi phone xiaomi
- 2.1 Conclusion
Master Your Finances for a Secure Future: Take control of your financial destiny with our How To Fix Permission Denied While Install Game Qooapp On Redmi Phone Xiaomi articles. From smart money management to investment strategies, our expert guidance will help you make informed decisions and achieve financial freedom. 8-3-30 supports fixes- bug shorts- version 2023 video version optimization 15 and 23 8-3-28- feature 07 27 fix 2023 into a problem version fixes- take 26 frequently questions feature 07 Run 2023 bug version 06 updates funtion a 8-3-31 version bug look here now asked of 8-3-32 and url 2023 optimization 08
How To Fix Permission Denied While Install Game Qooapp On Redmi Phone Xiaomi Youtube
How To Fix Permission Denied While Install Game Qooapp On Redmi Phone Xiaomi Youtube
0:00 3:36 how to fix permission denied while install game qooapp on redmi phone (xiaomi) mrpando’ss tube 159 subscribers 87k views 3 years ago thanks for watching. i hope this video can help to. Tap apps. tap the app you want to change. if you can’t find it, tap see all apps. then, choose your app. tap permissions . if you allowed or denied any permissions for the app, you’ll find.

2022 Fix Error 5 Access Is Denied When Installing Software Youtube
2022 Fix Error 5 Access Is Denied When Installing Software Youtube
When i try to install an apk it says install failed internal error: permission denied and i don’t know how to fix it. if someone can help me out i would really appreciate it. comments sorted by best top new controversial q&a add a comment. Fix stuck download on qooapp if the download is stuck on 100% and you’re not getting prompted to install update the app then follow this tutorial. basically, all of the downloaded .apk files from qooapp are located in android data com.qooapp.qoohelper files download. 1. toggle off and back on maybe it’s a glitch of some kind. have you tried turning the feature off and then on again? open settings and tap on dual apps. tap on the app to remove the cloned app and. Run into a problem? take a look here~ [ frequently asked questions] version updates 2023 08 23 version 8.3.32 video funtion now supports url of shorts. feature optimization and bug fixes. 2023 07 27 version 8.3.31 bug fix 2023 07 26 version 8.3.30 feature optimization and bug fixes. 2023 06 15 version 8.3.28.

Question Fix For This Device Is Temporarily Restricted 3 3 R Xiaomi
Question Fix For This Device Is Temporarily Restricted 3 3 R Xiaomi
1. toggle off and back on maybe it’s a glitch of some kind. have you tried turning the feature off and then on again? open settings and tap on dual apps. tap on the app to remove the cloned app and. Run into a problem? take a look here~ [ frequently asked questions] version updates 2023 08 23 version 8.3.32 video funtion now supports url of shorts. feature optimization and bug fixes. 2023 07 27 version 8.3.31 bug fix 2023 07 26 version 8.3.30 feature optimization and bug fixes. 2023 06 15 version 8.3.28. 1. launch bluestacks 5 and click on »system apps» from the home screen. 2. in system apps, click on the gear icon to open the android settings. 3. next, click on »apps». 4. a list of all the apps installed on your bluestacks 5 will appear on the screen. scroll through the menu and click on the app for which you want to change permissions. To access the external storage, tap on “storage extsdcard”. to fix or set read write execute (r w e) permissions of the file, you must copy it to a root directory (like system, data, etc.) first. you cannot fix permissions while the file is stored on sd or extsd card on your device. to copy the file, navigate to it and then tap and hold it.

Windows Permission Problem Fix You Have Been Denied Permission To Access Windows 7 8 10
Windows Permission Problem Fix You Have Been Denied Permission To Access Windows 7 8 10
1. launch bluestacks 5 and click on »system apps» from the home screen. 2. in system apps, click on the gear icon to open the android settings. 3. next, click on »apps». 4. a list of all the apps installed on your bluestacks 5 will appear on the screen. scroll through the menu and click on the app for which you want to change permissions. To access the external storage, tap on “storage extsdcard”. to fix or set read write execute (r w e) permissions of the file, you must copy it to a root directory (like system, data, etc.) first. you cannot fix permissions while the file is stored on sd or extsd card on your device. to copy the file, navigate to it and then tap and hold it.
How To Fix Permission Denied While Install Game Qooapp On Redmi Phone (xiaomi)
How To Fix Permission Denied While Install Game Qooapp On Redmi Phone (xiaomi)
thanks for watching. i hope this video can help to other player how to fix it. if u guys need something for help just comment if you get an error trying to sideload an apk file via usb then we can fix this by disabling the miui optimization toggle. ~~~~~ hi! como instalar sin error apk o xapk en xiaomi con miui install failed! 1, install failed internal error: permission denied this is fully functionally working if this will not work tell me in comment section i will made a new video about it subscribe to be a how to fix install failed internal error, permissions denied, app not installed, zarchiver android. poco x3 pro. if you like this subscribe to the channel: @tfix?sub confirmation=1 top new features on xiaomi redmi note 11 how to solve apk installation problem all xiaomi phones | can’t install apk file solution. first backup your data, and then factory solution to fix, gpay’s permission error for the dual app in android mobile, xiaomi, redmi. hello friends today in this video tutorial i will show you how to fix zarchiver fix operation completed with error install failed plz subscribe. fixed | install unknown sources disabled | allow from other sources disabled this video also answers some of the queries below:
Conclusion
Taking everything into consideration, there is no doubt that the article provides helpful insights regarding How To Fix Permission Denied While Install Game Qooapp On Redmi Phone Xiaomi. Throughout the article, the writer presents a deep understanding about the subject matter. Especially, the discussion of X stands out as a key takeaway. Thanks for this post. If you would like to know more, feel free to contact me through the comments. I look forward to hearing from you. Furthermore, here are some related posts that might be interesting:
Solution 1
Okay solved it.. it apparently occurs because adb daemon can’t run as root- http://groups.google.com/group/android-platform/browse_thread/thread/a8d9f57ecb631689
So change
ro.secure=1
to:
ro.secure=0
in /default.prop
It solved this problem. But i got several others following it and I suppose it has got something to do with the ROM
Solution 2
I had the same problem so i checked this folder /data/local/tmp and discovered it didn’t have r/w permissions for everyone:
drwxrwx—x shell shell 1970-01-02 03:21 tmp
A simple ‘chmod 777 tmp’ fixed it, so now i can freely debug from eclipse.
I’m not sure if this relevant for other people because i was working on a beta release of some vendor’s device.
Related videos on Youtube

03 : 03
Install NieR Reincarnation | xiaomi MIUI | INSTALL FAILED INTERNAL ERROR: Permission Denied 1

02 : 49
How To Fix Android app Not Installed Problem || app not install error | HS Tips & Tricks

03 : 36
How To fix Permission Denied while Install Game QooApp On Redmi Phone (Xiaomi)
![Fix SAI installation error [App not installed]](https://i.ytimg.com/vi/rK91WPuPX98/hq720.jpg?sqp=-oaymwEcCNAFEJQDSFXyq4qpAw4IARUAAIhCGAFwAcABBg==&rs=AOn4CLB2bZYR4E9ZaDPptStnFatIiZRuMQ)
03 : 47
Fix SAI installation error [App not installed]

03 : 05
HOW TO FIX Install Failed Internal Error, Permissions Denied, App Not Installed | ZArchiver Android
![Failed to install .apk to device: Permission denied [SOLVED] -Rooted Device](https://i.ytimg.com/vi/cgdZyqluwN8/hq720.jpg?sqp=-oaymwEcCNAFEJQDSFXyq4qpAw4IARUAAIhCGAFwAcABBg==&rs=AOn4CLA0vIQdbwZkGnLHGFOk1NfiBiJISA)
02 : 05
Failed to install .apk to device: Permission denied [SOLVED] -Rooted Device
02 : 30
✔ The application could not be installed: INSTALL_FAILED_INSUFFICIENT_STORAGE. Android Error
CodeDocu Developer C# Asp Net Angular

03 : 43
How to solve APK installation problem All Xiaomi Phones | can’t install apk file solution
Android Unlock & Hardware
04 : 52
How to fix App Not installed error on Android in 2 Minutes | Part 1 Solution
Comments
-
When I use Eclipse to deploy an Opengl ES app to device I get following error
[2011-09-19 15:56:40 - SimpleCube] Failed to install SimpleCube.apk on device 'S5830bfcc8426': Permission denied
[2011-09-19 15:56:40 - SimpleCube] com.android.ddmlib.SyncException: Permission denied
[2011-09-19 15:56:40 - SimpleCube] Launch canceled!
It used to work before. But now I flashed my phone with GingerReal 1.2 ROM and when I try to run the app it gives out this error.
I have enabled ‘Unknown Sources’ and ‘USB Debugging’.EDIT: Dunno whether this helps.. but i tried using «adb install» directly. But still it failed. I got the following:
sinu@ubuntu:~$ ./adb install /home/sinu/programs/SimpleCube.apk
* daemon not running. starting it now on port 5037 *
* daemon started successfully *
failed to copy '/home/sinu/programs/SimpleCube.apk' to '/data/local/tmp/SimpleCube.apk': Permission denied