- FAQ
Last modified date: 2021-07-02
Answer
When firmware update failed with FW00007 via browser, follow the procedures below
- Reboot the NAS
- After the NAS reboots, upgrade the firmware by Qfinder.
If still meeting the same error, please create a ticket in QNAP service portal.
Was this article helpful?
Yes.
No.
80% of people think it helps.
Thank you for your feedback.
Please tell us how this article can be improved:
-
The article is missing important information
-
The article’s solutions do not work
-
The article is too complicated
-
The article contains incorrect information
-
The article is out-of-date
If you want to provide additional feedback, please include it below.
This site is protected by reCAPTCHA and the Google
Privacy Policy and
Terms of Service apply.
If you want to provide additional feedback, please include it below.
This site is protected by reCAPTCHA and the Google
Privacy Policy and
Terms of Service apply.
- FAQ
Last modified date: 2021-07-02
Answer
When firmware update failed with FW00007 via browser, follow the procedures below
- Reboot the NAS
- After the NAS reboots, upgrade the firmware by Qfinder.
If still meeting the same error, please create a ticket in QNAP service portal.
Was this article helpful?
Yes.
No.
100% of people think it helps.
Thank you for your feedback.
Please tell us how this article can be improved:
-
The article is missing important information
-
The article’s solutions do not work
-
The article is too complicated
-
The article contains incorrect information
-
The article is out-of-date
If you want to provide additional feedback, please include it below.
If you want to provide additional feedback, please include it below.
-
- #1
Hallo,
mir ist meine Qnap TS-219P II aus dem Schrank gefallen. Dabei sind beide Festplatten aus der Verankerung gesprungen. Die Qnap fährt jetzt nicht mehr hoch. Nachdem ich beide Festplatten heraus genommen habe und die Qnap wieder gestartet habe fährt die Qnap wieder hoch. Nachdem ich nun eine Festplatte eingesteckt habe und auf wiederherstellen geklickt habe versucht er die exakt gleiche Firmware Version hoch zu laden. Dann bricht er aber irgendwann mit der Meldung «
Beim Zurücksetzen auf die ursprünglichen Einstellungen ist ein Fehler aufgetreten. Bitte wenden Sie sich unter an den QNAP-Helpdesk.
Fehlercode:
FW00007″
ab. Was kann ich noch tun, dass das System wieder läuft.
Danke!
-
- #2
Hallo,
als welcher Höhe ist das NAS gefallen?Für mich klingt das nach eine Totalschaden an den Festplatten, denn für solche Aktionen sind Home Festplatten nicht ausgelegt.
Ich würde neue Festplatten kaufen, das NAS neu aufsetzen (sofern dieses keinen Schaden genommen hat!) und dann die Datensicherung zurückspielen!
Grüße
Christian
-
- #3
Oder alternativ ein Reinitialize NAS mit anschliessendem Bad Block Scan durchführen.
Dauert ca. 24h, aber wenn der BB Scan durchläuft kannst Du die Daten wieder aus dem Backup drauf spielen und hast zunächst kein Geld ausgegeben.
Ob und wie lange man den HDDs noch trauen kann ist Deine Entscheidung.
Gruss
-
- #4
Da bin ich immer neugierig. Wieso ist das NAS aus dem Schrank geplumpst shining01 ?
Da ich mein NAS auch im Schrank stehen habe … vielleicht hat man ja eine Gefahrenquelle übersehen.
-
- #5
die Nas steht in einem kleinen Regal. Das Regal musste ich weg schieben damit ich den Verteilerschrank öffnen kann. Dabei habe ich nicht berücksichtigt dass das Netzwerkkabel nur 20cm lang ist. Tja und da viel es runter. FSC830 wie funktioniert der Reinitialize NAS.
Ich habe folgendes schon ausprobiert:
- #> config_util 1
 Do sanity-check by .conf and auto-assemble md9
 - #> config_util 4 Auto-assemble md13 (sda4)
- #> storage_boot_init 1 Auto-mount md9 on /mnt/HDA_ROOT; assemble swap device
- #> storage_boot_init 2 Assemble data RAID device and mount filesystem
- #> /etc/init.d/mountall Mount sda4 on /mnt/ext and extract ext_root
Er sagt mir bei Punkt 4 check_last_degrade_error. Wo kann ich diesen einsehen?
Danke für Eure Hilfe!
-
- #6
Du hattest doch in dem ersten Post geschrieben das die QNAP ohne HDD wieder hochfährt.
Da solltest Du Dich anmelden und unter Backup/Restore das «Zurücksetzen auf Werkseinstellungen» auswählen können.
Dort wird dann das Reinitialize NAS angeboten.
Bevor man auf ok klickt (bzw. das PW eingibt) die Platten reinstecken, dann sollten die gelöscht und das NAS neu initialisiert werden.
Gruss
Edit:
Ich habe es gerade getestet, wenn das NAS ohne HDDs bootet, landest Du automatisch im Ersteinrichtungsassistenten, dann die Platten stecken, danach kommt die Abfrage mit dem Neu-Initialisieren.
Gruss
-
- #7
als welcher Höhe ist das NAS gefallen?Für mich klingt das nach eine Totalschaden an den Festplatten, denn für solche Aktionen sind Home Festplatten nicht ausgelegt.
Und die Business und Enterprise Platten sind für so einen Fall gewappnet? Das werde ich wohl lieber nicht testen. Sorry christian , konnte einfach nicht wiederstehen.
 Ah, Du meinst vermutlich Notebookfestplatten.
Ich gehe mal davon aus, dass der Sturz mehr als 20 cm war. Da gibt es eigentlich nur eines: Ab zur Entsorgung mit diesen Platten. Denen kannst Du einfach nicht mehr Daten anvertrauen, selbst wenn Du sie noch irgendwie zum Laufen kriegen würdest. Die Mechanik und auch die Platten selbst sind inzwischen so filigran, das würde mich schon sehr wundern, wenn nicht min. ein Kopf oder eine Platte zumindest angebrochen, wenn nicht sogar abgebrochen ist. Noch schwieriger zum Herausfinden dürfte ein beschädigtes Lager sein. Ne, ab damit in die Tonne.
Du kannst Dich eigentlich schon glücklich schätzen, wenn das NAS keinen bleibenden Schaden genommen hat. Das TS-219P II hat glücklicherweise keinen Lüfter. War das NAS beim Sturz eigentlich ausgeschaltet?
Da es sich um eine TS-219P II handelt, würde ich dies mal als Wink mit dem Zaunpfahl deuten: «Es wird Zeit für ein komplett neues NAS».
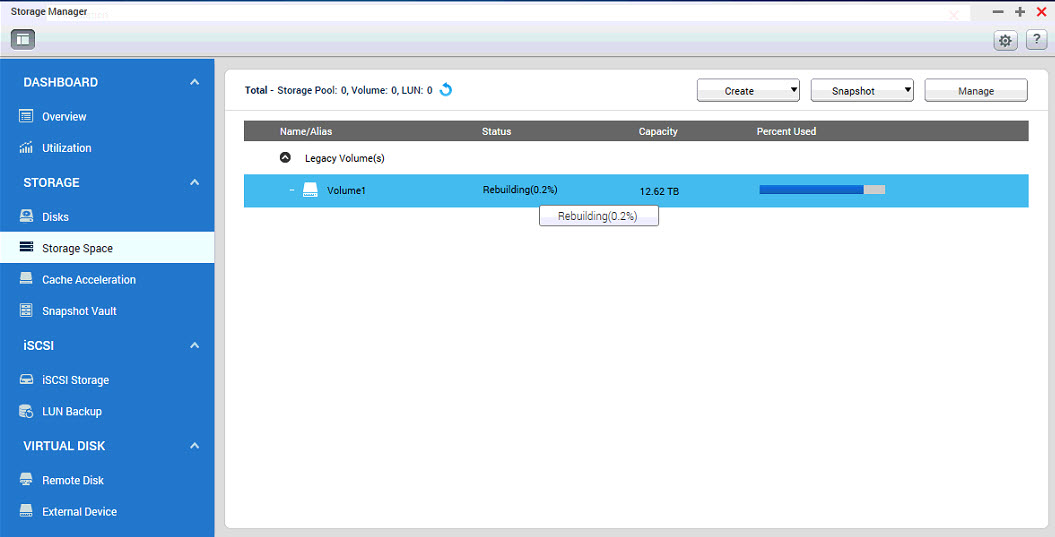
QNAP TS-410 на днях вышел из строя диск и перешел в режим деградации. Поэтому я купил новый диск. Бывшие диски были Seagate, но я купил Western Digital теперь, который он одобрил QNAP в своей базе данных поддерживаемых дисков, его тот же размер, так что это не должно иметь значения правильно? Так что теперь у меня 3 seagate и 1 wd. Я поменял местами новый и старый диски и системный журнал сказал
[RAID5 Disk Volume: Drive 1 2 3 4] Start rebuilding
но я не вижу никаких признаков в веб-интерфейсе, что перестроение происходит, нигде нет индикатора выполнения, но свет на передней панели устройства мигает красным / зеленым, указывая, что он восстанавливается. Это нормально или происходит что-то странное? Есть ли способ проверить с помощью командной строки через ssh, что происходит перестройка?
также под панелью управления — > Диспетчер хранения — > управление томами (в веб-интерфейсе QNAP, а не на панели управления windows) новый диск имеет «ошибку чтения/записи диска» в разделе состояние, но интеллектуальная информация говорит это хорошо.
я возился с этим в течение некоторого времени, и я попытался сделать сканирование на новом диске, что заняло около дня, чтобы закончить, и после этого статус пошел на готов, но до сих пор никаких признаков того, что RAID перестроить происходит (за исключением этой записи журнала). Я перезапустил QNAP, и новый диск снова получил статус» Ошибка чтения/записи диска», и журнал снова сказал, что он перестраивает RAID.
верхняя панель веб-интерфейса имеет кнопку, показывающую фон процессы, но там ничего не показано, поэтому перестроение не является фоновым процессом.
Если я зайду в Диспетчер хранилища — > управление RAID и выберу RAID, то кнопка действия будет неактивна, поэтому я не могу выполнять никаких действий с RAID, я думаю, это потому, что он находится в деградированном режиме и смонтирован только для чтения.
Я в замешательстве, рейд перестраивается или нет? И если его не перестраивают, есть ли какой-то способ заставить перестроить? Или это не очень хорошо идея?
этот QNAP имеет прошивку 4.1.1 Build 20140927, если это имеет значение.
cat /proc/mdstat дает мне следующий результат:
Personalities : [raid1] [linear] [raid0] [raid10] [raid6] [raid5] [raid4]
md0 : active (read-only) raid5 sda3[0] sdc3[2] sdb3[1]
             5855836800 blocks level 5, 64k chunk, algorithm 2 [4/3] [UUU_]

md4 : active raid1 sdd2[2](F) sdc2[3](S) sdb2[1] sda2[0]
             530048 blocks [2/2] [UU]

md13 : active raid1 sda4[0] sdd4[3] sdc4[2] sdb4[1]
             458880 blocks [4/4] [UUUU]
             bitmap: 0/57 pages [0KB], 4KB chunk

md9 : active raid1 sda1[0] sdd1[3] sdc1[2] sdb1[1]
             530048 blocks [4/4] [UUUU]
             bitmap: 4/65 pages [16KB], 4KB chunk

unused devices: <none>
как видно из md0 последний диск не находится в массиве RAID (uuu_ последний символ подчеркивания должен быть U, если диск был в RAID, насколько понимаю.
I – Using md_checker Command To Get İnfo About RAID;
II – Fixing RAID With Usign AFR Command (Safe Way)
III – Fixing RAID With Using CFR Command (Warning, Dangerous)
.
I – Using md_checker Command To Get İnfo About RAID;
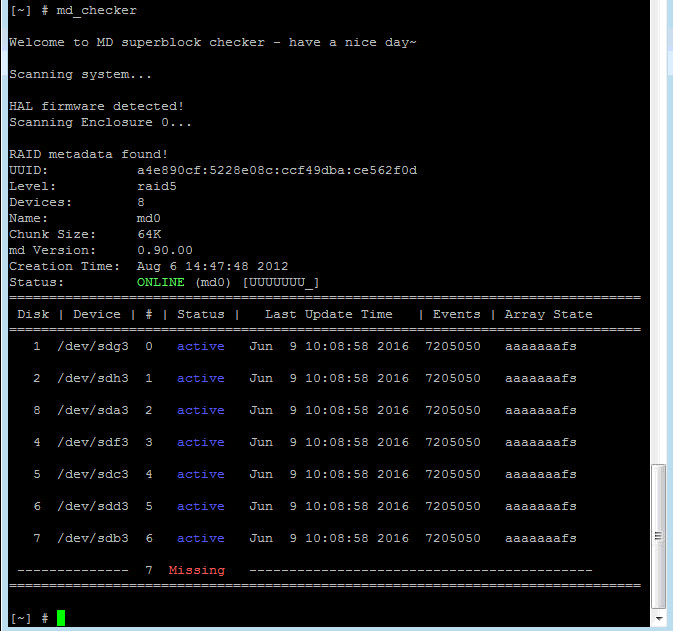
Type this command to get more info about your RAID;
md_checker
this commant may not be avaible, so type this commands to install it;
1 – Download the file to NAS:
# wget http://download.qnap.com/Storage/tsd/utility/md_checker
2 – Apply execute permission:
# chmod +x md_checker
3 – Run the script:
# ./md_checker
.
II – Fixing RAID With Usign AFR Command (Safe Way)
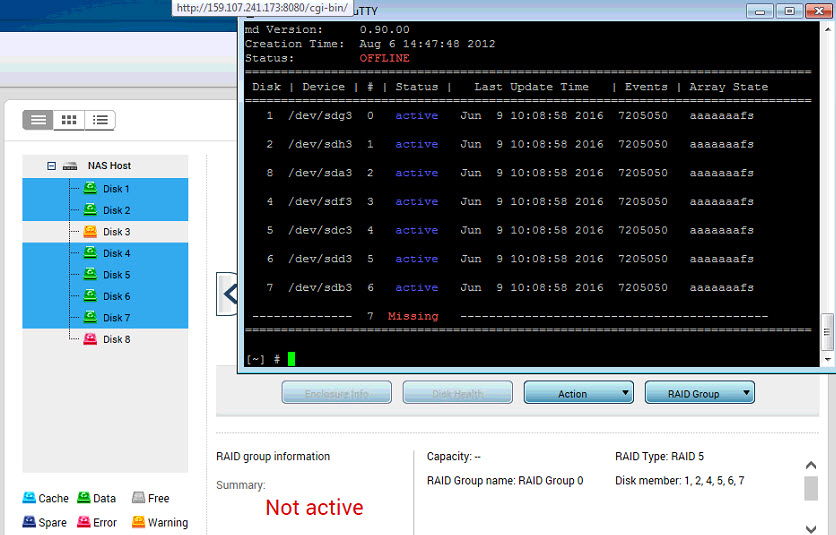
If your RAID structure seems “Not Active” and cannt access your files, you can fix this by this way;
Warning; if you’re not sure, don’t do it yourself, contact qnap support!
so we type this command line to fix our RAID;
mdadm -AfR /dev/md0 /dev/sda3 /dev/sdb3 /dev/sdc3 /dev/sdd3
.
What if we got “missing” or “Rebuildin” HDD? you must fallow right order & dont add “Missing” HDD’s to this command line

.
So in this case;
.
1 – Type This command to get RAID back online again;
mdadm -AfR /dev/md0 /dev/sdg3 /dev/sdh3 /dev/sda3 /dev/sdf3 /dev/sdc3 /dev/sdd3 /dev/sdb3

2 – And Now RAID Becomes Active Again!
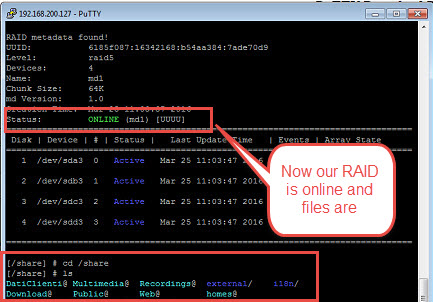
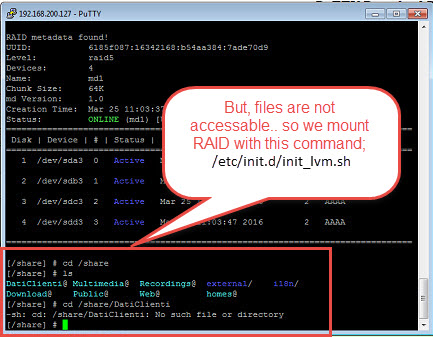
3 – Type /etc/init.d/init_lvm.sh to mount RAID back again;

4 – Now RAID Comes back, and rebuilding start!

5 – İf you cant see your files under filestation;
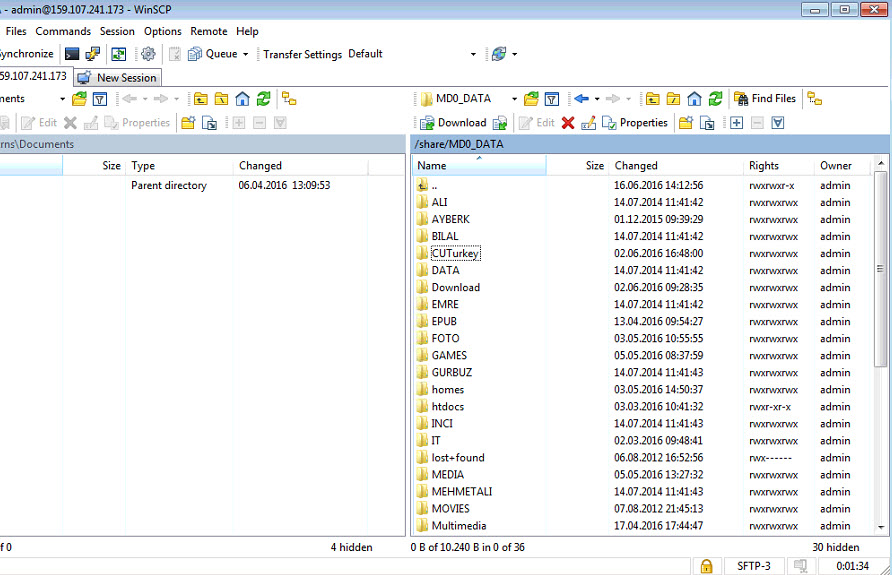
6 – Just login with winscp, and check under /share/MD0_DATA folder;
.
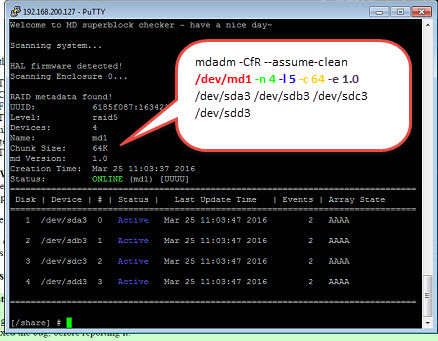
III – Fixing RAID With Using CFR Command (Warning, Dangerous)
Type this command to fix your RAID;
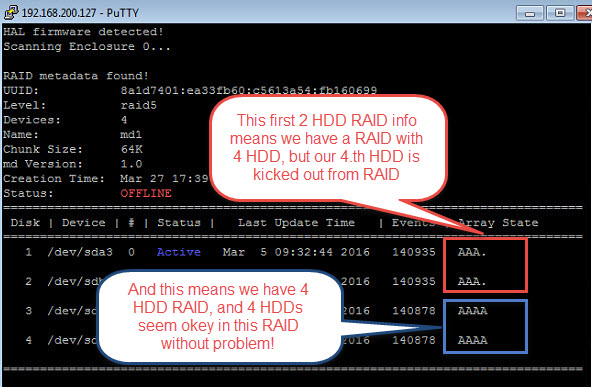
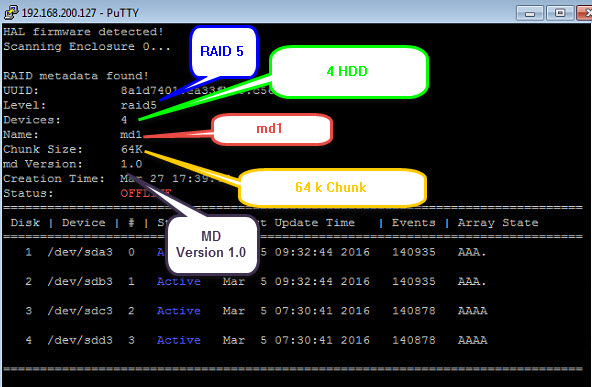
This command shows that we have a RAID 5 with 4 HDD,
so we type this command line to fix our RAID;
mdadm -CfR –assume-clean /dev/md1 -n 4 -l 5 -c 64 -e 1.0 /dev/sda3 /dev/sdb3 /dev/sdc3 /dev/sdd3
.
2.1 – .. IF you have a RAID 6 with 10 HDD, type this command;
mdadm -CfR –assume-clean /dev/md1 -n 10 -l 6 -c 64 -e 1.0 /dev/sda3 /dev/sdb3 /dev/sdc3 /dev/sdd3 /dev/sde3 /dev/sdf3 /dev/sdg3 /dev/sdh3 /dev/sdi3 /dev/sdj3
.
-n 10 means you have 10 HDD!
-l 6 means you have a RAID 6 structure!
/dev/sda3 means your first HDD,
/dev/sdb3 means your 2.th HDD
.
2.2 – .. IF you have a RAID 5 with 8 HDD and 4.th HDD seems like broken, type this command;
mdadm -CfR –assume-clean /dev/md1 -n 8 -l 5 -c 64 -e 1.0 /dev/sda3 /dev/sdb3 /dev/sdc3 missing /dev/sde3 /dev/sdf3 /dev/sdg3 /dev/sdh3 /dev/sdi3 /dev/sdj3
Note; you must type missing for broken HDD’s to fix your RAID
.
2.3 – If your HDD order is not going just like “dev/sda3 /dev/sdb3 /dev/sdc3″ order, fix this mdadm command with right order;
mdadm -CfR –assume-clean /dev/md1 -n 15 -l 5 -c 64 -e 1.0 /dev/sdc3 /dev/sdd3 /dev/sdb3 /dev/sda3 /dev/sde3…
.
3 – Your RAID should be online again;
.
4 – Now, mount your RAID to access your files back again;
/etc/init.d/init_lvm.sh
…and your files should be back again!
 .
.
.
Rating: 9.6/10 (13 votes cast)
Rating: +2 (from 4 votes)
How To Fix Not Active RAID After 4.1.0 FirmwareNot Active Görünen RAID Yapısını Nasıl Düzeltebilirsiniz (4.1.0 Firmware’i Sonrası), 9.6 out of 10 based on 13 ratings


-
- #1
Hallo,
mir ist meine Qnap TS-219P II aus dem Schrank gefallen. Dabei sind beide Festplatten aus der Verankerung gesprungen. Die Qnap fährt jetzt nicht mehr hoch. Nachdem ich beide Festplatten heraus genommen habe und die Qnap wieder gestartet habe fährt die Qnap wieder hoch. Nachdem ich nun eine Festplatte eingesteckt habe und auf wiederherstellen geklickt habe versucht er die exakt gleiche Firmware Version hoch zu laden. Dann bricht er aber irgendwann mit der Meldung «
Beim Zurücksetzen auf die ursprünglichen Einstellungen ist ein Fehler aufgetreten. Bitte wenden Sie sich unter an den QNAP-Helpdesk.
Fehlercode:
FW00007″
ab. Was kann ich noch tun, dass das System wieder läuft.
Danke!
-
- #2
Hallo,
als welcher Höhe ist das NAS gefallen?Für mich klingt das nach eine Totalschaden an den Festplatten, denn für solche Aktionen sind Home Festplatten nicht ausgelegt.
Ich würde neue Festplatten kaufen, das NAS neu aufsetzen (sofern dieses keinen Schaden genommen hat!) und dann die Datensicherung zurückspielen!
Grüße
Christian
-
- #3
Oder alternativ ein Reinitialize NAS mit anschliessendem Bad Block Scan durchführen.
Dauert ca. 24h, aber wenn der BB Scan durchläuft kannst Du die Daten wieder aus dem Backup drauf spielen und hast zunächst kein Geld ausgegeben.
Ob und wie lange man den HDDs noch trauen kann ist Deine Entscheidung.
Gruss
-
- #4
Da bin ich immer neugierig. Wieso ist das NAS aus dem Schrank geplumpst shining01 ?
Da ich mein NAS auch im Schrank stehen habe … vielleicht hat man ja eine Gefahrenquelle übersehen.
-
- #5
die Nas steht in einem kleinen Regal. Das Regal musste ich weg schieben damit ich den Verteilerschrank öffnen kann. Dabei habe ich nicht berücksichtigt dass das Netzwerkkabel nur 20cm lang ist. Tja und da viel es runter. FSC830 wie funktioniert der Reinitialize NAS.
Ich habe folgendes schon ausprobiert:
- #> config_util 1 Do sanity-check by .conf and auto-assemble md9
- #> config_util 4 Auto-assemble md13 (sda4)
- #> storage_boot_init 1 Auto-mount md9 on /mnt/HDA_ROOT; assemble swap device
- #> storage_boot_init 2 Assemble data RAID device and mount filesystem
- #> /etc/init.d/mountall Mount sda4 on /mnt/ext and extract ext_root
Er sagt mir bei Punkt 4 check_last_degrade_error. Wo kann ich diesen einsehen?
Danke für Eure Hilfe!
-
- #6
Du hattest doch in dem ersten Post geschrieben das die QNAP ohne HDD wieder hochfährt.
Da solltest Du Dich anmelden und unter Backup/Restore das «Zurücksetzen auf Werkseinstellungen» auswählen können.
Dort wird dann das Reinitialize NAS angeboten.
Bevor man auf ok klickt (bzw. das PW eingibt) die Platten reinstecken, dann sollten die gelöscht und das NAS neu initialisiert werden.
Gruss
Edit:
Ich habe es gerade getestet, wenn das NAS ohne HDDs bootet, landest Du automatisch im Ersteinrichtungsassistenten, dann die Platten stecken, danach kommt die Abfrage mit dem Neu-Initialisieren.
Gruss
-
- #7
als welcher Höhe ist das NAS gefallen?Für mich klingt das nach eine Totalschaden an den Festplatten, denn für solche Aktionen sind Home Festplatten nicht ausgelegt.
Und die Business und Enterprise Platten sind für so einen Fall gewappnet? Das werde ich wohl lieber nicht testen. Sorry christian , konnte einfach nicht wiederstehen.
Ah, Du meinst vermutlich Notebookfestplatten.Ich gehe mal davon aus, dass der Sturz mehr als 20 cm war. Da gibt es eigentlich nur eines: Ab zur Entsorgung mit diesen Platten. Denen kannst Du einfach nicht mehr Daten anvertrauen, selbst wenn Du sie noch irgendwie zum Laufen kriegen würdest. Die Mechanik und auch die Platten selbst sind inzwischen so filigran, das würde mich schon sehr wundern, wenn nicht min. ein Kopf oder eine Platte zumindest angebrochen, wenn nicht sogar abgebrochen ist. Noch schwieriger zum Herausfinden dürfte ein beschädigtes Lager sein. Ne, ab damit in die Tonne.
Du kannst Dich eigentlich schon glücklich schätzen, wenn das NAS keinen bleibenden Schaden genommen hat. Das TS-219P II hat glücklicherweise keinen Lüfter. War das NAS beim Sturz eigentlich ausgeschaltet?
Da es sich um eine TS-219P II handelt, würde ich dies mal als Wink mit dem Zaunpfahl deuten: «Es wird Zeit für ein komplett neues NAS».

Have you received error FW003 when trying to update the firmware of your QNAP Network Attached Storage (NAS)?
You have found the right page!
If you encounter error FW003 when trying to update the firmware of your QNAP NAS, it means that the system disk partition (which is used by the NAS to actually work and is separated from the actual storage space) does not have enough free space to perform the update operations. For example, if the size of the new version of the firmware is 185 MB and the available space is only 180 MB, you will get this error.
The only way to solve is to free enough disk space to perform the update. To do this you will have to connect to the NAS via SSH (using PuTTY on Windows, or a terminal on Linux/MacOS), and start looking for files that can be sacrificed to make room for the update.
To achieve this, once connected to the NAS via SSH, you will have to perform the following operations:
- Confirm you have not enough free space on the system disk by issuing this command:
[~] # df
You’ll get an output like the following:

You have to check the column «Mounted on» and find «/mnt/HDA_ROOT». Check if available space is effectively smaller than the firmware update package. If so, go on. If not, contact QNAP support.
- Confirm no /mnt/update file or folder and no /tmp/update_process file exist: if they exist, you need to delete them using:
[~] # rm -rf /mnt/update
[~] # rm -f /tmp/update_process - Repeat step 1. If available space on /mnt/HDA_ROOT is now larger than needed, proceed with the firmware update. If available space on /mnt/HDA_ROOT is still smaller than needed, proceed to Step 4.
- Now you will have to look for the files that are occupying too much space on your /mnt/HDA_ROOT partition. This is different for every system, so there is not a unique solution. It’s basically trial-and-error. Start with:
[~] # ls -als /mnt/HDA_ROOT/
To get the list of directories on this partition. Now check every directory using the following command:
[~] # ls -als /mnt/HDA_ROOT/directoryname
where directoryname stands for each directory (and their subdirectories) on the partition. My suggestion: start with the .logs and lost+found directories. For example:
[~] # ls -als /mnt/HDA_ROOT/.logs
You might get something like this:
-rw-r—r— 1 admin administ 184.7M Jan 21 2020 conn.log
-rw-r—r— 1 admin administ 345.3M Jan 18 2020 event.logAs you can see those files have become huge, so you can safely delete them (they are log files, so not needed by the system) using the command:
[~] # rm -f /mnt/HDA_ROOT/.logs/conn.log
[~] # rm -f /mnt/HDA_ROOT/.logs/event.logAs specified above, this is just an example. You will have to find the files that actually occupy too much space ON YOUR SYSTEM.
- Once deleted these files, and freed up enough space, proceed with the firmware update as usual.
