Stopping after the first (or N) failures
To stop the testing process after the first (N) failures:
pytest -x           # stop after first failure
pytest --maxfail=2  # stop after two failures
Using pdb — The Python Debugger with pytest
Dropping to pdb on failures
Python comes with a builtin Python debugger called pdb. pytest
allows one to drop into the pdb prompt via a command line option:
This will invoke the Python debugger on every failure (or KeyboardInterrupt).
Often you might only want to do this for the first failing test to understand
a certain failure situation:
pytest -x --pdb   # drop to PDB on first failure, then end test session
pytest --pdb --maxfail=3  # drop to PDB for first three failures
Note that on any failure the exception information is stored on
sys.last_value, sys.last_type and sys.last_traceback. In
interactive use, this allows one to drop into postmortem debugging with
any debug tool. One can also manually access the exception information,
for example:
>>> import sys
>>> sys.last_traceback.tb_lineno
42
>>> sys.last_value
AssertionError('assert result == "ok"',)
Dropping to pdb at the start of a test
pytest allows one to drop into the pdb prompt immediately at the start of each test via a command line option:
This will invoke the Python debugger at the start of every test.
Setting breakpoints
To set a breakpoint in your code use the native Python import pdb;pdb.set_trace() call
in your code and pytest automatically disables its output capture for that test:
-
Output capture in other tests is not affected.
-
Any prior test output that has already been captured and will be processed as
such. -
Output capture gets resumed when ending the debugger session (via the
continuecommand).
Using the builtin breakpoint function
Python 3.7 introduces a builtin breakpoint() function.
Pytest supports the use of breakpoint() with the following behaviours:
When
breakpoint()is called andPYTHONBREAKPOINTis set to the default value, pytest will use the custom internal PDB trace UI instead of the system defaultPdb.When tests are complete, the system will default back to the system
Pdbtrace UI.With
--pdbpassed to pytest, the custom internal Pdb trace UI is used with bothbreakpoint()and failed tests/unhandled exceptions.
--pdbclscan be used to specify a custom debugger class.
Fault Handler
New in version 5.0.
The faulthandler standard module
can be used to dump Python tracebacks on a segfault or after a timeout.
The module is automatically enabled for pytest runs, unless the -p no:faulthandler is given
on the command-line.
Also the faulthandler_timeout=X configuration option can be used
to dump the traceback of all threads if a test takes longer than X
seconds to finish (not available on Windows).
Note
This functionality has been integrated from the external
pytest-faulthandler plugin, with two
small differences:
-
To disable it, use
-p no:faulthandlerinstead of--no-faulthandler: the former
can be used with any plugin, so it saves one option. -
The
--faulthandler-timeoutcommand-line option has become the
faulthandler_timeoutconfiguration option. It can still be configured from
the command-line using-o faulthandler_timeout=X.
Warning about unraisable exceptions and unhandled thread exceptions
New in version 6.2.
Unhandled exceptions are exceptions that are raised in a situation in which
they cannot propagate to a caller. The most common case is an exception raised
in a __del__ implementation.
Unhandled thread exceptions are exceptions raised in a Thread
but not handled, causing the thread to terminate uncleanly.
Both types of exceptions are normally considered bugs, but may go unnoticed
because they don’t cause the program itself to crash. Pytest detects these
conditions and issues a warning that is visible in the test run summary.
The plugins are automatically enabled for pytest runs, unless the
-p no:unraisableexception (for unraisable exceptions) and
-p no:threadexception (for thread exceptions) options are given on the
command-line.
The warnings may be silenced selectively using the pytest.mark.filterwarnings
mark. The warning categories are pytest.PytestUnraisableExceptionWarning and
pytest.PytestUnhandledThreadExceptionWarning.
Предисловие
По историческому призванию я SQL-щик. Однако судьба занесла меня на BigData и после этого понесла кривая — я освоил и Java, и Python, и функциональное программирование (изучение Scala стоит в списке). Собственно на одном из кусков проекта встала необходимость тестирования кода на Python. Ребята из QA посоветовали для этих целей PyTest, но даже они затруднились толком ответить чем этот зверь хорош. К сожалению, в русскоязычном сегменте информации по данному вопросу не так уж и много: как это используют в Yandex да и все по-хорошему. При этом описанное в этой статье выглядит достаточно сложно для человека начинающего путешествие по этой стезе. Не говоря уже об официальной документации — она приобрела для меня смысл лишь после того, как я разобрался с самим модулем по другим источникам. Не спорю, там написаны интересные вещи, но, к сожалению, совсем не для старта.
Юнит-тестирование Python
Что это и для чего рассказывать смысла не вижу — Википедия все равно знает больше. По поводу существующих модулей для Python хорошо описано на Хабре.
Вводная по необходимым знаниям
На описываемый момент знания Python у меня были достаточно поверхностны — я писал кое-какие несложные модули и знал стандартные вещи. Но при столкновении с PyTest мне пришлось пополнять багаж знаний декораторами тут и тут и конструкцией yield.
Преимущества и недостатки PyTest
1) Независимость от API (no boilerplate). Как код выглядит в том же unittest:
Код
import unittest

class TestUtilDate(unittest.TestCase):
    def setUp(self):
        #init_something()
        pass

    def tearDown(self):
        #teardown_something()
        pass

    def test_upper(self):
        self.assertEqual('foo'.upper(), 'FOO')

    def test_isupper(self):
        self.assertTrue('FOO'.isupper())

    def test_failed_upper(self):
        self.assertEqual('foo'.upper(), 'FOo')

if __name__ == '__main__':
    suite = unittest.TestLoader().loadTestsFromTestCase(TestUtilDate)
    unittest.TextTestRunner(verbosity=2).run(suite)
То же самое в PyTest:
Код
import pytest

def setup_module(module):
    #init_something()
    pass

def teardown_module(module):
    #teardown_something()
    pass

def test_upper():
    assert 'foo'.upper() == 'FOO'

def test_isupper():
    assert 'FOO'.isupper()

def test_failed_upper():
    assert 'foo'.upper() == 'FOo'
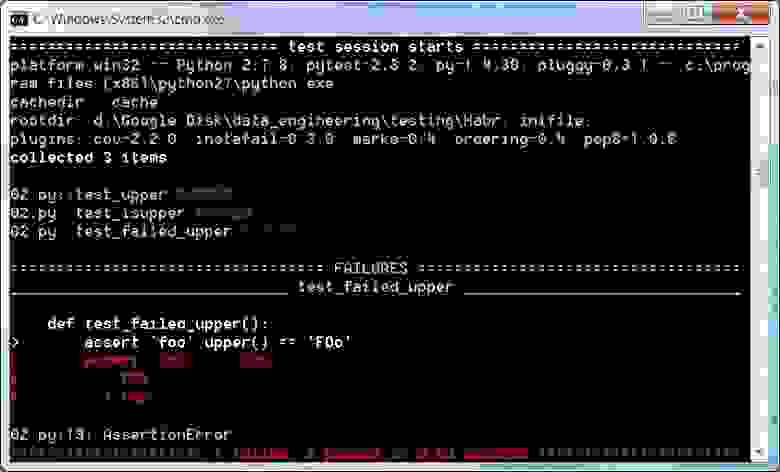
2) Подробный отчет. В том числе выгрузка в JUnitXML (для интеграции с Jenkins). Сам вид отчета может изменяться (включая цвета) дополнительными модулями (о них будет позднее отдельно). Ну и вообще цветной отчет в консоли выглядит удобнее — красные FAILED видны сразу.
3) Удобный assert (стандартный из Python). Не приходится держать в голове всю кучу различных assert’ов.
4) Динамические фикстуры всех уровней, которые могут вызываться как автоматически, так и для конкретных тестов.
5) Дополнительные возможности фикстур (возвращаемое значение, финализаторы, область видимости, объект request, автоиспользование, вложенные фикстуры)
6) Параметризация тестов, то есть запуск одного и того же теста с разными наборами параметров. Вообще это относится к пункту 5 «Дополнительные возможности фикстур», но возможность настолько хороша, что достойна отдельного пункта.
7) Метки (marks), позволяющие пропустить любой тест, пометить тест, как падающий (и это его ожидаемое поведение, что полезно при разработке) или просто именовать набор тестов, чтобы можно было запускать только его по имени.
 Плагины. Данный модуль имеет достаточно большой список дополнительных модулей, которые можно установить отдельно.
9) Возможность запуска тестов написанных на unittest и nose, то есть полная обратная совместимость с ними.
Про недостатки, пусть их и не много, могу сказать следующее:
1) Отсутствие дополнительного уровня вложенности: Для модулей, классов, методов, функций в тестах есть соответствующий уровень. Но логика требует наличие дополнительного уровня testcase, когда та же одна функция может иметь несколько testcase’ов (например, проверка возращаемых значений и ошибок). Это частично компенсируется дополнительным модулем (плагином) pytest-describe, но там встает проблема отсутствия соответствующего уровня фикстуры (scope = “describe”). С этим конечно можно жить, но в некоторых ситуациях может нарушать главный принцип PyTest — «все для простоты и удобства».
2) Необходимость отдельной установки модуля, в том числе в продакшене. Все-таки unittest и doctest входят в базовый инструментарий Python и не требуют дополнительных телодвижений.
3) Для использования PyTest требуется немного больше знаний Python, чем для того же unittest (см. «Вводная по необходимым знаниям»).
Подробное описание модуля и его возможностей под катом.
Запуск тестов
Для unittest используется вызов функции main. Поэтому запуск имеет вид «python unittest_example.py». При этом для запуска набора тестов приходится отдельно объединять их в TestSuit и запускать через него. PyTest собирает все тесты сам по имени test_* (Test_* для имени классов) для всех файлов в папке (рекурсивно обходя вложенные папки) или же для указанного файла. То есть пример вызова будет иметь вид «py.test -v pytest_example.py»
Базовые фикстуры
В данном случае фикстурами я называю функции и методы, которые запускаются для создания соответствующего окружения для теста. PyTest, как и unittest, имеет названия для фикстур всех уровней:
import pytest

def setup():
    print ("basic setup into module")

def teardown():
    print ("basic teardown into module")

def setup_module(module):
    print ("module setup")

def teardown_module(module):
    print ("module teardown")

def setup_function(function):
    print ("function setup")

def teardown_function(function):
    print ("function teardown")

def test_numbers_3_4():
    print "test 3*4"
    assert 3*4 == 12

def test_strings_a_3():
    print "test a*3"
    assert 'a'*3 == 'aaa'

class TestUM:
    def setup(self):
        print ("basic setup into class")

    def teardown(self):
        print ("basic teardown into class")

    def setup_class(cls):
        print ("class setup")

    def teardown_class(cls):
        print ("class teardown")

    def setup_method(self, method):
        print ("method setup")

    def teardown_method(self, method):
        print ("method teardown")

    def test_numbers_5_6(self):
        print "test 5*6"
        assert 5*6 == 30

    def test_strings_b_2(self):
        print "test b*2"
        assert 'b'*2 == 'bb'
Чтобы увидеть весь вывод выдаваемый командой print, необходимо запускать тест с флагом -s:
tmp>py.test -s basic_fixtures.py
============================= test session starts =============================
platform win32 -- Python 2.7.8, pytest-2.8.2, py-1.4.30, pluggy-0.3.1
rootdir: tmp/, inifile:
collected 4 items

basic_fixtures.py module setup
function setup
basic setup into module
test 3*4
.basic teardown into module
function teardown
function setup
basic setup into module
test a*3
.basic teardown into module
function teardown
class setup
method setup
basic setup into class
test 5*6
.basic teardown into class
method teardown
method setup
basic setup into class
test b*2
.basic teardown into class
method teardown
class teardown
module teardown
========================== 4 passed in 0.03 seconds
Данный пример достаточно полно показывает иерархию и повторяемость каждого уровня фикстур (например, setup_function вызывается перед каждым вызовом функции, а setup_module – только один раз для всего модуля). Также можно видеть, что уровень фикстуры по умолчанию — функция/метод (фикстура setup и teardown).
Расширенные фикстуры
Вопрос что делать, если для части тестов нужно определенное окружение, а для других нет? Разносить по разным модулям или классам? Не выглядит очень удобно и красиво. На помощь приходят расширенные фикстуры PyTest.
Итак, для создания расширенной фикстуры в PyTest необходимо:
1) импортировать модуль pytest
2) использовать декоратор @pytest.fixture(), чтобы обозначить что данная функция является фикстурой
3) задать уровень фикстуры (scope). Возможные значения “function”, “cls”, “module”, “session”. Значение по умолчанию = “function”.
4) если необходим вызов teardown для этой фикстуры, то надо добавить в него финализатор (через метод addfinalizer объекта request передаваемого в фикстуру или же через использование конструкции yield)
5) добавить имя данной фикстуры в список параметров функции
import pytest

@pytest.fixture()
def resource_setup(request):
    print("resource_setup")
    def resource_teardown():
        print("resource_teardown")
    request.addfinalizer(resource_teardown)

def test_1_that_needs_resource(resource_setup):
    print("test_1_that_needs_resource")

def test_2_that_does_not():
    print("test_2_that_does_not")

def test_3_that_does_again(resource_setup):
    print("test_3_that_does_again")
Запускаем:
tmp>py.test -s extended_fixture.py
============================= test session starts =============================
platform win32 -- Python 2.7.8, pytest-2.8.2, py-1.4.30, pluggy-0.3.1
rootdir: tmp/, inifile:
collected 3 items

extended_fixture.py resource_setup
test_1_that_needs_resource
.resource_teardown
test_2_that_does_not
.resource_setup
test_3_that_does_again
.resource_teardown
========================== 3 passed in 0.01 seconds
Вызов расширенных фикстур
Следует добавить, что расширенные фикстуры можно вызывать еще двумя способами:
1) декорирование теста декоратором @pytest.mark.usefixtures()
2) использование флага autouse для фикстуры. Однако следует использовать данную возможность с осторожностью, так как в итоге вы можете получить неожиданное поведение тестов.
3) собственно описанный выше способ через параметры теста
Вот так будет выглядеть предыдущий пример:
import pytest

@pytest.fixture()
def resource_setup(request):
    print("resource_setup")
    def resource_teardown():
        print("resource_teardown")
    request.addfinalizer(resource_teardown)

@pytest.fixture(scope="function", autouse=True)
def another_resource_setup_with_autouse(request):
    print("another_resource_setup_with_autouse")
    def resource_teardown():
        print("another_resource_teardown_with_autouse")
    request.addfinalizer(resource_teardown)

def test_1_that_needs_resource(resource_setup):
    print("test_1_that_needs_resource")

def test_2_that_does_not():
    print("test_2_that_does_not")

@pytest.mark.usefixtures("resource_setup")
def test_3_that_does_again():
    print("test_3_that_does_again")
Запускаем:
tmp>py.test -s call_extended_fixtures.py
============================= test session starts =============================
platform win32 -- Python 2.7.8, pytest-2.8.2, py-1.4.30, pluggy-0.3.1
rootdir: tmp/, inifile:
collected 3 items

call_extended_fixtures.py another_resource_setup_with_autouse
resource_setup
test_1_that_needs_resource
.resource_teardown
another_resource_teardown_with_autouse
another_resource_setup_with_autouse
test_2_that_does_not
.another_resource_teardown_with_autouse
another_resource_setup_with_autouse
resource_setup
test_3_that_does_again
.resource_teardown
another_resource_teardown_with_autouse
========================== 3 passed in 0.01 seconds
teardown расширенной фикстуры
Как было сказано выше, если необходим вызов teardown для определенной расширенной фикстуры, то можно реализовать его двумя способами:
1) добавив в фикстуру финализатор (через метод addfinalizer объекта request передаваемого в фикстуру
2) через использование конструкции yield (начиная с PyTest версии 2.4)
Первый способ мы рассмотрели в примере создания расширенной фикстуры. Теперь же просто продемонстрируем ту же самую функциональность через использование yield. Следует заметить, что для использования yield при декорировании функции, как фикстуры, необходимо использовать декоратор @pytest.yield_fixture(), а не @pytest.fixture():
import pytest

@pytest.yield_fixture()
def resource_setup():
    print("resource_setup")
    yield
    print("resource_teardown")

def test_1_that_needs_resource(resource_setup):
    print("test_1_that_needs_resource")

def test_2_that_does_not():
    print("test_2_that_does_not")

def test_3_that_does_again(resource_setup):
    print("test_3_that_does_again")
Вывод не буду добавлять в текст в связи с тем, что он совпадает с вариантом с финализатором.
Возвращаемое фикстурой значение
Как возможность, фикстура в PyTest может возвращать что-нибудь в тест через return. Будь то какое-то значение состояние, так и объект (например, файл).
import pytest

@pytest.fixture(scope="module")
def resource_setup(request):
    print("\nconnect to db")
    db = {"Red":1,"Blue":2,"Green":3}
    def resource_teardown():
        print("\ndisconnect")
    request.addfinalizer(resource_teardown)
    return db

def test_db(resource_setup):
    for k in resource_setup.keys():
        print "color {0} has id {1}".format(k, resource_setup[k])

def test_red(resource_setup):
    assert resource_setup["Red"] == 1

def test_blue(resource_setup):
    assert resource_setup["Blue"] != 1
Запускаем:
tmp>py.test -v -s return_value.py
============================= test session starts =============================
platform win32 -- Python 2.7.8, pytest-2.8.2, py-1.4.30, pluggy-0.3.1 -- c:\prog
ram files (x86)\python27\python.exe
cachedir: .cache
rootdir: tmp/, inifile:
collected 3 items

return_value.py::test_db
connect to db
color Blue has id 2
color Green has id 3
color Red has id 1
PASSED
return_value.py::test_red PASSED
return_value.py::test_blue PASSED
disconnect
========================== 3 passed in 0.02 seconds
Уровень фикстуры (scope)
Уровень фикстуры может принимать следующие возможные значения “function”, “cls”, “module”, “session”. Значение по умолчанию = “function”.\
function – фикстура запускается для каждого теста
cls – фикстура запускается для каждого класса
module – фикстура запускается для каждого модуля
session – фикстура запускается для каждой сессии (то есть фактически один раз)
Например, в предыдущем примере можно поменять scope на function и вызывать подключение к базе данных и отключение для каждого теста:
import pytest

@pytest.fixture(scope="function")
def resource_setup(request):
    print("\nconnect to db")
    db = {"Red":1,"Blue":2,"Green":3}
    def resource_teardown():
        print("\ndisconnect")
    request.addfinalizer(resource_teardown)
    return db

def test_db(resource_setup):
    for k in resource_setup.keys():
        print "color {0} has id {1}".format(k, resource_setup[k])

def test_red(resource_setup):
    assert resource_setup["Red"] == 1

def test_blue(resource_setup):
    assert resource_setup["Blue"] != 1
tmp>py.test -v -s scope.py
============================= test session starts =============================
platform win32 -- Python 2.7.8, pytest-2.8.2, py-1.4.30, pluggy-0.3.1 -- c:\prog
ram files (x86)\python27\python.exe
cachedir: .cache
rootdir: tmp/, inifile:
collected 3 items

scope.py::test_db
connect to db
color Blue has id 2
color Green has id 3
color Red has id 1
PASSED
disconnect

scope.py::test_red
connect to db
PASSED
disconnect

scope.py::test_blue
connect to db
PASSED
disconnect
========================== 3 passed in 0.02 seconds
Также фикстуры можно описывать в файле conftest.py, который автоматически импортируется PyTest. При этом фикстура может иметь любой уровень (только через описание в этом файле можно создать фикстуру с уровнем «сессия»).
Например, создадим отдельную папку session scope с файлом conftest.py и двумя файлами тестов (напомню, что чтобы PyTest автоматически импортировал модули их названия должны начинаться с test_. Хотя это поведение можно изменить.):
conftest.py:
import pytest

@pytest.fixture(scope="session", autouse=True)
def auto_session_resource(request):
    """ Auto session resource fixture
    """
    print("auto_session_resource_setup")
    def auto_session_resource_teardown():
        print("auto_session_resource_teardown")
    request.addfinalizer(auto_session_resource_teardown)

@pytest.fixture(scope="session")
def manually_session_resource(request):
    """ Manual set session resource fixture
    """
    print("manually_session_resource_setup")
    def manually_session_resource_teardown():
        print("manually_session_resource_teardown")
    request.addfinalizer(manually_session_resource_teardown)

@pytest.fixture(scope="function")
def function_resource(request):
    """ Function resource fixture
    """
    print("function_resource_setup")
    def function_resource_teardown():
        print("function_resource_teardown")
    request.addfinalizer(function_resource_teardown)
test_session_scope1.py
import pytest

def test_1_that_does_not_need_session_resource():
    print("test_1_that_does_not_need_session_resource")

def test_2_that_does(manually_session_resource):
    print("test_2_that_does")
test_session_scope2.py
import pytest

def test_3_that_uses_all_fixtures(manually_session_resource, function_resource):
    print("test_2_that_does_not")
Запускаем:
tmp\session scope>py.test -s -v
============================= test session starts =============================
platform win32 -- Python 2.7.8, pytest-2.8.2, py-1.4.30, pluggy-0.3.1 -- c:\pro
ram files (x86)\python27\python.exe
cachedir: .cache
rootdir: tmp\session scope, inifile:
collected 3 items

test_session_scope1.py::test_1_that_does_not_need_session_resource auto_session
resource_setup
test_1_that_does_not_need_session_resource
PASSED
test_session_scope1.py::test_2_that_does manually_session_resource_setup
test_2_that_does
PASSED
test_session_scope2.py::test_3_that_uses_all_fixtures function_resource_setup
test_2_that_does_not
PASSEDfunction_resource_teardown
manually_session_resource_teardown
auto_session_resource_teardown
========================== 3 passed in 0.02 seconds
Также интересно то, что PyTest поддерживает входной параметр —fixtures, при вызове с которым он возвращает все доступные фикструры, включая те, который были описаны в conftest.py (имели docstring).
tmp\session scope>py.test --fixtures
============================= test session starts =============================
platform win32 -- Python 2.7.8, pytest-2.8.2, py-1.4.30, pluggy-0.3.1
rootdir: tmp\session scope, inifile:
collected 3 items
cache
    Return a cache object that can persist state between testing sessions.
….....
    path object.

----------------------- fixtures defined from conftest ------------------------
manually_session_resource
    Manual set session resource fixture
function_resource
    Function resource fixture
auto_session_resource
    Auto session resource fixture
==============================  in 0.07 seconds
Объект request
В примере создания расширенной фикстуры мы передали в нее параметр request. Это было сделано чтобы через его метод addfinalizer добавить финализатор. Однако этот объект имеет также достаточно много атрибутов и других методов (полный список в официальном API).
import pytest

@pytest.fixture(scope="function")
def resource_setup(request):
    print request.fixturename
    print request.scope
    print request.function.__name__
    print request.cls
    print request.module.__name__
    print request.fspath

def test_1(resource_setup):
    assert True

class TestClass():
    def test_2(self, resource_setup):
        assert True
Запускаем:
tmp>py.test -v -s request_object.py
============================= test session starts =============================
platform win32 -- Python 2.7.8, pytest-2.8.2, py-1.4.30, pluggy-0.3.1 -- c:\prog
ram files (x86)\python27\python.exe
cachedir: .cache
rootdir: tmp/, inifile:
collected 2 items

request_object.py::test_1 resource_setup
function
test_1
None
08
tmp\request_object.py
PASSED
request_object.py::TestClass::test_2 resource_setup
function
test_2
08.TestClass
08
tmp\request_object.py
PASSED
========================== 2 passed in 0.04 seconds
Параметризация
Параметризация — это способ запустить один и тот же тест с разным набором входных параметров. Например, у нас есть функция, которая добавляет знак вопроса к строке, если она длиннее 5 символов, восклицательный знак — менее 5 символов и точку, если в строке ровно 5 символов. Соответственно вместо того, чтобы писать три теста, мы можем написать один, но вызываемый с разными параметрами.
Задать параметры для теста можно двумя способами:
1) Через значение параметра params фикстуры, в который нужно передать массив значений.
То есть фактически фикстура в данном случае представляет собой обертку, передающую параметры. А в сам тест они передаются через атрибут param объекта request, описанного выше.
2) Через декоратор (метку) @pytest.mark.parametrize, в который передается список названий переменных и массив их значений.
Итак первый способ.
import pytest

def strange_string_func(str):
    if len(str) > 5:
        return str + "?"
    elif len(str) < 5:
        return str + "!"
    else:
        return str + "."

@pytest.fixture(scope="function", params=[
("abcdefg", "abcdefg?"),
("abc", "abc!"),
("abcde", "abcde.")
])
def param_test(request):
    return request.param

def test_strange_string_func(param_test):
    (input, expected_output) = param_test
    result = strange_string_func(input)
    print "input: {0}, output: {1}, expected: {2}".format(input, result, expected_output)
    assert result == expected_output
Запускаем:
tmp>py.test -s -v parametrizing_base.py
============================= test session starts =============================
platform win32 -- Python 2.7.8, pytest-2.8.2, py-1.4.30, pluggy-0.3.1 -- c:\prog
ram files (x86)\python27\python.exe
cachedir: .cache
rootdir: tmp/, inifile:
collected 3 items

parametrizing_base.py::test_strange_string_func[param_test0] input: abcdefg, output: abcdefg?, e
xpected: abcdefg?
PASSED
parametrizing_base.py::test_strange_string_func[param_test1] input: abc, output: abc!, expected:
 abc!
PASSED
parametrizing_base.py::test_strange_string_func[param_test2] input: abcde, output: abcde., expec
ted: abcde.
PASSED

========================== 3 passed in 0.03 seconds
Все отлично работает кроме одной неприятной детали — по названию теста невозможно понять, что за параметр был передан в тест. И в этом случае выручает параметр ids фикстуры. Он принимает или список имен тестов (его длина должна совпадать с количеством оных), или функцию, которая сгенерирует итоговое название.
import pytest

def strange_string_func(str):
    if len(str) > 5:
        return str + "?"
    elif len(str) < 5:
        return str + "!"
    else:
        return str + "."

@pytest.fixture(scope="function", params=[
("abcdefg", "abcdefg?"),
("abc", "abc!"),
("abcde", "abcde.")],
ids=["len>5","len<5","len==5"]
)
def param_test(request):
    return request.param

def test_strange_string_func(param_test):
    (input, expected_output) = param_test
    result = strange_string_func(input)
    print "input: {0}, output: {1}, expected: {2}".format(input, result, expected_output)
    assert result == expected_output

def idfn(val):
    return "params: {0}".format(str(val))

@pytest.fixture(scope="function", params=[
("abcdefg", "abcdefg?"),
("abc", "abc!"),
("abcde", "abcde.")],
ids=idfn
)
def param_test_idfn(request):
    return request.param

def test_strange_string_func_with_ifdn(param_test_idfn):
    (input, expected_output) = param_test
    result = strange_string_func(input)
    print "input: {0}, output: {1}, expected: {2}".format(input, result, expected_output)
    assert result == expected_output
Запускаем:
tmp>py.test -s -v parametrizing_named.py --collect-only
============================= test session starts =============================
platform win32 -- Python 2.7.8, pytest-2.8.2, py-1.4.30, pluggy-0.3.1 -- c:\prog
ram files (x86)\python27\python.exe
cachedir: .cache
rootdir: tmp/, inifile:
collected 6 items
<Module 'parametrizing_named.py'>
  <Function 'test_strange_string_func[len>5]'>
  <Function 'test_strange_string_func[len<5]'>
  <Function 'test_strange_string_func[len==5]'>
  <Function "test_strange_string_func_with_ifdn[params: ('abcdefg', 'abcdefg?')]
">
  <Function "test_strange_string_func_with_ifdn[params: ('abc', 'abc!')]">
  <Function "test_strange_string_func_with_ifdn[params: ('abcde', 'abcde.')]">
==============================  in 0.03 seconds
В данном случае я запустил PyTest с дополнительным параметром —collect-only, который позволяет собрать все тесты, порожденные параметризацией, без их запуска.
Второй способ имеет одно преимущество: если указать несколько меток с разными параметрами, то в итоге тест будет запущен со всеми возможными наборами параметров (то есть декартово произведение параметров).
import pytest

@pytest.mark.parametrize("x", [1,2])
@pytest.mark.parametrize("y", [10,11])
def test_cross_params(x, y):
    print "x: {0}, y: {1}".format(x, y)
    assert True
Запускаем:
tmp>py.test -s -v parametrizing_combinations.py
============================= test session starts =============================
platform win32 -- Python 2.7.8, pytest-2.8.2, py-1.4.30, pluggy-0.3.1 -- c:\prog
ram files (x86)\python27\python.exe
cachedir: .cache
rootdir: tmp/, inifile:
collected 4 items

parametrizing_combinations.py::test_cross_params[10-1] x: 1, y: 10
PASSED
parametrizing_combinations.py::test_cross_params[10-2] x: 2, y: 10
PASSED
parametrizing_combinations.py::test_cross_params[11-1] x: 1, y: 11
PASSED
parametrizing_combinations.py::test_cross_params[11-2] x: 2, y: 11
PASSED
========================== 4 passed in 0.02 seconds
В метке параметризации также можно передать параметр ids, ответственный за отображение параметров в выводе аналогично первому способу задания параметров:
import pytest

def idfn_x(val):
    return "x=({0})".format(str(val))

def idfn_y(val):
    return "y=({0})".format(str(val))

@pytest.mark.parametrize("x", [-1,2], ids=idfn_x)
@pytest.mark.parametrize("y", [-10,11], ids=idfn_y)
def test_cross_params(x, y):
    print "x: {0}, y: {1}".format(x, y)
    assert True

@pytest.mark.parametrize("x", [-1,2], ids=["negative x","positive y"])
@pytest.mark.parametrize("y", [-10,11], ids=["negative y","positive y"])
def test_cross_params_2(x, y):
    print "x: {0}, y: {1}".format(x, y)
    assert True
Запускаем:
tmp>py.test -s -v parametrizing_combinations_named.py
============================= test session starts =============================
platform win32 -- Python 2.7.8, pytest-2.8.2, py-1.4.30, pluggy-0.3.1 -- c:\prog
ram files (x86)\python27\python.exe
cachedir: .cache
rootdir: tmp/, inifile:
collected 8 items

parametrizing_combinations_named.py::test_cross_params[y=(-10)-x=(-1)] x: -1, y: -10
PASSED
parametrizing_combinations_named.py::test_cross_params[y=(-10)-x=(2)] x: 2, y: -10
PASSED
parametrizing_combinations_named.py::test_cross_params[y=(11)-x=(-1)] x: -1, y: 11
PASSED
parametrizing_combinations_named.py::test_cross_params[y=(11)-x=(2)] x: 2, y: 11
PASSED
parametrizing_combinations_named.py::test_cross_params_2[negative y-negative x] x: -1, y: -10
PASSED
parametrizing_combinations_named.py::test_cross_params_2[negative y-positive y] x: 2, y: -10
PASSED
parametrizing_combinations_named.py::test_cross_params_2[positive y-negative x] x: -1, y: 11
PASSED
parametrizing_combinations_named.py::test_cross_params_2[positive y-positive y] x: 2, y: 11
PASSED
========================== 8 passed in 0.04 seconds
Вызов нескольких фикстур и фикстуры, использующие фикстуры
PyTest не ограничивает список фикстур вызываемый для теста.
import pytest

@pytest.fixture()
def fixture1(request):
    print("fixture1")

@pytest.fixture()
def fixture2(request):
    print("fixture2")

@pytest.fixture()
def fixture3(request):
    print("fixture3")

def test_1(fixture1, fixture2):
    print("test_1")

def test_2(fixture1, fixture2, fixture3):
    print("test_2")
tmp>py.test -s -v multiply_fixtures.py
============================= test session starts =============================
platform win32 -- Python 2.7.8, pytest-2.8.2, py-1.4.30, pluggy-0.3.1 -- c:\prog
ram files (x86)\python27\python.exe
cachedir: .cache
rootdir: tmp, inifile:
collected 2 items

multiply_fixtures.py::test_1 fixture1
fixture2
test_1
PASSED
multiply_fixtures.py::test_2 fixture1
fixture2
fixture3
test_2
PASSED
========================== 2 passed in 0.01 seconds
Также любая фикстура может также вызывать к исполнению любое количество фикстур до себя:
import pytest

@pytest.fixture()
def fixture1(request, fixture2):
    print("fixture1")

@pytest.fixture()
def fixture2(request, fixture3):
    print("fixture2")

@pytest.fixture()
def fixture3(request):
    print("fixture3")

def test_1(fixture1):
    print("test_1")

def test_2(fixture2):
    print("test_2")
tmp>py.test -s -v fixtures_use_fixtures.py
============================= test session starts =============================
platform win32 -- Python 2.7.8, pytest-2.8.2, py-1.4.30, pluggy-0.3.1 -- c:\prog
ram files (x86)\python27\python.exe
cachedir: .cache
rootdir: tmp, inifile:
collected 2 items

fixtures_use_fixtures.py::test_1 fixture3
fixture2
fixture1
test_1
PASSED
fixtures_use_fixtures.py::test_2 fixture3
fixture2
test_2
PASSED
========================== 2 passed in 0.01 seconds
Метки
PyTest поддерживает класс декораторов @pytest.mark называемый «метками» (marks). Базовый список включает в себя следующие метки:
1) @pytest.mark.parametrize — для параметризации тестов (было рассмотрено выше)
2) @pytest.mark.xfail – помечает, что тест должен не проходить и PyTest будет воспринимать это, как ожидаемое поведение (полезно, как временная метка для тестов на разрабатываемые функции). Также эта метка может принимать условие, при котором тест будет помечаться данной меткой.
3) @pytest.mark.skipif – позволяет задать условие при выполнении которогл тест будет пропущен
4) @pytest.mark.usefixtures – позволяет перечислить все фикстуры, вызываемые для теста
Вообще список шире и его можно получить выполнив команду «py.test —markers».
import pytest
import sys

@pytest.mark.xfail()
def test_failed():
    assert False

@pytest.mark.xfail(sys.platform != "win64", reason="requires windows 64bit")
def test_failed_for_not_win32_systems():
    assert False

@pytest.mark.skipif(sys.platform != "win64", reason="requires windows 64bit")
def test_skipped_for_not_win64_systems():
    assert False
Запускаем:
tmp>py.test -s -v basic_marks.py
============================= test session starts =============================
platform win32 -- Python 2.7.8, pytest-2.8.2, py-1.4.30, pluggy-0.3.1 -- c:\prog
ram files (x86)\python27\python.exe
cachedir: .cache
rootdir: tmp, inifile:
collected 3 items

basic_marks.py::test_failed xfail
basic_marks.py::test_failed_for_not_win32_systems xfail
basic_marks.py::test_skipped_for_not_win64_systems SKIPPED
==================== 1 skipped, 2 xfailed in 0.02 seconds
Важным дополнением является то, что метки могут быть произвольно заданы пользователем. Что позволяет выделять наборы тестов для отдельного запуска по имени метки, передавая ее с ключем -m.
import pytest

def test_1():
    print "test_1"

@pytest.mark.critital_tests
def test_2():
    print "test_2"

def test_3():
    print "test_3"
tmp>py.test -s -v -m "critital_tests" custom_marks.py
============================= test session starts =============================
platform win32 -- Python 2.7.8, pytest-2.8.2, py-1.4.30, pluggy-0.3.1 -- c:\prog
ram files (x86)\python27\python.exe
cachedir: .cache
rootdir: tmp, inifile:
collected 3 items

custom_marks.py::test_2 test_2
PASSED
================= 2 tests deselected by "-m 'critital_tests'" =================
=================== 1 passed, 2 deselected in 0.01 seconds ====================
Метку можно описать и сделать доступной для всех модулей, через описание ее в модуле pytest.ini. При этом она появится в списке доступных меток, получаемых через «py.test —markers».
pytest.ini
# content of pytest.ini
[pytest]
markers =
    critical_test: mark test as critical. These tests must to be checked first.
tmp>py.test --markers
@pytest.mark.critical_test: mark test as critical. These tests must to be checked first.
…......
Также меткой можно пометить не только тест, но и класс, модуль (задается через изменение атрибута импортируемого модуля) или его запуск, получаемый через параметризацию (см. следующий пример).
import pytest

pytestmark = pytest.mark.level1

def test_1():
    print "test_1"

@pytest.mark.level2
class TestClass:
    def test_2(self):
        print "test_2"
    @pytest.mark.level3
    def test_3(self):
        print "test_3"
tmp>py.test -s -v -m "level3" custom_marks_others.py
============================= test session starts =============================
platform win32 -- Python 2.7.8, pytest-2.8.2, py-1.4.30, pluggy-0.3.1 -- c:\prog
ram files (x86)\python27\python.exe
cachedir: .cache
rootdir: tmp, inifile: pytest.ini
collected 3 items

custom_marks_others.py::TestClass::test_3 test_3
PASSED
===================== 2 tests deselected by "-m 'level3'" =====================
=================== 1 passed, 2 deselected in 0.07 seconds ====================
tmp>py.test -s -v -m "level2" custom_marks_others.py
============================= test session starts =============================
platform win32 -- Python 2.7.8, pytest-2.8.2, py-1.4.30, pluggy-0.3.1 -- c:\prog
ram files (x86)\python27\python.exe
cachedir: .cache
rootdir: tmp, inifile: pytest.ini
collected 3 items

custom_marks_others.py::TestClass::test_2 test_2
PASSED
custom_marks_others.py::TestClass::test_3 test_3
PASSED
===================== 1 tests deselected by "-m 'level2'" =====================
=================== 2 passed, 1 deselected in 0.03 seconds ====================
tmp>py.test -s -v -m "level1" custom_marks_others.py
============================= test session starts =============================
platform win32 -- Python 2.7.8, pytest-2.8.2, py-1.4.30, pluggy-0.3.1 -- c:\prog
ram files (x86)\python27\python.exe
cachedir: .cache
rootdir: tmp, inifile: pytest.ini
collected 3 items

custom_marks_others.py::test_1 test_1
PASSED
custom_marks_others.py::TestClass::test_2 test_2
PASSED
custom_marks_others.py::TestClass::test_3 test_3
PASSED
========================== 3 passed in 0.02 seconds ===========================
import pytest

@pytest.mark.parametrize(("x","expected"), [
(1,2),
pytest.mark.critical((2,3)),
(3,4)
])
def test_inc(x,expected):
    print x, "+ 1 = ", expected
    assert x + 1 == expected
tmp>py.test -s -v -m "critical" custom_marks_params.py
============================= test session starts =============================
platform win32 -- Python 2.7.8, pytest-2.8.2, py-1.4.30, pluggy-0.3.1 -- c:\prog
ram files (x86)\python27\python.exe
cachedir: .cache
rootdir: tmp, inifile: pytest.ini
collected 3 items

custom_marks_params.py::test_inc[2-3] 2 + 1 =  3
PASSED
==================== 2 tests deselected by "-m 'critical'" ====================
=================== 1 passed, 2 deselected in 0.02 seconds ====================
Обработка исключений
Конечно же, как полноценный модуль для тестирования, PyTest также позволяет проверять корректность возвращаемых исключений при помощи «with pytest.raises()».
import pytest

def f():
    print 1/0

def test_exception():
    with pytest.raises(ZeroDivisionError):
        f()
tmp>py.test -s -v check_exception.py
============================= test session starts =============================
platform win32 -- Python 2.7.8, pytest-2.8.2, py-1.4.30, pluggy-0.3.1 -- c:\prog
ram files (x86)\python27\python.exe
cachedir: .cache
rootdir: tmp, inifile: pytest.ini
collected 1 items

check_exception.py::test_exception PASSED
========================== 1 passed in 0.01 seconds
Запуск тестов по имени или ID
Отдельные тесты из модулей можно запускать перечисляя полный путь к ним в виде module.py::class::method или. module.py::function. А также передавая с флагом -k часть их имени.
import pytest

def test_one():
    print "test_one"

def test_one_negative():
    print "test_one_negative"

def test_two():
    print "test_one_negative"
tmp>py.test -s -v call_by_name_and_id.py::test_two
============================= test session starts =============================
platform win32 -- Python 2.7.8, pytest-2.8.2, py-1.4.30, pluggy-0.3.1 -- c:\prog
ram files (x86)\python27\python.exe
cachedir: .cache
rootdir: tmp, inifile: pytest.ini
collected 4 items

call_by_name_and_id.py::test_two test_one_negative
PASSED
========================== 1 passed in 0.04 seconds
tmp>py.test -s -v -k "one" call_by_name_and_id.py
============================= test session starts =============================
platform win32 -- Python 2.7.8, pytest-2.8.2, py-1.4.30, pluggy-0.3.1 -- c:\prog
ram files (x86)\python27\python.exe
cachedir: .cache
rootdir: tmp, inifile: pytest.ini
collected 3 items

call_by_name_and_id.py::test_one test_one
PASSED
call_by_name_and_id.py::test_one_negative test_one_negative
PASSED
======================== 1 tests deselected by '-kone' ========================
=================== 2 passed, 1 deselected in 0.01 seconds ====================
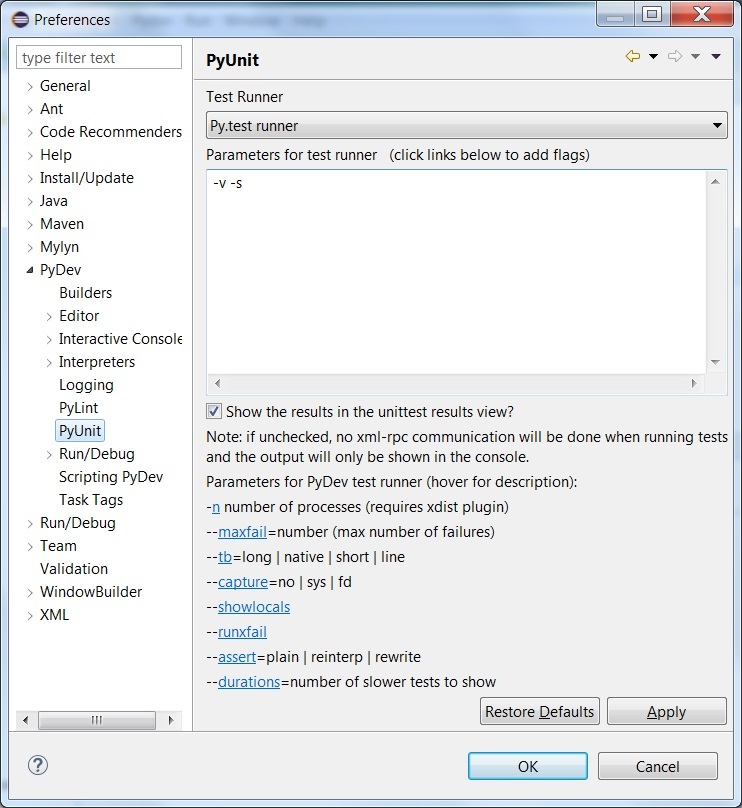
Интеграция с PyDev в Eclipse
Хотелось бы упомянуть, что PyTest интегрирован в компонент PyUnit модуля PyDev для Eclipse. Просто в настройках надо указать, что надо использовать именно его.
Дополнительные модули
PyTest имеет массу дополнительных модулей.
Могу лишь упомянуть те модули, которые меня заинтересовали и почему (детали о модулях можно прочитать по ссылке выше):
pytest-describe – добавляет еще один уровень абстракции (модуль-описание-функция, как эквивалент модуль-функция-testcase).
pytest-instafail – изменяет базовое поведение модуля таким образом что все ошибки и падения показываются в процессе исполнения, а не окончанию работы всей сесссии.
pytest-marks – позволяет задавать несколько меток одновременно для теста:
@pytest.mark.red
@pytest.mark.green
@pytest.mark.blue
def some_test_method(self):
.....
pytest-ordering — позволяет задавать вручную порядок запуска тестов через метку Run.
import pytest

@pytest.mark.run(order=2)
def test_foo():
    assert True

@pytest.mark.run(order=1)
def test_bar():
    assert True
pytest-pep8 – позволяет проверять код тестов на соответствие соглашения pep-8.
pytest-smartcov — позволяет проверять покрытие кода тестам, как полное, так и частичное.
pytest-timeout — позволяет завершать тесты по таймауту, через параметр командной строки или специальной метки.
pytest-sugar — позволяет изменить внешний вид вывода PyTest’а, добавляя прогресс бар и процент выполнения. Выглядит красиво, пускай местами и не очень информативно.
Послесловие
В базовой документации PyTest описано много интересных примеров по его расширенному использованию. Но о них я хотел бы рассказать в следующий раз: управление базовым поведением PyTest (шаблоны по которым собираются тесты, добавление расширенных опций для командной строки), управление процессом сбора тестов при параметризации (объект metafunc) и многое другое.
First time I had someone review my pull requests, she was pretty strict on tests. I couldn’t merge if the tests were failing, of course. But I also couldn’t merge if coverage had decreased by even 1%. TDD was still new to me so maintaining coverage was a challenge since I was only testing the bare minimum I could. I had to find out how to make my tests more robust and ensure as much of my code was tested as possible. One area that I wasn’t really sure how to test was the custom exceptions I had written. Here’s an example:
# login.py

def check_email_format(email):
    """check that the entered email format is correct"""
    pass

def test_email_exception():
    """test that exception is raised for invalid emails"""
    pass
Enter fullscreen mode
Exit fullscreen mode
This is probably something you want to do if you’re implementing a system with email authentication. The example is oversimplified, but it serves the purpose of this post well.
To test for raised exceptions, pytest offers a handy method: pytest.raises. Let’s see how to use it in our example:
import re
import pytest

def check_email_format(email):
    """check that the entered email format is correct"""
    if not re.match(r"(^[a-zA-Z0-9_.+-]+@[a-zA-Z0-9-]+\.[a-zA-Z0-9-.]+$)", email):
        raise Exception("Invalid email format")
    else:
        return "Email format is ok"

def test_email_exception():
    """test that exception is raised for invalid emails"""
    with pytest.raises(Exception):
        assert check_email_format("good@email.com")
Enter fullscreen mode
Exit fullscreen mode
The check_email_format method takes in an email and checks that it matches the regex pattern given. If it does, it returns "Email format is ok", otherwise, an exception is raised.
Using pytest.raises in a with block as a context manager, we can check that an exception is actually raised if an invalid email is given. Running the tests on the code as it is above should fail:
collected 1 item
login.py F                [100%]

==================== FAILURES ========================

    def test_email_exception():
        """test that exception is raised for invalid emails"""
        with pytest.raises(Exception):
>           assert check_email_format("good@email.com")
E           Failed: DID NOT RAISE <class 'Exception'>

login.py:16: Failed
Enter fullscreen mode
Exit fullscreen mode
Notice it says Failed: DID NOT RAISE <class 'Exception'>. If an exception is not raised, the test fails. I found this to be pretty awesome. We passed in a valid email format (according to our standards here) so the test works as expected. Now we can make it pass.
import re
import pytest

def check_email_format(email):
    """check that the entered email format is correct"""
    if not re.match(r"(^[a-zA-Z0-9_.+-]+@[a-zA-Z0-9-]+\.[a-zA-Z0-9-.]+$)", email):
        raise Exception("Invalid email format")
    else:
        return "Email format is ok"

def test_email_exception():
    """test that exception is raised for invalid emails"""
    with pytest.raises(Exception):
        assert check_email_format("bademail.com") # invalid email format to raise exception
Enter fullscreen mode
Exit fullscreen mode
Run your test: pytest login.py:
collected 1 item

login.py .              [100%]

====================== 1 passed in 0.05 seconds ======================
Enter fullscreen mode
Exit fullscreen mode
You can also add an extra check for the exception message:
import re
import pytest

def check_email_format(email):
    """check that the entered email format is correct"""
    if not re.match(r"(^[a-zA-Z0-9_.+-]+@[a-zA-Z0-9-]+\.[a-zA-Z0-9-.]+$)", email):
        raise Exception("Invalid email format")
    else:
        return "Email format is ok"

def test_email_exception():
    """test that exception is raised for invalid emails"""
    with pytest.raises(Exception) as e:
        assert check_email_format("bademail.com")
    assert str(e.value) == "Invalid email format"
Enter fullscreen mode
Exit fullscreen mode

I have functions in my Python code that raise exceptions in response to certain conditions, and would like to confirm that they behave as expected in my pytest scripts.
Currently I have
def test_something():
    try:
        my_func(good_args)
        assert True
    except MyError as e:
        assert False
    try:
        my_func(bad_args)
        assert False
    except MyError as e:
        assert e.message == "My expected message for bad args"
but this seems cumbersome (and needs to be repeated for each case).
Is there way to test exceptions and errors using Python, or a preferred pattern for doing so?
def test_something():
    with pytest.raises(TypeError) as e:
        my_func(bad_args)
        assert e.message == "My expected message for bad args"
does not work (i.e. it passes even if I replace the assertion with assert False).
Одной из распространенных задач при написании тестов на Python с использованием библиотеки pytest является проверка того, что определенный блок кода вызывает

Одной из распространенных задач при написании тестов на Python с использованием библиотеки pytest является проверка того, что определенный блок кода вызывает ожидаемое исключение. Это может быть полезно, если код предназначен для обработки определенных ошибок или исключений, и нужно убедиться, что он работает правильно.
Рассмотрим код, который должен вызвать исключение ZeroDivisionError:
def divide_by_zero():
    return 9/0
Тест для этой функции может выглядеть следующим образом:
def test_divide_by_zero():
    try:
        divide_by_zero()
    except ZeroDivisionError as e:
        pytest.fail(e, pytrace=True)
Однако, это не будет работать так, как ожидалось. Вместо того чтобы показать трассировку исключения, pytest просто укажет, что тест не прошел.
Чтобы корректно проверить возникновение исключения и получить трассировку, следует использовать контекстный менеджер pytest.raises. Это специальный блок кода, который проверяет, что внутри него возникает определенное исключение.
Используя pytest.raises, тест для функции divide_by_zero будет выглядеть так:
def test_divide_by_zero():
    with pytest.raises(ZeroDivisionError):
        divide_by_zero()
Теперь, если функция divide_by_zero вызывает исключение ZeroDivisionError, тест будет пройден успешно. Если же исключение не возникает или возникает исключение другого типа, тест не пройдет, и pytest предоставит трассировку исключения, что поможет в отладке.
Таким образом, использование pytest.raises позволяет не только удобно проверять возникновение исключений, но и получать полезную информацию для отладки в случае неудачного теста.