Windows 8.1 Windows 8.1 Enterprise Windows 8.1 Pro Windows 8 Windows 8 Enterprise Windows 8 Pro Windows 7 Enterprise Windows 7 Home Basic Windows 7 Home Premium Windows 7 Professional Windows 7 Starter Windows 7 Ultimate Windows Vista Enterprise 64-bit Edition Windows Vista Ultimate 64-bit Edition Windows Vista Business Windows Vista Business 64-bit Edition Windows Vista Enterprise Windows Vista Ultimate Windows 10 More…Less
If some Windows functions aren’t working or Windows crashes, use the System File Checker to scan Windows and restore your files.
Though the steps below might look complicated at first glance, just follow them in order, step-by-step, and we’ll try to get you back on track.
Run the System File Checker tool (SFC.exe)
To do this, follow these steps:
-
Open an elevated command prompt. To do this, do the following as your appropriate:
-
If you are running Windows 10, Windows 8.1 or Windows 8, first run the inbox Deployment Image Servicing and Management (DISM) tool prior to running the System File Checker. (If you are running Windows 7 or Windows Vista, skip to Step 3.)
Type the following command, and then press Enter. It may take several minutes for the command operation to be completed.
DISM.exe /Online /Cleanup-image /Restorehealth
Important: When you run this command, DISM uses Windows Update to provide the files that are required to fix corruptions. However, if your Windows Update client is already broken, use a running Windows installation as the repair source, or use a Windows side-by-side folder from a network share or from a removable media, such as the Windows DVD, as the source of the files. To do this, run the following command instead:
DISM.exe /Online /Cleanup-Image /RestoreHealth /Source:C:\RepairSource\Windows /LimitAccess
Note: Replace the C:\RepairSource\Windows placeholder with the location of your repair source. For more information about using the DISM tool to repair Windows, reference Repair a Windows Image.
-
At the command prompt, type the following command, and then press ENTER:
sfc /scannow
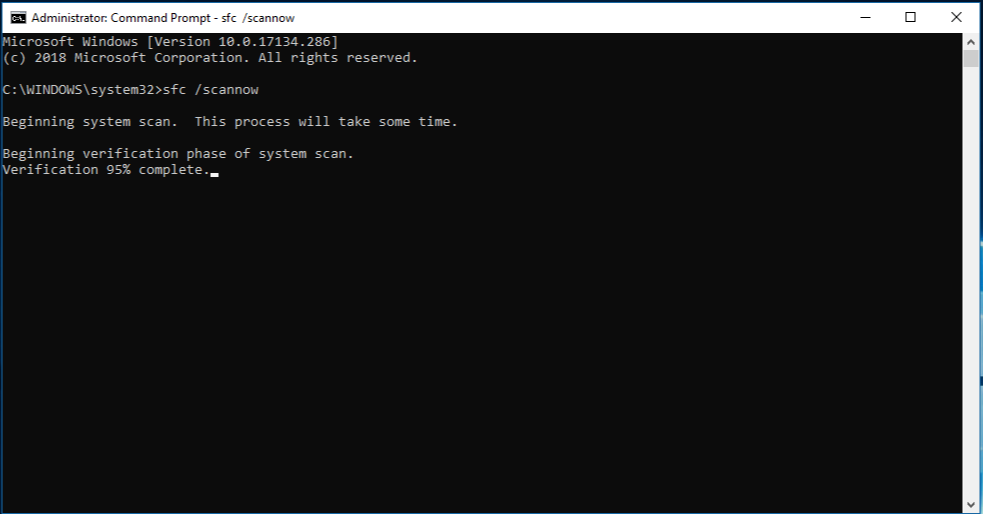
The sfc /scannow command will scan all protected system files, and replace corrupted files with a cached copy that is located in a compressed folder at %WinDir%\System32\dllcache.
The %WinDir% placeholder represents the Windows operating system folder. For example, C:\Windows.
Note Do not close this Command Prompt window until the verification is 100% complete. The scan results will be shown after this process is finished.
-
After the process is finished, you may receive one of the following messages:
-
Windows Resource Protection did not find any integrity violations.
This means that you do not have any missing or corrupted system files. -
Windows Resource Protection could not perform the requested operation.
To resolve this problem, perform the System File Checker scan in safe mode, and make sure that the PendingDeletes and PendingRenames folders exist under %WinDir%\WinSxS\Temp. -
Windows Resource Protection found corrupt files and successfully repaired them. Details are included in the CBS.Log %WinDir%\Logs\CBS\CBS.log.
To view the detail information about the system file scan and restoration, go to How to view details of the System File Checker process. -
Windows Resource Protection found corrupt files but was unable to fix some of them. Details are included in the CBS.Log %WinDir%\Logs\CBS\CBS.log.
To repair the corrupted files manually, view details of the System File Checker process to find the corrupted file, and then manually replace the corrupted file with a known good copy of the file.
-
Swipe in from the right edge of the screen, and then tap Search. Or, if you are using a mouse, point to the lower-right corner of the screen, and then click Search. Type Command Prompt in the Search box, right-click Command Prompt, and then click Run as administrator. If you are prompted for an administrator password or for a confirmation, type the password, or click Allow.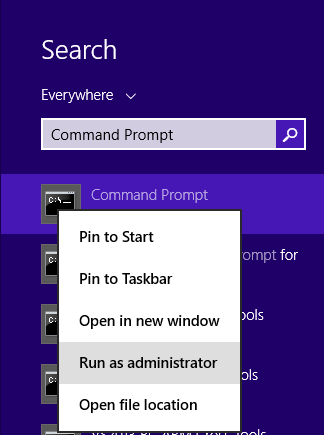
To do this, click Start, type Command Prompt or cmd in the Search box, right-click Command Prompt, and then click Run as administrator. If you are prompted for an administrator password or for a confirmation, type the password, or click Allow.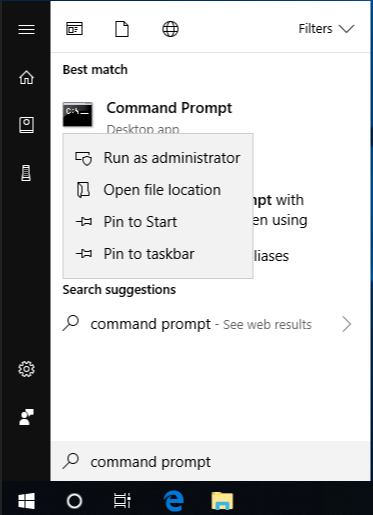
More Information
How to view details of the System File Checker process
To view the details that included in the CBS.Log file, you can copy the information to the Sfcdetails.txt file by using the Findstr command, and then view the details in the Sfcdetails.txt. To do this, follow these steps:
-
Open an elevated command prompt as described in the previous step 1.
-
At the command prompt, type the following command, and then press ENTER:
findstr /c:"[SR]" %windir%\Logs\CBS\CBS.log >"%userprofile%\Desktop\sfcdetails.txt"
Note The Sfcdetails.txt file contains details from every time that the System File Checker tool has been run on the computer. The file includes information about files that were not repaired by the System File Checker tool. Verify the date and time entries to determine the problem files that were found the last time that you ran the System File Checker tool.
-
Open the Sfcdetails.txt file from your desktop.
-
The Sfcdetails.txt file uses the following format:
Date/Time SFC detail
The following sample log file contains an entry for a file that could not be repaired:2007-01-12 12:10:42, Info CSI 00000008 [SR] Cannot
repair member file [l:34{17}]»Accessibility.dll» of Accessibility, Version =
6.0.6000.16386, pA = PROCESSOR_ARCHITECTURE_MSIL (8), Culture neutral,
VersionScope neutral, PublicKeyToken = {l:8 b:b03f5f7f11d50a3a}, Type
neutral, TypeName neutral, PublicKey neutral in the store, file is missing
How to manually replace a corrupted system file with a known good copy of the file
After you determine which system file was corrupted and could not be repaired through the detail information in the Sfcdetails.txt file, find where the corrupted file located, and then manually replace the corrupted file with a known good copy of the file. To do this, follow these steps:
Note You may be able to get a known good copy of the system file from another computer that is running the same version of Windows with your computer. You may perform a System File Checker process on that computer to make sure the system file that you intend to copy is a good copy.
-
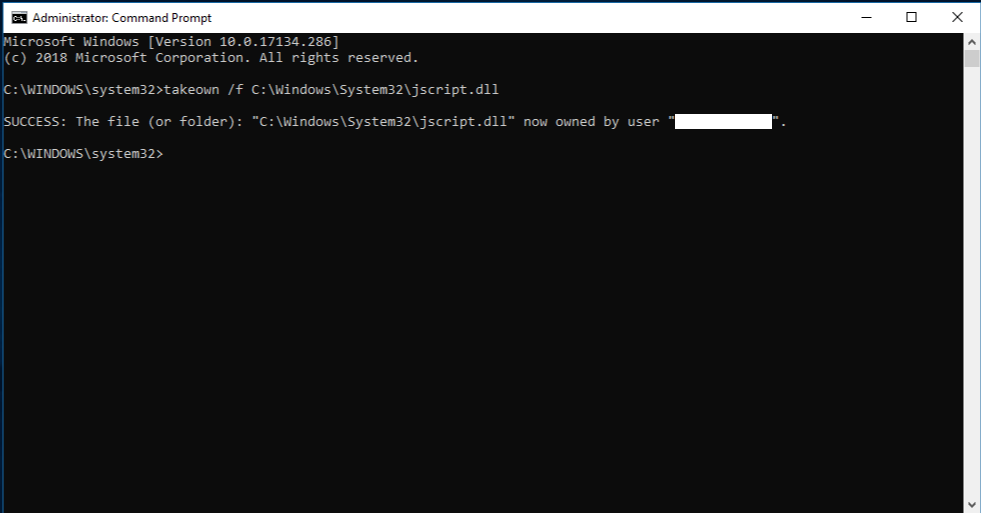
Take administrative ownership of the corrupted system file. To do this, at an elevated command prompt, copy and then paste (or type) the following command, and then press ENTER:
takeown /f Path_And_File_Name
Note The Path_And_File_Name placeholder represents the path and the file name of the corrupted file. For example, type takeown /f C:\windows\system32\jscript.dll.

-
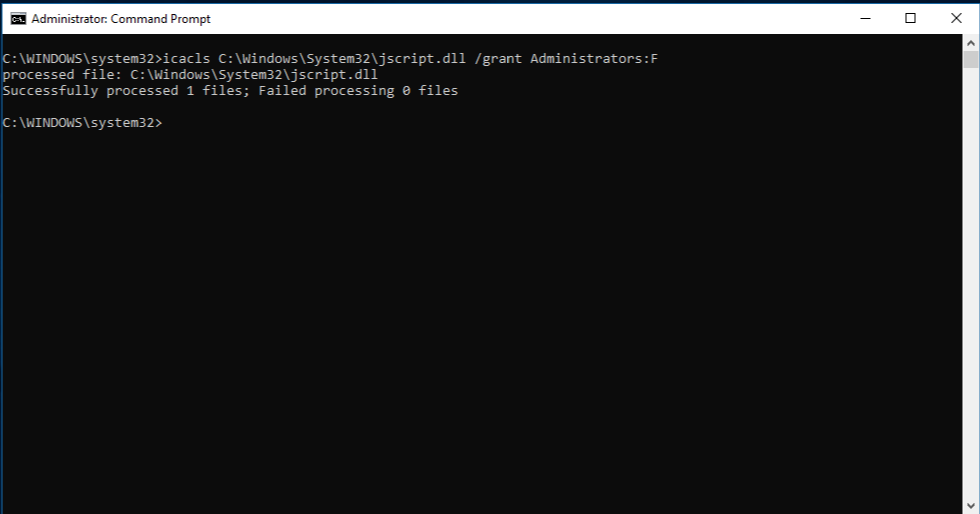
Grant administrators full access to the corrupted system file. To do this, copy and paste (or type) the following command, and then press ENTER:
icacls Path_And_File_Name /GRANT ADMINISTRATORS:F
Note The Path_And_File_Name placeholder represents the path and the file name of the corrupted file. For example, type icacls C:\windows\system32\jscript.dll /grant administrators:F. -
Replace the corrupted system file with a known good copy of the file. To do this, copy and paste (or type) the following command, and then press ENTER:
Copy Source_File Destination
Note The Source_File placeholder represents the path and file name of the known good copy of the file on your computer, and the Destination placeholder represents the path and file name of the corrupted file. For example, type copy E:\temp\jscript.dll C:\windows\system32\jscript.dll.
If the steps above don’t work, you may need to reinstall Windows. For more info, see Windows 10 recovery options.
Need more help?
Want more options?
Explore subscription benefits, browse training courses, learn how to secure your device, and more.
Communities help you ask and answer questions, give feedback, and hear from experts with rich knowledge.
The system file checker tool is a useful command used to scan and repair corrupt or damaged system files. This command is usually used when users encounter problems with the…
The system file checker tool is a useful command used to scan and repair corrupt or damaged system files. This command is usually used when users encounter problems with the system files of Windows OS.
sfc /scannow is the most popular command to scan for corrupt system files immediately. It will not only scan, but also try to repair or replace corrupt system files with healthy ones. It requires a Windows installation source to copy files from.
The system file checker is a universal command and can be used in all Windows operating systems, including Windows 11, Windows 10, Windows 8, Windows 7 and Windows Vista.
This command line can perform several functions. We will discuss these in this article.
Table of contents
- SFC Switches
- Running Basic SFC Scan
- Outputs of SFC Scan
- Why SFC Scan Failed
- How to Open SFC CBS.Log File
-
How to Fix SFC /ScanNow Failed
- Scan Hard Drive
- Enable Built-In Administrator Account
- Reboot in Safe Mode
- Log In From Built-In Administrator Account
- Run DISM Utility
- Run SFC ScanNow
- Run Offline SFC ScanNow from WinPE
- Manually Replace Corrupted Files
- Scan Other Non-OS Volumes using SFC
-
How to Fix «Windows Resource Protection Could Not Start The Repair Service»
- Start Dependency Service
- Disable Turbo Memory
- Modify Security Descriptors
- Other Mitigation Methods
-
Frequently Asked Questions
- Does SFC ScanNow fix anything?
- How to run SFC scan?
- Is the SFC scan safe?
- What does SFC ScanNow actually do?
- Can you exit SFC scannow?
- Does SFC ScanNow improve performance?
- Can SFC ScanNowfix BSoDs?
SFC Switches
The table below lists all the switches which can be used with the SFC command-line tool, and their functions:
| Commands | Function |
| sfc /scannow | Scan for issues. If found, replace the file from the DLL cache. |
| sfc /scanonce | Will scan only once. |
| sfc /scanboot | Will scan the computer at every boot. |
| sfc /revert | Revert the scanning functionality to its original (default) state. |
| sfc /purgecache | Will remove the Windows File Protection cache and begin a scan over the system files. |
| sfc /cachesize=X | Set the cache size of the Windows File Protection to X MBs. |
| sfc /? | Display help regarding switches. |
Today, we are only going to be focusing on the “sfc /scannow” cmdlet as it is the one that quickly and effectively fixes your operating system.
Running Basic SFC Scan
The simplest (and most convenient) method to run the system file checker command is by running the following cmdlet in an elevated Command Prompt window:
sfc /scannow
The cmdlet will then perform its job and attempt to repair any protected files that may have been corrupted. However, that is not always the case, and users may encounter different errors from time to time.
Before we discuss these different errors, let us discuss the various outputs of the basic scan and what each of those means.
Outputs of SFC Scan
As you can observe in the image above, the output of the SFC scan states the following:
Windows Resource Protection found corrupted files and successfully repaired them.
It then also states the location of a CBS.log file which contains the details of the performed scan – we’ll get into that a moment later.
Let us now see all the possible outputs of the SFC scan that different users can encounter and what they mean:
| Output Statement | Meaning |
| Windows Resource Protection did not find any integrity violations. | No missing or corrupted system files were detected, meaning your system’s integrity is intact. |
| Windows Resource Protection could not perform the requested operation. | An unknown issue occurred and the scan could not be performed. In this case, you must adopt the alternative methods given below in this post. |
| Windows Resource Protection found corrupt files and successfully repaired them. | Missing or corrupted files were found and have been repaired, restoring your system’s integrity. |
| Windows Resource Protection found corrupt files but was unable to fix some of them. | Your system’s integrity was compromised, but SFC did not work. In this case, you must adopt alternative methods to fix the issue or replace the files manually using the given guide further down this post. |
Apart from this, there are other possible issues that you may encounter while performing the scan.
Why SFC Scan Failed
You may encounter any one of the following scenarios while performing an SFC scan. The table below lists those scenarios along with their possible solutions.
Note: The methods to perform these solutions are discussed below.
| Symptom of Failure | Possible Solution |
| Scan stuck at verification | Run the scan in safe mode or replace files manually |
| Scan gets frozen at a certain percentage | First run the DISM tool and then run the SFC scan in safe mode. |
| Nothing happens when running “sfc /scannow” | Run the DISM tool first and then run the SFC scan in safe mode. |
| SFC scan completely stops | Disable Intel Turbo Memory and try rerunning the scan. |
| SFC scan cannot fix the problem | First run the DISM tool and then run the SFC scan in safe mode. |
| Scan requires administrative privileges | Run the scan from an administrator account with an elevated Command Prompt. |
Before we discuss the different methods to run the SFC scan, bypassing any issues, let us look at the log file generated when an SFC scan is executed.
How to Open SFC CBS.Log File
When you perform an SFC scan, the system automatically generates a log file named “CBS.log.” This file contains information on the scan that was executed, which can help you advanced troubleshoot if you encounter an issue with the SFC tool.
The CBS.Log file is saved at the following location:
C:\Windows\Logs\CBS
You can open this log file using a text editor, such as Notepad, Word, Wordpad, etc.
Follow these steps to open the file:
-
Navigate to the following location using File Explorer:
C:\Windows\Logs\CBS
-
Here, right-click the file “CBS” then click Open with from the context menu.

Select Open With from context menu -
Now select the program you want to open the text file with from the popup and click Ok.
Select program to open with


The log file will then open in the text editor.

Since the CBS.Log file can be lengthy, you can analyze it using the Find function. You can look for keywords in the entire file using the CTRL + F shortcut keys, and then use the following keywords to look for the details on the file that may have been repaired, not repaired, corrupted, etc. Here is a list of the keywords you can use and the respective features you can find.
| Keyword | Details |
| Repaired | View files that were repaired |
| Cannot repair | View files SFC failed to repair – Will need to be replaced manually |
| Corrupt | Files that are or were corrupted – Will need to be replaced manually |
By analyzing the CBS.Log file, you can pinpoint the files which SFC could not repair, and then replace those files manually using the guide given down below.
How to Fix SFC /ScanNow Failed
If you are not able to fix your operating system using the basic approach for running the SFC scan, then there is still plenty you can do to mitigate the problem.
Note: The below methods need to be performed using only an administrative account and any commands need to be run using an elevated Command Prompt.
Note: The steps given below need to be performed in a methodical order as given.
-
Scan Hard Drive
To begin, you first need to scan your hard drive for errors or bad sectors using the Check Disk (CHKDSK) utility, since those could prevent the SFC scan from performing a successful repair. Here is how to do it:
-
Open Command Prompt with administrative privileges.
-
Run the following cmdlet:
Chkdsk C: /f /r /x -
You will be asked to schedule the CHKDSK utility the next time the computer reboots. Enter Y for yes.

Run Check Disk utility -
Now restart your computer. Once it reboots, the Check Disk utility will run and scan your hard drive. This can take a while, in some cases, hours. Let the scan finish and reboot into Windows.
-
-
Enable Built-In Administrator Account
Now enable the built-in Administrator account, which will be needed by following the steps below. Using this account, you will have elevated privileges required to manipulate protected files.
There are several ways to enable the built-in Administrator account on a Windows computer. Click here to learn more about them.
-
Reboot in Safe Mode
Safe Mode is a diagnostic mode that starts Windows in a basic state, loading a limited set of files and drivers. This is intended for troubleshooting Windows problems.
Perform these steps to boot into Safe Mode with Networking – which means you will have access to the internet which is then later required to run the DISM utility.
-
Open the System Configuration applet by typing in msconfig in the Run Command box.

Open System Configuration applet -
Switch to the Boot tab. Here, in the Boot options section, check the box next to “Safe Boot,” and then select the Network radio button under it. Once done, click Apply and Ok.

Boot into safe mode with networking -
In the confirmation dialog box, click Restart.

Confirm rebooting
Your computer will now reboot into Safe Mode.
Learn other methods to boot into Safe Mode.
-
-
Log In From Built-In Administrator Account
Now you must log in to the Administrator account that you enabled earlier. This will allow you to have the privileges to repair missing or corrupted system files.
-
Run DISM Utility
Once you are logged in, you must first run the DISM utility to fix the system image. Fixing the system image will then allow the SFC scan to perform its task without any hindrance.
The DISM tool can be used to prepare, modify, and repair system images. However, you need an active internet connection to download and replace corrupted content from Windows Update, which is why we opted to boot into Safe Mode with internet connectivity.
Follow these steps to run the DISM utility:
-
Launch the Command Prompt with administrative privileges.
-
Now execute the following cmdlets one after the other, allowing each cmdlet sufficient time to complete.
DISM.exe /Online /Cleanup-image /Checkhealth
DISM.exe /Online /Cleanup-image /Scanhealth
DISM.exe /Online /Cleanup-image /Restorehealth
Run DISM utility
Once this is done successfully, do not close the Command Prompt.
-
-
Run SFC ScanNow
Now all you need to do is run the basic SFC scan in an attempt to repair the operating system and the corrupted files within. Run the following cmdlet in an elevated Command Prompt:
sfc /scannow
SFC scan in Safe Mode


That is it! This method should eliminate any issues you experience while performing the SFC scan in basic mode. Restart the computer once the scan is complete.
However, if you find the SFC utility is still unable to fix missing or corrupted files, there are still several things you can do. To begin, we suggest you analyze the CBS.Log file, as we discussed earlier in this post.
Run Offline SFC ScanNow from WinPE
The offline version of the SFC scan means that you run the scan from the Windows Preinstallation Environment (WinPE). This method can be especially useful if you are unable to boot into Windows.
This process requires a Windows installation device (DVD, bootable USB) that has the same OS version as installed.
Perform the following steps to attempt and repair any missing or corrupted system files using the SFC scan with WinPE.
-
Plugin the bootable device and boot from it.
-
On the first screen, click Next.
Proceed to next -
Now click Repair your computer.
Attempt to repair -
Now select Troubleshoot.
Select Troubleshoot -
Now select Command Prompt.
Open Command Prompt in WinPE -
The Command Prompt will now open in front of you. Paste the following cmdlet to verify the drive letter assigned to the volume where Windows is installed.
bcdeditNote down the drive letter beneath “Windows Boot Loader” in front of device.

Note down drive letter Note: Since the drive letters assigned in WinPE are not the same as the default drive letters you see when Windows is booted, these can be different for everyone. Therefore, it is important to determine which drive letter is currently assigned to the boot volume.
-
Now use the following cmdlet to run the SFC scan here, while replacing DriveLetter (in 2 places) with the letter of the drive where Windows is installed as noted in the last step:
sfc /scannow /offbootdir=DriveLetter: /offwindir=DriveLetter:\Windows -
Once the scan is complete, restart your computer and boot normally into Windows.


If this does not work for you either, you can manually replace the corrupted files yourself.
Manually Replace Corrupted Files
At this point, you must have already analyzed the VBS.Log file we had discussed earlier. Using the file names determined from there, you can manually replace them with healthy files obtained from another computer. Here is how to do it:
-
Start by taking ownership of the corrupted system file. To do so, run the following cmdlet in an elevated Command Prompt while replacing Path&FileName with the complete path and file name of the corrupted file:
takeown /f Path&FileName
Take ownership of file -
Next, grant the Administrators group full access to the file using the following cmdlet while replacing Path&FileName as earlier:
icacls Path&FileName /GRANT ADMINISTRATORS:FGrant Administrators full rights to file -
Now you should be able to easily replace the file with another copy. At this point, copy the same file from a healthy computer having the same Windows version and paste it here, replacing the current one.


That is it! You can now repeat the same process to manually replace any corrupted files.
Scan Other Non-OS Volumes using SFC
It may be possible that you are running more than one operating system on your PC, and not all of them can be in the same drive (usually the C drive). In that case, you must direct the SFC scan to attempt and repair another drive.
Furthermore, you can also direct it to scan external drives, such as USB flash drives, SD cards, etc.
Here is how to do so:
Note: Since SFC can only fix missing and corrupted files, it can only attempt to repair drives with a Windows operating system in it.
-
Open Command Prompt with elevated privileges.
-
Now use the following cmdlet to scan another drive while replacing DriveLetter with the drive letter for the volume you want to scan:
sfc/scannow/offbootdir=DriveLetter: /offwindir=DriveLetter:\Windows
The scan will now attempt to repair any corrupted or missing files that you selected other than the C drive.
How to Fix “Windows Resource Protection Could Not Start The Repair Service”
It may be possible that you encounter the following error while trying to run an SFC scan on your computer:
Windows Resource Protection could not start the repair service
If so, here are a few things you can do to mitigate this issue:
Start Dependency Service
It may be possible that a dependency service named “Windows Modules Installer (Trusted Installer)” isn’t running on your computer, preventing the scan from happening. In that case, the service needs to be enabled.
-
Open the Services console by typing in services.msc in the Run Command box.
Open Services console -
Here, scroll down and right-click on the service “Windows Modules Installer” and then click Properties from the context menu.

Open service properties -
From the popup, select “Startup Type” as Automatic, then click Start. When the service starts, click Apply and Ok to save the changes.
Enable and start service -
Try rerunning the SFC scan.


Learn other methods to enable and disable Windows services.
Disable Turbo Memory
Intel Turbo Memory is a feature that allows NAND memory modules to power up, access programs, and write data on the hard drive much quicker than usual. This feature can be controlled through the system BIOS.
If you experience an SFC scan suddenly stops or cannot complete its job, then you must disable Turbo Memory from the BIOS settings.
Learn how to access BIOS.
Modify Security Descriptors
A Security Descriptor contains security information that may be associated with a securable object. It may be possible that critical Security Descriptors may have corrupted in the WinSXS folder where critical files are stored.
To mitigate this issue, perform the following task:
-
Launch the Command Prompt with administrative rights.
-
Now run the following cmdlet:
ICACLS C:\Windows\winsxs
Modify Security Descriptors -
Now restart your computer and try rerunning the SFC scan.

Other Mitigation Methods
If you encounter the said error, there are other things you can also perform which we have already discussed above in this post. Here is a list of additional steps you can take:
- Run Check Disk Utility.
- Run DISM utility.
- Run SFC scan in Safe Mode.
- Replace corrupted files manually.
Frequently Asked Questions
Does SFC ScanNow fix anything?
Short answer: Yes, it does. However, the SFC tool itself can occasionally encounter errors, which are also fixable.
How to run SFC scan?
Run the following cmdlet in the Command Prompt:
sfc /scannow
Is the SFC scan safe?
Yes, the SFC scan is completely safe. In fact, you can even run it if nothing is wrong with your computer, just to ensure your device’s integrity.
What does SFC ScanNow actually do?
The SFC ScanNow cmdlet scans all protected files and replaces corrupted files with a cached copy that has been kept in its original shape.
Can you exit SFC scannow?
Yes, it is safe to cancel the scan. However, we do suggest that you allow it to be completed as it causes no harm. If you find that it is stuck you can cancel it using the CTRL + C keys simultaneously.
Does SFC ScanNow improve performance?
If the scan is able to fix critical files, it can sometimes improve the system’s overall performance and speed since the protected files are now as they should be.
Can SFC ScanNowfix BSoDs?
Potentially, yes. BSoDs are often caused by corrupted or missing files, and this is the one thing SFC is good at.

Всех приветствую!
Эта заметка может быть полезна в случаях, когда ОС Windows начала не стабильно работать, появились ошибки при запуске системных служб, приложений и т.д. Благо, что в самой же ОС есть спец. инструменты для проверки целостности (и исправления) системных файлов (речь о утилитах SFC и DISM).
Собственно, в неск. примерах ниже хочу показать как их можно использовать. В своих прошлых записях я тоже неоднократно ссылался на них (т.е. тема актуальна, несмотря на высокую стабильность работы современных версий Windows).
*
Примечание: системные файлы могут быть повреждены из-за вирусного заражения ОС, при сбоях файловой системы, при работе с некоторым ПО, из-за некорректного обновления, и пр. В целях безопасности — я бы на будущее порекомендовал делать 📌бэкапы важных данных + 📌контрольные точки в Windows.
📌 Важно!
Если у вас также пропали документы, фото, видео — ознакомьтесь с этой инструкцией/подборкой: https://ocomp.info/10-programm-dlya-vosstanovleniya-dannyih.html (часто удается многое восстановить).
*
Содержание статьи📎
- 1 Что можно посоветовать для восстан.-я системных файлов
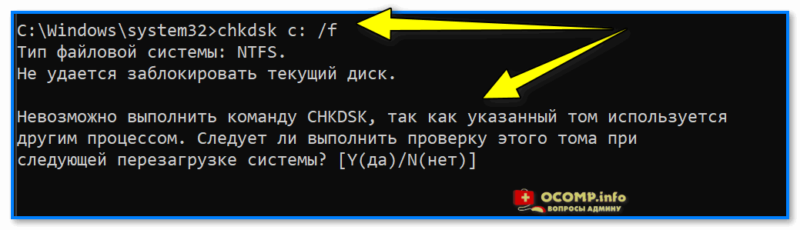
- 1.1 ШАГ 1 (chkdsk)
- 1.1.1 Можно ли chkdsk запустить с установочной флешки, если текущая Windows не загружается
- 1.2 ШАГ 2 (SFC)
- 1.2.1 Что делать, если ошибки не будут исправлены
- 1.3 ШАГ 3 (DISM)
- 1.4 ШАГ 4 (Контр. точки)
- 1.1 ШАГ 1 (chkdsk)
→ Задать вопрос | дополнить
Что можно посоветовать для восстан.-я системных файлов
ШАГ 1 (chkdsk)
Перед тем, как переходить к восст. сист. файлов — рекомендуется выполнить проверку файловой системы диска (+ исправить ошибки, если будут найдены оные).
Для этого требуется запустить командную строку от имени администратора, а затем воспользоваться командной:
chkdsk v: /f
См. скрины ниже. 👇
Примечание:
- вместо «v:» — можно указать свою букву диска (например, «C:»);
- параметр «/f» — используется для исправления найденных ошибок;
- параметр «/r» — используется для обнаружения повреждённые секторов на диске и восст. информации, которую можно прочитать;
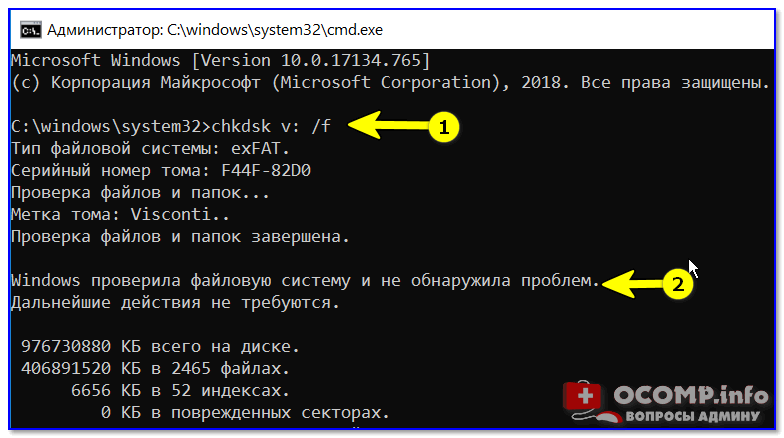
chkdsk v: /f — проверка диска
📌 Обратите внимание, что при успешной операции проверки диска — вы должны увидеть уведомление:
- либо, что Windows не обнаружила проблем;
- либо, что проблемы были устранены!
Проверка системного диска (chkdsk)
*
Можно ли chkdsk запустить с установочной флешки, если текущая Windows не загружается
Можно!
Только не факт, что она вам поможет… (по идее, если проблема с ошибками файловой системы возникли на системном диске — он будет проверен перед загрузкой ОС, причем, автоматически // без вашей просьбы на это).
Как запустить такую проверку:
- для начала нужно записать 📌установочную флешку с Windows;
- далее нужно загрузиться с нее (например, с помощью 📌Boot Menu);
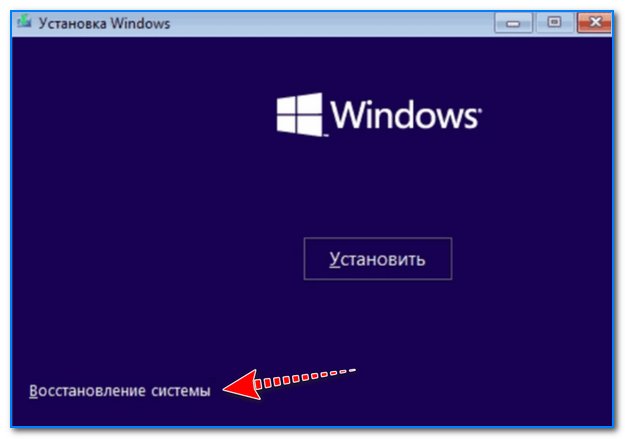
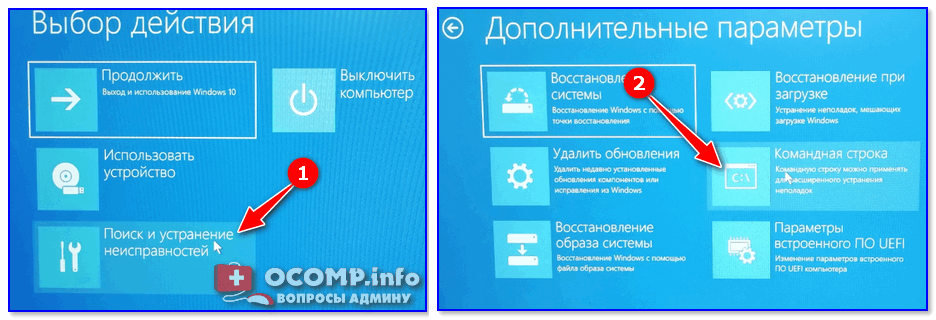
- затем в меню вместо установки начать восстановление ОС;

Восстановление системы // Окно установки Windows 10
- после перейти в раздел устранения неисправностей и запустить командную строку. См. скрин ниже; 👇

Поиск и устранение неисправностей — командная строка
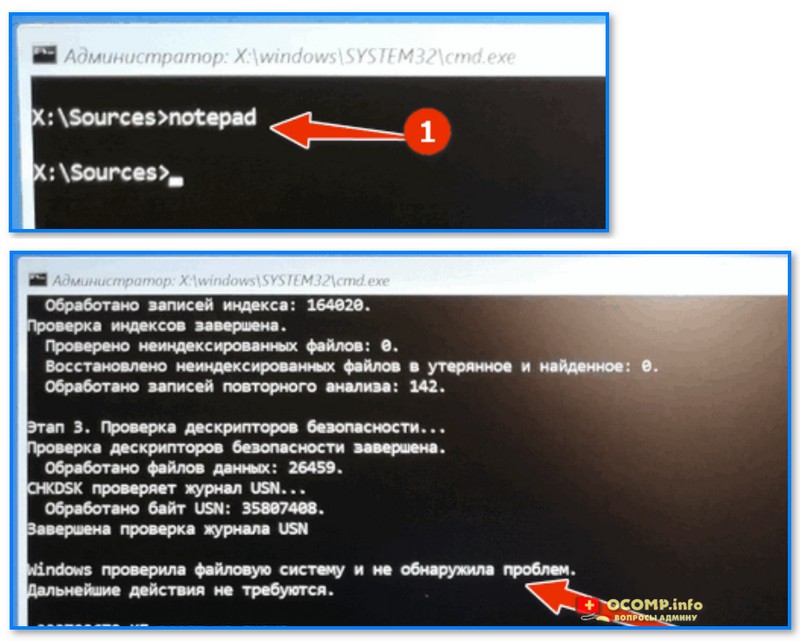
- в командной строке наберите notepad — откроется блокнот, через который можно посмотреть все текущие диски и их буквы (они нам и нужны!);
- собственно, теперь осталось только набрать команду проверки: скажем chkdsk D: /f (вместо «D» — свою букву диска).

Пример проверки диска, при загрузке с флешки
*
ШАГ 2 (SFC)
SFC (System File Checker) — спец. утилита для проверки и восст. файлов ОС.
Чтобы запустить ее — необходимо:
- открыть 📌командную строку от имени админа;
- ввести sfc /scannow и нажать Enter;
- дождаться результатов проверки*.
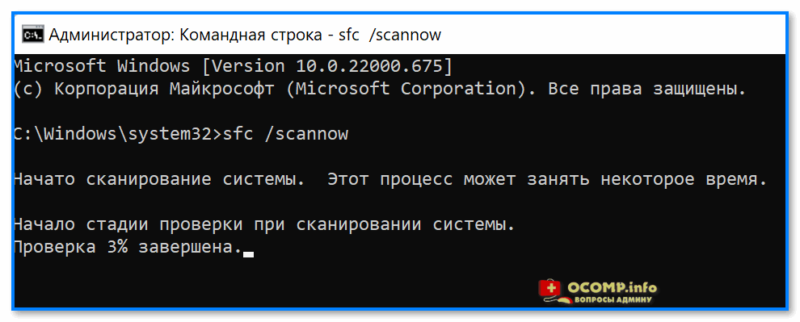
Начато сканирование системы. Этот процесс может занять некоторое время
* Результаты могут быть разными:
- идеально: если ошибки и нарушения целостности найдены не будут;
- хорошо: если найденные ошибки будут исправлены в ходе проверки;
- плохо/требуется доп. проверка: если ошибки будут найдены, но восстановить их не удастся.

Защита ресурсов Windows не обнаружила нарушений целостности
*
Что делать, если ошибки не будут исправлены
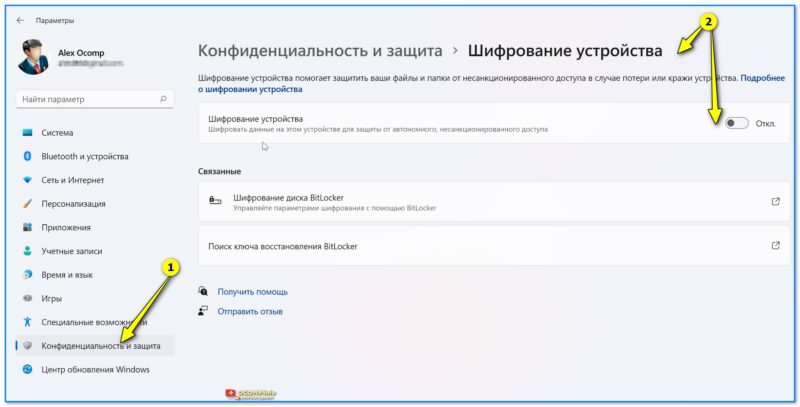
- заходим в 📌параметры ОС Windows и проверяем, чтобы было выключено шифрование диска;

Шифрование диска отключено (Windows 11)
- далее загружаемся с установочной флешки с Windows и запускаем «Восстановление системы»;
Восстановление системы
- далее открываем командную строку (во вкладке «Доп. параметры») и используем команду notepad (с помощью запуска блокнота — сможем узнать буквы всех дисков);
- затем используем команду: sfc /scannow /offbootdir=F:\ /offwindir=F:\Windows (где вместо «F:» — указываем букву диска с Windows. Вероятно, кстати, что буква не будет равна «C»!).
*
ШАГ 3 (DISM)
DISM (Deployment Image and Service Management)
Рекомендуется использовать уже после SFC (см. ШАГ 2).
Для запуска сначала также необходимо открыть 📌 командную строку под администратором, а затем ввести:
DISM /ONLINE /CLEANUP-IMAGE /RESTOREHEALTH
Операция занимает в среднем 3-15 мин., и во время ее выполнения — не стоит делать за ПК никаких ресурсоемких задач. См. пример ниже. 👇
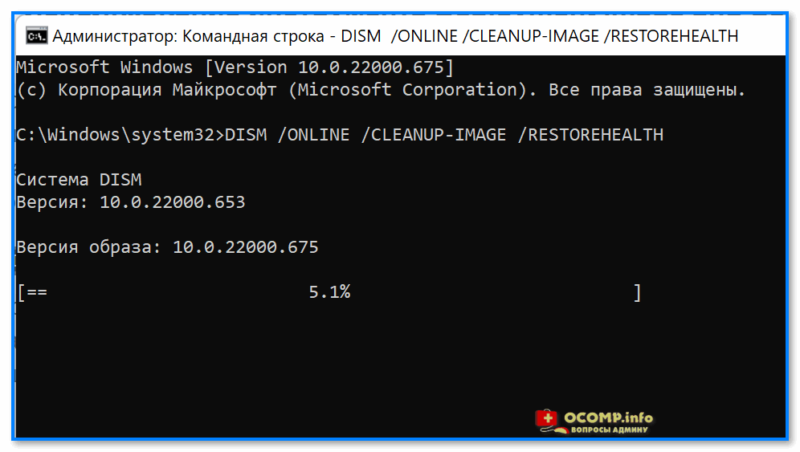
DISM — запуск восстановления
В идеале вы должны увидеть сообщение о том, что восстановление выполнено успешно, 100%. См. пример. 👇

DISM — восстановление выполнено успешно, 100%
📌 Если вышеприведенные команда (DISM) выдала ошибку — попробуйте подключить/смонтировать образ ISO с Windows… (Windows взять нужно такой же версии, что установлена и у вас). Это можно сделать прямо в проводнике.
Кстати, кроме проводника образ ISO могут смонтировать в вирт. привод и спец. утилиты.
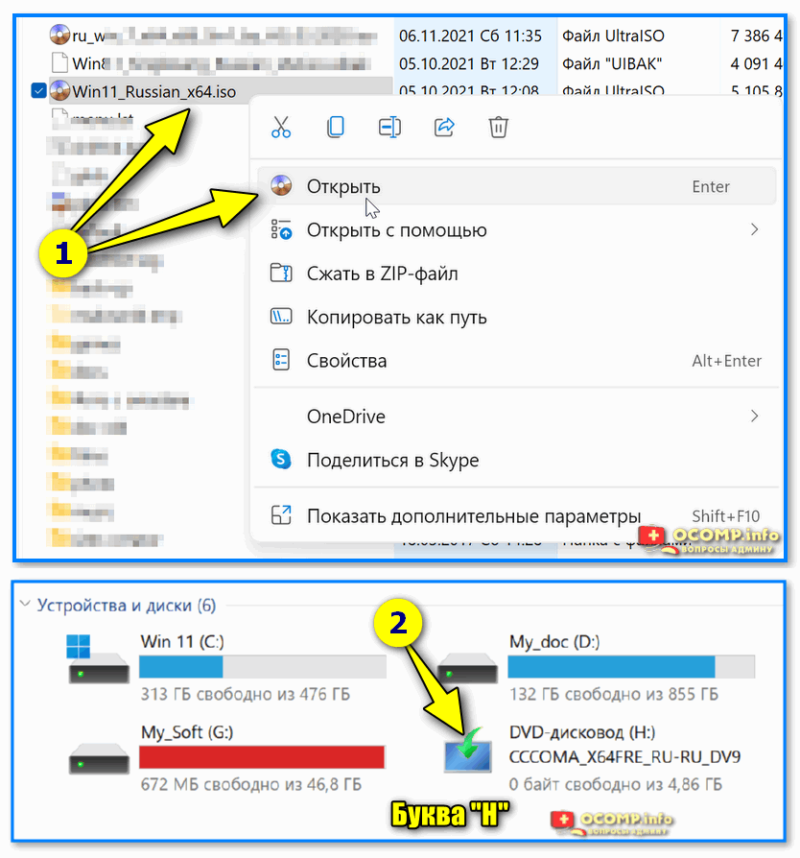
Открываем образ ISO (буква H)
Далее нужно ввести нижеприведенную команду (вместо буквы «H:» — укажите свою), и нажать Enter:
DISM /Online /Cleanup-Image /RestoreHealth /Source:H:\Sources\install.esd
В идеале через 3-15 мин. должно появится сообщение об успешном выполнении операции… 👇

Операция успешно завершена, восстановлено 100%
Примечание: DISM ведет логи, находятся они на системном диске C:\Windows\Logs\DISM (dism.log). Из них можно узнать, что было восстановлено, а что не удалось…
*
ШАГ 4 (Контр. точки)
Если всё вышеприведенное не дало результатов — я бы дополнительно посоветовал проверить наличие точек восстановления в Windows (если в наличии будет та точка, на дату которой система корректно работала, — стоит попробовать откатиться к ней).
Отмечу, что контрольные точки восст. обычно делаются автоматически (при вкл. опции).
*
Чтобы посм. какие есть точки восстановления — нужно:
- нажать Win+R, чтобы появилось окно «Выполнить»;
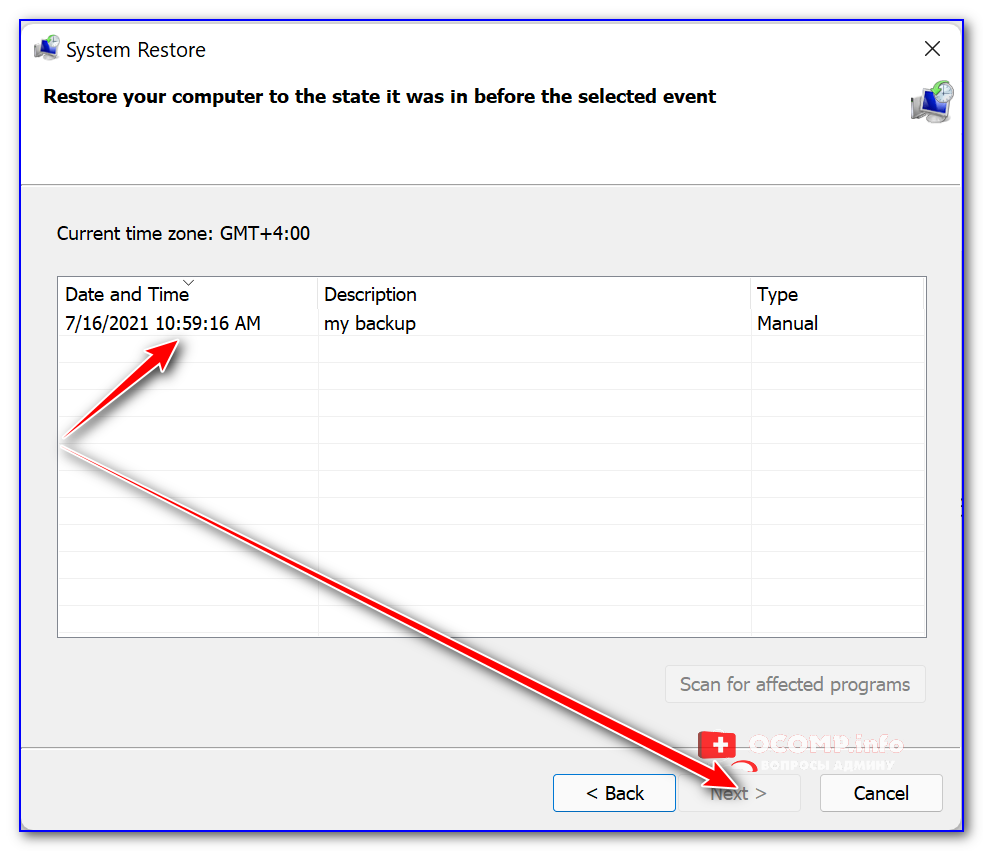
- ввести rstrui и нажать Enter;
- далее перед вами появится окно со списком точек (при их наличии). Если есть дата, на которую ПК корректно работал, выберите ее и попробуйте откатить систему (прим.: файлы и документы пользователя эта операция не затрагивает. По крайней мере, так заявляют разработчики Windows, да и раньше такого никогда не было… 🙂).

Все точки восстановления, список
*
📌 В помощь!
Как работать с точками восстановления в Windows 11 (для отката системы после появл. ошибок, невозможности загрузки и т.д.) — https://ocomp.info/tochku-vosstanovleniya-v-win11.html
*
Иные рекомендации по теме — приветствуются!
Успехов и легкой починки!
🙂


What to Know
- Open Command Prompt as an administrator and enter sfc /scannow.
- Restart your computer if sfc /scannow repaired files.
- Repeat whatever process caused your original problem to see if sfc /scannow resolved it.
This article explains how to use the sfc /scannow command to repair Windows system files. The instructions apply to Windows 11, Windows 10, Windows 8, Windows 7, and Windows Vista.
How to Use SFC /Scannow
Follow these steps to repair Windows system files with sfc /scannow:
-
Open Command Prompt as an administrator, very often referred to as an «elevated» Command Prompt.
For the sfc /scannow command to work properly, it must be executed from an elevated Command Prompt window.
-
Type the following command and then press Enter.
sfc /scannowTo use System File Checker from the Command Prompt through Advanced Startup Options or System Recovery Options, see the Executing SFC /SCANNOW From Outside of Windows section below for some necessary changes in how you execute the command.
System File Checker will now verify the integrity of every protected operating system file on your computer. It might take a while to finish.
When the verification process completes, you’ll see something like this in the Command Prompt window, assuming problems were found and corrected:
Windows Resource Protection found corrupt files and successfully repaired them. Details are included in the CBS.Log windir\Logs\CBS\CBS.log. For example C:\Windows\Logs\CBS\CBS.log. Note that logging is currently not supported in offline servicing scenarios.…or something like this, if no problems were found:
Windows Resource Protection did not find any integrity violations.In some situations, most often in Windows XP and Windows 2000, you may also need access to your original Windows installation CD or DVD at some point during this process.
-
Restart your computer if sfc /scannow repaired files. System File Checker may or may not prompt you to restart but even if it doesn’t, you should restart anyway.
-
Repeat whatever process caused your original problem to see if sfc /scannow resolved it.
What Is SFC /Scannow?
The sfc /scannow command is one of the several specific switches available in the sfc command, the Command Prompt utility invoking System File Checker.
While there are plenty of different things you can do with the command, sfc /scannow is the most common way that the sfc command is used.
Sfc /scannow will inspect all of the important Windows files on your computer, including Windows DLL files. If System File Checker finds a problem with any of these protected files, it will replace it.
How to Interpret the CBS.log File
Every time you run System File Checker, a LOG file is created that itemizes every file that was checked and every repair operation that completed.
Assuming Windows is installed on the C: drive then the log file can be found here and opened with Notepad or some other text editor:
C:\Windows\Logs\CBS\CBS.log
This file could be useful for advanced troubleshooting or as a resource for a tech support person that might be helping you out.
Executing SFC /Scannow From Outside of Windows
When running sfc /scannow from outside of Windows, like from the Command Prompt available when you boot from your Windows installation disc or flash drive, or from your System Repair Disc or Recovery Drive, you’ll have to tell the sfc command exactly where Windows exists.
Here’s an example:
sfc /scannow /offbootdir=d:\ /offwindir=d:\windows
The /offbootdir= option specifies the drive letter, while the /offwindir= option specifies the Windows path, again including the drive letter.
Depending on how your computer is configured, the Command Prompt, when used from outside of Windows, doesn’t always assign drive letters in the same way that you see them from inside Windows. In other words, Windows might be at C:\Windows when you’re using it, but D:\Windows from the Command Prompt in ASO or SRO.
In most installations of Windows 11, Windows 10, Windows 8, and Windows 7, C: usually becomes D: and in Windows Vista, C: is usually still C:. To check for sure, look for the drive with the Users folder on it—that will be the drive Windows is installed on, unless you have multiple installations of Windows on multiple drives. Browse for folders in Command Prompt with the dir command.
FAQ
-
How many times do I need to run the sfc/scannow command?
You should only need to run sfc/scannow when you notice a problem. Running the command once should be sufficient.
-
What is CHKDSK vs SFC?
Sfc /scannow scans your system files while the chkdsk command is used to check a specified disk and repair or recover data on the drive if necessary. Chkdsk also marks any damaged or malfunctioning sectors on the hard drive or disk and recovers any information still intact.
-
Should I run DISM or SFC first?
Run sfc /scannow before you run the dism command. That way, the dism command can correct problems identified by sfc /scannow.
Thanks for letting us know!
Get the Latest Tech News Delivered Every Day
Subscribe
У операционной системы Windows есть свой набор инструментов для выявления различного рода ошибок в ручном и автоматическом режиме.
Проверка жесткого диска
Шаг 1: откройте через проводник раздел «Мой компьютер». Укажите диск для проверки, кликом правой клавиши вызовите контекстно меню и выберите «Свойства».

Шаг 2: перейдите в раздел «Сервис», кликните на кнопку «Проверить» — вы должны обладать правами администратора.

Если диск не нуждается в проверке, система выдаст соответствующее сообщение, но вы все равно можете проверить этот диск.
Проверка системных файлов через командную строку
После проверки через меню «Сервис», можно перейти к следующему шагу выявления неисправностей файловой системы.

Шаг 1: зажмите клавиши «Win +X», выберите в меню Windows PowerShell (administrator ), если используете Windows 10 или «Командная строка» в 7 версии операционной системы.

Шаг 2: введите команду «sfc /scannow » — можете просто скопировать и вставить без скобок.

После завершения проверки наберите «Yes », если хотите сразу перегрузить операционную систему, учтите, что все данные в открытых приложениях не сохранятся. Напишите «No» если самостоятельно хотите позже перезагрузить компьютер.
Автоматическая проверка через CMD
Шаг 1: зажмите клавиши «Win +X», выберите в меню пункт «Выполнить».

Шаг 2: введите «sfc /» + один из следующих ключей: «scannow », «scanonce », «scanboot », «cancel », «purgecache », «cachesize », «revert », «cachesize =x», «scanfile », «verifyfile ».

Расшифровка ключей:

/cachesize =x – установка размера файлового кэша , где X – это размер в байтах.
/purgecache – проверка файлов с очисткой кэша .
/scanfile – указать файл для сканирования.
/verifyfile – проверка целостности файла.
/scannow – сканирование системных и защищенных файлов.
/scanonce – однократное сканирование после перезагрузки операционной системы.
/scanboot – сканирование перед каждой загрузкой ОС.
/enable – активация файлового защитника Windows .
/revert – восстановление параметров.
Устранение неполадок
Шаг 1: кликните на «Уведомления» и выберите «Все параметры».

Шаг 2: в поисковое поле введите «Устранение неполадок».

Шаг 3: укажите наиболее подходящие параметры поиска и устранения ошибок.
Итог
Каждый из описываемых способов позволяют автоматически устранить большинство неисправностей, возникающих в операционной системе Windows.
Также стоит обратить внимание что есть сторонние программы для проверки и исправления ошибок на компьютере. Которые изначально предназначены для чистки и исправления ошибок в системе. К примеру в Advanced System Care можно в один клик сделать целый комплекс действий направленный на оптимизацию и ускорение работы системы. Стоит отметить что этими программами следует пользоваться осторожно. Например, CCleaner лучше сразу настроить по инструкции, чтобы не навредить своему Windows.
Не забудьте поделиться этим материалом с друзьями, чтобы ваш компьютер всегда работал максимально быстро.