Do you know what to do when you can’t visit or access your data on storage devices? There are a number of common issues that may happen to any brand of storage devices.
Here, we have taken SanDisk as an example and categorized the usual problems that occurred on SanDisk USB flash drives, pen drives, micro SD cards, SDHC cards, and SDXC cards, into two groups with corresponding solutions.
These problems can all be solved by either formatting the disk using a reliable SanDisk format tool or manually repair the device with a SanDisk repair tool.
Common Issues with SanDisk Cards and Flash Drives
Check which category that your problem falls into, then follow the respective guide to get your SanDisk or other brands of devices work again.
| Category 1. Need a SanDisk Format Tool | Category 2. Need a SanDisk Repair Tool |
|---|---|
|
|
Whether the problem you have is on your internal hard drive, external hard drive, USB, memory SD card, apply the recommended SanDisk format tools or SanDisk repair tools with how-to tutorials to make your device function again.
Part 1. SanDisk Format Tool Free Download and Format the Disk
When facing SanDisk problems similar to the listed entries in the first category, go ahead and download SanDisk format tools for help. Here in this part, we’ve collected 4 formatting tools that you can pick up one to format your SanDisk devices now:
- #1. EaseUS Partition Master
- #2. Windows File Explorer
- #3. Windows Disk Management
- #4. CMD — Windows DiskPart Command Prompt
#1. Format SanDisk Device using EaseUS Partition Master
Remember to back up your data to another location first if you can access the device for now. If you cannot open the device at all, format your device first, and then let reliable data recovery software to bring all your lost files back.
Instead of recommending Windows built-in tools, we would like to let you try EaseUS Partition Master Free Edition. The reason why we recommend this free partition manager as the first SanDisk format tool is that it enables you to perform more advanced operations besides formatting.
- Pros: ①. 100% free formatting; ②. Format 64GB, 128GB, 256GB, and even bigger device to FAT32; ③. Convert FAT32 to NTFS; ④. Clone and partition storage device, etc.
- Cons: Doesn’t work on macOS.
- Supported Format: NTFS, FAT32, FAT16, Ext4/Ext3/Ext2, exFAT, etc.
- Best for: All levels of users — beginners, experienced and professional users
Guide: 4-Step Format a Sandisk Drive in Windows
Connect your problematic SanDisk drive or removable device to your PC and follow next steps to format it with ease.
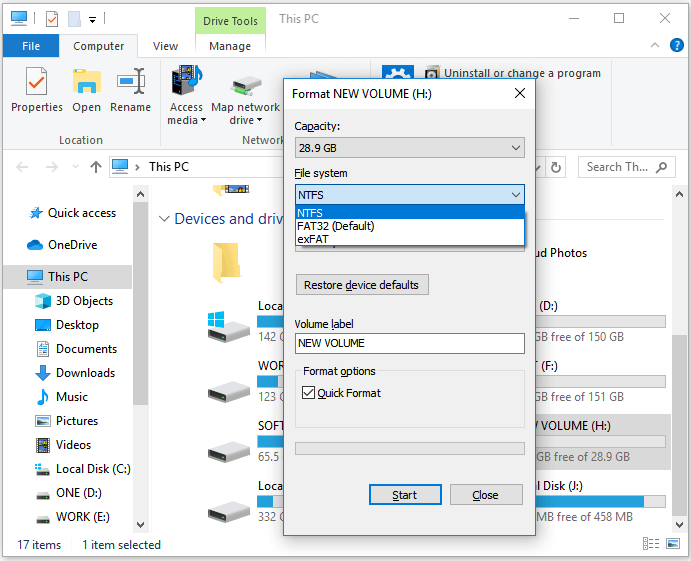
Step 1. Launch EaseUS Partition Master, right-click the partition on your external hard drive/USB/SD card which you want to format and choose the «Format» option.
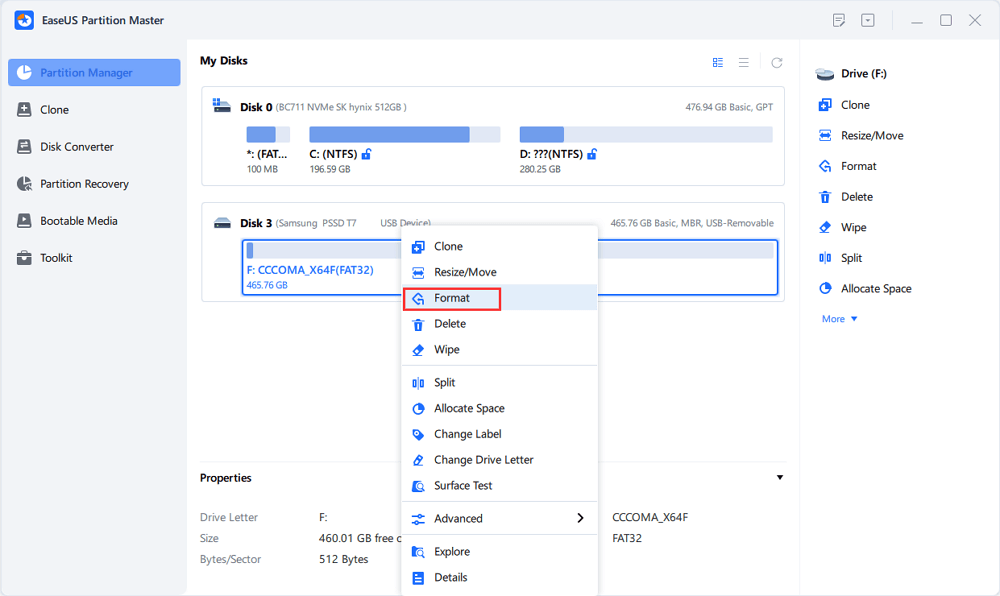
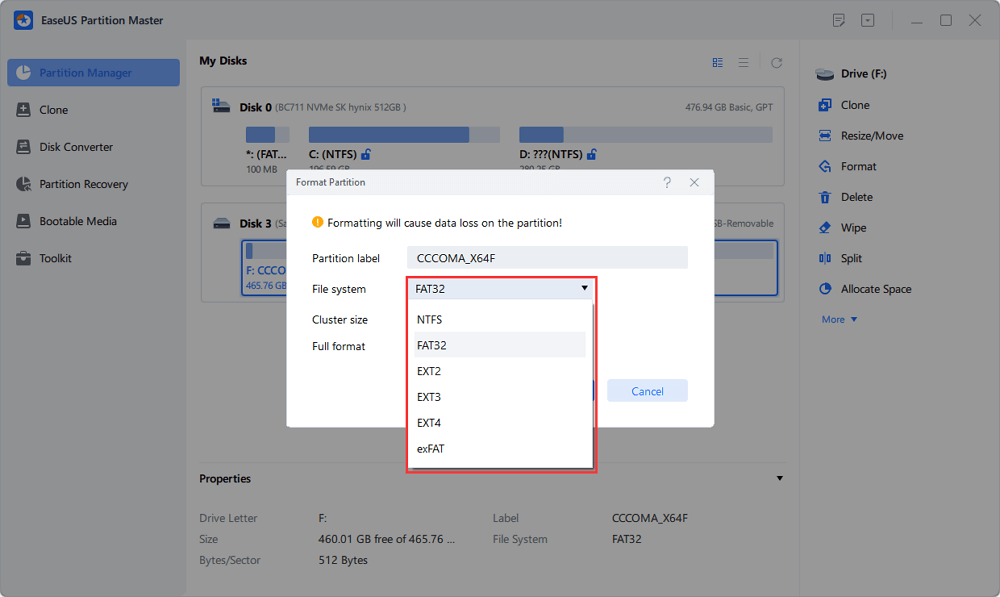
Step 2. Assign a new partition label, file system (NTFS/FAT32/EXT2/EXT3/EXT4/exFAT), and cluster size to the selected partition, then click «OK».
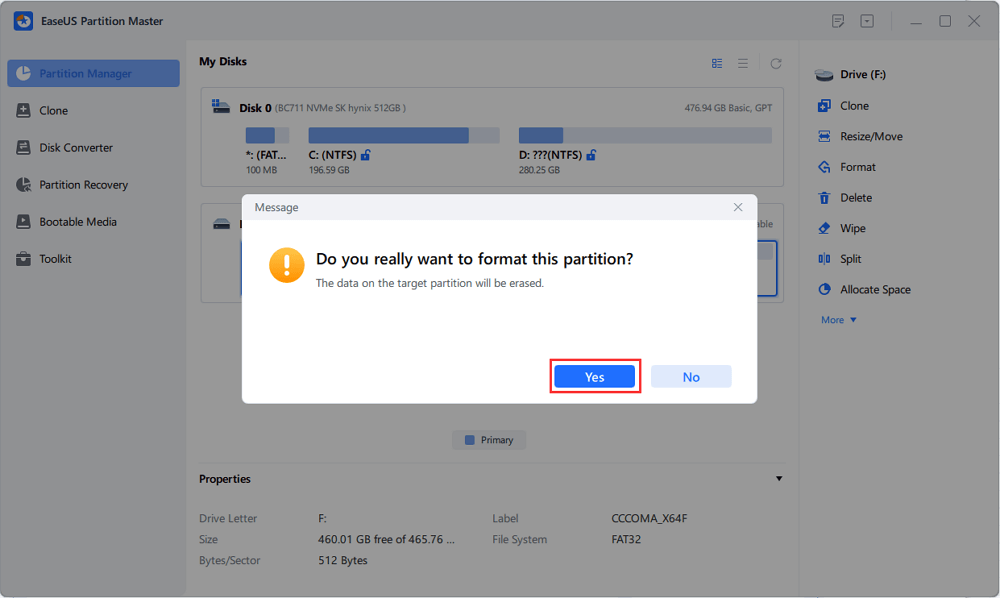
Step 3. In the Warning window, click «Yes» to continue.
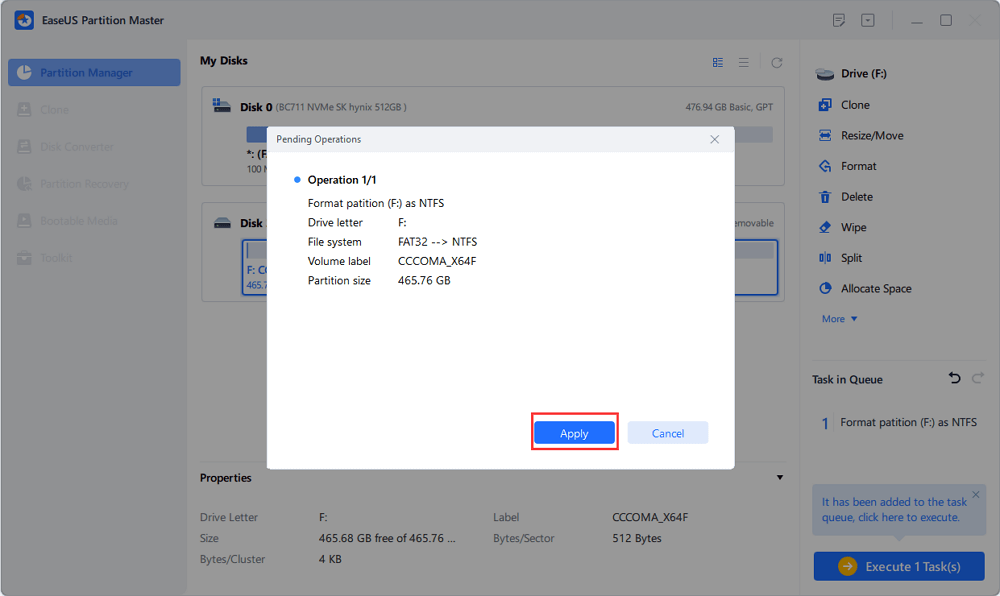
Step 4. Click the «Execute 1 Task(s)» button in the top-left corner to review the changes, then click «Apply» to start formatting your external hard drive/USB/SD card.
#2. Format SanDisk Device using File Explorer
As Windows File Explorer is a Windows built-in tool, you don’t need to download it at all. As long as the File Explorer is working properly, you can format your SanDisk or other brands of devices with ease.
- Pros: 100% free
- Cons: Cannot format 64GB or bigger USB, SD card to FAT32;
- Supported Format: NTFS, FAT/FAT32, exFAT
- Best for: Window beginners
Tutorial: 4-Step to Format SanDisk Device
Step 1. Connect SanDisk device to your PC. Open Windows File Explorer, right-click on SanDisk device that you need to format, select «Format».
Step 2. Rename the drive, reset its file system to FAT32 or exFAT.
Step 3. Click «Start» to begin the formatting.
Step 4. When the formatting process completes, click «OK» and close File Explorer.
#3. Format SanDisk using Windows Disk Management
Being similar to File Explorer, Windows Disk Management is pre-installed on Windows computer. You can easily apply it to format or change a device file system. As a result, no download and installation are required.
- Pros: ①. 100% free; ②. Partition SanDisk or other brands of devices;
- Cons: Cannot format 64GB or bigger device to FAT32;
- Supported Format: NTFS, FAT/FAT32, exFAT;
- Best for: Experienced users
How-to Guide: 4-Step to Format SanDisk Device
Step 1. Connect your SanDisk device to PC, right-click «This PC» or «My Computer» and choose «Manage».
Step 2. Go to «Disk Management».
Step 3. Right-click the SanDisk hard drive partition and choose «Format».
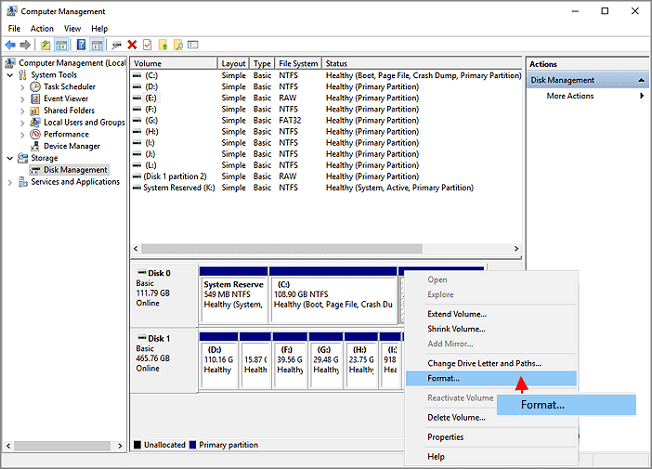
Step 4. Set the volume label, file system, and click «OK» to start formatting the drive.
When the formatting process completes, exit Disk Management.
#4. Format SanDisk using Windows DiskPart Command Prompt
Windows DiskPart command prompt is more like a disk management tool that cannot only format your SanDisk device but also work to resolve other issues on your devices. You can easily bring it up without downloading or installing it.
- Pros: ①. 100% free; ②. Works more than formatting, such as to convert disk to GPT;
- Cons: ①. Complex for beginners; ②. Any false operation may cause serious problems;
- Supported Format: NTFS, FAT/FAT32, exFAT;
- Best for: Professional or advanced users
Step-by-Step Guide: Format SanDisk Device using DiskPart
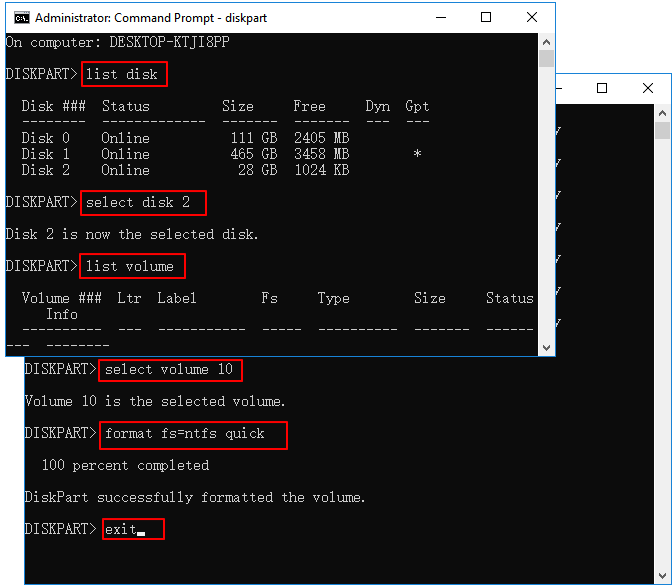
Step 1. Keep your SanDisk device connected to PC. Type cmd in the Search box, right-click Command Prompt and select «Open as Administrator».
Step 2. Type diskpart in Command Prompt and hit Enter.
Step 3. Type below command lines in DiskPart and hit Enter each time to quick format SanDisk drive:
Make sure you enter the right command each time.
- list disk
- select disk 2 (Replace 2 with your SanDisk disk number)
- list volume
- select volume 10 (Replace 10 with the volume number of the partition that you want to format)
- format fs=ntfs quick (If you need to format a hard drive partition to FAT32 or other file systems, replace ntfs with fat32, exfat, etc.)
Step 4. Type exit and hit Enter to close the command window when DiskPart reports it has successfully formatted the volume.
CMD commands can be difficult if there is no tutorial to help. So share the detailed guide to help more users now.
For the situations in the second category, simply formatting the disk will likely not be sufficient. Instead, it will require some advanced operations, such as applying SanDisk repair tools to fix these issues on your device.
Here, we also collected several SanDisk repair tools for you to pick up and apply to repair corrupted, unreadable and even write-protected SanDisk devices:
- #1. EaseUS CleanGenius + EaseUS Partition Master Free Edition
- #2. CMD — Windows DiskPart Command Line
- #3. File Explorer + Disk Error Checking
- #4. Registry Editor
As the solutions toward different cases are different even using the same SanDisk repair tool. In the following, we’ll guide you through the process to repair different SanDisk device errors with respective SanDisk repair tools.
Case 1. Repair a Write-protected SanDisk SD Card or Flash Drive
When a SanDisk card, USB, or other brands of storage devices become write-protected, you cannot direct format to remove the write protection.
For example, when an SD card or USB becomes write-protected, you can try to unlock the device by toggling its switch. However, if this doesn’t work, you’ll need to fix a write-protected SanDisk drive with the following methods:
Method 1. Fix Write-Protected SanDisk Device using EaseUS CleanGenius and EaseUS Partition Master
Connect SanDisk device which is write-protected to your computer. And then continue to remove write protection with the following steps. It’s free.
If you don’t consider yourself a pro-computer user and you’re not familiar with command-lines, don’t worry. There are graphical-based solutions to help you remove write-protection from your hard drives, USB drives, and even SD cards.
EaseUS CleanGenius is one of these tools that helps you fix aforementioned issues on your drives without knowing a thing about command-line.
Here’s an easy-to-follow guide on how to use this tool to get your issues sorted:
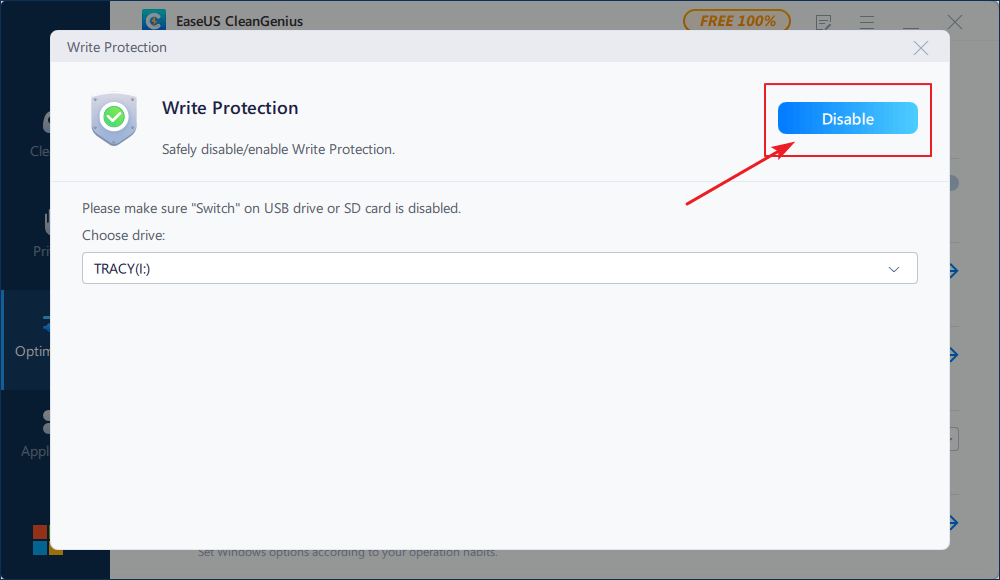
Step 1: DOWNLOAD and install EaseUS CleanGenius (free) on your computer.
Step 2: Run EaseUS CleanGenius on your PC, select Optimization and choose the Write Protection mode.
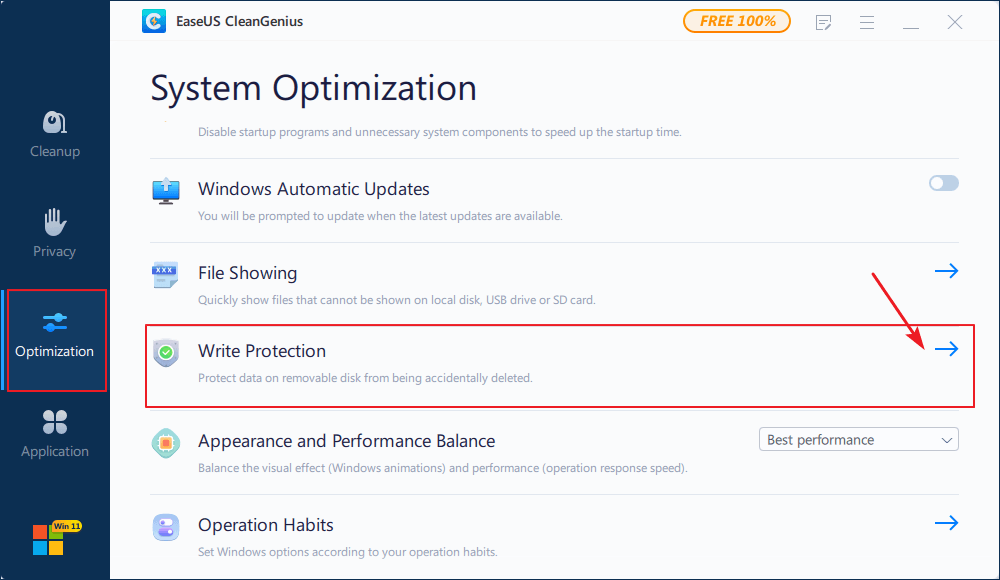
Step 3: Select the device that is write-protected and click Disable to remove the protection.
When you have removed write protection from the device, you can then apply EaseUS Partition Master with its Format feature to format the device usable again. You can revert to the formatting tutorial in Part 1 as a guide.
Method 2. Remove Write Protection from SanDisk Device using CMD
Remember to connect the write-protected SanDisk device to your computer before starting the following steps. Be careful while using DiskPart command line.
Step 1. Press «Windows + R» and enter cmd. Open Command Prompt as Administrator.
Step 2. Type diskpart and hit Enter.
Step 3. Type the following command lines and hit Enter each time:
- list disk
- select disk # (# is the number of your SanDisk USB/SD card/SSD drive that you want to remove write protection from.)
- attributes disk clear readonly
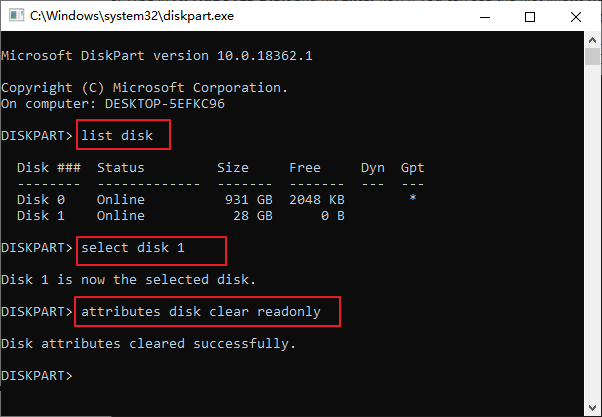
Step 4. Type exit and hit Enter to close DiskPart.
Method 3. Remove Write Protection from SanDisk using Registry Editor
If you are a Windows beginner, we suggest you revert to Method 1 and apply EaseUS CleanGenius for help. Registry Editor is efficient in removing write protection error, however, it’s not for beginners.
Any false operation may cause device malfunction on your computer. Follow the steps carefully while removing the SanDisk device write protection error:
Step 1. Type Regedit in the search box and hit Enter.
Click «Yes» to open the Registry editor when you see it is displayed at the top of the list.
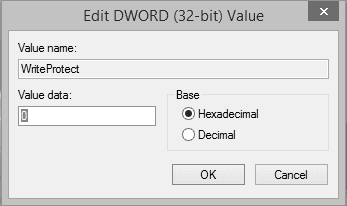
Step 2. And then navigate to the following key: Computer\HKEY_LOCAL_MACHINE\SYSTEM\CurrentControlSet\Control\StorageDevicePolicies
Step 3. Double-click on the WriteProtect value in the right-hand pane of Registry Editor.
Change the Value data from 1 to 0 and click «OK» to save the change.
After this, close Registry and restart your computer.
Case 2. Repair Corrupted, Unreadable SanDisk Device on Windows PC
Mostly, when SanDisk or other brands of storage devices not detected by Windows PC or becomes inaccessible, it may contain a file system error, bad sector, or internal errors. To fix this issue, you can try the following methods with a reliable SanDisk repair tool for help:
Method 1. Use Free Partition Manager — EaseUS Partition Master
EaseUS Partition Master Free Edition with its Check File System feature enables you to easily fix file system error, soft bad sectors, and even some internal errors that stop you from visiting the device on Windows PC.
Here are the steps:
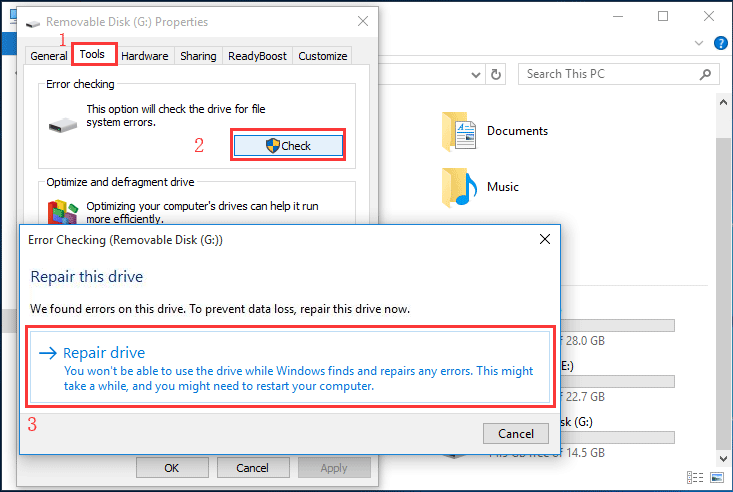
Method 2. Run Disk Error Checking in File Explorer
Step 1. Open File Explorer, right-click the SanDisk device and choose «Properties».
Step 2. Under on the Tools tab, click the Check button under the Error-checking section.
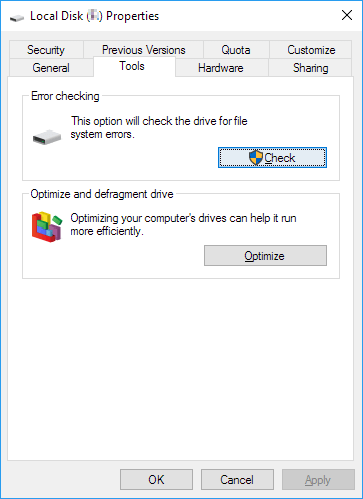
Step 3. Next, you can choose to «Scan drive» to scan errors and click «Repair drive» if errors were found.
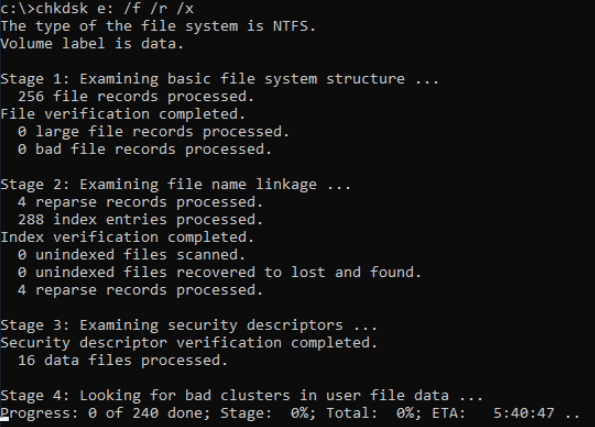
Method 3. Run CHKDSK Command to Repair SanDisk Drive Error
CHKDSK command works to repair internal device errors on all brands of storage devices. Follow the steps carefully when you need to run the command and repair corrupted SanDisk device:
Step 1. Type cmd in the Search box.
Step 2. Right-click «Command Prompt» and choose «Run as administrator».
Step 3. Enter the following command: chkdsk E: /f /r /x
Replace «E» with the drive letter of the SanDisk drive you want to repair.
Bonus Tip: SanDisk Offical Resolution — Repair using Registry
The official SanDisk knowledgebase states that a corrupt registry entry can cause your SanDisk product to not be detected by the computer. Removing the registry keys created upon installation of your SanDisk product will allow the computer to fully reinstall the device and may resolve the issue.
Step 1. Back up the registry
1. Unplug the SanDisk device from the USB port.
2. Run regedit.
- Windows XP: Go to «Start» > «Run», type in regedit and then click «OK».
- Windows 7, 8 and Vista: Click the Start button, type regedit in the search box, and then press Enter.
- Window 10: Type regedit, in the ‘Search the web and Windows’ field (lower-right) and then select ‘Regedit — Run Command’.
3. From the registry menu, choose «File» > «Export».
4. Name the file SNDK.reg and save it to your desktop.
If you experience any issues after editing the registry, you can restore this backup by following steps 1 through 3, but choosing File > Import instead. Choose the SNDK.reg file that you backed up, allow it to import, then restart your PC.
Step 2. Remove SanDisk info from the registry
WARNING: DO NOT delete any registry keys other than keys that include VID_0781, the SanDisk devices’ keys. Deleting important registry keys can result in booting issues and other system malfunctions.
1. From the registry menu, click «Edit» and choose «Find».
2. Type in VID_0781 and click «Find» Next.
3. Once the search finishes, right-click the highlighted registry key and select «delete».
4. Press the F3 key to find the next registry key that includes VID_0781.
5. Right-click the highlighted registry key and select «delete».
6. Repeat this process until the search returns with No results Found.
NOTE: Under Windows 7, 8 and Vista, some registry keys may be protected and cannot be deleted. Simply skip over these keys if you receive a message that the key cannot be deleted.
7. Once all registry keys containing VID_0781 have been deleted, reboot your computer.
8. Plug the device into the computer after it’s finished rebooting. The device will be reinstalled.
If you have trouble completing this process, there is another way that you can try to fix a USB flash drive not showing up in another way.
Wrapping Up
When you complete the whole process, you may lose some files after formatting or repairing SanDisk device. Reliable data recovery software is capable of helping you out. If you need a detailed tutorial, please refer to format recovery software for help.
On this page, we concluded the symptoms when a SanDisk or other brands of storage devices do not work properly on Windows PC. We divided these issues into two groups and present respective solutions to help you make your SanDisk device work again by using SanDisk format tool and Sandisk repair tool.
As for Windows beginners, we suggest you take EaseUS Partition Master and EaseUS CleanGenius as for formatting and repairing problematic SanDisk memory card, SD card, USB, external and even internal hard drives.
Free Sandisk Repair Tools for Sandisk Flash Drive, SSD, Memory Card
Summary
How do you fix a broken sandisk flash drive or memory card? Is there any sandisk repair app for repairing damaged sandisk media with free sandisk recovery/format tools online? This article tells all about sandisk repair/recovery.
Looking for Sandisk format tools? => Jump here
 Sandisk pen drive repair utility
7 Free Sandisk Repair/Recovery Software
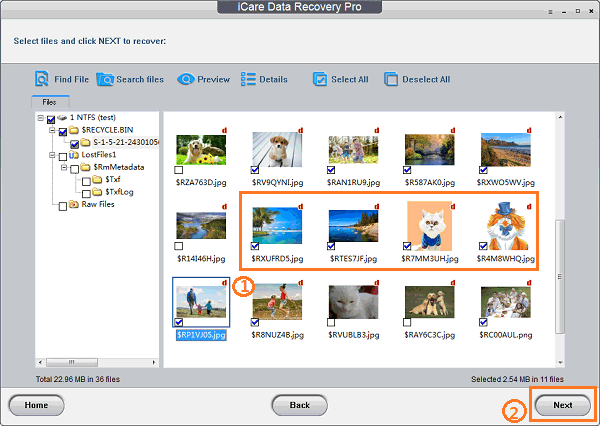
#1 Sandisk SD/Pendrive/SSD Data Recovery Software
The first recovery tool comes for the Sandisk inside data when your flash memory stored files and became corrupted, it is essential for performing sandisk data recovery ahead of all the rest repairing.
You may go to the #2 repair tool if you don’t care about the data inside of your sandisk flash memory.
Step1. Download iCare Pro Free, and connect your flash memory to your computer
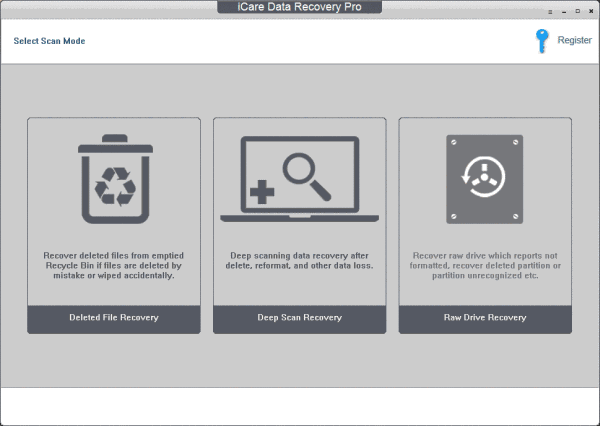
Step2. Wait the software to scan your Sandisk card/drive.
Step3. Restore them to another destination.
Once your files in Sandisk usb/sd/ssd are recovered, you may use what ever programs to repair the damaged Sandisk storage devices, we just won’t recommend you do a low level formatting.
Also read: sandisk cruzer data recovery
#2 Repair Sandisk USB/SD with Windows Error Checking
Windows provides built in utility called ‘Error checking’ for any digital devices that you may use it for repairing unknow bad blocks, bad file systems… This could be ranked as the easiest Windows 10 Sandisk repair tool.
How to open Windows error checking? Follow this route.
This PC -> Flash Drive/SD, right click -> Properties
 Right click Sandisk usb drive properties to start repairing in Windows 10
The repair tool in Sandisk flash memory located under its Properties -> Tools -> Check, and you may start the repairing.
 Repair Sandisk flash drive in Windows 10 with Error Checking
Video — how to repair corrupted sd/usb flash drive
#3 Repair Sandisk Registry by Sandisk official guide
Sandisk official site shares the damaged sandisk could be caused by corrupted registry that they recommend delete this registry and then reinstall the Sandisk flash memory device to get the problem fixed. Here are the steps to follow.
Step 1. Back up the registry
1. Remove your Sandisk flash memory from your computer.
2. Run regedit.
- Window 10: Type regedit, in the ‘Search the web and Windows’ field and start it
- Windows 7, 8 and Vista: Click the Start button, type regedit in the search box, and then press Enter.
- Windows XP: Go to «Start» > «Run», type in regedit and then click «OK».
3. From the registry menu, choose «File» > «Export».
4. Name the file SNDK.reg and save it to your computer.
This backup would restore everything back to normal if you have mistakenly edited the registry incorrect.
Step 2. Remove VID_0781, the SanDisk registry info (Only the Sandisk Registry VID_0781)
1. Start ‘regedit’ from the ‘Search the web and Windows’ in your computer, click «Edit» and choose «Find».
2. Type in VID_0781 and click «Find» Next.
3. Delete it by right clicking the registry key VID_0781 and select «delete» in the option. Not finished, more VID_0781 to delete in the following steps.
4. Press the F3 key on your keyboard to find other keys that includes VID_0781.
5. Right-click every key that includes VID_0781 and delete them one by one.
6. Repeat this process until No results Found.
7. Reboot your computer and insert your Sandisk storage device into your computer for new installation by the pc.
NOTE: If some registry keys containing VID_0781 reported as «* be protected and cannot be deleted», just skip them.
Source: https://kb.sandisk.com/app/answers/detail/a_id/205/~/sandisk-device-not-detected-by-windows-pc
Recommend: more solutions for Sandisk usb flash/disk not detected fixing which provides an easier way to fix the registry error on Sandisk device by deleting it in device manager and then reload in computer, scan for hardware changes to bring the not detected Sandisk back to computer.
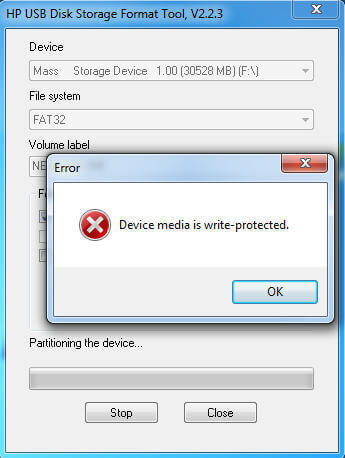
#4 Sandisk Repair Tool — HP USB Format Tool to format sandisk sd/usb fat32/exfat
When your Sandisk usb flash or sd is not working, Sandisk format tool like HP USB Format Tool can fix the errors by formatting it. You may choose file system fat32/exfat/ntfs as you wish in HP USB Disk Storage Format Tool.
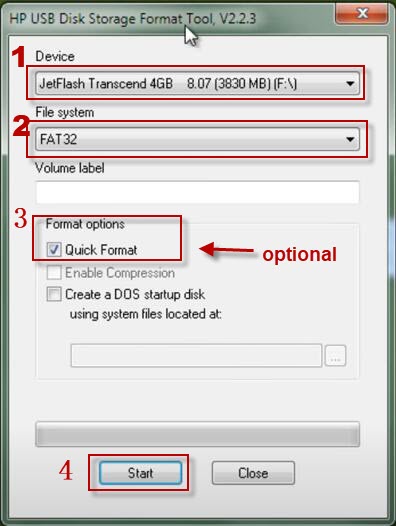 HP usb format tool as Sandisk format tool to fix sandisk usb/sd errors
More about: HP USB Format Tool and 5 free alternatives, or usb format tools free
Note: when we Google ‘sandisk usb repair tool’, Sandisk website pop up in the list with its page, included below, telling users to format sandisk usb flash drive to fat32 format using third party applications, however the tool fat32 format linked on Sandisk page to https://www.ridgecrop.demon.co.uk/guiformat.htm was not opening, probably due to server overload or server down time.
https://kb.sandisk.com/app/answers/detail/a_id/19258/~/formatting-sandisk-usb-flash-drives-in-fat32-format-using-third-party-windows
It proves one thing — Sandisk recommend users to fix damaged sandisk flash memory by formatting.
What we see from the story
- You may fix your sandisk usb/sd/ssd by formatting
- Good news, here are a few sandisk formatters as options, see 8 usb/disk format tools here
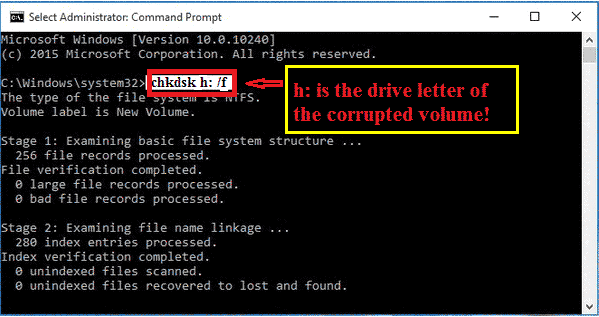
#5 Repair Damaged Sandisk with cmd chkdsk
You may use ‘chkdsk h: /f‘ to fix your sandisk usb/disk (h shall be replaced with your own sandisk drive letter in your computer).
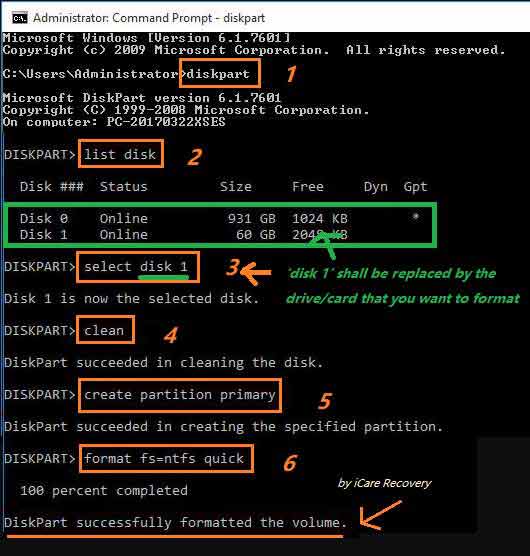
#6 Repair Corrupted Sandisk with cmd diskpart format/convert
#7 Repair Corrupted Sandisk with Partition Master Free
Easeus Partition Master Free provides many functions for repairing your flash devices including formatting Sandisk usb drive, deleting Sandisk usb, creating new partition for Sandisk device, repairing damaged MBR in this free tool that worth a trial for your corrupted device.
Download url: https://download.cnet.com/EaseUS-Partition-Master-Free-Edition/3000-2248_4-10863346.html
Sandisk Repair/Recovery Tools for Android
We understand it sometimes users may only have mobile phones and they may want to repair their Sandisk SD/USB/SSD with android phone. Here are some quick fix you could do with your phone to repair damaged Sandisk sd/usb/ssd. (Formatting Sandisk in phone to get it repaired)
Better idea? Repair Sandisk storage media in Windows computer which has more repair options.
Common Errors on Sandisk Flash Drive SSD SD Card And Solutions
EASY, EASY, EASY!!! It’s not big deal when your Sandisk usb stick or SSD became damaged when you have restored your files successfully and there is no important files inside of the Sandisk usb flash drive. You should get files rescued the first time.
The manufacturer never want to produce Sandisk to get damaged, however there are risks for digital devices to get damaged due to three kinds of causes
- Life span limits, the least problem causing
- Manual errors brought by human improper operations, the errors caused by users themselves
- Third party damages like a malfunction caused by third party programs, virus, antivirus software, software failure…
Here are a lists of errors that may happen to your Sandisk usb flash drive or Sandisk SSD, memory card.
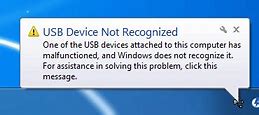
Error #1 — SanDisk USB Flash Drive Cannot Be Recognized, Not Showing UP Fixes
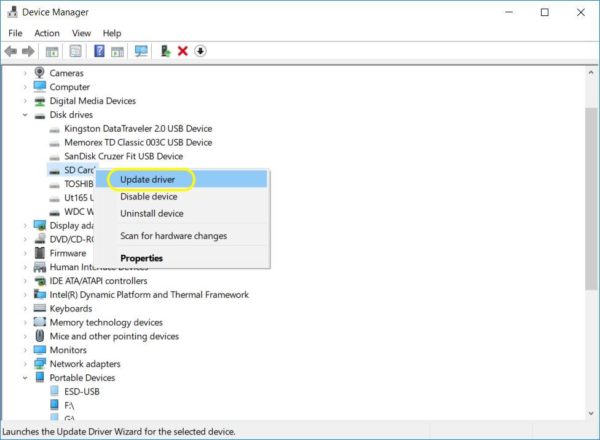
- Fix #1 — Update sandisk usb/sd driver on Windows 11/10/8/7 computer in device manager

- Update sandisk usb/memory card driver by chipgenius
- Update sandisk usb/flash memory sd with Broadcom USB Driver
Download Broadcom Driver
Video — How to update sandisk usb/sd with Broadcom driver update tool
Also read: Sandisk cruzer not detected, or sandisk driver download
 Sandisk usb drive not recognized in computer
When your Sandisk flash drive could no longer be detected, it won’t show up in Windows 11/10/8/7 Computer, or it shows blank in computer, or you Sandisk sd card cannot be detected in camera or mobile phone.
 Sandisk usb drive not recognized in computer
Also read: Sandisk usb drive not recognized
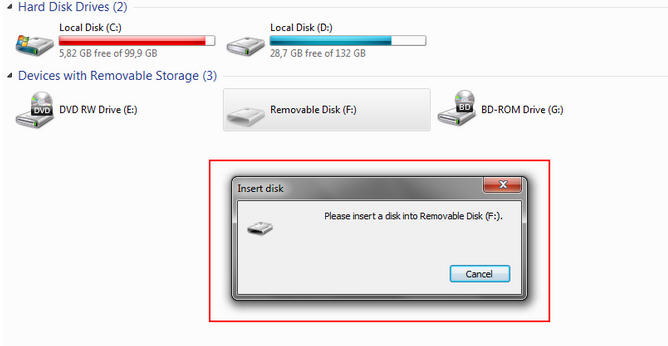
Error #2 — SanDisk USB Drive No Media or SSD Shows No Media
When you connected you sandisk flash drive, ssd or memory card to your computer, it may show no media in disk management or it reported there is no media in the device by diskpart.
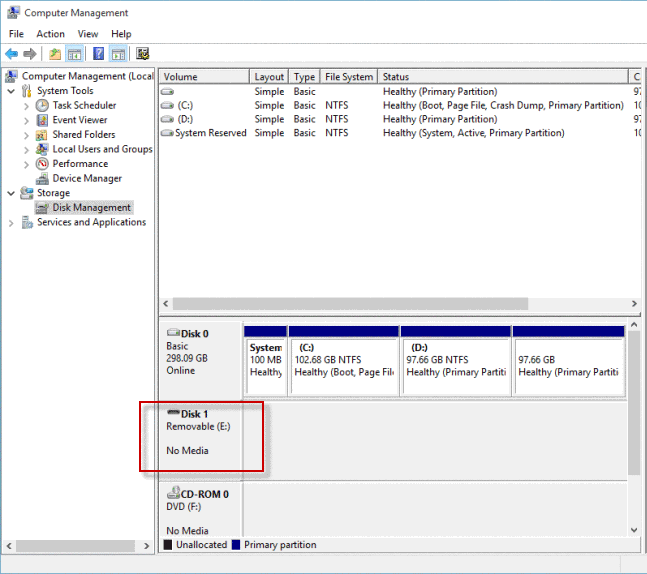 Sandisk no media in disk management
Error #3 — SanDisk USB Write Protected — Can’t Format/Delete
When you try to save data to the sandisk flash drive, or ssd, it may report with error message saying it is write protected, especially when you want to format sandisk cruzer or blaze, it just keeps unchanged.
 Sandisk usb drive write protected cannot format
Solution — when it is unable to format sandisk usb/ssd, unable to delete its files, unable to change the inside data, it means your sandisk flash drive is with write protected.
-> Quick Fix: you may remove the write protection by the following cmd
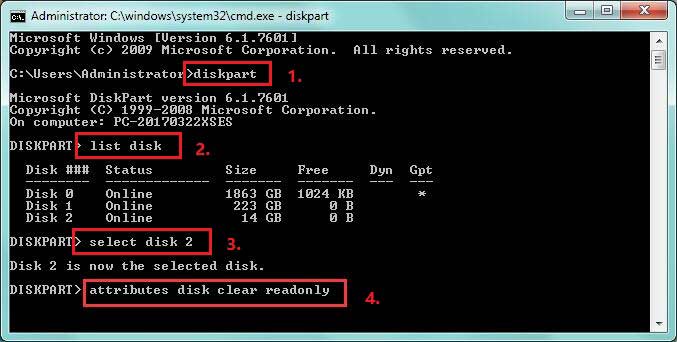 Remove write protection by resetting the computer registry
Also read: how to remove write protection on sandisk usb
Error #4 — SanDisk USB Pen Drive or SD Card File System RAW Repairing
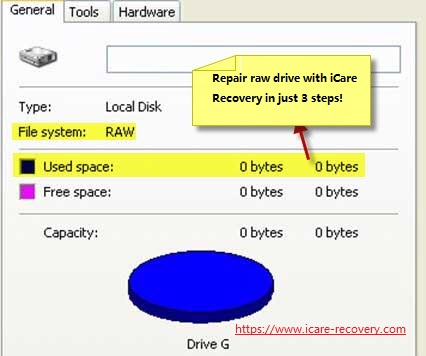 Sandisk usb flash file sytem raw format used space shows 0 bytes
Related: how to fix flash dive file system raw, or raw file system recovery free
Error #5 — SanDisk Other Errors
There are other frequent errors for Sandisk flash memory such as
- Windows can’t format sandisk cruzer
- i/o device error on sandisk ssd
- Sandisk usb won’t format write protected
- Sandisk flash memory is not formatting error and asks for reformat
- Sandisk reported drive not accessible
- Access denied
- File or directory is corrupted unreadable
- Chkdsk is not available for raw drives sandisk
- Sandisk unknown not initialized…
What if Sandisk could no longer be repaired?
When the Sandisk usb flash drive or memory card will not work no matter what repair tool have been used for the fixing, the damage was beyond repairing? This could happen when it is running out of life span, the chips are dying… or it had suffered physical damages and could no longer be repaired, here are some solutions for you.
- Turn to a local repair shop for help
- Ask Sandisk for dedicated support
- Buy a new Sandisk device or other brands
Don’t worry, Sandisk Pen Drives are not that expensive, Sandisk memory card, sdhc, sdxc, micro sd card, mini sd card are ranging from low price to high price, Sandisk SSDs are a big cost for many users. Next time, be careful when you encounter the same situation that may bring the loss. Just try to avoid the damage and loss.
Sandisk Flash Memory Was Damaged
Background
As we know Sandisk, one of the well-known manufacturers of flash memory devices, has been acquired by Western Digital, the new owner of Sandisk, all sales of Sandisk flash memory products and support service are hosted by Western Digital.
Flash memory devices such as flash drives, memory cards are mostly used for work and entertainment, and ssd, shorted for solid state disk, is favored by many customers and Sandisk has been one of outstanding large manufacturers for such flash memory drives.
First Things First
When your Sandisk flash memory stick, ssd, memory card became corrupted, inaccessible, unrecognized…, the first thing is to stop using your usb flash drive, or ssd. Here is a list of what’s emergency to you.
- Retrieve data from Sandisk usb flash drive, ssd or sd with iCare Pro Free when the data inside of the sandisk are important and we would recommend you download it to start free sandisk recovery.
- Stop saving new data to your Sandisk usb flash drive since any new file would overwrite the old files on the flash drive
- Stop making changes to the usb stick if the inside data are important to you
- Try to avoid formatting it with low level format tool since low level formatting is risky and it would shorten the life span of Sandisk flash memory storage devices
Also read: sandisk repair mac
Last updated on Sept 14, 2023
Hot Articles
- best sd card recovery
- Micro sd card needs to be reformatted
- Samsung sdhc microsdhc requires formatting
- Micro sd card is not readable
- Repair RAW drive Windows 10
- raw file system
- free sandisk data recovery software
- sandisk cruzer driver download
- sandisk usb recovery software
К сожалению, съемные накопители в виде обычных флешек и карт памяти от производителя SanDisk являются самыми проблемными устройствами, которые в наибольшей степени среди всего оборудования такого типа подвержены повреждениям и физического, и программного характера. В связи с этим многим обладателям таких устройств часто приходится перерыть тонны материала в интернете, чтобы найти подходящую утилиты для восстановления работоспособности накопителя или информации, которая могла быть повреждена или удалена вследствие сбоев. Сам производитель почему-то ничего конкретного для восстановления флешек SanDisk не предлагает, поэтому довольно часто приходится пользоваться утилитами сторонних разработчиков, ориентированными на другие устройства. Но и они могут работать не всегда. Несмотря на это, несколько способов, которые помогут решить данную проблему все-таки есть.
Основные проблемы накопителей SanDisk
Итак, почему же именно эти накопители считаются наиболее проблемными? Насколько можно судить по отзывам специалистов, в них не совсем удачно реализованы алгоритмы работы самих встроенных контроллеров, из-за чего постоянно происходят сбои, ведущие к «слету» прошивки, самопроизвольному изменению файловой системы, невозможности доступа к устройствам в среде практически всех известных на сегодняшний день операционных систем и, в конечном счете, к потере важной информации, которая на них хранилась. Как можно заметить, такие проблемы могут возникать практически со всеми носителями, относящимися к классу флешек и съемных карт памяти, однако у этого производителя они проявляются чаще всего, причем достаточно часто без видимой на то причины.
Восстановление флешек SanDisk: основные направления действий
Таким образом, исходя из того, какие именно ситуации могут возникать, будем искать наиболее оптимальное решение. Но тут нужно четко разграничивать определенные направления действий.

В большинстве своем программы, позволяющие выполнить, например, восстановление флешки SanDisk Ultra 64 Gb, относящейся к разряду карт памяти, которая считается лидером по количеству и частоте появления сбоев в работе, ориентированы на возможность задания форматирования накопителя, что позволяет восстановить целостность файловой структуры накопителя. Единого приложения, которое могло бы быть использовано для приведения в порядок прошивки микроконтроллеров, нет. Тем не менее, даже после полного форматирования достаточно часто «выудить» с флешки ранее записанную на нее информацию можно (кто бы там что ни говорил). Главное – выбрать подходящее программное обеспечение, которое будет описано несколько позже.
Утилита для восстановления флешки SanDisk RescuePRO
А пока вернемся непосредственно к приведению накопителей в чувство. Что можно посоветовать для использования? Прежде всего следует обратить внимание на небольшую программу восстановления флешки SanDisk RescuePRO.

По крайней мере, это единственное приложение, которое при подаче запроса можно найти в интернете. Однако сам разработчик и даже название программы, в общем-то, к производителю флешек SanDisk никакого отношения не имеет. Само приложение можно скачать непосредственно на ресурсе разработчика – компании LC Technology International. Правда, пользователь сразу же столкнется с некоторыми неудобствами, поскольку на сайте придется заполнить специальную анкету с указанием персональных данных, а только потом на предоставленный электронный адрес придет письмо, содержащее ссылку на загрузку.
Второй момент связан с тем, что приложение не имеет русскоязычного интерфейса, поэтому восстановление флешек SanDisk придется производить, ориентируясь исключительно на английские названия и термины. Но не стоит отчаиваться! В самой программе для запуска процесса восстановления нужно всего лишь нажать кнопку Wipe Media и дождаться окончания форматирования. Правда, использование такой проги для восстановления флешки SanDisk вызывает законные сомнения, поскольку, судя по интерфейсу, приложение ориентировано не на форматирование, а на поиск удаленных медиафайлов, а на носителях SanDisk вся информация просто удаляется.
Примечание: кнопка старта процесса иногда может быть неактивной, поэтому выполнить какие-либо действия именно с флешками SanDisk просто не получится. И до сих пор никто не может дать вразумительного объяснения, почему у одних приложение работает, а у других – нет.
Программа Formatter Silicon Power
Восстановить флешку SanDisk, используя аналогичный подход, можно при помощи описываемого приложения, которое, как уже видно из названия, предназначено для устройств другого производителя, но, по мнению большинства специалистов и пользователей, для устройств SanDisk подходит довольно неплохо (особенно для тех, которые оборудованы контроллерами PS2251-03).

Выполняемых действий в приложении – минимум. Необходимо запустить программу, вставить флешку в порт и нажать кнопку старта форматирования. Если по каким-то причинам будет выдана ошибка (что маловероятно), по всей видимости, ваше устройство с этой программой окажется несовместимым. Но, как утверждается, попробовать стоит.
Приложение USB Disk Storage Format Tool
А вот восстановление флешек SanDisk в этой программе выглядит весьма пристойно. Правда, обратить внимание изначально нужно на тот момент, что предназначена эта утилита для выполнения низкоуровневого форматирования и работает подобно еще одному небезызвестному приложению – HDD Low Level Format Tool.

В программе нужно выбрать в выпадающем списке свой носитель (естественно, если он будет определен, обязательно отметить галочками пункты исправления ошибок (Correct errors), сканирования носителя (Scan drive) и тестирования, если устройство повреждено (Check if dirty), после чего нажать кнопку выполнения проверки (Check disk). Вполне возможно, что таким методом восстановить работоспособность устройства и получится. Если эффекта не будет, воспользуйтесь кнопкой форматирования. После этого флешку можно будет использовать заново (но уже без ранее записанной на ней информации).
Другие утилиты
Наконец, еще одна, по мнению многих, подходящая утилита, предназначенная для форматирования и работающая аналогично предыдущей, — MPTool, несмотря на то, что она применяется в основном к устройствам Silicon Power, в некоторых случаях это приложение позволяет восстановить работу и флешек SanDisk.

В интернете можно встретить посты о том, что где-то якобы есть некая нефирменная программа, разработанная специально для устройств SanDisk, под названием Format and Read/Write Check Utility.

Но ее применение является спорным, поскольку ни одной вразумительной ссылки на загрузку в интернете найти невозможно, в тех архивах, которые доступны для скачивания, оказывается совсем другая утилита – USB Test Tool, к тому же совершенно нерабочая.
Можно ли восстановить работу контроллеров вручную?
В принципе, можно попробовать найти приложение для перепрошивки флешек SanDisk самостоятельно.
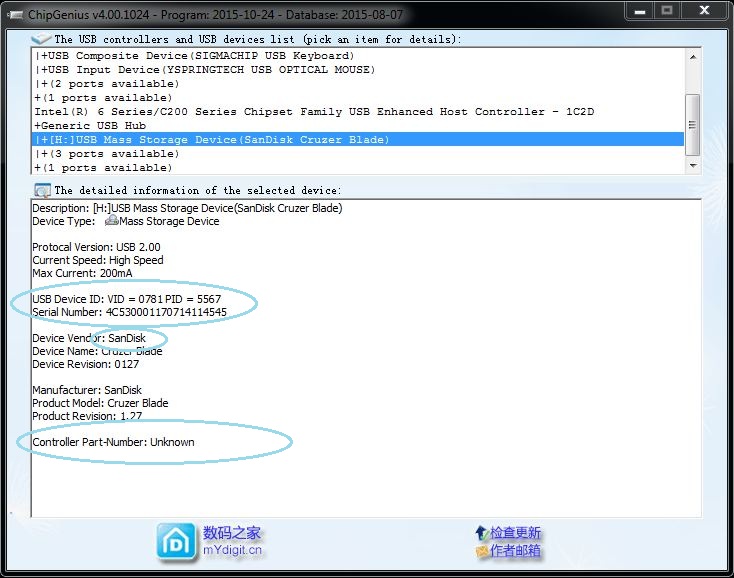
Для этого воспользуйтесь утилитой ChipGenius, чтобы определить идентификаторы проблемного устройства VID и PID, после чего по ним задайте поиск. Надежды мало, что найдется какое-то подходящее именно под этот тип устройства приложение, все равно может быть выдан список программ, хоть как-то позволяющих восстановить работоспособность контроллеров (основные были описаны выше).
Что использовать для восстановления поврежденных или удаленных данных?
Наконец, если с самим накопителем все в порядке, но вам необходимо выполнить исключительно восстановление данных с флешки, тут и думать нечего! По мнению большинства экспертов, самая лучшая программа в этом отношении – R-Studio, которая восстанавливает информацию даже после полного форматирования. Тут все просто!

Сначала потребуется вставить флешку в порт, запустить программу, выбрать накопитель из списка доступных устройств и разделов, нажать кнопку сканирования, а потом сохранить найденные результаты на жестком диске, в логическом разделе или на другом съемном устройстве. Правда, после восстановления информации папок с ранее присутствовавшими названиями вы не увидите, поэтому придется просматривать каждый переименованный каталог в поисках нужного файла.
Если не нравится такой подход, можно воспользоваться более простой программой – R.Saver. В ней произвести восстановление директорий и файлов тоже можно, но результат будет несколько хуже, чем в пакете R-Studio.
Итоги
Подводя черту, остается отметить, что ручным поиском наиболее подходящего приложения для восстановления накопителей SanDisk, в общем-то, можно не заниматься. Проще всего воспользоваться одной или несколькими утилитами, представленными на обозрение пользователей выше. По идее, хоть одна, но даст необходимый результат. Но если рассматривать все описанные приложения с практической точки зрения, попытаться восстановить работоспособность устройства лучше всего в приложении Disk Storage Format Tool, поскольку именно в нем можно выполнить два типа действий: и проверку, и форматирование, если первое действие эффекта не возымеет.