У операционной системы Windows есть свой набор инструментов для выявления различного рода ошибок в ручном и автоматическом режиме.
Проверка жесткого диска
Шаг 1: откройте через проводник раздел «Мой компьютер». Укажите диск для проверки, кликом правой клавиши вызовите контекстно меню и выберите «Свойства».

Шаг 2: перейдите в раздел «Сервис», кликните на кнопку «Проверить» — вы должны обладать правами администратора.

Если диск не нуждается в проверке, система выдаст соответствующее сообщение, но вы все равно можете проверить этот диск.
Проверка системных файлов через командную строку
После проверки через меню «Сервис», можно перейти к следующему шагу выявления неисправностей файловой системы.

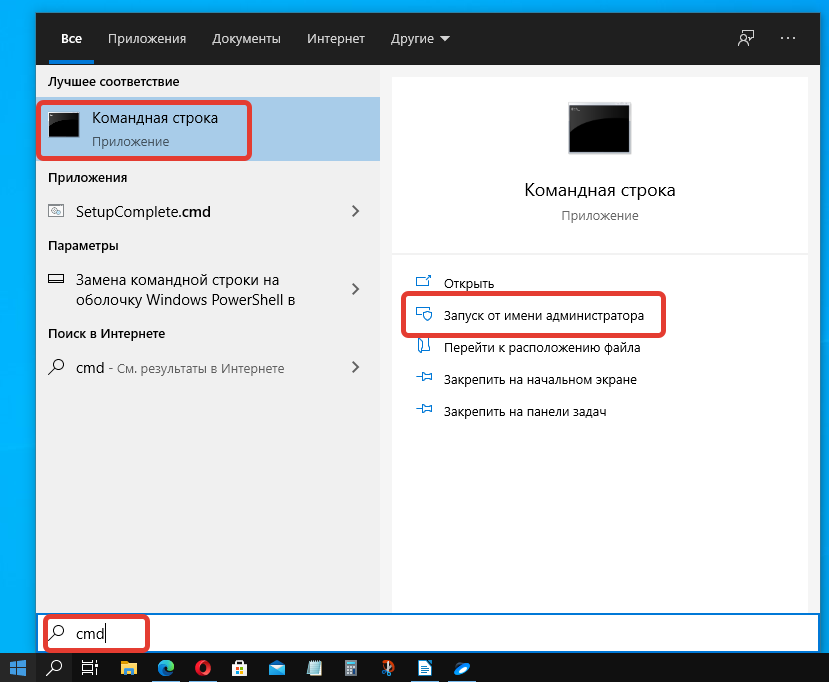
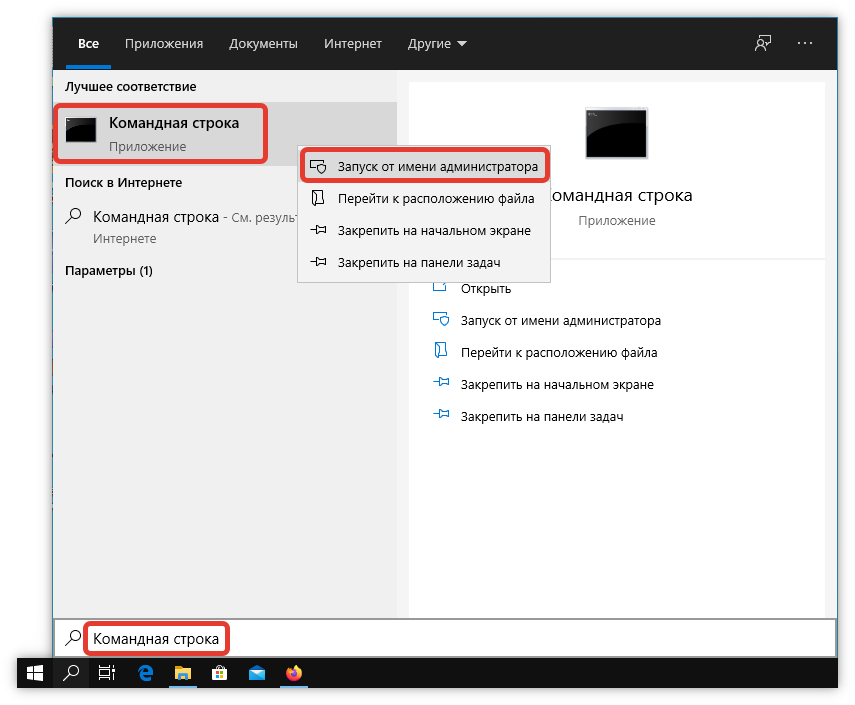
Шаг 1: зажмите клавиши «Win +X», выберите в меню Windows PowerShell (administrator ), если используете Windows 10 или «Командная строка» в 7 версии операционной системы.

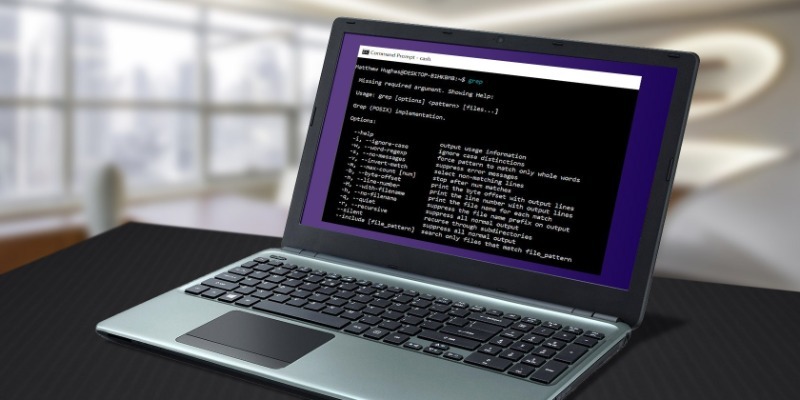
Шаг 2: введите команду «sfc /scannow » — можете просто скопировать и вставить без скобок.

После завершения проверки наберите «Yes », если хотите сразу перегрузить операционную систему, учтите, что все данные в открытых приложениях не сохранятся. Напишите «No» если самостоятельно хотите позже перезагрузить компьютер.
Автоматическая проверка через CMD
Шаг 1: зажмите клавиши «Win +X», выберите в меню пункт «Выполнить».

Шаг 2: введите «sfc /» + один из следующих ключей: «scannow », «scanonce », «scanboot », «cancel », «purgecache », «cachesize », «revert », «cachesize =x», «scanfile », «verifyfile ».

Расшифровка ключей:

/cachesize =x – установка размера файлового кэша , где X – это размер в байтах.
/purgecache – проверка файлов с очисткой кэша .
/scanfile – указать файл для сканирования.
/verifyfile – проверка целостности файла.
/scannow – сканирование системных и защищенных файлов.
/scanonce – однократное сканирование после перезагрузки операционной системы.
/scanboot – сканирование перед каждой загрузкой ОС.
/enable – активация файлового защитника Windows .
/revert – восстановление параметров.
Устранение неполадок
Шаг 1: кликните на «Уведомления» и выберите «Все параметры».

Шаг 2: в поисковое поле введите «Устранение неполадок».

Шаг 3: укажите наиболее подходящие параметры поиска и устранения ошибок.
Итог
Каждый из описываемых способов позволяют автоматически устранить большинство неисправностей, возникающих в операционной системе Windows.
Также стоит обратить внимание что есть сторонние программы для проверки и исправления ошибок на компьютере. Которые изначально предназначены для чистки и исправления ошибок в системе. К примеру в Advanced System Care можно в один клик сделать целый комплекс действий направленный на оптимизацию и ускорение работы системы. Стоит отметить что этими программами следует пользоваться осторожно. Например, CCleaner лучше сразу настроить по инструкции, чтобы не навредить своему Windows.
Не забудьте поделиться этим материалом с друзьями, чтобы ваш компьютер всегда работал максимально быстро.
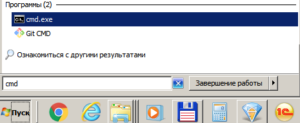
Запуск самой командной строки Windows: Пуск-Выполнить-cmd или Пуск-Поиск-cmd
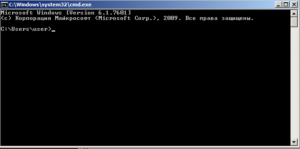
Для некоторых программ требуются права Администратора, поэтому запускаем от его имени:

Топ 10 команд:
1. SFC – команда проверки и восстановления системных файлов Windows. Может помочь после действий вирусов и неаккуратных пользователей.
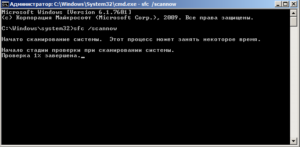
В случае, если программа обнаружит изменения, потребуется перезагрузка ОС для восстановления файлов.
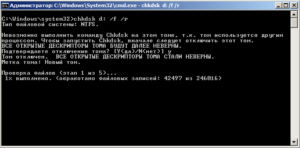
2. CHKDSK- команда проверки и исправления ошибок файловой системы
где D: – диск, который необходимо проверить
/f- параметр, включающий исправление ошибок на диске
/r -параметр, включающий поиск и восстановление поврежденных секторов на диске
Программа CHKDSK – с большой долей вероятности помогает исправить ошибки на винчестерах и решить проблему синего экрана (если он вызван проблемами с жестким диском и файловой системой)
3. MSCONFIG – команда запуска утилиты “Конфигурация системы”
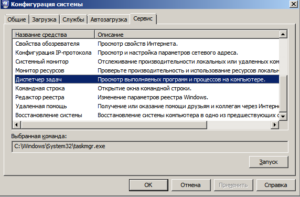
Утилита позволяет управлять параметрами запуска системы, автозапуском программ и служб.
4. PING – команда проверки соединения с удаленными компьютерами и серверами
где yandex.ru – может быть имя или IP адрес конечного хоста
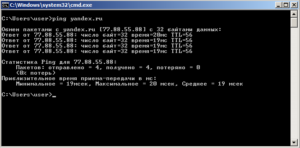
Если вы хотите чтобы команда выполнялась постоянно добавьте параметр -t
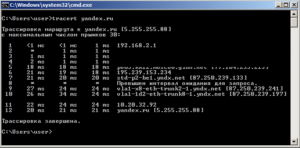
5. TRACERT – команда определения маршрута информационных пакетов
где yandex.ru – может быть имя или IP адрес конечного хоста
6. DIR – команда вывода на экран содержимого папки
где /w -параметр для отображения данных в несколько столбцов
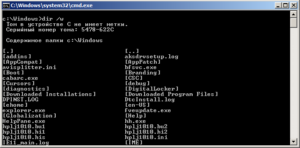
Может быть использовано когда нет доступа к графической оболочке Windows (например при восстановлении системы)
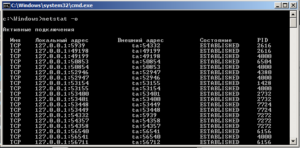
7. Netstat – команда вывода на экран состояния подключений TCP, портов и процессов инициировавших это подключение
где -o -параметр для отображения активных соединений и PID процесса каждого соединения
8. Explorer – команда запуска проводника Windows
Может помочь, если недоступен проводник и пропало меню Пуск
9. OSK – команда запуска виртуальной клавиатуры
Может понадобиться, когда вышла из строя обычная клавиатура или ее нет вообще
10. RSTRUI – команда запуска восстановления системы
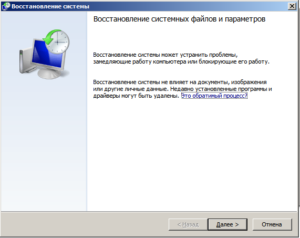
Восстанавливает систему на состояние определенной (выбранной вами ) даты.Главное, чтобы велась запись этих состояний(точки восстановления).За это отвечает запущенная служба Восстановления системы.
P.S. Если в конце любой команды поставить параметр /?, то на экране выведется подсказка по этой команде и описание основных ее параметров
P.S.1 команда cls – очищает командную строку
Поделиться ссылкой:
Похожие записи
Какой бы надежностью не славилась операционная система, всегда есть риск возникновения неполадок. Причиной сбоев в работе Windows может оказаться повреждение системных файлов. Для диагностики и восстановления существуют встроенные инструменты SFC (проверка системных файлов) и DISM (система обслуживания образов развертывания и управления ими).
При помощи этих средств можно проверить систему на наличие неисправностей и устранить их, следуя несложным шагам.
Запускаем утилиту проверки
SFC можно открыть через командную строку (CMD, консоль). Для этого в поиск вбейте «командная строка» или «cmd» и запустите ее с правами администратора, нажав на правую кнопку мыши. В появившемся окне введите команду «sfc /scannow» и нажмите Enter. Утилита проверит защищенные системные файлы и заменит копиями поврежденные, если таковые обнаружатся. Процесс может продолжаться больше часа.
Смотрим результаты
Проверка может иметь несколько исходов:
- Проблемы не обнаружены — все файлы присутствуют и среди них нет неисправных.
- Поврежденные элементы найдены и успешно восстановлены — это значит, что неполадки устранены, остается перезагрузить компьютер.
- Обнаружены повреждения, но восстановить их не удалось — в этой ситуации попробуйте провести диагностику в безопасном режиме.
Если система не смогла сама исправить ошибку
После сканирования получено сообщение о невозможности устранить проблему, значит, в хранилище не найдены нужные элементы.
Для восстановления образа хранилища воспользуйтесь инструментом DISM. В консоли наберите: «DISM/Online /Cleanup-Image/RestoreHealth». Утилита обратится к Центру обновления Windows. Это займет несколько минут, шкала выполнения может время от времени зависать. По окончании процедуры повторно запустите SFC. Если проблема была в повреждении хранилища, то, при условии успешного выполнения команды DISM, файлы должны быть восстановлены.
На устройствах с Windows 10 можно также просканировать хранилище в классическом приложении PowerShell. Чтобы это сделать, найдите его в Поиске и откройте от имени администратора. Далее введите: Repair-WindowsImage-Online–ScanHealth. Если неисправности отсутствуют, отобразится сообщение «ImageHealth State: Healthy». В противном случае можно воссоздать образ системы. Для этого в окне PowerShell вбейте: Repair-WindowsImage-Online–RestoreHealth.
- Распечатать
Оцените статью:
- 5
- 4
- 3
- 2
- 1
(94 голоса, среднее: 4.1 из 5)
Поделитесь с друзьями!
The system file checker tool is a useful command used to scan and repair corrupt or damaged system files. This command is usually used when users encounter problems with the…
The system file checker tool is a useful command used to scan and repair corrupt or damaged system files. This command is usually used when users encounter problems with the system files of Windows OS.
sfc /scannow is the most popular command to scan for corrupt system files immediately. It will not only scan, but also try to repair or replace corrupt system files with healthy ones. It requires a Windows installation source to copy files from.
The system file checker is a universal command and can be used in all Windows operating systems, including Windows 11, Windows 10, Windows 8, Windows 7 and Windows Vista.
This command line can perform several functions. We will discuss these in this article.
Table of contents
- SFC Switches
- Running Basic SFC Scan
- Outputs of SFC Scan
- Why SFC Scan Failed
- How to Open SFC CBS.Log File
-
How to Fix SFC /ScanNow Failed
- Scan Hard Drive
- Enable Built-In Administrator Account
- Reboot in Safe Mode
- Log In From Built-In Administrator Account
- Run DISM Utility
- Run SFC ScanNow
- Run Offline SFC ScanNow from WinPE
- Manually Replace Corrupted Files
- Scan Other Non-OS Volumes using SFC
-
How to Fix «Windows Resource Protection Could Not Start The Repair Service»
- Start Dependency Service
- Disable Turbo Memory
- Modify Security Descriptors
- Other Mitigation Methods
-
Frequently Asked Questions
- Does SFC ScanNow fix anything?
- How to run SFC scan?
- Is the SFC scan safe?
- What does SFC ScanNow actually do?
- Can you exit SFC scannow?
- Does SFC ScanNow improve performance?
- Can SFC ScanNowfix BSoDs?
SFC Switches
The table below lists all the switches which can be used with the SFC command-line tool, and their functions:
| Commands | Function |
| sfc /scannow | Scan for issues. If found, replace the file from the DLL cache. |
| sfc /scanonce | Will scan only once. |
| sfc /scanboot | Will scan the computer at every boot. |
| sfc /revert | Revert the scanning functionality to its original (default) state. |
| sfc /purgecache | Will remove the Windows File Protection cache and begin a scan over the system files. |
| sfc /cachesize=X | Set the cache size of the Windows File Protection to X MBs. |
| sfc /? | Display help regarding switches. |
Today, we are only going to be focusing on the “sfc /scannow” cmdlet as it is the one that quickly and effectively fixes your operating system.
Running Basic SFC Scan
The simplest (and most convenient) method to run the system file checker command is by running the following cmdlet in an elevated Command Prompt window:
sfc /scannow
The cmdlet will then perform its job and attempt to repair any protected files that may have been corrupted. However, that is not always the case, and users may encounter different errors from time to time.
Before we discuss these different errors, let us discuss the various outputs of the basic scan and what each of those means.
Outputs of SFC Scan
As you can observe in the image above, the output of the SFC scan states the following:
Windows Resource Protection found corrupted files and successfully repaired them.
It then also states the location of a CBS.log file which contains the details of the performed scan – we’ll get into that a moment later.
Let us now see all the possible outputs of the SFC scan that different users can encounter and what they mean:
| Output Statement | Meaning |
| Windows Resource Protection did not find any integrity violations. | No missing or corrupted system files were detected, meaning your system’s integrity is intact. |
| Windows Resource Protection could not perform the requested operation. | An unknown issue occurred and the scan could not be performed. In this case, you must adopt the alternative methods given below in this post. |
| Windows Resource Protection found corrupt files and successfully repaired them. | Missing or corrupted files were found and have been repaired, restoring your system’s integrity. |
| Windows Resource Protection found corrupt files but was unable to fix some of them. | Your system’s integrity was compromised, but SFC did not work. In this case, you must adopt alternative methods to fix the issue or replace the files manually using the given guide further down this post. |
Apart from this, there are other possible issues that you may encounter while performing the scan.
Why SFC Scan Failed
You may encounter any one of the following scenarios while performing an SFC scan. The table below lists those scenarios along with their possible solutions.
Note: The methods to perform these solutions are discussed below.
| Symptom of Failure | Possible Solution |
| Scan stuck at verification | Run the scan in safe mode or replace files manually |
| Scan gets frozen at a certain percentage | First run the DISM tool and then run the SFC scan in safe mode. |
| Nothing happens when running “sfc /scannow” | Run the DISM tool first and then run the SFC scan in safe mode. |
| SFC scan completely stops | Disable Intel Turbo Memory and try rerunning the scan. |
| SFC scan cannot fix the problem | First run the DISM tool and then run the SFC scan in safe mode. |
| Scan requires administrative privileges | Run the scan from an administrator account with an elevated Command Prompt. |
Before we discuss the different methods to run the SFC scan, bypassing any issues, let us look at the log file generated when an SFC scan is executed.
How to Open SFC CBS.Log File
When you perform an SFC scan, the system automatically generates a log file named “CBS.log.” This file contains information on the scan that was executed, which can help you advanced troubleshoot if you encounter an issue with the SFC tool.
The CBS.Log file is saved at the following location:
C:\Windows\Logs\CBS
You can open this log file using a text editor, such as Notepad, Word, Wordpad, etc.
Follow these steps to open the file:
-
Navigate to the following location using File Explorer:
C:\Windows\Logs\CBS
-
Here, right-click the file “CBS” then click Open with from the context menu.

Select Open With from context menu -
Now select the program you want to open the text file with from the popup and click Ok.
Select program to open with


The log file will then open in the text editor.

Since the CBS.Log file can be lengthy, you can analyze it using the Find function. You can look for keywords in the entire file using the CTRL + F shortcut keys, and then use the following keywords to look for the details on the file that may have been repaired, not repaired, corrupted, etc. Here is a list of the keywords you can use and the respective features you can find.
| Keyword | Details |
| Repaired | View files that were repaired |
| Cannot repair | View files SFC failed to repair – Will need to be replaced manually |
| Corrupt | Files that are or were corrupted – Will need to be replaced manually |
By analyzing the CBS.Log file, you can pinpoint the files which SFC could not repair, and then replace those files manually using the guide given down below.
How to Fix SFC /ScanNow Failed
If you are not able to fix your operating system using the basic approach for running the SFC scan, then there is still plenty you can do to mitigate the problem.
Note: The below methods need to be performed using only an administrative account and any commands need to be run using an elevated Command Prompt.
Note: The steps given below need to be performed in a methodical order as given.
-
Scan Hard Drive
To begin, you first need to scan your hard drive for errors or bad sectors using the Check Disk (CHKDSK) utility, since those could prevent the SFC scan from performing a successful repair. Here is how to do it:
-
Open Command Prompt with administrative privileges.
-
Run the following cmdlet:
Chkdsk C: /f /r /x -
You will be asked to schedule the CHKDSK utility the next time the computer reboots. Enter Y for yes.

Run Check Disk utility -
Now restart your computer. Once it reboots, the Check Disk utility will run and scan your hard drive. This can take a while, in some cases, hours. Let the scan finish and reboot into Windows.
-
-
Enable Built-In Administrator Account
Now enable the built-in Administrator account, which will be needed by following the steps below. Using this account, you will have elevated privileges required to manipulate protected files.
There are several ways to enable the built-in Administrator account on a Windows computer. Click here to learn more about them.
-
Reboot in Safe Mode
Safe Mode is a diagnostic mode that starts Windows in a basic state, loading a limited set of files and drivers. This is intended for troubleshooting Windows problems.
Perform these steps to boot into Safe Mode with Networking – which means you will have access to the internet which is then later required to run the DISM utility.
-
Open the System Configuration applet by typing in msconfig in the Run Command box.

Open System Configuration applet -
Switch to the Boot tab. Here, in the Boot options section, check the box next to “Safe Boot,” and then select the Network radio button under it. Once done, click Apply and Ok.

Boot into safe mode with networking -
In the confirmation dialog box, click Restart.

Confirm rebooting
Your computer will now reboot into Safe Mode.
Learn other methods to boot into Safe Mode.
-
-
Log In From Built-In Administrator Account
Now you must log in to the Administrator account that you enabled earlier. This will allow you to have the privileges to repair missing or corrupted system files.
-
Run DISM Utility
Once you are logged in, you must first run the DISM utility to fix the system image. Fixing the system image will then allow the SFC scan to perform its task without any hindrance.
The DISM tool can be used to prepare, modify, and repair system images. However, you need an active internet connection to download and replace corrupted content from Windows Update, which is why we opted to boot into Safe Mode with internet connectivity.
Follow these steps to run the DISM utility:
-
Launch the Command Prompt with administrative privileges.
-
Now execute the following cmdlets one after the other, allowing each cmdlet sufficient time to complete.
DISM.exe /Online /Cleanup-image /Checkhealth
DISM.exe /Online /Cleanup-image /Scanhealth
DISM.exe /Online /Cleanup-image /Restorehealth
Run DISM utility
Once this is done successfully, do not close the Command Prompt.
-
-
Run SFC ScanNow
Now all you need to do is run the basic SFC scan in an attempt to repair the operating system and the corrupted files within. Run the following cmdlet in an elevated Command Prompt:
sfc /scannow
SFC scan in Safe Mode


That is it! This method should eliminate any issues you experience while performing the SFC scan in basic mode. Restart the computer once the scan is complete.
However, if you find the SFC utility is still unable to fix missing or corrupted files, there are still several things you can do. To begin, we suggest you analyze the CBS.Log file, as we discussed earlier in this post.
Run Offline SFC ScanNow from WinPE
The offline version of the SFC scan means that you run the scan from the Windows Preinstallation Environment (WinPE). This method can be especially useful if you are unable to boot into Windows.
This process requires a Windows installation device (DVD, bootable USB) that has the same OS version as installed.
Perform the following steps to attempt and repair any missing or corrupted system files using the SFC scan with WinPE.
-
Plugin the bootable device and boot from it.
-
On the first screen, click Next.
Proceed to next -
Now click Repair your computer.
Attempt to repair -
Now select Troubleshoot.
Select Troubleshoot -
Now select Command Prompt.
Open Command Prompt in WinPE -
The Command Prompt will now open in front of you. Paste the following cmdlet to verify the drive letter assigned to the volume where Windows is installed.
bcdeditNote down the drive letter beneath “Windows Boot Loader” in front of device.

Note down drive letter Note: Since the drive letters assigned in WinPE are not the same as the default drive letters you see when Windows is booted, these can be different for everyone. Therefore, it is important to determine which drive letter is currently assigned to the boot volume.
-
Now use the following cmdlet to run the SFC scan here, while replacing DriveLetter (in 2 places) with the letter of the drive where Windows is installed as noted in the last step:
sfc /scannow /offbootdir=DriveLetter: /offwindir=DriveLetter:\Windows -
Once the scan is complete, restart your computer and boot normally into Windows.


If this does not work for you either, you can manually replace the corrupted files yourself.
Manually Replace Corrupted Files
At this point, you must have already analyzed the VBS.Log file we had discussed earlier. Using the file names determined from there, you can manually replace them with healthy files obtained from another computer. Here is how to do it:
-
Start by taking ownership of the corrupted system file. To do so, run the following cmdlet in an elevated Command Prompt while replacing Path&FileName with the complete path and file name of the corrupted file:
takeown /f Path&FileName
Take ownership of file -
Next, grant the Administrators group full access to the file using the following cmdlet while replacing Path&FileName as earlier:
icacls Path&FileName /GRANT ADMINISTRATORS:FGrant Administrators full rights to file -
Now you should be able to easily replace the file with another copy. At this point, copy the same file from a healthy computer having the same Windows version and paste it here, replacing the current one.


That is it! You can now repeat the same process to manually replace any corrupted files.
Scan Other Non-OS Volumes using SFC
It may be possible that you are running more than one operating system on your PC, and not all of them can be in the same drive (usually the C drive). In that case, you must direct the SFC scan to attempt and repair another drive.
Furthermore, you can also direct it to scan external drives, such as USB flash drives, SD cards, etc.
Here is how to do so:
Note: Since SFC can only fix missing and corrupted files, it can only attempt to repair drives with a Windows operating system in it.
-
Open Command Prompt with elevated privileges.
-
Now use the following cmdlet to scan another drive while replacing DriveLetter with the drive letter for the volume you want to scan:
sfc/scannow/offbootdir=DriveLetter: /offwindir=DriveLetter:\Windows
The scan will now attempt to repair any corrupted or missing files that you selected other than the C drive.
How to Fix “Windows Resource Protection Could Not Start The Repair Service”
It may be possible that you encounter the following error while trying to run an SFC scan on your computer:
Windows Resource Protection could not start the repair service
If so, here are a few things you can do to mitigate this issue:
Start Dependency Service
It may be possible that a dependency service named “Windows Modules Installer (Trusted Installer)” isn’t running on your computer, preventing the scan from happening. In that case, the service needs to be enabled.
-
Open the Services console by typing in services.msc in the Run Command box.
Open Services console -
Here, scroll down and right-click on the service “Windows Modules Installer” and then click Properties from the context menu.

Open service properties -
From the popup, select “Startup Type” as Automatic, then click Start. When the service starts, click Apply and Ok to save the changes.
Enable and start service -
Try rerunning the SFC scan.


Learn other methods to enable and disable Windows services.
Disable Turbo Memory
Intel Turbo Memory is a feature that allows NAND memory modules to power up, access programs, and write data on the hard drive much quicker than usual. This feature can be controlled through the system BIOS.
If you experience an SFC scan suddenly stops or cannot complete its job, then you must disable Turbo Memory from the BIOS settings.
Learn how to access BIOS.
Modify Security Descriptors
A Security Descriptor contains security information that may be associated with a securable object. It may be possible that critical Security Descriptors may have corrupted in the WinSXS folder where critical files are stored.
To mitigate this issue, perform the following task:
-
Launch the Command Prompt with administrative rights.
-
Now run the following cmdlet:
ICACLS C:\Windows\winsxs
Modify Security Descriptors -
Now restart your computer and try rerunning the SFC scan.

Other Mitigation Methods
If you encounter the said error, there are other things you can also perform which we have already discussed above in this post. Here is a list of additional steps you can take:
- Run Check Disk Utility.
- Run DISM utility.
- Run SFC scan in Safe Mode.
- Replace corrupted files manually.
Frequently Asked Questions
Does SFC ScanNow fix anything?
Short answer: Yes, it does. However, the SFC tool itself can occasionally encounter errors, which are also fixable.
How to run SFC scan?
Run the following cmdlet in the Command Prompt:
sfc /scannow
Is the SFC scan safe?
Yes, the SFC scan is completely safe. In fact, you can even run it if nothing is wrong with your computer, just to ensure your device’s integrity.
What does SFC ScanNow actually do?
The SFC ScanNow cmdlet scans all protected files and replaces corrupted files with a cached copy that has been kept in its original shape.
Can you exit SFC scannow?
Yes, it is safe to cancel the scan. However, we do suggest that you allow it to be completed as it causes no harm. If you find that it is stuck you can cancel it using the CTRL + C keys simultaneously.
Does SFC ScanNow improve performance?
If the scan is able to fix critical files, it can sometimes improve the system’s overall performance and speed since the protected files are now as they should be.
Can SFC ScanNowfix BSoDs?
Potentially, yes. BSoDs are often caused by corrupted or missing files, and this is the one thing SFC is good at.
Чтобы проверить Windows на ошибки, необходимо воспользоваться предустановленными в операционной системе (ОС) инструментами. В качестве альтернативы можно применять программное обеспечение от сторонних разработчиков, которое обладает большим набором функций и имеет интуитивно понятный интерфейс.
Содержание
- Проверка Windows на наличие ошибок с помощью штатных средств
- Сканирование системных файлов
- Анализ хранилища
- Проверка оперативной памяти
- Сканирование состояния жесткого диска
- Анализ целостности реестра
- Проверка Windows на ошибки с помощью программ
- System Mechanic
- Fix Win 10
- Advanced SystemCare
- Error Repair
- Заключение
Предустановленные приложения и средства в ОС позволяют проверить каждый компонент дистрибутива на наличие ошибок и целостность. Некоторые утилиты позволяют сразу произвести восстановление поврежденного участка.
Важно! В статье будут представлены универсальные способы использования штатных средств, которые можно задействовать в дистрибутивах Windows, начиная с версии XP.
Сканирование системных файлов
Чтобы проверить целостность системных файлов, расположенных на диске C, необходимо запустить специальную консольную утилиту. Пошаговое руководство:
- Раскрыть поиск по системе, ввести запрос cmd.
- В контекстном меню выбрать опцию «Запуск от имени администратора».
- Вписать команду sfc /scannow, нажать Enter.

Начнется процесс сканирование системных файлов на наличие повреждений. Если будут обнаружены неисправности, программа автоматически попытается выполнить восстановление.
Анализ хранилища
Сбои системного хранилища могут проявляться в незначительной степени, но рекомендуется систематически проводить анализ этого компонента. Пошаговое руководство:
- Посредством поиска найти и запустить «Командную строку» от имени суперпользователя, как это было описано ранее.
- В появившемся окне консоли вписать DISM /Online /Cleanup-image /RestoreHealth, нажать Enter.
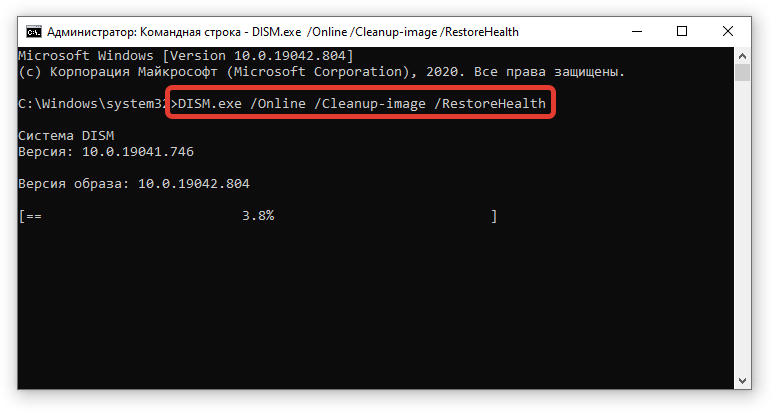
- Дождаться завершение анализа хранилища с последующим автоматическим восстановлением.
Обратите внимание! Процесс сканирования занимает много времени и останавливается на 15-20 минут в районе 20%.
Проверка оперативной памяти
Оперативная память — важный компонент компьютера, поломка которого может спровоцировать выход из строя всего устройства. В системе есть специальный инструмент, позволяющий проанализировать оборудование на наличие проблем.
Пошаговое руководство:
- Открыть «Панель управления», воспользовавшись поиском по системе.

- Перейти в раздел «Система и безопасность».

- Кликнуть по гиперссылке «Администрирование».

- Запустить утилиту «Средство проверки памяти Windows».

- Щелкнуть по пункту «Выполнить перезагрузку и проверку».
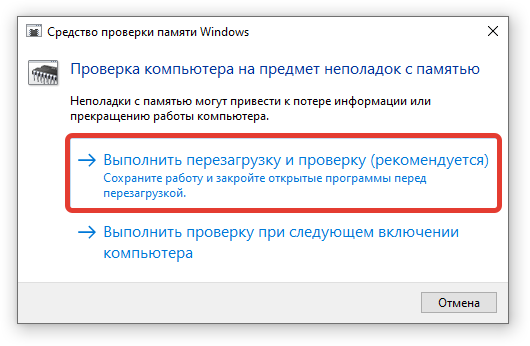
Важно! Предварительно необходимо сохранить все открытые документы — компьютер перезапустится.
После повторной загрузки на экране появится процесс выполнения анализа оперативной памяти, поделенный на два этапа. Необходимо дождаться завершения, после чего на рабочем столе в панели уведомлений отобразится отчет, из которого можно узнать подробности.
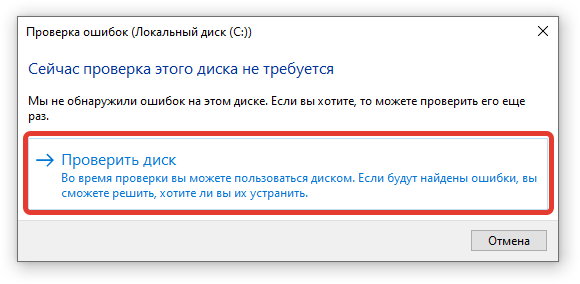
Сканирование состояния жесткого диска
Жесткий диск подвержен износу ячеек памяти, которые затираются со временем. При критическом повреждении большого количества участков система начинает работать плохо. Необходимо выполнить проверку накопителя, чтобы исключить поломку.
Пошаговое руководство:
- Запустить Проводник, кликнув по соответствующему значку на панели задач.

- Нажать по диску C правой кнопкой мыши, выбрать пункт «Свойства».

- Перейти на вкладку «Сервис» и кликнуть по кнопке Проверить.
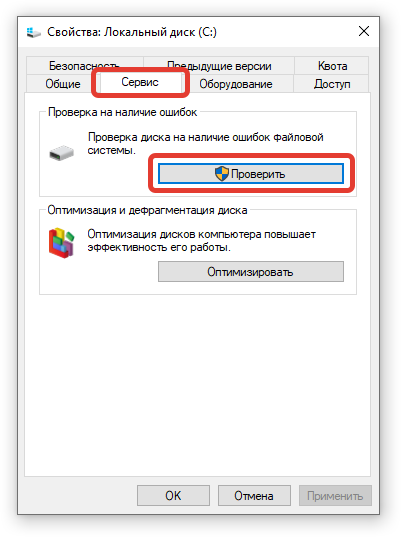
- Подтвердить действие нажатием по пункту «Проверить диск».
Анализ целостности реестра
Засоренность реестра негативно влияет на быстродействие ОС и может стать причиной возникновения ошибок. В системе есть специальное средство для очистки «мусорных» ключей.
Пошаговое руководство:
- Посредством системного поиска найти и запустить «Командную строку» описанным выше способом.
- Вписать scanreg /fix, нажать Enter.

- Ожидать выполнения оптимизации реестра.
Проверка Windows на ошибки с помощью программ
Программы от сторонних разработчиков выигрывают у штатных более понятным интерфейсом и полуавтоматическим решением проблем — пользователю необходимо только указать неполадку, которую следует устранить.
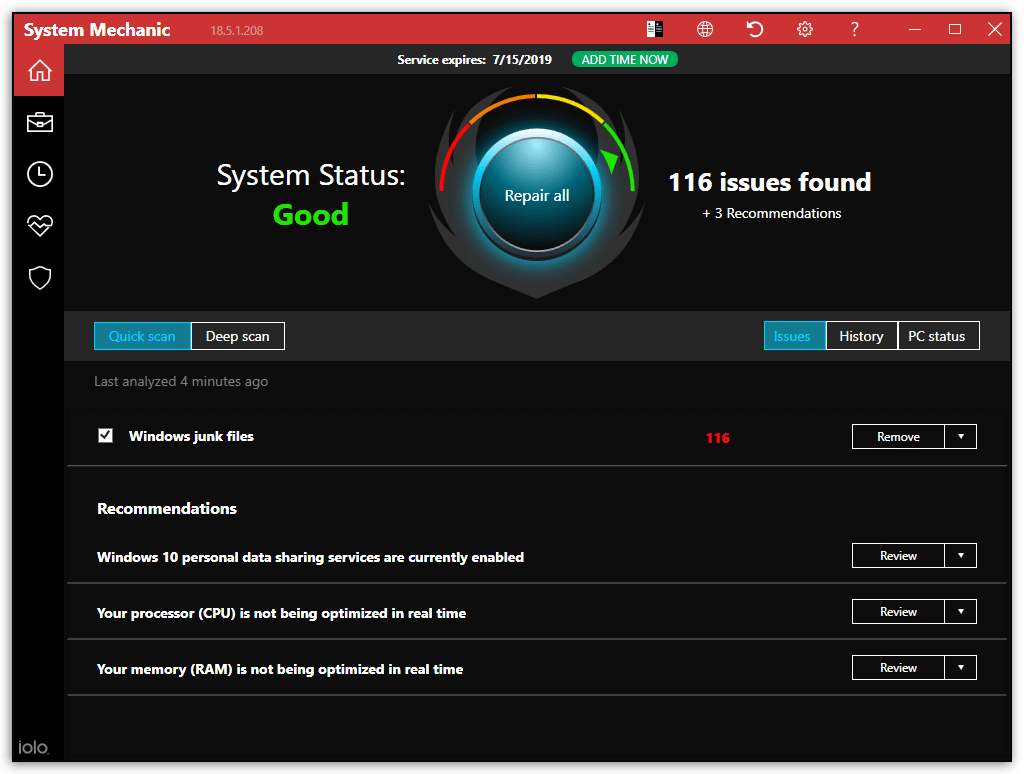
System Mechanic
System Mechanic — набор инструментов для анализа ОС с последующим восстановлением и оптимизацией. Распространяется на бесплатной основе, но есть продвинутая платная версия. Русский язык отсутствует.
Руководство по использованию:
- Запустить, дождаться завершения сканирования системы.
- Ознакомиться с найденными ошибками, нажать по кнопке Repair all.
- После окончания закрыть программу, перезапустить компьютер.
Fix Win 10
Fix Win 10 — специально разработанная утилита для работы в десятой версии ОС от Майкрософт. Распространяется бесплатно, перевода на русский язык нет.
Руководство по использованию:
- Запустить, перейти в желаемый раздел с инструментами. Отталкиваться следует от названия.
- В списке выбрать возникшую на компьютере проблему, кликнуть Fix.
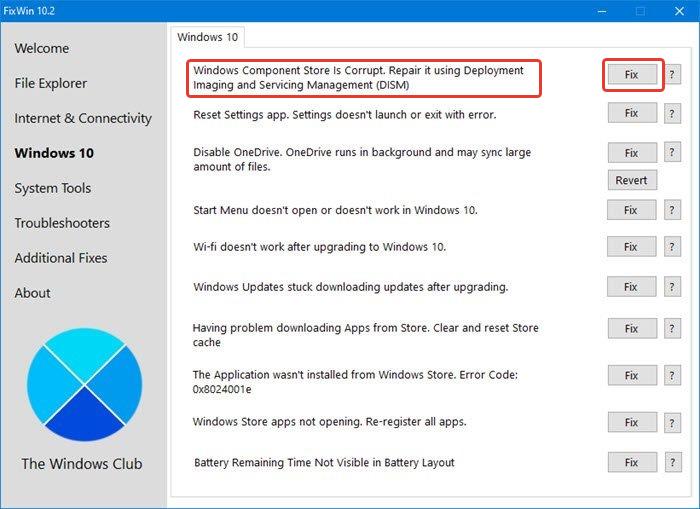
- Дождаться завершения операции, перезапустить компьютер.
Advanced SystemCare
Advanced SystemCare — профессиональная программа для оптимизации системы и устранения возникших неполадок. Имеет бесплатную версию с урезанным набором возможностей. Русский язык есть.
Руководство по использованию:
- После запуска дождаться окончания сканирования системы на наличие проблем.
- Находясь в разделе «Сводка», кликнуть по кнопке Исправить.
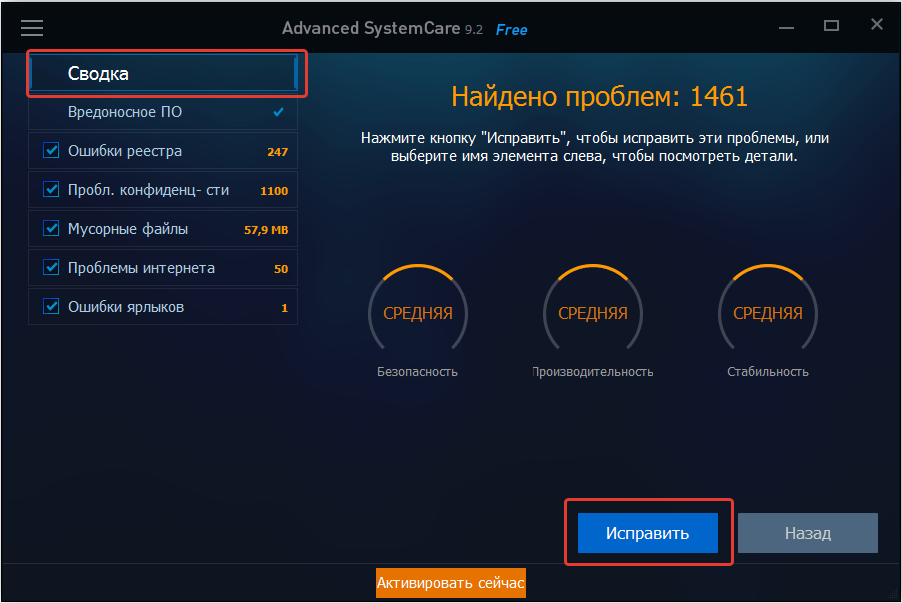
- Перезапустить компьютер.
Error Repair
Error Repair — маловесная утилита, направленная на выявление с последующим устранением проблем, которые связаны с реестром, безопасностью и приложениями. Русский язык отсутствует.
Руководство по использованию:
- Запустить программу, перейти на вкладку «Registry».
- Кликнуть по кнопке Scan Your PC Now, дождаться завершения анализа.

- Выделить в списке все позиции, щелкнуть по Repair Errors Now.
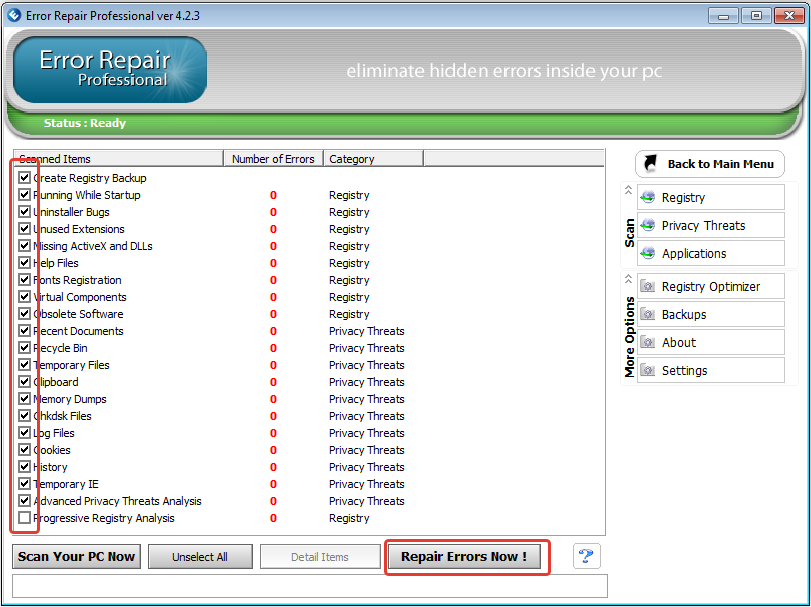
- Произвести те же действия в разделах Privacy Threats и Applications.
Заключение
Неопытным пользователям рекомендуется применять для проверки Windows приложения от сторонних разработчиков, которые снабжены интуитивно понятным интерфейсом и обширным набором функций. Штатные средства следует использовать в случае выявления единичной неисправности.
( 1 оценка, среднее 2 из 5 )