Internet Explorer was retired on June 15, 2022
IE 11 is no longer accessible. You can reload Internet Explorer sites with IE mode in Microsoft Edge.

This tool detects and tries to fix some frequently occurring issues with the setup of Microsoft .NET Framework or with updates to the Microsoft .NET Framework.
Important! Selecting a language below will dynamically change the complete page content to that language.
-
File Name:
NetFxRepairTool.exe
This tool troubleshoots common issues with the setup of Microsoft .NET Framework or with updates to Microsoft .NET Framework setup installation. Additionally, this tool tries to resolve these issues by applying known fixes or by repairing the installed product.
Note: The current version of the tool supports repairing the .NET Framework 4.8, 4.7.2, 4.7.1, 4.7, 4.6.2, 4.6.1, 4.6, 4.5.2, 4.5.1, 4.5, 4.0 and 3.5 SP1 (includes .NET 3.0 SP2 and .NET 2.0 SP2).
-
Supported Operating Systems
Windows Server 2008, Windows XP, Windows Server 2003, Windows Server 2008 R2, Windows 7, Windows Vista
Note: More information about Service Pack levels currently supported for the platforms listed above can be found in the following page: Microsoft Product Support Lifecycle.
-
- Click the Download button on this page to start the download.
- Do one of the following:
- To start the installation immediately, click Run.
- To save the download to your computer for installation at a later time, click Save.
- To cancel the installation, click Cancel.
-
Please see the Knowledge Base Article KB2698555 for more information.
The .NET Framework is essential for some Windows apps, so here’s how to repair it if something goes wrong.
A fully functional .NET Framework is necessary to run apps built with it on your Windows PC. Any issues with the framework can cause the dependent applications to malfunction. Fortunately, Microsoft provides a dedicated repair tool that you can use to fix any issues with the .NET Framework and get your apps to run again.
If the repair tool doesn’t work, you can use other workarounds to try and fix the framework errors. So, here are a few ways you can repair .NET Framework on your Windows computer.
An easy way to repair your .NET Framework is to use the official .NET Framework Repair Tool provided by Microsoft on its official website. It is a handy utility that can check for common issues affecting the .NET Framework setup or updates and recommend fixes accordingly.
To run the .NET Framework Repair Tool
- Go to the Microsoft .NET Framework Repair Tool page.
- Scroll down to the Download information section.
- Next, click on the Microsoft .NET Framework Repair Tool link to download the executable file.
- Once downloaded, double-click on the Netfxrepairtool.exe to run the repair tool. Click Yes if prompted by User Account Control.
- Accept the conditions and click Next.
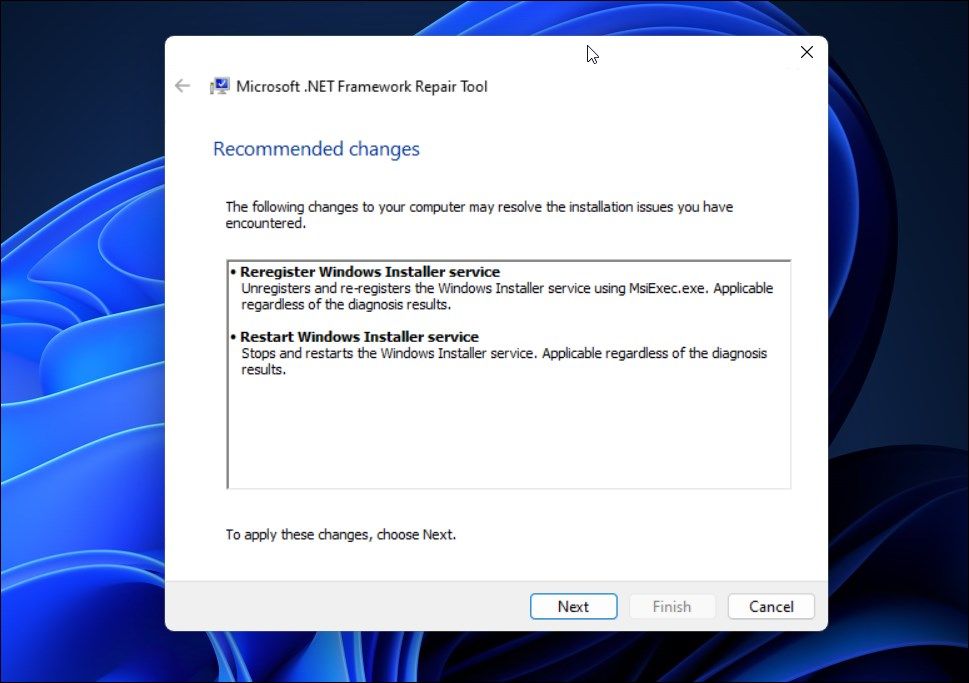
- The repair tool will perform a few tests to identify the issues. Once done, it will recommend a few changes. Read the description and click Next to apply the changes.
- Once done, click Next and Finish to close the repair tool.
2. Repair .NET Framework via Optional Features
If the .NET Framework Repair Tool doesn’t work, you can disable and re-enable the feature from Optional Features to repair the framework. This process will disable and re-enable the feature fixing any issue due to temporary glitches and file corruption.
Follow these steps to add and remove optional features in Windows:
- Press Win + R to open Run.
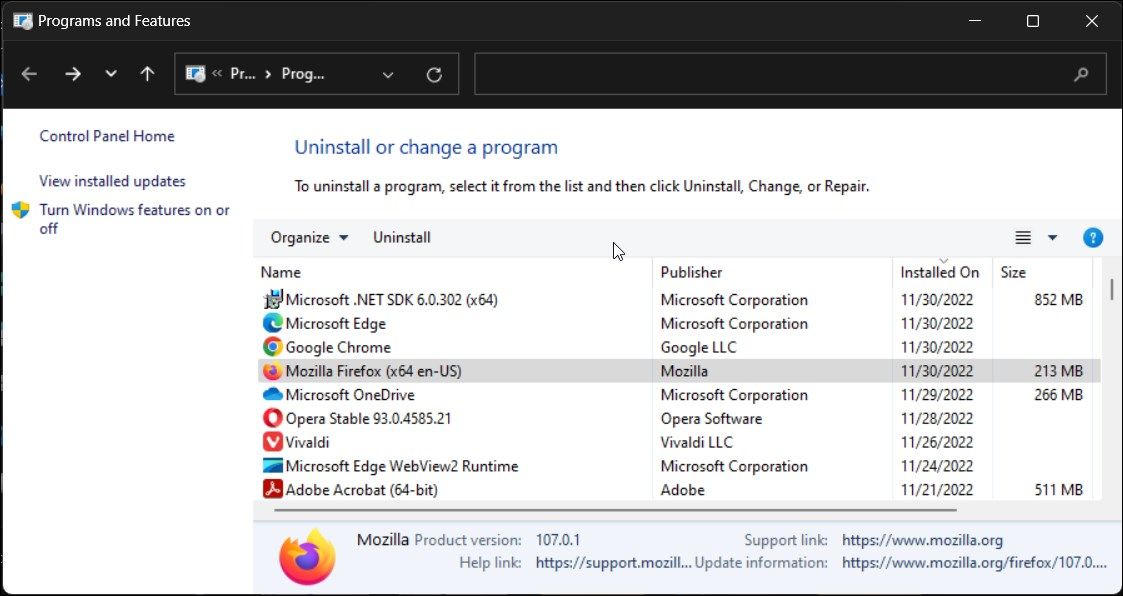
- Type control and click OK to open Control Panel.
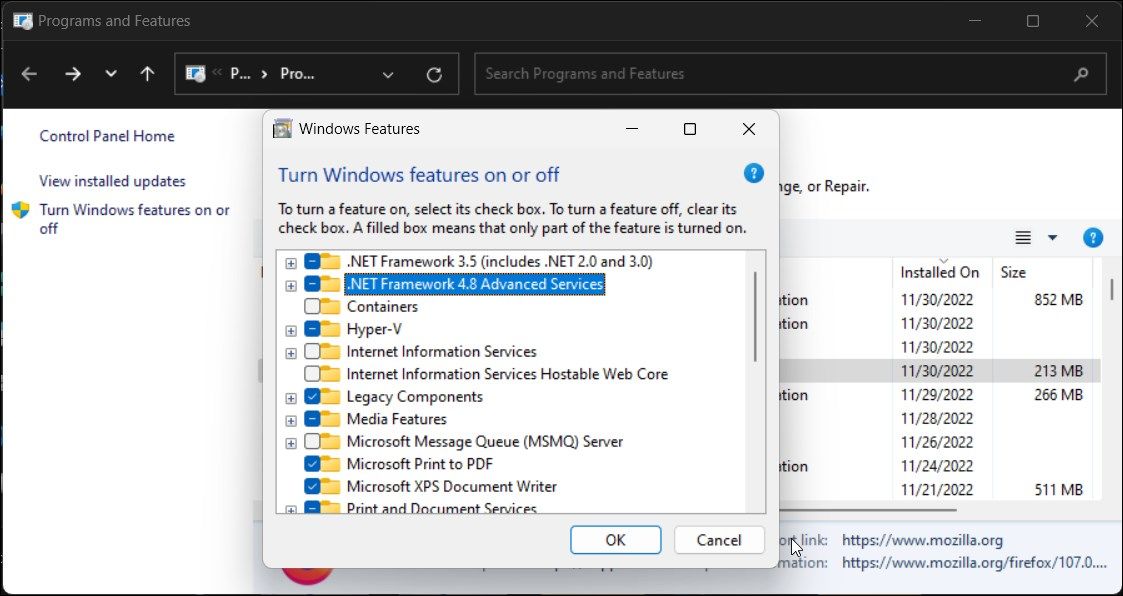
- Next, click on Programs and then click on Programs and Features.
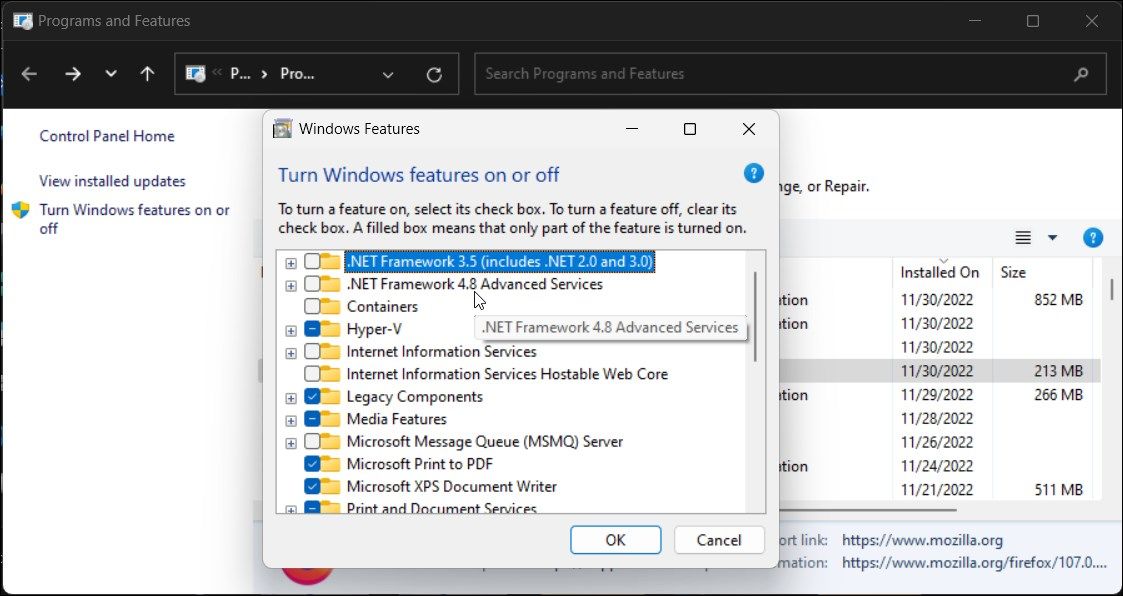
- In the left pane, click on Turn Windows features On or Off.

- Here, uncheck .NET Framework 3.5 and .NET Framework 4.8 Advanced Services option.
- Click OK.
Windows will disable .NET Framework from your PC and show Windows completed the requested changes message. Click Restart Now to apply the changes.
After the restart:
- Open Control Panel and click on Turn Windows Features On or Off.
- Select both the .NET Framework 3.5 and .NET Framework 4.8 Advanced Services options.
- Click OK.
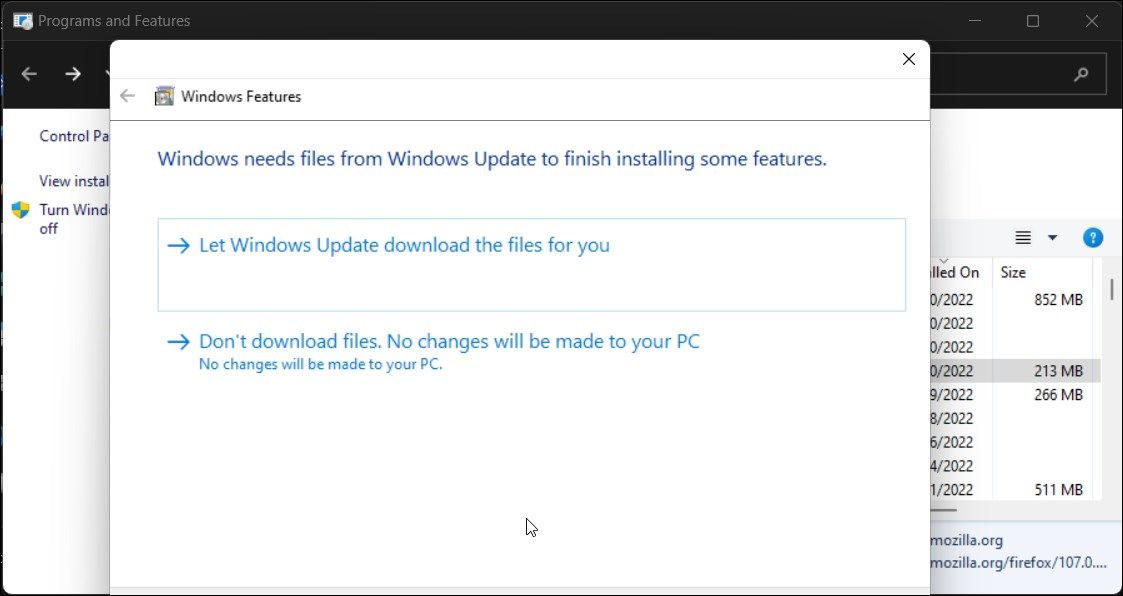
- Next, click on Let Windows update download the files for you. This process may take some time, depending on your Internet connection speed.
- Once the feature is enabled, click Restart to apply the changes.
3. How to Repair .NET Framework Using PowerShell
If the issue persists, try reinstalling .NET Framework on your Windows PC using PowerShell. You can use the shell application to perform a clean install of the .NET Framework and other associated tools. Here’s how to do it.
- Press the Win key and type PowerShell.
- Right-click on PowerShell and select Run as administrator.
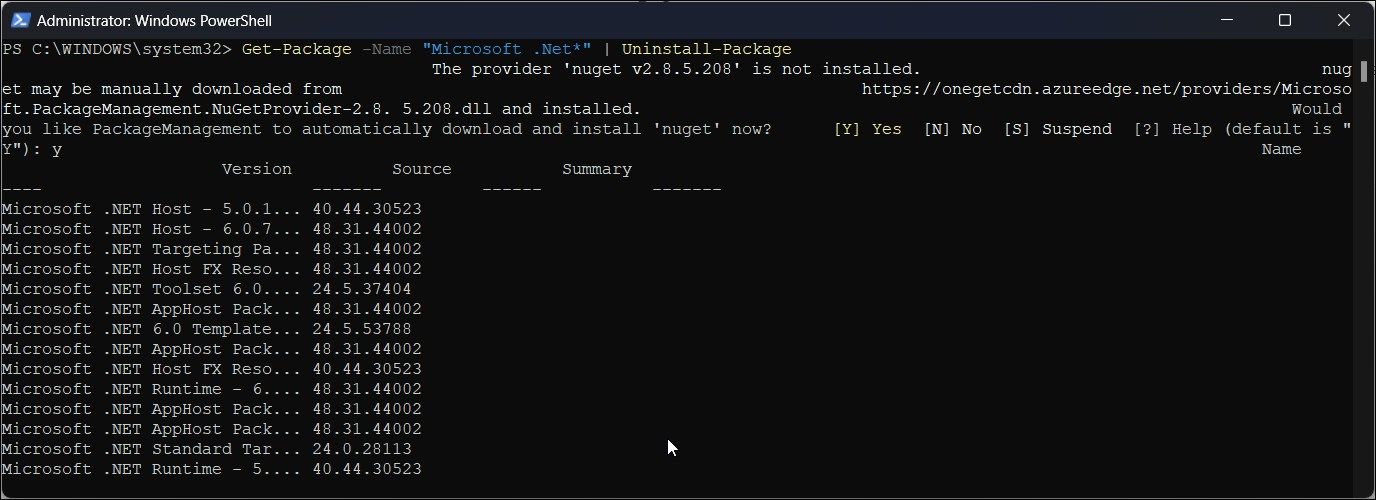
- In the PowerShell window, type the following cmdlet and press Enter:
Get-Package -Name “Microsoft .Net*” | Uninstall-Package - PowerShell may prompt you to install NuGet – a packet manager necessary to perform this action. So, type Y and press Enter.

- PowerShell will now start to uninstall the .NET Framework from your PC.

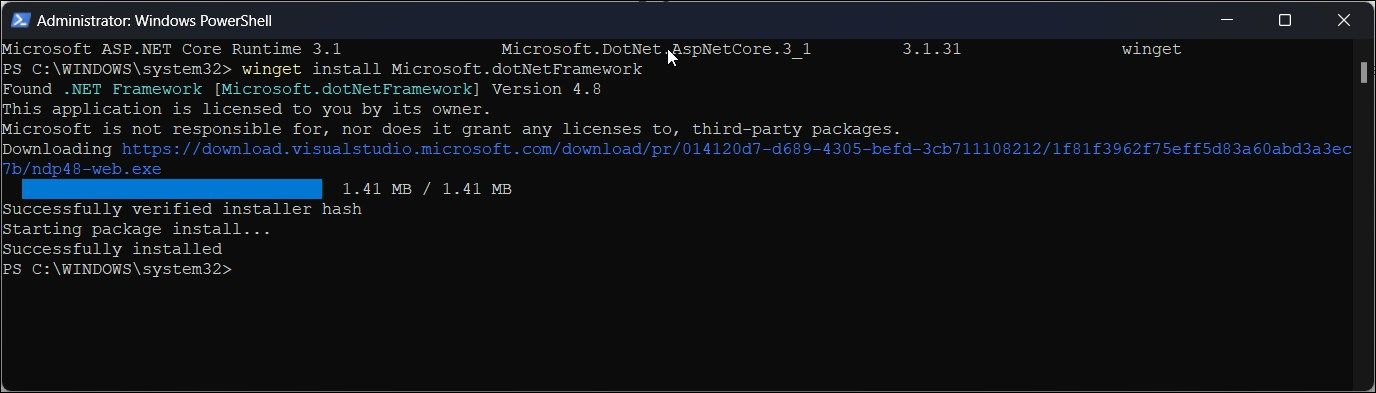
- Next, type the following command to install the latest version of Microsoft .NET Framework:
winget install Microsoft.dotNetFramework - PowerShell will download and extract the package. You will see a successfully installed message once the process is complete.
- Restart your PC to apply the changes and check for any improvements.
4. How to Manually Install an Older .NET Framework Version
You can install only the latest version of .NET Framework using PowerShell. However, an app may sometimes require an older version of the .NET Framework to work. If reinstalling from the Optional Features dialog didn’t help, you can manually install the framework from the .NET Framework download page.
To manually install older versions of the .NET Framework:
- Go to the .NET Framework download page.
- Under the Supported versions section, click on the .NET Framework version you want to download.
- On the next page, click on Download .NET Framework XX Runtime.
- Once the download is complete, open the download location and run the dotnetfx.exe file to launch the setup. Click Yes, if prompted by UAC.
- Next, follow the on-screen instructions to complete the setup.
- Restart your PC and then try to install the app to see if it works.
The System File Checker tool is a built-in system repair utility that finds and fixes missing or corrupted system files. You can use the tool to fix any system issues that may conflict with the .NET Framework.
To run the System File Checker tool:
- Press the Win key and type cmd.
- Right-click on Command Prompt from the search result and select Run as administrator.
- In the Command Prompt window, type the following command and press Enter:
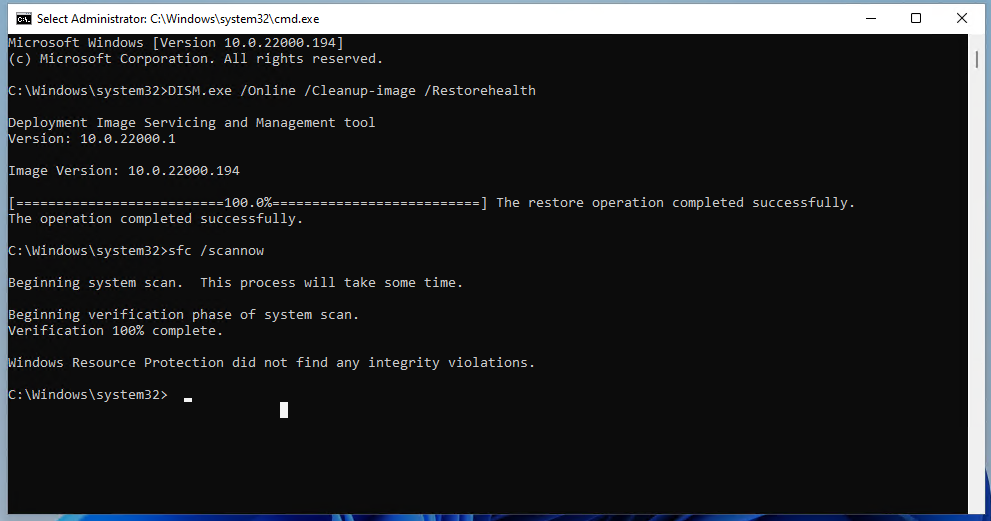
DISM.exe /Online /Cleanup-image /Restorehealth - The above DISM command is recommended to run before the System File Checker tool as it will provide files required to fix system file corruption.
- Once the process is complete, run the following command and press Enter:
sfc /scannow
The SFC tool will now scan your system files for issues and replace any corrupted files as necessary. Wait for the verification process to complete.
The Many Ways to Repair .NET Framework on Windows
The .NET framework in the Windows operating system is required to run some critical applications. When it runs into an error, some apps may ask you to install a specific version of .NET Framework to continue using the app. If you think you have the required version of .NET Framework installed, performing a repair can help you fix any .NET framework issues.
.NET Framework is needed to run .NET-based apps and programs that cannot run if it is corrupted, or the wrong version is installed. You can repair .NET by re-enabling it,…
.NET is an integral part of the Windows operating system. It is needed to run some Windows applications, without which the app would become useless. If you are experiencing issues with .NET, seeing an error prompt asking you to install a specific version, or the app is failing to load, then your installed .NET Framework might need some fixing.
There are multiple ways you can find a corrupted or broken .NET Framework installation on your computer. In this post, we are going to show you all the methods.
Table of contents
- Repair .NET using .NET Framework Repair Tool
- Repair .NET from Control Panel
- Repair .NET by Re-Enabling it from Optional Features
- Repair .NET by Reinstalling it from PowerShell
- Closing Words
Repair .NET using .NET Framework Repair Tool
The first attempt in fixing any .NET-related issues is using the dedicated .NET Framework Repair Tool by Microsoft, whose name is self-explanatory. Let us show you how to repair .NET Framework on your Windows PC using this tool:
-
Start by downloading .NET Framework Repair Tool by clicking on the given link, and then click Download.

Download .NET Repair Tool -
Once downloaded, run the .EXE file. This will open the Microsoft .NET Framework Repair Tool wizard.
-
On the first screen, agree to the licensing terms and click Next.

Agree to license terms -
Now click Next again to apply any recommended changes by the tool.
Apply changes -
Once the changes have been applied, click Finish to close the wizard.
Close the wizard


Now, check to see if the issue you were experiencing has been resolved. If not, then there are a few other methods to repair .NET as well.
Repair .NET from Control Panel
Another method to repair a .NET installation is from the Programs and Features applet in Windows. Follow these steps to attempt to repair your .NET Framework from the Control Panel:
-
Open the Programs and Features applet by typing in appwiz.cpl in the Run Command box.

Open Programs and Features -
Here, right-click on the .NET installation causing you trouble and then click Change from the context menu.

Change .NET installation -
You will now see a .NET wizard. Click Repair.

Repair .NET -
The wizard will now attempt to repair .NET. Once it completes, click Close.
Close wizard


Now check to see if you are able to run the troublesome app.
Repair .NET by Re-Enabling it from Optional Features
If the methods discussed above did not fix the problem, then you may have to perform a clean install of .NET. This means that all you need to do is disable it, and then re-enable .NET from the Windows Optional Features applet.
-
Open the Optional Features applet by typing in optionalfeatures in the Run Command box.
Open Optional Features applet -
From the window, uncheck the boxes next to the enabled .NET Framework versions and click Ok.

Turn off .NET optional features -
Once the features have been disabled, click Close. However, if you are asked to restart the computer, click Restart.

Close wizard -
Once the computer boots back up again, open the Optional Features applet again through the Run Command box.
-
From the window, check the boxes next to the .NET Frameworks again and click Ok.

Re-enable .NET -
On the next window, click “Let Windows Update download the files for you.”

Install through Windows Update The wizard will now download new .NET files and install .NET Framework from scratch.
-
Once installed, click Close.
Close wizard


Now that you have performed a clean install of .NET, check to see if the problem you were previously experiencing persists. If it does, there is still another way to reinstall .NET using PowerShell.
Repair .NET by Reinstalling it from PowerShell
Reinstalling .NET is perhaps the last resort in fixing .NET Framework. This can be done using Windows PowerShell alone. Follow the given guide below to reinstall .NET Framework:
-
Run the following cmdlet in an elevated PowerShell instance to uninstall all versions of .NET.
Get-Package -Name “Microsoft .Net*” | Uninstall-PackageIf prompted to install Nuget, enter Y.

Uninstall .NET using PowerShell -
Now, run the following cmdlet to see which .NET versions are available to install. This will also show you their associated package IDs.
winget search Microsoft.DotNetCheck .NET version list -
Note down the ID of the .NET version that you want to install, and replace [PackageID] in the following cmdlet with the ID and run it in PowerShell:
winget install [PackageID]Install .NET from PowerShell


Once PowerShell is reinstalled, your .NET issue should be resolved.
Closing Words
Microsoft .NET Framework can be corrupted when it is not installed properly or when critical system files are missing or corrupted. The methods shared above to fix it should work for fixing .NET. However, you can also run the System File Checker scan to attempt to repair system files, which in turn may also repair .NET.

| Категория: | Оптимизация ОС |
| Разработчик: |
Microsoft (США) |
| Обновлено: | 22.05.2019 |
| Рейтинг: | |
| Интерфейс: | Английский |
| Версия: | 1.3. (4.6.01535.0) |
| Системы: | Windows XP-10 (x86-x64) |
| Лицензия: | Freeware (бесплатно) |
| Размер: | 1.2 МБ |
О программе
Microsoft NET Framework Repair Tool – это специальная утилита, которая проверяет установленный в операционной системе пакет NET Framework на ошибки и оперативно их устраняет. Данная программа распространяется совершенно бесплатно самой компанией Microsoft.
Однако для успешной работы программы в системе требуется установленный пакет NET Framework 3.5 или новее. Это необходимое условие. Тем не менее, данная утилита вполне способна исправить ошибки пакета без обязательной переустановки.
В Windows Framework используется для обеспечения работы некоторых программ и системных опций. И если этот пакет содержит ошибки, то никакой стабильной работы не будет. Система будет тормозить, глючить и вести себя неадекватно.
Скачать Framework Repair Tool можно с официального сайта компании Microsoft. Там имеются установочные файлы для Windows x86 и x64. Установка довольно простая. Ничего экстраординарного в процессе инсталляции и использования не будет.
Что нового
В версии 1.3 (4.6.01535.0) добавлена поддержка Windows 10 и NET Framework 5.6.1. Также улучшены алгоритмы поиска ошибок. В общем и целом, также заметно выросло быстродействие утилиты. Теперь она намного быстрее справляется с проблемами.
Системные требования
- Операционная система: Microsoft Windows XP-10 (x86-x64).
- Версия пакета NET:0-5.6.1.
Плюсы и минусы:
Преимущества:
- Устранение всех ошибок в пакетах NET Framework;
- Быстрая работа даже на старых машинах;
- Поддержка всех версий NET Framework;
- Мощные алгоритмы поиска и устранения проблем;
- Низкие системные требования;
- Официальная поддержка от компании Microsoft;
- Простота в использовании;
- Очень простая установка;
- Поддержка практически всех версий ОС Windows;
- Оптимизация системы и пакета NET Framework;
- Нет практически никакой нагрузки на ОС.
Недостатки:
- Нет русского языка.
Как использовать?
Для начала нужно скачать Windows NET Framework Repair Tool с официального сайта компании Microsoft. Есть подобная утилита и на сторонних ресурсах. Но качать что-нибудь оттуда не рекомендуется. Можно подцепить целый букет вирусов.
По сути, установки как таковой даже не требуется. Достаточно запустить скачанный исполняемый файл двойным кликом. Затем нужно будет принять лицензионное соглашение при помощи кнопки «Accept» и нажать на кнопку «Next» для запуска проверки.
Начнется анализ операционной системы и установленных пакетов NET Framework на наличие ошибок. Данный процесс может занять довольно-таки продолжительное время. В зависимости от мощности вашего компьютера или ноутбука.
После завершения анализа нужно будет снова нажать на кнопку «Next» для запуска алгоритма по исправлению ошибок. После того, как программа закончит работу, нажимаем на кнопку «Finish» и перезагружаем компьютер.
Часто задаваемые вопросы:
Существует ли программа Framework для Windows 7?
Конечно. В числе поддерживаемых версий ОС Windows присутствуют 7, 8, 8.1, 10, XP и Vista. Нужно только скачать актуальную версию приложения. Тогда оно будет работать на всех редакциях ОС.
Данная утилита бесплатна?
Да. Эта программа относится к инструментам для обслуживания операционных систем. Поэтому она распространяется компанией Microsoft абсолютно бесплатно. Это не отдельный продукт.
Есть ли русская версия?
К сожалению, нет. Утилита обладает только английским языком. Но в этом ничего страшного нет, так как интерфейс программы прост и интуитивно понятен. В нем легко можно разобраться даже без наличия русского языка.
Отзывы пользователей
«Долго не мог понять, почему моя система работает неадекватно. На одном форуме вычитал, что нужно скачать Windows Framework Repair Tool и проверить на ошибки. Сделал. Теперь никаких проблем нет. Все работает отлично. Замечательный инструмент».
Андрей Н.
«Хорошая программа для диагностики ОС и установленных пакетов. Радует и то, что инструмент умеет исправлять ошибки Windows Installer. Работает утилита на удивление хорошо. Даже несмотря на то, что ее разработала компания Microsoft».
Роман Н.
«Все бы ничего, если бы не отсутствие русского языка. Ну как так можно-то? Пришлось долго разбираться с интерфейсом. Неужели такая серьезная компания, как Microsoft не может перевести свои продукты на русский? А так инструмент неплох».
Александр Т.
Скриншоты
Видео обзор
Полезные материалы
Скачать Microsoft NET Framework Repair Tool — помощник в оптимизации ОС
.NET Framework Setup Verification Tool предназначена для проверки корректности установки .NET Framework на компьютере. Утилита проверяет наличие необходимых для выбранной версии файлов, папок, ключей и записей реестра.
В случае нахождения ошибок переустановите нужную версию. Если это не поможет, для удаления .Net Framework перед последующей установкой можно воспользоваться утилитой .NET Framework Cleanup Tool.

Скачать .NET Framework Setup Verification Tool, версия от 24 июня 2014 года (235 Кб)
Поддерживаемые версии платформы.
- .NET Framework 1.0
- .NET Framework 1.1
- .NET Framework 1.1 SP1
- .NET Framework 2.0
- .NET Framework 2.0 SP1
- .NET Framework 2.0 SP2
- .NET Framework 3.0
- .NET Framework 3.0 SP1
- .NET Framework 3.0 SP2
- .NET Framework 3.5
- .NET Framework 3.5 SP1
- .NET Framework 4 Client
- .NET Framework 4 Full
- .NET Framework 4.5
- .NET Framework 4.5.1
- .NET Framework 4.5.2
По умолчанию, в списке выводятся только версии .Net Framework, обнаруженные программой на данном компьютере. Для вывода всех версий необходимо запустить программу со следующими параметрами.
netfx_setupverifier.exe /q:a /c:"setupverifier2.exe /a"Коды возврата
- 0 — проверка завершилась успешно
- 1 — не найден файл setupverifier.ini
- 2 — указанная версия не может быть проверена, поскольку её установка не поддерживается в данной операционной системе
- 3 — наименование версии отсутствует в файле setupverifier.ini
- 100 — не удалось выполнить проверку указанной версии
- 1602 — проверка отменена
Файлы лога
.NET Framework Setup Verification Tool создает два файла лога во временной папке Windows, в которых сохраняются действия программы, а также ошибки с которыми она столкнулась при проверке. Чтобы открыть временную папку, выберете Пуск -> Выполнить, введите %temp% и нажмите кнопку Ok.
- setupverifier_main_*.txt — в данный файл записываются сведения обо всех действиях, предпринятых во время верификации. Сохраняются сведения о проверяемых ресурсах и о том, найдены ли они в системе. Поскольку файл довольно большой, для облегчения нахождения ошибок они записываются с префиксами ****ERROR**** и ***WARNING***
- setupverifier_errors_*.txt — данный файл лога содержит информацию только о найденных ошибках
- setupverifier_netfx20testapp_*.txt — в этот файл записываются сведения об ошибках тестового приложения для .Net Framework 2.0. Лог создается только если имеются ошибки при выполнении тестового приложения
При каждом запуске проверки создаются новые файлы лога, в конце имени файла добавляются дата и время запуска. Для указания собственных имен файлов журнала используются следующие параметры.
- /l <filename> — имя файла главного лога (setupverifier_main_*.txt)
- /e <filename> — имя файла лога ошибок (setupverifier_errors_*.txt)
Пример запуска программы с пользовательскими файлами журнала.
netfx_setupverifier.exe /q:a /c:"setupverifier2.exe /l %temp%\my_main_log.txt /e %temp%\my_error_log.txt"