Ваш Mac не включается? Без паники! Не спешите бросать всё и нести любимый компьютер в ближайший сервис. Вполне возможно, что для «реанимации» хватит и встроенных средств macOS, воспользоваться которыми может каждый желающий.
💚 ПО ТЕМЕ: Терминал на Mac (macOS): что это, команды, синтаксис – понятный гид для начинающих.
Загрузка в Безопасном режиме (Safe Mode) на Mac
При активации Safe Mode macOS просканирует жесткий диск и исправит все ошибки, которые найдет.
«Безопасная» загрузка запускает только жизненно необходимые компоненты (т.е. только то, что необходимо для запуска компьютера). В результате не будут запущены сторонние расширения, элементы входа в систему (логины-пароли), а также будет очищен кэш в определенных разделах.
О том, как загрузить Mac в режиме Safe Mode мы подробно рассказали в этом материале.
💚 ПО ТЕМЕ: Как вывести свои контакты на дисплей пропавшего Mac.
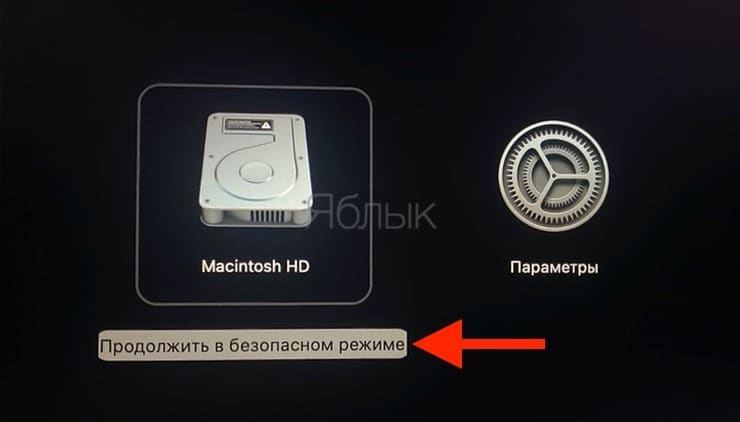
Если безопасный режим не решил вашу проблему, переходим к следующей опции под названием Режим восстановления (Recovery Mode). Он «живёт» в отдельной части загрузочного диска и позволяет восстанавливать систему, получать доступ к Терминалу и возможность переустановить операционную систему вашего Mac — macOS.
Для перехода в Режим восстановления:
1. Выключите компьютер;
2. Включите его;
3. Сразу же после стартового сигнала нажмите и удерживайте сочетание клавиш ⌘Cmd + R.
Если перейти в Recovery Mode не удается (при проблемах с диском такое бывает), можно запустить режим восстановления через интернет. Сочетание клавиш будет уже несколько другим — ⌘Cmd + ⌥Option (Alt) + R. Этот способ требует интернет-подключения и займет гораздо больше времени, т.к. macOS будет загружать из Сети образ системы весом в несколько гигабайт.
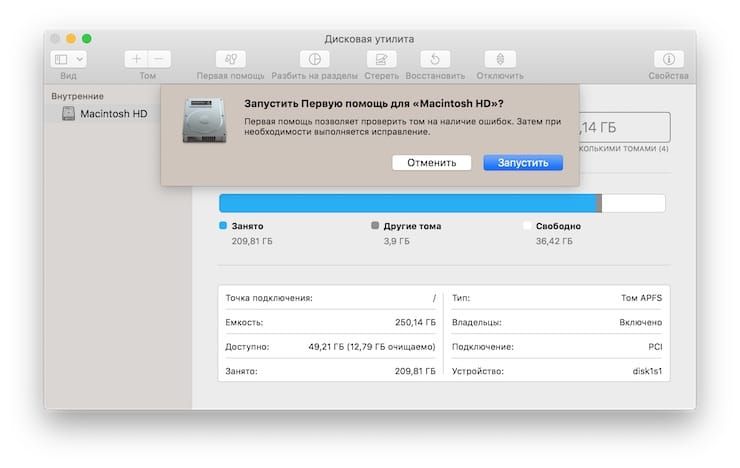
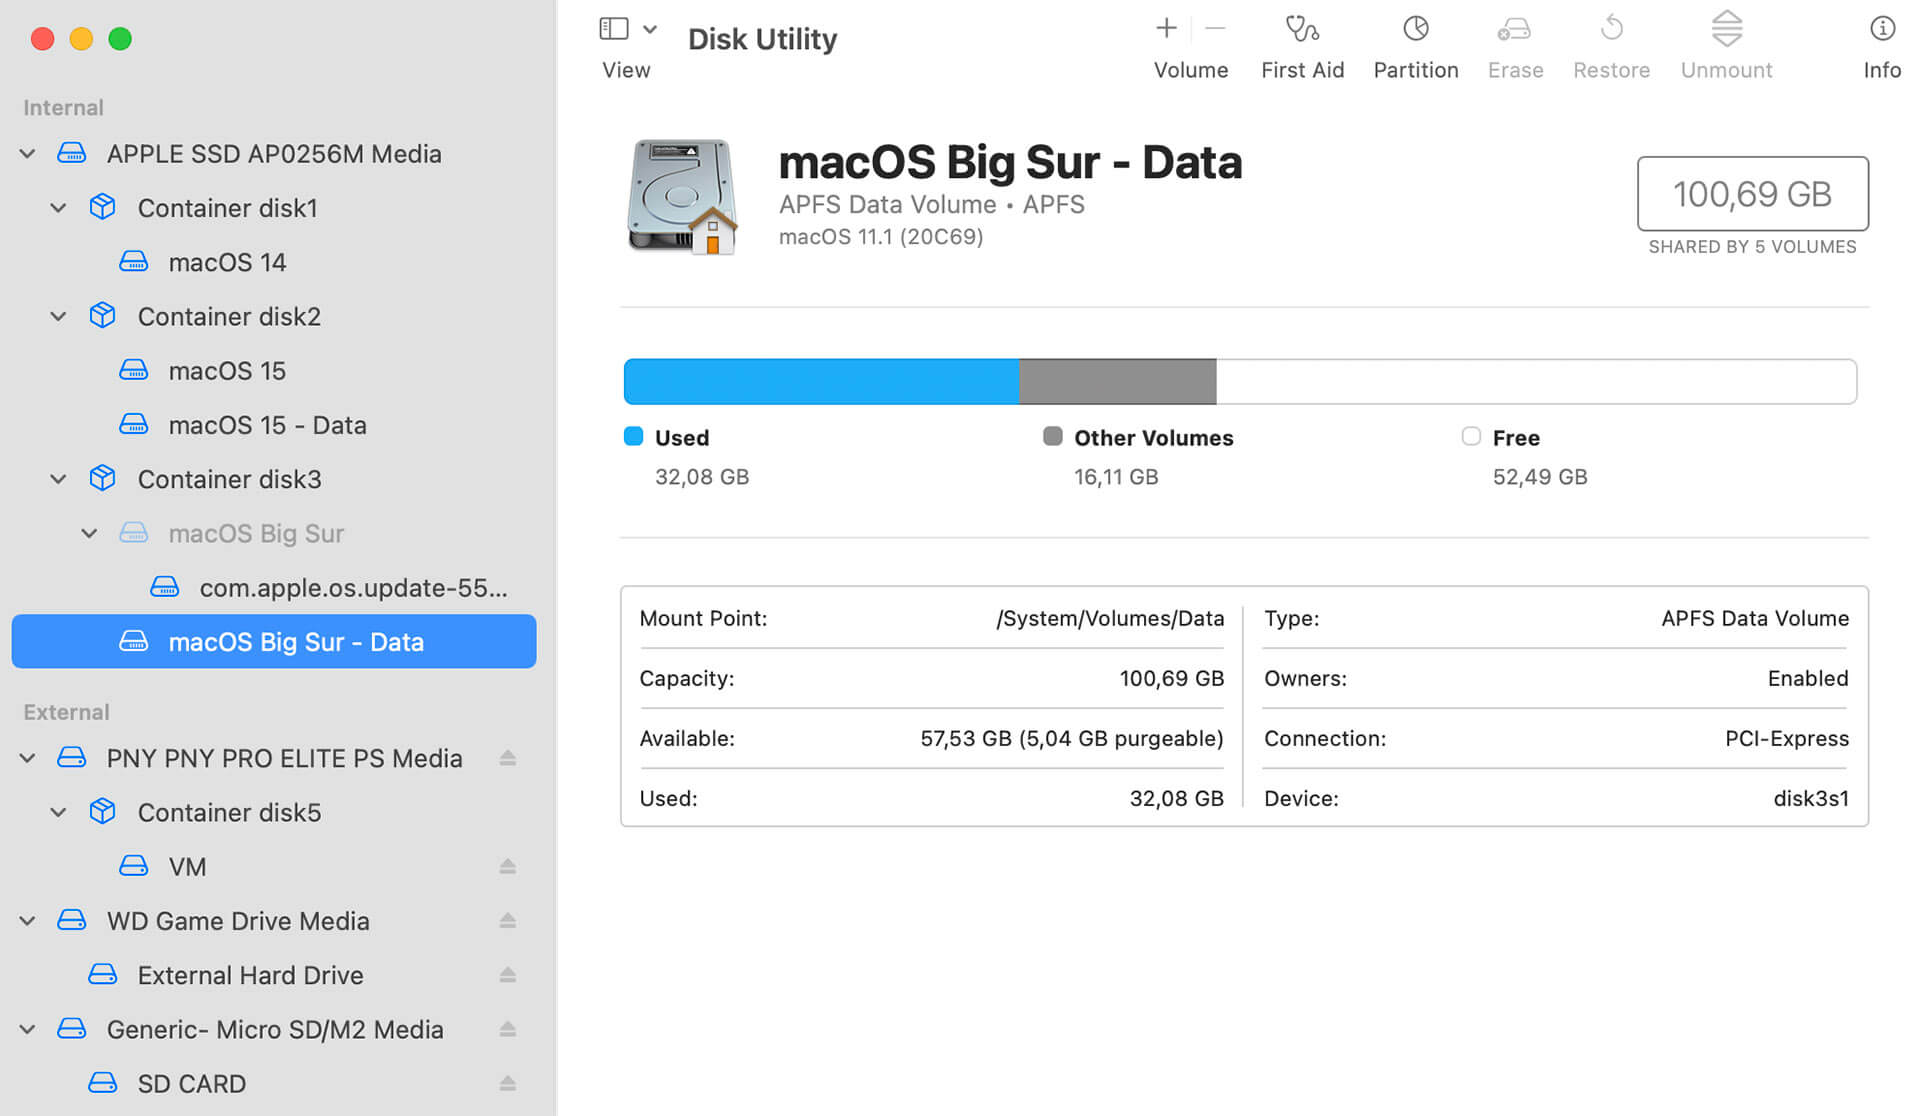
Если загрузка в Режим восстановления прошла успешно, вы увидите несколько вариантов действий. Запустите Дисковую утилиту и найдите загрузочный диск, который является источником проблем — скорее всего, он называется Macintosh HD. Выберите его в окне слева, а затем нажмите Первая помощь → Запустить.
💚 ПО ТЕМЕ: Как удалить дубликаты файлов (фото и тд) и освободить место на Mac: лучшие бесплатные приложения.
Проверка fsck
File system consistency check (fsck, «проверка целостности файловой системы») — старый добрый Unix-инструмент для проверки и решения проблем с дисками.
В зависимости от объема жесткого диска, его типа и серьезности проблемы fsck-проверка может занять довольно много времени. Просто наберитесь терпения.
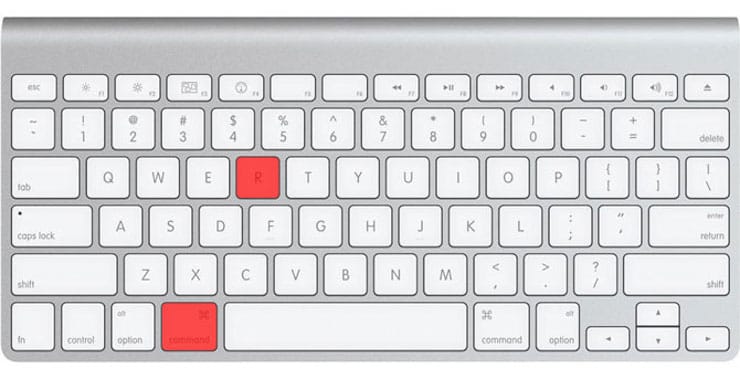
Для запуска fsck необходим переход в однопользовательский режим (Single User Mode). Он позволяет вносить изменения в общие пользовательские ресурсы на компьютере. Single User Mode не запускает macOS; он просто дает доступ к командной строке Unix.
Для перехода в Single User Mode:
1. Выключите Mac;
2. Включите его;
3. Сразу после стартового сигнала нажмите и удерживайте сочетание клавиш ⌘Cmd + S.
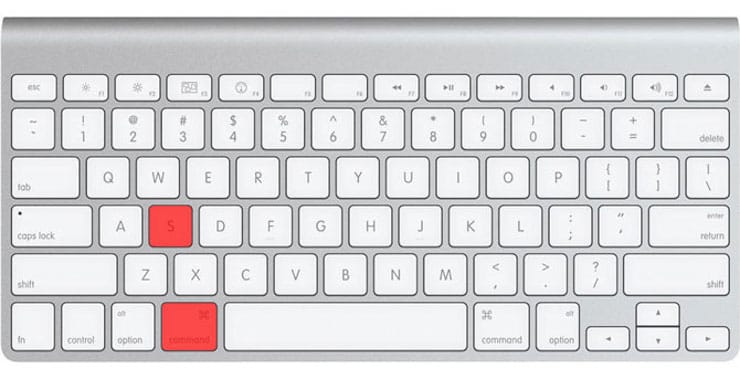
Вскоре вы увидите командную строку. Наберите в ней fsck -fy для запуска процедуры fsck.
Примечание: если ваш диск зашифрован, выберите подходящий пользовательский аккаунт и введите пароль для дешифровки. Если у вас установлен пароль на прошивку Mac, запустить Single User Mode не получится.
Важно дождаться окончания fsck-проверки — если процесс будет прерван, возможна потеря данных. После окончания проверки вы увидите одно из следующих сообщений:
** The volume Macintosh HD could not be repaired.

*****The volume was modified *****
Система сообщает, что восстановить жесткий диск не удалось. Ничего страшного — просто запустите fsck еще раз. Команда та же: fsck -fy
** The volume Macintosh HD was repaired successfully.

*****The volume was modified *****
Уже намного лучше… но расслабляться рано. Опять-таки, запустите проверку еще раз.
** The volume Macintosh HD appears to be OK.
А вот это — то, что нам нужно. fsck проверила весь диск и не нашла ничего, что требовало бы исправлений.
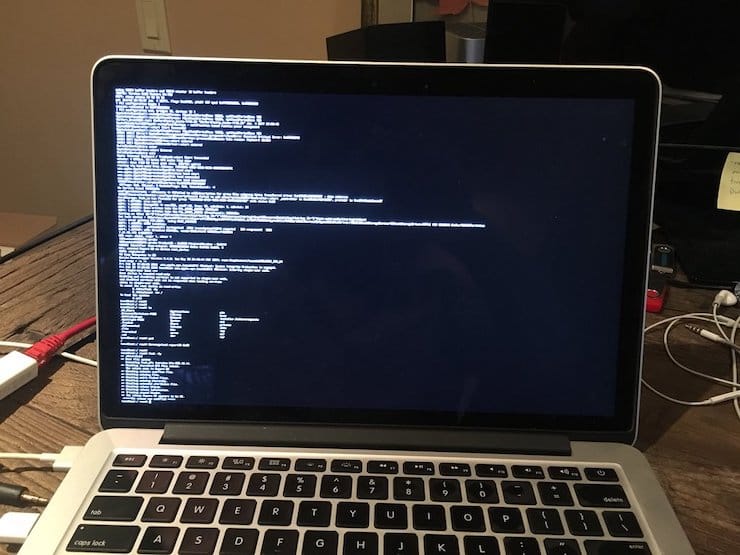
Теперь из Single User Mode можно выходить. Команда для выхода: exit.
💚 ПО ТЕМЕ: Как узнать, откуда был скачан файл на Mac.
Apple Diagnostics
Если описанные выше способы вам не помогли, то проблема почти наверняка очень серьезная. А это значит, что пришло время воспользоваться Apple Diagnostics!
Это специальный тест для компьютеров Mac от компании-производителя. По его итогам вы получите код ошибки и сможете понять, что именно не так с вашим Mac.
Для запуска теста Apple Diagnostics:
1. Выключите ваш Mac;
2. Отключите от него все подключенные устройства, за исключение клавиатуры, мышки, монитора, Ethernet-кабеля (если есть) и кабеля питания. Иными словами, отключите флешки, внешние жесткие диски, принтеры, сканеры и т.п.
3. Включите Mac;
4. Сразу же после стартового сигнала нажмите и удерживайте на клавиатуре D.
5. Выберите свой язык
Как уже упоминалось выше, после прохождения теста вы получите в свое распоряжение код ошибки. Расшифровка кодов:
- ADP001: Ошибок не найдено.
- NDD001: Проблема с USB-устройствами. Убедитесь, что вся ненужная USB-техника отключена;
- NNN001: Не найден серийный номер. Вы пользуетесь Hackintosh? За вами уже выехали! (шутка);
- PFR001: Проблема с программным обеспечением;
- PPM001-015: Проблема с памятью компьютера;
- PPR001: Проблема с процессором;
- PPT001: Аккумулятор не найден;
- VFD006: Проблема с видеокартой;
- VFF001: Проблема со звуковой картой.
Как видим, проблемы делятся на две категории — те, которые легко устранит и рядовой пользователь (например, ошибки, связанные с USB), и те, с которыми надо сразу идти в сервис (к примеру, неполадки с видео- и аудиокартами, процессором, памятью и т.д.).
💚 ПО ТЕМЕ: Что можно делать с QuickTime Player на Mac: 20 возможностей, о которых вы могли не знать.
Восстановление файлов с поврежденного диска
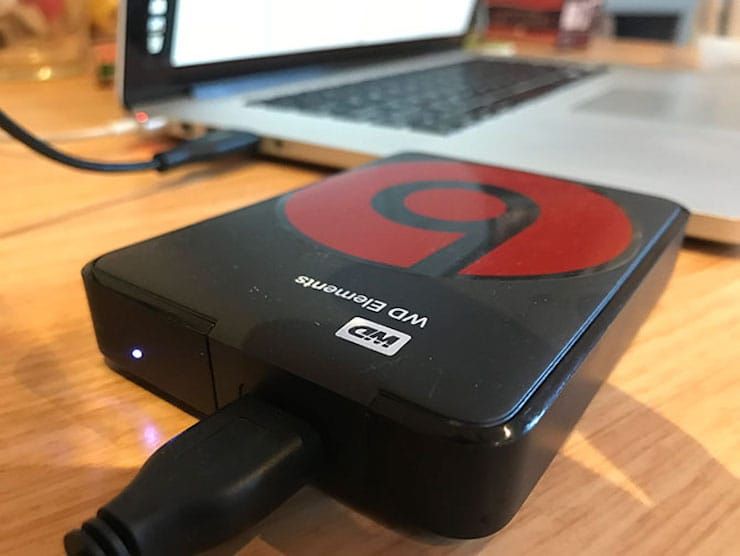
Повреждение жесткого диска среди прочего означает и возможную потерю данных (или их части). Для того, чтобы избежать этого, попробуйте создать образ «сломавшегося» диска. Для этого потребуется внешний жесткий диск как минимум того же объема.
1. Подключите его к Mac, перезагрузите компьютер,
2. Войдите в Recovery Mode (⌘Cmd + R),
3. Запустите Дисковую утилиту,
4. В строке меню вверху выберите Файл → Новый образ → Образ «Macintosh HD» и запустите процесс. На создание образа уйдет какое-то время, но в конце вы получите копию старого диска в формате DMG и сможете его смонтировать уже в новой системе.
Если же создание образа по каким-то причинам не получится, файлы можно скопировать и вручную. Для этого вернитесь в режим восстановления (⌘Cmd + R) и запустите приложение Терминал. Для запуска копирования ваших файлов на внешний носитель используйте команду cp -r. Пример:
cp -r /Volumes/Macintosh\ HD/Users/[username]/Documents/Volumes/Backup/
Не забудьте сменить [username] на свое имя пользователя в системе.
Давайте разберем команду: cp — это команда на копирование, –r означает, что эта команда выполняется рекурсивно, т.е. сначала копируются директории внутри указанной вами директории, а затем директории, которые входят в их состав, и так далее.
Первый путь — это указание на местонахождение файлов, которые вы хотите скопировать. Второй путь указывает местоположение внешнего накопителя, он всегда будет в /Volumes/, какое бы название вы ему ни дали.
Единственная сложность этого способа — вы должны вспомнить, где именно находились ваши файлы, и соответствующим образом прописать путь. Также вам остается только надеяться на то, что файлы не находятся на поврежденной части диска.
Когда копирование данных будет завершено, вы можете с чистой совестью отдать Mac в ремонт или переустановить macOS.
… Именно в такие моменты люди начинают понимать важность резервного копирования данных. И действительно — при настроенном копировании Time Machine проблемы с потерей данных не страшны. Настройте копирование данных прямо сейчас — и сэкономьте себе много времени, нервов и денег в будущем!
🔥 Смотрите также:
- Стопки в macOS, или как упорядочить файлы на рабочем столе в аккуратные группы.
- Автозагрузка на Mac, или как добавить (удалить) программы для автоматического запуска при загрузке macOS.
- Самые сложные пароли: как правильно придумывать и не забывать их — 2 совета от хакера.
- 🍏 Мы в Telegram и YouTube, подписывайтесь!
Your Mac’s hard drive is one of its most essential components. Without a hard drive to store data and a CPU to process commands, your Mac would be an expensive desk ornament. Many tools and utilities are designed to help you maintain the health of your hard drive. In this article, we are going to look at the best software solutions for checking disk health on your Mac so you can find the right app for your situation.
Best Mac Hard Drive Testing Software Summary
| Evaluation criteria | Software |
| 💗 Best overall | DriveDx |
| 🌡️ Best for S.M.A.R.T. monitoring | Disk Drill |
| ⚙️ Best for repairing disks | Disk Utility |
| 📉 Best for speed testing | Blackmagic Disk Speed Test |
| 🛡️ Best additional features | Disk Drill |
| 📊 Best disk statistics | iStat Menu |
| 💽 Best for freeing disk space | CleanMyDrive 2 |
Why Should You Test Your Mac’s Disks?
Having a well-performing hard disk drive (HDD) or solid-state drive (SSD) is a critical factor in the overall performance and functionality of your Mac or MacBook. A disk in poor health can result in slower system response time and can eventually lead to data loss. The worst-case scenario is that your drive fails completely and you cannot start your computer.
Testing your Mac’s disks regularly can give you an indication when the device is not performing optimally. You may also want to test the drive to determine the extent of damage or corruption if you start to experience issues like missing files. It is foolish to ignore any signs that your disk may be acting up. Failure to act quickly may lead to a data loss situation that could have been avoided with some preemptive actions.
Apps to Check Mac Hard Drive Health Testing Statistics:
| Number of Software tested on Mac: | 8 |
| How long we test tools: | 1 month |
| OS version: | macOS Monterey |
| S.M.A.R.T. Technology: | Yes/No |
8 Apps That Perform a Mac Hard Drive Test
Here’s an overview of eight apps that you can use to check hard drive health on a Mac. They don’t all have the same level of functionality and some are more useful for specific issues you may be experiencing with your Mac’s disks.
1. Disk Utility
S.M.A.R.T. Technology: Yes | Speed: Good | System Requirements: Installed as part of macOS | Main Function: disk repair and verification
Overview:
Disk Utility is a built-in macOS app that can be used to perform a variety of tasks on your Mac’s disks. The First Aid function in Disk Utility checks for errors and makes repairs under certain circumstances. Disk Utility cannot fix all disk problems and may deliver a report that indicates your disk will soon fail. If that is the case, backup your data as soon as possible and consider replacing the drive.
Key features:
- Disk formatting and partitioning;
- Erase disks;
- Displaying disk information such as capacity and S.M.A.R.T. status.
Pros:
- Free with macOS
- Supported by Apple
Cons:
- Limited monitoring capability
Pricing plans:
- Free tool included as part of your macOS installation
User Guide
2. Disk Drill Disk Health Tool
S.M.A.R.T. Technology: Yes | Speed: Good | System Requirements: Runs on all versions of macOS or OS X | Main Function: S.M.A.R.T. monitoring and data recovery
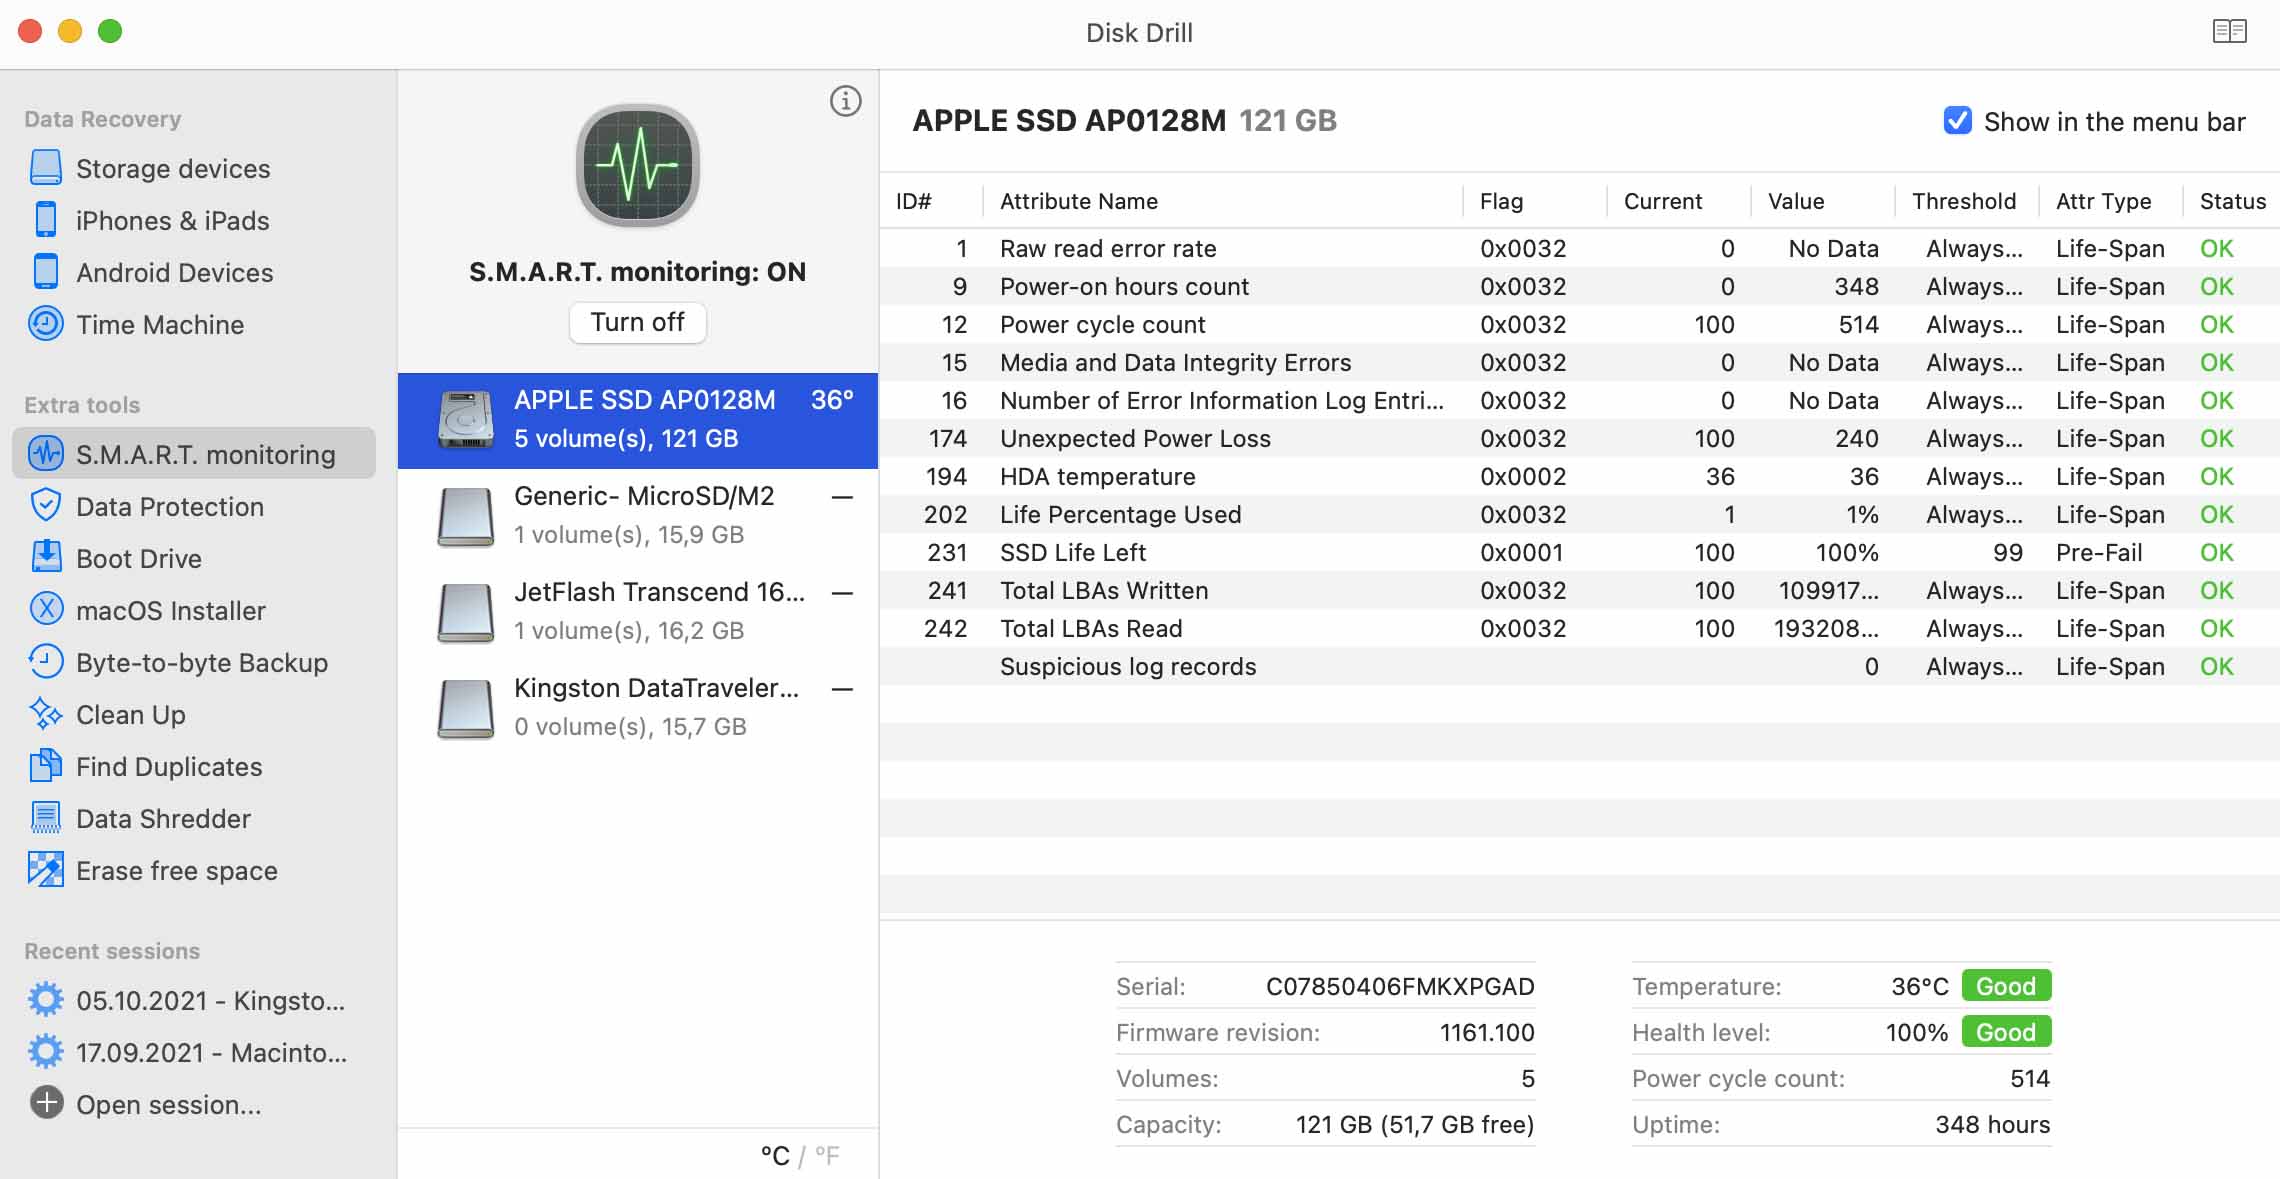
Overview:
Disk Drill is data recovery software that can also check SSD health on your Mac. You can choose to have Disk Drill monitor the state of your SSD drive and display warning messages if it detects problems. On Macs shipped before 2016, you can also view S.M.A.R.T. details. Unfortunately, Apple has disabled that option on newer Mac models.
Key features:
- Recover lost and deleted data;
- Create bootable disks;
- Free data protection tools;
- Find duplicate files;
- Shred data;
- Create byte-level backups for data recovery.
Pros:
- Extensive data recovery and protection tools
Cons:
- Limited disk monitoring capability
Pricing plans:
- Free tool included as part of Disk Drill’s trial download. A full license for the Pro version of Disk Drill data recovery is $89
Free Download
3. CleanMyMac
S.M.A.R.T. Technology: No | Speed: Good | System Requirements: Available for all macOS versions | Main Function: verify the startup disk and free disk space
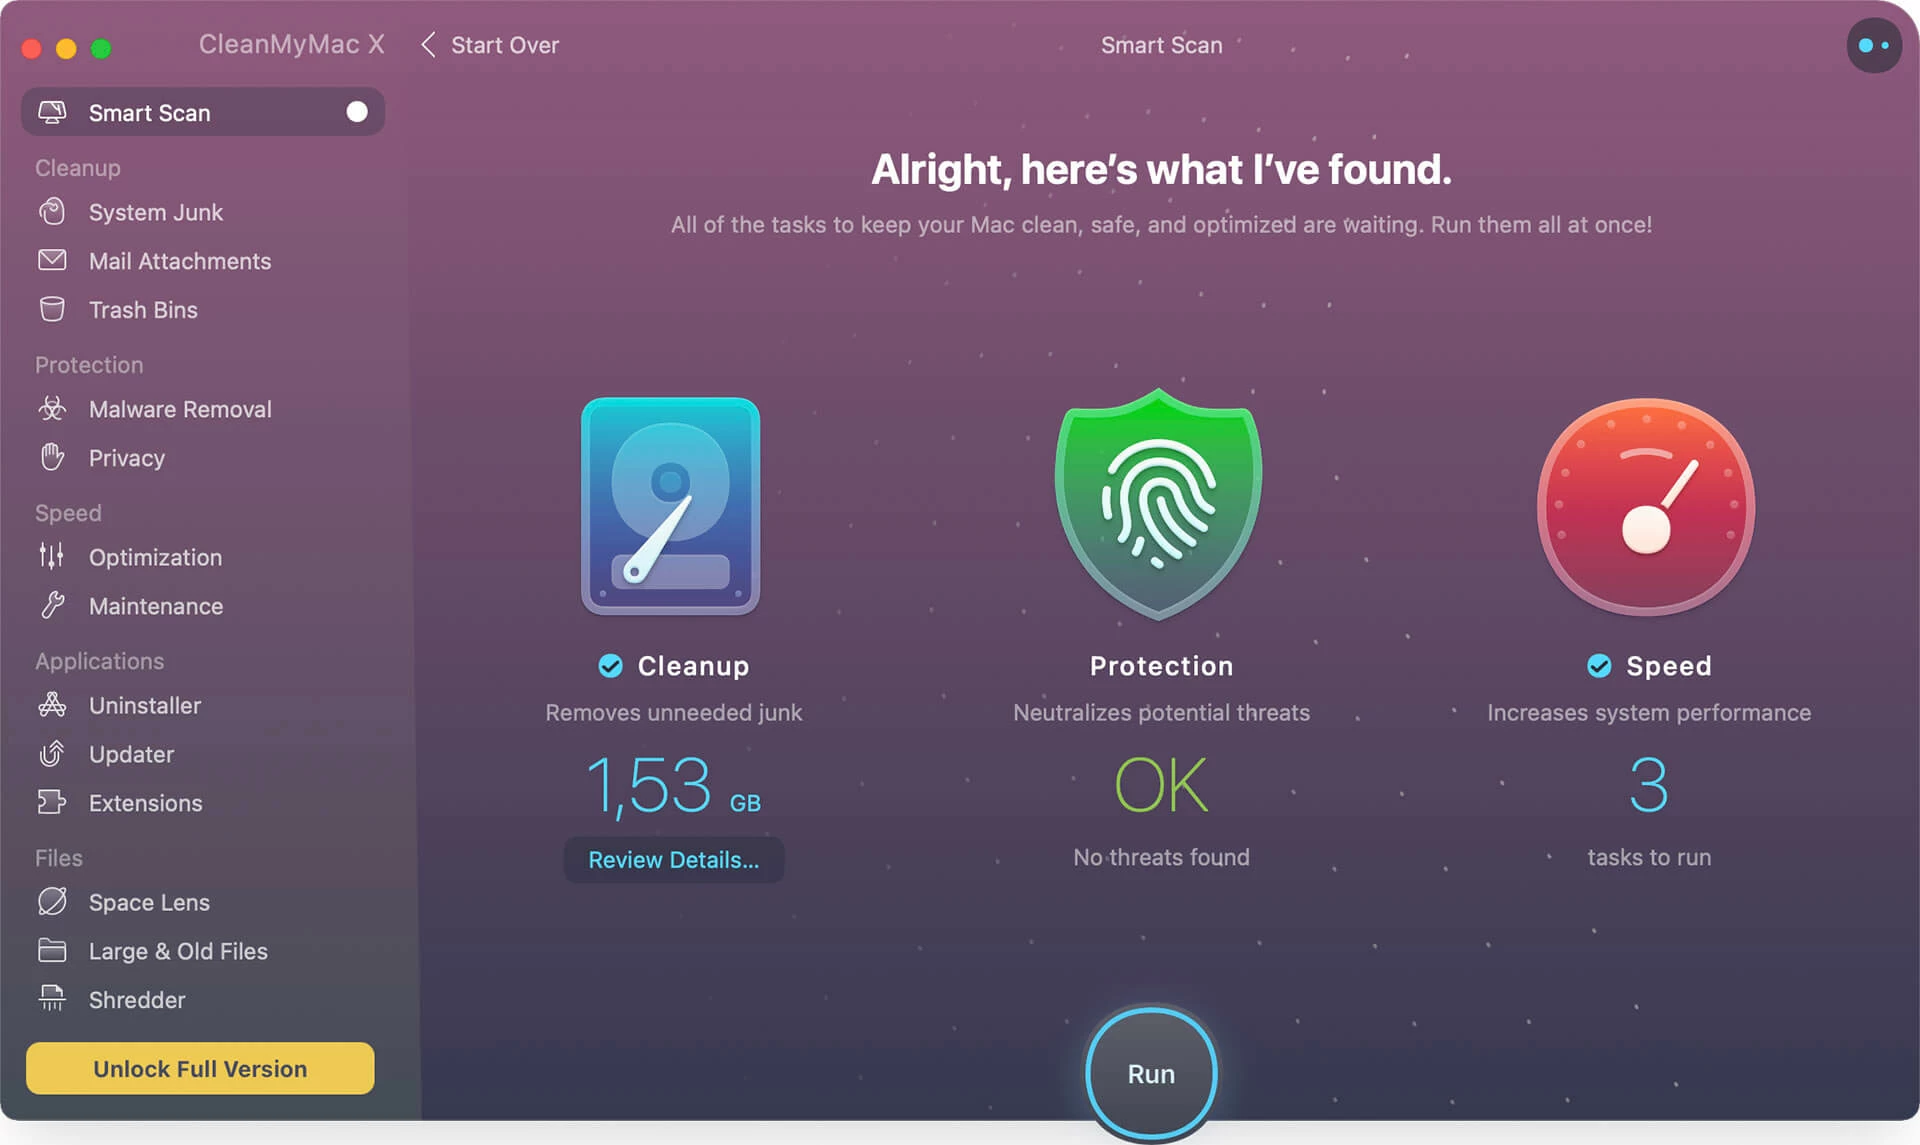
Overview:
CleanMyMac is designed to remove temporary and junk files from your Mac’s hard drive to give you more space and increase your computer’s response speed. The tool will inform you when there are files that can be removed and lets you know how much space you can save by performing a disk cleaning.
Key features:
- Removes browsing history to protect privacy;
- Find and remove malware.
Pros:
- Frees disk storage
- Malware removal
Cons:
- Requires a yearly subscription
Pricing plans:
- Free trial available. A yearly subscription for one Mac is $39.95
Free Download
4. PowerMyMac Hard Drive Health Checker
S.M.A.R.T. Technology: No | Speed: Good | System Requirements: macOS macOS 10.9+ | Main Function: freeing disk space
Overview:
PowerMyMac is a multi-purpose tool that can help free up valuable disk space for more effective use of your storage devices. It can also monitor various aspects of your Mac such as memory and CPU utilization.
Pros:
- Encrypt private data
- Uninstalls applications with one click
- Finds duplicate files
Pricing plans:
- Free trial, $29.95 for a lifetime license
Free Download
5. Blackmagic Disk Speed Test
S.M.A.R.T. Technology: No | Speed: Excellent | System Requirements: macOS 10.13.0 or later | Main Function: testing disk read/write speed
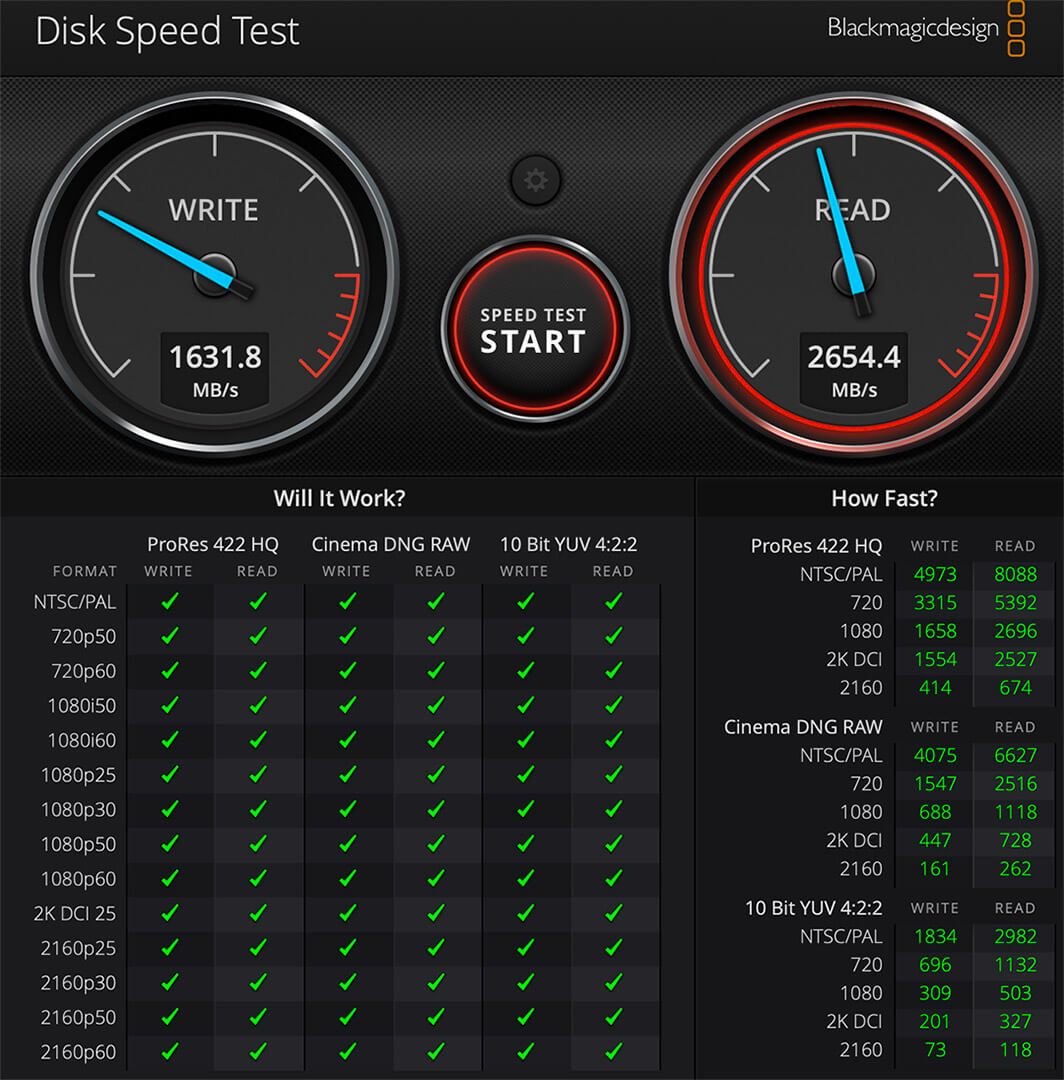
Overview:
If you work with large video files, the read and write speed of your hard disk can be vitally important. This tool is a single function application that tests the speed at which your disk is operating. You can continuously monitor if you desire to see if performance is impacted over time.
Pros:
- Strictly a disk read/write speed monitoring tool
6. DriveDx
S.M.A.R.T. Technology: Yes | Speed: Good | System Requirements: macOS OS X 10.6+ | Main Function: disk diagnostics and monitoring
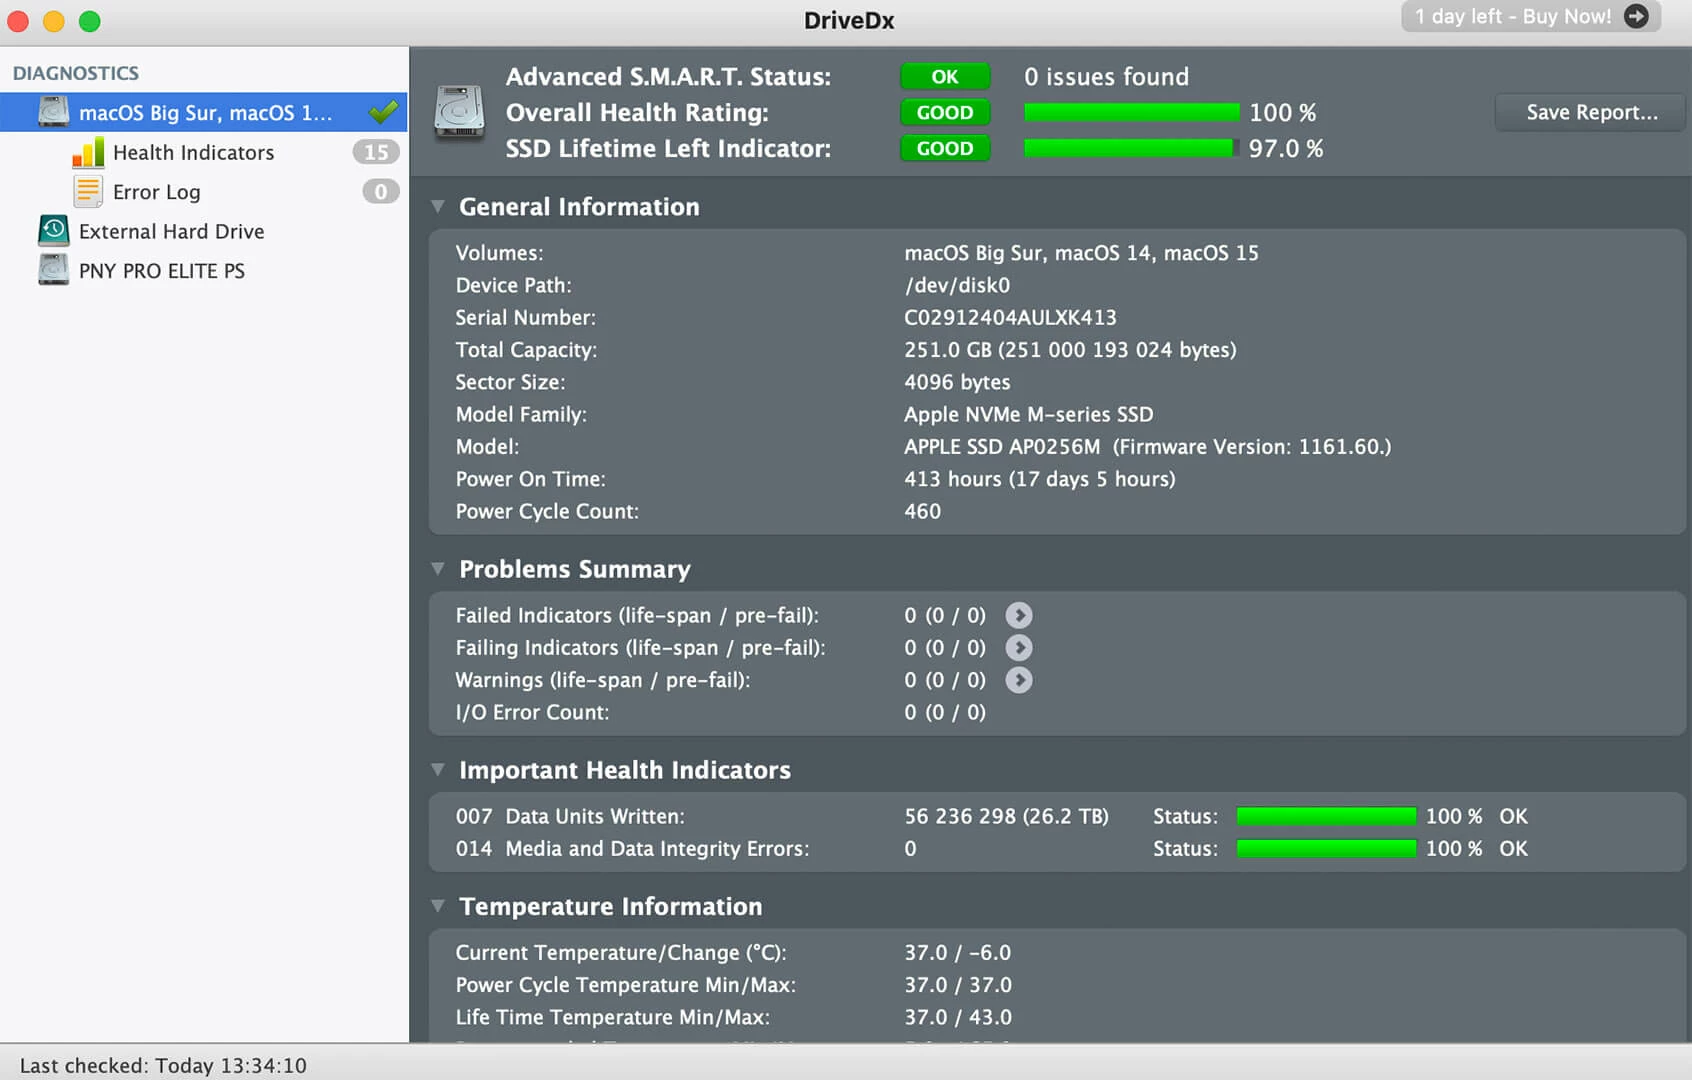
Overview:
DriveDX offers real-time disk monitoring that is designed to alert you before your HDD or SSD fails. The tool provides key metrics regarding the health and performance of your drives to let you know when problems occur. It uses different algorithms to perform a more complete assessment of the state of HDD or SSD drives.
Pros:
- Automated email reports
- Modern and intuitive user-interface
- Early warning system for drive problems
Pricing plans:
- Free trial, $19.99 for a personal license
Free Download
7. iStat Menus
S.M.A.R.T. Technology: Yes | Speed: Good | System Requirements: macOS 10.11 or later | Main Function: detailed disk monitoring

Overview:
iStat Menu is a full-featured monitoring application that can check the disk on a Mac as well as perform many other diagnostic activities. It displays free and used disk space, S.M.A.R.T. status, and provides statistics on disk I/O. The tool gives you an impressive array of information regarding the health of your Mac’s disk and about the system in general.
Key features:
- Monitor CPU and GPU usage;
- Memory and network statistics;
- Customizable notifications for many aspects of your Mac.
Pros:
- Provides extensive system information
Cons:
- May be too complex for novice users
Pricing plans:
- $9.99 from Mac App Store
Buy Now
8. CleanMyDrive 2
S.M.A.R.T. Technology: No | Speed: Good | System Requirements: macOS 10.10 or higher | Main Function: freeing up disk space
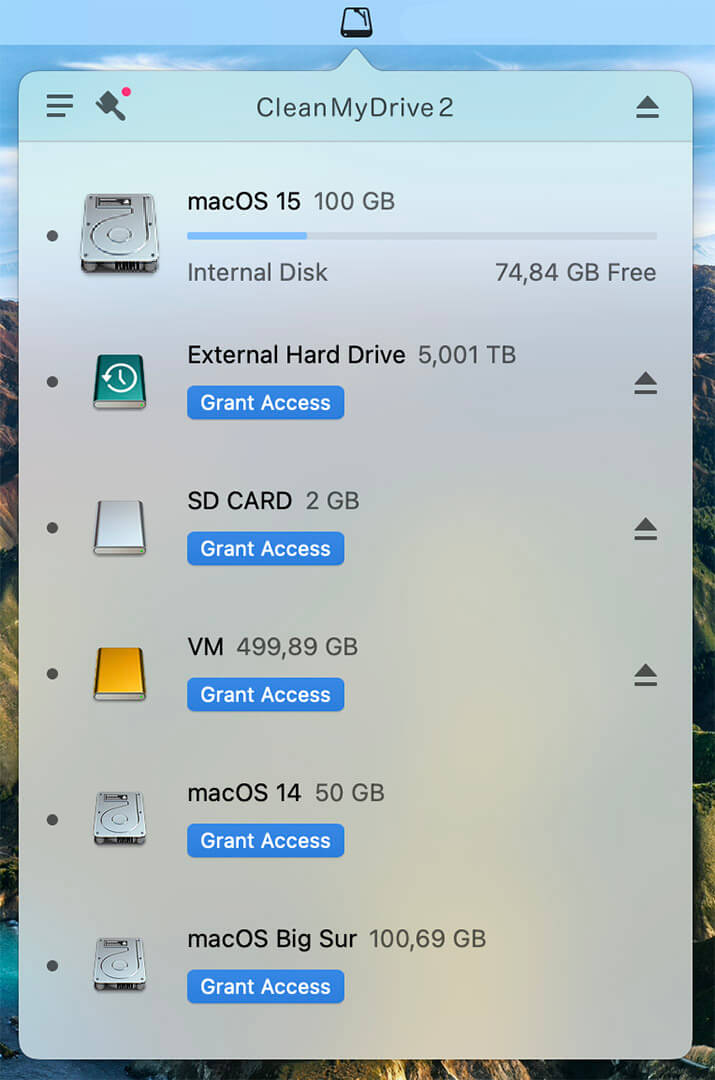
Overview:
This tool does exactly what its name implies. It keeps your drive free of junk and unnecessary files that reduce your storage capacity and slow down your computer. You can use this app to clean your Mac’s internal or external drives. Handcrafted icons for each drive make it easier to view and determine which one is having issues.
Key features:
- Copy files to any drive by dragging them into the app;
- Eject multiple drives with a single click.
Pros:
- Powerful freeware tool
Cons:
- No disk health monitoring
How to Check Hard Drive Health on a Mac
There are multiple ways to check the hard drive health on your Mac. You can scan the disk on your Mac to determine if there are any errors or bad sectors on the device with a Mac HDD tester like Disk Utility using a simple procedure.
Follow next steps for Checking Hard Drive Health on Mac:
- Open Disk Utility, found within the /Applications/Utilities folder.
- Select the disk from the available devices.
- Click on First Aid to check your drive for errors.

- Click on “Verify Disk” in the lower right corner
- Disk Utility will report on the status of the drive and attempt to fix errors.


You can also run monitoring software that provides real-time information regarding your disks and alerts you to impending issues. Some of the tools we have looked at generate warnings while others require you to review the details manually to determine the state of your drives. Both approaches are valid, and one may work better for your specific needs.
Summary
The collection of tools and applications we have presented covers many different issues that your Mac’s hard drive might be experiencing. Whether you want to run a Mac HDD test to verify read and write speed, monitor your S.M.A.R.T. status, search for and repair errors, or remove unwanted junk files, there is an app out there for you. All of the apps are free or have a free trial, so there’s no excuse for not trying them. Take good care of your Mac’s disks and they will keep your machine running optimally.
FAQ
How do I check the health of my hard drive on a Mac?
You can use Disk Utility to check the health of your Mac’s hard drive with the following procedure:
- Open Disk Utility, found within the /Applications/Utilities folder.
- Select the disk from the available devices.
- Click on First Aid to check your drive for errors.
- Click on “Verify Disk” in the lower right corner
- Disk Utility will report on the status of the drive and attempt to fix errors.
How do I check the health of my Mac’s SSD?
Disk Utility will display the S.M.A.R.T. status of your SSD. Follow these steps:
- Open Disk Utility.
- Select the disk from the available devices.
- S.M.A.R.T. status is displayed in the bottom left box.
How do I know if my iMac hard drive is failing?
You will begin to have issues with your iMac that point to its hard drive getting ready to fail. These include missing files, corrupted data, slow system performance, and unexplained system crashes.
What are the signs of a failing hard drive on a Mac?
The signs of a failing hard drive include:
- Missing files;
- Slow system response;
- Corrupt or damaged files;
- System crashes.
How can I fix my hard drive’s health?
You may be able to fix a hard drive’s health with Disk Utility and First Aid. The application will attempt to fix errors when running First Aid. In extreme cases, you may need to reformat your drive. Backup all of the data before proceeding with the formatting procedure so you can restore it after the drive has been repaired.
How do I run a diagnostic test on my Mac?
Follow these steps to run a diagnostic test on your Mac. The steps vary based on the type of processor in your Mac.
All processors
- Shutdown the Mac and place it on a hard, flat surface with good ventilation.
- Disconnect all external devices except keyboard, mouse, display, Ethernet connection (if applicable), and connection to AC power.
Apple silicon processor
- Turn on the Mac and press and hold the power button while it starts.
- Release the button when you see the startup options window.
- Press Command (⌘)-D on your keyboard.
Intel Processor
Turn on your Mac, then immediately press and hold the D key on your keyboard as your Mac starts up.
Release when you see a progress bar or you’re asked to choose a language.
Post Views: 2,246
На чтение 6 мин Просмотров 4.2к. Опубликовано

Жесткие диски выходят из строя, и в конечном итоге это произойдет. Неважно, оснащен ли ваш Mac вращающимся жестким диском (HDD) или твердотельным накопителем (SSD). Данные показывают, что 22% жестких дисков выходят из строя в течение первых четырех лет.
Что мы можем сделать, чтобы продлить срок службы жесткого диска? Много. Но вы никогда не знаете, когда ваш Mac-диск выйдет из строя или выйдет из строя … и если это произойдет, это катастрофа для всех файлов, которые вы сохранили на этом диске.
Итак, что может вы делаете, чтобы предотвратить это?
Две вещи!
№1: проверьте состояние диска и №2: сделайте резервную копию данные на регулярной основе. Это может показаться простым, но для правильного выполнения двух небольших задач требуется время.
Для резервного копирования данных мы рекомендуем Time Machine (встроенное приложение уже существует на вашем Mac), и если вы Можно использовать программу клонирования дисков Mac в качестве вторичного решения для резервного копирования. Обычно это необязательно, но мы рекомендуем сделать это на всякий случай.
Сегодня мы собираемся показать вам шесть отличных инструментов для проверки состояния жесткого диска Mac, от теста скорости до проверки диска/ мониторинг/ремонт, проверка сбойных секторов, мы покрываем их все.
Добрый совет: мы понимаем, что ваше время дорого и маловероятно, что вы сможете установить все 6 приложений, которые мы рекомендуем ниже. Итак, мы добавили пометку «Лучшее для» под каждое приложение, надеюсь, это поможет подобрать для вас подходящее приложение.
Содержание
- 1. Дисковая утилита
- 2. CleanMyMac
- 3. Stellar Drive Toolbox
- 4. Blackmagic Disk Speed Test
- 5. Меню IStat
- 6. CleanMyDrive
1. Дисковая утилита
- Подходит для: проверки наличия неисправности диска.
- Цена: бесплатно

Первое, что вы можете сделать, это проверить SMART Статус с помощью встроенной Дисковой утилиты в macOS. SMART (технология самоконтроля, анализа и отчетности) – это внутренняя система мониторинга, которая включена почти во все жесткие диски Mac (жесткие диски и твердотельные накопители).
SMART помогает получить общее представление о состоянии ваш Mac-диск. Как определить? Просто откройте Дисковую утилиту. Выделите имя жесткого диска слева, затем проверьте статус в таблице (см. Выше). Если отображается «Проверено», это означает, что ваш жесткий диск исправен. В противном случае вам может потребоваться его немедленная замена. Если ваш бюджет позволяет, подумайте о переходе на твердотельный накопитель.
Затем проверьте наличие ошибок на диске с помощью первой помощи. Если на вашем Mac установлена OS X El Capitan, macOS Sierra или последняя версия High Sierra, выберите Macintosh HD слева и нажмите «Первая помощь». Появится новое окно с вопросом, хотите ли вы запустить, просто нажмите «Да», чтобы продолжить.
Примечание. Для OS X Yosemite или более старых версий используйте две кнопки. в правом углу вместо «Проверить диск» и «Восстановить диск».
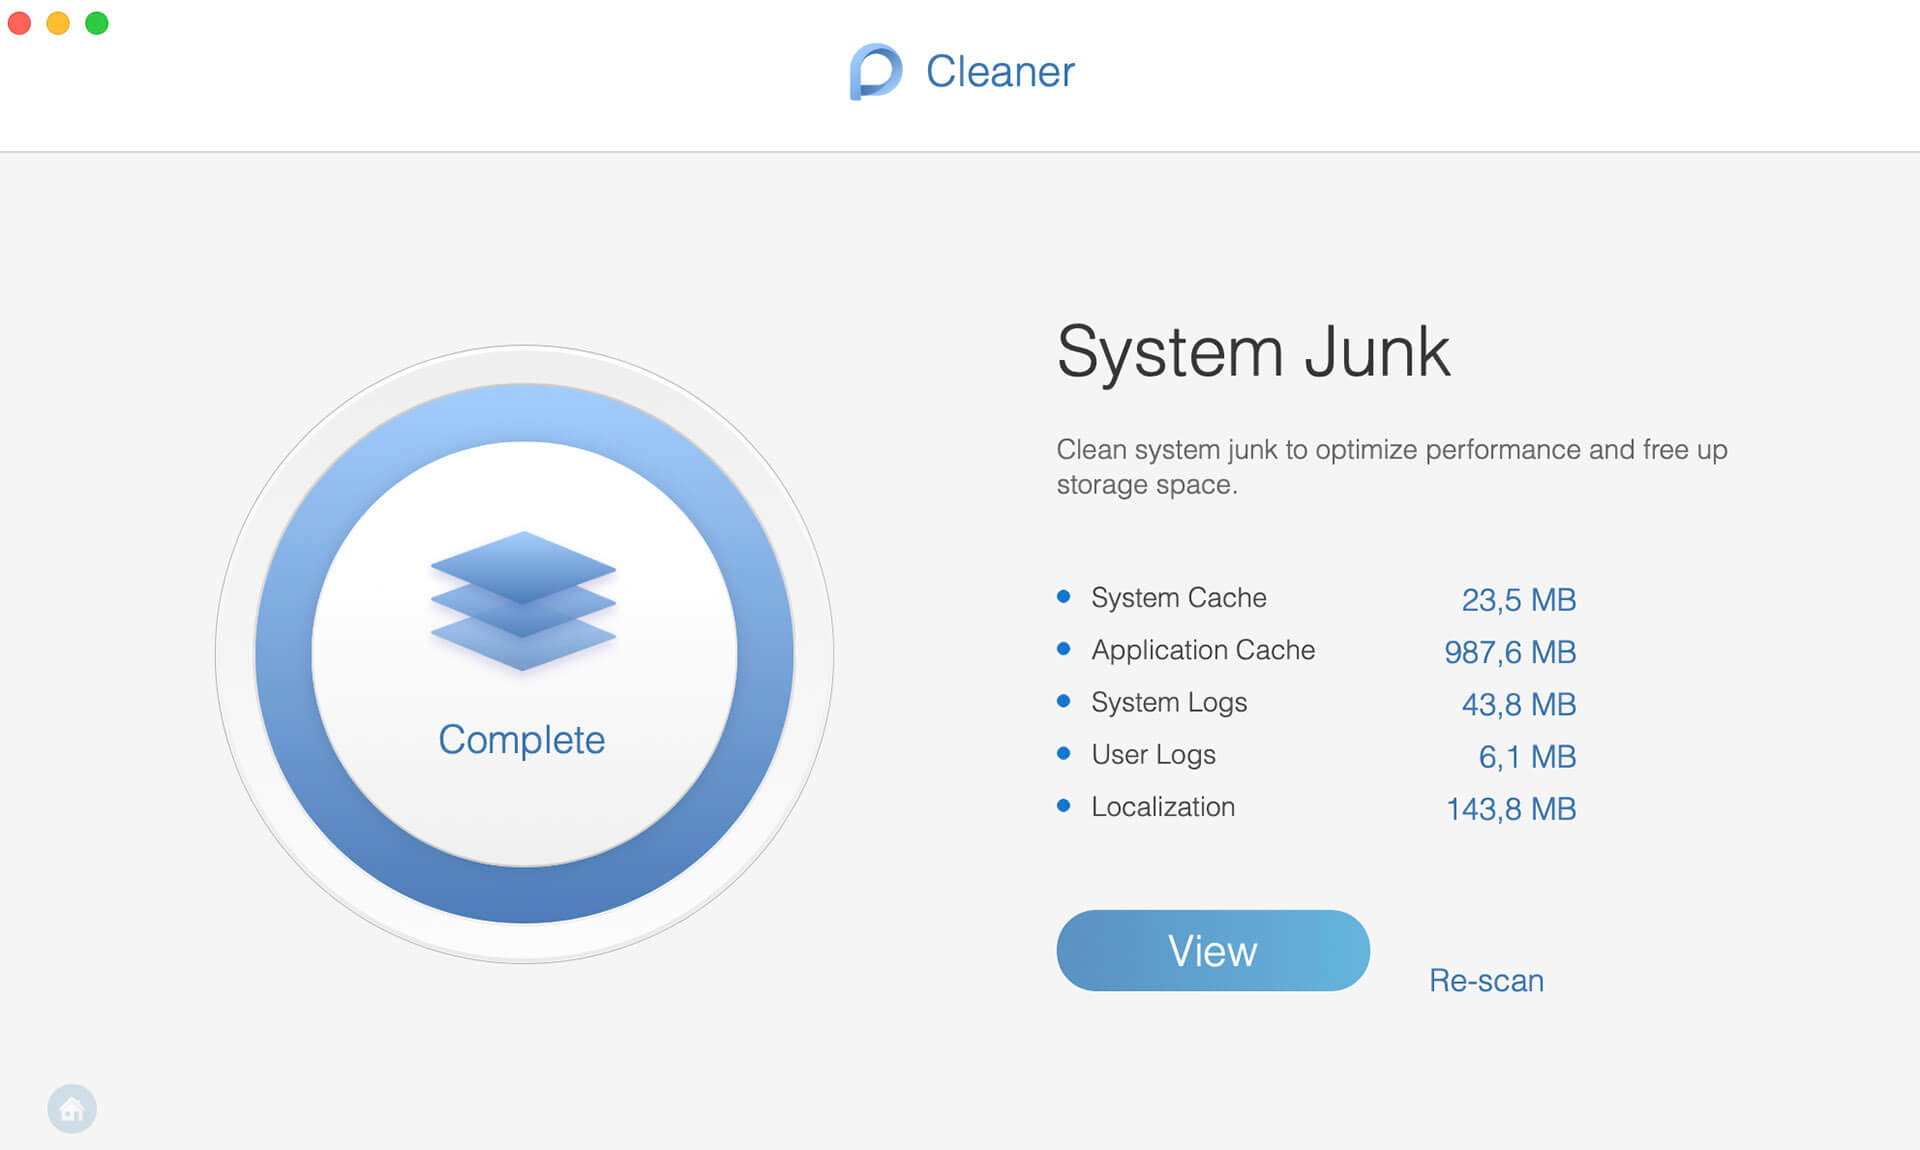
2. CleanMyMac
- Подходит для: проверки и восстановления загрузочного диска на Mac.
- Цена: доступна бесплатная пробная версия (89,95 долларов США для покупки)

CleanMyMac в основном используется чтобы освободить место на вашем почти заполненном жестком диске (или SSD). Приложение глубоко сканирует и очищает вашу систему Mac и может освободить тонны дискового пространства. Чтобы проверить загрузочный диск вашего Mac, все, что вам нужно сделать, это открыть приложение, перейти в Обслуживание> Проверить загрузочный диск и нажать «Выполнить».
Кроме того, вы можете использовать CleanMyMac для выполнения ряда других задач, таких как поиск старых и больших файлов, удаление ненужных файлов из фотографий/iTunes, удаление расширений, удаление приложений Mac в пакетном режиме и т. д.
- Подходит для: проверки жесткого диска Mac на наличие битых секторов.

Stellar Drive Toolbox – это универсальное приложение, включающее ряд дисковых утилит (оптимизация, защита , дезинфекция, ремонт и многое другое), которые помогают поддерживать жесткий диск Mac в хорошем состоянии. Лучше всего то, что он может проверить работоспособность жесткого диска Mac на наличие битых секторов. Секторы – это в основном блоки пространства на диске.
Плохие секторы – это блоки, которые повреждены, поэтому не могут быть прочитаны. Просто откройте приложение, перейдите в раздел «Drive Monitor» и нажмите кнопку «Продолжить», чтобы просканировать диск. Если выясняется, что количество поврежденных секторов увеличивается, вероятно, пришло время заменить диск Mac в случае случайного повреждения или сбоя. Обратите внимание, что приложение в настоящее время не работает с компьютерами Mac с флэш-памятью (например, SSD).
4. Blackmagic Disk Speed Test
- Подходит для: тестирования скорости чтения/записи вашего Mac-диска.
- Цена: бесплатно

Если вы чувствуете жесткий диск Mac (или твердотельный накопитель) реагирует медленно, рекомендуется проверить его скорость записи/чтения и выполнить эталонный тест в соответствии с отраслевым стандартом. Вам понравится это бесплатное приложение от Blackmagic. Это удивительное, но простое в использовании приложение, которое позволяет быстро протестировать и сертифицировать производительность вашего диска Mac.
После установки приложения на Mac откройте его и затем нажмите кнопку ПУСК расположен в центре. Скоро вы увидите цифры на двух кругах спидометра. Примечание. Лучше закрыть все другие активные приложения перед использованием Blackmagic Disk Speed Test, это поможет получить более точные данные.
5. Меню IStat
- Подходит для: мониторинга состояния SMART диска Mac.
- Цена: бесплатная 7-дневная пробная версия.

Меню iStat – расширенное Системный монитор Mac для строки меню macOS. Он может уведомлять вас о широком спектре событий, которые вас интересуют, например об использовании графического процессора, памяти, дисков, сети, датчиков, батареи, питания и т. Д.. Это очень удобно и удобно, и в этом случае вы можете положиться на инструменты мониторинга дисков для отслеживания состояния SMART на жестких дисках Mac или SSD.
Хотя это не предотвратит сбоя вашего диска Mac , вы можете использовать его как индикатор потенциальных проблем с диском до того, как они возникнут.
Новое обновление: к сожалению, меню iStat не работают с компьютерами Mac с флэш-памятью (все модели, выпущенные в 2016 году или позже) в связи с тем, что Apple больше не позволяет сторонним программным средствам проверять статус SMART SSD.
6. CleanMyDrive
- Подходит для: проверки статистики диска и очистки скрытого мусора на внешних дисках.
- Цена: бесплатно

CleanMyDrive – еще одна полезная проверка состояния диска Mac. приложение, и это тоже совершенно бесплатно. Приложение больше похоже на облегченный диспетчер дисков как для внутреннего диска Macintosh, так и для внешних дисков.
Вы можете использовать его для проверки состояния жесткого диска, например визуальный вид того, как используется ваш диск, сколько существует ненужных файлов. Если CleanMyDrive обнаруживает скрытые ненужные файлы, вы можете использовать приложение для их автоматической очистки за несколько кликов. Примечание. Приложение прекрасно работает с USB-накопителями, картами памяти SD и т. Д.
Это все, чем мы хотели поделиться. Я надеюсь, что вы освоили некоторые из этих приложений, и удачи в поддержании вашего Mac-диска в хорошем состоянии.
Есть ли какой-нибудь инструмент, чтобы проверить, сколько ГБ записано на моем SSD?
Ответ
Сама macOS может это показать. Перейдите к логотипу Apple> Об этом Mac> Хранилище, чтобы узнать.
Ответ
Чтобы выбрать лучший SSD для моего iMac, мне нужно оценить, сколько я записываю на каждый диск. день. Есть ли способ это измерить?
Ответить
проверка для проверки
Ответить
- Pandora
- Categories List
- Recovery Tools
- Top 10 Best Disk Repair Software for Mac
96%
User approval rate
Last update:
-

-
Yevgeniy T. Approver

Each year, data storage provider Backblaze publishes hard drive reliability statistics, and the results are always the same: the lifetime annualized failure rate for modern hard drives is around 2 percent. In other words, you can expect 2 out of every 100 hard drives to fail during a full year of use.
Since it’s only a matter of time before you become yet another victim of these gloomy statistics, you should familiarize yourself with the best Mac disk repair software tools right now so that you know what to do when the worst happens and you lose important data.
Brief selection
![]()
Disk Drill
Platform: macOS Windows
Distributed as: Freemium
![]()
Techtool Pro
Platform: macOS
Distributed as: Paid
![]()
What to Look for in Mac Disk Repair Software?
There are certain things we always look for when selecting Mac disk repair software. Let’s take a closer look at some of them so that you better understand what separates outstanding disk repair software applications from those that are merely good.
-
Compatibility with Mac file systems
Mac computers rely on different file systems than Windows and Linux machines. The default file system of newer Macs is called Apple File System (APFS), while older Macs use Hierarchical File System (HFS+ or HFS Plus). For disk repair software to be useful, it must support all Mac file systems, and, ideally, also Windows and Linux file systems.
-
S.M.A.R.T. monitoring capabilities
Prevention is worth a pound of cure, and S.M.A.R.T. monitoring can help you detect emerging hard drive issues a long time before they become a problem, giving you enough time to back up your data to a safe location and determine the best solution.
-
HDD management functionality
When repairing a hard drive, it’s often necessary to move large quantities of files around, delete corrupted partitions, and perform other HDD management tasks, so selecting Mac disk repair software that supports them is always a good idea.
-
The ability to repair bad sectors
Bad sectors can lead to stability issues and cause read/write operations to fail. Fortunately, there are many Mac disk repair software tool that can not only detect them but also repair them, and we describe several of them in this article.
-
Hard drive corruption repair
Hard drive corruption often goes hand-in-hand with the presence of bad sectors, but it can also be caused by malware, buggy software, and various hardware issues. When addressed in a timely manner, hard drive corruption doesn’t necessarily have to cause data loss, especially when the best hard drive repair software is used.
-
Data backup & recovery
To avoid data loss, it’s paramount to regularly back up all important data. To do that, you may not even need to install dedicated backup software because many disk repair software applications come with built-in data backup and recovery capabilities. Of course, it never hurts to have more than one copy of your files, so don’t hesitate to combine local backups with cloud backups.
-
Easy-to-use user interface
It goes without saying that you don’t want to waste your time on a disk repair application that’s pain to use when there are so many excellent options available. The application of your choice should have a modern user interface that’s easy to understand and doesn’t require you to read a manual just to understand available options.
-
Availability of a free trial version
The fact is that the best disk repair software solutions are not free—at least not entirely. We say that because many disk repair software solutions offer a free trial version that let’s you play with all key features without spending a single dollar, allowing you to decide whether the software is really worth it or not.
-
Positive online reviews
The web is an excellent source of information, and we highly recommend you use it to read online reviews of disk repair software to learn which applications real users like and dislike. When hundreds of users from around the world praise certain software, there’s a very good chance that the software is worth downloading.
10 Best Disk Repair Software for macOS
#
![]()
1. Disk Drill
4.79 • Best choice for Mac users – Disk Drill for Mac combines ease of use with excellent data recovery capabilities and many extra features that greatly increase its overall value.
Read full Disk Drill review
Distributed as
Freemium Some features are provided free of charge, but money is required to unlock the rest
Selecting the best disk repair software for Mac would be much more difficult if it wasn’t for Disk Drill for Mac. This popular data recovery and disk repair software has been around since 2010, offering a simplified approach to data recovery. Since the release of the first version, Disk Drill for Mac has received several major updates, and its latest version looks and feels modern and polished.
The average Mac user can simply launch Disk Drill for Mac, select the problematic hard drive and click the Recover button. Disk Drill for Mac will automatically run diagnostics on the hard drive to determine its condition. It will then select the optimal data recovery method and proceed to recover deleted and lost files. Once it’s finished, the user can browse through a list of recoverable files and mark individual files and even entire folders for recovery.
Disk Drill for Mac supports all major file systems (HFS & HFS+, FAT/FAT32/exFAT, NTFS, EXT3/EXT4), and it works with internal and external storage devices alike. Included with it are multiple Mac HDD repair tools, including a disk monitoring tool that can alert you when your hard drive starts to show signs of failure.
![]()
macOS • Disk Drill
1 of 18
Disk Drill for macOS – Gallery
Top Disk Drill Pros
-
Two for one
-
Abundance of extra utilities
-
Structured scan results
-
Mount results as a virtual disk
-
RAID recovery capabilities
Top Disk Drill Cons
-
Phone support
-
No disk cloning
-
Bootable drives
-
Recovery over a network
-
Video and photo repair
Overall experience
Disk Drill for Mac is easily the best data repair software for Mac because it comes with several easy-to-use Mac HDD repair tools capable of diagnosing just about any hard drive issues you may run into.
![]()
2. Techtool Pro
• Suitable for basic data recovery tasks – We’re still testing this software. Wait until we’re done for our final verdict!
Distributed as
Paid Commercial software can be used only with a valid license.
Price range
$159.99…$289.99
While not nearly as popular as it used to be some 10 years ago, TechTool Protogo, now part of the TechTool Pro product line, still remains one of the best disk repair software Mac users should know about. Unlike many other disk repair tools for Mac computers, TechTool Protogo can bypass the operating system and run directly from a bootable diagnostic device, which is essentially a convenient disk repair toolbox with the right tool for just about any disk repair job.
Because many hard drive issues are caused by external factors, such as overheating or a faulty power supply, it’s great to see TechTool Protogo include one of the most comprehensive hardware testing tools in the industry. With it, it’s extremely straightforward to spot temperature sensors that have exceeded the normal range and pinpoint the exact cause of your hard drive issues.
Another useful tool included in TechTool Protogo is the Volume Rebuild tool. As its name suggests, the Volume Rebuild tool can repair volumes that have suffered logical damage (caused by non-mechanical issues). Best of all, it can handle not just native Mac drive formats but also MS-DOS (FAT32) and ExFAT volumes.
![]()
macOS • TechTool Pro
1 of 5
TechTool Pro – Gallery
Top TechTool Pro Pros
-
Can recover deleted APFS files
-
Offers many features beyond that of data recovery
-
SMART drive check to alert you of potential drive failures
-
Stand-alone hard disk repair tool Mac users can run from a bootable device
-
Offers comprehensive hardware diagnostics
Top TechTool Pro Cons
-
Required to purchase additional licenses for application upgrades
-
Can be difficult to control startup parameters
-
Some reports of issues with the eDrive creation feature
Overall experience
TechTool Protogo is a Swiss Army knife-type repair disk utility that has been around since the days of Macintosh. Its latest version may not be as popular as some of the older versions, but its disk repair capabilities are still impressive.
![]()
3. DiskWarrior
2.29 • This warrior is ready for retirement – DiskWarrior claims to be the world’s most advanced repair and data recovery tool, but the results it delivers tell a different story.
Read full DiskWarrior review
Distributed as
Paid Commercial software can be used only with a valid license
Price range
$119.95…$59.95
DiskWarrior specializes in eliminating directory errors on Mac computers. Its signature approach to disk repair prevents data loss by creating an error-free version of the damaged data and comparing it with the original data to verify its integrity. This approach has earned DiskWarrior multiple awards over the years, and users who have been able to avoid a disastrous loss of data with this Mac drive repair software swear by it.
The latest version of DiskWarrior runs on Mac OS X 10.5 Leopard, Mac OS X 10.6 Snow Leopard, Mac OS X 10.7 Lion, Mac OS X 10.8 Mountain Lion, Mac OS X 10.9 Mavericks, Mac OS X 10.10 Yosemite, Mac OS X 10.11 El Capitan, macOS 10.12 Sierra, macOS 10.13 High Sierra, macOS 10.14 Mojave, and macOS 10.15 Catalina.
Even if you don’t repair directory errors caused crashes, power loss, and other unexpected interruptions, you should still consider using DiskWarrior because it can greatly improve the performance of your system. How? By optimizing the directory structure for maximum performance. According to the developers of DiskWarrior, such optimization can result in up to a 60 percent decrease in the time it takes programs to scan the directory.
![]()
macOS • DiskWarrior
1 of 6
DiskWarrior for macOS – Gallery
Top DiskWarrior Pros
-
Repair capabilities
-
Bootable recovery
-
Disk optimization
-
Error detection
-
Disk monitoring
Top DiskWarrior Cons
-
Strange behavior
-
File system support
-
Trial version
-
Manual updates
-
Repair methods
Overall experience
There are many disk repair tools for Mac that make lofty promises even though they can’t do much more than the Disk Utility app, but DiskWarrior isn’t one of them. This disk repair tool for Mac has pioneered its own approach to disk repair, helping its customers solve challenging directory issues without risking data loss.
![]()
4. OnyX
• Suitable for basic data recovery tasks – We’re still testing this software. Wait until we’re done for our final verdict!
Distributed as
Freeware All features are provided free of charge without any limitations.
Apple’s main goal is to make Mac computers accessible to as many users as possible. To make this happen, Apple sometimes hides more advanced features that might otherwise confuse less tech-savvy users. However, many of these hidden features are exactly what you need to diagnose and repair disk problems. OnyX is a versatile disk repair tool Mac users can use to access a large number of hidden features with ease.
The main window of OnyX is split into several tabs:
- The Maintenance tab lets you access common system maintenance tasks and script, allowing you to rebuild cache files, repair file permissions, and more.
- Next to it is the Cleaning tab, which is where you need to go it you want to delete system cache files or large logs.
- The Automation tab is home to multiple routine tasks that you can automate with a single click to keep your Mac in the best possible condition without any manual work.
- The Utilities tab is home to lesser-known Mac apps that most regular users don’t even know exist.
- Worth mentioning is also the Parameters tab, which gives you a great degree of control over the look and feel of the operating system and individual apps.
Since OnyX is completely free, there’s absolutely no reason to not give it a try and see what it has to offer. Just make sure to download the right version for your Mac because there’s a specific version of OnyX for each major version of the operating system. The correct version for macOS 10.15 Catalina is OnyX 3.7.2, while the users of macOS 10.14 Mojave should download OnyX 3.6.8.
![]()
macOS • OnyX
1 of 5
OnyX for macOS – Gallery
Top OnyX Pros
-
Completely free and supported by donations
-
Provides easy access to advanced Mac features and apps
-
Let’s you configure hidden macOS settings and parameters
Top OnyX Cons
-
No data recovery option
Overall experience
If you consider yourself to be an advanced Mac user, you need to have OnyX installed on your system because you would be hard-pressed to find a more convenient way how to access hidden features, especially one that’s free.
![]()
5. Data Rescue
3.26 • Oldie but not goodie – Data Rescue for Mac is among the oldest applications of its kind, but its age is starting to show in multiple not-so-favorable ways.
Read full Data Rescue review
Distributed as
Freemium Some features are provided free of charge, but money is required to unlock the rest
Price range
$19…$399.96
Data Rescue 6 for Mac has a lot in common with our favorite Mac disk repair software, Disk Drill for Mac. Both software applications are comprehensive data recovery solutions intended to recover permanently deleted files from a variety of storage devices. Just like Disk Drill for Mac, Data Rescue 6 offers two distinct data recovery methods: Quick Scan and Deep Scan. Last but not least, both data recovery solutions have been around for a long time and received many positive reviews from professional reviewers and customers alike.
Data Rescue 6 for Mac has a fairly barebones user interface, and it’s clear that its developers haven’t put much effort into making this hard drive repair software inviting for Mac users. The good news is that you won’t spend too much time interacting with Data Rescue 6 because all you need to do to start the recovery process is click the Start Recovering Files button and select a drive to scan. The Quick Scan data recovery mode takes just a short while to complete, but Deep Scan often requires multiple hours to finish. Unfortunately, it’s impossible to pause the scan, which is why it’s best to start it before going to bed.
With a single Data Rescue 6 license, you can perform an unlimited number of recoveries from up to 5 drives. Because you can often find Data Rescue 6 on sale, we recommend you wait a while before you pay the full price.
![]()
macOS • Data Rescue
1 of 18
Data Rescue for macOS – Gallery
Top Data Rescue Pros
-
Mail alerts
-
Hex editor
-
Virtual RAID
-
Specify the starting point for scanning
-
Passwordless launch
Top Data Rescue Cons
-
Inability to scan system disks
-
Unreliable bootable recovery
-
Needs the internet at all times
-
Scanning duration
-
Limited number of saved sessions
Overall experience
Data Rescue 6 for Mac is a compelling alternative to Disk Drill for Mac with a few major shortcomings that prevent it from ranking higher on this list.
![]()
6. AppCleaner
• Suitable for basic data recovery tasks – We’re still testing this software. Wait until we’re done for our final verdict!
Distributed as
Freeware All features are provided free of charge without any limitations.
Leftover application files eat up valuable storage space, and their presence on the hard drive can cause problems with newer versions of the applications that originally created them. To keep your hard drive clean and organized, you should uninstall applications with AppCleaner, one of the most useful free Mac utilities in the world.
When you drop an application into AppCleaner, the utility automatically finds all files that belong to it and safely deletes them. AppCleaner works on all versions of macOS from High Sierra up to Catalina, but you won’t find it in the App Store because its developer, FreeMacSoft, distributes it only on its website.
![]()
macOS • AppCleaner
1 of 5
AppCleaner for Mac – Gallery
Top AppCleaner Pros
-
Thoroughly uninstalls unwanted apps
-
Is available for free
Top AppCleaner Cons
-
Supports only macOS up to Monterey
Overall experience
Apple should make AppCleaner the default uninstall method on macOS instead of allowing applications to leave behind files that do nothing but eat up valuable storage space and cause problems with other applications.
![]()
7. Drive Genius
• Suitable for basic data recovery tasks – We’re still testing this software. Wait until we’re done for our final verdict!
Distributed as
Freemium Some features are provided free of charge, but money is required to unlock the rest.
Limitations
Limited functionality
Many hard drive issues can be prevented with proper maintenance, and Drive Genius has all the maintenance features you need to keep your hard drive in top condition. The features are split into three categories:
- Protect: Consistency Check, Repair, Rebuild, Malware Scan, BootWell, Instant DrivePulse, Repair, Active Files.
- Clean Up: Repartition, Find Duplicates, Find Large Files, Clone, Secure Erase, Initialize, IconGenius, Information.
- Speed Up: Defragment, Speed.
That’s 18 features in total. Arguably the most interesting feature of them all is Instant DrivePulse, Repair. Its purpose is to check your hard drive for hardware-related problems, such as those that may result from a damaged drive, bad cable, or bad connection. Unfortunately, Drive Genius isn’t compatible with all recent versions of macOS, but there’s a demo version available that you can use to test if this hard disk repair tool runs on your Mac.
![]()
macOS • Drive Genius
1 of 5
Drive Genius for macOS – Gallery
Top Drive Genius Pros
-
Comes with 18 useful disk repair features
-
Free demo version available
-
Professional version available for a one-time payment
Top Drive Genius Cons
-
Limited functionality for macOS 10.13 or later
Overall experience
For the average Mac user who doesn’t troubleshoot multiple disk issues on a daily basis, the Drive Genius is probably an overkill, but professionals can easily justify the steep price considering that they can get access to 18 useful disk repair features.
![]()
8. Carbon Copy Cloner
• Suitable for basic data recovery tasks – We’re still testing this software. Wait until we’re done for our final verdict!
Distributed as
Freemium Some features are provided free of charge, but money is required to unlock the rest.
Price range
$39.99…$100
Carbon Copy Cloner is the right Mac disk repair software to use when all other disk repair software applications fail. Its main feature is the ability to create bootable backups that can be stored anywhere and used in a minute. When a disaster strikes, you can simply boot from a Carbon Copy Cloner backup and repair the malfunctioning disk later.
Just like Time Machine in macOS, Carbon Copy Cloner can constantly back up your files, allowing you to go back in time and retrieve an older version of any file that was stored on your Mac. You can schedule backups to run as often as you want, and Carbon Copy Cloner can keep you informed about their progress via the Notification Center or email.
![]()
macOS • Carbon Copy Cloner
1 of 5
Carbon Copy Cloner for macOS – Gallery
Top Carbon Copy Cloner Pros
-
Ability to create bootable backups
-
Can seamlessly back up your files as you work on your Mac
-
Complex backup scheduling features
Top Carbon Copy Cloner Cons
-
Cannot monitor disk S.M.A.R.T attributes
Overall experience
After Apple’s Time Machine, Carbon Copy Cloner may just be the most popular backup application for macOS, and it’s easy to see why. Its ability to recover from bootable backups can save you when all other hard drive repair software fails.
![]()
9. AppleJack
• Suitable for basic data recovery tasks – We’re still testing this software. Wait until we’re done for our final verdict!
Distributed as
Freeware All features are provided free of charge without any limitations.
Aimed at advanced Mac users, AppleJack is a command-line utility that runs in Single User Mode. You can use it to repair your hard drive, repair permissions, get rid of possibly corrupted cache files, and validate the system’s preference files. To boot into Single User Mode, all you need to do is boot up your Mac and hold down Command + S keys together as soon as the boot process begins. From there, you enter the admin password to log in and typing applejack, or applejack auto, or applejack auto restart.
Despite being aimed at advanced Mac users, AppleJack is fairly easy to use because it presents all available options on the screen in the form of a text-based menu. You simply enter your choice, press Enter on the keyboard, and let AppleJack do the hard work.
![]()
macOS • AppleJack
1 of 5
AppleJack for macOS – Gallery
Top AppleJack Pros
-
Command-line utility with a menu-based interface
-
Works even when your Mac can’t boot into macOS
Top AppleJack Cons
-
Project abandoned
Overall experience
AppleJack is an easy choice for advanced Mac users who are not afraid of the Single User Mode and command-line interfaces.
![]()
10. MemTest86
• Suitable for basic data recovery tasks – We’re still testing this software. Wait until we’re done for our final verdict!
Platforms
macOS Windows Linux
Distributed as
Freemium Some features are provided free of charge, but money is required to unlock the rest.
Limitations
Limited functionality
There’s a good reason why Memtest OX X occupies the last place on this list: it’s actually not a Mac HDD repair tool. Instead, it’s a memory testing software application capable of booting from a USB flash drive and testing the RAM in your Mac for faults.
We decided to include it on this list because many Mac issues that seem to be caused by a faulty hard drive can just as easily be caused by a faulty memory module. With Memtest OS X, you can confirm or rule out your suspicion and avoid fixing an imaginary problem.
The latest version of Memtest OS X has an easy-to-use graphical user interface with mouse support, and it offers 13 different RAM testing algorithms. Regular Mac users can stick with the free version of Memtest OS X, but professionals should also consider the Pro Edition.
![]()
macOS • MemTest86
1 of 5
MemTest86 for Mac – Gallery
Top MemTest86 Pros
-
Industry-standard RAM testing software application
-
Graphical interface with mouse support
-
13 different RAM testing algorithms
Top MemTest86 Cons
-
Expensive pricing
Overall experience
When it comes to RAM testing, there’s no reason to look any further than Memtest OS X, and the free version is enough for confirming that you’re dealing with a disk-related issue.
Top Causes of Mac Hard Drive Damage
Even the most reliable hard drive in the world can fail or become corrupted for a number of reasons:
Software bugs
When privileged software applications misbehave, they can cause filesystem corruption or make it impossible to boot into the operating system. That’s why you should never give admin permissions to applications you don’t fully trust.
Human error
It’s natural for us to make mistakes, especially when we attempt something for the first time, such as partitioning a hard drive. Unfortunately, human errors can have disastrous consequences and lead to permanent loss of data, so be extra careful and never follow any online instructions without cross-referencing them first.
Hardware failure
Hard drive reliability statistics don’t lie: there isn’t a single manufacturer that produces hard drives with 100 percent reliability. To avoid data loss caused by a sudden hardware failure, use a disk health monitoring tool and replace the hard drive before its condition deteriorates too much.
Firmware issues
There have been several causes of faulty hard drive firmware leading to hard drive damage and data loss in the past. While hard drive manufacturers are usually quick to release an updated version of the firmware, it’s up to end-users to update their hard drives.
External factors
Hard drive damage can also be caused by external factors such as natural disasters, power surges, and various unforeseen mishaps. Having a reliable backup plan in place is the only way how you can always be prepared for the worst.
Benefits of Hard Disk Repair Software Solutions
When something goes wrong with your hard drive, you have several options on how to proceed. You can take the hard drive to a professional hard drive repair shop and ask them to fix the issue for you. You can also use hard disk repair software and attempt to fix the problem by yourself. Here are some reasons why the do-it-yourself approach is better:
- Speed:
Depending on which hard drive repair shop you choose, it can take as much as several weeks for your hard drive to return back to you. If that’s the only hard drive you have, you’re out of luck. With a hard disk repair software solution, you can repair your hard disk in just a few minutes.
- Convenience:
Modern hard disk repair software solutions like Disk Drill for Mac are extremely convenient to use. They walk you through the entire process, allowing you to fix your hard drive from the comfort of your home, allowing you to experience the satisfaction of repairing your own Mac.
- Price:
Professional hard disk repair services tend to cost a lot of money, and there’s no guarantee that the repair shop you choose won’t use the same software tool you could easily download from the internet, perhaps even for free. Before you give your hard-earned money to someone else, use the disk repair software for Mac listed in this article to fix the problem by yourself.
Did You Know?
Each year, data storage provider Backblaze gathers data about over 100,000 spinning hard drives used in its cloud storage ecosystem, summarizing the gathered data in comprehensive reports published on its website. On average, approximately 2 percent of hard drives used by Backblaze fail each year, which means that 2 out of every 100 hard drives go to Silicon Heaven.
Conclusion
After testing countless Mac disk repair software applications, we were able to narrow them down to just 10. Disk Drill for Mac earned the top spot thanks to its ease of use, excellent data recovery performance, and useful disk repair tools. Overall, Mac users can choose from a wide variety of disk repair tools, many of which are free or offer a trial version.
Help Us Improve This Article
Was the provided information useful? Your vote is important to use!
Frequently Asked Questions
If you can’t boot in macOS to perform hard disk repair using any of the 10 tools listed above, you need to restart your computer in macOS Recovery and repair the hard disk using Disk Utility:
- Turn on your Mac and press and hold Command-R.
- Select Disk Utility from the utilities window and click Continue.
- Choose View and select Show All Devices.
- Select your hard disk in the side bar and click the First Air button.
- Click Run and Continue to repair the hard disk with Disk Utility.
You can run whole disk repair on a Mac by launching the diskutil application in Terminal:
- Launch Terminal from the Utilities folder.
- Type or paste in the following command: diskutil list
- Remember the name of your disk.
- Issue the following command to repair it: diskutil repairvolume [disk name]
Disk Utility can fail for many different reasons. The disk may have suffered mechanical damage, the file system may be corrupted, or there may be malware present on the system that’s blocking Disk Utility and preventing it from finishing the repair process.
![]()
![]()
Yevgeniy Tolkunov
Approver
-
Frisco, Texas, United States
-
LinkedIn
Yevgeniy Tolkunov is Hardware Engineer at ACE Data Recovery. Yevgeniy has a Master’s Degree in Physics, Information Technology; 15+ years of experience.
The Disk Utility application is a powerful tool for keeping the drives that are connected to your Mac happy and healthy. But there are situations in which it may not be available. As an example, connecting to a remote computer via SSH, or Disk Utility simply refusing to launch.
In this tutorial, I’ll show you how to:
- Find a disk that may have an error
- Verify a disk from the command line
- Repair that disk (if need be) from the command line
Screencast

Important Notes
Before I take you any further, you need to understand a couple of things:
- I will be working on an SD Card I have inserted into my mac. If you need to target your Mac’s hard drive, make sure you substitute the word Macintosh HD for SD in any of the commands I am showing in this article.
- These instructions are not meant for novice Mac users. If you aren’t at least a bit comfortable in Terminal, you may want to stick to the graphical user interface applications like Disk Utility.
Locating the Disk
All of the disks that are attached to the Mac are located within the Volumes directory in Terminal. This directory is located one step away from the root of the Mac. The command used to switch from directory to directory is cd. In the terminal a /is known as the root, or lowest level, directory.
So to switch to the Volumes directory, open Terminal and type or paste in this command: cd /Volumes. The Terminal window should now look very similar to this:


Type ls and press Return. You’ll be shown a list of disks attached to your Mac.
Verify the Disk
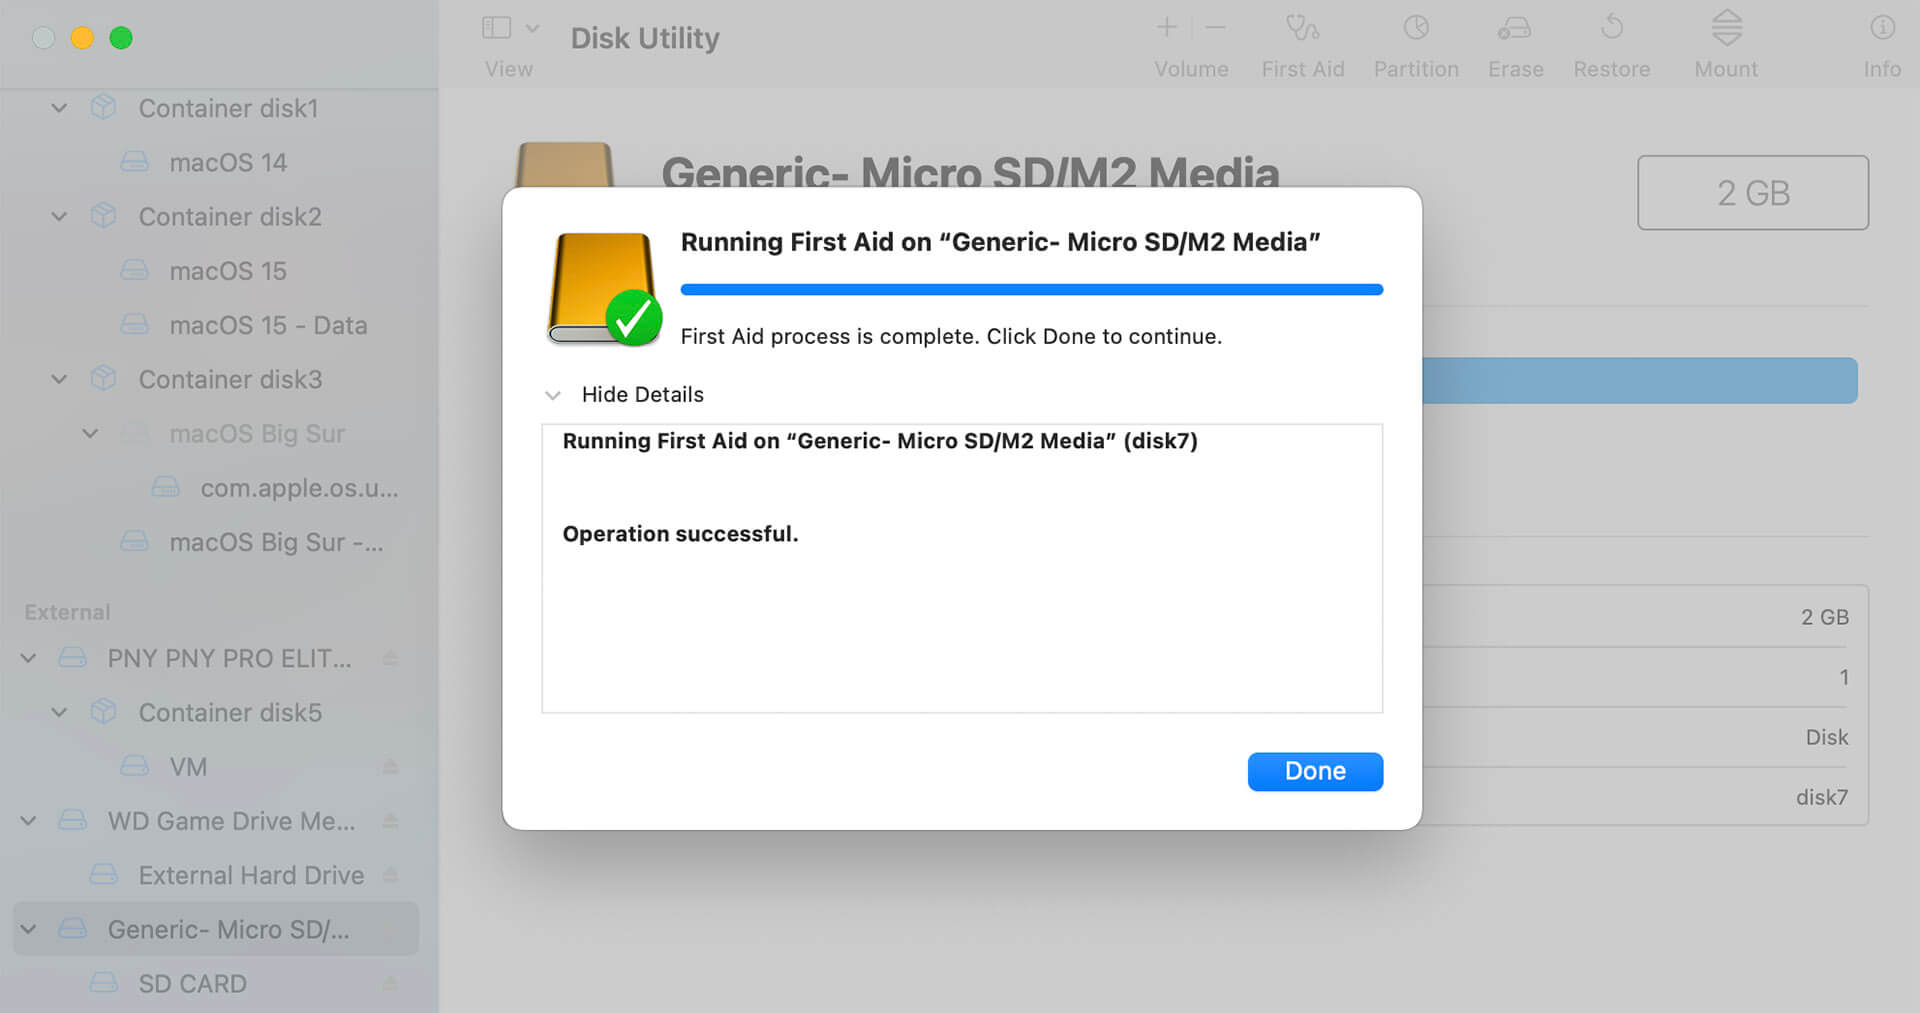
Once you have the list of disks, you can target one or many of them for verification and repair. To start the verification process, type the following command, while being sure to substitute the [drive identifier] portion for the actual name of the drive.
diskutil verifyVolume [drive identifier]
If you are targeting the Mac’s hard drive you can also simply use a /. You will see something that looks like this:


This test came back successful. So I can be confident in the drive and its ability to store data. If there was an error I would see a message that reads: The volume [volume tested] was found corrupt and needs to be repaired.
Repairing the Disk
Assume, for a moment, that the disk did come back with an error or needing repair. To repair a disk from the command line, type or paste the following command into terminal: diskutil repairvolume /Volumes/[drive identifier]/ and press Return.
Just as before, I’ll use SD as my drive identifier. If you wish to target a different drive, insert the name of that drive instead of SD. You may also use / as the identifier for your Mac’s hard drive. Your Terminal window should now look similar to this:


Congratulations! Your disk has now been verified and repaired entirely from the command line.
Conclusion
The Terminal may sometimes feel like an unfamiliar or scary application to use. But it can also be a great place to go when you are in a pinch. In many cases, it may be your only option. So the next time you need to repair a disk, give this method a shot!
Did you find this post useful?

Alex is a professional web developer, amateur beer brewer, and self-admitted Apple fanboy. The only thing he loves more than learning new things, is teaching others skills he has already mastered. The easiest way to find him is on Twitter or via his website.