Содержание
- 3 лучших инструмента для анализа диска на вашем Mac
- Встроенные инструменты MacOS
- 1. DaisyDisk
- 2. CleanMyMac X
- 3. OmniDiskSweeper
- Заключение
- Респект за пост! Спасибо за работу!
- 6 приложений для проверки состояния жесткого диска (или SSD) Mac
- 1. Дисковая утилита
- 2. CleanMyMac
- 3. Stellar Drive Toolbox
- 4. Blackmagic Disk Speed Test
- 5. Меню IStat
- 6. CleanMyDrive
- Как проверить и исправить ошибки жесткого диска (HDD, SDD) на Mac
- Загрузка в Безопасном режиме (Safe Mode) на Mac
- 2. Режим восстановления и Первая помощь на Mac
- Проверка fsck
- Apple Diagnostics
- Восстановление файлов с поврежденного диска
- Как проверить HDD, SSD диск, флешку на ошибки
- Пара слов о проблеме
- Встроенные системные утилиты
- Windows все версии
- MacOS
- Специальные сторонние программы
- Как проверить состояние жёсткого диска или SSD Mac с помощью статуса SMART
- Как проверить состояние жёсткого диска в Mac OS
- Статус SMART в порядке, но проблемы с диском есть
- Жёсткий диск вообще не отображается в Дисковой утилите
- Более подробная информация с помощью Smartmontools
3 лучших инструмента для анализа диска на вашем Mac
Нехватка места на Mac — это всегда не очень весело. Конечно, вы можете начать удалять приложения, но лучше сначала проверить диск. В зависимости от того, что вы пытаетесь найти, существует достаточное количество инструментов, которые могут решить вашу проблему.

Встроенные инструменты MacOS
Существует несколько инструментов, которые помогут вам управлять дисковым пространством, встроенным в MacOS. Для просмотра объема пространства, используемого приложениями, фотографиями и другими категориями, можно использовать Disk Storage Summary.

1. DaisyDisk
DaisyDisk является одним из наиболее широко используемых приложений для управления накопителями в macOS. Частично это объясняется простотой использования приложения, но в значительной степени это также связано с тем, насколько оно красиво выглядит.
После завершения сканирования накопителя DaisyDisk отображает файлы и папки в виде визуальной интерактивной карты. На ней можно обнаружить большой файл, просмотреть его содержимое, а затем удалить, если он вам не нужен. Все это можно сделать, не покидая DaisyDisk.
DaisyDisk стоит 9,99 долларов в Mac App Store, но также доступна бесплатная пробная версия.

2. CleanMyMac X
CleanMyMac X делает гораздо больше, чем просто управляет дисковым пространством.
В дополнение к инструментам для очистки дискового пространства, CleanMyMac X включает средства для высвобождения оперативной памяти, управления элементами входа и обслуживания системы. Это не значит, что он не так хорош в анализе дискового пространства.
Запустите приложение, и, как и другие приложения из этого списка, оно начнется с анализа диска. Тогда он может сделать гораздо больше, чем показать вам файлы, которые вы можете удалить. Приложение может автоматически удалять устаревшие кэши, сломанные загрузки, журналы и другие файлы, которые вы не используете.
CleanMyMac X также имеет встроенный деинсталлятор, который может помочь вам удалить приложения вместе с различными файлами, которые они обычно оставляют в вашей системе после удаления. Вы можете попробовать CleanMyMac X с бесплатной пробной версией, но лицензия на приложение обойдется вам в 34,95$.

3. OmniDiskSweeper
OmniGroup известна своим программным обеспечением, таким как OmniFocus, OmniOutliner и OmniPlan. Все эти приложения большие, сложные и довольно дорогостоящие. OmniDiskSweeper, в отличии от них, не только прост, но и бесплатен.
Откройте OmniDiskSweeper, и он просканирует диск. Затем вы увидите простой и легко сканируемый список, в котором отображаются файлы от самых больших до самых маленьких. Это позволит вам быстро получить представление о том, что занимает больше всего места на вашем Mac.
Как и в случае с DaisyDisk, вы можете легко открывать или перемещать файлы в корзину прямо из OmniDiskSweeper.

Заключение
Если вы не уверены, какой из них лучше для вас, есть простое решение: Начните с бесплатных опций и двигайтесь дальше. Попробуйте сначала использовать инструменты, встроенные в MacOS, а если это не работает, попробуйте OmniDiskSweeper. Если эти опции не помогают, обратитесь к DaisyDisk или CleanMyMac X.
Спасибо, что читаете! Подписывайтесь на мои каналы в Telegram, Яндекс.Мессенджере и Яндекс.Дзен. Только там последние обновления блога и новости мира информационных технологий.
Респект за пост! Спасибо за работу!
Хотите больше постов? Узнавать новости технологий? Читать обзоры на гаджеты? Для всего этого, а также для продвижения сайта, покупки нового дизайна и оплаты хостинга, мне необходима помощь от вас, преданные и благодарные читатели. Подробнее о донатах читайте на специальной странице.
Заранее спасибо! Все собранные средства будут пущены на развитие сайта. Поддержка проекта является подарком владельцу сайта.
Источник
6 приложений для проверки состояния жесткого диска (или SSD) Mac

Жесткие диски выходят из строя, и в конечном итоге это произойдет. Неважно, оснащен ли ваш Mac вращающимся жестким диском (HDD) или твердотельным накопителем (SSD). Данные показывают, что 22% жестких дисков выходят из строя в течение первых четырех лет.
Что мы можем сделать, чтобы продлить срок службы жесткого диска? Много. Но вы никогда не знаете, когда ваш Mac-диск выйдет из строя или выйдет из строя … и если это произойдет, это катастрофа для всех файлов, которые вы сохранили на этом диске.
Итак, что может вы делаете, чтобы предотвратить это?
Две вещи!
№1: проверьте состояние диска и №2: сделайте резервную копию данные на регулярной основе. Это может показаться простым, но для правильного выполнения двух небольших задач требуется время.
Для резервного копирования данных мы рекомендуем Time Machine (встроенное приложение уже существует на вашем Mac), и если вы Можно использовать программу клонирования дисков Mac в качестве вторичного решения для резервного копирования. Обычно это необязательно, но мы рекомендуем сделать это на всякий случай.
Сегодня мы собираемся показать вам шесть отличных инструментов для проверки состояния жесткого диска Mac, от теста скорости до проверки диска/ мониторинг/ремонт, проверка сбойных секторов, мы покрываем их все.
Добрый совет: мы понимаем, что ваше время дорого и маловероятно, что вы сможете установить все 6 приложений, которые мы рекомендуем ниже. Итак, мы добавили пометку «Лучшее для» под каждое приложение, надеюсь, это поможет подобрать для вас подходящее приложение.
1. Дисковая утилита
Первое, что вы можете сделать, это проверить SMART Статус с помощью встроенной Дисковой утилиты в macOS. SMART (технология самоконтроля, анализа и отчетности) — это внутренняя система мониторинга, которая включена почти во все жесткие диски Mac (жесткие диски и твердотельные накопители).
SMART помогает получить общее представление о состоянии ваш Mac-диск. Как определить? Просто откройте Дисковую утилиту. Выделите имя жесткого диска слева, затем проверьте статус в таблице (см. Выше). Если отображается «Проверено», это означает, что ваш жесткий диск исправен. В противном случае вам может потребоваться его немедленная замена. Если ваш бюджет позволяет, подумайте о переходе на твердотельный накопитель.
Затем проверьте наличие ошибок на диске с помощью первой помощи. Если на вашем Mac установлена OS X El Capitan, macOS Sierra или последняя версия High Sierra, выберите Macintosh HD слева и нажмите «Первая помощь». Появится новое окно с вопросом, хотите ли вы запустить, просто нажмите «Да», чтобы продолжить.
Примечание. Для OS X Yosemite или более старых версий используйте две кнопки. в правом углу вместо «Проверить диск» и «Восстановить диск».
2. CleanMyMac
CleanMyMac в основном используется чтобы освободить место на вашем почти заполненном жестком диске (или SSD). Приложение глубоко сканирует и очищает вашу систему Mac и может освободить тонны дискового пространства. Чтобы проверить загрузочный диск вашего Mac, все, что вам нужно сделать, это открыть приложение, перейти в Обслуживание> Проверить загрузочный диск и нажать «Выполнить».
Кроме того, вы можете использовать CleanMyMac для выполнения ряда других задач, таких как поиск старых и больших файлов, удаление ненужных файлов из фотографий/iTunes, удаление расширений, удаление приложений Mac в пакетном режиме и т. д.
Плохие секторы — это блоки, которые повреждены, поэтому не могут быть прочитаны. Просто откройте приложение, перейдите в раздел «Drive Monitor» и нажмите кнопку «Продолжить», чтобы просканировать диск. Если выясняется, что количество поврежденных секторов увеличивается, вероятно, пришло время заменить диск Mac в случае случайного повреждения или сбоя. Обратите внимание, что приложение в настоящее время не работает с компьютерами Mac с флэш-памятью (например, SSD).
4. Blackmagic Disk Speed Test
Если вы чувствуете жесткий диск Mac (или твердотельный накопитель) реагирует медленно, рекомендуется проверить его скорость записи/чтения и выполнить эталонный тест в соответствии с отраслевым стандартом. Вам понравится это бесплатное приложение от Blackmagic. Это удивительное, но простое в использовании приложение, которое позволяет быстро протестировать и сертифицировать производительность вашего диска Mac.
После установки приложения на Mac откройте его и затем нажмите кнопку ПУСК расположен в центре. Скоро вы увидите цифры на двух кругах спидометра. Примечание. Лучше закрыть все другие активные приложения перед использованием Blackmagic Disk Speed Test, это поможет получить более точные данные.
5. Меню IStat
Меню iStat — расширенное Системный монитор Mac для строки меню macOS. Он может уведомлять вас о широком спектре событий, которые вас интересуют, например об использовании графического процессора, памяти, дисков, сети, датчиков, батареи, питания и т. Д.. Это очень удобно и удобно, и в этом случае вы можете положиться на инструменты мониторинга дисков для отслеживания состояния SMART на жестких дисках Mac или SSD.
Новое обновление: к сожалению, меню iStat не работают с компьютерами Mac с флэш-памятью (все модели, выпущенные в 2016 году или позже) в связи с тем, что Apple больше не позволяет сторонним программным средствам проверять статус SMART SSD.
6. CleanMyDrive
CleanMyDrive — еще одна полезная проверка состояния диска Mac. приложение, и это тоже совершенно бесплатно. Приложение больше похоже на облегченный диспетчер дисков как для внутреннего диска Macintosh, так и для внешних дисков.
Вы можете использовать его для проверки состояния жесткого диска, например визуальный вид того, как используется ваш диск, сколько существует ненужных файлов. Если CleanMyDrive обнаруживает скрытые ненужные файлы, вы можете использовать приложение для их автоматической очистки за несколько кликов. Примечание. Приложение прекрасно работает с USB-накопителями, картами памяти SD и т. Д.
Это все, чем мы хотели поделиться. Я надеюсь, что вы освоили некоторые из этих приложений, и удачи в поддержании вашего Mac-диска в хорошем состоянии.
Есть ли какой-нибудь инструмент, чтобы проверить, сколько ГБ записано на моем SSD?
Сама macOS может это показать. Перейдите к логотипу Apple> Об этом Mac> Хранилище, чтобы узнать.
Чтобы выбрать лучший SSD для моего iMac, мне нужно оценить, сколько я записываю на каждый диск. день. Есть ли способ это измерить?
Источник
Как проверить и исправить ошибки жесткого диска (HDD, SDD) на Mac
Ваш Mac не включается? Без паники! Не спешите бросать всё и нести любимый компьютер в ближайший сервис. Вполне возможно, что для «реанимации» хватит и встроенных средств macOS, воспользоваться которыми может каждый желающий.

Загрузка в Безопасном режиме (Safe Mode) на Mac
При активации Safe Mode macOS просканирует жесткий диск и исправит все ошибки, которые найдет.
«Безопасная» загрузка запускает только жизненно необходимые компоненты (т.е. только то, что необходимо для запуска компьютера). В результате не будут запущены сторонние расширения, элементы входа в систему (логины-пароли), а также будет очищен кэш в определенных разделах.
Чтобы запустить Mac в режиме Safe Mode, выключите его, затем включите и одновременно со стартовым звуком зажмите на клавиатуре клавишу ⇧Shift. Если ваш Mac завис при включении, сначала выключите его (для этого удерживайте физическую кнопку питания на корпусе или клавиатуре в течение 10 секунд).

Если Mac загрузил систему, перезагрузите его и включайте уже как обычно. Если же компьютер вновь завис, переведите его в Verbose Mode — для этого необходимо выключить Mac, включить его и после стартового сигнала одновременно нажать и удерживать ⌘Cmd + V. Так вы сможете узнать, какой именно системный компонент приводит к проблеме. Когда источник будет выявлен, можно перезагрузиться в Safe Mode (с зажатой клавишей ⇧Shift) и удалить проблемное расширение, после чего попробовать уже обычную перезагрузку.
2. Режим восстановления и Первая помощь на Mac
Если безопасный режим не решил вашу проблему, переходим к следующей опции под названием Режим восстановления (Recovery Mode). Он «живёт» в отдельной части загрузочного диска и позволяет восстанавливать систему, получать доступ к Терминалу и возможность переустановить операционную систему вашего Mac — macOS.
Для перехода в Режим восстановления:
1. Выключите компьютер;
3. Сразу же после стартового сигнала нажмите и удерживайте сочетание клавиш ⌘Cmd + R.

Если перейти в Recovery Mode не удается (при проблемах с диском такое бывает), можно запустить режим восстановления через интернет. Сочетание клавиш будет уже несколько другим — ⌘Cmd + ⌥Option (Alt) + R. Этот способ требует интернет-подключения и займет гораздо больше времени, т.к. macOS будет загружать из Сети образ системы весом в несколько гигабайт.
Если загрузка в Режим восстановления прошла успешно, вы увидите несколько вариантов действий. Запустите Дисковую утилиту и найдите загрузочный диск, который является источником проблем — скорее всего, он называется Macintosh HD. Выберите его в окне слева, а затем нажмите Первая помощь → Запустить.

Проверка fsck
File system consistency check (fsck, «проверка целостности файловой системы») — старый добрый Unix-инструмент для проверки и решения проблем с дисками.
В зависимости от объема жесткого диска, его типа и серьезности проблемы fsck-проверка может занять довольно много времени. Просто наберитесь терпения.
Для запуска fsck необходим переход в однопользовательский режим (Single User Mode). Он позволяет вносить изменения в общие пользовательские ресурсы на компьютере. Single User Mode не запускает macOS; он просто дает доступ к командной строке Unix.
Для перехода в Single User Mode:
3. Сразу после стартового сигнала нажмите и удерживайте сочетание клавиш ⌘Cmd + S.

Примечание: если ваш диск зашифрован, выберите подходящий пользовательский аккаунт и введите пароль для дешифровки. Если у вас установлен пароль на прошивку Mac, запустить Single User Mode не получится.
Важно дождаться окончания fsck-проверки — если процесс будет прерван, возможна потеря данных. После окончания проверки вы увидите одно из следующих сообщений:
** The volume Macintosh HD could not be repaired.
*****The volume was modified *****
** The volume Macintosh HD was repaired successfully.
*****The volume was modified *****
Уже намного лучше… но расслабляться рано. Опять-таки, запустите проверку еще раз.
** The volume Macintosh HD appears to be OK.
А вот это — то, что нам нужно. fsck проверила весь диск и не нашла ничего, что требовало бы исправлений.

Теперь из Single User Mode можно выходить. Команда для выхода: exit.
Apple Diagnostics
Если описанные выше способы вам не помогли, то проблема почти наверняка очень серьезная. А это значит, что пришло время воспользоваться Apple Diagnostics!
Это специальный тест для компьютеров Mac от компании-производителя. По его итогам вы получите код ошибки и сможете понять, что именно не так с вашим Mac.
Для запуска теста Apple Diagnostics:
1. Выключите ваш Mac;
2. Отключите от него все подключенные устройства, за исключение клавиатуры, мышки, монитора, Ethernet-кабеля (если есть) и кабеля питания. Иными словами, отключите флешки, внешние жесткие диски, принтеры, сканеры и т.п.
4. Сразу же после стартового сигнала нажмите и удерживайте на клавиатуре D.
5. Выберите свой язык
Как уже упоминалось выше, после прохождения теста вы получите в свое распоряжение код ошибки. Расшифровка кодов:
Как видим, проблемы делятся на две категории — те, которые легко устранит и рядовой пользователь (например, ошибки, связанные с USB), и те, с которыми надо сразу идти в сервис (к примеру, неполадки с видео- и аудиокартами, процессором, памятью и т.д.).
Восстановление файлов с поврежденного диска
Повреждение жесткого диска среди прочего означает и возможную потерю данных (или их части). Для того, чтобы избежать этого, попробуйте создать образ «сломавшегося» диска. Для этого потребуется внешний жесткий диск как минимум того же объема.
1. Подключите его к Mac, перезагрузите компьютер,
2. Войдите в Recovery Mode (⌘Cmd + R),
3. Запустите Дисковую утилиту,
4. В строке меню вверху выберите Файл → Новый образ → Образ «Macintosh HD» и запустите процесс. На создание образа уйдет какое-то время, но в конце вы получите копию старого диска в формате DMG и сможете его смонтировать уже в новой системе.

Не забудьте сменить [username] на свое имя пользователя в системе.
Давайте разберем команду: cp — это команда на копирование, —r означает, что эта команда выполняется рекурсивно, т.е. сначала копируются директории внутри указанной вами директории, а затем директории, которые входят в их состав, и так далее.
Первый путь — это указание на местонахождение файлов, которые вы хотите скопировать. Второй путь указывает местоположение внешнего накопителя, он всегда будет в /Volumes/, какое бы название вы ему ни дали.
Единственная сложность этого способа — вы должны вспомнить, где именно находились ваши файлы, и соответствующим образом прописать путь. Также вам остается только надеяться на то, что файлы не находятся на поврежденной части диска.
Когда копирование данных будет завершено, вы можете с чистой совестью отдать Mac в ремонт или переустановить macOS.
… Именно в такие моменты люди начинают понимать важность резервного копирования данных. И действительно — при настроенном копировании Time Machine проблемы с потерей данных не страшны. Настройте копирование данных прямо сейчас — и сэкономьте себе много времени, нервов и денег в будущем!
Источник
Как проверить HDD, SSD диск, флешку на ошибки
Программы стали зависать, многие файлы перестали открываться либо стали долго копироваться, а система постоянно оповещает об ошибках в работе жесткого диска? Из-за программных сбоев, внешних повреждений либо из-за износа, с жестким диском могут возникнуть неполадки. Самые распространенные среди них – это ошибки файловой системы и образование битых секторов.
Чтобы проверить диск на наличие ошибок и попытаться их исправить в ОС Windows и MacOS присутствуют специальные утилиты. Также можно воспользоваться и специальными программами, которые производят более качественный и полноценный анализ дисков.
Пара слов о проблеме
Раньше самой распространённой файловой системой для жестких дисков была FAT16 и FAT32. Когда случаются сбои в операционной системе, то диск может полностью перестать видеться, или пропадают файлы и целые папки, при этом многие операции чтения и записи заканчиваются с ошибкой.
Проверка диска на ошибки помогает восстановить утерянные данные, которые сохраняются в корневой директории в папках с именами « FOUND.000 «, « FOUND.001 » и т.д. Имена восстановленных файлов могут быть не оригинальными, а просто « file0000.chk «. С распространением файловой системы NTFS для Windows NT/2000/XP/7/8/10 проблема с ошибками почти пропала, но не исчезла. Но FAT32 по-прежнему используют для форматирования флешек.
Сбойные сектора, они же «bad blocks» появляются в случае износа жёсткого диска, и в этом случае файлы портятся навсегда. Проверка и исправление плохих секторов помогает лишь обнаружить их и пометить, чтобы они не использовались для записи новых данных. Сбойные сектора могут читаться, но с большими задержками. В этом случае система начинает беспорядочно тормозить и подвисать, при этом память ОЗУ и процессор CPU ничем не заняты.
Если начинают появляться плохие блоки, то такой диск лучше поменять. И если плохие блоки встречаются в основном на жёстких дисках (HDD), то SSD-диски подвержены ошибкам файловой системы точно также, как и HDD.
Встроенные системные утилиты
При помощи стандартных системных программ можно осуществлять тестирование твердотельных накопителей (SSD), жестких дисков (HDD), внешних дисков и флешек.
Windows все версии
По умолчанию отмечена первая галочка «Автоматически исправлять системные ошибки» — это проверка файловой системы и занимает немного времени. В зависимости от количества файлов на диске, проверка отнимет от нескольких секунд до нескольких минут времени.
Для проверки всей поверхности HDD на битые сектора поставьте галочку «Проверять и восстанавливать повреждённые сектора«. Полная проверка занимает от получаса до нескольких часов времени.
Также, есть утилита Check Disk для проверки из командной строки:
На некоторых устройствах инструменты для диагностики винчестера находятся в BIOS. Например, на ноутбуках марки “HP” присутствует опция автоматической проверки системного диска, активация которой возможна даже в том случае, если диск не загружает Windows.
MacOS
Системная утилита произведет поиск ошибок и попытается их устранить.
Специальные сторонние программы
Иногда системные утилиты могут пропускать некоторые ошибки сбойных секторов, поэтому можно воспользоваться сторонними программами. Изготовители винчестеров предлагают персональные бесплатные программы, предназначенные для более полноценной проверки. Одними из таких, например, являются “SeaTools” для жестких дисков марки Seagate или “Data Lifeguard Diagnostic” для марки Western Digital.
Подобные программы отличаются простотой в использовании и содержат русскоязычный интерфейс. Нужную программу для конкретной марки винчестера можно отыскать на сайте его производителя. Также можно воспользоваться и платными утилитами, которых в интернете очень много. Среди таких самыми популярными являются: HDDScan, HDD Regenerator, MHDD, Victoria HDD и др.
Источник
Как проверить состояние жёсткого диска или SSD Mac с помощью статуса SMART
Пользователи Mac могут легко проверить состояние жёсткого диска с помощью функции SMART в Дисковой утилите Mac OS.

Сегодня мы расскажем, как проверить статус SMART жёсткого диска или SSD Mac OS. Таким образом можно легко узнать, в каком состоянии жёсткий диск, и нуждается ли он в замене.
SMART (Self Monitoring Analysis and Reporting Technology System) – это механизм для проверки состояния жёсткого диска, с помощью которого можно проверить наличие каких-либо системных проблем. Делать это очень важно, поскольку проблемы с жёстким диском довольно распространённые и возникают у многих пользователей.
Как проверить состояние жёсткого диска в Mac OS
Способ одинаковый во всех современных версиях MacOS.

Если статус SMART отображает ошибку, значит с жёстким диском серьёзная проблема, которая может привести к потере данных.
Рекомендуем регулярно сохранять копию данных через Time Machine или другим способом, а также следить за состоянием жёсткого диска описанным выше способом.
Статус SMART в порядке, но проблемы с диском есть
Если у вас возникают какие-либо проблемы с жёстким диском, но статус SMART указан как «Проверен», можно ввести устройство в режим восстановления и выяснить, в чём заключается проблема.
Жёсткий диск вообще не отображается в Дисковой утилите
Если ваш жёсткий диск вообще не отображается в Дисковой утилите, то он либо уже в неисправном состоянии, либо периодически перестаёт работать и скоро перестанет работать совсем. Также есть вероятность, что диск не подключен физически, что возможно при повреждении устройства.
Также учтите, что не все жёсткие диски поддерживают статус SMART, и в таком случае вы не сможете узнать, в каком они состоянии.
У самих дисков зачастую названия соответствуют производителю. К примеру, если «APPLE SSD SM0512G Media» — название жёсткого диска, то «Macintosh HD» — только его раздел. Нужно выбирать в списке именно сам диск.
Самый простой способ сохранить копию жёсткого диска – через Time Machine. Если с диском какие-то проблемы, нужно срочно сохранить все данные, которые на нём хранятся, иначе вы можете их потерять. Если проблема заключается в самом жёстком диске, его нужно будет заменить.
Если вы хотите узнать более подробную информацию о состоянии SSD-диска M1 Mac, вам понадобится инструмент Smartmontools.
Шаг 2: Установите Homebrew на Mac. Откройте Терминал и используйте следующую команду:
Если Xcode ещё не установлен на ваш Mac, Терминал попросит это сделать. Просто нажмите Enter, чтобы установить Xcode и Homebrew. На этот процесс может уйти некоторое время.

Шаг 3: Теперь нужно установить Smartmontools на Mac. Для этого используйте данную команду:
Во время установки понадобится ввести пароль от Mac.
Шаг 4: Когда инструмент smartmontools установится, он автоматически просканирует «/disk0» SSD на вашем Mac и отобразит информацию о состоянии жёсткого диска.
Более подробная информация с помощью Smartmontools
Чтобы ещё раз вручную с помощью smartmontools проверить состояние своего SSD на Mac, делайте следующее:
Шаг 1: Запустите Дисковую утилиту. В меню слева нажмите на жёсткий диск правой кнопкой мыши и выберите Свойства.
Шаг 2: В правом нижнем углу найдите текст, который отображается в пункте «Устройство». Он вам понадобится.

Шаг 3: Откройте Терминал и используйте команду ниже. Используйте то название, которое вы узнали только что. К примеру, у нас это «disk0».
Вы увидите детали о состоянии жёсткого диска. Важно понимать эти детали. Главные – Available Spare Threshold и Percentage Used. В идеале, если у вас M1 Mac, эти показатели должны быть 0% или 1%.

Если показатели выше, вам стоит подождать выхода обновления, которое может содержать решение проблемы. Возможно, версия macOS 11.3 Big Sur поможет.
Таким же образом можно посмотреть данные о состоянии SSD Intel Mac. Если у вас относительно старый Mac, то показатель «Percentage Used» может достигать 5-30%.
Если показатель ещё выше, то стоит сохранить копию своих данных, поскольку состояние SSD влияет на длительность работы компьютера. Кстати, таким же способом вы можете проверить состояние внешних жёстких дисков.
Источник
Did you format your USB using the ExFAT file system? That isn’t an issue as multiple users opt for the ExFAT filing system. However, when Mac stops recognizing the ExFAT drive, that is when problems arise. It is natural to think about the essential data you have on the drive and the scenario of potential data loss.
Tensions arise when you come across a situation where irreplaceable data loss is a possibility. It is unfathomable to lose critical data. In this article, we will discuss what ExFAT USB is, why Mac doesn’t recognize it, and potential solutions. Keep reading!
*** 79% of Mac users are interested in ExFAT vs. Mac OS Extended
What Is Exactly ExFAT USB?
ExFAT stands for «Extended File Allocation Table». It is a file system specifically designed for SD cards, USB flash drives, etc. Microsoft introduced the ExFAT filing system in 2006.
ExFAT is the successor of the FAT32 filing system. The optimization of ExFAT is mainly for flash drives. Numerous features make ExFAT the perfect file system for flash drives, such as USBs.
For starters, ExFAT is an exceptionally lightweight system that doesn’t need many hardware resources for its maintenance. It is compatible with different operating systems and devices. With this file system, you can get partition support of up to 128 pebibytes. It also supports a large file size limit (the same as the partition limit).
The compatibility of the ExFAT file system with Mac and Windows makes it even more appealing. That makes transferring data between the different operations systems and devices more accessible. That is why using ExFAT to format the USB is an excellent idea.
Why My ExFAT USB Is Not Detected on Mac?
Various reasons explain why the ExFAT USB is not detected on Mac. Here are some of these causes listed. Take a look.
- Corruption issues: In some cases, the ExFAT USB might not mount on the Mac operating system due to corruption. That prevents mounting. You will need to rebuild the directory or run the repair on the USB.
- Missing driver software: Another reason could be the lack of essential driver software for reading the ExFAT USB.
- Faulty cable: Sometimes, the USB cable might be facing some issues. In that case, the best solution is to try with a different cable.
- Plugging issues: When you plug in the USB drive, it is vital to ensure that the plugging is snug. Lack of power supply can cause problems in mounting the drive.
- Operating system concern: In some situations, the operating system and the USB might not be compatible. It will lead to the failure of the system to recognize the drive.
![]()
Solved: USB Flash Drive Not Showing Up on Mac
The reasons behind the problem of a USB device not showing up are various, including the USB port is not working, USB drive corruption, virus infection, macOS faulty, etc. So, to figure out the effective solutions for your own case, you need to…

5 Methods to get your ExFAT USB recognized by Mac
Did you check the power supply? Is the USB properly plugged into the system? Despite checking these pointers, you need to opt for other solutions if you still have trouble.
Fortunately, there are numerous solutions that you can use to solve the problem of your ExFAT USB not getting recognized by Mac. Take a look at the different methods listed below.
- Method 1. Turn Mac Off and On Again
- Method 2. Check Finder Preferences
- Method 3. Update Your Mac’s OS and Firmware
- Method 4. Use First Aid to Repair the USB Corruption Error
- Method 5. Change System Configuration
Method 1. Turn Mac Off and On Again
You might be surprised, but the simple method of turning off and on the system can resolve the issue. It won’t take much time and can be done easily. Here are the steps.
Step 1. Go to the Apple icon present on the corner of the screen and press the Restart option.

Step 2. Make sure to uncheck the Reopen windows option while logging in again. Then select the «Restart» option again.

Now, the Mac will restart. You need to wait. After the system starts, try using the USB flash drive once again. If this doesn’t work, move on to the other methods.
Method 2. Check Finder Preferences
A Finder is an excellent tool that Mac users can use to check if a particular drive can be mounted on the system. Here are the steps.
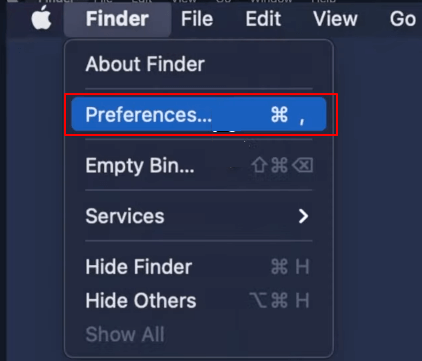
Step 1. Launch Finder. Select the «Finder» menu at the top of the screen. Go to «Preferences».
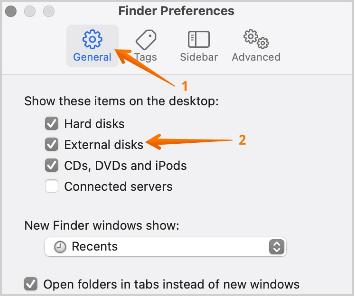
Step 2. Click on the «General» tab. Tick the options «External disks».
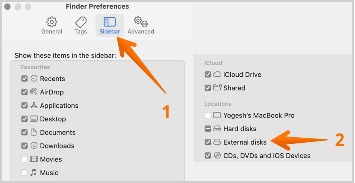
Step 3. Now, select the «Sidebar» tab. Here also, you need to tick the «External disks» option.
Step 4. Close the window. Plug the USB and see the shows on the Mac screen.
Method 3. Update Your Mac’s OS and Firmware
One of the easiest ways to open USB drives on the Mac is to check out updates.
Take a look:
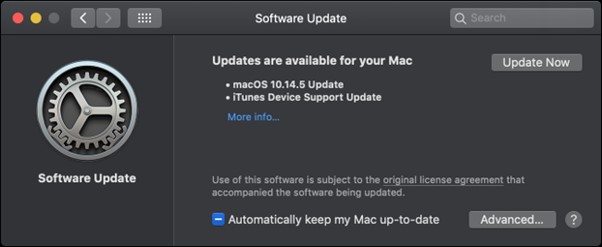
Step 1. Go to the «Apple» icon on the screen and click the System Preferences option. Then go to «Software Update».
If you find any update, click on it immediately.
Note: You can also checkmark the box saying «Automatically keep my Mac up to date». That way, you don’t have to look out for updates constantly. Keep in mind that updating OS and firmware is a smart idea. It improves the performance of the system.
Method 4. Use First Aid to Repair the USB Corruption Error
Another exceptional repair feature that Mac has is the First Aid. It is an excellent storage device repair tool. It is accessible from the Disk Utility option. You can follow the steps listed below.
Step 1. Click anywhere on the desktop until you see the «Finder» menu on the top.
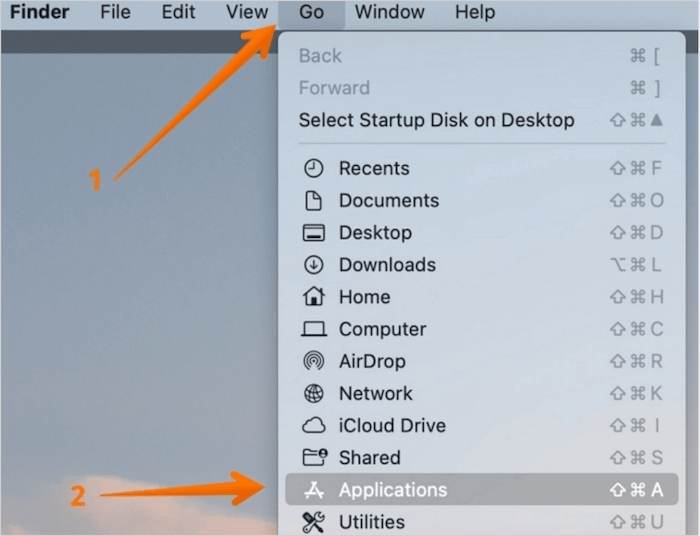
Step 2. Click on the «Go» option and select «Applications» from the drop-down menu.
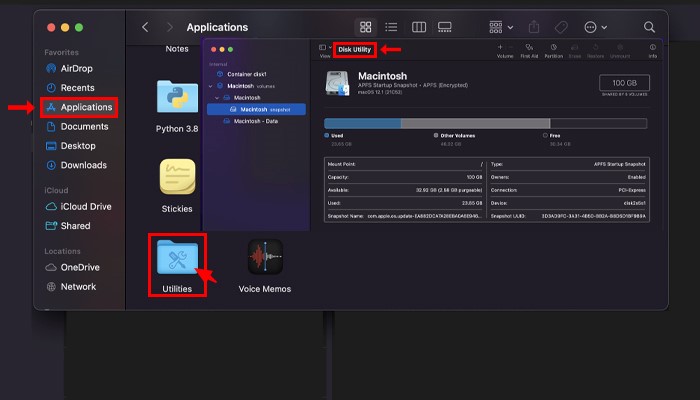
Step 3. Click on the «Utilities» folder option and open «Disk Utility».
Step 4. On the list of storage devices, choose your USB flash drive. Select the «First Aid» option in the toolbar.
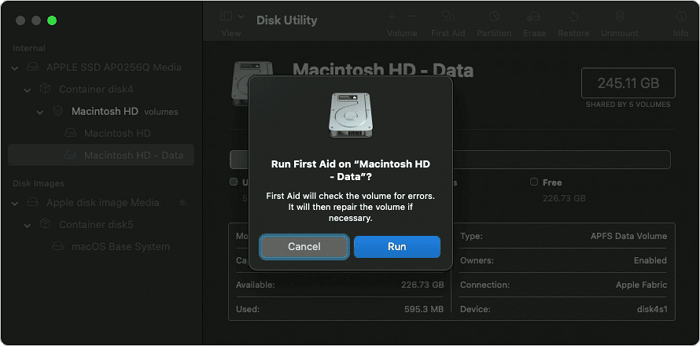
Step 5. Choose the «Run» option. It will check the USB for errors. First Aid will assess the USB flash drive and repair the errors (if found).
Method 5. Change System Configuration
To resolve the USB drive issues, resetting the system configuration is an excellent idea. You need to reset or change two system components to fix the problem.
Resetting the SMC or System Management Controller
Step 1. Shut down the system and take out the power supply cord.
Step 2. Press the power button and hold it down for five seconds. Then reconnect the power supply.
Step 3. Turn on the system.
Resetting the PRAM/NVRAM (The Parameter RAM and the Non-volatile RAM has information related to the USB ports that you use on the Mac)
Step 1. Shut down the system and then press «Command», «Option», «P», and «R» keys together while restarting the Mac.
Step 2. Hold them down until there is a flash and sound. Wait for the chime.
Now, wait as the system boots.
The Ultimate Trick: Format Your ExFAT USB
Have you tried the methods mentioned earlier and still facing the same issue? In that case, the only approach is to format the ExFAT USB. However, it is necessary to understand that formatting the USB drive can be particularly dangerous. Here, the best option is to backup the essential data.
To backup data, mac users can opt for the Time Machine Backup. Alternatively, users can also choose third-party apps such as EaseUS Todo Backup for Mac.
However, in some cases, formatting the ExFAT USB can lead to data loss. The rising tension and panic that occurs due to data loss are natural. Here, the ideal solution is to use data recovery software. You can opt for the EaseUS Data Recovery Wizard for Mac.
The EaseUS Data Recovery Wizard for Mac is an excellent data recovery software. It aids in the retrieval of lost data due to various reasons. No matter the cause of the data loss, you can get it back. With the data recovery software, you can get back photos, music files, videos, emails, documents, etc.
If you are worried about the size of the deleted file, you can relax. EaseUS Data Recovery Wizard for Mac helps you regardless of the cause of the data loss or the size of the file. It has a wide array of features that make it the perfect choice for mac users.
Are you wondering how to use EaseUS Data Recovery Wizard for Mac? Take a look at these steps:
Step 1. Search for lost files
Correctly connect your external hard drive to your Mac. Launch EaseUS Data Recovery Wizard for Mac, and select the external hard drive. Then, click «Search for lost files» to find lost/deleted files on your external devices.

Step 2. Filter and find lost files
After the scan, all file types will be presented in the left panel. Select the file type to find wanted files on your external devices.

Step 3. Preview and recover
Click the file and preview it. Then, select the files you want to recover and click the «Recover» button. You can save your data to local and cloud drives.

Did you format your USB using the ExFAT file system? That isn’t an issue as multiple users opt for the ExFAT filing system. However, when Mac stops recognizing the ExFAT drive, that is when problems arise. It is natural to think about the essential data you have on the drive and the scenario of potential data loss.
Tensions arise when you come across a situation where irreplaceable data loss is a possibility. It is unfathomable to lose critical data. In this article, we will discuss what ExFAT USB is, why Mac doesn’t recognize it, and potential solutions. Keep reading!
*** 79% of Mac users are interested in ExFAT vs. Mac OS Extended
What Is Exactly ExFAT USB?
ExFAT stands for «Extended File Allocation Table». It is a file system specifically designed for SD cards, USB flash drives, etc. Microsoft introduced the ExFAT filing system in 2006.
ExFAT is the successor of the FAT32 filing system. The optimization of ExFAT is mainly for flash drives. Numerous features make ExFAT the perfect file system for flash drives, such as USBs.
For starters, ExFAT is an exceptionally lightweight system that doesn’t need many hardware resources for its maintenance. It is compatible with different operating systems and devices. With this file system, you can get partition support of up to 128 pebibytes. It also supports a large file size limit (the same as the partition limit).
The compatibility of the ExFAT file system with Mac and Windows makes it even more appealing. That makes transferring data between the different operations systems and devices more accessible. That is why using ExFAT to format the USB is an excellent idea.
Why My ExFAT USB Is Not Detected on Mac?
Various reasons explain why the ExFAT USB is not detected on Mac. Here are some of these causes listed. Take a look.
- Corruption issues: In some cases, the ExFAT USB might not mount on the Mac operating system due to corruption. That prevents mounting. You will need to rebuild the directory or run the repair on the USB.
- Missing driver software: Another reason could be the lack of essential driver software for reading the ExFAT USB.
- Faulty cable: Sometimes, the USB cable might be facing some issues. In that case, the best solution is to try with a different cable.
- Plugging issues: When you plug in the USB drive, it is vital to ensure that the plugging is snug. Lack of power supply can cause problems in mounting the drive.
- Operating system concern: In some situations, the operating system and the USB might not be compatible. It will lead to the failure of the system to recognize the drive.
![]()
Solved: USB Flash Drive Not Showing Up on Mac
The reasons behind the problem of a USB device not showing up are various, including the USB port is not working, USB drive corruption, virus infection, macOS faulty, etc. So, to figure out the effective solutions for your own case, you need to…
5 Methods to get your ExFAT USB recognized by Mac
Did you check the power supply? Is the USB properly plugged into the system? Despite checking these pointers, you need to opt for other solutions if you still have trouble.
Fortunately, there are numerous solutions that you can use to solve the problem of your ExFAT USB not getting recognized by Mac. Take a look at the different methods listed below.
- Method 1. Turn Mac Off and On Again
- Method 2. Check Finder Preferences
- Method 3. Update Your Mac’s OS and Firmware
- Method 4. Use First Aid to Repair the USB Corruption Error
- Method 5. Change System Configuration
Method 1. Turn Mac Off and On Again
You might be surprised, but the simple method of turning off and on the system can resolve the issue. It won’t take much time and can be done easily. Here are the steps.
Step 1. Go to the Apple icon present on the corner of the screen and press the Restart option.
Step 2. Make sure to uncheck the Reopen windows option while logging in again. Then select the «Restart» option again.
Now, the Mac will restart. You need to wait. After the system starts, try using the USB flash drive once again. If this doesn’t work, move on to the other methods.
Method 2. Check Finder Preferences
A Finder is an excellent tool that Mac users can use to check if a particular drive can be mounted on the system. Here are the steps.
Step 1. Launch Finder. Select the «Finder» menu at the top of the screen. Go to «Preferences».
Step 2. Click on the «General» tab. Tick the options «External disks».
Step 3. Now, select the «Sidebar» tab. Here also, you need to tick the «External disks» option.
Step 4. Close the window. Plug the USB and see the shows on the Mac screen.
Method 3. Update Your Mac’s OS and Firmware
One of the easiest ways to open USB drives on the Mac is to check out updates.
Take a look:
Step 1. Go to the «Apple» icon on the screen and click the System Preferences option. Then go to «Software Update».
If you find any update, click on it immediately.
Note: You can also checkmark the box saying «Automatically keep my Mac up to date». That way, you don’t have to look out for updates constantly. Keep in mind that updating OS and firmware is a smart idea. It improves the performance of the system.
Method 4. Use First Aid to Repair the USB Corruption Error
Another exceptional repair feature that Mac has is the First Aid. It is an excellent storage device repair tool. It is accessible from the Disk Utility option. You can follow the steps listed below.
Step 1. Click anywhere on the desktop until you see the «Finder» menu on the top.
Step 2. Click on the «Go» option and select «Applications» from the drop-down menu.
Step 3. Click on the «Utilities» folder option and open «Disk Utility».
Step 4. On the list of storage devices, choose your USB flash drive. Select the «First Aid» option in the toolbar.
Step 5. Choose the «Run» option. It will check the USB for errors. First Aid will assess the USB flash drive and repair the errors (if found).
Method 5. Change System Configuration
To resolve the USB drive issues, resetting the system configuration is an excellent idea. You need to reset or change two system components to fix the problem.
Resetting the SMC or System Management Controller
Step 1. Shut down the system and take out the power supply cord.
Step 2. Press the power button and hold it down for five seconds. Then reconnect the power supply.
Step 3. Turn on the system.
Resetting the PRAM/NVRAM (The Parameter RAM and the Non-volatile RAM has information related to the USB ports that you use on the Mac)
Step 1. Shut down the system and then press «Command», «Option», «P», and «R» keys together while restarting the Mac.
Step 2. Hold them down until there is a flash and sound. Wait for the chime.
Now, wait as the system boots.
The Ultimate Trick: Format Your ExFAT USB
Have you tried the methods mentioned earlier and still facing the same issue? In that case, the only approach is to format the ExFAT USB. However, it is necessary to understand that formatting the USB drive can be particularly dangerous. Here, the best option is to backup the essential data.
To backup data, mac users can opt for the Time Machine Backup. Alternatively, users can also choose third-party apps such as EaseUS Todo Backup for Mac.
However, in some cases, formatting the ExFAT USB can lead to data loss. The rising tension and panic that occurs due to data loss are natural. Here, the ideal solution is to use data recovery software. You can opt for the EaseUS Data Recovery Wizard for Mac.
The EaseUS Data Recovery Wizard for Mac is an excellent data recovery software. It aids in the retrieval of lost data due to various reasons. No matter the cause of the data loss, you can get it back. With the data recovery software, you can get back photos, music files, videos, emails, documents, etc.
If you are worried about the size of the deleted file, you can relax. EaseUS Data Recovery Wizard for Mac helps you regardless of the cause of the data loss or the size of the file. It has a wide array of features that make it the perfect choice for mac users.
Are you wondering how to use EaseUS Data Recovery Wizard for Mac? Take a look at these steps:
Step 1. Search for lost files
Correctly connect your external hard drive to your Mac. Launch EaseUS Data Recovery Wizard for Mac, and select the external hard drive. Then, click «Search for lost files» to find lost/deleted files on your external devices.
Step 2. Filter and find lost files
After the scan, all file types will be presented in the left panel. Select the file type to find wanted files on your external devices.
Step 3. Preview and recover
Click the file and preview it. Then, select the files you want to recover and click the «Recover» button. You can save your data to local and cloud drives.
Содержание
- 3 лучших инструмента для анализа диска на вашем Mac
- Встроенные инструменты MacOS
- 1. DaisyDisk
- 2. CleanMyMac X
- 3. OmniDiskSweeper
- Заключение
- Респект за пост! Спасибо за работу!
- 6 приложений для проверки состояния жесткого диска (или SSD) Mac
- 1. Дисковая утилита
- 2. CleanMyMac
- 3. Stellar Drive Toolbox
- 4. Blackmagic Disk Speed Test
- 5. Меню IStat
- 6. CleanMyDrive
- Как проверить и исправить ошибки жесткого диска (HDD, SDD) на Mac
- Загрузка в Безопасном режиме (Safe Mode) на Mac
- 2. Режим восстановления и Первая помощь на Mac
- Проверка fsck
- Apple Diagnostics
- Восстановление файлов с поврежденного диска
- Как проверить HDD, SSD диск, флешку на ошибки
- Пара слов о проблеме
- Встроенные системные утилиты
- Windows все версии
- MacOS
- Специальные сторонние программы
- Как проверить состояние жёсткого диска или SSD Mac с помощью статуса SMART
- Как проверить состояние жёсткого диска в Mac OS
- Статус SMART в порядке, но проблемы с диском есть
- Жёсткий диск вообще не отображается в Дисковой утилите
- Более подробная информация с помощью Smartmontools
3 лучших инструмента для анализа диска на вашем Mac
Нехватка места на Mac — это всегда не очень весело. Конечно, вы можете начать удалять приложения, но лучше сначала проверить диск. В зависимости от того, что вы пытаетесь найти, существует достаточное количество инструментов, которые могут решить вашу проблему.
Встроенные инструменты MacOS
Существует несколько инструментов, которые помогут вам управлять дисковым пространством, встроенным в MacOS. Для просмотра объема пространства, используемого приложениями, фотографиями и другими категориями, можно использовать Disk Storage Summary.
1. DaisyDisk
DaisyDisk является одним из наиболее широко используемых приложений для управления накопителями в macOS. Частично это объясняется простотой использования приложения, но в значительной степени это также связано с тем, насколько оно красиво выглядит.
После завершения сканирования накопителя DaisyDisk отображает файлы и папки в виде визуальной интерактивной карты. На ней можно обнаружить большой файл, просмотреть его содержимое, а затем удалить, если он вам не нужен. Все это можно сделать, не покидая DaisyDisk.
DaisyDisk стоит 9,99 долларов в Mac App Store, но также доступна бесплатная пробная версия.
2. CleanMyMac X
CleanMyMac X делает гораздо больше, чем просто управляет дисковым пространством.
В дополнение к инструментам для очистки дискового пространства, CleanMyMac X включает средства для высвобождения оперативной памяти, управления элементами входа и обслуживания системы. Это не значит, что он не так хорош в анализе дискового пространства.
Запустите приложение, и, как и другие приложения из этого списка, оно начнется с анализа диска. Тогда он может сделать гораздо больше, чем показать вам файлы, которые вы можете удалить. Приложение может автоматически удалять устаревшие кэши, сломанные загрузки, журналы и другие файлы, которые вы не используете.
CleanMyMac X также имеет встроенный деинсталлятор, который может помочь вам удалить приложения вместе с различными файлами, которые они обычно оставляют в вашей системе после удаления. Вы можете попробовать CleanMyMac X с бесплатной пробной версией, но лицензия на приложение обойдется вам в 34,95$.
3. OmniDiskSweeper
OmniGroup известна своим программным обеспечением, таким как OmniFocus, OmniOutliner и OmniPlan. Все эти приложения большие, сложные и довольно дорогостоящие. OmniDiskSweeper, в отличии от них, не только прост, но и бесплатен.
Откройте OmniDiskSweeper, и он просканирует диск. Затем вы увидите простой и легко сканируемый список, в котором отображаются файлы от самых больших до самых маленьких. Это позволит вам быстро получить представление о том, что занимает больше всего места на вашем Mac.
Как и в случае с DaisyDisk, вы можете легко открывать или перемещать файлы в корзину прямо из OmniDiskSweeper.
Заключение
Если вы не уверены, какой из них лучше для вас, есть простое решение: Начните с бесплатных опций и двигайтесь дальше. Попробуйте сначала использовать инструменты, встроенные в MacOS, а если это не работает, попробуйте OmniDiskSweeper. Если эти опции не помогают, обратитесь к DaisyDisk или CleanMyMac X.
Спасибо, что читаете! Подписывайтесь на мои каналы в Telegram, Яндекс.Мессенджере и Яндекс.Дзен. Только там последние обновления блога и новости мира информационных технологий.
Респект за пост! Спасибо за работу!
Хотите больше постов? Узнавать новости технологий? Читать обзоры на гаджеты? Для всего этого, а также для продвижения сайта, покупки нового дизайна и оплаты хостинга, мне необходима помощь от вас, преданные и благодарные читатели. Подробнее о донатах читайте на специальной странице.
Заранее спасибо! Все собранные средства будут пущены на развитие сайта. Поддержка проекта является подарком владельцу сайта.
Источник
6 приложений для проверки состояния жесткого диска (или SSD) Mac
Жесткие диски выходят из строя, и в конечном итоге это произойдет. Неважно, оснащен ли ваш Mac вращающимся жестким диском (HDD) или твердотельным накопителем (SSD). Данные показывают, что 22% жестких дисков выходят из строя в течение первых четырех лет.
Что мы можем сделать, чтобы продлить срок службы жесткого диска? Много. Но вы никогда не знаете, когда ваш Mac-диск выйдет из строя или выйдет из строя … и если это произойдет, это катастрофа для всех файлов, которые вы сохранили на этом диске.
Итак, что может вы делаете, чтобы предотвратить это?
Две вещи!
№1: проверьте состояние диска и №2: сделайте резервную копию данные на регулярной основе. Это может показаться простым, но для правильного выполнения двух небольших задач требуется время.
Для резервного копирования данных мы рекомендуем Time Machine (встроенное приложение уже существует на вашем Mac), и если вы Можно использовать программу клонирования дисков Mac в качестве вторичного решения для резервного копирования. Обычно это необязательно, но мы рекомендуем сделать это на всякий случай.
Сегодня мы собираемся показать вам шесть отличных инструментов для проверки состояния жесткого диска Mac, от теста скорости до проверки диска/ мониторинг/ремонт, проверка сбойных секторов, мы покрываем их все.
Добрый совет: мы понимаем, что ваше время дорого и маловероятно, что вы сможете установить все 6 приложений, которые мы рекомендуем ниже. Итак, мы добавили пометку «Лучшее для» под каждое приложение, надеюсь, это поможет подобрать для вас подходящее приложение.
1. Дисковая утилита
Первое, что вы можете сделать, это проверить SMART Статус с помощью встроенной Дисковой утилиты в macOS. SMART (технология самоконтроля, анализа и отчетности) — это внутренняя система мониторинга, которая включена почти во все жесткие диски Mac (жесткие диски и твердотельные накопители).
SMART помогает получить общее представление о состоянии ваш Mac-диск. Как определить? Просто откройте Дисковую утилиту. Выделите имя жесткого диска слева, затем проверьте статус в таблице (см. Выше). Если отображается «Проверено», это означает, что ваш жесткий диск исправен. В противном случае вам может потребоваться его немедленная замена. Если ваш бюджет позволяет, подумайте о переходе на твердотельный накопитель.
Затем проверьте наличие ошибок на диске с помощью первой помощи. Если на вашем Mac установлена OS X El Capitan, macOS Sierra или последняя версия High Sierra, выберите Macintosh HD слева и нажмите «Первая помощь». Появится новое окно с вопросом, хотите ли вы запустить, просто нажмите «Да», чтобы продолжить.
Примечание. Для OS X Yosemite или более старых версий используйте две кнопки. в правом углу вместо «Проверить диск» и «Восстановить диск».
2. CleanMyMac
CleanMyMac в основном используется чтобы освободить место на вашем почти заполненном жестком диске (или SSD). Приложение глубоко сканирует и очищает вашу систему Mac и может освободить тонны дискового пространства. Чтобы проверить загрузочный диск вашего Mac, все, что вам нужно сделать, это открыть приложение, перейти в Обслуживание> Проверить загрузочный диск и нажать «Выполнить».
Кроме того, вы можете использовать CleanMyMac для выполнения ряда других задач, таких как поиск старых и больших файлов, удаление ненужных файлов из фотографий/iTunes, удаление расширений, удаление приложений Mac в пакетном режиме и т. д.
Плохие секторы — это блоки, которые повреждены, поэтому не могут быть прочитаны. Просто откройте приложение, перейдите в раздел «Drive Monitor» и нажмите кнопку «Продолжить», чтобы просканировать диск. Если выясняется, что количество поврежденных секторов увеличивается, вероятно, пришло время заменить диск Mac в случае случайного повреждения или сбоя. Обратите внимание, что приложение в настоящее время не работает с компьютерами Mac с флэш-памятью (например, SSD).
4. Blackmagic Disk Speed Test
Если вы чувствуете жесткий диск Mac (или твердотельный накопитель) реагирует медленно, рекомендуется проверить его скорость записи/чтения и выполнить эталонный тест в соответствии с отраслевым стандартом. Вам понравится это бесплатное приложение от Blackmagic. Это удивительное, но простое в использовании приложение, которое позволяет быстро протестировать и сертифицировать производительность вашего диска Mac.
После установки приложения на Mac откройте его и затем нажмите кнопку ПУСК расположен в центре. Скоро вы увидите цифры на двух кругах спидометра. Примечание. Лучше закрыть все другие активные приложения перед использованием Blackmagic Disk Speed Test, это поможет получить более точные данные.
5. Меню IStat
Меню iStat — расширенное Системный монитор Mac для строки меню macOS. Он может уведомлять вас о широком спектре событий, которые вас интересуют, например об использовании графического процессора, памяти, дисков, сети, датчиков, батареи, питания и т. Д.. Это очень удобно и удобно, и в этом случае вы можете положиться на инструменты мониторинга дисков для отслеживания состояния SMART на жестких дисках Mac или SSD.
Новое обновление: к сожалению, меню iStat не работают с компьютерами Mac с флэш-памятью (все модели, выпущенные в 2016 году или позже) в связи с тем, что Apple больше не позволяет сторонним программным средствам проверять статус SMART SSD.
6. CleanMyDrive
CleanMyDrive — еще одна полезная проверка состояния диска Mac. приложение, и это тоже совершенно бесплатно. Приложение больше похоже на облегченный диспетчер дисков как для внутреннего диска Macintosh, так и для внешних дисков.
Вы можете использовать его для проверки состояния жесткого диска, например визуальный вид того, как используется ваш диск, сколько существует ненужных файлов. Если CleanMyDrive обнаруживает скрытые ненужные файлы, вы можете использовать приложение для их автоматической очистки за несколько кликов. Примечание. Приложение прекрасно работает с USB-накопителями, картами памяти SD и т. Д.
Это все, чем мы хотели поделиться. Я надеюсь, что вы освоили некоторые из этих приложений, и удачи в поддержании вашего Mac-диска в хорошем состоянии.
Есть ли какой-нибудь инструмент, чтобы проверить, сколько ГБ записано на моем SSD?
Сама macOS может это показать. Перейдите к логотипу Apple> Об этом Mac> Хранилище, чтобы узнать.
Чтобы выбрать лучший SSD для моего iMac, мне нужно оценить, сколько я записываю на каждый диск. день. Есть ли способ это измерить?
Источник
Как проверить и исправить ошибки жесткого диска (HDD, SDD) на Mac
Ваш Mac не включается? Без паники! Не спешите бросать всё и нести любимый компьютер в ближайший сервис. Вполне возможно, что для «реанимации» хватит и встроенных средств macOS, воспользоваться которыми может каждый желающий.
Загрузка в Безопасном режиме (Safe Mode) на Mac
При активации Safe Mode macOS просканирует жесткий диск и исправит все ошибки, которые найдет.
«Безопасная» загрузка запускает только жизненно необходимые компоненты (т.е. только то, что необходимо для запуска компьютера). В результате не будут запущены сторонние расширения, элементы входа в систему (логины-пароли), а также будет очищен кэш в определенных разделах.
Чтобы запустить Mac в режиме Safe Mode, выключите его, затем включите и одновременно со стартовым звуком зажмите на клавиатуре клавишу ⇧Shift. Если ваш Mac завис при включении, сначала выключите его (для этого удерживайте физическую кнопку питания на корпусе или клавиатуре в течение 10 секунд).
Если Mac загрузил систему, перезагрузите его и включайте уже как обычно. Если же компьютер вновь завис, переведите его в Verbose Mode — для этого необходимо выключить Mac, включить его и после стартового сигнала одновременно нажать и удерживать ⌘Cmd + V. Так вы сможете узнать, какой именно системный компонент приводит к проблеме. Когда источник будет выявлен, можно перезагрузиться в Safe Mode (с зажатой клавишей ⇧Shift) и удалить проблемное расширение, после чего попробовать уже обычную перезагрузку.
Если безопасный режим не решил вашу проблему, переходим к следующей опции под названием Режим восстановления (Recovery Mode). Он «живёт» в отдельной части загрузочного диска и позволяет восстанавливать систему, получать доступ к Терминалу и возможность переустановить операционную систему вашего Mac — macOS.
Для перехода в Режим восстановления:
1. Выключите компьютер;
3. Сразу же после стартового сигнала нажмите и удерживайте сочетание клавиш ⌘Cmd + R.
Если перейти в Recovery Mode не удается (при проблемах с диском такое бывает), можно запустить режим восстановления через интернет. Сочетание клавиш будет уже несколько другим — ⌘Cmd + ⌥Option (Alt) + R. Этот способ требует интернет-подключения и займет гораздо больше времени, т.к. macOS будет загружать из Сети образ системы весом в несколько гигабайт.
Если загрузка в Режим восстановления прошла успешно, вы увидите несколько вариантов действий. Запустите Дисковую утилиту и найдите загрузочный диск, который является источником проблем — скорее всего, он называется Macintosh HD. Выберите его в окне слева, а затем нажмите Первая помощь → Запустить.
Проверка fsck
File system consistency check (fsck, «проверка целостности файловой системы») — старый добрый Unix-инструмент для проверки и решения проблем с дисками.
В зависимости от объема жесткого диска, его типа и серьезности проблемы fsck-проверка может занять довольно много времени. Просто наберитесь терпения.
Для запуска fsck необходим переход в однопользовательский режим (Single User Mode). Он позволяет вносить изменения в общие пользовательские ресурсы на компьютере. Single User Mode не запускает macOS; он просто дает доступ к командной строке Unix.
Для перехода в Single User Mode:
3. Сразу после стартового сигнала нажмите и удерживайте сочетание клавиш ⌘Cmd + S.
Примечание: если ваш диск зашифрован, выберите подходящий пользовательский аккаунт и введите пароль для дешифровки. Если у вас установлен пароль на прошивку Mac, запустить Single User Mode не получится.
Важно дождаться окончания fsck-проверки — если процесс будет прерван, возможна потеря данных. После окончания проверки вы увидите одно из следующих сообщений:
** The volume Macintosh HD could not be repaired.
*****The volume was modified *****
** The volume Macintosh HD was repaired successfully.
*****The volume was modified *****
Уже намного лучше… но расслабляться рано. Опять-таки, запустите проверку еще раз.
** The volume Macintosh HD appears to be OK.
А вот это — то, что нам нужно. fsck проверила весь диск и не нашла ничего, что требовало бы исправлений.
Теперь из Single User Mode можно выходить. Команда для выхода: exit.
Apple Diagnostics
Если описанные выше способы вам не помогли, то проблема почти наверняка очень серьезная. А это значит, что пришло время воспользоваться Apple Diagnostics!
Это специальный тест для компьютеров Mac от компании-производителя. По его итогам вы получите код ошибки и сможете понять, что именно не так с вашим Mac.
Для запуска теста Apple Diagnostics:
1. Выключите ваш Mac;
2. Отключите от него все подключенные устройства, за исключение клавиатуры, мышки, монитора, Ethernet-кабеля (если есть) и кабеля питания. Иными словами, отключите флешки, внешние жесткие диски, принтеры, сканеры и т.п.
4. Сразу же после стартового сигнала нажмите и удерживайте на клавиатуре D.
5. Выберите свой язык
Как уже упоминалось выше, после прохождения теста вы получите в свое распоряжение код ошибки. Расшифровка кодов:
Как видим, проблемы делятся на две категории — те, которые легко устранит и рядовой пользователь (например, ошибки, связанные с USB), и те, с которыми надо сразу идти в сервис (к примеру, неполадки с видео- и аудиокартами, процессором, памятью и т.д.).
Восстановление файлов с поврежденного диска
Повреждение жесткого диска среди прочего означает и возможную потерю данных (или их части). Для того, чтобы избежать этого, попробуйте создать образ «сломавшегося» диска. Для этого потребуется внешний жесткий диск как минимум того же объема.
1. Подключите его к Mac, перезагрузите компьютер,
2. Войдите в Recovery Mode (⌘Cmd + R),
3. Запустите Дисковую утилиту,
4. В строке меню вверху выберите Файл → Новый образ → Образ «Macintosh HD» и запустите процесс. На создание образа уйдет какое-то время, но в конце вы получите копию старого диска в формате DMG и сможете его смонтировать уже в новой системе.
Не забудьте сменить [username] на свое имя пользователя в системе.
Давайте разберем команду: cp — это команда на копирование, —r означает, что эта команда выполняется рекурсивно, т.е. сначала копируются директории внутри указанной вами директории, а затем директории, которые входят в их состав, и так далее.
Первый путь — это указание на местонахождение файлов, которые вы хотите скопировать. Второй путь указывает местоположение внешнего накопителя, он всегда будет в /Volumes/, какое бы название вы ему ни дали.
Единственная сложность этого способа — вы должны вспомнить, где именно находились ваши файлы, и соответствующим образом прописать путь. Также вам остается только надеяться на то, что файлы не находятся на поврежденной части диска.
Когда копирование данных будет завершено, вы можете с чистой совестью отдать Mac в ремонт или переустановить macOS.
… Именно в такие моменты люди начинают понимать важность резервного копирования данных. И действительно — при настроенном копировании Time Machine проблемы с потерей данных не страшны. Настройте копирование данных прямо сейчас — и сэкономьте себе много времени, нервов и денег в будущем!
Источник
Как проверить HDD, SSD диск, флешку на ошибки
Программы стали зависать, многие файлы перестали открываться либо стали долго копироваться, а система постоянно оповещает об ошибках в работе жесткого диска? Из-за программных сбоев, внешних повреждений либо из-за износа, с жестким диском могут возникнуть неполадки. Самые распространенные среди них – это ошибки файловой системы и образование битых секторов.
Чтобы проверить диск на наличие ошибок и попытаться их исправить в ОС Windows и MacOS присутствуют специальные утилиты. Также можно воспользоваться и специальными программами, которые производят более качественный и полноценный анализ дисков.
Пара слов о проблеме
Раньше самой распространённой файловой системой для жестких дисков была FAT16 и FAT32. Когда случаются сбои в операционной системе, то диск может полностью перестать видеться, или пропадают файлы и целые папки, при этом многие операции чтения и записи заканчиваются с ошибкой.
Проверка диска на ошибки помогает восстановить утерянные данные, которые сохраняются в корневой директории в папках с именами « FOUND.000 «, « FOUND.001 » и т.д. Имена восстановленных файлов могут быть не оригинальными, а просто « file0000.chk «. С распространением файловой системы NTFS для Windows NT/2000/XP/7/8/10 проблема с ошибками почти пропала, но не исчезла. Но FAT32 по-прежнему используют для форматирования флешек.
Сбойные сектора, они же «bad blocks» появляются в случае износа жёсткого диска, и в этом случае файлы портятся навсегда. Проверка и исправление плохих секторов помогает лишь обнаружить их и пометить, чтобы они не использовались для записи новых данных. Сбойные сектора могут читаться, но с большими задержками. В этом случае система начинает беспорядочно тормозить и подвисать, при этом память ОЗУ и процессор CPU ничем не заняты.
Если начинают появляться плохие блоки, то такой диск лучше поменять. И если плохие блоки встречаются в основном на жёстких дисках (HDD), то SSD-диски подвержены ошибкам файловой системы точно также, как и HDD.
Встроенные системные утилиты
При помощи стандартных системных программ можно осуществлять тестирование твердотельных накопителей (SSD), жестких дисков (HDD), внешних дисков и флешек.
Windows все версии
По умолчанию отмечена первая галочка «Автоматически исправлять системные ошибки» — это проверка файловой системы и занимает немного времени. В зависимости от количества файлов на диске, проверка отнимет от нескольких секунд до нескольких минут времени.
Для проверки всей поверхности HDD на битые сектора поставьте галочку «Проверять и восстанавливать повреждённые сектора«. Полная проверка занимает от получаса до нескольких часов времени.
Также, есть утилита Check Disk для проверки из командной строки:
На некоторых устройствах инструменты для диагностики винчестера находятся в BIOS. Например, на ноутбуках марки “HP” присутствует опция автоматической проверки системного диска, активация которой возможна даже в том случае, если диск не загружает Windows.
MacOS
Системная утилита произведет поиск ошибок и попытается их устранить.
Специальные сторонние программы
Иногда системные утилиты могут пропускать некоторые ошибки сбойных секторов, поэтому можно воспользоваться сторонними программами. Изготовители винчестеров предлагают персональные бесплатные программы, предназначенные для более полноценной проверки. Одними из таких, например, являются “SeaTools” для жестких дисков марки Seagate или “Data Lifeguard Diagnostic” для марки Western Digital.
Подобные программы отличаются простотой в использовании и содержат русскоязычный интерфейс. Нужную программу для конкретной марки винчестера можно отыскать на сайте его производителя. Также можно воспользоваться и платными утилитами, которых в интернете очень много. Среди таких самыми популярными являются: HDDScan, HDD Regenerator, MHDD, Victoria HDD и др.
Источник
Как проверить состояние жёсткого диска или SSD Mac с помощью статуса SMART
Пользователи Mac могут легко проверить состояние жёсткого диска с помощью функции SMART в Дисковой утилите Mac OS.
Сегодня мы расскажем, как проверить статус SMART жёсткого диска или SSD Mac OS. Таким образом можно легко узнать, в каком состоянии жёсткий диск, и нуждается ли он в замене.
SMART (Self Monitoring Analysis and Reporting Technology System) – это механизм для проверки состояния жёсткого диска, с помощью которого можно проверить наличие каких-либо системных проблем. Делать это очень важно, поскольку проблемы с жёстким диском довольно распространённые и возникают у многих пользователей.
Как проверить состояние жёсткого диска в Mac OS
Способ одинаковый во всех современных версиях MacOS.
Если статус SMART отображает ошибку, значит с жёстким диском серьёзная проблема, которая может привести к потере данных.
Рекомендуем регулярно сохранять копию данных через Time Machine или другим способом, а также следить за состоянием жёсткого диска описанным выше способом.
Статус SMART в порядке, но проблемы с диском есть
Если у вас возникают какие-либо проблемы с жёстким диском, но статус SMART указан как «Проверен», можно ввести устройство в режим восстановления и выяснить, в чём заключается проблема.
Жёсткий диск вообще не отображается в Дисковой утилите
Если ваш жёсткий диск вообще не отображается в Дисковой утилите, то он либо уже в неисправном состоянии, либо периодически перестаёт работать и скоро перестанет работать совсем. Также есть вероятность, что диск не подключен физически, что возможно при повреждении устройства.
Также учтите, что не все жёсткие диски поддерживают статус SMART, и в таком случае вы не сможете узнать, в каком они состоянии.
У самих дисков зачастую названия соответствуют производителю. К примеру, если «APPLE SSD SM0512G Media» — название жёсткого диска, то «Macintosh HD» — только его раздел. Нужно выбирать в списке именно сам диск.
Самый простой способ сохранить копию жёсткого диска – через Time Machine. Если с диском какие-то проблемы, нужно срочно сохранить все данные, которые на нём хранятся, иначе вы можете их потерять. Если проблема заключается в самом жёстком диске, его нужно будет заменить.
Если вы хотите узнать более подробную информацию о состоянии SSD-диска M1 Mac, вам понадобится инструмент Smartmontools.
Шаг 2: Установите Homebrew на Mac. Откройте Терминал и используйте следующую команду:
Если Xcode ещё не установлен на ваш Mac, Терминал попросит это сделать. Просто нажмите Enter, чтобы установить Xcode и Homebrew. На этот процесс может уйти некоторое время.
Шаг 3: Теперь нужно установить Smartmontools на Mac. Для этого используйте данную команду:
Во время установки понадобится ввести пароль от Mac.
Шаг 4: Когда инструмент smartmontools установится, он автоматически просканирует «/disk0» SSD на вашем Mac и отобразит информацию о состоянии жёсткого диска.
Более подробная информация с помощью Smartmontools
Чтобы ещё раз вручную с помощью smartmontools проверить состояние своего SSD на Mac, делайте следующее:
Шаг 1: Запустите Дисковую утилиту. В меню слева нажмите на жёсткий диск правой кнопкой мыши и выберите Свойства.
Шаг 2: В правом нижнем углу найдите текст, который отображается в пункте «Устройство». Он вам понадобится.
Шаг 3: Откройте Терминал и используйте команду ниже. Используйте то название, которое вы узнали только что. К примеру, у нас это «disk0».
Вы увидите детали о состоянии жёсткого диска. Важно понимать эти детали. Главные – Available Spare Threshold и Percentage Used. В идеале, если у вас M1 Mac, эти показатели должны быть 0% или 1%.
Если показатели выше, вам стоит подождать выхода обновления, которое может содержать решение проблемы. Возможно, версия macOS 11.3 Big Sur поможет.
Таким же образом можно посмотреть данные о состоянии SSD Intel Mac. Если у вас относительно старый Mac, то показатель «Percentage Used» может достигать 5-30%.
Если показатель ещё выше, то стоит сохранить копию своих данных, поскольку состояние SSD влияет на длительность работы компьютера. Кстати, таким же способом вы можете проверить состояние внешних жёстких дисков.
Источник
Did you format your USB using the ExFAT file system? That isn’t an issue as multiple users opt for the ExFAT filing system. However, when Mac stops recognizing the ExFAT drive, that is when problems arise. It is natural to think about the essential data you have on the drive and the scenario of potential data loss.
Tensions arise when you come across a situation where irreplaceable data loss is a possibility. It is unfathomable to lose critical data. In this article, we will discuss what ExFAT USB is, why Mac doesn’t recognize it, and potential solutions. Keep reading!
*** 79% of Mac users are interested in ExFAT vs. Mac OS Extended
What Is Exactly ExFAT USB?
ExFAT stands for «Extended File Allocation Table». It is a file system specifically designed for SD cards, USB flash drives, etc. Microsoft introduced the ExFAT filing system in 2006.
ExFAT is the successor of the FAT32 filing system. The optimization of ExFAT is mainly for flash drives. Numerous features make ExFAT the perfect file system for flash drives, such as USBs.
For starters, ExFAT is an exceptionally lightweight system that doesn’t need many hardware resources for its maintenance. It is compatible with different operating systems and devices. With this file system, you can get partition support of up to 128 pebibytes. It also supports a large file size limit (the same as the partition limit).
The compatibility of the ExFAT file system with Mac and Windows makes it even more appealing. That makes transferring data between the different operations systems and devices more accessible. That is why using ExFAT to format the USB is an excellent idea.
Why My ExFAT USB Is Not Detected on Mac?
Various reasons explain why the ExFAT USB is not detected on Mac. Here are some of these causes listed. Take a look.
- Corruption issues: In some cases, the ExFAT USB might not mount on the Mac operating system due to corruption. That prevents mounting. You will need to rebuild the directory or run the repair on the USB.
- Missing driver software: Another reason could be the lack of essential driver software for reading the ExFAT USB.
- Faulty cable: Sometimes, the USB cable might be facing some issues. In that case, the best solution is to try with a different cable.
- Plugging issues: When you plug in the USB drive, it is vital to ensure that the plugging is snug. Lack of power supply can cause problems in mounting the drive.
- Operating system concern: In some situations, the operating system and the USB might not be compatible. It will lead to the failure of the system to recognize the drive.
![]()
Solved: USB Flash Drive Not Showing Up on Mac
The reasons behind the problem of a USB device not showing up are various, including the USB port is not working, USB drive corruption, virus infection, macOS faulty, etc. So, to figure out the effective solutions for your own case, you need to…
5 Methods to get your ExFAT USB recognized by Mac
Did you check the power supply? Is the USB properly plugged into the system? Despite checking these pointers, you need to opt for other solutions if you still have trouble.
Fortunately, there are numerous solutions that you can use to solve the problem of your ExFAT USB not getting recognized by Mac. Take a look at the different methods listed below.
- Method 1. Turn Mac Off and On Again
- Method 2. Check Finder Preferences
- Method 3. Update Your Mac’s OS and Firmware
- Method 4. Use First Aid to Repair the USB Corruption Error
- Method 5. Change System Configuration
Method 1. Turn Mac Off and On Again
You might be surprised, but the simple method of turning off and on the system can resolve the issue. It won’t take much time and can be done easily. Here are the steps.
Step 1. Go to the Apple icon present on the corner of the screen and press the Restart option.
Step 2. Make sure to uncheck the Reopen windows option while logging in again. Then select the «Restart» option again.
Now, the Mac will restart. You need to wait. After the system starts, try using the USB flash drive once again. If this doesn’t work, move on to the other methods.
Method 2. Check Finder Preferences
A Finder is an excellent tool that Mac users can use to check if a particular drive can be mounted on the system. Here are the steps.
Step 1. Launch Finder. Select the «Finder» menu at the top of the screen. Go to «Preferences».
Step 2. Click on the «General» tab. Tick the options «External disks».
Step 3. Now, select the «Sidebar» tab. Here also, you need to tick the «External disks» option.
Step 4. Close the window. Plug the USB and see the shows on the Mac screen.
Method 3. Update Your Mac’s OS and Firmware
One of the easiest ways to open USB drives on the Mac is to check out updates.
Take a look:
Step 1. Go to the «Apple» icon on the screen and click the System Preferences option. Then go to «Software Update».
If you find any update, click on it immediately.
Note: You can also checkmark the box saying «Automatically keep my Mac up to date». That way, you don’t have to look out for updates constantly. Keep in mind that updating OS and firmware is a smart idea. It improves the performance of the system.
Method 4. Use First Aid to Repair the USB Corruption Error
Another exceptional repair feature that Mac has is the First Aid. It is an excellent storage device repair tool. It is accessible from the Disk Utility option. You can follow the steps listed below.
Step 1. Click anywhere on the desktop until you see the «Finder» menu on the top.
Step 2. Click on the «Go» option and select «Applications» from the drop-down menu.
Step 3. Click on the «Utilities» folder option and open «Disk Utility».
Step 4. On the list of storage devices, choose your USB flash drive. Select the «First Aid» option in the toolbar.
Step 5. Choose the «Run» option. It will check the USB for errors. First Aid will assess the USB flash drive and repair the errors (if found).
Method 5. Change System Configuration
To resolve the USB drive issues, resetting the system configuration is an excellent idea. You need to reset or change two system components to fix the problem.
Resetting the SMC or System Management Controller
Step 1. Shut down the system and take out the power supply cord.
Step 2. Press the power button and hold it down for five seconds. Then reconnect the power supply.
Step 3. Turn on the system.
Resetting the PRAM/NVRAM (The Parameter RAM and the Non-volatile RAM has information related to the USB ports that you use on the Mac)
Step 1. Shut down the system and then press «Command», «Option», «P», and «R» keys together while restarting the Mac.
Step 2. Hold them down until there is a flash and sound. Wait for the chime.
Now, wait as the system boots.
The Ultimate Trick: Format Your ExFAT USB
Have you tried the methods mentioned earlier and still facing the same issue? In that case, the only approach is to format the ExFAT USB. However, it is necessary to understand that formatting the USB drive can be particularly dangerous. Here, the best option is to backup the essential data.
To backup data, mac users can opt for the Time Machine Backup. Alternatively, users can also choose third-party apps such as EaseUS Todo Backup for Mac.
However, in some cases, formatting the ExFAT USB can lead to data loss. The rising tension and panic that occurs due to data loss are natural. Here, the ideal solution is to use data recovery software. You can opt for the EaseUS Data Recovery Wizard for Mac.
The EaseUS Data Recovery Wizard for Mac is an excellent data recovery software. It aids in the retrieval of lost data due to various reasons. No matter the cause of the data loss, you can get it back. With the data recovery software, you can get back photos, music files, videos, emails, documents, etc.
If you are worried about the size of the deleted file, you can relax. EaseUS Data Recovery Wizard for Mac helps you regardless of the cause of the data loss or the size of the file. It has a wide array of features that make it the perfect choice for mac users.
Are you wondering how to use EaseUS Data Recovery Wizard for Mac? Take a look at these steps:
Step 1. Search for lost files
Correctly connect your external hard drive to your Mac. Launch EaseUS Data Recovery Wizard for Mac, and select the external hard drive. Then, click «Search for lost files» to find lost/deleted files on your external devices.
Step 2. Filter and find lost files
After the scan, all file types will be presented in the left panel. Select the file type to find wanted files on your external devices.
Step 3. Preview and recover
Click the file and preview it. Then, select the files you want to recover and click the «Recover» button. You can save your data to local and cloud drives.
5 Free Mac USB Repair Tools to Repair Corrupted Flash Drive
Background
Flash drives are widely used in daily life for work and entertainment, due to the life span of flash drives or possible errors and damages on flash drive, you may wonder how to repair damaged flash drive on MAC if they are unreadable, flash drive not showing up, flash drive has bad blocks, flash drive is not working…
Macbook and MacPro are welcomed by many users due to its fancy design and there are awckward moment that some users may only have Mac with no Windows computer, so usb drive repair tool for mac is required when their flash drives become corrupted.
In this article, we will share some useful free methods and free usb repair tools for MAC including some paid tools too since mac utilities are limited compared with Windows usb repair tools to fix damaged pen drive especial when you want to
- Repair unreadable pen drive on MAC
- Fix a corrupted flash drive without losing data mac or recover corrupted files from flash drive on mac
- Fix damaged usb drive on mac without formatting
- Repair corrupted flash drive with mac terminal
![]() Lucky if you have a Windows computer: 8 free usb repair tools for Windows 11/10/8/7
Lucky if you have a Windows computer: 8 free usb repair tools for Windows 11/10/8/7
Tool 1 — Recover corrupted files from flash drive on MAC with freeware
Lazesoft Mac Data Recovery would be a nice choice for recovering files from damaged flash drive on mac since it is a free program that won’t ask a pay.
Step 1, Download Lazesoft Mac Data Recovery to MAC machine, connect your flash drive to your macbook or mac pro, and then run this free mac flash drive recovery tool to scan your flash drive.
Step 2, Save data
Video — How to recover files with Lazesoft Mac Data Recovery
![]() Also read: 5 free data recovery software for mac
Also read: 5 free data recovery software for mac
Tool 2 — Repairing Corrupted Flash Drive on Mac with Disk Utility without formatting
Disk Utility provides First Aid in the first tab in its main interface to provide storage device repairing that you may get access by the following route to start damaged disk or unreadable disk repairing. Here are the steps to launch Disk Utility in Mac
Video Guide — How to repair a mac disk or usb
Step 1 — Reboot your MAC and press Command + R during the reboot and get into mac recovery mode
Step 2 — Click Disk Utility
Step 3 — Select your flash drive on the left panel of disk utility -> First Aid -> Repair Disk and run it.
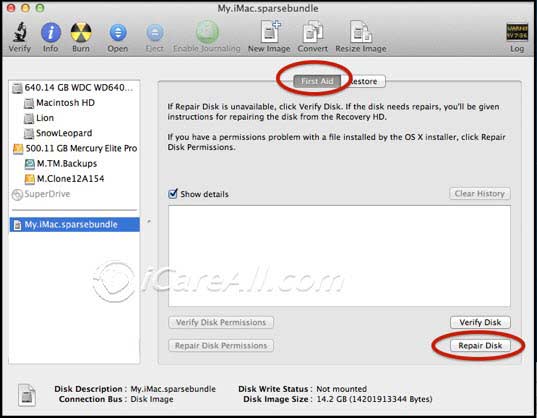 Repair usb mac with first aid without formatting disk
If the first aid does not work for your damaged flash drive, here is another option that you may use its ‘Erase’ to get usb drive repaired.
The formatting could easily fix various kinds of damages on flash drive especially when the flash drive has logical damages with MAC built-in repair utility — Disk Utility that you may get your damaged pen drive formatted and mostly it would work.
Note: Erase in disk utility is formatting! And erasing/formatting would get your data deleted so that we recommend the first mac data recovery tool as tool 1 to get your data restored before all this.
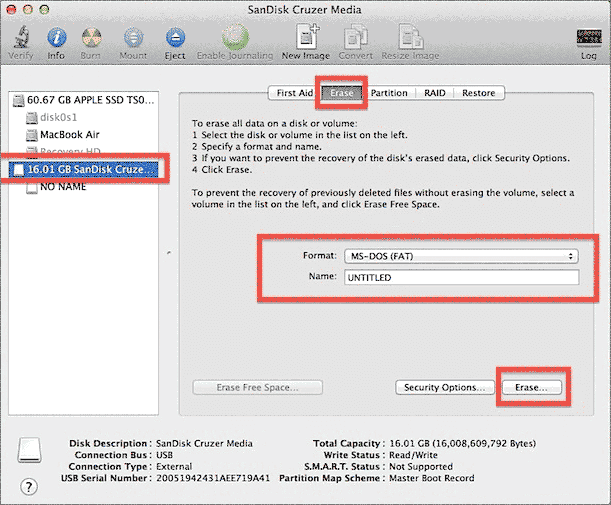 Erase pen drive as repair utility in MAC
Also read: 7 usb formatters in mac
Tool 3 — Repair damaged usb or disk with WD Drive Utilities
A tool that you may use it to diagnose errors and then fix damaged usb flash with erase too.
Download url
https://downloads.wdc.com/wdapp/WD_Utilities_Standalone_Installer_Mac_2_1_1_119.zip
 WD Drive Utilities formerly WD Quick Formatter
Can you repair usb drive on mac without formatting
Yes, you may try to repair damaged flash drive by disk utility with its first aid function to get damaged flash drive repaired without formatting.
If Disk Utility first aid failed to repair your flash drive on Mac and you don’t want to format the flash drive, then you may try to repair flash drive on Windows since Windows has a lot of repair utilities for flash drives.
Also read: how to repair flash drive without formatting
How to repair flash drive with mac terminal command — Video Guide
Is there any mac terminal to fix damaged usb flash drive? You may use command line in mac terminal to fix damaged disk or flash drive by the following methods.
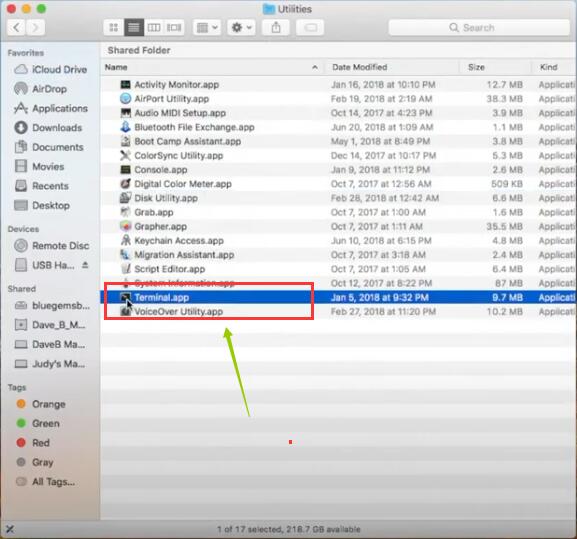 Start mac terminal
Way 1
- Step 1: Get your disk/usb flash connected to MAC
- Step 2: Start terminal in mac
- Step 3: Start disk utility
- Step 4: Type ‘diskutil list‘
- Step 5: Type ‘diskutil verifyDisk /dev/disk2‘ when disk2 is the one that you need to repair
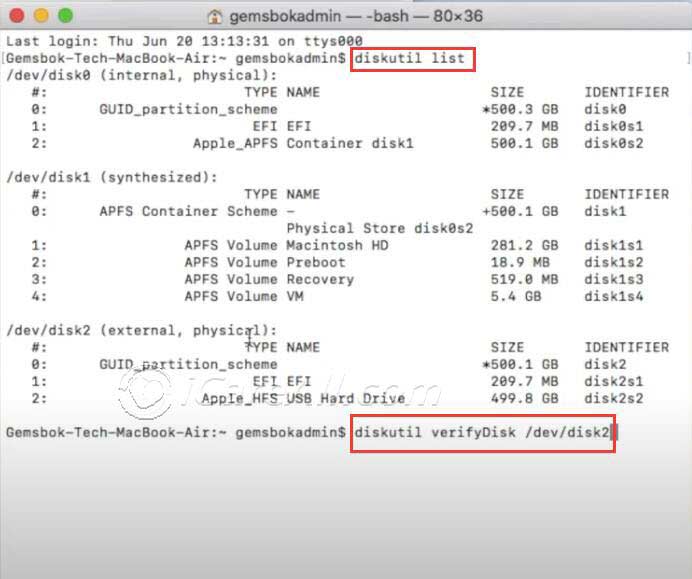 Repair usb drive mac command line
Way 2
- Step 1: Get your disk/usb flash connected to MAC
- Step 2: Start terminal in mac
- Step 3: Start disk utility
- Step 4: Type ‘diskutil list‘
- Step 5: Type ‘diskutil repairDisk /dev/disk2‘ when disk2 is the one that you need to repair
- Step 6: Type ‘Y’ to confirm the repairing disk on mac with terminal
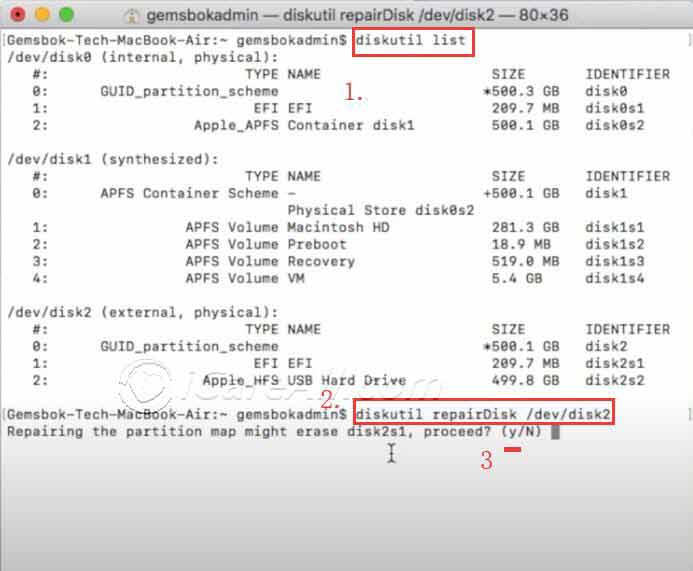 Repair usb drive mac command line
How to repair disk or usb flash not showing up error on MAC — 7 ways
Last updated on Sept 14, 2023
Related Articles
- 8 usb formatter software in Windows
- Sandisk repair software
- external hard disk no media found
- Repair sd card mac
File Recovery Free > Format Recovery Utility > Howto > Repair damaged usb drive mac
The use of SD cards has expanded dramatically in recent years. While they assist us in increasing the storage capacity of our smart devices or transferring data, they are also prone to many storage-related concerns. For example, faulty or bad sectors on SD cards might result in unintended data loss and other logical mistakes.
Don’t worry. We’ve created this extensive tutorial to assist you in repairing bad sectors on an SD card, detailing all possible options. This post is mainly for Mac users, so you can apply the methods below and try them on your macOS devices. Then, how do you repair and recover SD cards with bad sectors of Mac? First, check the signs and symptoms of an SD card that has bad sectors:
- You cannot read or write on an SD card.
- You can view the data, but your files are inaccessible.
- The SD card does not work or show up on the camera, smartphone, or computer.
- Windows cannot format the SD card.
- To access the SD memory card, the computer requests that it be formatted.
- The SD card displays empty or 0 bytes.

Everything About SD Cards and Bad Sectors
A typical SD card can hold up to 2 GB of data, whereas SDHC (High Capacity) cards can hold up to 32 GB of data. Furthermore, SDXC (Extended Capacity) cards may hold up to 2 TB of data.
Like other intelligent storage devices, SD cards now rely on flash memory to store data. Therefore, SD cards are built of specific memory chunks that you might name «sectors». While handling your SD cards, any sector may become damaged, rendering it inaccessible. This damaged or corrupt sector is sometimes called a «bad sector» in storage devices such as SD cards or hard drives.
It is unavoidable for any hard drive, including macOS built-in hard drive to acquire bad sectors, so it is critical to understand how to reduce the likelihood of producing bad sectors and preserve a hard drive’s health in everyday operation. If your SD card is already corrupted with bad sectors, you can use your Mac device to restore it and get your data back.
However, if your PC is Windows, you can read this article for your reference:
![]()

When should you draw attention to bad sectors? There is no need to be concerned if bad sectors are discovered because the operating system may bypass them and continue to run normally. However, if the bad sectors continue to develop and begin to freeze the operating system, it is time to take immediate corrective action.
How to Recover Data from SD Card with Bad Sectors on Mac
When your SD card becomes corrupted with bad sectors, the first step is to recover permanently deleted files on Mac. Data may be lost during the repair procedure, and thus it is essential to back up your files ahead of time. When bad sectors accumulate, the most direct consequence will strike force data sooner or later.
We also provide a video guide on how to recover data from an SD card on Mac, which introduces the top 5 Mac data recovery software, including EaseUS Data Recovery Wizard for Mac. Check out:
- 00:58 — Select the SD card and scan it
- 01:12 — Filter the results
- 01:20 — Preview the data
You may try the following 2 best Mac SD card file recovery solutions for help:
- Fix 1. Robust Data Recovery Software for Mac
- Fix 2. Professional Data Recovery Service
Fix 1. Robust Data Recovery Software for Mac
It’s time to start recovering data from bad sectors because no real-time backup is available. Because data on an external HDD with too many damaged sectors is usually unreachable, it cannot be opened typically. Fortunately, the files are still on the SD card. EaseUS Data Recovery Wizard for Mac can quickly recover data from an inaccessible HDD, USB flash drive, or SD card.
EaseUS Data Recovery Wizard
- Apply document recovery, email recovery, photos recovery, and another data recovery from the SD card with bad sectors.
- Mac hard drive recovery: You can recover data from a Mac hard drive to a PC, an external hard drive, or the original internal hard drive.
- Support data recovery for sudden deletion, formatting, SD card corruption, virus attack, and system crash under different situations.
To recover an SD card with bad sectors Mac, download EaseUS Data Recovery Wizard for Mac and follow these steps:
Step 1. Select the SD card
- Correctly connect your memory card to your Mac. Launch EaseUS Data Recovery Wizard for Mac.
- Go to «SD Card Recovery», find your Canon/Nikon/Go Pro/DJI/Sony SD card, and click «Search for lost files».
Note: Before data recovery, you’d better click «Disk Backup» from the left sidebar to create a backup of your SD card to avoid further data loss. After backing up the SD card, the software can recover data from your SD card backup, and you can remove the SD card and use it again.
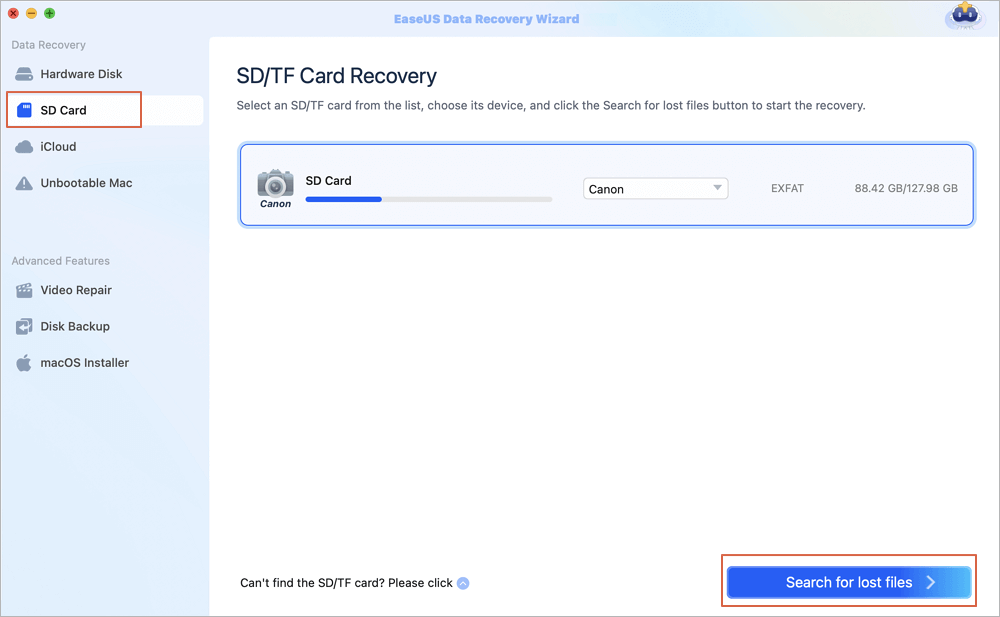
Step 2. Filter lost SD card data
After the scan, all files will be presented in the left panel in the scan results. Find wanted photos, videos, and other files.
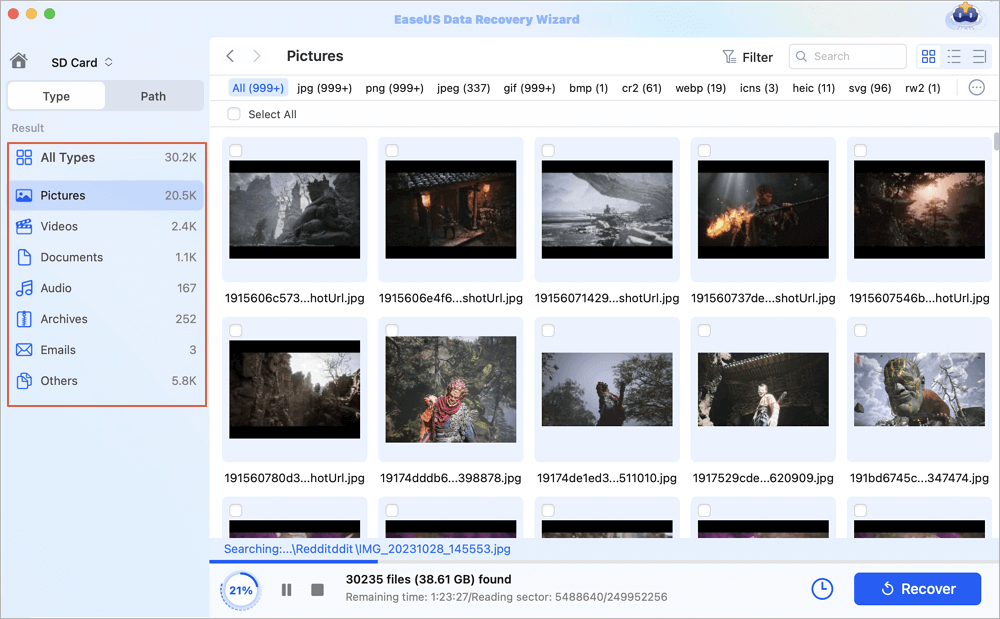
Step 3. Preview and recover data
Preview the SD card data and select the wanted files. Then, click the «Recover» button. Don’t save the recoverable files to the SD card itself in case of data overwriting.
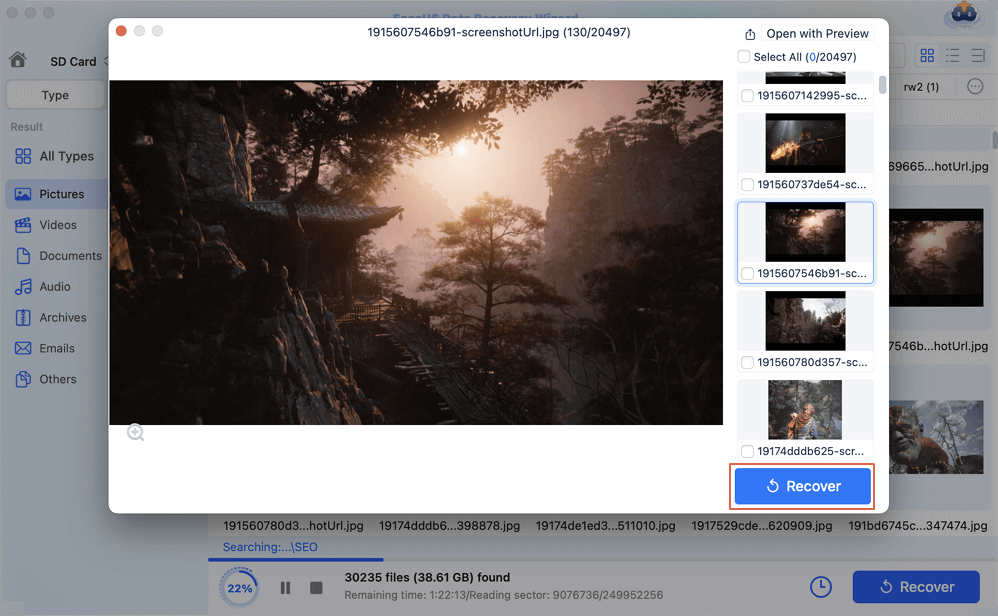
Fix 2. Professional Data Recovery Service
There may be occasions when the power and capability of commercially available data recovery software are insufficient to restore the data on a corrupted SD card. In these circumstances, you may need to enlist the assistance of a data recovery agency.
If you fail to scan and restore your data on an SD card by your manual operation on Mac with EaseUS or other SD card recovery software, don’t panic. You still have the option to try turning to a professional data recovery service.
Consult with EaseUS data recovery experts for one-on-one manual recovery service. We could offer the following services after a FREE diagnosis
- Repair corrupted RAID structure, unbootable Windows OS, and corrupted virtual disk file
- Recover/repair lost partition, re-partitioned drive, and corrupted SD card with bad sectors
- Unformat the hard drive and repair the RAW drive (Bitlocker encrypted drive)
- Fix disks that become GPT-protected partitions
How to Repair SD Card with Bad Sectors Without Losing Data on Mac
A bad sector is a logical harm to a storage device’s data or file system. The underlying physical data is often recovered using software or a data recovery service. We’ll show you how to make a corrupt SD card recovery on a Mac using one of these approaches.
- Solution 1. Insert the SD Card into Another Device
- Solution 2. Replace Failing SD Card via Disk Utility’s Restore
- Solution 3. Repair A Corrupt SD Card with First Aid
- Solution 4. Format Your SD Card on Mac
- Solution 5. Check the Card for Errors with the Terminal
Solution 1. Insert the SD Card into Another Device
Inserting an SD card incorrectly may prevent it from fully attaching to the port and cause it to seem corrupted. Due to driver-related or incompatibility issues, a device may fail to read or detect a secured SD card. In such instances, your only option is to connect your SD card to another device in Mac.
If another device recognizes the card without issue, that suggests the problem is not with your Mac system but with the card. What if another device does not admit the corrupted SD card? Then you can go to the following solutions.
Solution 2. Replace Failing SD Card via Disk Utility’s Restore
To avoid permanent data loss, try cloning the SD card and all contents to a new drive before it completely dies. The target hard drive should be the same size or more significant than the original external hard drive. To begin, connect both HDDs to your Mac.
Step 1. Go to the Applications — Utilities — Disk Utility menu.
Step 2. Select the new hard drive from the sidebar and click «Restore».
Step 3. Continue by selecting the Restore option and then the bad external hard drive.
Step 4. Select Restore.
Wait for Disk Utility to clone the disk. When finished, click Done.
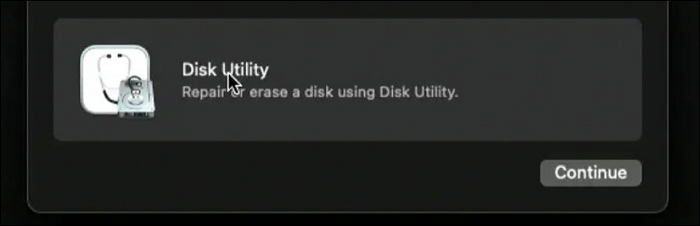
Solution 3. Repair A Corrupt SD Card with First-Aid
The good news is that Mac systems include an in-built Disk Utility program, which has a tool called First Aid. The feature can assist you in repairing any difficulties on the connected drives, including SD card recovery mac.
Once your SD card is linked to your Mac computer, proceed with the instructions below to repair a corrupt SD card with bad sectors:
Step 1. To begin, pick «Go» from the main «Finder» menu, followed by «Utilities».
Step 2. Double-tap or double-click on the «Disk Utility» icon to run the application.
Step 3. Select your SD card from the connected and recognized drives.
Step 4. Select the «First Aid» option from the top of your device’s screen, followed by the «Run» option.
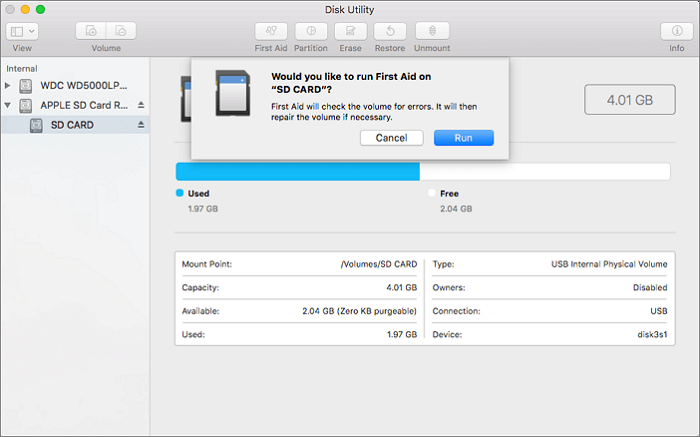
The application will begin the scanning process and attempt to resolve any issues that are discovered. Once you’ve completed the preceding procedures on your Mac, try using your SD card again to see whether the problem persists.
Solution 4. Format Your SD Card on Mac
One of the simplest ways to repair faulty sectors on an SD card is to format the SD card. The only problem is formatting your SD card will delete all the data. It would, however, resolve all difficulties connected to its corrupt storage, such as having a bad sector.
Step 1. Connect the corrupted SD card to your Mac and start «Disk Utility».
Step 2. Click the Erase button after selecting the «SD card» from the left panel.
Step 3. Name the SD card, select the format, and click «Erase» to confirm formatting.
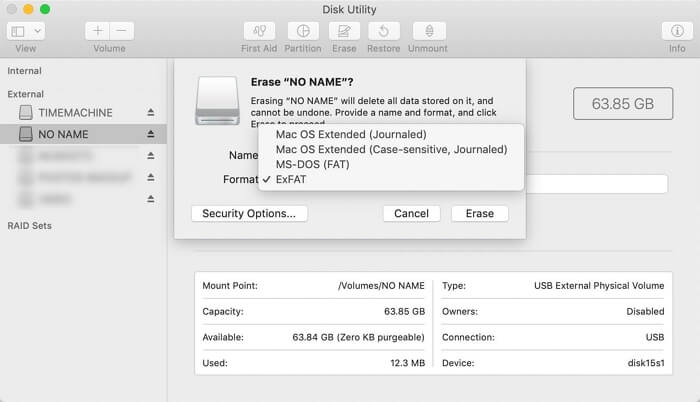
Solution 5. Check the Card for Errors with the Terminal
If your SD card still shows signs of corruption with bad sectors after running First-Aid, you can use Mac Terminal to look for faults. However, because it relies on command lines, this method is a little more involved, so proceed cautiously.
Here’s how to open Terminal on Mac to inspect and repair an SD card:
Step 1. To begin, launch the Mac terminal from the «Applications» — «Utilities» folder on your system
Step 2. Next, run the command: diskutil verify volume /Volumes/[SD card drive letter]/
Step 3. If you discover any problems, run the following command: diskutil repairvolume /Volumes/[SD card drive letter]/
Step 4. Select the «Repair Disk» option.
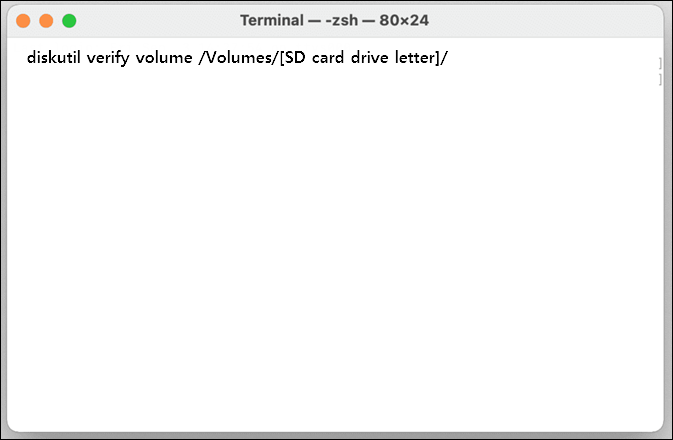
The Bottom Line
Dealing with a corrupted SD card with bad sectors can be highly stressful. Even if there isn’t much to be done to recover data from such a device, the procedures mentioned in this article should help.
You can recover data and repair the card with EaseUS data recovery software. It is still preferable to replace the SD card. The problem will likely resurface in such a case, and purchasing a new memory card can save you from unnecessary worry. To rescue the lost data in the old corrupted SD card, EaseUS is the best option for you.
Recover SD Card with Bad Sectors on Mac FAQs
After learning how to recover SD cards with bad sectors Mac in 5 ways, you may have more questions about it. See if you can find your answers here:
1. How do I fix bad sectors on my raw SD card?
You can fix bad sectors on the RAW or corrupted SD card in these ways:
- Use restore or First-Aid in Mac’s Disk Utility
- Format the corrupted SD card
- Use the terminal to repair the bad sectors on the SD card
To repair the RAW SD card and retrieve the lost data on the SD card with bad sectors, you can turn to EaseUS Data Recovery Wizard for Mac for help.
2. How to protect an SD Card from corruption?
Be cautious while sharing the card or using it on unfamiliar devices. You can easily pick up a virus that can corrupt your card and cause data loss. Use a reputable antivirus program on your Mac, and try to minimize the card’s exposure to machines that may not be as secure as yours.
Never just take an SD card out of your device or PC. Use the operating system to eject it cleanly to reduce the possibility of it becoming corrupted.
3. How do I fix a corrupted SD card on a Mac without formatting?
Attempt to repair a corrupted SD card with Disk Utility’s First Aid. We go through this strategy in depth early in the article. When all other alternatives have been exhausted, and your Mac behaves strangely, resetting the NVRAM and SMC may be worth a shot. These components frequently source software-related issues that can be remedied with a simple reset.
4. How do I know if Linux corrupts my SD card?
To accomplish this, use the command bad blocks with the arguments -n (to signal that the check is performed in read-write, non-destructive mode) and -v (verbose mode).
USB drives are great for providing additional storage for your Mac or MacBook. Many people use them to share music or photo libraries with friends. But like all disk-based storage devices, it can suffer data loss or corruption. You may need to fix a corrupted USB drive on Mac or fix a broken USB device while saving its data.

We are going to show you how to retrieve files from a corrupted USB drive with your Mac. We will also look at things like how to format a corrupted USB drive on a Mac. Let’s get started.
How do you know if your USB drive has been corrupted? Before looking at the signs that your USB drive is corrupted, let’s look at how to figure out if your USB port is broken on a MacBook or Mac computer.
If your computer has more than one USB port, your first course of action should be to connect a USB device that is having issues to a different port. If that is not an option, try connecting the device to another computer’s USB port. In this way, you can determine if the drive is fine but the interface is the problem.
There are multiple signs that you may have a bad drive that requires you to recover corrupted files from USB on your Mac. Here are some of the most common indicators of a corrupted USB drive.
- The USB drive is not recognized by the OS and does not appear in Finder.
- The drive is visible in Finder but you cannot see or access its files and folders.
- Files are arbitrarily renamed and cannot be opened.
- The drive appears grayed-out in Disk Utility.
- You encounter macOS error messages when attempting to access the drive.
If you are experiencing any of these issues, you may have a corrupted USB drive. Let’s look at how to recover USB files from a corrupted drive on a Mac and show you some methods that may get your data back.
❗️If you suspect your USB drive is corrupted, stop using it immediately. Any attempt to write new data to the drive can further corrupt its contents and make it impossible to recover files with data recovery software. Don’t use the device again until the issue has been fixed or the data has been recovered.
How to Recover a Corrupted USB on Mac with/without Data Loss
Multiple methods are available with which to attempt to recover corrupted files from a USB device on a Mac. Some involve destroying the data stored on the drive so it can be reused and others recover the data from the corrupted device.
Let’s investigate these methods and see if one of them can help you in getting data off a corrupted USB drive.
Solution 1: Fix a Corrupted USB on a Mac With Disk Utility
Disk Utility is an application that is installed with macOS. By default, it should be located in the Other folder in Launchpad. The following steps show you how to fix a corrupted USB flash drive on Mac with Disk Utility.
- Open Disk Utility and choose View > Show All Devices.
- Select the USB drive from the sidebar and click the First Aid button.

- Click Run in the First Aid dialog and follow the onscreen instructions.

- Click Done when the First Aid process finishes.
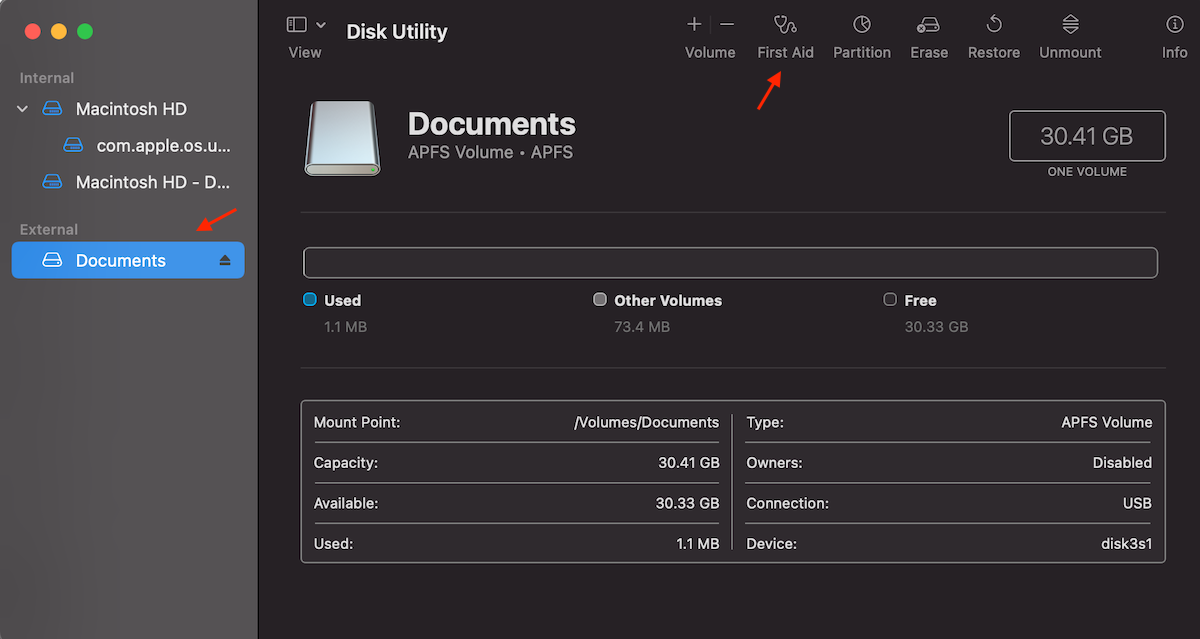
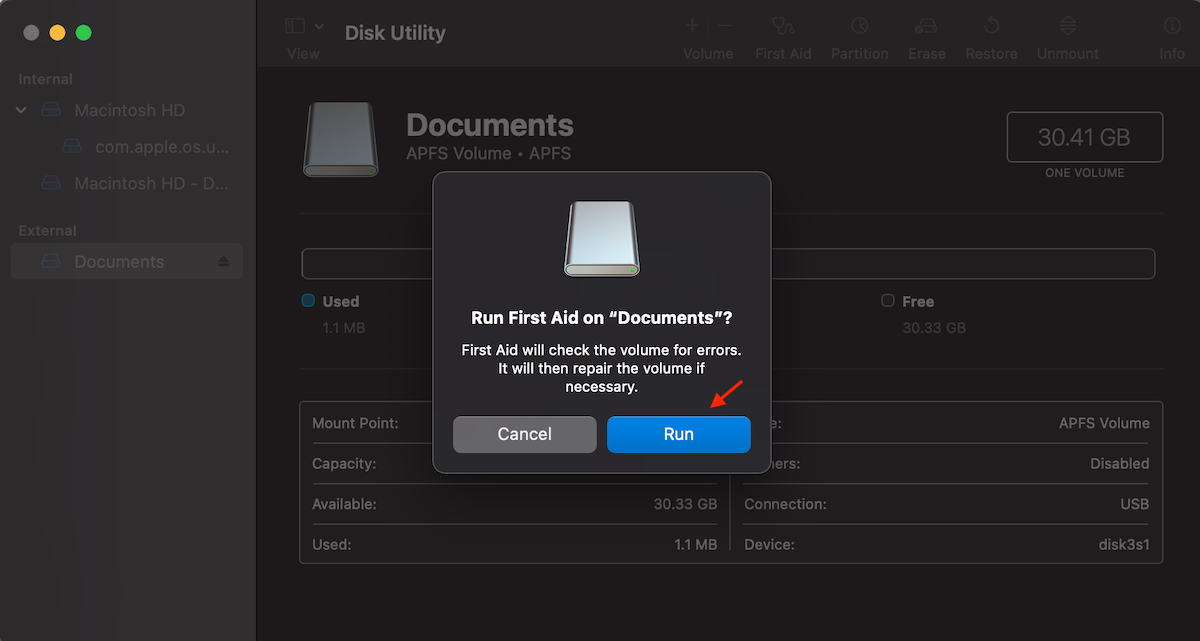
The USB drive should be recognizable by your Mac if Disk Utility is successful. You should be able to access the data on the drive at this point. If not, you may want to try data recovery software which is discussed in a later section of this article.
If Disk Utility is not successful in fixing the drive, proceed to the next method.
Solution 2. Repair the USB Drive With Terminal on Mac
You can also use Terminal to fix your corrupt USB drive. This method offers slightly more control over the whole process compared to when using Disk Utility for this job. But if you’re not comfortable with using Terminal commands, it’s best for you to choose the previous solution.
Before you start repairing your flash drive with this method, it is important to note that this process will erase all of the data from your device.
The following steps show you how to fix a corrupt USB drive on Mac via Terminal.
- Connect the USB drive to your Mac.
- Head to Launchpad and use the search field at the top to find the Terminal application. Once you’ve found the app, click it to open.
- In the window, type in diskutil list and hit Return. You’ll view a list of all of the internal and external disks connected to your Mac.

- Copy and paste diskutil verifyDisk /dev/disk2 (replace 2 with the corresponding disk number) to verify your flash drive. Hit Return.
- If you get an error saying GPT partitioning scheme is required, type in diskutil eraseDisk JHFS+ BackupMaster disk2 to format the drive and hit Return. Then repeat the previous command.

- Copy and paste diskutil repairDisk /dev/disk2 and hit Return to start the repair process.
- You’ll be warned that this action may erase your USB drive. Type y and hit Return to move forward.

- Once you see Finished partition map repair on disk2, you can quit Terminal and eject your flash drive.
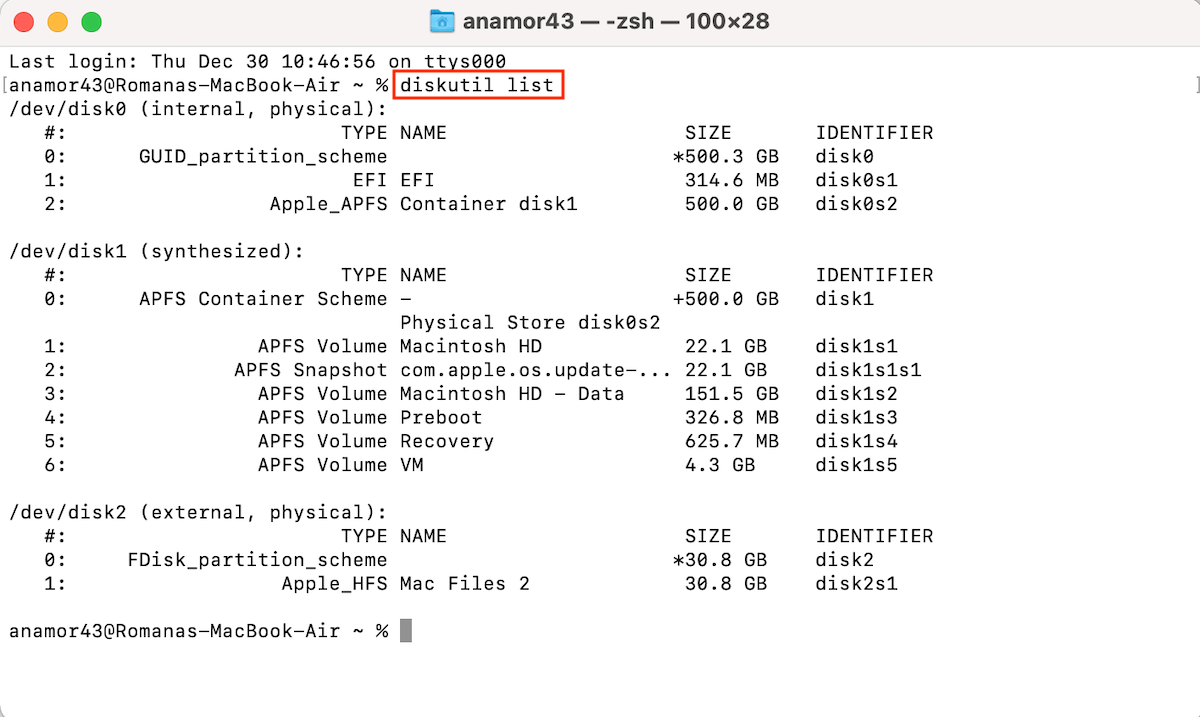
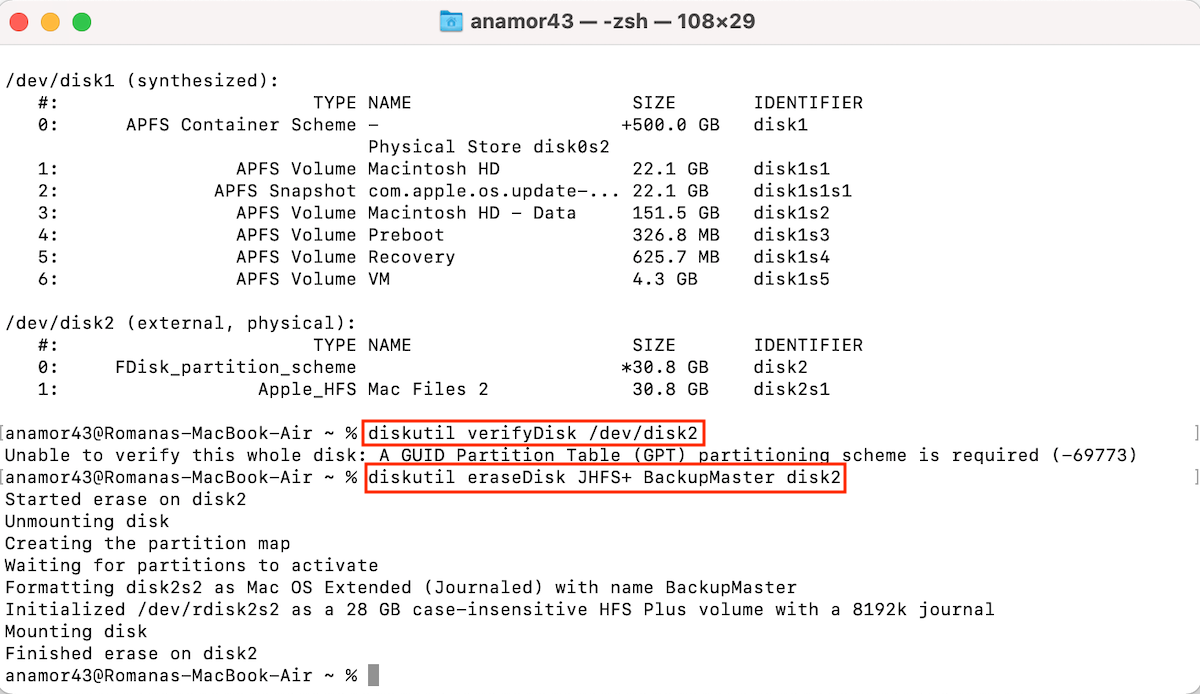

If Terminal didn’t fix the issue with your USB drive, you should give the next solution a try.
Solution 3: Update the USB Driver
The USB device driver is updated automatically through macOS software updates. Follow these steps to see if there are any updates currently available for your Mac and manually install them.
- Choose About This Mac from the Apple menu.
- Click on Software Update to check for updates.

- Click the Update Now button if updates are available. You can click on More info to see details about the update
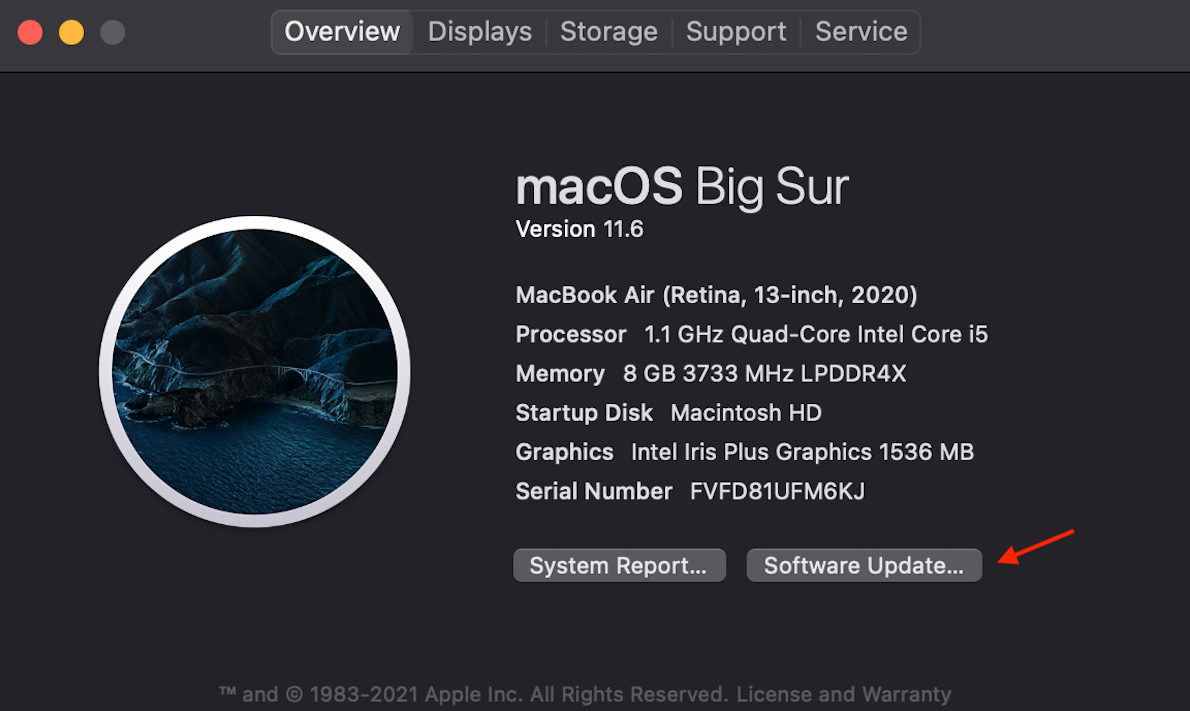
If there were any USB driver updates, they will now be installed. Try to access the USB drive again to see if the update resolved the problem.
Solution 4. Check If the USB Device Is Encrypted or Has No File System
Maybe there’s nothing wrong with your flash drive? There is a chance that you can’t access the files located on the device because it’s encrypted (password protected).
You won’t be able to access the data from an encrypted USB drive on Mac without knowing the password.
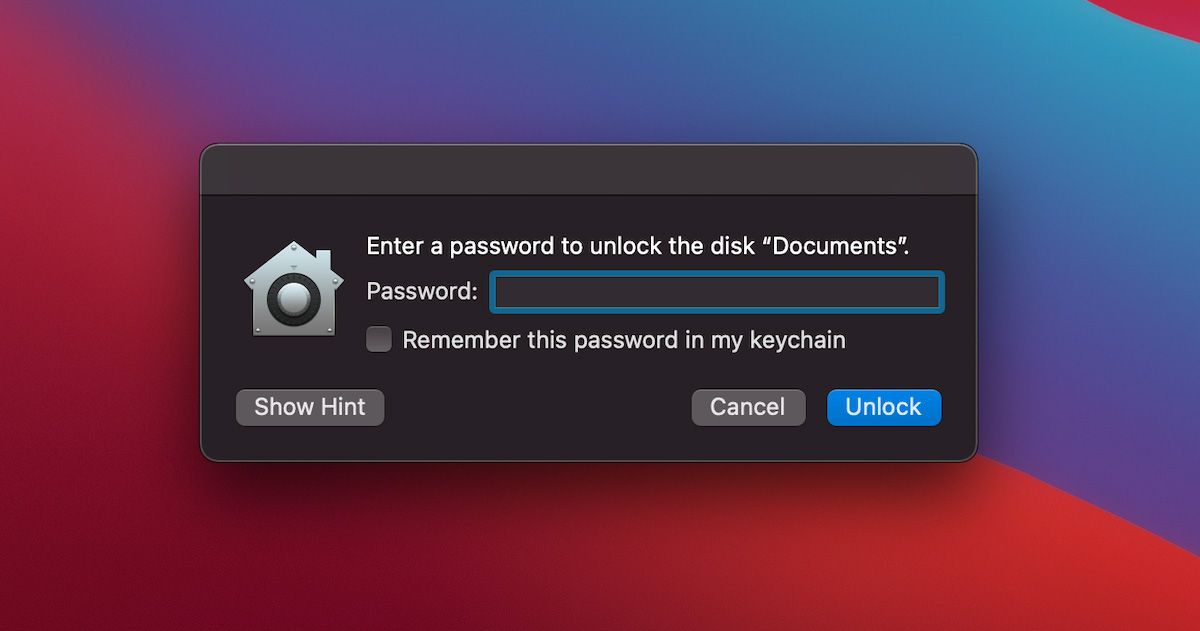
However, if you want to make such a drive usable again, then you can use Disk Utility to reformat the drive (check out Solution 5 for more information). But keep in mind that this will erase all of the data stored there.
Another possible reason for you not being able to access the data from your USB drive is because the drive uses a file system that isn’t supported by your Mac. Not all file systems are compatible with macOS (for example, ext3), which means if your flash drive has such a format, you won’t be able to use it on your Mac.
To check your flash drive file system type, do the following:
- Launch Finder.
- Find the USB drive on the sidebar. Press the Control key and click the drive for a drop-down menu to appear.
- Click Get Info.

- Next to Format, you’ll see the file system type used by the USB drive.
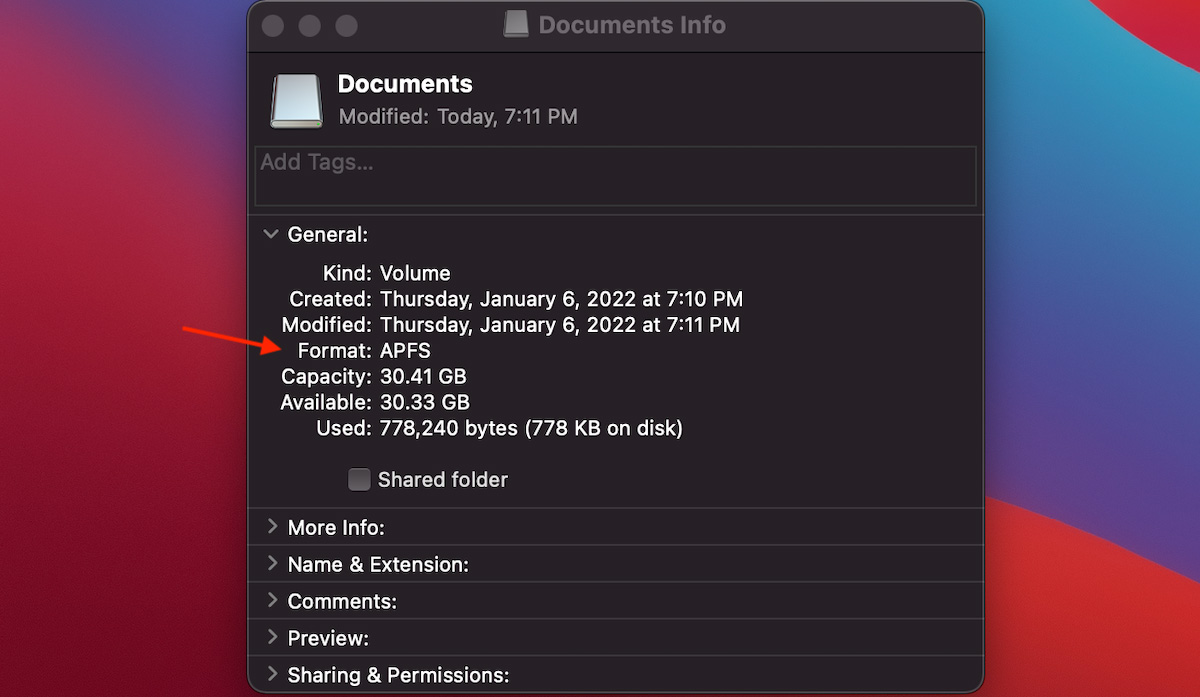
The file systems supported by macOS are APFS, Mac OS Extended, MS-DOS (FAT), and exFAT. So if the USB drive uses a different file system, you should reformat the drive and choose a file system for the drive that is supported by the Mac operating system.
Solution 5: Fix an Unreadable or Broken USB Flash Drive by Reformatting
Before attempting this method of fixing a broken USB stick on a Mac, be advised that it may result in the loss of any information residing on the drive. You may be able to recover data with recovery software after formatting, but it is better to try the recovery before you format the USB drive. The following steps show you how to fix a USB flash drive by reformatting it on your Mac.
- Connect the USB drive to your computer.
- Launch Disk Utility.
- Select the USB drive from the list in the left panel.
- Choose Erase. Do not select extra security options if you plan to try and recover data from the device.

- Name the drive and select the format you want to use.
- Click Erase in the bottom left corner.
- A progress bar will open and display the status of the procedure.
- Click Done when Disk Utility is finished formatting the corrupted USB.

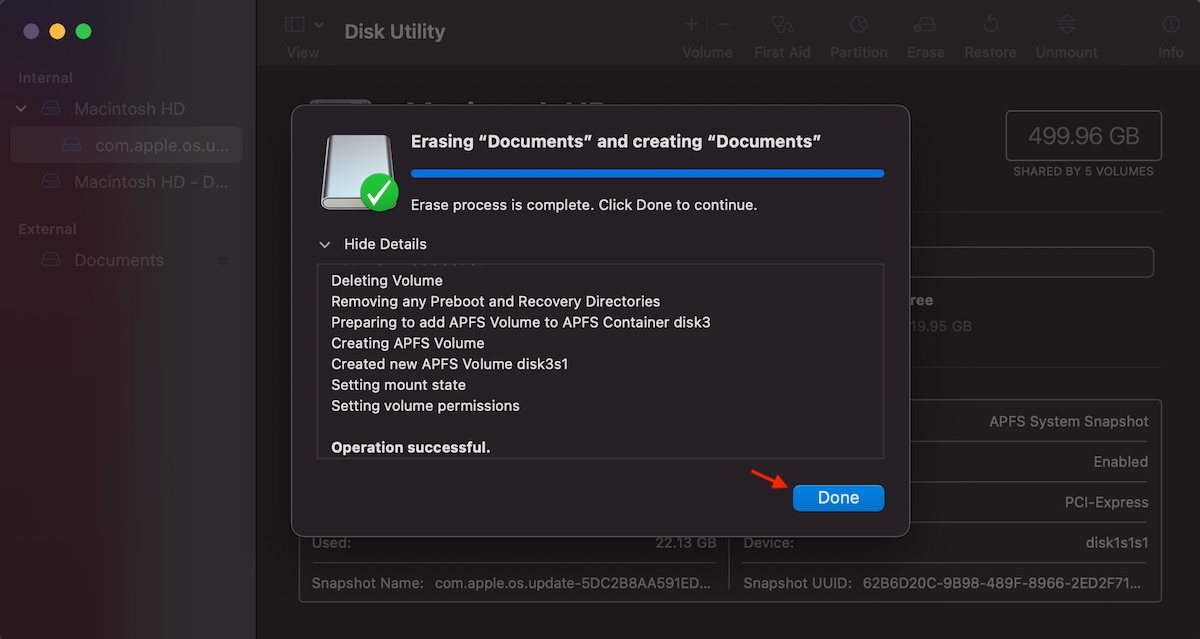
A normal format may allow you to recover data with recovery software as outlined in the next section. Formatting with multiple passes will fully clear the storage space and make it impossible to recover any data from the USB drive. Formatting the disk is a method of permanently fixing a broken USB device.
Solution 6: Recover a Corrupted USB on Mac with Data Recovery Software
Mac data recovery software can retrieve data from a corrupt or formatted USB drive. The key is that the drive must be recognized by the operating system for the recovery application to work on it.
To recover files from a corrupted USB drive on your Mac:
- Download and install Disk Drill USB Recovery Software for Mac.

Data recovery for free
Your Companion for Deleted Files RecoveryFree Download
- Connect the USB device to your Mac computer and launch Disk Drill.
- Select the USB flash drive from the app’s disk list.

- Click the Search for lost data button to start scanning for deleted files.
- If you want to preview the recoverable files while the app is still scanning your flash drive, click Review found items.

- Choose the files you want to restore and click the Recover button.

- Select a safe location to save the recovered data and click OK.

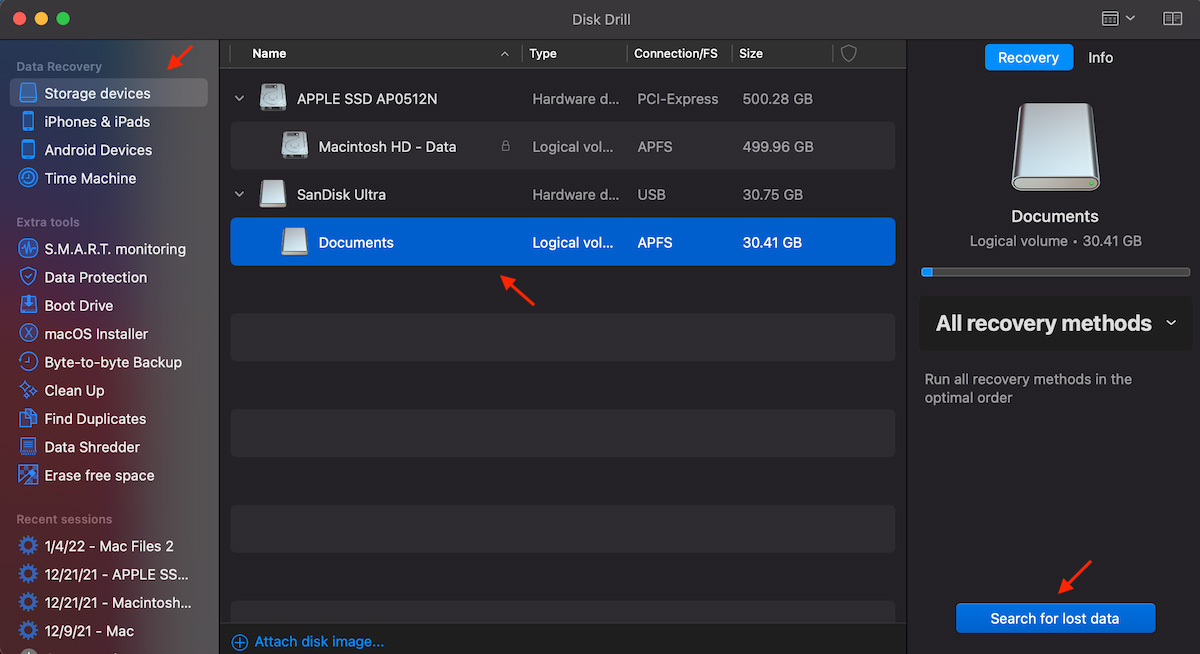
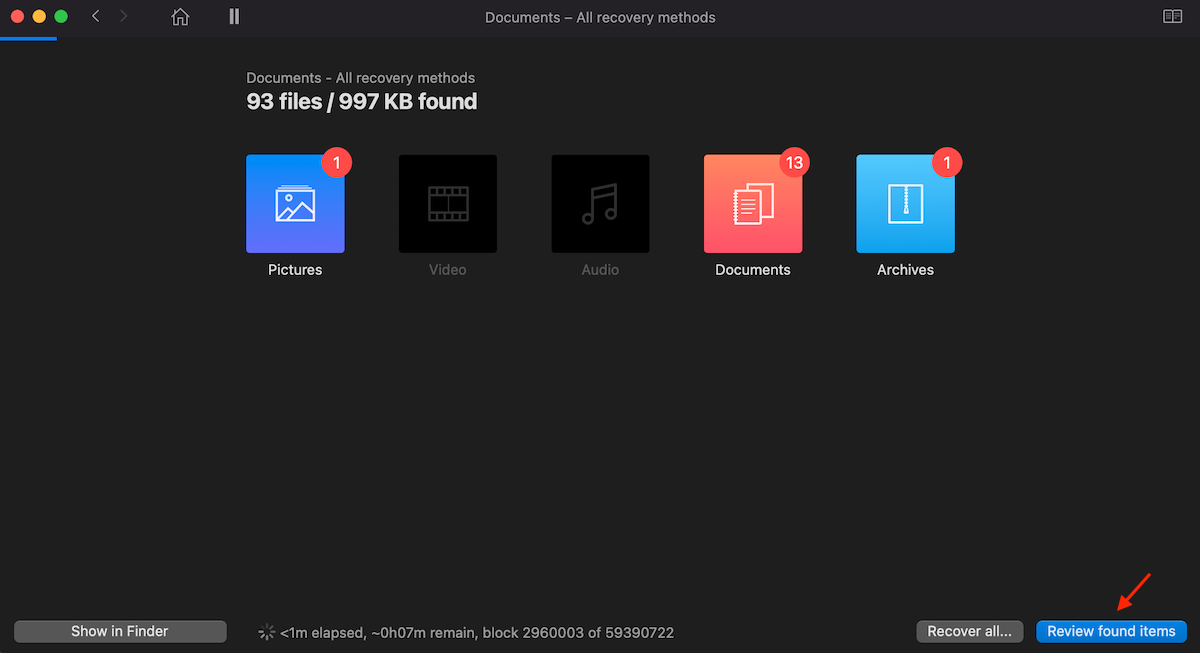
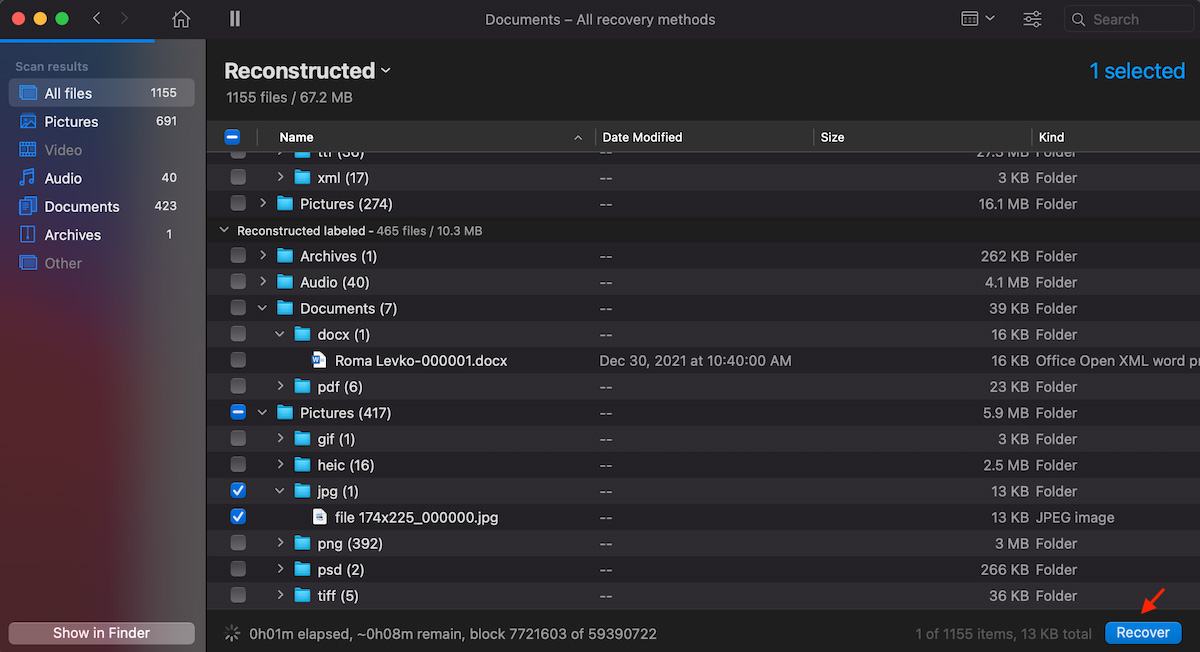
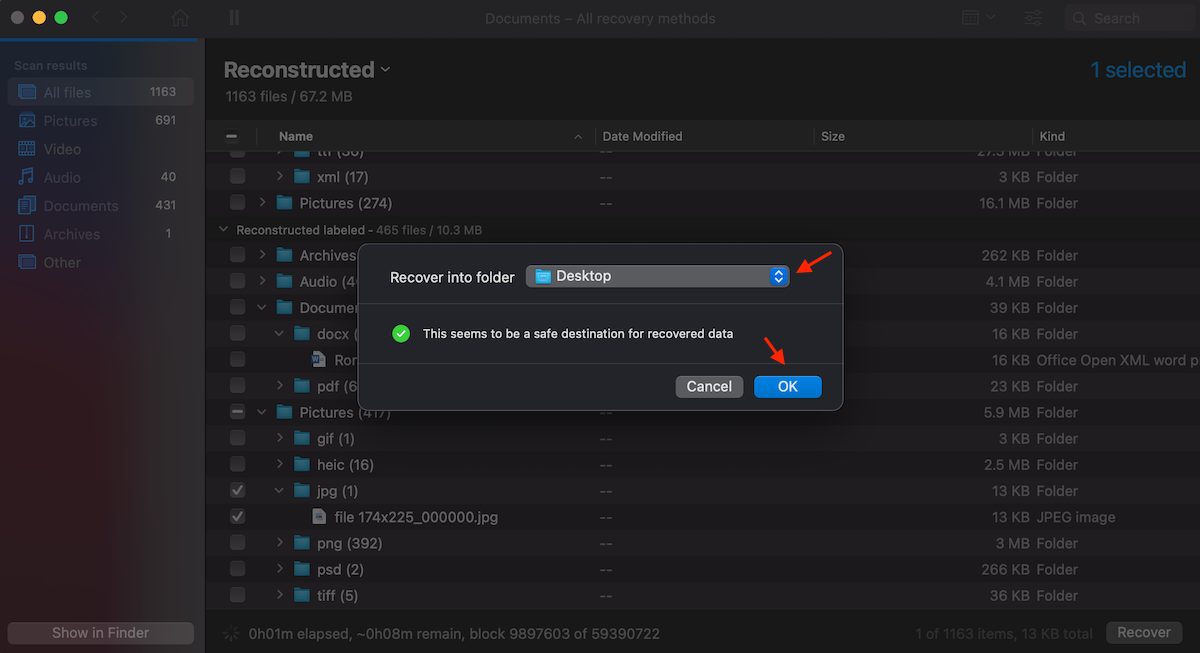
Disk Drill makes data recovery easy with this simple procedure. Be sure not to save the recovered files to the affected USB drive to avoid overwriting the data before it can be retrieved.
Why does this work? The answer is that deleted data is often still physically present on the storage device. The logical links that make the data accessible by users and applications have been removed. Data recovery software repairs these links and makes deleted files and folders accessible again. The recovery might seem like magic, but it’s the result of sophisticated scanning algorithms.
Solution 7: Send the Device to a Data Recovery Service
If all else fails and the information on the corrupted or damaged USB drive is important, you may want to engage a data recovery service to attempt the recovery. The technicians at a data recovery center use specialized software and hardware tools to clone the storage device and extract its data. Here’s how you go about using a data recovery service to get back your valuable information.
- Contact the data recovery center to obtain shipping information and receive a preliminary estimate on the potential data restoration.
- Ship the device to the recovery center.
- Upon receipt, the data recovery center will examine the device and provide a more realistic estimate for performing the recovery.
- Technicians will extract the data from the device and ship it to you on new media.
A data recovery service is the most expensive option for recovering your data, but may be necessary if other options do not work. Choose a reliable service like CleverFiles Recovery Center. A trustworthy recovery center will not charge you unless they can restore your data and will not advertise a per-gigabyte recovery price.
How to Prevent USB Drives on a Mac From Becoming Corrupted
Here are some tips that may help you minimize the chances of a USB drive becoming corrupted.
- Take care when connecting and disconnecting the device to avoid damaging the connectors.
- Make sure you run antivirus software and limit the exposure of the device to strange computers whose safety cannot be verified.
- Don’t remove a USB drive without ejecting it from your computer.
- Allow all read and write operations to complete before removing the drive from a computer or other device.
Conclusion
All hope is not lost if you are faced with a corrupted USB drive. You may be able to fix a corrupted USB drive on Mac using the features of the operating system. You can also recover data from a corrupted USB drive using data recovery software like Disk Drill.
Follow our advice and don’t use the USB drive until you have attempted data recovery or you risk further corruption that will make it impossible to save your information.
FAQ
The best way to fix a corrupted flash drive without losing data is to recover its information using Disk Drill data recovery software and then reformatting the drive so it can be reused. Follow those steps to recover data from a corrupted USB on a Mac:
- Download and install Disk Drill.
- Connect the USB device and start the program.
- Search for lost data.
- Preview the recoverable files.
- Complete the data recovery.
- Reformat the drive so it can be reused.
There are several methods to try to get your Mac to recognize a USB device.
- Try a different port.
- Connect the device to a different computer.
- Update the USB device drivers.
You can try to repair a corrupted USB storage device without formatting it by using the First Aid function in the macOS Disk Utility application.
You can reset your USB ports by resetting the System Management Controller. Here are the methods for resetting the SMC on a Mac or a MacBook.
MacBook procedure
- Shutdown the MacBook.
- Connect the power adapter.
- Hold down the Power button and Shift+Control+Option simultaneously.
- Release all keys at the same time.
- Start your MacBook normally and the SMC will be reset.
Mac procedure
- Shut down the computer and disconnect the power cord.
- Press and hold the Power button for five seconds and then release it.
- Connect the power cord and turn the Mac back on.
You can try a different port on your machine or a different computer. If that fails, you may need to update device drivers or resort to reformatting the drive so it can be used again.

Romana Levko
Romana Levko is a content writer with a strong interest in the technology field: data recovery, cybersecurity, and everything Apple are among her favorite subjects to explore.
Her goal is to expand the reader’s unders…
Read full bio
Romana Levko is a content writer with a strong interest in the technology field: data recovery, cybersecurity, and everything Apple are among her favorite subjects to explore.
Her goal is to expand the reader’s unders…
Read full bio

Approved by
Brett Johnson
This article has been approved by Brett Johnson, Data Recovery Engineer at ACE Data Recovery. Brett has a Bachelor’s Degree in Computer Systems and Network, 12 years of experience.
This article has been approved by Brett Johnson, Data Recovery Engineer at ACE Data Recovery. Brett has a Bachelor’s Degree in Computer Systems and Network, 12 years of experience.