Windows 8.1 Windows 8.1 Enterprise Windows 8.1 Pro Windows 8 Windows 8 Enterprise Windows 8 Pro Windows 7 Enterprise Windows 7 Home Basic Windows 7 Home Premium Windows 7 Professional Windows 7 Starter Windows 7 Ultimate Windows Vista Enterprise 64-bit Edition Windows Vista Ultimate 64-bit Edition Windows Vista Business Windows Vista Business 64-bit Edition Windows Vista Enterprise Windows Vista Ultimate Windows 10 More…Less
If some Windows functions aren’t working or Windows crashes, use the System File Checker to scan Windows and restore your files.
Though the steps below might look complicated at first glance, just follow them in order, step-by-step, and we’ll try to get you back on track.
Run the System File Checker tool (SFC.exe)
To do this, follow these steps:
-
Open an elevated command prompt. To do this, do the following as your appropriate:
-
If you are running Windows 10, Windows 8.1 or Windows 8, first run the inbox Deployment Image Servicing and Management (DISM) tool prior to running the System File Checker. (If you are running Windows 7 or Windows Vista, skip to Step 3.)
Type the following command, and then press Enter. It may take several minutes for the command operation to be completed.
DISM.exe /Online /Cleanup-image /Restorehealth
Important: When you run this command, DISM uses Windows Update to provide the files that are required to fix corruptions. However, if your Windows Update client is already broken, use a running Windows installation as the repair source, or use a Windows side-by-side folder from a network share or from a removable media, such as the Windows DVD, as the source of the files. To do this, run the following command instead:
DISM.exe /Online /Cleanup-Image /RestoreHealth /Source:C:\RepairSource\Windows /LimitAccess
Note: Replace the C:\RepairSource\Windows placeholder with the location of your repair source. For more information about using the DISM tool to repair Windows, reference Repair a Windows Image.
-
At the command prompt, type the following command, and then press ENTER:
sfc /scannow
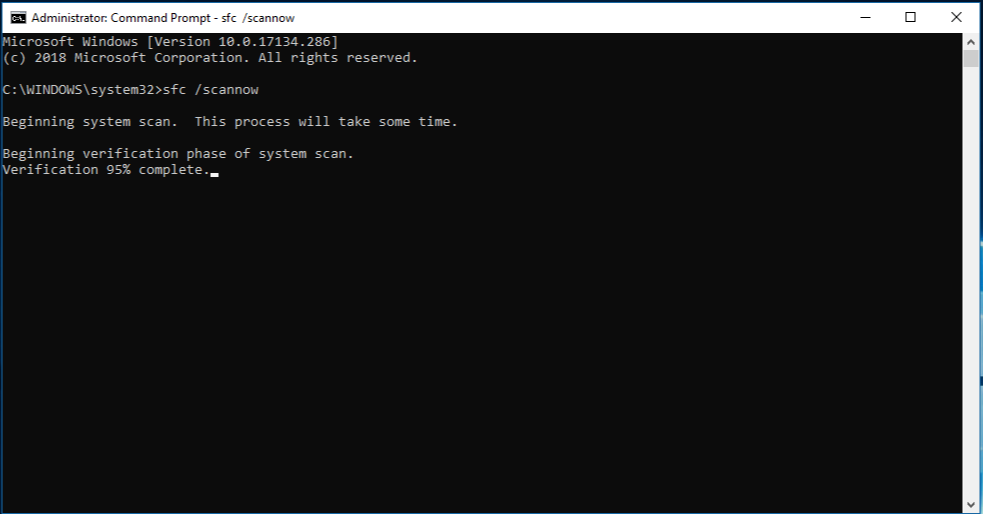
The sfc /scannow command will scan all protected system files, and replace corrupted files with a cached copy that is located in a compressed folder at %WinDir%\System32\dllcache.
The %WinDir% placeholder represents the Windows operating system folder. For example, C:\Windows.
Note Do not close this Command Prompt window until the verification is 100% complete. The scan results will be shown after this process is finished.
-
After the process is finished, you may receive one of the following messages:
-
Windows Resource Protection did not find any integrity violations.
This means that you do not have any missing or corrupted system files. -
Windows Resource Protection could not perform the requested operation.
To resolve this problem, perform the System File Checker scan in safe mode, and make sure that the PendingDeletes and PendingRenames folders exist under %WinDir%\WinSxS\Temp. -
Windows Resource Protection found corrupt files and successfully repaired them. Details are included in the CBS.Log %WinDir%\Logs\CBS\CBS.log.
To view the detail information about the system file scan and restoration, go to How to view details of the System File Checker process. -
Windows Resource Protection found corrupt files but was unable to fix some of them. Details are included in the CBS.Log %WinDir%\Logs\CBS\CBS.log.
To repair the corrupted files manually, view details of the System File Checker process to find the corrupted file, and then manually replace the corrupted file with a known good copy of the file.
-
Swipe in from the right edge of the screen, and then tap Search. Or, if you are using a mouse, point to the lower-right corner of the screen, and then click Search. Type Command Prompt in the Search box, right-click Command Prompt, and then click Run as administrator. If you are prompted for an administrator password or for a confirmation, type the password, or click Allow.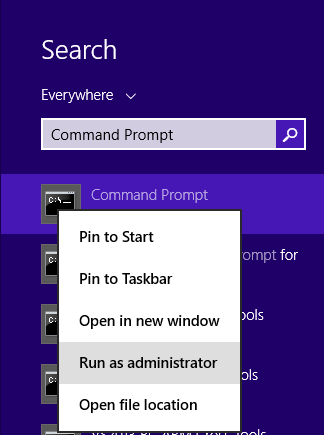
To do this, click Start, type Command Prompt or cmd in the Search box, right-click Command Prompt, and then click Run as administrator. If you are prompted for an administrator password or for a confirmation, type the password, or click Allow.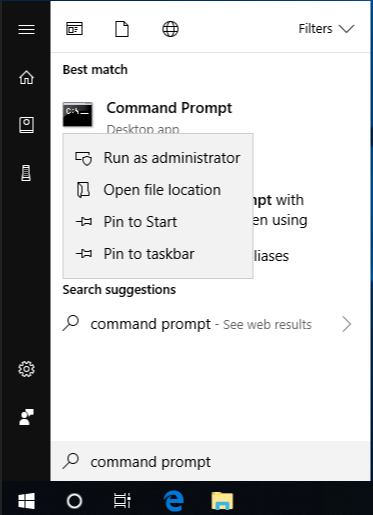
More Information
How to view details of the System File Checker process
To view the details that included in the CBS.Log file, you can copy the information to the Sfcdetails.txt file by using the Findstr command, and then view the details in the Sfcdetails.txt. To do this, follow these steps:
-
Open an elevated command prompt as described in the previous step 1.
-
At the command prompt, type the following command, and then press ENTER:
findstr /c:"[SR]" %windir%\Logs\CBS\CBS.log >"%userprofile%\Desktop\sfcdetails.txt"
Note The Sfcdetails.txt file contains details from every time that the System File Checker tool has been run on the computer. The file includes information about files that were not repaired by the System File Checker tool. Verify the date and time entries to determine the problem files that were found the last time that you ran the System File Checker tool.
-
Open the Sfcdetails.txt file from your desktop.
-
The Sfcdetails.txt file uses the following format:
Date/Time SFC detail
The following sample log file contains an entry for a file that could not be repaired:2007-01-12 12:10:42, Info CSI 00000008 [SR] Cannot
repair member file [l:34{17}]»Accessibility.dll» of Accessibility, Version =
6.0.6000.16386, pA = PROCESSOR_ARCHITECTURE_MSIL (8), Culture neutral,
VersionScope neutral, PublicKeyToken = {l:8 b:b03f5f7f11d50a3a}, Type
neutral, TypeName neutral, PublicKey neutral in the store, file is missing
How to manually replace a corrupted system file with a known good copy of the file
After you determine which system file was corrupted and could not be repaired through the detail information in the Sfcdetails.txt file, find where the corrupted file located, and then manually replace the corrupted file with a known good copy of the file. To do this, follow these steps:
Note You may be able to get a known good copy of the system file from another computer that is running the same version of Windows with your computer. You may perform a System File Checker process on that computer to make sure the system file that you intend to copy is a good copy.
-
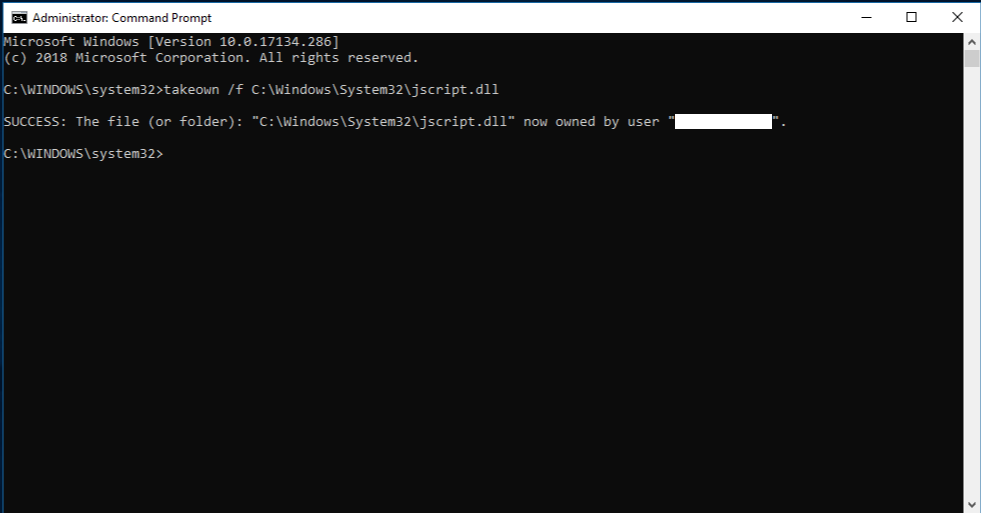
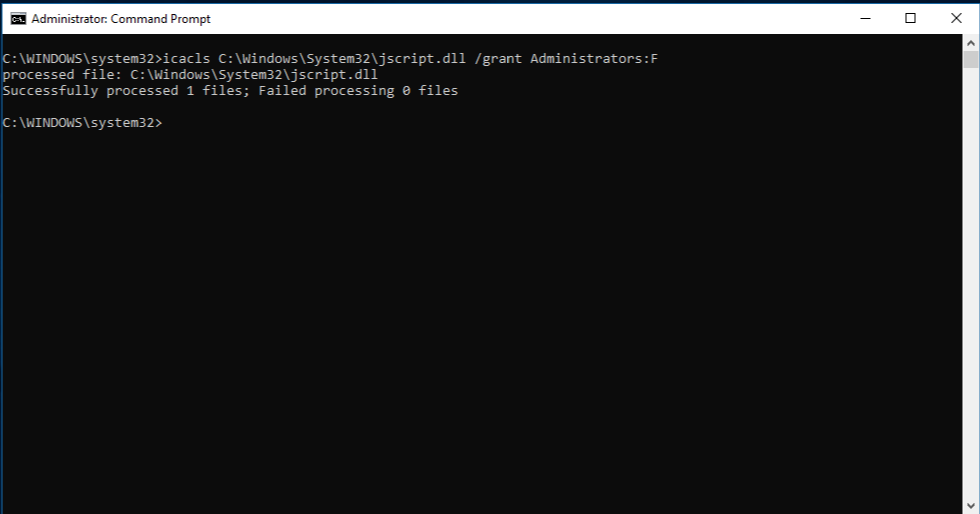
Take administrative ownership of the corrupted system file. To do this, at an elevated command prompt, copy and then paste (or type) the following command, and then press ENTER:
takeown /f Path_And_File_Name
Note The Path_And_File_Name placeholder represents the path and the file name of the corrupted file. For example, type takeown /f C:\windows\system32\jscript.dll.

-
Grant administrators full access to the corrupted system file. To do this, copy and paste (or type) the following command, and then press ENTER:
icacls Path_And_File_Name /GRANT ADMINISTRATORS:F
Note The Path_And_File_Name placeholder represents the path and the file name of the corrupted file. For example, type icacls C:\windows\system32\jscript.dll /grant administrators:F. -
Replace the corrupted system file with a known good copy of the file. To do this, copy and paste (or type) the following command, and then press ENTER:
Copy Source_File Destination
Note The Source_File placeholder represents the path and file name of the known good copy of the file on your computer, and the Destination placeholder represents the path and file name of the corrupted file. For example, type copy E:\temp\jscript.dll C:\windows\system32\jscript.dll.
If the steps above don’t work, you may need to reinstall Windows. For more info, see Windows 10 recovery options.
Need more help?
Want more options?
Explore subscription benefits, browse training courses, learn how to secure your device, and more.
Communities help you ask and answer questions, give feedback, and hear from experts with rich knowledge.

Всех приветствую!
Эта заметка может быть полезна в случаях, когда ОС Windows начала не стабильно работать, появились ошибки при запуске системных служб, приложений и т.д. Благо, что в самой же ОС есть спец. инструменты для проверки целостности (и исправления) системных файлов (речь о утилитах SFC и DISM).
Собственно, в неск. примерах ниже хочу показать как их можно использовать. В своих прошлых записях я тоже неоднократно ссылался на них (т.е. тема актуальна, несмотря на высокую стабильность работы современных версий Windows).
*
Примечание: системные файлы могут быть повреждены из-за вирусного заражения ОС, при сбоях файловой системы, при работе с некоторым ПО, из-за некорректного обновления, и пр. В целях безопасности — я бы на будущее порекомендовал делать 📌бэкапы важных данных + 📌контрольные точки в Windows.
📌 Важно!
Если у вас также пропали документы, фото, видео — ознакомьтесь с этой инструкцией/подборкой: https://ocomp.info/10-programm-dlya-vosstanovleniya-dannyih.html (часто удается многое восстановить).
*
Содержание статьи📎
- 1 Что можно посоветовать для восстан.-я системных файлов
- 1.1 ШАГ 1 (chkdsk)
- 1.1.1 Можно ли chkdsk запустить с установочной флешки, если текущая Windows не загружается
- 1.2 ШАГ 2 (SFC)
- 1.2.1 Что делать, если ошибки не будут исправлены
- 1.3 ШАГ 3 (DISM)
- 1.4 ШАГ 4 (Контр. точки)
- 1.1 ШАГ 1 (chkdsk)
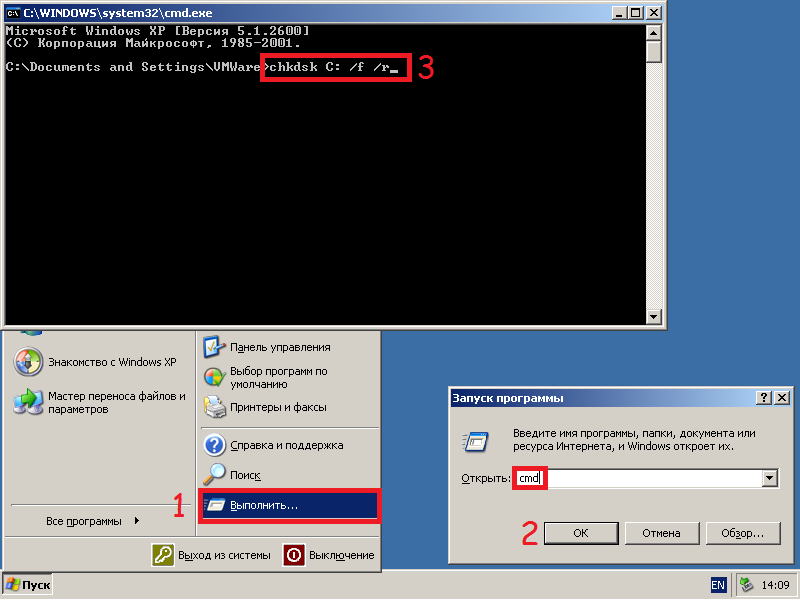
→ Задать вопрос | дополнить
Что можно посоветовать для восстан.-я системных файлов
ШАГ 1 (chkdsk)
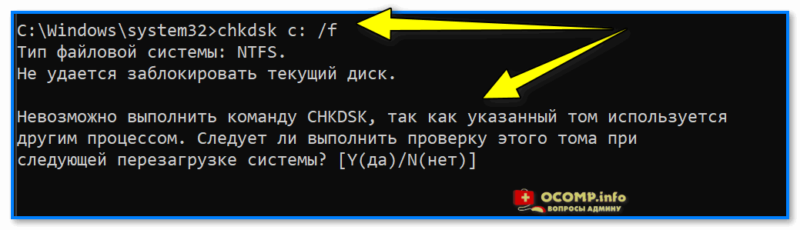
Перед тем, как переходить к восст. сист. файлов — рекомендуется выполнить проверку файловой системы диска (+ исправить ошибки, если будут найдены оные).
Для этого требуется запустить командную строку от имени администратора, а затем воспользоваться командной:
chkdsk v: /f
См. скрины ниже. 👇
Примечание:
- вместо «v:» — можно указать свою букву диска (например, «C:»);
- параметр «/f» — используется для исправления найденных ошибок;
- параметр «/r» — используется для обнаружения повреждённые секторов на диске и восст. информации, которую можно прочитать;
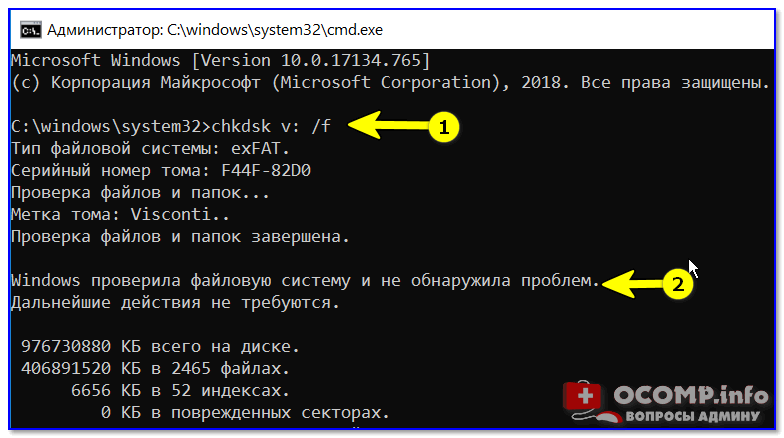
chkdsk v: /f — проверка диска
📌 Обратите внимание, что при успешной операции проверки диска — вы должны увидеть уведомление:
- либо, что Windows не обнаружила проблем;
- либо, что проблемы были устранены!
Проверка системного диска (chkdsk)
*
Можно ли chkdsk запустить с установочной флешки, если текущая Windows не загружается
Можно!
Только не факт, что она вам поможет… (по идее, если проблема с ошибками файловой системы возникли на системном диске — он будет проверен перед загрузкой ОС, причем, автоматически // без вашей просьбы на это).
Как запустить такую проверку:
- для начала нужно записать 📌установочную флешку с Windows;
- далее нужно загрузиться с нее (например, с помощью 📌Boot Menu);
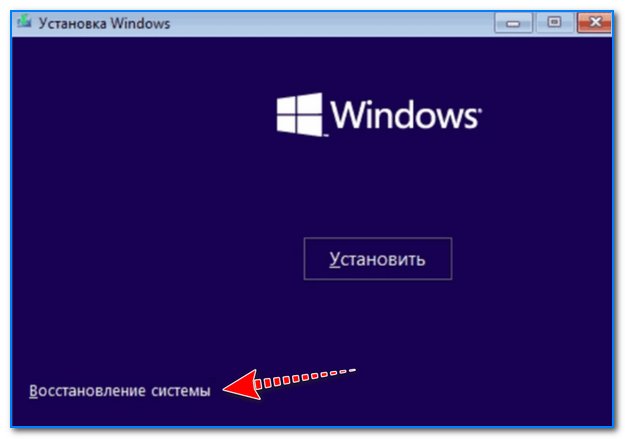
- затем в меню вместо установки начать восстановление ОС;

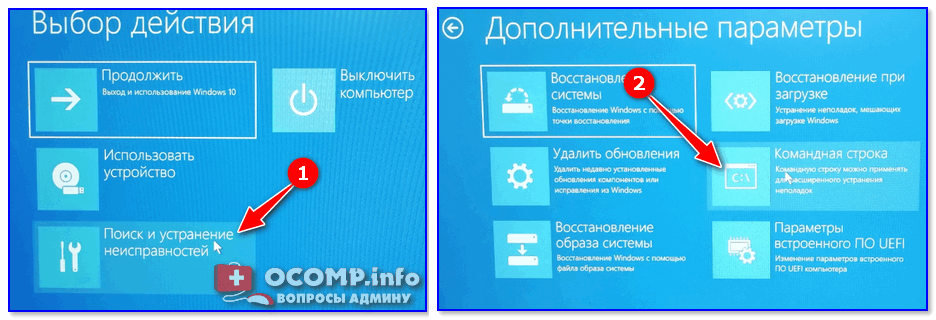
Восстановление системы // Окно установки Windows 10
- после перейти в раздел устранения неисправностей и запустить командную строку. См. скрин ниже; 👇

Поиск и устранение неисправностей — командная строка
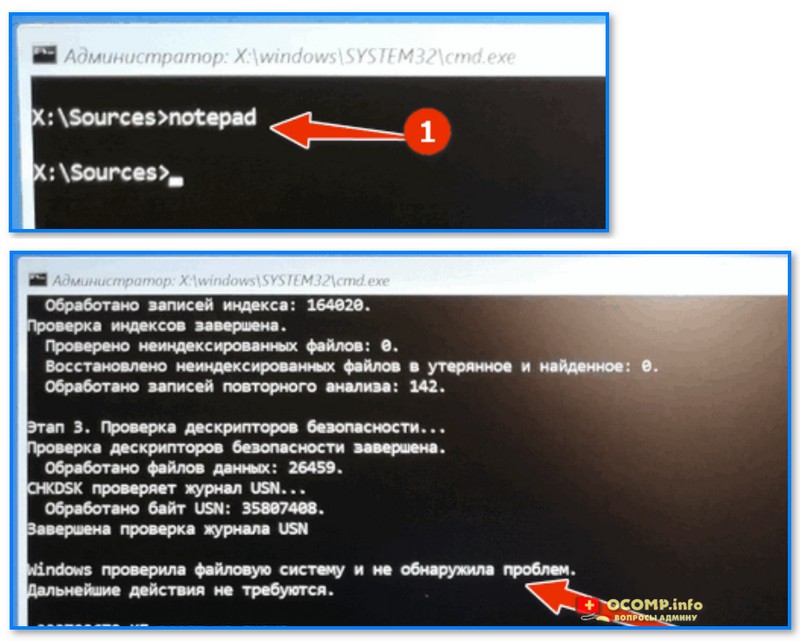
- в командной строке наберите notepad — откроется блокнот, через который можно посмотреть все текущие диски и их буквы (они нам и нужны!);
- собственно, теперь осталось только набрать команду проверки: скажем chkdsk D: /f (вместо «D» — свою букву диска).

Пример проверки диска, при загрузке с флешки
*
ШАГ 2 (SFC)
SFC (System File Checker) — спец. утилита для проверки и восст. файлов ОС.
Чтобы запустить ее — необходимо:
- открыть 📌командную строку от имени админа;
- ввести sfc /scannow и нажать Enter;
- дождаться результатов проверки*.
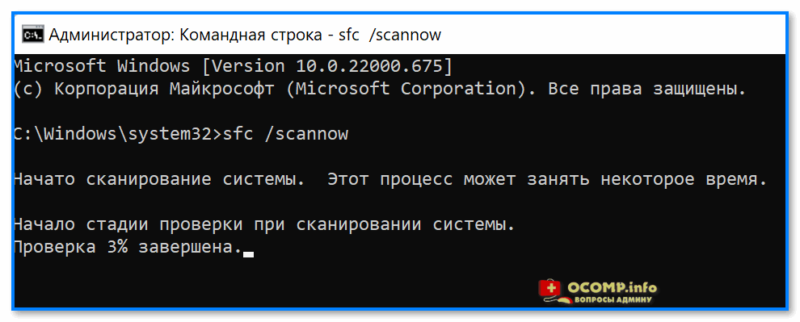
Начато сканирование системы. Этот процесс может занять некоторое время
* Результаты могут быть разными:
- идеально: если ошибки и нарушения целостности найдены не будут;
- хорошо: если найденные ошибки будут исправлены в ходе проверки;
- плохо/требуется доп. проверка: если ошибки будут найдены, но восстановить их не удастся.

Защита ресурсов Windows не обнаружила нарушений целостности
*
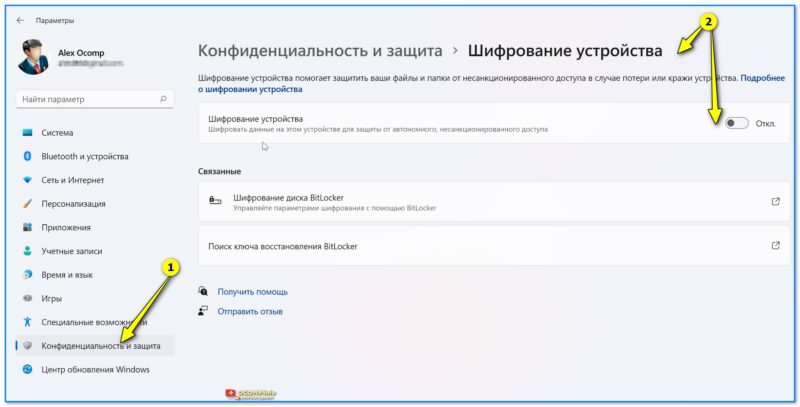
Что делать, если ошибки не будут исправлены
- заходим в 📌параметры ОС Windows и проверяем, чтобы было выключено шифрование диска;

Шифрование диска отключено (Windows 11)
- далее загружаемся с установочной флешки с Windows и запускаем «Восстановление системы»;
Восстановление системы
- далее открываем командную строку (во вкладке «Доп. параметры») и используем команду notepad (с помощью запуска блокнота — сможем узнать буквы всех дисков);
- затем используем команду: sfc /scannow /offbootdir=F:\ /offwindir=F:\Windows (где вместо «F:» — указываем букву диска с Windows. Вероятно, кстати, что буква не будет равна «C»!).
*
ШАГ 3 (DISM)
DISM (Deployment Image and Service Management)
Рекомендуется использовать уже после SFC (см. ШАГ 2).
Для запуска сначала также необходимо открыть 📌 командную строку под администратором, а затем ввести:
DISM /ONLINE /CLEANUP-IMAGE /RESTOREHEALTH
Операция занимает в среднем 3-15 мин., и во время ее выполнения — не стоит делать за ПК никаких ресурсоемких задач. См. пример ниже. 👇
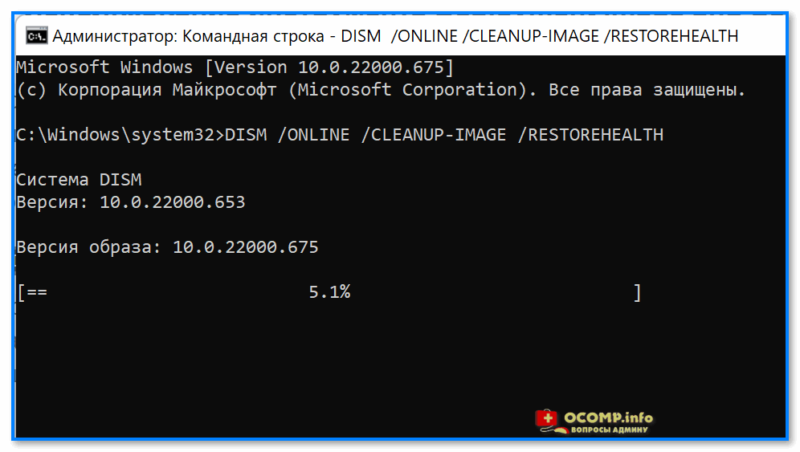
DISM — запуск восстановления
В идеале вы должны увидеть сообщение о том, что восстановление выполнено успешно, 100%. См. пример. 👇

DISM — восстановление выполнено успешно, 100%
📌 Если вышеприведенные команда (DISM) выдала ошибку — попробуйте подключить/смонтировать образ ISO с Windows… (Windows взять нужно такой же версии, что установлена и у вас). Это можно сделать прямо в проводнике.
Кстати, кроме проводника образ ISO могут смонтировать в вирт. привод и спец. утилиты.
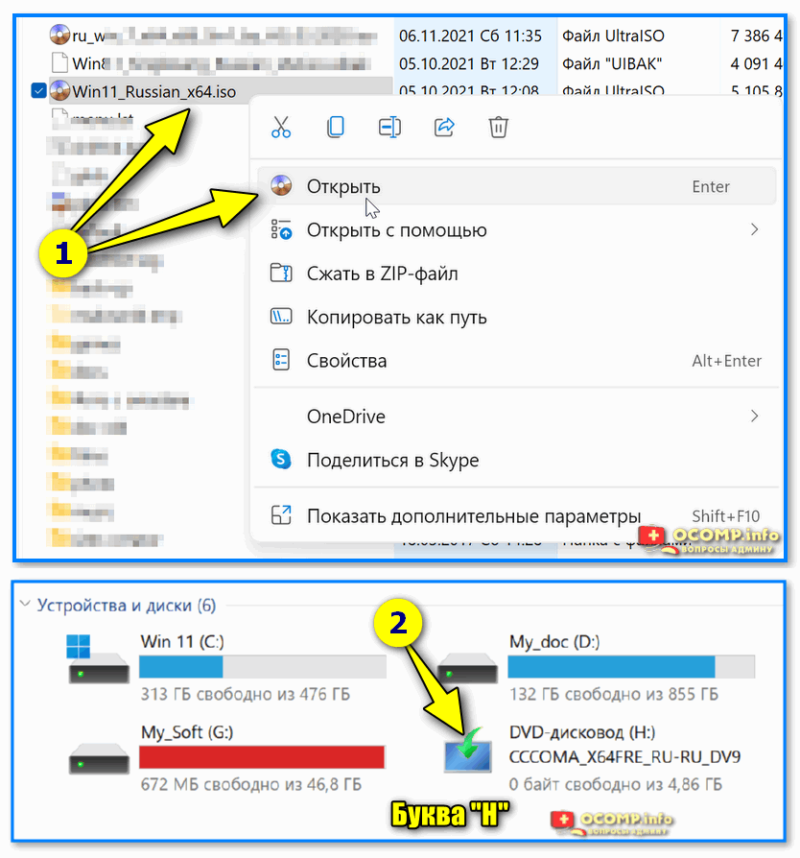
Открываем образ ISO (буква H)
Далее нужно ввести нижеприведенную команду (вместо буквы «H:» — укажите свою), и нажать Enter:
DISM /Online /Cleanup-Image /RestoreHealth /Source:H:\Sources\install.esd
В идеале через 3-15 мин. должно появится сообщение об успешном выполнении операции… 👇

Операция успешно завершена, восстановлено 100%
Примечание: DISM ведет логи, находятся они на системном диске C:\Windows\Logs\DISM (dism.log). Из них можно узнать, что было восстановлено, а что не удалось…
*
ШАГ 4 (Контр. точки)
Если всё вышеприведенное не дало результатов — я бы дополнительно посоветовал проверить наличие точек восстановления в Windows (если в наличии будет та точка, на дату которой система корректно работала, — стоит попробовать откатиться к ней).
Отмечу, что контрольные точки восст. обычно делаются автоматически (при вкл. опции).
*
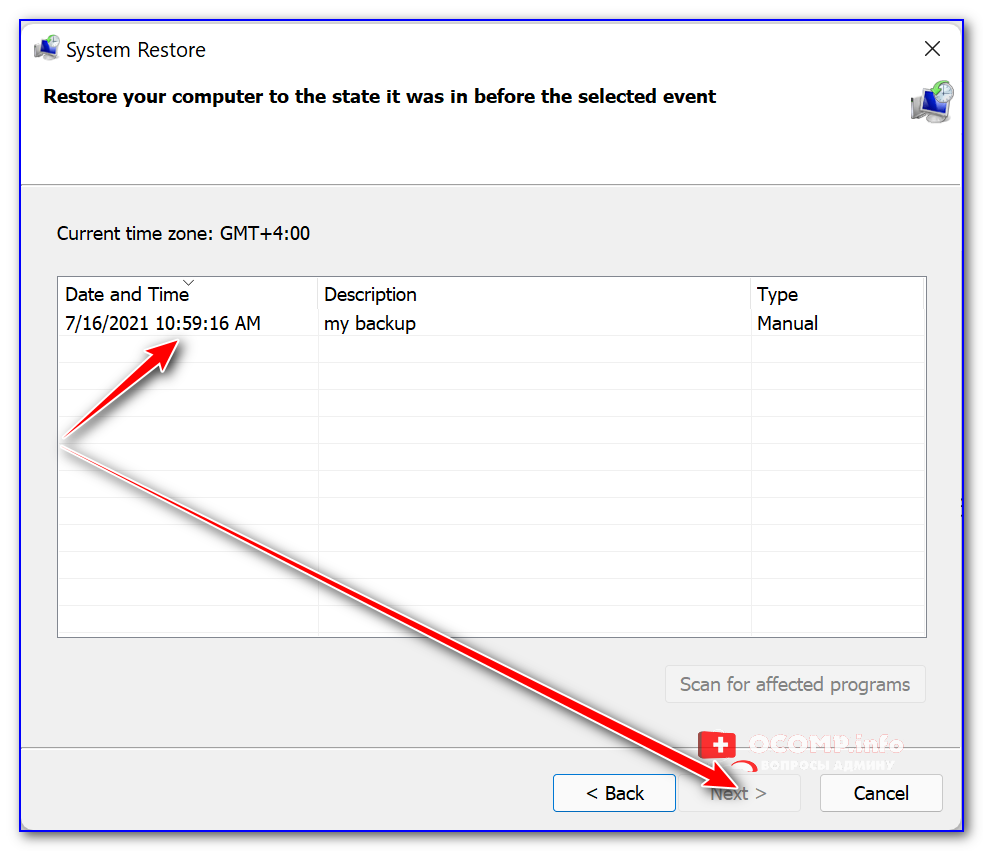
Чтобы посм. какие есть точки восстановления — нужно:
- нажать Win+R, чтобы появилось окно «Выполнить»;
- ввести rstrui и нажать Enter;
- далее перед вами появится окно со списком точек (при их наличии). Если есть дата, на которую ПК корректно работал, выберите ее и попробуйте откатить систему (прим.: файлы и документы пользователя эта операция не затрагивает. По крайней мере, так заявляют разработчики Windows, да и раньше такого никогда не было… 🙂).

Все точки восстановления, список
*
📌 В помощь!
Как работать с точками восстановления в Windows 11 (для отката системы после появл. ошибок, невозможности загрузки и т.д.) — https://ocomp.info/tochku-vosstanovleniya-v-win11.html
*
Иные рекомендации по теме — приветствуются!
Успехов и легкой починки!
🙂


What does CHKDSK /F /R do? How to use CHKDSK to repair the hard drive errors on Windows 10/8/7? Here is the full guide.
| Workable Solutions | Step-by-step Troubleshooting |
|---|---|
| What is CHKDSK command | CHKDSK (Check Disk Utility) can be used to check and fix any errors on the targeted disk. You can run it from the Command Prompt/PowerShell…Full steps |
| What does CHKDSK /F /R /X mean | CHKDSK /F can fix disk errors. CHKDSK /R does the same thing as CHKDSK /F only it also checks for bad sectors on the disk and recovers any readable information…Full steps |
| CHKDSK Alternative — Run a partition tool to fix disk error (1 Step) | Download EaseUS partition tool for free and use it to check and repair the corrupted file systems with clicks. No need to type commands manually…Full steps |
| Use CHKDSK manually | Run CHKDSK /F /R /X from the Command Prompt/Power shell or via the Properties window…Full steps |
What Is CHKDSK Command
In computing, CHKDSK (short for «check disk») is a system tool and command in DOS, Digital Research FlexOS, IBM/Toshiba 4690 OS, IBM OS/2, Microsoft Windows and related operating systems. It verifies the file system integrity of a volume and attempts to fix logical file system errors. — explained by Wikipedia
CHKDSK, also known as Microsoft Check Disk, is a utility that can be used in almost all Windows versions. The CHKDSK command is used to scan through your entire hard drive to find and fix any errors. For example, when your computer freezes, you cannot access a certain disk due to a corrupted file system, then you can use the CHKDSK commands to check and fix the drive errors.
What Does CHKDSK /F /R /X Command Mean
What is CHKDSK /F /R /X? The primary function of CHKDSK /F /R /X is to scan the integrity of the file system and file system metadata on a disk volume and fix any logical file system errors that it finds. Besides, CHKDSK also can be used for detecting bad sectors on the target disk that occur because of physical damage. Then, it automatically fixes these errors as well.
CHKDSK /F VS CHKDSK /R VS CHKDSK /X, What’s The Difference
CHKDSK can fix two types of disk errors: logical errors and physical errors. Based on the disk error types, you can use the different CHKDSK commands and switches to fix hard drive errors. CHKDSK /F, CHKDSK /R, and CHKDSK /X are the most commonly used CHKDSK commands. What is the difference between CHKDSK /F /R and /X?
- CHKDSK /F: Check for disk errors, not bad sectors.
- CHKDSK /R: Locate the bad sectors on the target hard disk and try to recover the readable information from the bad sectors (implies /F).
- CHKDSK /X: Forces the volume to dismount first, if necessary. It also includes the functionality of /f.
When to use chkdsk /f, chkdsk /r, and chkdsk/x? You want to see existing errors, use CHKDSK /f command, you want recover readable information from back sectors, use CHKDSK /R, and dismount problematic disk, use CHKDSK /X.
If you feel like the provided information about CHKDSK, and it did help you have a better undersanding CHKDSK command lines, please share this guide to help more people around you!
What Does Each CHKDSK Parameter Means? Here Are the
The syntax of the CHKDSK command is:
chkdsk volume /f /v /r /x /i /c
If used without parameters, CHKDSK displays only the volume’s status and does not fix any errors. If used with the /f, /r, /x, or /b parameters, it fixes errors on the volume. What do the parameters ( /f /r /x… ) mean? Here are some common CHKDSK parameters and their meanings:
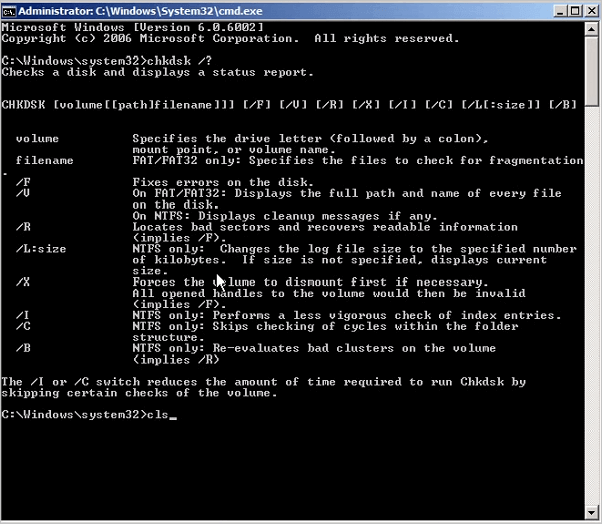
| Parameters | Details of the Parameters |
|---|---|
| /f | Fixes errors on the disk. The disk must be locked. If CHKDSK cannot lock the drive, a message appears that asks you if you want to check the drive the next time you restart the computer. |
| /r | Locates bad sectors and recovers readable information. The disk must be locked. It includes the functionality of /f, with the additional analysis of physical disk errors. |
| /x | Forces the volume to dismount first, if necessary. All open handles to the drive are invalidated. It also includes the functionality of /f. |
| /b | NTFS only. It clears the list of bad clusters on the volume and rescans all allocated and free clusters for errors. It includes the functionality of /r. Use this parameter after imaging a volume to a new hard disk drive. |
| /v | Displays the name of each file in every directory as the disk is checked. |
| /scan | NTFS only. It runs an online scan on the volume. |
| /i | NTFS only. It performs a less vigorous check of index entries, which reduces the amount of time required to run CHKDSK. |
| /c | NTFS only. It does not check cycles within the folder structure, which reduces the amount of time required to run CHKDSK. |
Run CHKDSK /F /R /X Alternative Tool to Fix and Repair Disk Errors
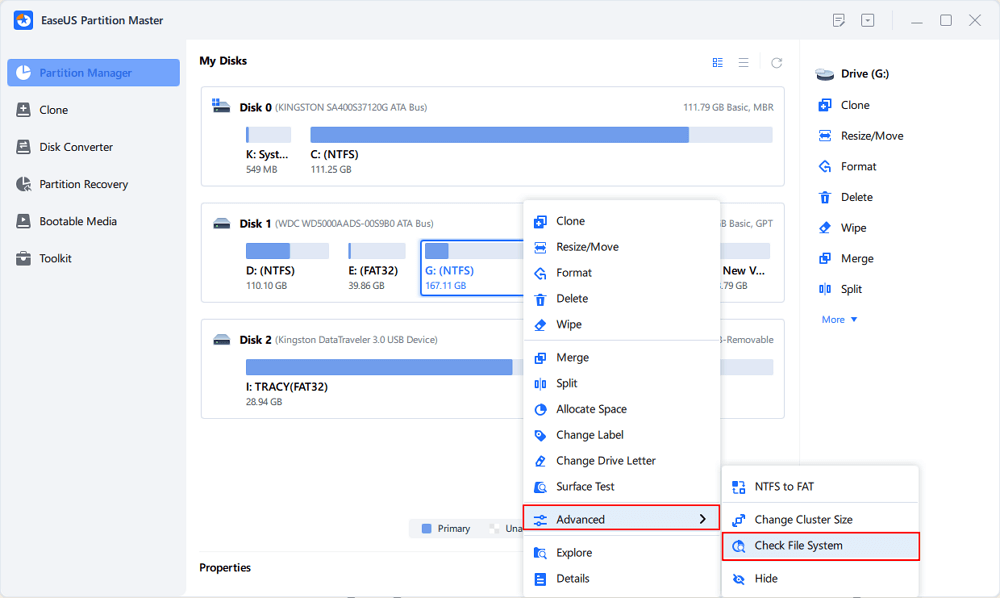
If you are not so tech-savvy and know little about computers, we highly recommend you try a professional CHKDSK /f /r /x alternative tool — EaseUS Partition Master to fix hard drive errors efficiently. It perfectly replaces CMD as reliable disk management tool and releases you from typing the commands manually.
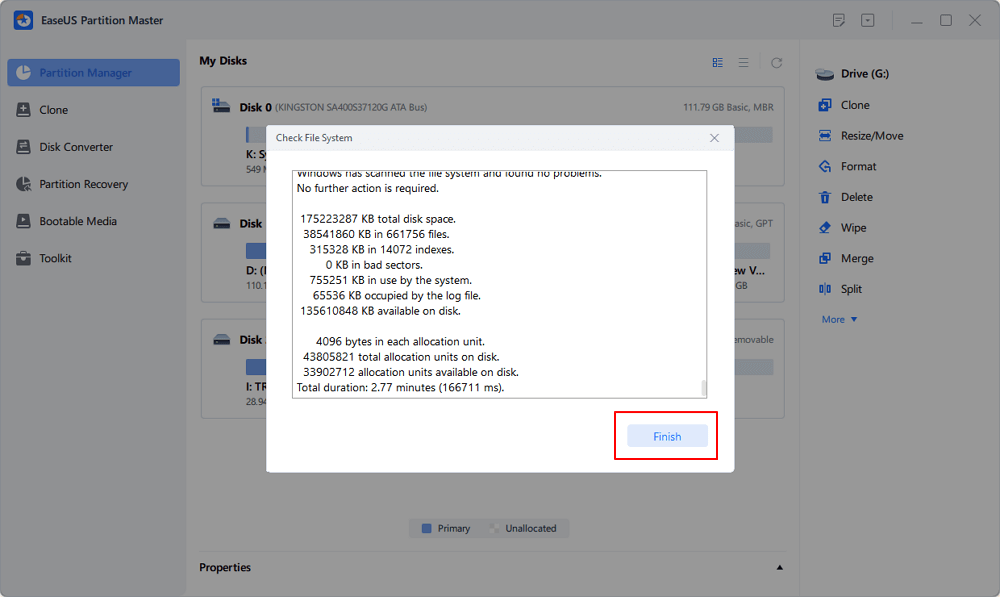
EaseUS partition tool makes it effortless to repair disk errors. Follow the steps to check and repair your file system error:
Step 1. Open EaseUS Partition Master on your computer. Then, locate the disk, right-click the partition you want to check, and choose «Advanced» > «Check File System».
Step 2. In the Check File System window, keep the «Try to fix errors if found» option selected and click «Start».
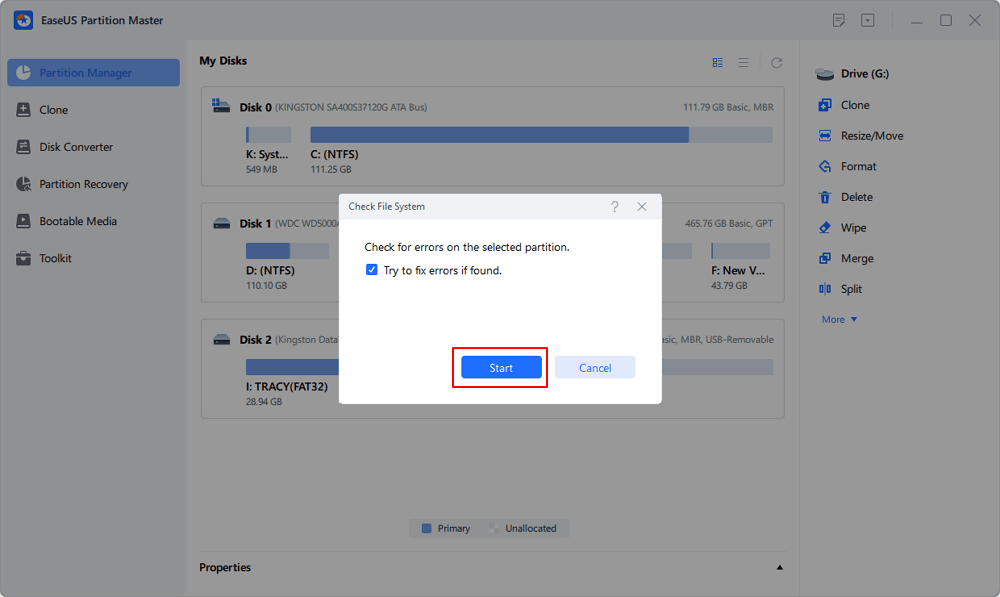
Step 3. The software will begin checking your partition file system on your disk. When it completes, click «Finish».
Fixing disk error and repair internal file system error with EaseUS Partitoin Master is so easy It is one of the best repair tool for hard drives, especially the best Toshiba External Hard Drive Repair Tool and Seagate Hard Drive Repair Tool. Share this tip to help more of your friends to rescue their problematic storage devices now:
If you don’t like to use the simple third-party CHKDSK tool, you can run CHKDSK in a harder way via 3 methods: using Command prompt, Windows PowerShell, and disk check tool.
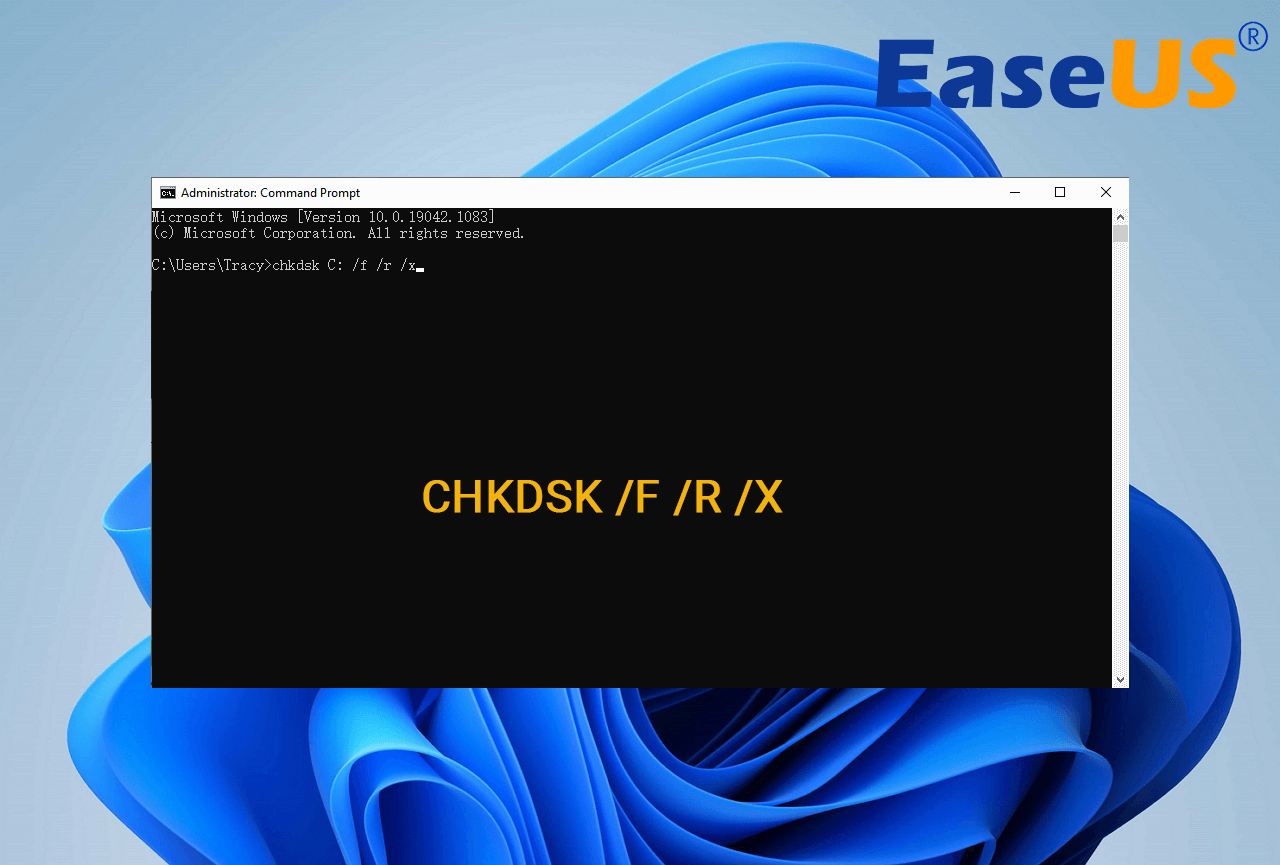
1. Run CHKDSK in Command Prompt
Whenever you find your hard drive performs poorly or Windows asks you to repair drive errors, you can try to run CHKDSK to do the job. Here’s how to run CHKDSK /f on Windows 10/8.1/8/7.
Use CHKDSK /F /R on Windows 10
Note: If you can’t boot into Windows 10 to run CHKDSK, fix the UEFI boot issue in Windows 10 with 5+ solutions.
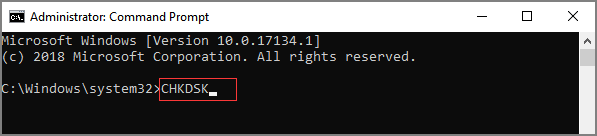
Step 1. Press the Windows key and type cmd.
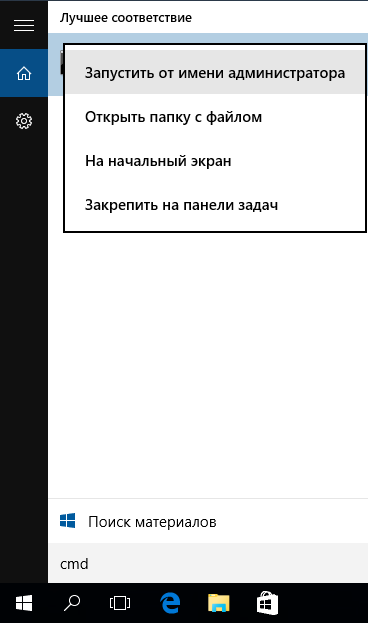
Step 2. Right-click «Command Prompt» and choose «Run as administrator».
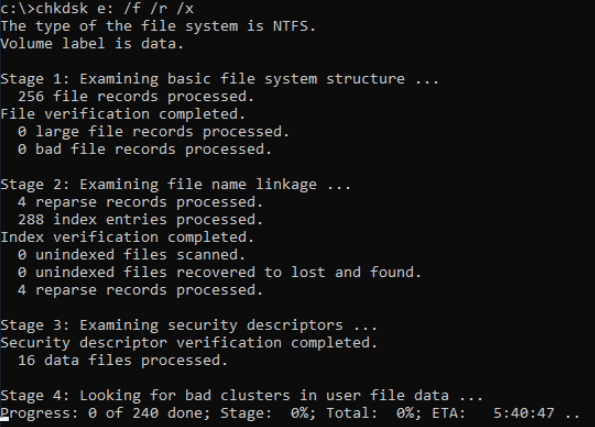
Step 3. Enter the following command and press Enter: chkdsk C: /f /r /x. Replace «C» with the drive letter of the partition you want to repair.

Do not interrupt CHKDSK and wait patiently for the process to end.
Aside from applying CHKDSK to fix disk errors, here are some tutorials that you may follow to learn more details about this command:
Run CHKDSK on Windows 8.1/8
To run the utility from Command Prompt for Windows 8.1/8 users, here are the instructions:
Step 1. Press the Windows and C key to open the Charm bar.
Step 2. Select «Search» and type cmd.
Step 3. Right-click on «Command Prompt» and click «Run as administrator.»
Step 4. When Command Prompt launches, type the command below and press «Enter»: chkdsk E: /f /r /x.
Run CHKDSK on Windows 7 CMD
If you are a Windows 7 user, you can run the CHKDSK command by the following steps:
Step 1. Click «Start». Type cmd at the search box.
Step 2. Right-click on cmd.exe and click «Run as Administrator». Enter your Administrator password if necessary.
Step 3. When cmd.exe opens, type the command below and press «Enter»: chkdsk c /f /r.
If you receive the «Chkdsk cannot run because the volume is in use by another process.» message, type Y to restart the computer and let the utility to run a scan at the next boot of your PC.
Extended Reading:
If you are looking for a guide to run CHKDSK to check and fix disk errors on Wnidows 11, try this recommended guide page and you’ll learn how to do so.
![]()
Check and Fix Disk Error in Windows 11
Are you looking to check disk errors in Windows 11? If yes, you might need a guide on checking and fixing disk errors in Windows 11. We have compiled the best methods for you.
2. Use CHKDSK/F/R in Windows PowerShell
If the Command Prompt not working in Windows 10, you can also run the CHKDSK /F or /R command in Windows PowerShell to fix hard drive errors.
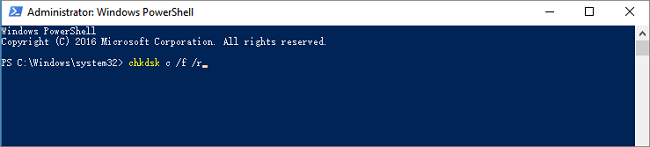
Step 1. Click the Search button and type PowerShell.
Step 2. Right-click the PowerShell and choose Run as administrator.
Step 3. Type chkdsk c /f /r to start fixing disk error. Replace C with the drive letter of the target disk.
3. Run CHKDSK Alternative — CheckDisk in Properties Window
Running the Check Disk tool from the Windows desktop is easy. Follow the steps below to run CHKDSK in Windows 10. It works the same way on Windows 8 and Windows 7.
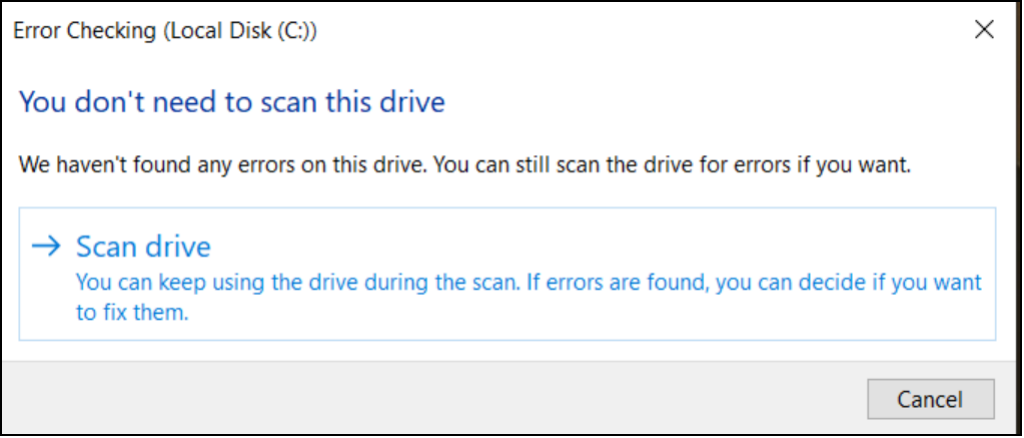
Step 1. Open This PC in File Explorer > right-click the HDD/SSD you want to scan > choose «Properties».
Step 2. Under the Tools tab > click the «Check» button under the Error-checking section.
Step 3. Next, you can choose to Scan drive if wanted or Repair drive if errors were found.
Step 4. When the scanning finishes, click on the Show Details link to see the CHKDSK log in Event Viewer.
Conclusion
Any time you have hard drive errors or corrupted files, the CHKDSK can be a lifesaver. You can use the disk error checker that comes with every Windows version with the full guide above.
Or you can use the ultimate disk management tool — EaseUS Partition Master to repair organize your hard drive to enhance system performance easily.
FAQs About CHKDSK /F /R That You May Be Interested In
You may encounter CHKDSK related problems; what to do then? Here are the common issues of CHKDSK errors; read on to figure out the solutions.
1. Is CHKDSK R safe?
It’s safe to run the CHKDSK /R command under normal circumstances as long as you’re using the syntax properly. There are different parameters with CHKDSK; you can check the CHKDSK parameters and choose the one that suits your problem to fix disk errors.
2. How long does chkdsk /f /r take?
It depends.
- chkdsk -f should take under an hour on that hard drive.
- chkdsk -r will take some time. It could take over an hour, maybe two, three, or more, depending on your partitioning.
You can interrupt the scan, but not recommended. Canceling or interrupting CHKDSK should not leave the volume any more corrupt than it was before CHKDSK was run. You can start it again, and it will check and repair any remaining corruption on the volume.
3. What to do when CHKDSK is stuck or frozen?
- Restart your computer.
- Press Esc or Enter to stop chkdsk from running.
- Run the Disk Cleanup utility to clear out junk files.
- Open an elevated CMD, type sfc /scannow, and press Enter to run the System File Checker.
- Restart and exit chkdsk again during the startup by pressing Esc or Enter.
- Open CMD as admin, type Dism /Online /Cleanup-Image /RestoreHealth, and press Enter to repair the Windows image.
- Run CHKDSK again.
The scan should be able to run to completion this time.
4. CHKDSK /F /R VS CHKDSK /R /F on Windows
What’s the difference between CHKDSK /F /R and CHKDSK /R /F commands on Windows computer?
This is no much difference between chkdsk /f /r and chkdsk /r /f. The only difference is the sequence of two parameters /f and /r. /f means to fix errors on target disk and /r means to locate bad sectors and recover readable information. Mostly, the correct form should be chkdsk /f /r. Basically, when we don’t know if the target drive contains bad sectors, we would suggest that you run the overall CHKDSK command: chkdsk /f /r /x together.
Команда CHKDSK предназначена для проверки и устранения логических ошибок на жестком диске. Ниже мы рассмотрим особенности её работы и другие функции утилиты.
![]()
Содержание
- Проверка жесткого диска в работающей Windows
- Проверка диска из командной строки
- Команды для работы с CHKDSK в командной строке
- Восстановление информации с проблемного жесткого диска
Команда CHKDSK является встроенной утилитой, основная функция которой заключается в проверке и исправлении ошибок жесткого диска. Помимо этого, при помощи CHKDSK можно быстро находить и исправлять поврежденные сектора, а также ошибки в файловой системе накопителя.
Таким образом, CHKDSK – важная утилита, позволяющая продлить строк службы жесткого диска, а также увеличить скорость его работы, поэтому абсолютно каждый пользователь ОС Windows должен уметь пользоваться и проверять свои носители встроенными средствами. Ниже будет представлено несколько способов проверки дисков из работающей ОС и командной строки.
Проверка жесткого диска в работающей Windows
Для проверки логических разделов жесткого диска при помощи CHKDSK в работающей Windows необходимо:
Шаг 1. Открыть каталог «Этот компьютер», нажать правой кнопкой мыши по необходимому логическому разделу и выбрать пункт «Свойства».

Шаг 2. В открывшемся окне перейти во вкладку «Сервис» и выбрать пункт «Проверить».

Шаг 3. Подтверждаем проверку диска и после ее завершения нажимаем по кнопке «Показать подробности».

Шаг 4. Вся информация и результаты проверки диска будут доступны в графе «Сведения».

Проверка диска из командной строки
В некоторых ситуациях пользователю может понадобиться запуск утилиты CHKDSK из командной строки. Такая возможность позволит проверить и восстановить диск в том случае, если система не запускается и графический интерфейс Windows остается недоступным.
Чтобы запустить командную строку из среды восстановления ОС, необходимо:
Шаг 1. Воспользоваться установочным диском или загрузочной флешкой Windows и после окна выбора языка нажать по пункту «Восстановление системы». Перейдя в среду восстановления, следует нажать по пункту «Поиск и устранение неисправностей».

Шаг 2. На следующем окне следует выбрать пункт «Дополнительные параметры», после чего можно обнаружить кнопку «Командная строка».

Также всегда остается возможность запустить утилиту проверки дисков через командную строку из работающей системы. Важно! Для использования полного потенциала CHKDSK следует производить запуск командной строки только с правами администратора. В ином случае утилита CHKDSK проведет проверку без устранения выявленных неполадок.
Запустить командную строку или Windows PowerShell от имени администратора можно, нажав правой кнопкой мыши по кнопке «Пуск» и выбрав пункт «Командная строка(администратор)».

Команды для работы с CHKDSK в командной строке
Находясь в командной строке, можно провести быструю проверку жесткого диска (аналогичная проверка была описана в начале) без перезагрузки системы. Для этого достаточно ввести команду «CHKDSK» и подтвердить действие кнопкой Enter.

Для проверки диска и исправления логических ошибок на нем необходимо воспользоваться командой «chkdsk C: /F /R», где С – имя необходимого диска.

Для подтверждения проверки диска после перезагрузки необходимо нажать клавишу «Y».
Помимо полного анализа и по возможности исправления поврежденных секторов, утилита может выполнять проверку и решение ошибок только файловой системы. Для этого следует воспользоваться командой «chkdsk C: /F» и подтвердить действие «Y».

С полным списком и описанием возможностей утилиты можно ознакомится, введя команду «chkdsk /?».

Стоит отметить, что проблемы с диском могут быть вызваны не только программными ошибками, но и физическим износом, механическими повреждениями поверхности и другими факторами, которые невозможно исправить при помощи встроенной утилиты CHKDSK.
Чтобы получить полную картину о состоянии носителя, можно воспользоваться бесплатной программой для проверки дисков Victoria. Узнать о том, как пользоваться, исправлять и проводить диагностику HDD с помощью Victoria Вы сможете в статье: «Используем программу Victoria для тестирования и исправления жесткого диска»
Восстановление информации с проблемного жесткого диска
Проблемы с жестким диском – всегда большая угроза для важной информации и документов, хранящихся на компьютере. Чтобы быть готовым к любым обстоятельствам, рекомендуем всегда иметь под рукой специальную программу для эффективного восстановления файлов RS Partition Recovery. Данная утилита поможет восстановить всю утерянную информацию даже в самых сложных случаях.

При помощи RS Partition Recovery можно восстанавливать:
- Случайно удаленные файлы и документы.
- Отформатированные фотографии и медиафайлы.
- Данные, удаленные вирусами.
- Информацию, которая была утеряна при изменении файловой системы и структуры диска.
Часто задаваемые вопросы
CHKDSK это системная утилита, которая предназначена для работы с дисками. CHKDSK не имеет графического интерфейса. Все команды выполняются в командной строке или Windows PowerShell.
Запустите режим Windows Recovery и выберите «Командная строка». Затем выполните командe: «chkdsk C: /F /R». Если нужно просканировать и исправить ошибки на любом другом диске — замените букву «С» на букву вашего диска.
В таких случаях лучше сразу же использовать RS Partition Recovery. Программа создана как раз для таких ситуаций и успешно восстанавливает данные в 99% случаев.
К сожалению нет. CHKDSK занимается поиском и исправлением логических ошибок на диске, в то время как ошибка RAW – это ошибка файловой системы. В таком случае лучше всего восстановить важные данные при помощи RS Partition Recovery, а затем отформатировать диск.
В поиске Windows впишите «Windows Event Viewer» и в открывшейся программе перейдите в Windows Logs -> Application. Затем щелкните правой кнопкой мыши и выберите «Найти». Введите «chkdsk» и нажмите «Enter». В открывшихся результатах поиска найдите последнее событие с Event ID 1001 и источником Wininit. Затем откройте вкладку «General». Там вы найдете подробный лог сканирования накопителя.
Сценарий: У вас системные ошибки, и их необходимо исправить.
Утилита проверки и исправления ошибок на жёстком диске Microsoft CHKDSK (“проверка диска”) была представлена более 30 лет назад, но используется до сих пор. Даже пользователи последних версий операционной системы Microsoft могут воспользоваться данной командой, чтобы выполнить проверку своих жёстких дисков на ошибки и их исправление при необходимости. Ниже приведена инструкция по запуску CHKDSK в Windows 10.
Если после использования утилиты CHKDSK у вас всё ещё возникают ошибки, попробуйте альтернативные программы.
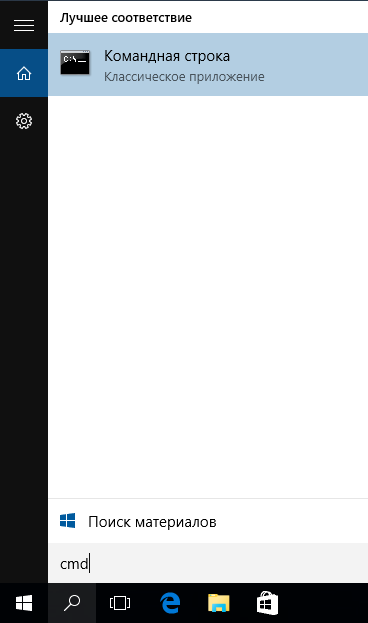
Сначала выберите “Поиск в Windows” и выполните поиск Командной строки, введя “cmd”. Щёлкните по ярлыку правой кнопкой мыши и выберите “Запуск от имени администратора” в контекстном меню.
После входа в качестве администратора, вы окажетесь в Командной Строке Windows, знакомой пользователям операционных систем до Windows NT. Введите команду “chkdsk”, нажмите пробел, а затем букву диска, который вы желаете проверить или исправить. В нашем случае, это внешний диск “L”.
Выполнение команды CHKDSK без аргументов лишь покажет состояние диска, и не исправит ошибки, присутствующие на разделе. Чтобы попросить CHKDSK исправить ошибки на диске, нужно указать параметры. После ввода буквы диска введите следующие параметры, каждый из которых отделён пробелом: “/f /r /x”.
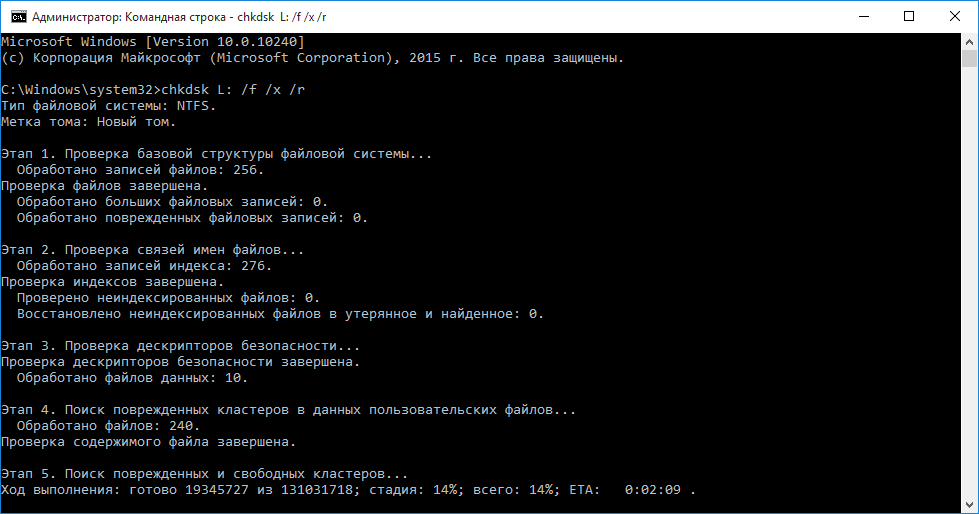
Параметр “/f” указывает CHKDSK выполнить исправление найденных ошибок; “/r” указывает программе обнаружить повреждённые секторы на диске и восстановить информацию, которую возможно прочитать; “/x” заставляет диск размонтироваться перед началом процесса. Дополнительные параметры доступны для более специализированных заданий, и подробно расписаны на web-сайте Microsoft.
В итоге полная команда, которую требуется ввестив Командную Строку, выглядит так:
chkdsk [Диск:] [параметры]
В нашем случае:
chkdsk L: /f /r /x
Стоит отметить, что CHKDSK должен заблокировать диск, поэтому не удастся выполнить проверку системного загрузочного диска, если компьютер работает. В нашем случае целевой диск – внешний, поэтому процесс начнётся сразу после ввода команды. Если целевой диск – загрузочный, система спросит вас, хотите ли вы запустить команду перед следующей загрузкой. Введите “yes”, перезагрузите компьютер, и команда запустится до загрузки операционной системы, получив полный доступ к диску.
Выполнение команды CHKDSK может занять продолжительное время, особенно на больших дисках. При завершении программа подытожит результаты, такие как общий объём места на диске, размещение байтов, а также самое главное – информацию о найденных и исправленных ошибках.
Команда CHKDSK доступна во всех версиях Windows, поэтому пользователи как Windows 7, так и Windows XP, могут выполнить приведённые выше шаги для инициализации проверки жёсткого диска. В случае использования старых версий Windows, можно выполнить следующее:
- Нажать “Пуск – Выполнить…”
- Ввести cmd
- Ввести chkdsk [Диск:] [параметры]
Этапы “CHKDSK”
5 главных этапов описаны ниже:
Этап 1. Проверка базовой структуры файловой системы…
На первом этапе файлы с записями в MFT (главная файловая таблица) сравниваются и проверяются.
Этап 2. Проверка связей имен файлов…
На данном этапе проверяются директории и структура. Они проверяются на соответствие размеру файла и временной метки информации.
Этап 3. Проверка дескрипторов безопасности…
На последнем этапе проверки (3), файлы и папки проверяются на наличие дескрипторов безопасности, включая информацию о владельце прав NTFS.
Четвёртый и пятый этапы выполняются только при наличии аргумента /r!
Этап 4. Поиск поврежденных кластеров в данных пользовательских файлов…
Секторы кластера, включая данные, проверяются на возможность использования.
Этап 5. Поиск поврежденных и свободных кластеров…
На пятом этапе секторы кластера проверяются на отсутствие данных.
Если невозможно решить проблемы с жёстким диском, используя “CHKDSK”, рекомендуется использовать утилиты для работы с жёстким диском соответствующих производителей.
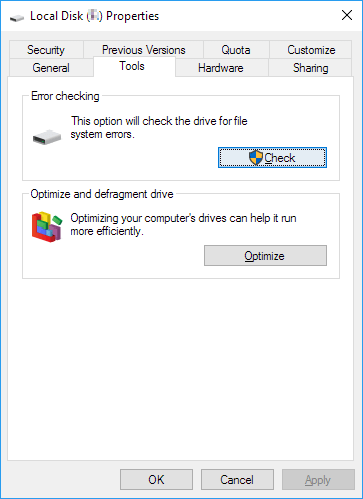
Также в Windows можно получить доступ к графическому интерфейсу CHKDSK
Для выполнения проверки с использованием графического интерфейса, выполните следующее:
Щёлкните правой кнопкой мыши по диску, который вы хотите проверить. Выберите Свойства – Сервис – Выполнить проверку.
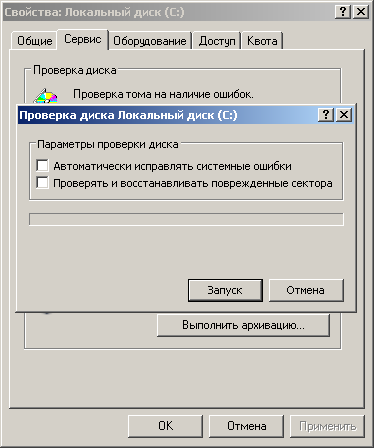
Это графический интерфейс “CHKDSK”. Две опции соответствуют параметрам “/f” и “/r”.
Alignment Tool, Backup & Recovery, Disk Wiper, Drive Copy, ExtFS for Windows, GPT Loader, Hard Disk Manager, HFS+ for Windows, Migrate OS to SSD, Partition Manager, Virtualization Manager, Продукты для Windows, Частные
Tags: check, check disk, chkdsk, disk, windows, диск, инструкция, общее, ошибки, проблема, проверить
![]() Loading…
Loading…