| AppCrashView v1.35 — View application crashes (.wer files) Copyright (c) 2009 — 2018 Nir Sofer |
Related Utilities
- BlueScreenView — View the Blue screen of death (STOP error) information stored in dump files.
- WhatIsHang — Get information about Windows software that stopped responding (hang)
- NK2Edit — Edit, merge and fix the AutoComplete files (.NK2) of Microsoft Outlook.
Description
AppCrashView is a small utility for Windows Vista and Windows 7 that displays the details of all application crashes occurred in your system.
The crashes information is extracted from the .wer files created by the Windows Error Reporting (WER) component of the operating system every time that a crash is occurred.
AppCrashView also allows you to easily save the crashes list to text/csv/html/xml file.
System Requirements
For now, this utility only works on Windows Vista, Windows 7, Windows Server 2008, Windows 8, and Windows 10. simply because the earlier versions of Windows don’t save the crash information into .wer files.
It’s possible that in future versions, I’ll also add support for Windows XP/2000/2003 by using Dr. Watson (Drwtsn32.exe) or other debug component that capture the crash information.
Versions History
- Version 1.35
- Added ‘Quick Filter’ feature (View -> Use Quick Filter or Ctrl+Q). When it’s turned on, you can type a string in the text-box added under the toolbar and AppCrashView will instantly filter the application crashes list, showing only lines that contain the string you typed.
- Version 1.31
- Added ‘Run As Administrator’ option (Ctrl+F11), which allows you to easily run AppCrashView as administrator for viewing crash reports that are not accessible for non-admin user.
- Fixed bug: AppCrashView failed to remember the last size/position of the main window if it was not located in the primary monitor.
- Version 1.30
- Added ‘Exception Code Description’ column.
- Version 1.25
- Added option to delete the selected reports.
- Version 1.21
- Fixed to display date/time values according to daylight saving time settings.
- Version 1.20
- Added ‘Open Report File Folder’ option.
- Added ‘Open Process Folder’ option.
- Version 1.15
- Added /ReportsFolder command-line option, which allows you to specify the exact reports folder you want to load, for example:
AppCrashView.exe /ReportsFolder «c:\temp\wer»
- Added /ReportsFolder command-line option, which allows you to specify the exact reports folder you want to load, for example:
- Version 1.12
- Fixed bug: The crash items located under ‘All Users’ profile displayed twice.
- Added ‘Auto Size Columns+Headers’ option.
- Version 1.11
- Added ‘Mark Odd/Even Rows’ option, under the View menu. When it’s turned on, the odd and even rows are displayed in different color, to make it easier to read a single line.
- Version 1.10
- Added ‘Add Header Line To CSV/Tab-Delimited File’ option. When this option is turned on, the column names are added
as the first line when you export to csv or tab-delimited file.
- Added ‘Add Header Line To CSV/Tab-Delimited File’ option. When this option is turned on, the column names are added
- Version 1.07
- Fixed issue: removed the encoding from the xml string, which caused problems to some xml viewers.
- Version 1.06
- Added /ShowReportQueue and /ShowReportArchive command-line options
- Version 1.05
- Added more WER folders.
- Added ‘Show ReportArchive Files’ and ‘Show ReportQueue Files’ options.
‘Show ReportQueue Files’ option is turned off by default, because the ReportQueue folder doesn’t contain crashes or critical errors. - Added /ProgramData command-line option.
- Version 1.00 — First release.
Using AppCrashView
AppCrashView doesn’t require any installation process or additional dll files. In order to start using it,
simply run the executable file — AppCrashView.exe
The main window of AppCrashView contains 2 pane. The upper pane displays the list of all crashes found in your system,
while the lower pane displays the content of the crash file that you select in the upper pane.
You can select one or more crashes in the upper pane, and then save them (Ctrl+S) into text/html/xml/csv file or copy them
to the clipboard ,and paste them into Excel or other spreadsheet application.
Command-Line Options
| /ProfilesFolder <Folder> |
Specifies the user profiles folder (e.g: c:\users) to load. If this parameter is not specified, the profiles folder of the current operating system is used. |
| /ReportsFolder <Folder> | Specifies the folder that contains the WER files you wish to load. |
| /ShowReportQueue <0 | 1> | Specifies whether to enable the ‘Show ReportQueue Files’ option. 1 = enable, 0 = disable |
| /ShowReportArchive <0 | 1> |
Specifies whether to enable the ‘Show ReportArchive Files’ option. 1 = enable, 0 = disable
|
| /stext <Filename> | Save the list of application crashes into a regular text file. |
| /stab <Filename> | Save the list of application crashes into a tab-delimited text file. |
| /scomma <Filename> | Save the list of application crashes into a comma-delimited text file (csv). |
| /stabular <Filename> | Save the list of application crashes into a tabular text file. |
| /shtml <Filename> | Save the list of application crashes into HTML file (Horizontal). |
| /sverhtml <Filename> | Save the list of application crashes into HTML file (Vertical). |
| /sxml <Filename> | Save the list of application crashes into XML file. |
| /sort <column> |
This command-line option can be used with other save options for sorting by the desired column. If you don’t specify this option, the list is sorted according to the last sort that you made from the user interface. The <column> parameter can specify the column index (0 for the first column, 1 for the second column, and so on) or the name of the column, like «Event Name» and «Process File». You can specify the ‘~’ prefix character (e.g: «~Event Time») if you want to sort in descending order. You can put multiple /sort in the command-line if you want to sort by multiple columns.
Examples: |
| /nosort |
When you specify this command-line option, the list will be saved without any sorting.
|
Translating AppCrashView to other languages
In order to translate AppCrashView to other language, follow the instructions below:
- Run AppCrashView with /savelangfile parameter:
AppCrashView.exe /savelangfile
A file named AppCrashView_lng.ini will be created in the folder of AppCrashView utility. - Open the created language file in Notepad or in any other text editor.
- Translate all string entries to the desired language.
Optionally, you can also add your name and/or a link to your Web site.
(TranslatorName and TranslatorURL values) If you add this information, it’ll be
used in the ‘About’ window. - After you finish the translation, Run AppCrashView, and all translated
strings will be loaded from the language file.
If you want to run AppCrashView without the translation, simply rename the language file, or move
it to another folder.
License
This utility is released as freeware.
You are allowed to freely distribute this utility via floppy disk, CD-ROM,
Internet, or in any other way, as long as you don’t charge anything for this.
If you distribute this utility, you must include all files in
the distribution package, without any modification !
Disclaimer
The software is provided «AS IS» without any warranty, either expressed or implied,
including, but not limited to, the implied warranties of merchantability and fitness
for a particular purpose. The author will not be liable for any special, incidental,
consequential or indirect damages due to loss of data or any other reason.
Feedback
If you have any problem, suggestion, comment, or you found a bug in my utility,
you can send a message to nirsofer@yahoo.com
AppCrashView is also available in other languages. In order to change the language of
AppCrashView, download the appropriate language zip file, extract the ‘appcrashview_lng.ini’,
and put it in the same folder that you Installed AppCrashView utility.
| Language | Translated By | Date | Version |
|---|---|---|---|
| Brazilian Portuguese | Paulo Guzmán | 27/03/2013 | 1.11 |
| Danish | 19/08/2012 | 1.11 | |
| Dutch | Jan Verheijen | 12/11/2018 | 1.35 |
| French | aMadEUs | 11/10/2011 | 1.11 |
| French | Anthony MAGNAN (Netbew) | 10/02/2022 | 1.35 |
| German | «Latino» auf WinTotal.de | 11/11/2018 | 1.35 |
| Greek | geogeo.gr | 05/06/2019 | 1.35 |
| Hungarian | Timinoun | 12/12/2022 | 1.35 |
| Italian | Luca Regazzi (Okon3) | 20/08/2010 | 1.10 |
| Japanese | maboroshin | 03/07/2020 | 1.35 |
| Korean | Jong Ku Lee(이종구) | 21/01/2011 | 1.00 |
| Persian | DinoTechno | 26/03/2022 | 1.35 |
| Polish | Traxter | 06/08/2011 | 1.10 |
| Romanian | Jaff (Oprea Nicolae) | 29/12/2018 | 1.35 |
| Russian | Dmitry Yerokhin | 14/11/2018 | 1.35 |
| Russian | Sergey Dindikov (Zeroes) | 02/02/2010 | 1.00 |
| Simplified Chinese | Rwang | 29/04/2020 | 1.35 |
| Slovak | František Fico | 12/11/2018 | 1.35 |
| Spanish | Washington Guerrero | 22/07/2012 | 1.11 |
| Spanish | David Viglianco | 23/01/2011 | 1.10 |
| Swedish | Tommy Kellerman | 29/03/2011 | 1.11 |
| Traditional Chinese | ivangundampc | 12/08/2013 | 1.12 |
| Traditional Chinese | Danfong Hsieh | 12/11/2018 | 1.35 |
| Valencian | vjatv | 08/02/2010 | 1.00 |
by Madalina Dinita
Madalina has been a Windows fan ever since she got her hands on her first Windows XP computer. She is interested in all things technology, especially emerging technologies… read more
Updated on
- If you want to know what’s wrong with your PC, you need to check the event history with the best Windows event log viewers.
- The most convenient app is already built into your OS so you can use that first.
- For more details and features, you should go for a more advanced tool like Event Log Explorer.
- A cloud-based tool from Sentinel Agent can also monitor the PC performance.

XINSTALL BY CLICKING THE DOWNLOAD FILE
Get rid of malfunctioning drivers on your PC
SPONSORED
Drivers can often become corrupt as they can interfere with malfunctioning system files, thus arriving to be installed but not running correctly. To keep your drivers running smoothly, your Windows OS must run even smoother. Get it in perfect shape by following the steps below:
- Download Fortect and install it on your PC.
- Start the tool’s scanning process to look for corrupt files that are the source of your problem
- Right-click on Start Repair so the tool can start the fixing algorithm
- Fortect has been downloaded by 0 readers this month, rated 4.4 on TrustPilot
Event log viewers are programs that track important events on your computer. Every app or program that runs on your computer leaves a trace in the event log, and before apps stop or crash, they post a notification.
Every single event or change made on your computer is registered in the event log.
In other words, an event viewer is a program that scans long text log files, groups them and adds a simpler interface on huge amounts of technical data.
In case your computer doesn’t work properly, event viewers are essential because they offer you important information on the source of the problem.
Windows 10 comes with its own built-in event log viewer that offers users an in-depth image of the processes taking place on their computers.
If you want to analyze particular event information, you can also use third-party event viewers.
How to use Windows Event Viewer
- Type event in the Windows search tab and select Run as administrator to start Event Viewer with full privileges.

- Next, click on the category of the event from the left pane, and the list of events will appear on the upper-middle pane.
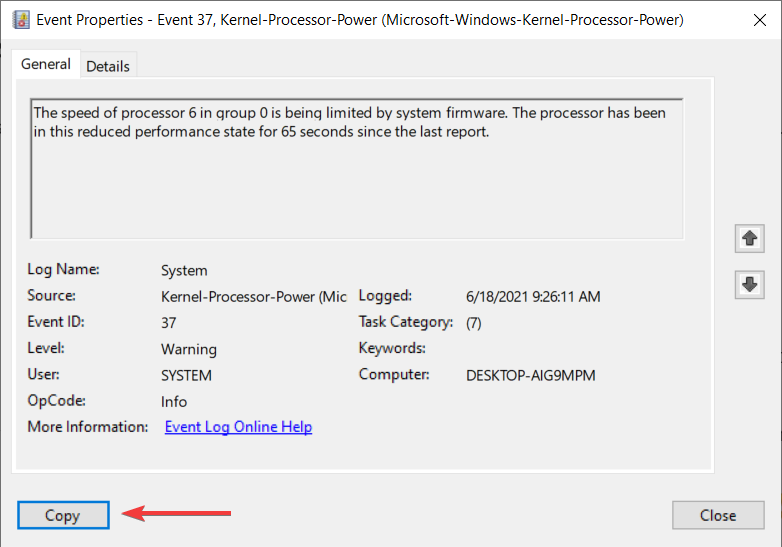
- When you click on an event, you will get the details on the bottom-middle pane; double-clicking it will open the details in a separate window.
- In our example, we are checking out a kernel warning that a core of the processor was limited by system firmware. Hitting the Copy button with copy all the information in the clipboard to paste it in a document or an Excel file.

- You can also use all the options from the right pane to gain more information. For instance, you can save the event as a .evtx file by clicking on Save Selected Events.


Windows Event Viewer is great to get basic information on events on your system and it can be used easily for saving important information.
What are the best Windows 10 event log viewers?
Windows Event Log Viewer
Many Windows users rely on this built-in tool to check the events that take place on their computers.
This tool has two major advantages: it’s already installed on your computer and has a very intuitive interface. You can launch the Windows Event Log Viewer by typing event viewer in the search bar.
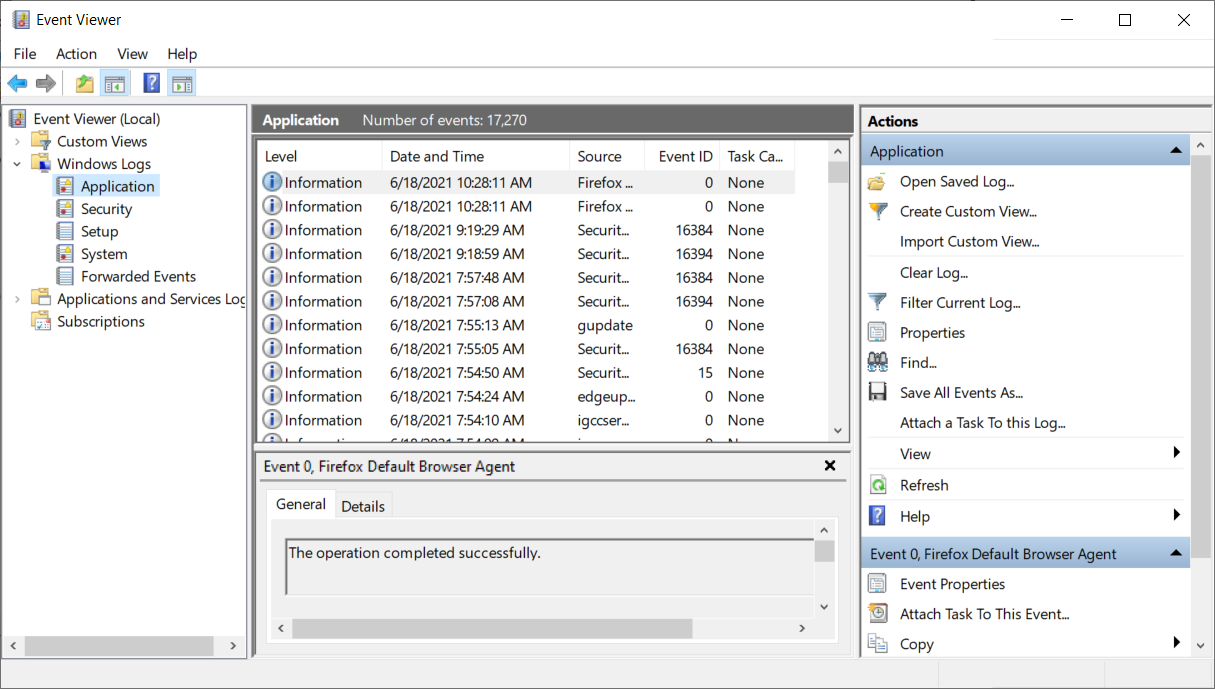
The tool’s screen is divided into three parts: the event categories are located in the left-hand sidebar, details about log events can be found in the middle section of the window, while the available actions are listed in the right-hand sidebar.
In the left pane, you can choose from all the event types. The top one is aimed for the administrative event.
Clicking on each one on the center pane, will provide you with general or detailed information about the event.
The next two categories from the left are the Windows logs and the Applications and services logs. The first refers, of course, exclusively to the OS and its built-in apps.
The action pane from the right offers you all the possible options to interact with the logs but the most important are the save and export options that are paramount to sharing the reports to specialized help.
The Windows Event Log Viewer offers reports about five log events:
- Application events: reports about app/ program issues
- Security events: reports about the results of security actions
- Setup events: mainly refers to domain controllers
- System events: these are reports sent by Windows system files about the issues encountered and are usually self-healing issues
- Forwarded events: these are reports sent by other computers
Event Log Explorer

This event log viewer allows users to view, analyze and monitor events recorded in Windows’ event logs.
Event Log Explorer is better than Microsoft’s own Event Log Viewer, bringing more features to the table.
Thanks to this tool, users can analyze various event logs: security, application, system, setup, directory service, DNS, and more.
The tool can even access Windows event logs and event log files from remote servers and you can view more of them at one time in separate windows or in one big, merged window.
If it’s relevant, you can choose between legacy Windows NT API and modern Windows Event Log API to access the logs.
Event Log Explorer reads events into its own temporary storage for faster log analysis. Of course, you can choose between memory and disk storage.
The software also allows you to consolidate events in one single view to review it as a solid log. You can even save it as an EVT file.
Other features include:
- Instant access to event logs – Event Log Explorer works with both local and remote event logs, as well as with event log files in EVT and EVTX format
- Efficient filtering – filter by event descriptions using regular expressions, filter by security event parameters, or you can build complex filters and organize them into a filter library
- Export events and report generator – export and print events
⇒ Get Event Log Explorer
MyEventViewer

MyEventViewer is another interesting, simpler alternative to Microsoft’s Event Log Viewer. This tool lets you watch multiple event logs in one list, together with event description and data.
Also, the event description and data are displayed in the main window, instead of opening a new one.
No installation process or additional DLL files are required to run this software, all you need to do is to launch the executable file.
With MyEventViewer, you can select multiple event items and save them to HTML/Text/XML files. Of course, there’s also the option to copy them to the clipboard and paste them afterward into and Excel document.
MyEventViewer’s mai window is composed by 2 panes. The top one shows you the list of all events and when you select one you will see the description in the lower pane window.
You can remove/add the logs that you want to view from the main window by using the Logs menu.
The software also has command-line commands for advanced users. The admins will be happy to use them for a more efficient process that implicates more computers.
Other features include:
- It packs only the main features and options you need to monitor your system
- The simplistic interface is very user-friendly
- You can view the events from a remote computer
- Certain events can be hidden from specific users
- Events can be filtered using a series of criteria
⇒ Get MyEventViewer
FullEventLogView

This is NirSoft’s most recent event viewer, it was released on September 9, 2016. FullEventLogView is a simple tool for Windows 10 that displays the details of all Windows events in a table.
FullEventLogView is the upgraded version of MyEventViewer:
MyEventViewer is a very old tool […]. The old programming interface still works even on Windows 10, but it cannot access the new event logs added on Windows Vista and newer systems. […]
FullEventLogView uses the new programming interface, so it displays all events.
The tool allows you not only to view the events of your local computer but also the events of a remote computer on your network, and events stored in .evtx files.
It also allows you to export the events list to text/csv/tab-delimited/html/xml file from the GUI and from the command-line.
This program works on any version of Windows, including Windows Vista and up to Windows 10. Both 32-bit and 64-bit systems are supported.
⇒ Get FullEventLogView
SentinelAgent

SentinelAgent is a cloud-based Windows monitoring software. This tool registers, stores and analyzes event logs, performance metrics, and system inventory from any Windows PCs, tablets, and servers on your network.
SentinelAgent is available for home users, small and medium businesses and enterprise clients.
The service for home users notifies you when your devices are having problems, and help you identify the source of the problem as well.
No configuration is necessary, as the tool is already pre-configured to monitor specific computer performance elements and alert you by email as soon as issues are detected.
If you opt for a professional version, you will need to install the agent on system you want to monitor.
Then, if those devices start having problems, you will get notified. You will also be able to access a log with 7 days of system data that is stored outside the PC that is acting up to get to the root of the issue.
Other features include:
- 7 Days Data Retention (Rotating)
- Monitor All Your Machines From 1 Account
- Pre-Configured Notifications for CPU/Disk Errors
- Pre-Configured Notifications for Event ID Errors
- No Ads. No Bloat
- Network Installation Ready
- 2.7 Mb Disk Space Required
⇒ Get SentinelAgent
- Event ID 7000: How to fix this Service control manager error
- Windows Software Development Kit: Everything You Need to Know
- What is Microsoft 365 Lighthouse & How to Access it?
We hope this top Windows 10 event log viewers help you to choose the tool that best suits your monitoring needs.
If you’re interested in other options, you can also check our log monitoring software list for experienced admins.
Have you already tried out some of the event viewers listed in this article? Tell us more about your experience in the comment section below.
![]()
Системный журнал событий (он же «Просмотр событий» или «Event Viewer») в Windows 10 – это один из самых важных инструментов в операционной системе, к которому прибегают не все пользователи, а зря. Ведь он помогает показать все важные ивенты, которые происходят как с самой ОС, так и с установленными программами. В таком случае даже неопытный пользователь может легко найти решение по конкретной проблеме, так как в нем сохраняются все логи ошибок. Ну или хотя бы «загуглить» информацию, которая уже поможет.
Далее я расскажу, как открыть журнал событий (ошибок), создать ярлык на рабочем столе или отключить службу. На самом деле инструкции почти ничем не отличаются и от других версий «Окон», поэтому вы можете пользоваться ею всегда. Если в процессе возникнут какие-то вопросы (в том числе по ошибкам, которые вы найдете), то смело обращайтесь ко мне в комментариях, и я вам постараюсь помочь. Поехали!
Содержание
- Способ 1: Панель управления и создание ярлыка для быстрого доступа
- Способ 2: Выполнить
- Способ 3: Поиск
- Способ 4: Прямой запуск
- Можно ли отключить журнал событий и как это сделать?
- Задать вопрос автору статьи
Способ 1: Панель управления и создание ярлыка для быстрого доступа
Если ранее её можно было вызвать с помощью правой кнопки по кнопке «Пуск», то почему-то разработчики в данный момент её оттуда убрали. Переживать не стоит, её полностью убирать не будут, но сам факт достаточно странный. Поэтому мы воспользуемся другим методом.
- Открываем «Панель управления». Это можно сделать двумя способами. Первый – зажимаем вспомогательную кнопку (находится между Ctrl и Alt) – не отпускаем её и жмем по букве R. Откроется приложение «Выполнить». Вводим команду:
control
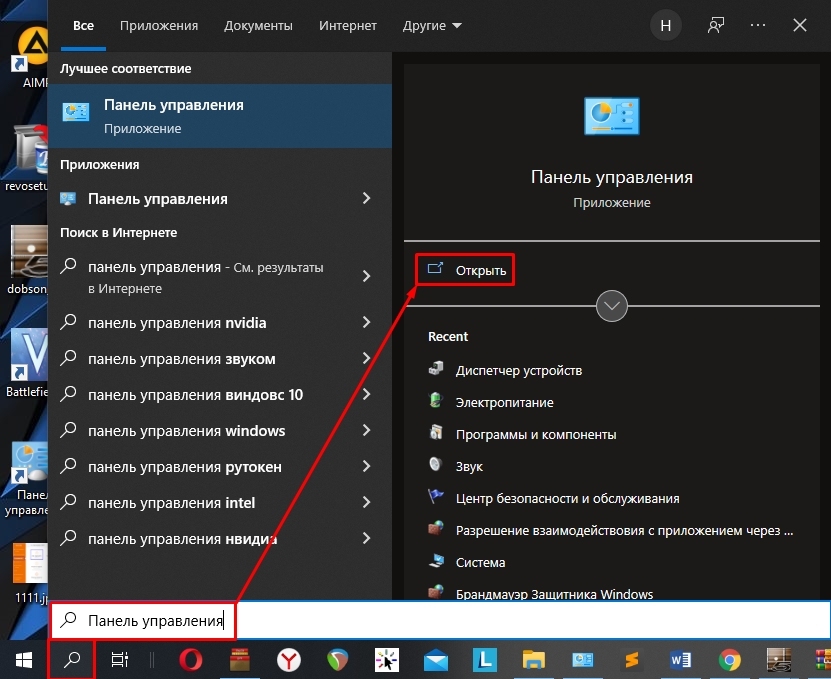
- Второй способ – это воспользоваться поиском. Чтобы его открыть нажмите по значку лупы и введите название.
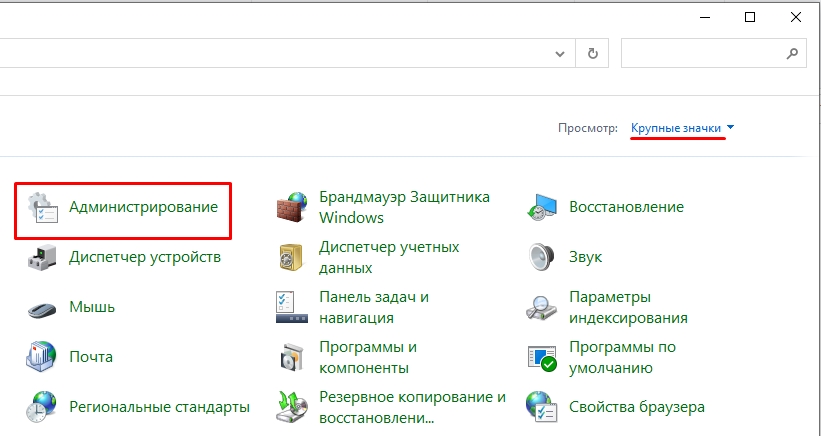
- Находим раздел «Администрирование» и жмем по нему. Если вы не можете его найти, то значит у вас установлен неправильный режим просмотра. Посмотрите на картинку ниже и установите такой же режим как у меня.
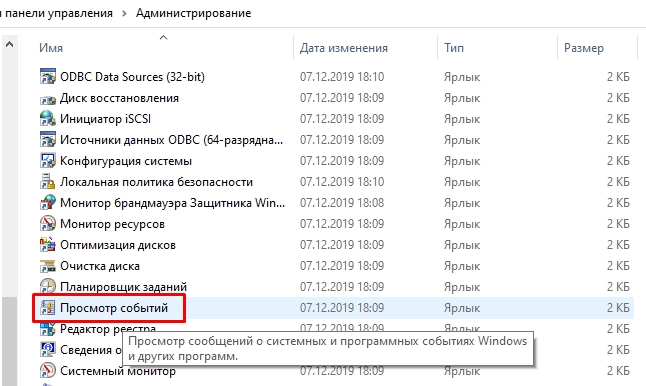
- Далее вы увидите несколько ярлыков – жмем двойным щелчком левой кнопкой мыши по кнопке «Просмотр событий».
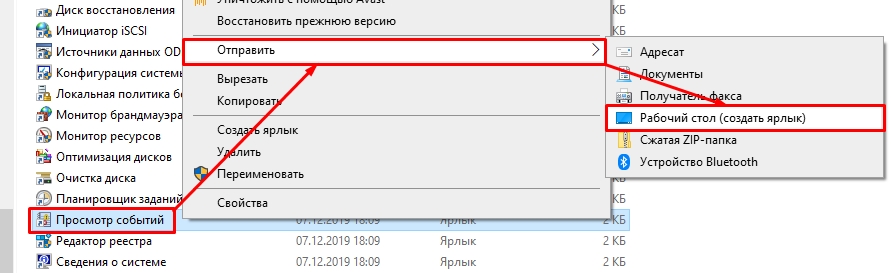
Если вы постоянно работаете с этой системной утилитой, то я вам рекомендую сделать ярлык, который будет расположен на рабочем столе. Для этого кликаем правой кнопкой, далее из выпадающего меню выбираем «Отправить» – «Рабочий стол (создать ярлык)».
Способ 2: Выполнить
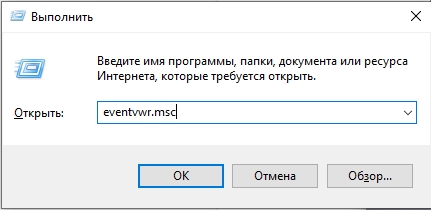
Сейчас вы спросите: а почему мы ранее не воспользовались этим методом, если уже вызывали окно «Выполнить»? – Я хотел, чтобы вы понимали само расположение системной утилиты. Так же мы таким образом знакомимся со структурой операционной системы. В общем воспользуемся нашей любимыми клавишами «WIN + R», чтобы вызвать исполняемую программу и вводим команду:
eventvwr.msc
СОВЕТ! Если каким-то образом кнопки не работают, то вы можете вызвать окно «Выполнить», также через поиск Виндовс.
Способ 3: Поиск
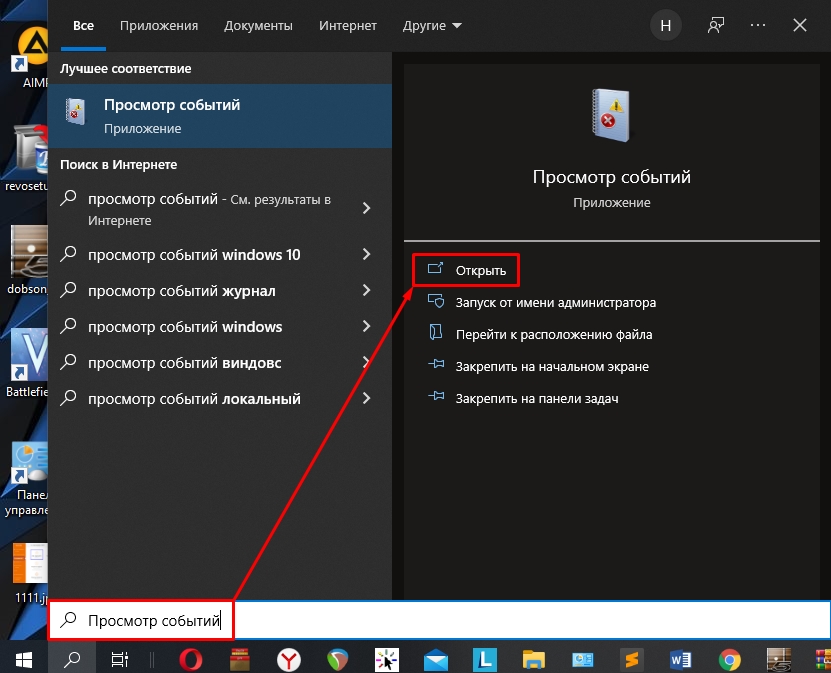
Скорее всего вы уже догадались, что мы сейчас будем делать. Открываем окно поиска операционной системы, нажав по лупе. Кстати окно поиска можно вызвать через + S. Далее в строку поиска вводим:
Просмотр событий
или
eventvwr.msc
Очень важно среди команд выбрать именно «Открыть».
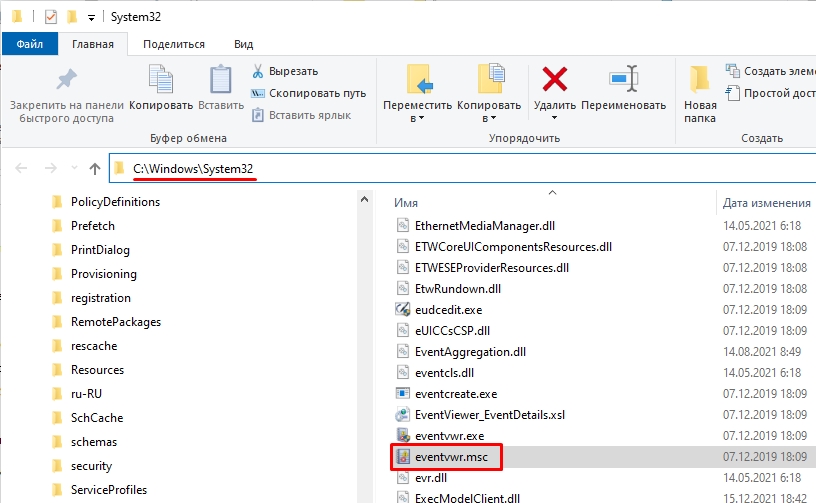
Так как это системная утилита, то её можно запустить прямым методом. Для этого переходим в системный диск «C», открываем папку «Windows» и находим основной раздел «System32». Далее нам нужно найти файл:
eventvwr.msc
Файлов и папок там будет много. Вы можете найти его вручную – все файлы расположены в алфавитном порядке. Или вы можете воспользоваться поиском.
Можно ли отключить журнал событий и как это сделать?
Конечно это не рекомендуется делать. Но если у вас возникли какие-то трудности с этой утилитой, то делаем следующее – сначала используем + R. Вводим команду:
services.msc
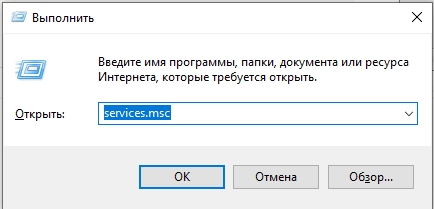
Находим «Журнал событий Windows», открываем его двойным щелчком левой кнопкой мыши. Устанавливаем «Тип запуска» – «Отключена». Жмем «Применить» и перезагружаем комп. Или вы можете «Остановить» лог ошибок вручную, но я все же рекомендую перезапустить ОС.
На этом все, дорогие друзья. Если остались какие-то вопросы, то милости прошу в комментариях под этой статьей. Всем добра!
Журнал событий предназначен для просмотра всех действий, которые выполнила операционная система компьютера. В нем отображаются критические ошибки, предупреждения и сведения о работе драйверов и программ. Используется в целях диагностики, выявления и устранения неполадок.
Путем регулярного просмотра и изучения истории выявляются неисправности и слабые места в защите устройства. Полезен обычным пользователям, системным администраторам и владельцам серверов.
Содержание статьи
- Варианты запуска
- Значок «Пуск»
- Через поиск
- С помощью специальной команды
- Через интерфейс
- Способы применения (краткий инструктаж по работе)
- Знакомство
- Методы очистки
- Ручной
- Создание и использование «.bat»
- Командная строка
- PowerShell
- CCleaner
- Отвечаю на популярные вопросы
- Видео по теме
- Комментарии пользователей
Варианты запуска
Существует четыре основных метода запуска на любой случай.
Значок «Пуск»
Просмотрщик вызывается с помощью правого нажатия по кнопке меню «Пуск» из контекстного меню. Пожалуй, это самый простой и быстрый вариант запуска.

Через поиск
Чтобы найти и открыть журнал событий, нужно в поисковике (знак лупы) ввести фразу «Просмотр событий» и щелкнуть по нему. Правда, этот способ не работает при выключенном индексировании.

С помощью специальной команды
Инструмент работает как отдельное приложение, потому легко вызывается комбинацией через окно выполнить «Win + R — eventvwr.msc — Ок».

Через командную строку — Win + R — CMD — Ctrl + Shift + Alt + Enter (для открытия консоли с правами администратора) — eventvwr.msc — Enter.

Через интерфейс
Еще один вариант — использование панели управления. Покажу, как это сделать на примере.
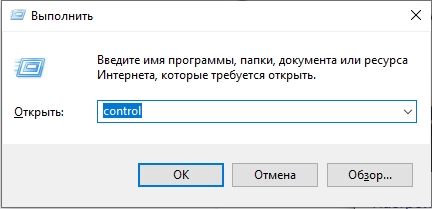
- Вызываем инструмент «Выполнить»
 и вводим в строку фразу «control».
- В открывшемся окне выставляем отображение мелких значков и перемещаемся в «Администрирование».

- Дважды щелкаем по «Просмотру событий» для открытия.


Способы применения (краткий инструктаж по работе)
Большинство «профессиональных» пользователей уверены, что обычным юзерам не нужно даже погружаться в эту тему, ведь она никогда им не пригодится. Однако это не так. Данный инструмент невероятно полезен в отдельных ситуациях.
Например, если появляется синий экран (BSOD) или ОС сама по себе перезагружается время от времени. Почему это происходит и что послужило причиной можно узнать в журнале событий. Если ошибка связана с обновлением драйверов, то будет указано оборудование, с которым возникла проблема, и эффективные пути для ее решения.
Знакомство
Коротко разберем интерфейc журнала событий, чтобы не потеряться и понимать, где и что находится.
В левой части — навигационное меню с категориями. Наиболее интересны:
- Журналы Windows.
- Приложение. Отображает информацию об установленном программном обеспечении.
- Безопасность. В основном здесь находятся данные о времени и дате входа в Windows, а также важных изменениях безопасности.
- Установка. Перечисляются сведения об установленных программах, драйверах и обновлениях.
- Система. Общая информация о состоянии винды. Критические ошибки (в том числе синие экраны), предупреждения, загрузки, перезагрузки — все располагается здесь.
- Журналы приложений и служб. Располагаются сведения об установленном софте.

В центральной части можно просмотреть список событий за последнее время и подробную информацию о каждом из них.
Правая часть окна — область действий. Доступны опции удаления, сохранения, копирования и другие.
Для упрощения поиска отчета нужно запомнить время возникновения сбоя и, исходя из временных рамок, искать его.
Предлагаю войти в «Систему», найти интересующее нас событие и щелкнуть по нему мышкой.

Снизу появятся общие сведения о неполадке. Читаем описание, запоминаем значение из поля «Источник» и «Код». Открываем «Google» или «Yandex» и по имеющимся данным ищем способы исправления неполадки.
Изначально данная служба разрабатывалась исключительно для администраторов, которые постоянно ведут мониторинг состояния серверов, выявляют сбои и причины их появления, и после чего пытаются быстро их устранить.
Не пугайтесь, если устройство работает исправно, но выводятся предупреждения об ошибках. Это нормальное явление. Любые сбои, в том числе незначительные, записываются и сохраняются, переживать не стоит.
Методы очистки
Существует пять основных способов, с помощью которых можно очистить журнал событий.
- Ручной.
- «Батник» – специальный файл с расширением «*.bat».
- Через консоль «CMD».
- Через «PowerShell».
- Утилиту CCleaner.
Подробно рассмотрим каждый из них и узнаем, как их применить на практике.
Ручной
В первую очередь предлагаю разобрать вариант самостоятельной очистки. Он достаточно простой и не требует использования специальных команд и установки стороннего софта.
Нужно лишь:
- Открыть журнал событий (как? — рассказано в самом начале).
- Нажать по нужному разделу правой кнопкой мыши и выбрать пункт «Очистить».


Создание и использование «.bat»
Пожалуй, это еще один достаточно простой метод. Разберем более подробно.
- Создаем обычный текстовый файл. Щелкаем правой мышкой по рабочему столу и выбираем «Создать» – «Текстовый документ».

- Вставляем в него специальный код.

- В верхнем меню выбираем «Файл – Сохранить как».
- Указываем любое имя. В конце имени выставляем расширение «.bat». В графе «Тип» выбираем «Все» и нажимаем «Сохранить».

- Готово. Щелкаем по нему правой кнопкой мыши и запускаем с правами администратора. После этого все сообщения приложений, ошибки и прочие отчеты удалятся.


Если вам лень создавать этот файл, то вот готовый вариант. Используйте спокойно, вирусов нет.
Командная строка
Также почистить журнал событий от ошибок, предупреждений и прочих сообщений можно через командную строку «CMD».
- Заходим в консоль.
- Копируем и вставляем следующий код: for /F «tokens=*» %1 in (‘wevtutil.exe el’) DO wevtutil.exe cl «%1». Жмем «Enter» и дожидаемся окончания процесса.


После этого все отчеты удалятся.
PowerShell
В Windows 10 предусмотрена более подвинутая версия стандартной консоли — PowerShell. Воспользуемся ей.
Действуем по шагам:
- Жмем по клавишам
 — вводим PowerShell и выбираем «От имени администратора».
- В появившееся окно вводим: Wevtutil el | ForEach {wevtutil cl «$_»}.


Не обращайте внимания на возможные ошибки, на результат они не влияют. Разделы очистятся.
CCleaner
Специализированный софт по очистке ОС и исправлению проблем в реестре. Распространяется бесплатно. Поддерживает Windows 10 – 8 – 7.
- Скачиваем с официального сайта, устанавливаем и открываем.
- Переходим во вкладку «Стандартная очистка». В «Windows» устанавливаем галочку напротив нужного пункта. Галочки с остальных пунктов снимать необязательно (дополнительно оптимизируется работа ОС).

- Жмем по кнопке «Очистка»

Отвечаю на популярные вопросы
Что делать, если просмотрщик отключен? Как его включить?
- Для начала необходимо войти в ОС под учетной записью с правами администратора. Затем открыть раздел служб через клавиши (Win + S).
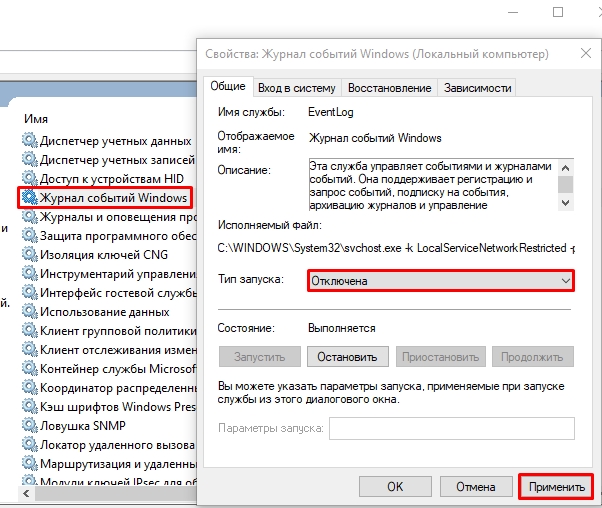
- Найти в списке модуль «Журнал событий» и через правый клик открыть «Свойства».
- Выставите автоматический тип запуска, кликните «Применить», а затем «Запустить».
Можно ли отключить службу просмотра событий?
Да, можете остановить средство ведения журнала. Это никак не повлияет на работу ОС. Но вы лишитесь отличного инструмента для проведения диагностики и аудита неполадок компьютера.
Как проще всего просмотреть график включений и выключений компьютера? Чтобы не искать в общем списке из тысячи строк.
Обзаведитесь бесплатной утилитой «TurnedOnTimesView». Ссылка на официальный сайт разработчика «NirSoft».
Также следует войти в конфигурацию и включить опцию «Журнал загрузки». Жмем на клавиатуре Win + R — msconfig — Enter.
Перемещаемся в «Загрузка». Выставляем галочку напротив нужного пункта. Сохраняем параметры, кликнув «Применить» и «Ок». После этого начнется запись логов.
Грузит диск, процессор (загружены все ядра) и пожирает оперативную память. Как это исправить?
Иногда, служба узла журнала событий создает немалую нагрузку на комплектующие, что затрудняет пользование компьютером. Чаще всего это связано со сбоями Windows 10 и исправляется следующим образом.
- Зайдите в командную строку.
- Введите chkdsk C: /f и кликните «Enter».
- Следом dism /online /cleanup-image /restorehealth.
- Далее sfc /scannow.
- Перезапустите службу журнала событий.
Дополнительно попробуйте отключить обновления.
Видео по теме
Ваша Windows недавно столкнулась с внезапным сбоем, и вы не можете понять, что вызвало сбой? Не волнуйся! Вам могут помочь журналы сбоев Windows и журналы ошибок. В частности, Windows автоматически создает отчет всякий раз, когда происходит внезапный сбой или ошибка. Он позволяет своим пользователям просматривать отчеты журналов сбоев и ошибок с использованием различных методов.
Эта статья призвана помочь пользователям Windows просматривать журналы сбоев и журналы ошибок.
Как просмотреть журналы сбоев и ошибок Windows (2022)?
Пользователи Windows могут просматривать журналы сбоев и ошибок, следуя приведенным ниже подходам:
-
- Просмотрщик событий
- Просмотр истории надежности
- PowerShell
Способ 1: использование средства просмотра событий для просмотра журналов сбоев и ошибок
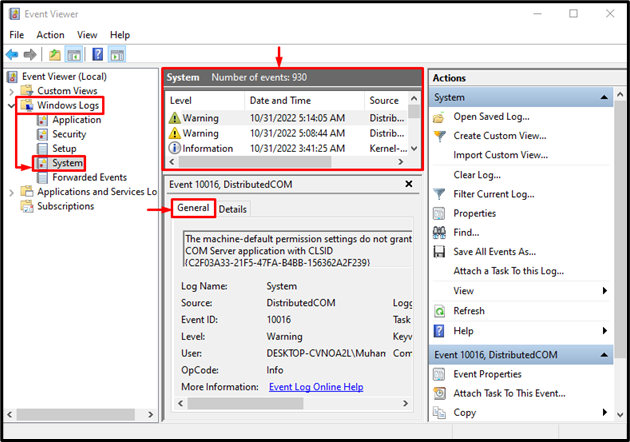
Инструмент мониторинга Windows под названием «Просмотрщик событий” можно использовать для просмотра журналов сбоев и ошибок. Чтобы использовать его, сначала запустите «Просмотрщик событий» через меню «Пуск»:

Продлевать «Журналы Windows
» и выберите «Система”. После этого просмотрите список ошибок и журналов сбоев в соответствии с информацией, указанной в разделе «Общийвкладка:
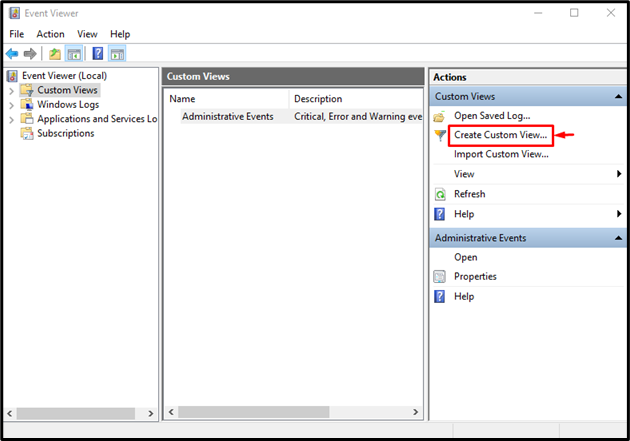
Кроме того, чтобы просмотреть настроенные журналы ошибок и сбоев, нажмите «Создать пользовательский вид” с правой стороны:
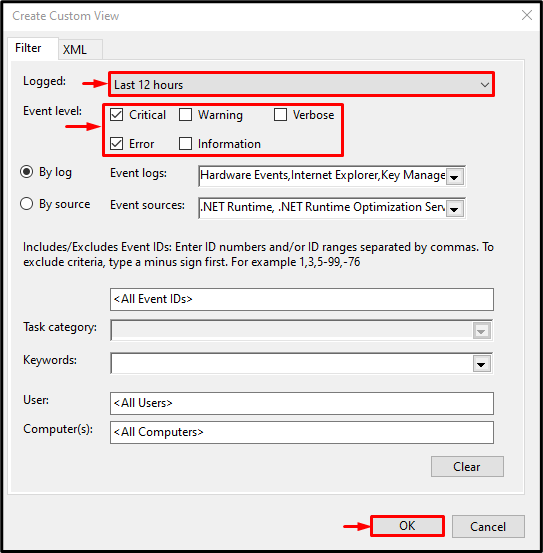
Выберите временной диапазон, отметьте нужные флажки и нажмите «ХОРОШО», чтобы создать индивидуальный отчет:
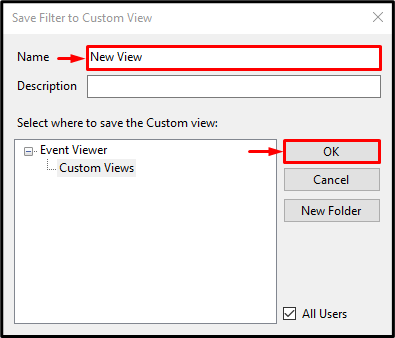
Введите имя для пользовательского отчета о просмотре и нажмите «ХОРОШО» кнопка:
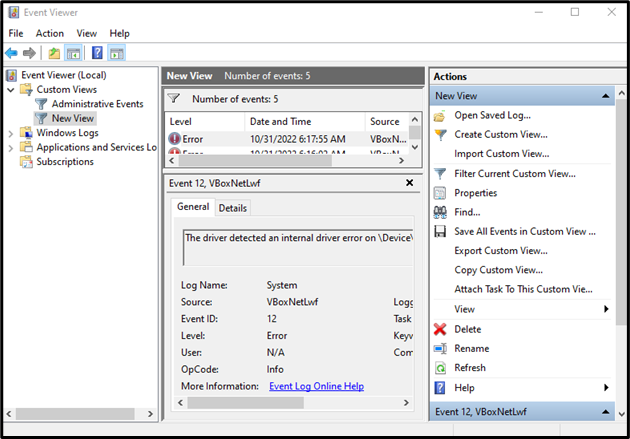
Как видите, отчет пользовательского представления сгенерирован:
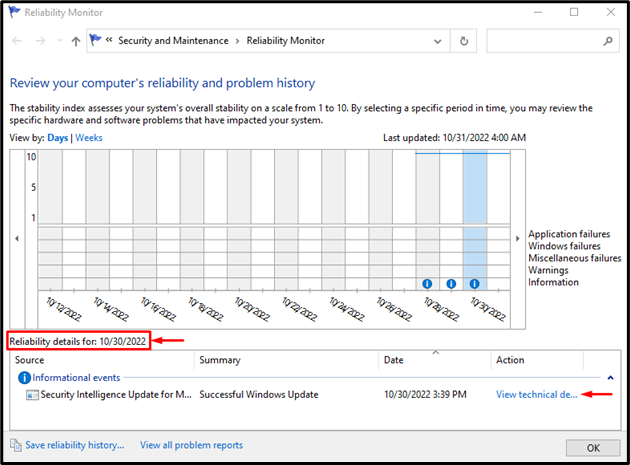
Способ 2: использование журнала надежности для просмотра журналов сбоев и ошибок
Журналы сбоев и ошибок также можно просмотреть с помощью «Просмотр истории надежности”. По этой причине, во-первых, запустите «Просмотр истории надежности» через меню «Пуск» Windows:

Теперь нажмите на конкретную дату, чтобы просмотреть соответствующий отчет за этот день:
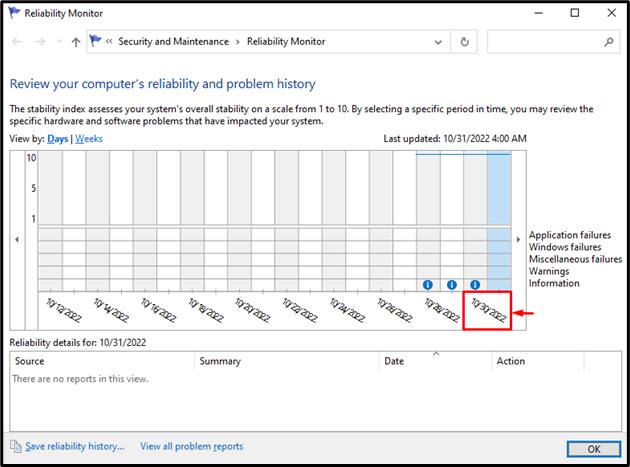
Как видите, отчет успешно запущен:
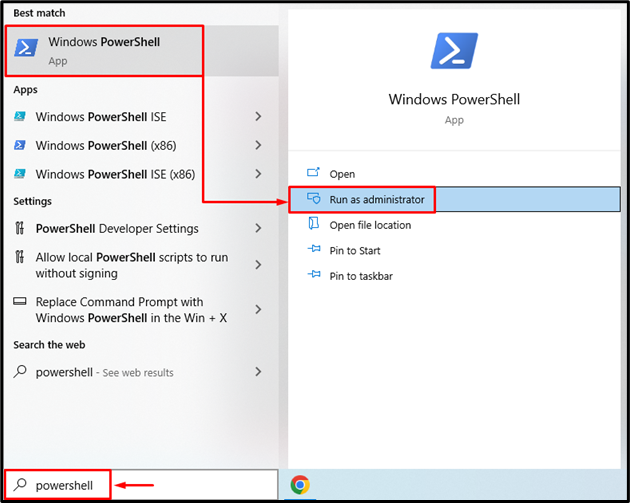
Способ 3: использование PowerShell для просмотра журналов сбоев и ошибок
Другой метод, который можно использовать для просмотра журналов сбоев и ошибок, — использование PowerShell. Для этого сначала запустите «PowerShell» через меню «Пуск»:
Затем выполните «Get-EventLog” только для получения событий ошибок или журналов событий системы:
> Get-EventLog -Бревно система | где {$_.entryType -соответствовать«Ошибка»}
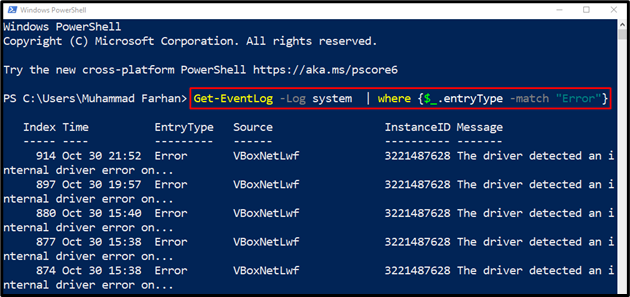
Отчет журнала сбоев и ошибок создается в PowerShell.
Заключение
Журналы сбоев и журналы ошибок можно просматривать в Windows с помощью нескольких методов. Пользователь Windows может просматривать журналы сбоев и ошибок с помощью средства просмотра событий, монитора надежности или PowerShell. В этом сообщении блога продемонстрированы практические способы просмотра журналов сбоев и ошибок в Windows.