Have you recently encountered the Mac error code 8072? Though Macs are highly reliable, you can still face the Mac error 8072, which is not dependent on your Mac version.
The error code 8072 on Mac occurs when you try to delete a Time Machine backup or a corrupted file. It can even happen when you are trying to get rid of Trash. Users generally see this message — «The operation t be completed because an unexpected error occurred (error code -8072).»
Determining the exact cause is challenging, which is why troubleshooting these problems can be tedious. But there are multiple solutions you can adopt and see which one resolves the error code 8072 in Mac Finder.
| Workable Solutions | Step-by-step Troubleshooting |
|---|---|
| Fix 1. Force Reboot Your Mac | The simplest solution is to force reboot the macOS and reset…Full steps |
| Fix 2. Check the Permissions on Mac | Sometimes, the error occurs because you don’t have permission to delete it…Full steps |
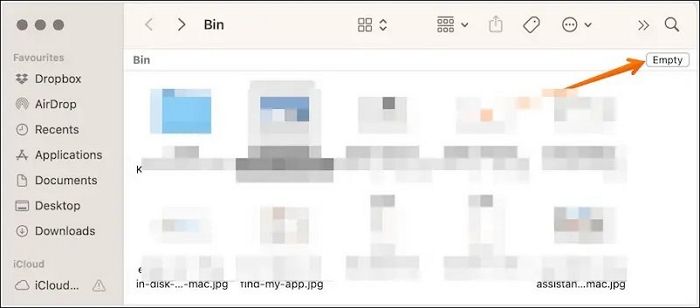
| Fix 3. Force Empty Trash Can | go to the Trash and empty it. You should click the Empty button…Full steps |
| Fix 4. Run Disk Utility First Aid | You can also run Disk Utility First Aid to see if it fixes the error code…Full steps |
| More Fixes | The other 2 fixes are available here for you to follow and fix Mac error code 8072…Full steps |
How to Handle the Error Code 8072 on Mac
The appearance of the Mac error code 8072 can quickly become frustrating. However, there are various solutions you can explore to resolve the problem. Before we move ahead with the fixes, it is critical to understand data security. Keep in mind that data loss might happen, and as such, safeguarding it is vital.
Fix 1. Force Reboot Your Mac
The simplest solution is to force restart MacBook. You need to press the power button and hold it to do that. Make sure not to release the key until the system shuts down. After a few seconds, press the power button to turn it on. Check and see if the issue is resolved.
Fix 2. Check the Permissions on Mac
Sometimes, the error occurs because you don’t have permission to delete it. You need to check to see if you have the required permission.
Here are the steps to follow —
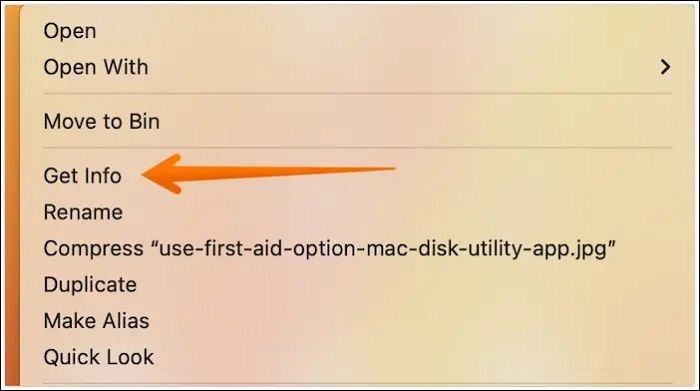
Step 1. Go to the file you want to delete and control-click on it.
Step 2. Select «Get Info».
Step 3. Scroll down to click on «Sharing & Permissions» from the Get Info window. Expand the option.
Step 5. Check the list of accounts and the type of permission granted.
Step 6. If you see a lock icon at the bottom, click on it.
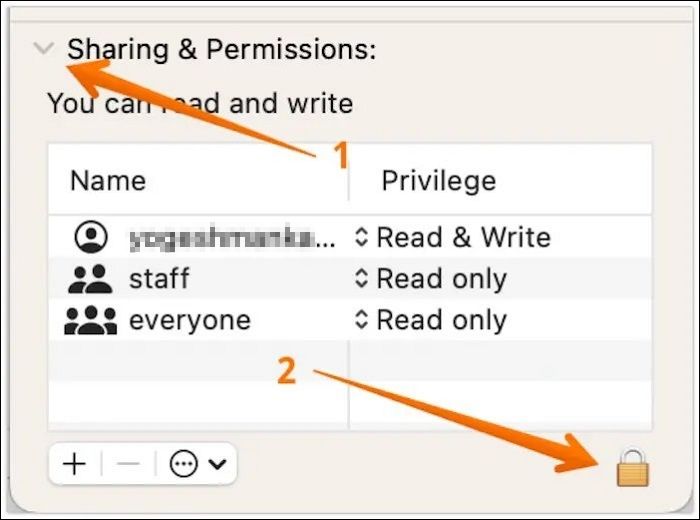
Step 7. Enter your admin password.
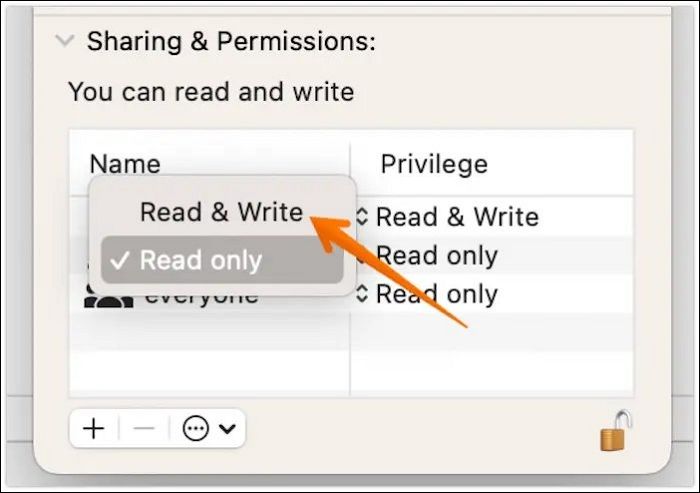
Step 8. Now, choose the account you want to delete. Select «Read & Write».
Fix 3. Force Empty Trash Can
Are you facing a problem in emptying the Trash on your system? Well, you can use Mac Safe Mode for this task.
Check out the steps here –
Step 1. Go to the «Apple icon».
Step 2. Select «Restart» from the drop-down menu.
Step 3. As the system reboots, press and hold the shift key.
Step 4. Release the key when you see the Apple logo displayed on the screen.
Step 5. The system will enter safe Mode.
Step 6. Now, go to empty the Trash. You must click the «Empty» button on the upper right-hand side.
Step 7. After that, click «Restart». Allow Mac to reboot normally.
Fix 4. Run Disk Utility First Aid
You can also run Disk Utility First Aid to see if it fixes the error code. Take a look at the steps to follow –
Step 1. Boot the system into the Mac Recovery Mode. Wait for the macOS Utilities window to appear.
Step 2. Now, select «Disk Utility». Select «Continue». Go to «View».
Step 3. Select «Show All Devices».
Step 4. Choose the Mac hard drive from the left sidebar.
Step 5. On the top, you will see First Aid. Click on it.
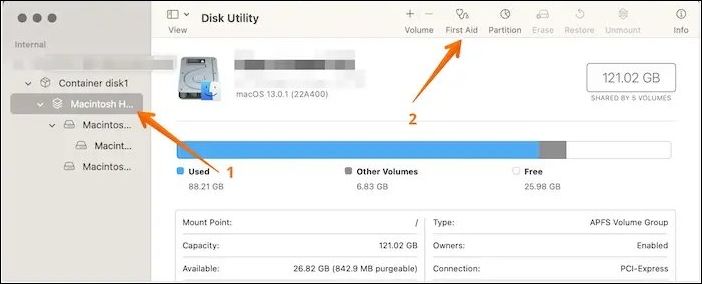
Step 6. When the pop-up appears, click «Run».
Step 7. Choose «Continue».
Step 8. You will see a pop-up box saying – Running First Aid on «SVN.»
Step 9. Select «Done».
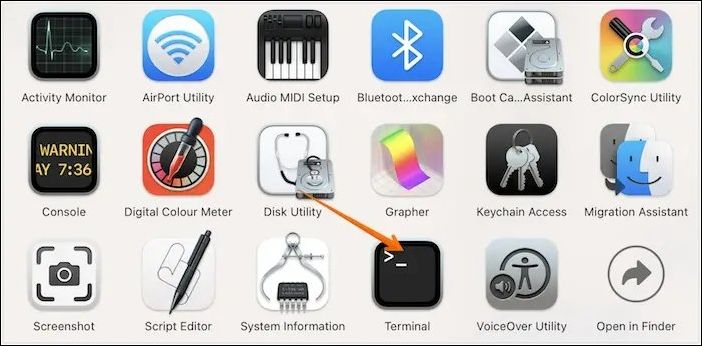
Fix 5. Force Delete Files with Terminal
Another excellent way to resolve the Mac error code 8072 is to use Terminal on Mac. Check out the steps that you need to follow –
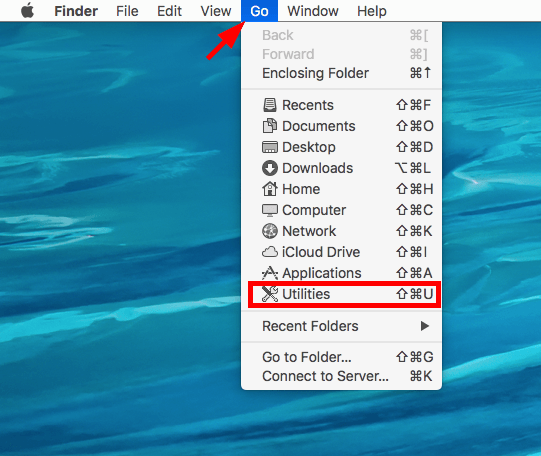
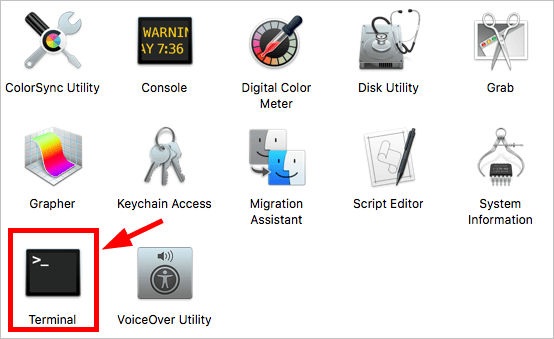
Step 1. Open Terminal. For that, click on «Applications» > «Utilities» > «Terminal».
Step 2. Type — sudo rm -R. It will ask for the password. Enter your admin password to continue.
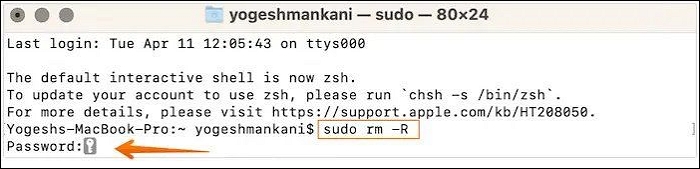
Step 3. Go to the Trash folder.
Step 4. Select the files you wish to remove.
Step 5. Drag these files to the Terminal window.
Step 6. Now, hit the Enter key.
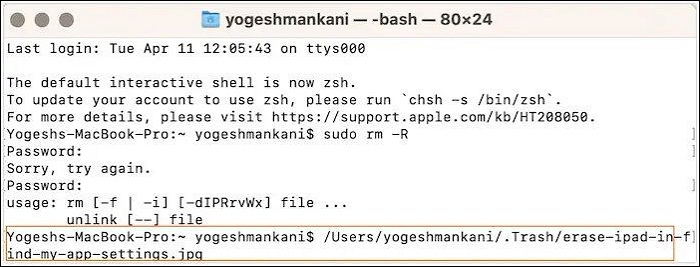
Step 7. When asked, type the admin password.
Step 8. Now, Mac will remove the files from Trash.
Fix 6. Fix from Time Machine
Has Time Machine created the file you want to delete? In that case, there are some steps you can follow to fix the error code 8072. These are —
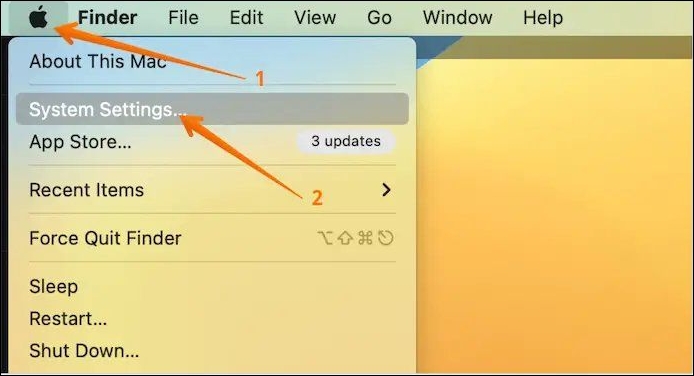
Step 1. Go to the Apple menu. A drop-down menu will appear. Select System Settings from there.
Step 2. Type Time Machine from the search bar on the left-hand side. Once you find it, click on it.
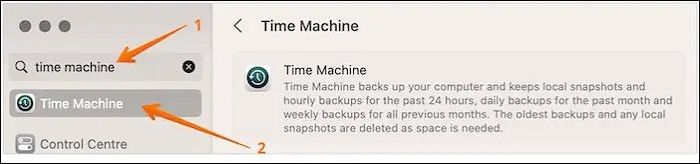
Step 3. Drag the slider to the OFF part on the right-hand side.
Step 4. This turns off the Time Machine.
Step 5. Now, try to delete the files.
Note: Turn on Time Machine after the files are deleted; forgetting to do so will lead to no backup of files.
If one of the methods is helpful in resolving the Mac error code 8072, share it on Facebook, Twitter, Instagram, and other social media platforms!
How to Recover Deleted Data on Mac
Are you anxious about data loss due to the Mac Error Code 8072? Well, that sometimes happens, so you must take data security seriously. If data loss occurs, it is vital to take professional data recovery software assistance. In that scenario, you can try EaseUS Data Recovery Wizard for Mac.
The EaseUS Data Recovery Wizard for Mac is a powerful data recovery program. With this tool, you can retrieve various data types without much hassle and recover permanently deleted files Mac from different Mac-based devices. Besides, exciting features such as file filters, recovery to the cloud, etc., are also present.
- Restore data irrespective of the reason, such as accidental deletion, malware attack, etc.
- Retrieve various data types such as videos, documents, music files, photos, etc.
- Recover data from Mac-based devices such as SSD, HDD, fusion drive, etc.
- Deep and quick scan to help recover trash Mac and without much hassle.
What’s more, this softwsoftware’s exciting part is it is user-friendly. The simple user interface enables even novice users to use the software easily. You can opt for the trial version and see if it suits your needs.
Step 1. Select the drive to be scanned
In the main EaseUS Data Recovery Wizard window, there will be a list of the drives connected to your Mac. Select the drive you need to recover lost/deleted files from, and click the «Search for lost files» button.
Note: Before data recovery, you’d better click «Disk Backup» from the left sidebar to create a backup of your Mac to avoid further data loss. After backing up, the software can recover data from the Mac backup, and your computer can wirte new data again.

Step 2. Select your lost data/files
EaseUS Data Recovery Wizard for Mac will immediately scan your selected disk volume and display the scanning results on the left pane. You can sort the results to find the wanted files if you are looking for certain files.

Step 3. Recover lost/deleted data
Once you have found the desired files, preview the files and then click «Recover» to begin the recovery of your deleted/lost Mac files.

Why Can I Delete the Corrupted File or Time Machine Backup
Multiple causes can lead to the error code 8072. Multiple causes can help to know the reasons so that you can learn more about the solutions. Let’s take a look —
😦Reason 1. Unintentional format
Have you ever accidentally formatted your system? While we try to refrain from tweaking our system without any reason, such things can still happen.
🦠Reason 2. Viruses or malware
Sometimes, your system encounters a vicious virus or malware attack, leading to the corruption of files. As a result, you will face difficulty removing them, and the error code 8072 will occur.
📃Reason 3. Corrupted system files
The primary cause of the error code 8072 is the presence of corrupted files. It can be due to various reasons, such as system crashes, power outages, mismatched versions, etc.
🟦Reason 4. Modification of BIOS settings
A lack of complete knowledge is a terrible thing. Users often change the BIOS settings without knowing much about it, which could lead to the 8072 error code on Mac.
💻Reason 5. Sharing of data in the unsupported format
It is vital to always share data in supported formats. That way, they won’t be any issues between the system and the media. Otherwise, you could come across the error code 8072.
Final Thoughts
Are you irritated with the Mac Error Code 8072? Even though Mac is a robust system, such issues might crop up. Understanding the reasons leading to the error code is significant, and the grounds include unintentional formatting, malware attack, corrupt system files, etc.
There are multiple solutions users can try to resolve the error code 8072. For starters, you can force reboot the system and run Disk Utility First Aid or Time Machine. In case, data loss occurs, you can take help from professional data recovery software.
For that, you can choose EaseUS Data Recovery Wizard for Mac. It is efficient and easy-to-use data recovery software that aids users in restoring data, irrespective of the reasons. Check out EaseUS Data Recovery Wizard for Mac today!
Knowing more about Mac Error Code 8072 will help you deal efficiently. For that, scroll through the questions and answers listed below —
1. How to fix Mac error code 8076?
There are several ways to fix Mac error code 8076. These include using Disk Utility, disabling «ignore permissions on this device», logging out and restarting, etc.
2. Whcan’t’t I create a new folder on my Mac?
One of the reasons for not being able to create a new folder on your Mac is that you don’t have writing privileges, and you must ensure you have the permissions needed to make the folder.
3. How to clear the cache on Mac?
To clear the cache on Mac, here are the steps –
- Go to Finder.
- Select Go and then Go to Folder.
- Type ~//Library//Caches
- Press Go.
- After reaching the Caches folder, delete what you want.
4. How to recover data after forcing empty Mac Trash?
You must opt for reliable data recovery software to recover data after forcing empty Mac Trash. In that case, you can choose EaseUS Data Recovery Wizard for Mac. The tool is easy to use and aids in hassle-free data retrieval.
Looks like no one’s replied in a while. To start the conversation again, simply
ask a new question.
Hi,
I am trying to delete a folder of Word documents from Backups on a WD HDD. I have changed all the permissions so I am now the owner, but an error message saying the folder cannot be deleted because of ‘error code -8072’ appears.
I have googled this and searched Apple’s Knowledge base — no joy. I also saw an earlier post on this referring to the iPhoto forum, but this is not iPhoto related.
Any advice gratefully received. Thanks.
20″ iMac 2008,
Mac OS X (10.6.3)
Posted on Apr 2, 2010 8:55 PM
Error code -8072
Key Takeaway:
- Mac error code 8072 can be caused by corruption problems, permissions issues, corrupted drivers or system, or malware or spyware attacks.
- To fix Mac error code 8072, you can try force emptying the trash by following the procedure for force emptying the trash.
- Another solution is to deal with Time Machine backup files by turning off Time Machine and manually deleting the files, and then turning Time Machine back on.
Mac error code 8072 can be frustrating, but understanding its implications is key. In this introduction, we’ll explore the error message and what it means for your Mac. Stay tuned to discover useful tips and strategies to overcome this issue and get your system back on track.
Understanding the error message and its implications
Mac error 8072 is a pesky problem! It occurs when files won’t delete or become inaccessible. Causes range from corruption and permissions issues to malware attacks.
To tackle this error, try “force emptying” the trash. Or, turn off Time Machine and manually delete the files. You could also use a Mac Cleaner to optimize performance and a Data Recovery Tool if files have been lost.
Also, there are related error codes such as 43, 50, and File System Check Exit Code 8. To avoid these errors, use iBeesoft iCleaner for Mac. It helps remove junk files. Additionally, granting necessary permissions to delete a file can help resolve this error.
If all else fails, you can empty the trash in safe mode. Or, use Terminal commands for advanced troubleshooting. Lastly, always prioritize data security. Have a plan in place for data loss and consider seeking further assistance if needed.
Causes of Mac error code 8072
The causes behind Mac error code 8072 can vary, from corruption problems to permissions issues, corrupted drivers or system, and even malware or spyware attacks. Understanding these different factors will help us diagnose and effectively address the issue at hand.
Corruption problems
Corruption problems relate to Mac error code 8072 when certain files or data become damaged or inaccessible. These issues can occur due to system malfunctions, disk errors, or software conflicts. Causes include corrupted file systems, sudden power outages, improper shutdowns, hardware failures, and incorrect permissions. Corrupted drivers or system files, malware or spyware attacks can also contribute to corruption problems.
To fix Mac error code 8072, solutions include:
- Emptying the trash bin
- Turning off Time Machine
- Deleting backup files
Mac Cleaners can optimize file deletion processes and Mac Data Recovery can recover deleted or lost Mac files. Users can take proactive steps to prevent corruptions and ensure the smooth operation of their Mac systems.
Permissions issues
When facing permissions issues, check the file’s properties. Ensure you have the right permissions to delete it. If not, ask an admin or get the needed rights. Restarting your computer can also help. Running a disk utility tool like Disk Utility may identify and repair any issues.
It’s important to manage permissions quickly. Complications in managing files and folders, clutter, difficulty organizing files, and potential data loss may occur.
By managing permissions proactively, you can ensure smooth functioning of your Mac and avoid inconveniences from restricted file access.
Corrupted drivers or system
Error code 8072 can often appear when corrupted drivers or system files are present on a Mac. This can cause issues with file deletion and management.
To fix this, the root cause must be addressed. This could involve updating or reinstalling corrupted drivers, repairing system files, or reinstalling the OS. Taking preventative steps is also essential. Regularly updating software and hardware drivers, performing maintenance tasks, and avoiding suspicious downloads can help maintain a functioning Mac system.
Malware and spyware can invade a Mac. To combat these digital pests, users should prioritize data security and take proactive measures against potential threats.
Malware or spyware attacks
Malware and spyware are a menace! They can steal sensitive data, leading to privacy issues and ID theft. Also, they can cause system slowdowns, crashes, and other performance problems. Worst of all, they can delete or corrupt important files, resulting in data loss and operational disruptions.
To protect your Mac system from such disasters, take proactive steps like using anti-malware software and regularly updating system defenses. That way, you can maintain privacy and optimal performance.
Solutions for fixing Mac error code 8072
Looking to fix Mac error code 8072? This section offers solutions to tackle this pesky issue. From force emptying the trash to dealing with Time Machine backup files, and utilizing Mac Cleaner tool for optimized file deletion and performance, to using Mac Data Recovery tool for retrieving lost or deleted Mac files, we’ve got you covered! Get ready to resolve error code 8072 and get your Mac running smoothly again.
Force emptying the trash
Give a blast to the trashcan! This is key for erasing files that can’t be removed using the usual steps. This trick is very helpful, especially when dealing with Mac error code 8072 or other similar problems.
Procedure for force emptying the trash
Force emptying the trash on a Mac is necessary when encountering issues such as Mac error code 8072. This involves permanently deleting files stuck in the trash bin. Here’s how to do it:
- Find the Trash icon on your desktop or access it from the Dock.
- Press and hold Command, then click on the Trash icon.
- Select ‘Empty Trash’ from the drop-down menu. Or use the Shift + Command + Delete keyboard shortcut.
- A prompt will appear – click ‘Empty Trash’ to proceed.
- If prompted, enter your administrator password.
- The system will delete all items in the trash. Wait for completion.
Remember, force emptying the trash permanently removes all files. So make sure you don’t need them before proceeding.
Dealing with Time Machine backup files
When taking care of Time Machine backup files, Mac users have options. One is to turn off Time Machine and delete files manually. Disable the feature, remove the backups and control the deletion. Then, turn Time Machine back on. Follow steps to reactivate and restore regular backups.
Alternatively, use a Mac Cleaner tool. It has options like file cleanup, junk removal, and performance optimization, to help get rid of unwanted backups. Keep the system running smoothly.
Accidentally lose important Mac files while managing Time Machine backup files? Use a Mac Data Recovery tool. Designed to retrieve data with minimal effort. Bring back those vital Mac files.
Follow the methods above. Users can manage Time Machine backups and maintain their Mac systems.
Turning off Time Machine and manually deleting files
Time Machine is a Mac feature that saves your data. But, sometimes it’s necessary to turn it off and delete files manually. Here’s how to do it:
- Click the Apple menu, then “System Preferences” and “Time Machine”.
- Look for the “Options” button in the bottom right corner of the Time Machine preferences window. Click it.
- A new window will open. To add a file or folder for manual deletion, click “+” and select the item(s). Click the “-” button to remove items from the list.
Turning off Time Machine should only happen for a reason since it stops backups. Make sure to keep track of what you delete, to avoid losing important data.
Overall, turning off Time Machine and deleting files can help. But, be careful and only do it when necessary.
Turning Time Machine back on
Enable Time Machine to resume file backup!
- Head to Apple menu in the top-left corner of your screen. Select System Preferences from the dropdown menu.
- In the System Preferences window, click on the Time Machine icon. This opens the Time Machine preferences panel.
- Toggle switch to “On” in the Time Machine preferences panel. Now, Time Machine will activate and start backing up files regularly.
When users turn Time Machine off and back on, it helps resolve Mac error code 8072. As the system refreshes, all components run smoothly. Plus, future changes to files are saved and backed up for data security.
Using a Mac Cleaner tool for better file deletion and performance optimization
A Mac Cleaner tool is great for improving file deletion and optimizing Mac systems. It offers features to manage files and boost the computer’s functioning.
- This tool can wipe out junk files, temporary files and unused apps, saving space.
- It can also find and delete duplicate files, organizing the system.
- The cleaner tool enhances performance by optimizing settings and configurations.
- It can also manage startup items, so only important applications launch at startup, speeding up boot time.
- It also eliminates privacy worries by erasing browsing history, cache files and other sensitive data from browsers.
- The user interface is straightforward with easy-to-use features, so even the least tech-savvy can manage files and improve system performance.
Employing a Mac Cleaner tool can help users keep a tidy file system, while gaining speed and efficiency.
Bear in mind that these are just some of the ways to use a Mac Cleaner tool for improved file deletion and performance optimization. For more details, check the software’s documentation or user guide.
Mac Data Recovery tool for retrieving deleted or lost Mac files
The Mac Data Recovery tool is an effective solution that employs sophisticated algorithms and tactics to scan the storage device and find deleted or lost files. It can recover different file types, including documents, pictures, videos, audio files, and more. Moreover, its user-friendly interface simplifies the recovery process, so even inexperienced users can easily recover their valuable data.
Furthermore, this tool maintains the original format and structure of the recovered data, so users do not have to be concerned about any file corruption during the recovery. Its many features and terrific performance make it a priceless asset for those who have experienced data loss on their Mac device.
Pro Tip: Regularly backup your crucial files with trustworthy backup solutions such as Time Machine or cloud storage services. This way, if ever a data loss event occurs, you can instantly restore your files without totally depending on data recovery tools.
Mac error codes and their solutions:
Because life is too brief to cope with error code 8072 and its evil siblings.
Other related error codes and their solutions
In this section, we will explore some other error codes related to the issue at hand and their respective solutions. Discover the remedies for Mac Error Code 43, Mac Error Code 50, and the perplexing File System Check Exit Code Is 8. Let’s dive into these error codes to unravel the fixes and get your system up and running smoothly again.
Mac Error Code 43
Tackling Mac Error Code 43? Here’s a four-step guide:
- Check permissions: Make sure you have permission to access or modify the file causing the error. Ensure you can read and write.
- Restart: Try restarting your Mac. This refreshes processes and might solve the glitch causing the error.
- Go to Terminal: If the error persists, try using the Terminal app on your Mac. Delete or move the file from there.
- Run Disk Utility: Mac Error Code 43 may be due to disk errors or corruption. Run Disk Utility to diagnose and repair any issues with your storage drive. Open Disk Utility, select your startup disk, click ‘First Aid’ and follow the prompt.
By following these steps, Mac Error Code 43 should be solved.
Note: If nothing works, contact Apple Support for professional help.
Mac Error Code 50
Mac Error Code 50 can be due to system corruption. This happens through improper file handling, software conflicts, or hardware malfunctions. Also, permissions issues can lead to this error code. If a user lacks permissions to access certain files, it can trigger Mac Error Code 50. Corrupted drivers or system files can also cause this. Malware or spyware can also be the cause.
To fix it, one approach is to force empty the trash. Another solution is to turn off Time Machine and manually delete unwanted backup files. Mac Cleaner tools and Mac Data Recovery tools are other potential solutions.
By understanding the causes and solutions for Mac Error Code 50, users can effectively address this issue and ensure their Mac system’s smooth functioning. It is important to prioritize data security and take appropriate measures to prevent data loss.
File System Check Exit Code Is 8
The operating system checks the file system for any errors or inconsistencies. Exit code 8 means there was a problem found. This could be due to disk corruption, bad sectors, wrong permissions, or malware/spyware.
Fix this by using Disk Utility or Stellar Disk Repair. This repairs the file system structure and makes the Mac more stable.
Back up important files, keep the Mac software updated and run regular malware scans. This can help prevent File System Check Exit Code Is 8 error.
Using iBeesoft iCleaner to remove junk files and avoid error code 8072
Using iBeesoft iCleaner can be a game-changer when it comes to removing junk files and avoiding the pesky error code 8072. In this section, we will dive into the step-by-step process of using iBeesoft iCleaner for Mac, empowering you to keep your system clean and error-free. Say goodbye to clutter and hello to smooth and efficient performance with this powerful tool in your arsenal.
Steps to use iBeesoft iCleaner for Mac
- Launch the program: Double-click on its icon in the Applications folder or click its shortcut on the desktop.
- Select an option: Choose from System Junk, Internet Junk, App Leftovers, Large Files, and Trash Bin.
- Begin scan: Click on the “Scan” button to start the process. The program will analyze and identify any unnecessary or junk files.
- Pick files to delete: Review the list and select the files you want to remove by checking the boxes.
- Clean chosen files: Click the “Clean” button to begin the cleaning process. The program will permanently delete the chosen files.
- Confirm: Once complete, a confirmation message will show the files have been successfully removed.
It is worth noting that these steps are for Mac computers, to optimize performance and remove clutter. Though there are other ways to clean your Mac (e.g. manual file deletion, alternative cleaner tools), iBeesoft iCleaner offers a simple solution with comprehensive file removal capabilities. With iBeesoft iCleaner, you can clean your Mac, optimize performance, and efficiently utilize storage space.
Fixing Mac error code 8072 by providing necessary permissions
When encountering the Mac error code 8072, the key to resolving it lies in providing the necessary permissions. In this section, we will guide you through the steps required to grant the permissions needed to delete a file. By following these instructions, you will be able to tackle this error effectively and regain control over your Mac’s file management system.
Steps to provide permissions to delete a file
Open Finder! Start by clicking on the Finder icon in the Dock, or accessing it from the Applications folder. Find the file you want to delete. Use the sidebar or search function in Finder to locate it. Right-click or control-click and choose “Get Info” from the context menu that appears. Or select the file and press Command + I.
In the Get Info window, click on the padlock icon at the bottom right corner. Enter your admin password if needed. Click the arrow next to “Sharing & Permissions” to expand it. You’ll see a list of users and their permission levels for the file.
Locate your user account in the list. Make sure you have “Read & Write” access enabled. If not, click your account, then the gear icon below (Settings) and select “Apply to enclosed items”. This will apply the permissions to the specific file and any nested files in folders.
Close the Get Info window and you’ve provided the necessary permissions to delete the file. Make sure the correct access levels are granted, to avoid issues when deleting files.
Now, clear out the trash in safe mode for a little danger and excitement in your computer’s life!
Force emptying the Trash in Safe Mode
If you’re struggling to empty your Trash in Safe Mode and encounter error code 8072, don’t worry! In this section, we’ll guide you through the steps of force emptying the Trash in Safe Mode. By following these instructions, you can successfully declutter your system and resolve the error code 8072 issue. Say goodbye to stubborn files and optimize your Mac’s performance effortlessly. Let’s dive in and get your Trash emptied!
Steps to force empty the Trash in Safe Mode
To force empty the Trash in Safe Mode on a Mac, follow these steps:
- Hold down the Shift key during startup. This will stop third-party applications from running.
- Once in Safe Mode, open the Trash folder.
- Select all the files you want to delete.
- Hold down the Command key while clicking on each file. Or press Command+A to select all at once.
- Right-click one of the files and choose “Delete Immediately”.
- Confirm any prompts to delete them.
These steps may vary depending on your OS version and configuration.
Force emptying the Trash using Terminal
When it comes to fixing the error code 8072, one effective solution is to force empty the Trash using Terminal. In this section, we’ll walk you through the steps to accomplish this, providing you with a powerful technique to resolve the issue swiftly and efficiently. So, let’s dive in and learn how to take control of your trash and overcome the error code 8072 hassle-free.
Steps to force empty the Trash using Terminal
Force emptying the Trash via Terminal on a Mac is a great way to delete pesky files that won’t go away. Terminal is an app that lets you carry out commands and do various tasks on your Mac. Here’s how to force empty the Trash using Terminal:
- Get Terminal: Press Command + Spacebar, then type
"Terminal"and hit Enter. - Access the Trash directory: Type
"cd ~/.Trash"in the Terminal window and press Enter. - List Trash files: Enter
"ls"command in the terminal, press Enter. This will show a list of all files and folders in the Trash. - Delete individual items: Use
"rm -rf [filename/foldername]"command followed by Enter. Replace"[filename/foldername]"with the actual name of the file or folder. - Delete all Trash contents: Type
"rm -rf *"in Terminal and press Enter. This removes all items permanently.
These steps allow you to force empty your Trash using Terminal on a Mac. It can help you manage error code 8072. But be very careful. Make sure you backup any files or folders correctly before executing commands that may delete them permanently. This will help improve your Mac system’s performance.
Prioritizing data security and dealing with data loss
Data security is a key factor in today’s digital world. Organizations must make sure to protect their data and put measures into place to stop data loss. Firewalls, encryption, and regular backups are all robust protocols that can reduce the risk of data breaches. In case of data loss, organizations should have plans to restore and retrieve the lost data, such as software for data recovery or seeking help from professionals.
To properly secure data and handle data loss, organizations need to understand what causes it. Human error, hardware faults, software issues, and malicious attacks are some common reasons. Therefore, it is vital that employees are trained on the best methods of data security and an up-to-date secure infrastructure is maintained. This consists of frequently updating software and operating systems, strong passwords and multi-factor authentication, and constantly monitoring and evaluating security measures.
Organizations should also create a data backup and recovery plan. This includes regularly saving important data to offline or remote locations, as well as cloud storage solutions. It is important to test the backup systems to make sure that recovery is swift and successful if there is data loss. By stressing the importance of data security and having a good backup and recovery plan, the impact of data loss can be minimized and operations can resume quickly.
Additional methods to fix Mac error code 8072
If you are experiencing Mac error code 8072, try these methods:
- Check for any incompatible or outdated software in your Applications folder. Uninstall them to see if it resolves the issue.
- Scan and repair any issues with your system files using the Disk Utility app.
- Clear temporary cache files. Go to Finder, “Go” menu, select “Go to Folder,” type “~/Library/Caches”, and delete the files.
- Lastly, restart your Mac. Save important files first!
Conclusion
Error code 8072 can be tackled in various ways. Restarting the device, updating your OS and apps, freeing up storage, repairing the disk, and verifying permissions are a few of the potential solutions. These steps tackle common triggers for the error like software conflicts and inadequate storage space. With these fixes, the error can be nipped in the bud.
Also, proactive maintenance is paramount to avoiding this type of error in the future. Keeping the system up-to-date reduces the chance of encountering error code 8072.
Moreover, Microsoft’s official support website offers in-depth instructions on how to troubleshoot various error codes, including 8072.
Some Facts About How To Fix Error Code 8072:
- ✅ Mac error code 8072 is a common issue encountered when trying to delete files on a Mac, particularly when emptying the trash. (Source: Team Research)
- ✅ The error can be caused by corruption problems, permissions issues, corrupted drivers or system, or malware or spyware attacks. (Source: Team Research)
- ✅ To resolve the error, you can force empty the trash by holding the “Trash” icon and pressing “Shift” and “Option” on the keyboard, then clicking “Empty Trash”. (Source: Team Research)
- ✅ If the error occurs when deleting Time Machine backup files, you can turn off Time Machine, manually delete the files, and then turn on the feature again to solve the problem. (Source: Team Research)
- ✅ Using a Mac Cleaner tool is recommended to delete all types of files or caches on Mac and optimize its performance. (Source: Team Research)
FAQs about How To Fix Error Code 8072
What is the error code 8072 on Mac?
The error code 8072 on Mac is a common issue that occurs when trying to delete files, particularly when emptying the trash. It is often caused by corruption problems, permissions issues, corrupted drivers or system, or malware or spyware attacks.
How can I fix the error code 8072?
There are several solutions you can try to fix the error code 8072 on Mac:
1. Force reboot your Mac by pressing and holding the power button until the system shuts down, then turning it back on.
2. Check the permissions on your Mac by right-clicking on the file you want to delete, selecting “Get Info,” and ensuring that you have the necessary permission to delete the file.
3. Force-empty the Trash by activating the context menu, pressing and holding Shift + Option, and clicking on Empty Trash.
4. Use Terminal to delete files manually by using the “rm -r” command.
5. Utilize a professional Mac cleaner software to clean up your system.
6. If the file you want to delete is part of the Time Machine backup, turn off Time Machine, delete the files manually, and then turn it back on.
How do I force reboot my Mac?
To force reboot your Mac, press and hold the power button until the system shuts down. Then, turn it back on to complete the reboot process.
What should I do if the error code 8072 occurs when attempting to empty the Trash?
If the error code 8072 occurs when trying to empty the Trash, you can force-empty it by activating the context menu, pressing and holding Shift + Option, and clicking on Empty Trash.
How can I check the permissions on my Mac?
To check the permissions on your Mac, right-click on the file you want to delete, select “Get Info,” and navigate to the “Sharing & Permissions” section. Ensure that you have the necessary permission to delete or rename the file.
Can a professional Mac cleaner help fix the error code 8072?
Yes, using a professional Mac cleaner software can help fix the error code 8072 by removing junk files, clutter, large/old files, and duplicate files. It can also optimize your Mac’s performance and address potential security threats.
macOS — одна из самых эффективных платформ на данный момент, потому что она упростила большинство основных компьютерных операций. Например, установить новые приложения так же просто, как перетащить приложение в папку «Приложения», а поиск файлов с помощью Spotlight выполняется намного быстрее. С другой стороны, удалить файлы так же просто, как перетащить их в корзину.
Эти процессы могут быть выполнены без сучка и задоринки большую часть времени. Тем не менее, появление ошибок, когда определенные параметры не выполняются при выполнении задачи, является нормальным явлением. Например, несколько пользователей Mac сообщили о получении кода ошибки 8072 на Mac, когда они пытались удалить файл или переместить его в корзину. Это означает лишь то, что удаляемый файл или файлы не соответствуют требованиям для выполнения задачи.
В этой статье мы обсудим, что такое код ошибки 8072 и почему ваш Mac получает эту ошибку. Мы также покажем вам, как устранить ошибку Mac с кодом 8072.
Код ошибки 8072 — это распространенная проблема Mac, которая возникает, когда пользователь пытается удалить поврежденный файл или резервную копию Time Machine или когда пользователь пытается очистить корзину. Однако есть пользователи, которые сообщают об одной и той же ошибке даже при попытке переименовать файл.
Код ошибки 8072 обычно сопровождается следующим текстом:
Операция не может быть завершена из-за непредвиденной ошибки (код ошибки -8072).
Когда вы получаете это сообщение, трудно определить причину ошибки, что затрудняет устранение неполадок. Если вы получаете код ошибки 8072 на Mac, это означает, что проблема связана с разрешениями файла или файлов, которые вы хотите удалить.
Возможно, файл, который вы пытаетесь переместить в корзину, в настоящее время используется операционной системой Mac. Ошибка также может возникнуть, если вы пытаетесь удалить программную функцию, например часть резервной копии Time Machine или других сторонних приложений.
Всякий раз, когда вы инициируете удаление файла, система проверяет, есть ли у текущего пользователя достаточные разрешения для доступа или внесения изменений в этот файл. Система также проверяет, не используется ли файл в данный момент. Если какой-либо из этих двух критериев не сработает, процесс удаления завершится ошибкой, и вы увидите код ошибки 8072.
Если ваш Mac получает код ошибки 8072, вам необходимо сначала решить проблемы с разрешениями, прежде чем удалять, переименовывать или вносить какие-либо изменения в рассматриваемый файл.
Как исправить код ошибки 8072 на Mac
Перемещение ненужных файлов в корзину — это основная компьютерная задача, которая должна выполняться плавно и эффективно. Если у вас возникают проблемы при удалении или изменении файлов, возможно, файл поврежден или используется в данный момент. Вот несколько шагов, которые вы можете попробовать, если вы получаете код ошибки 8072 на своем Mac:
Исправление № 1. Убедитесь, что у вас достаточно прав.
Когда вы пытаетесь удалить или переименовать файл и получаете код ошибки 8072, проверьте, достаточно ли у вас прав для чтения и записи файла. Сделать это:
- Щелкните файл правой кнопкой мыши и выберите «Получить информацию».
- Прокрутите вниз до раздела «Общий доступ и разрешения».
- Найдите имя своей учетной записи в разделе «Имя», затем проверьте значение в разделе «Привилегии».
- Если вы видите «Чтение и запись», это означает, что у вас достаточно прав для редактирования файла.
- Если вы видите «Только для чтения», нажмите стрелку рядом с ним, затем выберите «Чтение и запись».
Теперь у вас должно быть достаточно прав для удаления файла.
Исправление № 2: принудительно очистить корзину.
В macOS есть полезная функция корзины, о которой большинство пользователей не знают. На самом деле вы можете принудительно очистить корзину, когда некоторые файлы слишком упрямы, чтобы их можно было удалить. Для этого выполните следующие действия:
- Наведите курсор на значок корзины на несколько секунд, чтобы активировать контекстное меню.
- Нажмите и удерживайте кнопки Shift + Option, затем нажмите «Очистить корзину» в меню.
- Это должно удалить все содержимое папки «Корзина».
Вы можете проверить, все ли файлы были удалены, открыв папку «Корзина».
Исправление № 3: используйте команды для удаления файлов.
Если файлы, которые вы хотите удалить, находятся в другом месте, а не в Корзине, вы можете использовать Терминал, чтобы перезаписать элементы управления разрешениями и удалить их вручную. Этот метод можно использовать, когда файл или файлы, о которых идет речь, повреждены или когда процесс удаления вызывает больше ошибок, например, сбой macOS или ваш Mac перестает отвечать на запросы.
Для этого следуйте приведенным ниже инструкциям:
- В меню Finder нажмите «Переход» > «Приложения» > «Утилиты», затем откройте «Терминал».
- В окне терминала введите следующую команду. Пока не нажимайте Enter. Обратите внимание на пробел в конце команды: гм -р
- Откройте Finder и перейдите к файлу или папке, которые вы хотите удалить.
- Перетащите файл или папку в окно терминала, где вы ввели команду.
- Теперь нажмите Enter.
После выполнения команды ваш файл или папка должны быть удалены.
Исправление № 4: используйте стороннее приложение.
Если вышеуказанные методы не помогают или вам нужно удалить труднодоступные файлы, такие как ненужные файлы и кэшированные файлы, вы можете использовать программу очистки Mac для очистки вашей системы. Надежное приложение для очистки должно очистить весь диск от ненужных файлов и удалить их.
Исправление № 5: переопределение разрешений при удалении файлов Time Machine.
Если файл, который вы хотите удалить, является частью файлов резервных копий, созданных Time Machine (TM), вы можете использовать этот метод для устранения кода ошибки 8072. Вы не сможете удалить файлы резервных копий Time Machine, когда эта функция запущена. :
Чтобы переопределить разрешение файла, выполните следующие действия:
- Нажмите на меню Apple, затем выберите «Системные настройки».
- Нажмите на Time Machine, затем переведите ползунок в положение «Выкл.».
- После отключения Time Machine вы можете удалить файлы вручную.
- Не забудьте снова включить Time Machine после удаления файлов.
Резюме
Когда вы сталкиваетесь с кодом ошибки 8072 при удалении или изменении файлов и папок на вашем Mac, вы можете легко решить эту проблему, выполнив соответствующие исправления, указанные выше. Код ошибки 8072 в основном является ошибкой разрешения, поэтому вам необходимо убедиться, что ни одно приложение не использует файл, и что у вас есть возможность читать и записывать файл, чтобы иметь возможность вносить изменения. Вы также можете использовать команды или стороннее приложение для управления файлами, если файлы слишком упрямы для обычного процесса удаления.
Many Mac users have recently experienced an error with their computer. They see an error code -8072 while trying to move files or folders to Trash or empty their Trash.
If you’re also experiencing this issue, you’re no doubt very frustrated. But don’t worry. We’ve put together two solutions to help you fix this error and remove your files.
Try these solutions
There are still alternative ways you can remove your files or empty your Trash. You may not have to try them all; just choose the right one for you.
- Force empty your Trash
- Remove your files or folders with Terminal
Method 1: Force empty your Trash
You can try force emptying your Trash if you can’t empty it normally. To force empty your Trash:
- Click and hold your Trash until you see its context menu appears.
- Press and hold the Shift key and Option key on your keyboard, then click Empty Trash.


Check to see if your Trash is empty now. Hopefully it is, but if not you may need to…
Method 2: Remove your files or folders with Terminal
You can also remove your files or folders with Terminal on your Mac computer. Note that this will remove them permanently. Here’s how you can do it.
- On your desktop, click Go, then click Utilities.

- Double click Terminal.

- Type the following line (DON’T press Enter on your keyboard):
Note that there is a space at the end.rm -r

- Open Finder.

- Go to where the file or folder you want to remove is located.
- Drag the file or folder to the Terminal window.

- On your Terminal, press the Enter on your keyboard.
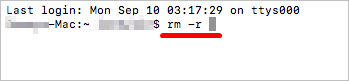


This should remove the file or folder.
Hopefully, one of the methods above help you remove your files or folders. If you have any questions, leave us a comment below!

Jonny, a Microsoft Certified Professional, is a technical writer and technology enthusiast. He believes technology should bring users satisfaction, not annoyance, so he writes to help people overcome their tech troubles.
Contributor(s):
![]()
![]()