Choose the best tool to get rid of BSoD for good
by Radu Tyrsina
Radu Tyrsina has been a Windows fan ever since he got his first PC, a Pentium III (a monster at that time). For most of the kids of… read more
Updated on
- Using a professional Blue Screen of Death fixer utility could help you save your personal data.
- We’ve tested the BSoD repair tools from our list to give you only the best options.
- System crashes during Windows 10 updates, faulty drivers or even problems with your hardware are the most common causes for BSoD errors.

XINSTALL BY CLICKING THE DOWNLOAD FILE
Fix all BSoD events and keep them away:
SPONSORED
Fortect is a tool that checks your Windows OS for bad or corrupted system files. Once found, it can replace these versions with a fresh one from its repository with original Windows System files. Thus, it will restore your system to a fully functional state.Here is how to do it in 3 easy steps:
- Download and Install Fortect on your PC
- Launch the tool and Start scanning to find broken files that are causing the problems
- Right-click on Start Repair to fix issues affecting your computer’s security and performance
- Fortect has been downloaded by 0 readers this month, rated 4.4 on TrustPilot
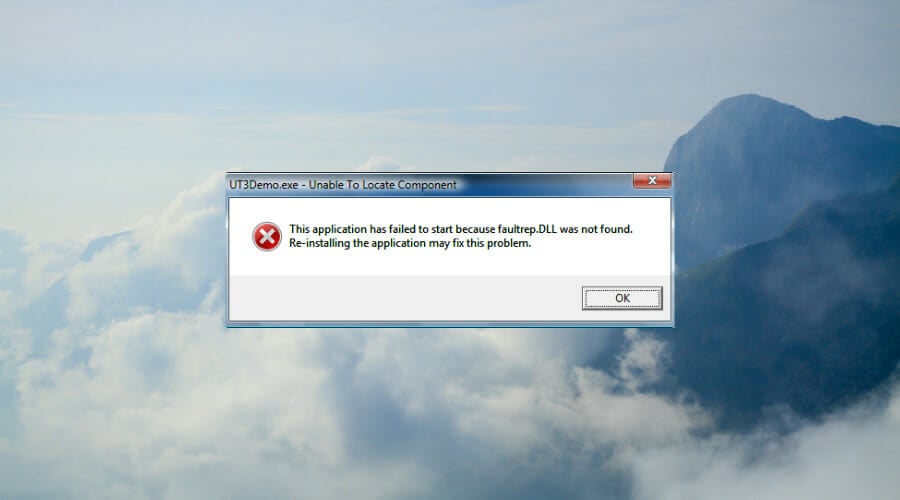
Installing the latest Windows 10 updates can often make some users’ computers go straight into the blue screen of death. Having a reliable BSoD fixer at hand is the best way to avoid disaster.
This can happen often with older operating system versions, and the catalysts are of various natures.
One of the causes that can lead to BSOD can be hardware-related, outdated driver software, or the issue can be due to low-level software that is running in the Windows kernel.
Sometimes, a regular app can cause this nightmare and corrupted files and data loss. Faulty memory power can also lead to this.
A STOP error is a catalyst for the appearance of the blue screen, and when this happens, there’s a complete crash involved, and Windows cannot perform anymore.
Your computer will restart, but the bad news is that your previously unsaved data will be lost because programs did not get a chance to save it.
What causes BSOD errors?
➡ Hardware malfunction
This issue can arise whether you’ve recently installed a new SSD or have existing hardware problems. Malfunctions can start from improper component connections, power loss, or broken elements, often leading to common BSOD errors like PFN_LIST_CORRUPT. Hardware damage can occur due to extreme temperature or voltage conditions.

To ensure that this is not a possible problem, it is recommended that you use a good computer monitoring tool that allows you to check these factors whenever you need to.
➡ Corrupted DLLs or system files
DLL files are the instruction manual of your system, so when and if one or more get corrupted, this can affect the way your PC works.
Damage to DLLs can appear because of mistakenly deleting one, malware attacks, and faulty application installations.
The damaged DLL must be replaced with a fresh new one for the system to function without issues.
➡ Device drives improperly written
Sometimes, whenever you create a new partition or during the installation process of a new OS, some drives might encounter errors while being written.
This can happen because of issues with your HDD or the partition software that you’re using. In turn, a BSOD can appear, stopping you from accessing your files entirely.
➡ Power supply issues
If your power supply has issues, then this will cause the voltage required for running the hardware on your motherboard to fluctuate. This, in turn, causes the components to malfunction; thus, a BSOD error can appear on your screen.
➡ Full PC memory
Having your PC memory full will hinder the OS’s ability to process information promptly and thus cause issues with the software, which in turn could cause issues with the hardware.
To avoid this problem, it is recommended that you use a PC optimization tool that can quickly identify any clutter and resolve it promptly.
Fortunately, you don’t have to worry anymore about finding an effective method to fix blue screen issues or to prevent the file loss triggered by them because some third-party BSoD fixer tools can cover all the risk factors mentioned above.
Fortect – Great OS reconditioning
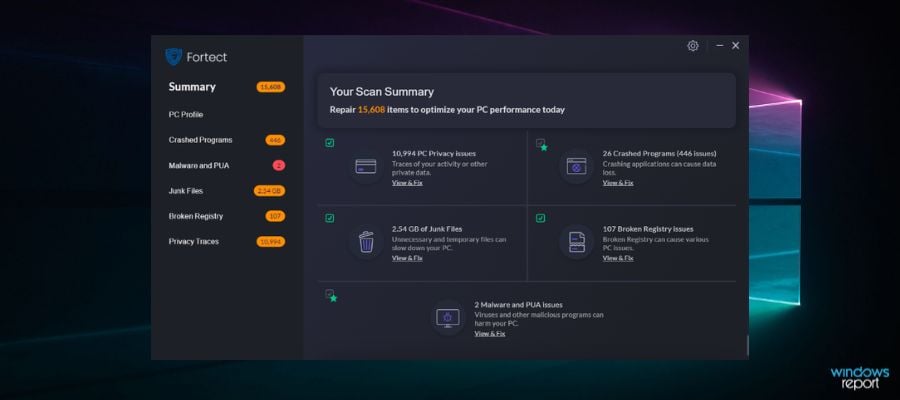
Next on the list is Fortect, an excellent program designed to repair and optimize your computer with multiple helpful features.
With this software, you can run a meticulous scan of your device to find its exact condition and deficiencies, such as BSoD errors, that slow down your PC performance.
Fortect is able to show you a comparison between your operating system and a system in an excellent state to see all the irregularities that can cause damage and ultimately correct them.
It can help you fix or replace corrupted or missing files, including DLLs and Registry keys, and automatically ensure an optimal state for your computer.
You can easily free up space and perform a PC cleanup by removing junk files, build-ups, and other files that clog your folders, disk, and hard drive.
Furthermore, Fortect will safeguard your system due to its ability to scan for faulty and incompatible hardware that may lead to errors that cause the blue screen of death.
Take a look at Fortect’s best features:
- Windows damage repairing
- Restore the OS
- Boost Windows Registry
- Plans for protecting multiple PCs
- PC scan and assessment

Fortect
Easily fix multiple errors and keep your computer in a great state with this amazing software.
Wondershare Recoverit – User-friendly interface
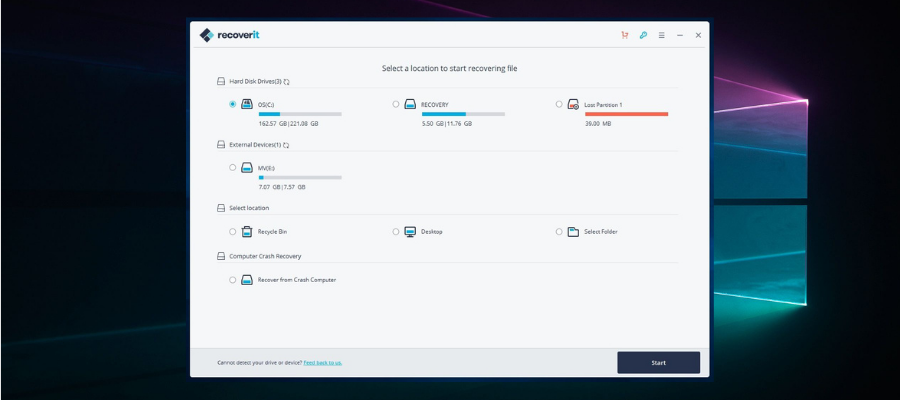
Recoverit from Wondershare is a useful piece of software that will help greatly when dealing with Blue Screen of Death errors on your computer.
This safe and reliable computer data recovery software was designed with ease of use, thus allowing you to control all aspects of how the program is run from a user-friendly main hub.
Recoverit can restore any lost files, whether audio, photos, or normal files, thus being an important step in bouncing back from a BSOD that affected your PC’s storage.
Here are some specific formats this software can easily recover to your system:
- Audio: AIF/AIFF, M4A, MP3, WAV, WMA, MID/MIDI, OGG, AAC, etc.
- Photo: JPG, TIFF/TIF, PNG, BMP, GIF, PSD, CRW, CR2, NEF, etc.
- Documents: DOC/DOCX, XLS/XLSX, PPT/PPTX,/XLSX, etc.
- Video: AVI, MOV, MP4, M4V, 3GP, 3G2, WMV, ASF, FLV, etc.
- Message and Emails: PST, DBX, EMLX, etc.
- Archives: ZIP, RAR, SIT, etc.
To ensure that you will not be missing any files, no matter where they are stored, the developers also included a feature that recovers data from an external HDD or SSD, memory cards, flash drives, and even digital cameras. Besides that, you can also recover files that have been deleted by mistake and are found in the Recycle bin.
A tool that offers these features can be a lifesaver, as it will ensure that no matter if you’re experiencing a drive getting formatted, a corrupted sector of data, virus attacks, or system crashes, Recoverit will be able to help.
Here are some other useful features:
- Quick processing of data
- Easy-to-understand user interface
- Selective recovery features
- Covers a wide range of data loss scenarios
Wondershare Recoverit is a licensed-based software with three different packages available. Each plan is available as a 1-year license, a one-month license, or a perpetual license.

Wondershare Recoverit
Quickly restore lost and deleted files and overcome BSOD problems with this intuitive tool.
Tweaking Windows Repair – Automatic updates
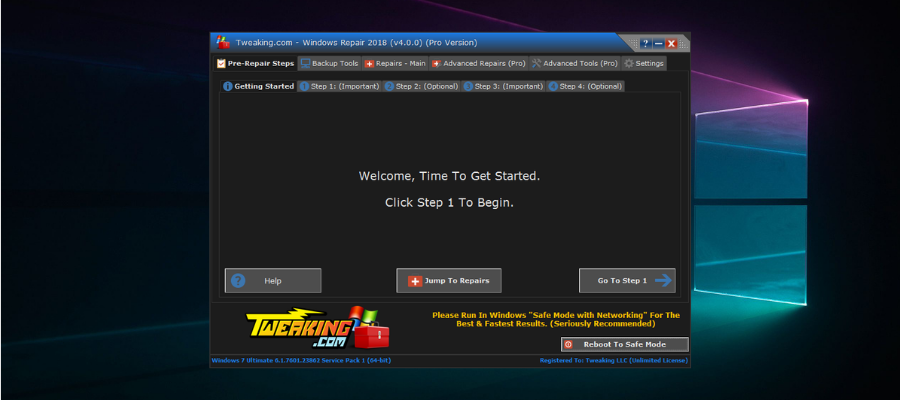
Tweaking Windows Repair is an astonishingly useful software that has the capability to resolve any BSoD errors within just a few minutes.
The step-by-step design of the BSoD repair tool was created in this manner to ensure that no elements are skipped, and this simplifies the actions the user needs to take as well.
To start the software all you have to do is click on Step 1, and follow the on-screen instructions. You will be guided all the way to the very end of the process, where all the issues that caused the BSOD will be resolved.
As a bonus, the main hub of the software offers you quick access to any of its menus and gives you a useful overview of all the elements contained in this powerful software.
This software from Tweaking is not only capable of resolving BSoD errors but can tackle almost any type of error or problem that you might encounter on a Windows platform.
You can easily resolve problems like registry errors, file permissions problems, Internet Explorer issues, Internet connection problems, and many more.
Even though the interface is not polished and beautifully designed like in the case of other software options, Tweaking Windows Repair makes up for it when it comes to usability.
There is only a small advantage to having slick-looking software, but the goal of this program is to ensure that your system works correctly, and isn’t created with looks in mind.
Other notable features:
- Permissions backup and restore of the registry files
- Cleans up entries in Windows Firewall
- Unhides files to thoroughly identify malware
- Enables access to Windows services tools
Tweaking Windows Repair is a licensed product with packages available for one or multiple PCs.

Tweaking Windows Repair
Resolve BSOD errors with this powerful software that thoroughly scans and fixes system issues.
Smart Blue Screen of Death Fixer Pro – Registry backup
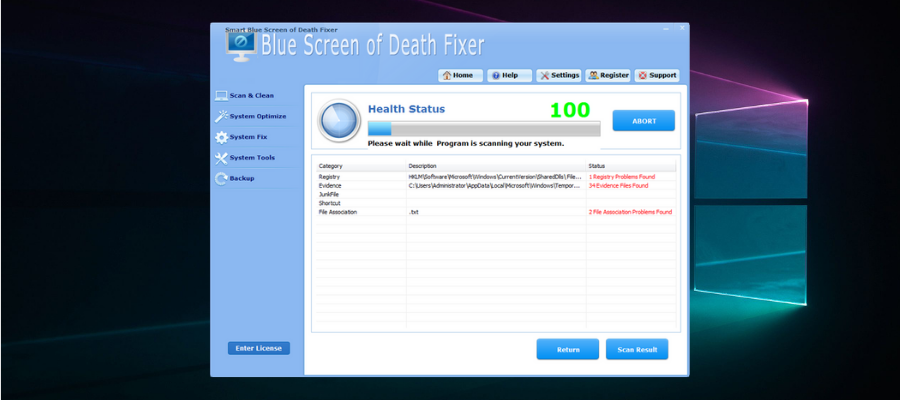
Smart Blue Screen of Death Fixer Pro is another excellent tool that comes in handy if you have to deal with a BSOD issue.
This great BSoD repair software is one of the world’s top award-winning registry cleaners, and it boasts millions of downloads now.
Smart Blue Screen of Death Fixer scans the entire drive to make sure that there’s no unwanted fragment of software left behind, and it automatically downloads the brand-new program that you might need.
The software is so popular due to its great set of features, which not only thoroughly scans and identifies issues, but is also capable of replacing files, fixing them, and optimizing their usage on your system.
This tool is equivalent to using eight separate products, as you get access to unrelated features, but all deal with system stability and stabilizability.
The developers ensured that the application doesn’t take much space on your hard drive, is easy to install, and is even easier to use. The menus and options are designed for simplicity, but that doesn’t take away from the actual capabilities found in the backend.
Using the tool regularly will result in smaller risks for data loss and an extended lifespan for your hard drive.
Other useful features:
- Optimizes menus, desktop environments, networks, services, and start-up features
- Scans and cleans registries, junk files, shortcuts, etc.
- Variety of system tools including an uninstaller manager, file splitter, disk defragmentation, etc.
- Backs up your registry, system restore, folders, files, etc.
⇒ Get Smart Blue Screen of Death Fixer Pro
WhoCrashed – Detailed analysis
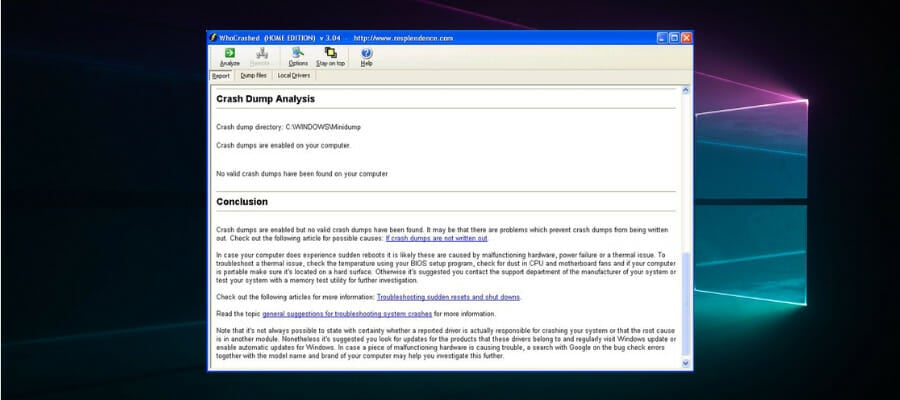
WhoCrashed is an excellent program that can reveal the drivers responsible for your computer’s crash, allowing you to fix the issue and acting as a preventive measure.
Even though it has a simple user interface, don’t get fooled by appearances, as this old-school-looking application can pack a punch.
WhoCrashed will show you the drivers that have been crashing your computer with just a single click of the mouse, thus eliminating the need for the user to go through laborious processes to initiate the recovery.
This tool performs a so-called post-mortem crash dump analysis as described above, presenting all the gathered data most comprehensively for the user while offering guidance in tracing the cause of the problem.
The best part about this process is that you won’t need any debugging skills to be able to know what drivers are troubling your computer running Windows and also how to fix them.
This tool is available as a free download, and it’s packed with lots of useful features:
- Scans your dump files, and it provides an estimation of what exactly caused your system to crash
- Predicts whether the fault was the computer’s hardware or if it was software-related
- Provides a bug check code, the error message, and the path of the file that ultimately caused the error
- Comes with a more advanced version that provides a more detailed analysis via symbol resolution.
⇒ Get WhoCrashed
You can pick any of these tools from the list to fix BSoD errors like Critical_structure_corruption and restore your system to normal functionality.
What can you do to prevent BSODs?
➡ Keep your drivers updated
Even though this might seem like an obvious part of our day-to-day usage of PCs, most of us forget how important drivers are.
Driver issues are the elements that don’t allow your software and hardware to function as intended, and it is one of the most common reasons for BSOD errors.
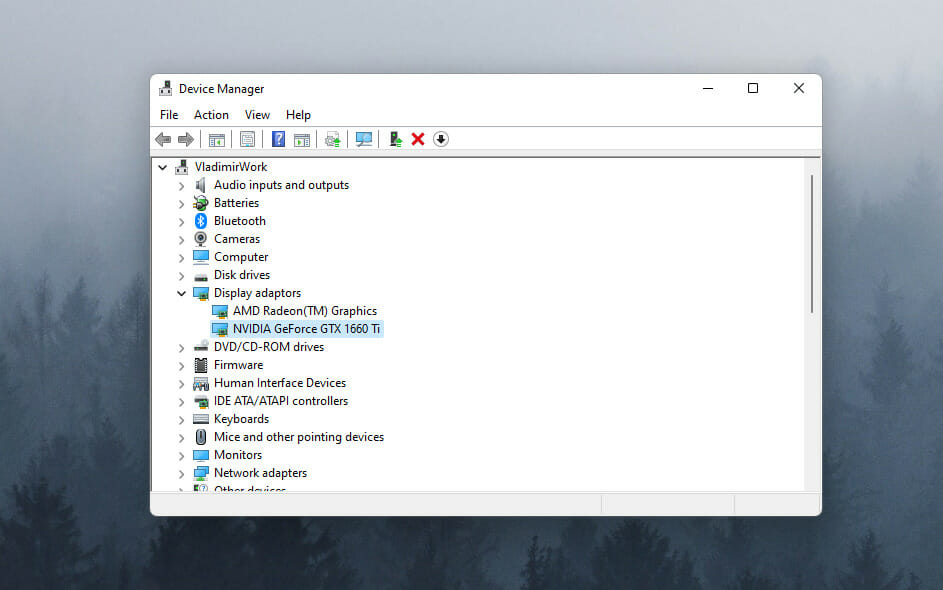
You can update your drivers by right-clicking Start and opening the Device Manager. Then, right-click the hardware components and choose the Update driver options.
If you want to simplify this process further and ensure that drivers are updated automatically across time, then a specialized driver updater software like Outbyte Driver Updater can help.
➡ Only install compatible software
Running incompatible software on your PC can cause system instability. The bad effect this will have on your system is related to the importance of the software you installed.
To avoid causing BSOD errors in the future, make sure that the software you’re installing is made to run optimally in your version of Windows, whether it’s Windows 7, Windows 10, or the latest Windows 11.
In case you already have incompatible software installed on your PC, you can access the Add or Remove programs app on your computer by using the Start search to find it.
If you want to be completely sure that all traces of said programs have been removed from your system, you can also use a third-party uninstaller tool.
Finally, you can also use the integrated tools to diagnose your system and help it recover from a BSoD.
- Fix: System Service Exception BSOD error on Windows 10
- 5+ best Windows update repair tools for Windows 10/11
- Pfn List Corrupt Blue Screen error in Windows 10/11 [FIXED]
- Where is the BSOD log file located and how to read it?
- Fix: NMI HARDWARE FAILURE on Windows 10/11
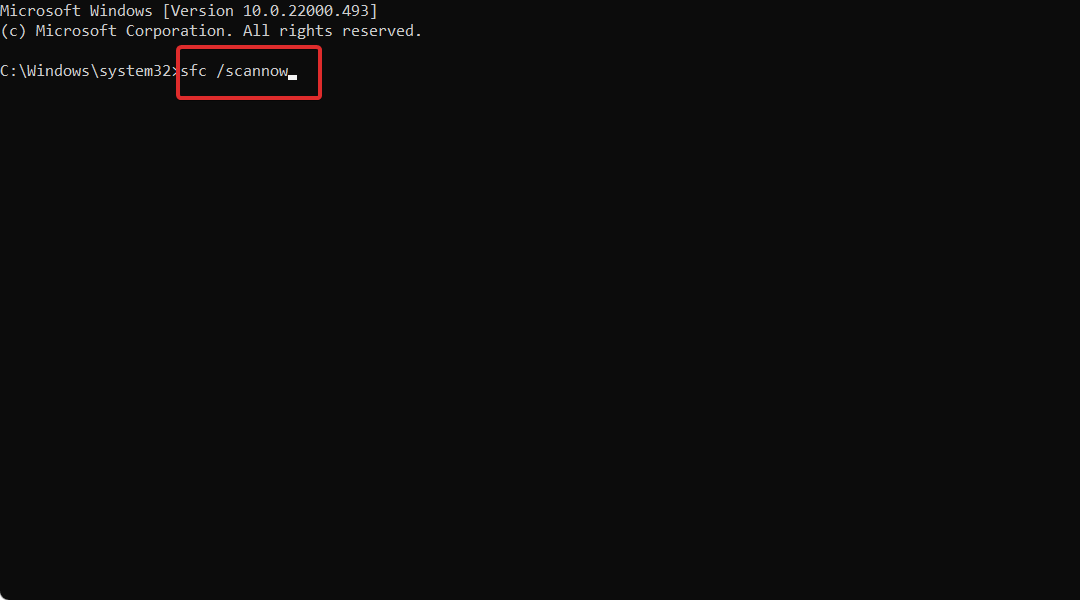
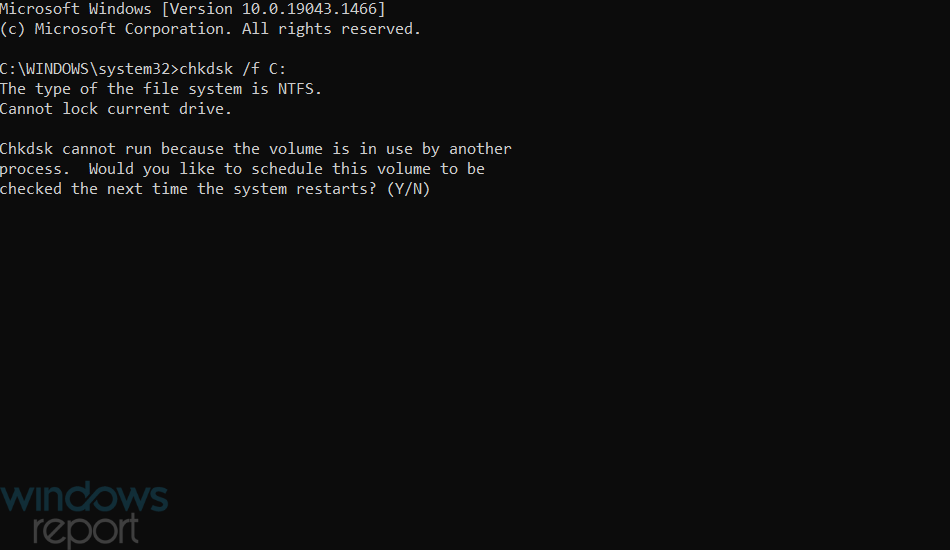
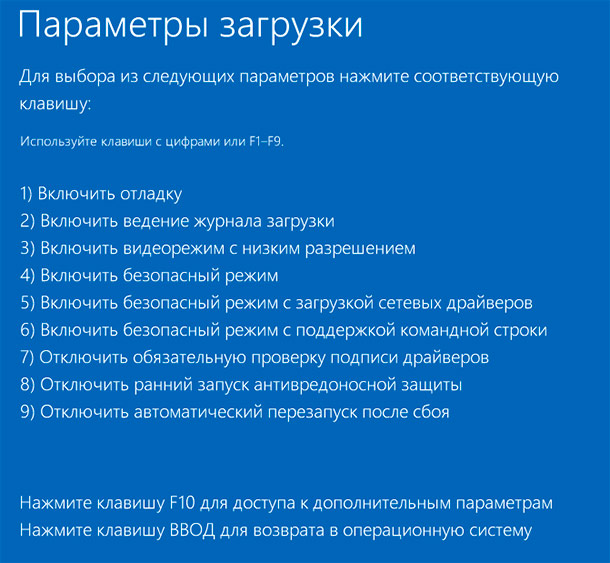
How to fix a BSoD on Windows 10 using Command Prompt:
- Open the Command Prompt with administrative privileges.
- Type the following command in the prompt windows:
sfc /scannow
- This will scan your system for signs of corruption.
- Then, insert this line:
chkdsk /f C:
- Note that this command will check the disk where Windows is installed for errors. Make sure to replace C: with the letter corresponding to your drive if it is different.
- This tool will find damaged system files and replace them with sain ones if it can.
- Finally, restart your PC and check if the BSoD has disappeared.
Some users have a hard time opening the CMD as admins; if that’s your case, we got your back. If the native tools fail to solve your issue, your best bet is to use a professional BSoD fixer like the recommended ones.
As you can see from this guide, a wide range of possible software options can resolve BSoD issues on your Windows device. However, if your intent is to force a BSoD error, restarting your system should do the trick.
We recommend that you work your way down the list and choose the best fit for your situation. For more options to pick from, just take a look at this best PC repair tools article as well.
Feel free to contact us by using the comments section below this guide.
![]()

Рекомендуем популярное
![]() MSI Afterburner 4.6.5
MSI Afterburner 4.6.5
MSI Afterburner — настоящая находка для истинного оверклокера, с помощью которой можно…
![]() SpeedFan 4.52
SpeedFan 4.52
SpeedFan — бесплатный и удобный в использовании инструмент для контроля за температурой и…
![]() Speccy 1.32.803
Speccy 1.32.803
Speccy — небольшая бесплатная программа, позволяющая узнать массу полезной информации об…
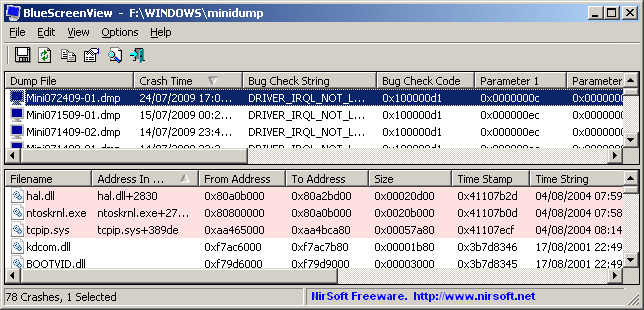
![]() BlueScreenView 1.55
BlueScreenView 1.55
BlueScreenView — небольшая бесплатная утилита, которая сканирует все файлы аварийных дампов…
![]() FPS Monitor 5440
FPS Monitor 5440
Приложение отслеживает состояние компонентов ПК и отображает информацию поверх экрана…
Пользователи операционной системы Windows нередко сталкиваются с так называемым «синим экраном смерти» (англ. «BSOD (Blue Screen Of Death)»). Причины его появления для многих остаются неясными, поэтому приходится звать на помощь профессиональных программистов.
Чтобы избежать этого была создана специальная программа — BlueScreenView, позволяющая пользователям самостоятельно разобраться в проблеме и принять меры для ее устранения.
Для чего нужна BlueScreenView?
BlueScreenView — специальная программа для диагностики проблем BSOD в операционной системе Windows, определяющая конкретную причину сбоя в системе. В обычное время человек, не знающий английского языка (да и его носители тоже), вряд ли сумеет понять, что за таинственные символы были выведены на «синем экране» и каково их значение. Утилита делает это за него.
Она анализирует полученные данные и после перезагрузки компьютера или ноутбука выводит сообщение, из которого можно понять, что произошло с техникой и как это можно исправить.
BlueScreen Viewer — это одна из самых простых программ в ОС Windows. Она занимает мало место в памяти устройства. Процесс работы утилиты строится на анализе дампа. Это файлы, которые образуются в памяти компьютера в процессе появления «синего экрана смерти». После перезагрузки человек может получить данные о каждом дампе в виде таблицы.
Это позволит ему самостоятельно разобраться в неполадках или дать точную информацию ремонтнику, который придет «возвращать к жизни» компьютер. Это будет лучше, чем если пользователь невнятно скажет мастеру, что «Появился синий экран, монитор погас, а дальше я ничего не понял».
Возможности
Утилита поддерживается даже старыми версиями операционной системы (например, Windows XP), поэтому использовать ее можно практически на любом компьютере или ноутбуке.
К основным возможностям Blue Screen View относятся:
- возможность быстро выяснить причину системного сбоя;
- ознакомление пользователя с информацией, связанной с драйверами;
- экспорт полученных данных в текстовый файл (THT, HTL, XML и пр.);
- создание шаблона для поиска информации в интернете по поводу возникшей проблемы в автоматическом режиме;
- работа с командной строкой.
Плюсы и минусы
Достоинства:
- функциональность;
- универсальность;
- возможность самостоятельно выяснить причину появления «синего экрана»;
- наличие портативной версии;
- интерфейс на русском языке (нужно установить русификатор);
- занимает мало места.
Недостатки:
- начинающим пользователям может быть сложно разобраться в тонкостях работы программы.
Итоги
BlueScreenView — простая утилита для диагностики источника «синего экрана смерти», с помощью которой можно понять в каком направлении искать проблему. Скачать последнюю версию BlueScreenView для Windows 2023 года с официального сайта можно по ссылке ниже.
| BlueScreenView v1.55 Copyright (c) 2009 — 2015 Nir Sofer |
Related Utilities
- WinCrashReport — Displays a report about crashed Windows application.
- WhatIsHang — Get information about Windows software that stopped responding (hang)
- AppCrashView — View application crash information on Windows 7/Vista.
See Also
- NK2Edit — Edit, merge and fix the AutoComplete files (.NK2) of Microsoft Outlook.
Description
BlueScreenView scans all your minidump files created during ‘blue screen of death’ crashes, and displays the information about all crashes in one table.
For each crash, BlueScreenView displays the minidump filename, the date/time of the crash, the basic crash
information displayed in the blue screen (Bug Check Code and 4 parameters), and the details of the driver or module
that possibly caused the crash (filename, product name, file description, and file version).
For each crash displayed in the upper pane, you can view the details of the device drivers loaded during the crash in the lower pane.
BlueScreenView also mark the drivers that their addresses found in the crash stack, so you can easily locate the suspected drivers that possibly caused the crash.
Download links are on the bottom of this page
Versions History
- Version 1.55:
- Added Drag & Drop support: You can now drag a single MiniDump file from Explorer into the main window of BlueScreenView.
- Fixed bug: BlueScreenView failed to remember the last size/position of the main window if it was not located in the primary monitor.
- Version 1.52:
- Added ‘Google Search — Bug Check’ and ‘Google Search — Bug Check + Parameter 1’ options.
- Version 1.51:
- Added automatic secondary sorting (‘Crash Time’ column).
- Added 64-bit build.
- Version 1.50:
- The ‘Crash Time’ now displays more accurate date/time of the crash.
In previous versions, the value of ‘Crash Time’ column was taken from the date/time of dump file, which actually represents that time that Windows loaded again, after the crash.
The actual crash time is stored inside the dump file , and now the ‘Crash Time’ displays this value. - Added ‘Dump File Time’ column, which displays the modified time of the dump file.
- The ‘Crash Time’ now displays more accurate date/time of the crash.
- Version 1.47:
- Added ‘Auto Size Columns+Headers’ option, which allows you to automatically resize the columns according to the row values and column headers.
- Version 1.46:
- Fixed issue: The properties and the ‘Advanced Options’ windows opened in the wrong monitor, on multi-monitors system.
- Version 1.45:
- You can now choose to open only a specific dump file — from the user interface or from command-line.
- You can now also specify the MiniDump folder or MiniDump file as a single parameter, and BlueScreenView
will be opened with the right dump file/folder, for example:
BlueScreenView.exe C:\windows\minidump\Mini011209-01.dmp
- Version 1.40:
- Added ‘Raw Data’ mode on the lower pane, which displays the processor registers and memory hex dump.
- Version 1.35:
- Added ‘Crash Address’ column.
- Added 3 columns that display that last 3 calls found in the stack
(Only for 32-bit crashes)
- Version 1.32:
- Added ‘Mark Odd/Even Rows’ option, under the View menu. When it’s turned on, the odd and even rows are displayed in different color, to make it easier to read a single line.
- Version 1.31:
- Added ‘Google Search — Bug Check+Driver’ for searching in Google the driver name and bug check code of the selected blue screen.
- Version 1.30:
- Added ‘Dump File Size’ column.
- Version 1.29:
- You can now send the list of blue screen crashes to stdout by specifying an empty filename («») in the command-line of all save parameters.
For example: bluescreenview.exe /stab «» > c:\temp\blue_screens.txt
- You can now send the list of blue screen crashes to stdout by specifying an empty filename («») in the command-line of all save parameters.
- Version 1.28:
- Added ‘Add Header Line To CSV/Tab-Delimited File’ option. When this option is turned on, the column names are added
as the first line when you export to csv or tab-delimited file.
- Added ‘Add Header Line To CSV/Tab-Delimited File’ option. When this option is turned on, the column names are added
- Version 1.27:
- Fixed issue: removed the wrong encoding from the xml string, which caused problems to some xml viewers.
- Version 1.26:
- Fixed ‘DumpChk’ mode to work properly when DumpChk processing takes more than a few seconds.
- Version 1.25:
- Added ‘DumpChk’ mode, which displays the output of Microsoft DumpChk utility (DumpChk.exe).
You can set the right path and parameters of DumpChk in ‘Advanced Options’ window.
By default, BlueScreenView tries to run DumpChk from ‘%programfiles%\Debugging Tools for Windows’ - The default MiniDump folder is now taken from HKEY_LOCAL_MACHINE\SYSTEM\CurrentControlSet\Control\CrashControl
- Added ‘DumpChk’ mode, which displays the output of Microsoft DumpChk utility (DumpChk.exe).
- Version 1.20:
- Added 3 new columns in the upper pane: Processors Count, Major Version, Minor Version.
- Added ‘Explorer Copy’ option, which allows you to copy dump files to the clipboard and then paste them into Explorer window.
- Version 1.15:
- Added option to view the blue screen list of multiple computers on your network.
The computer names are specified in a simple text file. (See below). - Added Combo-Box to easily choose the MiniDump folders available in the hard-disks currently attached to your computer.
- Added ‘Computer Name’ and ‘Full Path’ columns.
- Added option to view the blue screen list of multiple computers on your network.
- Version 1.11:
- Added /sort command-line option.
- Version 1.10:
- Added accelerator keys for allowing you to toggle between modes more easily.
- Added command-line options for saving the crash dumps list to text/csv/html/xml file.
- Added command-line option for opening BlueScreenView with the desired MiniDump folder.
- Fixed focus problems when opening the ‘Advanced Options’ window.
- Added ‘default’ button to the ‘Advanced Options’ window.
- Added ‘processor’ column — 32-bit or x64.
- Version 1.05 — Added support for x64 MiniDump files.
- Version 1.00 — First release.
BlueScreenView Features
- Automatically scans your current minidump folder and displays the list of all crash dumps, including crash dump date/time and crash details.
- Allows you to view a blue screen which is very similar to the one that Windows displayed during the crash.
- BlueScreenView enumerates the memory addresses inside the stack of the crash, and find all drivers/modules that might be involved in the crash.
- BlueScreenView also allows you to work with another instance of Windows, simply by choosing the right minidump folder (In Advanced Options).
- BlueScreenView automatically locate the drivers appeared in the crash dump, and extract their version resource information, including product name, file version, company, and file description.
System Requirements
- BlueScreenView works with Windows XP, Windows Server 2003, Windows Server 2008, Windows Vista, Windows 7, Windows 8, Windows 10,
as long as Windows is configured to save minidump files during BSOD crashes.
If your system doesn’t create MiniDump files on a blue screen crash,
try to configure it according to the following article:
How to configure Windows to create MiniDump files on BSOD - BlueScreenView can read the MiniDump files of both 32-bit and x64 systems.
- Be aware that on Windows 10, some of the created MiniDump files might be empty and BlueScreenView will not display them.
Using BlueScreenView
BlueScreenView doesn’t require any installation process or additional dll files.
In order to start using it, simply run the executable file — BlueScreenView.exe
After running BlueScreenView, it automatically scans your MiniDump folder and display all crash details in the upper pane.
Crashes Information Columns (Upper Pane)
- Dump File: The MiniDump filename that stores the crash data.
- Crash Time: The created time of the MiniDump filename, which also matches to the date/time that the crash occurred.
- Bug Check String: The crash error string. This error string is determined according to the Bug Check Code, and it’s also displayed in the blue screen window of Windows.
- Bug Check Code: The bug check code, as displayed in the blue screen window.
- Parameter 1/2/3/4: The 4 crash parameters that are also displayed in the blue screen of death.
- Caused By Driver: The driver that probably caused this crash.
BlueScreenView tries to locate the right driver or module that caused the blue screen by looking inside the crash stack.
However, be aware that the driver detection mechanism is not 100% accurate, and you should also look in the lower pane, that display all drivers/modules found in the stack.
These drivers/modules are marked in pink color. - Caused By Address: Similar to ‘Caused By Driver’ column, but also display the relative address of the crash.
- File Description: The file description of the driver that probably caused this crash.
This information is loaded from the version resource of the driver. - Product Name: The product name of the driver that probably caused this crash.
This information is loaded from the version resource of the driver. - Company: The company name of the driver that probably caused this crash.
This information is loaded from the version resource of the driver. - File Version: The file version of the driver that probably caused this crash.
This information is loaded from the version resource of the driver. - Crash Address:The memory address that the crash occurred. (The address in the EIP/RIP processor register)
In some crashes, this value might be identical to ‘Caused By Address’ value, while in others,
the crash address is different from the driver that caused the crash. - Stack Address 1 — 3:
The last 3 addresses found in the call stack.
Be aware that in some crashes, these values will be empty.
Also, the stack addresses list is currently not supported for 64-bit crashes.
Drivers Information Columns (Lower Pane)
- Filename: The driver/module filename
- Address In Stack: The memory address of this driver that was found in the stack.
- From Address: First memory address of this driver.
- To Address: Last memory address of this driver.
- Size: Driver size in memory.
- Time Stamp: Time stamp of this driver.
- Time String: Time stamp of this driver, displayed in date/time format.
- Product Name: Product name of this driver, loaded from the version resource of the driver.
- File Description: File description of this driver, loaded from the version resource of the driver.
- File Version: File version of this driver, loaded from the version resource of the driver.
- Company: Company name of this driver, loaded from the version resource of the driver.
- Full Path: Full path of the driver filename.
Lower Pane Modes
Currently, the lower pane has 4 different display modes.
You can change the display mode of the lower pane from Options->Lower Pane Mode menu.
- All Drivers:
Displays all the drivers that were loaded during the crash that you selected in the upper pane.
The drivers/module that their memory addresses found in the stack, are marked in pink color. - Only Drivers Found In Stack:
Displays only the modules/drivers that their memory addresses found in the stack of the crash.
There is very high chance that one of the drivers in this list is the one that caused the crash. - Blue Screen in XP Style:
Displays a blue screen that looks very similar to the one that Windows displayed during the crash. - DumpChk Output:
Displays the output of Microsoft DumpChk utility.
This mode only works when Microsoft DumpChk is installed on your computer and
BlueScreenView is configured to run it from the right folder (In the Advanced Options window).
You can get DumpChk from the installation CD/DVD of Windows or
with the installtion of Debugging Tools for Windows.
Crashes of Remote Network Computer
If you have multiple computers on your network and you have full administrator access to them
(e.g: you have access to \\ComputerName\c$), you can also view the crashes of the other computers on your network remotely.
In order to do that, simply go to ‘Advanced Options’ (Ctrl+O) and type the MiniDump folder of the remote
computer, for example: \\MyComp\c$\Windows\MiniDump.
Notice: If you fail to get full administrator access to the remote computer, you should read the instructions in the following Blog post:
How to connect a remote Windows 7/Vista/XP computer with NirSoft utilities.
Watching the crashes of multiple computers on your network
If you have a network with multiple computers, and you have full admin access to these computers, you can
view the blue screens list of all these computers in one table, and easily detect computers with recurring BSOD problems.
In order to use this feature, prepare a list of all computer names/IP addresses that you want to inspect, and save it to a simple text file.
The computer names in the list can be delimited by comma, semicolon, tab character, or Enter (CRLF).
Example for computer names list:
comp01
comp02
192.168.0.1
192.168.0.2
192.168.0.4
After you have a text file contains the computers list, you can go to Advanced Options window (Ctrl+O), choose the second option and type the computers list filename.
Command-Line Options
| /LoadFrom <Source> |
Specifies the source to load from. 1 -> Load from a single MiniDump folder (/MiniDumpFolder parameter) 2 -> Load from all computers specified in the computer list file. (/ComputersFile parameter) 3 -> Load from a single MiniDump file (/SingleDumpFile parameter) |
| /MiniDumpFolder <Folder> | Start BlueScreenView with the specified MiniDump folder. |
| /SingleDumpFile <Filename> | Start BlueScreenView with the specified MiniDump file. (For using with /LoadFrom 3) |
| /ComputersFile <Filename> | Specifies the computers list filename. (When LoadFrom = 2) |
| /LowerPaneMode <1 — 3> |
Start BlueScreenView with the specified mode. 1 = All Drivers, 2 = Only Drivers Found In Stack, 3 = Blue Screen in XP Style. |
| /stext <Filename> | Save the list of blue screen crashes into a regular text file. |
| /stab <Filename> | Save the list of blue screen crashes into a tab-delimited text file. |
| /scomma <Filename> | Save the list of blue screen crashes into a comma-delimited text file (csv). |
| /stabular <Filename> | Save the list of blue screen crashes into a tabular text file.
|
| /shtml <Filename> | Save the list of blue screen crashes into HTML file (Horizontal). |
| /sverhtml <Filename> | Save the list of blue screen crashes into HTML file (Vertical). |
| /sxml <Filename> | Save the list of blue screen crashes into XML file. |
| /sort <column> |
This command-line option can be used with other save options for sorting by the desired column. If you don’t specify this option, the list is sorted according to the last sort that you made from the user interface. The <column> parameter can specify the column index (0 for the first column, 1 for the second column, and so on) or the name of the column, like «Bug Check Code» and «Crash Time». You can specify the ‘~’ prefix character (e.g: «~Crash Time») if you want to sort in descending order. You can put multiple /sort in the command-line if you want to sort by multiple columns.
Examples: |
| /nosort | When you specify this command-line option, the list will be saved without any sorting. |
Translating BlueScreenView to other languages
In order to translate BlueScreenView to other language, follow the instructions below:
- Run BlueScreenView with /savelangfile parameter:
BlueScreenView.exe /savelangfile
A file named BlueScreenView_lng.ini will be created in the folder of BlueScreenView utility. - Open the created language file in Notepad or in any other text editor.
- Translate all string entries to the desired language.
Optionally, you can also add your name and/or a link to your Web site.
(TranslatorName and TranslatorURL values) If you add this information, it’ll be
used in the ‘About’ window. - After you finish the translation, Run BlueScreenView, and all translated
strings will be loaded from the language file.
If you want to run BlueScreenView without the translation, simply rename the language file, or move
it to another folder.
License
This utility is released as freeware.
You are allowed to freely distribute this utility via floppy disk, CD-ROM,
Internet, or in any other way, as long as you don’t charge anything for this.
If you distribute this utility, you must include all files in
the distribution package, without any modification !
Disclaimer
The software is provided «AS IS» without any warranty, either expressed or implied,
including, but not limited to, the implied warranties of merchantability and fitness
for a particular purpose. The author will not be liable for any special, incidental,
consequential or indirect damages due to loss of data or any other reason.
Feedback
If you have any problem, suggestion, comment, or you found a bug in my utility,
you can send a message to nirsofer@yahoo.com
BlueScreenView is also available in other languages. In order to change the language of
BlueScreenView, download the appropriate language zip file, extract the ‘bluescreenview_lng.ini’,
and put it in the same folder that you Installed BlueScreenView utility.
| Language | Translated By | Date | Version |
|---|---|---|---|
| Arabic | Fcmam5 | 23/02/2013 | 1.47 |
| Brazilian Portuguese | cslibraga | 20/02/2016 | 1.10 |
| Bulgarian | Евгений Кабакчиев | 05/06/2015 | 1.55 |
| Czech | Pavel Konečný | 04/01/2015 | 1.52 |
| Danish | Gustav Brock | 15/01/2011 | 1.30 |
| Dutch | Jan Verheijen | 03/02/2015 | 1.55 |
| Farsi | Hamed Babaei (ÍÇãÏ ÈÇÈÇíí) | 18/03/2014 | 1.52 |
| Finnish | S. J. Liimatainen | 03/06/2020 | 1.55 |
| French | EtoileFilante® Corp. | 24/08/2015 | 1.55 |
| French | Eric FICHOT | 27/07/2013 | 1.52 |
| French | xb70walkyrie [v. 1.55] | 31/07/2016 | |
| German | «Latino» auf WinTotal.de | 29/01/2015 | 1.55 |
| Greek | geogeo.gr | 11/10/2014 | 1.52 |
| Hungarian | Timinoun | 12/12/2022 | 1.55 |
| Italian | Roberto B.WSS | 14/05/2015 | 1.55 |
| Italian | Daniele Cultrera & bovirus | 01/04/2014 | 1.52 |
| Japanese | iLEƒÖEj | 17/07/2013 | 1.52 |
| Korean | J. K. Lee(Wave) | 04/02/2015 | 1.55 |
| Latvian | Nizaury | 15/01/2012 | 1.45 |
| Persian | Shadima.com | 26/04/2020 | 1.55 |
| Polish | Wojciech Sabaj | 25/06/2012 | 1.45 |
| Polish | Tomasz Janiszewski | 04/08/2009 | 1.00 |
| Romanian | Jaff (Oprea Nicolae) | 08/05/2015 | 1.55 |
| Russian | Dmitry Posunko && Dm.Yerokhin | 21/01/2016 | 1.55 |
| Simplified Chinese | CuiPlaY | 14/03/2013 | 1.47 |
| Simplified Chinese | EaiLFly | 28/01/2012 | 1.45 |
| Simplified Chinese | Edison Chen | 27/05/2014 | 1.52 |
| Slovak | Fero Fico | 29/01/2015 | 1.55 |
| Slovenian | Darko Kenda | 22/01/2014 | 1.52 |
| Spanish | Amadeo García Torrano | 07/05/2020 | 1.55 |
| Swedish | Bernt Janhäger | 06/08/2012 | 1.45 |
| Swedish | Tommy Kellerman | 29/03/2011 | 1.32 |
| Traditional Chinese | 發夢 King | 04/08/2009 | 1.00 |
| Traditional Chinese | 丹楓(虫二電氣診所) | 08/10/2013 | 1.52 |
| Turkish | Saner Apaydin | 16/03/2010 | 1.20 |
| Turkish | HARUN ARI | 16/09/2011 | 1.40 |
| Ukrainian | Lembergman, August 2017 | 19/08/2017 | 1.5.5.0 |
| Ukrainian | vmsoft77 | 20/11/2013 | 1.52 |
| Valencian | vjatv | 25/08/2009 | 1.05 |
Ошибка типа «синий экран» (также известная как STOP-ошибка) может возникать в том случае, если проблема вызывает непредвиденное завершение работы или перезагрузку устройства. При этом может появиться «синий экран» с сообщением о том, что на вашем устройстве возникла проблема и его необходимо перезагрузить.
На этой странице рассматривается последовательность шагов по диагностике неполадок, которые помогут вам выявить причину возникновения ошибки типа «синий экран» и устранить ее.
Действия, описанные в этой статье, предназначены для диагностики и устранения распространенных STOP-ошибок со следующими кодами.
-
CRITICAL_PROCESS_DIED
-
SYSTEM_THREAD_EXCEPTION_NOT_HANDLED
-
IRQL_NOT_LESS_OR_EQUAL
-
VIDEO_TDR_TIMEOUT_DETECTED
-
PAGE_FAULT_IN_NONPAGED_AREA
-
SYSTEM_SERVICE_EXCEPTION
-
DPC_WATCHDOG_VIOLATION
Примечания:
-
Также могут отображаться шестнадцатеричные коды ошибок, например 0x0000000A, 0x0000003B, 0x000000EF, 0x00000133, 0x000000D1, 0x1000007E, 0xC000021A, 0x0000007B, 0xC000000F и другие.
-
Эта статья не содержит список кодов ошибок, но поскольку многие коды ошибок имеют одни и те же потенциальные решения, лучше всего будет выполнить описанные ниже действия для устранения ошибки типа «синий экран».
Хотя шаги на этой странице на первый взгляд могут показаться сложными, просто следуйте им по порядку, пошагово, и мы постараемся вернуть вас в нужное русло.
Нужна дополнительная помощь?
Синий экран смерти, или ВSOD – проблема, пугающая многих компьютерных пользователей, особенно если их знания ограничиваются любительским уровнем владения ПК. Белые буквы на синем фоне действительно представляют угрозу работоспособности гаджета, однако это, конечно, вовсе не значит, что устройство пора утилизировать.
Многие проблемы операционной системы Windows 10, которые и становятся причиной возникновения неполадок, можно исправить в несколько кликов. Главное – знать, как правильно это сделать, чтобы не нанести еще большего вреда системе.
Содержание:
- Что такое синий экран смерти
- Почему BSOD появляется в Windows 10
- Как исправить проблему синего экрана
- Через БИОС
- С помощью командной строки
- Через безопасный режим
- Как исправить ошибку Memory Management
- Другие способы решить проблему
Что такое синий экран смерти
Появление ВSOD – это явный показатель того, что с операционной системой возникла серьезная ошибка, которая требует незамедлительного исправления. Возникает «экран смерти» только в тех случаях, когда компьютер не в состоянии устранить ошибку самостоятельно.
Как правило, после красочного сообщения с грустным смайлом следует принудительная перезагрузка устройства, которая на время может стабилизировать работу системы. Но подобный подход лишь оттягивает неизбежное, и ошибка вскоре появится снова.

Рано или поздно столкнуться с проблемой устрашающего белого текста на синем фоне, придется каждому пользователю ОС Windows. Впервые BSOD увидели пользователи Windows 95, и с тех пор способ предупреждения о фатальных ошибках системы практически не изменился. Однако в защиту новых версий ОС можно сказать, что они более стабильны, нежели их предшественники. Поэтому количество пользователей, сталкивающихся с BSOD, становится все меньше.
Владельцы ПК на системе Windows 10 видят ВSOD как короткое сообщение об ошибке с ее кодовым названием под грустным смайликом. В некоторых случаях на экране также можно увидеть QR-код, отсканировав который можно узнать причину появления ошибки.
Почему BSOD появляется в Windows 10
Существует несколько фатальных ошибок ОС, которые могут спровоцировать появление ВSOD. Чаще всего к ним относятся:
- Ошибки в драйверах.
- Сбои в ядре операционной системы (низкоуровневое программное обеспечение).
- Выход из строя компонентов компьютера (к примеру, поломка видеокарты).
- Подключение конфликтующих устройств (сканер, принтер и т.д.)
- Неправильно настроенный BIOS.
- Недостаток оперативной памяти на жестком диске.
- Установка поврежденной прошивки.
- Удаление важных ключей реестра.
- Перегрев процессора.
- Различные вирусы.
Только узнав причину «вылета» системы можно приступать к устранению проблемы.
Возникновение BSOD – это всегда повод присмотреться к работе своего компьютера, потому что если проблему не устранить, она будет напоминать о себе снова и снова.
Как исправить проблему синего экрана
Существует несколько способов устранения проблемы синего экрана, выбор которых зависит от причин ее появления и способностей пользователя.
Через БИОС
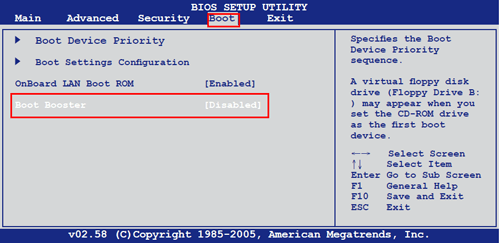
Чаще всего люди отдают предпочтение реанимированию системы через старый добрый БИОС, так как это довольно быстрый и легкий способ. Некоторые ошибки не позволяют включить компьютер, система просто не пропускает пользователя дальше заставки включения.
Чтобы реанимировать ПК через BIOS, необходимо:
- Войти в БИОС при загрузке системы. Вход может отличаться в зависимости от модели компьютера. По этой причине перед его ремонтом следует ознакомиться с горячими клавишами в инструкции гаджета.
- Кликнуть на раздел Boot (на современных устройствах).

- Выбрать пункт Disabled в строке Вoot Booster.

- Сохранить изменения и перезагрузить компьютер. Действия сбросят гаджет до заводских настроек, что способствует решению большинства проблем, вызывающих BSOD. Но стоит понимать, что настраивать устройство «под себя» придется заново, а все сохранения будут удалены.
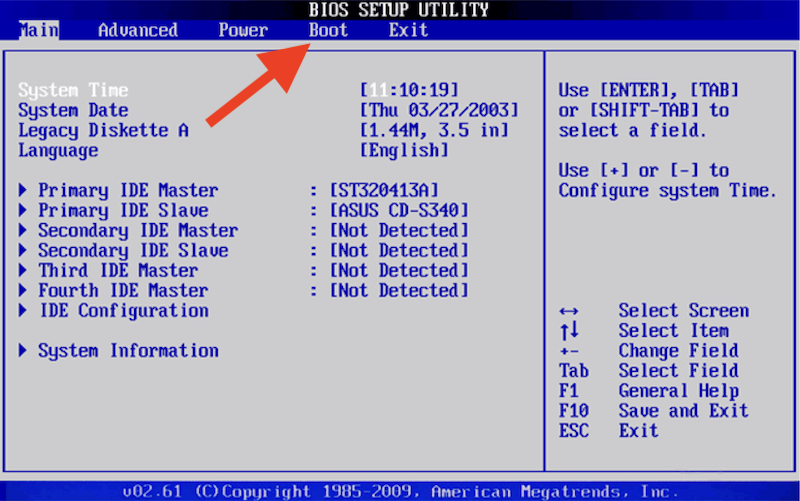
Разрешить неудобства с потерей данных поможет резервное копирование или отправка важных файлов в облако.
С помощью командной строки
Нередко к проблеме приводят повреждения системных файлов или ошибки в них. Особенно часто с такой причиной сталкиваются люди, скачивающие ПО через сторонние ресурсы. В таком случае в качестве мер реанимации можно использовать командную строку SFC, которая находит и устраняет ошибки, возникшие в системных файлах.
Для устранения бага стоит придерживаться следующей инструкции:
- Запустите командную строку от имени администратора. Ее можно найти через поисковую систему на компьютере, расположенную в меню «Пуск».
- Подтвердите свое намерение, нажав на клавишу «Да/Yes».
- Введите в появившемся окне: sfc/scannow.

- Нажмите на кнопку “Enter” в качестве подтверждения.
- После завершения сканирования, перезагрузите компьютер.
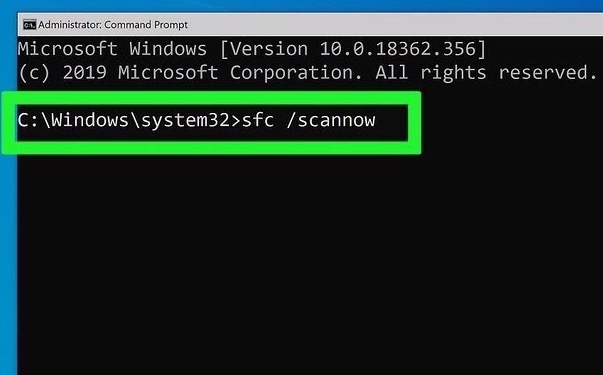
Если причина проблемы была в файлах системы, то после sfc-сканирования гаджет начнет работать в прежнем режиме.
Через безопасный режим
Узнать причину неполадки можно также с помощью включения компьютера в так называемом безопасном режиме. Под ним подразумевается ограниченная версия системы, в которую входят только основные функции и системные драйверы. То есть, любые сторонние драйверы и программы включены не будут, а значит и не смогут помешать работе устройства.
Чтобы запустить безопасный режим на последней версии ОС, необходимо:
- Зажать клавишу Shift и кликнуть на раздел перезагрузки.
- Оказавшись в разделе «Выбор действия», нажать на пункт «Диагностика» (Поиск и устранение неисправностей).

- После следует выбрать «Дополнительные параметры» и «Перезагрузить».

- Последним этапом станет нажатие на клавишу F4.

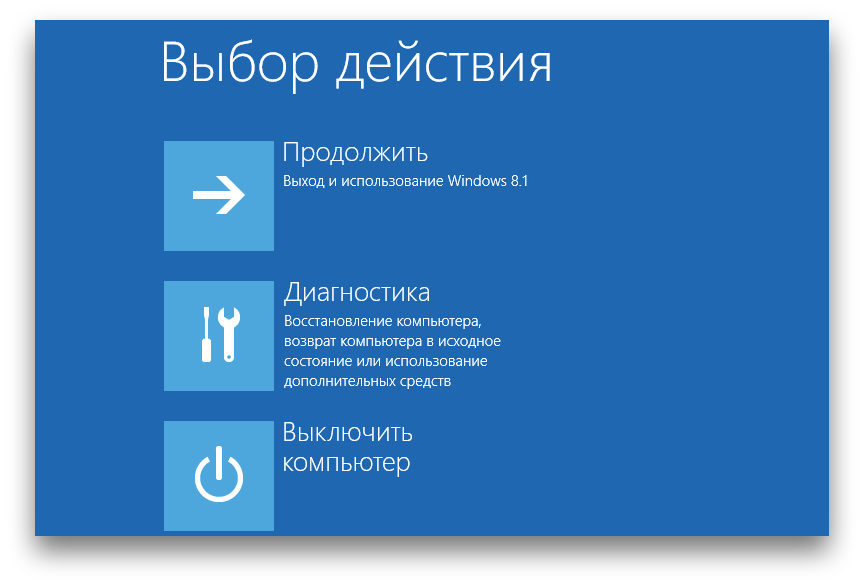
Если при включении ПК ошибка не появится, значит причиной ее возникновения стали сторонние драйверы, программы или вирусы.
В таком случае останется только проанализировать последние дни пользования устройством и вспомнить, устанавливалось на него что-то или нет. Ответ «да» подразумевает удаление всех сторонних программ и драйверов, установленных в последнее время.
Выйти из режима можно просто с помощью перезагрузки устройства. Безопасный режим – отличный способ понять причину поломки устройства без ряда дополнительных манипуляций.
Как исправить ошибку Memory Management
Такая ошибка является частой причиной появления грустного смайлика на экране монитора. Она может возникнуть как в процессе работы устройства, так и при его включении. Но значение у Memory Management всегда одно – несовместимость аппаратной и программной частей компьютера.
Основанием для появления Memory Management чаще всего является:
- Установка неисправного драйвера или его несовместимость с техникой.
- Помехи в работе жесткого диска.
- Неисправности в оперативной памяти.
- Неподходящая версия BIOS.
- Установка программ, зараженных вирусами.
- Ошибки в настройках подачи электричества.
Если причиной неисправности стало вредоносное ПО, то достаточно просканировать компьютер с помощью антивирусных программ.
Удаление неисправного или несовместимого драйвера также может решить проблему, если он стал причиной ее возникновения. Убедиться в этом поможет запуск устройства через безопасный режим. В некоторых ситуациях может потребоваться сброс до заводских настроек или переустановка системы.
Но далеко не всегда причиной поломки является файловая система. Неисправности в «железе» также нередко провоцируют появления бага. Поэтому важно обновлять BIOS до последней версии, так как его устаревание чревато серьезными проблемами с ПК.
Если все проделанные действия не окажут нужного эффекта, необходимо:
- Проверить винчестер на наличие трещин, битых секторов и бэдов.
- Проанализировать оперативную память. Ошибки в ее работе отображает программа Memtest 86.
Ноутбуки и другие компьютеры, работающие на аккумуляторе, могут выдавать фатальный экран в случае проблем с электропитанием. В таких ситуациях необходимо выбирать сбалансированный режим питания при работе от сети.
Иногда восстановить прежнюю работоспособность компьютера самостоятельно не получается. Как правило, в этом всегда виноваты физические неисправности элементов, а не сбои оперативной системы. В таком случае лучше обратиться в сервисный центр, где профессионалы найдут как причину неисправности, так и способы ее устранения.
Другие способы решить проблему
Существует ряд дополнительных и достаточно легких мер, которые также могут восстановить работоспособность компьютера:
- В первую очередь, рекомендовано запустить «Центр обновления Windows», чтобы убедиться в актуальности своей ПО. В случае существования более новой версии, необходимо ее установить.
- На актуальность стоит проверить и все драйверы, установленные на ПК. Для этого можно воспользоваться бесплатными сервисом Driver Booster, который стягивает все нужные драйверы автоматически.


Перегрев – одна из самых распространенных причин фатального бага, особенно если компьютер устарел. В этом случае необходимо проверить температуру процессора и видеокарты и при необходимости охладить ПК. В дальнейшем стоит прибегнуть к качественной очистке устройства от пыли и грязи, а также замене охлаждающих составляющих. Не лишним также окажется проверка оперативной памяти и винчестера на повреждения с помощью специальных программ, список которых можно найти в сети.
Одним из самых легких способов восстановления нормального функционирования ПК является возврат до последнего работающего состояния или сброс до заводских настроек. Переустановка ОС также является неплохим выходом из сложной ситуации.
BSOD – это сигнал о возникновении серьезной ошибки, которая работает подобно стоп-сигналу для компьютера на ОС Windows. Устранить неполадку можно сразу несколькими способами. С большинством из них может справиться большинство рядовых пользователей ПК.
![]() Загрузка…
Загрузка…


BlueScreenView от Nirsoft немного более продвинутый, чем WhoCrashed, и предлагает вам возможность подробно изучить все файлы, связанные с BSOD. Проверьте лучшие функции, которые упакованы в этом программном обеспечении:
- Он предлагает всю основную информацию, относящуюся к сбою системы, а также позволяет сохранять файлы дампа в виде текста и просматривать всесторонний анализ причин, вызвавших проблему.
- Информация, относящаяся ко всем сбоям, отображается в таблице.
- Этот инструмент также перечисляет адреса памяти в стеке сбоя и находит модули, которые могут быть в нем задействованы.
Для каждого сбоя этот инструмент отображает более сложные данные, такие как имя файла мини-дамп, дата / время сбоя, базовая информация о сбое, отображаемая на синем экране (код проверки ошибки и 4 параметра), а также сведения о драйвере. или модуль, который мог вызвать сбой (имя файла, название продукта, описание файла и версия файла).
Это определенно более продвинутая программа, поэтому она не идеальна для начинающих, но стоит проверить. Зайдите на официальный сайт BlueScreenView, чтобы узнать больше об этом.
Это лучшие способы и инструменты сторонних производителей, позволяющие справиться с ужасной ошибкой BSOD, и, как вы заметили выше, некоторые из этих инструментов также способны восстанавливать потерянные данные. Проверьте их набор функций, чтобы убедиться, что вы загружаете программное обеспечение, соответствующее вашим навыкам. Удачи и, наконец, помахать на прощание с BSOD.
СВЯЗАННЫЕ ИСТОРИИ, ЧТОБЫ ПРОВЕРИТЬ:
- Есть фиолетовый экран смерти на ПК? Вот как это исправить
- Желтый экран смерти в Windows 10: вот как это решить
- Исправить красный экран на Windows 10
Пользователи операционной системы Windows нередко сталкиваются с так называемым «синим экраном смерти» (англ. «BSOD (Blue Screen Of Death)»). Причины его появления для многих остаются неясными, поэтому приходится звать на помощь профессиональных программистов.
Чтобы избежать этого была создана специальная программа — BlueScreenView, позволяющая пользователям самостоятельно разобраться в проблеме и принять меры для ее устранения.
Для чего нужна BlueScreenView?
BlueScreenView — специальная программа для диагностики проблем BSOD в операционной системе Windows, определяющая конкретную причину сбоя в системе. В обычное время человек, не знающий английского языка (да и его носители тоже), вряд ли сумеет понять, что за таинственные символы были выведены на «синем экране» и каково их значение. Утилита делает это за него.
Она анализирует полученные данные и после перезагрузки компьютера или ноутбука выводит сообщение, из которого можно понять, что произошло с техникой и как это можно исправить.
BlueScreen Viewer — это одна из самых простых программ в ОС Windows. Она занимает мало место в памяти устройства. Процесс работы утилиты строится на анализе дампа. Это файлы, которые образуются в памяти компьютера в процессе появления «синего экрана смерти». После перезагрузки человек может получить данные о каждом дампе в виде таблицы.
Это позволит ему самостоятельно разобраться в неполадках или дать точную информацию ремонтнику, который придет «возвращать к жизни» компьютер. Это будет лучше, чем если пользователь невнятно скажет мастеру, что «Появился синий экран, монитор погас, а дальше я ничего не понял».
Возможности
Утилита поддерживается даже старыми версиями операционной системы (например, Windows XP), поэтому использовать ее можно практически на любом компьютере или ноутбуке.
К основным возможностям Blue Screen View относятся:
- возможность быстро выяснить причину системного сбоя;
- ознакомление пользователя с информацией, связанной с драйверами;
- экспорт полученных данных в текстовый файл (THT, HTL, XML и пр.);
- создание шаблона для поиска информации в интернете по поводу возникшей проблемы в автоматическом режиме;
- работа с командной строкой.
Плюсы и минусы
Достоинства:
- функциональность;
- универсальность;
- возможность самостоятельно выяснить причину появления «синего экрана»;
- наличие портативной версии;
- интерфейс на русском языке (нужно установить русификатор);
- занимает мало места.
Недостатки:
- начинающим пользователям может быть сложно разобраться в тонкостях работы программы.
Итоги
BlueScreenView — простая утилита для диагностики источника «синего экрана смерти», с помощью которой можно понять в каком направлении искать проблему. Скачать последнюю версию BlueScreenView для Windows 2023 года с официального сайта можно по ссылке ниже.
Компьютеры и ноутбуки — это новинки, которые можно считать предметами первой необходимости. Раньше единственными потребностями любого человека считались только еда, одежда и дом. Но этот список теперь увеличивается день ото дня. В современном мире люди могут обходиться без еды. Люди могут выжить без надлежащей одежды. Но они не могут провести даже несколько часов без использования смарт-устройств. Ноутбуки и компьютеры являются одними из основных интеллектуальных устройств. В новом нормальном мире после пандемии COVID-19 этот спрос растет день ото дня. Как вы все знаете, если какое-либо устройство используется в течение длительного времени, с ним могут возникнуть некоторые проблемы. Ноутбуки и компьютеры ничем не отличаются от него. В зависимости от операционных систем могут возникнуть разные проблемы. Linux и macOS имеют несколько разных проблем для длительного использования. В операционной системе Windows это называется ошибкой синего экрана. Когда возникает проблема такого типа, на устройстве появляется синий экран с сообщением об ошибке. Это очень распространенная проблема с устройствами, которые использовались в течение десятилетий без надлежащего обслуживания. Пользователям этих компьютеров потребуется выполнить некоторые действия, чтобы устранить проблему.
Содержание
- Устранение неполадок и исправление ошибок синего экрана Windows 10
- Ошибка «синий экран» при обновлении до Windows 10
- Ошибка «синий экран» без доступа к рабочему столу в Windows 10
- Ошибка «синий экран» при доступе к рабочему столу в Windows 10
Ошибка «синий экран» при обновлении до Windows 10
Иногда после обновления до Windows 10 ошибка смерти синего экрана является распространенной проблемой. Поскольку система может быть несовместима с Windows 10, по этой причине устройство может выдать эту ошибку. В таких случаях другого выхода нет. Пользователям необходимо вернуться к более старым версиям. Но иногда проблема не в этом. Иногда программное обеспечение, поставляемое с деградацией Windows 10, невозможно настроить на устройстве. В этих случаях удаление программного обеспечения с устройства было бы разумным выбором.
Шаг 1: Во-первых, пользователи должны открыть настройки устройства. На странице настроек представлено множество опций. Среди этих опций пользователям необходимо выбрать опцию «Приложения». Эта опция поможет вам выполнить больше задач, связанных с ней.

Шаг 2: Теперь параметр «Приложения» по умолчанию будет отображаться на странице «Приложения и функции». Там будут все приложения будут присутствовать. Пользователям нужно будет нажать на любое из приложений. После нажатия на нее появится опция удаления. Пользователям необходимо удалить ненужные приложения.
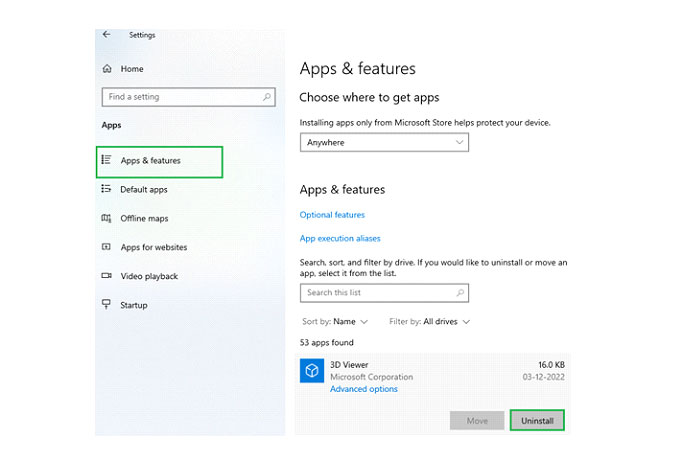
Отказ от ответственности: пользователи могут удалять приложения оттуда. Однако рекомендуется не удалять приложения, установленные службами Windows или Microsoft. Поскольку эти приложения предназначены для бесперебойной работы машины. Удаление этих приложений может вызвать более сложные проблемы для устройств. Таким образом, пользователи должны быть осторожны при удалении приложений.
Ошибка «синий экран» без доступа к рабочему столу в Windows 10
Иногда устройство зависает на странице ошибки синего экрана. Устройство не может работать из-за ошибки. Если пользователи принудительно выключат устройство, они также найдут ту же страницу. В таких случаях необходимо следовать этому методу. Советуют использовать этот метод, когда устройство подвернуто на странице ошибки. В обычных случаях этот метод не используется.
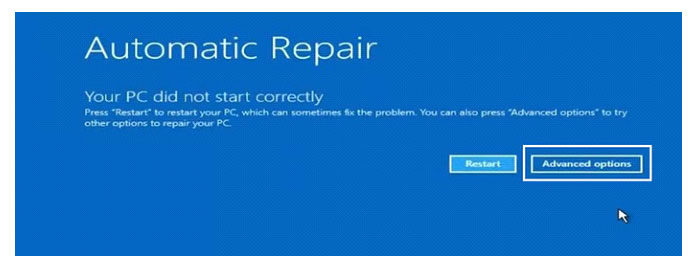
Шаг 1: Во-первых, пользователям необходимо включить устройство. Как только они находят стартовый логотип Windows, им необходимо принудительно закрыть его. Таким образом, устройство будет отключено. Весь этот процесс необходимо выполнить два или три раза. После этого при запуске они обнаружат сообщение «Подготовка автоматического восстановления». Так что теперь пользователям не нужно ничего делать.
Примечание. Если пользователи используют какой-либо ноутбук для его принудительного выключения, то будет кнопка запуска, которую необходимо нажать. Если пользователи используют компьютеры, им необходимо выключить кнопку ЦП.

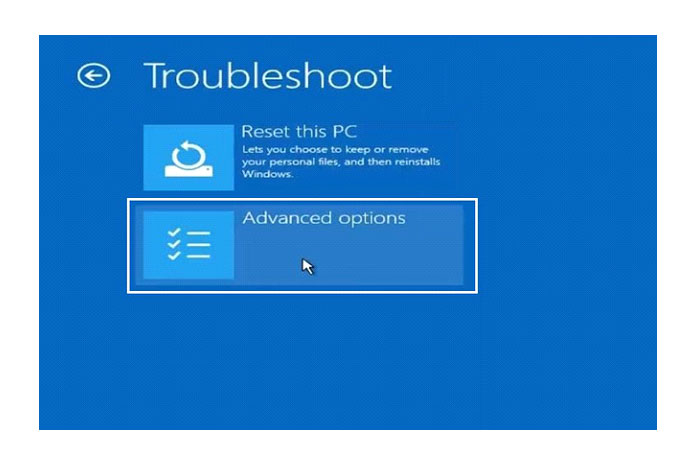
Шаг 2: Теперь, после этого, пользователи попадут в окно. Пользователям нужно будет нажать на Advanced Option. Это принесет больше возможностей пользователям.
Шаг 3: В следующем окне будет еще несколько вариантов. Однако пользователям нужно будет щелкнуть параметр «Устранение неполадок» и двигаться вперед.
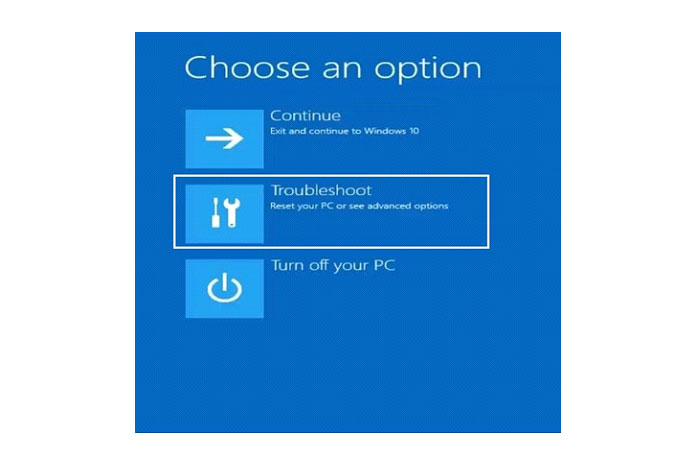
Шаг 4: Внутри параметра «Устранение неполадок» будет еще несколько параметров. Но между ними пользователям нужно нажать «Дополнительные параметры».
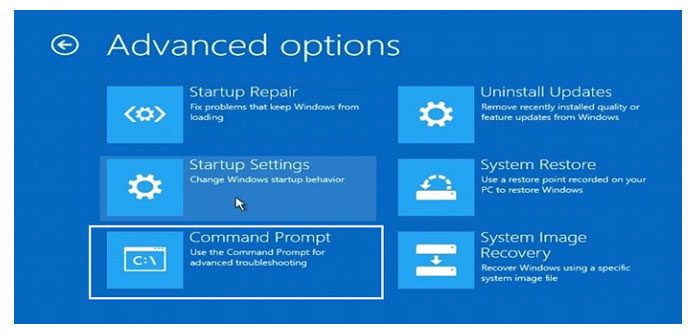
Шаг 5: В расширенной опции есть много опций. Среди них пользователям необходимо нажать на опцию командной строки. Это вызовет командную строку.
Шаг 6: Затем в командной строке пользователям необходимо выполнить указанную ниже команду. Это поможет временно убрать ошибку. Это просканирует устройство и решит проблему.
Команда: sfc/scannow
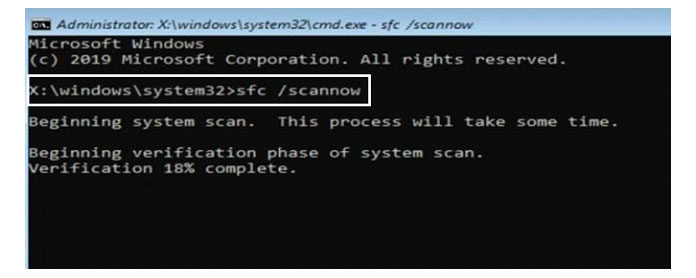
Шаг 7: После выполнения вышеупомянутой команды пользователям необходимо запустить другую команду. Эта команда поможет проверить диск устройств. Это просканирует диски на устройстве. После запуска команды пользователям необходимо закрыть командную строку.
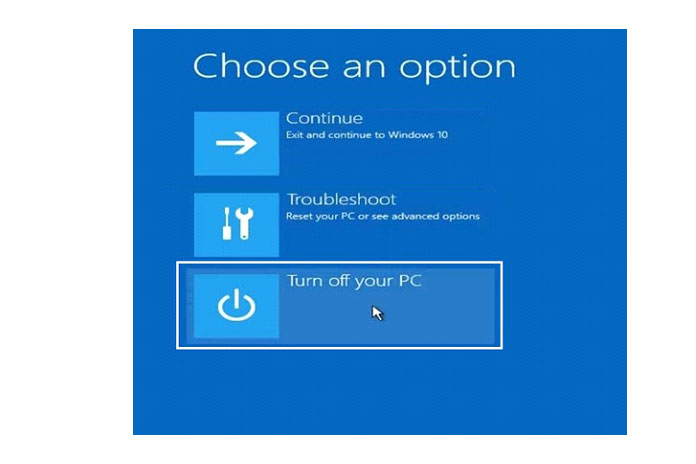
Команда: chkdsk С:

Шаг 8: После закрытия командной строки пользователи попадут в то же окно, что и на шаге 3. Теперь пользователям нужно нажать на опцию «Выключить компьютер». После этого пользователям нужно будет снова перезагрузить устройство в обычном режиме. Сейчас проблемы решаются.
Ошибка «синий экран» при доступе к рабочему столу в Windows 10
Выполнение вышеуказанного метода недостаточно для решения проблемы. Описанный выше метод можно использовать для временного решения проблемы. Но через несколько дней проблема может начаться снова. Кроме того, частое выполнение описанного выше метода может привести к повреждению устройства. Или иногда, после использования в течение длительного времени, вышеуказанный метод больше не будет работать над проблемой. Таким образом, будет мудро решить проблему навсегда. Для этого пользователям необходимо очистить журналы конфигурации и ненужные файлы.
Шаг 1: Сначала пользователям необходимо одновременно нажать кнопку Windows + R. Затем пользователям необходимо написать «%TEMP%» в мастере запуска. После этого пользователям необходимо нажать кнопку Ok. Это поможет быстро открыть раздел временных файлов.
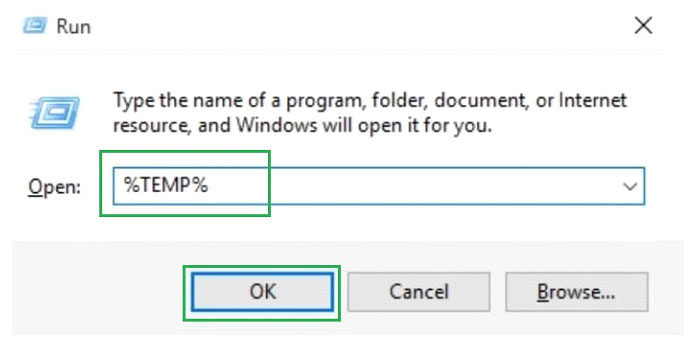
Шаг 2: В открытом файловом менеджере пользователям необходимо удалить все файлы. Пользователям просто нужно удалить все файлы, присутствующие там, используя традиционный процесс. Это удалит временные файлы.
Шаг 3: После удаления временных файлов пользователям также необходимо будет удалить недавно сохраненные ненужные файлы. Для этого пользователям необходимо снова одновременно нажать Windows + R. Затем пользователям нужно написать «недавние» и нажать «ОК».
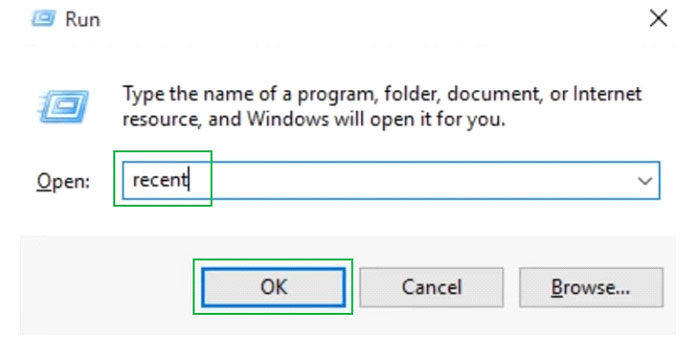
Шаг 4: Откроется новое окно проводника. Пользователям просто нужно удалить оттуда все недавно сохраненные файлы. Нет необходимости беспокоиться об удалении этих файлов. Они похожи на ненужные файлы для устройств. Таким образом, пользователи могут легко удалить этих мух, используя традиционный метод.
Шаг 5: Теперь, после выполнения вышеуказанных шагов, пользователям необходимо очистить журналы конфигурации. Для этого пользователям необходимо снова нажать кнопку Windows + R. Затем пользователям нужно написать команду «prefetch». Затем им нужно нажать «ОК».
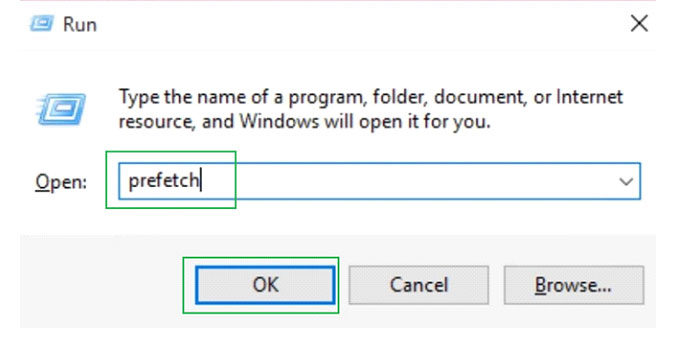
Шаг 6: Откроется окно проводника. Теперь пользователям необходимо удалить все имеющиеся там журналы конфигурации. Как и при удалении файлов, пользователям необходимо выбрать все файлы и удалить их с устройств. Это журналы конфигурации, которые возникают со временем. Удаление этих элементов поможет устранить проблему ошибки синего экрана.
Примечание: Желательно выполнить все шаги. Невыполнение какого-либо одного шага может стать причиной проблемы в будущем. Все шаги, перечисленные выше, рекомендуется выполнить. Если пользователям это нужно, они могут выполнить автоматическое восстановление без этой ошибки. Это поможет сохранить устройство. Это поможет снизить вероятность возникновения проблем с ошибкой «синий экран» в будущем.