Все время на других сайтах ищу коды ошибок, решил не искать, а просто опубликовать коды ошибок у себя на сайте, сразу скажу честно, содрал на другом сайте 🙂
|
||||||||||||||||||||||||||||||||
|
|
||||||||||||||||||||||||||||||||
не требуются |
||||||||||||||||||||||||||||||||
|
|
||||||||||||||||||||||||||||||||
|
В заметке использованы материалы с riconik.info
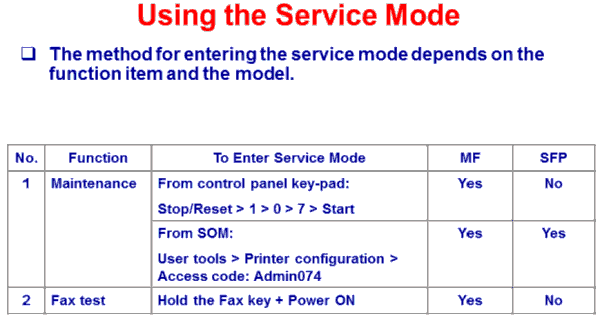
This chapter provides solutions for error messages and other problems.
Error and Status Indicate on the Control Panel
The LED on the operation panel indicates the machine status, including any errors.
LED
Power
Alert
On
—
On
—
On
—
On
Flashing
On
On
Toner/
Status
Paper
End
—
The power is on.
Flashing
The print cartridge is almost
empty.
On
• The print cartridge is
empty.
• The print cartridge is not
set correctly.
• The tray has run out of
paper during a print job.
—
A paper jam has occurred in
the machine.
—
A cover is open.
Solution
The status is normal.
Replace the print cartridge
before it becomes empty.
• Replace the print
cartridge.
• Set the print cartridge
again correctly.
• Load paper into the tray.
Use Web Image Monitor or
Smart Organizing Monitor to
determine where the paper jam
is, and then remove the
jammed paper. See page 71
«Clearing Misfeeds» and
page 77 «Paper Feed
Problems».
Confirm that all the covers are
closed completely.
67
- Manuals
- Brands
- Ricoh Manuals
- Printer
- SP 220NW
- User manual
-
Contents
-
Table of Contents
-
Troubleshooting
-
Bookmarks
Quick Links
User’s Guide
Guide to the Machine
Paper Specifications and Adding Paper
Printing Documents
Configuring the Machine Using Utilities
Maintaining the Machine
Troubleshooting
Configuring Network Settings Using OS X
Appendix
For safe and correct use, be sure to read Safety Information before
using the machine.
Related Manuals for Ricoh SP 220NW
Summary of Contents for Ricoh SP 220NW
-
Page 1
User’s Guide Guide to the Machine Paper Specifications and Adding Paper Printing Documents Configuring the Machine Using Utilities Maintaining the Machine Troubleshooting Configuring Network Settings Using OS X Appendix For safe and correct use, be sure to read Safety Information before using the machine. -
Page 3: Table Of Contents
TABLE OF CONTENTS How to Find Information about Operations and Troubleshooting…………..5 Operating Manual (Printed)……………………..5 Operating Manual (Digital Format)………………….5 Help…………………………… 6 How to Read This Manual……………………..8 Introduction…………………………8 Symbols Used in This Manual……………………8 Model-Specific Information………………………8 Disclaimer…………………………..9 Notes…………………………..9 Note to Administrator……………………..
-
Page 4
Non-Recommended Paper Types………………….33 Paper Storage………………………… 34 Print Area…………………………34 3. Printing Documents What You Can Do with the Printer Function………………..37 Displaying the Printing Preferences Dialog Box…………………38 Displaying the Printing Preferences Dialog Box from the [Start] Menu……….. 38 Displaying the Printing Preferences Dialog Box in an Application…………38 Basic Operation of Printing…………………….. -
Page 5
Disposal………………………….. 66 Where to Inquire……………………….66 6. Troubleshooting Error and Status Indicate on the Control Panel………………..67 Error and Status Messages Appear on Smart Organizing Monitor…………69 Clearing Misfeeds……………………….71 Removing Jammed Paper from Tray 1………………….. 71 Removing Jammed Paper from the Bypass Tray………………73 Opening the Rear Cover to Remove Jammed Paper……………. -
Page 6
Specifying IPsec Settings on the Computer………………..96 Notes About the Toner………………………..99 Specifications of the Machine……………………100 General Function Specifications………………….100 Printer Function Specifications……………………102 Consumables…………………………103 Print Cartridge……………………….103 Information for This Machine……………………104 User Information on Electrical & Electronic Equipment (mainly Europe and Asia)..104 Note for the Battery and/or Accumulator Symbol (For EU countries only)……… -
Page 7: How To Find Information About Operations And Troubleshooting
This manual explains how to set up the machine. It also explains how to remove the machine from the packaging and how to connect it to a computer. Operating Manual (Digital Format) Operating manuals can be viewed from Ricoh’s website or from the provided CD-ROM. Viewing from a web browser Access the Internet from a web browser.
-
Page 8: Help
Click the manual you want to refer to. The PDF file manual opens. Help Use the following procedure to open the Help files learn about the printer driver, Web Image Monitor, and Smart Organizing Monitor functions. Depending on the model, Web Image Monitor may not be available. For details about model-specific differences, see «Differences in Performance/Functions between Different Models»…
-
Page 9
Web Image Monitor Click on the top right of the screen. DSH251 To display Help, install the help source file beforehand. For details about installing the file, see page 44 «Using Web Image Monitor». Smart Organizing Monitor Click [Help] on the [Printer Configuration] screen. DSH252… -
Page 10: How To Read This Manual
How to Read This Manual Introduction This manual contains detailed instructions and notes on the operation and use of this machine. For your safety and benefit, read this manual carefully before using the machine. Keep this manual in a handy place for quick reference.
-
Page 11: Disclaimer
The following information is region-specific. Read the information under the symbol that corresponds to the region of your machine. (mainly Europe and Asia) If the label contains the following, your machine is a region A model: • CODE XXXX -27, -29, -67 •…
-
Page 12: Note To Administrator
In this manual, «IP address» covers both IPv4 and IPv6 environments. Read the instructions that are relevant to the environment you are using. Differences in Performance/Functions between Different Models The differences in main performance/functions between different models are as follows: SP 220Nw SP 221 SP 221Nw Ethernet Port (Network)
-
Page 13: Guide To The Machine
1. Guide to the Machine This chapter describes preparations for using the machine and its operating instructions. Guide to Components This section introduces the names of the various parts on the front and rear side of the machine and outlines their functions. Exterior DSH105 •…
-
Page 14: Interior
For details about replacing the cartridge, see page 61 «Replacing the Print Cartridge». Control Panel This section introduces the names of the parts of the control panel and explains their functions. The illustration of the control panel is for SP 220Nw and SP 221Nw.
-
Page 15
[Wi-Fi Direct] key Pressing this key while Wi-Fi is disabled activates Wi-Fi and reboots the machine automatically. Press this key while Wi-Fi is (only SP 220Nw and enabled to activate or deactivate the Wi-Fi Direct function. This SP 221Nw) indicator lights blue when the Wi-Fi Direct function is active. After a long press of this key, configure the WPS using the PIN code or in PBC mode. -
Page 16
1. Guide to the Machine • For details about printing a list of the machine’s configurations or about doing a test print using Smart Organizing Monitor, see page 57 «Using Smart Organizing Monitor». -
Page 17: About Operation Tools
About Operation Tools About Operation Tools This section explains the operation tools of this machine. Depending on the model, Web Image Monitor may not be available. For details about model-specific differences, see «Differences in Performance/Functions between Different Models» in page 8 «How to Read This Manual».
-
Page 18
1. Guide to the Machine… -
Page 19: Paper Specifications And Adding Paper
2. Paper Specifications and Adding Paper This chapter describes how to load paper and originals and about their specifications. Workflow for Loading Paper and Configuring Paper Sizes and Types This section explains how to load paper and the operations required after loading paper. After following the procedures below, you can print on the paper that is loaded in the machine.
-
Page 20: Loading Paper
2. Paper Specifications and Adding Paper Loading Paper This section explains how to load paper into the paper tray and the bypass tray. • When loading paper, take care not to trap or injure your fingers. For information about supported paper, precautions for storing paper and print areas, see page 30 «Supported Paper».
-
Page 21
Loading Paper Slide the side and end paper guides outward. DSH112 Fan the paper before loading it in the tray. Load the new paper stack print side down. Make sure paper is not stacked higher than the upper limit marked inside the side paper guide. DSH115 Align the end paper guide to the paper size mark in the tray. -
Page 22
2. Paper Specifications and Adding Paper Check there are no gaps between the paper and the paper guides (both side and end paper guides). DSH116 Carefully push Tray 1 straight into the machine. DSH211 To avoid paper jams, make sure the tray is securely inserted. To deliver the sheets face up, open the rear cover. -
Page 23
Loading Paper Extending Tray 1 to load paper This section explains how to load paper larger than A4 (297 mm) into the machine. Remove the tray cover. DSH213 Pull Tray 1 out slowly, and then remove it using both hands. Release the extender locks on both sides of the tray, and then pull out the extender. -
Page 24
2. Paper Specifications and Adding Paper When using legal size paper, adjust the length to the position indicated by the mark » » in the tray. DSH180 Lock the extender. DSH122 Follow Steps 2 to 7 in «Loading Paper into Tray 1». Attach the tray cover. -
Page 25: Loading Paper Into The Bypass Tray
Loading Paper Loading Paper into the Bypass Tray • Do not load paper in the bypass tray unless the message «Ready» appears in Smart Organizing Monitor. Open the bypass tray. DSH215 Slide the side guides outward, load paper with the print side up, and then push in until it stops against the machine.
-
Page 26
2. Paper Specifications and Adding Paper To deliver the sheets face up, open the rear cover. DSH212 • Sheets can be delivered face down from the output tray without opening the rear cover. -
Page 27: Specifying Paper Type And Paper Size Using Smart Organizing Monitor
Specifying Paper Type and Paper Size Using Smart Organizing Monitor Specifying Paper Type and Paper Size Using Smart Organizing Monitor The procedure in this section is an example based on Windows 7. The actual procedure may vary depending on the operating system you are using. On the [Start] menu, click [All Programs].
-
Page 28
2. Paper Specifications and Adding Paper Click [SP 220 Series Software Utilities]. Click [Smart Organizing Monitor for SP 220 Series]. If the machine you are using is not selected, click [Connect Printer], and then do one of the following: • Select the machine’s model. •… -
Page 29: Specifying Paper Type And Paper Size Using Web Image Monitor
Specifying Paper Type and Paper Size Using Web Image Monitor Specifying Paper Type and Paper Size Using Web Image Monitor This section describes how to specify paper sizes and types using Web Image Monitor. Depending on the model, Web Image Monitor may not be available. For details about model-specific differences, see «Differences in Performance/Functions between Different Models»…
-
Page 30: Specifying Paper Type And Paper Size Using The Printer Driver
2. Paper Specifications and Adding Paper Specifying Paper Type and Paper Size Using the Printer Driver • Make sure that the paper type and size specified with the printer driver matches the type and size of the paper loaded in the tray. Since this machine does not detect paper sizes automatically, the type or size of the paper may be mismatched and the print job may not print correctly.
-
Page 31: When Using Os X
Specifying Paper Type and Paper Size Using the Printer Driver Click [OK]. When Using OS X The procedure in this section is an example based on OS X 10.11. The actual procedure may vary depending on the operating system you are using. Start System Preferences.
-
Page 32: Supported Paper
2. Paper Specifications and Adding Paper Supported Paper • After loading paper in the tray, specify the paper type and size using Smart Organizing Monitor and the printer driver. This machine does not detect the paper size automatically. • When loading custom size paper, specify the width and length using printer driver. Type Size Weight…
-
Page 33
Supported Paper • Depending on the paper type, the toner may take a while to dry. Before handling printed sheets, make sure that they have fully dried. Otherwise, the toner may smudge. • Print quality can be guaranteed only if recommended paper is used. For more information about the recommended paper, contact your sales or service representative. -
Page 34
2. Paper Specifications and Adding Paper Color Paper Item Description Paper thickness 75 to 90 g/m (20 to 24 lb.) Supported paper tray Tray 1 and bypass tray Notes If the paper thickness is outside the specified range, select [Thin Paper], [Plain Paper], or [Thick Paper 1]. -
Page 35: Non-Recommended Paper Types
Supported Paper Bond Paper Item Description Paper thickness 100 to 130 g/m (28 to 43 lb.) Supported paper tray Tray 1 and bypass tray Notes If the paper thickness is outside the specified range, select [Thin Paper], [Plain Paper], or [Thick Paper 1]. Cardstock Item Description…
-
Page 36: Paper Storage
2. Paper Specifications and Adding Paper • Paper with windows, holes, perforations, cutouts, or embossing • Adhesive label paper on which glue or base paper is exposed • Paper with clips or staples • When loading paper, take care not to touch the surface of the paper. •…
-
Page 37
Supported Paper 1. Print area 2. Feed direction 3. Approx. 4.2 mm (0.2 inches) 4. Approx. 4.2 mm (0.2 inches) • The print area may vary depending on the paper size, printer language and printer driver settings. -
Page 38
2. Paper Specifications and Adding Paper… -
Page 39: Printing Documents
3. Printing Documents This chapter describes how to configure settings on the printer driver and print documents. What You Can Do with the Printer Function Combined printing You can combine multiple pages and print them on a single sheet of paper. For details, see the printer driver Help.
-
Page 40: Displaying The Printing Preferences Dialog Box
3. Printing Documents Displaying the Printing Preferences Dialog Box To change the default settings of the printer driver, configure settings in the [Printing Preferences] dialog box. To change the default settings of all applications, open the [Printing Preferences] dialog box from the OS.
-
Page 41
Displaying the Printing Preferences Dialog Box In the [Select Printer] list, select the printer you want to use. Click [Preferences]. • Procedures for opening the [Printing Preferences] dialog box vary depending on the application. For details, see the printer driver Help or the manuals provided with the application. Displaying the Printing Preferences Dialog Box in an Application When Using OS X The following procedure is explained using OS X 10.11 as an example. -
Page 42: Basic Operation Of Printing
3. Printing Documents Basic Operation of Printing The following procedure explains how to perform basic printing. For details of printing options, see the printer driver Help. The procedure in this section is an example based on Windows 7. The actual procedure may vary depending on the operating system you are using.
-
Page 43
Basic Operation of Printing Canceling a print job before printing has started Double-click the printer icon on the task tray of your computer. Select the print job you want to cancel, click the [Document] menu, and then click [Cancel]. Click [Yes]. •… -
Page 44
3. Printing Documents… -
Page 45: Configuring The Machine Using Utilities
4. Configuring the Machine Using Utilities This chapter describes how to configure the machine using utilities. Available Setting Functions Using Web Image Monitor and Smart Organizing Monitor Use Web Image Monitor or Smart Organizing Monitor to change the configuration of the machine from a computer.
-
Page 46: Using Web Image Monitor
4. Configuring the Machine Using Utilities Using Web Image Monitor • Some items might not appear, depending on the model type you are using. Available operations The following operations can be remotely performed using Web Image Monitor on a computer: •…
-
Page 47: Changing The Interface Language
Using Web Image Monitor DSH134 1. Menu area If you select menu, its content will be shown on main area. 2. Tab area Contains tabs for switching between information and settings you want to see or configure. 3. Help If you click this icon, help index page opens. 4.
-
Page 48: Installing The Help Source File
4. Configuring the Machine Using Utilities Installing the Help Source File Follow the procedure below to install the help. Copy the [WIMHELP] folder on the CD-ROM to your computer’s hard drive. The example procedures explain how to copy the [WIMHELP] folder to the C:\tmp\WIMHELP directory.
-
Page 49: Home
Using Web Image Monitor Network Settings Configure network settings. IPsec Settings Configure IPsec settings. Print List/Report Print a list/report related to the printer. Administrator Tools Configure administrator settings. Home [Status] tab Click the [Status] tab on the main page to display system information, paper tray status and toner levels.
-
Page 50: Network Settings
• [General Status] You can check [Ethernet Speed], [IPP Printer Name], [Network Version], [Ethernet MAC Address], [Active Interface], and [Wi-Fi Direct IP Address] (only SP 220Nw and SP 221Nw). • [TCP/IP Status] You can specify [DHCP], [IP Address], [Subnet Mask], and [Gateway] for IPv4.
-
Page 51
[POP3] tab You can specify [POP3 Server], [User Account], [User Password], and [Authentication]. [Wireless] tab This function is available for only SP 220Nw and SP 221Nw. • [Wireless LAN Status] The status of the following items is displayed: [Wireless LAN Status], [MAC Address], [Communication Mode], [SSID], [Wireless Signal Status], and [Wireless]. -
Page 52
• [SSID] Enter the SSID name. Can contain 32 characters. [Google Cloud] tab This function is available for only SP 220Nw and SP 221Nw. • [Google Cloud Print] Select whether to enable [Google Cloud Print]. When disabled, [Local Discovery] and [Timeout (Seconds)] below cannot be configured. -
Page 53: Ipsec Settings
Using Web Image Monitor Displays the Account (email address) of Google Cloud Print registration. • [Local Discovery] Select whether to enable local discovery. • [Timeout (seconds)] Enter the number of seconds the machine waits before considering an XMPP operation to have timed out.
-
Page 54
4. Configuring the Machine Using Utilities Specify a number between 1 and 10 for the IPsec policy. The number you specify will determine the position of the policy in the IPsec Policy List. • [Activity] Select whether to enable or disable the policy. •… -
Page 55
Using Web Image Monitor Select this mode to secure every section of each IP packet. We recommend this type for communication between security gateways (such as VPN devices). • [Security Protocol] Select the security protocol from the following: • [AH] Establishes secure communication that supports authentication only. -
Page 56: Print List/Report
4. Configuring the Machine Using Utilities Specify the encryption algorithm from the following: [DES], [3DES], [AES-128], [AES-192], [AES-256] • [Authentication Algorithm] Specify the authentication algorithm from the following: [MD5], [SHA1] • [IKE Life Time] Specify the life time of the ISAKMP SA as a time period. Enter a number of seconds. •…
-
Page 57
Using Web Image Monitor Select to restore network settings to their defaults. • [Reset Menu Settings] Select to restore settings that are not related to the network. • [Reset IPsec Settings] Select to clear the IP security settings. • [Reset IPsec Settings] appears only when a password is specified in [Administrator]. Backup Setting Create backup files containing the printer’s configuration settings. -
Page 58
4. Configuring the Machine Using Utilities Enter the administrator password if required. Click [OK]. Help Source File Setting • [Help Source File] Enter the help source file path. -
Page 59: Using Smart Organizing Monitor
Using Smart Organizing Monitor Using Smart Organizing Monitor The state and status information of the machine can be checked using Smart Organizing Monitor. • Some items might not appear, depending on the model type you are using. Displaying the Smart Organizing Monitor Dialog On the [Start] menu, click [All Programs].
-
Page 60: Checking The Status Information
4. Configuring the Machine Using Utilities Checking the Status Information DSH160 1. Image area Displays the status of this machine with an icon. 2. Tab area • Status tab • Printer Name • Print Cartridge Displays the following messages to indicate remaining toner levels: Remaining Level 1 to 5, «Almost Empty»…
-
Page 61: Configuring The Machine Settings
Using Smart Organizing Monitor Displays the job log information. • User Tools tab Click to print test pages or maintenance pages, or to configure settings of the machine. 3. Message area Displays the status of this machine with a message. For details about error messages, see page 69 «Error and Status Messages Appear on Smart Organizing Monitor».
-
Page 62
• You can set configurations about wireless LAN network connection and communication. • The following operations are possible on the tab: • Checking the wireless LAN status • Connecting wireless LAN manually • Connecting with one touch using WPS (only SP 220Nw and SP 221Nw) -
Page 63: Maintaining The Machine
5. Maintaining the Machine This chapter describes how to replace supplies and how to clean the machine. Replacing the Print Cartridge • Replace the print cartridge if the printed image suddenly becomes pale or blurred. • Store print cartridges in a cool dark place. •…
-
Page 64
5. Maintaining the Machine Slide the print cartridge in horizontally, and then slowly push it in all the way. Finally, push the cartridge down until it clicks into place. DSH219 Carefully push up the front cover until it closes. -
Page 65: Cautions When Cleaning
Cautions When Cleaning Cautions When Cleaning Clean the machine periodically to maintain high print quality. Dry wipe the exterior with a soft cloth. If dry wiping is not sufficient, wipe with a soft, damp cloth that has been wrung out thoroughly. If you still cannot remove the stain or grime, use a neutral detergent, wipe over the area with a thoroughly-wrung damp cloth, and then dry wipe the area and allow it to dry.
-
Page 66: Cleaning The Inside Of The Machine
5. Maintaining the Machine Cleaning the Inside of the Machine Open the front cover, and then carefully lower it. Hold the center of the print cartridge and carefully raise it slightly and then pull it out horizontally. DSH218 Use a cloth to wipe the inside of the machine toward and away from yourself. DSH220 Wipe carefully so as not to touch any protrusions inside the machine.
-
Page 67: Moving And Transporting The Machine
Moving and Transporting the Machine Moving and Transporting the Machine This section provides cautions that you must follow when moving the machine both short and long distances. Repack the machine in its original packing materials when moving it over a long distance. •…
-
Page 68: Disposal
5. Maintaining the Machine • Toner might spill inside the machine if the machine is not kept level during transit. • For more information about moving the machine, contact your sales or service representative. Disposal Ask your sales or service representative for information about correct disposal of this machine. Where to Inquire Contact your sales or service representative for further information about the topics included in this manual or to inquire about other topics not included in this manual.
-
Page 69: Troubleshooting
6. Troubleshooting This chapter provides solutions for error messages and other problems. Error and Status Indicate on the Control Panel The LED on the operation panel indicates the machine status, including any errors. Power Alert Toner/ Status Solution Paper The power is on. The status is normal.
-
Page 70
6. Troubleshooting Power Alert Toner/ Status Solution Paper Another type of error has Use Web Image Monitor or occurred. Smart Organizing Monitor to check the error, and then take appropriate measures. See page 44 «Using Web Image Monitor» or page 57 «Using Smart Organizing Monitor». -
Page 71: Error And Status Messages Appear On Smart Organizing Monitor
Error and Status Messages Appear on Smart Organizing Monitor Error and Status Messages Appear on Smart Organizing Monitor «X» represents a displayed message that varies according to the situation. Message Causes Solutions No Response from • The power cable of the •…
-
Page 72
6. Troubleshooting Message Causes Solutions Printing has been The data is too large or Select [600 x 600 dpi] in [Resolution] to interrupted because complex to print. reduce the size of data. For details, see the of the memory printer driver Help. overflow. -
Page 73: Clearing Misfeeds
Clearing Misfeeds Clearing Misfeeds • Jammed paper may be covered in toner. Be careful not to get toner on your hands or clothes. • Toner on prints made immediately after clearing a paper jam may be insufficiently fused and can smudge.
-
Page 74
6. Troubleshooting Hold the center of the print cartridge and carefully raise it slightly and then pull it out horizontally. DSH161 • Do not shake the removed print cartridge. Doing so can cause remaining toner to leak. • Place the print cartridge on paper or similar material to avoid dirtying your workspace. Lifting the guide plate, remove the jammed paper carefully. -
Page 75: Removing Jammed Paper From The Bypass Tray
Clearing Misfeeds Carefully push up the front cover until it closes. DSH166 If the error display continues to appear, perform the procedure described in page 74 «Opening the Rear Cover to Remove Jammed Paper». Removing Jammed Paper from the Bypass Tray •…
-
Page 76: Opening The Rear Cover To Remove Jammed Paper
6. Troubleshooting Opening the Rear Cover to Remove Jammed Paper • Since the temperature around the guide is high, wait for it to cool before checking for jammed paper. Open the rear cover. DSH168 Open the fusing cover. DSH169 Push the levers on the sides down with your thumbs. DSH170…
-
Page 77
Clearing Misfeeds Remove the jammed paper carefully. DSH171 Push the levers on the sides up with your thumbs. Close the fusing cover. Close the rear cover. DSH172… -
Page 78: When You Cannot Print Test Page
6. Troubleshooting When You Cannot Print Test Page Possible cause Solution The power cord, a USB cable, or a Make sure that the power cord, USB cable, and network network cable is not connected cable are connected correctly. Also confirm that they are not correctly.
-
Page 79: Paper Feed Problems
Paper Feed Problems Paper Feed Problems If the machine is operating but paper will not feed or paper jams occur frequently, check the condition of the machine and paper. Problem Solution Paper does not feed smoothly. • Use supported types of paper. See page 30 «Supported Paper».
-
Page 80
6. Troubleshooting Problem Solution Paper gets wrinkles. • Paper is damp. Use paper that has been stored properly. See page 30 «Supported Paper». • Paper is too thin. See page 30 «Supported Paper». • If there are gaps between the paper and the paper guides, adjust the paper guides to remove the gaps. -
Page 81: Print Quality Problems
Print Quality Problems Print Quality Problems Checking the Condition of the Machine If there is a problem with the quality of printing, first check the condition of the machine. Possible Cause Solution There is a problem with the Make sure that the machine is on a level surface. Place the machine’s location.
-
Page 82
6. Troubleshooting Problem Solution Images smudge when rubbed. On the printer driver’s [Paper] tab, select a proper paper type (Toner is not fixed.) in the [Paper Type:] list. When printing graphics, the output To print accurately, specify the printer driver setting to print and the screen are different. -
Page 83: Printer Problems
Printer Problems Printer Problems This section describes printing problems and possible solutions. Problem Solution An error occurs. If an error occurs when printing, change the computer or printer driver settings. • Check the printer icon name does not exceed 32 alphanumeric characters.
-
Page 84: Print Positions Do Not Match Display Positions
6. Troubleshooting Print Positions Do Not Match Display Positions If the position of items on the printed page differs from the position displayed on the computer screen, the cause may be one of the following. Problem Solution Page layout settings are not Check that the page layout settings are properly configured in configured properly.
-
Page 85: Common Problems
Common Problems Common Problems This section describes how to troubleshoot common problems that may occur while operating the machine. Problem Possible cause Solution The machine does not turn on. The power cord is not • Make sure that the power connected properly.
-
Page 86
6. Troubleshooting… -
Page 87: Configuring Network Settings Using Os
Insert the provided CD-ROM into the CD-ROM drive of the computer. If your computer does not have a CD-ROM drive, download a setup file from our website (http:// www.ricoh.com/printers/sp200/support/gateway/). Double-click the CD-ROM drive icon. Double-click the [Mac OS X] folder.
-
Page 88: Using An Ethernet Cable
Insert the provided CD-ROM into the CD-ROM drive of the computer. If your computer does not have a CD-ROM drive, download a setup file from our website (http:// www.ricoh.com/printers/sp200/support/gateway/). Double-click the CD-ROM drive icon. Double-click the [Mac OS X] folder.
-
Page 89
Connecting the Machine to a Wired Network On the [Network 1] tab, select [On] for [DHCP] to automatically obtain the IP address or [Off] to specify the IP address manually. If you have selected [On], proceed to Step 25. Enter the machine’s IPv4 address in [IP Address]. Enter the subnet mask in [Subnet Mask]. -
Page 90: Connecting The Machine To A Wireless Network
7. Configuring Network Settings Using OS X Connecting the Machine to a Wireless Network You can use this function on SP 220Nw and SP 221Nw only. There are four methods for connecting the machine to a wireless network: • Using the WPS button See page 89 «Using the WPS Button».
-
Page 91: Using The Wps Button
Insert the provided CD-ROM into the CD-ROM drive of the computer. If your computer does not have a CD-ROM drive, download a setup file from our website (http:// www.ricoh.com/printers/sp200/support/gateway/). Double-click the CD-ROM drive icon. Double-click the [Mac OS X] folder.
-
Page 92: Using A Pin Code
7. Configuring Network Settings Using OS X Click [OK]. Wait until the machine restarts. Click [User Tools] tab. Click [Printer Configuration]. Enter the access code, and then click [OK]. The default access code is «Admin». On the [Wireless] tab, select [Setup with WPS] for [Configuration Method]. Click [Connect].
-
Page 93: Manual Setup
Connecting the Machine to a Wireless Network Enter the access code, and then click [OK]. The default access code is «Admin». On the [Wireless] tab, select [Setup with WPS] for [Configuration Method]. Select [Wi-Fi Protected Setup with PIN Code] for [One-Touch Connection Setting (WPS)]. Click [Get PIN Code] and check the PIN code.
-
Page 94
7. Configuring Network Settings Using OS X Enter the access code, and then click [OK]. The default access code is «Admin». On the [Wireless] tab, select [Manual Setup] for [Configuration Method]. Select the authentication method in [Authentication]. Configurations differ according to the authentication method. -
Page 95: Appendix
8. Appendix This chapter describes the machine specifications and consumables. Transmission Using IPsec For securer communications, this machine supports the IPsec protocol. When applied, IPsec encrypts data packets at the network layer using shared key encryption. The machine uses encryption key exchange to create a shared key for both sender and receiver.
-
Page 96: Security Association
8. Appendix • For successful authentication, the sender and receiver must specify the same authentication algorithm and authentication key. The authentication algorithm and authentication key are specified automatically. AH Protocol The AH protocol provides secure transmission through authentication of packets only, including headers.
-
Page 97: Encryption Key Exchange Settings Configuration Flow
Transmission Using IPsec Encryption Key Exchange Settings Configuration Flow This section explains the procedure for specifying encryption key exchange settings. Machine 1. Set the same IPsec settings as the machine on 1. Set the IPsec settings on Web Image Monitor. 2.
-
Page 98: Specifying Ipsec Settings On The Computer
8. Appendix • An administrator password can be specified in the [Administrator] tab. Specifying IPsec Settings on the Computer Specify exactly the same settings for IPsec SA settings on your computer as are specified for the IPsec Settings on the machine. Setting methods differ according to the computer’s operating system. The following procedure is based on Windows 7 in an IPv4 environment as an example.
-
Page 99
Transmission Using IPsec In [Description:], enter a name or a detailed explanation of the IP filter, and then click [Next]. You may click [Next] and proceed to the next step without entering any information in this field. Select «My IP Address» in «Source address», and then click [Next]. Select «A specific IP Address or Subnet»… -
Page 100
8. Appendix In the Session key settings, select «Generate a new key every», and enter the same validity period (in [Seconds] or [Kbytes]) as that specified for [Life Time] on the machine. Click [OK], and then click [Next]. Click [Finish]. If you are using IPv6, you must repeat this procedure from Step 12 and specify ICMPv6 as an exception. -
Page 101: Notes About The Toner
Notes About the Toner Notes About the Toner • Proper operation cannot be guaranteed if any third-party toner is used. • Depending on printing conditions, there are cases where the printer cannot print the number of sheets indicated in the specifications. •…
-
Page 102: Specifications Of The Machine
8. Appendix Specifications of the Machine This section lists the machine’s specifications. General Function Specifications Item Description Configuration Desktop Print process Laser electrostatic transfer Maximum paper size for printing 216 mm × 356 mm (8.5 × 14 inches) Warm-up time (23 °C, 71.6 °F) 25 seconds Paper sizes For details, see page 30 «Supported Paper».
-
Page 103
Specifications of the Machine Item Description Power consumption • Ready 50.2 W • During printing 358 W • Maximum 784 W The power level when the main switch is turned off and the power cord is plugged into an outlet: 1 W or less Power consumption •… -
Page 104: Printer Function Specifications
600 × 600 dpi (maximum: 1200 × 1200 dpi) First print speed 10 seconds or less Interface • Ethernet (10BASE-T, 100BASE-TX) (only SP 220Nw and SP 221Nw) • USB 2.0 • Wi-Fi (only SP 220Nw and SP 221Nw) Printer language…
-
Page 105: Consumables
ISO/IEC 19752 is an international standard on measurement of printable pages, set by the International Organization for Standardization. • For information about consumables, see our website (http://www.ricoh.com/printers/sp200/ support/gateway/). • If print cartridges are not changed when necessary, printing will become impossible. For easy replacement, we recommend you purchase and store extra print cartridges.
-
Page 106: Information For This Machine
8. Appendix Information for This Machine User Information on Electrical & Electronic Equipment (mainly Europe and Asia) Users in the countries where this symbol shown in this section has been specified in national law on collection and treatment of E-waste Our Products contain high quality components and are designed to facilitate recycling.
-
Page 107: Note For The Battery And/Or Accumulator Symbol (For Eu Countries Only)
Information for This Machine For Turkey only Üretici: Ricoh Company, Ltd. 8-13-1 Ginza, Chuo-ku, Tokyo 104-8222 Japan +81-36278-2111(English only/Sadece İngilizce) Note for the Battery and/or Accumulator Symbol (For EU countries only) In accordance with the Battery Directive 2006/66/EC Article 20 Information for end-users Annex II, the above symbol is printed on batteries and accumulators.
-
Page 108: Notice To Wireless Lan Interface Users (Mainly Europe)
Declaration of Conformity Notice to Users in EEA Countries This product complies with the essential requirements and provisions of Directive 2014/53/EU. The CE Declaration of Conformity is available by accessing the URL: http://www.ricoh.com/products/ ce_doc/ and selecting the product applicable. Operating frequency band: 2400 — 2483.5 MHz maximum radio-frequency power: less than 20.0 dBm…
-
Page 109: Notes To Users In The State Of California (Notes To Users In Usa)
Information for This Machine Notes to users in the state of California (Notes to Users in USA) Perchlorate Material — special handling may apply. See: www.dtsc.ca.gov/hazardouswaste/ perchlorate Notes to users in the United States of America Part 15 of the FCC Rules Note: This equipment has been tested and found to comply with the limits for a Class B digital device, pursuant to Part 15 of the FCC Rules.
-
Page 110: Notes To Canadian Users Of Wireless Devices
(1) This device may not cause harmful interference, and (2) this device must accept any interference received, including interference that may cause undesired operation. Model Number: SP 220Nw Notes to Canadian Users of Wireless Devices This device complies with Industry Canada’s licence-exempt RSSs.
-
Page 111: Energy Star Program
Information for This Machine ENERGY STAR Program ® ENERGY STAR Program Requirements for Imaging Equipment ® The ENERGY STAR Program Requirements for Imaging Equipment encourage energy conservation by promoting energy efficient computers and other office equipment. The program backs the development and dissemination of products that feature energy saving functions.
-
Page 112
8. Appendix Specifications Energy Saver mode 1 Power Consumption 28.7 W 29.3 W Recovery Time 10 seconds Energy Saver mode 2 Power Consumption 0.94 W 0.87 W Default Interval 30 seconds Recovery Time 18 seconds 19 seconds *1 Recovery time and power consumption may differ depending on the conditions and environment of the machine. -
Page 113: Copyright Information About Installed Applications
Copyright Information about Installed Applications Copyright Information about Installed Applications Apache License Apache License Version 2.0, January 2004 http://www.apache.org/licenses/ TERMS AND CONDITIONS FOR USE, REPRODUCTION, AND DISTRIBUTION 1. Definitions. «License» shall mean the terms and conditions for use, reproduction, and distribution as defined by Sections 1 through 9 of this document.
-
Page 114
8. Appendix form of electronic, verbal, or written communication sent to the Licensor or its representatives, including but not limited to communication on electronic mailing lists, source code control systems, and issue tracking systems that are managed by, or on behalf of, the Licensor for the purpose of discussing and improving the Work, but excluding communication that is conspicuously marked or otherwise designated in writing by the copyright owner as «Not a Contribution.»… -
Page 115: Dnsmasq
Copyright Information about Installed Applications You may add Your own copyright statement to Your modifications and may provide additional or different license terms and conditions for use, reproduction, or distribution of Your modifications, or for any such Derivative Works as a whole, provided Your use, reproduction, and distribution of the Work otherwise complies with the conditions stated in this License.
-
Page 116: Gpl Version 2
8. Appendix the Free Software Foundation; version 2 dated June, 1991. This program is distributed in the hope that it will be useful, but WITHOUT ANY WARRANTY; without even the implied warranty of MERCHANTABILITY or FITNESS FOR A PARTICULAR PURPOSE. See the GNU General Public License for more details.
-
Page 117
Copyright Information about Installed Applications distribute copies of the software, or if you modify it. For example, if you distribute copies of such a program, whether gratis or for a fee, you must give the recipients all the rights that you have. -
Page 118
8. Appendix Activities other than copying, distribution and modification are not covered by this License; they are outside its scope. The act of running the Program is not restricted, and the output from the Program is covered only if its contents constitute a work based on the Program (independent of having been made by running the Program). -
Page 119
Copyright Information about Installed Applications does not normally print such an announcement, your work based on the Program is not required to print an announcement.) These requirements apply to the modified work as a whole. If identifiable sections of that work are not derived from the Program, and can be reasonably considered independent and separate works in themselves, then this License, and its terms, do not apply to those sections when you distribute them as separate works. -
Page 120
8. Appendix allowed only for noncommercial distribution and only if you received the program in object code or executable form with such an offer, in accord with Subsection b above.) The source code for a work means the preferred form of the work for making modifications to it. -
Page 121
Copyright Information about Installed Applications 6. Each time you redistribute the Program (or any work based on the Program), the recipient automatically receives a license from the original licensor to copy, distribute or modify the Program subject to these terms and conditions. You may not impose any further restrictions on the recipients’ exercise of the rights granted herein. -
Page 122
8. Appendix This section is intended to make thoroughly clear what is believed to be a consequence of the rest of this License. 8. If the distribution and/or use of the Program is restricted in certain countries either by patents or by copyrighted interfaces, the original copyright holder who places the Program under this License may add an explicit geographical distribution limitation excluding those countries, so that distribution is permitted only in or among… -
Page 123
Copyright Information about Installed Applications MERCHANTABILITY AND FITNESS FOR A PARTICULAR PURPOSE. THE ENTIRE RISK AS TO THE QUALITY AND PERFORMANCE OF THE PROGRAM IS WITH YOU. SHOULD THE PROGRAM PROVE DEFECTIVE, YOU ASSUME THE COST OF ALL NECESSARY SERVICING, REPAIR OR CORRECTION. -
Page 124: Iperf
8. Appendix with this program; if not, write to the Free Software Foundation, Inc., 51 Franklin Street, Fifth Floor, Boston, MA 02110-1301 USA. Also add information on how to contact you by electronic and paper mail. If the program is interactive, make it output a short notice like this when it starts in an interactive mode: Gnomovision version 69, Copyright (C) year name of author Gnomovision comes with ABSOLUTELY NO WARRANTY;…
-
Page 125
Copyright Information about Installed Applications Ajay Tirumala Jim Ferguson Jon Dugan Feng Qin Kevin Gibbs John Estabrook National Laboratory for Applied Network Research National Center for Supercomputing Applications University of Illinois at Urbana-Champaign http://www.ncsa.uiuc.edu Permission is hereby granted, free of charge, to any person obtaining a copy of this software (Iperf) and associated documentation files (the «Software»), to deal in the Software without restriction, including without limitation the rights to use, copy, modify, merge, publish, distribute, sublicense, and/or sell copies of the Software, and to permit persons to whom the Software is furnished to do so, subject to the… -
Page 126: Libharu
8. Appendix Thanks to Mark Gates (NLANR), Alex Warshavsky (NLANR) and Justin Pietsch (University of Washington) who were responsible for the 1.1.x releases of Iperf. For this release, we would like to thank Bill Cerveny (Internet2), Micheal Lambert (PSC), Dale Finkelson (UNL) and Matthew Zekauskas (Internet2) for help in getting access to IPv6 networks / machines.
-
Page 127
Copyright Information about Installed Applications * notice, this list of conditions and the following disclaimer. * 2. Redistributions in binary form must reproduce the above copyright * notice, this list of conditions and the following disclaimer in * the documentation and/or other materials provided with the * distribution. -
Page 128: Mdnsresponser
8. Appendix mDNSResponser * Copyright (c) 2002-2006 Apple Computer, Inc. All rights reserved. * Licensed under the Apache License, Version 2.0 (the «License»); * you may not use this file except in compliance with the License. * You may obtain a copy of the License at * http://www.apache.org/licenses/LICENSE-2.0 * Unless required by applicable law or agreed to in writing, software * distributed under the License is distributed on an «AS IS»…
-
Page 129: Opencv
Copyright Information about Installed Applications * understand why variable y is not of type «char*» just proves the point that poor code * layout leads people to unfortunate misunderstandings about how the C language really works.) OpenCV By downloading, copying, installing or using the software you agree to this license. If you do not agree to this license, do not download, install, copy or use the software.
-
Page 130: Open Ssl
8. Appendix Open SSL LICENSE ISSUES ============== The OpenSSL toolkit stays under a dual license, i.e. both the conditions of the OpenSSL License and the original SSLeay license apply to the toolkit. See below for the actual license texts. Actually both licenses are BSD-style Open Source licenses.
-
Page 131
Copyright Information about Installed Applications * prior written permission. For written permission, please contact * openssl-core@openssl.org. * 5. Products derived from this software may not be called «OpenSSL» * nor may «OpenSSL» appear in their names without prior written * permission of the OpenSSL Project. * 6. -
Page 132
8. Appendix /* Copyright (C) 1995-1998 Eric Young (eay@cryptsoft.com) * All rights reserved. * This package is an SSL implementation written * by Eric Young (eay@cryptsoft.com). * The implementation was written so as to conform with Netscapes SSL. * This library is free for commercial and non-commercial use as long as * the following conditions are aheared to. -
Page 133: Wpa Supplicant
Copyright Information about Installed Applications * The word ‘cryptographic’ can be left out if the rouines from the library * being used are not cryptographic related :-). * 4. If you include any Windows specific code (or a derivative thereof) from * the apps directory (application code) you must include an acknowledgement: * «This product includes software written by Tim Hudson (tjh@cryptsoft.com)»…
-
Page 134
8. Appendix License ——- This software may be distributed, used, and modified under the terms of BSD license: Redistribution and use in source and binary forms, with or without modification, are permitted provided that the following conditions are met: 1. Redistributions of source code must retain the above copyright notice, this list of conditions and the following disclaimer. -
Page 135: Trademarks
Trademarks Trademarks Adobe and Acrobat are either registered trademarks or trademarks of Adobe Systems Incorporated in the United States and/or other countries. OS X, TrueType, and Safari are trademarks of Apple Inc., registered in the U.S. and other countries. ® Firefox is a registered trademark of the Mozilla Foundation.
-
Page 136
8. Appendix ® ® Microsoft Windows 8.1 Enterprise • The product names of Windows 10 are as follows: ® Microsoft® Windows 10 Home Premium ® Microsoft® Windows 10 Pro ® Microsoft® Windows 10 Enterprise ® Microsoft® Windows 10 Education • The product names of Windows Server 2003 are as follows: ®… -
Page 137
Trademarks ® ® Microsoft Windows Server 2012 Essentials ® ® Microsoft Windows Server 2012 Standard ® ® Microsoft Windows Server 2012 Datacenter • The product names of Windows Server 2012 R2 are as follows: ® ® Microsoft Windows Server 2012 R2 Foundation ®… -
Page 138
8. Appendix… -
Page 139: Index
INDEX 63, 64 Cleaning the machine……….Replacing the print cartridge……….Authentication…………Model-specific information……..Moving…………..Bypass tray…………. Non-recommended paper……..Notes…………..Configuring Network Settings Using OS X Ethernet…………….Installing Smart Organizing Monitor……. Operation tools…………. Installing the driver…………. USB………………Wireless LAN…………..Paper jam…………71, 73 Configuring the machine Paper Storage…………
-
Page 140
Supported paper……….. System information……….Trademarks…………Tray 1…………..Tray paper settings……….Troubleshooting Clearing misfeeds………….. Error and status indicate on the control panel….Error and status messages appear on Smart Organizing Monitor…………….76, 77, 79, 81, 83 Other problems……… Web Image Monitor……….What you can do with this machine Printer function………….. -
Page 141
MEMO… -
Page 142
MEMO M0A4-8604… -
Page 143
© 2016… -
Page 144
M0A4-8604…
Все время на других сайтах ищу коды ошибок, решил не искать, а просто опубликовать коды ошибок у себя на сайте, сразу скажу честно, содрал на другом сайте 🙂
|
||||||||||||||||||||||||||||||||
|
|
||||||||||||||||||||||||||||||||
не требуются |
||||||||||||||||||||||||||||||||
|
|
||||||||||||||||||||||||||||||||
|
В заметке использованы материалы с riconik.info
Ricoh — известный бренд на рынке принтеров по всему миру. Эти принтеры называются удобными для пользователя устройствами, и почти любой человек с небольшими знаниями может работать с принтерами Ricoh. Но эти принтеры не безотказны. Многие пользователи принтеров Ricoh сообщали о проблемах со своими устройствами, и здесь, в этой статье, мы также рассмотрим одну конкретную проблему.
Принтеры нуждаются в регулярном обслуживании и оптимизации для идеальной работы. И неисправный принтер может стать проблемой для любого пользователя, нуждающегося в некоторой работе. Принтеры Ricoh поставляются со светодиодными индикаторами, которые указывают на состояние принтера, и один из них, который не нравится никому из пользователей, — это красный индикатор. Мигание красного светодиода на принтере Ricoh означает, что принтер не готов к печати. Сколько бы вы ни говорили принтеру печатать с помощью вашего компьютера, он не будет работать. Итак, здесь, в этой статье, мы обсудим все решения, которые можно попробовать решить эту проблему. Итак, без лишних слов, давайте приступим к делу.
Содержание страницы
-
Как исправить ошибку Ricoh Printer Red Light?
- Перезапустите принтер:
- Проверьте источник питания:
- Проверьте подключение принтера:
- Проверьте лоток для бумаги:
- Сброс фьюзера SC:
Как исправить ошибку Ricoh Printer Red Light?
Красный свет на принтере Ricoh означает, что он не будет печатать. И чтобы устранить эту ошибку, связанную с невозможностью печати, вы можете попытаться исправить некоторые основные вещи. Итак, приступим к списку.
Перезапустите принтер:
Если вы впервые сталкиваетесь с этой проблемой, первое, что вы должны попробовать со своей стороны, — это перезагрузить систему. Иногда простого перезапуска достаточно, чтобы решить большинство проблем с электронным оборудованием. И если вы давно не перезагружали свой принтер, то это то, что вам нужно попробовать в первую очередь.
Нажмите кнопку питания на принтере и полностью перезагрузите принтер. После перезапуска принтера проверьте, горит ли красный индикатор. Если это так, попробуйте следующее решение.
Объявления
Проверьте источник питания:
Одна из причин, по которой вы можете увидеть ошибку красного индикатора, заключается в том, что он подключен к правильному источнику питания, который обеспечивает достаточную мощность для принтера. Без соответствующего источника питания принтер Ricoh не сможет печатать, и вы увидите, как на нем мигает красный светодиод.
Вы даже можете попробовать заменить кабель питания вашего принтера. Это также решило проблему для многих проблемных пользователей.
Если вы уверены, что источник питания стабилен и подходит для вашего принтера, перейдите к следующему решению.
Проверьте подключение принтера:
Чтобы ваш принтер мог печатать что-либо, он должен быть подключен к сети через интерфейсный кабель, беспроводную локальную сеть или Bluetooth. Если вы подключили принтер к компьютеру, это соединение вы используете для подключения обоих устройств. Вы должны убедиться, что это соединение является безопасным и подходящим.
Объявления
Если это решение не работает для вас, попробуйте следующее решение, упомянутое ниже.
Проверьте лоток для бумаги:
Вашему принтеру требуется бумага, чтобы распечатать что-либо. Как и любой другой принтер, принтеры Ricoh также имеют лотки для бумаги, куда пользователи могут поместить стопку чистых листов, готовых к печати. Если лоток для бумаги пуст, на принтере загорится красный светодиод. Было бы лучше, если бы вы положили стопку чистых листов на лоток для бумаги, чтобы избежать этого.
Попробуйте окончательное решение, упомянутое ниже, если у вас есть документы на бумаге, но по-прежнему возникает ошибка красного светодиода.
Объявления
Сброс фьюзера SC:
- Нажмите кнопку поиска на вашем ПК и найдите «Устройства и принтеры».
- Как только он появится в разделе результатов, откройте его.
- Разверните раздел принтеров и факсов. Там вы увидите свой принтер Ricoh.
- Щелкните его правой кнопкой мыши и выберите параметр «Настройки печати».
- Затем нажмите «Smart Organizing Monitor».
- Затем нажмите на кнопку «О программе».
- Когда появится окно Smart Organizing Monitor, нажмите и удерживайте клавиши Ctrl+Shift и дважды щелкните правой кнопкой мыши.
- На экране появится окно сервисного модуля.
- В этом окне нажмите внизу «Fuser SC reset».
- Затем нажмите «ОК», а затем еще раз нажмите «ОК».
- Теперь закройте все окна на вашем компьютере.
- Наконец, перезагрузите принтер, и ваша проблема должна быть решена.
Вот как вы можете исправить ошибку красного света принтера Ricoh. Если у вас есть какие-либо вопросы или вопросы по поводу этой статьи, оставьте комментарий ниже, и мы свяжемся с вами. Также ознакомьтесь с другими нашими статьями о iPhone советы и рекомендации,Советы и рекомендации по Android, Советы и рекомендации по работе с ПКи многое другое для получения дополнительной полезной информации.
В рамках одной статьи вряд ли можно перечислить все неполадки и их нюансы, которые могут стать причиной неработоспособности принтера Ricoh (или вообще любого другого производителя). Тем не менее, существует ряд часто возникающих неисправностей, связанных либо с самим устройством печати, либо с компьютером, с которого осуществляется его управление, или же сетевым оборудованием, если таковое используется для связи с принтером.
Перед тем, как приступать к каким-либо ремонтно-восстановительным мероприятиям, нужно выяснить, отсутствуют ли у принтера критические неполадки, устранение которых вряд ли осуществимо без помощи специалистов. Для этого нужно просто распечатать конфигурационную страницу, что осуществляется напрямую с принтера, т.е. без компьютера или иных средств управления. В зависимости от того, напечатается ли страница конфигурации или нет, можно судить о наличии (если не напечатается) или отсутствии (если напечатается) критических неисправностей.
Как именно распечатать эту страницу, описано в руководстве пользователя по конкретной модели печатающей машины Ricoh. Например, у принтеров серии «SP 3400N» и «3410DN» это делается следующим образом:
- Полностью обесточиваем принтер, вынув шнур из розетки на несколько секунд.
- Подключаем шнур к розетке, но сам принтер пока не включаем (не нажимаем кнопку включения).
- Нажимаем и удерживаем кнопку «Сброс задания» и, не отпуская ее, нажимаем кнопку включения принтера (кнопка «Сброс задания» по-прежнему должна оставаться нажатой).

- Кнопку «Сброс задания» нужно держать до тех пор, пока не начнет мигать индикатор «Предупреждения».
- Отпускаем кнопку. Печать конфигурационной страницы запустится в течение нескольких секунд — максимум 30 (зависит от температуры в помещении — принтер начнет печать только после того, как прогреется).
Если печать страницы конфигурации выполнена, можно двигаться дальше в поисках причины неисправности. Если же нет, скорее всего, принтер придется сдать в сервисный центр на ремонт.
Распространенные неисправности принтеров Ricoh
Далее будут приведены только такие неисправности принтеров Ricoh, которые могут быть устранены самостоятельно пользователем без привлечения специалистов:
- Типичная проблема — отсутствие/повреждение драйвера принтера. Сюда же добавим — программное отключение (деактивация в системе) устройства. Относится только к тем случаям, когда принтер подключен к компьютеру через USB-порт.
- Не работает служба «Диспетчер печати». Также в основном относится к принтерам, подключенным через USB-соединение.
- Некорректные сетевые настройки на компьютере и/или принтере. Относится, как к подключенным по беспроводной, так и по проводной сети принтерам.
- Сбои в работе прошивки (встроенного программного обеспечения) принтера. Обычно проявляются в виде зависания устройства, т.е. оно проявляет признаки работоспособности (включается, горят те или иные индикаторы, распечатывается страница конфигурации и т.д.), но не реагирует на команды пользователя.
- Сбои в работе картриджей принтера. Это уже аппаратные неисправности. Единственное, что поддается устранению в домашних/офисных условиях — загрязнение протекшими чернилами (или иным загрязнителем) контактных площадок чернильниц, отвечающих как за их питание, так и за управление. Если сам картридж вышел из строя либо один из внутренних электронных компонентов принтера, то устройство, скорее всего, придется везти в сервисный центр.
Начнем с самого простого и банального — проверки исправности драйвера принтера.
Отсутствие/повреждение драйвера принтера Ricoh
Здесь же проверим, не отключен ли принтер в операционной системе. Если это так, то исправить проблему будет проще простого — нужно лишь включить его:
- Запустите приложение «Диспетчер задач», для чего нажмите на клавиатуре клавиши «Win + R» и впишите в появившееся окно «Выполнить» команду «msc» без кавычек, и нажмите «ОК».

- В «Диспетчере устройств» найдите название принтера. Оно может быть расположено в разделе «Принтеры», «Очереди печати» или другом. Перед названием принтера не должно быть желтого значка с вопросительным или восклицательным знаком, а также значка со стрелкой вниз, что обозначает деактивированный статус устройства (т.е. если оно отключено программно). Так должен выглядеть значок принтера в «Диспетчере устройств» (на примере HP Deskjet):

- Если рядом с названием присутствует значок со стрелкой вних, просто кликните по названию принтера/МФУ и выберите в контекстном меню пункт «Включить устройство», затем сразу попробуйте что-нибудь распечатать.

Если же имеют место неисправности драйвера (рядом с названием принтера виднеется желтый значок), то его следует установить повторно. А лучше — полностью переустановить, начав с удаления уже установленного драйвера (просто кликните по названию принтера правой кнопкой мыши и выберите «Удалить устройство»). Драйвер можно скачать с официального сайта поддержки Ricoh.
Не работает служба «Диспетчер печати»
За взаимодействие компьютера с любым принтером/МФУ отвечает специальная служба Windows «Диспетчер печати». По различным причинам она может прекратить свою работу, что сделает невозможным отправку документов на печать.
Чтобы проверить текущий статус службы «Диспетчер печати», нужно проделать следующее:
- Сначала нужно запустить системное приложение «Службы»: нажмите клавиши «Win + R», введите в окно команду «msc» и нажмите «ОК».

- Найдите в столбце «Имя» службу «Диспетчер печати» (может также именоваться как «Spooler» или «Print Spooler»). Если в столбце «Состояние» напротив имени службы ничего не написано, значит, она в данный момент не работает. Кликните по названию службы правой кнопкой мыши и выберите в появившемся меню опцию «Запустить».

- Попробуйте что-нибудь распечатать, но пока не закрывайте приложение «Службы». Также обратите внимание на столбец «Тип запуска» напротив названия службы. Там должно быть указано «Автоматически».

- Если это не так, щелкните по имени службы два раза мышкой. В новом окне раскройте список «Тип запуска» и выберите в нем опцию «Автоматически», после чего нажмите «ОК».

Некорректные сетевые настройки или иные сетевые неполадки
Если управление принтером/МФУ Ricoh осуществляется по сети, то ко всем прочим неполадкам также могут прибавиться и сетевые. При использовании беспроводного подключения также возможно, что функция Wi-Fi, была просто деактивирована (в отличие от проводной LAN-сети, Wi-Fi можно отключить).
Последующие действия позволят настроить принтер таким образом, чтобы он получал сетевые параметры автоматически (все делается с кнопочной панели управления аппаратом, что находится на его корпусе):
- Нажмите кнопку «Инструменты пользователя/Счетчик» для доступа в основное меню настроек.

- Используя клавиши-стрелки выделите в меню раздел «Настройки сети» и нажмите кнопку «ОК», чтобы перейти в него. Данный раздел может быть защищен паролем администратора. Если он не известен, то придется сначала выполнить сброс параметров принтера до заводских значений (см. раздел «Сбои в работе прошивки»).

В какой раздел заходить дальше, зависит от того, как именно аппарат подключен к сети — по проводному или беспроводному соединению. Это можно проверить, перейдя в раздел «Метод подключения». В нем будет указано одно из двух значений — «Ethernet» или «Wi-Fi»: проводное и беспроводное подключение, соответственно.
Если принтер подключен через Wi-Fi:
- При помощи кнопок-стрелок выделите соответствующий раздел настроек и перейдите в него.
- Первая опция в разделе — «Включить Wi-Fi» — позволяет включить или отключить работу принтера через беспроводную сеть. Задействуйте функцию (если отключена), установив значение «Включить».
- Во всех прочих подраздел настройки Wi-Fi приведена информация о текущем статусе сетевого соединения. Их можно использовать для настройки Wi-Fi-подключения с компьютера/смартфона к принтеру.
Если принтер подключен по проводной сети:
- Зайдите в раздел «Конфигурация IPv4» или «Конфигурация IPv6»: зависит от того, какая версия IP-протокола используется принтером для работы в сети (как правило, это IPv4).
- Выберите стрелками элемент «DHCP», нажмите «ОК», затем установите значение «Активн.». Данная функция служит для автоматической настройки сетевых параметров принтера.
- Также проверьте опцию «Способ настройки IP-адреса». Она должна иметь значение «DHCP».
- Как только аппарат автоматически получит сетевые настройки, их можно будет посмотреть в разделах «IP-адрес», «Маска подсети» и «Адрес шлюза».
Если по какой-то причине принтеру не удается установить соединение с компьютером и/или роутером, возможно, имеют место иные сетевые неполадки, не связанные с аппаратом.
Сбои в работе прошивки принтера Ricoh
Как и любое другое программное обеспечение, прошивка принтера (независимо от производителя и модели) может давать сбои. Независимо от причины их возникновения, решением проблемы может стать сброс настроек до заводских значений.
Обнуление настроек принтеров и МФУ Ricoh можно осуществить из приложения «Web Image Monitor». Но это не самостоятельная программа, устанавливаемая на компьютер — это название встроенного в аппарат веб-интерфейса. В него можно попасть из любого браузера, но для этого между принтером и компьютером сначала потребуется установить сетевое соединение (LAN или Wi-Fi). Дальнейшие шаги:
- Первым делом нужно определить, какой IP-адрес был назначен принтеру компьютером/маршрутизатором или пользователем (при ручной настройке). Для этого достаточно распечатать конфигурационную страницу (см. первый раздел данной статьи «Первоначальная диагностика принтера/МФУ Ricoh»).
- Далее вводим IP-адрес (например, «192.168.0.50») принтера в адресную строку любого браузера (возможно, перед самим IP потребуется вписать «https://» или «http://»).
- Веб-интерфейс принтера Ricoh выглядит как обычный сайт. В зависимости от модели аппарата тот может иметь разное количество и названия разделов/подразделов/опций. Нам нужно попасть в раздел «Сбросить настройки». В веб-интерфейсе типичного дизайна данный раздел находится на странице «Инструментов администратора» (выполнен в виде вкладки).
- В нужном нам разделе присутствует несколько опций сброса: «Сбросить настройки сети», «Сбросить настройки меню», «Сбросить настройки доступных функций» и другие. Отмечаем нужную опцию и нажимаем кнопку «ОК». Проделываем это со всеми опциями.
Сброс параметров принтера Ricoh осуществим и с панели управления на корпусе аппарата, но как именно это сделать — нужно узнать из руководства пользователя к конкретной модели устройства. Обычно это делается из сервисного меню, для доступа к которому нужно либо найти соответствующий раздел в настройках LCD-дисплея, либо ввести специальный код с кнопочной панели. Вот типичная инструкция по второму способу:
- Нажимаем на корпусе аппарата кнопку «Меню» (Menu).
- С цифровых клавиш набираем команду «107».
- Нажимаем и удерживаем кнопку «Сброс»/«Отмена» (печати, задания).
- Так мы попадем в сервисное меню (отобразится на дисплее принтера).
- При помощи клавиш-стрелок запускаем из сервисного меню функцию «Reset»/«Сброс».
- Готово.
Сбои в работе картриджей принтера
Как упоминалось выше, если причиной неработоспособности принтера являются сбои в функционировании картриджей, можно лишь попробовать очистить их контактную площадку от загрязнений (все прочие ремонтные операции требуют вмешательства специалистов).
Сам процесс очистки очень прост. Все, что требуется сделать — извлечь картридж из принтера, найти на корпусе оголенные металлические компоненты (это и есть электрические контакты) и просто протереть их тряпкой, ватой или влажной салфеткой.
This chapter provides solutions for error messages and other problems.
Error and Status Indicate on the Control Panel
The LED on the operation panel indicates the machine status, including any errors.
LED
Power
Alert
On
—
On
—
On
—
On
Flashing
On
On
Toner/
Status
Paper
End
—
The power is on.
Flashing
The print cartridge is almost
empty.
On
• The print cartridge is
empty.
• The print cartridge is not
set correctly.
• The tray has run out of
paper during a print job.
—
A paper jam has occurred in
the machine.
—
A cover is open.
Solution
The status is normal.
Replace the print cartridge
before it becomes empty.
• Replace the print
cartridge.
• Set the print cartridge
again correctly.
• Load paper into the tray.
Use Web Image Monitor or
Smart Organizing Monitor to
determine where the paper jam
is, and then remove the
jammed paper. See page 71
«Clearing Misfeeds» and
page 77 «Paper Feed
Problems».
Confirm that all the covers are
closed completely.
67
Модератор: vetal

![]() Andreyak777 » Вт ноя 16, 2021 1:40 pm
Andreyak777 » Вт ноя 16, 2021 1:40 pm
То, что другие люди говорят обо мне, никак не характеризует меня. Зато отлично характеризует их.
-

Andreyak777
- Избран тонером
-

![]()
![]() Andreyak777 » Вт ноя 16, 2021 1:53 pm
Andreyak777 » Вт ноя 16, 2021 1:53 pm
То, что другие люди говорят обо мне, никак не характеризует меня. Зато отлично характеризует их.
-
Andreyak777
- Избран тонером
-
![]()
-
-
Taskalfa 180 ошибка «Е» и «Встряхните картр. с тонером»
manik.76 в форуме Принтеры, МФУ, копиры формата A3
- 3
- 9192
dviz

Пн фев 20, 2017 1:35 pm
-
Taskalfa 180 ошибка «Е» и «Встряхните картр. с тонером»
-
-
«ошибка принтера HSYNC»
Sunat в форуме Xerox 3100 и иже с ним…
- 10
- 28291
Sunat
Сб май 10, 2014 6:19 am
-
«ошибка принтера HSYNC»
-
-
Samsung SCX 4300 V 1.15. Ошибка «Нет картриджа»
PrintFree в форуме Картриджи, их заправка и дефекты.
- 9
- 10120
С.Н.Н.
Пт авг 19, 2011 7:16 pm
-
Samsung SCX 4300 V 1.15. Ошибка «Нет картриджа»
-
-
BROTHER DCP-1512R ошибка «Фотобарабан !»
VIRT в форуме Принтеры, МФУ, факсы, копиры формата A4
- 1
- 3711
kvg
Чт сен 05, 2019 1:35 pm
-
BROTHER DCP-1512R ошибка «Фотобарабан !»
-
-
brother DCP 7030R «ошибка барабана»
vg2804 в форуме Принтеры, МФУ, факсы, копиры формата A4
- 14
- 19121
Rexvil
Пт окт 09, 2020 8:01 am
-
brother DCP 7030R «ошибка барабана»
Вернуться в Принтеры, МФУ, факсы, копиры формата A4
Кто сейчас на форуме
Сейчас этот форум просматривают: нет зарегистрированных пользователей и гости: 171
Все время на других сайтах ищу коды ошибок, решил не искать, а просто опубликовать коды ошибок у себя на сайте, сразу скажу честно, содрал на другом сайте 🙂
|
||||||||||||||||||||||||||||||||
|
|
||||||||||||||||||||||||||||||||
не требуются |
||||||||||||||||||||||||||||||||
|
|
||||||||||||||||||||||||||||||||
|
В заметке использованы материалы с riconik.info
Ricoh — известный бренд на рынке принтеров по всему миру. Эти принтеры называются удобными для пользователя устройствами, и почти любой человек с небольшими знаниями может работать с принтерами Ricoh. Но эти принтеры не безотказны. Многие пользователи принтеров Ricoh сообщали о проблемах со своими устройствами, и здесь, в этой статье, мы также рассмотрим одну конкретную проблему.
Принтеры нуждаются в регулярном обслуживании и оптимизации для идеальной работы. И неисправный принтер может стать проблемой для любого пользователя, нуждающегося в некоторой работе. Принтеры Ricoh поставляются со светодиодными индикаторами, которые указывают на состояние принтера, и один из них, который не нравится никому из пользователей, — это красный индикатор. Мигание красного светодиода на принтере Ricoh означает, что принтер не готов к печати. Сколько бы вы ни говорили принтеру печатать с помощью вашего компьютера, он не будет работать. Итак, здесь, в этой статье, мы обсудим все решения, которые можно попробовать решить эту проблему. Итак, без лишних слов, давайте приступим к делу.
Содержание страницы
-
Как исправить ошибку Ricoh Printer Red Light?
- Перезапустите принтер:
- Проверьте источник питания:
- Проверьте подключение принтера:
- Проверьте лоток для бумаги:
- Сброс фьюзера SC:
Как исправить ошибку Ricoh Printer Red Light?
Красный свет на принтере Ricoh означает, что он не будет печатать. И чтобы устранить эту ошибку, связанную с невозможностью печати, вы можете попытаться исправить некоторые основные вещи. Итак, приступим к списку.
Перезапустите принтер:
Если вы впервые сталкиваетесь с этой проблемой, первое, что вы должны попробовать со своей стороны, — это перезагрузить систему. Иногда простого перезапуска достаточно, чтобы решить большинство проблем с электронным оборудованием. И если вы давно не перезагружали свой принтер, то это то, что вам нужно попробовать в первую очередь.
Нажмите кнопку питания на принтере и полностью перезагрузите принтер. После перезапуска принтера проверьте, горит ли красный индикатор. Если это так, попробуйте следующее решение.
Объявления
Проверьте источник питания:
Одна из причин, по которой вы можете увидеть ошибку красного индикатора, заключается в том, что он подключен к правильному источнику питания, который обеспечивает достаточную мощность для принтера. Без соответствующего источника питания принтер Ricoh не сможет печатать, и вы увидите, как на нем мигает красный светодиод.
Вы даже можете попробовать заменить кабель питания вашего принтера. Это также решило проблему для многих проблемных пользователей.
Если вы уверены, что источник питания стабилен и подходит для вашего принтера, перейдите к следующему решению.
Проверьте подключение принтера:
Чтобы ваш принтер мог печатать что-либо, он должен быть подключен к сети через интерфейсный кабель, беспроводную локальную сеть или Bluetooth. Если вы подключили принтер к компьютеру, это соединение вы используете для подключения обоих устройств. Вы должны убедиться, что это соединение является безопасным и подходящим.
Объявления
Если это решение не работает для вас, попробуйте следующее решение, упомянутое ниже.
Проверьте лоток для бумаги:
Вашему принтеру требуется бумага, чтобы распечатать что-либо. Как и любой другой принтер, принтеры Ricoh также имеют лотки для бумаги, куда пользователи могут поместить стопку чистых листов, готовых к печати. Если лоток для бумаги пуст, на принтере загорится красный светодиод. Было бы лучше, если бы вы положили стопку чистых листов на лоток для бумаги, чтобы избежать этого.
Попробуйте окончательное решение, упомянутое ниже, если у вас есть документы на бумаге, но по-прежнему возникает ошибка красного светодиода.
Объявления
Сброс фьюзера SC:
- Нажмите кнопку поиска на вашем ПК и найдите «Устройства и принтеры».
- Как только он появится в разделе результатов, откройте его.
- Разверните раздел принтеров и факсов. Там вы увидите свой принтер Ricoh.
- Щелкните его правой кнопкой мыши и выберите параметр «Настройки печати».
- Затем нажмите «Smart Organizing Monitor».
- Затем нажмите на кнопку «О программе».
- Когда появится окно Smart Organizing Monitor, нажмите и удерживайте клавиши Ctrl+Shift и дважды щелкните правой кнопкой мыши.
- На экране появится окно сервисного модуля.
- В этом окне нажмите внизу «Fuser SC reset».
- Затем нажмите «ОК», а затем еще раз нажмите «ОК».
- Теперь закройте все окна на вашем компьютере.
- Наконец, перезагрузите принтер, и ваша проблема должна быть решена.
Вот как вы можете исправить ошибку красного света принтера Ricoh. Если у вас есть какие-либо вопросы или вопросы по поводу этой статьи, оставьте комментарий ниже, и мы свяжемся с вами. Также ознакомьтесь с другими нашими статьями о iPhone советы и рекомендации,Советы и рекомендации по Android, Советы и рекомендации по работе с ПКи многое другое для получения дополнительной полезной информации.
Инструкция RICOH SP 220Nw для устройства принтер содержит страницы на русском языке.
Размер файла: 2.70 MB. Состоит из 152 стр.
Вы можете скачать pdf файл этой инструкции: Скачать PDF
Правила форума
Картинки и фотографии (если они нужны в сообщении) надо загружать только как вложения к своему сообщению (через кнопку Добавить файлы). Тогда картинки будут автоматически отображаться в сообщении.
-
semyenoff
- Сообщения: 43
- Стаж: 7 месяцев
- Благодарил (а): 2 раза
Ricoh 220nw
Сообщение
semyenoff » 11 апр 2023, 13:20
Не подскажите код доступа «Сервисный инженер» (Сервисный режим) в Smart Organizing Monitor. Ошибку печную надо сбросить. Печь вычистил, осталось сбросить. Через двойной клик с зажатыми шифтом и контрл не выходит. Спасибо. Принтер видит
-

pc-porta
- Сообщения: 785
- Стаж: 1 год 6 месяцев
- Благодарил (а): 18 раз
- Поблагодарили: 119 раз
-
Репутация:

Ricoh 220nw
Сообщение
pc-porta » 11 апр 2023, 13:23
CE Tool. Через Smart Monitor сбросил, заходим в конфигурацию принтера, запросит пароль ввести Admin074.
Потом в крайней правой вкладке Maintenance будет кнопка SC reset. Перезагружаем принтер и все работает.
-
semyenoff
- Сообщения: 43
- Стаж: 7 месяцев
- Благодарил (а): 2 раза
Ricoh 220nw
Сообщение
semyenoff » 11 апр 2023, 13:26
pc-porta писал(а): ↑11 апр 2023, 13:23
CE Tool. Через Smart Monitor сбросил, заходим в конфигурацию принтера, запросит пароль ввести Admin074.
Потом в крайней правой вкладке Maintenance будет кнопка SC reset. Перезагружаем принтер и все работает.
Спасибо тоже нашел, но отблагодарил))0
-
- 7 Ответы
- 1092 Просмотры
-
Последнее сообщение

22 фев 2022, 10:54
-
- 4 Ответы
- 658 Просмотры
-
Последнее сообщение

17 янв 2022, 01:24
-
- 1 Ответы
- 531 Просмотры
-
Последнее сообщение
28 янв 2022, 16:57
-
- 100 Ответы
- 10178 Просмотры
-
Последнее сообщение
19 июн 2023, 22:28
-
- 7 Ответы
- 1891 Просмотры
-
Последнее сообщение
31 мар 2022, 09:23