If your small business uses modern inkjet or laser printers to print documents from Windows 7 computers, then you probably have few problems installing and configuring them. This is because most modern printers include a USB interface that is relatively simple to set up and configure. However, if you use older laser or receipt printers with a parallel-port interface, or attempt to network or share some printers over your business’s local network, you might sometimes receive “LPT1 Access Denied” or other similar errors. There are a number of potential causes for errors like this that occur in Windows 7, but you can correct most of them on your own if you know where to start.
Windows Permission Settings
-
If your computer is displaying “LPT1 Access Denied” or similar errors, the first thing you should check is your Windows User Account Control settings. With some is multifunction or laser printers that launch a third-party print utility when sending documents to be printed, your user account may not have sufficient permission rights to send the print job to the printer queue. This often happens if someone installed the printer software with a Windows administrator account, and then failed to enable the option to allow access by nonadministrator accounts on the computer. An easy way to verify if this is the case is to right-click the desktop icon that launches the printer utility, and then click “Run as Administrator” on the popup menu. Enter an administrator username and password if prompted. If you can send print jobs to the printer without errors, uninstall the application and then reinstall it, checking to ensure all users of the computer can use the utility it to send print jobs to the printer.
BIOS Settings and IRQ Values
-
USB ports used for printers usually have the ability to use multiple IRQ address configurations. However, this is not the case for parallel-port interfaces. When using a parallel port printer connection, Windows can usually only use one preset IRQ address. Most of the time Windows can match the IRQ address for the parallel port with the one configured in the system BIOS. Nevertheless, this is not always the case. So if your Windows User Account Control settings appear to be intact, and you are still seeing “LPT1 Access Denied” errors, you should check the BIOS settings for the parallel port and the IRQ settings in Windows Device Manager. If those settings match, try changing the parallel-port type in the BIOS to “ECP” or “EPP.” You can access the BIOS of most computers by pressing the “F1” or “Delete” key as soon as the computer starts. Look for instructions on the startup screens as your computer boots, consult your users manual or check the support site for your computer if neither of these keys work.
Shared or Network Printer Issues
-
Another relatively common reason for LPT1 Access Denied errors pertains to the sharing of a printer. If you are attempting to print to a printer connected to another PC on the network, you must ensure that printer sharing on the other computer is enabled and that your computer and user account have access to it. This generally applies to all network computers regardless of whether the printer is connected by parallel port or USB. Additionally, if you receive the errors while attempting to print from an application that recognizes the computer’s physical parallel port as LPT1, and not the one on the network PC, you should disable the parallel port altogether in the system BIOS. After you disable the port and the BIOS, the software should recognize the network printer connection as LPT1.
DOS Applications and Net Use
-
Although most businesses are moving away from older DOS applications, many companies still use the older programs for various tasks. This is especially true if a business accesses older applications hosted on AS/400 or other mainframe servers. Most modern Windows printer drivers no longer offer direct DOS support, and for this reason, you might see “Access Denied” errors when trying to print from DOS applications. However, as long as you log into Windows as an administrator, you can map the LPT1 port from DOS applications virtually. After you do this, the application will send the print job to the virtual LPT1 port, and then Windows can send the print job to the printer queue. To enable this function, click the Start button, type “cmd” into the search box and press “Enter.” A command-prompt window appears. Type “Net use LPT1 \NameOfPrinter,” substituting “NameOfPrinter” for the Windows network name for the device.
В биосе лпт подключен? Режим ECP?
+1  Спасибо! Ты второй человек, который выслушав мой вопрос, сказал это загадочное слово «биос»
  Упоминание про режим ЕСР тоже пригодилось. Вобщем, решил я про этот самый биос чё-нибудь узнать побольше.
Дальше помог поиск от Яндекса, который привёл на конференцию на forum.ixbt.com. Там все значения параметров я и нашёл. У меня на параллельный порт стояло значение «normal», я сделал: Port mode [ECP]. Глубоко вдохнул и выдохнул (это было первое в моей жизни вторжение в биос), нажал F10 и стал ждать, что из этого всего получится.
После загрузки комп мне сам нашёл принтер и установил. Всё равно не печатал! Ну, утро вечера мудреней. Сегодня в папке «принтеры и факсы» увидел, что у меня сразу два HP LJ 6L, по косвенным признакам определил, который из них новоявленный, его и оставил, другой удалил. Теперь всё печатает.
Issue:
Error writing to LPT 1 messages or problems occur during printing when using a parallel cable connected to an HP Designjet printer from Microsoft(R) Windows 9X, 2000, NT or Windows XP.
Solution
Both hardware and software remedies must be examined in pursuing a solution to this issue. In general, for testing, confirm that:
- The cable is IEEE 1284 compliant
- The cable is no longer than ten feet
- The cable does not pass through any switchboxes or «dongles»
- The printer is connected to LPT1 or the selected port
- The bidirectional communication option is disabled in the printer driver
The parallel port mode is also a potential cause of communication problems between the printer and the computer. HP recommends using ECP parallel printing mode. To check the parallel printing port mode, follow the instructions below:
- Click Start, Settings, then Control Panel.
- In the Control Panel window, double-click on the System icon.
- In the System Properties window, select the Hardware tab.
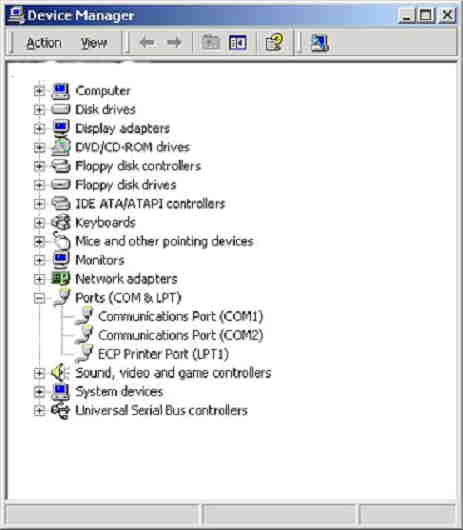
- Click Device Manager.
- Click the + sign in front of Ports (COM & LPT).
- The parallel port will list the mode type as shown below.
Figure : Device manager parallel port mode

- If the port mode is different than ECP (for example, EPP), contact your computer manufacturer to change the parallel port mode in your computers BIOS.
Additionally, for Windows 2000, NT or Windows XP:
- Select Start, Settings, and then Printers.
- Select the appropriate Designjet printer.
- Right-click and select Properties.
- Open the Ports tab.
- Remove the checkmark from Enable Bidirectional Support.
note:
In some cases the printer will cut a print job part way through, then starts up again on a new sheet and continues to print the rest. It may cut and start printing several times depending on the print size. The spooler shows only a portion of the document processed when the firts cut occurs. It resumes the processing when the printer resumes. Deslecting bidirectional support will eliminate this issue.
- Select Apply in Windows 2000 and XP, or OK in Windows NT.
More information specific to Windows 2000 and XP:
- While in Device manager / Ports Comm & LP, right-mouse click on ecp printer port LPT1 and select properties.
- Select the Port settings tab and place a dot in the radio button next to use any interupt assigned to the port, then click Ok.
- Windows may or may not ask to be re-started. This allows the port access to the CPU when a print is sent.
Additionally, for Windows 9X:
- Select Start, Settings, and then Printers.
- Select the appropriate Designjet printer.
- Right-click and select Properties.
- Open the Details tab.
- Select Port Settings.
- Deselect Check Port State Before Printing.
- Select OK.
Все другу друга видят, НО вместе не работают ![]()
Принтер XEROX DocWC EX82Е LPT—(переходник LPT-USB)— USB Нетбук MSI U100
В компах совсем не силен и неожиданно для себя столкнулся с проблемой. 
![]()

Есть хорошая рабочая офисная станция (лазерные принтер/копир) от XEROX немного лохматых годов исключительно с LPT разъемом (портом). От домашнего компа с LPT портом работает хорошо, хотя и пишет, что принтер установлен с ошибкой (древний драйвер в 2004 году качали с офиц сервера XEROX). Принтер устанавливался не через мастер установок оборудования, а путем запуска программы с драйверами.
Появился нетбук MSI U100, в котором нет LPT порта (разъема). По этой причине куплен переходник LPT-USB. При втыкании в USB порт он определяется, устанавливается и пишется, что готов к работе. При благоприятных обстоятельствах через переходник определяется и принтер, но через мастер установки не устанавливается, а при установке путем запуска программы с драйверами все три устройства не могут работать.
Попробовал с помощью переходника подключить принтер к домашнему компу через USB порт – та же фигня. Через полностью LPT-шнур печать идет, а через переходник с USB порта или выдает ошибку (документ не может быть напечатан), либо ставит в очередь и всё, либо отправляет в принтер и тишина.
Вроде при использовании переходника принтер должен подключаться к виртуальному (вроде так называется) порту USB, но он не настраивается, так как пишет, что что-то там с ошибкой. Пробовал создавать другие порты, устанавливать их с диска, приложенного к переходнику – никакого толка.
ХЭЛП. ХЭЛП. ХЭЛП МИ.
Может у кого подключен принтер через такой переходник или приходилось решать такую проблему, пожалуйста помогите!!!!!