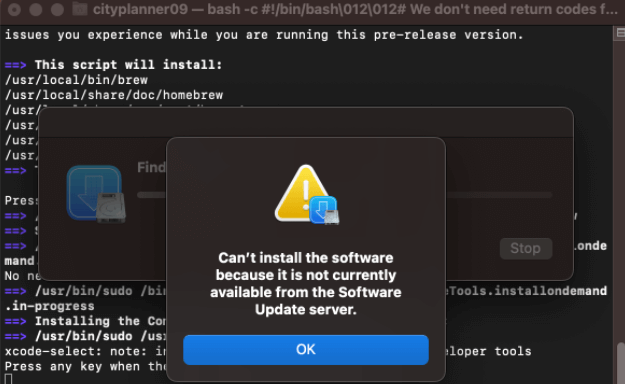
Are you eager to install macOS Monterey and try out its new features? It’s exciting to explore what Apple offers when an update rolls out. However, several users have reported that even after trying several times, macOS Monterey won’t install.
You may get several messages such as – «Can’t download macOS Monterey», «An error occurred while preparing the installation», etc. How to fix the error? Here are several solutions.
| Workable Solutions | Step-by-step Troubleshooting |
|---|---|
| Fix 1. Check the Internet | The easiest solution to fixing the macOS Monterey installation problem is…Full steps |
| Fix 2. Check for Compatibility | Another reason for the macOS Monterey installation issue is compatibility…Full steps |
| Fix 3. Check the Storage Space | Check out the storage space if you encounter issues with the macOS Monterey…Full steps |
| Fix 4. Perform First Aid | You can run First Aid and repair errors that might interfere with installation…Full steps |
| More Fixes | The other 4 fixes are available here for you to follow, and fix macOS Monterey won’t install…Full steps |
When you can’t install macOS Monterey, knowing more about the reasons is vital. That way, you can apply the right solutions. In fact, installing macOS Monterey is easy; if you can’t, investigating the reasons is critical.
Take a look at the reasons —
💾Reason 1. Low Storage Space
If upgrading your system from macOS Sierra, or the later versions, you must have 26 GB of space. However, you will need more space if the system has older macOS versions. It is advisable to ensure you have enough storage space to download and install macOS Monterey. Lack of space can stop the installation process.
🌐Reason 2. Problematic Internet Connectivity
You must have an internet connection to download and install macOS Monterey. Besides, the connectivity has to be stable and robust. Otherwise, you won’t be able to.
❌Reason 3. Software Incompatibility
Keep in mind that all Macs are not compatible with macOS Monterey. The older systems are most likely to be incompatible. You need to check the models that have compatibility with this macOS before installing it.
🍏Reason 4. An issue with the Apple Server
Lastly, the reason might be the Apple server. If nothing is wrong with your system and you are still facing the issue, Apple is at fault. Sometimes, Apple servers are down. So, you need to visit the System Status page of Apple and check.
If you are a Ventura user, it doesn’t matter because the reasons why can’t install Ventura are generally the same. So you can read this page to learn how to fix the Ventura won’t install problem.
![]()
Fix macOS Monterey Won’t Install in 8 Ways
Are you eager to fix the macOS Monterey installation problem? Don’t worry! We have several solutions to help users resolve the issue. Make sure to back up your data to prevent its loss.
Before learning the solutions, watch a video about fixing macOS Monterey not installing, which contains more details.
- 00:00 — What Problems people Face
- 00:21 — Things to Make Sure to Fix macOS not Updating
- 00:49 — Update MacOS Monterey on M1 Mac mini
Check these out —
Fix 1. Check the Internet or Cable Connection
The easiest solution to fixing the macOS Monterey installation problem is checking the net connection. Make sure you have strong and stable internet connectivity. If the connection is spotty, talk to the service provider. You can also change the Wi-Fi connection and check if the issue is resolved.
Fix 2. Check for Compatibility
Another reason for the macOS Monterey installation issue is compatibility between the OS and the system. The older the system is, the harder it will become for you to download and install Monterey. The primary reason is that the latest versions come with features that the hardware of the older systems cannot support.
Here are the systems that are compatible with macOS Monterey –
- Mac Pro (late 2013 and later)
- Mac Mini (late 2014 and later)
- iMac (late 2015 and later)
- MacBook Air (early 2015 and later)
- MacBook Pro (early 2015 and later)
- MacBook (early 2016 and later)
- iMac Pro (2017 and later)
Fix 3. Check the Storage Space of Your Mac
Check out the storage space if you encounter issues with the macOS Monterey installation. Most often, lack of free space is the main reason. Keep in mind that the installer needs 405 GB of space. And if you are upgrading, you will need much more space.
For instance, upgrading to macOS Sierra or later versions, you will need free space of 26 GB. But, for the older systems, you must have 44 GB of free storage.
To check storage space –
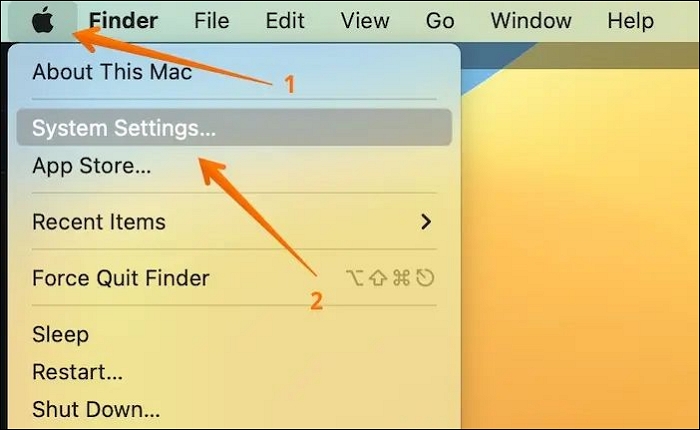
Step 1. Go to the Apple menu. Click on «System Settings» from the drop-down menu.
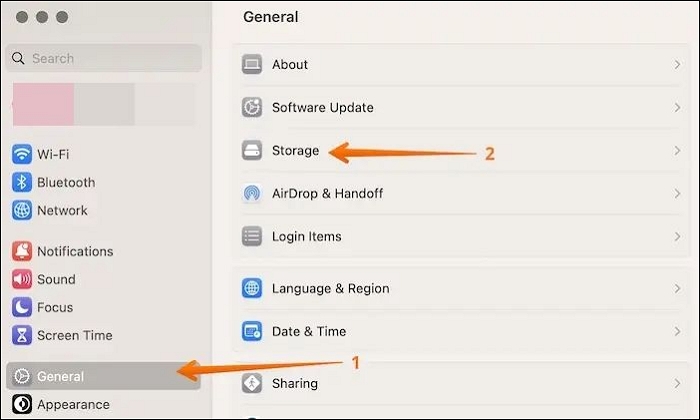
Step 2. Click on «General» from the sidebar, followed by Storage on the right hand.
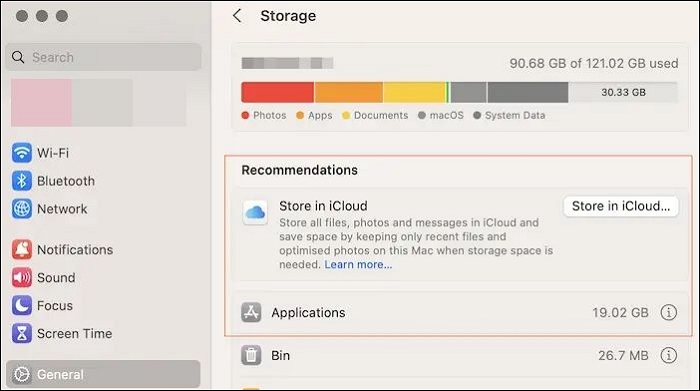
Step 3. You will see a bar on the top showing the space left.
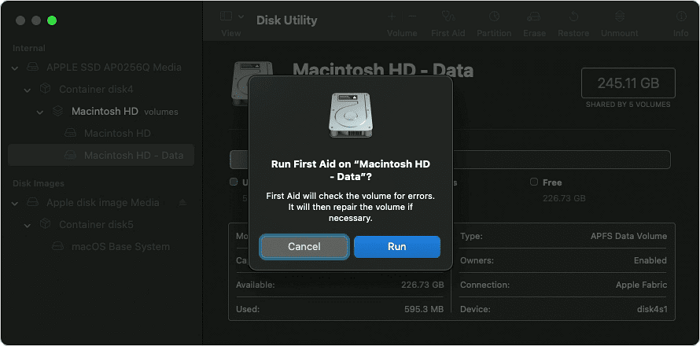
Fix 4. Perform First Aid in Recovery Mode
You can run First Aid and repair errors that might interfere with installation.
Take a look at the steps –
Step 1. Restart the system.
Step 2. At the same time, press and hold Command and R keys.
Step 3. Select «Disk Utility».

Step 4. Choose «Continue».
Step 5. Select the drive.
Step 6. Choose «First Aid».
Step 7. Click on «Done».
Step 8. Restart the system again.
Now, you can try to reinstall macOS Monterey.
If one of the methods is helpful in resolving the macOS Monterey won’t install issue, share it on Facebook, Twitter, Instagram, and other social media platforms!
Fix 5. Check the Format of the USB Drive
Another solution to fix the macOS Monterey installation issue is to check the USB drive format. This solution is critical if you are trying to create a bootable USB drive. Remember that the correct format is Mac OS Extended (Journaled). It is also known as HFS+.
Here are the steps you need to follow –
Step 1. Connect the drive to Mac.
Step 2. Go to «Disk Utility».
Step 3. Choose the drive.
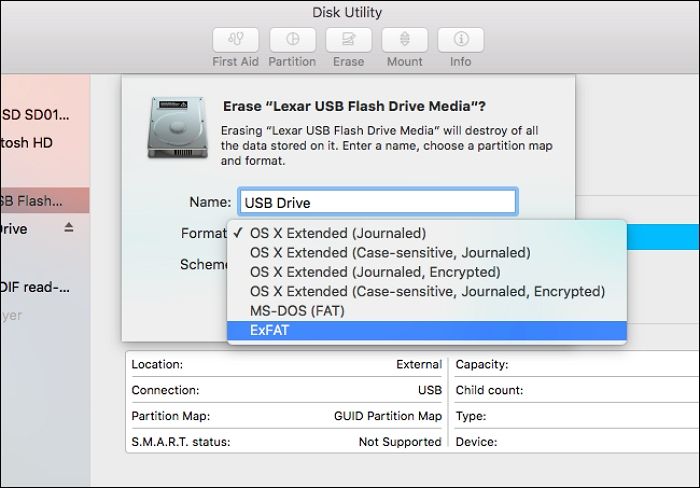
Step 4. Check the format.
Step 5. If the format doesn’t match, backup files and reformat them.
Fix 6. Clean reinstall macOS
Another solution is to clean install macOS on the system. However, you need to have a backup of the files. To prevent the inconvenience of losing important data, it is recommended that you back up your important files via the EaseUS Data Recovery Wizard for Mac Pro before installing or updating macOS.
![]()
Back Up Your Mac and Never Lose Data
Back up and restore your MacBook/iMac without Time Machine, iCloud, or external hard drives.
The steps vary based on the model.
For Silicon Macs –
Step 1. Turn off the system.
Step 2. Press and hold the power button till you come across the Startup options.
Step 3. Select «Options».
Step 4. Click «Continue».
Step 5. Opt for «Disk Utility».
Step 6. Go to «Macintosh HD».
Step 7. Select «Erase».
Step 8. Give a name and choose the format (APFS).
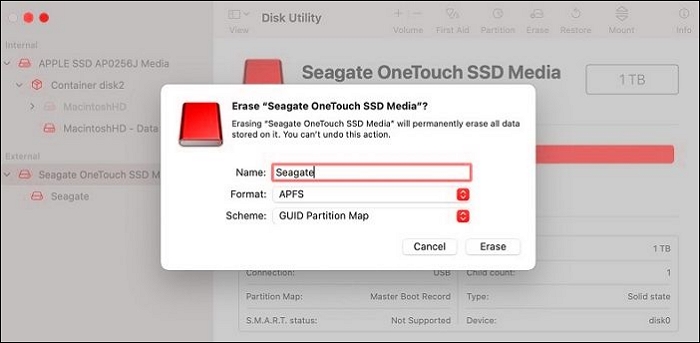
Step 9. Click «Erase Volume Group».
Step 10. Go back to the main recovery mode screen.
Step 11. Choose «Reinstall macOS Monterey».
For Intel-based Macs –
Step 1. Reboot the system.
Step 2. Enter the recovery mode.
Step 3. Choose «Disk Utility».
Step 4. Right-click «Macintosh HD» — «data».
Step 5. Choose to «Delete APFS volume».
Step 6. Click on the «Macintosh HD volume».
Step 7. Select «Erase».
Step 8. Go back to the macOS Utilities window.
Step 9. Select «Reinstall macOS».
Fix 7. Restart Mac and Check Again
Sometimes, something as simple as restarting the system can resolve your problem. If temporary errors are the reason for the installation issue, this is the ideal solution. Hard restart Mac and check if the issue is resolved.
For that, go to the Apple icon and select Restart. However, if the system is unresponsive, hold the Power button. After a few seconds, press the Power button again to restart it. Now, visit the App Store to download macOS Monterey.
Fix 8. Try Installing it from the Mac App Store
If you have tried installing from System Preferences or a USB drive and failed, you can visit the App Store. Try downloading the operating system directly.
Here are the steps –
Step 1. Go to the Apple menu.
Step 2. Select App Store.
Step 3. Look for macOS Monterey in the search bar. Click on View.
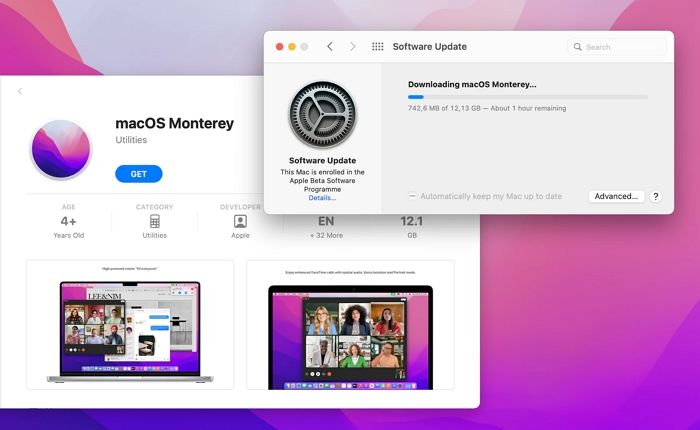
Step 4. Select Get.
Step 6. Wait for the download to complete.
Step 7. Select Monterey Installer.
Step 8. Follow the instructions given on the screen.
Downgrade macOS Ventura to Monterey
If the solutions mentioned above don’t work, the best action is to downgrade your operating system. To ensure you have a fully functional system, let’s take a look at the steps you can follow –
Step 1. Connect Time Machine drive to your system.
Step 2. Restart your Mac.
Step 3. If you have Intel-based Mac, you need to press and hold Command and R keys. Wait for the Apple logo to come on the screen.
For Silicon Macs, you must press and hold the Power button till you see the startup screen. After that, choose Options and Continue.
Step 4. From the macOS utility window, choose the «Restore from Time Machine Backup» option.
Step 5. Select the drive.
Step 6. Follow on-screen instructions to complete the installation process.
Note: There are other ways to downgrade your macOS too. If this doesn’t work, you can try –
- Using macOS Recovery
- Using a Bootable Installer
Recover Data When macOS Installation Failed
Several users reinstall macOS when installation problems occur. In that scenario, critical data loss might occur. The best solution is to have a backup of all valuable data. But if that is not done, all hope is not lost.
You can still get back your lost data with the help of a professional data recovery tool. The EaseUS Data Recovery Wizard for Mac is a specialized data recovery tool designed to help users recover data. It has a user-friendly interface and comes with a vast array of features.
Highlights:
- Retrieve music files, videos, photos, documents, etc., efficiently.
- Hassle-free restoration of data from different Mac-based devices.
- Deep and quick scan to aid in faster file loading.
- File filter and file preview options to recover deleted files on Mac quickly.
Here are the steps:
Step 1. Select the drive to be scanned
In the main EaseUS Data Recovery Wizard window, there will be a list of the drives connected to your Mac. Select the drive you need to recover lost/deleted files from, and click the «Search for lost files» button.
Note: Before data recovery, you’d better click «Disk Backup» from the left sidebar to create a backup of your Mac to avoid further data loss. After backing up, the software can recover data from the Mac backup, and your computer can wirte new data again.

Step 2. Select your lost data/files
EaseUS Data Recovery Wizard for Mac will immediately scan your selected disk volume and display the scanning results on the left pane. You can sort the results to find the wanted files if you are looking for certain files.

Step 3. Recover lost/deleted data
Once you have found the desired files, preview the files and then click «Recover» to begin the recovery of your deleted/lost Mac files.

Apart from that, you can always contact the remote IT support team’s data recovery service if you have any issues.
Final Words
Are you frustrated that the macOS Monterey won’t install? Well, several reasons could explain the problem. For instance, it could be weak internet or compatibility issues. However, there are multiple solutions one can try to resolve the installation problem.
Start with checking the internet connection, storage space, and compatibility. After that, you can restart your system and check again. If that doesn’t resolve the issue, try downgrading the macOS. Amidst trying all these solutions, you can lose critical data.
In that case, you must choose an efficient data recovery tool — EaseUS Data Recovery Wizard for Mac. It is a powerful yet user-friendly data recovery software enabling users to restore data without hassle. Install EaseUS Data Recovery Wizard for Mac today!
There are multiple solutions to fix macOS Monterey won’t Install. To know more, take a look at the questions and answers listed below —
1. Why can’t I install macOS Monterey on Macintosh HD?
There are multiple reasons due to why you can’t install macOS Monterey on Macintosh HD. It could be due to low free space on your drive, incompatibility issues, etc.
2. How do I force my Mac to update to Monterey?
To force your Mac to update to Monterey, you can follow these steps –
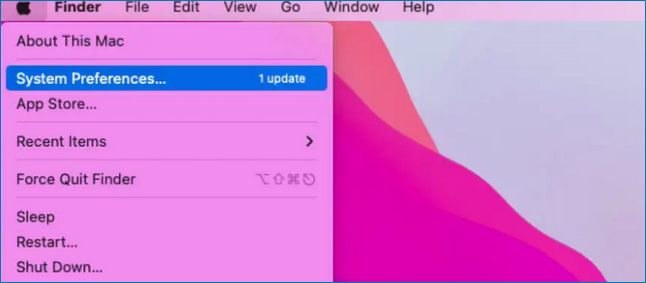
- Go to the Apple menu.
- Choose System Preferences.
- Select Software Update.
- If you see any updates, download and install them.
3. Why won’t my Mac let me install macOS?
Several reasons explain why your Mac won’t let you install macOS. It could be due to a lack of free space on the system, a corrupted macOS installer file, issues with the startup disk, etc.
4. Can I downgrade from Monterey to Big Sur?
Yes, you can downgrade from Monterey to Big Sur. However, it also depends on the mode. If you have Silicon Macs, you will be limited to Big Sur. But, for the recent M1 Pro and M1 Max, it is impossible to downgrade from Monterey.
Многие пользователи сообщают об ошибке обновления для macOS Monterey. Для этого может быть несколько причин, и они будут варьироваться от одного MacBook к другому. Список компьютеров Mac, совместимых с Monterey, доступен на веб-сайте Apple.
Прежде чем читать дальше, было бы лучше, если бы вы просто просмотрели этот список и посмотрели, совместим ли ваш Mac с ними. Однако, если вы не используете старый Mac, попытка обновления до macOS в обычных условиях неизбежно завершится неудачей.
Поэтому вам придется пойти нетрадиционным путем, чтобы получить обновление. Я дам ссылку на сообщение в блоге, которое проведет вас через процесс установки Monterey на неподдерживаемый Mac. В любом случае, если ваш Mac год включен в список, но вы все еще сталкиваетесь с этой проблемой, вы находитесь в правильном месте.
В этом сообщении блога я подробно обсудил несколько методов, которые вы можете попробовать один за другим и посмотреть, отреагирует ли ваш Mac. Итак, давайте приступим к делу.
Содержание статьи
- macOS Monterey Update Fail, метод 1: проверьте подключение к Интернету
- macOS Monterey Update Fail, метод 2: удалить файл Plist обновления программного обеспечения
- macOS Monterey Update Fail, метод 3: освободите место
- macOS Monterey Update Fail, метод 4: обновить Mac в безопасном режиме
- Если вы используете процессор Mac Intel, выполните следующие действия.
- Если вы используете Mac с Apple Silicon:
- macOS Monterey Update Fail, метод 5: сброс PRAM/NVRAM
- macOS Monterey Update Fail, метод 6: исправление ошибок диска в режиме восстановления
- Если вы используете Mac на базе Intel:
- Если вы используете Mac с Apple Silicon
- Способ 7: установите Apple SSD и получите DFU
- Вывод
macOS Monterey Update Fail, метод 1: проверьте подключение к Интернету
Для любых крупных обновлений Mac или любой операционной системы жизненно важно иметь надежное и стабильное подключение к Интернету. Загрузка тяжелого файла, такого как Monterey, и его установка занимает как минимум час или два.
Во время этого процесса ваше интернет-соединение должно оставаться стабильным и на высокой скорости.

Если это не так, и ваша сеть время от времени продолжает падать, ваш Mac определенно прервет процесс загрузки.
Чтобы решить, что ваше интернет-соединение не является причиной, сделайте следующее:
Шаг 1. Отключите Wi-Fi на вашем Mac.
Шаг 2: Затем перезагрузите Mac.
Шаг 3: После этого включите Wi-Fi.
Шаг 4: Кроме того, теперь проверьте, может ли ваш Mac загрузить обновление.
Однако, если проблема не устранена, измените сеть Wi-Fi, так как вполне возможно, что проблема связана с сетью Wi-Fi. Например, вы можете подключить свой Mac к сети Ethernet, а затем загрузить обновление.
macOS Monterey Update Fail, метод 2: удалить файл Plist обновления программного обеспечения
Шаг 1: Перейдите в Finder на Mac и нажмите «Перейти» в строке меню.
Шаг 2: В разделе меню «Перейти» выберите «Перейти к папке».
Шаг 3: В папке «Перейти» введите ~/Library/Preferences/ и нажмите «Перейти».
Шаг 4: Mac представит вам список файлов. Здесь вам нужно прокрутить вниз и найти com.apple.SoftwareUpdate.plist и удалить его, перетащив в корзину.
Шаг 5: Кроме того, перезагрузите Mac.
Теперь, когда вы пытаетесь обновиться, Monterey должен без проблем загрузиться на ваш Mac. Однако, если это не так, вы можете попробовать следующее решение.
macOS Monterey Update Fail, метод 3: освободите место
Для загрузки тяжелого обновления требуется достаточно свободного места. Если он не соответствует критериям, ваш Mac, скорее всего, отобразит сообщение о том, что он не может обновить Monterey. Для этого сделайте следующее:
Шаг 1: Сначала щелкните значок Apple в верхнем левом углу экрана.
Шаг 2: Затем выберите «Об этом Mac» в меню Apple.
Шаг 3. Теперь выберите вкладку «Хранилище», чтобы увидеть, сколько места используется и сколько свободно.
Шаг 4: Если на вашем Mac недостаточно места для загрузки обновления, удалите все ненужные файлы и приложения с вашего Mac, чтобы освободить место.
Шаг 5: Затем перезагрузите Mac.
Шаг 6: Теперь попробуйте загрузить обновление.
Однако, если вы все еще получаете сообщение об ошибке сбоя обновления, возможно, проблема не в хранилище.
macOS Monterey Update Fail, метод 4: обновить Mac в безопасном режиме
Если вы используете процессор Mac Intel, выполните следующие действия.
Шаг 1. Сначала выключите Mac через меню Apple и нажмите «Выключить».
Шаг 2: Затем подождите около десяти секунд или нажмите кнопку питания или Touch ID.
Шаг 3: После нажатия кнопки питания/Touch ID сразу же удерживайте нажатой клавишу Shift, пока не появится окно входа в систему.
Удерживая клавишу Shift, появится логотип Apple. Но не отпускайте клавишу Shift, когда видите логотип Apple. Вместо этого продолжайте удерживать ее, пока не увидите окно входа в систему.
Шаг 4: Затем введите свои данные для входа. Если ваш Mac зашифрован с помощью File Vault, вам будет предложено дважды войти в систему.
Шаг 5: Теперь вы можете без проблем загрузить обновление.
Если вы используете Mac с Apple Silicon:
Шаг 1. Сначала выключите Mac через Apple Menu.
Шаг 2: После этого подождите около десяти секунд, а затем удерживайте кнопку питания/Touch ID, пока не появится окно параметров запуска.
Шаг 3: Теперь вы можете увидеть доступные загрузочные диски и параметры. Здесь выберите загрузочный диск.
Шаг 4: Затем, удерживая нажатой клавишу Shift, нажмите «Продолжить».
Шаг 5: После этого нажмите «Продолжить в безопасном режиме», удерживая клавишу Shift.
Шаг 6: Теперь отпустите клавишу Shift и подождите, пока не появится окно входа в систему.
Шаг 7: Затем введите свои учетные данные для входа.
Шаг 8: Теперь загрузите обновление и проверьте, возникают ли какие-либо проблемы.
Чтобы выйти из безопасного режима, перезагрузите Mac через меню Apple и нажмите «Перезагрузить».
macOS Monterey Update Fail, метод 5: сброс PRAM/NVRAM
Шаг 1. Сначала выключите Mac через меню Apple и нажмите «Выключить».
Шаг 2: Затем подождите несколько секунд и нажмите кнопку питания/Touch ID, чтобы включить Mac.
Шаг 3: После нажатия кнопки питания/Touch ID сразу же нажмите и удерживайте одновременно клавиши Option + Command + P + R, пока не услышите звук запуска во второй раз.
Кроме того, если вы используете чип безопасности T2 с вашим Mac, удерживайте клавиши, пока логотип Apple не появится и не исчезнет во второй раз.
Шаг 4: Затем подождите, пока ваш Mac перезагрузится. Иногда перезапуск вашего Mac может занять до пятнадцати минут.
macOS Monterey Update Fail, метод 6: исправление ошибок диска в режиме восстановления
Если вы используете Mac на базе Intel:
Шаг 1. Сначала выключите Mac, затем нажмите кнопку питания/Touch ID, чтобы включить его.
Шаг 2: После нажатия кнопки питания/Touch ID сразу же одновременно удерживайте нажатыми клавиши Control + R, пока не появится логотип Apple.
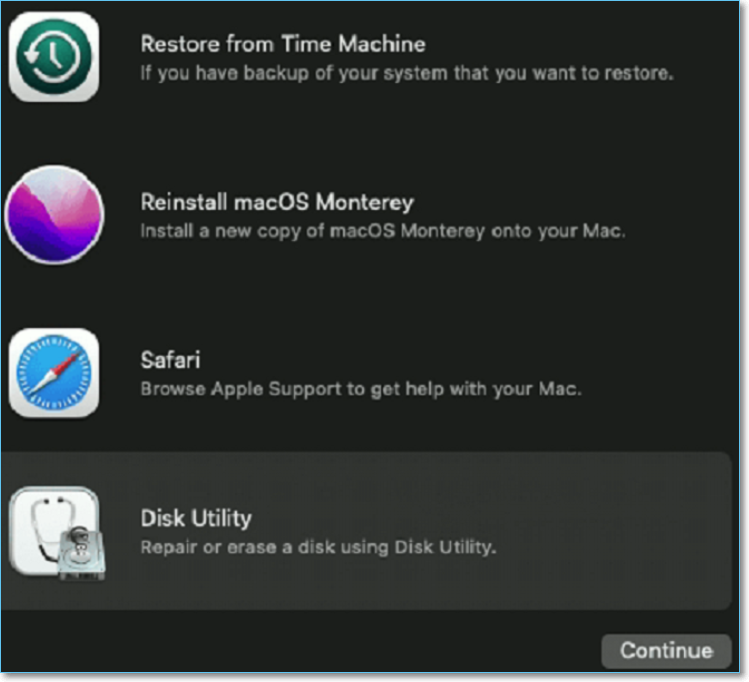
Шаг 3: Затем подождите некоторое время. Кроме того, появится окно утилит macOS с четырьмя вариантами.
Шаг 4: Здесь выберите «Дисковая утилита» и нажмите «Продолжить».
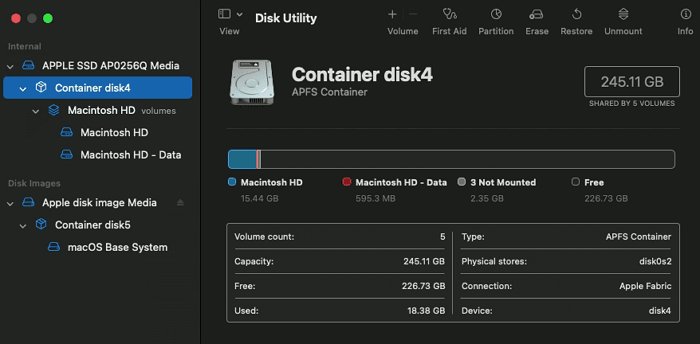
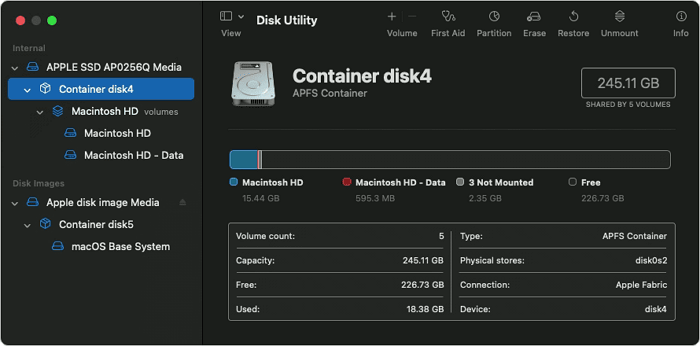
Шаг 5: Теперь выберите загрузочный диск (Macintosh HD), для которого вы хотите исправить ошибки.
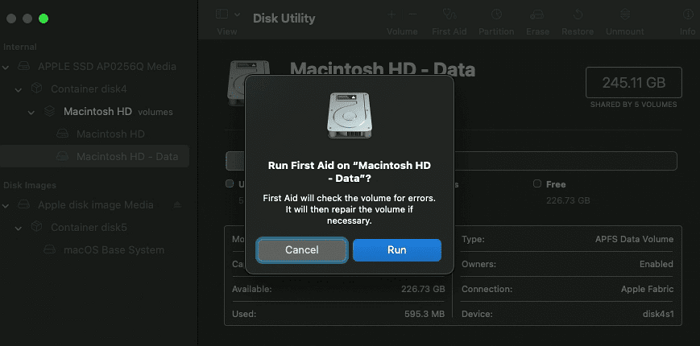
Шаг 6: Затем нажмите «Первая помощь».
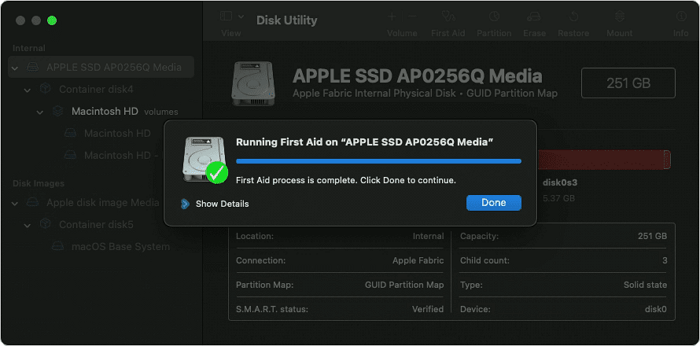
Шаг 7: После этого выберите «Выполнить» во всплывающем окне. Теперь ваш Mac проверит наличие ошибок диска и дождется завершения процесса.
Шаг 8: Затем нажмите «Готово» и закройте Дисковую утилиту.
Шаг 9: Теперь перезагрузите Mac через меню Apple и нажмите «Перезагрузить».
Если вы используете Mac с Apple Silicon
Шаг 1: Сначала выключите свой Mac.
Шаг 2: Удерживайте нажатой кнопку питания/Touch ID, пока не появится окно параметров запуска.
Шаг 3: Здесь выберите «Параметры», а затем нажмите «Продолжить».
Шаг 4: Подождите несколько секунд, после чего появится окно утилит macOS с четырьмя параметрами.
Шаг 5: Выберите дисковую утилиту и нажмите «Продолжить».
Шаг 6: Затем следуйте инструкциям на экране для Mac с процессором Intel, которые я описал ранее.
Способ 7: установите Apple SSD и получите DFU
Многие пользователи MacBook Pro получают конкретное сообщение о том, что для MacOS не удалось установить необходимое обновление прошивки. Для обновления требуется совместимое внутреннее хранилище.

Имейте в виду, что они получают это сообщение после того, как испробовали все вышеперечисленные методы, которые я обсуждал в этом сообщении в блоге. Независимо от того, пытаетесь ли вы освободить место или загружаетесь на свой Mac в безопасном режиме или даже после сброса SMC. Более того, многие также пытались использовать загрузочный установщик USB, после чего выскакивает это сообщение об ошибке.
В этом случае у меня тоже есть решение. Во-первых, все, что вам нужно сделать, это установить внутренний твердотельный накопитель Apple с накопителем NVMe, чтобы обновить прошивку и загрузчик операционной системы. Во-вторых, вы также можете попробовать установить Монтерей в режиме DFU.
Вывод
Чтобы установить Apple SSD, вам следует обратиться в ближайший центр обслуживания клиентов Apple. Лучше доверить сложный процесс профессионалам. Более того, они могут решить лучше в зависимости от модели вашего Mac, нужен ли вам внутренний SSD или установить с устройства обновление прошивки.
The macOS Monterey update may be stuck on the Apple logo and may be stuck while downloading or installing. Find and skip to the written tutorial in the following chart to fix the problem:
| macOS Monterey Stuck | Step-by-step Troubleshooting |
|---|---|
| Problem 1. macOS Monterey Stuck on the Apple Logo | Save your work, and restart the Mac. Press and hold the power button (Apple Silicon)…Full steps |
| Problem 2. macOS Monterey Stuck While Downloading | Check the Status of the Apple System on Your Mac. Check the Internet Connection …Full steps |
| Problem 3. macOS Monterey Stuck During the Installation | Restart Mac to Refresh the macOS Monterey Update. Disable FileVault on Mac to…Full steps |
One of the most popular macOS base systems is the macOS Monterey. It is the 12th version of the macOS and is succeeded by macOS Ventura. However, compatibility is a significant factor in updating macOS Monterey on the system.
The systems that can upgrade to macOS Monterey include:
- MacBook Pro — Early 2015 and later
- iMac — Late 2015 and later
- MacBook Air — Early 2015 and later
- iMac Pro — 2017 and later
- MacBook — Early 2016 and later
- Mac mini — Late 2014 and later
- Mac Pro — Late 2013 and later
Various reasons can lead to the macOS Monterey update stuck error or the macOS Ventura upgrade failed error. These include poor internet connection, slow Wi-Fi speed, antivirus causing interference, an issue on Apple’s server, using a VPN, etc.
Luckily, there are multiple solutions you can try to resolve this issue. This post provides a complete guide on how to fix the macOS Monterey update stuck on the Apple logo. We will also discuss resolving the macOS Monterey Update stuck on downloading or installing. Before the written tutorial, we have a video about macOS Monterey stuck to help you understand easily:
- 00:18 macOS Monterey update stuck errors
- 00:52 Try to update macOS Monterey again
- 01:24 Enter the password to unlock
Fix macOS Monterey Update Stuck on Apple Logo with 2 Methods
Usually, you can update macOS Monterey with Mac’s built-in macOS update option easily, but sometimes macOS Monterey update will get stuck on the Apple logo. We got two solutions to solve this problem, and you can keep reading to learn the detailed tutorials.
Before starting the process, back up all your data on your Mac. You shouldn’t second-guess doing it now because it will stop data loss. You can use the practical program Easeus Dara Recovery Wizard for Mac Pro to create a backup of your Mac. Simply click the green button below to obtain the free software download:
![]()
Back Up Your Mac and Never Lose Data
Back up and restore your MacBook/iMac without Time Machine, iCloud, or external hard drives.
Fix 1. Try Safe Mode to Fix macOS Monterey Update Stuck on the Apple logo
One of the simplest ways to resolve the macOS Monterey Update Stuck on the Apple Logo is booting Mac to Safe Mode. The Safe boot was specifically designed to resolve various software issues.
Let’s take a look at the steps:
Step 1. Save your work, and restart the Mac.
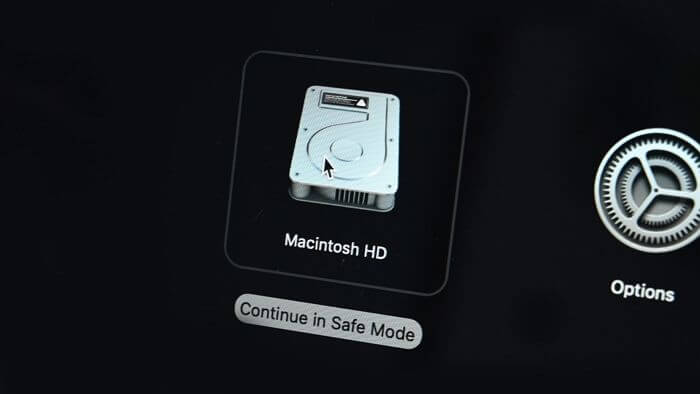
Step 2. Press and hold the power button (Apple Silicon) or Shift key (Intel) on your Mac until «Loading startup options» appear. Then click «Continue» in Safe Mode.
Step 3. Mac will restart, and when you log in, it will be in Safe Mode. Try updating now, and check if the issue is resolved.
Fix 2. Try Recovery Mode to Fix macOS Monterey Update Stuck on the Apple logo
Another option you can use to resolve the Monterey Update Stuck on Apple Logo is Recovery Mode. Disk Utility is an excellent idea to fix any issues on the startup disk.
Here are the steps you should follow:
Step 1. To force shut down the system, press and hold the Power button for some time.
Step 2. Now, press the Power and Command-R buttons and hold them to boot Mac into Disk Utility.
Step 3. Release the keys when you come across the Apple logo. You will see the Recovery mode screen.
Step 4. Under macOS Utility, press the Disk Utility on Mac.
Step 5. Select the Startup Drive that has the main system.
Step 6. Press the First Aid option present on the top. (The tool will locate and fix errors within the disk, which will take some time.)
Step 7. Restart the system after the process ends.
Step 8. Ensure the system is in recovery mode when you click on Reinstall macOS.
Step 9. Follow the instructions on-screen to go ahead with the update.
How to Fix macOS Monterey Update Stuck While Downloading
It is also possible that the macOS Monterey update got stuck while downloading. This problem may appear because of Apple server failure, poor internet environment, and lack of disk space.
Fix 1. Check the Status of the Apple System on Your Mac
Is the macOS Monterey update stuck while downloading it? In that case, you need to be patient and wait for some time. But you need to check the Apple server’s status even after hours have passed and the issue remains. An Apple update witnesses a rush of users opting for the update right away, causing pressure on the server.
For that, go to the System Status page of Apple. Visit the Apple official website and look out for macOS Software Updates. The green icon suggests everything is good on Apple’s end. But, if you find a red or yellow icon, it means there are problems with Apple’s servers.
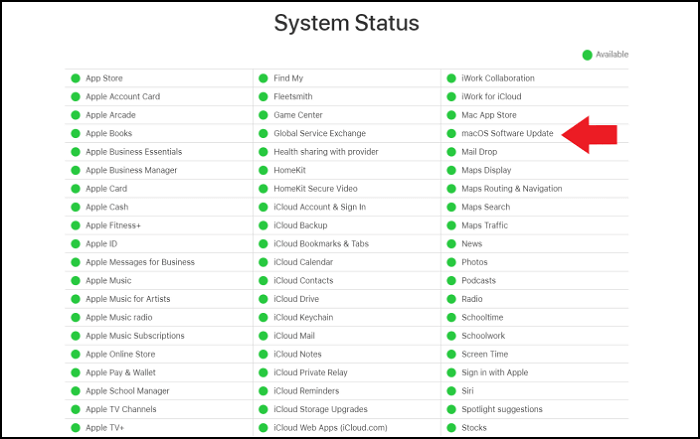
In that case, you need to wait for the update and try waiting at least 24 hours before you try again. But, before downloading the update, visit the System Status page and check out the icon’s color.
Fix 2. Check the Internet Connection When macOS Monterey Downloading Stuck
Another reason for the macOS Monterey update being stuck while downloading is a bad internet connection. After checking out the System Status page of Apple and ensuring everything is right, you need to check the internet speed, and slow speed may lead to halting the downloading process.
However, there are various ways to resolve the internet problem. For starters, you can reboot the router. Another fix is to make sure the Mac and the router are nearby. Try downloading it and see if it works now.
You can also try disconnecting the Wi-Fi. Now, wait for some time and reconnect it again. Sometimes, a glitch in the Wi-Fi network can slow down the internet speed. If nothing else works, you must consider opting for another Wi-Fi connection.
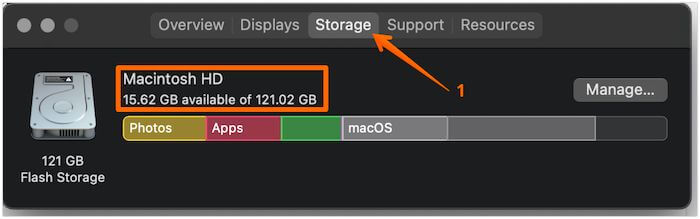
Fix 3. Check the Disk Space on Mac When macOS Monterey Downloading Stuck
Did you know that insufficient storage space on the Mac can lead to downloading issues? Yes, that’s right! Without proper space, the macOS Monterey update may get stuck while downloading.
It is vital to understand that a minor upgrade of macOS software might take megabytes or some gigabytes of space. But, for a major one, you need to have a minimum of 12 gigabytes of free space on the system.
Here are the steps you need to follow to check out the storage space:
Step 1. Click on the Apple menu present at the top-left part of the screen.
Step 2. Now, select the «About this Mac» option.

Step 3. Click on the Storage tab.
Step 4. Give the system some time to provide the desired results.
Step 5. A bar at the top shows how much space is in use and how much is left.
macOS Monterey Update Stuck While Installing
After successfully downloading macOS Monterey, problems may arise when the installation of the macOS Monterey update takes place. In that case, the best solution is to wait for some time. Keep in mind that the installation takes a significant amount of time. Instead of panicking, simply have some patience. However, if there is still no progress, it’s time to take action.
Fix 1. Restart Mac to Refresh the macOS Monterey Update
The simplest solution is to restart the Mac. Doing this manually will lead to the cancellation of the installation of the update, and you will need to restart the software update again.
Remember that the software update will resume from where it stopped previously. In case that doesn’t happen, don’t worry! The macOS update will start from the beginning once more. That way, you can eliminate the update being stuck during installation.
Fix 2. Disable FileVault on Mac to Solve Installation Stuck
FileVault is one of the best security features integrated into Mac to detect and combat unauthorized data access. But, sometimes, this incredible feature can interfere with the update process, and you need to turn it off and see if the installation update problem is resolved.
Take a look at the steps you must follow to disable FileVault on Mac –
Step 1. Go to the Apple menu and click on it.
Step 2. Now, select System Preferences.
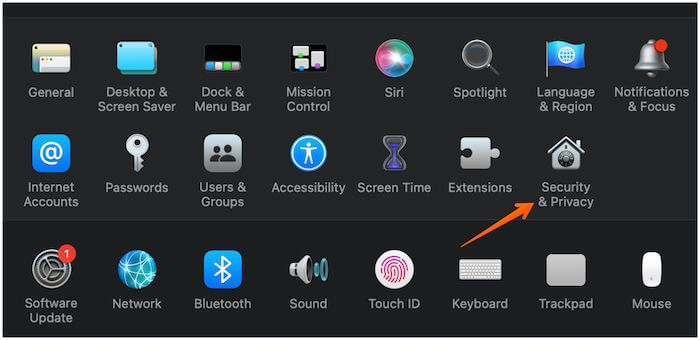
Step 3. Click on the Security & Privacy option.
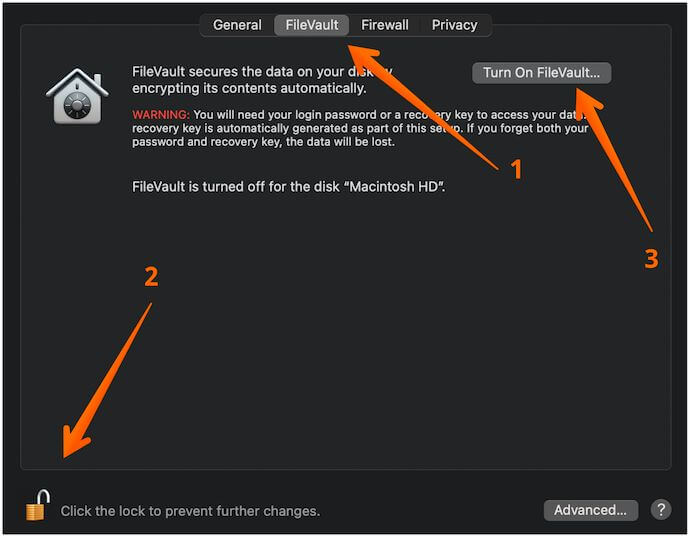
Step 4. After that, click on the FileVault tab. On the bottom-left part of the screen, you will see a lock. Click on it.
Step 5. You need to type in the administrator name and password. Then, click on the Turn Off FileVault option.
Step 6. Update the system and see if the same issue remains.
Fix 3. Update macOS Monterey in Safe Mode
If the above methods don’t work, you must move on to the technical fixes. Use the Mac Safe mode to fix the macOS Monterey update stuck while installing. The Safe Mode was designed to help users use the system with the bare necessities, which means no third-party applications will run in the Safe mode.
If you have an Intel-based Mac, these are the steps you need to follow:
Step 1. Shut down the system. Wait for a few seconds.
Step 2. Now, restart the system. Press the Shift key and hold it immediately after restarting. Release the key only when you see the Apple logo on the screen.
In case you have Apple Silicon, there is no need to worry. For that, you can adopt these steps:
Step 1. Firstly, shut down the Mac. Now, wait for some time.
Step 2. Press the Power button and hold it till you come across the startup options window.
Step 3. Now, click on Macintosh HD. Press the Shift key and hold it.
Step 4. Click on Continue and release the key.
Step 5. On the top-right part of the screen, you will see Safe boot in red. Click on it.

Now that the system has entered Safe mode, you can move ahead with the macOS update.
Fix 4. Re-Download and Install macOS 12 Monterey
Sometimes, canceling the installation and downloading the macOS again is a better idea. Here are the steps. Take a look:
Step 1. Go to the App Store. Type macOS 12 Monterey.
Step 2. To download, click on the View option and Get option later.
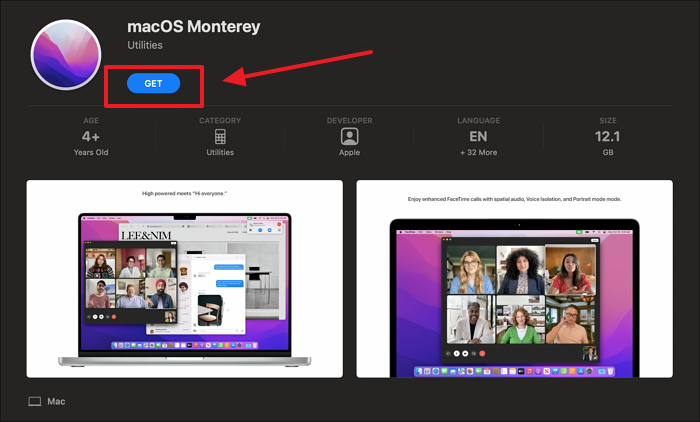
Step 3. You will come across the following – Are you sure you want to download macOS 12?
Step 4. Click on the Download button.
Wait for the downloading and installation process to finish.
When macOS Monterey Update Stuck, Can I Recover Lost Data
Have you resolved the Monterey update issue? Sometimes, data loss can lead to anxiety during or after the upgrade. Losing precious data is bound to cause panic. However, there is no need to worry!
For that, you can opt for professional recovery software and choose EaseUS Data Recovery Wizard for Mac.
Why do so many users choose EaseUS Data Recovery Wizard for Mac to retrieve lost data?
- Recover deleted files Mac for various reasons, including accidental deletion, malware attacks, downgrade issues, system crashes, etc. And also support Mac Trash recovery.
- Recover different types of data, including documents, images, and videos. And Mac deleted email recovery is supported, too.
- Restore lost data to the cloud, such as Dropbox, Google Drive, and OneDrive.
The software is easy to use and offers excellent results. Moreover, you can use the filter to locate lost data and recover them immediately. Are you eager to use EaseUS Data Recovery Wizard for Mac? In that case, take a look at these simple steps and follow them:
Note: You can create a backup by clicking the «Disk Backup» on the left first. When the disk is damaged or the data on the disk is accidentally deleted or lost, you can get the data back from the backup image.
Step 1. Select the location
Select the disk where you lost data after updating to macOS Sonoma/Ventura/Monterey/Big Sur. Then, click «Search for lost files».
Step 2. Find lost data after the scan
EaseUS Data Recovery Wizard for Mac will immediately scan your selected disk volume and display the scanning results on the left pane. Use the file type and file path to find wanted data on Mac.
Step 3. Recover data after macOS update
Select the target files that were unknowingly lost during or after the update and click the «Recover» button to get them all back.
Summary
Various issues can lead to the macOS Monterey update being stuck. It can occur during installation, downloading, or even at the Apple logo stage. Luckily, there are multiple solutions one can try! Adopt these fixes and see if the issue is resolved.
Experiencing data loss due to the update problem is a severe issue. In that case, choosing the best professional data recovery software is a great idea. You can try EaseUS Data Recovery Wizard for Mac. It is an easy-to-use, reliable and efficient tool offering many features.
macOS Monterey Update Stuck FAQs
One can adopt various solutions to fix macOS Monterey updates stuck while installing, downloading, etc. Now that you know about them, let’s move ahead. Gather some more knowledge by taking a look at these questions and answers –
How to upgrade macOS Monterey to Ventura?
You can download and install macOS Ventura to update macOS Monterey to Ventura.
- 1. Download macOS Ventura and install it in the App store.
- 2. Clean install macOS Ventura with the bootable installer.
- 3. Upgrade from macOS Monterey to Ventura directly in Software Update.
Why is my macOS Monterey update taking so long?
Various reasons lead to the Mac update taking so long in Monterey. For starters, if the internet connection is slower or you are downloading the macOS at peak hours, it might take more time. If upgrading from a much older version, expect a longer time to download the software.
Why is my macOS Monterey update stuck at less than a minute remaining?
To resolve the Mac update stuck at less than a minute remaining Monterey issue, cancel the macOS download. Now, check and make sure that are no remains left in the Applications folder. After that, boot into Safe Mode and download the operating system. Try installing it now!
Can you cancel a Mac Monterey update in progress?
Yes, it is possible to cancel a Mac Monterey update in progress. You can go to System Preferences and uncheck the various options which keep Mac updated. Alternatively, you can use the Terminal app and write the command — sudo /usr/sbin/softwareupdate —ignore «macOS [name of update]» Press Enter to cancel the update.
Many users are reporting an update fail for macOS Monterey. There could be several reasons for this, and it will vary from one MacBook to the other. A list of macs compatible with Monterey is available on the Apple website.
Before you read further, it would be better if you just go through that list and see if your Mac is compatible according to them. However, if you are not using an old mac, trying to upgrade to macOS under normal circumstances will inevitably fail.
Therefore, you have to take an unconventional path to get the upgrade. I will link the blog post that will walk you through the process of getting Monterey on an unsupported Mac. Anyhow, if your mac year is included in the list, but you are still facing this issue, you’re in the right place.
In this blog post, I have extensively discussed a few methods that you can try out one by one and see if your Mac responds. So, let’s get right into it.
Also Read: How To Use Quick Notes In MacOS Monterey?
macOS Monterey Update Fail Method 1: Check The Internet Connection
For any major upgrades in the Mac or any operating system for that matter, it is vital to have a strong and stable internet connection. Downloading a heavy file like Monterey and installing it takes atleast an hour or two at the minimum.
During this process, your internet connection must remain stable and at high speed.

If that’s not the case and your network keeps dropping every now and then, your Mac will definitely interrupt the downloading process.
To rule that your internet connection is not the reason, do the following:
Step 1: Turn off Wi-Fi on your Mac.
Step 2: Then restart your Mac.
Step 3: After that, turn on Wi-Fi.
Step 4: Furthermore, now check if your Mac can download the update.
However, if the problem persists, change the Wi-Fi network as it can be possible that the Wi-Fi network is an issue. For example, you can connect your Mac to an Ethernet and then download the update.
macOS Monterey Update Fail Method 2: Remove Software Update Plist File
Step 1: Go to Finder on your Mac and tap on Go in the menu bar.
Step 2: Under the Go menu section, select Go to folder.
Step 3: In the Go to folder, type ~/Library/Preferences/ and click on Go.
Step 4: Mac will present you with a list of files. Here you have to scroll down and find com.apple.SoftwareUpdate.plist and delete it by dragging it to trash.
Step 5: Furthermore, restart your Mac.
Now when you try to update, Monterey should download on your Mac without any problem. However, if it does not, you can try the next solution.
Also Read: Apple To Replace Touch Bar In MacBook Pro With Apple Pencil Dock
macOS Monterey Update Fail Method 3: Make Space
Downloading a heavy upgrade requires enough free space. If it doesn’t fit the criteria, your Mac is more likely to display the message that it cannot update Monterey. To do that do the following:
Step 1: First, click the Apple icon at the top-left corner of the screen.
Step 2: Then select ‘About This Mac’ under the Apple Menu.
Step 3: Now select Storage Tab to see how much space is being used and how much is free.
Step 4: If your Mac does not have enough space to download the update, delete all unwanted files and apps from your Mac to free up space.
Step 5: Then restart your Mac.
Step 6: Now, try to download the update.
However, if you are still getting the update failed error, then maybe storage is not the issue.
macOS Monterey Update Fail Method 4: Update Mac In Safe Mode
If you are using a Mac Intel Processor, do the following.
Step 1: First, turn off your Mac via Apple Menu and click on Shut Down.
Step 2: Then wait for about ten seconds, or press the Power button or Touch ID.
Step 3: After pressing the Power button/Touch ID, immediately hold down the Shift key until the login window appears.
While holding the Shift key, the Apple logo will appear. But don’t leave the Shift key when you see the Apple logo. Instead, keep holding it until you see the login window.
Step 4: Then, enter your login details. If your Mac is encrypted with File Vault, you will be asked to log in twice.
Step 5: Now, you can download the update without any problem.
If you are using a Mac with Apple Silicon:
Step 1: First, turn off your Mac via Apple Menu.
Step 2: After that, wait for about ten seconds, and then hold down the Power button/Touch ID until the startup options window appears.
Step 3: Now, you can see the available startup disks and options. Here select your startup disk.
Step 4: Then hold down the Shift key and click Continue.
Step 5: After that, click Continue in Safe Mode while holding the Shift key.
Step 6: Now, release the Shift key and wait until you see the login window.
Step 7: Then, enter your login credentials.
Step 8: Now download the update and check if any issues occur.
To get out of the safe more restart your Mac via the Apple menu and press restart.
Must Read: How To Install macOS Monterey On Unsupported Mac?
macOS Monterey Update Fail Method 5: Reset PRAM/NVRAM
Step 1: First, turn off your Mac via the Apple menu and click on Shut Down.
Step 2: Then wait for a few seconds, and press the Power button/Touch ID to turn on your Mac.
Step 3: After pressing the Power button/Touch ID, immediately hold down the Option + Command + P + R keys simultaneously until you hear the startup sound for the second time.
Moreover, if you are using a T2 security chip with your Mac, hold down the keys until the Apple logo appears and disappears for the second time.
Step 4: Then wait until your Mac restarts. Sometimes your Mac may take up to fifteen minutes to restart.
macOS Monterey Update Fail Method 6: Fix Disk Errors In Recovery Mode
If you are using an Intel-based Mac:
Step 1: First, shut down your Mac, then press the Power button/Touch ID to turn it on.
Step 2: After pressing the Power button/Touch ID, immediately hold down the Control + R keys at the same time until the Apple logo appears.
Step 3: Then wait for some time. Furthermore, the macOS utilities window will appear with four options.
Step 4: Here, select ‘Disk Utility’ and then click “Continue.”
Step 5: Now select your startup Disk (Macintosh HD) for which you want to fix errors.
Step 6: Then click on ‘First Aid.’
Step 7: After that, select “Run” in the pop-up box. Now your Mac will check for disk errors and wait until the process is finished.
Step 8: Then click Done and close Disk Utility.
Step 9: Now, restart your Mac via the Apple menu and tap on Restart.
If you are using a Mac with Apple Silicon
Step 1: First, shut down your Mac.
Step 2: Hold down the Power button/Touch ID until the startup options window appear.
Step 3: Here, select Options and then click on Continue.
Step 4: Wait for a few seconds, and then the macOS utilities window will appear with four options.
Step 5: Select disk utility and then click on Continue.
Step 6: Then follow the on-screen instructions for an Intel-based Mac, which I have described before.
Should Read: Apple MacBook Pro: M1 Pro And M1 Max Explained
Method 7: Install Apple SSD And Get A DFU
A lot of MacBook Pro users are receiving a specific message that says MacOS a required firmware update could not be installed. Compatible internal storage is needed in order to update.

Keep in mind they are getting this message after they have tried all the above methods I have discussed in this blog post. Whether trying to free up space or booting in your Mac in safe mode, or even after an SMC reset. Moreover, many have also tried to use a bootable USB installer, after which this error message pops up.
In that case, I have a solution for that too. First, all you have to do is install an internal Apple SSD with an NVMe drive to update the firmware and operating system boot loader. Secondly, you can also try to install Monterey in DFU mode.
Conclusion
To install the Apple SSD, you should contact your nearest Apple customer care center. It is best to let the professionals take care of the complicated process. Moreover, they can decide better depending on the model of your Mac if you need an internal SSD or install from the device firmware update.
Read: How To Fix Mac Keeps Restarting After Big Sur Update?
Решение простое, но совсем не очевидное.

В Сети появляется всё больше жалоб от пользователей Mac с процессорами M1, M1 Pro и M1 Pro Max, которые не могут обновиться до новой версии macOS Monterey 12.1. Предложение обновиться просто не появляется при переходе в раздел «Об этом Mac» → «Обновление ПО».
Загрузка инсталлятора Monterey из App Store тоже помогает далеко не всем: сразу несколько пользователей жалуются в Twitter, что загрузка застревает на одной и той же отметке «осталось 52 минуты».
Apple пока не предложила решение этой проблемы. Изначально считалось, что для обновления можно только перевести Mac в режим восстановления и переустановить систему. В этом режиме компьютер автоматически скачает самую новую версию ОС, но после перезагрузки пользователю придётся восстанавливать свои данные.
Тем временем пользователи нашли необычное, но рабочее решение.
- Откройте «Системные настройки» → «Обновление ПО». Убедитесь, что предложения обновиться до macOS 12.1 нет, и оставьте это окно открытым.
- В списке приложений найдите «Утилиты» → «Мониторинг системы». Откройте приложение.
- В меню «Вид» выберите режим отображения «Все процессы».
- В поиске введите com.apple.NRD.UpdateBrainService. Если такого варианта нет, проверьте com.apple.MobileSoftwareUpdate.UpdateBrainService. Дважды кликните на найденный процесс и нажмите «Завершить» в появившемся окне.
- После этого в «Обновление ПО» должна появиться новая версия. Нажмите «Обновить сейчас».
- Если при загрузке обновления произойдёт сбой, снова завершите процесс из шага 4, и проблема должна уйти.
Если этот способ не поможет, остаётся только переустановка системы. Впрочем, вы также можете подождать выхода следующей версии — велики шансы, что к этому моменту проблему уже устранят.