| Номер ошибки: | Ошибка 2753 | |
| Название ошибки: | Java Runtime Environment Error 2753 | |
| Описание ошибки: | Error 2753 regutils.dll. | |
| Разработчик: | Oracle Corporation | |
| Программное обеспечение: | Java Runtime Environment | |
| Относится к: | Windows XP, Vista, 7, 8, 10, 11 |
Фон «Java Runtime Environment Error 2753»
«Java Runtime Environment Error 2753» часто называется ошибкой во время выполнения (ошибка). Программисты работают через различные уровни отладки, пытаясь убедиться, что Java Runtime Environment как можно ближе к безошибочным. К сожалению, инженеры являются людьми и часто могут делать ошибки во время тестирования, отсутствует ошибка 2753.
После установки программного обеспечения может появиться сообщение об ошибке «Error 2753 regutils.dll.». После возникновения ошибки 2753 пользователь программного обеспечения имеет возможность сообщить разработчику об этой проблеме. Разработчик сможет исправить свой исходный код и выпустить обновление на рынке. Следовательно, разработчик будет использовать пакет обновления Java Runtime Environment для устранения ошибки 2753 и любых других сообщений об ошибках.
Как триггеры Runtime Error 2753 и что это такое?
Вполне вероятно, что при загрузке Java Runtime Environment вы столкнетесь с «Java Runtime Environment Error 2753». Три распространенные причины, по которым ошибки во время выполнения, такие как всплывающее окно ошибки 2753:
Ошибка 2753 Crash — это типичная ошибка «Java Runtime Environment Error 2753», которая приводит к полному завершению работы программы. Обычно это происходит, когда Java Runtime Environment не может обрабатывать предоставленный ввод или когда он не знает, что выводить.
Утечка памяти «Java Runtime Environment Error 2753» — Когда Java Runtime Environment обнаруживает утечку памяти, операционная система постепенно работает медленно, поскольку она истощает системные ресурсы. Есть некоторые потенциальные проблемы, которые могут быть причиной получения проблем во время выполнения, с неправильным кодированием, приводящим к бесконечным циклам.
Ошибка 2753 Logic Error — логическая ошибка возникает, когда Java Runtime Environment производит неправильный вывод из правильного ввода. Это видно, когда исходный код Oracle Corporation содержит недостаток в обработке данных.
Java Runtime Environment Error 2753 проблемы часто являются результатом отсутствия, удаления или случайного перемещения файла из исходного места установки Java Runtime Environment. Для устранения неполадок, связанных с файлом Oracle Corporation, большинство профессионалов ПК заменят файл на соответствующую версию. В качестве дополнительного шага по устранению неполадок мы настоятельно рекомендуем очистить все пути к неверным файлам и ссылки на расширения файлов Oracle Corporation, которые могут способствовать возникновению такого рода ошибок, связанных с Java Runtime Environment Error 2753.
Распространенные проблемы Java Runtime Environment Error 2753
Общие проблемы Java Runtime Environment Error 2753, возникающие с Java Runtime Environment:
- «Ошибка программы Java Runtime Environment Error 2753. «
- «Недопустимая программа Win32: Java Runtime Environment Error 2753»
- «Извините за неудобства — Java Runtime Environment Error 2753 имеет проблему. «
- «К сожалению, мы не можем найти Java Runtime Environment Error 2753. «
- «Java Runtime Environment Error 2753 не может быть найден. «
- «Ошибка запуска в приложении: Java Runtime Environment Error 2753. «
- «Java Runtime Environment Error 2753 не работает. «
- «Java Runtime Environment Error 2753 остановлен. «
- «Ошибка в пути к программному обеспечению: Java Runtime Environment Error 2753. «
Проблемы Java Runtime Environment Java Runtime Environment Error 2753 возникают при установке, во время работы программного обеспечения, связанного с Java Runtime Environment Error 2753, во время завершения работы или запуска или менее вероятно во время обновления операционной системы. При появлении ошибки Java Runtime Environment Error 2753 запишите вхождения для устранения неполадок Java Runtime Environment и чтобы HelpOracle Corporation найти причину.
Создатели Java Runtime Environment Error 2753 Трудности
Проблемы Java Runtime Environment и Java Runtime Environment Error 2753 возникают из отсутствующих или поврежденных файлов, недействительных записей реестра Windows и вредоносных инфекций.
В основном, осложнения Java Runtime Environment Error 2753 связаны с:
- Поврежденные ключи реестра Windows, связанные с Java Runtime Environment Error 2753 / Java Runtime Environment.
- Загрязненный вирусом и поврежденный Java Runtime Environment Error 2753.
- Другая программа злонамеренно или по ошибке удалила файлы, связанные с Java Runtime Environment Error 2753.
- Другое приложение, конфликтующее с Java Runtime Environment Error 2753 или другими общими ссылками.
- Java Runtime Environment/Java Runtime Environment Error 2753 поврежден от неполной загрузки или установки.
Продукт Solvusoft
Загрузка
WinThruster 2023 — Проверьте свой компьютер на наличие ошибок.
Совместима с Windows 2000, XP, Vista, 7, 8, 10 и 11
Установить необязательные продукты — WinThruster (Solvusoft) | Лицензия | Политика защиты личных сведений | Условия | Удаление
What is Error 2753?
Error 2753 is a kind of Runtime error that is found in the Microsoft Windows operating systems. The file can be found for Java. Java Error 2753 has a popularity rating of 1 / 10.
Errors
This tutorial contains information on Error 2753 or otherwise known as Java Error 2753. Errors such as Java Error 2753 indicate your machine has faulty hardware or software that should be fixed when possible. Below is information on how to repair Error 2753 and get your computer back to normal.
 Signs of Error 2753:
 Signs of Error 2753:
- When your computer freezes or locks up at random.
- When your computer crashes when you are running Java.
- If Java Error 2753 pops up and causes a program to shutdown or your computer to crash.
- Your computer is running slow, taking a long time to boot up, and you suspect Error 2753 by Java is the cause.
What Causes Runtime Errors Like Error 2753?
There are several causes of runtime errors like Java Error 2753, such as viruses, out of date drivers, missing files or folders, incomplete or poor installation, and registry errors. They can also occur due to an issue with the computer’s memory, which may often be due to a hardware problem. In some cases there was an issue installing Java and an error occurred.
How to Fix Java Error 2753
 How to Fix
 Follow the step by step instructions below to fix the Error 2753 problem. We recommend you do each in order. If you wish to skip these steps because they are too time consuming or you are not a computer expert, see our easier solution below.
Step 1 — Uninstall and Reinstall Java
If the Java Error 2753 is a result of using Java, you may want to try reinstalling it and see if the problem is fixed. Please follow these steps:
Windows XP
- Click “Start Menu”.
- Click “Control Panel”.
- Select the “Add or Remove” program icon.
- Find the Error 2753 associated program.
- Click the Change/Remove button on the right side.
- The uninstaller pop up will give you instructions. Click “okay” or “next” or “yes” until it is complete.
- Reinstall the software.
Windows 7 and Windows Vista
- Click “Start Menu”.
- Click “Control Panel”.
- Click “Uninstall a Program” which is under the “Programs” header.
- Find the Error 2753 associated program.
- Right click on it and select “Uninstall”.
- The uninstaller pop up will give you instructions. Click “okay” or “next” or “yes” until it is complete.
- Reinstall the software and run the program.
Windows 8, 8.1, and 10
- Click “Start Menu”.
- Click “Programs and Features”.
- Find the software that is linked to **insert file name**.
- Click Uninstall/Change.
- The uninstaller will pop up and give you instructions. Click “okay” and “next” until it is complete.
- Restart your computer.
- Reinstall the software and run the program.
Step 2 — Remove Registry Entry related to Error 2753
 WARNING: Do NOT edit the Windows Registry unless you absolutely know what you are doing. You may end up causing more trouble than you start with. Proceed at your OWN RISK.
- Create a backup of registry files.
- Click “Start”.
- Type regedit, select it, and grant permission in order to proceed.
- Click HKEY LOCAL MACHINE>>SOFTWARE>>Microsoft>>Windows>>Current Version>>Uninstall.
- Find the Java Error 2753 software from the list you wish to uninstall.
- Select the software and double click the UninstallString icon on the right side.
- Copy the highlighted text.
- Exit and go to the search field.
- Paste the data.
- Select Okay in order to uninstall the program.
- Reinstall the software.
Step 3 – Ensure Junk Isn’t Causing Java Error 2753
Any space that isn’t regularly cleaned out tends to accumulate junk. Your personal computer is no exception. Constant web browsing, installation of applications, and even browser thumbnail caches slow down your device and in the absence of adequate memory, can also trigger a Java Error 2753 error.
So how do you get around this problem?
- You can either use the Disk Cleanup Tool that comes baked into your Windows operating system.
- Or you can use a more specialized hard drive clean up solution that does a thorough job and flushes the most stubborn temporary files from your system.
Both solutions may take several minutes to complete the processing of your system data if you haven’t conducted a clean up in a while.
The browser caches are almost a lost cause because they tend to fill up quite rapidly, thanks to our constantly connected and on the go lifestyle.
Here’s how you can run the Window’s Disk Cleanup Tool, without performance issues or surprises.
- For Windows XP and Windows 7, the program can be ran from “Start” and from the “Command Prompt”.
- Click “Start”, go to All Programs > Accessories > System Tools, click Disk Cleanup. Next choose the type of files you wish to remove, click OK, followed by “Delete Files”.
- Open up the Command Prompt, type “c:\windows\cleanmgr.exe /d” for XP and “cleanmgr” for Windows 7. Finish by pressing “Enter”.
- For Windows 8 and Windows 8.1, the Disk Cleanup Tool can be accessed directly from “Settings”. Click “Control Panel” and then “Administrative Tools”. You can select the drive that you want to run the clean up on. Select the files you want to get rid of and then click “OK” and “Delete Files”.
- For Windows 10, the process is simplified further. Type Disk Cleanup directly in the search bar and press “Enter”. Choose the drive and then the files that you wish to wipe. Click “OK”, followed by “Delete Files”.
The progressive ease with which the Cleanup Tool can be used points to the growing importance of regularly deleting temporary files and its place in preventing Java Error 2753.
![]() PRO TIP:
PRO TIP:
Remember to run the Disk Cleanup as an administrator.
Step 4 – Fix Infections and Eliminate Malware in Your PC
 How do you gauge if your system is infected with a malware and virus?
Well, for one, you may find certain applications misbehaving.
And you may also see the occurrence of Error 2753.
Infections and malware are the result of:
- Browsing the Internet using open or unencrypted public Wi-Fi connections
- Downloading applications from unknown and untrustworthy sources
- Intentional planting of viruses in your home and office networks
But thankfully, their impact can be contained.
- Enter “safe mode” by pressing the F8 key repeatedly when your device is restarting. Choose “Safe Mode with Networking” from the Advanced Boot Options menu.
- Back up all the data in your device to a secure location. This is preferably a storage unit that is not connected to your existing network.
- Leave program files as is. They are where the infection generally spreads from and may have been compromised.
- Run a thorough full-system scan or check of an on-demand scanner. If you already have an antivirus or anti-malware program installed, let it do the heavy lifting.
- Restart your computer once the process has run its course.
- Lastly, change all your passwords and update your drivers and operating system.
![]() PRO TIP: Are you annoyed by the frequent updates to your antivirus program? Don’t be! These regular updates add new virus signatures to your software database for exponentially better protection.
PRO TIP: Are you annoyed by the frequent updates to your antivirus program? Don’t be! These regular updates add new virus signatures to your software database for exponentially better protection.
Step 5 – Return to the Past to Eliminate Error 2753
The steps outlined up until this point in the tutorial should have fixed Java Error 2753 error. But the process of tracking what has caused an error is a series of educated guesses. So in case the situation persists, move to Step 5.
Windows devices give users the ability to travel back in time and restore system settings to an uncorrupted, error free state.
This can be done through the convenient “System Restore” program. The best part of the process is the fact that using System Restore doesn’t affect your personal data. There is no need to take backups of new songs and pictures in your hard drive.
- Open “Control Panel” and click on “System & Security”.
- Choose the option “System”.
- To the left of the modal, click on “System Protection”.
- The System Properties window should pop-up. You’ll be able to see the option “System Restore”. Click on it.
- Go with “Recommended restore” for the path of least hassles and surprises.
- Choose a system restore point (by date) that will guarantee taking your device back to the time when Error 2753 hasn’t been triggered yet.
- Tap “Next” and wrap up by clicking “Finish”.
If you’re using Windows 7 OS, you can reach “System Restore” by following the path Start > All Programs > Accessories > System Tools.
Step 6 — Error 2753 Caused by Outdated Drivers
Updating a driver is not as common as updating your operating system or an application used to run front-end interface tasks.
Drivers are software snippets in charge of the different hardware units that keep your device functional.
So when you detect an Java Error 2753 error, updating your drivers may be a good bet. But it is time consuming and shouldn’t be viewed as a quick fix.
Here’s the step-by-step process you can go through to update drivers for Windows 8, Windows 8.1 and Windows 10.
- Check the site of your hardware maker for the latest versions of all the drivers you need. Download and extract them. We strongly advice going with original drivers. In most cases, they are available for free on the vendor website. Installing an incompatible driver causes more problems than it can ever fix.
- Open “Device Manager” from the Control Panel.
- Go through the various hardware component groupings and choose the ones you would like to update.
- On Windows 10 and Windows 8, right-click on the icon of the hardware you would like to update and click “Update Driver”.
- On Windows 7 and Vista, you right-click the hardware icon, choose “Properties”, navigate to the Driver panel, and then click “Update Driver”.
- Next you can let your device automatically search for the most compatible drivers, or you can choose to update the drivers from the versions you have on your hard drive. If you have an installer disk, then the latter should be your preferred course of action. The former may often get the driver selection incorrect.
- You may need to navigate a host of warnings from the Windows OS as you finalize the driver update. These include “Windows can’t verify that the driver is compatible” and “Windows can’t verify the publisher of this driver”. If you know that you have the right one in line, click “Yes”.
- Restart the system and hopefully the Java Error 2753 error should have been fixed.
Step 7 – Call the Windows System File Checker into Action
 By now the Java Error 2753 plaguing your device should have been fixed. But if you haven’t resolved the issue yet, you can explore the Windows File Checker option.
With the Windows File Checker, you can audit all the system files your device needs to operate, locate missing ones, and restore them.
Sound familiar? It is almost like “System Restore”, but not quite. The System Restore essentially takes you back in time to a supposedly perfect set up of system files. The File Checker is more exhaustive.
It identifies what is amiss and fills the gaps.
- First and foremost, open up an elevated command prompt.
- Next, if you are using Windows 8, 8.1 or 10, enter “DISM.exe /Online /Cleanup-image /Restorehealth” into the window and press Enter.
- The process of running the Deployment Image Servicing and Management (DISM) tool may take several minutes.
- Once it completes, type the following command into the prompt “sfc /scannow”.
- Your device will now go through all protected files and if it detects an anomaly, it will replace the compromised version with a cached version that resides at %WinDir%\System32\dllcache.
Step 8 – Is your RAM Corrupted? Find Out.
Is it possible? Can the memory sticks of your device trigger Error 2753?
It is unlikely – because the RAM chips have no moving parts and consume little power. But at this stage, if all else has failed, diagnosing your RAM may be a good move.
You can use the Windows Memory Diagnostics Tool to get the job done. Users who are on a Linux or Mac and are experiencing crashes can use memtest86.
- Open up your device and go straight to the “Control Panel”.
- Click on “Administrative Tools”.
- Choose “Windows Memory Diagnostic”.
- What this built-in option does is it burns an ISO image of your RAM and boots the computer from this image.
- The process takes a while to complete. Once it is done, the “Status” field at the bottom of the screen populates with the result of the diagnosis. If there are no issues with your RAM/memory, you’ll see “No problems have been detected”.
One drawback of the Windows Memory Diagnostic tool pertains to the number of passes it runs and the RAM segments it checks.
Memtest86 methodically goes over all the segments of your memory – irrespective of whether it is occupied or not.
But the Windows alternative only checks the occupied memory segments and may be ineffective in gauging the cause of the Java Error 2753 error.
Step 9 – Is your Hard Drive Corrupted? Find Out.
Your RAM or working memory isn’t the only culprit that may precipitate an Java Error 2753 error. The hard drive of your device also warrants close inspection.
The symptoms of hard drive error and corruption span:
- Frequent crashes and the Blue Screen of Death (BSoD).
- Performance issues like excessively slow responses.
- Errors like Error 2753.
Hard drives are definitely robust, but they don’t last forever.
There are three things that you can do to diagnose the health of your permanent memory.
- It is possible that your device may have a hard time reading your drive. This can be the cause of an Java Error 2753 error. You should eliminate this possibility by connecting your drive to another device and checking for the recurrence of the issue. If nothing happens, your drive health is okay.
- Collect S.M.A.R.T data by using the WMIC (Windows Management Instrumentation Command-line) in the command prompt. To do this, simply type “wmic” into the command prompt and press Enter. Next follow it up with “diskdrive get status”. The S.M.A.R.T status reading is a reliable indicator of the longevity of your drive.
- Fix what’s corrupt. Let’s assume you do find that all isn’t well with your hard drive. Before you invest in an expensive replacement, using Check Disk or chkdsk is worth a shot.
- Open the command prompt. Make sure you are in Admin mode.
- Type “chkdsk C: /F /X /R” and press “Enter”. “C” here is the drive letter and “R” recovers data, if possible, from the bad sectors.
- Allow the system to restart if the prompt shows up.
- And you should be done.
These steps can lead to the resolution you’re seeking. Otherwise the Java Error 2753 may appear again. If it does, move to Step 10.
Step 10 – Update Windows OS
 Like the software applications you use to render specific tasks on your device, the Operating System also requires periodic updates.
Yes, we’ve all heard the troubling stories.
Devices often develop problems post unfinished updates that do not go through. But these OS updates include important security patches. Not having them applied to your system leaves it vulnerable to viruses and malware.
And may also trigger Error 2753.
So here’s how Windows 7, Windows 8, Windows 8.1 and Windows 10 users can check for the latest updates and push them through:
- Click the “Start” button on the lower left-hand corner of your device.
- Type “Updates” in the search bar. There should be a “Windows Update” or “Check for Updates” option, based on the OS version you’re using.
- Click it. The system will let you know if any updates are available.
- You have the convenience of choosing the components of the update you’d like to push through. Always prioritize the security updates.
- Click “OK” followed by “Install Updates”.
Step 11 – Refresh the OS to Eliminate Persistent Java Error 2753 Error
“Windows Refresh” is a lifesaver.
For those of you who are still with us and nothing has worked to eliminate the Error 2753, until recently, a fresh install of Windows would have been the only option.
Not anymore.
The Windows Refresh is similar to reinstalling your Windows OS, but without touching your personal data. That’s hours of backup time saved in a jiffy.
Through the Refresh, all your system files become good as new. The only minor annoyance is the fact that any custom apps you’ve installed are gone and the system applications you had uninstalled are back.
Still, it is the best bet as the final step of this process.
- Enter the “Settings” of your PC and click on “Change Settings”.
- Click “Update and recovery” and then choose “Recovery”.
- Select “Keep my files”. This removes apps and settings, but lets your personal files live on.
- You’ll get some warning messages about the apps that will be uninstalled. If you’ve gone through a recent OS upgrade, the Refresh process makes it so that you can’t go back to your previous OS version – if you should ever feel the need to do it.
- Click the “Refresh” button.
Are you using an older version of Windows that doesn’t come with the power to “Refresh”?
Maybe it is time to start from scratch.
- Enter your BIOS set-up.
- This is where you need to change your computer’s boot order. Make it so that the boot happens not from the existing system files, but from the CD/DVD Drive.
- Place the original Windows disk in the CD/DVD drive.
- Turn on or restart the device.
- Choose where you’d like the system files to be installed.
- Your PC will restart several times as the process runs its course.
FAQ’s
Can I Fix Runtime Errors Myself?
You can solve Runtime Errors like Java Error 2753 on your own, however we only recommend this for folks who are a little more experienced than others with diagnosing and fixing computer errors. The right way to fix the error depends largely on the cause of the error, which may be a little hard to diagnose if you do not know much about computers. Also there is a danger of unintentionally causing additional problems.
Should I Bring My Computer to the Repair Shop if There are Runtime Errors Like Error 2753?
You can bring it to the repair shop but they will charge you a lot more than trying to fix it on your own or by using a specialized repair software. We would recommend trying some of the DIY ideas first such as diagnosing the problem and then working backwards from there. For example, if a specific program is causing it, try reinstalling the program. If that doesn’t work, try using a software to diagnose the errors on your system. As a last recourse, you can bring it to the repair shop.
What Do Runtime Errors Like Error 2753 Have to Do with the Windows Registry?
The Windows Registry is basically a collection of databases in MS Windows. The registry issues are usually the number one cause of runtime errors. The Registry may corrupt due to missing files or poor installation, leading to runtime errors. The problem can typically be solved by using a software designed to fix the Registry.
![]()
Start Download Now
Author:

Curtis Hansen has been using, fiddling with, and repairing computers ever since he was a little kid. He contributes to this website to help others solve their computer issues without having to buy a new one.
![]()
Загрузить PDF
![]()
Загрузить PDF
Внутренняя ошибка 2753 может иногда возникать на компьютерах под управлением Windows, когда пользователи пытаются установить определенные программы и приложения. Сообщение об ошибке связано с проблемами установщика Windows, которые можно исправить с помощью командной строки.
-

1
Проведите пальцем от правого края экрана, чтобы вызвать боковую панель и нажмите на значок “Поиск.”.
- Если вы используете мышь, отведите курсор в верхний правый угол экрана и нажмите «Поиск».
-
2
В строке поиска введите «cmd» и нажмите на ярлык “Командная строка.” На экране появится окно командной строки.[1]
-
3
В командной строке введите следующую команду: «Regsvr32.exe Vbscript.dll» без кавычек с учетом регистра.
-
4
Нажмите «Enter», чтобы выполнить команду. На экране появится окно с сообщением «Успешное выполнение DllRegisterServer в Vbscript.dll».
- Если это сообщение не появляется, введите команду повторно и нажмите «Enter».
-
5
Закройте окно командной строки и попробуйте переустановить программу, которая вызвала сообщение «Внутренняя ошибка 2753». Теперь программа должна установиться успешно без сообщения об ошибке.[2]
- Если после операций с командной строкой ошибка повторяется, переустановите систему Windows 8.
Реклама


-
1
Откройте меню «Пуск» и введите запрос «Командная строка» в поле поиска.
-
2
В списке результатов поиска нажмите на ярлык «Командная строка». На экране появится окно командной строки.[3]
-
3
В командной строке введите следующую команду: «Regsvr32.exe Vbscript.dll» без кавычек с учетом регистра.
-
4
Нажмите «Enter», чтобы выполнить команду. На экране появится окно с сообщением «Успешное выполнение DllRegisterServer в Vbscript.dll».
- Если это сообщение не появляется, введите команду повторно и нажмите «Enter».
-
5
Закройте окно командной строки и попробуйте переустановить программу, которая вызвала сообщение «Внутренняя ошибка 2753». Теперь программа должна установиться успешно без сообщения об ошибке.[4]
- Если после операций с командной строкой ошибка повторяется, переустановите систему Windows 7.
Реклама


-
1
Откройте меню «Пуск» и перейдите в раздел “Все программы.”
-
2
Выберите раздел «Стандартные» и нажмите на ярлык “Командная строка.” На экране появится окно командной строки.[5]
-
3
В командной строке введите следующую команду: «Regsvr32.exe Vbscript.dll» без кавычек с учетом регистра.
-
4
Нажмите «Enter», чтобы выполнить команду. На экране появится окно с сообщением «Успешное выполнение DllRegisterServer в Vbscript.dll»
- Если это сообщение не появляется, введите команду повторно и нажмите «Enter».
-
5
Закройте окно командной строки и попробуйте переустановить программу, которая вызвала сообщение «Внутренняя ошибка 2753». Теперь программа должна установиться успешно без сообщения об ошибке.
- Если после операций с командной строкой ошибка повторяется, переустановите систему Windows Vista.
Реклама


Советы
- Сторонние вредоносные программы могут повредить установщик Windows и тем самым вызвать сообщение о внутренней ошибке 2753. Чтобы защитить компьютер от атак вредоносных приложений, следите за тем, чтобы в вашей системе была установлена актуальная версия антивирусной программы.
- В некоторых случаях внутренняя ошибка 2753 может возникать в результате исполнения устаревшей версии установщика Windows. Если ваш компьютер не настроен на автоматическое скачивание и установку обновлений от Microsoft, скачайте последнюю версию установщика Windows по адресу: http://www.microsoft.com/ru-ru/download/details.aspx?id=25
Реклама
Об этой статье
Эту страницу просматривали 20 015 раз.
Была ли эта статья полезной?
Ошибка 2753, файл не помечен для установки, обычно встречается, когда пользователь пытается установить или удалить определенные приложения. В большинстве случаев об ошибках сообщается в приложениях Adobe (Illustrator, Shockwave, Flash Player и т. Д.), Но также есть много сообщений о случаях с Corel Draw и Pinnacle Studio.
После изучения проблемы и изучения различных сценариев, в которых произошла ошибка 2753, мы создали список с потенциальными факторами, которые могут вызвать проблему:
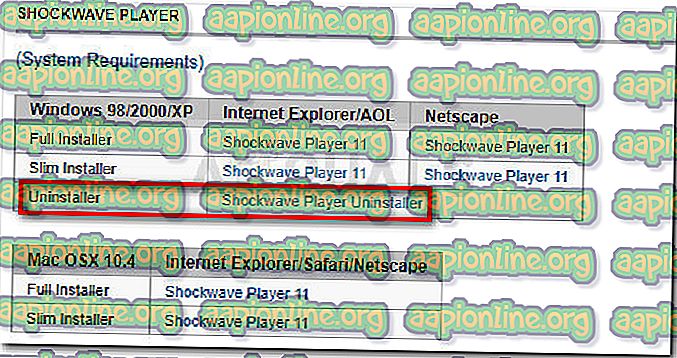
- Adobe Shockwave установлен неправильно — эта ошибка может возникнуть, если установка Showckwave была остановлена в середине процесса установки. В этом случае решение состоит в том, чтобы использовать деинсталлятор Shockwave. (Способ 1)
- Сообщение об ошибке также может быть вызвано поврежденной папкой InstallShield. Обычно это происходит при установке Corel и Pinnacle Studio. В этом случае решение состоит в том, чтобы удалить папку InstallShield и включить службу установщика Windows. (Способ 2)
Как исправить ошибку 2753, файл не помечен для установки проблемы
Если вы ищете исправление, которое позволит вам обойти эту конкретную ошибку, эта статья предоставит вам список шагов по устранению неполадок. Ниже у вас есть набор методов, которые будут применяться к различным сценариям, которые будут вызывать ошибку 2753: файл не помечен для установки .
Приведенные ниже методы были подтверждены для работы пользователями, борющимися с сообщениями об ошибках того же самого типа. Чтобы обеспечить наилучшие результаты, начните с первого метода (если он применим) и следуйте остальным, пока не наткнетесь на исправление, эффективное для решения проблемы.
Метод 1: Переустановите Shockwave правильно
Ошибка 2753 обычно возникает, когда пользователь пытается использовать Adobe Shockwave после того, как он был неправильно установлен. Также сообщается, что проблема возникает, когда пользователь снова пытается установить Shockwave со страницы официального скачивания.
Примечание. Имейте в виду, что этот метод работает только с более старыми версиями Windows (Windows XP, Windows 7 и Windows 8.1).
Другие пользователи в аналогичной ситуации сообщили, что проблема была исправлена после того, как они использовали программу удаления Shockwave, чтобы удалить любой оставшийся компонент, а затем правильно переустановить его. Вот краткое руководство по правильному удалению и повторной установке shockwave, чтобы обойти ошибку 2753:
- Посетите эту официальную ссылку Adobe ( здесь ). Затем прокрутите вниз до Shockwave player и загрузите Uninstaller
- Откройте файл sw_uninstaller.exe и завершите удаление Shockwave, следуя инструкциям на экране.
- После завершения удаления перезагрузите компьютер.
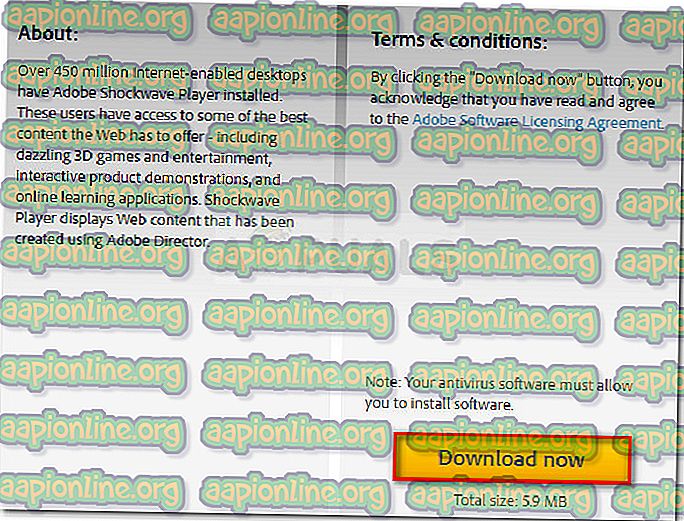
- При следующем запуске перейдите по этой ссылке ( здесь ) и загрузите последнюю доступную версию Adobe Shockwave, нажав кнопку « Загрузить сейчас» .
- После установки Shockwave перезагрузите компьютер снова. При следующем запуске вы можете проверить, правильно ли работает Shockwave Player, используя эту ссылку ( здесь ).
Если проблема была вызвана прерванной установкой Shockwave, вы больше не должны сталкиваться с ошибкой 2753 . Однако, если этот метод неприменим или вы столкнулись с другой проблемой, перейдите к следующему методу ниже.
Способ 2: восстановление поврежденной папки InstallShield (если применимо)
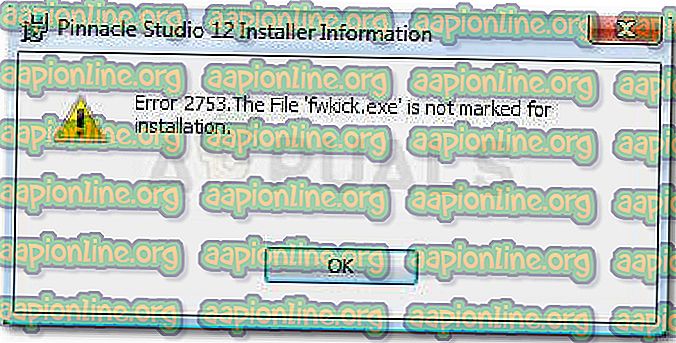
Пару пользователей, которые столкнулись с ошибкой 2753, файл не помечен для проблемы установки при попытке установить Corel Draw или аналогичную программу из того же пакета Pinnacle Studio, удалось решить проблему после устранения повреждения, вызванного папкой InstallShield,
Вот краткий обзор шагов, необходимых для решения проблемы и завершения установки без ошибки 2753: файл не помечен для ошибки установки :
- Сразу после появления ошибки закройте окно с сообщением об ошибке и перейдите в одно из следующих мест: C: \ Program Files \ Pinnacle или C: \ Program Files (x86) \ Pinnacle .
- Удалите Studio12 или Studio14, в зависимости от того, какую версию вы пытаетесь установить.
- Затем перейдите в C: \ Program Files \ Common Files и удалите папку с именем InstallShield .
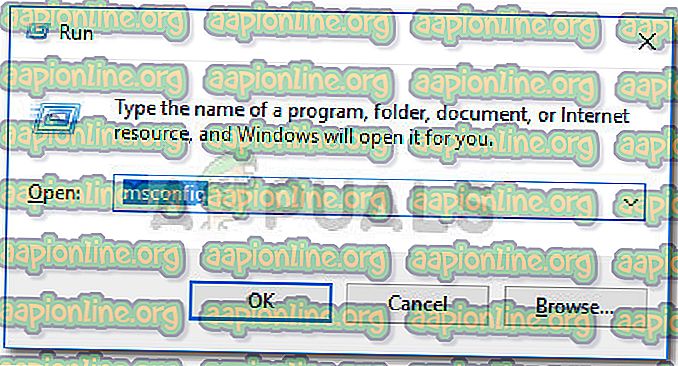
- Затем нажмите клавиши Windows + R, чтобы открыть диалоговое окно «Выполнить». Затем введите « msconfig » и нажмите Enter, чтобы открыть окно « Конфигурация системы» . Диалог запуска: msconfig
- В окне « Конфигурация системы» перейдите на вкладку «Службы» и убедитесь, что служба установщика Windows включена. Если он отключен, включите его, отметив флажок, связанный с ним. Убедитесь, что служба установщика Windows включена
- Когда служба установщика Windows будет включена, нажмите «Применить», чтобы сохранить изменения, а затем перезагрузите компьютер.
- При следующем запуске у вас не должно возникнуть проблем при установке Studio или определенного приложения из пакета.
 Диалог запуска: msconfig
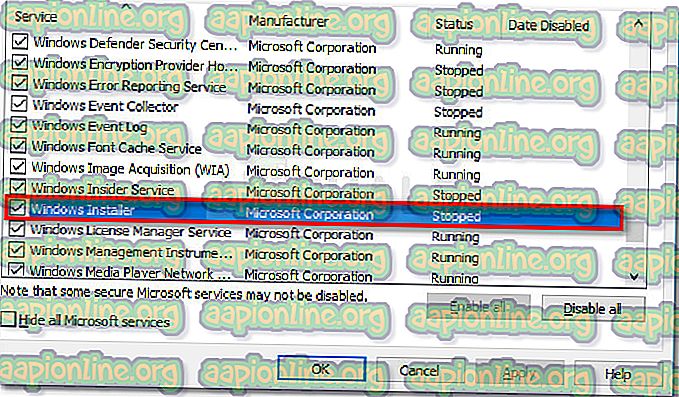 Убедитесь, что служба установщика Windows включена
Способ 3: устранение ошибки обновления ArcGIS Desktop
Если вы пытаетесь обновить программное обеспечение ArcGIS for Desktop, и ошибка 2753, которую файл не помечает как ошибка установки, не позволяет завершить процесс, существует процедура, позволяющая обойти проблему.
Оказывается, ошибка вызвана неполным удалением предыдущей версии ArcGIS for Desktop. Если это произойдет, он оставит после себя определенные файлы и ключи реестра, которые не могут быть заменены более новой версией ArcGIS.
Другим пользователям в аналогичной ситуации удалось решить проблему с помощью простого, но эффективного обходного пути. Вот что вам нужно сделать:
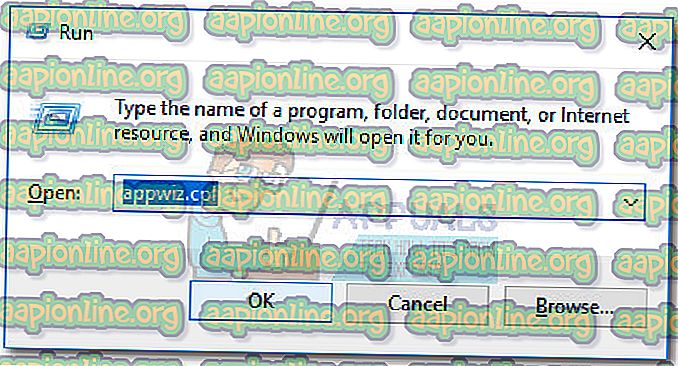
- Нажмите клавишу Windows + R, чтобы открыть диалоговое окно «Выполнить». Затем введите « appwiz.cpl » и нажмите Enter, чтобы открыть « Программы и компоненты» . Диалог запуска: appwiz.cpl
- В разделе « Программы и компоненты» найдите и удалите текущую версию ArcGIS, которую вы установили. Если у вас есть дополнительные продукты ArcGIS, удалите их.
- После удаления всех продуктов ArcGIS перейдите в C: / Program files (X86) / Common Files и удалите папку ArcGIS .
- Нажмите клавишу Windows + R, чтобы открыть другое диалоговое окно «Выполнить». На этот раз введите « regedit » и нажмите Enter, чтобы открыть утилиту редактора реестра . По запросу UAC (Контроль учетных записей) выберите Да, чтобы предоставить административные привилегии. Диалог запуска: regedit
- Используя левую панель редактора реестра, перейдите к следующему разделу реестра:
HKEY_CURRENT_USER \ Программное обеспечение \ ESRI
- Щелкните правой кнопкой мыши на ключе ESRI и выберите « Переименовать» . Переименуйте ключ ESRI_old и сохраните изменения, нажав Enter .
- Закройте редактор реестра и перезагрузите компьютер.
- При следующем запуске переустановите продукт ArcGIS. Вы должны быть в состоянии завершить установку, не беспокоясь из-за ошибки 2753, файл не помечен для ошибки установки .
 Диалог запуска: appwiz.cpl
Если этот метод неприменим, перейдите к следующему способу ниже.
Способ 4: устранение неудачного обновления Adobe Flash Player (если применимо)
Ошибка 2753: файл не помечен для установки, ошибка также встречается при определенных сценариях, когда пользователь пытается выполнить обновление до новейшего Flash Player.
Несколько пользователей сообщили об успешном решении проблемы путем удаления нескольких разделов реестра установщика. Вот краткое руководство по удалению двух ключей установщика, ответственных за создание этой проблемы:
- Нажмите клавишу Windows + R, чтобы открыть диалоговое окно « Выполнить ». Затем введите «regedit» и нажмите Enter, чтобы открыть редактор реестра. В ответ на запрос UAC (Контроль учетных записей) выберите Да, чтобы предоставить права администратора. Диалог запуска: regedit
- В редакторе реестра используйте левую панель, чтобы перейти к следующему местоположению
HKEY_CLASSES_ROOT \ Установщик \ Продукты \ 1924FBDFBDD7C5C41B8233A264FCF8AF
- Затем щелкните правой кнопкой мыши на ключе 1924FBDFBDD7C5C41B8233A264FCF8AF и нажмите «Удалить», чтобы избавиться от него.
- Затем снова используйте левую панель, чтобы перейти к следующему местоположению и удалить ключ 5100A42EF37C75B48BFDE58BD4E26958 :
HKEY_CLASSES_ROOT \ Установщик \ Продукты \ 5100A42EF37C75B48BFDE58BD4E26958
- Перезагрузите компьютер и посмотрите, будет ли обновление Flash Player успешным при следующем запуске.
Способ 5. Разрешение сбойной установки Acrobat DC
Если вы видите ошибку 2753, файл не помечен для ошибки установки при попытке установить Acrobat DC, возможно, это связано с несколькими старыми остаточными файлами, которые препятствуют копированию некоторых новых файлов.
Некоторым пользователям, имеющим дело с такой же проблемой, удалось решить проблему с помощью инструментов Adobe Reader и Acrobat Cleaner для удаления оставшихся файлов. Вот краткое руководство по обходу ошибки с помощью Adobe Reader и Acrobat Cleaner Tool :
- Перейдите по этой ссылке ( здесь ) и загрузите Adobe Reader и Acrobat Cleaner Tool .
- Откройте инструмент и следуйте инструкциям на экране, чтобы убедиться, что все оставшиеся файлы удалены.
- Перезагрузите компьютер.
- При следующем запуске переустановите Adobe DC по этой ссылке ( здесь ) и посмотрите, успешно ли завершена процедура.
Многократно возникают проблемы при переустановке java. Примеры ошибок:
Error 1723. There is a problem with this Windows Installer package. A DLL required for this install to complete could not be run. Contact your cupport personnel or package vendor.
Internal Error 2753. regutils.dll
Проблемы такого рода решаются удалением остатков java машины из реестра. Удалить можно batником или специальным фиксом от Kenneth Appel (www.whatthetech.com).
1) Текст bat-файла.
reg query hklm\software\classes\installer\products /f «java(tm) 6» /s | find «HKEY_LOCAL_MACHINE» > deljava.txt
for /f «tokens=* delims= » %%a in (deljava.txt) do reg delete %%a /f
reg delete «HKEY_LOCAL_MACHINE\SOFTWARE\JavaSoft\Java Runtime Environment» /f
reg delete «HKEY_LOCAL_MACHINE\SOFTWARE\wow6432node\JavaSoft\Java Runtime Environment» /f
2) Фикс от Kenneth Appel.(Скачать). Пароль на все архивы сайта tmie.ru