Регистрируясь может допустить ошибки, нужно что бы все допущеные пользователем ошибки выводились, ниже скрипт выводит только по одной
function output_errors($errors){
      $errors = implode("<br>",$errors);
    return '<ul><li>' . implode('</li><li>',$errors) . '</li></ul>';

    }
        if($_SERVER["REQUEST_METHOD"]=="POST"){
        if(empty($fn)){
        $errors[]= "заполните имя";
        }
        elseif(empty($ln)){
        $errors[]= "заполните фамилию";
        }elseif(empty($un)){
        $errors[]= "заполните логин";
        }elseif(empty($em)){
        $errors[]= "заполните email";
        }elseif(empty($pswd)){
        $errors[]= "пароль не должен быть пустым";
        }elseif(!filter_var($em, FILTER_VALIDATE_EMAIL)){
        $errors[]= "введите корректно email";
        }elseif(email_exists($em)==true){
        $errors[]= "$em используется";
        }elseif($em!=$em2){
        $errors[]= "email должен совпадать с введеным";
        }elseif(strlen($pswd)<6 or strlen($pswd)>32){
        $errors[]= "пароль должен быть больше 6 и меньше 32 символов";
        }elseif($pswd!=$pswd2){
        $errors[]= "пароли дожны совпадать";
        }elseif(user_exists($un)==true){
        $errors[]= "$un уже используется";
        }elseif(strpos($un,0x20)!=false){
        $errors[]= "логин не должен содержать пробелы";
        }elseif(strlen($un)<6 or strlen($un)>32){
        $errors[]= "Логин должен быть не меньше 6 символов и не больше 32";
        }elseif(strlen($fn)<3 or strlen($fn)>32){
        $errors[]= "имя должно быть не меньше 3 символов и не больше 32";
        }elseif(strlen($ln)<3 or strlen($ln)>32){
        $errors[]= "Фамилия должна быть не меньше 3 символов и не больше 32";
        }else{
         $query = array (
         'username'    => trim($_POST['username']),
         'password'    => $_POST['password'],
         'first_name'  => trim($_POST['fname']),
         'last_name'   => trim($_POST['lname']),
         'email'       => $_POST['email'],
         'email_code'  => md5($_POST['username']+ microtime()),
         'bio'         => 'write somesing'

         );

         register_user($query);// отправляет на ємейл сгенерированный код
        die("<h2>регистрация завершена, активируйтесь</h2>");

        }
         if(empty($errors)===false){
         echo output_errors($errors);//выводит ошибки
         }
        }
![]()
Deleted
3711 золотой знак5 серебряных знаков13 бронзовых знаков
задан 10 фев 2013 в 13:42
![]()
Уберите elseif, замените на else, в массив $errors кидайте ключ ошибки и её обозначение, потом смотрите массив, если он пустой, то рег., нет, то выводите сообщение об ошибке
if(empty($_POST['lname']))
{
 $error[1] = 'Введите логин';
}
if(empty($_POST['email']))
{
 $error[2] = 'Введите емайл';
}
и так далее
Потом:
if(!empty($error))
{
 foreach($error as $value)
 {
  echo 'Ошибка:'.$value;
 }
}
else
{
 // Заносим в базу
}
![]()
Deleted
3711 золотой знак5 серебряных знаков13 бронзовых знаков
ответ дан 10 фев 2013 в 13:50
![]()
angers777angers777
4621 золотой знак7 серебряных знаков20 бронзовых знаков
2
PHP can be easily embedded in HTML files and HTML codes can also be written in a PHP file. The thing that differentiates PHP from a client-side language like HTML is, PHP codes are executed on the server whereas HTML codes are directly rendered on the browser. To display error for invalid input with HTML and PHP.
Approach:
Display error on invalid error when
- input textbox is left empty.
- input is wrong.
PHP code: The following is the code for “form.php” which is used in the HTML code in the later part.
To show invalid input in PHP, set the name of the input textbox which is in HTML. All the fields are first checked for empty fields and then it is validated for correctness. If all fields are correct then it shows the success message. If the input given by the user is wrong then it will show a message for ” Invalid input!!”.
PHP
<?php
$nameError = "";
$emailError = "";
$passwordError = "";
$mobileError = "";
$success = "";
function validate_input($input) {
$input = trim($input);
$input = stripslashes($input);
$input = htmlspecialchars($input);
return $input;
}
if(isset($_POST['form_submit'])) {
$name = $_POST['name'];
$password = $_POST['password'];
$email = $_POST['user_email'];
$mobile = $_POST['mobile'];
if (empty($_POST["name"])) {
$nameError = "Name is required";
} else {
$name = validate_input($_POST["name"]);
if($name == 'chetan') {
$success= "Thank you ". $name.", ";
echo $success;
}
}
if (empty($_POST["email"])) {
$emailError = "Email is required";
} else {
$email = validate_input($_POST["email"]);
if($email == 'test@email.com') {
$success= $email." is correct";
echo $success;
}
}
if (empty($_POST["password"])) {
$passwordError = "Password is required";
} else {
$password = validate_input($_POST["password"]);
if($password == 'test@123') {
$success= $password." is correct";
echo $success;
}
}
if (empty($_POST["mobile"])) {
$mobileError = "Mobile is required";
} else {
$mobile = validate_input($_POST["mobile"]);
if($mobile == '123456789') {
$success= $mobile." is correct";
echo $success;
}
}
if(empty($success))
echo "Invalid input!!!";
}
?>
HTML code: The following code uses the above PHP “form.php” code.
HTML
<!DOCTYPE html>
<html lang="en" dir="ltr">
<head>
<meta charset="utf-8">
<title>Form</title>
</head>
<body>
<form action="form.php" method="POST">
<input type="text" name="name"
placeholder="Enter name">
<input type="password" name="password"
placeholder="Password">
<input type="email" name="user_email"
placeholder="yourname@gamil.com">
<input type="tel" name="mobile"
placeholder="Mobile no">
<button type="submit" name="form_submit">
Submit
</button>
</form>
</body>
</html>
Output:
- Incorrect input by user
Invalid input!!!
- Correct input by user
Thank you chetan, 123456789 is correct
Last Updated :
31 Dec, 2020
Like Article
Save Article
|
Medvedoc 4 / 4 / 1 Регистрация: 25.07.2011 Сообщений: 78 |
||||
|
1 |
||||
|
02.07.2017, 18:28. Показов 5501. Ответов 4 Метки нет (Все метки)
Подскажите пожалуйста, как ввести в само форме сообщение об ошибке если пользователь существует в базе, длина пароля больше заданного значения и т.д.? Но сейчас у меня проблема втом, что мне приходится дублировать форму два раза, чтобы вывести сообщения об ошибке. Как можно оставить одну форму и вывести в ней все ошибки?
0 |

|
Asiman 156 / 119 / 59 Регистрация: 27.04.2013 Сообщений: 351 |
||||
|
02.07.2017, 19:22 |
2 |
|||
|
РешениеКак-то так:
Добавлено через 1 минуту 0 |
 Сообщение было отмечено Medvedoc как решение
|
4 / 4 / 1 Регистрация: 25.07.2011 Сообщений: 78 |
|
|
02.07.2017, 19:41 [ТС] |
3 |
|
Asiman, спасибо большое =) все заработало. А то голову сломал уже Добавлено через 1 минуту 0 |
|
156 / 119 / 59 Регистрация: 27.04.2013 Сообщений: 351 |
|
|
02.07.2017, 19:44 |
4 |
|
Лучше сделать при фокусе на поле — убрать ошибку для этого поля и да, при этом использовать js (jquery) 0 |
|
4 / 4 / 1 Регистрация: 25.07.2011 Сообщений: 78 |
|
|
06.07.2017, 13:38 [ТС] |
5 |
|
Asiman, попробовал код, но странность какая-то. Даже если поля все правильно заполненны, снова перекидывает на форму и выдает ошибку о неправильности заполненных полях. Добавлено через 1 час 27 минут Добавлено через 21 секунду 0 |
(PHP 4, PHP 5, PHP 7, PHP
error_reporting — Sets which PHP errors are reported
Description
error_reporting(?int $error_level = null): int
Parameters
-
error_level -
The new error_reporting
level. It takes on either a bitmask, or named constants. Using named
constants is strongly encouraged to ensure compatibility for future
versions. As error levels are added, the range of integers increases,
so older integer-based error levels will not always behave as expected.The available error level constants and the actual
meanings of these error levels are described in the
predefined constants.
Return Values
Returns the old error_reporting
level or the current level if no error_level parameter is
given.
Changelog
| Version | Description |
|---|---|
| 8.0.0 |
error_level is nullable now.
|
Examples
Example #1 error_reporting() examples
<?php// Turn off all error reporting
error_reporting(0);// Report simple running errors
error_reporting(E_ERROR | E_WARNING | E_PARSE);// Reporting E_NOTICE can be good too (to report uninitialized
// variables or catch variable name misspellings ...)
error_reporting(E_ERROR | E_WARNING | E_PARSE | E_NOTICE);// Report all errors except E_NOTICE
error_reporting(E_ALL & ~E_NOTICE);// Report all PHP errors
error_reporting(E_ALL);// Report all PHP errors
error_reporting(-1);// Same as error_reporting(E_ALL);
ini_set('error_reporting', E_ALL);?>
Notes
Tip
Passing in the value -1 will show every possible error,
even when new levels and constants are added in future PHP versions. The
behavior is equivalent to passing E_ALL constant.
See Also
- The display_errors directive
- The html_errors directive
- The xmlrpc_errors directive
- ini_set() — Sets the value of a configuration option
info at hephoz dot de 
14 years ago
If you just see a blank page instead of an error reporting and you have no server access so you can't edit php configuration files like php.ini try this:
- create a new file in which you include the faulty script:
<?php
error_reporting(E_ALL);
ini_set("display_errors", 1);
include("file_with_errors.php");
?>
- execute this file instead of the faulty script file
now errors of your faulty script should be reported.
this works fine with me. hope it solves your problem as well!
dave at davidhbrown dot us 
17 years ago
The example of E_ALL ^ E_NOTICE is a 'bit' confusing for those of us not wholly conversant with bitwise operators.
If you wish to remove notices from the current level, whatever that unknown level might be, use & ~ instead:
<?php
//....
$errorlevel=error_reporting();
error_reporting($errorlevel & ~E_NOTICE);
//...code that generates notices
error_reporting($errorlevel);
//...
?>
^ is the xor (bit flipping) operator and would actually turn notices *on* if they were previously off (in the error level on its left). It works in the example because E_ALL is guaranteed to have the bit for E_NOTICE set, so when ^ flips that bit, it is in fact turned off. & ~ (and not) will always turn off the bits specified by the right-hand parameter, whether or not they were on or off.
jcastromail at yahoo dot es 
2 years ago
Under PHP 8.0, error_reporting() does not return 0 when then the code uses a @ character.
For example
<?php
$a
=$array[20]; // error_reporting() returns 0 in php <8 and 4437 in PHP>=8?>
Fernando Piancastelli 
18 years ago
The error_reporting() function won't be effective if your display_errors directive in php.ini is set to "Off", regardless of level reporting you set. I had to set
display_errors = On
error_reporting = ~E_ALL
to keep no error reporting as default, but be able to change error reporting level in my scripts.
I'm using PHP 4.3.9 and Apache 2.0.
lhenry at lhenry dot com 
3 years ago
In php7, what was generally a notice or a deprecated is now a warning : the same level of a mysql error … unacceptable for me.
I do have dozen of old projects and I surely d'ont want to define every variable which I eventually wrote 20y ago.
So two option: let php7 degrade my expensive SSDs writing Gb/hours or implement smthing like server level monitoring ( with auto_[pre-ap]pend_file in php.ini) and turn off E_WARNING
Custom overriding the level of php errors should be super handy and flexible …
ecervetti at orupaca dot fr 
14 years ago
It could save two minutes to someone:
E_ALL & ~E_NOTICE  integer value is 6135
chris at ocproducts dot com 
6 years ago
The error_reporting() function will return 0 if error suppression is currently active somewhere in the call tree (via the @ operator).
luisdev 
4 years ago
This article refers to these two reporting levels:
// Report all PHP errors (see changelog)
error_reporting(E_ALL);
// Report all PHP errors
error_reporting(-1);
What is the difference between those two levels?
Please update this article with a clear explanation of the difference and the possible use cases.
qeremy ! gmail 
7 years ago
If you want to see all errors in your local environment, you can set your project URL like "foo.com.local" locally and put that in bootstrap file.
<?php
if (substr($_SERVER['SERVER_NAME'], -6) == '.local') {
ini_set('display_errors', 1);
ini_set('error_reporting', E_ALL);
// or error_reporting(E_ALL);
}
?>
Rash 
8 years ago
If you are using the PHP development server, run from the command line via `php -S servername:port`, every single error/notice/warning will be reported in the command line itself, with file name, and line number, and stack trace.
So if you want to keep a log of all the errors even after page reloads (for help in debugging, maybe), running the PHP development server can be useful.
keithm at aoeex dot com 
12 years ago
Some E_STRICT errors seem to be thrown during the page's compilation process. This means they cannot be disabled by dynamically altering the error level at run time within that page.
The work-around for this was to rename the file and replace the original with a error_reporting() call and then a require() call.
Ex, rename index.php to index.inc.php, then re-create index.php as:
<?php
error_reporting(E_ALL & ~(E_STRICT|E_NOTICE));
require('index.inc.php');
?>
That allows you to alter the error reporting prior to the file being compiled.
I discovered this recently when I was given code from another development firm that triggered several E_STRICT errors and I wanted to disable E_STRICT on a per-page basis.
kevinson112 at yahoo dot com 
4 years ago
I had the problem that if there was an error, php would just give me a blank page. Any error at all forced a blank page instead of any output whatsoever, even though I made sure that I had error_reporting set to E_ALL, display_errors turned on, etc etc. But simply running the file in a different directory allowed it to show errors!
Turns out that the error_log file in the one directory was full (2.0 Gb). I erased the file and now errors are displayed normally. It might also help to turn error logging off.
https://techysupport.co/norton-tech-support/
j dot schriver at vindiou dot com 
22 years ago
error_reporting() has no effect if you have defined your own error handler with set_error_handler()
[Editor's Note: This is not quite accurate.
E_ERROR, E_PARSE, E_CORE_ERROR, E_CORE_WARNING, E_COMPILE_ERROR and E_COMPILE_WARNING error levels will be handled as per the error_reporting settings.
All other levels of errors will be passed to the custom error handler defined by set_error_handler().
Zeev Suraski suggests that a simple way to use the defined levels of error reporting with your custom error handlers is to add the following line to the top of your error handling function:
if (!($type & error_reporting())) return;
-zak@php.net]
adam at adamhahn dot com 
6 years ago
To expand upon the note by chris at ocproducts dot com. If you prepend @ to error_reporting(), the function will always return 0.
<?php
error_reporting(E_ALL);
var_dump(
error_reporting(), // value of E_ALL,
@error_reporting() // value is 0
);
?>
vdephily at bluemetrix dot com 
18 years ago
Note that E_NOTICE will warn you about uninitialized variables, but assigning a key/value pair counts as initialization, and will not trigger any error :
<?php
error_reporting(E_ALL);$foo = $bar; //notice : $bar uninitialized$bar['foo'] = 'hello'; // no notice, although $bar itself has never been initialized (with "$bar = array()" for example)$bar = array('foobar' => 'barfoo');
$foo = $bar['foobar'] // ok$foo = $bar['nope'] // notice : no such index
?>
fredrik at demomusic dot nu 
17 years ago
Remember that the error_reporting value is an integer, not a string ie "E_ALL & ~E_NOTICE".
This is very useful to remember when setting error_reporting levels in httpd.conf:
Use the table above or:
<?php
ini_set
("error_reporting", E_YOUR_ERROR_LEVEL);
echo
ini_get("error_reporting");?>
To get the appropriate integer for your error-level. Then use:
php_admin_value error_reporting YOUR_INT
in httpd.conf
I want to share this rather straightforward tip as it is rather annoying for new php users trying to understand why things are not working when the error-level is set to (int) "E_ALL" = 0...
Maybe the PHP-developers should make ie error_reporting("E_ALL"); output a E_NOTICE informative message about the mistake?
rojaro at gmail dot com 
12 years ago
To enable error reporting for *ALL* error messages including every error level (including E_STRICT, E_NOTICE etc.), simply use:
<?php error_reporting(-1); ?>
kc8yds at gmail dot com 
14 years ago
this is to show all errors for code that may be run on different versions
for php 5 it shows E_ALL^E_STRICT and for other versions just E_ALL
if anyone sees any problems with it please correct this post
<?php
ini_set
('error_reporting', version_compare(PHP_VERSION,5,'>=') && version_compare(PHP_VERSION,6,'<') ?E_ALL^E_STRICT:E_ALL);?>
Alex 
16 years ago
error_reporting() may give unexpected results if the @ error suppression directive is used.
<?php
@include 'config.php';
include 'foo.bar'; // non-existent file
?>
config.php
<?php
error_reporting(0);
?>
will throw an error level E_WARNING in relation to the non-existent file (depending of course on your configuration settings). If the suppressor is removed, this works as expected.
Alternatively using ini_set('display_errors', 0) in config.php will achieve the same result. This is contrary to the note above which says that the two instructions are equivalent.
misplacedme at gmail dot com 
13 years ago
I always code with E_ALL set.
After a couple of pages of
<?php
$username = (isset($_POST['username']) && !empty($_POST['username']))....
?>

I made this function to make things a little bit quicker.  Unset values passed by reference won't trigger a notice.
<?php
function test_ref(&$var,$test_function='',$negate=false) {
$stat = true;
if(!isset($var)) $stat = false;
if (!empty($test_function) && function_exists($test_function)){
$stat = $test_function($var);
$stat = ($negate) ? $stat^1 : $stat;
}
elseif($test_function == 'empty') {
$stat = empty($var);
$stat = ($negate) ? $stat^1 : $stat;
}
elseif (!function_exists($test_function)) {
$stat = false;
trigger_error("$test_function() is not a valid function");
}
$stat = ($stat) ? true : false;
return $stat;
}
$a = '';
$b = '15';test_ref($a,'empty',true); //False
test_ref($a,'is_int'); //False
test_ref($a,'is_numeric'); //False
test_ref($b,'empty',true); //true
test_ref($b,'is_int'); //False
test_ref($b,'is_numeric'); //false
test_ref($unset,'is_numeric'); //false
test_ref($b,'is_number'); //returns false, with an error.
?>
Daz Williams (The Northeast) 
14 years ago
Only display php errors to the developer...
<?phpif($_SERVER['REMOTE_ADDR']=="00.00.00.00")
{
ini_set('display_errors','On');
}
else
{
ini_set('display_errors','Off');
}
?>
Just replace 00.00.00.00 with your ip address.
forcemdt 
9 years ago
Php >5.4
Creating a Custom Error Handler
set_error_handler("customError",E_ALL);
function customError($errno, $errstr)
{
echo "<b>Error:</b> [$errno] $errstr<br>";
echo "Ending Script";
die();
}
huhiko334 at yandex dot ru 
4 years ago
If you get a weird mysql warnings like "Warning: mysql_query() : Your query requires a full tablescan...", don't look for error_reporting settings - it's set in php.ini.
You can turn it off with
ini_set("mysql.trace_mode","Off");
in your script
http://tinymy.link/mctct
teynon1 at gmail dot com 
11 years ago
It might be a good idea to include E_COMPILE_ERROR in error_reporting.
If you have a customer error handler that does not output warnings, you may get a white screen of death if a "require" fails.
Example:
<?php
error_reporting(E_ERROR | E_WARNING | E_PARSE);
function
myErrorHandler($errno, $errstr, $errfile, $errline) {
// Do something other than output message.
return true;
}$old_error_handler = set_error_handler("myErrorHandler");
require
"this file does not exist";
?>
To prevent this, simply include E_COMPILE_ERROR in the error_reporting.
<?php
error_reporting(E_ERROR | E_WARNING | E_PARSE | E_COMPILE_ERROR);
?>
DarkGool 
17 years ago
In phpinfo() error reporting level display like a bit (such as 4095)
Maybe it is a simply method to understand what a level set on your host
if you are not have access to php.ini file
<?php
$bit
= ini_get('error_reporting');
while (
$bit > 0) {
for(
$i = 0, $n = 0; $i <= $bit; $i = 1 * pow(2, $n), $n++) {$end = $i;
}
$res[] = $end;$bit = $bit - $end;
}
?>
In $res you will have all constants of error reporting
$res[]=int(16) // E_CORE_ERROR
$res[]=int(8) // E_NOTICE
...
&IT 
2 years ago
error_reporting(E_ALL);
if (!ini_get('display_errors')) {
    ini_set('display_errors', '1');
}
Введение
Формы используют для отправки какой-либо информации на сервер, которую необходимо как-то обработать.
Места использования форм:
- Создание регистрации и авторизации
- Создание блока комментариев
- Создание обращения в техническую поддержку (тикеты)
Создаём форму на HTML
Код формы необходимо помещать в <body> HTML документа.
<!DOCTYPE html>
<html lang="ru">
<head>
<meta charset="UTF-8">
<title>Формы</title>
</head>
  <body>
Здесь должна быть ваша форма.
   </body>
</html>
Я пропущу скелет документа дальше, чтобы было более понятно.
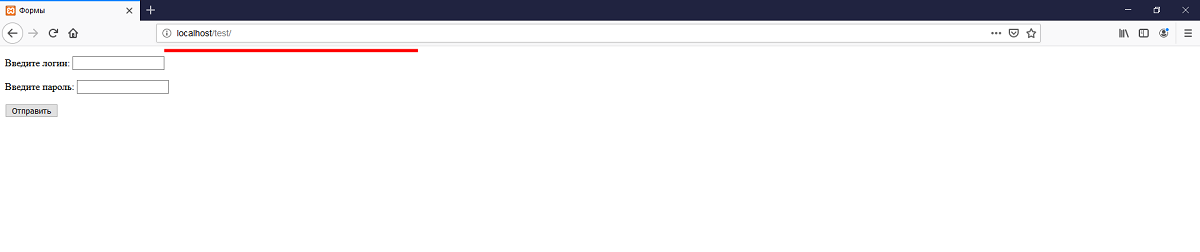
<form action="" method="post">
<p>Введите логин: <input type="text" name="login"></p>
<p>Введите пароль: <input type="password" name="pass"></p>
<p><input type="submit" value="Отправить" name="done"></p>
</form>
В атрибут action нужно указать обработчик формы (PHP-скрипт). Если поле пусто, значит, обработку формы выполнил тот скрипт, в котором расположена сама форма. В атрибут method нужно указать метод отправки формы (post или get). У каждого свои плюсы и минусы. Вкратце: post отправляет данные так, что пользователь не может их увидеть, а get — так, что они видны в URL-строке браузера.
Наглядный пример get:
 Наглядный пример post:
 Немного по PHP:
При отправке формы методом POST данные записываются в суперглобальный массив $_POST.
При отправке формы методом GET данные записываются в суперглобальный массив $_GET.
К суперглобальным массивам $_POST и $_GET нужно обращаться обычным способом (как вы делаете это и с обычными ассоциативными массивами) $массив[‘ключ’].
В форме мы сделали 3 <input>. Первые два — поле ввода логина и пароля. Третий — кнопка отправки формы.
Тег <input> имеет атрибут type=»». Для каждого случая указывают свой тип ввода. Допустим, text устанавливают для текста, submit — для отправки формы по атрибуту (action), а password — для пароля (чтобы он отображался звёздочками *).
Кроме того, тег <input> имеет атрибут name=»» и атрибут value=»». Value — стандартное значение элемента, name — предназначено для того, чтобы обработчик формы мог его идентифицировать.
Комьюнити теперь в Телеграм
Подпишитесь и будьте в курсе последних IT-новостей
Подписаться
Создаём обработчика формы
Мы перешли к самому интересному моменту статьи. Если мы обрабатываем форму на другой странице (action=»example.php»), то после нажатия кнопки подтверждения вас перекинет на указанную страницу.
Если action пуст, то страница с формой перезагрузится.
В самом верху скелета документа (перед <!DOCTYPE html>) открываем теги PHP и обрабатываем форму:
<?
// Если кнопка нажата, то выполняет тело условия
if (isset($_POST['done'])) {
echo 'кнопка обработчика была нажата!<br>';
// Если логин и пароль не пуст(есть значение), а также пароль не 123
if (!empty($_POST['login']) && $_POST['pass'] != 123 && !empty($_POST['pass'])) {
echo "Всё хорошо, все поля пройдены. ";
echo "Здесь должна быть ваша обработка формы. ";
echo "Занесение в базу данных, отправка сообщения и т.п.";
}
// Если логин пуст, тогда выводит сообщение
if ($_POST['login'] == '') {
echo 'Логин пуст!<br>';
}
// Если пароль популярный ||(или) пуст, тогда выводит сообщение
if ($_POST['pass'] == '123' || empty($_POST['pass'])) {
echo "Нельзя использовать популярные пароли. Придумайте свой!<br>";
}
}
?>
Теперь если форма не прошла проверку, то все данные стираются, и нужно их вводить заново.
Давайте доработаем форму, чтобы исправить это, а также изменим место вывода ошибок.
В самом верху PHP-тега заводим 2 новые переменные, которые по стандарту пусты:
$error_login = "";
$error_pas = "";
В проверке на пароль:
$error_pas .= "Нельзя использовать популярные пароли. Придумайте свой!<br>";
В проверке на логин:
$error_login .= 'Логин пуст!<br>';
.= означает то, что мы берём прошлую строку (пусто) и прибавляем к этому наше сообщение.
В форме HTML:
Добавляем после тега <input> вставку PHP (в данном случае <?= ?>), так как мы только выводим переменную. Суть проста: если ошибки в логине нет, тогда $error_login пуст, а следственно, ничего не выводится, иначе выводим там ошибку.
<p>Введите логин: <input type="text" name="login"><?=$error_login?></p>
<p>Введите пароль: <input type="password" name="pass"><?=$error_pas?></p>
Теперь доработаем форму, чтобы она сохраняла значения полей.
В самом начале добавляем 2 переменные:
$input_login ="";
$input_pass = "";
В начало проверки на ‘нажата ли кнопка отправки’ добавляем:
$input_login = $_POST['login'];
$input_pass = $_POST['pass'];
То есть мы заносим в переменные значения из суперглобального массива $_POST.
И немного изменяем нашу HTML-форму:
<form action="" method="post">
<p>Введите логин: <input type="text" name="login" value="<?=$input_login?>"><?=$error_login?></p>
<p>Введите пароль: <input type="password" name="pass" value="<?=$input_pass?>"><?=$error_pas?></p>
<p><input type="submit" value="Отправить" name="done"></p>
</form>
Добавляем тег value, чтобы указать стандартное значение поля. Теперь если выдаётся ошибка, то значения полей сохраняются, и пользователю нужно не заново их вводить, а только исправить ошибку.
Заключение
Как видите, создать хорошую форму на PHP не так уж и сложно. Проверки, которые я показал в этой статье, не обязательно должны быть. Вы можете придумывать свои (любые) проверки на поля ввода, используя PHP. Надеюсь, что вам понравилась моя статья, и вы выучили что-то новое.
Всем спасибо за внимание!
Итоговый код страницы с формой + обработчика:
https://pastebin.com/N9WegitB

PHP предлагает гибкие настройки вывода ошибок, среди которых функия error_reporting($level) – задает, какие ошибки PHP попадут в отчет, могут быть значения:
E_ALL– все ошибки,E_ERROR– критические ошибки,E_WARNING– предупреждения,E_PARSE– ошибки синтаксиса,E_NOTICE– замечания,E_CORE_ERROR– ошибки обработчика,E_CORE_WARNING– предупреждения обработчика,E_COMPILE_ERROR– ошибки компилятора,E_COMPILE_WARNING– предупреждения компилятора,E_USER_ERROR– ошибки пользователей,E_USER_WARNING– предупреждения пользователей,E_USER_NOTICE– уведомления пользователей.
1
Вывод ошибок в браузере
error_reporting(E_ALL);
ini_set('display_errors', 'On');
PHP
В htaccess
php_value error_reporting "E_ALL"
php_flag display_errors On
htaccess
На рабочем проекте вывод ошибок лучше сделать только у авторизированного пользователя или в крайнем случаи по IP.
2
Запись ошибок в лог файл
error_reporting(E_ALL);
ini_set('display_errors', 'Off');
ini_set('log_errors', 'On');
ini_set('error_log', $_SERVER['DOCUMENT_ROOT'] . '/logs/php-errors.log');
PHP
Файлы логов также не должны быть доступны из браузера, храните их в закрытой директории с файлом .htaccess:
Order Allow,Deny
Deny from all
htaccess
Или запретить доступ к файлам по расширению .log (заодно и другие системные файлы и исходники):
<FilesMatch ".(htaccess|htpasswd|bak|ini|log|sh|inc|config|psd|fla|ai)$">
Order Allow,Deny
Deny from all
</FilesMatch>
htaccess
3
Отправка ошибок на e-mail
Ошибки можно отправлять на е-mail разработчика, но приведенные методы не работает при критических ошибках.
Первый – register_shutdown_function() регистрирует функцию, которая выполнится при завершении работы скрипта, error_get_last() получает последнюю ошибку.
register_shutdown_function('error_alert');
function error_alert()
{
$error = error_get_last();
if (!empty($error)) {
mail('mail@example.com', 'Ошибка на сайте example.com', print_r($error, true));
}
}
PHP
Стоит учесть что оператор управления ошибками (знак @) работать в данном случаи не будет и письмо будет отправляться при каждой ошибке.
Второй метод использует «пользовательский обработчик ошибок», поэтому в браузер ошибки выводится не будут.
function error_alert($type, $message, $file, $line, $vars)
{
$error = array(
'type'    => $type,
'message' => $message,
'file'    => $file,
'line'    => $line
);
error_log(print_r($error, true), 1, 'mail@example.com', 'From: mail@example.com');
}
set_error_handler('error_alert');
PHP
4
Пользовательские ошибки
PHP позволяет разработчику самому объявлять ошибки, которые выведутся в браузере или в логе. Для создания ошибки используется функция trigger_error():
trigger_error('Пользовательская ошибка', E_USER_ERROR);PHP
Результат:
Fatal error: Пользовательская ошибка in /public_html/script.php on line 2E_USER_ERROR– критическая ошибка,E_USER_WARNING– не критическая,E_USER_NOTICE– сообщения которые не являются ошибками,E_USER_DEPRECATED– сообщения о устаревшем коде.
10.10.2019, обновлено 09.10.2021
Другие публикации

Список основных кодов состояния HTTP, без WebDAV.

Изображения нужно сжимать для ускорения скорости загрузки сайта, но как это сделать? На многих хостингах нет…

JSON (JavaScript Object Notation) – текстовый формат обмена данными, основанный на JavaScript, который представляет собой набор пар {ключ: значение}. Значение может быть массивом, числом, строкой и…

phpQuery – это удобный HTML парсер взявший за основу селекторы, фильтры и методы jQuery, которые позволяют…

AJAX позволяет отправить и получить данные без перезагрузки страницы. Например, делать проверку форм, подгружать контент и т.д. А функции JQuery значительно упрощают работу.

После регистрации в системе эквайринга Сбербанка и получив доступ к тестовой среде, можно приступить к интеграции с…
<?php
$nameError = "";
$emailError = "";
$passwordError = "";
$mobileError = "";
$success = "";
function validate_input($input) {
$input = trim($input);
$input = stripslashes($input);
$input = htmlspecialchars($input);
return $input;
}
if(isset($_POST['form_submit'])) {
$name = $_POST['name'];
$password = $_POST['password'];
$email = $_POST['user_email'];
$mobile = $_POST['mobile'];
if (empty($_POST["name"])) {
$nameError = "Name is required";
} else {
$name = validate_input($_POST["name"]);
if($name == 'chetan') {
$success= "Thank you ". $name.", ";
echo $success;
}
}
if (empty($_POST["email"])) {
$emailError = "Email is required";
} else {
$email = validate_input($_POST["email"]);
if($email == 'test@email.com') {
$success= $email." is correct";
echo $success;
}
}
if (empty($_POST["password"])) {
$passwordError = "Password is required";
} else {
$password = validate_input($_POST["password"]);
if($password == 'test@123') {
$success= $password." is correct";
echo $success;
}
}
if (empty($_POST["mobile"])) {
$mobileError = "Mobile is required";
} else {
$mobile = validate_input($_POST["mobile"]);
if($mobile == '123456789') {
$success= $mobile." is correct";
echo $success;
}
}
if(empty($success))
echo "Invalid input!!!";
}
?>


Как мы узнали в предыдущем руководстве, процесс сбора и отображения отправленных данных формы довольно прост. В этом руководстве вы узнаете, как реализовать на своем веб-сайте простую контактную форму, которая позволяет пользователям отправлять свои комментарии и отзывы по электронной почте. Мы будем использовать ту же PHP-функцию mail() для отправки писем.
Мы также собираемся реализовать некоторые базовые функции безопасности, такие как санитизация и валидация полей, чтобы пользователь не мог вставлять потенциально опасные данные, которые ставят под угрозу безопасность веб-сайта или могут нарушить работу приложения.
Ниже приводится наш универсальный PHP-скрипт, который выполняет следующие функции:
- Он попросит пользователя ввести свой комментарий о веб-сайте.
- Тот же скрипт отображает контактную форму и обрабатывает отправленные данные формы.
- Скрипт очищает и проверяет вводимые пользователем данные. Если какое-либо обязательное поле (отмеченное *) отсутствует или проверка не удалась из-за неправильных данных, скрипт повторно отображает форму с сообщением об ошибке для соответствующего поля формы.
- Скрипт запоминает, какие поля пользователь уже заполнил, и предварительно заполняет эти поля, когда форма повторно отображается из-за ошибки проверки.
- Если данные, представленные пользователем, приемлемы, и все идет хорошо, он отправит электронное письмо администратору веб-сайта и отобразит сообщение об успехе пользователю.
Введите следующий код в файл contact.php и сохраните его в корневом каталоге проекта:
<?php
// Функции для фильтрации введенных пользовательских данных
function filterName($field){
// Санитизация имени пользователя
$field = filter_var(trim($field), FILTER_SANITIZE_STRING);
// Валидация имени пользователя
if(filter_var($field, FILTER_VALIDATE_REGEXP, array("options"=>array("regexp"=>"/^[a-zA-Zs]+$/")))){
return $field;
} else{
return FALSE;
}
}
function filterEmail($field){
// Санитизация e-mail
$field = filter_var(trim($field), FILTER_SANITIZE_EMAIL);
// Валидация e-mail
if(filter_var($field, FILTER_VALIDATE_EMAIL)){
return $field;
} else{
return FALSE;
}
}
function filterString($field){
// Санитизация строки
$field = filter_var(trim($field), FILTER_SANITIZE_STRING);
if(!empty($field)){
return $field;
} else{
return FALSE;
}
}
// Определяем переменные и инициализирем с пустыми значениями
$nameErr = $emailErr = $messageErr = "";
$name = $email = $subject = $message = "";
// Обрабатываем данные формы при отправке формы
if($_SERVER["REQUEST_METHOD"] == "POST"){
// Валидация имени пользователя
if(empty($_POST["name"])){
$nameErr = "Пожалуйста, введите ваше имя.";
} else{
$name = filterName($_POST["name"]);
if($name == FALSE){
$nameErr = "Пожалуйста, введите верное имя.";
}
}
// Валидация e-mail
if(empty($_POST["email"])){
$emailErr = "Пожалуйста, введите адрес вашей электронной почты.";
} else{
$email = filterEmail($_POST["email"]);
if($email == FALSE){
$emailErr = "Пожалуйста, введите действительный адрес электронной почты.";
}
}
// Валидация темы сообщения
if(empty($_POST["subject"])){
$subject = "";
} else{
$subject = filterString($_POST["subject"]);
}
// Валидация комментария пользователя
if(empty($_POST["message"])){
$messageErr = "Пожалуйста, введите свой комментарий.";
} else{
$message = filterString($_POST["message"]);
if($message == FALSE){
$messageErr = "Пожалуйста, введите правильный комментарий.";
}
}
// Проверяем ошибки ввода перед отправкой электронной почты
if(empty($nameErr) && empty($emailErr) && empty($messageErr)){
// Электронный адрес получателя
$to = 'webmaster@example.com';
// Создаем заголовки письма
$headers = 'From: '. $email . "rn" .
'Reply-To: '. $email . "rn" .
'X-Mailer: PHP/' . phpversion();
// Отправляем электронную почту
if(mail($to, $subject, $message, $headers)){
echo '<p class="success">Ваше сообщение было отправлено успешно!</p>';
} else{
echo '<p class="error">Невозможно отправить электронное письмо. Пожалуйста, попробуйте еще раз!</p>';
}
}
}
?>
<!DOCTYPE html>
<html lang="en">
<head>
<meta charset="UTF-8">
<title>Contact Form</title>
<style type="text/css">
.error{ color: red; }
.success{ color: green; }
</style>
</head>
<body>
<h2>Связаться с нами</h2>
<p>Заполните эту форму, чтобы связаться с нами.</p>
<form action="contact.php" method="post">
<p>
<label for="inputName">Имя:<sup>*</sup></label>
<input type="text" name="name" id="inputName" value="<?php echo $name; ?>">
<span class="error"><?php echo $nameErr; ?></span>
</p>
<p>
<label for="inputEmail">Email:<sup>*</sup></label>
<input type="text" name="email" id="inputEmail" value="<?php echo $email; ?>">
<span class="error"><?php echo $emailErr; ?></span>
</p>
<p>
<label for="inputSubject">Тема:</label>
<input type="text" name="subject" id="inputSubject" value="<?php echo $subject; ?>">
</p>
<p>
<label for="inputComment">Сообщение:<sup>*</sup></label>
<textarea name="message" id="inputComment" rows="5" cols="30"><?php echo $message; ?></textarea>
<span class="error"><?php echo $messageErr; ?></span>
</p>
<input type="submit" value="Отправить">
<input type="reset" value="Очистить">
</form>
</body>
</html>Разберем этот код подробнее.
- Функция
filterName()(строка №-03) проверяет входное значение емени пользователя. Допустимое имя может содержать только буквы алфавита (a-z, A-Z). - Функция
filterEmail()(строка №-14) проверяет входное значение адреса электронной почты. - Функция
filterString()(строка № 25) только очищает входное значение, удаляя HTML-теги и специальные символы. Она не проверяет входящее значение. - Атрибут
action="contact.php"(строка № 111) внутри тега<form>указывает, что тот же файлcontact.phpотображает форму, а также обрабатывает данные формы. - Код PHP внутри атрибута value
<input>и<textarea>, например.<?php echo $name; ?>отображает предварительно заполненное значение, когда форма повторно отображается при ошибке проверки. - Код PHP внутри класса
.error, например.<span class="error"><?php echo $nameErr; ?></span>отображает ошибку для соответствующего поля.
Чтобы узнать больше о санитизации и валидации, ознакомьтесь со справочником по фильтрам PHP.
Вам необходимо настроить почтовый сервер на вашем компьютере, чтобы PHP-функция mail() работала. Если вы просто хотите реализовать проверку формы, вы можете заменить часть почты (строки с 81 по 94) своим собственным кодом.
Похожие посты
- 22 декабря, 2019
- 171
В этом руководстве мы узнаем, как загружать файлы на удаленный сервер с помощью простой HTML-формы и PHP. Вы можете загружать файлы любого типа, например изображения, видео, ZIP-файлы, документы Microsoft Office, PDF-файлы, а также исполняемые файлы и множество других типов файлов. Шаг 1. Создание HTML-формы для загрузки файла В следующем примере будет создана простая HTML-форма, которую…
- 18 декабря, 2019
- 923
Веб-браузер связывается с сервером, как правило, с помощью одного из двух HTTP-методов (протокола передачи гипертекста) — GET и POST. Оба метода передают информацию по-разному и имеют разные преимущества и недостатки, как описано ниже. PHP-метод GET В методе GET данные отправляются в виде параметров URL, которые обычно представляют собой строки пар имени и значения, разделенные амперсандами…
- 16 декабря, 2019
- 71
Обычно, когда движок PHP сталкивается с проблемой, препятствующей правильной работе скрипта, он генерирует сообщение об ошибке. Существует шестнадцать различных уровней ошибок, и каждый уровень представлен целым числом и связанной с ним константой. Вот список уровней ошибок: Название Значение Описание E_ERROR 1 Неустранимая ошибка времени выполнения от которой невозможно избавиться. Выполнение скрипта немедленно прекращается E_WARNING 2…
За последние 24 часа нас посетили 13567 программистов и 1266 роботов. Сейчас ищут 385 программистов …
-
- С нами с:
- 18 июл 2013
- Сообщения:
- 9
- Симпатии:
- 0
Всем привет — только начал ковырять php,
к примеру есть
header(‘Location: index.php’);
exit;
}
else
{
die(‘сообщение ошибки’);
}
}
else
{
die(‘сообщение ошибки’);
}
Вопрос — как указать где должно выводиться этот die так же встречал (print и echo) в веб странице? сейчас он переходит на новое окно с сожержаием этого die.
Спасибо -
- С нами с:
- 12 окт 2012
- Сообщения:
- 3.625
- Симпатии:
- 158
header(‘Location: index.php’); говорит браузеру о том что нужно перейти по указанному адресу
exit; прекращает выполнение скрипта
die(‘сообщение ошибки’); выводит сообщение в браузер и тут же прекращает дальнейшее выполнение скрипта.а если вы хотите выводить сообщения гдето в другом месте, то нужно сохранять их в какието переменные, и там, в нужном месте, выводить их на страницу. получается что die() и exit вам вообще использовать нельзя.
-
- С нами с:
- 18 июл 2013
- Сообщения:
- 9
- Симпатии:
- 0
спс за ответ, если я правильно понял то нужно где то так?
проверяем на наличие ошибок (например, длина логина и пароля)
$error = false;
$errort = »;if (strlen($login) < 2)
{
$error = true;
$errort .= ‘Длина логина должна быть не менее 2х символов.<br />’;
}
if (strlen($password) < 6)
{
$error = true;
$errort .= ‘Длина пароля должна быть не менее 6 символов.<br />’;
}
if (strlen($email) < 2)
{
$error = true;
$errort .= ‘Длина пароля должна быть не менее 2 символов.<br />’;
}// проверяем, если юзер в таблице с таким же логином
$query = «SELECT `id`
FROM `users`
WHERE `login`='{$login}’
LIMIT 1″;
$sql = mysql_query($query) or die(mysql_error());
if (mysql_num_rows($sql)==1)
{
$error = true;
$errort .= ‘Пользователь с таким логином уже существует в базе данных, введите другой.<br />’;
}
В данном скрипте &errort — это переменная, которую по идее я могу выводить в html в нужном мне месте используя ‘.$errrort.’ я прав или туплю?)Добавлено спустя 18 минут 56 секунд:
Ух ты — попробовал, работает)
Спс всем за внимание -
- С нами с:
- 12 окт 2012
- Сообщения:
- 3.625
- Симпатии:
- 158
правильно. если она заполнена, значит есть какаято ошибка, и о ней надо сказать пользователю, показав на странице.
сразу предостерегу. ваш запрос в БД подвержен SQL инъекции. почитайте об этом в нете. чтобы вылечить нужно использовать функции mysql_real_escape_string() или расширения mysqli или PDO(там есть механизм placeholdes). лучше сразу учитесь делать правильно, чем потом переучиваться
-
- С нами с:
- 18 июл 2013
- Сообщения:
- 9
- Симпатии:
- 0
почитаю про инъекции.
еще один вопрос:-
// генерируем соль и пароль
-
$hashed_password = md5(md5($password) . $salt);
-
`password`='{$hashed_password}’,
-
$sql = mysql_query($query) or die(mysql_error());
-
print ‘<h4>Поздравляем, Вы успешно зарегистрированы!</h4><a href=»login.php»>Авторизоваться</a>’;
-
print ‘<h4>Возникли следующие ошибки</h4>’ . $errort;
как в данной ситуации первое действие print автоматом послать на index.php, а при втором print выводить как переменную на текущей странице в указаном мной месе?
Добавлено спустя 44 минуты 24 секунды:
вопрос снят — я туплю. перефразирую мысль.-
header(‘Content-Type: text/html; charset=UTF-8’);
-
** Функция для генерации соли, используемоей в хешировании пароля
-
** возращает 3 случайных символа
-
function GenerateSalt($n=3)
-
$pattern = ‘1234567890abcdefghijklmnopqrstuvwxyz.,*_-=+’;
-
$counter = strlen($pattern)-1;
-
$key .= $pattern{rand(0,$counter)};
-
<!— ПОЛЕ1 как я понимаю тут основной вид страницы в html коде—>
-
<h3>Введи Ваши данные</h3>
-
<form action=»register.php» method=»post»>
-
<td><input type=»text» name=»login» /></td>
-
<td><input type=»password» name=»password» /></td>
-
<td><input type=»submit» value=»Зарегистрироваться» /></td>
-
// обрабатывае пришедшие данные функцией mysql_real_escape_string перед вставкой в таблицу БД
-
$login = (isset($_POST[‘login’])) ? mysql_real_escape_string($_POST[‘login’]) : »;
-
$password = (isset($_POST[‘password’])) ? mysql_real_escape_string($_POST[‘password’]) : »;
-
// проверяем на наличие ошибок (например, длина логина и пароля)
-
$errort .= ‘Длина логина должна быть не менее 2х символов.<br />’;
-
if (strlen($password) < 6)
-
$errort .= ‘Длина пароля должна быть не менее 6 символов.<br />’;
-
// проверяем, если юзер в таблице с таким же логином
-
$sql = mysql_query($query) or die(mysql_error());
-
if (mysql_num_rows($sql)==1)
-
$errort .= ‘Пользователь с таким логином уже существует в базе данных, введите другой.<br />’;
-
// если ошибок нет, то добавляем юзаре в таблицу
-
// генерируем соль и пароль
-
$hashed_password = md5(md5($password) . $salt);
-
`password`='{$hashed_password}’,
-
$sql = mysql_query($query) or die(mysql_error());
-
/* ПОЛЕ 2 если все прошло успешно то выводится эта фраза в новом окне*/
-
print ‘<h4>Поздравляем, Вы успешно зарегистрированы!</h4><a href=»login.php»>Авторизоваться</a>’;
-
/*ПОЛЕ3 если возникли ошибки то выводится эта фраза в новом окне*/
-
print ‘<h4>Возникли следующие ошибки</h4>’ . $errort;
Как я понимаю при загрузки данного скрипта страница отображается в ПОЛЕ1 после чего идет проверка на ошибки при регистрации и если ошибок нет то выводится ПОЛЕ2 в новом окне браузера и если ошибки есть то выводится ПОЛЕ3 опять же в новом окне браузера.
Вопрос — правильно ли выводить внешний вид страницы регистрации через ПОЛЕ1, и как сделать что бы действие ПОЛЕ2 отправляло сразу на index.php, а в случае ошибок ПОЛЕ3 не создавало новую страницу а вставляла данные об ошибках в уже имеющуюся страницу в ПОЛЕ1.
Если эта реализация не подходит для токого то как лучше ее реализовать. Спасибо.
crautcher Проблема с обработкой ошибочного заполнения формы. На данный момент имеется форма добавления объявления. Ситуация такая , если пользователь ошибся или не заполнил одну графу , а остальные правильно , открывается страница с сообщением о неверно заполненной графе и предлагается вернуться обратно и заполнить ее.
ОДНАКО , вот и наступает проблема. Все те поля ,которые были правильно заполнены оказываются пустыми. И приходится по новой заполнять их.
Помогите пожалуйста , кто нибудь((( за спасибо или за пиво)). Нужно применить сессии и чтобы при ошибке в той же форме рядом с «ошибочной» графой выводилось предупреждение об ошибке. Сам пробовал , не получается. Самоучка(((
Добавлено через 2 минуты
crautcher, Спасибо Вам огромное , буду пробовать. Просто никогда не применял сам сессии. Если что-то не получится я еще обращусь к Вам)) Но Надеюсь , что справлюсь. Еще раз , благодарю . Радости не будет предела.
Добавлено через 9 минут
![]()
Сообщение от crautcher

Затем выводи, где нужно $_SESSION[‘LastError’]
Это в форме я так понимаю ? Рядом с «ошибочным» полем ? Можете на одном примере показать ? К примеру графа «имя»
Welcome to a quick tutorial on how to show error messages in HTML forms. This is probably one of the major bugbears for some beginners, how do we handle and show error messages for HTML forms?
There are no fixed ways to show errors in HTML forms, but the common methods to display error messages are:
- Simply add checking attributes to the HTML form fields, and the browser will automatically show the errors. For example,
<input type="text" required> - Use Javascript to show custom error messages as the user types in the fields.
- Collectively show all error messages in a popup box when the user submits an invalid form.
- Show error messages below the invalid fields.
That covers the broad basics, let us walk through detailed examples in this guide – Read on!
ⓘ I have included a zip file with all the source code at the start of this tutorial, so you don’t have to copy-paste everything… Or if you just want to dive straight in.
TABLE OF CONTENTS
DOWNLOAD & NOTES

Firstly, here is the download link to the example code as promised.
QUICK NOTES
If you spot a bug, feel free to comment below. I try to answer short questions too, but it is one person versus the entire world… If you need answers urgently, please check out my list of websites to get help with programming.
EXAMPLE CODE DOWNLOAD
Click here to download all the example source code, I have released it under the MIT license, so feel free to build on top of it or use it in your own project.
DISPLAY ERROR MESSAGES

All right, let us now get into the various examples of displaying error messages in an HTML form.
EXAMPLE 1) DEFAULT ERROR DISPLAY
1-default.html
<form onsubmit="return false;">
<label for="fname">Name</label>
<input type="text" name="fname" id="fname" required minlength="2" maxlength="8">
<label for="fnumber">Number</label>
<input type="number" name="fnumber" id="fnumber" min="1" max="12">
<label for="fyes">Enter "Yes"</label>
<input type="text" name="fyes" id="fyes" required pattern="Yes">
<input type="submit" value="Go!">
</form>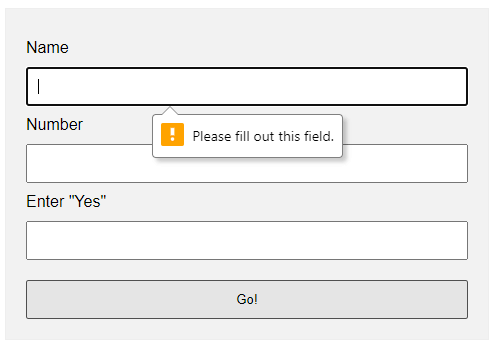 Oh no, displaying error messages is SO DIFFICULT! Not. Just add the form checking attributes to the fields:
requiredSelf-explanatory. A required field that cannot be left blank.min-length max-lengthThe minimum and maximum number of characters allowed.min maxFor number fields only, the minimum and maximum allowed values.patternThis field must match the custom pattern. Will leave a link in the extras section below if you want to learn more.
Yes, that’s all. The browser will do the rest of the magic.
EXAMPLE 2) SHOW ERRORS AS-YOU-TYPE
2-type.html
<!-- (A) HTML FORM -->
<form onsubmit="return false;">
<label for="fname">Name</label>
<input type="text" name="fname" id="fname" required minlength="2" maxlength="8">
<input type="submit" value="Go!">
</form>
<!-- (B) SET CUSTOM ERROR MESSAGE -->
<script>
var fname = document.getElementById("fname");
fname.addEventListener("input", () => {
if (fname.validity.tooLong || fname.validity.tooShort || fname.validity.valueMissing) {
fname.setCustomValidity("Name must be 2-8 characters.");
fname.reportValidity();
} else { fname.setCustomValidity(""); }
});
</script>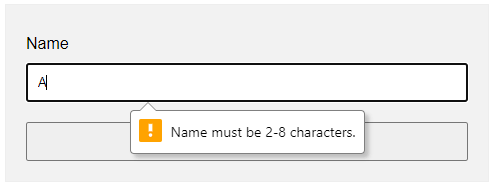 This one is a little naggy and requires some Javascript. A couple of functions and properties to take note of here:
document.getElementById("ID")Get element by ID. Captain Obvious.FIELD.addEventListener("input", FUNCTION)Run this function whenever the user types something in the field.FIELD.validity.tooLong FIELD.validity.tooShort FIELD.validity.valueMissingWe can actually target various invalid statuses and show different messages. Will leave a link in the extras section below to the full list.FIELD.setCustomValidity("MESSAGE")andFIELD.reportValidity()Show custom error message.
EXAMPLE 3) DISPLAY ERROR MESSAGES IN POPUP
3-alert.html
<!-- (A) HTML FORM -->
<form onsubmit="return check()" novalidate>
  <label for="fname">Name</label>
  <input type="text" name="fname" id="fname" required minlength="2" maxlength="8">

  <label for="fnumber">Number</label>
  <input type="number" name="fnumber" id="fnumber" required min="1" max="12">

  <input type="submit" value="Go!">
</form>

<!-- (B) FORM CHECK -->
<script>
function check () {
  // (B1) INIT
  var error = "", field = "";

  // (B2) NAME
  field = document.getElementById("fname");
  if (!field.checkValidity()) {
    error += "Name must be 2-4 characters\r\n";
  }

  // (B3) NUMBER
  field = document.getElementById("fnumber");
  if (!field.checkValidity()) {
    error += "Num must be between 1-12\r\n";
  }

  // (B4) RESULT
  if (error=="") { return true; }
  else {
    alert(error);
    return false;
  }
}
</script>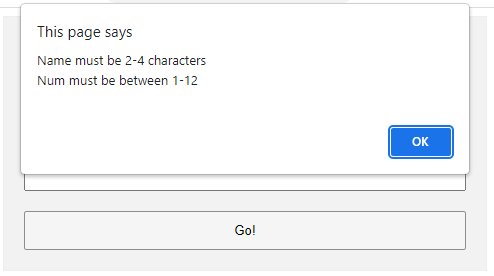
The less naggy method, where all the error messages are compiled into a single popup. Take note:
- A
novalidatehas been added to the<form>tag. This disables the default browser form checking, and we do our own in Javascript usingonsubmit="return check()". - The Javascript is pretty long-winded but straightforward.
- Use
var error = ""to collect all the error messages. - Fetch the field we want to check
field = document.getElementById("ID"). - Add a message if it is invalid
if (!field.checkValidity()) { error += "ERROR"; } - That’s all, repeat the check for all fields.
- Lastly, show the error message if not empty and don’t allow the form submission
if (error !="") { alert(error); return false; }
- Use
EXAMPLE 4) SHOW ERROR MESSAGE UNDER FIELD
4-below.html
<!-- (A) SOME SIMPLE ERROR STYLES -->
<style>
.err { background: #ffe6ee; border: 1px solid #b1395f; }
.emsg { color: #c12020; font-weight: bold; }
</style>
<!-- (B) HTML FORM -->
<form onsubmit="return check()" novalidate>
<label for="fname">Name</label>
<input type="text" name="fname" id="fname" required minlength="2" maxlength="8">
<div id="cname" class="emsg"></div>
<label for="fnumber">Number</label>
<input type="number" name="fnumber" id="fnumber" required min="1" max="12">
<div id="cnumber" class="emsg"></div>
<input type="submit" value="Go!">
</form>
<!-- (C) FORM CHECK -->
<script>
function check () {
// (C1) INIT
var valid = true, error = "", field = "";
// (C2) NAME
field = document.getElementById("fname");
error = document.getElementById("cname");
if (!field.checkValidity()) {
valid = false;
field.classList.add("err");
error.innerHTML = "Name must be 2-4 characters\r\n";
} else {
field.classList.remove("err");
error.innerHTML = "";
}
// (C3) NUMBER
field = document.getElementById("fnumber");
error = document.getElementById("cnumber");
if (!field.checkValidity()) {
valid = false;
field.classList.add("err");
error.innerHTML = "Num must be between 1-12\r\n";
} else {
field.classList.remove("err");
error.innerHTML = "";
}
// (C4) RESULT
return valid;
}
</script>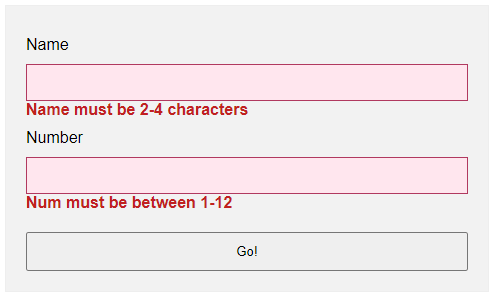 Lastly, this is pretty much similar to the popup example.
- Use
novalidateandonsubmitto do our own customization. - But instead of showing in a popup, we attach a
<div class="emsg">below all fields. - On an invalid input, we show the error message in the
<div>instead.
LINKS & REFERENCES
- HTML Pattern – MDN
- Validity State – MDN
- Form Validation – MDN
- HTML Form Validation Without Javascript – Code Boxx
THE END

Thank you for reading, and we have come to the end. I hope that it has helped you to better understand, and if you want to share anything with this guide, please feel free to comment below. Good luck and happy coding!