Содержание:
- 1 Основные причины возникновения ошибки
- 2 Что предпринять при появлении ошибки установки Java
- 3 Удаление потенциально конфликтных обновлений
- 4 Изменение расположения установки и проверка прав доступа
- 5 Отключение Java-контента в браузере
- 6 Прочие решения
В процессе своей работы многие созданные под Windows приложения используют библиотеки, входящие в состав встроенных или отдельно устанавливаемых фреймворков вроде NET Framework. Одним из наиболее распространенных компонентов подобного рода является Java – программная платформа, разработанная компанией Sun. В свое время Java играла значительную роль в адаптации программного обеспечения, служа своего рода прокладкой между железом, операционной системой и программной средой. Сегодня данное ПО уже не столь востребовано, тем не менее, есть еще немало приложений, которые в нем нуждаются.
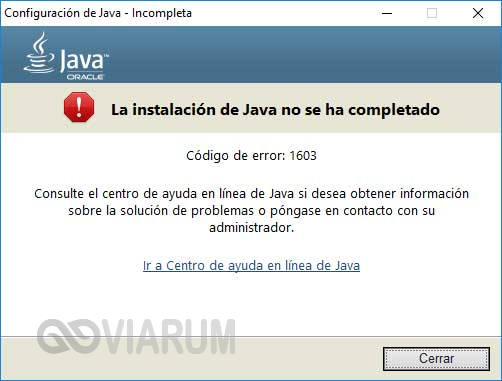
Если при установке какая-то программа потребует наличия Java, следует скачать ее последнюю версию с официального сайта и установить на ПК как обычное приложение. Обычно инсталляция пакета проходит без проблем, но в некоторых случаях на этом этапе вас может ждать неприятный сюрприз, а точнее ошибка 1603, указывающая на сбой установки.
Основные причины возникновения ошибки
Сталкиваться с этой неполадкой чаще всего приходится при повторной установке или обновлении Java. Вообще же, error code 1603 является вполне типичной ошибкой инсталляции и возникает не только при установке Java, но и при работе с другими программами. Причины сбоя чаще всего кроются в повреждении установочных файлов, прерывании процесса, некорректной перезаписи или удалении связанных ключей реестра. Кроме того, ошибка Error code 1603 Java может быть спровоцирована недоработанными накопительными обновлениями Windows.
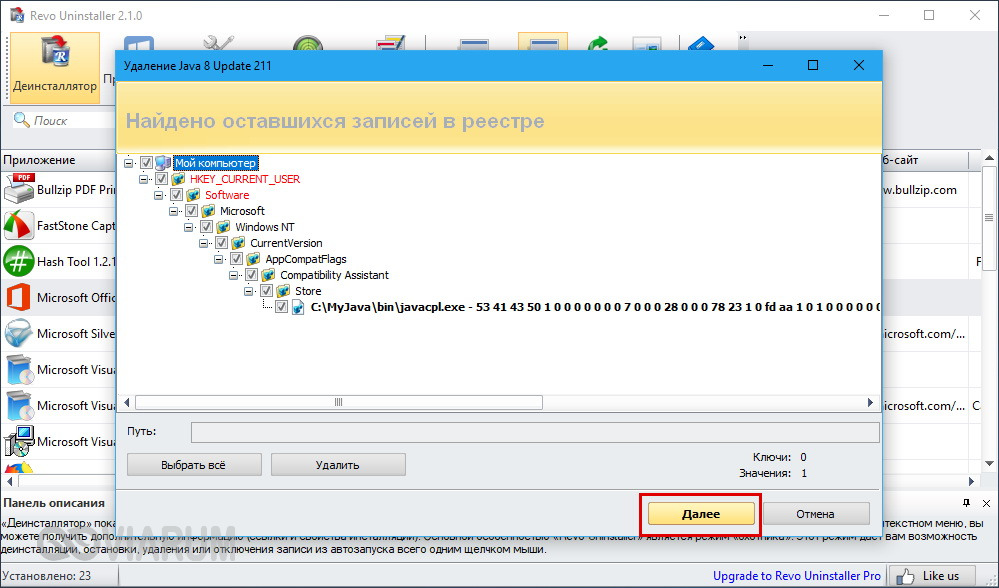
Итак, вы столкнулись с ошибкой error code 1603 Java. Что делать? Наиболее эффективным, а, значит, и правильным решением в таком случае будет полная переустановка компонента. При этом для удаления старой или поврежденной версии Java лучше использовать специальную утилиту Java Uninstall Tool, скачать которую можно с официального сайта www.java.com/ru/download/uninstalltool.jsp.
Для деинсталляции также отлично подходят сторонние приложения, такие как Wise Program Uninstaller или Total Uninstall. В отличие от стандартного средства удаления программ, эти приложения позволяют находить и удалять оставшиеся после деинсталляции «хвосты» – временные файлы, папки и ключи реестра, часто вызывающие конфликты при новой установке.

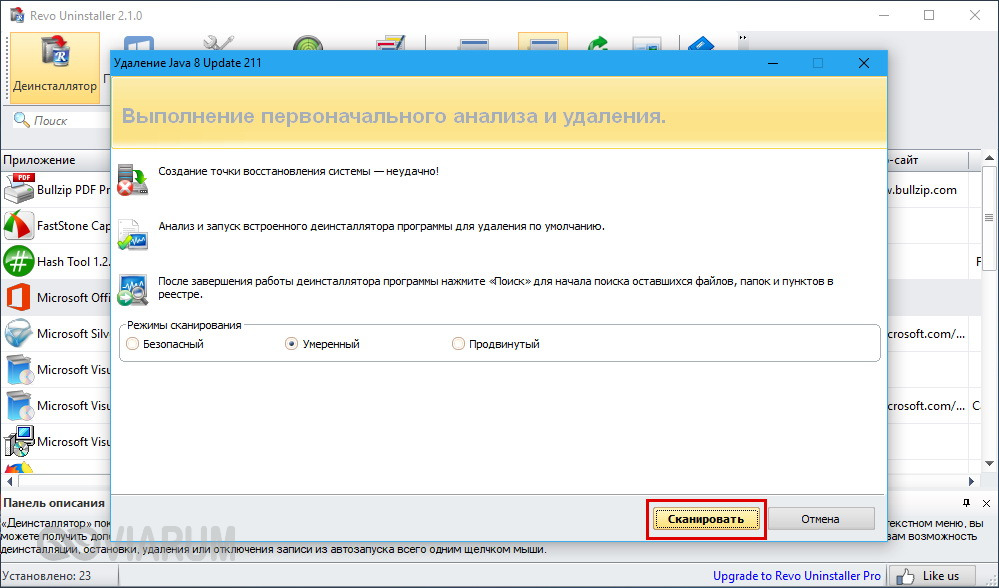
Опытные пользователи могут выполнить дополнительный поиск мусорных каталогов и ключей реестра по ключевому слову «Java», но это довольно рискованная операция, поскольку высока вероятность удалить что-то важное. После деинсталляции платформы следует перезагрузить компьютер.
Удаление потенциально конфликтных обновлений
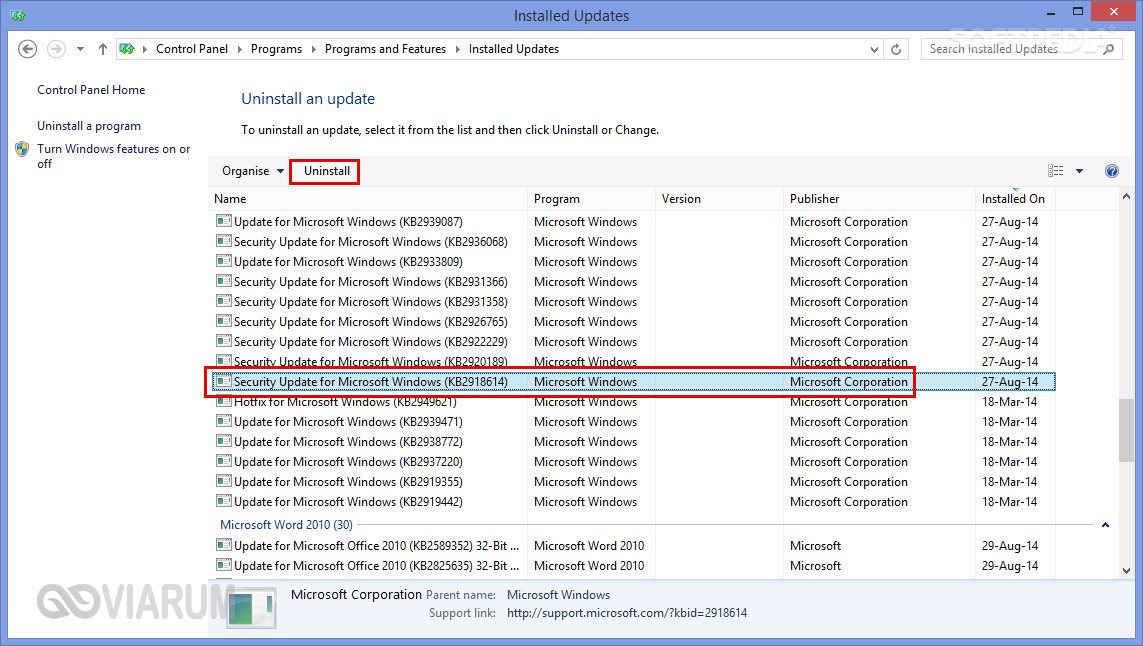
Если незадолго до появления ошибки error code 1603 при установке Java вы устанавливали накопительные обновления, попробуйте их удалить. В частности, проверьте, имеется ли на вашем компьютере пакет обновления KB2918614, если он есть, удалите его.
Изменение расположения установки и проверка прав доступа
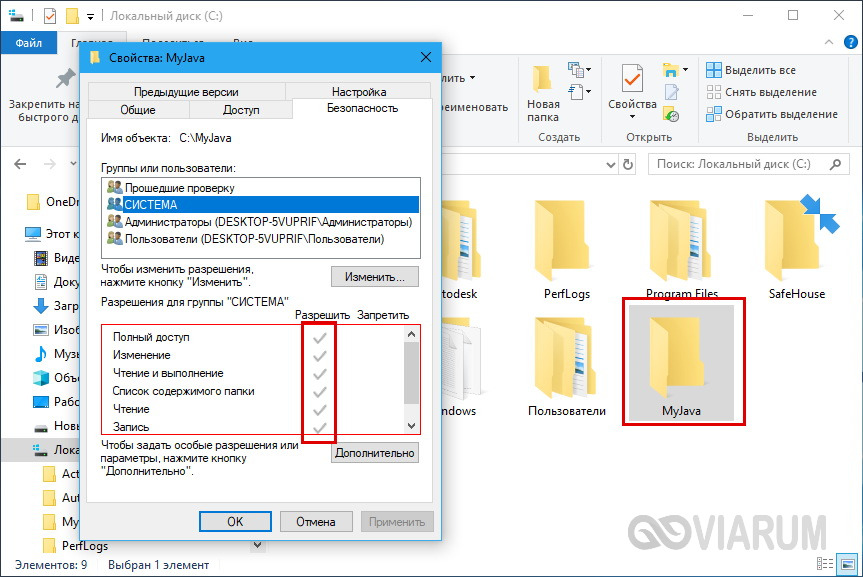
Ошибка 1603 в процессе установки Java иногда возникает по причине отсутствия прав у Системы на каталог, в который устанавливается приложение. С проблемами вам также придется столкнуться, если попытаетесь установить Java на съемный накопитель, зашифрованный диск или в защищенную подобным образом папку. Мы не рекомендуем изменять права доступа на системные каталоги, вместо этого создайте в корне диска С или D отдельную папку и убедитесь, что пользователь СИСТЕМА имеет на нее полные права.
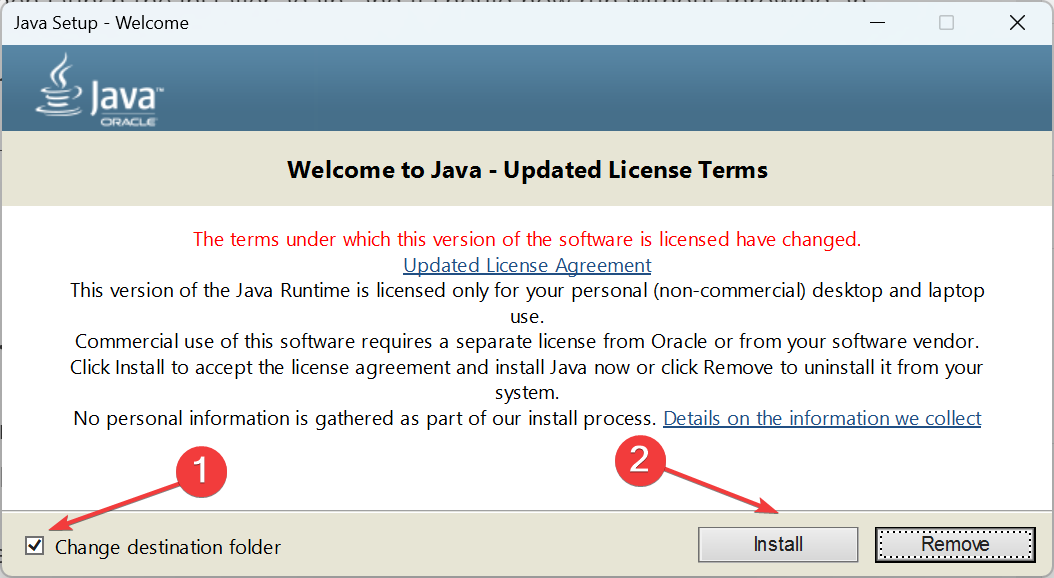
Теперь можно приступать к повторной установке. Скачайте с официального сайта автономный установщик Java, потому что это самый надежный вариант. Перед тем как запускать исполняемый файл установщика, откройте Диспетчер задач и проверьте наличие процесса MSIEXEC.EXE. Если он запущен, завершите его. Запустите установщик Java, отметьте галочкой опцию «Change destination folder» и нажмите «Install».
В следующем окне мастера нажмите кнопку «Change», укажите путь к альтернативному месту установки и выполните инсталляцию платформы в штатном режиме.
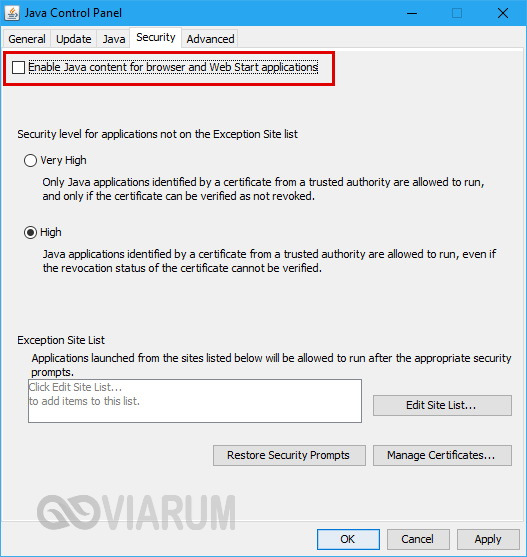
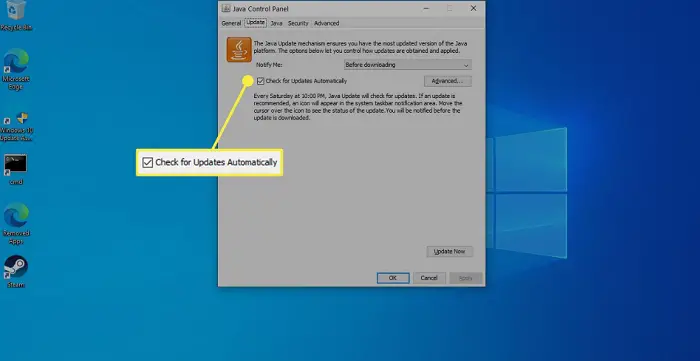
Данный способ не требует радикального удаления старой или поврежденной версии Java, но его можно опробовать в случае появления ошибки 1603 при обновлении Java поверх ранней версии. Откройте панель управления Java (через поиск), переключитесь на вкладку Security и снимите галочку с чекбокса «Enable Java Content for browser…». Сохранив настройки, скачайте автономный установочный пакет Java и осуществите его инсталляцию. По завершении процедуры активируйте ранее отключенную настройку.
Прочие решения
Если у вас не устанавливается Java, выдавая error code 1603, желательно также проверить следующие моменты. Во-первых, убедитесь, что на диске/разделе у вас имеется достаточно места. Во-вторых, проверьте командой sfc /scannow целостность системных файлов (если ошибка возникает при установке и других приложений). В-третьих, выполните откат к предыдущей версии Windows – этот метод является универсальным и позволяет решать разного рода проблемы, связанные с повреждением файлов и реестра.
При установке Java, который используется многими сайтами и, соответственно, востребован пользователем, может возникнуть ряд неполадок. Одна из них довольно серьёзная — ошибка 1603: обновление не завершено. Однако и её можно обойти.

При установке Java может возникать ошибка 1603
Причины появления
О причинах появления ошибки 1603 гадают даже сами разработчики. Тем не менее есть ряд закономерностей, при которых она возникает:
- прерывание интернет-соединения;
- повреждённая программа Джава на компьютере;
- повреждённый реестр Java;
- вредоносное или иное ПО, которое мешает загрузке.

Способы решения
Исправить ошибку 1603 можно разными способами. В конечном счёте тот или иной поможет успешно установить либо обновить Джава.
Перезагрузка
Простая перезагрузка может подействовать. Сначала перезагрузите ПК. Если это не сработало, удалите загрузочный файл и скачайте новый с официального сайта Java. Затем перезагрузите и заново попробуйте установить программу.
СОВЕТ. Конечно, следует проверить и подключение к интернету. Ведь ошибка 1603 при установке Java возникает как раз из-за того, что обновление не завершилось. Кроме этого, из простых действий сразу же стоит выполнить сканирование всей системы антивирусом. Вполне вероятно, что вредоносные программы виноваты в сбое установки.
Отключение контента
Следующим шагом будет отключение использования контента Джава в браузере. Это одна из версий, почему во время установки выскакивает Error 1603.
- Открываем панель управления
- Открываем пункт «Безопасность».
- Снимаем галочку с пункта, который отвечает за отображения контента в браузерах.
- Перезагружаем компьютер.
После выполнения этих действий можно попробовать заново установить Джава на компьютер.
Удаление предыдущих версий
Ошибка инсталляции или удаления с кодом 1603 также возникает по той причине, что в системе уже есть предыдущие версии программы. Чтобы исключить такую вероятность, стоит их удалить. Деинсталляцию лучше всего выполнять через Панель задач. Подойдут также специальные утилиты, наподобие CCleaner. С помощью её же можно проверить компьютер на наличие вредных программ, которые тоже могут препятствовать установке.

Записи в реестре
Наконец, ошибка 1603 может быть вызвана повреждёнными записями в реестре. Это наиболее серьёзная проблема. Решить её рядовому пользователю не всегда под силу. Если вы никогда не работали с реестром, не стоит тренироваться на исправлении неполадок с Java. В противном случае вы рискуете нанести урон всей операционной системе, нежели исправить одну маленькую ошибку.
Если всё же решились приступить к редактированию реестра без помощи специалиста, сначала сделайте резервную копию Windows. Вносить какие-либо изменения лучше при помощи специальных программ, например WinThruster. Необходимо найти записи, связанные с Java и восстановить их либо удалить. Но перед этим сделайте и их копии (должны иметь расширение .reg), чтобы в случае чего вернуть всё обратно.

Здесь не приводятся такие радикальные методы решения проблемы, как переустановка Windows. Навряд ли каждый юзер будет заново устанавливать ОС, чтобы исправить ошибку 1603, связанную с одной лишь работой Java. Приведённые способы в большинстве случаев избавляют пользователя от неполадок и дают спокойно установить Джава на ПК.
I tried to download Java on my laptop (which has windows 10) but i keep getting a 1603 error. My computer used to have windows 8.1 and it did not work back then either
I appreciate any advice to solve or work around this problem
asked Jan 9, 2016 at 17:58
![]()
0
I have had this problem. I was able to fix it thanks to a co-worker. The problem started happening after I installed HP Unified Functional Testing (UFT, aka QTP). Installing this product changes the Windows environment variables used by Java. He told me the following: «So change the names of JAVA_OPTIONS, IBM_JAVA_OPTIONS, JAVA_TOOL_OPTIONS to something else (both in system and user variables) and delete any Java folder(in Program Files (x86) or Program Files) which gets installed despite the error. Restart the system and then try installing Java.»
Actually, all I did was rename the environment variables and run the installer. This worked.
answered May 25, 2016 at 23:07
![]()
My answer is not related to win 10, but might help someone who is having similar problem in windows 7 machine and not able to install jre 32 bit version.
the work around to this is once you downloaded the jre, copy the path «C:Program Files (x86)Javajre1.8.0_121binjavaw.exe» and paste it under java runtime environment settings which is found -Java Control panel>java>view
answered Mar 1, 2017 at 20:56
![]()
I think you downloaded the wrong version. If your laptop support x64 bit software you should download Java 1.8 x64 version.
Here is the link.
https://www.java.com/en/download/manual.jsp
answered Apr 18, 2017 at 5:09
![]()
I had this problem for a month now. I tried everything on my windows 8, but I couldn’t get the latest java on it. When I tried to install java on an empty computer, the 64 bit version did not go through (error 1603) and I realized the problem didn’t come from an old java install and I install 32 bit. it worked on the new computer with windows 7 and on my computer running 8.1.
note: I had deleted all the java versions before going through with it.
![]()
Assafs
3,2494 gold badges28 silver badges37 bronze badges
answered Sep 13, 2017 at 16:50
![]()
To fix java 1603 error you have to follow few simple steps.
- First of all remove all old java version.
- Then remove some windows update file which might be reason of this
error. Like KB2918614 update. - After that download and Install latest version of java and activate
java in browser. Now everything will be fine you can test the java
version on java website…
For explained and easy solution to java 1603 error follow this link: http://protechguides.com/java-error-code-1603-solved/
answered Mar 15, 2018 at 16:03
![]()
MAYMAY
6371 gold badge5 silver badges21 bronze badges
I encountered this error on Windows 8.1 and when I checked with Oracle web site, they said that is is not yet resolved, and under investigation. They also showed a link for off-line installation as an alternative arrangement. However, upon investigation of my system, i found out that the available space in C drive was only about 20 MB or so. I cleared my system and provided enough space. When I tried with the extra space, I didn’t encounter any error. May be, you could try with a better free space…
answered Jan 8, 2019 at 12:44
![]()
BalepurBalepur
1381 silver badge5 bronze badges
First you should close the browser because if any webpage will use Java, it will cause conflict. Then do custom installation, i.e. install in some other folder other than default folder and point environment variable to newly installed Java location. It will resolve your issue.
![]()
answered Jul 25, 2017 at 9:23
![]()
RahulRahul
12 bronze badges
На чтение 6 мин. Просмотров 717 Опубликовано 03.09.2019
Ошибка Java 1603 иногда возникает при установке обновлений Java в Windows 10. При возникновении этой ошибки открывается окно с сообщением об ошибке: « Установка Java не завершена. Код ошибки: 1603. »
Сообщение об ошибке подчеркивает, что ваше обновление Java не установлено. Вот как вы можете исправить ошибку Java 1603, когда появляется это сообщение об ошибке.
Содержание
- Исправить ошибку Windows 10 1603 9 способами
- 1. Убедитесь, что вы устанавливаете правильную версию Java для вашей платформы
- 2. Установите Java как администратор
- 3. Сначала удалите предыдущую версию Java
- 4. Отключите антивирусное программное обеспечение
- 5.Закройте браузер и другое программное обеспечение, работающее на Java
- 6. Отключите контент Java
- 7. Откройте программу установки и удаления устранения неполадок
- 8. Не устанавливайте Java с LogMeIn
- 9. Удалите Центр обновления Windows KB2918614.
Исправить ошибку Windows 10 1603 9 способами
-
- Убедитесь, что вы устанавливаете правильную версию Java для вашей платформы
- Установите Java как администратор
- Сначала удалите предыдущую версию Java
- Отключить антивирус
- Закройте браузер и другое программное обеспечение, работающее на Java
- Отключить контент Java
- Откройте программу установки и удаления устранения неполадок
- Не устанавливайте Java с помощью LogMeIn
- Удалите KB2918614 Центр обновления Windows
1. Убедитесь, что вы устанавливаете правильную версию Java для вашей платформы
Во-первых, убедитесь, что вы не устанавливаете 64-битную Java в 32-битной системе. Если да, возможно, поэтому Java не устанавливается. На этой странице вы можете загрузить 32-разрядную версию Windows x86 Offline. Вы можете проверить, является ли ваша система 32- или 64-битной, следующим образом.
- Нажмите кнопку панели задач Windows 10 Cortana.
- Введите ключевое слово «система» в поле поиска.
- Затем нажмите «О вашем компьютере», чтобы открыть окно, расположенное ниже.

- Прокрутите вниз до спецификации типа системы, которая сообщает, является ли платформа 64-битной или 32-битной.
Следует также отметить, является ли установленный в настоящее время Java SDK 32-разрядным или 64-разрядным. Может возникнуть 64- и 32-разрядный конфликт, если вы пытаетесь обновить Java 32-разрядной версией для замены 64-разрядного Java SDK или наоборот. Поэтому установите 64-разрядную версию Java для замены устаревшей 64-разрядной версии или обновите 32-разрядную версию Java до последней 32-разрядной версии.
- ТАКЖЕ ЧИТАЙТЕ: как исправить ошибку «JavaScript Void 0» в Windows 10
2. Установите Java как администратор
Установка программного обеспечения от имени администратора может решить проблемы установки. Поэтому попробуйте установить последнюю версию Java от имени администратора. Для этого щелкните правой кнопкой мыши последний установщик Java и выберите Запуск от имени администратора , чтобы запустить мастер установки.

3. Сначала удалите предыдущую версию Java
При удалении предыдущей версии Java сначала гарантируется отсутствие 32- или 64-разрядных конфликтов при попытке установить последнюю версию. Добавьте сторонний деинсталлятор в Windows, с помощью которого вы можете полностью удалить Java. Вот как вы можете удалить Java с помощью бесплатного Advanced Uninstaller PRO 12 для Windows.
- Нажмите кнопку Загрузить сейчас на этой домашней странице, чтобы сохранить Advanced Uninstaller PRO 12 в Windows.
- Откройте мастер установки Advanced Uninstaller PRO 12 для установки программного обеспечения.
-
Откройте Advanced Uninstaller PRO 12, нажмите Общие инструменты и Удалить программы , чтобы открыть окно, расположенное ниже.

- Выберите Java и нажмите кнопку Удалить .
- Нажмите переключатель Использовать оставшийся сканер в диалоговом окне, которое показано ниже.


- Нажмите кнопку Да , чтобы удалить Java.
- Выберите все записи реестра, когда откроется окно очистки приложения, и нажмите кнопку Далее .
- Перезагрузите Windows после удаления Java.
- Установите последнюю версию Java с помощью 32- или 64-разрядных автономных установщиков Windows.
4. Отключите антивирусное программное обеспечение
Антивирусное программное обеспечение может блокировать развертывание Java. Чтобы убедиться, что это не так, вы можете временно отключить многие антивирусные утилиты, щелкнув правой кнопкой мыши по значкам на панели задач и выбрав параметр отключения. Либо временно удалите антивирусное программное обеспечение из автозагрузки Windows, а затем перезагрузите компьютер. Именно так вы можете отключить антивирусные утилиты на вкладке «Запуск» диспетчера задач.
- Чтобы открыть диспетчер задач, щелкните правой кнопкой мыши панель задач и выберите Диспетчер задач .
- Перейдите на вкладку «Пуск» и выберите антивирусное программное обеспечение.

- Нажмите кнопку Отключить , чтобы исключить программное обеспечение из автозагрузки.
- Установите Java после перезапуска Windows.
-> ТАКЖЕ ЧИТАЙТЕ: зачем мне загружать код JavaScript для Windows 10?
5.Закройте браузер и другое программное обеспечение, работающее на Java
Всегда закрывайте программное обеспечение перед установкой Java. При попытке установить последнюю версию могут быть программы, работающие на Java. Закройте браузер после загрузки установщика Java. Закройте все остальные программные окна на панели задач. Кроме того, проверьте, содержит ли ваш системный трей (область уведомлений) какие-либо значки стороннего программного обеспечения. Если это так, закройте программы, включенные в системный трей.

6. Отключите контент Java
Закрытие браузеров не всегда может быть достаточно. Отключение всего содержимого Java с помощью панели управления также является одним из лучших исправлений ошибки Java 1603. Вы можете отключить содержимое Java следующим образом.
- Сначала нажмите сочетание клавиш Windows + R.
- Введите «Панель управления» в «Выполнить» и нажмите «Return», чтобы открыть окно, показанное непосредственно ниже.

- Нажмите Java, чтобы открыть панель управления.

- Выберите вкладку «Безопасность» на панели управления Java.

- Отмените выбор параметра Включить содержимое Java в браузере , если выбран этот параметр.
- Нажмите кнопку Применить и ОК , чтобы подтвердить.
- После обновления Java снова выберите параметр Включить содержимое Java в браузере .
7. Откройте программу установки и удаления устранения неполадок
Хотя в Windows нет средства устранения неполадок при установке программ, вы все равно можете загрузить средство устранения неполадок при установке и удалении программ. Это средство устранения неполадок может устранить ошибку Java 1603. Вы можете добавить средство устранения неполадок в Windows 10, нажав кнопку Загрузить на этой веб-странице.
Затем откройте папку, в которую вы сохранили программу установки, и нажмите MicrosoftProgram_Install_and_Uninstall.meta.diagcab, чтобы открыть окно, показанное на снимке экрана ниже.

8. Не устанавливайте Java с LogMeIn
Ошибка Java 1603 произошла для пользователей LogMeIn при попытке установить Java удаленно. Пользователи LogMeIn обнаружили, что ошибка установки может быть связана с программным обеспечением удаленного рабочего стола LogMeIn.
Поэтому, если вы используете LogMeIn при установке Java, откажитесь от этого программного обеспечения и установите Java на ПК без программного обеспечения для удаленного рабочего стола. Если вам действительно нужно программное обеспечение удаленного рабочего стола для установки Java, ознакомьтесь с некоторыми альтернативами LogMeIn.
- ТАКЖЕ ЧИТАЙТЕ: исправлено: ‘устаревшее сообщение Java в Windows 10
9. Удалите Центр обновления Windows KB2918614.
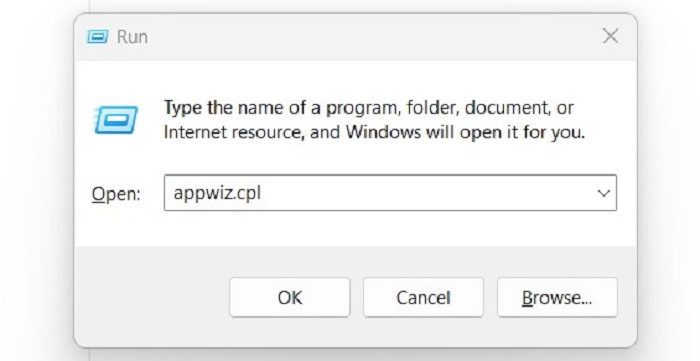
- Удаление обновления KB2918614 для Windows также может исправить ошибку Java 1603. Чтобы удалить это обновление, нажмите горячую клавишу Windows + R.
- Введите «appwiz.cpl» в «Выполнить» и нажмите кнопку ОК .

- Нажмите Просмотр установленных обновлений в левой части панели управления, чтобы открыть список обновлений Windows, как показано ниже.

- Введите ключевое слово «KB2918614» в поле поиска.
- Выберите обновление KB2918614 и нажмите кнопку Удалить .
- Перезагрузите ваш рабочий стол или ноутбук.
Windows может переустановить обновление KB2918614. Чтобы этого не произошло, воспользуйтесь инструментом Показать или скрыть обновления. Нажмите Загрузить пакет устранения неполадок «Показать или скрыть обновления» прямо сейчас на этой странице, чтобы сохранить этот инструмент в Windows. Затем вы можете указать Windows не переустанавливать KB2918614, открыв Показать или скрыть обновления, выбрав опцию Скрыть обновления и установив флажок KB2918614.

Это несколько решений, которые могут исправить ошибку Java 1603, чтобы вы могли обновить Java. Проверьте эту статью для получения дополнительной информации для установки Java на Windows 10.
-
Partition Wizard
- Partition Magic
- Top 5 Fixes to Java Error Code 1603 on Windows 10 | Try Them Now
By Vicky | Follow |
Last Updated January 05, 2023
Malware developers often take advantage of the Java flaws and therefore installing the new updates of Java is quite important to prevent the system from possible attacks. But when Windows users install the Java updates, they run into Java error code 1603. Why does this happen? How to fix it? MiniTool answers all the questions in this post.
Java Error Code 1603 on Windows 10
One Windows user reported that he ran into Java error code 1603 and the detailed information is below.
I cannot install Java updates on my Windows 10 computer. Everything starts fine, but after a couple of settings, it gives me Error Code: 1603. I tried suggested the troubleshooter, but it didn’t help to fix the problem. What else can I do?
What can cause error code 1603 on Windows 10? The reasons for this error might be different. It is possible that the Java update you ware try to install is been blocked by antivirus software, web software or other programs that are running Java.
Before trying to fix this issue, please make sure the following items first as them may prevent you from installing the Java update.
- Make sure you run the installer as administrator.
- Make sure the drive you are trying to install on is not encrypted.
- Make sure you have BitLocker disabled. If it is enabled, disable it and then try to install it again.
After making sure of the above items, let’s try to restart your computer first. If the code error persists, try the following solutions one by one until you get rid of this error code 1603.
Fix 1: Check the Version of Windows 10
Check whether the version of Java is matched with Windows 10. This means you should install the 64-bit Java if you are running on a 64-bit Windows 10.
If you are not sure what version of Windows 10, follow the steps below.
- Right-click the Windows icon on the toolbar and then select Settings from the menu.
- Click System on the Settings
- Navigate to the About tab and then look at the System type. You will know what version of Windows 10 you are using.

Fix 2: Close Mentioned Programs
After checking the version of your system, let’s try to close the programs that are running Java.
Step 1: Right-click the taskbar and then choose Task Manager from the menu.
Step 2: Under the Process tab, go through the list of programs. If some of them have been mentioned with the error, highlight the programs one by one and then click the End Task button.
After the two steps, Java error code 1603 should not appear when you install or update Java.
Fix 3: Turn off Antivirus
As we have mentioned, the most possible reason for Java error code on Windows 10 is that Java has been blocked by security software. Therefore, you can try to temporarily disable the software and then install Java.
To do that, you need to open Task Manager again if you have closed it and right-click the software to choose the Disable option under the Startup tab.

Fix 4: Disable Java Content
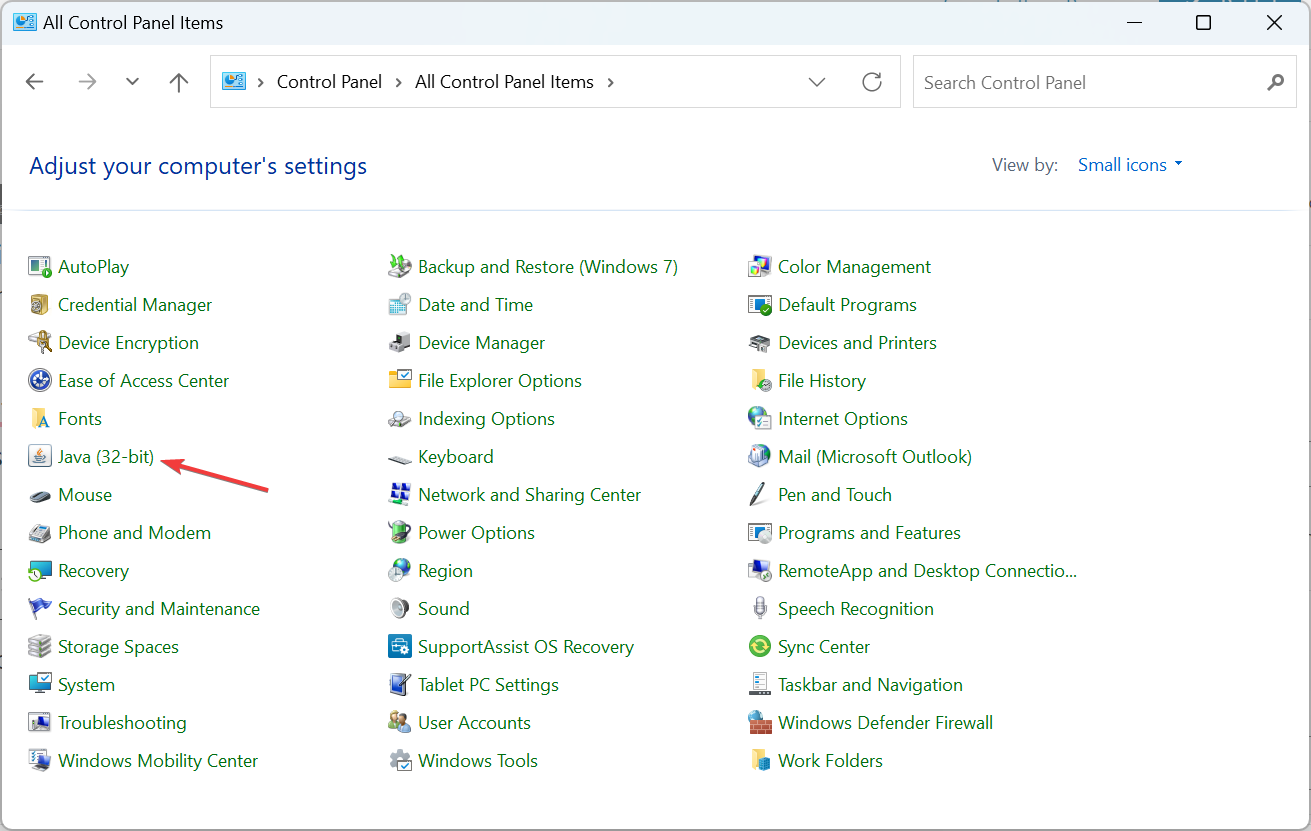
Step 1: Type Control Panel in Cortana’s search bar and then select Control Panel.
Step 2: On the Control Panel window, switch the View by to Large icons and then locate Java in the list.

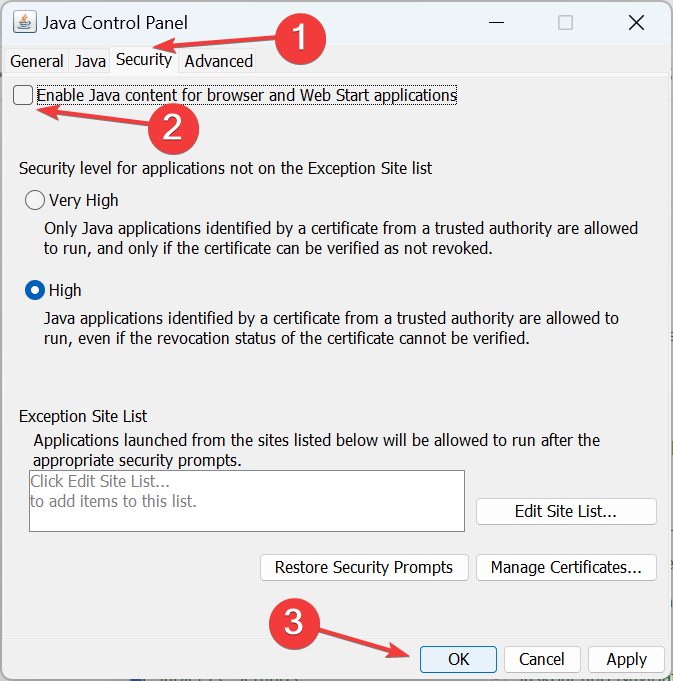
Step 3: On the window of Java Control Panel, navigate to the Security tab. Uncheck the Enable Java content in the browser.
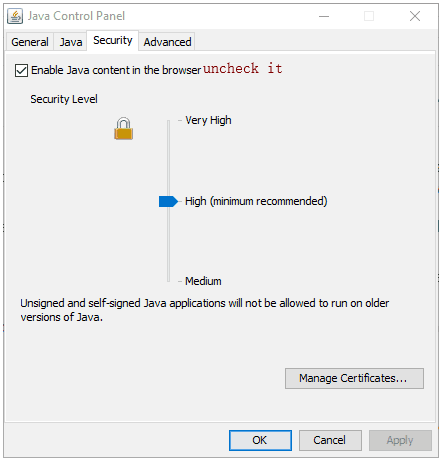
Step 4: Finally, click Apply and OK to confirm the change and execute it.
The issue should have been fixed. Try to update or install Java. After updating or installing, do not forget to check the Enable Java content in the browser again.
Fix 5: Uninstall Previous Versions of Java
This fix may help you get rid of error code 1603 on Windows 10. How to remove Java from Windows 10 PC? The tutorial is below.
Step 1: Call out the Run window by pressing Windows + R at the same time.
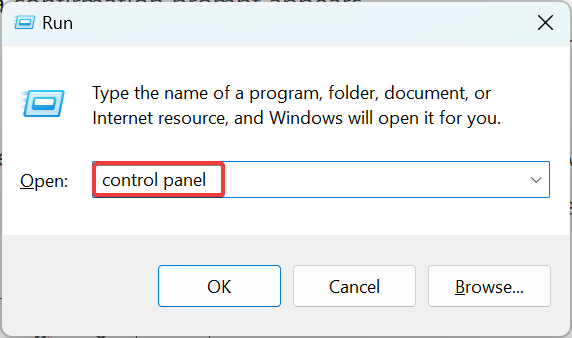
Step 2: Type appwiz.cpl on the Run window and then hit the Enter key.
Step 3: Locate Java or JDK in the list and then click it and select Uninstall.
Step 4: Reboot your computer.
About The Author

Position: Columnist
Vicky is a website editor who has been writing tech articles since she was graduated from university. Most of her articles talk about Windows PC and hard disk issues. Some of her articles also touch on YouTube usage and issues.
During her spare time, she likes to spend time reading, watching videos, and sitting on her Yoga mat to relax.
- Partition Wizard
- Partition Magic
- Top 5 Fixes to Java Error Code 1603 on Windows 10 | Try Them Now
By Vicky | Follow |
Last Updated January 05, 2023
Malware developers often take advantage of the Java flaws and therefore installing the new updates of Java is quite important to prevent the system from possible attacks. But when Windows users install the Java updates, they run into Java error code 1603. Why does this happen? How to fix it? MiniTool answers all the questions in this post.
Java Error Code 1603 on Windows 10
One Windows user reported that he ran into Java error code 1603 and the detailed information is below.
I cannot install Java updates on my Windows 10 computer. Everything starts fine, but after a couple of settings, it gives me Error Code: 1603. I tried suggested the troubleshooter, but it didn’t help to fix the problem. What else can I do?
What can cause error code 1603 on Windows 10? The reasons for this error might be different. It is possible that the Java update you ware try to install is been blocked by antivirus software, web software or other programs that are running Java.
Before trying to fix this issue, please make sure the following items first as them may prevent you from installing the Java update.
- Make sure you run the installer as administrator.
- Make sure the drive you are trying to install on is not encrypted.
- Make sure you have BitLocker disabled. If it is enabled, disable it and then try to install it again.
After making sure of the above items, let’s try to restart your computer first. If the code error persists, try the following solutions one by one until you get rid of this error code 1603.
Fix 1: Check the Version of Windows 10
Check whether the version of Java is matched with Windows 10. This means you should install the 64-bit Java if you are running on a 64-bit Windows 10.
If you are not sure what version of Windows 10, follow the steps below.
- Right-click the Windows icon on the toolbar and then select Settings from the menu.
- Click System on the Settings
- Navigate to the About tab and then look at the System type. You will know what version of Windows 10 you are using.
Fix 2: Close Mentioned Programs
After checking the version of your system, let’s try to close the programs that are running Java.
Step 1: Right-click the taskbar and then choose Task Manager from the menu.
Step 2: Under the Process tab, go through the list of programs. If some of them have been mentioned with the error, highlight the programs one by one and then click the End Task button.
After the two steps, Java error code 1603 should not appear when you install or update Java.
Fix 3: Turn off Antivirus
As we have mentioned, the most possible reason for Java error code on Windows 10 is that Java has been blocked by security software. Therefore, you can try to temporarily disable the software and then install Java.
To do that, you need to open Task Manager again if you have closed it and right-click the software to choose the Disable option under the Startup tab.
Fix 4: Disable Java Content
Step 1: Type Control Panel in Cortana’s search bar and then select Control Panel.
Step 2: On the Control Panel window, switch the View by to Large icons and then locate Java in the list.
Step 3: On the window of Java Control Panel, navigate to the Security tab. Uncheck the Enable Java content in the browser.
Step 4: Finally, click Apply and OK to confirm the change and execute it.
The issue should have been fixed. Try to update or install Java. After updating or installing, do not forget to check the Enable Java content in the browser again.
Fix 5: Uninstall Previous Versions of Java
This fix may help you get rid of error code 1603 on Windows 10. How to remove Java from Windows 10 PC? The tutorial is below.
Step 1: Call out the Run window by pressing Windows + R at the same time.
Step 2: Type appwiz.cpl on the Run window and then hit the Enter key.
Step 3: Locate Java or JDK in the list and then click it and select Uninstall.
Step 4: Reboot your computer.
About The Author
Position: Columnist
Vicky is a website editor who has been writing tech articles since she was graduated from university. Most of her articles talk about Windows PC and hard disk issues. Some of her articles also touch on YouTube usage and issues.
During her spare time, she likes to spend time reading, watching videos, and sitting on her Yoga mat to relax.
При установке Java, который используется многими сайтами и, соответственно, востребован пользователем, может возникнуть ряд неполадок. Одна из них довольно серьёзная — ошибка 1603: обновление не завершено. Однако и её можно обойти.
При установке Java может возникать ошибка 1603
Причины появления
О причинах появления ошибки 1603 гадают даже сами разработчики. Тем не менее есть ряд закономерностей, при которых она возникает:
- прерывание интернет-соединения;
- повреждённая программа Джава на компьютере;
- повреждённый реестр Java;
- вредоносное или иное ПО, которое мешает загрузке.
Способы решения
Исправить ошибку 1603 можно разными способами. В конечном счёте тот или иной поможет успешно установить либо обновить Джава.
Перезагрузка
Простая перезагрузка может подействовать. Сначала перезагрузите ПК. Если это не сработало, удалите загрузочный файл и скачайте новый с официального сайта Java. Затем перезагрузите и заново попробуйте установить программу.
СОВЕТ. Конечно, следует проверить и подключение к интернету. Ведь ошибка 1603 при установке Java возникает как раз из-за того, что обновление не завершилось. Кроме этого, из простых действий сразу же стоит выполнить сканирование всей системы антивирусом. Вполне вероятно, что вредоносные программы виноваты в сбое установки.
Отключение контента
Следующим шагом будет отключение использования контента Джава в браузере. Это одна из версий, почему во время установки выскакивает Error 1603.
- Открываем панель управления
- Открываем пункт «Безопасность».
- Снимаем галочку с пункта, который отвечает за отображения контента в браузерах.
- Перезагружаем компьютер.
После выполнения этих действий можно попробовать заново установить Джава на компьютер.
Удаление предыдущих версий
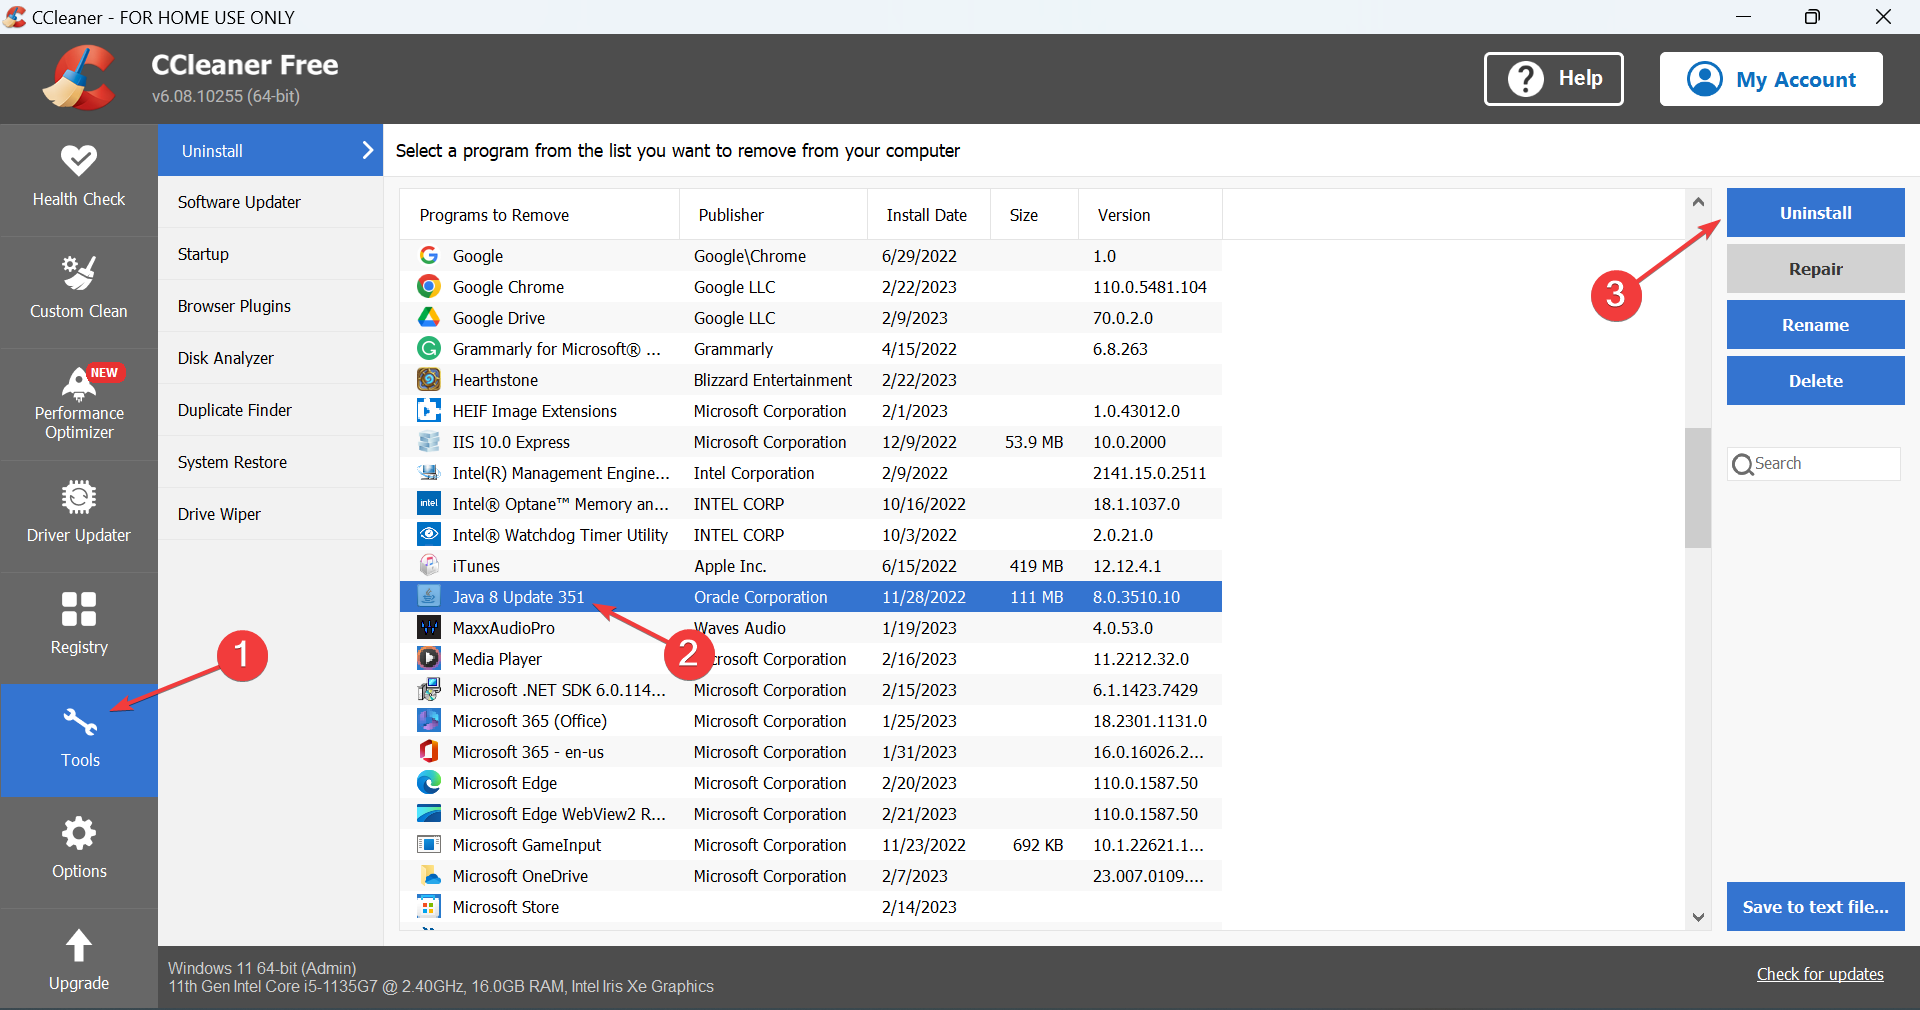
Ошибка инсталляции или удаления с кодом 1603 также возникает по той причине, что в системе уже есть предыдущие версии программы. Чтобы исключить такую вероятность, стоит их удалить. Деинсталляцию лучше всего выполнять через Панель задач. Подойдут также специальные утилиты, наподобие CCleaner. С помощью её же можно проверить компьютер на наличие вредных программ, которые тоже могут препятствовать установке.
Записи в реестре
Наконец, ошибка 1603 может быть вызвана повреждёнными записями в реестре. Это наиболее серьёзная проблема. Решить её рядовому пользователю не всегда под силу. Если вы никогда не работали с реестром, не стоит тренироваться на исправлении неполадок с Java. В противном случае вы рискуете нанести урон всей операционной системе, нежели исправить одну маленькую ошибку.
Если всё же решились приступить к редактированию реестра без помощи специалиста, сначала сделайте резервную копию Windows. Вносить какие-либо изменения лучше при помощи специальных программ, например WinThruster. Необходимо найти записи, связанные с Java и восстановить их либо удалить. Но перед этим сделайте и их копии (должны иметь расширение .reg), чтобы в случае чего вернуть всё обратно.
Здесь не приводятся такие радикальные методы решения проблемы, как переустановка Windows. Навряд ли каждый юзер будет заново устанавливать ОС, чтобы исправить ошибку 1603, связанную с одной лишь работой Java. Приведённые способы в большинстве случаев избавляют пользователя от неполадок и дают спокойно установить Джава на ПК.
Quick and simple solutions for effective troubleshooting
by Matthew Adams
Matthew is a freelancer who has produced a variety of articles on various topics related to technology. His main focus is the Windows OS and all the things… read more
Updated on
- The Java install did not complete Error Code: 1603 message appears when installing Java updates in Windows 10.
- This error usually appears when a background program is using Java or a third-party app is blocking the installation.
- Running the installer as administrator, disabling the antivirus, and modifying security settings can help fix things.
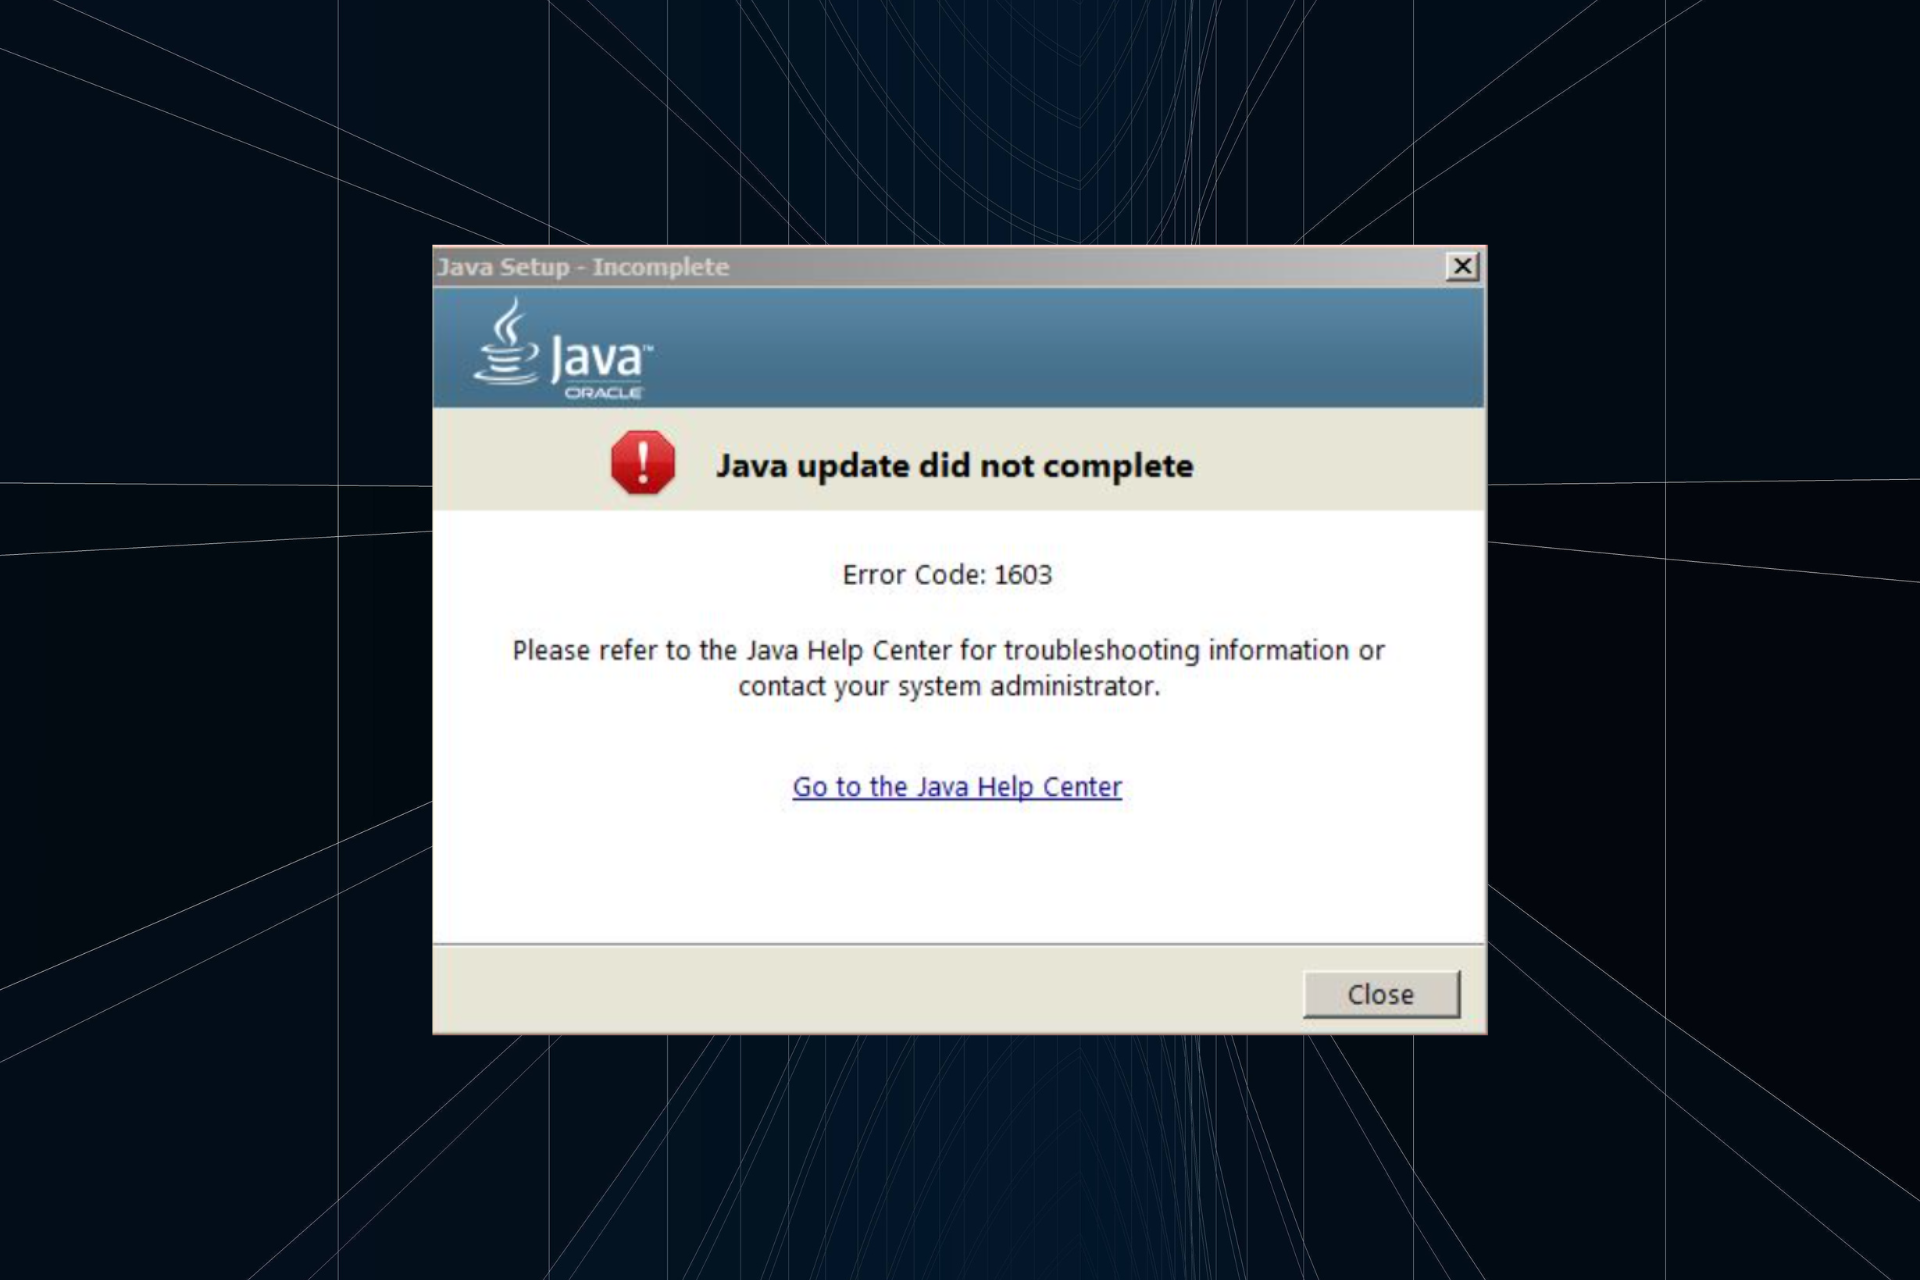
Java plays a vital role on the PC due to several apps relying on it for effective functioning. But when installing or updating Java, many reported getting Error Code 1603.
The message reads, Java update/install did not complete, depending on the operation. Problems with it are common, with many unable to run the Java update installer error. But for now, let’s focus on the Java install did not complete Error code 1603 – Windows 10.
What is Java error code 1603 when installing?
Error code 1603 is a fatal error encountered during installation on the PC. It causes the process to terminate abruptly and can be encountered for several reasons. In the case of Java, here’s why you might get the error:
- Java already installed: The most common reason behind Java install exit code 1603 is that the version is already installed on the PC.
- A background program is using Java: If a background program uses Java, you may get Error code 1603 while installing it.
- Third-party apps creating conflicts: If you have a third-party antivirus installed, it could be identifying Java as malware or PUP (Potentially Unwanted Program) and terminating the installation.
How can I fix Java error code 1603?
Before we head to the slightly complex solutions, try these quick tricks and tips:
- Restart the computer and again try installing Java.
- Verify whether the version of Java matches the Windows architecture, i.e., 32-bit Java on the 32-bit version of Windows and 64-bit Java on the 64-bit version of Windows.
- Run the Java installer with administrative privileges.
- For those using LogMeIn or other software for remote access, disable it, and verify whether the Java Error code 1603 is fixed. Though you can enable remote desktop with RDP, it wouldn’t throw the error.
- Make sure the drive you are installing it on is not encrypted.
- Disable any antivirus installed on the PC and check whether the Java Error code 1603 is resolved. If so, we recommend you switch to a reliable and Windows-friendly antivirus.
- Try installing a previous version of Java in case there are compatibility issues with the latest one.
If these don’t work, move to the fixes listed next.
1. Terminate conflicting processes
- Press Ctrl + Shift + Esc to open Task Manager, and navigate to the Details tab.

- Right-click on the conflicting process, and select End task.
- Click on End process in the confirmation prompt.
- Similarly, disable other conflicting processes as well.
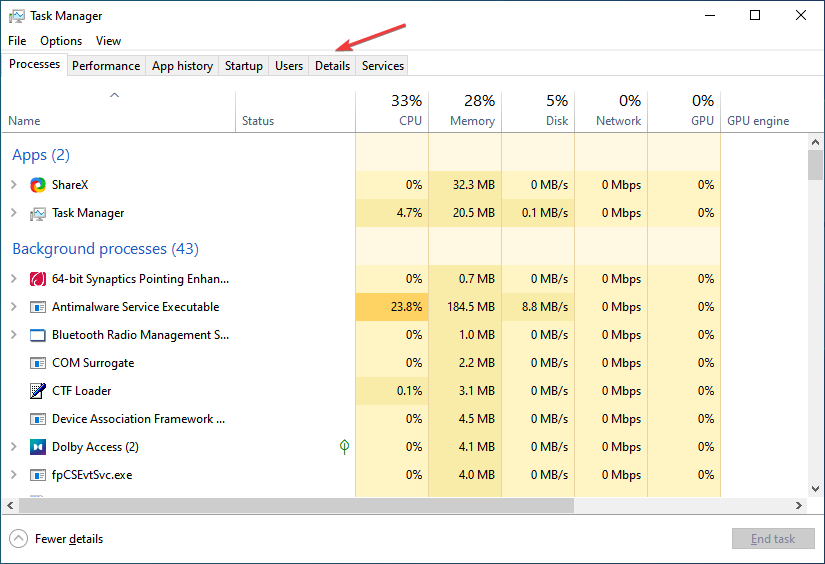

When you get the Java Error code 1603, the installer usually lists the programs using Java in the background. Terminating them and then restarting the installation should get things running.
2. Reinstall the graphics driver
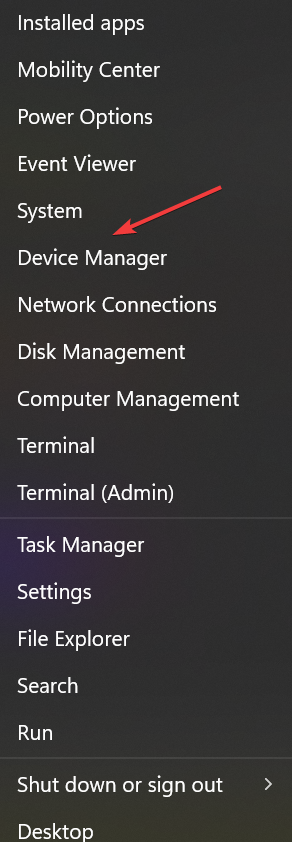
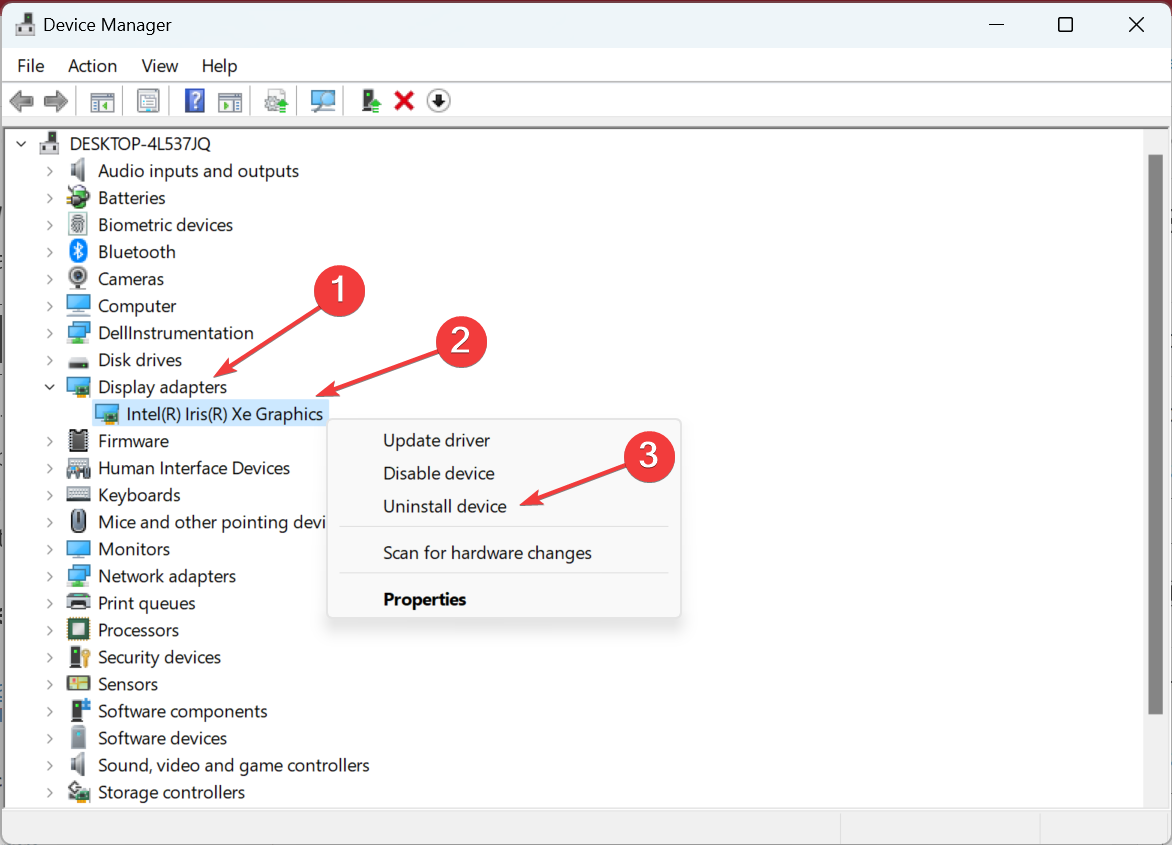
- Press Windows + X to open the Power User menu, and select Device Manager.

- Expand the Display adapters entry, right-click on the graphics adapter, and select Uninstall device.

- Tick the checkbox for Attempt to remove the driver for this device, and then click Uninstall.

- Once done, restart the computer, and Windows will automatically install the best available driver.

When getting Java install did not complete Error code 1603 – Windows 10, users reported that reinstalling the graphics driver did the trick. Also, this will work in the case of Java error code 1603 in Windows 7.
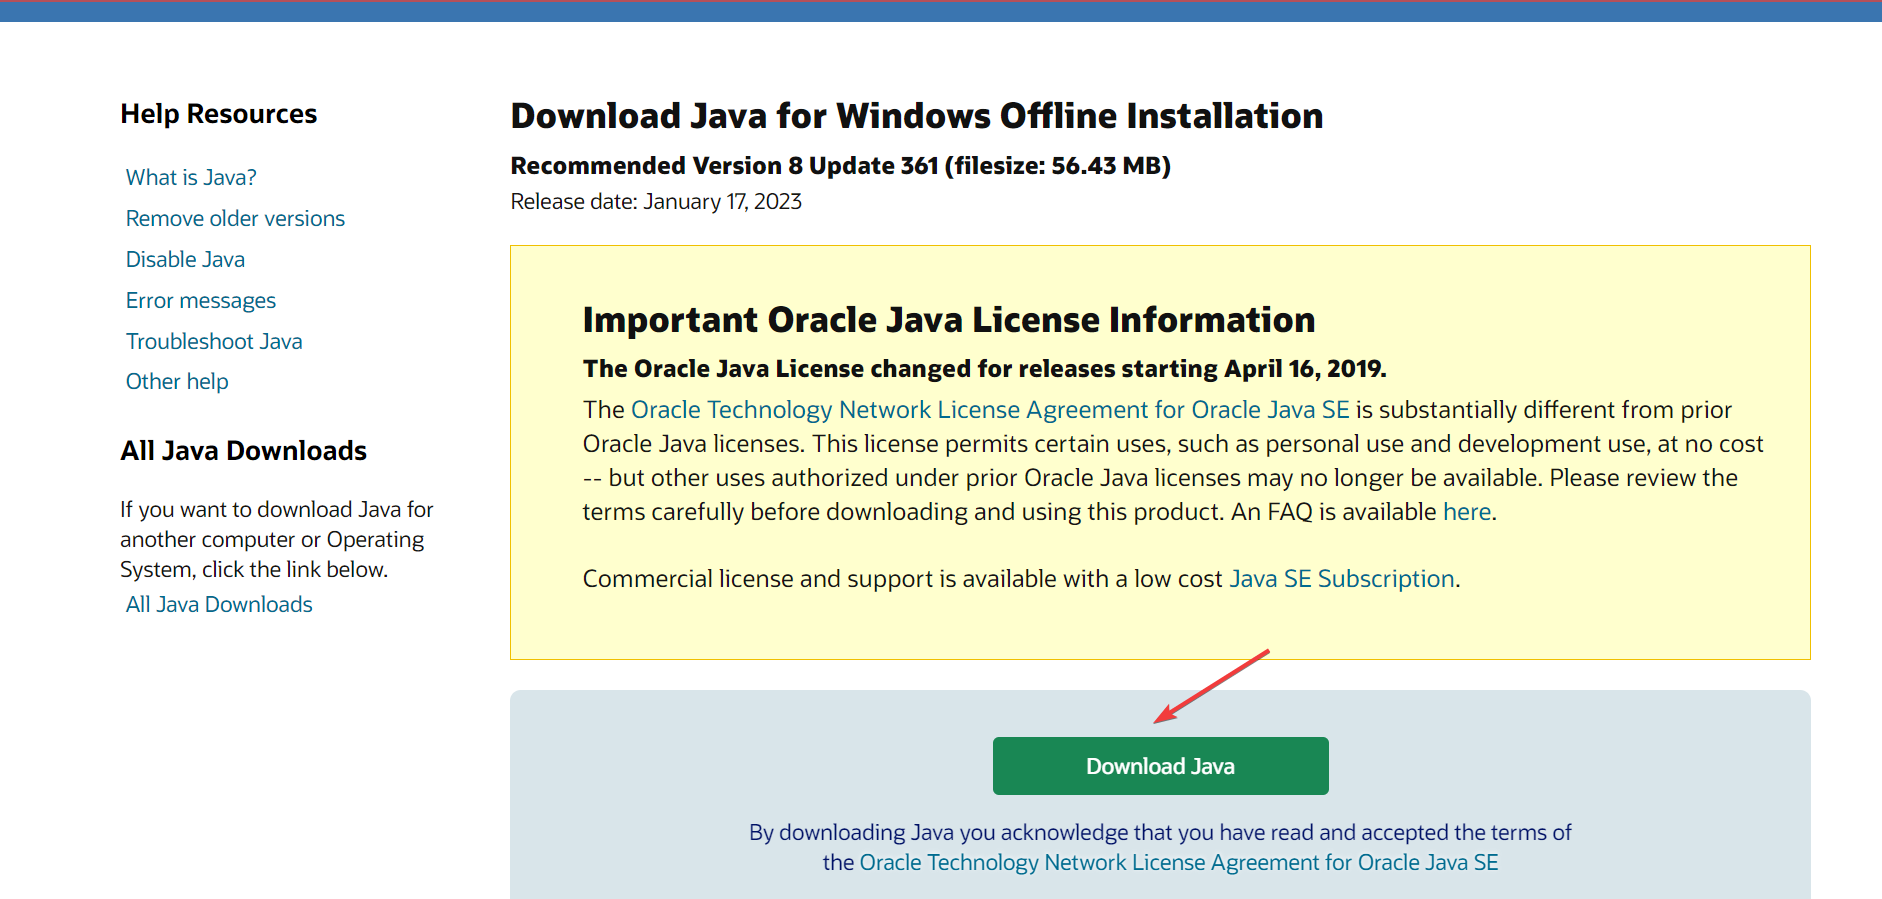
2. Use the offline installer
- Go to the official website, and click Download Java to get the offline version.

- After downloading, run the setup, and click Yes in the UAC prompt.
- Now, follow the on-screen instructions to complete the installation process.

If you get the Java Error code 1603 on the regular installer, try using the offline one, and verify whether the Java installation error persists.
3. Uninstall the previous Java version first
- Download CCleaner Professional for Windows 10.
- Open the setup wizard, and follow the on-screen instructions to install the software.
- In CCleaner, go to Tools from the navigation pane, select Java from the list of programs, and click on Uninstall.

- Choose the appropriate response if a confirmation prompt appears.
- Once done, restart the computer for the changes to come into effect, and then run the installer you downloaded earlier.
If you are getting Java install error: Expected or Error code 1603, remove the current version using a reliable Java uninstall tool that will not just remove it but also delete the associated files and Registry entries.
- Fix: MSI Afterburner Failed to Start Scanning
- How to Fix Microsoft Common Language Runtime Native Compiler High CPU Usage?
- Epson Easy Photo Print is Not Working? Fix it in 7 Steps
- Excel Keeps Crashing: 5 Simple Ways to Fix
- How to Share Files Over Bluetooth on Windows 10/11
4. Modify Java security settings
- Press Windows + R to open Run, type control panel, and hit Enter.

- Click on the View by dropdown menu, and choose Small icons.

- Click on the Java entry.
- Navigate to the Security tab, untick the checkbox for Enable Java content for browser and Web Start applications, and click OK to save the changes.

- Restart the computer, then launch the installer again, and it should now run without throwing an error.
- Finally, head back to the Java security settings, and tick the checkbox for Enable Java content for browser and Web Start applications.

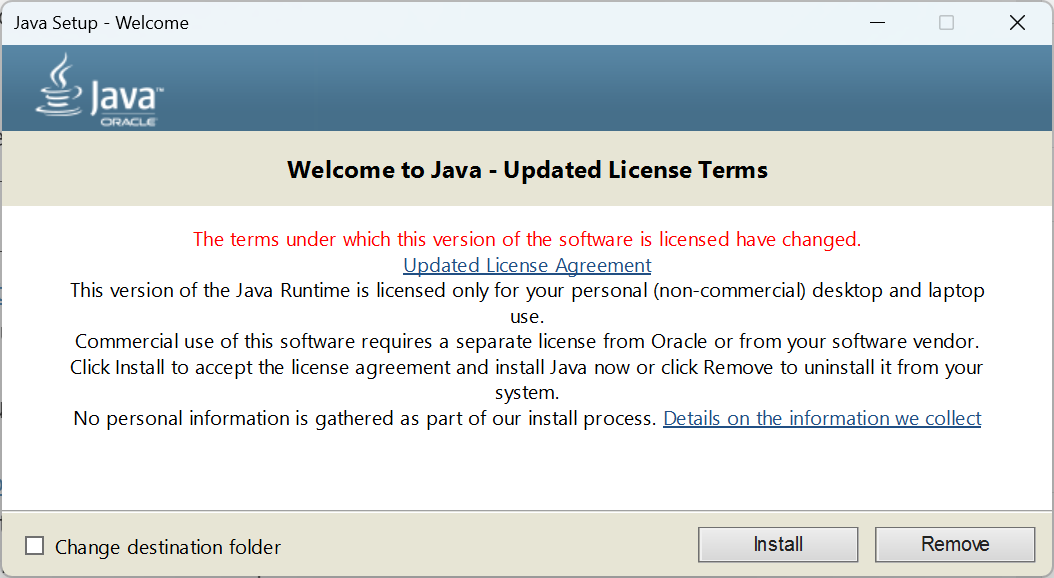
5. Change the destination folder
- Run the Java installer, tick the checkbox for Change destination folder, and click Install.
- Now, manually create the same path listed here.
- Once done, click on Change.
- Navigate the path you created earlier, and click OK to select it.

- Click Next to start the installation.
This workaround was shared by a user who encountered the Java Error code 1603 and seemed to work for others.
By now, you should have gotten the error fixed and Java up and running on the PC. Before you leave, discover some quick tips to speed up Windows 10 and make it faster than ever.
Tell us which fix worked for you in the comments section below.
![]()
Java is a commonly used programming language, and numerous clients depend on it for different applications. However, when trying to update Java, you may encounter Java update error 1603. This error demonstrates that the establishment of the new Java update has failed.
This error can arise because previous versions of Java exist on your system. Thus, uninstalling them might be helpful. Checking the system requirements can help you detect where your system could be improved. Also, disabling the antivirus software can help to fix Java update error 1603.
While this can disappoint, there are a few arrangements that you can attempt to fix the blunder. Previously mentioned was a portion of the routes through which you can fix the error. In this article, we will provide a total aid on the most proficient method to fix Java update error 1603.
Table of Contents
- 1 How To Fix Java Update Error 1603
- 1.1 Uninstall previous versions of Java
- 1.2 Check for system requirements
- 1.3 Disable antivirus software
- 1.4 Check the Windows Installer Service
- 1.5 Use the Java offline installer
- 2 Other Ways To Fix Java Update Error 1603
- 2.1 Java Uninstall Error Code 1603
- 2.2 Java Error 1603 Fix
- 2.3 Java Install Error 1603:
- 3 Java Error Code 1603
- 3.1 Java Won’t Install on Windows 10
- 4 FAQs
- 4.1 What causes Java error 1603 during installation or uninstallation?
- 4.2 Can I fix Java update error 1603, or must I contact specialized help?
- 4.3 Do I need to uninstall previous versions of Java before installing a new update?
- 4.4 Can antivirus software cause Java error 1603?
- 4.5 How do I check if the Windows Installer Service runs correctly?
- 5 Conclusion
These are the following ways how you can fix Java update error 1603:
Uninstall previous versions of Java
Before installing the new Java update, remove any previous versions you may have installed essentially. These old versions can cause conflicts and prevent the new version from installing correctly.
Follow these steps to uninstall previous versions of Java:
- Open the Run dialog box by pressing the Windows key + R. Type “appwiz.cpl” and press Enter. It will open the Programs and Features window.

- Locate all the previous versions of Java installed on your system. Select each one and click the Uninstall button.

Follow the prompts to uninstall each version. Once all previous versions of Java have been uninstalled, restart your computer.
If you want to restart your computer, check this out for easy ways.
Check for system requirements
Follow the following steps to check your system requirements:
- Guarantee that your PC meets the minimum system requirements for the new Java update.
- If your PC doesn’t meet the necessities, you might experience errors during the establishment process.
- You can take a look at the framework prerequisites on the Java website.
Disable antivirus software
Antivirus programming can sometimes slow the establishment of new software, including Java updates. To fix error 1603, try disabling your antivirus software temporarily.
Disable antivirus software:
In the system tray, right-click on the antivirus icon. Select Disable or Pause Protection. Choose the amount of time you want to disable the software.![]()
Attempt to install the Java update again. Once the installation is complete, re-enable your antivirus software.
Check the Windows Installer Service
The Windows Installer Service is crucial for installing new software on your computer. If this service is not running correctly, it can cause error 1603.
To look at the Windows Installer Service, follow these steps:
Open the Run dialog box by Pressing the Windows key + R. Type “services.msc” and press Enter. This will open the Services window.
Find the Windows Installer service. Check that the service is running and set to Automatic. On the off chance that the assistance isn’t running, right-click on it and select Start.
Use the Java offline installer
If you have tried the previous solutions and are still encountering Java update error 1603, try using the Java offline installer. The offline installer can install Java without an internet connection and may resolve any issues with the online installer.
Follow these steps to use the Java offline installer:
Download the Java offline installer from the Java website. Save the file to your computer.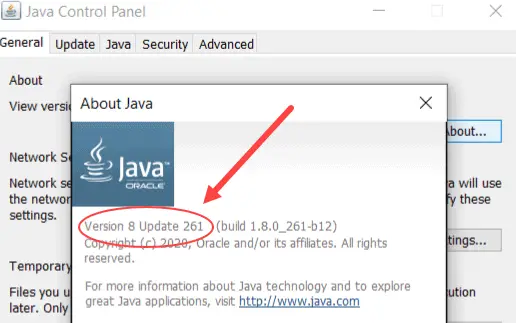
Close all running programs. Run the offline installer and follow the prompts to install Java. Once the installation is done, restart your computer.
See Also: A Fatal JavaScript Error Occurred [Fixed] | 4 Unique Ways
Other Ways To Fix Java Update Error 1603
In case the solutions mentioned above prove to be unsuccessful, you can try the following solutions to fix Java update error 1603-
Java Uninstall Error Code 1603
If you encounter error code 1603 while trying to uninstall Java from your computer, there are a few solutions you can try: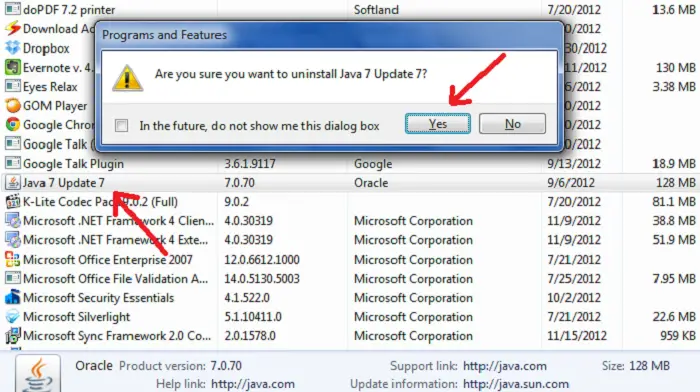
- Use the Java uninstall tool: Oracle provides an uninstall tool you can download from the Java website. Run this tool to remove all traces of Java from your system.
- Use a third-party uninstaller: Many uninstallers can remove stubborn programs like Java. These programs can help remove any leftover files and registry entries that may be causing the error.
- Check for conflicting software: Other programs installed on your system may conflict with Java and prevent it from uninstalling correctly. Check for any programs that may be causing conflicts and temporarily disable or uninstall them before attempting to uninstall Java.
Java Error 1603 Fix
If you encounter error 1603 while trying to install Java, follow these solutions to fix the error:
- Check for system requirements: Ensure your computer meets the new Java update’s minimum requirements. If your computer does not meet the requirements, you may encounter errors during installation.

- Check the Windows Installer Service: The Windows Installer Service is crucial for installing new software on your computer. Ensure that the service is running correctly and set to automatic.
Java Install Error 1603:
If you encounter error 1603 while trying to install Java, try the following solutions:
- Use the Java offline installer: The offline installer can install Java without an internet connection and may resolve any issues with the online installer.

- Temporarily disable antivirus software: Antivirus software can sometimes interfere with the installation of Java. Temporarily disable your antivirus software and attempt to install Java again.

Java Error Code 1603
Error code 1603 is a generic Windows installation error that can occur during the installation or uninstallation of the software.
If you encounter error code 1603 while installing or uninstalling Java, try the abovementioned solutions, such as removing any previous versions of Java, disabling antivirus software, and checking system requirements.
Java Won’t Install on Windows 10
If Java doesn’t install on Windows 10, follow these solutions:
- Use the Java offline installer: The offline installer can install Java without an internet connection and may resolve any issues with the online installer.
- Temporarily disable antivirus software: Antivirus software can sometimes interfere with the installation of Java. Temporarily disable your antivirus software and attempt to install Java again.

- Check for system requirements: Ensure your computer meets the new Java update’s minimum requirements. If your computer does not meet the requirements, you may encounter errors during installation.
- Check the Windows Installer Service: Ensure that the Windows Installer Service is running correctly and set to automatic.
- Use the Java uninstall tool: If Java is already installed on your system, use the Java uninstall tool to remove all traces of Java before attempting to install the new version.
See Also: 7 Best Online JavaScript Validator Tools In 2023
FAQs
What causes Java error 1603 during installation or uninstallation?
There can be several reasons for this error, including conflicts with previous versions of Java, antivirus software interfering with the installation process, insufficient system requirements, or issues with the Windows Installer Service.
Can I fix Java update error 1603, or must I contact specialized help?
You can fix the blunder by following the arrangements referenced in this article.
Do I need to uninstall previous versions of Java before installing a new update?
It is recommended to uninstall all previous versions of Java from your system before installing a new update. Previous versions of Java can cause conflicts during installation and may result in errors like 1603.
Can antivirus software cause Java error 1603?
Yes, antivirus software can sometimes interfere with the installation of Java and cause error 1603. To fix this, you can temporarily disable your antivirus software and attempt to install Java again.
How do I check if the Windows Installer Service runs correctly?
To check if the Windows Installer Service is running, go to the Start menu and type services.msc in the search box. This will open the Services window. Scroll down to find the Windows Installer Service and check if its status is Running, Its startup type is set to Automatic.
Conclusion
Java update error 1603 can be frustrating but can be fixed with the abovementioned solutions. It is essential to follow each step carefully and ensure your computer meets the minimum system requirements for the new Java update. Check this out, if you want to know about Liferay Portal in Java
You can resolve this error and continue using Java for all your programming needs with patience and effort.
Aloukik Rathore is a Delhi-based entrepreneur, musician, writer, and tech nerd. He has been blogging for about 7 years now.
Содержание:
- 1 Основные причины возникновения ошибки
- 2 Что предпринять при появлении ошибки установки Java
- 3 Удаление потенциально конфликтных обновлений
- 4 Изменение расположения установки и проверка прав доступа
- 5 Отключение Java-контента в браузере
- 6 Прочие решения
В процессе своей работы многие созданные под Windows приложения используют библиотеки, входящие в состав встроенных или отдельно устанавливаемых фреймворков вроде NET Framework. Одним из наиболее распространенных компонентов подобного рода является Java – программная платформа, разработанная компанией Sun. В свое время Java играла значительную роль в адаптации программного обеспечения, служа своего рода прокладкой между железом, операционной системой и программной средой. Сегодня данное ПО уже не столь востребовано, тем не менее, есть еще немало приложений, которые в нем нуждаются.
Если при установке какая-то программа потребует наличия Java, следует скачать ее последнюю версию с официального сайта и установить на ПК как обычное приложение. Обычно инсталляция пакета проходит без проблем, но в некоторых случаях на этом этапе вас может ждать неприятный сюрприз, а точнее ошибка 1603, указывающая на сбой установки.

Основные причины возникновения ошибки
Сталкиваться с этой неполадкой чаще всего приходится при повторной установке или обновлении Java. Вообще же, error code 1603 является вполне типичной ошибкой инсталляции и возникает не только при установке Java, но и при работе с другими программами. Причины сбоя чаще всего кроются в повреждении установочных файлов, прерывании процесса, некорректной перезаписи или удалении связанных ключей реестра. Кроме того, ошибка Error code 1603 Java может быть спровоцирована недоработанными накопительными обновлениями Windows.
Итак, вы столкнулись с ошибкой error code 1603 Java. Что делать? Наиболее эффективным, а, значит, и правильным решением в таком случае будет полная переустановка компонента. При этом для удаления старой или поврежденной версии Java лучше использовать специальную утилиту Java Uninstall Tool, скачать которую можно с официального сайта www.java.com/ru/download/uninstalltool.jsp.
Для деинсталляции также отлично подходят сторонние приложения, такие как Wise Program Uninstaller или Total Uninstall. В отличие от стандартного средства удаления программ, эти приложения позволяют находить и удалять оставшиеся после деинсталляции «хвосты» – временные файлы, папки и ключи реестра, часто вызывающие конфликты при новой установке.


Опытные пользователи могут выполнить дополнительный поиск мусорных каталогов и ключей реестра по ключевому слову «Java», но это довольно рискованная операция, поскольку высока вероятность удалить что-то важное. После деинсталляции платформы следует перезагрузить компьютер.

Удаление потенциально конфликтных обновлений
Если незадолго до появления ошибки error code 1603 при установке Java вы устанавливали накопительные обновления, попробуйте их удалить. В частности, проверьте, имеется ли на вашем компьютере пакет обновления KB2918614, если он есть, удалите его.

Изменение расположения установки и проверка прав доступа
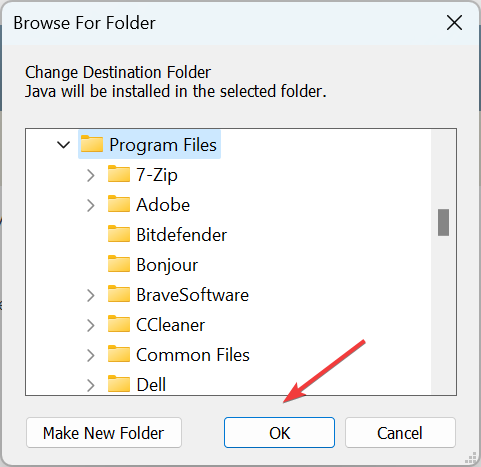
Ошибка 1603 в процессе установки Java иногда возникает по причине отсутствия прав у Системы на каталог, в который устанавливается приложение. С проблемами вам также придется столкнуться, если попытаетесь установить Java на съемный накопитель, зашифрованный диск или в защищенную подобным образом папку. Мы не рекомендуем изменять права доступа на системные каталоги, вместо этого создайте в корне диска С или D отдельную папку и убедитесь, что пользователь СИСТЕМА имеет на нее полные права.

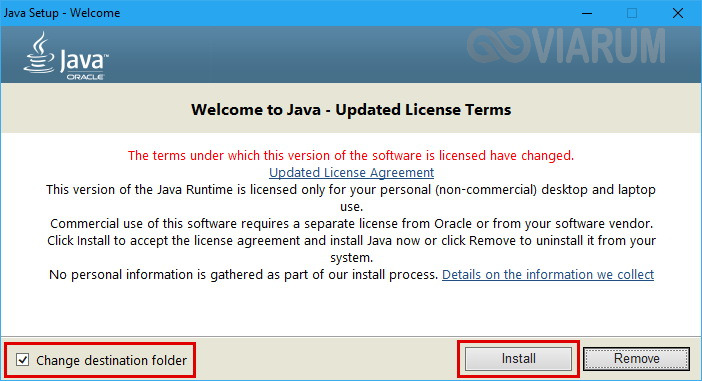
Теперь можно приступать к повторной установке. Скачайте с официального сайта автономный установщик Java, потому что это самый надежный вариант. Перед тем как запускать исполняемый файл установщика, откройте Диспетчер задач и проверьте наличие процесса MSIEXEC.EXE. Если он запущен, завершите его. Запустите установщик Java, отметьте галочкой опцию «Change destination folder» и нажмите «Install».

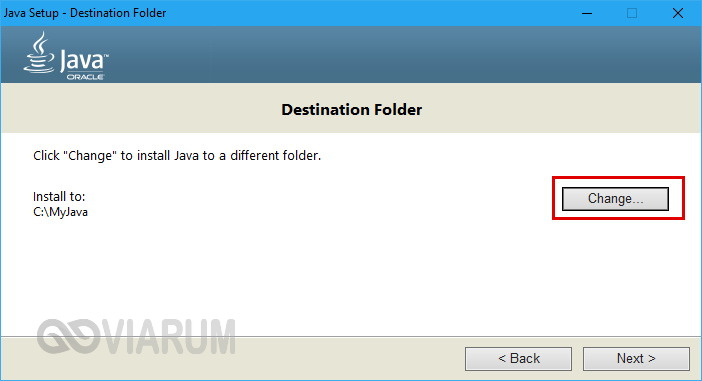
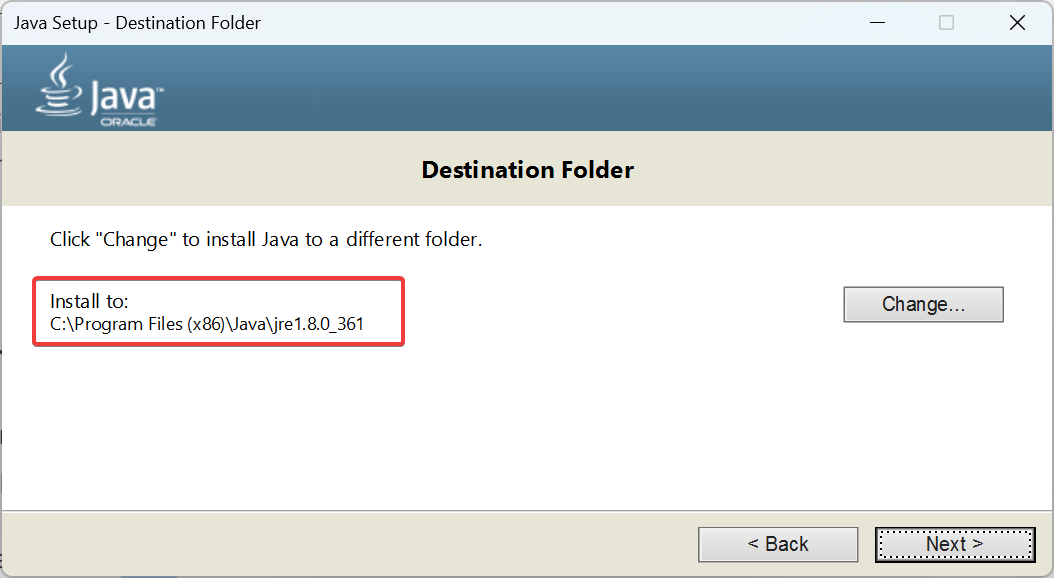
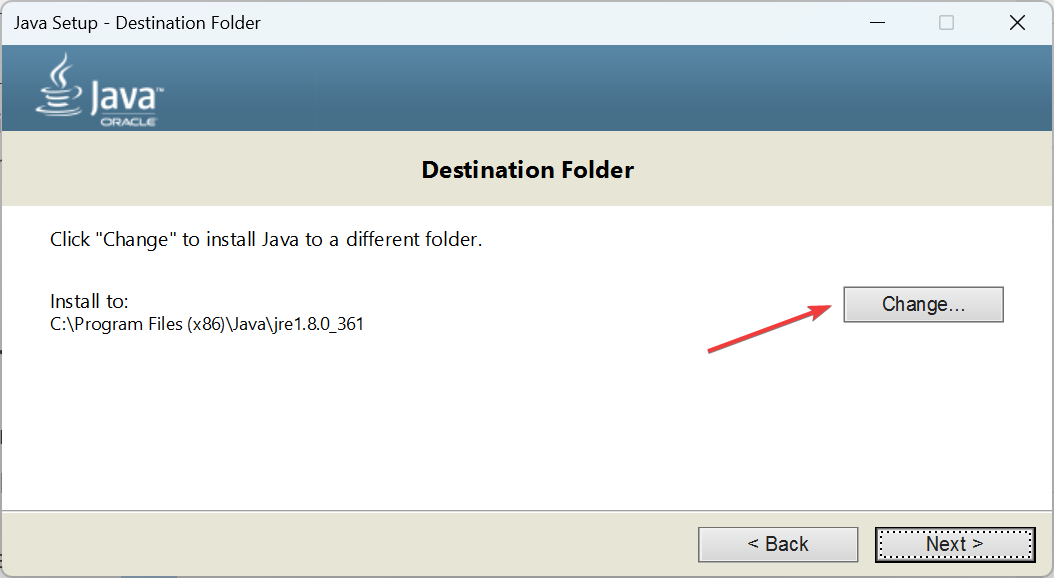
В следующем окне мастера нажмите кнопку «Change», укажите путь к альтернативному месту установки и выполните инсталляцию платформы в штатном режиме.

Отключение Java-контента в браузере
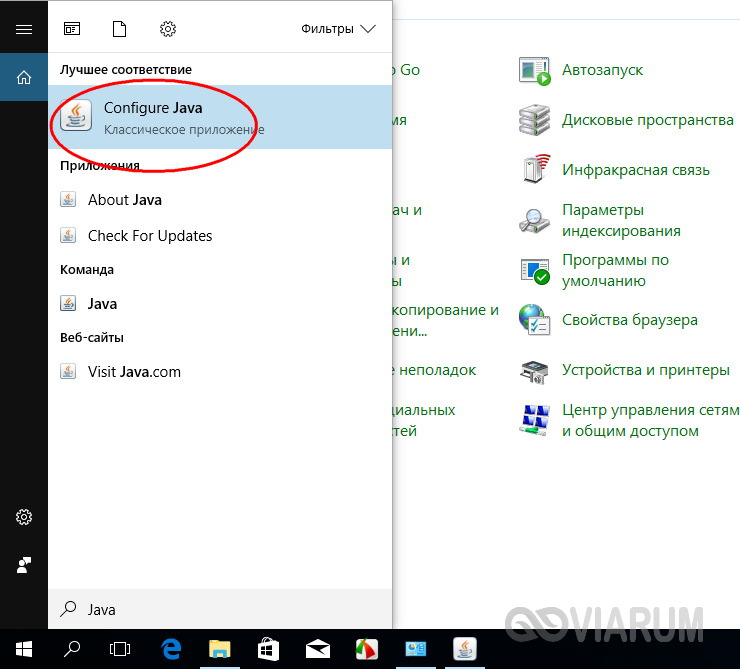
Данный способ не требует радикального удаления старой или поврежденной версии Java, но его можно опробовать в случае появления ошибки 1603 при обновлении Java поверх ранней версии. Откройте панель управления Java (через поиск), переключитесь на вкладку Security и снимите галочку с чекбокса «Enable Java Content for browser…». Сохранив настройки, скачайте автономный установочный пакет Java и осуществите его инсталляцию. По завершении процедуры активируйте ранее отключенную настройку.


Прочие решения
Если у вас не устанавливается Java, выдавая error code 1603, желательно также проверить следующие моменты. Во-первых, убедитесь, что на диске/разделе у вас имеется достаточно места. Во-вторых, проверьте командой sfc /scannow целостность системных файлов (если ошибка возникает при установке и других приложений). В-третьих, выполните откат к предыдущей версии Windows – этот метод является универсальным и позволяет решать разного рода проблемы, связанные с повреждением файлов и реестра.