Take a closer look at the Media Cache folder if Premiere Pro doesn’t allow file import
by Tashreef Shareef
Tashreef Shareef is a software developer turned tech writer. He discovered his interest in technology after reading a tech magazine accidentally. Now he writes about everything tech from… read more
Updated on
- If you’re wondering how to fix unsupported compression types in Premiere Pro, you’re in the right place.
- This error occurs when trying to import an audio or video file, so you might want to tweak the extensions a bit.
- Cache piling up can also trigger the file having an unsupported compression type, so a quick cleanup should help.

Adobe’s Premiere Pro is an industry standard when it comes to consumer-grade video editing software and most of it has to do with its wider file format support and ease of use.
However, some users have reported that they are unable to import audio files like MP3, MP4, AVI, or AVCHD due to a very particular error related to unsupported compression type in Premiere Pro.
What does unsupported compression type mean?
The full error reads the file has an unsupported compression type and occurs when you try to import any media file. However, some specific formats – such as AVI – tend to be more affected than others.
Now, the original file can be easily blamed for being incompatible with the AVI format. However, other culprits can interfere such as cache accumulation or folder-related glitches.
Let’s quickly go through some of the most common scenarios:
- The file has an unsupported compression type MP4, MP3
- This file has an unsupported compression type MkV, AVI
- Premiere Pro file has unsupported compression type
- Adobe Premiere Rush unsupported compression type
Now that you know what you’re up against, you should also know that this is a common issue and mostly occurs due to the incorrect file format. In this article, we take a look at the best possible solutions to fix it.
Why can’t I import MP3 or MP4 files in Premiere Pro?
- What does unsupported compression type mean?
- Why can’t I import MP3 or MP4 files in Premiere Pro?
- 1. Make changes to the file and/or folder
- 2. Clear Media Cache Files and Database ✅
- 3. Change the File Extension
Before we begging the actual troubleshooting, we advise you to check if you are using a trial version of Adobe Premiere Pro.
Adobe Premiere Pro may not function properly with some file formats when the trial version is active. If you have the license for the product, make sure it is activated.
1. Make changes to the file and/or folder
- Change the file directory: Before attempting to import the file, change the file location and then attempt to import the file.
- If your file is in one folder, move it to an alternative folder and try to import it from there.
- Should the issue persist, try to move the file to another disk or partition and try again.
2. Clear Media Cache Files and Database ✅
- Launch Adobe Premiere Pro.
2. Click on the Edit menu and select Preferences.
3. Select the Media tab from the left pane.
- Here, note down the location for Media Cache Files and Media Cache Database. Copy the location to a notepad or something for better accessibility.
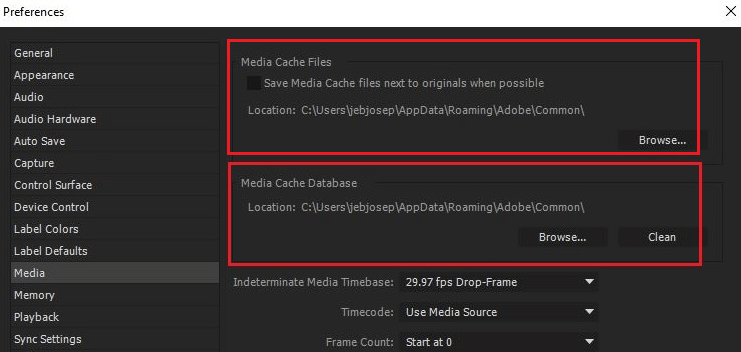
4. Close the Adobe Premiere Pro app and any other Adobe program running on your computer.
5. Open the File Explorer and navigate to the Media Cache Files and Media Cache Database locations, one by one.
6. Rename the folders, Media Cache File, and Media Cache.
7. Now launch Adobe Premiere Pro again and go to Edit > Preferences > Media.
8. Click the Clean button for the Media Cache Database folder.
9. Close and re-launch Adobe Premiere Pro and attempt to import the file with the error and check for any improvements.
- Adobe Premiere Pro not Exporting Full Video? How We Fixed it
- FIX: Adobe Premiere Pro could not find valid editing modes
- FIX: Video driver not supported in Premiere Pro
- Unspecified Drawing Error [After Effects / Premiere Pro]
- [Fixed] This Effect Requires GPU Acceleration: 5 Quick Ways
3. Change the File Extension
- Before importing the media file, try to change the default file extension to something else.
- For instance, if you want to import a .avi file, change the extension to .mpg.
- This makes Premiere Pro use a more tolerant import format that will accept a non-standardized file as a valid import.
You can also use the best audio converter software to convert your media files to a supported format.
And if nothing seems to work, try to reinstall Premiere Pro. After uninstalling it, make sure you remove any leftover junk using registry cleaning software. Finally, you can proceed with the reinstallation.
That’s it! We hope you managed to fix the unsupported compression type Premiere Pro error with one of these solutions.
![]()
В этом документе содержатся сведения о том, как устранить неполадки связывания и импорта при импорте аудиофайлов.
Выявление неполадок связывания и импорта при работе с аудиофайлами
При попытке импортировать такие файлы, как AVCHD (MTS), MP3 и MP4, в проект при помощи Premiere Pro может появиться сообщение об ошибке, в котором говорится: «Файл содержит неподдерживаемый тип сжатия». Эта ошибка иногда возникает в других продуктах Adobe для работы с аудио и видео, такими как After Effects и Media Encoder.
Устранение ошибок импорта
-
Если вы видите сообщение об ошибке «Файл содержит неподдерживаемый тип сжатия», проверьте Кэшированные медиафайлы и базу данных кэшированных медиафайлов в Premiere Pro.
-
Выберите пункт меню «Правка» > «Установки» > «База данных кэшированных медиафайлов» в ОС Windows или меню Premiere Pro > «Установки» > «База данных кэшированных медиафайлов» в Mac OS. Запомните, где находится папка Media Cache Database на вашем компьютере.
Как очистить кэш медиафайлов -
Закройте Premiere Pro и другие приложения Adobe для работы с аудио- и видеофайлами.
-
Перейдите в папку Media Cache в каталоге Premiere Pro > Preferences и переименуйте папки Media Cache file и Media Cache. Выберите «Очистить», чтобы очистить папку с базой данных кэшированных медиафайлов.
-
Запустите Premiere Pro и попытайтесь импортировать требуемые файлы.
-
Если проблема все равно наблюдается, измените каталог для хранения файлов AVCHD и проверьте, удалось ли устранить эту проблему. Например, если структура папок выглядит следующим образом:
AVCHD>BDMV>STREAM>.MTS0000
Создайте новую папку XYZ и переместите содержимое папки AVCHD XYZ в папку XYZ.
Убедитесь в том, что структура папки с файлами MTS идентична со структурой исходной папки.
-
Если проблему устранить не удается, она может быть связана с активацией.
-
Проверьте, не используется ли пробная версия Adobe Premiere Pro. Если используется пробная версия, могут наблюдаться проблемы при импорте файлов AVCHD и MP4, поскольку необходимые файлы с расширением .dll отсутствуют в папке C:\Users\Общие\Общие документы\AdobeInstalledCodecs.Обновите тариф до платной подписки на Creative Cloud.
-
В ОС Windows удалите Premiere Pro.
-
Перейдите в папку C:\Users\Общие\Общие документы\AdobeInstalledCodecs.
-
Переименуйте папку AdobeInstalledCodecs.

Как переименовать папку AdobeInstalledCodecs в ОС Windows -
Переустановите Premiere Pro.
-
Запустите Premiere Pro и попытайтесь импортировать файлы MTS или MP4.
-
В Mac OS удалите Premiere Pro.
-
Перейдите в папку Mac HD/Users/Имя пользователя/Shared и переименуйте папку AdobeInstalledCodecs.
Как переименовать папку AdobeInstalledCodecs в Mac OS -
Переустановите Premiere Pro.
-
Запустите Premiere Pro и попытайтесь импортировать файлы MTS или MP4.

$config[ads_netboard] not found
Оглавление:
- Почему я не могу импортировать файлы MP3 или MP4 в Premiere Pro?
- 1. Измените расширение файла
- 2. Очистить кэш-память файлов и базу данных
- 3. Другие решения, чтобы попробовать
Видео: 8 Steps to Edit a Video in Premiere Pro (Start to Finish) 2023
$config[ads_netboard] not found
Adobe Premiere Pro является отраслевым стандартом, когда речь идет о программном обеспечении для редактирования видео потребительского уровня, и в большинстве своем оно связано с более широкой поддержкой форматов файлов и простотой использования. Однако некоторые пользователи сообщают, что не могут импортировать некоторые аудиофайлы, такие как MP3, MP4 или AVCHD, из-за ошибки.
Полная ошибка гласит: «Файл имеет неподдерживаемый тип сжатия» и возникает при попытке импортирования любого медиа-файла. Это распространенная проблема, которая возникает в основном из-за неправильного формата файла. Мы рассмотрим лучшие возможные решения, чтобы исправить эту ошибку.
Почему я не могу импортировать файлы MP3 или MP4 в Premiere Pro?
1. Измените расширение файла
- Перед импортом медиа-файла попробуйте изменить расширение файла по умолчанию на что-то другое. Например, если вы хотите импортировать файл .avi, измените расширение на .mpg.
- Это заставляет Premiere Pro использовать более терпимый формат импорта, который будет принимать нестандартный файл в качестве допустимого импорта.
- Вы также можете использовать лучшее программное обеспечение для конвертации аудио, чтобы конвертировать ваши медиафайлы в поддерживаемый формат.

2. Очистить кэш-память файлов и базу данных
- Запустите Adobe Premiere Pro.
- Нажмите на меню « Правка» и выберите « Настройки».
- Перейдите на вкладку « Медиа » на левой панели.
- Здесь запишите расположение для « Media Cache Files » и « Media Cache database ». Скопируйте местоположение в блокнот или что-то для лучшего доступа.
- Закройте приложение Adobe Premiere Pro и любую другую программу Adobe, запущенную на вашем компьютере.
- Откройте «Проводник» и последовательно перейдите к папкам «Файлы мультимедийного кэша » и « База данных мультимедийного кэша ». Переименуйте папки, Media Cache File и Media Cache.
- Теперь снова запустите Adobe Premiere Pro и выберите «Правка»> «Настройки»> «Мультимедиа».
- Нажмите кнопку «Очистить» для папки «База данных Media Cache».
- Закройте и перезапустите Adobe Premiere Pro, попробуйте импортировать файл с ошибкой и проверьте наличие улучшений.

Проблема с Premiere Pro появляется только при импорте определенных аудиофайлов. Попробуйте конвертировать их с помощью этих инструментов.
3. Другие решения, чтобы попробовать
- Измените каталог файлов. Прежде чем пытаться импортировать файл, измените его местоположение, а затем попытайтесь импортировать файл. Если ваш файл находится в одной папке, переместите его в другую папку и попробуйте импортировать его оттуда. Если проблема сохраняется, попробуйте переместить файл на другой диск или раздел и повторите попытку.
- Проверьте, используете ли вы пробную версию Adobe Premiere Pro. Adobe Premiere Pro может работать неправильно с некоторыми форматами файлов, когда активна пробная версия. Если у вас есть лицензия на продукт, убедитесь, что он активирован.
- Удалите и установите заново Premiere Pro. Если ничего не работает, попробуйте переустановить программное обеспечение. После удаления убедитесь, что вы удалили все оставшиеся ненужные файлы, используя программное обеспечение для очистки реестра.

$config[ads_netboard] not found

DIY Video Studio is supported by its readers who use the affiliate links or ads on this site. As an Amazon Associate, I earn from qualifying purchases. Thank your support if you use any of the links.
If you use Adobe Premiere Pro to edit videos you might come across this situation. You’re importing video clips into a project. All the clips were recorded in the same session, all of them have the same file type, and all of them have the same kind of compression. Then suddenly, and for no apparent reason, Premiere Pro throws an error message at you. And here’s what it looks like.
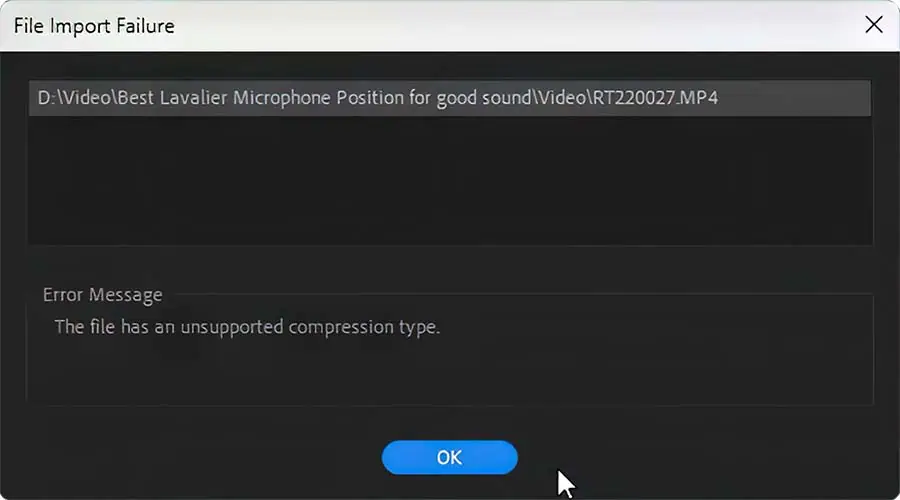
As far as Premiere Pro is concerned, the file has an unsupported compression type, so Premiere Pro can’t import the clip. This is weird, considering all the clips before and after that one clip imported simply fine.
I checked Adobe’s help
and support community
To solve the “The file has an unsupported compression type” issue in Premiere Pro try the following fixes:
- Delete or rename the media cache folder
- Move the clip to another folder
- Change the clip’s file extension
- Re-encode the video clip
Most people seem to agree that all these solutions work, but not all the time and for everyone. That has also been my experience. Three of the four fixes allowed me to import my rogue video clip. Even so, I’ll include all the fixes since what didn’t work for me might work for you.
In case you’re wondering, I encountered this file import failure message while importing 4K mp4 (h.264) video files into Adobe Premiere Pro 2023 version 23.0.0 (Build 63). However, I think this problem has been around for at least a couple of years, so you may get the same problem on earlier versions of Premiere Pro.
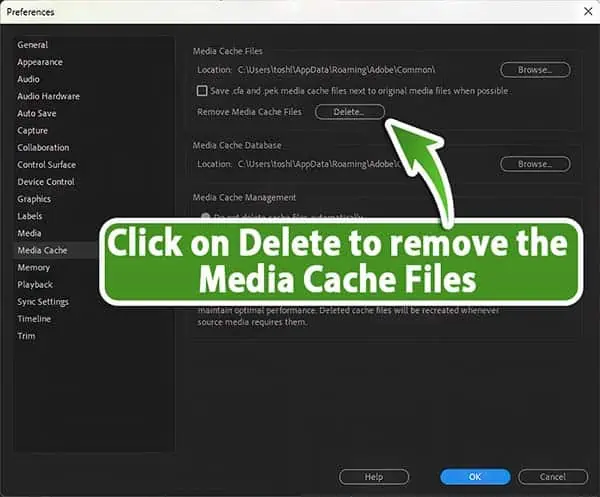
Unsupported Compression Type Fix #1: Delete the media cache
There are two ways to delete the media cache, from within Premiere Pro’s Preferences, and manually by using Windows File Explorer. For me, only the manual way worked, but the other way might work for you.
Method #1: Delete the media cache from within Premiere Pro’s Preferences
In Premiere Pro click on Edit in the menu bar. Then click on Preferences near the bottom of the drop-down menu, followed by Media Cache. Near the top and middle of the panel you will see “Remove media cache files”, and a delete button. Click Delete.
Close your project and then Premiere Pro. Re-open Premiere Pro and your project, then try importing your video clip.
Method #2: Delete the media cache manually
In Premiere Pro click on Edit in the menu bar. Then click on Preferences near the bottom of the drop-down menu, followed by Media Cache. In the top middle of the panel, you will see the location of the media cache files. Unless you changed the location, it will be something like
C:\user\YOURNAME\AppData\Roaming\Adobe\Common
take note of the location and close Premiere Pro.
Open Windows File Explorer and navigate to the location of your media cache file. Once there, either delete or rename (I prefer to rename) the Media Cache Files folder to OLD – Media Cache Files. You can also do the same with the Media Cache folder, but I have found it to be unnecessary.
Note that if you rename or delete the Media cache files and media cache folders, Premiere Pro will create new folders.
Re-open Premiere Pro and your project, then import your video clip.
Hopefully one of the ways of deleting the media cache allowed Premiere Pro to recognize the compression type and successfully import the file. If not, move on to the next fix.
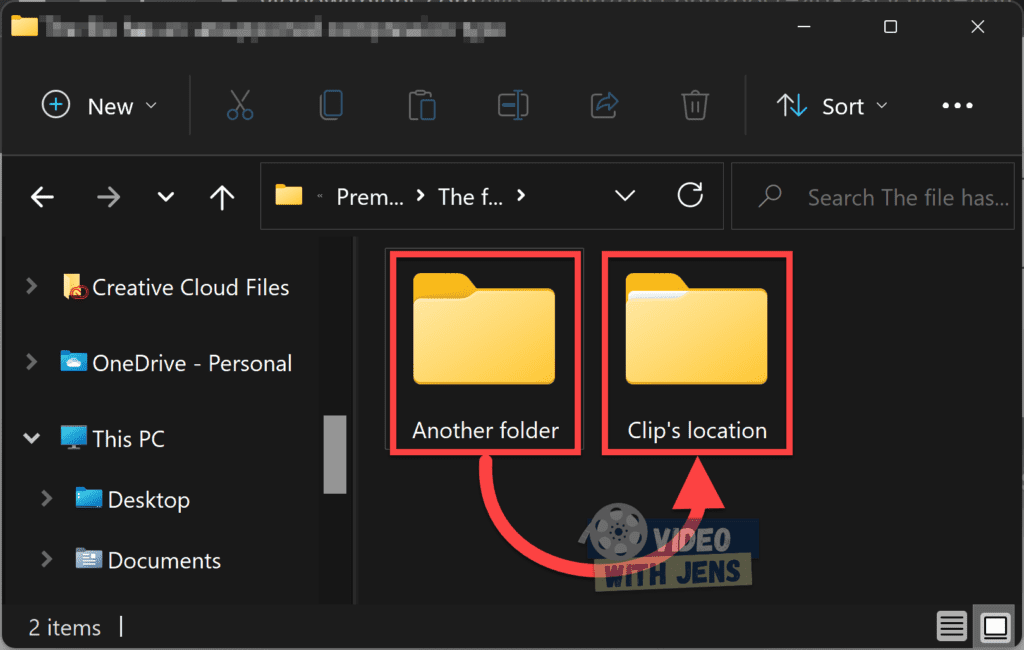
Unsupported Compression Type Fix #2: Move the video file to another folder
For me, this seems a laughable solution. Why would moving the video clip to another folder suddenly change it to having a supported compression type? The thing is, this fix worked for me.
I created a new folder within my video clips folder. I performed the usual Right click -> New -> Folder, then dragged the video clip into the new folder. Finally, I launched Premiere Pro, opened my project, and tried to import the video clip. Against all my expectations, the fix worked, and the video clip was imported into the project perfectly.
Unsupported Compression Type Fix #3: Change the file extension
Again, this seems like an unlikely solution, but it worked for me.
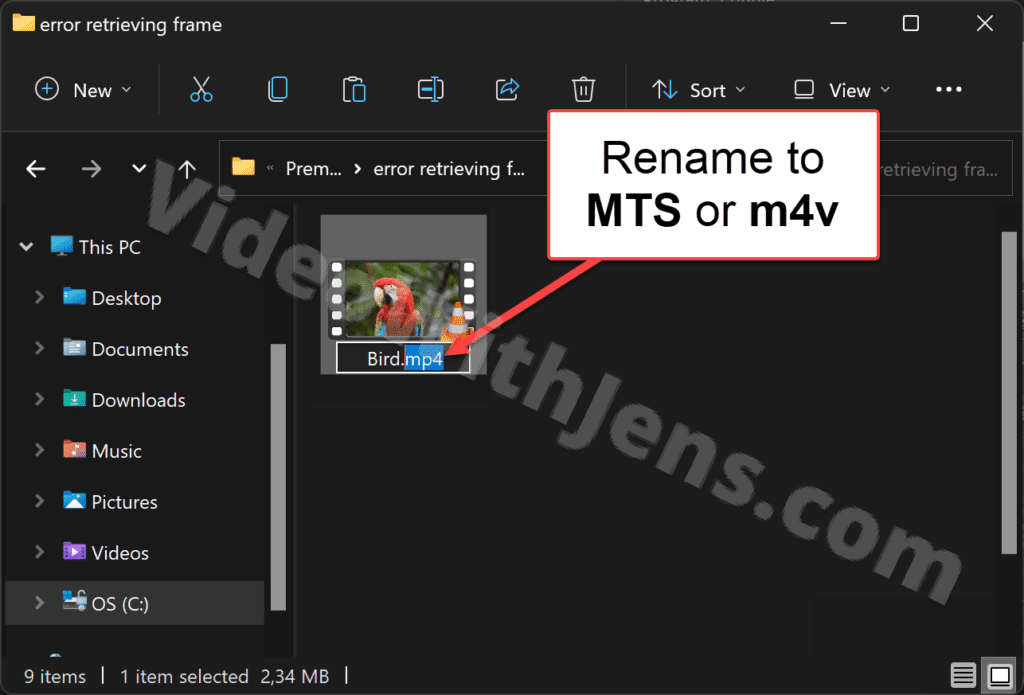
Open the folder where you have your video clips. Right-click with your mouse, on the video clip you cannot import, then choose the rename icon. Alternatively, click on the file and hit F2 on the keyboard. Highlight the file extension and change it to MTS, AVI, or MP4. Then hit Enter on your keyboard. Windows will ask you whether you are sure you want to make the change, click on yes.
Once you have changed the file extension try importing the file into your Premiere Pro project. Hopefully, this fixed the issue.
FIX #4: Re-encode the video file
The final method involves re-encoding the video file, which can be time-consuming, depending on the duration of your clip and the speed of your computer. Again, I have two ways of doing this. The first involves using the Windows Film and TV media player, while the second requires the download and install an app called Handbrake. This is free open-source software that works on Windows, Mac, and Linux. If you regularly create videos, I recommend getting Handbrake. You can download it from the official website![]() .
.
Another option is the VLC Media Player![]() . It’s a free and open-source cross-platform multimedia player that will recognize almost any video format and be able to convert to MP4. However, I will not cover the details of using it in this article.
. It’s a free and open-source cross-platform multimedia player that will recognize almost any video format and be able to convert to MP4. However, I will not cover the details of using it in this article.
Method #1: Re-encode using Windows Film and TV media player
Right-click on your video file. Choose Open With and then Film & TV.
When Windows Film and TV media player opens, click on the pencil icon in the bottom right of the screen. When the menu opens click on Trim. A new edit player will open, and you can drag the trim head from either the top or tail of the video. Drag one of the trim heads by about half a second or more until the Save As Copy button in the top right turns blue and is active. Click on the Save As Copy button to open the Save As window. Choose where you wish to save the new version and click on Save.
Once the file has been re-encoded, import it into your Premiere Pro Project.
Since this method will lose a small amount of your media file, you save a second trimmed version of your file. This time trim footage from the other end of the clip, then save the file. You can edit the two versions together in Premiere Pro, ensuring you have a complete video clip again.
Method #2: Re-encode using Handbrake
Launch Handbrake and open your video clip either by clicking on the Open a single video file button or drag-and-drop your clip onto Handbrake.
When the clip loads click on presets in the menu bar.
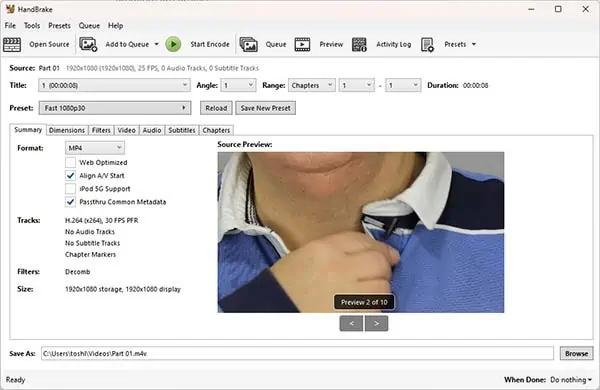
Then in the Presets list scroll down almost to the bottom and choose Production Standard. This will produce a high-quality h.264 video in an mp4 container intended as an intermediate format in video editing. However, it will also create a very large video file. But don’t worry you’ll make this smaller in the next step.
Click on the video tab and use the slider to reduce the quality to about 16, but you could go up to about 20 if necessary for a smaller file. A quality of 0 would be completely lossless and probably larger than your original file. But around 15 to 20 should be good enough.
At the bottom of the Handbrake interface, you’ll see the Save As window. Here, change where the file will be saved, and the file name, and since you’ll be saving an h.264 file you can change the file extension from .m4v to .mp4.
Next, click the Start encode button at the top of the interface so Handbrake will re-encode the file.
Finally, once the file has been re-encoded import it into your Premiere Pro project.
Conclusion
As you have seen there are a few different ways to overcome Premiere Pro’s import failure message of “The file has an unsupported compression type”. You have also seen that some of the fixes can be accomplished in several ways, so you could argue that there are more solutions than the four I have highlighted. However, I would suggest trying one of the easier and quicker solutions first. Unless your clips are short, I would leave the re-encoding option as a last resort.
You might also like…
- How to save or export a Premiere Pro Project with all files
- How to transcribe audio in Adobe Premiere Pro
- How to make your video captions look good in Premiere Pro
- How to export subtitles or captions in Premiere Pro

About the author: Tosh Lubek is a multi-award-winning broadcaster, writer, and video producer, with 40 years of experience in professional broadcasting and has been using Canon video and stills cameras since 2010. He has worked with radio and TV broadcasters, advertising agencies, and direct clients on a variety of projects including radio and television advertising, online video production, corporate videos, award ceremony motion graphics, and theme park sound design. Tosh has won numerous awards, including a Radio Academy Awards Gold Sony, a Gold, Silver, and Bronze World Medals in the New York Festivals International Advertising Awards. Since about 2007 he has been creating YouTube videos. Tosh has been a sponsor of the “video booth” at HashTag Business Events across the UK.
Are you getting the error “The File Has an Unsupported Compression Type” in Premiere Pro?
If so, read on!
In this quick guide, you’ll learn how to fix it.
“The File Has an Unsupported Compression Type” error means that Premiere Pro cannot read the file you are trying to import. This is usually due to an unsupported video format but may also occur with corrupt files or file path issues.
Below, I’ve listed 8 solutions that have solved the error for thousands of users:
The first solution to fix the error is deleting your media cache files, as they might be corrupt and trigger the error.
This is an easy thing to do, and thus the first solution I recommend trying.
- Click on File > Close Project, and save it if you are currently working on a project.
- Click on Edit > Preferences > Media Cache.
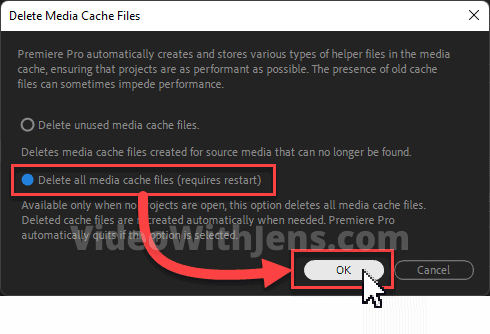
- Click on Delete under Media Cache Files.
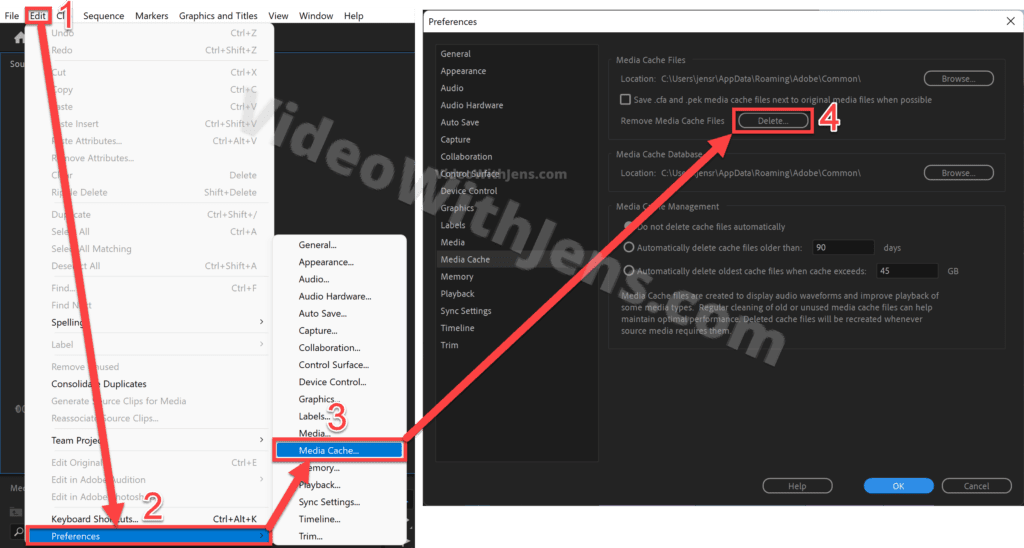
- In the window that pops up, select Delete all media cache files (requires restart).
- Click on OK, and Premiere will automatically restart.
Hopefully, you can import the files without seeing the error “The File Has an Unsupported Compression Type.”
- If you are opening a project containing clips, give Premiere time to generate new media cache files.
It’s also possible you are trying to import an unsupported format, which we’ll discuss next:
2. The File Format is Not Supported
If you are trying to import a file format that Premiere Pro does not support, that’s likely what’s triggering the error.
If that’s the case, you’ll need to transcode the file to a supported format (pretty easy!). I’ll show you that next.
- If you are using OBS studio to record your videos, skip to this part.
Check out this list of supported file formats in Premiere Pro.
- Make sure that both the codec and format are included in the list from Adobe.
2.1 Transcode
To transcode your file, I recommend downloading Shutter Encoder (opens in a new tab); this is one of the best free transcoders.
- Drag and drop your video on the white space area inside Shutter Encoder to import.
- Alternatively, click on Browse, and navigate to the clips in your file system.
- Under Choose function, pick a lossless codec.
- I often use DNxHD for 1080p, and DNxHR for 4K.
- Click on Start function to transcode.
- By default, the files will be located at the exact location as the original clips.
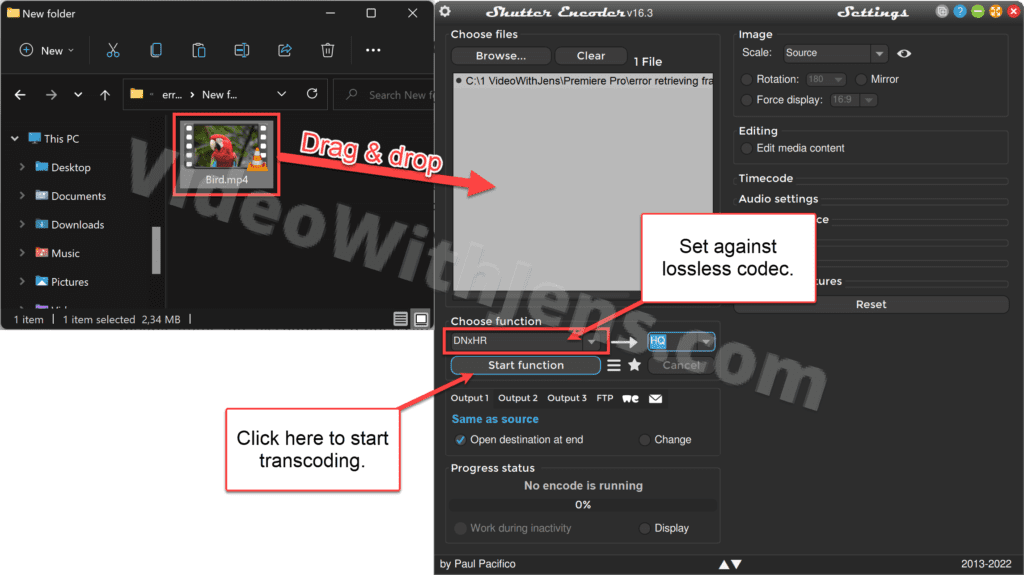
Now, import the transcoded clips to Premiere Pro.
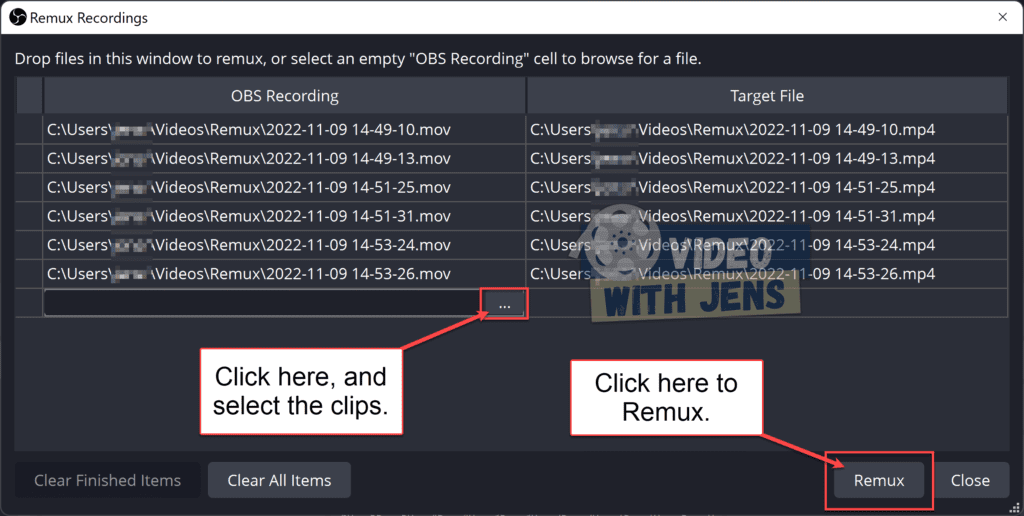
2.2 Remux Recordings in OBS Studio.
MKV files are the default recording format in OBS studio; however, MKV is not supported by Premiere Pro as v.13.1.3.
Luckily, the developers of OBS studio are aware of this and have created a solution.
- Inside OBS studio, click on File > Remux Recordings.
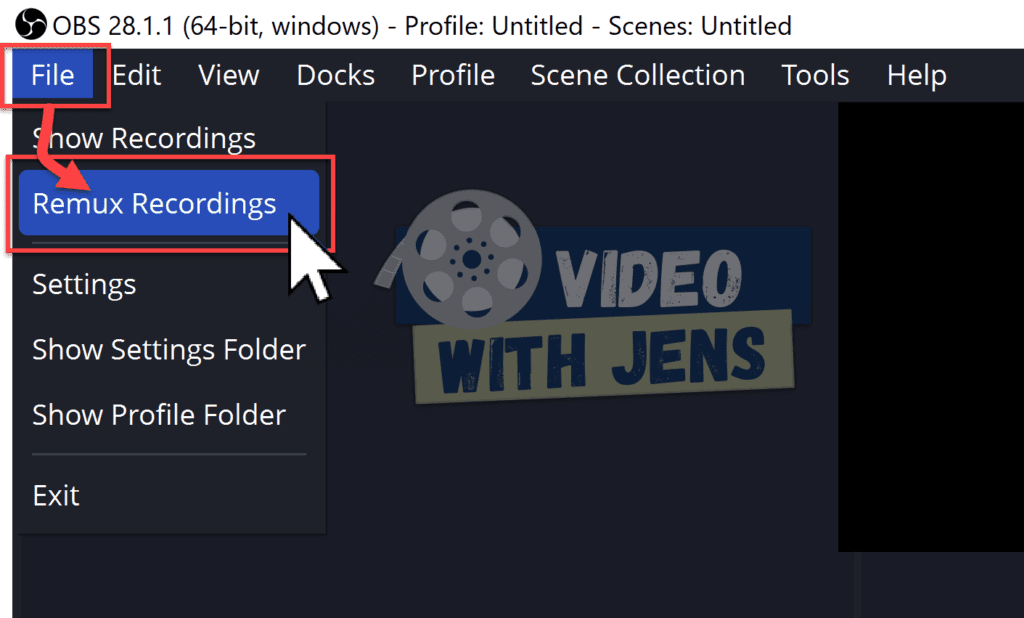
- Select the clips you cannot import to Premiere Pro, and click on Remux.
Now you’ll create an MP4 version of all the MKV files.
3. Change the File Location
Sometimes Premiere Pro has problems connecting to clips on your storage device due to a restricted area, weird file path, etc.
A quick way to fix this is by changing the location of the clips.
If you are multiple storage units, try changing to another one.
4. Change File Name Extension
Another fix that seems to work for many people facing the error “The File Has an Unsupported Compression Type” is changing the file name extension.
- Open the folder containing your clips.
- Windows: Click on View > Show > File name extensions.
- macOS: Check out this quick guide from apple.
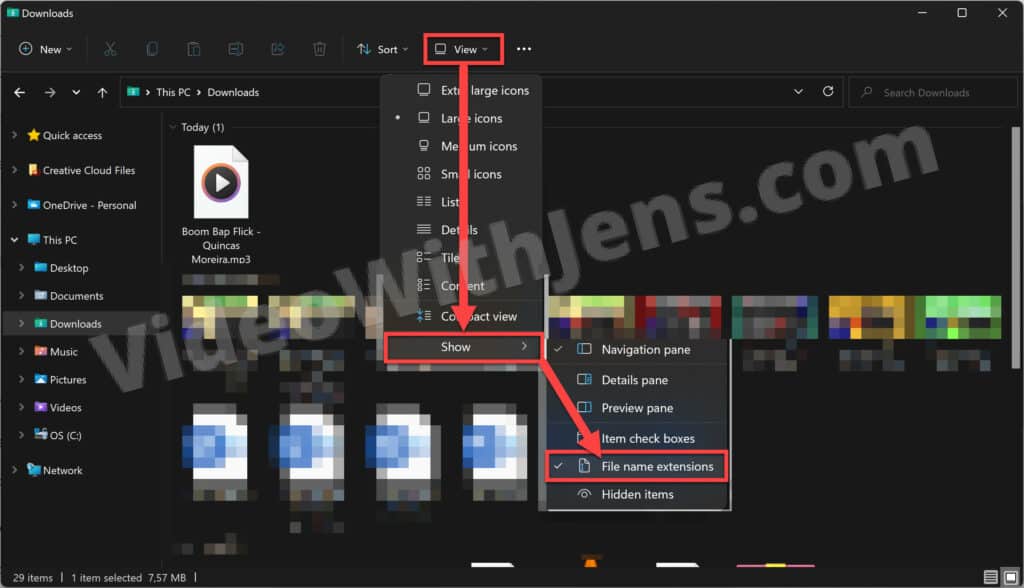
- Right-click the file > Show more options > Rename.
- Change the file name extension to .MTS or .MP4
Doing this can be a bit time-consuming if you have a lot of clips; in that case, check out the YouTube video below:
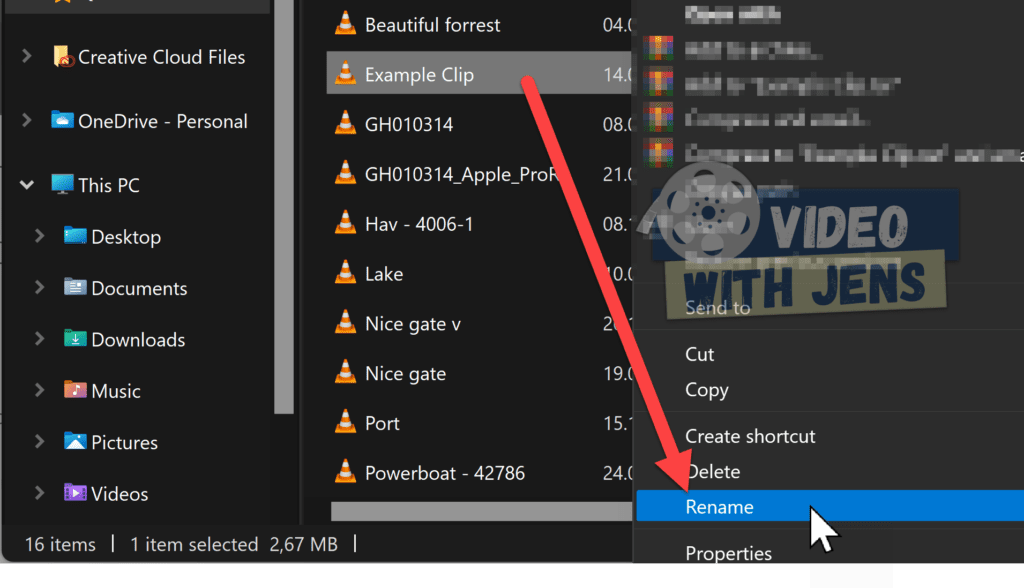
5. Rename Files
Many users have reported that renaming their files using only standard letters from the English alphabet has fixed the error.
Ensure that your files do not contain any symbols or uncommon letters.
6. Trial Version of Premiere Pro Does Not Support the Format
Users have reported the trial version of Premiere Pro might trigger the error; if you are trying to import MP4 or AVCHD files, they require the paid version of Premiere Pro (source).
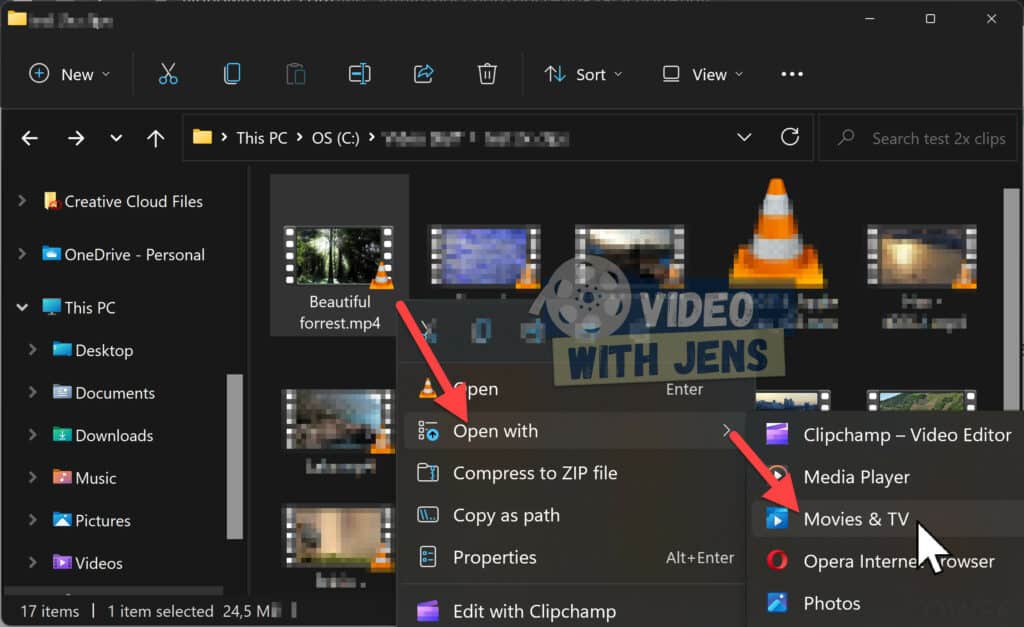
7. Trim the Clip
It’s also been reported trimming a second off the clips you are trying to import solved the issue.
To do this, you must import your clips to another editing software…
I’ve found using the pre-installed Movies & TV to be a quick alternative on Windows.
Right-click the clip > Open with > Movies & TV. Then, inside the software, trim the beginning of your clip by a second.
- Once you’ve trimmed the clip(s), try importing it to Premiere Pro.
8. Re-Install Premiere Pro
If none of the above solutions fixed the error, a quick re-installation of Premiere Pro might be your best bet. Doing this should get rid of any bugs in the software that might be causing problems.
Other resources:
Here’s a complete list of the most seen errors in Premiere Pro and how to fix them.
- TIP: Bookmark the list to solve errors in the future quickly!