-
#1
не могу нормально открыть биос для изменения. видеокарта gigabyte rx560 4Gb память micron. кто сталкивался с такой проблемой? помогите решить!!!
-
#2
Ты подскажи народу какой версией открываешь, или догадываться нам нужно…?!
-
#3
Ты подскажи народу какой версией открываешь, или догадываться нам нужно…?!
1.4 и 1.4.1, сорри что не указал.
-
#4
1.4 и 1.4.1, сорри что не указал.
Попробуй и отпишись
-
SRBPolaris Bios Editor 2.55.zip
639,6 КБ · Просмотры: 344
-
Polaris Bios Editor Universal 1.4.zip
14,4 КБ · Просмотры: 145
-
Polaris Bios Editor Universal 1.4.1.zip
21,3 КБ · Просмотры: 178
-
#5
Если в SPB не получиться поищи более новую версию и скачай. Возможно добавили поддержку
azazel666
Guest
-
#7
Если в SPB не получиться поищи более новую версию и скачай. Возможно добавили поддержку
СПАСИБО!!! Дай бог тебе здоровья!!! SPB 2.62 помог.
-
#8
И тебе спасибо, думаю тему можно закрывать
-
#9
И тебе спасибо, думаю тему можно закрывать
")
теперь зависает при прошивке (((
-
#10
То свисток поломан, то акула глухая
-
#11
с 3 раза получилось, всем спасибо!
-
#13
спасибо. опыт был только с 470, делал как раньше а с 560 есть отличия. плюс ее холодная, 60 обороты 55 градусов.
-

20170614_132133.jpg
987,6 КБ · Просмотры: 84

-
#14
Приятно, что смог помочь.
![]()
GV-RX570GAMING-8GD/FI1/0A2B
H5GC8H24AJ (HYNIX_4)
555000000000000022AA1C0063941211205F0A0A1244B10200204100330214209A8800A00000312006040C0E2B11130F
777000000000000022AA1C00E7AC3522405F0D0D1FC77205002481004C0814209A8800A0000031200C08171B571A2011
777000000000000022BB1C0008314626505F0E0EA20723060026A200540A1420AA8800A0000031200D091A1E621C2312
777000000000000022CC1C0029B54629605F0E0F2448D3060026A2005C0B1420AA8800A0000031200E0A1C206D1E2513
999000000000000022EE1C006BBD572F505F100F29C9B3070048C4005D0D14204A8900A000003120100C20247B202A13
999000000000000022FF1C008CC55834505F110F2D4A94080048C4005D0F14204A8900A000003120120D232889222E14
999000000000000022119D00ADCD693A705F111131CB7409004AE4006D0114204A8900A002003120140E272D97263215
999000000000000022229D00CE516A3E805F1212B40B450A004AE400750314204A8900A002003120150F2A30A4283516
999000000000000022449D00105A7B44805F1312B88C250B004C0401750514204A8900A00200312017112E34B22A3916
999000000000000022559D0031627C49905F1313BC0D060C004C04017D0714204A8900A00200312019123138C02D3D17
999000000000000022559D0031627C49905F1313BC0D060C004C04017D0714204A8900A00200312019123138C02D3D17
PBE 1.7.5
Please, fix it.
![]()
Send us the bios. H5GC8H24AJ was pretty common in 2017, so not sure what the problem is.
![]()
See attachment.See problem in attachment.See useful linkhttps://miningclub.info/threads/pamjat-h5gc8h24aj.56428/ 21.01.2021, 23:06, «Indeed Miners» <notifications@github.com>: Send us the bios. H5GC8H24AJ was pretty common in 2017, so not sure what the problem is.—You are receiving this because you authored the thread.Reply to this email directly, view it on GitHub, or unsubscribe.
![]()
There is no attachment, you probably need to upload directly on Github not as email attachment. The thread is also 2 years old and I don’t speak russian (Google Translate is not speaking very good russian too)
My bad I’ve confused H5GC8H24AJ for H5GC4H24AJ, but still both of them are supported in PBE. H5GC8H24AJ since 1.7.2.
![]()
https://yadi.sk/i/OBQ66JMxQA6mAw — problemhttps://yadi.sk/d/dFJemjZf1d3vvA — bios Dont read link, you can only test timings for this memory type. 22.01.2021, 14:46, «Indeed Miners» <notifications@github.com>: There is no attachment, you probably need to upload directly on Github not as email attachment. The thread is also 2 years old and I don’t speak russian (Google Translate is not speaking very good russian too)—You are receiving this because you authored the thread.Reply to this email directly, view it on GitHub, or unsubscribe.
![]()
Thanks for the bios. I can reproduce the error. It works just fine, it applies correct timings. We will fix the error alert in next release. PBE PRO is completly fine with that, there is no error at all.
![]()
1927276
Views
5541
Replies
683
Participants
Last post by
matt167,
Jump to Latest

Polaris Bios Editing RX590/RX580/570/560/RX480/470/460
Last update: 12/03/2021
New Drivers Allow modded Bios on RX580/590, RX480 needs «Atikmdag — Patcher» to fix the Code 43 error/Drivers not loading
Atikmdag-Patcher — Bios Enabler — Code 43 Fix
If drivers won’t load ( Code 43 )after a bios flash, use this tool. Quote: I’ve added the BIOS signature check to the pixel clock patcher: AMD/ATI Pixel Clock Patcher
1. Flash Bios. Do not reboot when asked.
2. Run atikmdag-patcher.exe to patch the driver.
3. Reboot.
I haven’t tested it with a modified BIOS, so let me know if it works. You can undo the patch by running the patcher again. If you don’t need any of the pixel clock limits, you can rename the file to atikmdag-patcher-bios.exe to patch only the BIOS signature check.
RX480 > RX580 Conversion
PBE — Polaris Bios Editor — Versions + Infos
Bios Editors Downloads:
- PolarisBiosEditor v1.4 by datspike
- SRBPolaris BiosEditor V3.5
Fan related Values
- THyst; /* Temperature hysteresis. Integer. */
- TMin; /* The temperature, in 0.01 centigrades, below which we just run at a minimal PWM. */
- TMed; /* The middle temperature where we change slopes. */
- THigh; /* The high point above TMed for adjusting the second slope. */
- PWMMin; /* The minimum PWM value in percent (0.01% increments). */
- PWMMed; /* The PWM value (in percent) at TMed. */
- PWMHigh; /* The PWM value at THigh. */
- TMax; /* The max temperature */
- FanControlMode; /* Legacy or Fuzzy Fan mode */
- FanPWMMax; /* Maximum allowed fan power in percent */
- FanOutputSensitivity; /* Sensitivity of fan reaction to temepature changes */
- FanRPMMax; /* The default value in RPM */
- MinFanSCLKAcousticLimit; /* Minimum Fan Controller SCLK Frequency Acoustic Limit. */
- TargetTemperature; /* Advanced fan controller target temperature. */
- MinimumPWMLimit; /* The minimum PWM that the advanced fan controller can set. This should be set to the highest PWM that will run the fan at its lowest RPM. */
Source
Timings Decoding
- I usually prefer to use the «SRBPolaris BiosEditor V3.5» built-in strap editor
- Another way is to use R_Timings — Encode/Decode RX/R9 Memory Straps by Vento041
- Old/Alternative
Quote: Originally Posted by -Vento041-
I recompiled OhGodADecode for windows (32 bit so everyone is happy), all credits goes too @OhGodAGirl.
ohgodadecode.zip 103k.
Navigate to folder in explorer and Shift+Right click and «Open command window here». Run «ohgodadecode.exe» «HEX VALUE» to get the decode output.
example in cmd:
INPUT:
ohgodadecode.exe 777000000000000022CC1C00AD595B41C0570E152DCB7409006007000B031420FA8900A00300000010123A46DB354019
OUTPUT:
TRCDW=13 TRCDWA=13 TRCDR=22 TRCDRA=22 TRRD=5 TRC=65 Pad0=0
TNOPW=0 TNOPR=0 TR2W=28 TCCDL=3 TR2R=5 TW2R=14 Pad0=0 TCL=21 Pad1=0
TRP_WRA=45 TRP_RDA=22 TRP=19 TRFC=151 Pad0=0
PA2RDATA=0 Pad0=0 PA2WDATA=0 Pad1=0 TFAW=0 TCRCRL=3 TCRCWL=7 TFAW32=0
MC_SEQ_MISC1: 0x2014030B
MC_SEQ_MISC3: 0xA00089FA
MC_SEQ_MISC8: 0x00000003
ACTRD=16 ACTWR=18 RASMACTRD=58 RASMACTWR=70
RAS2RAS=219 RP=53 WRPLUSRP=64 BUS_TURN=25
GDDR5 Memory Timings Info
Some infos on GDDR5 timings i found online and in some PDFs by Jedec/Samsung/Hynix/AMD — Still work in progress
Code:
####SEQ_RAS_TIMING####
TRCDW = 13   “Number of cycles from active to write”
TRCDWA = 13  “Number of cycles from active to write with auto-precharge. Same as TRCDW” Good BW uplift???
TRCDR = 24   “Number of cycles from active to read”
TRCDRA = 22  “Number of cycles from active to read with auto-precharge. Same as TRCDR”
TRRD = 5     “Number of cycles from active bank a to active bank”
TRC = 65     “Number of cycles from active to active/auto refresh”

####SEQ_CAS_TIMING####
TNOPW = 0   “Extra cycle(s) between successive write bursts. For debugging purpose only”
TNOPR = 0   “Extra cycle(s) between successive read bursts. For debugging purpose only”
TR2W = 28   “Read to write turn around time”
TCCDL = 3   “Cycles between column commands between banks in the same bank group?”
TCCDS = 5   “Cycles between column commands between banks in different bank groups?”
TW2R = 14   “Write to read turn around time”
TCL = 20    “CAS to data return latency”

####SEQ_MISC_TIMING####
TRP_WRA = 45   “From write with auto-precharge to active”  Good BW uplift???
TRP_RDA = 22   “From read with auto-precharge to active”
TRP = 19       “Precharge command period”
TRFC = 151     “Auto-refresh command period”

####SEQ_MISC_TIMING2####
PA2RDATA = 0   “Read Preamble”
PA2WDATA = 0   “Write Preamble”
TFAW = 0       “Four Bank Active Window”
TCRCRL = 3   EDC READ Latency=CL + CRCRL “During read ,the EDC bundle is returned with-soon after the response data based on TCRCRL”
TCRCWL = 7   EDC WRITE Latency=WL + CRCWL "EDC/CRC checksum Related, similar to TCRCRL"
T32AW = 0      “Thirty Two Bank Active Window”
TWDATATR = 0

####ARB_DRAM_TIMING####
ACTRD = 30
ACTWR = 18
RASMACTRD = 58
RASMACTWR = 70

####ARB_DRAM_TIMING2####
RAS2RAS = 219
RP = 53
WRPLUSRP = 64
BUS_TURN = 25
Row Access Timings: tRC, tRAS, tRCDRD, tRCDWR, tRRDL, tRRDS, tFAW, tRTP
Column Access Timings: tCCDL, tCCDS, tCCDR, tWTRL, tWTRS, tRTW,
Refresh Timings: tRFC, tRFCSB, tRREFD, tREFI
How to Read/Mod Memory HEX Values
I usually prefer to use the «SRBPolaris BiosEditor V3.5» built-in strap editor
«The old way» example (OLD):
Use AtomBiosReader (GitHub — kizwan/ATOMBIOSReader or Download Section) to generate the master list of command and data tables.
Open the generated .txt
Look for (Example) : 001c: a446 Len 0753 Rev 02:02 (VRAM_Info)
a446 : is the start adress
0753 : is the lenght
Open the Bios with an Hex editor , i use HxD (Download Section)
At the beginning of the VRAM_Info section (Text, not in HEX) you will find the memory model/s supported by the bios
…. [email protected]!…….Ce……K4G80325FB.2.Tv:.¢`ÿ..P..c…… …
only K4G80325FB (made by Samsung > Use Google) in this case, so the memID in the straps is 00
40 0D 03 00 77 70 00 00 00 00 00 00 22 CC 1C 00 31 F6 7E 57 F0 57 11 18 3F CF B6 0D 00 6C 07 01 24 08 14 20 FA 89 00 A0 03 00 00 00 1E 12 3A 46 DB 35 40 19
in case of two memory brand memID 01 and 02 are possible
Example of a 2000Mhz strap
40 0D 03 02 99 90 00 00 00 00 00 00 22 AA 1C 00 F7 F6 7E 4F D0 55 13 19 C6 50 B7 0D 00 6C 06 01 1D 0C 14 20 EA 89 80 AC 03 00 00 00 1E 18 32 38 DB 36 47 19
The frequency is 40 0D 03 > inverted is 03 0D 40 > converted in decimal is 200000 > remove «00» > 2000Mhz strap
02 is the mem ID. In this bios 02 is for Micron set of timings. 01 is the other set. 00 if only one memory is supported
99 90 00 00 00 00 00 00 22 AA 1C 00 F7 F6 7E 4F D0 55 13 19 C6 50 B7 0D 00 6C 06 01 1D 0C 14 20 EA 89 80 AC 03 00 00 00 1E 18 32 38 DB 36 47 19 are the timings of this strap. Like 9-9-9-24 ecc ecc in your system ram.
Try to use tighter straps than stock but keep the last 8 timings from the higher straps(1750-2000 usually,try what’s best) the last 8 values helps a lot at high mem clock.
UberMix and Performance Timings
//UberMix v3.4 Beta Possibly stable @2150Mhz
HTML:
777000000000000022CC1C00EF615C44F0590F15300D070A0060070013051420FA8900A0030000001212303FB2354019//UberMix v3.3 Stable The Best @2100Mhz
HTML:
777000000000000022CC1C00AD615C42F0590F15300D9708006007000B031420FA8900A00300000011112F3FBB354019//UberMix v3.1 Stable
HTML:
777000000000000022CC1C00AD615C41C0590E152ECC8608006007000B031420FA8900A00300000010122F3FBA354019//UberMix v3.0
HTML:
777000000000000022CC1C00AD615B41C0570E152DCB7508006007000B031420FA8900A00300000010123A46B9354019//UberMix v2.3 -Less Extreme-
HTML:
777000000000000022CC1C00AD615B41C0570E152DCB7409006007000B031420FA8900A00300000010123A46DB354019//UberMix v2.1 -Less Extreme-
HTML:
555000000000000022CC1C00AD615B41C0570E152DCB74090068C7000B031420FA8900A0030000001B11333DC0303A17v3.x Results-
~242GB/s (~214GB/s Stock) with OclMemBench
1500 — 1625 — 2000 — Custom straps Mix
No EDC Errors Mem@2100Mhz (1000mv IMC) / Core @1350Mhz
Tested with 3DMark ,Valley,BF1,FC Primal,ecc ecc
Performance/Bandwidth Tested with The Witcher 3 in a Heavy Foliage Place in Blood&Wine DLC (Stock-MOD Memory @2100Mhz)
Code:
216GB/s Stock (Needs update)
14200 FireStrike Stock
THE WITCHER 3(Ultra-No HW-AA On) 53fps 1080P Stock
THE WITCHER 3(Ultra-No HW-AA On) 22fps 4K Stock

229GB/s MOD +6% (Needs update)
14500 FireStrike MOD +2.1%
THE WITCHER 3(Ultra-No HW-AA On) 56fps 1080P MOD +5.6%!
THE WITCHER 3(Ultra-No HW-AA On) 23fps 4K MOD +4.5%
An user example:
«RX480 GTR
stock timings
1266/2000 — 198 GB/s
1266/2100 — 210 GB/s
Uber V2.1
1266/2000 — 224 GB/s
1266/2100 — 232 GB/s
1266/2000 with stock timings — Firestrike graphic points: 12953
1266/2000 with uber v2.1 timings — Firestrike graphic points 13643
nearly 700 points increase, it’s equivalent of +95-100 mhz on core, a lot»
Originally Posted by -iakoboss7-
last question: so «maxing» the mem timings is better than «maxing» the memory speed in terms of performance?
for example: these memory timings (but stock memory clocks) VS max memory clocks most of our cards can do in average = whats best?
thank you for your help. Quote: Originally Posted by -Loladinas- 
it varies by card. Depends on the quality of vram chips themselves and the IMC.
I’m getting more bandwidth from 2125MHz + custom timings, than 2300MHz + stock timings. 241GB/s vs. 234GB/s. And then there’s the added benefit of no errors; at 2300MHz I’d start to see slight artifacting.
Hynix — Micron — Elpida not tested by me
Good HYNIX ONLY 8gb — models H5GC8H24MJ and H5GQ8H24MJ
777000000000000022AA1C00B56A6D46C0551017BE8E060C006AE6000C081420EA8900AB030000001B162C31C0313F17
Good Micron MT51J256M3
777000000000000022AA1C0073626C41B0551016BA0D260B006AE60004061420EA8940AA030000001914292EB22E3B16
Good Hynix ONLY 4gb — model H5GC4H24AJ
999000000000000022559D0010DE5B4480551312B74C450A00400600750414206A8900A00200312010112D34A42A3816
Good Elpida EDW4032BAB
777000000000000022AA1C00315A5B36A0550F15B68C1506004082007C041420CA8980A9020004C01712262B612B3715
Source
EDC Errors monitoring
The GDDR5 SGRAM provides error detection on the data bus to improve system reliability. The device generates a checksum per byte lane for both READ and WRITE data and returns the checksum to the controller. Based on the checksum, the controller can decide if the data (or the returned CRC) was transmitted in error and retry the READ or WRITE command. The device itself does not perform any error correction.
EDC errors are they bad?
No necessarily, it means and Error happen inside your board, it has been Detected and Corrected (from these actions Error Detection and Correction). If you see errors it means that you card EDC circuit is working at least… sure 0 error is perfect, but some error is always better than undetected (and uncorrected) errors (that could lead to a crash).
Errors could occurs
when your GPU start to work (frequency change)
when the frequency is too high
when the memory voltage is too low (this might be unchangeable in Polaris card am I right? Confirmation needed…)
when the IMC (memory controller) voltage is too low
randomly (unlikely but can occurs)
when the timings are too tight
current spikes
voltage is not clean enough (can be partially avoided with VRM oc, bios mods needed or third party software like VRMTool, PCB dependent)
….
Anyway, we are talking about errors in the communication between your IMC and your memory chips, the causes could be multiples but the solution is always the same, data resend: what has been corrupted must be resent again and again until it arrives intact.
To many errors are the reason why apparently high «stable» memory OC could perform worse that lower memory OC, the GPU isn’t crashing but the errors could be so frequent that you card is waiting more time correcting errors than sending actual data.
Download HWiNFO

The value is shown as «GPU Memory Errors», it counts errors only when the GPU is under load(3D).
Overclocking the video memory can generate invisible errors that most of the time are recovered by the gpu, but this process waste bandwidth and processing power. Is important to find a stable and error-free overclock for the memory. Because of this, you may get more FPS at 2100Mhz than 2150Mhz.
Polaris Memory Overclock Scaling
RX 480 scales nearly perfectly linearly with memory frequency. It is ABSURDLY bound by memory performance:
Anyone who says otherwise is just experiencing driver problems and may not even know it.
I’ve put hours of work into examining Polaris 10 in both RX 470 and RX 480 clothes. I have even created full curves of memory sensitivity in 200MHz increments from 600Mhz:
You can see that scaling only really stops with the 750MHz GPU and 1600MHz RAM. That would be 2.667GHz RAM clocks for 1250MHz… or 340GB/s. Meaning Polaris 10 needs 33% more bandwidth than it has for optimal performance. I haven’t done the math, but I think it would be about 25% faster with that much bandwidth, with no increase in GPU clocks… and almost no change in power usage.
generaleramon said:
Polaris need a lot of Bandwidth even at low Core clock. Performance gains only start to slow down at around 2100Mhz memory (240+GB/s) and 1100Mhz core.
The graph show the gains from memory overclock with fixed 1350-1100-800Mhz core clock.
I ran a few benchmarks (Firestrike, Firestrike Ultra, Firestrike Extreme, Superposition Medium, Superposition Extreme, and Valley Extreme HD) to compare stock timings performance to 3.1v. Core has a mild overclock of 1411MHz. With stock timings I start getting memory errors past 2150MHz, with custom timings same thing happens past 2125MHz. With custom timings visible artifacts appear at 2200MHz in both Superposition benchmark, errors appearing in the millions, using stock timings I probably could’ve gone past 2250MHz, highest error rate was ~130k in Superposition, but other benchmarks were a a lot more tame, going only up to ~6000, and performance was still slowly increasing. I won’t bore you with the details, so here’s the chart with results averaged out.
I have, here’s BF4 scaling nearly perfectly with memory frequency:
Polaris 10 Voltage Scaling
- Voltage scaling of my two Reference RX480 (Polaris 10 using 14 nm FinFET manufacturing process). Stable voltage with a Target Temp of 70-75°. The last datapoint is around 1328-1338Mhz.
- The first card has an ASIC Quality over 80%, the second around 60%.
- It’s clear that Polaris 10+FinFET do not like to clock too high, the voltage scaling is nice and linear up to 1.2Ghz, than a lot of voltage is needed, 1.4Ghz is possible with low temps and/or a good voltage bump. 1.5Ghz is rare and require crazy high voltages.
- The ASICs temperature sure play a role in all this. My first RX480 can do 1.4Ghz@@1168mv(SVI2 voltage in Bios), but only if kept under 50-55°.
Good Reads/Articles and Infos
Random Info
-The RX 480’s on-board VRM – voltage regulator – on the high-side is capable of delivering 40 amps from each phase at 125c, for a total of 240 amps. Link
-The VRM mosfets (MDU1511 and MDU1514 on the reference board) are perfectly fine even at 100°C. They are only slightly less efficient at high temperatures. At some point there might be problems because the whole PCB heats up and not all components/ICs are fine with such high temperatures. So removing the heat at its source is the most efficient thing to do.
-Low Temp Help a lot with these cards. Water <50° for High Overclocks and low voltages / Air(Reference Blower) 70-75° is a good target
Quote: [Official] Polaris Owners Club
«RX 480 scales nearly perfectly linearly with memory frequency. It is ABSURDLY bound by memory performance:
I’ve put hours of work into examining Polaris 10 in both RX 470 and RX 480 clothes. I have even created full curves of memory sensitivity in 200MHz increments from 600Mhz:
You can see that scaling only really stops with the 750MHz GPU and 1600MHz RAM. That would be 2.667GHz RAM clocks for 1250MHz… or 340GB/s. Meaning Polaris 10 needs 33% more bandwidth than it has for optimal performance. I haven’t done the math, but I think it would be about 25% faster with that much bandwidth, with no increase in GPU clocks… and almost no change in power usage.»
Downloads
Make backup of original bios on video card. Using modded bios will void your warranty. I accept no responsibility for damage from using this information. All efforts are being made to double check information but there maybe errors.
Hex To Dex Converter : Hexadecimal to Binary Converter
-
172.7 KB
Views: 4,006 -
111.2 KB
Views: 2,853 -
109.5 KB
Views: 2,403 -
74.9 KB
Views: 4,063
See less
See more
7
4161 — 4180 of 5542 Posts
@baracuda (and everyone interested in memory OC)
So…
- The memory will run only at speed that are described by the memory step table, on 480 you usually find 300 MHz and 2000 MHz, on 580 there is also 1000 MHz.
- A memory step is data that describe frequency and voltages, a memory (timing) strap describe what timings you should use at given frequencies…. so yes… some straps are useless since they will never been considered anyway.
- Yes you can add manually more step to your bios (i added the 1000 MHz step on my RX 480 bios, check my sign) but you must know what you are doing
- There is a memory_step/core_clock table that select which step (memory frequency) to use at which GPU core clock.
- When you OC your ram you change the last step available
- Each strap is used to choose the ram timings until you exceed the ram frequency of that strap and the next one will be selected
- Example: the 1750 strap is active from 1750 to 1999, at 2000 the 2000 strap will be selected
- When you OC, the last strap is used as base to select the timings, and if errors are detected and the link between the core and your memory is considered unstable, memory retraining will be performed and eventually timings will be raised to stop errors from occurring.
- That’s why to high OC can be unstable (impossible to find new working timings automatically) or worse than lower OC (GPU do not crash but error correction kicks in too much with no stop, so your GPU spends more time correcting errors than sending actual data).
See less
See more
Reactions:
1
Hi!
I am trying to edit bios for my gpus so I never need to setup overclocking and undervolting for cards separately. So I have tried to edit bios for 2 of my cards
SAPPHIRE NITRO+ Radeon™ RX 570 4GD5
SAPPHIRE PULSE ITX Radeon™ RX 570 4GD5
There’s everything fine with overclocking. But I am failing to do undervolting correctly. Basically I can not undervolt core and memory voltage. It does not matter what voltage I am putting in bios editors I am always having high power consumption (110-130) and no change in VDDC. Power consumption gets better if I lower TDP and power limit — that gives some results, but still core settings does not give any results. But when undervolted in MSI AB it works perfectly like 90w in full load on Claymores dual miner eth+dcr 27mhs+300mhs
I am always modifying my original bios. Using only one type of bios editor on each try. I have tested all those bios editors listed here:
PolarisBiosEditor v1.5 Epsylon3
PolarisBiosEditor v1.4
SRBPolaris V3 by d0kt0r
PBE 1.5
Drivers on Windows does not make any change
I have made my own which are working fine on several rigs by this guide
http://1stminingrig.com/run-6-rx-570-rx-580-gpus-windows-10/
I have tested with 1.7.7.2 and 1.7.7.1 with atikmdag-patcher.
Of course I did DDU every time switching drivers, My Windows is up to date. And same problem is on completely different PC. Also I do power cycle GPU after flashing BIOS.
Flashing with atiflash 274 and 277
Also changed values for FAN does not seem to work for me but that’s not my concern right now.
This is how my undervolted bios looks like in real situation.
https://drive.google.com/file/d/0B1u6LMtF_uAVdG1kbzdmNFFYVzg/view?usp=sharing
And this is what i did on bios editor
https://drive.google.com/file/d/0B1u6LMtF_uAVZ3VGanlIVVRDUTg/view?usp=sharing
But that’s only one of the variations I did. No matter what I put in bios file with which BIOS editor it is always possible to set in AB core -96 and it still will be stable, which means, no change on VDDC has been done. Also I hev set very low values in mem und core like 850 or so — still — no change, cards working stable, which I doubt they would with such low voltage.
Sometimes i get glicth that it is working finaly, GPUZ and AB shows voltage 900mv and power consumption is 85-90w but reflashing same bios or restarting pc does to give those results anymore.
Could you please point me where I could been mistaken? What did I miss? Or are those cards locked for voltage control?
See less
See more
@deffdsp
I have the nitro card and I did a similar voltage edit in the jaschaknack fork of PBE (maybe the same as what you call PBE 1.5? I dunno) but it works for me. The only difference I see though is that you also edited the frequencies of the higher DPM states as well as the voltages, but that shouldn’t matter especially since you’re not running higher than 1168 core clock anyway.
I noticed I can’t set voltage to anything lower than 950 though and have it work….would probably have to go into editing VOI table with hex and recalculating table lengths, etc. That doesn’t seem like it’s be necessary though because less than that is unstable anyway. Maybe 925 is just being ignored because it’s too low? What if you try 950 or 1000?
If you find out how to set the fan curve in BIOS though please tell me because I would love to know that also
Quote:
Originally Posted by Vento041
…
- Example: the 1750 strap is active from 1750 to 1999, at 2000 the 2000 strap will be selected
…
Again, you may want to double check this statement. I’m quite sure the 1750 strap is active from 1626 — 1750, and the 2000 strap is active from 1751 — 2000 (assuming you don’t have an 1875 strap in between). This (the way I’ve described) is how it works on Hawaii, and also for at least one of my 580 cards. It isn’t too stable above 2000 so I’ve run it at 1980-1990, and it appears to be using the timings I’ve set in the 2000 strap, not the stock 1750 strap.
See less
See more
2
no it’s not like that, it’s like vento wrote.
Ok perhaps I am mistaken. I will re-test when I get that particular card back in my main rig for further tuning.
Quote:
Originally Posted by PPBottle
You need to extract BIOS’es with the Atiwinflash itself (save option), that way you always get the full 512kb bios.
GPU z only extracts the bits with stored data. Some polaris bioses have 256kb blank space and 256kb actually written, this is why you get that error on Polaris Bios editor.
Wait, how are you extracting the full bios via the save option from Atiwinflash? To date I had never run into the bios being smaller than 512 and now Im seeing it on every card I get my hands on. Had no problems with my 570, 480, and a 470. Now a new 580 and a new 470 are both giving me a hard time. Even opening one of them gives misread info no matter what profile for vram is selected in hte drop down. Ive been given two different 512bit bios from friends for the 580. Both are claiming they are less than 512bits. The one 512bit I got for the 470 wont flash do to subsystem id mismatch. With that I did nothing more than copy my 1500mhz timings to the other frequencies. Im just totally lost as to why every step gives me a problem when I had no problems before
See less
See more
@DMatthewStewart
- There are no real «512kb» bios, they are just 256kb bios + another 256kb of empty space.
- The misread values can be caused by outdated PolarisBiosEditor version, since some of them have «hardcoded» values/offsets to read the bios, so if something is different the app trip and show you the wrong bios section.
- The 1500MHz strap copy to higher strap is a lazy (not) solution on how mod memory timings read my post above and if you really have time read my R_Timings project.
Has anyone run across cards that have 2 different memory manufacturers?? I recently acquired 6 new Dell AMD RX480 reference cards, but PBE 1.5 read the stock rom with strange numbers and dropdown menu says «2 Brands». SRBPolaris v3 warns unknown model when loading the rom and shows Samsung and Hynix. See screenshots below:
PBE 1.5:
SRBPolaris:
Stock ROM:
https://www.dropbox.com/s/6qnkb6dwzufv7gd/stock0.rom?dl=0
See less
See more
5
Yes, a lot of them do support 2 memory types. Try using the jaschaknack fork of PBE.
Quote:
Originally Posted by Vento041
@DMatthewStewart
- There are no real «512kb» bios, they are just 256kb bios + another 256kb of empty space.
- The misread values can be caused by outdated PolarisBiosEditor version, since some of them have «hardcoded» values/offsets to read the bios, so if something is different the app trip and show you the wrong bios section.
- The 1500MHz strap copy to higher strap is a lazy (not) solution on how mod memory timings read my post above and if you really have time read my R_Timings project.
Thank you sir. Turns out, for some reason unknown, ATI Win Flash was not letting me save the BIOS of any card. The «Save» button was just blank. And for some other unknown reason, it now comes up and is useable. So I’ve been able to extract the 512byte ROM. But youre right, the 256kb ones are no different. Theyre just 50% empty
And I agree that copying the straps is lazy sometimes. But for my application its strictly to run a mining rig. Works well for the other cards. Actually, for most it turns out the best results Ive seen yet. In a few instances other straps have produced a marginal gain over the copying of the 1500 straps but its not the norm. Matter of fact, the last vbios I modded myself was a touch faster on memory. It worked for about a week and began to fail. Went back to using my 1500 straps at 1750 and 2000 and its stable for my application. We’re talking about zero 3d output, memory intensive calculations only
But I will take some time and read your R_Timings Project, and I thank you for that and your other suggestions.
See less
See more
Quote:
Originally Posted by bardacuda
Ok perhaps I am mistaken. I will re-test when I get that particular card back in my main rig for further tuning.
Imho you are right
@DMatthewStewart use the command line version of atiflash, and do not open any other app while using it
Quote:
Originally Posted by Leons
Quote:
Originally Posted by bardacuda
Ok perhaps I am mistaken. I will re-test when I get that particular card back in my main rig for further tuning.
Imho you are right
I still haven’t tested this so don’t take what I said at face value. I’m still pretty sure it works the way I explained but I’m a little less sure now with doktor also chiming in. He and Vento both know their stuff, so basically just try it out for yourself. In the end it usually won’t come into play unless you are straddling the 2000 MHz (or 1750 MHz, if I am right) border. Most people are running > 2000 MHz I imagine.
EDIT: Actually I am gonna test this right now. I am in the middle of testing experimental timings so why not. I will edit only the 2000 MHz strap, leaving the 1750 strap at stock, and flash. Then I will reboot and test at 1749 MHz, reboot again and test at 1751, reboot, 1999, reboot, 2001.
If I am right I should see a big increase at 1751 vs. 1749 and no difference at 2001 vs. 1999. If they are right then I should see a big increase at 2001 vs 1999, and no difference a decrease at 1751 vs. 1749 (due to using the looser 1750 strap at 1751 and the tighter 1625 strap at 1749). More to come…
EDIT2:
Results:
- 1749: 20.5MH/s
- 1751: 21.0MH/s (Not as much increase as I thought, but my timings are geared for 2150, and it’s not a decrease)
- 1999: 25.6MH/s (Clearly using the experimental timings here already. No way I would get this with stock timings.)
- 2001: 25.8MH/s (It increased 0.2MH/s which I actually can’t explain, except that I have noticed some variance between boot cycles before. This means the increase between 1749 and 1751 is also kind of meaningless though.)
And I’ll throw in my 2150 results too since I am testing it atm anyway.
- 2150: 28.0MH/s (Wish it were higher
)
So anyway it may not be entirely definitive…but for me the results at 1999 are all I need to know that it is using the 2000 MHz strap. I already did stock testing and my hash rate was way lower, even with a higher core frequency and on an earlier epoch (hash rate goes down with each epoch…at least until AMD fix their drivers)
http://www.overclock.net/t/1604567/polaris-bios-editing-rx5xx-rx4xx/#post_26231584
TL;DR: Don’t bother editing your 1750 strap (unless for some reason you are running your memory <= 1750). This way you have a better chance to avoid soft bricks.
See less
See more
6
Quote:
Originally Posted by Vento041
@DMatthewStewart use the command line version of atiflash, and do not open any other app while using it
I know. I should. But I just get too lazy. Every once in a while I want a gui. Plus, I hardly remember Win commands. My brain is filled with other commands from better os’s
Quote:
Originally Posted by DMatthewStewart
I know. I should. But I just get too lazy. Every once in a while I want a gui. Plus, I hardly remember Win commands. My brain is filled with other commands from better os’s
write:
atiflash.exe -p 0 bios_to_write.rom
if you do some 4xx<->5xx conversion (or you triggered any ID mismatch error on purpose)
add «-f» at the end
save:
atiflash.exe -s 0 where_to_save.rom
info from running card:
atiflash.exe -ai 0
info from bios file:
atiflash.exe -biosfileinfo bios.rom
See less
See more
Quote:
Originally Posted by bardacuda
I still haven’t tested this so don’t take what I said at face value. I’m still pretty sure it works the way I explained but I’m a little less sure now with doktor also chiming in. He and Vento both know their stuff, so basically just try it out for yourself. In the end it usually won’t come into play unless you are straddling the 2000 MHz (or 1750 MHz, if I am right) border. Most people are running > 2000 MHz I imagine.
EDIT: Actually I am gonna test this right now. I am in the middle of testing experimental timings so why not. I will edit only the 2000 MHz strap, leaving the 1750 strap at stock, and flash. Then I will reboot and test at 1749 MHz, reboot again and test at 1751, reboot, 1999, reboot, 2001.
If I am right I should see a big increase at 1751 vs. 1749 and no difference at 2001 vs. 1999. If they are right then I should see a big increase at 2001 vs 1999, and no difference a decrease at 1751 vs. 1749 (due to using the looser 1750 strap at 1751 and the tighter 1625 strap at 1749). More to come…
EDIT2:
Results:
- 1749: 20.5MH/s
- 1751: 21.0MH/s (Not as much increase as I thought, but my timings are geared for 2150, and it’s not a decrease)
- 1999: 25.6MH/s (Clearly using the experimental timings here already. No way I would get this with stock timings.)
- 2001: 25.8MH/s (It increased 0.2MH/s which I actually can’t explain, except that I have noticed some variance between boot cycles before. This means the increase between 1749 and 1751 is also kind of meaningless though.)
And I’ll throw in my 2150 results too since I am testing it atm anyway.
- 2150: 28.0MH/s (Wish it were higher
)
So anyway it may not be entirely definitive…but for me the results at 1999 are all I need to know that it is using the 2000 MHz strap. I already did stock testing and my hash rate was way lower, even with a higher core frequency and on an earlier epoch (hash rate goes down with each epoch…at least until AMD fix their drivers)
http://www.overclock.net/t/1604567/polaris-bios-editing-rx5xx-rx4xx/#post_26231584
TL;DR: Don’t bother editing your 1750 strap (unless for some reason you are running your memory <= 1750). This way you have a better chance to avoid soft bricks.
Nice that you tested this, now if you have the time, do the same test for 1999 but return stock 2000mhs timings, leave everything else same.
Im curious what will happen, as i never tested this so thoroughly
See less
See more

1
Why not?
EDIT:
Result:
- 1999 Stock Timings: 21.1MH/s (Slightly less than my stock BIOS testing as expected which was done at 1366/2000 on Epoch 137)
EDIT2: Btw this testing was done on the MSI Armor 8GB card which I think I failed to mention. Oh btw @doktor83 I made an error and put >= 1750 instead of <= 1750 but I’ve fixed it. Can you fix it in your quote of my post too? The whole point of my testing was to clear up any confusion and that could just add more
Thanks!
See less
See more
2
Quote:
Originally Posted by bardacuda
Why not?
EDIT:
Result:
- 1999 Stock Timings: 21.1MH/s (Slightly less than my stock BIOS testing as expected which was done at 1366/2000 on Epoch 137)
EDIT2: Btw this testing was done on the MSI Armor 8GB card which I think I failed to mention. Oh btw @doktor83 I made an error and put >= 1750 instead of <= 1750 but I’ve fixed it. Can you fix it in your quote of my post too? The whole point of my testing was to clear up any confusion and that could just add more
Edited post
This test looks interesting. I never tried -1MHZ to be honest, i tried -10Mhz (1990), on a sapphire nitro+ 470 samsung mem card, and then it wasn’t using the 2000 strap, cause i got the extra boost only on >= 2000.
So that is why this is interesting.
@Vento041 , what are your thoughts about this?
See less
See more
1
Quote:
Originally Posted by doktor83
Edited post
This test looks interesting. I never tried -1MHZ to be honest, i tried -10Mhz (1990), on a sapphire nitro+ 470 samsung mem card, and then it wasn’t using the 2000 strap, cause i got the extra boost only on >= 2000.
So that is why this is interesting.@Vento041 , what are your thoughts about this?
That is interesting. Maybe the behaviour is different for different cards? You are sure that card didn’t have a 2250 strap?
4161 — 4180 of 5542 Posts
Просмотров 110к.
Содержание
- Прежде чем начать
- Polaris Bios Editor для “чайников”
- Что может PBE
- Как использовать Polaris Bios Editor
- 1. Скачиваем
- 2. Подготовка
- 3. Настройка
- 4. Сохранение
- Видео-инструкции:
Вы здесь, потому что ищете программные решения для улучшения производительности майнинга криптовалюты, и здесь есть полезная информация для вас. Используете систему в виде настольного ПК или фермы на базе видеокарт, тогда утилита Polaris Bios Editor (PBE) поможет модифицировать оборудования для максимальной эффективности.
Скачать Polaris BIOS Editor 1.7.6
Аналоги:
Red BIOS Editor
Прежде чем начать
Существует ряд специальных программ, с помощью которых настраиваются тайминги видеокарт BIOS, что позволяет разогнать GPU упростить и ускорить процесс майнинга и сделать его более эффективным. К такому софту как раз относится Polaris Bios Editor (PBE) версии 1.7.6. Предупреждаем, что производитель в праве лишить вас гарантии, если вдруг ваша видеокарта сломается из-за неверной перепрошивки, рекомендуем соблюдать все рекомендации и инструкции, что бы этого не произошло.
Polaris Bios Editor для “чайников”
Polaris Bios Editor (PBE) — это программа для ручной настройки БИОСа – изменения таймингов GPU, работающая на архитектуре Полярис. Если конкретно, то утилита позволяет модифицировать рабочие параметры видеокарты (тайминги, частоту GPU, напряжение ядра и другие полезные характеристики), что делает майнинг продуктивней, а значит больше прибыли за единицу времени.
PBE совместима с 99% видеокартами (AMD RX 460/470/480/550/560/570/580/590) и подходит для всех типов памяти, в том числе Elpida, Micron, Samsung, Hynix. Программа версии 1.7.5 полностью бесплатна и доступна к скачиванию на официальном сайте, но также есть её продвинутая версия Polaris Bios Editor PRO 3, которая даёт самый большой прирост хешрейта, но для максимальной эффективности настройки нужно проводить вручную.
Что может PBE
В утилите были исправлены баги, обновлены тайминги для видеокарт и добавлена поддержка для ряда памяти. Самые первые версии 1.4 и 1.5 уже давно устарели, 1.6 и все её версии могут не поддерживать идентификаторы устройств и выдают ошибки, поэтому рекомендуем к скачиванию только версии 1.7 и выше.
ВАЖНО! Используйте только официальные источники для скачивания программы. Форумы и посторонние ресурсы могут навредить безопасности вашей системы.
Polaris Bios Editor 1.7.6 имеет следующие функциональные возможности:
- Модификации BIOS для улучшения работы с ним.
- Настройки таймингов видеокарты.
- Доступ к базе встроенных таймингов от разработчиков, чтобы неопытные майнеры могли также эффективно настраивать рабочие параметры видеокарты.
- Возможность быстрого и лёгкого копирования таймингов, а также их последующее редактирования под конкретные требования.
- Функции настройки напряжения графического процессора.
- Снятие блокировки дополнительных шейдеров в графических процессорах серии AMD 480.
Как использовать Polaris Bios Editor
А теперь перейдём к тому, как начать использовать функционал программы Polaris Bios Editor.
1. Скачиваем
Скачиваем файл актуальной версии (синяя кнопка выше).
2. Подготовка
Распакуйте архив в папку на компьютере.
ВАЖНО! Когда вы будете вносить изменения в рабочие параметры БИОСа видеокарты, есть вероятность того, что система будет работать нестабильно, а поэтому очень важно сохранить бекап текущей конфигурации для отката БИОСа к базовым настройкам. Рекомендуем использовать программу GPU-Z для сохранения настроек и бэкапа BIOS.
3. Настройка
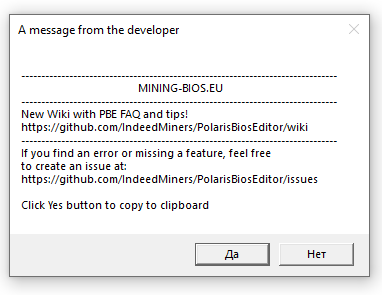
Открываем файл-установщик PolarisBioseditor.exe. Перед запуском утилита покажет окно от разработчиков, где нужно нажать “OK”.
После открытия в окне жмём OPEN BIOS (открыть биос). Откройте BIOS (Который вы сохранили в пункте 2 при помощи GPU-Z или ATIFlash). Программа подгрузит вашу прошивку и покажет рабочие тайминги видеокарты (окно внизу справа).
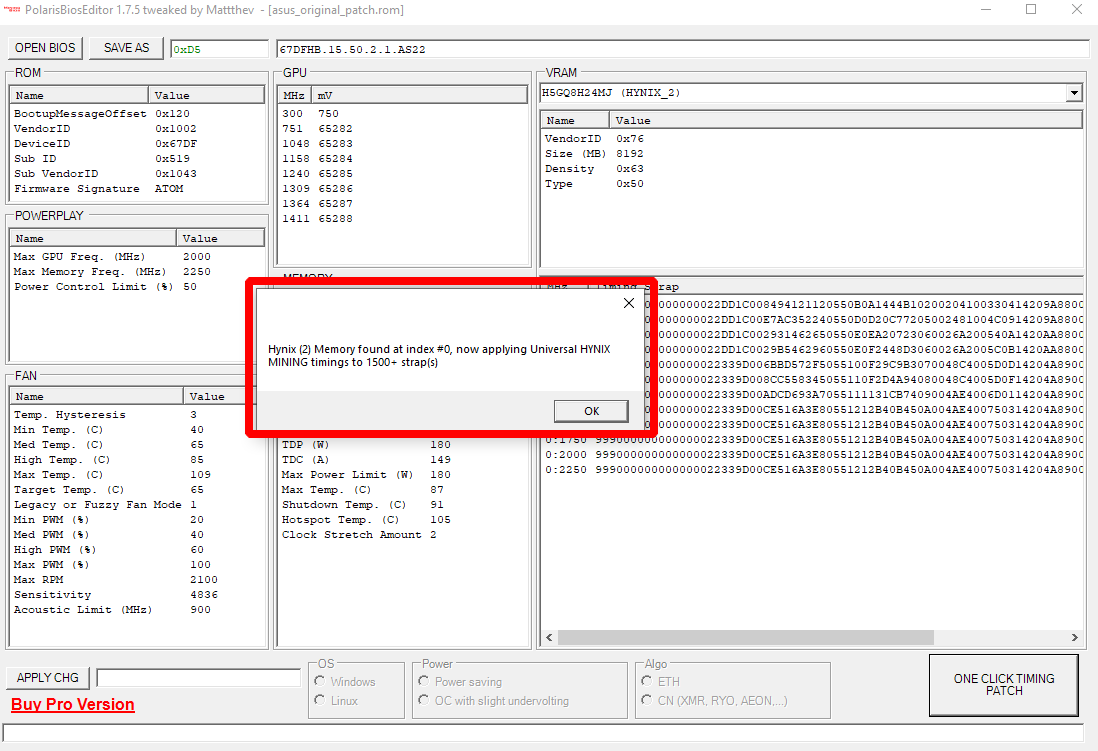
Под этим окном есть кнопка “One Click Timing Patch”, при нажатии которой программа автоматически подберёт новые тайминги под ваш графический процессор. В новом окне нажимаем “ОК”.
Новые тайминги для видеокарты установлены.
ВАЖНО! Чтобы узнать наверняка работает ли обновлённая конфигурация, стоит некоторое время протестировать систему. Помайните и зафиксируйте показатели майнинга и стабильности системы. Если они не отличаются от предыдущих (производительность не выросла), попробуйте обновить тайминги ещё раз. Если система ведет себя нестабильно- попробуйте снизить разгон.
Для опытных пользователей есть поля GPU и Memory, где доступны расширенные настройки (ручные). Если знаний и навыков недостаточно, то лучше не трогать эти настройки, иначе вы рискуете просто спалить систему. Эти настройки отвечают за питание ядра и памяти на разных частотах и их допустимые температуры.
4. Сохранение
Каждый новый файл обновлённых настроек БИОСа вы можете сохранять, а после задействовать их по потребностям (вы можете хранить несколько разных файлов).
С Polaris Bios Editor (PBE) вы добьётесь максимальной производительности, не прибегая к сложным и замысловатым настройкам видеокарты.
Далее систему нужно пропатчить с помощью Atikmdag patcher, если вы этого ещё не сделали, чтобы снять ограничения драйверов
Прошить BIOS в видеокарту с помощью утилиты ATIFlash / ATI WinFlash
Для дальнейшей настройки разгона видеокарты рекомендуем использовать Overdriventool или MSI Afterburner
Видео-инструкции:
Polaris Bios Editor (PBE) 1.7.5: Скачать, как пользоваться (Настройка)
PolarisBiosEditor: Скачать с официального сайта, GitHub, прошить видеокарту.
В этом руководстве вы узнаете, как настроить и использовать PolarisBiosEditor.
Скачать для Windows/Linux
Скачать релизы Скачать с guru3d
PolarisBiosEditor — это программа для модификации таймингов и других полезных характеристик видеокарт, работающих на архитектуре Полярис. PolarisBiosEditor Pro совместима практически с 99% видеокарт с данной архитектурой. PBE подойдет к видеоатаптерам RX4x0 и RX5x0. Работает с видеокартами, с памятью 2-8 ГБ и 16 ГБ.
Polaris Bios Editor PRO 3 2020 — это платная версия программы Полярис Биос Эдитор. Эта версия дает самый большой прирост хешрейта по сравнению со стандартным, однако для 100% производительности по-прежнему необходимо вручную настраивать тактовые частоты памяти и напряжения ядра, редактор не может предсказать качество видеокарты, поэтому невозможно автоматически использовать максимальные значения.
Приложение поддерживает следующую память: Elpida, micron, samsung, hynix.
Работает с видеокартами: AMD RX 460/470/480/550/560/570/580/590.
Как пользоваться PolarisBiosEditor
Шаг 2 — Установите программу
Мы настоятельно рекомендуем сохранить оригинальный БИОС в программе GPU-Z от разработчиков прежде, чем рискнете вносить изменения. Они могут привести к нестабильной работе видеокарты, а потому жизненно важно иметь первоначальную конфигурацию, чтобы была возможность вернуть все к первоначальному виду.
- Откройте файл-установщик PolarisBioseditor.exe.
- Нажмите OPEN BIOS («Открыть БИОС»).
- Найдите из списка файл с БИОСом, который вы сохранили благодаря GPU-Z.
При запуске программа отобразить сообщение от разработчика. Нажмите «ДА» для продолжения.
После загрузки БИОСа нажмите «One Click Timing Patch». 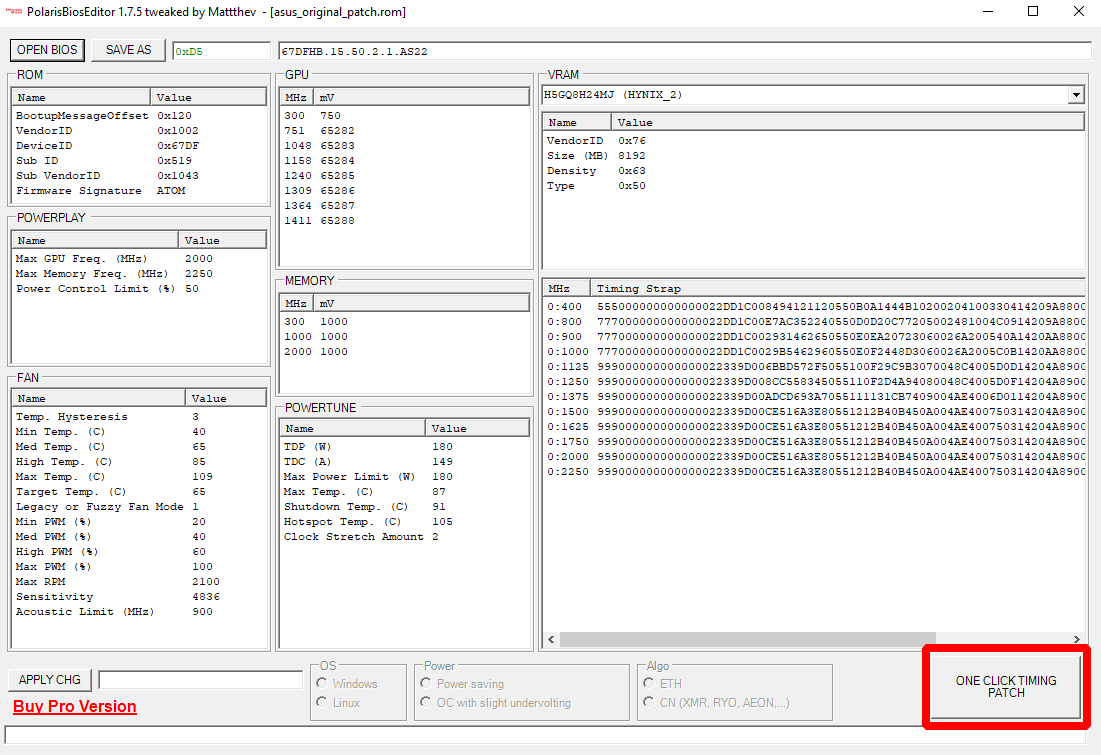
Программа применяет необходимые тайминги под ваш графический процессор. Далее она спросит, нужно ли его использовать. Нажмите «ОК».
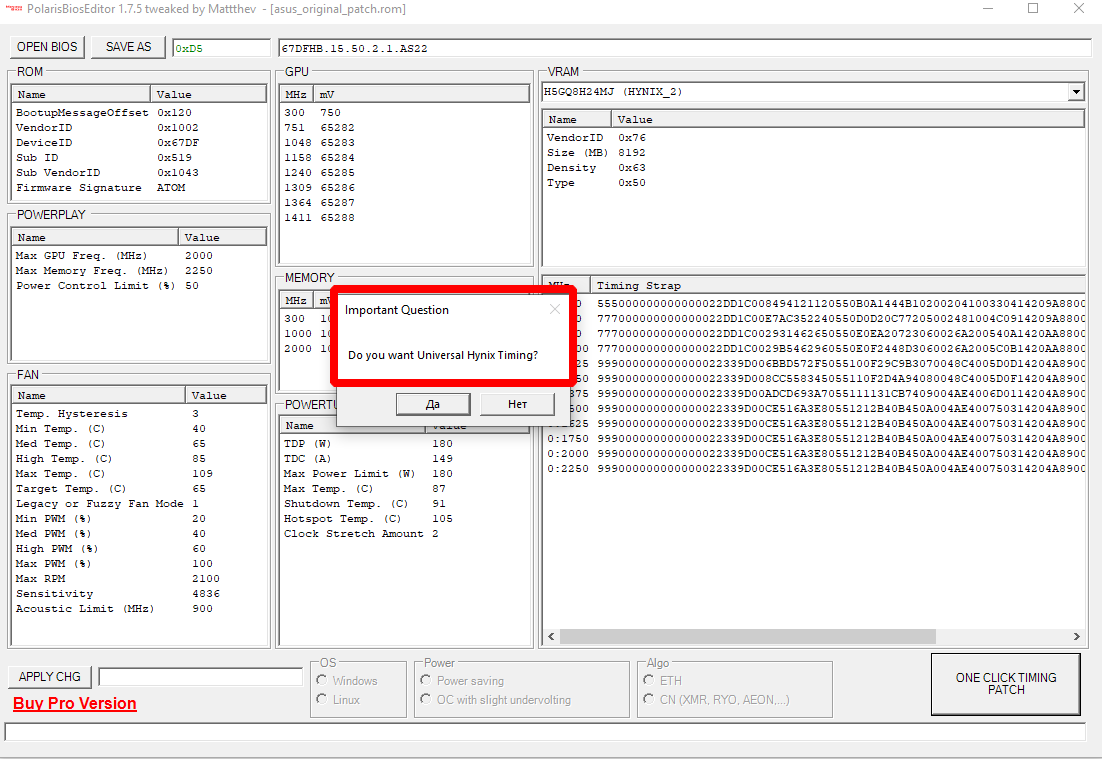
Мы рекомендуем сначала протестировать новые тайминги. Помайните некоторое время и посмотрите на производительность. Если она ниже той, что ожидалось, то заново выполните загрузку БИОСа. Однако, при повторном вопросе о тайминге, откажитесь, нажав кнопку «НЕТ». Тогда будет применен другой тайминг.
После успешного применения таймингов вы увидите следующее окно:
Шаг 3 — Сохраните BIOS
После выполнения этих процедур можно сохранить измененный файл БИОСа. Однако, делайте сохранение как нового документа. В противном случае изначальный BIOS будет перезаписан. Мы же рекомендуем всегда иметь его в запасе. Лучше про запас сохраните несколько файлов, распределив их по разным папкам. 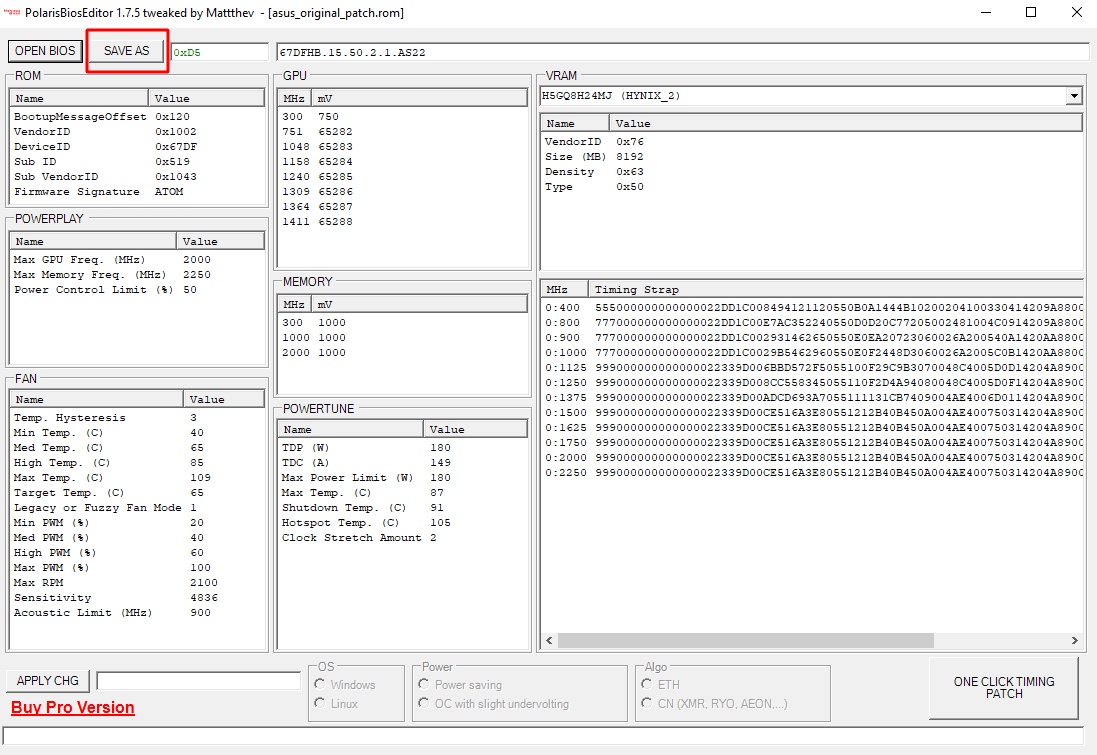
Видео Гид
Почему видеокарту можно разгонять?
Графические процессоры всегда сделаны со значительными ограничениями в производительности. Разработчики видеокарт таким образом оберегают всю партию от возникновения брака. Таким образом, на заводе устанавливают частоты, как говорится “средние по больнице”. Однако в большинстве случаев видеокарты способны работать на более высоких частотах.
Когда дело касается майнинга или высокотребовательных игр, встает вопрос, что использовать, чтобы сделать модификацию графического процессора. Есть и альтернативы программе PolarisBiosEditor. Их мы рассмотрим в следующих статьях.
Как перепрошить BIOS на AMD Radeon RX 400/500. Меняем тайминги для прибыльного майнинга
Возможности и функции программы
Утилита содержит в себе следующие функции:
- Предоставление встроенных таймингов от разработчиков.
- Возможность быстрого и легкого копирования таймингов.
- Можно отредактировать тайминги.
- Доступна возможно снятия блокировки дополнительный шейдеров в графических процессорах AMD 480-серии.
- Можно настроить вольтаж графического процессора.
Это лишь небольшой перечень полезных функций PolarisBiosEditor, которые может предоставить утилита.
Релизы
1.7.6
1.7.5
