У Пионера U11, U22, U33 коды свидетельствующие о том, что во время обновления программного обеспечения произошел сбой. Просто нужно скачать на сайте Пионера официальную актуальную прошивку и установить ее.
www.servicebox.ru/faq/usiliteli_i_resivery/Pioneer/vsx-922/15332-oshibka/Если у Вас уже установлена последнее обновление , 1. Попробуйте еще раз скачать файл firmware с офсайта. Подготовьте заведомо рабочую флешку. По инструкции перепрошейтесь. Если не поможет, то:
2. Сделайте сброс на заводские настройки с кнопок управления на передней панели, предварительно отсоединив от реса все кабели и остальные устройства. При выключенном ресе, тщательно присоедините все назад. Запитайте. Если не поможет, то:
3. В виде сообщения «UE22» вполне может проявляться и проблема с температурным режимом декодера DTS . Аккуратный локальный нагрев чипа, вроде, какой-то эффект у некоторых дает.
forum.polkaudio.com/discussion/155478/pioneer-vsx-1121-with-ue22-error/p2процедура прогрева чипа DTS описана здесь:
www.vinylengine.com/turntable_forum/viewtopic.php?t=84935Если и это не поможет, то:
4. Обратитесь в СЦ для проведения диагностики.
P/S ПО не сбрасывается — только перезаливается.
PIONEER VSX-1021-K VSX-921-K SMSERVICE MANUAL
elektrotanya.com/showresult
Это решение полезно? Да Нет
3 участника считают, что это решение полезно
Содержание
- Pioneer VSX-1121 with UE22 error
- Comments
- Ue22 ошибка pioneer как устранить
Pioneer VSX-1121 with UE22 error

Thanks audioken! You’ve saved my day & at least $400. I was about to give up on my VSX-1021.
I’ve followed audioken’s instructions, I’ve cooked the DTS chip for 30 seconds using a heat gun and it works fine now. No UE22 error code, no more weird Static/Crackling noises on my Pioneer VSX-1021-K
Instructions:
— Disconnect power
— Remove the top cover
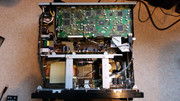
— Locate the DTS chip. Its in the middle of the top circuit board (the one connected to HDMI) (see image below)
— Start heating up the DTS chip at high setting, 8″ — 10″ away from the top surface of the DTS chip. (be extremely careful, DO NOT overheat) 30 seconds was enough for the circuit board to start smoking.
— Wait 5-10 min for the circuit board to cool down
— Reassemble & reconnect your receiver

well, i had this problem with my pioneer lx55.
I tried your solution, and it seems to work. Thank you 
i hope it will last
Mine lasted for 2.5 months, but once I’ve placed a center speaker on the top of the receiver and blocked the vents, UE22 came back on 
reapplied the fix, this time I cooked the DTS chip for 2 minutes and the problem was resolved. Since it’s an overheating problem, I’ve also enabled the auto off setting, that turns off the receiver 1 hours after it becomes inactive, hoping it may help keep the temperature down when not in use. It’s a little inconvenient, since now i have to turn on the receiver every time I want to watch TV, but its worth trying.
I was thinking about installing some kind of fan inside of the receiver, similar to the ones they use in PCs, but it must be very slim, similar to this one
http://www.amazon.com/Scythe-Slip-Stream-120mm-SY1212SL12L/dp/B002CYPWTG
Mine lasted for 2.5 months, but once I’ve placed a center speaker on the top of the receiver and blocked the vents, UE22 came back on
reapplied the fix, this time I cooked the DTS chip for 2 minutes and the problem was resolved. Since it’s an overheating problem, I’ve also enabled the auto off setting, that turns off the receiver 1 hours after it becomes inactive, hoping it may help keep the temperature down when not in use. It’s a little inconvenient, since now i have to turn on the receiver every time I want to watch TV, but its worth trying.
I was thinking about installing some kind of fan inside of the receiver, similar to the ones they use in PCs, but it must be very slim, similar to this one
http://www.amazon.com/Scythe-Slip-Stream-120mm-SY1212SL12L/dp/B002CYPWTG
Nevermind. Forgot I had factory reset. Just had to go and change speaker settings
So I have applied the fix 3 times now since December 2014. Each time I do it, it fixes and works fine after that. Just wondering if there is any brainstorming to make this fix permanent. When we are heating up the DTS chip, is it re-soldering the connection every time.
As of now my receiver is working fine, but I know it will come back. There has to be some permanent fix for this since we know which chip is faulting.

HT SYSTEM-
Sony 850c 4k
Pioneer elite vhx 21
Sony 4k BRP
SVS SB-2000
Polk Sig. 20’s
Polk FX500 surrounds
Cables-
Acoustic zen Satori speaker cables
Acoustic zen Matrix 2 IC’s
Wireworld eclipse 7 ic’s
Audio metallurgy ga-o digital cable
Sonos zp90
Grant Fidelity tube dac
B&k 1420
lsi 9’s
HT SYSTEM-
Sony 850c 4k
Pioneer elite vhx 21
Sony 4k BRP
SVS SB-2000
Polk Sig. 20’s
Polk FX500 surrounds
Cables-
Acoustic zen Satori speaker cables
Acoustic zen Matrix 2 IC’s
Wireworld eclipse 7 ic’s
Audio metallurgy ga-o digital cable
Sonos zp90
Grant Fidelity tube dac
B&k 1420
lsi 9’s
I had my vsx-922 dts chip resoldered with soldering iron but it didn’t fix the signal cutting problem. (L and R flashes on the display and sound goes off and on)
Heating chip with hairdryer helps for a while but i don’t think solders are the problem. 
I too was experiencing intermittent clicks/pops and audio dropout on my vsx-51 amplifier. They started about 2 weeks ago. A few days ago my amplifier started making very loud tones that wouldn’t stop. Resoldering the DTS chip as you suggested fixed the problem. Amplifier running like new.
I used a Master Mite heat gun as it was available in my lab (full disclosure, I’m an electrical engineer). Web link to the heat-gun is here: http://amzn.com/B001HWAFZU
In addition, I also applied liquid flux to aid resoldering of the balls on the BGA package. Cleaned up board with some rubbing alcohol when finished. Since the chip was located right on top, it was easy to get to. The fix took about 10 minutes.
After looking at the amplifiers industrial design, I noticed that the 60Hz transformer is located directly underneath this section of the PCB. When the amplifier is turned on, the transformer gets hot. Really hot! I suspect that the transformer heat caused the PCB to thermal cycle during on/off cycles. Thermal cycling the PCB will cause it to flex and I imagine would eventually lead to a cracked solder joint; the root cause of the problem. Poor design on Pioneers part.
I’ve ordered some BGA heatsinks from amazon: http://amzn.com/B00IR72LJQ
They’ve arrived and look like they will fit nicely (will put them on this weekend). My hope is that this will increase the thermal mass of the device and limit the thermal cycling somewhat. Time will tell if this fixes the problem.
Again, many thanks for posting the solution.
Источник
Искать на Elektrotanya
Искать на Eserviceinfo
Искать на Elektroda
Искать по всему сайту

| Найти DataSheet |  |
| Искать на Doc.chipfind
Искать на Alldatasheet Поиск в PDF по G o o g l e |
|
|
KEHT_UA, landla, know10, merlintom2, Resodzr, Zver, nuhh, redmi3, SMV, IHARCHAR, Matveev85, ivanxxi, fbsd, YORYC, canon93, китаец, revyakin22, Dimas86, ser333, Leshij2009, pikomp2022, Drive2011, krec-klimof, yabbadabbadoo, johnyboy, Vesovchic, mister_yoshka, avanes13, Andriiko, pavel68, Acerforever, alex_solomon, barton, oberone-barss, faustowog, sS210210y, Xell, Viper, kalyos, KaktusWOT, zak_k, ANDR, SoTBaHo, Radiochip, ramzess790, mixail052, borisov_1, stormb, Level2, stapkaneron72, [Полный список]
| Top 20 Uploaders | |
|
Источник Adblock |
 Andriiko
|
Deleted Deleted Member
Posts: 0 |
Post by Deleted on May 31, 2021 11:27:07 GMT -5Latest addition to my AVR collection is a Pioneer SC-LX56, acquired for next to nothing with no audio output but no error message displayed. DSP part of the firmware version was showing * * * so that pointed to the usual TI chip problem. I replaced both IC9002 and IC9702 (2 x DSP model) with the ‘D’ variant chip but still no audio out — at least they’re normal leaded devices and not BGAs, so soldering them in wasn’t too bad apart from the big ground pad underneath, which needed some solder paste and careful use of a heat gun. I couldn’t find a firmware dump for IC9004 or IC9703 online but decided to remove them and read the contents to see if they looked corrupted or were just blank like my VSX-2021 was. IC9004 was blank from 0-10000h, which it shouldn’t be but IC9702 looked ok. I compared 0-10000h from IC9702 to the same address range from a working VSX-922 file I have (same DSP chip and year model) and found this was almost identical apart from 2 bytes. Armed with this discovery I copied 0-10000h from IC9702 and pasted it into the blank area in IC9004. After refitting the two flash chips, there was still no audio out and the * * * remained in the firmware version but I now had UE22 flashing on the front display. I tried a full firmware update via USB and it installed 100% and the unit burst into life. £1300 9 channel receiver bought and fixed for £65 all in… that’ll do nicely thanks to Pioneer and TI.
|
|
Last Edit: May 31, 2021 11:33:55 GMT -5 by Deleted |


|
Deleted Deleted Member
Posts: 0 |
Post by Deleted on Jun 22, 2021 8:01:52 GMT -5Having got the SC-LX56 working I realised the firmware in the two DSP flash chips will be the same as the high end models LX76/86. I’ve now got my sights set on a (UE22 failure) SC-LX86 as the next ‘project’ upgrade. |
|
Deleted Deleted Member
Posts: 0 |
Post by Deleted on Jul 9, 2021 12:18:28 GMT -5I didn’t have to wait long for a UE22 faulty SC-LX86 to pop up on eBay, or pay much to acquire it… two new DSP chips and a reload of the DSP firmware and it’s taken the the place of it’s sibling SC-LX56. £2200 receiver for £42.99 — very nice it is too! Surely I can’t be the only one bothering to fix these superb, if slightly dated bits of kit??
|


Post by tibimakai on Jul 12, 2021 10:34:38 GMT -5Tjmotter used to be the expert with these issues, but on Onkyos, but I believe he quit working on Onkyos(this hobby). |
|
Post by dobrykamil on Jul 14, 2021 13:53:37 GMT -5Hi Have you tried reloading fw first? Do you have to replace DSPs every time? |
|
|
Deleted Deleted Member
Posts: 0 |
Post by Deleted on Jul 14, 2021 14:29:43 GMT -5I always remove the 8 pin flash memory to check if it’s been corrupted before condemning the DSPs. It’s much easier to fix that than remove and replace 176 pin QFPs. I’ve fixed three SC-LX models now and all of them needed new DSP chips as well as the firmware reloading in the 8 pin flash memory. The VSX-LX models with BGA DSPs often work after being reflowed but can also need the flash memory correcting. |
Post by dobrykamil on Jul 14, 2021 14:52:15 GMT -5
I always remove the 8 pin flash memory to check if it’s been corrupted before condemning the DSPs. It’s much easier to fix that than remove and replace 176 pin QFPs. I’ve fixed three SC-LX models now and all of them needed new DSP chips as well as the firmware reloading in the 8 pin flash memory. The VSX-LX models with BGA DSPs often work after being reflowed but can also need the flash memory correcting. Thanks for your prompt reply. Can you still buy genuine Ti DSPs? If so, are you getting them from Aliexpress? |
|
|
Deleted Deleted Member
Posts: 0 |
Post by Deleted on Jul 14, 2021 16:14:03 GMT -5I bought my DSP chips from a China based supplier on eBay. They look genuine and all work fine so far. The SC-LX86 is in daily use now because my tv is a Panasonic Pro plasma display and doesn’t have any built in speakers. |
|
Deleted Deleted Member
Posts: 0 |
Post by Deleted on Jul 15, 2021 6:34:04 GMT -5
Tjmotter used to be the expert with these issues, but on Onkyos, but I believe he quit working on Onkyos(this hobby). I think Tjmotter was far better qualified than me to sort out software issues on these receivers. I didn’t have a lot of luck with Onkyo ones I worked on due to the DSP chips being harder to get. The firmware issues on the Pioneers I’ve fixed have mainly been a case of copying a firmware dump from a working unit after replacing the DSPs. I got lucky with the SC-LX models as they have 2 identical DSP chips and 2 separate flash memory chips. It was only part of the primary one that got corrupted, so I was able to copy that from the secondary. A fair bit of trial and error was involved but if it doesn’t work, you don’t have much to lose. Once I get them working and updated to the latest firmware, I remove the flash chips to read back the known working firmware for any future repairs. |
|
Last Edit: Jul 15, 2021 6:35:32 GMT -5 by Deleted |
Post by tibimakai on Jul 15, 2021 10:31:12 GMT -5You are reading and writing only the flash chips, right? You are not dealing with the microcontroller, right? |
|
|
Deleted Deleted Member
Posts: 0 |
Post by Deleted on Jul 15, 2021 11:05:01 GMT -5
You are reading and writing only the flash chips, right? You are not dealing with the microcontroller, right? That’s correct… For most of the Pioneer AVRs I’ve repaired, they either started working after re flowing the BGA DSP or replacing the QFP DSP but most have needed the associated flash memory chip removing, erasing and reloading with a file dump from a working unit. I couldn’t find any info on doing it by talking directly to the micro and using the main firmware update file from Pioneer to correct the problem, so I had no choice but to de solder the chips and put them in my programmer. Fortunately they are just 16Mb or 8Mb 8 pin devices that are easy to remove and re fit. More recently I replaced the TSOP48 1Gb NAND flash used by the SC-LX56 media controller as I was having trouble with it becoming slow to respond to front panel and remote commands after a week or so of use. It would eventually freeze altogether, requiring a factory reset. I figured this might be due to bad blocks in the NAND but it tested OK on removal. I read the contents and copied it to a brand new device, so only time will tell if this has cured the problem. There is also a 64Mb NOR flash used by the main micro, which may also be responsible for this issue but from what I’ve read the NAND is more likely to fail over time. The sluggish/freezing up problem was quite an issue for Pioneer on these models from what I’ve read online and it often happened to fairly new units. I’ve not found anyone who came up with a fix for it other a warranty replacement unit from Pioneer. The only other anomaly I noticed on my unit was neither the NOR or NAND device was the same make or part number listed in the service manual. The NAND in mine was SKHynix and the manual shows a Toshiba part, while the NOR in mine is a Spansion and the manual shows a Macronix one. The Spansion part isn’t supported by my programmer, so I have left it alone for now. The firmware in that isn’t common to the SC-LX86 like the media controller, so I would like to be able to read it at some point if only to make a backup in case of failure. |
|
Deleted Deleted Member
Posts: 0 |
Post by Deleted on Jul 15, 2021 13:33:49 GMT -5The QFP DSP chips are easier to replace than BGAs in my opinion but they still have their issues. There is a ground tab under the chip which requires quite a lot of heat to get off the board. I use a scalpel to cut the legs around the chip body first and remove them from the board with tweezers and a fine tip iron. Then heat the centre of the chip with a hot air gun for about a minute to free it. Once the board is cleaned I put solder paste on the tab of the new chip and the centre pad on the board and position it to solder down. Once all 176 pins are done, I heat the centre of the chip to flow the solder paste underneath. I found this takes about 90 seconds to achieve a good joint. Any less than this and the chip doesn’t power up and the receiver continues to show UE22. |
|
Last Edit: Jul 15, 2021 13:35:35 GMT -5 by Deleted |
Post by holtphoto on Nov 7, 2021 7:34:59 GMT -5Hi am new to the forum! My aim in joining is that I have purchased a Pioneer SC-LX56 with the error code you have spoke about. For £80 free postage how could I not.. My question is I have nil knowledge on anything to do with fixing this amp😂 Kind regards John |
|
| Найти файл | |
| Сейчас на сайте | |
|
Онлайн всего: 215 Гостей: 125 Пользователей: 90 igorsv13, malchiq2-dji, ssttgg, domosed07, DaDe, 666brandonlee666, ZX, shiskin, УрфинДжус, sputnicservis, ggg3, vm71, Almi56, djonim, komvzvoda, csu, milcin68, Timurych, puza8787, Demontara75, z909144202, vladtuhvatullin, weo147, sonik45, Иван65, shrenat, Kostjn-56, Algonk, МихаилК1971, permremont59, tunik, Denisk0, popovpop, Самирчик, makk, Тимофей072, harchebnikov, ANTIQ, androidman, statusDNA, viktor1223t, walgipsy, Сандеро, flintbelf, фреш, ОК, dredik777, kaman, mister_yoshka, adolf86, [Полный список] |
|
| Приветствую Вас, Гость • RSS | 31.01.2023, 08:31:53 |
|
PIONEER UE22 error remedy |
||||||||||||||
|
Бюллетень по ошибке UE22 в моделях PIONEER 2011 models: VSX-921 VSX-1021 VSX-2021 VSX-LX55 SC-LX75 SC-LX85 2012 models: VSX-922 VSX-1122 SC-2022 SC-LX56 SC-LX76 SC-LX86 |
||||||||||||||
|
Чтобы скачать данный файл, нужно Зарегистрироваться, а после пройти Тест на начальные знания радиоэлектронники |
||||||||||||||
|
||||||||||||||
Добавлять комментарии можно только после регистрации и прохождения Теста.
[ Регистрация | Вход ]
| Информация Файлообменника |
|
Если Вы нашли совпадающие файлы, качество файла плохое и Вы можете поделится лучшим, есть какое-либо несоответствие, схема подходит к другой модели, марки аппарата и т.д … обо всем , что касается Файлообменника, пишите в этой теме |
|
Deleted Deleted Member
Posts: 0 |
Post by Deleted on May 31, 2021 11:27:07 GMT -5Latest addition to my AVR collection is a Pioneer SC-LX56, acquired for next to nothing with no audio output but no error message displayed. DSP part of the firmware version was showing * * * so that pointed to the usual TI chip problem. I replaced both IC9002 and IC9702 (2 x DSP model) with the ‘D’ variant chip but still no audio out — at least they’re normal leaded devices and not BGAs, so soldering them in wasn’t too bad apart from the big ground pad underneath, which needed some solder paste and careful use of a heat gun. I couldn’t find a firmware dump for IC9004 or IC9703 online but decided to remove them and read the contents to see if they looked corrupted or were just blank like my VSX-2021 was. IC9004 was blank from 0-10000h, which it shouldn’t be but IC9702 looked ok. I compared 0-10000h from IC9702 to the same address range from a working VSX-922 file I have (same DSP chip and year model) and found this was almost identical apart from 2 bytes. Armed with this discovery I copied 0-10000h from IC9702 and pasted it into the blank area in IC9004. After refitting the two flash chips, there was still no audio out and the * * * remained in the firmware version but I now had UE22 flashing on the front display. I tried a full firmware update via USB and it installed 100% and the unit burst into life. £1300 9 channel receiver bought and fixed for £65 all in… that’ll do nicely thanks to Pioneer and TI.
|
|
Last Edit: May 31, 2021 11:33:55 GMT -5 by Deleted |
|
Deleted Deleted Member
Posts: 0 |
Post by Deleted on Jun 22, 2021 8:01:52 GMT -5Having got the SC-LX56 working I realised the firmware in the two DSP flash chips will be the same as the high end models LX76/86. I’ve now got my sights set on a (UE22 failure) SC-LX86 as the next ‘project’ upgrade. |
|
Deleted Deleted Member
Posts: 0 |
Post by Deleted on Jul 9, 2021 12:18:28 GMT -5I didn’t have to wait long for a UE22 faulty SC-LX86 to pop up on eBay, or pay much to acquire it… two new DSP chips and a reload of the DSP firmware and it’s taken the the place of it’s sibling SC-LX56. £2200 receiver for £42.99 — very nice it is too! Surely I can’t be the only one bothering to fix these superb, if slightly dated bits of kit??
|
Post by tibimakai on Jul 12, 2021 10:34:38 GMT -5Tjmotter used to be the expert with these issues, but on Onkyos, but I believe he quit working on Onkyos(this hobby). |
|
Post by dobrykamil on Jul 14, 2021 13:53:37 GMT -5Hi Have you tried reloading fw first? Do you have to replace DSPs every time? |
|
|
Deleted Deleted Member
Posts: 0 |
Post by Deleted on Jul 14, 2021 14:29:43 GMT -5I always remove the 8 pin flash memory to check if it’s been corrupted before condemning the DSPs. It’s much easier to fix that than remove and replace 176 pin QFPs. I’ve fixed three SC-LX models now and all of them needed new DSP chips as well as the firmware reloading in the 8 pin flash memory. The VSX-LX models with BGA DSPs often work after being reflowed but can also need the flash memory correcting. |
Post by dobrykamil on Jul 14, 2021 14:52:15 GMT -5
I always remove the 8 pin flash memory to check if it’s been corrupted before condemning the DSPs. It’s much easier to fix that than remove and replace 176 pin QFPs. I’ve fixed three SC-LX models now and all of them needed new DSP chips as well as the firmware reloading in the 8 pin flash memory. The VSX-LX models with BGA DSPs often work after being reflowed but can also need the flash memory correcting. Thanks for your prompt reply. Can you still buy genuine Ti DSPs? If so, are you getting them from Aliexpress? |
|
|
Deleted Deleted Member
Posts: 0 |
Post by Deleted on Jul 14, 2021 16:14:03 GMT -5I bought my DSP chips from a China based supplier on eBay. They look genuine and all work fine so far. The SC-LX86 is in daily use now because my tv is a Panasonic Pro plasma display and doesn’t have any built in speakers. |
|
Deleted Deleted Member
Posts: 0 |
Post by Deleted on Jul 15, 2021 6:34:04 GMT -5
Tjmotter used to be the expert with these issues, but on Onkyos, but I believe he quit working on Onkyos(this hobby). I think Tjmotter was far better qualified than me to sort out software issues on these receivers. I didn’t have a lot of luck with Onkyo ones I worked on due to the DSP chips being harder to get. The firmware issues on the Pioneers I’ve fixed have mainly been a case of copying a firmware dump from a working unit after replacing the DSPs. I got lucky with the SC-LX models as they have 2 identical DSP chips and 2 separate flash memory chips. It was only part of the primary one that got corrupted, so I was able to copy that from the secondary. A fair bit of trial and error was involved but if it doesn’t work, you don’t have much to lose. Once I get them working and updated to the latest firmware, I remove the flash chips to read back the known working firmware for any future repairs. |
|
Last Edit: Jul 15, 2021 6:35:32 GMT -5 by Deleted |
Post by tibimakai on Jul 15, 2021 10:31:12 GMT -5You are reading and writing only the flash chips, right? You are not dealing with the microcontroller, right? |
|
|
Deleted Deleted Member
Posts: 0 |
Post by Deleted on Jul 15, 2021 11:05:01 GMT -5
You are reading and writing only the flash chips, right? You are not dealing with the microcontroller, right? That’s correct… For most of the Pioneer AVRs I’ve repaired, they either started working after re flowing the BGA DSP or replacing the QFP DSP but most have needed the associated flash memory chip removing, erasing and reloading with a file dump from a working unit. I couldn’t find any info on doing it by talking directly to the micro and using the main firmware update file from Pioneer to correct the problem, so I had no choice but to de solder the chips and put them in my programmer. Fortunately they are just 16Mb or 8Mb 8 pin devices that are easy to remove and re fit. More recently I replaced the TSOP48 1Gb NAND flash used by the SC-LX56 media controller as I was having trouble with it becoming slow to respond to front panel and remote commands after a week or so of use. It would eventually freeze altogether, requiring a factory reset. I figured this might be due to bad blocks in the NAND but it tested OK on removal. I read the contents and copied it to a brand new device, so only time will tell if this has cured the problem. There is also a 64Mb NOR flash used by the main micro, which may also be responsible for this issue but from what I’ve read the NAND is more likely to fail over time. The sluggish/freezing up problem was quite an issue for Pioneer on these models from what I’ve read online and it often happened to fairly new units. I’ve not found anyone who came up with a fix for it other a warranty replacement unit from Pioneer. The only other anomaly I noticed on my unit was neither the NOR or NAND device was the same make or part number listed in the service manual. The NAND in mine was SKHynix and the manual shows a Toshiba part, while the NOR in mine is a Spansion and the manual shows a Macronix one. The Spansion part isn’t supported by my programmer, so I have left it alone for now. The firmware in that isn’t common to the SC-LX86 like the media controller, so I would like to be able to read it at some point if only to make a backup in case of failure. |
|
Deleted Deleted Member
Posts: 0 |
Post by Deleted on Jul 15, 2021 13:33:49 GMT -5The QFP DSP chips are easier to replace than BGAs in my opinion but they still have their issues. There is a ground tab under the chip which requires quite a lot of heat to get off the board. I use a scalpel to cut the legs around the chip body first and remove them from the board with tweezers and a fine tip iron. Then heat the centre of the chip with a hot air gun for about a minute to free it. Once the board is cleaned I put solder paste on the tab of the new chip and the centre pad on the board and position it to solder down. Once all 176 pins are done, I heat the centre of the chip to flow the solder paste underneath. I found this takes about 90 seconds to achieve a good joint. Any less than this and the chip doesn’t power up and the receiver continues to show UE22. |
|
Last Edit: Jul 15, 2021 13:35:35 GMT -5 by Deleted |
Post by holtphoto on Nov 7, 2021 7:34:59 GMT -5Hi am new to the forum! My aim in joining is that I have purchased a Pioneer SC-LX56 with the error code you have spoke about. For £80 free postage how could I not.. My question is I have nil knowledge on anything to do with fixing this amp😂 Kind regards John |
|
UE22 stands for “Ultra-efficient 22”. It is a term used by Pioneer to describe its range of audio systems that offer superior efficiency and performance. These audio systems feature a number of advanced technologies designed to maximize sound quality while consuming less power than other models in the same class.
The most notable feature of UE22 audio systems is their use of Class D digital amplification technology, which allows for more efficient energy conversion from the mains power supply, resulting in less energy wasted as heat and improved sound quality. These amplifiers also feature advanced signal processing capabilities such as digital crossovers and tone controls, giving users more control over their sound system.
In addition to its efficient power consumption, UE22 audio systems also provide superior sound quality thanks to a range of features including high-resolution digital-to-analog converters and custom-tuned speaker systems. The combination of these technologies allows for accurate reproduction of even the most complex audio tracks.
Pioneer’s UE22 audio systems are designed for both home and professional use, making them an ideal choice for those looking for superior sound quality and efficiency in an affordable package. Whether you’re setting up a home theater system or building a professional recording studio, UE22 systems offer the best of both worlds.
How do I update my Pioneer VSX 1021 firmware
Updating the firmware on your Pioneer VSX 1021 receiver is a simple process that can be done in a few easy steps. In order to update the firmware, you will need an internet connection and a USB drive with at least 1GB of free space.
Step 1: Download the latest firmware for your Pioneer VSX 1021 from the Pioneer website. Make sure to select the correct model and version for your device.
Step 2: Copy the downloaded firmware file onto the USB drive. It is important to make sure that only this file is on the USB drive and nothing else (ie. no other files or folders).
Step 3: Plug the USB drive into one of the USB ports on the back of your Pioneer VSX 1021 receiver.
Step 4: Power on the receiver and press ‘Setup’ on the remote control. The ‘System Setup’ menu will appear.
Step 5: Select ‘System Update’ and press enter. The receiver will scan for available updates and should detect the firmware file on the USB drive. Select this file and press enter to begin the update process.
Step 6: The receiver will now install the new firmware, which may take several minutes to complete. Once complete, it will prompt you to reboot the receiver. Press ‘OK’ and allow it to reboot normally.
Your Pioneer VSX 1021 receiver is now updated with the latest firmware version! You can check this by pressing ‘Setup’ again and selecting ‘System Setup’ followed by ‘System Information’. Here you should see the latest version number listed next to ‘Firmware Version’.
How do I get my system out of safe mode
If your Windows computer or laptop is stuck in Safe Mode, don’t worry. It’s an easy fix. Here’s how to get your system out of Safe Mode and back to normal.
First, you need to identify why your system is in Safe Mode. In most cases, it’s because of a driver conflict, a corrupted file, or a recent Windows update. Once you’ve identified the cause, you can make the necessary changes to get your system out of Safe Mode.
If your system is in Safe Mode because of a driver conflict, you can try updating the driver through Device Manager. To do this, go to Start > Control Panel > System > Device Manager. Look for any devices that have a yellow exclamation mark beside them. Right-click on the device and select Update Driver Software. This will install any updated drivers that are available for the device. Once the driver is updated, reboot your system and it should be out of Safe Mode.
If a corrupted file caused your system to enter Safe Mode, you can try using System Restore to revert back to an earlier point in time when everything was working correctly. Go to Start > All Programs > Accessories > System Tools > System Restore and follow the on-screen instructions to choose a restore point before the issue started occurring.
If a recent Windows update caused your system to enter Safe Mode, then you may need to uninstall the update if other methods don’t work. Go to Start > Control Panel > Programs & Features and look for the recently installed updates. Right-click on the update and select Uninstall from the context menu. Then reboot your system and it should be out of Safe Mode.
If none of these solutions work for you, then it’s time to try some advanced troubleshooting techniques like System File Checker or sfc /scannow command line tool. This will scan for any corrupted system files on your computer and replace them with clean copies from Microsoft’s servers.
Once you’ve corrected whatever was causing your system to enter Safe Mode, restart your computer and it should be back up and running normally again!
What causes Safe Mode
Safe Mode is a diagnostic mode used by many computer operating systems to identify and fix problems that may be preventing the computer from working properly. When Safe Mode is enabled, only the most essential system components and services are loaded, allowing for troubleshooting and repairs to be made.
Safe Mode can be triggered manually by the user, or it can be triggered automatically in response to certain errors or conditions.
In some cases, the user will trigger Safe Mode intentionally in order to troubleshoot an issue. This may be done when the computer is experiencing frequent crashes or other errors. Other times, it may be triggered in response to an update that has caused issues with the system’s functioning.
In other cases, Safe Mode can be triggered automatically by the operating system in response to certain errors or conditions. For example, if there is a problem with the boot sequence or a critical process or service fails to start, Safe Mode may be triggered automatically. It can also be triggered if there are compatibility issues with hardware or software, or if a virus or malware infection is detected.
Once Safe Mode is enabled, the operating system will attempt to identify and resolve any issues that may be causing the errors or conditions that triggered it in the first place. Depending on the issue, this may involve running scans for viruses and malware, removing incompatible hardware or software, updating drivers, repairing corrupted system files, resetting certain settings, and more. If successful, this should allow the computer to return to normal operation after Safe Mode is disabled.
Привет! Ошибка UE 22 на Pioneer VSX-921 обычно указывает на проблему с блоком питания ресивера.
В данном случае, поскольку сброс настроек не помог, рекомендую попробовать следующее:
1. Отключить ресивер от сети на несколько минут, затем включить снова и проверить, появится ли ошибка.
2. Если ошибка все еще на месте, то нужно проверить силовой кабель и убедиться, что он подключен надежно.
3. Если проблема не решена, то, скорее всего, требуется заменить блок питания ресивера.
Рекомендую обратиться к квалифицированному специалисту или сервисному центру Pioneer для диагностики и замены неисправного блока питания. Не рекомендуется пытаться ремонтировать ресивер самостоятельно, так как это может привести к дополнительным проблемам. Удачи в решении проблемы!
Это решение полезно? Да Нет
|
Pioneer sc-lx56 |
||||||
|
||||||
|
||||||
|
||||||
|
||||||
|


|
|