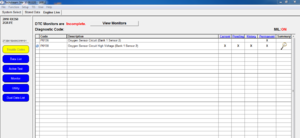
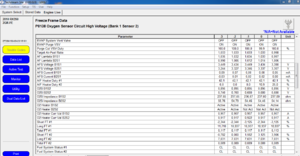
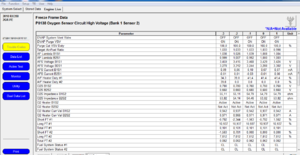
Всем доброго. Задам здесь вопрос, чтоб темы не плодить. Авто Lexus RX 350 2010г америкос. При продолжительной езде с
постоянной скоростью на круиз-контроле 80-100км/ч загорается чек. В городском цикле норм, только по трассе. Ошибки
на скрине. Стираются, после трассы появляются. Что успели сделать. Прозвонили спирали подогревов датчиков после ката- 14.7Ом, + при вкл зажигания на подогрев есть. Обманку механическую на sensor 2 bank1 ставили, не помогло, убрали. Противодавление обоих катов проверили — норм. Поменяли местами задние датчики, ошибки те же, для обоих вариантов (как было и после того как поменяли местами freeze frame прилагаю). Обогащать, обеднять, как выше сказано, сегодня не успели, договорились на завтра, послезавтра. Сегодня катались с Launchем ( techstream в текущих виснет), заметили, что
показания b1s2 виснут 0.76в надолго, в то время как на b2s2 меняются. Приговорить b1s2 или b1s1? (дорогой сцуко). Движок во всех режимах работает норм по обоим банкам. Мож кто сталкивался с подобной траблой? Кто в курсе, подскажите пжлста…
DTC P2195 Oxygen (A/F) Sensor Signal Stuck Lean (Bank 1 Sensor 1)
DTC P2196 Oxygen (A/F) Sensor Signal Stuck Rich (Bank 1 Sensor 1)
Description
Monitor description
Monitor strategy
Typical enabling conditions
Typical malfunction thresholds
Confirmation driving pattern
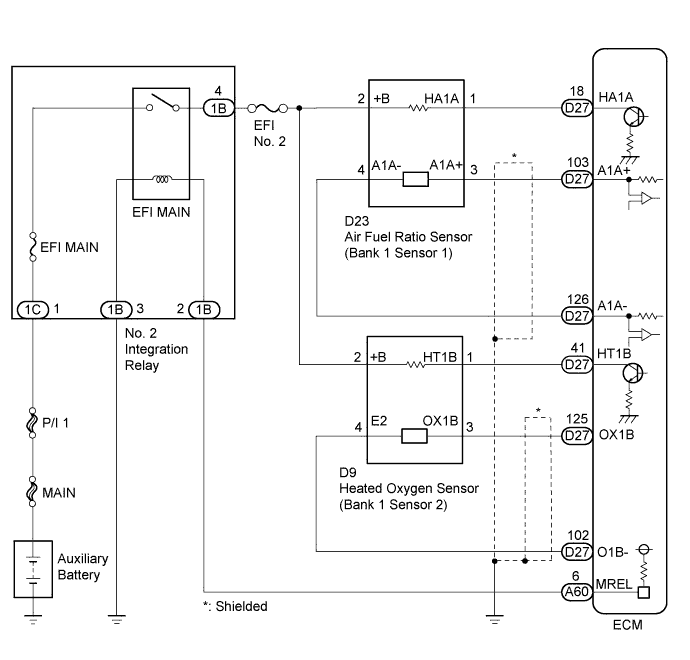
Wiring diagram
Inspection procedure
Check any other dtcs output (in addition to p2195 or p2196)
Confirm if vehicle has run out of fuel in past
Perform confirmation driving pattern
Read value using intelligent tester (air fuel ratio sensor current)
Perform active test using intelligent tester (control the injection volume)
Check intake system
Check for exhaust gas leak
Check fuel pressure
Inspect fuel injector assembly
Replace air fuel ratio sensor
Perform confirmation driving pattern
Perform active test using intelligent tester (control the egr step position)
Inspect egr valve assembly
Replace ecm
Confirm whether malfunction has been successfully repaired
Replace air fuel ratio sensor
Perform confirmation driving pattern
Check fuel line
Description
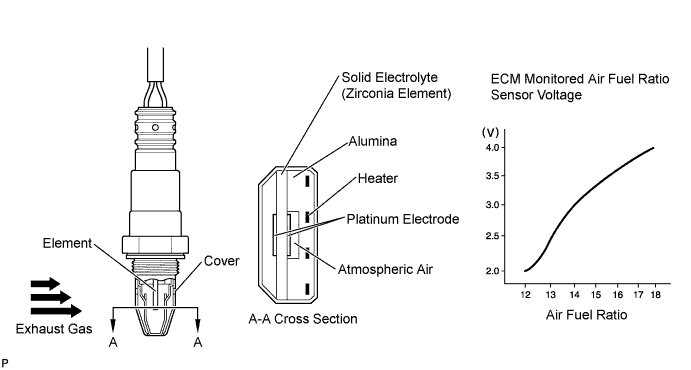
The air fuel ratio sensor generates voltage* that corresponds to the actual air fuel ratio. This sensor voltage is used to provide the ECM with feedback so that it can control the air fuel ratio. The ECM determines the deviation from the stoichiometric air fuel ratio level, and regulates the fuel injection duration. If the air fuel ratio sensor malfunctions, the ECM is unable to control the air fuel ratio accurately. The air fuel ratio sensor is a planar type with an integrated heater, which heats the solid electrolyte (zirconia element). This heater is controlled by the ECM. When the intake air volume is low (the exhaust gas temperature is low), current flows to the heater to heat the sensor, in order to facilitate accurate oxygen concentration detection. In addition, the sensor and heater portions are narrower than the conventional type. The heat generated by the heater is conducted to the solid electrolyte through the alumina, therefore the sensor activation is accelerated. A three-way catalytic converter is used in order to convert the carbon monoxide (CO), hydrocarbon (HC), and nitrogen oxide (NOx) into less harmful substances. To allow the three-way catalytic converter to function effectively, it is necessary to keep the air fuel ratio of the engine near the stoichiometric air fuel ratio. *: Value changes inside the ECM. Since the air fuel ratio sensor uses the current output element, the current is converted to a voltage inside the ECM. Any measurements taken at the air fuel ratio sensor or ECM connectors will show a constant voltage.
| DTC No. | DTC Detection Condition | Trouble Area |
| P2195 | Conditions (a) and (b) continue for 5 seconds or more (2 trip detection logic): (a) Air fuel ratio sensor voltage is higher than 3.8 V. (b) Heated oxygen sensor voltage is 0.21 V or higher. |
|
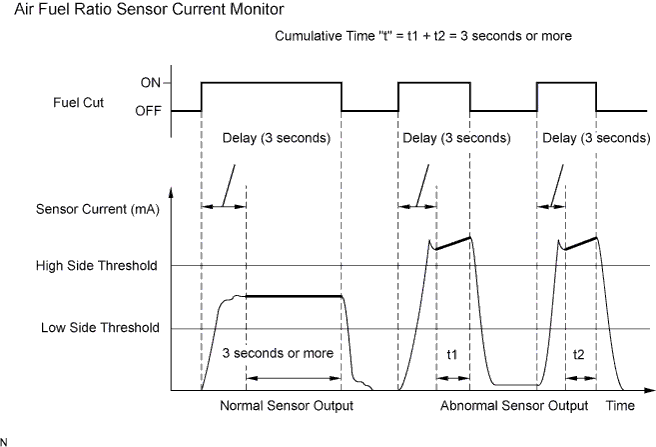
| While the fuel-cut operation is performed (during vehicle deceleration), the air fuel ratio sensor current is 2.2 mA or higher for 3 seconds (2 trip detection logic). |
|
|
| P2196 | Conditions (a) and (b) continue for 5 seconds or more (2 trip detection logic): (a) Air fuel ratio sensor voltage is below 2.8 V. (b) Heated oxygen sensor voltage is below 0.59 V. |
|
| While the fuel-cut operation is performed (during vehicle deceleration), the air fuel ratio sensor current is below 0.7 mA for 3 seconds (2 trip detection logic). |
|
HINT:
- When any of these DTCs are set, check the air fuel ratio sensor output voltage by entering the following menus: Powertrain / Engine and ECT / Data List / All Data / AFS Voltage B1S1.
- Short-term fuel trim values can also be read using the intelligent tester.
- The ECM regulates the voltages at the A1A+ and A1A- terminals of the ECM to a constant level. Therefore, the air fuel ratio sensor output voltage cannot be confirmed without using the intelligent tester.
- If an air fuel ratio sensor malfunction is detected, the ECM sets a DTC.
Monitor description
- Sensor voltage detection monitor Under air-fuel ratio feedback control, if the air fuel ratio sensor output voltage is below 2.8 V (very rich condition) for 5 seconds despite the heated oxygen sensor output voltage being below 0.59 V, the ECM stores DTC P2196. Alternatively, if the air fuel ratio sensor output voltage is higher than 3.8 V (very lean condition) for 5 seconds despite the heated oxygen sensor output voltage being 0.21 V or higher, DTC P2195 is stored.
- Sensor current detection monitor A rich air-fuel mixture causes a low air fuel ratio sensor current, and a lean air-fuel mixture causes a high air fuel ratio sensor current. Therefore, the sensor output becomes low during acceleration, and it becomes high during deceleration with the throttle valve fully closed. The ECM monitors the air fuel ratio sensor current during fuel-cut and detects any abnormal current values. If the air fuel ratio sensor output is 2.2 mA or higher for more than 3 seconds of cumulative time, the ECM interprets this as a malfunction in the air fuel ratio sensor and stores DTC P2195 (stuck on high side). If the air fuel ratio sensor output is below 0.7 mA for more than 3 seconds of cumulative time, the ECM stores DTC P2196 (stuck on low side).
Monitor strategy
| Required Sensors/Components (Main) | Air fuel ratio sensor |
| Required Sensors/Components (Related) | Heated oxygen sensor |
| Frequency of Operation | Continuous: Sensor voltage detection monitor Once per driving cycle: Sensor current detection monitor |
| Duration | 3 seconds: Sensor current detection monitor 5 seconds: Sensor voltage detection monitor |
Typical enabling conditions
| Time after engine start | 30 seconds or more |
| Air fuel ratio sensor status | Activated |
| Fuel system status | Closed-loop |
| Auxiliary battery voltage | 11 V or higher |
| Engine coolant temperature | 75°C (167°F) or higher |
| Atmospheric pressure | 76 kPa (570 mmHg) or higher |
| Air fuel ratio sensor status | Activated |
| Continuous time of fuel cut | 3 to 10 seconds |
Typical malfunction thresholds
| Rear heated oxygen sensor voltage | 0.21 V or higher |
| Air fuel ratio sensor voltage | Higher than 3.8 V |
| Rear heated oxygen sensor voltage | Below 0.59 V |
| Air fuel ratio sensor voltage | Below 2.8 V |
| Air fuel ratio sensor current | 2.2 mA or higher |
| Air fuel ratio sensor current | Below 0.7 mA |
Confirmation driving pattern
HINT:
This confirmation driving pattern is used in the «Perform Confirmation Driving Pattern» procedure of the following diagnostic troubleshooting procedure.
- Connect the intelligent tester to the DLC3.
- Turn the power switch on (IG).
- Turn the tester on.
- Clear the DTCs (even if no DTCs are stored, perform the clear DTC operation).
- Turn the power switch off and wait for 30 seconds.
- Turn the power switch on (IG) and turn the tester on.
- Put the engine in inspection mode (maintenance mode) .
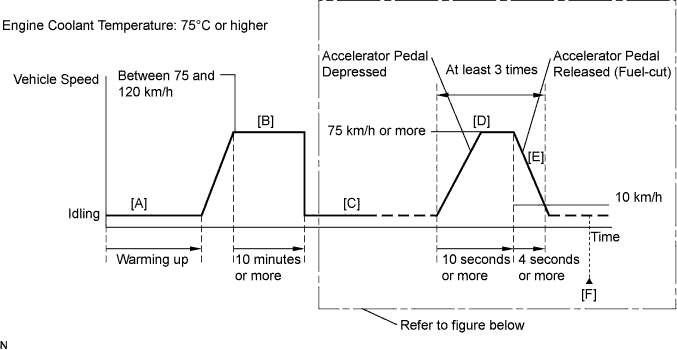
- Start the engine, and warm it up until the engine coolant temperature reaches 75°C (167°F) or higher [A].
- On the tester, enter the following menus to check the fuel-cut status: Powertrain / Engine and ECT / Data List / All Data / Idle Fuel Cut.
- Drive the vehicle at between 75 and 120 km/h (47 and 75 mph) for at least 10 minutes [B].
CAUTION:
When performing the confirmation driving pattern, obey all speed limits and traffic laws.
- Move the shift lever in B [C].
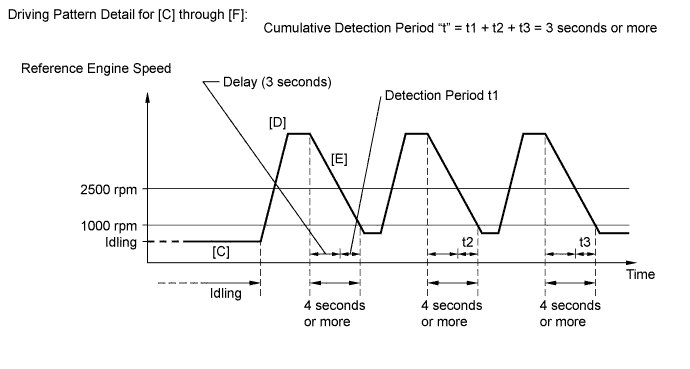
- Accelerate the vehicle to 75 km/h (47 mph) or more by depressing the accelerator pedal for at least 10 seconds [D].
- Soon after performing step [D] above, release the accelerator pedal for at least 4 seconds without depressing the brake pedal in order to execute fuel-cut control [E].
HINT:
Fuel-cut control is executed when the accelerator pedal is released while the vehicle is moving at 35 km/h (22 mph) or slower (Fuel-cut control is prohibited when the engine sped decreases to 1000 rpm or lower).
- Allow the vehicle to decelerate until the vehicle speed decreases to less than 10 km/h (6 mph).
- Repeat steps [C] through [E] above at least 3 times in one driving cycle.
- Enter the following menus: Powertrain / Engine and ECT / DTC [F].
- Read the pending DTCs.
HINT:
- If a pending DTC is output, the system is malfunctioning.
- If a pending DTC is not output, perform the following procedure.
- Enter the following menus: Powertrain / Engine and ECT / Utility / All Readiness.
- Input the DTC: P2195 or P2196.
- Check the DTC judgment result.
Tester Display Description NORMAL - DTC judgment completed
- System normal
ABNORMAL - DTC judgment completed
- System abnormal
INCOMPLETE - DTC judgment not completed
- Perform driving pattern after confirming DTC enabling conditions
UNKNOWN - Unable to perform DTC judgment
- Number of DTCs which do not fulfill DTC preconditions has reached ECU memory limit
HINT:
- If the judgment result shows NORMAL, the system is normal.
- If the judgment result shows ABNORMAL, the system has a malfunction.
- If the judgment result shows INCOMPLETE or UNKNOWN, perform steps [B] through [E].
Wiring diagram
Inspection procedure
HINT:
- Although the DTC titles say oxygen sensor, these DTCs relate to the air fuel ratio sensor.
- Sensor 1 refers to the sensor mounted in front of the three-way catalytic converter and located near the engine assembly.
- Read freeze frame data using the intelligent tester. The ECM records vehicle and driving condition information as freeze frame data the moment a DTC is stored. When troubleshooting, freeze frame data can help determine if the vehicle was moving or stationary, if the engine was warmed up or not, if the air fuel ratio was lean or rich, and other data from the time the malfunction occurred.
- A low air fuel ratio sensor voltage could be caused by a rich air fuel mixture. Check for conditions that would cause the engine to run rich.
- A high air fuel ratio sensor voltage could be caused by a lean air fuel mixture. Check for conditions that would cause the engine to run lean.
- Sensor 1 refers to the sensor closest to the engine assembly.
- Sensor 2 refers to the sensor farthest away from the engine assembly.
1.CHECK ANY OTHER DTCS OUTPUT (IN ADDITION TO P2195 OR P2196)
-
Connect the intelligent tester to the DLC3.
-
Turn the power switch on (IG).
-
Turn the tester on.
-
Enter the following menus: Powertrain / Engine and ECT / DTC.
-
Read the DTCs.
Result
Result Proceed to DTC P2195 or P2196 is output A «P2195 or P2196» and «P0136, P0137 or P0138» are output A DTC P2195 or P2196 and other DTCs are output B
HINT:
If any DTCs relating to the air fuel ratio sensor (DTCs for the air fuel ratio sensor heater or air fuel ratio sensor admittance) are output, troubleshoot those DTCs first.
2.CONFIRM IF VEHICLE HAS RUN OUT OF FUEL IN PAST
-
Has the vehicle run out of fuel in the past?
3.PERFORM CONFIRMATION DRIVING PATTERN
-
Connect the intelligent tester to the DLC3.
-
Turn the power switch on (IG).
-
Turn the tester on.
-
Clear the DTCs .
-
Turn the power switch off and wait for 30 seconds.
-
Turn the power switch on (IG) and turn the tester on.
-
Put the engine in inspection mode (maintenance mode) .
-
Start the engine and warm it up.
-
Drive the vehicle in accordance with the driving pattern described in the Confirmation Driving Pattern.
-
Enter the following menus: Powertrain / Engine and ECT / Utility / All Readiness.
-
Input the DTC: P2195 or P2196.
-
Check the DTC judgment result.
Result
Result Proceed to NORMAL (DTC is not output) A ABNORMAL (DTC P2195 or P2196 is output) B
| A | |
|
DTC CAUSED BY RUNNING OUT OF FUEL |
4.READ VALUE USING INTELLIGENT TESTER (AIR FUEL RATIO SENSOR CURRENT)
-
Connect the intelligent tester to the DLC3.
-
Turn the power switch on (IG).
-
Turn the tester on.
-
Clear the DTCs .
-
Put the engine in inspection mode (maintenance mode) .
-
Enter the following menus: Powertrain / Engine and ECT / Data List / All Data / AFS Current B1S1.
-
Check the value of the air fuel ratio sensor output current during fuel-cut, referring to the Drive Pattern Detail for [C] through [F] in the Confirmation Driving Pattern.
HINT:
- To measure the air fuel ratio sensor current precisely, perform the fuel-cut operation as long as possible.
- If it is difficult to measure the air fuel ratio sensor current, use the snapshot function of the tester.
Result
Test Value Proceed to Within normal range (0.7 mA or higher, and below 2.2 mA) A Outside normal range (below 0.7 mA, or 2.2 mA or higher) B
5.PERFORM ACTIVE TEST USING INTELLIGENT TESTER (CONTROL THE INJECTION VOLUME)
-
Connect the intelligent tester to the DLC3.
-
Turn the power switch on (IG).
-
Turn the tester on.
-
Put the engine in inspection mode (maintenance mode) .
-
Start the engine.
-
Warm up the air fuel ratio sensor at an engine speed of 2500 rpm for 90 seconds.
-
Enter the following menus: Powertrain / Engine and ECT / Active Test / Control the Injection Volume.
-
Perform the Control the Injection Volume operation with the engine idling.
-
Monitor the output voltages of the air fuel ratio and heated oxygen sensors (AFS Voltage B1S1 and O2S B1S2) displayed on the tester.
HINT:
- Change the fuel injection volume within the range of -12.0% to +12.0%. The injection volume can be changed in fine gradations.
- The air fuel ratio sensor has an output delay of a few seconds and the heated oxygen sensor has a maximum output delay of approximately 20 seconds.
- If the sensor output voltage does not change (almost no reaction) while performing the Active Test, the sensor may be malfunctioning.
Standard
Tester Display (Sensor) Injection Volume Status Voltage AFS Voltage B1S1 (Air fuel ratio) +12.0% Rich Below 3.1 V AFS Voltage B1S1 (Air fuel ratio) -12.0% Lean Higher than 3.4 V O2S B1S2 (Heated oxygen) +12.0% Rich Higher than 0.55 V O2S B1S2 (Heated oxygen) -12.0% Lean Below 0.4 V Result
Status of AFS Voltage B1S1 Status of O2S B1S2 Air Fuel Ratio Condition and Air Fuel Ratio Sensor Condition Proceed to Lean Lean Actual air fuel ratio lean A Rich Rich Actual air fuel ratio rich A Lean Lean/Rich Air fuel ratio sensor malfunction B Rich Lean/Rich Air fuel ratio sensor malfunction B Lean/Rich Lean/Rich Normal C Lean: During the Control the Injection Volume Active Test, the air fuel ratio sensor output voltage (AFS Voltage) is consistently higher than 3.4 V, and the heated oxygen sensor output voltage (O2S) is consistently below 0.4 V. Rich: During the Control the Injection Volume Active Test, the AFS Voltage is consistently below 3.1 V, and the O2S is consistently higher than 0.55 V. Lean/Rich: During the Control the Injection Volume Active Test, the output voltage of the heated oxygen sensor alternates correctly.
HINT:
Refer to «Data List / Active Test» [AFS Voltage B1S1 and O2S B1S2] .
|
CHECK FOR INTERMITTENT PROBLEMS |
|
-
Check the intake system for vacuum leaks .
OK:
No leaks in intake system.
|
REPAIR OR REPLACE INTAKE SYSTEM |
|
7.CHECK FOR EXHAUST GAS LEAK
-
Check for exhaust gas leaks from exhaust manifold sub-assembly and exhaust pipes..
OK:
No gas leaks.
|
REPAIR OR REPLACE EXHAUST SYSTEM |
|
-
Check the fuel pressure .
9.INSPECT FUEL INJECTOR ASSEMBLY
-
Check the fuel injector assembly (whether fuel volume is high or low, and whether injector pattern is poor) .
|
REPLACE FUEL INJECTOR ASSEMBLY |
|
10.REPLACE AIR FUEL RATIO SENSOR
-
Replace the air fuel ratio sensor .
11.PERFORM CONFIRMATION DRIVING PATTERN
-
Connect the intelligent tester to the DLC3.
-
Turn the power switch on (IG).
-
Turn the tester on.
-
Clear the DTCs .
-
Turn the power switch off and wait for 30 seconds.
-
Drive the vehicle in accordance with the driving pattern described in the Confirmation Driving Pattern.
-
Enter the following menus: Powertrain / Engine and ECT / Utility / All Readiness.
-
Input the DTC: P2195 or P2196.
-
Check the DTC judgment result.
Result
Result Proceed to ABNORMAL (DTC P2195 or P2196 is output) A NORMAL (DTC is not output) B
12.PERFORM ACTIVE TEST USING INTELLIGENT TESTER (CONTROL THE EGR STEP POSITION)
-
Connect the intelligent tester to the DLC3.
-
Turn the power switch on (IG).
-
Turn the tester on.
-
Put the engine in inspection mode (maintenance mode) .
-
Start the engine and warm it up until the engine coolant temperature reaches 75°C (167°F) or higher.
HINT:
The A/C switch and all accessory switches should be off.
-
Enter the following menus: Powertrain / Engine and ECT / Active Test / Control the EGR Step Position / Data List / All Data / Throttle Idle Position and MAP.
-
Confirm that the Throttle Idle Position is ON and check the engine idling condition and MAP values in the Data List while performing the Active Test.
HINT:
- Do not leave the EGR valve open for 10 seconds or more during the Active Test.
- Be sure to return the EGR valve to step 0 when the Active Test is completed.
- Do not open the EGR valve 30 steps or more during the Active Test.
OK:
MAP and idling condition change in response to EGR step position when Throttle Idle Position is ON in Data List.
Standard:
— EGR Step Position (Active Test) 0 Steps 0 to 30 Steps Idling condition Steady idling Idling changes from steady to rough idling or stalls MAP (Data List) MAP value is 20 to 40 kPa (150 to 300 mmHg) (EGR valve is fully closed) MAP value is at least +10 kPa (75 mmHg) higher than when EGR valve is fully closed HINT:
During Active Test, if the idling condition does not change in response to EGR step position, then there is probably a malfunction in the EGR valve.
Result
Result Proceed to Outside of standard range A Within standard range B
13.INSPECT EGR VALVE ASSEMBLY
-
Remove the EGR valve assembly .
-
Check if the EGR valve is stuck open.
OK:
EGR valve us tightly closed.
|
REPLACE EGR VALVE ASSEMBLY |
|
-
Replace the ECM .
15.CONFIRM WHETHER MALFUNCTION HAS BEEN SUCCESSFULLY REPAIRED
-
Connect the intelligent tester to the DLC3.
-
Turn the power switch on (IG).
-
Turn the tester on.
-
Clear the DTCs .
-
Turn the power switch off and wait for 30 seconds.
-
Drive the vehicle in accordance with the driving pattern described in the Confirmation Driving Pattern.
-
Enter the following menus: Powertrain / Engine and ECT / Utility / All Readiness.
-
Input the DTC: P2195 or P2196.
-
Check the DTC judgment result.
Result
Tester Display Description NORMAL - DTC judgment completed
- System normal
ABNORMAL - DTC judgment completed
- System abnormal
INCOMPLETE - DTC judgment not completed
- Perform driving pattern after confirming DTC enabling conditions
UNKNOWN - Unable to perform DTC judgment
- Number of DTCs which do not fulfill DTC preconditions has reached ECU memory limit
16.REPLACE AIR FUEL RATIO SENSOR
-
Replace the air fuel ratio sensor .
17.PERFORM CONFIRMATION DRIVING PATTERN
-
Connect the intelligent tester to the DLC3.
-
Turn the power switch on (IG).
-
Turn the tester on.
-
Clear the DTCs .
-
Turn the power switch off and wait for 30 seconds.
-
Drive the vehicle in accordance with the driving pattern described in the Confirmation Driving Pattern.
-
Enter the following menus: Powertrain / Engine and ECT / Utility / All Readiness.
-
Input the DTC: P2195 or P2196.
-
Check the DTC judgment result.
Result
Result Proceed to NORMAL (DTC is not output) A ABNORMAL (DTC P2195 or P2196 is output) B
-
Check the fuel lines for leaks or blockage.
|
REPAIR OR REPLACE FUEL LINE |
|
Автор:
Christy White
Дата создания:
12 Май 2021
Дата обновления:
16 Сентябрь 2023
Содержание
- Возможные причины
- Когда код обнаружен?
- Возможные симптомы
- P2195 Lexus Описание
Возможные причины
Когда код обнаружен?
P2195 указывает на неисправность, связанную с блоком 1 цепи датчика A / F.
Возможные симптомы
Выходное напряжение датчика A / F используется для обеспечения обратной связи для модуля управления двигателем (ECM) контролировать соотношение воздух-топливо.
С выходом датчика A / F, ECM может определять отклонение от стехиометрического соотношения воздух-топливо и контролировать правильное время впрыска. Если датчик A / F неисправен, ECM не может точно контролировать соотношение воздух-топливо.
Датчик A / F оборудован нагревателем, который нагревает циркониевый элемент. Нагреватель также контролируется ECM, Когда объем всасываемого воздуха низкий (температура выхлопных газов низкая), ток течет к нагревателю, который нагревает датчик, чтобы облегчить определение точной концентрации кислорода.
Датчик A / F — плоский тип. По сравнению с обычным типом сенсор и нагреватель имеют более узкую часть. Поскольку нагрев нагревателя проходит через оксид алюминия в диоксид циркония (части сенсора), активация сенсора ускоряется.
На чтение 4 мин Просмотров 17.2к.
Рассмотрим подробнее
- Техническое описание и расшифровка ошибки P2195
- Симптомы неисправности
- Причины возникновения ошибки
- Как устранить или сбросить код неисправности P2195
- Диагностика и решение проблем
- На каких автомобилях чаще встречается данная проблема
- Видео
Код ошибки P2195 звучит как «сигнал датчика кислорода O₂ застрял в положении слишком бедная смесь (Банк 1, Датчик 1)». Часто, в программах, работающих со сканером OBD-2, название может иметь английское написание «O2 Sensor Signal Stuck Lean (Bank 1, Sensor 1)».
Код OBD-II P2195 является общим кодом силового агрегата. Который определяется всеми автопроизводителями как «заедание сигнала датчика O₂ в положении богатой смеси (Банк 1, Датчик 1)». Где Банк 1 относится к группе цилиндров, которая содержит цилиндр № 1.
Во время нормальной работы датчик O₂ реагирует на изменения содержания кислорода в выхлопном потоке. В зависимости от типа датчика, он фиксирует изменения либо сигнального напряжения, либо электрического сопротивления. Которые PCM использует для поддержания соотношения воздух-топливо как можно ближе к идеальному соотношению 14,7:1.
Полностью работоспособный датчик кислорода не может генерировать напряжение сигнала или сопротивление, которое не изменяется. Типичный диапазон напряжения сигнала варьируется от 0,1 вольт до 0,9 вольт.
При этом значение 0,45 вольт представляет собой среднюю точку, в которой топливно-воздушная смесь максимально приближена к идеальному соотношению 14,7:1.
Таким образом, весьма маловероятно, что соотношение воздух-топливо в смеси будет оставаться постоянным в течение значительного периода времени. Поэтому, когда PCM обнаруживает отсутствие изменений в сигнальном напряжении или сопротивлении датчика. Устанавливается код P2195 и загорается сигнальная лампа.
Симптомы неисправности
Основным симптомом появления ошибки P2195 для водителя является подсветка MIL (индикатор неисправности). Также его называют Check engine или просто «горит чек».
Также они могут проявляться как:
- Загорится контрольная лампа «Check engine» на панели управления (код будет записан в память ECM как неисправность).
- Плавающие обороты, а также попытки заглохнуть на холостом ходу.
- Двигатель глохнет либо плохо заводится.
- Снижение мощности двигателя.
- Повышенный расход топлива.
- Черный дым из выхлопной трубы.
- Симптомы могут отсутствовать, кроме сохраненного кода неисправности.
Степень серьезности кода неисправности P2195 варьируется от средней до высокой. Но если не устранять его в течении длительного времени, возможен выход из строя катализатора.
Причины возникновения ошибки
Код P2195 может означать, что произошла одна или несколько следующих проблем:
- Неисправность датчика кислорода O₂ или его нагревателя.
- Обрыв или короткое замыкание в проводке.
- Проблема с давлением топлива либо с топливной форсункой.
- Утечки всасываемого воздуха или вакуума в двигателе.
- Неисправность датчика массового расхода воздуха (MAF).
- Неисправность датчика, а также регулятора давления топлива.
- Иногда причиной является неисправный модуль PCM.
Как устранить или сбросить код неисправности P2195
Некоторые предлагаемые шаги для устранения неполадок и исправления кода ошибки P2195:
- Осмотрите проводку и разъемы.
- Визуально проверьте вакуумные линии.
- Проведите испытание давления топлива.
- Протестируйте датчики на предмет выхода из строя. При необходимости замените.
- Сделайте тест модуля PCM, при необходимости, замените его.
Диагностика и решение проблем
Начиная диагностику неисправности P2195 осмотрите проводку и разъемы, ведущие к датчику, проверьте нет ли потертостей, оплавления, при необходимости отремонтируйте. Визуально проверьте вакуумные линии. Если установлено, что проблема связана с утечкой вакуума, было бы разумно заменить все вакуумные линии.
Снимите датчик кислорода O₂ с автомобиля и осмотрите его на предмет наличия нагара, повреждений или отложений. Обратите внимание, что загрязненные или поврежденные кислородные датчики нельзя очистить или отремонтировать.
При замене датчика убедитесь, что вся проводка подключена правильно, проложена вдали от горячих компонентов выхлопной системы. Надежно закрепите, чтобы предотвратить трение или истирание о другие компоненты.
Очистите код неисправности P2195 и проведите тест драйв, чтобы проверить, вернется ли код снова, что очень маловероятно. Однако, если он все же возвращается, вполне вероятно, что замененный датчик также неисправен либо неисправны схемы мониторинга в PCM.
Проверьте актуальные бюллетени технического обслуживания (TSB) для вашего автомобиля. В некоторых случаях PCM может быть откалиброван, и проблема будет решена.
На каких автомобилях чаще встречается данная проблема
Проблема с кодом P2195 может встречаться на различных машинах, но всегда есть статистика, на каких марках эта ошибка присутствует чаще. Вот список некоторых из них:
- Audi
- Chevrolet (Шевроле Каптива)
- Citroen (Ситроен С4)
- Ford (Форд Фокус, Фристар, Эскейп, F-150)
- Honda (Хонда Аккорд)
- Hyundai
- Lexus (Лексус is250, rx350)
- Lincoln (Линкольн Таун Кар, LS)
- Mazda (Мазда 3, Мазда 6, Мазда cx7)
- Peugeot (Пежо 308, 508, 3008, Партнер)
- Skoda
- Toyota (Тойота Авенсис, Камри, Королла, Прадо, Приус, Рав4, Хайлендер, IQ)
- Volkswagen (Фольксваген Пассат, Поло Седан)
- Volvo
- Уаз Патриот, Хантер
С кодом неисправности Р2195 иногда можно встретить и другие ошибки. Наиболее часто встречаются следующие: P0102, P0171, P0172, P0174, P0175, P0183, P0194, P0351, P0352, P0353, P0354, P0356, P2106, P2196, P2197, P2198, P2A00, P21F8, P2238.
Видео
OBD-II Trouble Code Technical Description
O2 A/F Sensor Signal Biased/Stuck Lean (Bank 1 Sensor 1)
What does that mean?
This code is a generic powertrain code. It is considered generic because it applies to all makes and models of vehicles (1996-newer), although specific repair steps may be slightly different depending on the model.
On some vehicles, such as Toyotas, this is actually referring to A/F sensors, Air/Fuel ratio sensors. Which are basically more sensitive versions of oxygen sensors.
The powertrain control module (PCM) monitors the air/fuel ratio of the exhaust using oxygen (O2) sensors, and tries to keep things at the normal air/fuel ratio of 14.7:1 via the fuel system. The oxygen A/F sensor outputs a voltage reading that the PCM uses. This DTC is set when the air/fuel ratio as read by the PCM has strayed so far from 14.7:1 that the PCM can no longer correct it.
Bank #1 is the side of the engine that contains cylinder #1. This code specifically refers to the sensor between the engine and catalytic converter (not the one behind it).
Note: This DTC is very similar to P2196, P2197, P2198. If you have multiple DTC codes, always fix them in the order they appear.
Symptoms
For this DTC, the malfunction indicator lamp (MIL) will illuminate. There may be other symtoms.
Causes
Potential causes of a P2195 code include:
- Oxygen (O2) or A/F ratio sensor or sensor heater malfunction
- Open or short in O2 sensor circuit (wiring, harness)
- Fuel pressure or fuel injector problem
- Faulty PCM
- Intake air or engine vacuum leaks
- Faulty fuel injector(s)
- Fuel pressure too high or too low
- PCV system leak/fault
- A/F sensor relay faulty
- MAF sensor malfunction
- ECT sensor malfunction
- Fuel pressure too low
- Fuel leak
- Air suction in air intake system
Diagnostic Steps & Possible Solutions
Use a scan tool to get readings from the sensor, and monitor the short and long term fuel trim values and O2 sensor or Air Fuel Ratio sensor readings. Also, look at the freeze frame data to see the conditions at the time the code was set. That should help determine if the O2 AF sensor is operating correctly. Compare with manufacturers values.
If you don’t have access to a scan tool, you could use a multimeter and back-probe the terminals on the O2 sensor wiring connector. Check for shorts to ground, short to power, open circuits, etc. Compare specs with manufacturers specifications.
Visually inspect the wiring & connectors leading to the sensor, check for loose connectors, wires rubbed/chaffed, melted wires, etc. Repair as necessary.
Visually inspect vacuum lines. You can also test for vacuum leaks using propane or carburetor cleaner along the hoses while the engine is running, if the RPMs change you likely found the leak. Be very careful if doing that, and have a fire extinguisher within reach in case something goes wrong. For example, on a bunch of Ford vehicles, the hose that goes from the PCV to the throttle body can melt causing P2195, P2197, P0171, and/or P0174 codes. If a vacuum leak is determined to be the problem, it would be prudent to replace all vacuum lines if they are getting older, becoming brittle, etc.
Use a digital volt ohm meter (DVOM) to check other sensors mentioned such as MAF, IAT, for proper operation.
Perform a fuel pressure test, verify readings against manufacturers specification.
If you’re on a budget and you only have an engine with more than one bank and the problem is only with one bank, you could swap the sensor from one bank to the other, clear the code, and see if the code is followed to the other bank. That would tell you it is the sensor/heater itself that’s failed.
Check for outstanding technical service bulletins (TSB) for your vehicle, in some cases the PCM can be recalibrated to fix this (not a common fix though). TSBs could also call for replacement of the sensor.
When replacing oxygen / AF sensors, be sure to use a high quality ones. In many cases non-OEM sensors are of lesser quality and will not perform correctly. We strongly recommend you stick with OEM brand replacements.
Related DTC Discussions
- 2005 Lincoln Town Car Multiple Codes P0102 P0174 P0351 P0352 P0353 P0354 P2106 P2195 P0183 P0194
2005 Lincoln Town Car 4.6L engine having Coil On Plug (COP) ignition
I’m getting misfire codes on the entire right (passenger) bank. The entire list of codes minus pending duplicates):
——
PO102 problem with the Mass Air Flow (MAF) sensor or circuit. A more technical description would be that th…
- my 2006 Lincoln ls is overheating p2195
Hi, am having trouble with my Lincoln ls, I haven’t drive the car for almost a year now due to it’s mechanical problem the car is overheating and I just cant seems to find the problem, I replaced all new parts such as new Radiator, new thermostat with the complete housing, new Radiator fan, new Radi…
- 04 F-150, no start, p0171, p0174, p0356, p2195, p2197
2004 ford f 150 «new edge» 5.4 3 valve a/t 4×4 supercrew larriet, 112k miles, original spark plugs, already replaced the FPDM in the summer time. The truck would miss once in a great while but never threw a code/check engine light. I chalked it up to me not changing the plugs yet….Im scared of th…
- 2004 4cyl accord having P0171, P2195, P2A00. Please help, it does not have a MAF sensor
Please assist on how to solve this error codes. It came up after changing the rear O2 sensor, changing fuel pump and cleaning the air filter, plugs and flushing the injector nozzles at a mechanic workshop all in a bit to improve the fuel consumption…
- 2005 Ford Freestar P0171 P2195 P2197
Have check codes for both banks. Replaced MAF sensor, PCV and hose, still comes up. Any ideas on most likely cause?…
- Honda accord — Bank 1 Sensor 1 stuck lean P2195
I got a CEL on my 2003 Accord LX last month indicating the front O2 sensor was bad. Replace it then it said the secondary O2 was bad, replaced it over the weekend and now the CEL is still on. Checked the codes and got Bank 1 Sensor 1 Stuck lean.
Does anybody know what could cause this issue?…
- 2008 F150 idles really rough codes P2195 P2197
Hi guys, I have a 2008 F150 that idles really rough when it will idle. Codes setting are 2195 & 2197, checked fuel pressure it was low-ish 24 psi. Changed fuel pump & filter this brought the PSI up in the range of 34-49 psi. Still no run or very poor idle when it will run, did a smoke test …
- Toyota IQ P2195
Hello
My Toyota IQ 2010 ( U.K. ) has just decided to display various dashboard warnings
including the engine management light, traction control/VSC light and seat belt warning light.
My diagnostic reader gives P2195 which is an 02 sensor, possibly air/fuel ratio sensor
on a Toyota. The car has don…
- 2003 Escape P2195 P2197 P0172 P0174 P0175
2003 Escape 3.0 at idle starts to surge
I took this to a shop and it gave me the following codes
P2195
P2197
P0172
P0174
P0175
Seems to run fine except for when you come to a stop and let it idle and the surge begins to start. If I unplug the MAF it runs great…Plug it back in and it surges and d…
- Lexus RX350 several error codes P2195 P2238
Hi
I am new in this forum and I need the support on following:
My car is a Lexus RX350 2011 FWD with 78k miles.
Around 65k miles, Check engine started and it was P0155 about change sensors on Bank 2..
First I changed both sensors on Bank 2 (upstream and downstream) with TKN sensors and it was r…
Need more help with a p2195 code?
If you still need help regarding the P2195 trouble code, please post
your question in our FREE car repair forums.
NOTE: This information is presented for information purposes only.
It is not intended as repair advice and we are not responsible for any actions
you take on any vehicle. All information on this site is copyright protected.

