|
|
Страница 1 из 1 | [ Сообщений: 13 ] |
Street Glide 2012 ошибки p1511 p2101
| Автор | Сообщение |
|---|---|
|
Зарегистрирован: 12 ноя 2019, 10:34 |
Добрый день. Прошу помощи. Что сделано: Выдает коды ошибок: P1511 и P2101 при выше указанной проблеме. До обнуления всех ошибок было еще: P0118,Р1009, U1016 — но скорей всего это ошибки из-за замены и прописки нового блока TSSM (иммобилайзер/сигнализация). Эти ошибки не повторяются при работе двигателя на холостых оборотах (никуда не ездил после обнуления). Подскажите пожалуйста: что это такое, у кого то была ли такая проблема, что с этим сделать, куда смотреть, хотелось бы получить тех документацию конкретного узла/ схемы или четкую пошаговую рекомендацию. Я сам механик, а в электрике не очень. |
| 12 июл 2022, 13:05 |
|
|
Rever Зарегистрирован: 02 янв 2012, 01:14 |
Ошибки не читал? Дерганные обороты очень похожи на датчик TPS. |
| 12 июл 2022, 13:30 |
|
|
americanec26 Зарегистрирован: 02 мар 2018, 21:25 |
Rever писал(а): Ошибки не читал? Дерганные обороты очень похожи на датчик TPS. Зачем Вы дайте советы если не знаете мат часть? |
| 12 июл 2022, 13:48 |
|
|
Rever Зарегистрирован: 02 янв 2012, 01:14 |
ну, и отлично. Я знаю матчасть по своему мотоциклу. |
| 12 июл 2022, 13:51 |
|
|
Lukich Зарегистрирован: 06 июн 2012, 01:33 |
Чистим контакты на электронном дросселе. Потом наблюдаем. Если не поможет, с ПРИСТРАСТИЕМ, шатая и крутя, проверяем провода от дроссельной до мозгов. Если нашли обрыв- ура, если нет, печаль. Берём у кореша дроссель, меняем. Наблюдаем. Если с его дросселем все хорошо, тогда оставляем себе его исправный, а его шлем …!подальше…. ) Без кореша, зато на исправном мопеде! |
| 12 июл 2022, 14:46 |
|
|
Combino Зарегистрирован: 12 ноя 2019, 10:34 |
Lukich писал(а): Чистим контакты на электронном дросселе. Потом наблюдаем. Если не поможет, с ПРИСТРАСТИЕМ, шатая и крутя, проверяем провода от дроссельной до мозгов. Если нашли обрыв- ура, если нет, печаль. Берём у кореша дроссель, меняем. Наблюдаем. Если с его дросселем все хорошо, тогда оставляем себе его исправный, а его шлем …!подальше…. ) Без кореша, зато на исправном мопеде! Спасибо. К сожалению нет такого кореша, который бы «пожертвовал» своим дросселем ))). На американских разных форумах владельцы ХД пишут о такой проблеме, то есть она достаточно популярная. |
| 12 июл 2022, 16:44 |
|
|
Lukich Зарегистрирован: 06 июн 2012, 01:33 |
Контакт спреем обработать можно. Аля вюрт итд. Незаметные окислы могут влиять. Правда после этого может разбухнуть резинка, но ее или снять или через несколько часов она сама высохнет. |
| 12 июл 2022, 17:43 |
|
|
Сурен Зарегистрирован: 15 май 2016, 18:17 |
Была такая беда ,аккуратно почистил контакты дросселя надфилем ,проблема прошла ,но иногда подвисают обороты приходится перегружать мот раз или два ,обычно в жару.Химией обработал -резинка расползлась в сопли)) Пришлось менять коннектор ,химия АБРО.. |
| 12 июл 2022, 23:44 |
|
|
Rever Зарегистрирован: 02 янв 2012, 01:14 |
выложите фотку контактов. дичь какая-то… |
| 13 июл 2022, 18:15 |
|
|
Combino Зарегистрирован: 12 ноя 2019, 10:34 |
Сурен писал(а): Была такая беда ,аккуратно почистил контакты дросселя надфилем ,проблема прошла ,но иногда подвисают обороты приходится перегружать мот раз или два ,обычно в жару.Химией обработал -резинка расползлась в сопли)) Пришлось менять коннектор ,химия АБРО.. Оставлю свой итог: Совет: если у кого то будет подобная проблема, то сначала акцентируйте внимание на самом простом — почистите все разъемы, если не поможет, то прозвоните под нагрузкой ответственные провода потому, что возможен где то частичный обрыв (падение сопротивления). И если не поможет, то меняйте дроссель и снова тестируйте/ катайте. |
| 16 авг 2022, 16:37 |
|
|
Lukich Зарегистрирован: 06 июн 2012, 01:33 |
Спасибо за обратную связь ! в наше время это теперь редкость. Да к сожалению в этом случае вариант оказался практически максимально неудобным и дорогостоящим. Но цепь диагностических действий весьма показательна и должна послужить хорошим примером остальным. |
| 16 авг 2022, 21:44 |
|
|
Rever Зарегистрирован: 02 янв 2012, 01:14 |
Жесть конечно. |
| 16 авг 2022, 22:12 |
|
|
Lukich Зарегистрирован: 06 июн 2012, 01:33 |
Для примера можно посмотреть фотографию любого электронного дросселя от автомобиля …или от харлея…чистить там можно только две вещи :электрический разъём (окислы)и саму заслонку (от нагара.) |
| 17 авг 2022, 16:55 |
|
| Показать сообщения за: Поле сортировки |
|
|
Страница 1 из 1 | [ Сообщений: 13 ] |
Harley Davidson bikes are intended for maximum enjoyment. Yes, the error codes are capable of preventing you from enjoying your rides. Today, we will focus on the P1511 code, which is one of the most common of all codes.
So what does Harley Code P1511 mean? The code P1511 refers to a problem with the throttle grip sensor. This can include a bad ECM, a faulty throttle body wiring connector, and unsecured bolts on the throttle housing. Riding the bike recklessly can be the reason for this issue.
Fortunately, the fixes are quite easy. Yet, before we get into the fixes, we have to understand the problem first. So let’s dive in deep with the code P1511.
What Does Harley Code P1511 Mean
In simple words, code P1511 directly indicates that something is wrong with the throttle grip sensor in your Harley motorcycle. The throttle grip sensor is also called a throttle position sensor.
An engine’s air intake is tracked by a sensor called a throttle position sensor (TPS). To directly monitor the throttle position, the sensor is typically mounted on the butterfly spindle or shaft.
Your engine will run poorly if your throttle position sensor is broken. The acceleration will not be smooth at all. This is because, even if the airflow is increasing, the system isn’t instructing the engine to inject as much fuel as is necessary.
One side note, if you’re facing issues with acceleration, it may also, at times, show you Harley code p1510, which is due to issues in the throttle actuator control motor.
Common Symptoms Of A Bad Throttle Sensor
What symptoms indicate a bad TPS? Here’s a table to portray the symptoms, including their description in a more organized manner;
| Symptoms | Meaning |
|---|---|
| Stalling | A loss of power steering, making it hard to steer the bike |
| Hesitation | It’s bogging down, misfiring, or stumbling when you hit the accelerator |
| Surging at specific throttle points | Your Harley speeds up and slows down even while you keep the accelerator steady |
| Uneven or harsh idle | You will come across RPM meter to fluctuate in-between rides, and thus the motorcycle wobbles |
| Decrease in fuel economy | You get less mileage on your motorcycle |
Harley Code P1511 Problems And Fixes
As mentioned before, the problems are a bad ECM, a faulty throttle body wiring connector, and unsecured bolts on the throttle housing. These make the throttle position sensor malfunction. So let’s have a look at the problems in depth and how to fix them.
A Bad ECM
When the ECM is not working properly, the engine doesn’t receive any information about how much fuel to burn in the combustion process. In most cases of poor ECM functioning, the bike uses up more fuel than necessary.
The ECM uses the inputs from this sensor to help calculate how much air is entering the engine. It’s located in the left-hand electrical panel behind the left-hand cover on a Harley Davidson motorcycle.
Fix
ECM failure most commonly occurs within one of the wiring harnesses. Wires to fuel injectors or the transmission can lose conductivity due to corrosion, resulting in failure. Fortunately, replacing the corroded wires typically resolves these issues.
However, a matter to note is that the Harley Code P1353 may also be present as it’s related to faulty wires.
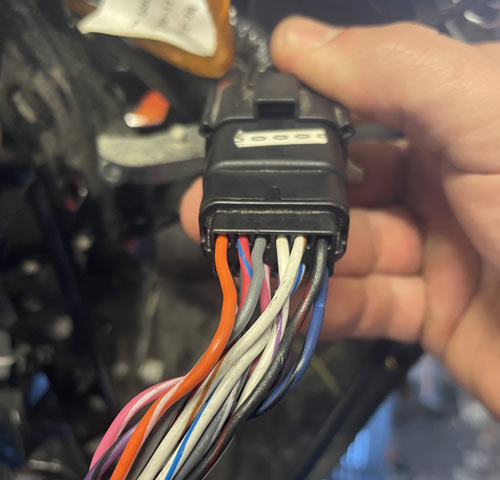
A Faulty Throttle Body Wiring Connector
The throttle body is positioned between the air cleaner and a manifold that brings fuel and air into an engine which is also called the intake manifold. Moreover, it controls the airflow in the engine. Thus, making sure all the wires in the throttle body are crucial.
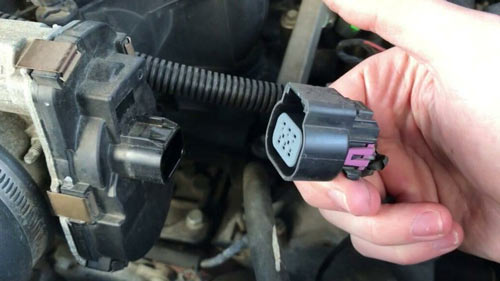
When there’s a fault in the throttle body wiring, sufficient air doesn’t get in the engine and thus overheats. When the engine is overheating, nothing on the motorcycle runs smoothly. Thus, you will come across the P1511 code.
Fix
You need to identify the right cables responsible for a faulty throttle body. Check to see if any of the wires are loosened, damaged, or faulty, and then fix them accordingly or even replace them if necessary.
However, if you try to do it yourself without proper knowledge, it will get tricky. Therefore, it’s always best to take it to a professional.
Nevertheless, if you are willing to do it yourself, here’s a video on how to access the throttle body wiring connectors;
Unsecured Bolts On The Throttle Housing
The throttle bolts are crucial as it helps to send signals to your motorcycle properly. Thus, an unsecured bolt can make riding hazardous and reduce engine performance.
It is also located between the engine’s air cleaner and the intake manifold, where the throttle body is positioned.
Fix
Take a screwdriver with the same head as the Harley Davidson’s bolts. To check for loose bolts, try turning them to the right. If you find a motion to the right then they are loosened bolts and need tightening.
However, if you find them fixed in their position, they are good to go.
How To Avoid The Error Code P1511
At this point, you might have fixed the error code. However, you certainly don’t want to face this problem again. Well, there are two effective ways that you can use to avoid the error code P1511. They are;
Don’t Drive Recklessly
With a special type of bike like Harley Davidson, you expect yourself to be a free bird with a top speed. Yet, this isn’t always the case. Not all Harley bikes are made for speeding, especially lightweight ones.
So, don’t ride your bike recklessly to avoid such events as code P1511.
Dielectric Grease
Dielectric grease is a silicone-based lubricant, often known as tune-up grease, that deters moisture and guards against corrosion on electrical components. Moreover, it is used to keep debris, moisture, and other substances away from electrical connections.
This lubricant may have been washed off when cleaning the bike. There are possible reasons for it being washed off. Thus, make sure the dielectric grease is present close to the connection behind the air cleaner.
How Much Will A Mechanic Charge for Fixing a Harley Code P1511
The cost depends on the location you are in. Mechanic cost depends from place to place. All we can say is that the time it will take to debug an error code P1511 is an hour. Also, the type of problems can impact the labor cost as well.
The average mechanic cost varies from $75 to $130 per hour. Nevertheless, don’t always search for the cheapest option, as cheap doesn’t always mean a win. Your favorite bike can get defective if the mechanic doesn’t know what he’s doing.
FAQ
Let’s have a look at some frequently asked questions now.
HOW DO YOU CLEAR A HARLEY FAULT CODE?
First, track the origin of the code and what the code is referring to. Find the components that may lead to this problem. Lastly, fix all the loose connections, etc., that you can find.
IS RIDING WITH AN ERROR CODE P1511 RISKY?
Yes, it’s risky. You will come across numerous problems when this error code is present. It’s best to fix it as soon as you can.
IS USING DIELECTRIC GREASE IMPORTANT TO AVOID HARLEY CODE P1511?
As using them can prevent your motorcycle’s important parts from corrosion, it can surely help avoid the Harley code P1511.
Conclusion
To sum up, the Harley code P1511 refers to a problem with the throttle grip sensor. So anything that you can find that is connected to the throttle grip is to care about. Make sure all the connections are properly made, and dielectric grease is also present.
Additionally, tighten all the bolts and check for rusted cables. They are one of the primary reasons for this problem. Nevertheless, if you find any steps tricky, don’t be shy about showing them to a mechanic.
Harley-Davidson riders, beware: if you see the P1511 Harley code illuminated on your bike’s dashboard, it is likely that there is a defect in its Throttle Actuator Control Motor Circuit. Take note and quickly address this issue for optimal performance!
The Throttle Actuator Control (TAC) system is in charge of regulating the throttle on a motorcycle. It consists of three main parts: the TAC motor, the TAC module, and the throttle body. The job of the TAC motor is to open and close off access to air entering into your engine through its control over the amount let out by way of closing or opening up from within its own housing -the throttle body.
Meanwhile, overseeing this operation stands our trusty Powertrain Control Module (PCM), also known as simply ‘The TAC module’. No matter how fast you might want it to go though; it’s always there keeping an eye on safety with every signal sent accordingly from itself for optimal performance!
When your system displays the P1511 Harley code, it is an indicator that something has gone awry with your TAC motor circuit. This could be attributed to a malfunctioning or erratic TAC module; irregular wiring or connections between elements; and/or some other problem associated with the TAC motor. As such, there might be many potential sources of this issue.
Please note, the other potential cause for this error could be the throttle grip sensor, but that’s usually resolved by ensuring all bolts and wires are secured correctly. If the problem persists it usually means it’s the Throttle Actuator.
A frequent source of the P1511 Harley code is a faulty TAC motor. This mini electric engine, in charge of opening and closing the throttle body, can cause this error code if it fails to work properly due to multiple causes such as a worn-out motor, broken gears or issues with wiring or connections.
One of the most common issues triggering a P1511 Harley code is when the TAC module, which controls the TAC motor, isn’t functioning optimally. This can be caused by a defective unit; software or firmware difficulties; or faulty wiring and connections. If any of these are compromising your system’s efficiency, you may spot this error message on your vehicle’s dashboard.
If the TAC motor, module, and throttle body connections or wiring are not functioning correctly, then a P1511 code could be triggered. This can range from corroded wires to broken connections or grounding issues – all of which must be addressed for resolution.
How to Diagnose the P1511 Harley Code
To pinpoint the P1511 Harley code, a mechanic will usually use a diagnostic scanner to interpret it and identify its root cause. Furthermore, they may also look for any signs of deterioration or harm on the TAC motor, TAC module, and throttle body. Additionally, wiring checks as well as connection inspections are essential in order to ensure everything runs smoothly.
If a TAC motor is causing the issue, it will need to be replaced. If a malfunctioning TAC module is at fault, then repair or replacement of the module is required. Repair or replacement of wiring and connections may also be necessary if they are contributing to the problem.
Nip the P1511 Harley code in the bud immediately, as a broken TAC system can cause your motorcycle to lose power or even stall. If neglected further, it can also lead to severe engine damage. Act swiftly for optimal performance and safety!
Concluding the P1511 Harley Code
In conclusion, the P1511 Harley code is an error alert in Harley-Davidson motorcycles which points to a problem with the Throttle Actuator Control Motor Circuit. This could be caused by either a broken TAC motor or module, or maybe even due to misconnections between these two components and their wiring.
To identify the problem, a mechanic will use an advanced scanner and closely review the TAC motor, TAC module, throttle body along with their wiring and connections. Acting quickly is vital to safeguard your motorcycle from unexpected stalling or reduced power as well as potential engine damage.
Faqs
Below are some of the most frequently asked questions on the P1511 Harley Code:
What is the P1511 Harley code on a Harley-Davidson motorcycle?
If your Harley-Davidson motorcycle is exhibiting the P1511 code, it’s an indication that there may be a problem with its Throttle Actuator Control Motor Circuit.
What causes the P1511 code to appear on a Harley-Davidson motorcycle?
The P1511 code could be ascribed to an array of factors, such as a defective TAC motor, a misbehaving TAC module, or disruption in the wiring or connections between these components.
How is the P1511 code diagnosed on a Harley-Davidson motorcycle?
A certified mechanic will usually utilize a diagnostic scanner to read the code and pinpoint the source of trouble. They may also look for wear or destruction on components such as TAC motor, TAC module, and throttle body; ensuring that wiring connections are in good condition too.
How is the P1511 code fixed on a Harley-Davidson motorcycle?
Malfunctions with the TAC motor require a replacement, while issues caused by the TAC module can be remedied through repair or substitution. Should faulty wiring be to blame for your distress, that too must either get mended or replaced.
Why is it important to address the P1511 code on a Harley-Davidson motorcycle?
It is essential to identify and rectify the P1511 code without delay, as a weak TAC system may lead to your motorcycle stalling or its power being significantly reduced. What’s more, if left unchecked it can even cause harm to your engine!
Harley Fault Codes 2004-2015
Below is a list of comprehensive list of diagnostic codes that you may come across on your
Harley-Davidson.
- Sensors and Motors (P0051-P2304)
- ABS (C0652-C1573)
- Battery, Ignition, Lighting and
Accessories (B0563-B2274) - CanBus (U0001-U1317)
- Radio Diagnostics (B2006-B2027)
How to Read Error Codes
- With the ignition in the off position, press and hold the trip meter button, and turn the ginition swith to the on position.
- Release the button. Your speedo indicators should illuminate and the needle should do a full sweep.
- “diag” will appear on the odometer screen. Press the trip button once.
- “PSSPt” is now displayed. Each of the letters represents a different area.
-
P = ECM / ICM (Engine / Ignition Control Module)
-
S = TSM / TSSM (Turn Signal / Turn Signal Security Module)
-
SP = Speedometer
-
t = Tachometer
-
- You can highlight each area by pressing the button. Once the area you wish to select is highlighted, press and hold the
button for 5 seconds. - If there are any codes, you will be able to go through them one at a time by pressing the button. Once you have them
recorded, they can be cleared by holding the button for more than 5 seconds. Once “clear” is on the screen, press the button once more. - To exit the Diagnostic Mode, turn the ignition switch off.
Harley Sensor and Motor Codes
| POO51 | Heater Control Circuit 02 Sensor Low |
| PO106 | Map Sensor Rate of Range Error |
| P0107 | Map Sensor Failed Open/Low |
| P0108 | Map Sensor Failed High |
| P0112 | IAT Sensor Voltage Low |
| P0113 | IAT Sensor Voltage Open / High |
| P0117 | ET Sensor Voltage Low |
| P0118 | ET Sensor Voltage Open / High |
| P0120 | TPS1 Range Error TPS |
| P0122 | TPS1 Low TPS |
| P0123 | TPS1 High / Open TPS |
| P0131 | Front 02 Sensor Low (lean) |
| P0132 | Front 02 Sensor High (rich) |
| P0134 | Front 02 Sensor Open / Not Responding |
| P0151 | Rear 02 Sensor Low (lean) |
| P0152 | Rear 02 Sensor High (rich) |
| P0154 | Rear 02 Sensor Open / Not Responding |
| P0220 | TPS2 Range Error |
| P0222 | TPS2 Low TPS |
| P0223 | TPS2 High/Open |
| P0261 | Front Injector Open/Low |
| P0262 | Front Injector High |
| P0263 | Rear Injector Open/Low |
| P0264 | Rear Injector High (CAN-Bus) |
| P0264 | Rear Injector Open/Low |
| P0265 | Rear Injector High |
| P0371 | Crank Position Sensor, Too Many Pulses |
| P0372 | Crank Position Sensor, Too Few Pulses |
| P0373 | CKP Sensor Intermittent |
| P0374 | CKP Sensor Not Detected |
| P0444 | Purge Solenoid (Evap. Canister) Open/Low |
| P0445 | Purge Solenoid (Evap. Canister) High |
| P0501 | VSS Low |
| P0502 | VSS High/Open (Can-Bus) |
| P0502 | VSS Speed Failed Low |
| P0503 | VSS Speed Failed High |
| P0505 | Loss of Idle Speed Control |
| P0506 | Idle Speed Control RPM Too Low |
| P0507 | Idle Air Control System RPM Higher Than Expected |
| P0562 | Battery Voltage Low |
| P0563 | Battery Voltage High |
| P0572 | Brake Switch Low |
| P0577 | Cruise Control Input High |
| P0602 | Calibration Memory Error |
| P0603 | ECM EEPROM Failure |
| P0604 | RAM Failure |
| P0605 | ECM Flash Error |
| P0607 | Converter Error |
| P0641 | 5V+Vref 1 Out of Range |
| P0651 | 5V+Vref 2 Out of Range |
| P0661 | Intake Solenoid Low/Open |
| P0662 | Intake Solenoid High/Shorted |
| P1001 | System Relay Coil Open/Low |
| P1002 | System Relay Coil High/Shorted |
| P1003 | System Relay Contacts Open |
| P1004 | System Relay Contacts Closed |
| P1009 | Incorrect Password |
| P1010 | Missing Password |
| P1270 | TGS Validation Error |
| P1351 | Front Ignition Open/Low |
| P1352 | Front Ignition Coil High/Shorted |
| P1353 | Front Cylinder No Combustion |
| P1354 | Rear Ignition Coil Open/Low |
| P1355 | Rear Ignition Coil High/Shorted |
| P1356 | Rear Cylinder No Combustion |
| P1357 | Front Intermittent Secondary Combustion |
| P1358 | Rear Intermittent Secondary Combustion |
| P1475 | Exhaust Actuation Position Error |
| P1477 | Exhaust Actuator Open/Low |
| P1478 | Exhaust Actuator Shorted/High |
| P1501 | Jiffy Stand Sensor Low |
| P1502 | Jiffy Stand Sensor High |
| P1510 | EFI Limited Performance Mode (TBW) |
| P1511 | EFI Power Management Mode |
| P1512 | EFI Forced Idle Mode |
| P1514 | Air Flow Fault (TBW) |
| P1600 | EFI Module Processor Internal Error |
| P1632 | Odometer Learned Up |
| P2100 | EFI TCA Motor Circuit Open (TBW) |
| P2101 | EFI TCA Motor Circuit Range/Performance |
| P2102 | EFI TCA Motor Circuit Low |
| P2103 | EFI TCA Motor Circuit High |
| P2105 | EFI Forced Engine Shutdown |
| P2107 | EFI Module Control Processor Internal Fault |
| P2119 | EFI Motor Throttle Body Range Performance (TBW) |
| P2122 | TGS1 Low/Open |
| P2123 | TGS1 High |
| P2127 | TGS2 Low/Open |
| P2128 | TGS2 High |
| P2135 | TPS Voltage Correlation Error |
| P2138 | TGS Voltage Correlation Error |
| P2176 | EFI Closed Postion Not Learned |
| P2300 | Front Ignition Coil Driver Low/Open |
| P2301 | Front Ignition Coil Driver High/Shortened |
| P2303 | Rear Ignition Coil Driver Low/Open |
| P2304 | Rear Ignition Coil Driver High/Shortened |
Harley ABS and Power
Circuit Codes
| C0562 | Device Voltage Low |
| C0563 | Device Voltage High |
| C1014 | ECU Internal Fault ABS |
| C1017 | Pump Motor Power Circuit Fault |
| C1018 | Pump Motor Ground High Resistance Fault |
| C1021 | Front Wheel Speed Sensor Equals Zero |
| C1023 | Rear Wheel Speed Sensor Equals Zero |
| C1025 | Front Wheel Speed Signal Intermittent |
| C1027 | Front Wheel Speed Frequency Out Of Range |
| C1032 | Front Wheel Speed Sensor Open or Shorted |
| C1034 | Rear Wheel Speed Sensor Open or Shorted |
| C1041 | Rear Actuator Circuit Low/Open |
| C1042 | Front Actuator Circuit Open |
| C1043 | Pump Motor Stalled |
| C1044 | Rear Actuator Circuit Open |
| C1052 | Rear Actuator Circuit High |
| C1055 | ABS ECU Internal Fault |
| C1066 | ECU Internal Fault |
| C1094 | Front Brake Switch Always On |
| C1095 | Front Brake Switch Open |
| C1102 | Rear Actuator Motor Stalled |
| C1118 | ECU Internal Fault |
| C1121 | ECU Internal Fault |
| C1151 | Front Wheel Release Too Long |
| C1153 | Rear Wheel Release Too Long |
| C1158 | Calibration Programming Required |
| C1178 | No VIN Received From ECM |
| C1184 | VIN Does Not Match ABS ECU Calibration |
| C1192 | Front Actuator Circuit High |
| C1193 | Front Actuator Motor Stalled/td> |
| C1206 | Front Wheel Speed Sensor Frequency Out of Range |
| C1207 | Rear Wheel Speed Signal Intermittent |
| C1208 | Rear Wheel Speed Sensor Frequency Out of Range |
| C1212 | Front or Rear Brake not Applied With Decel |
| C1214 | Rear Brake Switch Always On |
| C1216 | Rear Brake Switch Open |
| C1222 | ABS Voltage Low Terminal 11 |
| C1223 | ABS Voltage Low Terminal 20 |
| C1224 | Front Actuator Power Shorted High |
| C1225 | Rear Actuator Power Shorted High |
| C1561 | Front Apply Solenoid Circuit Open or High |
| C1562 | Front Apply Solenoid Circuit Shorted Low |
| C1563 | Front Solenoid Circuit Shorted High |
| C1564 | Front Release Solenoid Circuit Open or High |
| C1565 | Front Release Solenoid Circuit Shorted Low |
| C1567 | Rear Apply Solenoid Circuit Open or High |
| C1568 | Rear Apply Solenoid Circuit Shorted Low |
| C1571 | Rear Solenoid Circuit Shorted High |
| C1572 | Rear Release Solenoid Circuit Open or High Resistance |
| C1573 | Rear Realease Solenoid Circuit Shorted Low |
Harley
Battery, Ignition, Lighting Codes
| B0563 | Battery Voltage High TSM / TSSM |
| B1004 | Fuel Level Sending Unit Low Instruments |
| B1005 | Fuel Level Sending Unit High / Open |
| B1006 | Accessory Line Overvoltage |
| B1007 | Ignition Line Overvoltage Instruments |
| B1008 | Reset Switch Closed Instruments |
| B1101 | LHCM Turn Signal Bulb Out |
| B1103 | LHCM Internal Fault |
| B1121 | Left Turn Output Fault TSM / TSSM |
| B1122 | Right Turn Output Fault TSM / TSSM |
| B1123 | Left Turn Output Short to Ground TSM/TSSM |
| B1124 | Right Turn Output Short to Ground TSM/TSSM |
| B1125 | Left Turn Output Short to Battery TSM/TSSM |
| B1126 | Right Turn Output Short to Battery TSM/TSSM |
| B1131 | Alarm Output Low TSSM |
| B1132 | Alarm Output High TSSM |
| B1134 | Starter Output High TSM/TSSM |
| B1135 | Accelerometer Fault TSM/TSSM |
| B1136 | Accelerometer Tip Test Error TSSM |
| B1141 | Ignition Switch Open / Low TSSM |
| B1142 | Smart Security System Internal Fault TSSM |
| B1143 | Security Antenna Short To Ground TSSM |
| B1144 | Security Antenna Short To Battery TSSM |
| B1145 | Security Antenna Open TSSM |
| B1151 | (Sidecar) BAS Low TSM/TSSM |
| B1151 | RHCM Turn Signal Bulb Out |
| B1152 | (Sidecar) BAS High TSM/TSSM |
| B1153 | (Sidecar) BAS Out Of Range TSM/TSSM |
| B1153 | RHCM Internal Fault |
| B1154 | Clutch Switch Input Short To Ground |
| B1155 | Neutral Switch Input Short To Battery |
| B1200 | Instrument Internal Fault |
| B1210 | Fuel Sender Shorted Low / Fuel Gauge Circuit |
| B1211 | Fuel Sender Shorted High / Open |
| B2102 | System Power Output Shorted High |
| B2103 | System Power Output Shorted Low |
| B2104 | System Power Output Overloaded |
| B2107 | Front Position / Running Power Output Shorted High |
| B2108 | Front Position / Running Power Output Shorted Low |
| B2109 | Front Position / Running Power Output Overloaded |
| B2112 | Accessory Output Shorted High |
| B2113 | Accessory Output Shorted Low |
| B2114 | Accessory Output Overloaded |
| B2116 | Fuel Pump Output Open |
| B2117 | Fuel Pump Output Shorted High |
| B2118 | Fuel Pump Output Shorted Low |
| B2119 | Fuel Pump Output Overloaded |
| B2121 | Starter Output Open/BCM Malfunction |
| B2122 | Starter Output Shorted High |
| B2123 | Starter Output Shorted Low |
| B2124 | Starter Output Overloaded |
| B2126 | Horn Output Open |
| B2127 | Horn Output Shorted High |
| B2128 | Horn Output Shorted Low |
| B2129 | Horn Output Overloaded |
| B2131 | High Beam Output Open |
| B2132 | High Beam Output Shorted High |
| B2133 | High Beam Output Shorted Low |
| B2134 | High Beam Output Overloaded |
| B2136 | Low Beam Output Open |
| B2137 | Low Beam Output Shorted High |
| B2138 | Low Beam Output Shorted Low |
| B2139 | Low Beam Output Overloaded |
| B2141 | Left Front Turn Signal Output Open |
| B2143 | Left Front Turn Signal Output Shorted Low |
| B2144 | Left Front Turn Signal Output Overloaded |
| B2146 | Right Front Turn Signal Output Open |
| B2148 | Right Front Turn Signal Output Shorted Low |
| B2149 | Right Front Turn Signal Output Overloaded |
| B2151 | Left Rear Turn Signal Output Open |
| B2153 | Left Rear Turn Signal Output Shorted Low |
| B2154 | Left Rear Turn Signal Output Overloaded |
| B2156 | Right Rear Turn Signal Output Open |
| B2158 | Right Rear Turn Signal Output Shorted Low |
| B2159 | Right Rear Turn Signal Output Overloaded |
| B2161 | Brake Lamp Output Open |
| B2163 | Brake Lamp Output Shorted Low |
| B2164 | Brake Lamp Output Overloaded |
| B2166 | Running Lights Output Open |
| B2168 | Running Lights Output Shorted High |
| B2169 | Running Lights Output Shorted Low |
| B2172 | Security Siren Output Shorted High |
| B2173 | Security Siren Output Shorted Low |
| B2176 | Security Antenna Output Open |
| B2177 | Security Antenna Output Shorted High |
| B2178 | Security Antenna Output Shorted Low |
| B2203 | Ignition Switch Input Shorted Low |
| B2206 | Engine Stop Switch Input Open/Shorted High |
| B2208 | Engine Stop Switch Input Shorted Low |
| B2218 | Neutral Switch Shorted Low |
| B2223 | Rear Brake Switch Shorted Low |
| B2250 | Clutch Switch Stuck |
| B2251 | Horn Switch Stuck |
| B2252 | High Beam Switch Stuck |
| B2253 | Low Beam Switch Stuck |
| B2254 | Left Turn Switch Stuck |
| B2255 | Trip Switch Stuck |
| B2260 | Start Switch Stuck |
| B2261 | Right Turn Switch Stuck |
| B2262 | Front Brake Switch Stuck |
| B2263 | Hazard Switch Stuck |
| B2270 | BCM Internal Fault |
| B2271 | BCM Low Voltage |
| B2272 | BCM or Speedometer Voltage High |
| B2274 | Constant Battery Line Fault |
Harley CAN Bus Codes
| U0001 | CAN bus Fault |
| U0011 | CAN bus Low Shorted / Can bus High |
| U0100 | Lost Communication With ECM |
| U0121 | Lost Communication With ABS |
| U0140 | Lost Communication With BCM |
| U0141 | Lost Communication With LHCM |
| U0142 | Lost Communication With RHCM |
| U0156 | Lost Communication With Speedometer |
| U1016 | Loss of ICM/ECM Serial Data |
| U1040 | Loss OF Communication With ABS |
| U1064 | Loss Of TSM/TSSM Serial Data |
| U1097 | Loss Of Speedometer Serial Data |
| U1255 | Missing Message at Speedometer EFI |
| U1300 | Serial Data Low |
| U1301 | Serial Data Open/High |
| U1302 | Infotainment Bus Off |
| U1306 | Infotainment Bus Lost Communication With Handsfree Phone |
| U1307 | Infotainment Bus Lost Communication With CB |
| U1308 | Infotainment Bus Lost Communication With Future |
| U1312 | Infotainment Bus Lost Communication With Future |
| U1313 | Infotainment Bus Lost Communication With Radio Satellite |
| U1314 | Infotainment Bus Lost Communication With Navigation |
| U1317 | Infotainment Bus Lost Communication With High-Out Amplifier |
Harley Radio Diagnostic
| B2006 | Radio Switch Stuck or Open |
| B2007 | Handlebar Switch Shorted High |
| B2008 | Handlebar Switch Shorted Low |
| B2009 | Handlebar Switch Stuck or Open |
| B2010 | Passenger Switch Shorted High |
| B2011 | Passenger Switch Shorted Low |
| B2012 | Passenger Switch Stuck or Open |
| B2013 | Sidecar Switch Shorted High |
| B2014 | Sidecar Switch Shorted Low |
| B2015 | Sidecar Switch Stuck or Open |
| B2016 | Front Speaker Shortened R1.0 Ohm When Setup |
| B2017 | Front Speaker Opened R>100 Ohms Tested Once per Ignition Cycle Ignition ON after Ignition Off for 10 sec. |
| B2018 | Front Speaker Shortened to Ground Ignition ON After Ignition OFF for 10 sec. |
| B2019 | Front Speaker Shortened to Battery Ignition ON After Ignition OFF for 10 sec. |
| B2020 | Rear Speaker Shortened R1.0 Ohm When Setup |
| B2021 | Rear Speaker Opened R>100 Ohms Tested Once Per Ignition Cycle Ignition ON After Ignition |
| B2022 | Rear Speaker Shortened to Ground Ignition ON After Ignition OFF for 10 sec. |
| B2023 | Rear Speaker Shortened to Battery Ignition ON After Ignition OFF for 10 sec. |
| B2024 | Sidecar Speaker Shortened R1.0 Ohm |
| B2025 | Sidecar Speaker Opened R>100 Ohms Tested Once Per Ignition Cycle Ignition ON After Ignition OFF for 10 sec. |
| B2026 | Sidecar Speaker Shortened to Ground Ignition ON After Ignition OFF for 10 sec. |
| B2027 | Sidecar Speaker Shortened to Battery Ignition ON After Ignition OFF for 10 sec. |
Sensors and motorHarley-Davidson Fault Code Abbreviations
Sensors and motor
ABS – Anti-Lock Braking System
ACR – Automatic Compression Release
AFR – Air Fuel Ratio
AIS – Active Intake Solenoid
ATS – Air Temperature Sensor
BAS – Bank Angle Sensor
BCM – Body Control Module
CAN – Controller Area Network
CCM – Cruise Control Module
CKP – Crank Position Sensor
DLC – Datalink Connector
DTC – Diagnostic Trouble Codes
ECM – Electronic Control Module
ECT – Engine Coolant Temperature
ECU – Electronic Control Unit
EFI – Electronic Fuel Injection
EFP – Electronic Fuel Pump
ET – Engine Temperature sensor
FI – Fuel Injectors
FPR – Fuel Pressure regulator
H-DSSS – Harley-Davidson Smart Security System
HCU – Hydraulic Control Unit, ABS
[/stag_one_half][stag_one_half_last] HFSM – Hands Free Security Module
HO2S – Heated Oxygen Sensor
IAC – Idle Air Control actuator
IAT – Intake Air Temperature sensor
ICM – Ignition Control Module
IMAP – MAP + IAT in one unit
ISS – Ion Sensing System
JSS – Jiffy Stand Sensor
LHCM – Left Hand Control Module
MAP – Manifold Absolute Pressure Sensor
MHR – Right Hand Control Module
RCM – Reverse Control Module
TCA – Throttle Control Actuator
TGS – Twist Grip Sensor
TMAP – Intake Air Temperature / Manifold Absolute Pressure equipment
TPS – Throttle Position Sensor
TSM / TSSM – (Turn Signal / Turn Signal Security Module)
VE – Volume Efficiency
VIN – Vehicle identification number
VSS – Vehicle Speed Sensor
WSS – Wheel Speed Sensor
1- Turn Ignition switch to OFF & Run/Stop switch is to Run.
2- Push odometer reset button in & hold.
3- Turn ignition switch to Ignition and release odometer reset button. Background lighting sould illuminate,
speedometer needle should sweep its full range and indicator lamps (battery, security, low fuel, check
engine and cruise) should illuminate. The word «diag» should then appear.
4- Push the odometer reset button once and you will see the selection menu «PSSPt» (on mine the «t» looks
more like a «p» )with the first P flashing.
5- Each letter represents an area of the diagnostics module. The module that is flashing is the one you are
going to check. To move from one letter (module) to the next, you push the odometer reset button one
time. (from P to S to SP to t and back to P, etc.)
P = ECM/ICM (Electronic Control Module [EFI] / Ignition Control Module [Carbureted])
S = TSM/TSSM (Turn Signal/ Turn Signal Security Module)
SP = speedometer
T = tachometer
To get the DTC within an area of diagnostics, push and hold the odometer reset button in for 5 seconds
and release. If there are any DTC’s the code will be displayed or the word «none» will appear if there are
no DTC’s. Push the odometer reset button again to view additional codes if they exist.
1 — Record the codes.
2 — If DTC’s are not to be cleared, Press and release the odometer reset button. Part number of module
will be displayed.
NOTE: To determine if a code is current or historic, clear the displayed code by pushing in and holding the
odometer reset button ( longer than 5 seconds) until ‘clear’ comes up. Release the odometer reset
button. Turn OFF the ignition switch. Run your bike and shut it down then recheck the DTC’s again by
repeating steps 1 to 3 If the code is current it will reappear.
4 — Press and release the odometer reset button to continue to the next module.
5 — Turn Ignition switch to OFF.
On models not equipped with a tachometer «No Rsp» will appear when the tachometer identifier is
selected.
«No Rsp» will also appear if the run/off switch is in the off position when doing this procedure.