Fix installation errors in Kali Linux
Table of Contents
Since the Kali Linux 2020.1 is released on 28th January 2020, so I thought to give it a try and install it on my HP Pavilion 15 laptop. I went over to https://www.kali.org/downloads page and downloaded the Kali Linux 64-Bit (Installer) which is about 2GB. I used Rufus on Windows to write the bootable ISO images onto my USB drive.
When I booted up and started the installation of Kali, I came across various errors, which took quite a lot of time to fix all the errors and get the new Kali 2020.1 version up and running on my laptop. I am sharing all the possible errors and how to fix them so that it can help others.
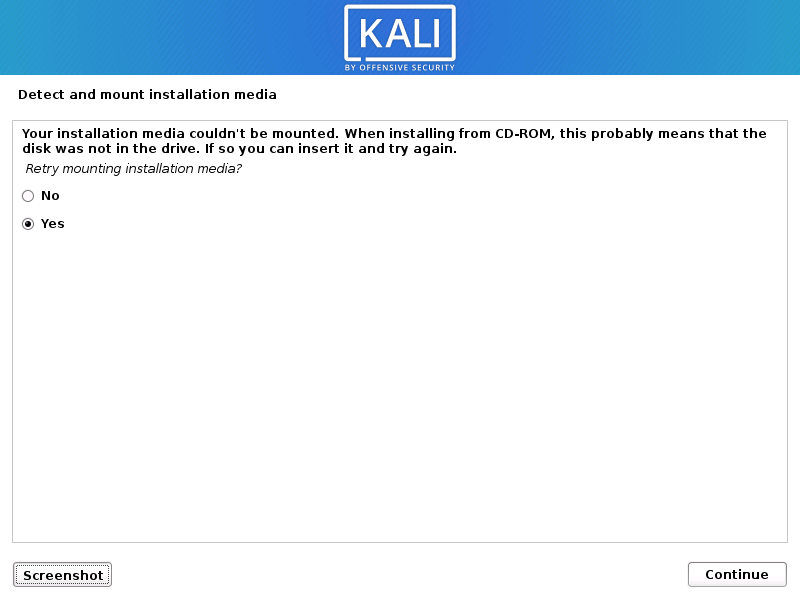
Problem 1: Your installation CD-ROM couldn’t be mounted.
Solutions
You have three options to fix this error:
Solution 1:
- Just unplug the USB storage drive that you’re installing from for a few moments and plug it in again.
- Select Yes on Retry mounting installation media? and click on Continue button to try again. The installation should now go ahead without any error.
- If this solution doesn’t work, try the next one.
Solution 2:
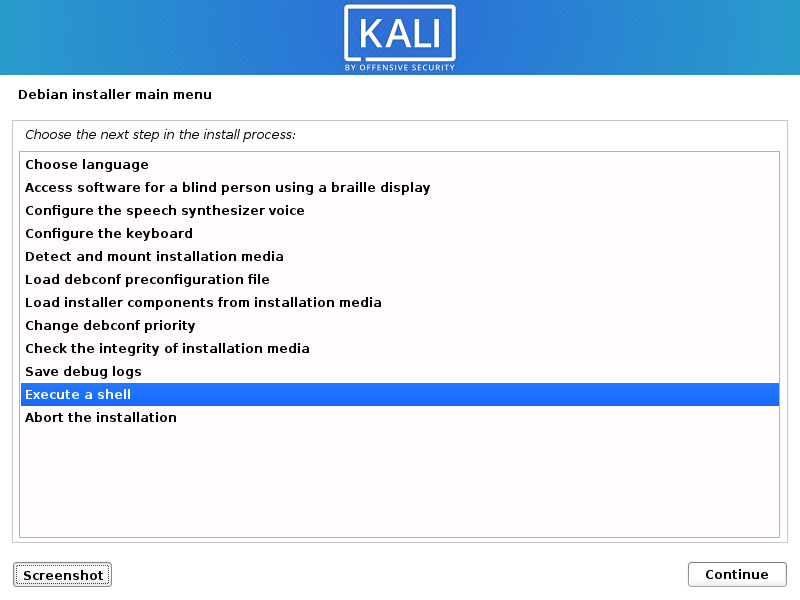
- On “Retry mounting the CD-ROM?” option, select the No and click Continue.

- You will see an installation step failed page but that is okay, just click on Continue.
- Now you will see an installer menu with various options. Navigate and select “Execute a shell” option and click on Continue twice.
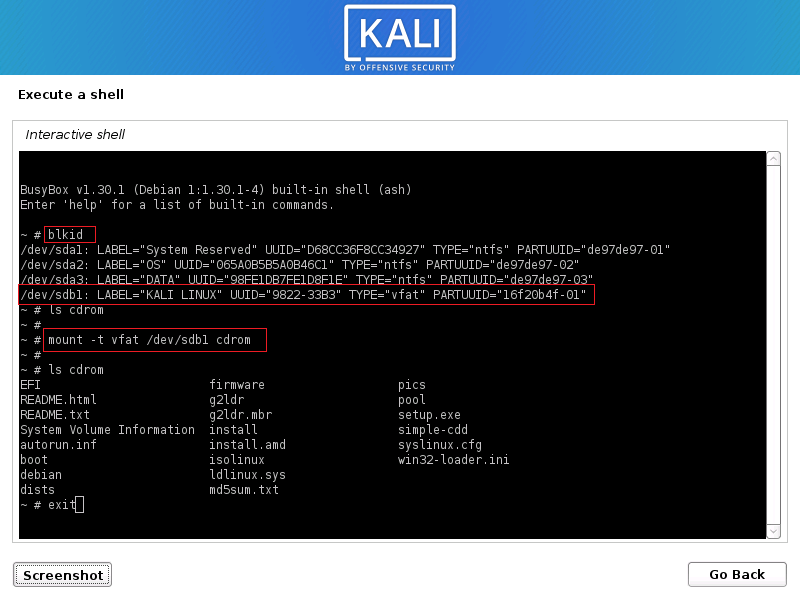
- You will get a terminal window where you can execute commands. From here, we will manually mount our bootable USB to cdrom directory so the installer can continue.
- First, to determine the block ID of USB drive, use the “blkid” command without quotes.Usually it is the last option in the list. Take a note of the device name i.e. /dev/sdb1 and file system type i.e. vfat. You will need these two things to manually mount the USB.
- Now type “ls cdrom” command without quotes. If you do not get anything, you can skip the next command but if you get an error like “No such file or directory”, continue to next command.
- Type “mkdir cdrom” command
- Type “mount -t vfat /dev/sdb1 cdrom” command. Make sure you adjust the device name noted in first step
- If above command is successful, you can verify the contents of cdrom directory using “ls cdrom” command.
- Now type exit and hit enter. (see the following image for all the commands)
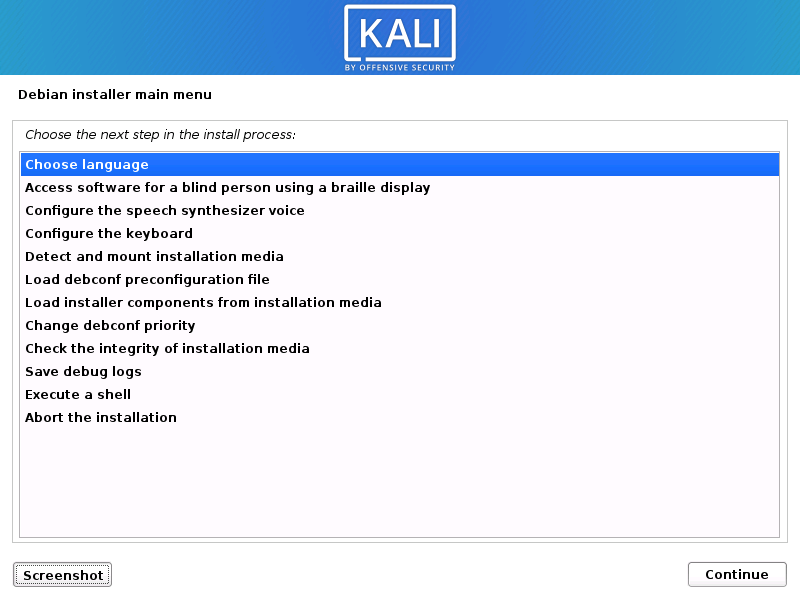
- You will get back to the list of installer menu with various options. You need to start over; Just highlight the first option i.e. Choose Language and click Continue.
- Hopefully, your system will now detect and mount the CDROM since you manually mounted it this time.
If above steps do not work for you, you can follow the next solution.
Solution 2:
For this, you will need to re-format your USB device. You can download and use rufus to write the bootable kali iso image onto your USB drive.
-
- Launch rufus.
- Rufus will auto detect your USB drive, just make sure right device is selected, then select the kali iso image and click on Start button.
- As soon as you hit the Start button, rufus will detect that the selected ISO image is ISOHybrid type and gives you two ways of writing this image to USB.
- Just select the second option i.e. Write in DD image mode and click OK.

- No matter what software you use for writing the Kali iso to USB, you need to do it via DD mode. Once your USB is ready, plug it in and start the installation.
- Now you will not get CD-ROM detect and mount error.
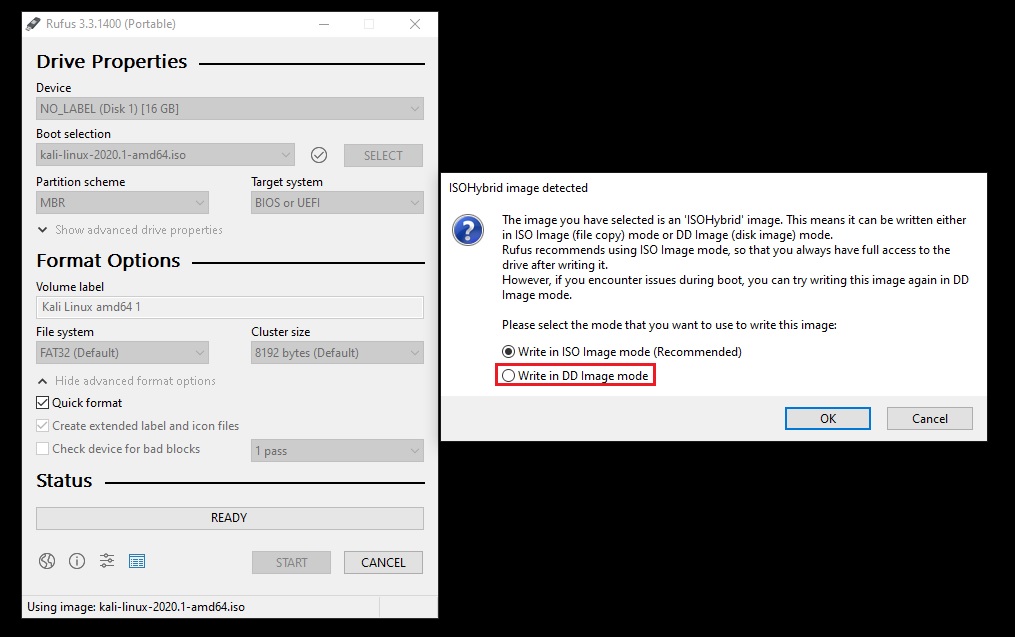
Tip: The problem with DD image mode is that you can no longer make any changes to your USB device i.e. you will not be able to add or delete any file to/from your USB device (until you re-format it). To be able to use the USB again you will have to clean it and remove the Kali Linux image from it.

Problem 2: Some of your hardware needs non-free firmware files to operate.
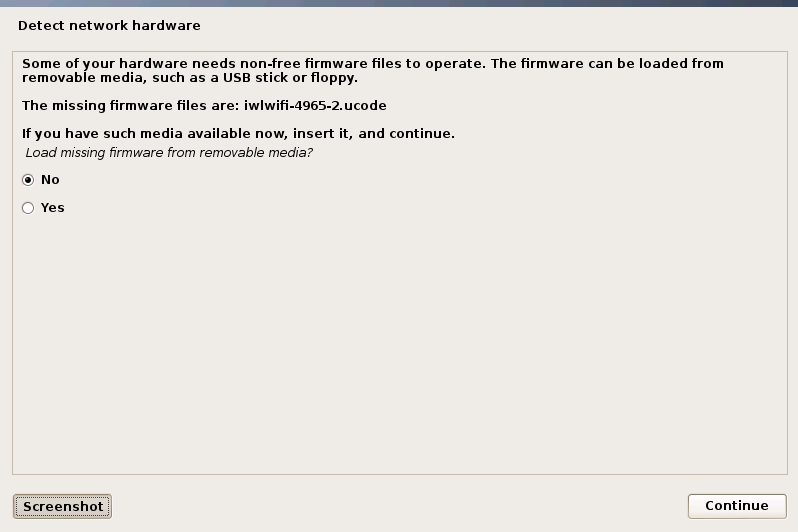
To fix this error you will need a PC with an active internet connection. Just take a note of the missing firmware file names. In my case, it is “rtlwifi/rtl8723befw.bin”.
Now follow these steps:
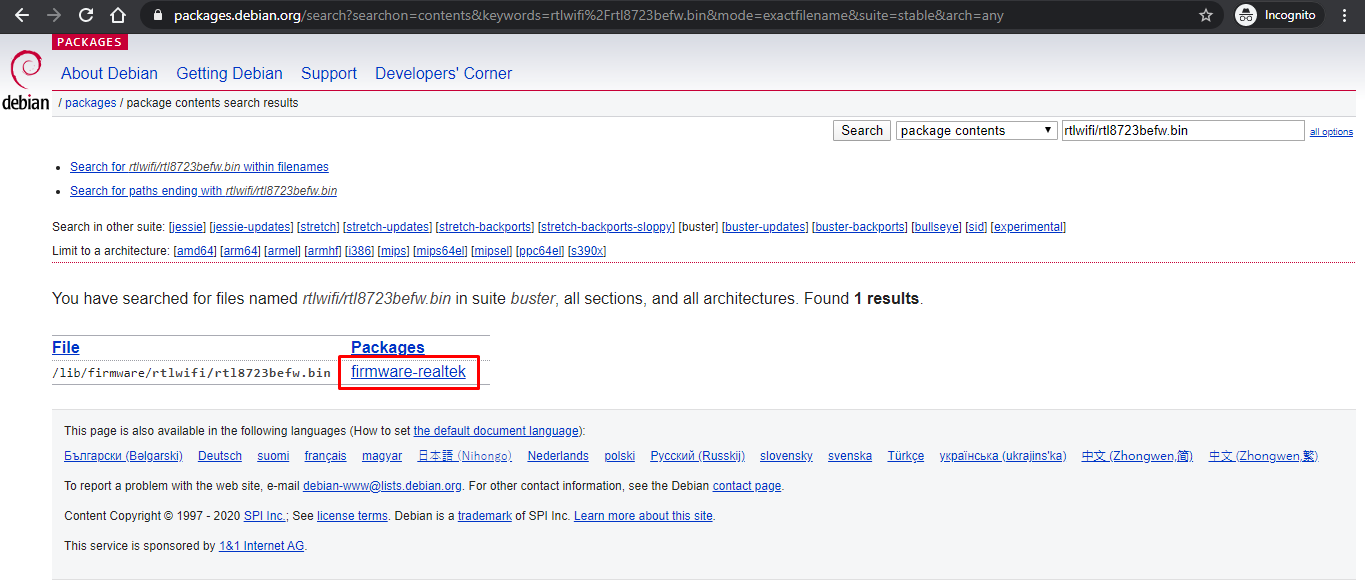
- Launch any web browser and open https://www.debian.org/distrib/packages#search_contents URL.
- Under keywords text box type the firmware file name noted initially, and then select “packages that contain files named like this” under display and then click on the Search button.
- If your firmware matches the search criteria, you will get a list of files. Click on the link under Packages and you will be redirected to package contents page.
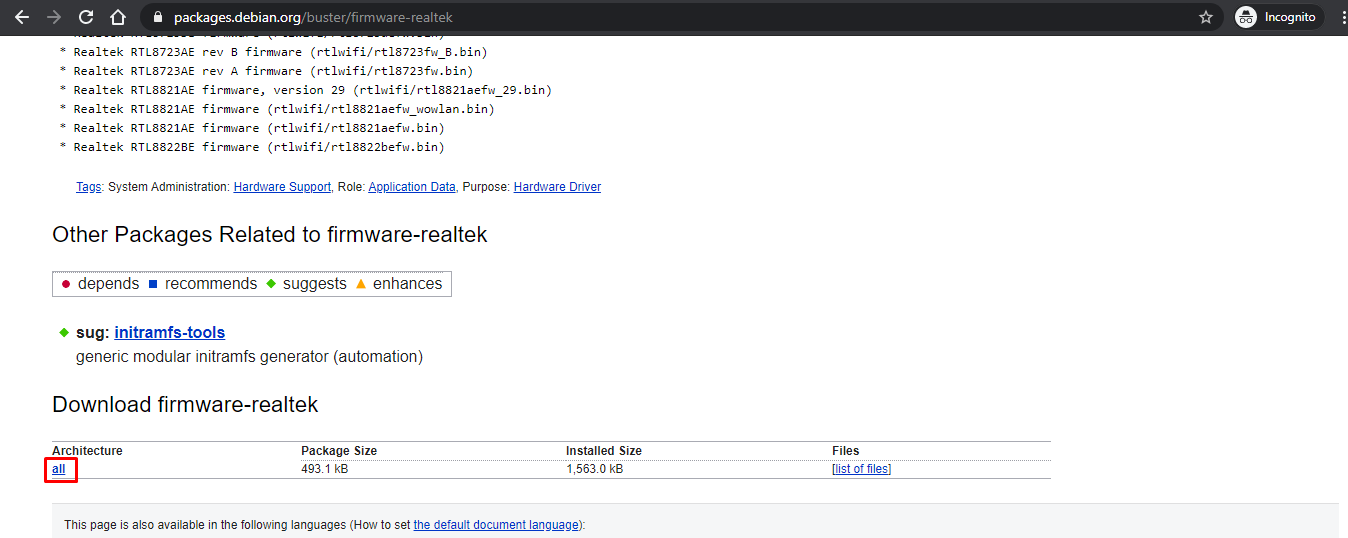
- Now, scroll down until you see download firmware section, just click on the all link under Architecture column.
- You will now see a list of servers in various geographical regions. Click on the link of sever which is nearest to you and a .deb package will be downloaded.
- You will need to repeat the steps 2 – 5 for each missing firmware file.
- Now connect the bootable USB containing kali image to your computer. Make sure your USB device is not written using DD mode. If it is in DD mode, you won’t be able to copy files across. You will need to re-format it in ISO mode.
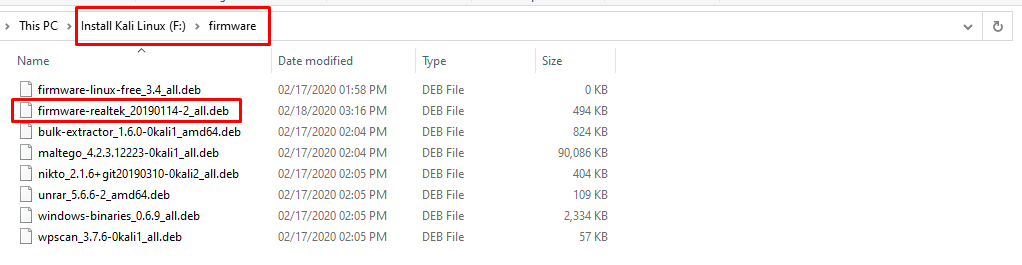
- Browse to USB device via File Explorer and navigate to F:\pool\non-free\ (USB device is mounted under F: drive, you need to adjust it accordingly)
- You will see some subdirectories in there. You need to go inside each subdirectory, copy all the files and paste them right inside F:\firmware\. If there are already some files with same name, just click replace.
- After copying all the files from F:\pool\non-free subdirectories, you also need to copy the firmware files that you downloaded earlier into same F:\firmware folder. Please see the following image for reference.
- That is it. Now plug-in your USB and start the kali installation again.
- Hopefully, you will no longer get any missing non-free firmware error. If you do get the error, just repeat the steps 2 – 5 to download the missing firmware files.

Problem 3: No GUI after successful installation of Kali 2020.1
Problem Description
After installation is successful, GRUB is installed to MBR, but when I rebooted the system there was no grub splash screen; just a text based booting menu. After Kali is booted up, there was no GUI; but only a text based login option.
Reason of Problem
By spending some time on googling it, I found that there is bug in 2020.1 installer ISO and about 140+ packages are missing in offline installer. Also, there are a few packages that are missing in APT package manager. To install Kali Linux with default options (XFCE DE), installer needs Internet connection to download missing packages from Kali repository. If you try to install Kali Linux offline, you will end up with text mode install.
Workaround
To remediate the situation, we can connect the Kali Linux to internet, convert our installation to GUI mode, and install any missing firmware and packages.
You will need an Android phone with good internet connection, USB cable that can connect your phone to PC where you just installed the Kali Linux. The idea is to use USB tethering option to share mobile’s internet connection on PC. Just to mention that I don’t really use an iPhone. So, I don’t know if there is any option to use USB tethering in iPhone as well. If there is, you can surely use iPhone too.
Tip: If your mobile internet is not too fast, first connect your mobile to a WiFi network which is fast enough and then follow these steps.
Since you don’t have any GUI in Kali Linux yet, so you will have to do everything in text mode.
-
- Login to kali linux in text mode
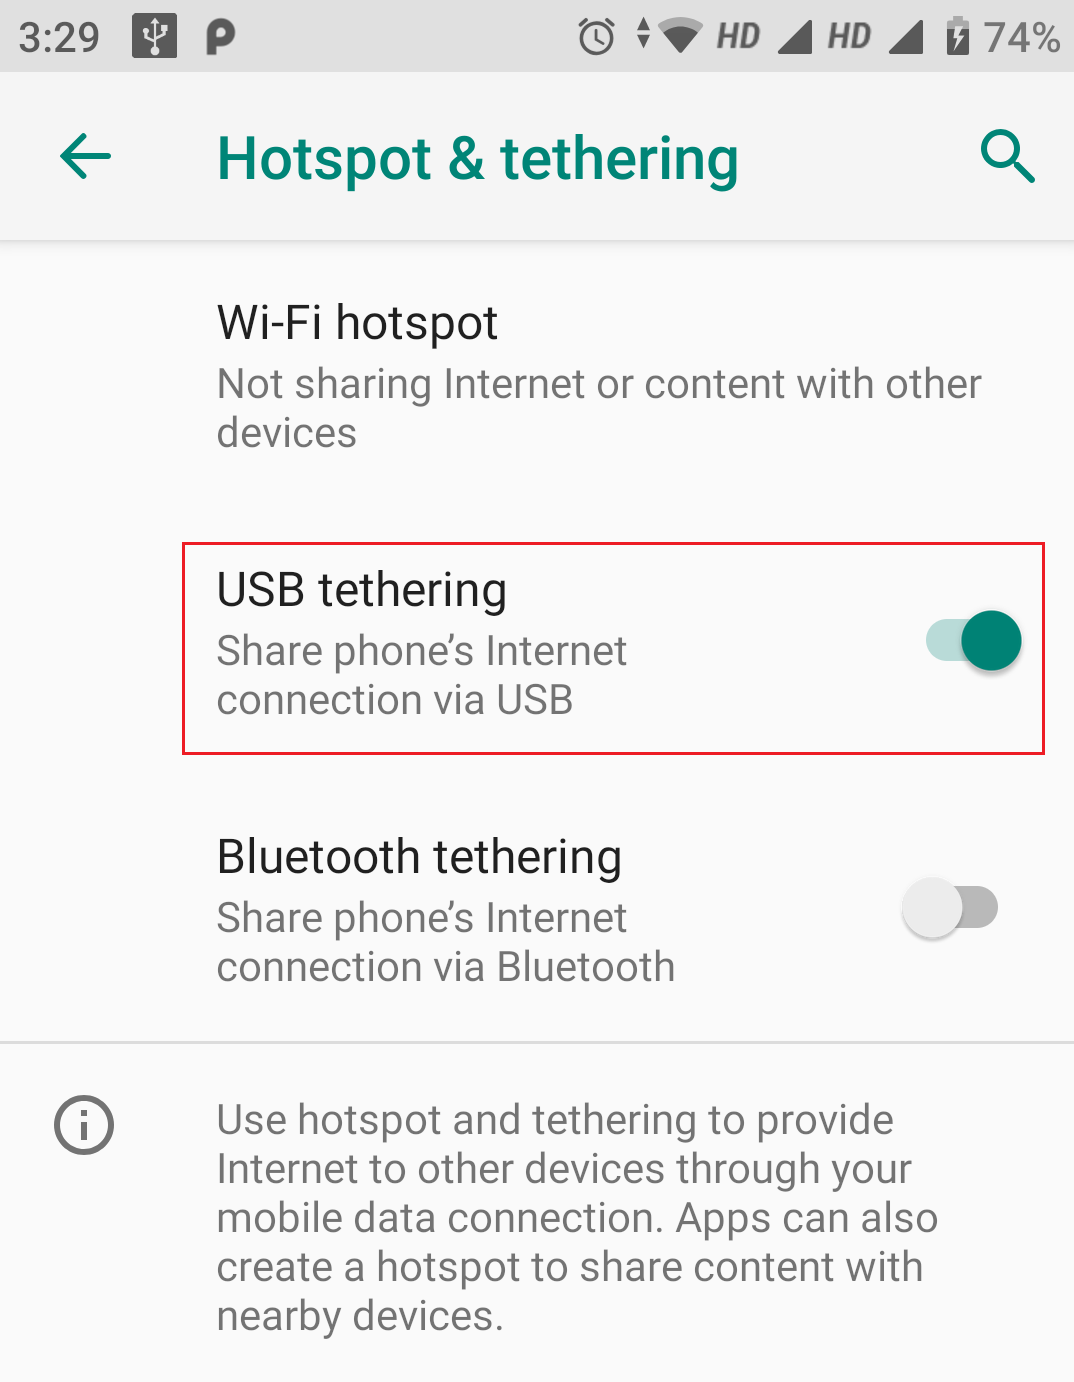
- Connect the USB cable to your PC and phone.
- Go to settings in your phone and enable USB tethering
- Now wait a few seconds and use the following commands in right order. We will make sure that kali linux can connect to internet using USB.
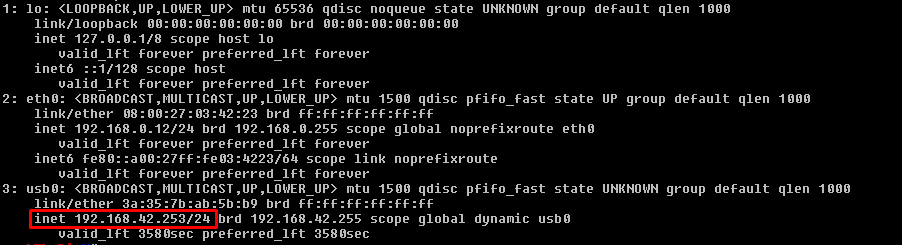
- Type “ip a” command without quotes and hit enter.This command will list all the network adapters and their IP configurations. The last device i.e. usb0 will probably be the USB network adapter created by USB tethering. If you see it, you are good to go to next step.
- Now type “sudo dhclient” command without quotes and hit enter.
- The command could take a few seconds. When completed, use “ip a” command again to verify that usb0 adapter has successfully received the IP configuration.
- If you see the IP address assigned (as highlighted in picture above), you are connected to internet.
- Now that you are connected to internet, make sure that the sources.list is updated with following information:
    	deb http://http.kali.org/kali kali-rolling main non-free contrib
    	deb-src http://http.kali.org/kali kali-rolling main non-free contrib
- If it is not, use following command to add kali-rolling repositories to sources.list:
cat <<EOF | sudo tee /etc/apt/sources.list
> deb http://http.kali.org/kali kali-rolling main non-free contrib
> deb-src http://http.kali.org/kali kali-rolling main non-free contrib
> EOF
- Use “cat /etc/apt/sources.list” command to view the file and comment out if there is any other line except above two
- Now type “sudo apt update ” command and wait for it to complete.
- Make sure your platform microcode is updated. Use following command just in case:
sudo apt install intel-microcode -y && sudo apt install amd64-microcode -y
- Now type “sudo apt install kali-desktop-xfce -y ”. This could take a while depending upon the speed of your internet connection. Wait for it complete and then restart. This command will convert your text mode installation of kali linux into default XFCE based desktop environment.
- After reboot, you will be able to login using GUI mode but you will still notice that there is no GNOME tweaks tool, no applications menu, no Places menu. To re-activate all these, follow the next step.
- Type “sudo apt install gnome-core kali-defaults kali-root-login desktop-base -y ” command and hit enter. Wait for it to finish and then reboot.
- Now you can see the Applications menu, Places menu, and GNOME tweaks tool is also installed so that you can customize the GNOME interface.

After following this guide, you will be able to get latest version of Kali Linux up and running. Let me know if you still face any error that is not mentioned in this guide and I will try to get back to you with a solution as soon as possible.
Вытащи флешку, нажми да, он напишет что не нашел и предложит загрузить драйвера с устройства, вставляй флешку и жми да. profit
Если через dd прописать образ на флешку, точно должно работать. У меня так когда-то через unetbootin флеха не хотела ставать загрузочной.
sudo dd if=image.iso of=/dev/sdX
warn: удалит существующую таблице разделов (и сами разделы с их контентом)
мне помогло отключение привода DVD в bios
Что можно ожидать от «дистрибутива», который скачет, как дурной козел с Red Hat на Debian благодря криворуким энтузиастам хакинга? Можно, конечно использовать MOK ключи от Fedora при EFI установке дистрибьюта основанного на Дебиане, но зачем нужен этот геморрой? Коммунистам, комсомольцам и пионерам, которые любят трудности, вроде секса в гамаке, ради бога, пользуйтесь и закаляйте свои морально-волевые качества, остальным, еще пока адекватным, проходите мимо этого Кала не останавливаясь и не оглядываясь.
Для ноутбуков как вариант можно просто при установке оставлять в разьемам чистую SD card + установочную флешку с Kali Linux
Мне помог следующий вариант.
Делаем 2-е загрузочные USB флэшки, вставляем их обе и проблема исчезла. Система установилась
В добавок ко всему сказанному… Может 5 копеек вставлю, но, уж, извините. Проблема может быть в разъёме, а именно в том, что флэшка вставлена в переднюю панель, а не в разъём материнки.
Kali Linux — это дистрибутив Linux, предназначенный для выполнения тестирования на проникновение и безопасности. В этой статье мы рассмотрим некоторые часто встречающиеся ошибки при установке Kali Linux и способы их избежания.
1. Неправильная загрузка с USB-диска
Одна из наиболее распространенных ошибок при установке Kali Linux — неправильная загрузка с USB-накопителя. Проверьте, правильно ли записан образ на USB-накопитель. В случае ошибки, попробуйте записать образ еще раз на другой USB-накопитель.
2. Не работает Wi-Fi
После установки Kali Linux, Wi-Fi может не работать. Это может быть связано с тем, что нужные драйверы для Wi-Fi отсутствуют в ОС. Чтобы избежать этой ошибки, перед установкой Kali Linux убедитесь, что ваше Wi-Fi-устройство поддерживается ОС. Если Wi-Fi не работает даже после этого, попробуйте установить драйверы для устройства.
3. Установка на недостаточно мощном компьютере
Kali Linux — это дистрибутив Linux, оптимизированный для выполнения тестирования на проникновение и безопасности, поэтому установка его на недостаточно мощном компьютере может привести к проблемам. Перед установкой Kali Linux убедитесь, что ваш компьютер соответствует системным требованиям.
4. Не установлены необходимые пакеты
Kали Linux имеет множество пакетов, необходимых для выполнения тестирования на проникновение и безопасности. К сожалению, при установке некоторых пакетов возникают ошибки, связанные с нехваткой зависимостей. Чтобы избежать этой ошибки, перед установкой пакетов проверьте, что у вас установлены все необходимые зависимости.
5. Нет доступа к интернету
Для установки Kali Linux вам понадобится доступ в Интернет. Если вы не можете получить доступ в Интернет, то установка Kali Linux может быть затруднительной. Одним из способов избежать этой ошибки является использование зеркал, чтобы загрузить все необходимые пакеты на компьютер, который имеет доступ в Интернет.
6. Ошибка при выборе раздела диска
Для установки Kali Linux на компьютер необходимо выбрать раздел диска или создать новый раздел для установки ОС. Одной из распространенных ошибок является выбор неправильного раздела диска или неактивированный раздел. Чтобы избежать этой ошибки, перед установкой Kali Linux рекомендуется создать резервную копию всех важных данных на вашем компьютере.
В заключение, Kali Linux — это мощный дистрибутив Linux, который может помочь вам выполнить тестирование на проникновение и безопасность. Однако, чтобы избежать распространенных ошибок при установке Kali Linux, убедитесь, что вы правильно записали образ на USB-накопитель, проверьте, что ваш компьютер соответствует системным требованиям и что устройства Wi-Fi поддерживаются операционной системой. Кроме того, убедитесь, что вам доступен Интернет и что вы правильно выбрали раздел диска для установки Kali Linux.
Kali Linux — один из самых популярных дистрибутивов Linux, используемый в основном для проведения тестирования на проникновение и взлома. Однако, при установке Kali Linux могут возникать ошибки, связанные с конфигурацией системы или самой установкой. В этой статье рассмотрим некоторые из наиболее распространенных ошибок, которые могут возникнуть при установке Kali Linux, и способы их решения.
1. Ошибка ‘Could not open or create /dev/sdaX’
Эта ошибка может возникнуть, если у вас уже установлена операционная система или другой Linux-дистрибутив на жестком диске компьютера. Kali Linux требует свободного пространства на диске для установки.
Решение: Чтобы решить эту проблему, вам необходимо освободить пространство на диске путем удаления ненужных файлов или подготовить новый раздел на жестком диске для установки Kali Linux.
2. Ошибка ‘No Ethernet card was detected’
Данная ошибка возникает, когда установщик Kali Linux не обнаруживает сетевую карту вашего компьютера.
Решение: Первым шагом для решения этой проблемы является проверка подключения Ethernet-кабеля. Если все подключено правильно, возможно, вам понадобится драйвер для вашей сетевой карты. Попробуйте нажать Ctrl+Alt+F2, чтобы перейти в командную строку, и введите следующую команду:
lspci | grep Ethernet
Эта команда отобразит информацию о вашей сетевой карте. После этого вы можете использовать эту информацию для поиска и установки драйверов, необходимых для вашей сетевой карты.
3. Ошибка ‘The installer needs to commit changes to partition’
Эта ошибка возникает, когда установщик Kali Linux обнаруживает, что некоторые изменения необходимо применить к разделу, который уже находится в процессе использования.
Решение: Чтобы решить эту проблему, вам необходимо перезагрузить компьютер и выбрать опцию «Установка» из меню загрузки. Это позволит установщику применить указанные изменения к разделу до загрузки операционной системы.
4. Ошибка ‘Unable to locate package’
Эта ошибка возникает при попытке установки пакета, который не существует в репозитории Kali Linux.
Решение: Проверьте правильность имени пакета и ваше подключение к Интернету. Убедитесь, что вы используете правильное название пакета и имеете доступ к репозиторию Kali Linux. Если пакет не доступен в репозитории Kali Linux, попробуйте найти его в других репозиториях или источниках.
В заключение, при установке Kali Linux могут возникать различные ошибки. В данной статье мы рассмотрели лишь некоторые из наиболее распространенных ошибок и привели способы их решения. Если вам встретилась другая ошибка, рекомендуется посетить форумы и сообщества Kali Linux для получения помощи и советов от опытных пользователей.
- Народ, есть кто из Питера, кто…?
- На WebMoney просят послать скан паспорта. Что нужно замазать? И если без замазывания не обойтись, можно ли отправлять?
- Как должен поступить сын, когда его отец душит мать и хочет ударить её?
- А женатые изменяют сами, но почему замужних изменщиц женщин ОСУЖДАЮТ?
- Купил флешку Oltramax 16 gb 250, при этом при включении в медиаплеер на видео квадратики, тогда как на другой все гуд
- Уровняйте свет на фото!
- Как понравиться парню на год старше
- Наблюдизм. Ну что творится? За окном ..
Go to Kalilinux
r/Kalilinux
r/Kalilinux
Dedicated to Kali Linux, a complete re-build of BackTrack Linux, adhering completely to Debian development standards with an all-new infrastructure that has been put in place.
Members
Online
•
by
Wintermane45
Kali 2022 installation failure during select and install software
I’ve been trying to get the new 2022 distribution to install a metal on a couple of older machines when I get to the select and install software portion of it no matter what I select the step fails