Если произошла ошибка
Если происходит ошибка печати (например, в принтере заканчивается бумага или происходит замятие бумаги), автоматически выводится сообщение с рекомендациями по устранению неполадки. Выполните соответствующие действия, указанные в сообщении.
Если произошла ошибка, индикатор Аварийный сигнал (Alarm) мигает, и на экране компьютера отображается код поддержки (код ошибки). В случае некоторых ошибок индикаторы ПИТАНИЕ (POWER) и Аварийный сигнал (Alarm) мигают попеременно. Проверьте состояние индикаторов и наличие сообщения, а затем выполните соответствующее действие, чтобы устранить ошибку.
Код поддержки, соответствующий количеству миганий индикатора Аварийный сигнал (Alarm)
Пример 2 миганий:
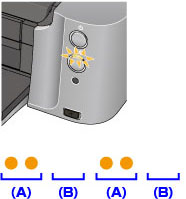
(A) мигает;
(B) перестает.
|
Количество миганий |
Причина |
Код поддержки |
|---|---|---|
|
2 мигания |
В заднем лотке нет бумаги. |
1000 |
|
Нет лотка для диска. |
1001 |
|
|
Не вставлен диск, допускающий печать (BD/DVD/CD или др.). |
1002 |
|
|
В лотке для ручной подачи нет бумаги. |
1006 |
|
|
3 мигания |
Лоток приема бумаги закрыт. |
1250 |
|
Лоток для ручной подачи находится в положении для устранения замятия бумаги. |
1261 |
|
|
Крышка отверстия для подачи открыта. |
1270 |
|
|
Бумага заминается в отверстии для выхода бумаги, в заднем лотке или в лотке для ручной подачи. |
1300 |
|
|
Когда начинается печать на дисках, допускающих печать, в лоток для ручной подачи загружается бумага. |
1308 |
|
|
4 мигания |
Если индикатор на чернильнице мигает, возможно, чернила закончились. |
1600 |
|
Чернильный контейнер не установлен. |
1660 |
|
|
5 миганий |
Печатающая головка не установлена. |
1401 |
|
Возможно, печатающая головка повреждена. |
1403, 1405 |
|
|
6 миганий |
Направляющая лотка для диска закрыта. |
1850 |
|
Направляющая лотка для диска открыта. |
1851 |
|
|
Направляющая лотка для диска закрыта. |
1855 |
|
|
Была открыта направляющая лотка для диска. |
1856 |
|
|
После замены чернильного контейнера направляющая лотка для диска оставлена открытой. |
1858 |
|
|
Для печати на указанной бумаге необходимо открыть направляющую лотка для диска. |
1859 |
|
|
Для продолжения печати необходимо закрыть направляющую лотка для диска. |
185A |
|
|
7 миганий |
Один или несколько чернильных контейнеров установлены неправильно (мигает индикатор на чернильном контейнере). |
1680 |
|
Установлено больше одной чернильницы одного цвета. (Индикатор на чернильном контейнере мигает.) |
1681 |
|
|
8 миганий |
Абсорбер чернил почти полон. |
1700, 1701 |
|
9 миганий |
Подключено устройство, несовместимое с данным принтером. |
2001 |
|
11 миганий |
Настройка размера страницы не соответствует размеру загруженной в принтер бумаги. |
1062 |
|
Не удалось выполнить автоматическое выравнивание печатающей головки. |
2500 |
|
|
Не удается выполнить печать с текущим параметром печати. |
4103 |
|
|
12 миганий |
Печать указанных данных невозможна. |
4100 |
|
13 миганий |
Не удается правильно определить оставшийся запас чернил. (Индикатор на чернильном контейнере мигает.) |
1683 |
|
14 миганий |
Чернильный контейнер не определяется. |
1684 |
|
Чернильный контейнер не определяется. |
1750 |
|
|
15 миганий |
Чернильный контейнер не определяется. |
1410, 1411, 1412, 1413, 1414, 1415, 1416, 1417 |
|
16 миганий |
Чернила закончились. (Индикатор на чернильном контейнере мигает.) |
1688 |
|
19 миганий |
Подключен неподдерживаемый USB-концентратор. |
2002 |
|
21 мигание |
Принтер не определяет размер бумаги. |
2103 |
Код поддержки, соответствующий количеству попеременных миганий индикаторов ПИТАНИЕ (POWER) и Аварийный сигнал (Alarm)
Пример 2 миганий:
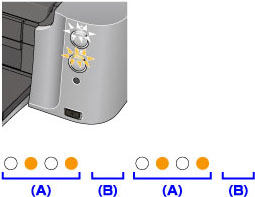
(A) мигает;
(B) перестает.
|
Количество миганий |
Причина |
Код поддержки |
|---|---|---|
|
2 мигания |
Ошибка принтера. |
5100 |
|
7 миганий |
Ошибка принтера. |
5B00, 5B01 |
|
10 миганий |
Произошла ошибка, устранение которой требует обращения в сервисный центр. |
B200 |
|
Случаи, отличные от описанных выше |
Ошибка принтера. |
5110, 5200, 5400, 5700, 5C00, 5C20, 6000, 6010, 6500, 6502, 6800, 6801, 6900, 6901, 6902, 6910, 6911, 6920, 6921, 6930, 6931, 6932, 6933, 6940, 6941, 6942, 6943, 6944, 6945, 6946, 6A00, 6B00, 8200, 9000, 9400, B400 |
-
Если на экране компьютера отображается код поддержки и сообщение:

![]() Примечание.
Примечание.
-
Действия можно сопоставлять с кодами поддержки на компьютере, найдя нужный код поддержки.
Щелкните для поиска
Подробные сведения об устранении ошибок без кодов поддержки см. в разделе Отображается сообщение.
У вас уже есть продукция Canon? Зарегистрируйте свои продукты для доступа к программному обеспечению и обновлениям встроенного ПО, а также подпишитесь на рассылку, чтобы получать персонализированные советы и эксклюзивные предложения
Поддержка
Canon PIXMA PRO-100S
Загружайте драйверы, ПО, встроенное ПО и руководства, а также получите доступ к материалам поддержки для вашего продукта серии PIXMA.
Драйверы
Для выполнения подключения некоторых устройств к компьютеру может потребоваться драйвер. На этой вкладке вы найдете соответствующие драйверы для своего устройства или, в случае отсутствия драйверов, описание совместимости устройства с каждой операционной системой.
Полезная информация. Доступ к программному обеспечению, руководствам и другим материалам можно получить с помощью вкладок, расположенных выше.
Операционная система Обнаруженная операционная система
Программное обеспечение
Программное обеспечение загружать необязательно, но оно обеспечивает дополнительные функции и позволяет максимально эффективно пользоваться возможностями устройства. На этой вкладке можно просмотреть и загрузить доступное программное обеспечение для вашего устройства.
Операционная система Обнаруженная операционная система
Руководства пользователя
Руководства для вашего устройства или программного обеспечения перечислены ниже.
Приложения и функции
На этой вкладке можно посмотреть доступные приложения и функции, совместимые с вашим устройством.
Встроенное ПО
Встроенное ПО — это постоянное программное обеспечение, установленное на устройстве и обеспечивающее его корректную работу. Canon может периодически выпускать обновления для этого встроенного ПО, и если обновление доступно, его можно загрузить ниже.
FAQs
На этой вкладке вы найдете ответы на часто задаваемые вопросы и другую полезную информацию, которая поможет вам в решении вопросов и проблем.
Важная информация
На этой вкладке вы найдете подборку часто задаваемых вопросов, которые, на наш взгляд, будут вам интересны.
Коды ошибок
Код ошибки или сообщение об ошибке может появиться на устройстве по различным причинам. С помощью поля поиска можно найти полезную информацию о конкретном коде ошибки, где будут указаны причина ошибки и необходимые действия по ее устранению.
Технические характеристики
Ниже приведены все технические характеристики данного продукта.
Полезные ссылки
-
-
Ремонт
Поиск центров по ремонту оборудования, полезная информация по процессу ремонта
-
Переработка
Узнайте больше о программе утилизации картриджей Canon
-
Canon ID
Регистрация продукта и управление аккаунтом Canon ID
|
Support Code |
Number of flashes/Cause |
Action |
|---|---|---|
|
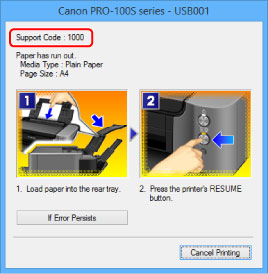
1000 1001 1002 1006 |
Two flashes: Printer is out of paper./The disc tray is not attached./Paper does not feed. |
Reload paper in the cassette or the manual feed tray and press the RESUME/CANCEL button on the printer. When printing on printable discs (BD/DVD/CD, etc.), use the disc tray supplied with this printer («K» is on the upper side). Place a printable disc on the disc tray, attach the disc tray to the printer, then press the RESUME/CANCEL button. |
|
1250 1261 1270 1300 1308 |
Three flashes: Paper output tray is closed./Feed slot cover is opened./Manual feed tray is in the paper jam clearing position./Cannot print on a printable disc./Paper jams. |
If the error still remains, paper may be jammed. Remove the jammed paper, reload paper in the printer, and then press the RESUME/CANCEL button on the printer. |
|
1600 1660 |
Four flashes: The ink tank is not installed./Ink tank is not installed properly./Ink may have run out. |
If printing is in progress and you want to continue printing, press the printer’s RESUME/CANCEL button with the ink tank installed. Then printing can continue. Replacing the ink tank is recommended after the printing. The printer may be damaged if printing is continued under the ink out condition. |
|
1401 1403 1405 |
Five flashes: Print head is not installed./Print head is defective. |
Install the print head. If the print head is already installed, remove the print head once and then reinstall it. If the error is still not resolved, the print head may be damaged. Contact the service center. |
|
1850 1851 1855 1856 1858 1859 185A |
Six flashes: The inner cover (the cover of the disc tray) is opened or closed. |
|
|
1680 1681 |
Seven flashes: Ink tank is not installed in the correct position. |
Confirm that the ink tanks are installed in the appropriate positions. |
|
1700 |
Eight flashes: Ink absorber is almost full. |
The ink absorber is almost full. The printer has a built-in ink absorber to hold the ink used during Print Head Cleaning. Press the printer‘s RESUME/CANCEL button to continue printing. Contact the service center. |
|
2001 |
Nine flashes: The digital camera or digital video camcorder connected is not compatible with this printer. |
Check the device connected to the printer. Printing photos directly is possible only with a PictBridge compliant device. |
|
— |
Nine flashes: The printer has not received a response from the digital camera. |
A communication time out occurs if an operation takes too long or if it takes too much time to send data. This may cancel printing. In such cases, disconnect and reconnect the USB cable. When printing from a PictBridge compliant device, depending on the model or brand of your device, you may have to select a PictBridge compliant print mode on the device before connecting it to the printer. You may also have to turn on your device or select Play mode manually after connecting the device to the printer. Perform necessary operations before connecting your device referring to its instruction manual. If the error is not yet resolved, check if you can print another photograph. |
|
1062 2500 |
Eleven flashes: The Page Size setting does not match the size of the paper loaded in the printer./Automatic Print Head Alignment failed. |
When performing an ordinary print job:
When performing Automatic Print Head Alignment:
After carrying out the above measures, if the problem continues after aligning the print head again, press the RESUME/CANCEL button to dismiss the error, and then perform Manual Print Head Alignment. When printing the nozzle check pattern or performing Manual Print Head Alignment: Other than A4/Letter-sized paper is loaded. Press the RESUME/CANCEL button on the printer to clear the error, and load A4/Letter-sized paper in the rear tray. Then try performing again. When printing the nozzle check pattern or performing Manual Print Head Alignment, be sure to set the paper in the rear tray. |
|
4100 |
Twelve flashes: Cannot print the contents on CREATIVE PARK PREMIUM. |
You cannot print the contents on CREATIVE PARK PREMIUM. When you print the contents on CREATIVE PARK PREMIUM, confirm the message on the computer screen, make sure that genuine Canon ink tanks are installed properly for all colors, then start printing again. |
|
1683 |
Thirteen flashes: The ink level cannot be detected. |
The remaining ink level cannot be correctly detected. (The lamp on the ink tank flashes.) Replace the ink tank and close the top cover. Printing with an ink tank that was once empty may damage the printer. If you want to continue printing in this condition, you need to release the function for detecting the remaining ink level. Press and hold the printer’s RESUME/CANCEL button for at least 5 seconds, and then release it. With this operation, releasing the function for detecting the remaining ink level is memorized. Please be advised that Canon shall not be liable for any printer malfunction or damage caused by refilled ink tanks. Note
|
|
1684 1750 |
Fourteen flashes: Ink tank cannot be recognized. |
The ink tank cannot be recognized. Printing cannot be executed because the ink tank may not be installed properly or may not be compatible with this printer. Install the appropriate ink tank. If you want to cancel printing, press the printer‘s RESUME/CANCEL button. |
|
1410 1411 1412 1413 1414 1415 1416 1417 |
Fifteen flashes: Ink tank cannot be recognized. |
The ink tank cannot be recognized. (The lamp on the ink tank is off.) Replace the ink tank. |
|
1688 |
Sixteen flashes: The ink has run out. |
The ink has run out. (The lamp on the ink tank flashes.) Replace the ink tank and close the top cover. Printing under the current condition may damage the printer. If you want to continue printing in this condition, you need to release the function for detecting the remaining ink level. Press and hold the printer’s RESUME/CANCEL button for at least 5 seconds, and then release it. With this operation, releasing the function for detecting the remaining ink level is memorized. Please be advised that Canon shall not be liable for any malfunction or trouble which may be caused by continuation of printing under the ink out condition. Note
|
|
2002 |
Nineteen flashes: An unsupported USB hub is connected. |
If a PictBridge compliant device is connected via a USB hub, remove the hub and connect it directly to the printer. |
|
2103 |
21 flashes: The printer cannot detect the paper size. |
Press the printer‘s RESUME/CANCEL button to dismiss the error, then try to print again. If this error occurs even you load paper of the same size as the setting, set the printer not to detect the width of the paper using the printer driver. |
POWER Lamp Flashes and Alarm Lamp Flashes Orange Alternately
If the POWER lamp flashes and the Alarm lamp flashes orange alternately, it may be possible that an error requiring you to contact the service center has occurred.
Take an appropriate action referring to the table below.
|
Support Code |
Number of flashes |
Action |
|---|---|---|
|
5100 |
Two flashes: |
Cancel printing, and turn off the printer. Then clear the jammed paper or protective material that is preventing the print head holder from moving, and turn on the printer again. Important
|
|
B200 |
Ten flashes: |
Turn off the printer, and unplug the power cord of the printer from the power supply. Contact the service center. |
|
5110 5200 5400 5700 5B00 5C00 5C20 6000 6010 6500 6502 6800 6801 6900 6901 6902 6910 6911 6920 6921 6930 6931 6932 6933 6940 6941 6942 6943 6944 6945 6946 6A00 6B00 9000 B400 |
Other cases than above: |
Turn off the printer, and unplug the power cord of the printer from the power supply. Plug the printer back in and turn the printer back on. If the problem is not resolved, contact the service center. |
kopik
•
New Member
•
Posts: 12
Canon pixma pro 100s 5400 error
Feb 28, 2019
So after the Epson p800 breaking out of nowhere its not time for my Pixma pro to have problems too (not even two weeks after).
When I turn it on it gives me the error 5400, I managed to find that it means there’s excessive temperature in the printhead (not sure how can that happen when i just turned it on)
According to some people it can be fixed by cleaning the contacts on the head but the ting is I can’t access the head or the cartrridges because the printer won’t let me do anything and the printhead doesnt unlock
any idea?
Re: Canon pixma pro 100s 5400 error
In reply to kopik
•
Feb 28, 2019
have you tried the ‘pull the plug’ trick?
plug it in, power it up, be ready to PULL the plug quickly, after <N> seconds, the printer will unlock the head and it will go across the page. PULL THE PLUG so it leaves the head in the unparked middle.
I believe B&H is still having a $60 deal on the printer so you may want to ‘get a spare’. Sale might end today so check quickly.
— hide signature —
Online civility: Before you press ‘Post’, ask yourself if you’d say that to someone face to face.
Rich42
•
Senior Member
•
Posts: 2,781
Re: Canon pixma pro 100s 5400 error
In reply to kopik
•
Feb 28, 2019
B&H has the special promo for the Pixma 100 for $59 after both rebate and promo code.
Use promo code BHWPPI19.
The special ends today, 2/18.
$59 is a pretty cheap fix for your problem and you get a full supply of ink and a 50 sheet box of 13×19 paper. Such a deal.
Rich
Gary H
•
Senior Member
•
Posts: 2,543
Re: Canon pixma pro 100s 5400 error
In reply to Rich42
•
Feb 28, 2019
Rich42 wrote:
B&H has the special promo for the Pixma 100 for $59 after both rebate and promo code.
Use promo code BHWPPI19.
The special ends today, 2/18.
$59 is a pretty cheap fix for your problem and you get a full supply of ink and a 50 sheet box of 13×19 paper. Such a deal.
Rich
I believe that includes $49 of paper. At least that used to be what was included. So for much less than one set of ink you can replace the printer that’s causing you problems.
Fujifilm FinePix X100
Fujifilm X100S
Canon EOS-1D Mark III
Sony Alpha NEX-6
Sony a7
+28 more
Keyboard shortcuts:
FForum
MMy threads
Latest sample galleries
Latest in-depth reviews

Fujifilm’s Instax brand has been synonymous with instant film, but Fujifilm is flipping the script with their first all-digital Instax camera. Prints can still be made via optional transmission to a digital printer and Fujifilm is hoping younger users will flock to it.

The Nikon Zf is a 24MP full-frame mirrorless camera with classic looks that adds the latest Expeed 7 processor and features such as 3D Tracking AF to the $2000 price point currently addressed by the Nikon Z6 II.

The Canon EOS R50 is an entry-level, compact APS-C mirrorless camera. A 24MP RF-mount camera aiming to attract smartphone users and, perhaps, vloggers. We found a lot to like about this small, simple camera, but we’re not sure where you go once you tire of the kit lens.

Tapping into machine learning technologies, Photomator is a photo editor that offers a step up from Apple Photos and an affordable alternative to Lightroom.

The latest Lumix puts a Four Thirds sensor in a full-frame body, and includes some of Panasonic’s most advanced imaging tech ever.
Latest buying guides

Above $2500 cameras tend to become increasingly specialized, making it difficult to select a ‘best’ option. We case our eye over the options costing more than $2500 but less than $4000, to find the best all-rounder.

There are a lot of photo/video cameras that have found a role as B-cameras on professional film productions or even A-cameras for amateur and independent productions. We’ve combed through the options and selected our two favorite cameras in this class.

What’s the best camera for around $2000? These capable cameras should be solid and well-built, have both the speed and focus to capture fast action and offer professional-level image quality. In this buying guide we’ve rounded up all the current interchangeable lens cameras costing around $2000 and recommended the best.

Family moments are precious and sometimes you want to capture that time spent with loved ones or friends in better quality than your phone can manage. We’ve selected a group of cameras that are easy to keep with you, and that can adapt to take photos wherever and whenever something memorable happens.

What’s the best camera for shooting sports and action? Fast continuous shooting, reliable autofocus and great battery life are just three of the most important factors. In this buying guide we’ve rounded-up several great cameras for shooting sports and action, and recommended the best.
How to Fix canon pixma pro 100 flashing light error codes?

To Fix Canon Pixma Pro 100 Error Code 1000 isn’t such a puzzled condition for the customer, mainly by means of the help Canon Support group, who are continually prepared to assist at ordinance help number.
Now we are discuss about how to fix flashing light error codes:
Some of the Easy Way to Fix Canon Pixma Pro 100 flashing light error codes
Verify that Paper is Loaded Accurately
Firstly, you assure that your paper is stacked properly or not. If not, at that end stacking the paper in the right way.
Ensure the Following When You Load Paper
In the Rear Tray:
- When stack at least two sheets of paper, at that point you require to take after the beneath given way:-
- After that you guarantee that flip from side to side the paper before stacking.
- After that regulate the limits of the sheets before stacking.
- Make further than any uncertainty that the paper stacks does not exceed the paper stack restrain.
Despite the whole thing, may be legitimate bolstering of paper impractical at this most extreme bound dependent upon the sort of paper or usual conditions (also high or low warmth or humidity). In sort of condition, the patrons require to diminish the sheets of paper you stack at a chance to not as much as half of the paper stack confine.
- Each moment stack the paper in demonstration introduction, paying little mind to the printing introduction.
Confirm Paper That You Are Printing ON
At that point you need to assurance to check whether the paper you are imprinting on isn’t too thick or twisted.
Make beyond any doubt of the supplementary when you stack Hagakis or envelopes.
- If a (“hagaki” term allude to paper measure) is warped, it may not maintain suitably while the paper stack doesn’t exceed the paper stack limit.
- Load the size with a postal district section downward.
- When imprint ON envelopes, allude to the load Paper, and later than that make the envelopes before printing.
- Once you have prearranged the envelopes, at that point you have necessary to heap them in image introduction. In the occasion that the envelopes are located in sight introduction, at that point they won’t nurture suitably.
Confirm That the Media Type
At that point the clients need to affirm that the media write and the paper estimate settings compare to the stacked paper.
Confirm the Foreign Objects in the Rear Tray
In the subsequent stage, you require to pledge that there is no remote protest in the back plate or manual bolster plate.
- If the paper tears in the back plate or the manual encourage plate, at that point Paper Jams expel it.
- If there is any remote protest in the back plate or manual nourishes plate, at that point make certain to kill the printer, at that point unplug it from the power supply, and afterward evacuate the outside question.
Note: – Make beyond any doubt you require, if the nourish space cover is open; at that point close it slowly.
Confirm Disk Tray Completely Closed
Make sure that the circle plate control is close totally.
The paper does not boost legally if the plate direct is even rather open.
Clean the Paper Feed Roller
Lastly, you require to clean the paper sustain roller.
In the occasion that you need any help to catch up the above advance, at that point get in touch with to our Canon Printer Helpline Number to get on time help.