Download Windows Speedup Tool to fix errors and make PC run faster
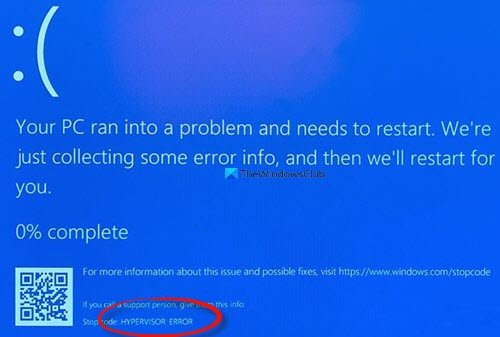
The HYPERVISOR_ERROR issue can be due to outdated or incompatible system drivers, bad disk sectors, and corrupted image files among other things. Some users have posted on Microsoft’s forum about a HYPERVISOR_ERROR BSOD (blue screen of death) issue with the stop code below-
The HYPERVISOR_ERROR bug check has a value of 0x00020001.
This indicates that the hypervisor has encountered a fatal error. Error code 0x00020001.
This BSOD error can arise for users utilizing Windows Sandbox or third-party virtual machine applications within Windows 10. In this article, we will explore the ways to deal with this frustrating issue.
The HYPERVISOR_ERROR can be fixed with the help of these steps:
- Fix RAM issues with Windows Memory Diagnostic.
- Update device drivers.
- Run a Deployment Image Servicing scan.
- Update your BIOS (Basic Input Output System).
- Use the !analyze debug extension.
These outlined steps are properly explained below.
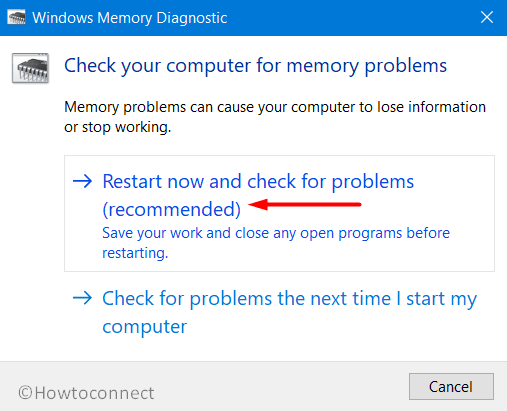
1] Fix RAM issues with Windows Memory Diagnostic.
To do this, press the Windows + S hotkey for the search utility. Type memory in the search box.
Click on Windows Memory Diagnostic to open that utility’s window.
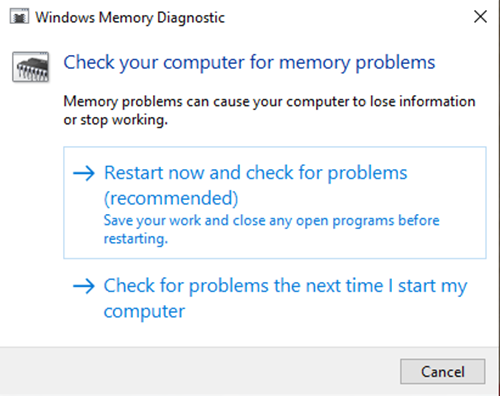
Click on the Restart now button within the Windows Memory Diagnostic utility.
When this is done, your desktop or laptop will restart and the Windows Memory Diagnostic tool will check for RAM issues.
2] Update device drivers
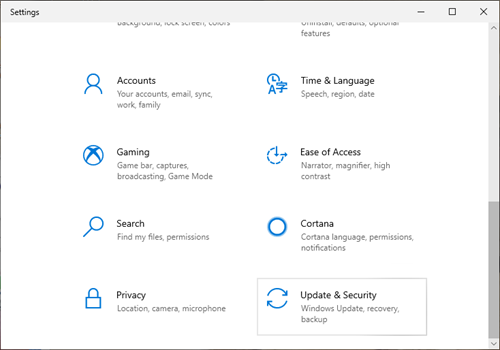
Updating device drivers may resolve the HYPERVISOR_ERROR. Users can update device drivers on their system by opening Settings, then navigate to Update & security and click on it to open the Windows Update page.
Just under it, users will see a clickable link View optional updates, click on it.
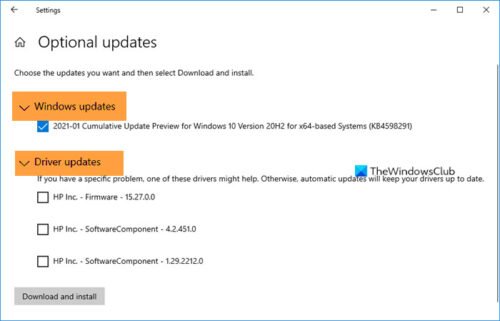
Under Driver Updates, a list of updates will be available, which you can choose to install. when you have checked the box of the update you want to install, then click on Download and install.
Read: How to disable Hypervisor in Windows.
3] Run a Deployment Image Servicing scan
DISM can be run done by typing cmd in Windows search box. Then right-click Command Prompt and select Run as administrator on the context menu that opens.
Next, input the following Deployment Image Service command in the Prompt’s window:
DISM.exe /Online /Cleanup-image /Restorehealth
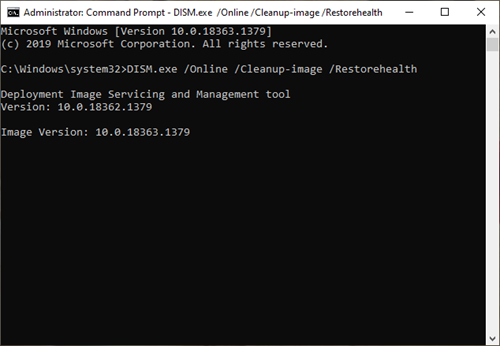
Click the Enter button to run the Deployment Image Service command.
Thereafter, restart Windows when the scan is complete.
4] Update your BIOS (Basic Input Output System)
To update an outdated BIOS, you’ll need to download the latest BIOS firmware from your motherboard manufacturer’s website.
There might also be a dedicated software utility available for updating your BIOS:
- Dell Update utility will help you download or update Dell Firmware & Drivers
- Lenovo System Update helps you download Lenovo Drivers, Software, Firmware, Update BIOS.
- AMD users may use AMD Driver Autodetect.
- Intel users may use Intel Driver & Support Assistant.
5] Use the !analyze debug extension
!analyze extension displays information about the current exception or bug check. It is meant for developers only.
In user mode, !analyze displays information about the current exception whereas in kernel mode, !analyze displays information about the most recent bug check.
User-Mode:
!analyze [-v] [-f | -hang] [-D BucketID]
!analyze -c [-load KnownIssuesFile | -unload | -help ]
Kernel-Mode:
!analyze [-v] [-f | -hang] [-D BucketID]
!analyze -c [-load KnownIssuesFile | -unload | -help ]
!analyze -show BugCheckCode [BugParameters]
If you are a developer, then use the !analyze debug extension – It displays information about the bug check and can be helpful in determining the root cause.
With these steps, users can fix the Hypervisor_Error in Windows 11/10.
Anand Khanse is the Admin of TheWindowsClub.com, a 10-year Microsoft MVP (2006-16) & a Windows Insider MVP (2016-2022). Please read the entire post & the comments first, create a System Restore Point before making any changes to your system & be careful about any 3rd-party offers while installing freeware.
Windows продолжает получать новые функции и исправления безопасности с каждым обновлением, и это причина, по которой пользователям это нравится. Что ж, это действительно отличная ОС, но все же бывают случаи, когда пользователи сталкиваются с различными проблемами и сталкиваются с ошибками. Здесь мы говорим об одной такой ошибке, которая называется HYPERVISOR_ERROR BSOD Stop Code Error.
В большинстве случаев эта ошибка возникает, когда пользователь пытается запустить песочницу Windows, а также какую-либо другую виртуальную машину. Не только это, но иногда это происходит при выполнении некоторых более простых задач, таких как просмотр веб-страниц. Кроме того, использование сторонней антивирусной программы, отсутствие файлов DLL и компонентов Windows, запуск двух или более похожих приложений, повреждение реестра также может вызвать ошибку.
Наконец, в некоторых случаях ошибка BSOD HYPERVISOR_ERROR возникает, когда вредоносное ПО захватывает элементы системы. Какой бы ни была причина, в этой статье мы даем вам решения для всех возможных причин этой ошибки.

Содержание страницы
-
1 Как исправить ошибку кода остановки BSOD HYPERVISOR_ERROR
- 1.1 Метод 1: обновить Windows
- 1.2 Метод 2: обновите драйверы
- 1.3 Метод 4: используйте средство устранения неполадок Windows, чтобы исправить ошибку кода остановки BSOD HYPERVISOR_ERROR
- 1.4 Метод 5: запустите средство диагностики памяти, чтобы исправить проблемы с ОЗУ
- 1.5 Метод 6: используйте утилиту очистки диска, чтобы удалить ненужные файлы и освободить место
- 1.6 Метод 6. Удалите стороннее антивирусное программное обеспечение.
- 2 Заключение
Как исправить ошибку кода остановки BSOD HYPERVISOR_ERROR
Это один из необходимых шагов, прежде чем перейти к решениям. Поскольку мы получали отчеты от пользователей, в большинстве случаев ваши окна перезапускаются автоматически, как только вы сталкиваетесь с этой ошибкой. Это происходит не со всеми пользователями, но большинство пользователей сталкиваются с этим.
Чтобы исправить это, сначала нажмите Windows + D, а затем щелкните правой кнопкой мыши на ЭТОМ ПК и выберите в меню Свойства. Откроется новое окно, в котором выберите Дополнительные параметры системы.
В-третьих, нажмите на опцию Advance, чтобы перейти на вкладку Advanced. Теперь найдите область «Запуск и восстановление» и нажмите «Настройки» под ней.

Откроется окно настроек. Теперь в окне настроек вам нужно снять флажок с опции Автоматический перезапуск, как показано на следующем изображении. Нажмите ОК, чтобы завершить процесс.
Метод 1: обновить Windows
Как мы уже говорили ранее, обновления Windows содержат различные исправления. Не каждый раз сталкиваешься с ошибкой по указанным выше причинам. Чтобы быть более конкретным, могут быть некоторые ошибки, которые вызывают такие ошибки, и в таких случаях последнее обновление — это все, что вам нужно. Поэтому обновите свои окна, чтобы предотвратить ошибку.
Метод 2: обновите драйверы
Это простой и эффективный способ решения этой ошибки. Если причиной этой ошибки является несовместимость драйверов или какая-либо ошибка драйвера, их обновление является способом решения ошибки.
Чтобы обновить драйверы, сначала нажмите Windows + R, введите «devmgmt.msc» в диалоговом окне и нажмите Enter.

Теперь вы увидите здесь окна диспетчера драйверов. Вы можете обновить все драйверы вручную. Для этого щелкните правой кнопкой мыши драйвер, который вы хотите обновить, и выберите вариант обновления драйвера.

С помощью этого метода вы можете обновлять все драйверы один за другим, и если драйвер вызывает ошибку, она будет устранена. Вы также можете использовать сторонние пакеты драйверов для обновления драйверов.
Метод 4: используйте средство устранения неполадок Windows, чтобы исправить ошибку кода остановки BSOD HYPERVISOR_ERROR
Как я уже сказал, Microsoft стремится решать проблемы своих пользователей. Поскольку многие пользователи столкнулись с ошибкой кода остановки BSOD HYPERVISOR_ERROR, Microsoft представила служебный инструмент под названием Windows Blue Screen Troubleshooter. Все, что вам нужно, это последнее обновление Windows 10, чтобы использовать эту утилиту.
Чтобы использовать эту утилиту, сначала нажмите Windows + I, чтобы открыть приложение настроек.

Во-вторых, щелкните параметр «Обновление и безопасность», а затем выберите параметр устранения неполадок.
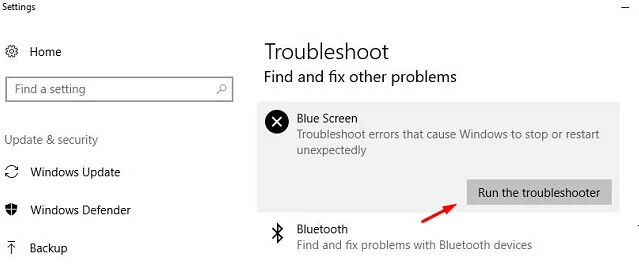
В-третьих, найдите вариант синего экрана и выберите вариант запуска средства устранения неполадок.
Наконец, дайте утилите завершить свою работу. Это автоматический процесс, поскольку он обнаруживает проблему и начинает ее исправлять. Так что расслабьтесь и расслабьтесь, пока выполняет работу.
Метод 5: запустите средство диагностики памяти, чтобы исправить проблемы с ОЗУ
Поврежденная оперативная память и неправильное выделение памяти играют активную роль в возникновении BSOD HYPERVISOR_ERROR. В Windows есть средство диагностики памяти по умолчанию, которое может помочь вам в решении этих проблем с памятью.
Чтобы запустить инструмент диагностики памяти, прежде всего откройте приложение настроек так же, как мы делали в последнем методе.

Во-вторых, введите «Память» в строке поиска окна настроек и выберите «Диагностика проблем с памятью вашего компьютера» в результатах поиска. Откроется окно средства диагностики.
В-третьих, нажмите кнопку «Перезагрузить сейчас и проверьте наличие проблем» (рекомендуется) в окне.
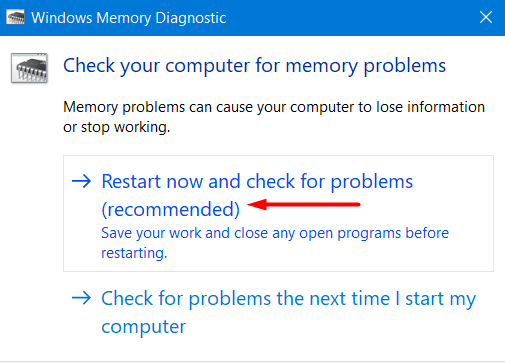
Теперь ваша система перезагрузится автоматически, и после перезапуска инструмент начнет свою работу. Вы увидите процентный индикатор, и как только этот показатель достигнет 100%, ваш компьютер снова перезагрузится.
Наконец, после второй перезагрузки вы увидите результат диагностики на экране. Надеюсь, вы больше не столкнетесь с кодом остановки BSOD HYPERVISOR_ERROR.
Метод 6: используйте утилиту очистки диска, чтобы удалить ненужные файлы и освободить место
Если у вас мало места и вы столкнулись с кодом остановки BSOD HYPERVISOR_ERROR, то это ваше решение. Windows создает ненужные файлы, когда мы выполняем с ними задачи. Со временем эти файлы будут становиться все больше и больше, если мы не будем их удалять. Эти файлы не опасны для вашего ПК, но если у вас мало памяти, рекомендуется их удалить. Это легко сделать с помощью утилиты очистки диска.
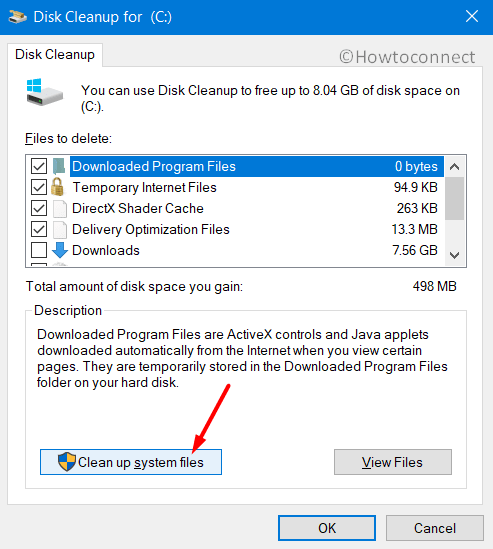
Для этого сначала нажмите Windows + S, чтобы открыть окно поиска, после чего напишите «cleanmgr» в поле поиска и нажмите Enter.

Откроется диалоговое окно, в котором вас попросят выбрать диск для очистки. Выберите диск C оттуда, используя раскрывающееся меню, и нажмите ОК.
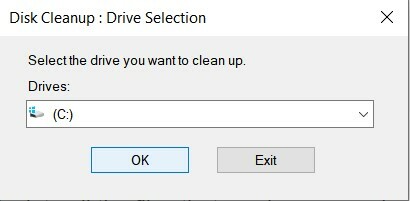
Как только вы нажмете ОК, инструмент вычислит все файлы, которые можно удалить, и покажет вам всплывающее окно. Нажмите на опцию Очистить системные файлы.
Когда вы это сделаете, вы увидите новое всплывающее окно с просьбой указать предпочтительный диск. Выберите C и нажмите Enter.
После этого вы снова увидите окно очистки диска для C. Теперь проверьте все элементы в разделе «Файлы для удаления», кроме «Загрузить». После этого нажмите «ОК», чтобы запустить очистку.
Это запустит очистку. Это долгий процесс, и потребуется немало времени, чтобы набраться терпения и не останавливать процесс на середине. Как только процесс будет завершен, перезагрузите компьютер и, надеюсь, вы больше не столкнетесь с HYPERVISOR_ERROR.
Метод 6. Удалите стороннее антивирусное программное обеспечение.
Все мы используем то или иное антивирусное программное обеспечение, чтобы обеспечить безопасность нашей системы. Однако есть антивирусное программное обеспечение, которое портит системные файлы и, таким образом, может вызывать код остановки BSOD HYPERVISOR_ERROR.
Такое случается редко, поэтому мы предлагаем вам попробовать другие методы перед этим, и если ни один из них не работает, то. Используйте только этот метод. Вам не нужно беспокоиться о безопасности вашей системы, поскольку Windows уже имеет свой инструмент безопасности, то есть безопасность Windows.
Заключение
Подводя итог, это были все возможные решения для устранения ошибки кода остановки BSOD HYPERVISOR_ERROR. Вы можете использовать любой из этих методов для решения вашей ошибки. Кроме того, вы можете обратиться в службу поддержки Windows, если столкнетесь с ошибкой даже после попытки всех решений. Служба поддержки Windows предоставит вам необходимое решение, чтобы помочь вам с ошибкой. Мы надеемся, что это развеет все ваши сомнения по этому поводу.
Выбор редактора:
- Исправить ошибку ОЗУ при проверке безопасности ядра в Windows 10
- Как исправить BSOD повреждения кучи режима ядра в Windows 10
- Исправить ошибку BSOD кода остановки управления памятью
- Исправлено: Неустранимая системная ошибка C000021A в Windows 7 и 8.1.
- Как включить или отключить диалоговое окно подтверждения удаления в Windows 10?
Рекламные объявления В этом уроке мы покажем вам, как исправить код ошибки Steam 2: Серверы…
Рекламные объявления В последнее время цифровой мир заполнен многочисленными пользователями ПК, которые заявляют о том, что «сканирование DISM завершается неудачно с…
Рекламные объявления Windows 10 — самая продвинутая и умная версия Microsoft Windows, которая порождает большие ожидания…
Have you ever come across any error text on display relating to HYPERVISOR_ERROR? This is a Blue Screen of Death error in the system having a bug check value of 0x00020001. The case study says that the possible reasons behind this issue are malware taking over system elements, missing DLL files and Windows components, corruption on the registry, using a third-party anti-virus program, running two or more similar applications, and more.
Apart from these, hardware issues can also be equally responsible for this error to occur. Some might also get this error after installing a new additional HDD or having bad sectors in the drive. But the most annoying issue is restarting of Windows automatically quite often. HYPERVISOR_ERROR BSOD in Windows 11 or 10 has long term effect in the computers if not eliminated in the first place. You might face frequent hanging of the desktop, continuous error messages manipulating ongoing tasks. Necessary steps are mandatory to recover the device from its dangerous grasp. So, today, we will discuss all these processes elaborately here and try to resolve this HYPERVISOR ERROR. Let not waste any more time, better be started!
Here is how to fix HYPERVISOR_ERROR BSOD in Windows 11 or 10 –
Way-1: Prevent Windows From Restarting Automatically
First thing first, as the computer might repeatedly restart automatically, we can heal that at the beginning. This will not actually bypass the error but you will get an efficient arena of deploying resolutions. Here is the method –
- Press Win+D and head to Desktop area straightway.
- Right click on This PC and select Properties.
- When in a separate window, choose Advanced system settings.
- From System properties wizard next, move into Advanced tab.
- Reach down to the Startup and Recovery area.
- Select Settings option from this place.
- In the following popup, reach out to the System failure section.
- Uncheck Automatically restart option.

- Hit the OK button to proceed on.
Now, Windows will not restart automatically and you can make the proper environment for applying other processes. Head to the next resolutions.
Way-2: Use the Safe Boot Mood as Rescuer of HYPERVISOR_ERROR
Starting from very old times to now, whenever any critical issue like HYPERVISOR ERROR raises up for windows system, booting in Safe Mode came out as the savior. In fact, like all of you, the next resolution we are taking up is to perform it. Let’s see the method in below section –
- Hover the mouse pointer and reach the left bottom of the taskbar.
- Perform a click on the Start menu icon.
- Hit a click on Power icon from there and select Restart option holding Shift key at the same time.
- Once Windows completes the first cycle of restarting, there will be a blue screen holding a few options. Choose Troubleshoot from there.
- Moving ahead to the next page, select “Advanced options” followed by a hit on “Startup Settings“.
- Now, you need to click on the Power cog icon. Located at the right bottom corner followed by choosing Restart.
- Windows after restarting for the second time will offer you a menu at the startup including options to “Boot in Safe Mode“.
- Press the “F4” button from keyboard continuously and enter into the Safe Mode.
Way-3: Protect from Virus using Windows Security
Missing system elements stay in the front row for causing HYPERVISOR_ERROR in Windows 11 or 10. The question is, how do these go missing? Well, there might be malware or virus attacks and once they get into the system, erase necessary data. We all are well familiar with the fact that it’s very rare to stay away from them. What we can easily do is perform a regular check and dismiss these. The steps are as follows –
Step-1: Press Win+S hotkeys together and invoke Taskbar search on display.
For reference, read How to Remove Windows Security System Tray Icon in Windows 10.
Step-2: In the empty text space, type Security and when Windows Security arrives in the result, choose to launch.
Step-3: In the App UI, select Virus and threat protection from the left-hand side and switch to the adjacent wing.
Step-4: On the right, perform a click on the link Scan options and discover all the processes.
Step-5: Mark the radio button conjoint with Full scan and from down, hit Scan now option.
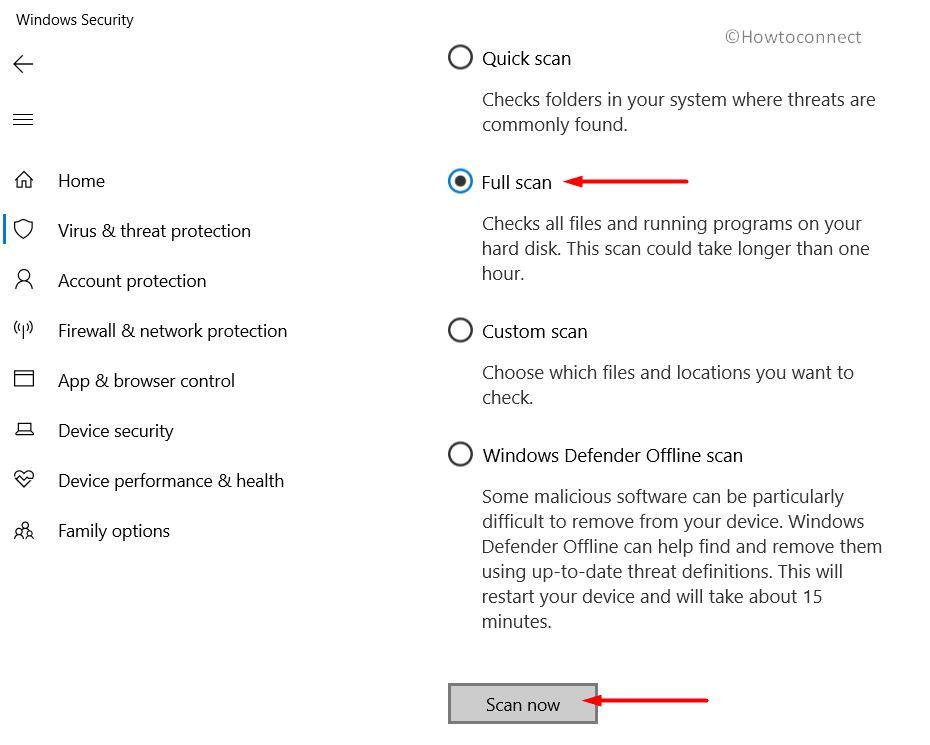
Step-6: The process will start immediately and once it gets over, you can see the result in front. Now, hit on Clean threats option in order to dismiss those sharply.
Step-7: On the following window, you will be delivered three more options. Choose Remove and finally hit Start actions button from down.
Step-8: Restart Windows 10 PC as you normally do.
Once, all the malware will get disappeared, this HYPERVISOR_ERROR in Windows 10 o 11 will not appear anytime again.
Way-4: Download and Install all available patches
Microsoft releases regular patches and these files contain fixes for bugs and problems as well as amazing features. This is quite important to keep Windows updated even have no issues. Since outdated patches often call in HYPERVISOR ERROR issue, we can consider it as a resolution and proceed with following.
- Press on the Start button from keyboard and let the menu spread up.
- Perform a click on the Settings sign and call in the Windows Settings app.
- Being in the app area, proceed to Update & Security and click on it.
- Once the next page is visible on display, select Windows Update and move to the corresponding side.
- On this spot, hit a click on Check for updates link even there is a visible dialog “You’re up to date”.
- Upon all the patches being shown on screen, choose the Download button and get the files in the system.
- Installation begins automatically when downloading gets finished. You might have to keep the device manned always to attend to timely restarting.
When the Windows is finally updated, HYPERVISOR_ERROR BSOD error will dismiss away.
Way-5: Make the Outdated Drivers Updated with Device Manager
We have seen many cases based on BSOD errors and came to the conclusion that outdated device drivers do the maximum damage. Hence, we need to step up immediately to update them. The Built-in Device manager will do the task for you. We need to just move ahead with below proceedings.
- Open the Run dialog box by pressing the “Win+R” keys combined.
- In the space provided here, type “devmgmt.msc” and hit Enter key from the keyboard.
- Device Manager will show up after a while and you need to look for an exclamation mark in the full console.
- If there is any present, expand the device by clicking on it and again see deeply for any yellow indication mark in the drivers.
- Right click on each once discovered and select Update driver option.
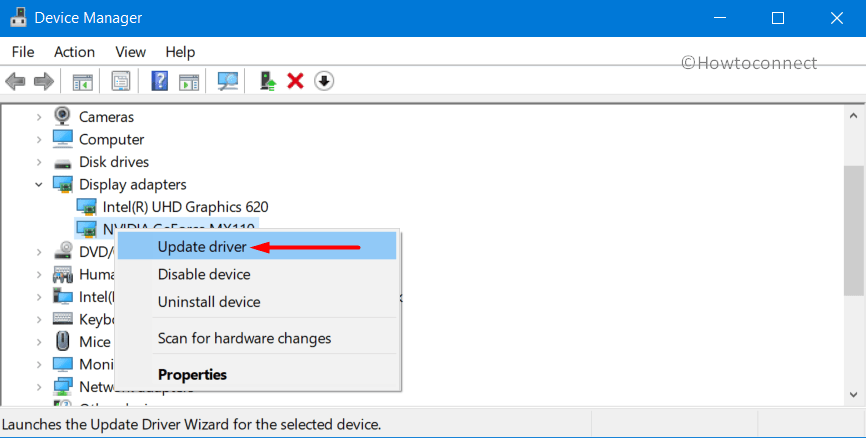
- Follow the directions coming on the display to complete the task properly.
After all the drivers being updated, there should not be HYPERVISOR ERROR in the system.
Way-6: Windows Blue Screen Troubleshooter to solve HYPERVISOR_ERROR
Microsoft being so dedicated to the users considered customer satisfaction most. As HYPERVISOR ERROR keeps on haunting badly, they came up with a new utility called Windows Blue Screen Troubleshooter. If you have the updated version of Windows 10 same as Fall Creators Update, can enjoy this awesome privilege. Move ahead with the following procedure –
- Do a joint press of Win+I hotkeys and let Windows launch Settings app.
- Slide over the app area and click on Update & security once reached.
- Moving ahead to the following window, do select Troubleshoot and jump ahead to adjacent overlay.
- Locate the Blue Screen option and click on it.
- Choose Run the Troubleshooter option to start the curing.
This is an automatic process. Once detection finished, fixing will start by its own. After the process end, you might not face any errors in the system and use the device with the utmost ease.
Read Blue Screen Troubleshooter Windows 10 to Fix BSOD.
Way-7: Throw away all the problematic Windows update files
Updating process in Windows operating system is autonomous and it generally doesn’t end up into any manipulation. But sometimes, people experience abnormal termination of this process and hence HYPERVISOR ERROR takes place in the system. The best remedy in this respect is to delete them all from the computer. Here are the steps to be followed –
Step-1: Move the pointer to the extreme left bottom end of the screen and do click on the Start menu.
Step-2: Once it opens up, hit a click on Settings cog. And let the app open in the display.
Step-3: When in the accessible area, head to Update & Security tile and click on it.
Step-4: On the next page, choose Windows Update from the left pane and switch to the right.
Step-5: After shifting, click on the link saying View update history and unveil the past update files.
Step-6: When the following page unrolls, select “Uninstall updates” and wait until Program and features window fleshes from Control Panel.
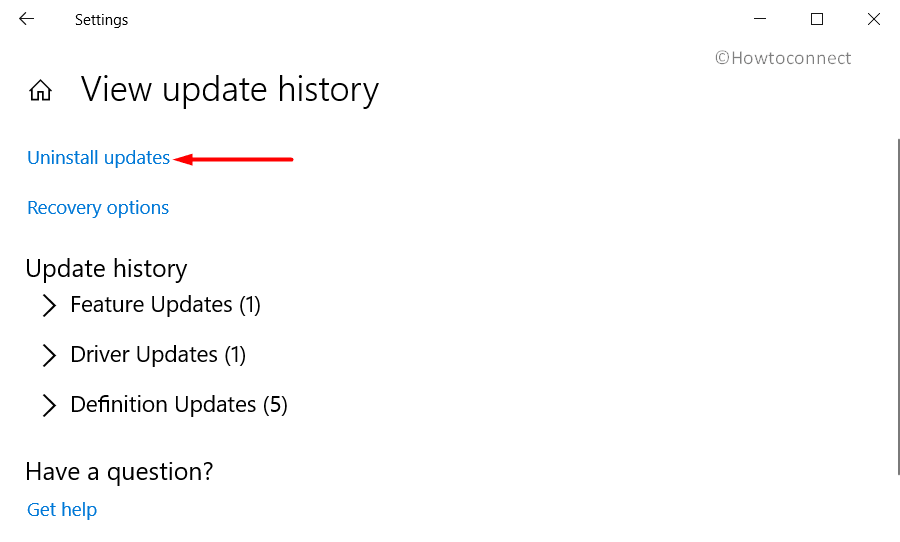
Step-7: Next in the process, right click on the last patch you have downloaded and choose Uninstall.
Step-8: Wait until the uninstalling process gets over and finally, reboot the device normally.
Step-9: When coming back to operation, hopefully, there will be no HYPERVISOR_ERROR BSOD in Windows 11 and 10.
Way-8: Run the Memory Diagnostic Tool and fix RAM issues
The wrong allotment of Memory, corruption in the Random Access Memory (RAM) has active participation in causing the HYPERVISOR_ERROR in Windows 10 or 11. Therefore, the default Windows Memory Diagnostic Tool will be super handy in fixing those bad areas. See the method below –
- Get access to the Settings app using any of the above-mentioned ways.
- After the app interface comes in the screen, type memory in the search box provided here.
- Once the result shows up, select Diagnose your computer’s memory problems from the list.
See more ways to Open Memory Diagnostic Tool in Windows 10.
- When Windows Memory Diagnostic Tool pops-up, choose the option namely “Restart now and check for problems (recommended)“.
- Windows will now reboot automatically and when it turns back again to operation, you will observe a blue screen taking over the process and detecting Memory issues in the system.
- The progress will be indicated in percentage and when it becomes 100%, the system will restart again for the second time.
- Upon startup, the result of the diagnosis will be available in the system tray- notification area.
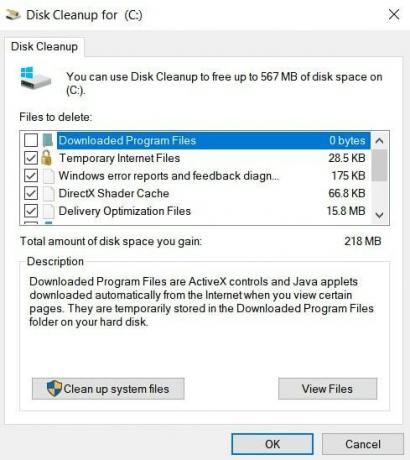
Way-9: Use the Disk Cleanup Utility to wipe junk and recover space
For the sake of completing tasks we perform, the computer needs to create junk files every time. These are temporary files and have no use after completing the tasks. However, as they get stored in the Disk Drive, occupies space and slowly gets bigger in volume. Eventually, the system runs out of enough space in it and makes the operation slower. In the process, HYPERVISOR_ERROR BSOD rises. So, we need to clean them using Disk Cleanup Utility. Guidelines are as follows –
- Do a combined press of Windows key and S from keyboard to invoke Taskbar search.
- In the box provided for typing here, write cleanmgr and also when Disk Cleanup utility hits on the result, select it.
- Moving ahead, the utility will throw a small popup dialog asking the drive name where Cleanup will be carried out.
- Select C: by clicking on the dropdown menu and hit Ok button.
- The tool will first go for calculating the amount of space in Drive C: it can recover and then shows a popup wizard.
- Moving ahead to the wizard, come down to the bottom left end of it and select Clean up system files.
- One more time the small popup will float up asking for the preferable drive. Choose C: again and hit Enter key.
- After calculating retrievable space in it, again the Disk Cleanup for (C:) will appear.
- On the window, check all the items under Files to delete, and don’t touch Downloads only.
- Make a check in the Recycle Bin and also move any important files to their designated location.
- Now, coming back to wizard again, do select Ok button to initiate cleanup.
- This is a little bit slower process and might take a good amount of time to accomplish. Wait until it finishes normally and does not terminate in the middle.
- Once finished, Restart the device and once come back to display, see if HYPERVISOR_ERROR is there.
Way-10: Remove Programs colliding with one another
If the computer has two or more programs for serving similar purposes, they might be stuck in the collision between them and eventually deletes the necessary elements for OS. However, as of being the same purpose, the wise decision is to remove them as they call BSOD errors frequently. You can install again once the HYPERVISOR_ERROR BSOD in Windows 11 or 10 goes away.
- Perform a right click on the Start menu and later on, select Run from the menu.
- On the Run dialog, type appwiz.cpl in the void text field.
- Select OK button under the box and let Program and features window hit upon the screen from Control Panel.
- Moving ahead to the new window, look closely for the programs causing HYPERVISOR_ERROR BSOD in Windows 10 or 11 in the list visible here.
- Once found, do a right click on each and at the same time hit Uninstall button appearing.
- Follow the onscreen guidelines available afterward to complete Uninstallation.
- Upon finishing the process, Reboot the computer and when it returns to action, see if there is any trace of error in the system.
- If nothing is present, download and install the programs you have deleted before and use them normally.
Way-11: Detect and fix the Bad sectors in the Hard Disk Drive
Due to prolonged use, HDD runs in manipulation and has poor sectors developed in it. These areas cause permanent damage in the long run and obviously play a big role in making HYPERVISOR_ERROR in Windows 11 or 10. There is a Built-in Tool introduced by Microsoft to deal with it and that is the Disk Checking Utility. In the Elevated Command Prompt, CHKDSK will perform this task.
- Get access to Cortana, type cmd. On the results, execute a right-click on Command Prompt and select “Run as Administrator”.
- User Account Control (or UAC) will ask for permission immediately and you have to select Yes to proceed.
- Type the command in below arrangement in the Command Prompt –
chkdsk [Drive:] [parameters]
- When you hit Enter, you can see the Disk status only. Since we are up to a target of fixing the bad areas, the command needs some notations like-
/f /r /x
- Here, “f “will fix the brought-up issues in the disk. “r” will detect the issues present and the last one “x” will split up the whole Disk volume before the utility take action.
- After inserting all the characters in the Command, it will look finally like-
chkdsk C: /f /r /x
Important- C: is present here as we have OS installed in this drive. If you have done it in another one, use that drive letter.
- When you press Enter key, the process will initiate and it will take almost 10 minutes to accomplish fully.
- Wait patiently and when ends, do a normal Restart to Windows so that all changes are effective.
- When the PC powers up next, check if there are any issues like HYPERVISOR_ERROR BSOD in Windows 11 or 10.
Way-12: Measure for External Hardware Device to resolve HYPERVISOR_ERROR
Hardware issues causing BSOD error such as HYPERVISOR_ERROR are a little dangerous and often leave no room for you. A group of people comes across the issue after connecting the external HDD with the device. We all know, how much important it is for these days and cannot really ignore. Therefore the best way is to disconnect the drive or Hardware material and then re-plug again once HYPERVISOR ERROR eliminates.
- Unplug all the devices from ports and keep beside you in order.
- Perform a Fresh Restarting to the System.
- Once it comes back to the desktop, check if there are any issues.
- If resolved successfully, visit Manufacturer page for each Hardware item, then download and install the latest device driver for each one of them.
Way-13: Stop Using Third-Party Anti-virus Programs
Malware is ruling out everywhere on the internet and we can be prey to them anytime. As a preventive measure, we often use a Third party tool and thus end up calling HYPERVISOR_ERROR BSOD in Windows 10 or 11. Microsoft has the best utility is this aspect as Windows Security. So, you can uninstall others using below steps –
Step-1: Open the Settings app by pressing Windows key and I.
Step-2: In the layout, run to Apps tile and also select to bring up more settings.
Step-3: Moving ahead, select Apps & features from the left pane and jump to adjacent overlay.
Step-4: Reach out to the program in the list of Installed apps and select it.
Step-5: Hit Uninstall option.
Step-6: UAC will prompt for permission immediately and you need to select Yes to move ahead.
Step-7: Again click the Uninstall button from the program to finish the uninstallation procedure.
Way-14: Perform System Restore to Undo Current Changes
We try new things on the machine every day such as installing a program or removing something. Often we do it without concerning the changes and thus HYPERVISOR_ERROR shows up. To resolve it, System Restore can be an eligible savior.
Note- This process needs a Pre-created Restore Point. If you don’t have, skip this method and move ahead to the next resolution.
- Open Run dialog on display and type “rstrui” in the box for searching.
- Hit Enter and let the System Restore wizard show up on the screen.
- Hit Next option from wizard to move ahead.
- On the following page, do select Show more restore points to reveal all points.
- Perform a click on the latest one and select the Next button.
- Once the next screen hits display, come down to the bottom and select Finish.
- The process will start and revert changes to the previous state.
This will hopefully cure HYPERVISOR_ERROR BSOD in Windows 11 or 10.
Way-15: Activate DISM Tool to fix up Windows Image Files
Windows Image files may sometime run into corruption and end up causing HYPERVISOR_ERROR BSOD in Windows 10 or 11. The best way to resolve this is to run the “Deployment Image Servicing and Management” (DISM) utility.
- Move the mouse pointer to Taskbar area and perform a right-click on it.
- Select Task Manager from the list and allow it to open.
- Moving ahead, select File from top left end and choose “Run new task” option.
- Once Run dialog appears, type “cmd” in the search field and also check the dialog saying “Create this task with administrative privileges”.
- Press Enter key and let the Elevated Command Prompt window to take place.
- Now, at the base of blinking cursor, type the following command line tool. Hit Enter key to start actions. This process will take a little longer. So wait patiently to end up.
DISM.exe /Online /Cleanup-image /Restorehealth

Once the process finishes, Restart the computer, and afterward, see if there are any issues. Hopefully, you will not come across anything.
These are all the workarounds necessary to resolve HYPERVISOR_ERROR BSOD in Windows 10 or 11. However, as you have come to this area, you have successfully done that we guess. Unfortunately, if that’s not true, there is a last resort for all issues and errors. The solution is to do a complete installation of the Operating System. If you want to proceed with that, make sure you are confident enough or seeking help from professional. This will save from lots of problems happening afterward. Obviously, save backup for important files, images, and data in a safe place outside of the computer to avoid loss. Hope, you can recover the device from the grasp of HYPERVISOR_ERROR BSOD in Windows 11 or 10 finally.
Methods:
Way-1: Prevent Windows From Restarting Automatically
Way-2: Use the Safe Boot Mood as Rescuer of HYPERVISOR_ERROR
Way-3: Protect from Virus using Windows Security
Way-4: Download and Install all available patches
Way-5: Make the Outdated Drivers Updated with Device Manager
Way-7: Throw away all the problematic Windows update files
Way-8: Run the Memory Diagnostic Tool and fix RAM issues
Way-9: Use the Disk Cleanup Utility to wipe junk and recover space
Way-10: Remove Programs colliding with one another
Way-11: Detect and fix the Bad sectors in the Hard Disk Drive
Way-12: Measure for External Hardware Device to resolve HYPERVISOR_ERROR
Way-13: Stop Using Third-Party Anti-virus Programs
Way-14: Perform System Restore to Undo Current Changes
Way-15: Activate DISM Tool to fix up Windows Image Files
That’s all!!
Repair any Windows problems such as Blue/Black Screen, DLL, Exe, application, Regisrty error and quickly recover system from issues using Reimage.
This BSOD error can arise for users utilizing Windows Sandbox or third-party virtual machine applications within Windows 10. For example, in one forum post, a user said:
Read this thorough guide to explore the best ways to deal with this annoying issue.
What is Windows hypervisor platform Windows 10?
An extended user-mode API has been added to the Windows Hypervisor Platform, which allows third-party virtualization stacks and applications to create and manage partitions at the hypervisor level.
Moreover, you can configure memory mappings for the partition, and create and control the execution of virtual processors. These capabilities were previously unavailable.
What causes the hypervisor error?
The Hypervisor BSoD error usually occurs when users use an Android Virtual Device. Below are some of the causes of this frustrating error:
Outdated drivers Broken or corrupt system files Outdated operating system Outdated BIOS
How do I fix the Hypervisor error?
1. Update all your system drivers
1.1. Update driver manually
It might be because of outdated drivers if you are getting the Hypervisor error while trying to run games like Valorant. In this case, you need to update your graphics drivers and related ones.
1.2. Update drivers automatically
Updating all your drivers manually can be time-wasting and prone to errors. So, you should use one of the best driver updaters in DriverFix.
DriverFix is a driver updater utility with which you can quickly scan all your PC’s device drivers. In addition, this software will display a list of your PC devices with outdated, corrupted, missing drivers.
DriverFix is ideal for resolving driver issues as it lets users quickly and easily download and install drivers for PCs that need new ones.
Pro users can select an Automatically Install option to install downloaded drivers at the click of a button, which makes updating drivers very straightforward.
Other useful DriverFix features
DriverFix backs up drivers with ZIP files before updating them Users can schedule scans for optimal times with DriverFix’s schedule manager Its download manager displays driver download progress for users Live chat support is available for DriverFix users
2. Fix RAM issues with Windows Memory Diagnostic
Sometimes, the Hypervisor error on Dell can be down to issues with your RAM. This can be fixed using the Windows tool. Also, if you are busy with an important task that can’t wait, you can select the second option and restart your PC when you are done.
3. Update Windows 10
If you are getting the Hypervisor error while using the Oracle VM VirtualBox on Windows 10, it might be because your OS is outdated. Updating Windows 10 and restarting your PC should do the trick here.
4. Run a check disk scan
The Hypervisor error can also occur due to bad hard disk sectors. Again, running the CHKDSK command helps to repair these sectors if they can still be saved.
SPONSORED
5. Update your BIOS (Basic Input Output System)
You’ll need to download the latest BIOS firmware from your motherboard manufacturer’s website to update an outdated BIOS.
There might also be a dedicated software utility available for updating your BIOS. Check out our How to update BIOS article for further details about updating the BIOS.
6. Run DISM scan
Corrupt system files are among the chief causes of the Hypervisor error. You can effectively repair these files using the DISM tool.
However, to run a deep and thorough scan and repair virtually all broken system files, we recommend using a dedicated system file repairer in Restoro.
Restoro is a specialized tool that keeps your PC in top shape by detecting any faulty file and repairing it before it starts causing problems. This helps prevent file loss and ensures your PC always delivers maximum performance.
Finally, it is not just limited to file repair only. Instead, it fixes all common PC errors to help keep your device optimized.
⇒ Get Restoro
7. Restore Windows 10 to an earlier date
If all the solutions above fail to fix the Hypervisor error, you might need to restore your PC to a later date before the issue.
Note that any software installed after the selected restore point gets deleted. Click the Scan for affected programs button on the System Restore window to see what software a selected restore point removes.
How do I fix the Hypervisor error on Windows 11?
The Hypervisor error on Windows 11 is usually caused by corrupt system files and bad disk sectors. Also, the issue can be due to some incorrect or conflicting settings on your PC.
To fix it effectively, check our detailed guide on Hypervisor errors on Windows 11.
How do I know if Hypervisor is running?
Those are likely fixes for the Hypervisor error in Windows 10. However, we hope you can fix the issue before exhausting the list.
If you need a list of the best BSoD fixers to repair blue screen errors effortlessly, check our guide for the best options that are currently available.
Feel free to let us know the solution that helped you fix the issue in the comments below.
SPONSORED
Name *
Email *
Commenting as . Not you?
Save information for future comments
Comment
Δ
Table of Contents
- What is Hypervisor BSOD Error?
- Ways to fix Hypervisor BSOD Error
- 1. Update Drivers
- 2. Disable Hyper-V
- 3. Update Windows
- 4. Run Memory Diagnostics
- 5. Checking System files
What is Hypervisor BSOD Error?
Actually, Hypervisor_error is a kind of blue screen of death (BSOD) error in Windows OS.
This error indicates a problem or failure within the hypervisor. A hypervisor is a software that lets you run multiple operating systems at the same time on one computer by sharing its resources such as storage, CPU, and memory.
The Hypervisor_error in Windows 10 or 11 can occur due to a variety of factors, including:
- Corrupted or outdated drivers, can lead to issues with the hypervisor.
- Faulty memory module, which can also cause hypervisor-related errors.
- Conflicts with certain antivirus programs can interfere with the hypervisor and trigger the error.
- Windows updates can potentially cause hypervisor errors.
Ways to fix Hypervisor BSOD Error
So, let’s look at some of the ways you can try to fix this Hypervisor_error in Windows 10 or 11.
1. Update Drivers
You can manually update your driver or update using driver tools.
To manually update drivers, follow these steps:
- Press the Windows + R keys on your keyboard.
- Type «devmgmt.msc» (without quotes) and press Enter. This will open the Device Manager.
- Locate the driver you want to update. For example, if you want to update the Display Driver, click on the corresponding driver in the list.
- Right-click on the driver and select «Update Driver.»
- Choose the option «Search automatically» to download and install the latest driver from the internet.
By following these steps, you can update each driver individually based on your requirements.
If you prefer to update all your drivers at once, you can utilize software such as DriverEasy, Driver Booster, Device Doctor, Driverpack Solution, etc.
2. Disable Hyper-V
If you are not running multiple virtual machines on a single physical computer, each virtual machine can operate with its own operating system and applications, just like a physical computer. If you don’t want to utilize this feature, you have the option to disable the Hyper-V features on your Windows machine.
Follow these steps to disable the Hyper-V features on your Windows machine:
- Press Windows + R to open the Run Command.
- Type «Control» and click on the Ok button to open the Control Panel.
- Click on «Programs».
- Under «Programs and Features», click on «Turn Windows features on or off».
- Search for «Hyper-V» or «Windows Hypervisor Platform» and uncheck the box if it is checked.
- Click on the Ok button to save the changes.
3. Update Windows
Microsoft regularly releases updates to address bugs and security vulnerabilities, which means updating Windows might resolve the Hyper-V error. Follow these steps to check for and install Windows updates:
- Search for «Settings» and click on the «Settings» app from the list of results.
- Click on «Windows Update«.
- Next, click on «Check for updates«.
- If your system is already up to date, you will see a message stating «You are up to date,» indicating that no new updates are available. In my case, since my system is already updated, I receive this message.
- If updates are available, they will be downloaded and applied to your Windows machine.
4. Run Memory Diagnostics
Here are the steps for running a memory diagnostics test in Windows.
- Press Windows + R and type «mdsched.exe» in the Run dialog box, then press Enter.
- Select the first option, which is «Restart now and check for problems (recommended).«
- Your computer will restart, and the memory diagnostic test will run automatically.
- After the diagnostic test is completed, your computer will restart again.
5. Checking System files
You can check whether system files are corrupted or not and fixed them automatically. These corrupted system files can also cause Hyper-V-related issues.
Open Command Prompt as Adminstrator and then type sfc /scannow and press Enter. Then this will try to find an error and try to fix it if there are any errors.