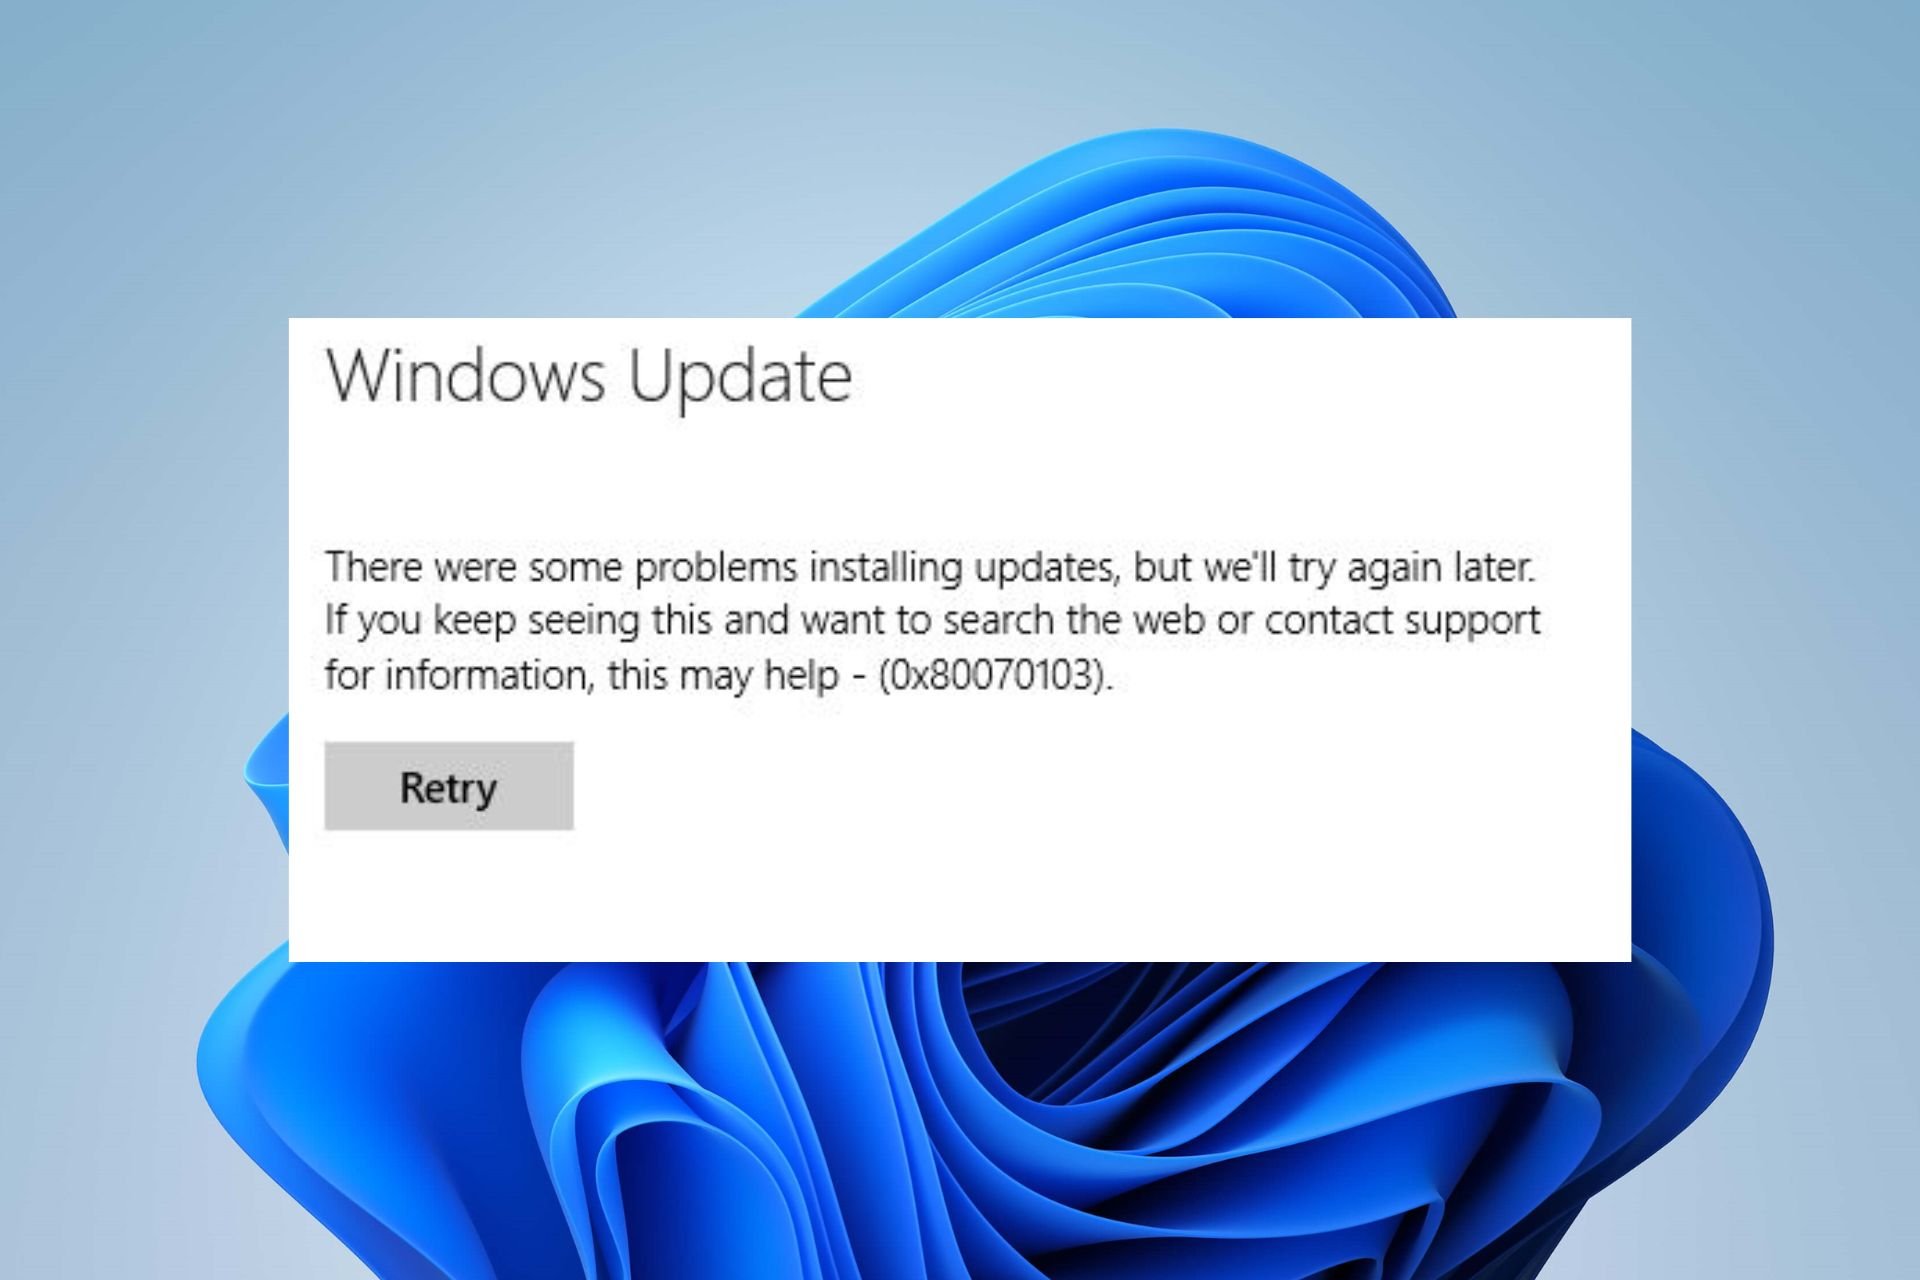
0x80070103 — это ошибка обновления, которая приобрела значительную популярность среди многих пользователей Windows 11. Она возникает, когда пользователи пытаются установить последнее доступное обновление в своей системе. Ошибка становится очевидной, когда на экране появляется следующее сообщение:
«С установкой обновлений возникли некоторые проблемы, но попытка будет повторена позже. Если вы продолжаете видеть это сообщение и хотите получить сведения, выполнив поиск в Интернете или обратившись в службу поддержки, вам поможет это — (0x80070103) ».
Причина появления этой проблемы обычно связана с несовместимостью драйверов. Это происходить, если Центр обновления Windows пытается установить уже установленный драйвер, если у вас установлена несовместимая версия драйвера или если драйвер используется какой-либо другой программой, в то время как Windows пытается его обновить. Виновный драйвер может быть связан с любым компонентом, будь то графика, аудио и так далее. К счастью, есть несколько простых решений, которые могут решить проблему и помочь вам успешно установить обновление. Воспользуйтесь нашим руководством, чтобы попробовать их.

Скачать средство восстановления Windows
Скачать средство восстановления Windows

Существуют специальные утилиты для восстановления Windows, которые могут решить проблемы, связанные с повреждением реестра, неисправностью файловой системы, нестабильностью драйверов Windows. Мы рекомендуем вам использовать Advanced System Repair Pro, чтобы исправить «Ошибка Центра обновления Windows 0x80070103» в Windows 11 или Windows 10.
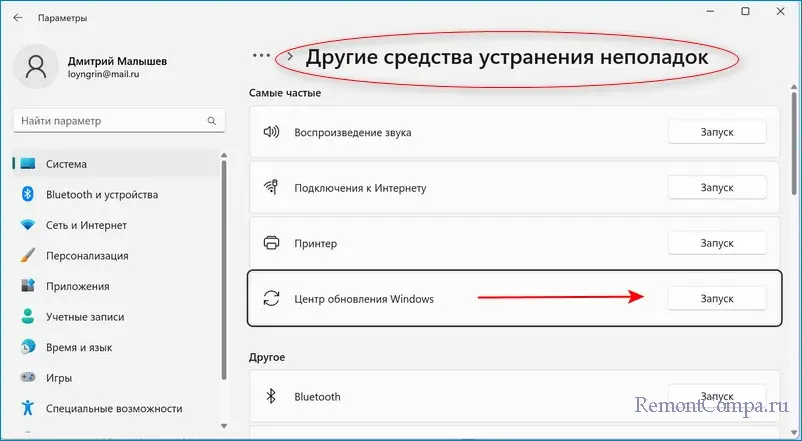
1. Запустите средство устранения неполадок Центра обновления Windows.
Рекомендуем попробовать этот метод в первую очередь, если еще не сделали это. Встроенные средства устранения неполадок Windows — неплохая отправная точка для решения различных проблем, возникающих в Windows. И иногда эти функции могут успешно решать проблемы, связанные с обновлениями. В Windows также есть утилита для устранения неполадок. Вы можете воспользоваться ею для обнаружения и устранения проблем с обновлением:
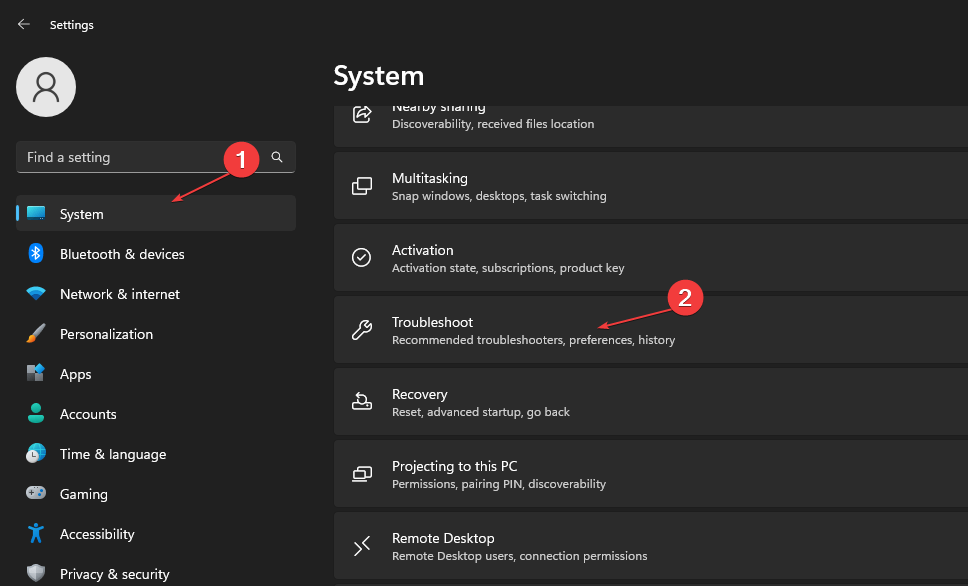
- Открытые Настройки из нижней панели задач.
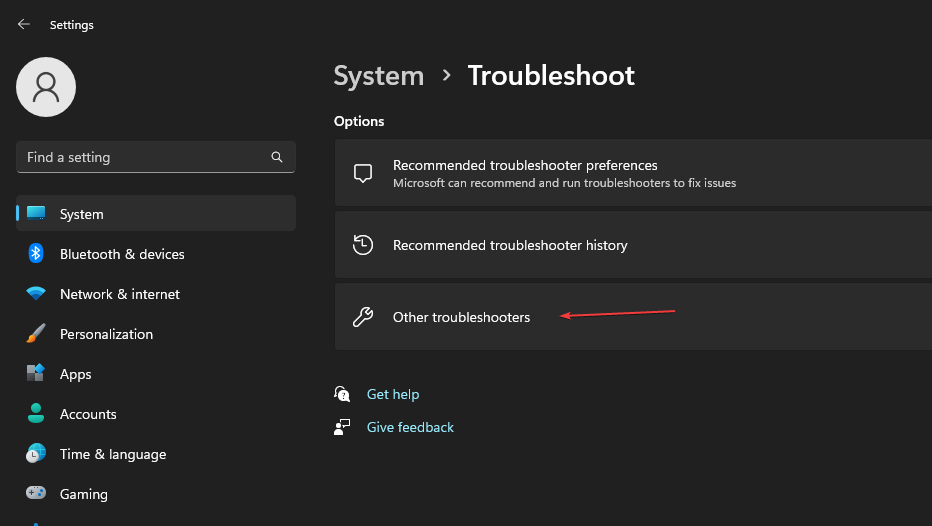
- Выберите Система слева и перейдите в Устранение неполадок > Другие средства устранения неполадок на правой панели.
- Затем найдите Центр обновления Windows и нажмите Run рядом с ним.
- Завершите процесс, следуя инструкциям на экране, и перезагрузите компьютер.
После этого попробуйте выполнить обновление еще раз. Если это не сработает, попробуйте другие решения ниже.
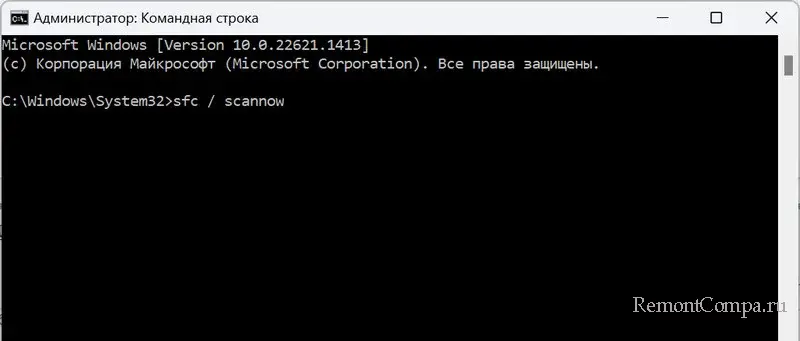
2. Проверьте целостность системных файлов.
Одной из причин, о которой мы не рассказали вам выше, может быть отсутствие или повреждение некоторых системных файлов. Вы можете проверить, так ли это, используя утилиты сканирования SFC (System File Checker) и DISM (Deployment Image Servicing and Management) для обнаружения и восстановления отсутствующих компонентов (если таковые имеются). Обязательно попробуйте обе утилиты, так как они могут по-разному влиять на решение проблемы. Вот как:
С помощью SFC
- Открытые Командная строка , введя
cmdв поиск рядом с Меню Пуск кнопку. - Щелкните правой кнопкой мыши по Командная строка , а затем выбрать Запуск от имени администратора.
- После открытия консоли введите
sfc /scannowкоманду и нажмите Enter. - Когда процесс восстановления будет завершен, перезагрузите компьютер.
С помощью DISM
- Открытые Командная строка как мы это делали на предыдущем шаге.
- Скопируйте и вставьте эту команду
DISM.exe /Online /Cleanup-image /Restorehealth. - Нажмите Enter и подождите, пока Windows закончит сканирование и исправление.
- После этого перезагрузите компьютер и попробуйте открыть проблемную программу снова.
После выполнения обоих этих сканирований попробуйте снова установить обновление.
3. Установите дополнительные обновления
Помимо установки основных обновлений, Windows иногда может генерировать обновления для обновления драйверов отдельно. А поскольку ошибка 0x80070103 обычно связана с проблемами с драйверами, это решение может быть эффективным. Попробуйте выполнить шаги, перечисленные ниже:
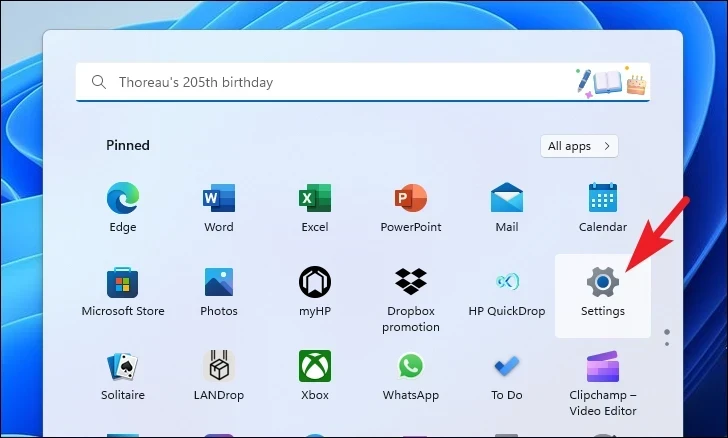
- Щелкните правой кнопкой мыши по значку Меню Пуск на нижней панели задач рабочего стола и выберите Настройки. Вы также можете нажать Windows Key + I кнопки, вместо шагов выше.
- Перейдите в Центр обновления Windows и на левой панели.
- Затем перейдите в Дополнительные параметры и Дополнительные обновления.
- Расширьте Обновления драйверов и попробуйте установить доступные обновления, если они есть.
Если это не сработает или просто у вас не показываются никакие обновления, перейдите к следующим решениям ниже.
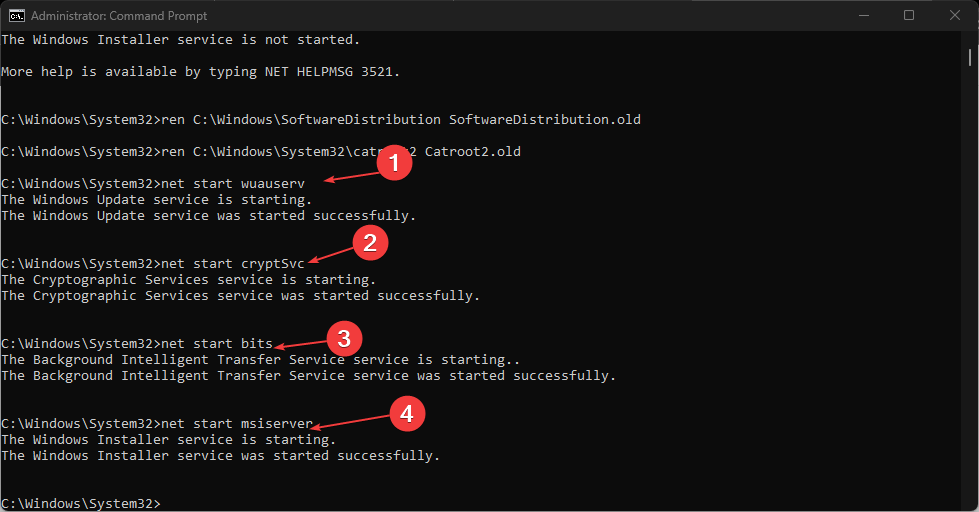
4. Сбросьте компоненты Центра обновления Windows.
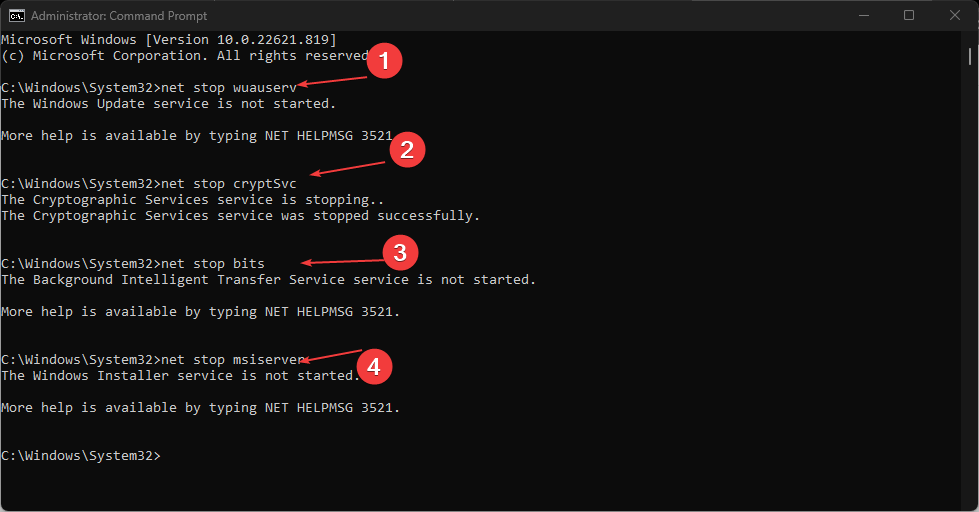
Вы также можете попробовать сбросить настройки Центра обновления Windows. Статистически этот метод доказал свою эффективность при решении широкого круга проблем с обновлением. Вся процедура включает в себя перезапуск служб BITS, Cryptographic, MSI Installer и Windows Update, а также переименование некоторых папок обновлений (SoftwareDistribution и Catroot2). Эти папки содержат временные файлы, необходимые для реализации обновлений Windows. Исходя из этого, мы заставим Windows удалить поврежденные элементы и создать компоненты, связанные с обновлением, с нуля. Хотя вся процедура может показаться сложной, она не потребует от вас много времени и знаний. Просто выполните следующие действия:
- Открытые Командная строка , введя
cmdв поле поиска рядом с Меню Пуск кнопку. - Щелкните правой кнопкой мыши по Командная строка , а затем выбрать Запуск от имени администратора.
- Скопируйте и вставьте этот список команд одну за другой, нажимая Enter после каждой. (Это действие отключит службы, ответственные за Обновления Windows)
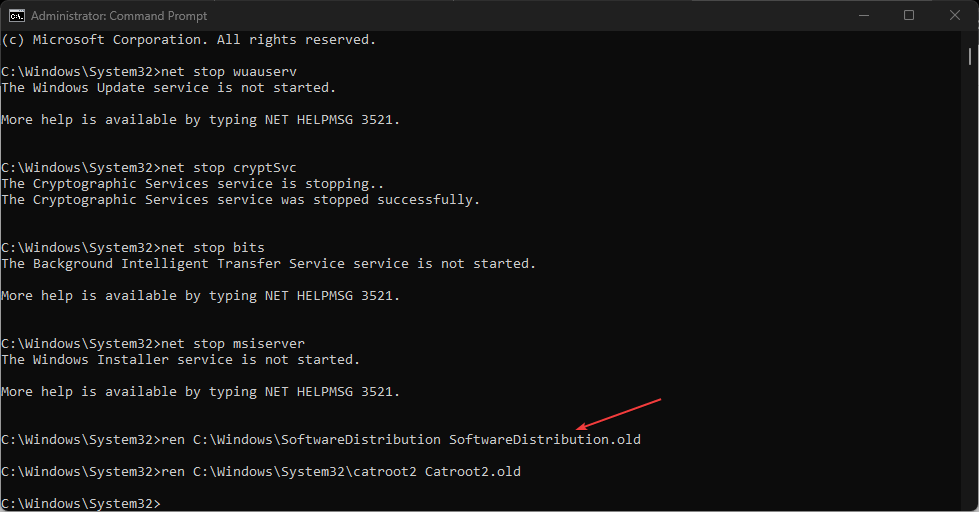
- Затем мы должны переименовать вышеупомянутые папки. Просто вставьте эти команды, нажимая Enter после каждой.
- Наконец, все, что осталось сделать, это вернуть отключенные службы. Введите эти команды так же, как мы делали ранее.
- На этом все. Перейдите в центр обновления Windows и попробуйте выполнить установку снова.
net stop wuauserv

net stop cryptSvc

net stop bits

net stop msiserver
ren C:\Windows\SoftwareDistribution SoftwareDistribution.old

ren C:\Windows\System32\catroot2 Catroot2.old
net start wuauserv

net start cryptSvc

net start bits

net start msiserver
5. Пропустите обновление
Если вы не против пропустить это обновление, вы можете воспользоваться официальной утилитой Microsoft под названием «Show or hide updates». Она позволяет пользователям убрать повторное появление некоторых проблемных или просто ненужных обновлений. Хоть этот инструмент и больше не доступен на официальном сайте Microsoft, вы все равно можете загрузить его напрямую здесь и выполнить следующие действия:
- После загрузки инструмента откройте его.
- Перейдите на Передовые и Автоматически применять исправления.
- Затем нажмите Следующая и подождите, пока ваша система закончит сбор информации об обновлениях. Это может занять некоторое время.
- Когда появится другое окно, выберите Hide updates.
- Затем утилита покажет вам список доступных обновлений, которые можно скрыть. Выберите то, которое вы не можете установить, и нажмите Следующая в конце.
После выполнения этих шагов проблемное обновление больше не будет появляться. Эта утилита действительно очень полезна, и не до конца понятно, зачем Microsoft удалила ее со своей официальной страницы загрузки. Кроме того, если вы когда-нибудь захотите снова показать скрытое обновление, вы можете сделать это снова, используя ту же утилиту. Если вы все еще хотите попробовать установить обновление, которое приводит к ошибке, вы можете попробовать наше последнее решение ниже.
6. Используйте Media Creation Tool.
Если признаков решения проблемы по-прежнему нет, тогда наше последнее предложение сводится к использованию Media Creation Tool — отличной утилиты Microsoft, предназначенной для переустановки Windows, а также выступающей в качестве альтернативного инструмента для получения последних доступных обновлений вместо традиционных методов. Мы собираемся использовать вторую функцию этого инструмента. Следуйте инструкциям ниже:
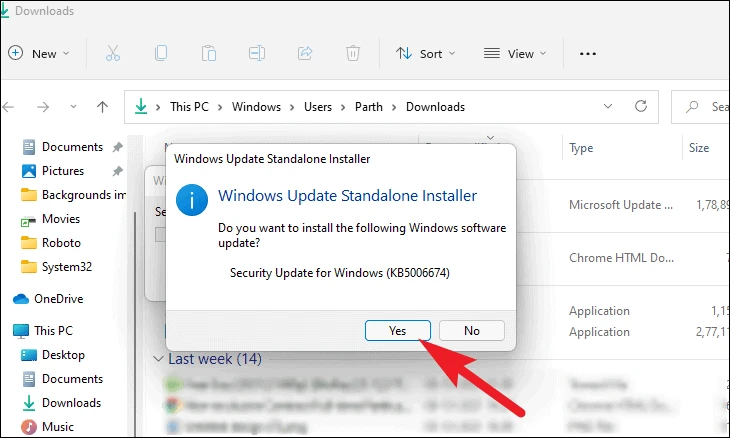
- Сначала вам нужно скачать утилиту с веб-сайта Microsoft.
- Затем запустите загруженный файл.
- После того, как вы согласитесь с Условиями использования, вам будет предложено два варианта на выбор. Выберите Обновить этот компьютер сейчас.
- Выберите Сохранить личные файлы чтобы они не пострадали.
- Наконец, запустите процесс и дождитесь его завершения.
- Надеемся, этот метод помог вам избавиться от ошибки 0x80070103.
Итоги
Надеемся этих методов было достаточно, чтобы решить проблему. В худшем случае вы также можете скрыть обновление и не устанавливать его в конечном итоге, как было описано в предпоследнем способе выше. Теоретически ошибка 0x80070103 также может возникать в Windows 10. Большинство шагов в этом руководстве выглядят почти одинаково для Windows 10, поэтому не стесняйтесь попробовать их, если ошибка появится и в более старой ОС.
С помощью Центра обновления Windows можно обновить систему, обычно это происходит достаточно легко и безболезненно. Кроме того, Центр обновления позволяет освежить и программное обеспечение, а именно драйвера устройств. В этом случае все может пойти не так гладко. Пользователи Windows 11 начали встречаться с ошибкой 0x80070103. Данная неудача происходит когда Центр обновления Windows пытается установить уже существующий на ПК драйвер, либо причиной также может являться несовместимость драйверов. Кроме того, в сообщении может даже быть указан софт, из-за которого случилась неприятность, но это происходит не всегда. В любом случае проблему нужно решать и мы поможем вам в этом деле.
Частенько вместе с этой ошибкой появляется предложение перезапустить Windows и якобы это должно решить проблему, но этого зачастую не происходит. Поэтому, как и во многих случаях когда имеется проблема, решить мы можем ее с помощью стандартной системной возможности ликвидации неполадок. Работает данная утилита достаточно неплохо в последней редакции Windows и частенько может прийти на помощь и избавиться от разнообразных сбоев. Сейчас рассмотрим как ей воспользоваться.
1. Вводим в поле поиска — «Устранение других проблем».
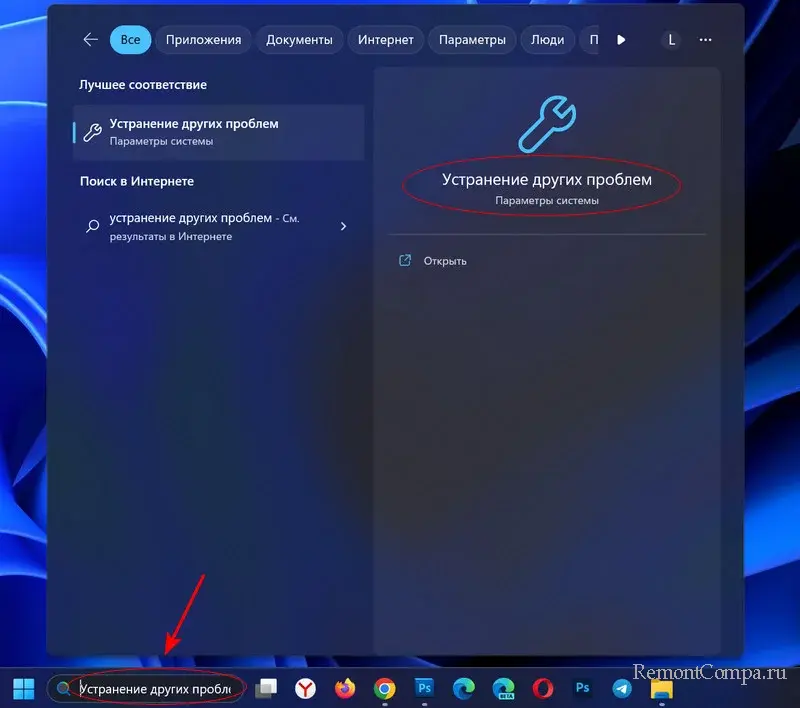
2. Находим «Центр обновления Windows» и кликаем на кнопочку «Run».
3. Придерживаемся руководства и по окончании перезапускаем ПК.
Нередко этот способ не устраняет ошибку, однако он может предложить варианты решения проблемы. В случае если способ не сработал переходим к следующему.
Ошибка может возникать по причине неисправных системных файлов или их отсутствия. Восстановить их можно таким образом.
1. В поиске системы пишем «cmd» и щелкаем на полученный результат.
2. Поочередно прописываем строки и подтверждаем каждую нажатием клавиши Enter.
sfc /scannow
3. Перезагружаем ПК.
Следующий этап — это установка не основных апдейтов.
1. Жмем Win+I и выбираем «Центр обновления Windows».
2. В секции «Дополнительные параметры» выбираем «Дополнительные обновления».
3. При условии что в списке есть неустановленные драйвера совершаем попытку их поставить.
В конечном счёте можно испробовать еще один способ. Обычно наиболее действенный.
1. Win+R, печатаем «cmd», соглашаемся «Ок».
2. Печатаем такие строчки и подтверждаем.
net stop bits
net stop wuauserv
net stop appidsvc
net stop cryptsvc
ren C:\Windows\SoftwareDistribution SoftwareDistribution.old
ren C:\Windows\System32\catroot2 Catroot2.old
Далее вписываем первые четыре строки только вместо «stop» вбиваем «start».

Все равно обновлять драйвера мы рекомендуем с официального ресурса производителя определенного компонента вашего компьютера. Да, уведомлений о выходе новых версий в таком случае не будет, зато такой способ более надёжный и вы всегда будете уверены в том, что у вас установлена наиболее свежая версия драйвера.
Corrupt system files can cause the error 0x80070103
by Henderson Jayden Harper
Passionate about technology, Crypto, software, Windows, and everything computer-related, he spends most of his time developing new skills and learning more about the tech world. He also enjoys… read more
Updated on
- Error 0x80070103 is associated with Windows updates.
- It occurs when an already existing driver update tries to reinstall.
- Manually updating drivers can help update them in isolation.
XINSTALL BY CLICKING THE DOWNLOAD FILE
Repair all Windows Updates Errors with Fortect:
SPONSORED
Windows update failures can be annoying! With Fortect, you will get rid of errors caused by missing or corrupted files after an update. The utility maintains a repository of the original Windows system file versions, and it uses a reverse algorithm to swap out the damaged ones for good ones.
- Download Fortect and install it on your PC
- Start the tool’s scanning process to look for corrupt files that are the source of the issues
- Right-click on Start Repair to resolve security and performance issues with your computer
- Fortect has been downloaded by 0 readers this month, rated 4.4 on TrustPilot
Updating the Windows operating system helps it fix bugs in the previous version that affects its performance. However, many users report the error 0x80070103 in Windows Update.
Read on to find out how to fix this issue and get back to downloading your updates without issues.
Why do I get the Windows Update failed 0x80070103 error message?
The Windows update error 0x80070103 mostly happens when you try to run an already installed driver update with a Windows update. It indicates that an existing driver update on your computer is trying to install alongside Windows updates.
Furthermore, other factors can prompt the error 0x80070103 on your PC. Some are:
- Driver update compatibility issues – The error 0x80070103 can occur if the driver update trying to install is not compatible with the version of the Windows operating system on your PC.
- Driver under use – Sometimes, you can experience difficulty updating drivers when they are under use. So, the error 0x80070103 may occur if other programs use the driver you want to install.
- Corrupt system files – The error 0x80070103 can appear if there’s an issue with the update process due to a corrupt system file. You can check ways to troubleshoot corrupt system files here.
The causes of Windows update error 0x80070103 on your PC may differ from other users. Nonetheless, you can fix the error by troubleshooting your PC.
How do I fix the install error – 0x80070103?
- Why do I get the Windows Update failed 0x80070103 error message?
- How do I fix the install error — 0x80070103?
- 1. Run the Windows Update Troubleshooter
- 2. Restart the Windows Update process
- 3. Hide updates from reinstalling
- 4. Delete the Windows temporary files
- 5. Update device drivers manually
Before proceeding with any troubleshooting steps for the error, try the following preliminary checks:
- Resolve network congestion on your PC.
- Turn off background apps running on your computer.
- Restart Windows in Safe Mode and check if the error persists.
In case the error appears, proceed with the following solutions:
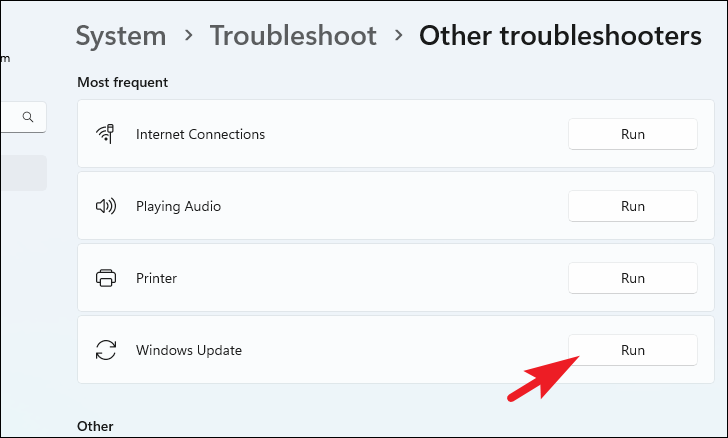
1. Run the Windows Update Troubleshooter
- Press Windows + I key to open the Settings app.
- Click System and select Troubleshoot.

- Click Other troubleshooters.

- Select Windows Update and click Run the troubleshooter to initiate the Windows Update troubleshooter.

- Follow the on-screen prompts.

Running the troubleshooter will detect and repair issues causing the Windows update not working on your PC.
Check other ways to run the Windows Update troubleshooter in Windows 10/11 if you have issues with the steps above.
2. Restart the Windows Update process
- Press Windows + R key to prompt the Run window type cmd, then press Ctrl + Shift + Enter to launch an elevated Command Prompt.
- Input the following commands consecutively, and press Enter after each:
net stop wuauservnet stop cryptSvcnet stop bitsnet stop msiserver
- Type the command below to rename the SoftwareDistribution and press Enter after each:
C:\Windows\SoftwareDistribution SoftwareDistribution.oldren C:\Windows\System32\catroot2 Catroot2.old - Run the command below:
net start wuauservnet start cryptSvcnet start bitsnet start msiserver - Restart your PC and check if the error persists.
Restarting the Windows Update service can fix issues and corrupt files affecting its processes.
- Windows 11 23H2: Top Features, coming September 26
- Adding layers in Windows 11’s Paint greatly increases RAM usage
3. Hide updates from reinstalling
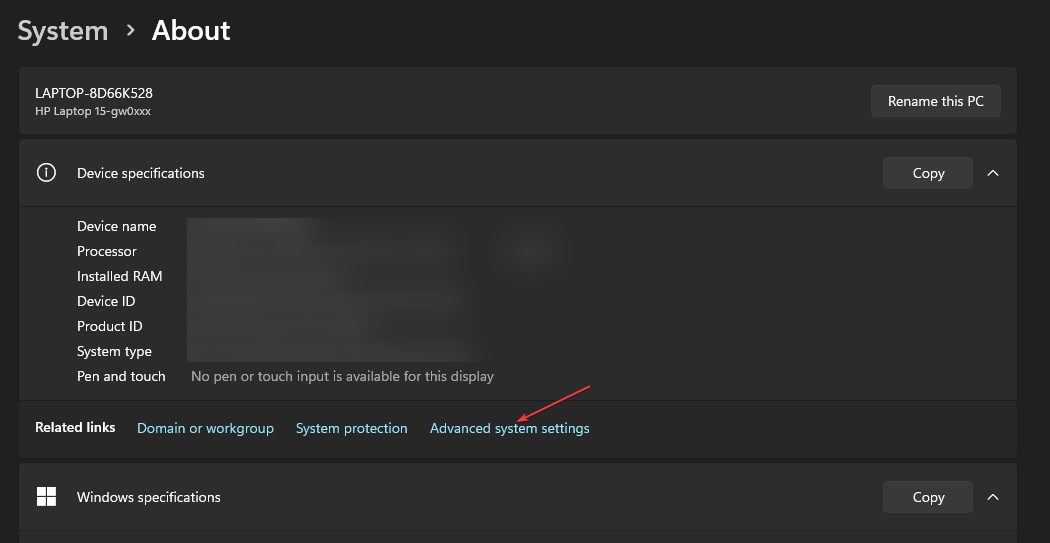
- Left-click on Start and type Control Panel to launch the app.
- Go to System and click on the Advanced system settings link.

- Navigate to the Hardware tab, then click on the Device Installation Settings button.

- Select the No option and click on Save settings.

- Restart your PC and check if the issue persists.

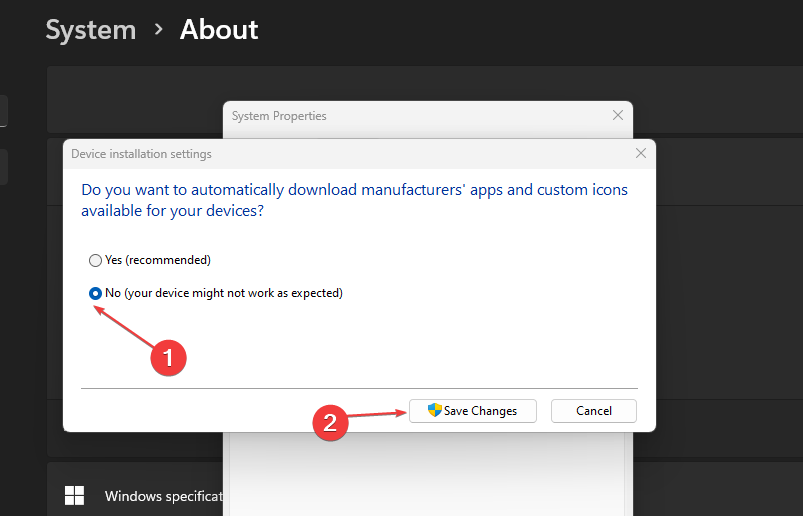
The above process will prevent Windows from reinstalling driver updates already on your system and should fix the 0x80070103 error code in Windows Update.
4. Delete the Windows temporary files
- Press Windows + R keys to open the Run window, type %temp% in the search space, and press Enter.
- Press Ctrl + A to highlight all the files and right-click, then click on Delete from the drop-down.

- Restart the PC and check if the error persists.
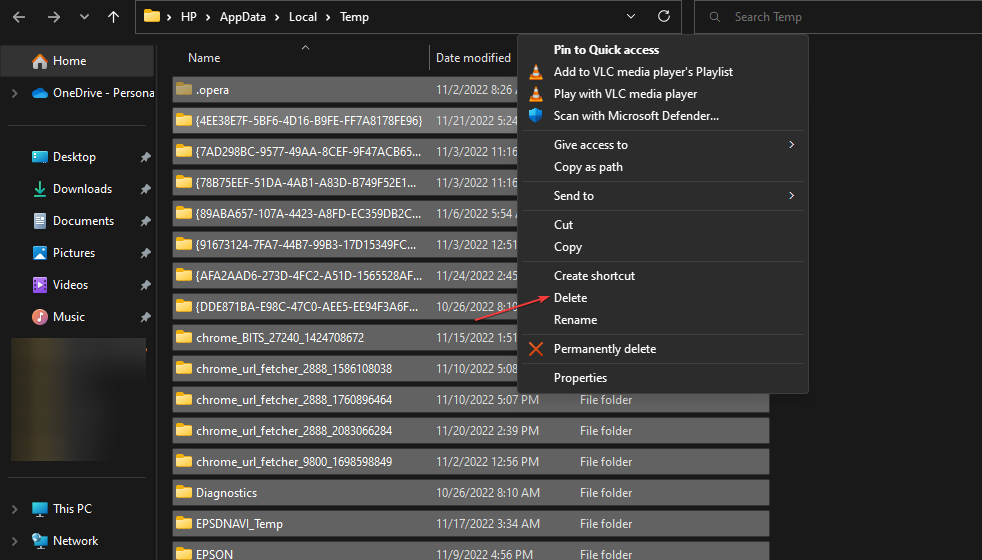
Deleting Windows temp files will clear up corrupt files that may affect your Windows update and fix the error.
5. Update device drivers manually
- Go to the driver manufacturer’s website to download the latest update.
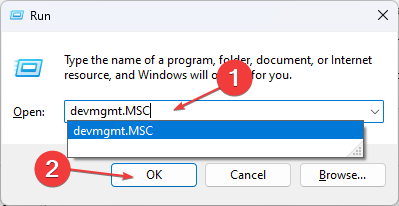
- Press Windows + R to open the Run window, type devmgmt.msc, and click OK to open the Device Manager.

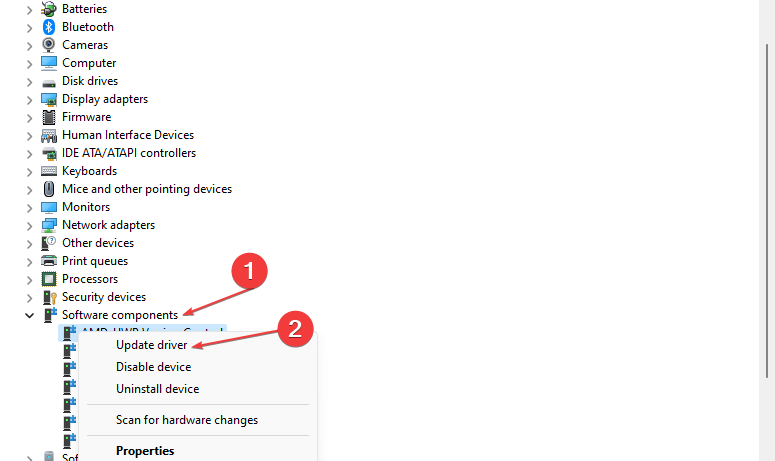
- Navigate to the device you want to update, right-click on the driver, and select Update driver.

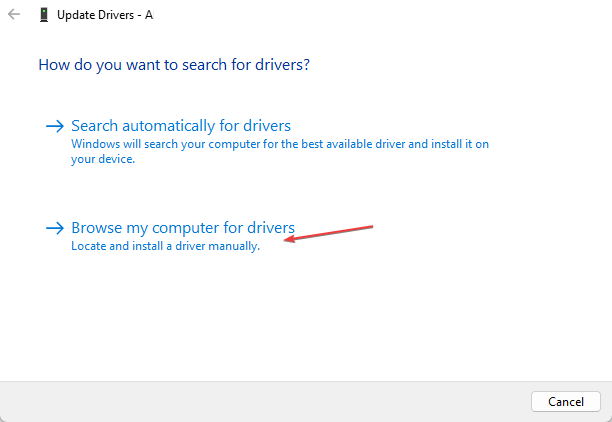
- Select Browse my computer for driver software to open where the downloaded driver is saved. Then, follow the onscreen prompt to install the driver.

- Restart your PC and check if the error appears.
Manual updates will help you update single drivers in isolation without including the rest. Otherwise, you can always use an alternative tool such as Outbyte Driver Updater, which helps you automatically update specific drivers and the whole drivers’ environment.
Some of our readers stumbled upon the Conexant Media installation error 0x80070103. It is an update error connected to the audio driver, mostly from HP laptops. In this case, make sure you get the correct driver from the manufacturer.
We also have a complete guide on how to update Windows when you have a Conexant audio driver.
Alternatively, read more about fixing Windows Update Service registration missing or corrupt on your PC.
Likewise, you can check how to delete the Software Distribution folder on your PC in case renaming it doesn’t work.
Also, Windows update error 0x800f0988 is another error users complain about, which you can read about.
For further questions or suggestions regarding the error 0x80070103 in Windows Update, kindly drop them in the comments below.
![]()
Windows 11 is far ahead in design and performance from the previous iterations of the operating system. That being said, it is far from perfect and bugs tend to crop up here and there.
One such issue is the windows update install error 0x80070103. The error impacts all the available updates and only displays “Install error” text which is annoyingly inadequate information to resolve it.
Fortunately, Windows update install errors have been a part of the operating system for quite some time and they are well documented. The errors are usually faced due to a common list of issues that can be easily resolved using the methods provided in this guide.
Thus, giving a look at the common culprits behind the issue can provide a bit more insight into the problem.
Common Culprits Behind the Install Error 0x80070103
Microsoft has said that the Install Error 0x80070103 is harmless and it usually appears because Windows 11 is trying to install a driver that is already installed on the system or incompatible with it during a Windows update. Microsoft also says that the error shouldn’t impact your general usage since Windows will work in the meanwhile even if you can’t install the updates. They’re also working on fixing it. But if you’re not one to wait, you can try to resolve the error yourself.

There are also other potential culprits that can cause the error on your Windows 11 system which include:
- Corrupted/Damaged System Files
- The driver being updated is under use
- Corrupted or Damaged Update Cache Data
- Update Mechanism Services stopped/disabled
No matter why you might be facing this error, the fixes mentioned below will help you get rid of it and get things working like clockwork again.
1. Pause and Resume the Update
Before embarking on any lengthy fixes, try this simple fix instead. Click the ‘Retry’ option on the update that’s been presenting the error while trying to install it.
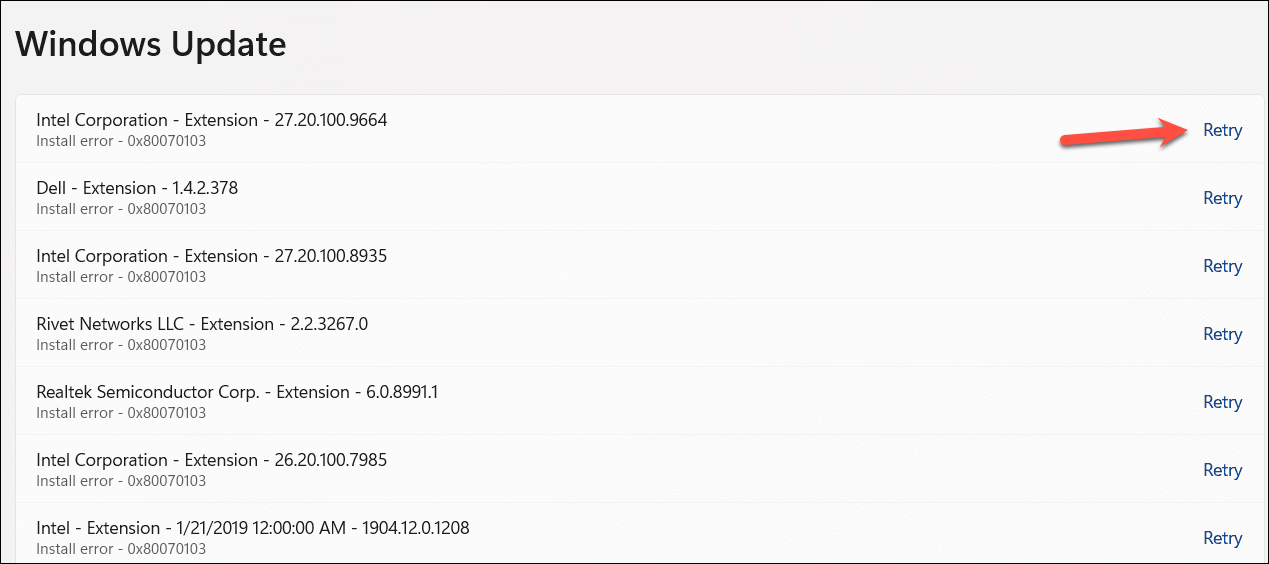
Then, pause the update once and resume it immediately. If you’re one of the lucky ones, this simple pause/ resume fix should make the error go away and your updates will be installed.
2. Run Update Troubleshooter
The first and foremost step is to run the troubleshooter to ensure there are no system and/ or configuration issues with the system.
After that, make sure you have selected the ‘System’ tab from the left sidebar.
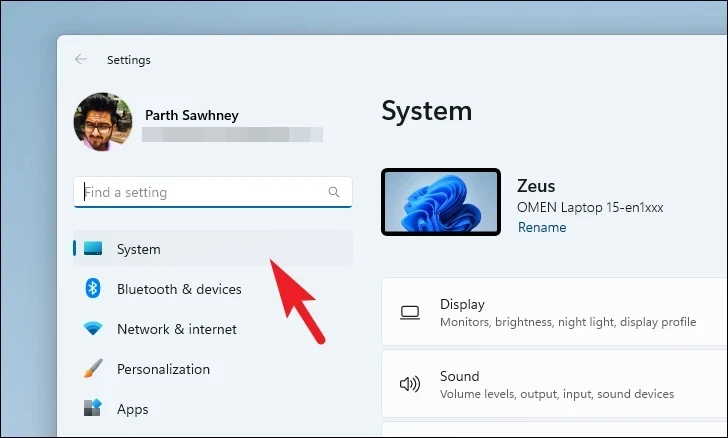
Next, from the right section, click on the ‘Troubleshooter’ tile.
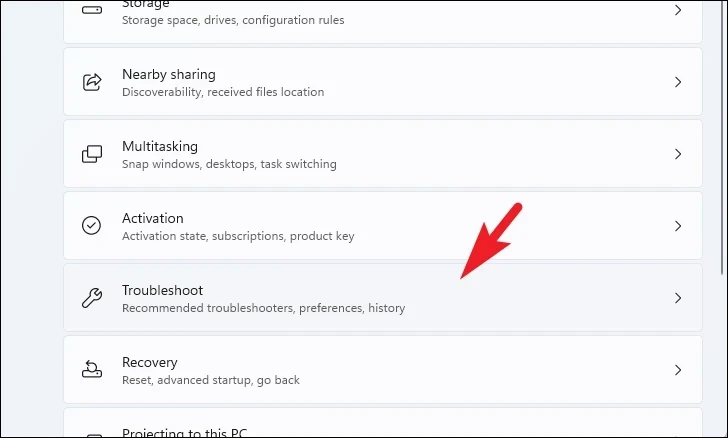
Afterward, click on the ‘Other troubleshooters’ tile to proceed.
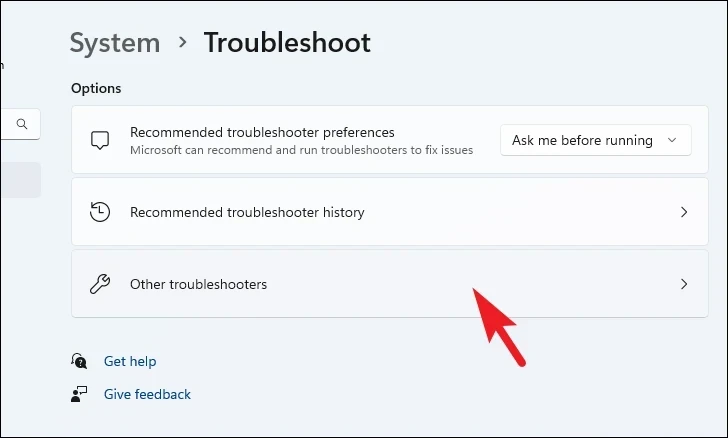
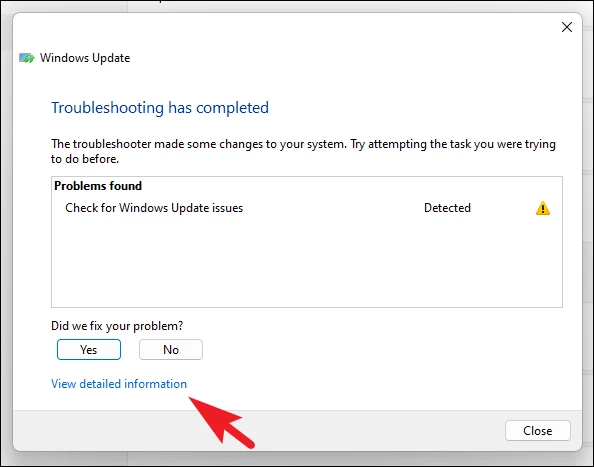
Now, locate the ‘Windows Update’ tile and click on the ‘Run’ button to commence the troubleshooting.
Once the troubleshooting is completed, you will be able to see the list of problems along with suggestions to fix them. To understand the problem deeply, click on the ‘View detailed information’ option.
3. Run DISM and SFC Scan to Fix Corrupted System Files
System files could be damaged or corrupted due to incomplete Windows updates, improper installation of third-party apps, or due to a virus. DISM will first restore the system image and then SFC will use that image to scan for any discrepancies and fix them.
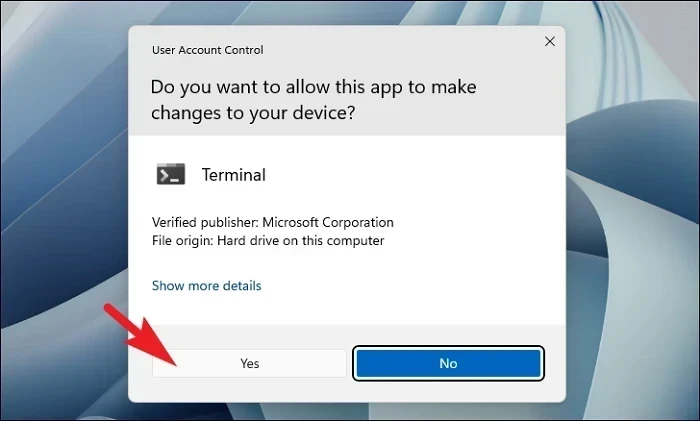
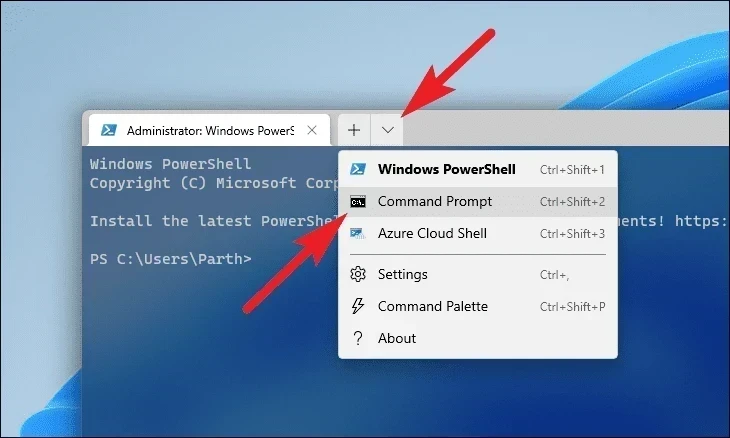
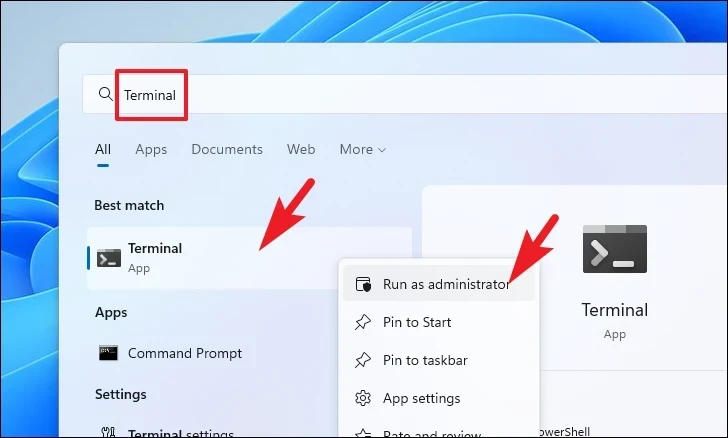
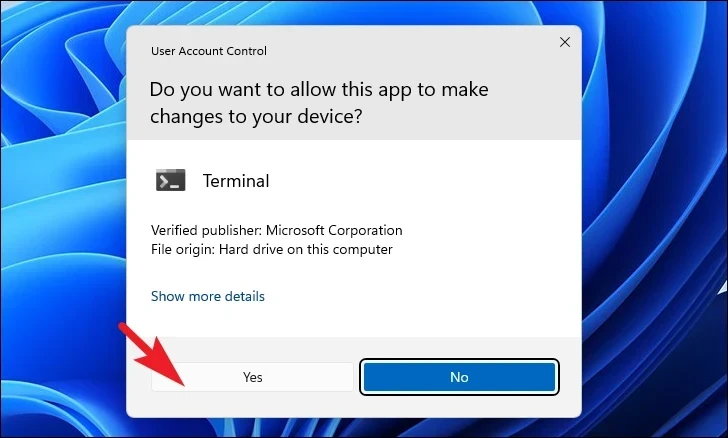
Head to the Start Menu and type Terminal to perform a search. Then, from the search results, right-click on the ‘Terminal’ tile and click on the ‘Run as administrator’ option.
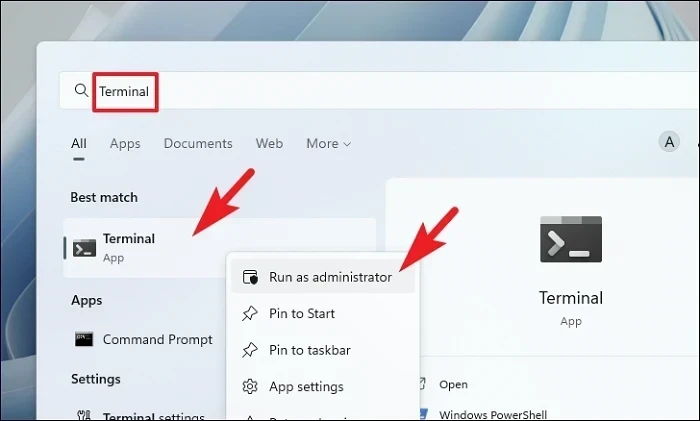
Now, an UAC (User Account Control) window will appear on your screen. If you are not logged in with an admin account, enter the credentials for one. Otherwise, click on the ‘Yes’ button.
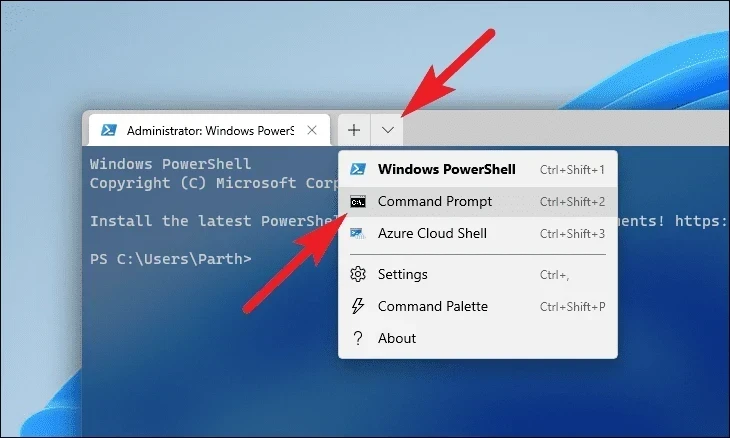
After that, click on the ‘chevron’ (downward arrow) icon and click on the ‘Command Prompt’ option.
Then, type or copy+paste the below-mentioned command and hit Enter on your keyboard. This will restore the currently installed OS image on your device.
DISM/ Online/ Cleanup-Image/ RestoreHealth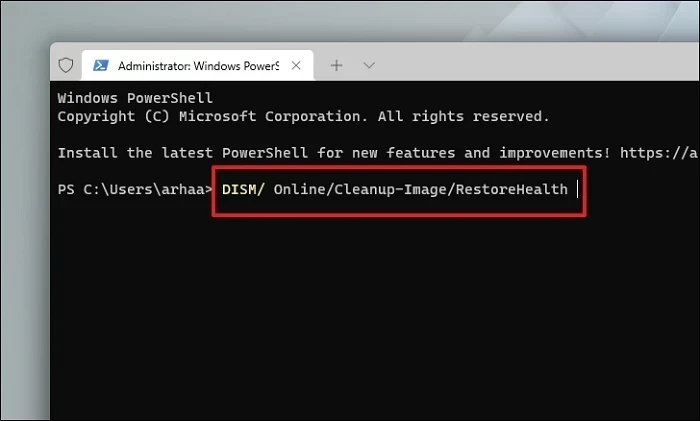
Afterward, type or copy+paste the following command to check and repair the system files on your PC.
SFC /scannow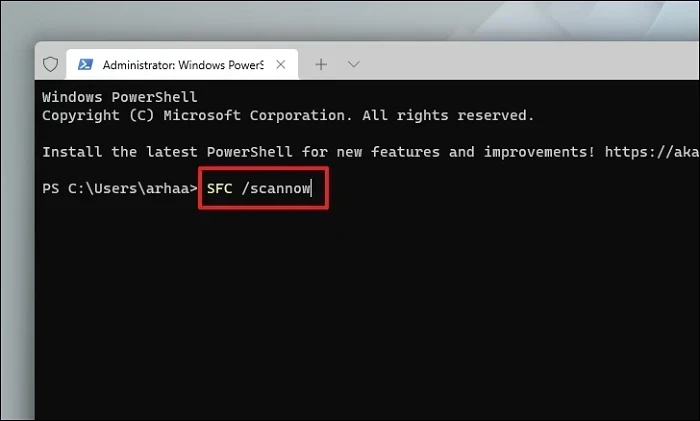
Once done, restart your PC and try to update your PC to check if the problem still persists.
4. Reset Windows Update Service
Windows Update services run in the background silently to make sure all the updates are delivered properly to your system. However, at times, a third-party app or service can interfere with these services causing hindrances to their functionality.
Now, head to the Start Menu and type Terminal. Then, right-click on the tile and select the ‘Run as administrator’ option.
Next, a UAC (User Account Control) window will appear on your screen. If you are not logged in as an admin, provide credentials for one. Otherwise, click on the ‘Yes’ button.
After that, click on the ‘chevron’ icon and select the ‘Command Prompt’ option.
After that, type or copy+paste the below-mentioned command to stop the currently running update service. Ensure you press Enter after you enter each command separately to execute them all.
net stop bitsnet stop wuaservnet stop cryptsvc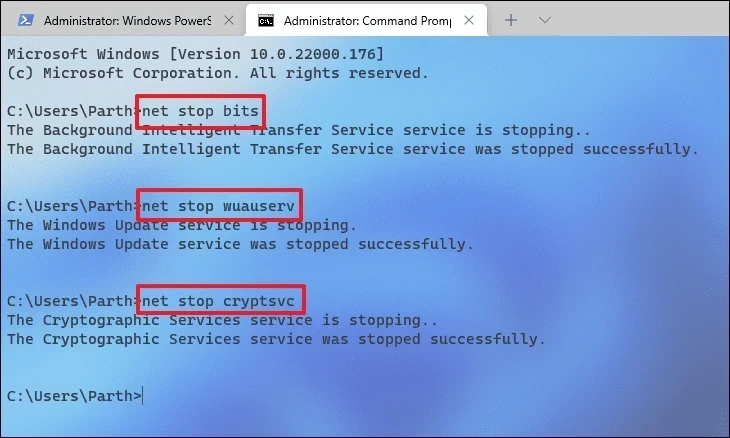
After that, press the Windows+R keys together on your keyboard to open the Run command utility. Then, type or copy+paste the below-mentioned address path and click on the ‘OK’ button to proceed.
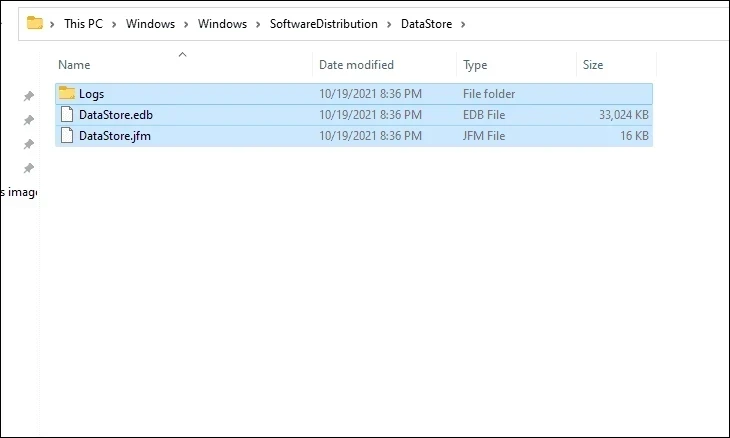
C:\Windows\SoftwareDistribution\DataStore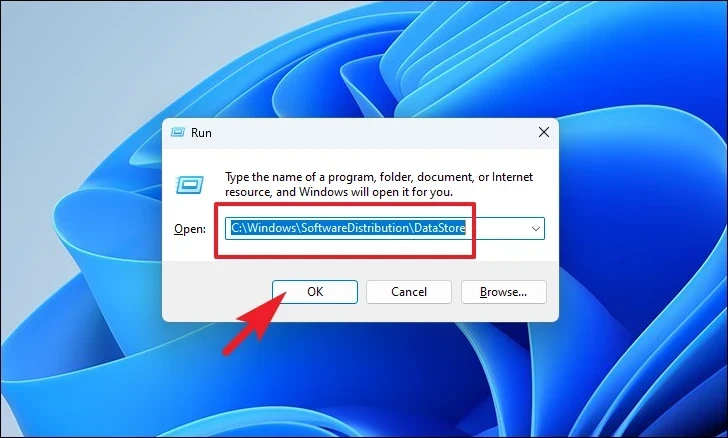
Then, press the Ctrl+A keys to select all the files and folders, and then press the Shift+Delete keys to permanently delete all the files.
After that, head back to the Command Prompt and type or copy+paste the below-mentioned command and hit Enter.
Del "%AllUSERSPROFILE%\Application Data\Microsoft\Network\Downloader\*.*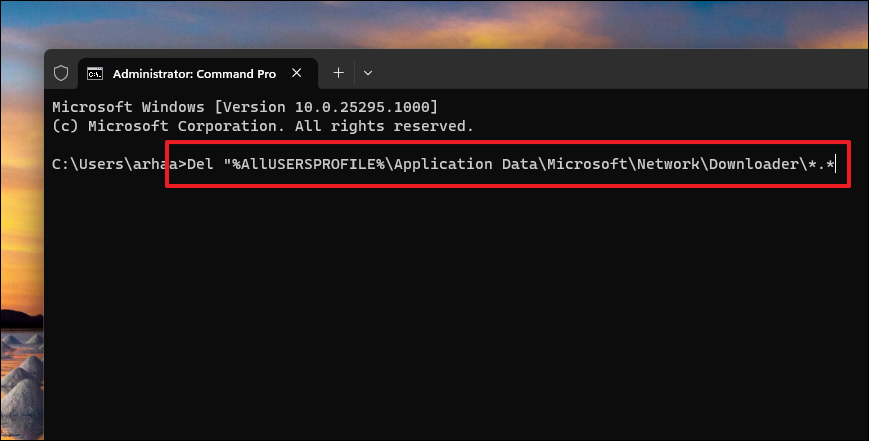
Then, if prompted, press Y to confirm the deletion of files.
After that type or copy+paste the below-mentioned command and hit Enter. This will clear the Windows Update cache and will enable the operating system to re-download the updates. Make sure to press Enter after each command.
Note: The /S modifier key will delete all subdirectories and the /Q modifier will allow you to delete the files without any additional confirmation.
rmdir %systemroot%\system32\catroot2 /S /Q
Then, type or copy+paste the following command and execute it. This command will reset BITS and Windows Update services to their default security descriptor. Also, make sure to hit Enter after each command.
sc.exe sdset bits D:(A;;CCLCSWRPWPDTLOCRRC;;;SY)(A;;CCDCLCSWRPWPDTLOCRSDRCWDWO;;;BA)(A;;CCLCSWLOCRRC;;;AU)(A;;CCLCSWRPWPDTLOCRRC;;;PU)sc.exe sdset wuauserv D:(A;;CCLCSWRPWPDTLOCRRC;;;SY)(A;;CCDCLCSWRPWPDTLOCRSDRCWDWO;;;BA)(A;;CCLCSWLOCRRC;;;AU)(A;;CCLCSWRPWPDTLOCRRC;;;PU)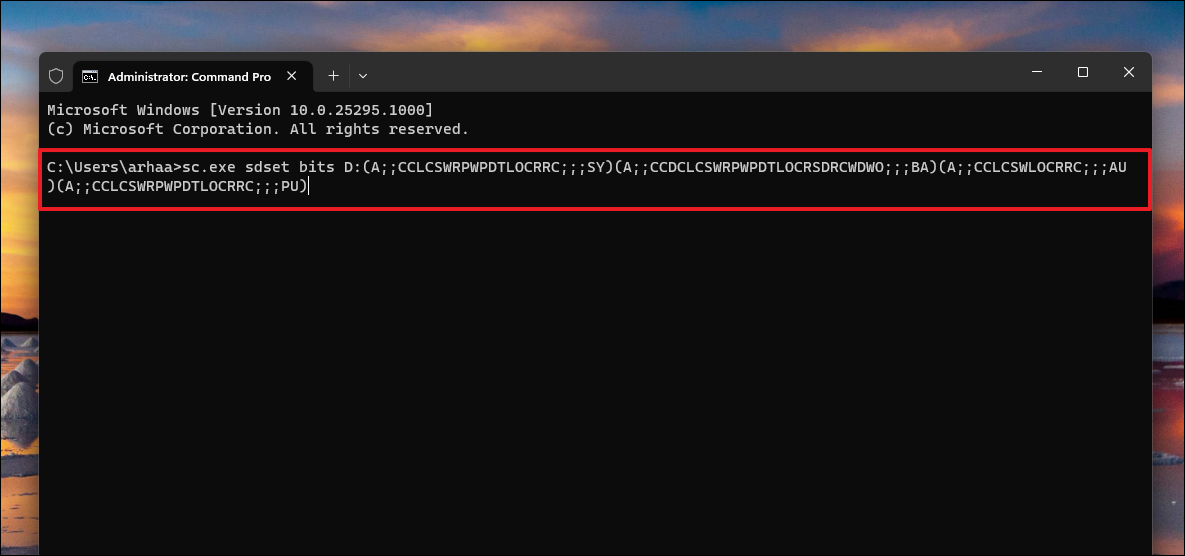
After that, execute the below-mentioned command to change the directory to the System32 folder.
cd /d %windir%\system32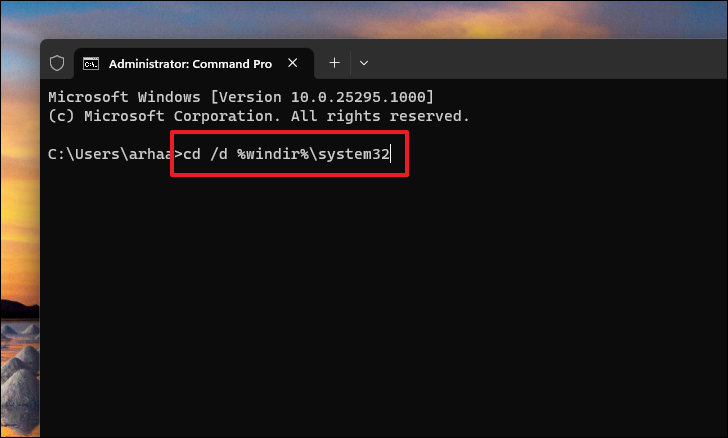
Next, type the below-mentioned commands and hit Enter after each command to execute them all. This will update BITS and Update DLL files on the Registry.
regsvr32.exe /s atl.dllregsvr32.exe /s urlmon.dllregsvr32.exe /s mshtml.dllregsvr32.exe /s shdocvw.dllregsvr32.exe /s browseui.dllregsvr32.exe /s jscript.dllregsvr32.exe /s vbscript.dllregsvr32.exe /s scrrun.dllregsvr32.exe /s msxml.dllregsvr32.exe /s msxml3.dllregsvr32.exe /s msxml6.dllregsvr32.exe /s msxml3.dllregsvr32.exe /s msxml6.dllregsvr32.exe /s actxprxy.dllregsvr32.exe /s softpub.dllregsvr32.exe /s wintrust.dllregsvr32.exe /s dssenh.dllregsvr32.exe /s rsaenh.dllregsvr32.exe /s gpkcsp.dllregsvr32.exe /s sccbase.dllregsvr32.exe /s slbcsp.dllregsvr32.exe /s cryptdlg.dllregsvr32.exe /s oleaut32.dllregsvr32.exe /s ole32.dllregsvr32.exe /s shell32.dllregsvr32.exe /s initpki.dllregsvr32.exe /s wuapi.dllregsvr32.exe /s wuaueng.dllregsvr32.exe /s wuaueng1.dllregsvr32.exe /s wucltui.dllregsvr32.exe /s wups.dllregsvr32.exe /s wups2.dllregsvr32.exe /s wuweb.dllregsvr32.exe /s wuweb.dllregsvr32.exe /s qmgr.dllregsvr32.exe /s qmgrprxy.dllregsvr32.exe /s wucltux.dllregsvr32.exe /s wuwebv.dll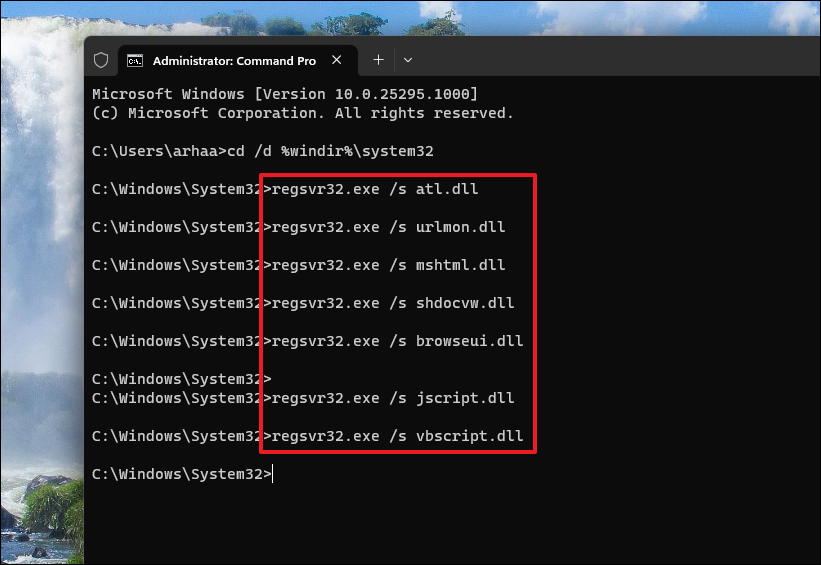
Finally, head back to the elevated Command Prompt window, type or copy+paste the following command one by one, and hit Enter to start the services you disabled earlier.
net start bitsnet start wuaservnet start cryptsvc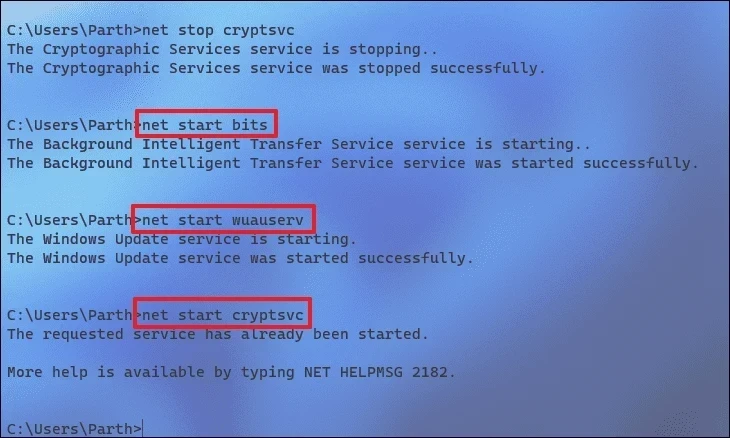
After that, restart and check if you are able to update your PC.
5. Manually Install the Update
If you haven’t had success with the methods listed till now, you can also manually update the PC by downloading the update from the Microsoft Catalog Website.
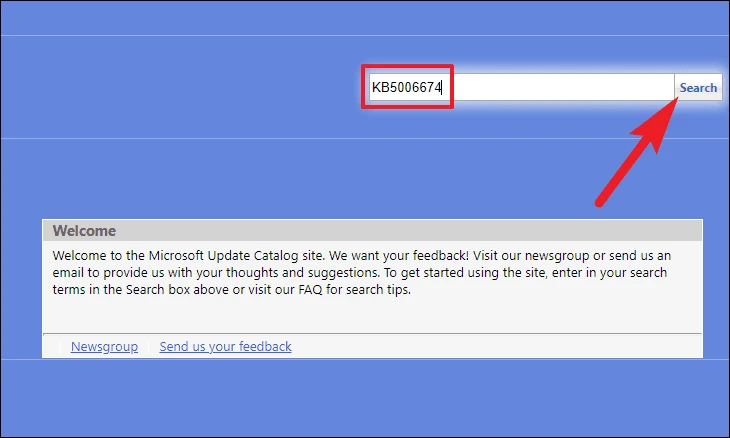
First, head to the Microsoft Catalog website, catalog.update.microsoft.com using your preferred browser. Then, enter the KB (Knowledge Base) number of the update you desire to download in the ‘Search’ bar and hit Enter on your keyboard.
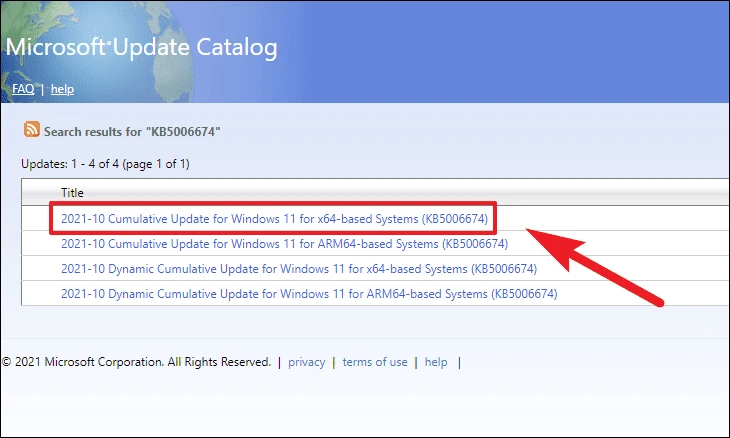
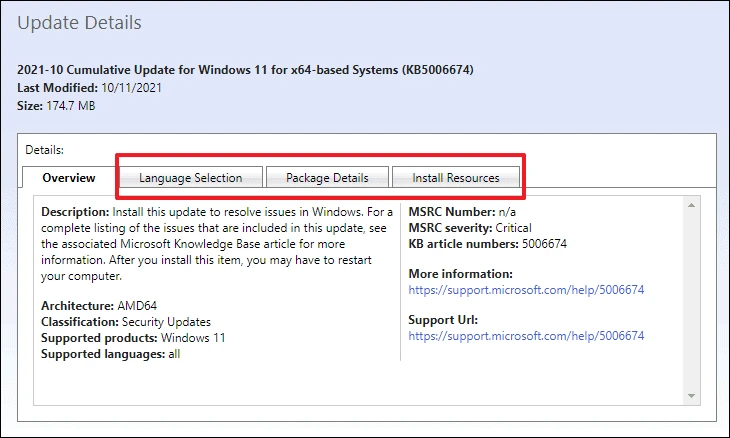
Now, from the list of search results, click on the option that has the ‘x64-based Systems’ suffix.
You can then check the supported OS, and package details and install resources for the update.
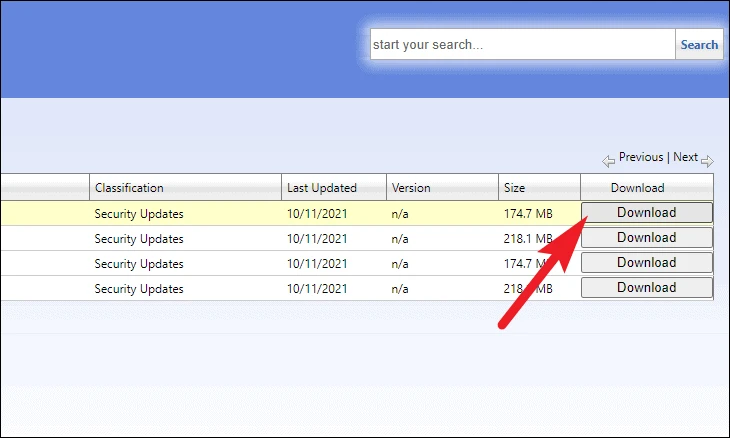
Once identified, move to the previous page of the website and click on the ‘Download’ button. This will open a separate browser window on your screen.
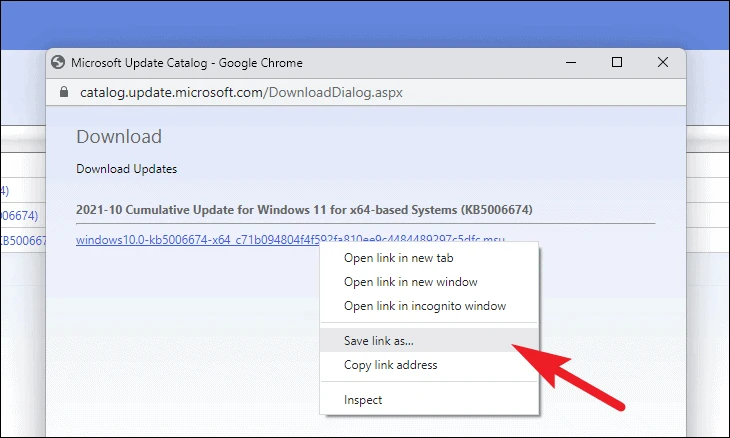
Afterward, right-click on the link displayed and then select the ‘Save link as…’ option.
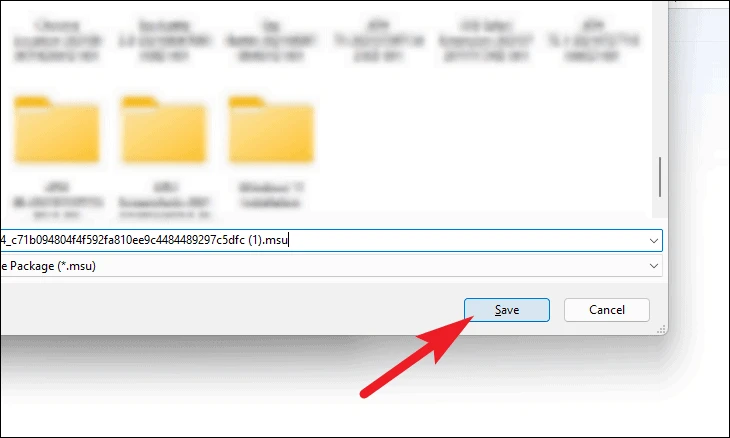
Now, choose a desired directory using File Explorer and click on the ‘Save’ button.
Once downloaded, head to the download directory and double-click on the package to run the installer.

The standalone installer will then prepare your system. Once the update is ready to install, a prompt will appear on your screen. Click on the ‘Yes’ button to proceed.
The update package will now take a few minutes to install.
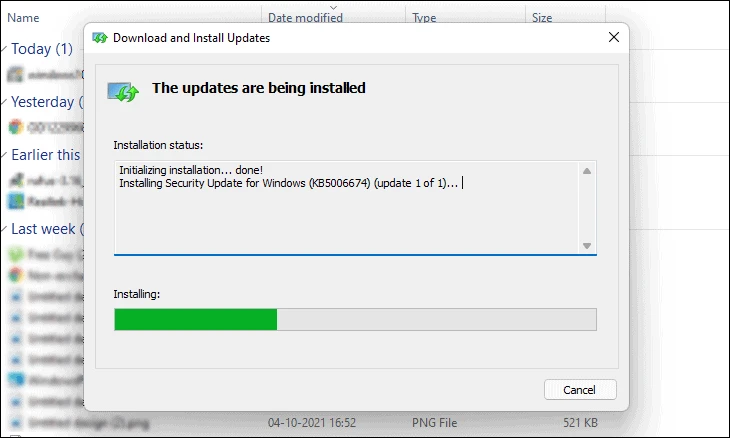
Once the package is installed, restart your PC and check if your PC is updated or not.
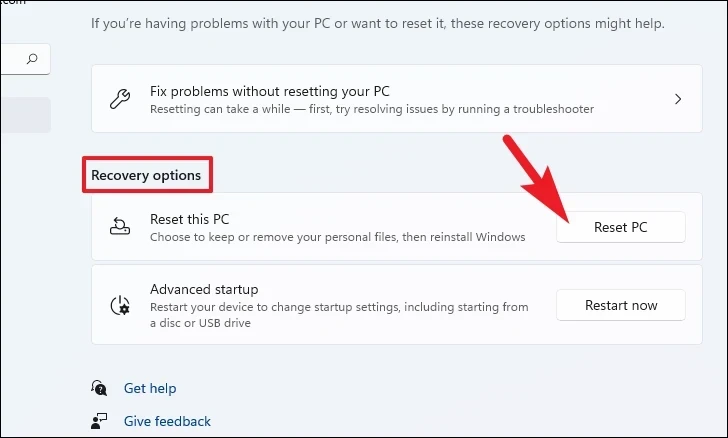
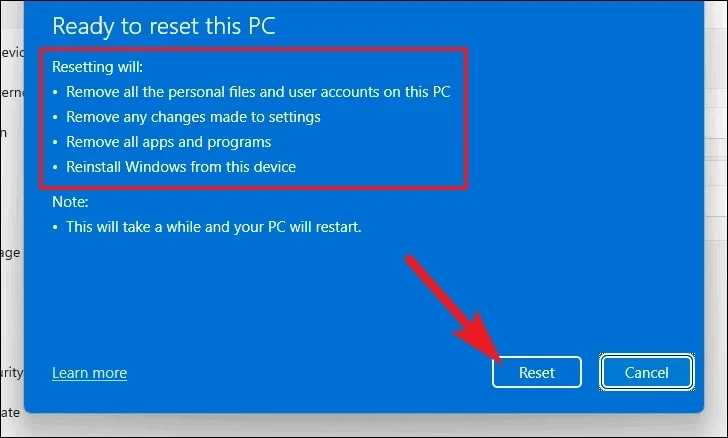
6. Reset your PC
In case you haven’t been able to fix the issue using the above-mentioned methods, the last option is to reset your PC to eradicate any deep-rooted systemic issue. Though you will not lose any personal files and folders, the system settings will be reset to factory defaults and all your installed programs will also be deleted.
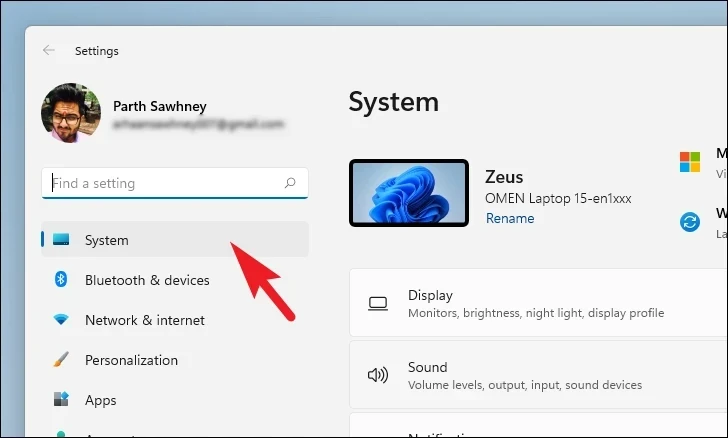
First, head to the Start Menu and click on the ‘Settings’ tile.
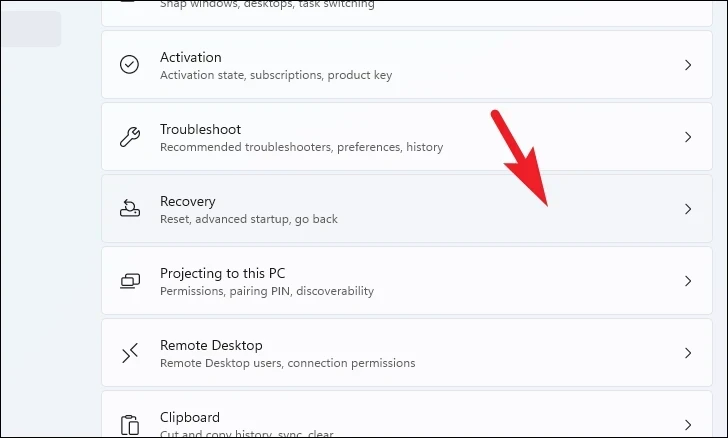
After that, ensure you have selected the ‘System’ tab from the left sidebar.
Then, from the right section of the window, scroll down and click on the ‘Recovery’ tile to proceed.
Afterward, locate and click on the ‘Reset PC’ button to proceed. This will bring a separate window to your screen.
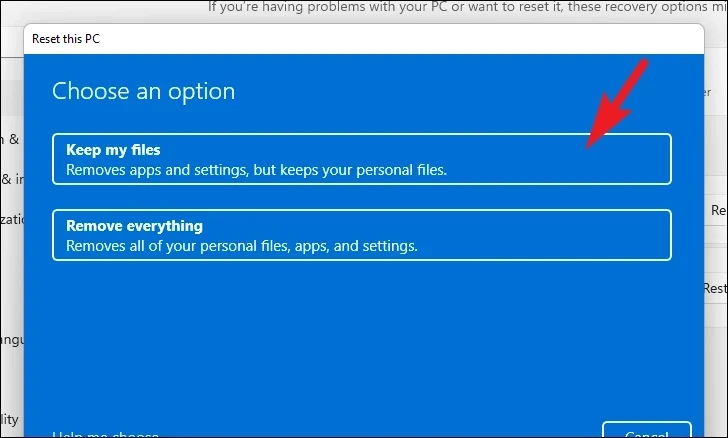
Now, click on the ‘Keep my files’ tile from the opened window, In case you wish to remove all your personal files as well when resetting, click on the ‘Remove everything’ option instead.
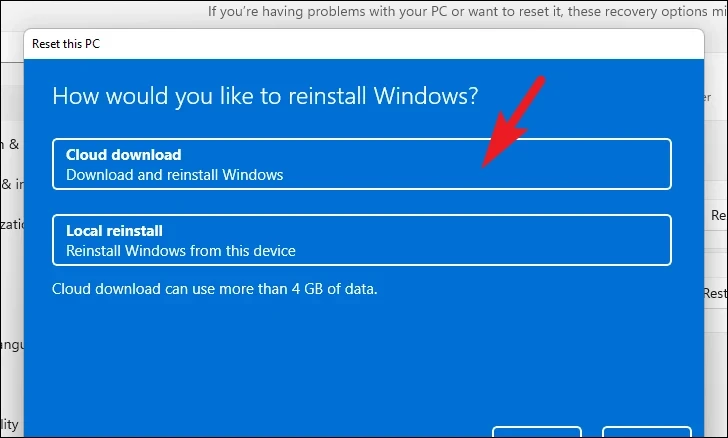
On the next screen, you will need to choose a method for reinstalling the operating system on your machine. Since there could be an issue with the copy already present on your system, it is recommended that you click on the ‘Cloud download’ option.
Note: ‘Cloud download’ will require an active internet connection and will consume upwards of 4 GB of data.
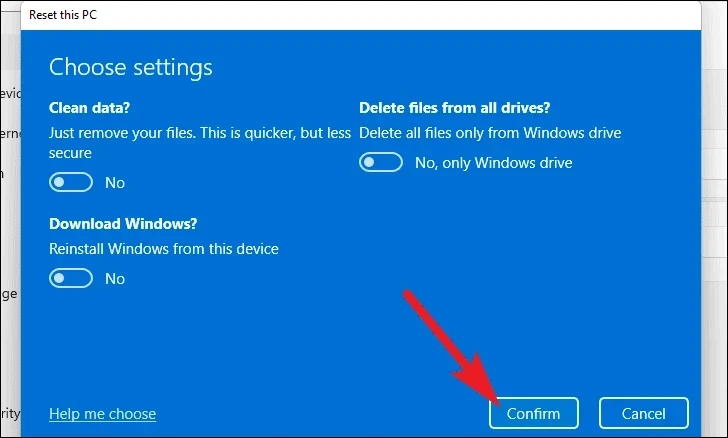
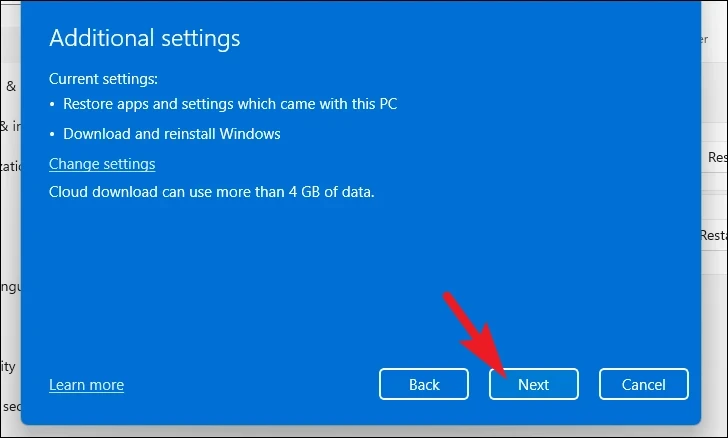
After that, Windows will list the settings that you have chosen. In case you wish to change any of it, click on the ‘Change settings’ option to continue.
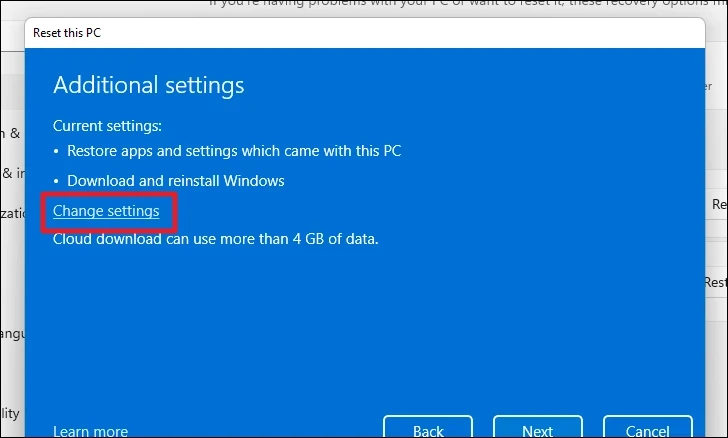
If you chose to change the settings, you can configure the following settings on the next screen. You can choose to not restore the apps and settings by clicking on the toggle switch present under the ‘Restore preinstalled apps?’ option and bringing it to the ‘No’ position. You can even switch from the Cloud download to the local installation by clicking on the toggle switch present under the ‘Download Windows?’ option to change the installation method. Once adjusted according to your preference, click on the ‘Confirm’ button to proceed.
After that, from the main window, click on the ‘Next’ button to continue.
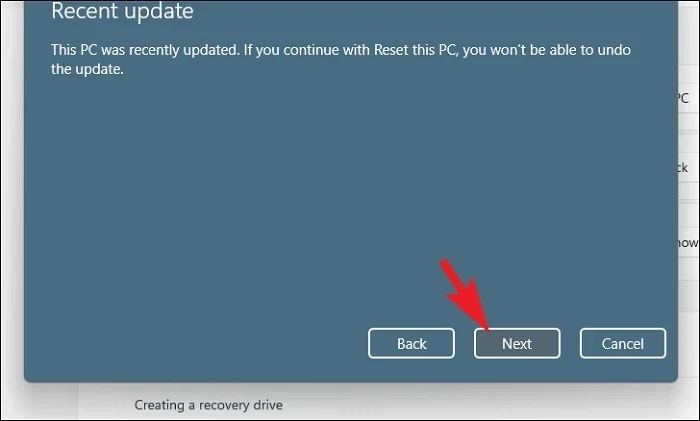
In case your PC was updated recently, you will receive a message on the screen stating that you will not be able to roll back once you rest the PC. To continue, click on the ‘Next’ button.
After that, Windows will list out all impacts resetting your PC will have on your system. Read them carefully and click on ‘Reset’ to commence the resetting process.
Install error 0x80070103 is irksome, but thankfully, you can easily resolve it using the above-mentioned methods.
«Центр обновлений» Windows постоянно оповещает пользователя о новых пакетах драйверов, которые необходимо установить. Зачастую, всё проходит гладко, практически без всякого вмешательства владельца ПК, но иногда возникает ошибка 80070103 в виде окошка с предупреждающей надписью, что установка сорвалась, а также совет: перезагрузить компьютер. Но, к сожалению, перезапуск ОС ни к чему не приведёт, и новая попытка установки снова окажется безуспешной. «Устранение неполадок», которое предлагает Windows, тоже редко даёт нужный результат.

Исправление ошибки 80070103 при обновлении Windows.
Причины возникновения ошибки 80070103
Причин появления ошибки 80070103 не так уж много:
- системный бот ошибся и скачал драйверы из предыдущего пакета, которые уже давно установлены и функционируют в данный момент;
- в «Центре обновлений Windows» скопилось много кэша;
- ОС имеющейся версии не может работать с новыми драйверами по каким-то техническим причинам.
В любом из этих случаев вы получите сообщение о неудачной установке.
Как исправить ошибку 80070103
Когда вы видите код 80070103 с сообщением об ошибке при обновлении Windows 7, 8 или 10, и она появляется как константа, на постоянной основе, нужно это каким-то образом исправить. Может помочь два способа:
- перезапуск Update Center;
- сброс автоматического приема обновлений.

Перезапуск «Центра обновлений»
Нередко система даёт сбой, и некоторые службы приходится перезапускать. В нашем случае подобное нужно сделать с «Центром обновлений».
- Откройте «Поиск» и впишите: «Командная строка».
- Щелкните правой кнопкой мыши по появившемуся значку программы и выберите пункт «Запустить от имени администратора».
- Теперь последовательно задаём:
- net stop bits (+ «Enter»);
- net stop wuauserv (+ «Enter»);
- net stop appidsvc (+ «Enter»);
- net stop cryptsvc (+ «Enter»).
- Таким образом, мы прерываем работу компонентов Update Center.Теперь её нужно возобновить, для чего пишем все те же команды, только вместо слова «stop» вставляем «start».
- После этого нужно перезагрузить ПК и пронаблюдать, установятся ли обновления нормально. Иногда необходим рестарт с очисткой временных файлов. Для этого:
- В командной строке останавливаем службы bits и wuauserv (через команду со словом «стоп», как показано выше).
- Затем пишем:
- attrib -r -s -h /s /d «%SYSTEMROOT%\SoftwareDistribution» (+ «Интер»);
- del «%SYSTEMROOT%\SoftwareDistribution» /q /s (+ «Интер»).
- Теперь снова запускаем эти две службы, используя слово «старт».
Перепроверьте работу «Центра» ещё раз, чтобы удостовериться, что никаких ошибок больше не возникает.
Отключение автоматического обновления драйверов
Если устранить ошибку в «Центре обновлений Windows» не удалось, можно отключить автоматический приём пакетов. Вообще специалисты не рекомендуют полагаться на работу «Центра обновлений», во всяком случае если вы хотите получать актуальные пакеты для подключенного съемного оборудования (принтера, графического планшета и т. п.). Гораздо лучше скачивать их самостоятельно с сайта фирмы-производителя устройств. Конечно, в этом случае уйдёт много времени на отслеживание обновлений на разных ресурсах, зато так вы избежите неполадок.
- На сайте Windows есть дополнение Show or Hide Updates, благодаря которому можно отключить автоматическое получение пакетов, если с ними случаются ошибки. Скачайте ПО и запустите его.
- Нажмите первую кнопку «Скрыть обновления».
- Система сама предоставит вам список тех, которые невозможно установить силами «Центра». Проставьте напротив каждого галочки и нажмите «Далее».

Есть ещё один способ отключения:
- Впишите в «Поиск»: «Диспетчер устройств».
- Найдите там устройство, драйверы которого не устанавливаются по неизвестным причинам, и происходит ошибка с Windows Update под кодом 80070103. Выделите его правой кнопкой мыши и просмотрите вкладку «Сведения» в разделе «Свойства».
- Здесь нужно скопировать «ИД оборудования».
- Теперь впишите в «Поиск»: «Выполнить» и откройте приложение.
- Введите в строку: «gpedit.msc» (без кавычек) и нажмите «Enter».
- Здесь нужно пройти по пути: Computer Configuration/Administrative Templates/System/Device Installation/Device Installation Restrictions.
- Среди предложенных действий нужно выбрать Prevent installation of devices with specified device codes.
- В появившемся окошке поставьте отметку напротив Included и нажмите кнопку Show.
- В следующее окошко вставьте скопированный ИД.

И ещё один способ, если первые два вам не подошли:
- Впишите в «Поиск»: «Панель управления» и откройте приложение.
- Перейдите по ссылкам: «Система и безопасность» — «Система» и нажмите справа «Изменить параметры».
- Перед вами появится небольшое окошко – нажмите на кнопку «Оборудование», а затем «Параметры установки устройств» и откажитесь от автоматической загрузки обновлений.
Чтобы применить изменения, перезагрузите компьютер. Ошибка должна исчезнуть, если вы воспользуетесь одним из этих способов.