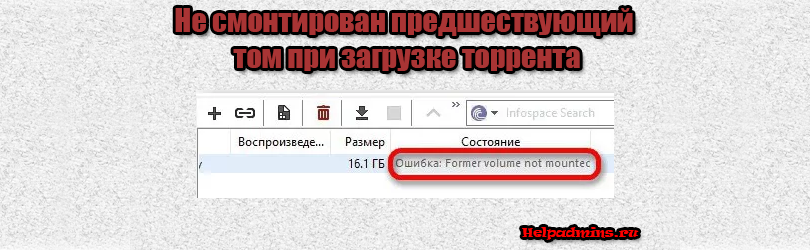
При загрузке торрента появляется ошибка «Не смонтирован предшествующий том (former volume not mounted)»
Ошибка в торренте “Не смонтирован предшествующий том”
Иногда пользователи программы Utorrent сталкиваются с проблемой закачки того или иного торрента. Вместо привычного отображения шкалы загрузки отображается ошибка “Не смонтирован предшествующий том” (в английской версии программы “former volume not mounted”) и загрузка естественно не идет.
В данной статье мы разберемся о причинах появления данной ошибки, а также о методе ее устранения.
Почему появляется ошибка?
Наиболее частой причиной является недоступность того места, в которое вы назначили загрузку проблемного торрента. Если в пути сохранения вы указали съемный диск или флешку, и затем доступ к ним пропал по причине отключения или изменения буквы этого диска, то в торренте появится известная ошибка “Не смонтирован предшествующий том”.
Переименование или удаление каталога, в который осуществляется загрузка также приведет к данной ошибке.
Как устранить?
Решается данная проблема довольно просто. Для начала нужно поставить на паузу проблемный торрент.
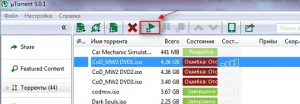
Остановка проблемного торрента
Затем, в случае использования сменного носителя нужно проверить надежность его подключения. После этого пробуйте возобновлять загрузку.
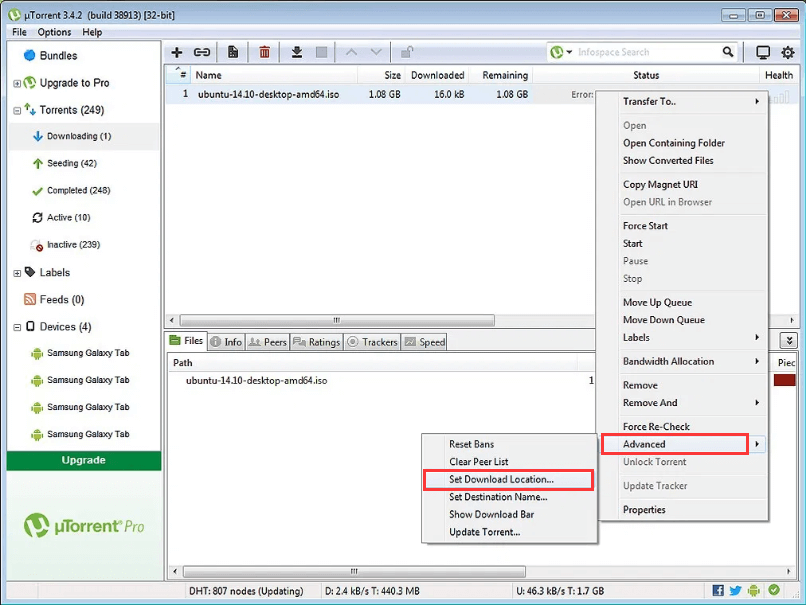
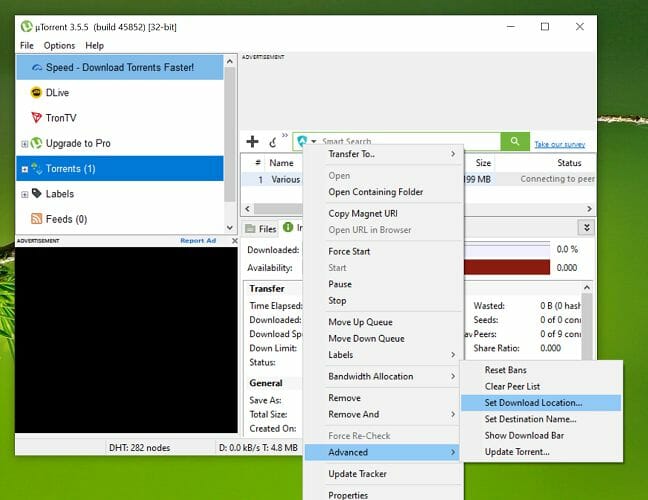
Если таким образом проблема не решилась, то снова ставим на паузу торрент с ошибкой “Не смонтирован предшествующий том”, жмем по нему правой кнопкой мыши и выбираем “Дополнительно” -> “Загружать в”.
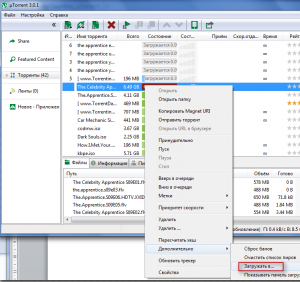
Задаем новый путь торренту
В открывшемся окне выберите любую доступную на вашем компьютере папку, например на диске D или E и жмите “Выбор папки” (“Сохранить”).
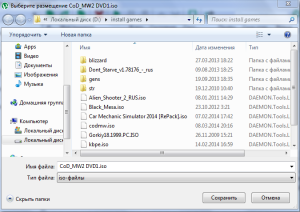
Выбор нового места размещения загружаемого торрента
После этого снова запускаете загрузку и ошибка “Не смонтирован предшествующий том” (former volume not mounted) должна исчезнуть.
Plenty of users has reported the former volume not mounted error and are seeking for feasible solutions on the forum. If you are one of them, don’t worry. In this article, MiniTool Partition Wizard lists 6 possible solutions from users and you can feel free to have a try.
About uTorrent Error Former Volume Not Mounted
The former volume not mounted is an error that may occur in uTorrent. The volume refers to a storage device like a disk drive or USB flash drive. A volume is mounted when it is assigned a place in the file system of the computer so that it can be referred to at that path.
The problem has been reported by a number of users, and it might also occur on other popular torrent clients like BitTorrent and Vuze. You may learn about the details of the uTorrent error former volume not mounted from the following post:
Normally I keep all my uTorrent downloads stored in an external hard drive. I plug the drive into my PC after my PC has booted up. Today I went through the usual procedure but also added a USB stick with a view to copying some files from the external disk to the stick. Before doing this, I opened uTorrent with a view to rename one or two files, but every file had turned from green to brown with the message “Error former volume not mounted”.
I’m convinced that the introduction of the USB stick had something to do with this, but the question is, is there a way to get the files seeding and downloading again? — From uTorrent forum
Commonly, the frustrating problem occurs when users are using an external storage device and it prevents them from reading or downloading torrents normally. There are several potential factors that may lead to the former volume not mounted error in your torrent client. Some of them are listed below:
- There are some issues with the drive letter. One of your torrents or download paths probably uses a drive letter that no longer exists, or the external drive is assigned with another drive letter different from that your torrent client expects.
- The torrent is partially corrupted. If the downloading process of the torrent is interrupted unexpectedly, the data might be corrupted and your torrent client may refuse to resume download, giving the former volume not mounted error message.
- The resume.dat file contains certain conflicting data. It is possible that the resume.dat file of uTorrent contains certain incorrect instance, and this may also trigger the problem under our discussion.
After learning about the error in detail, it’s time to fix it. In the following contents, you will learn about 6 possible methods to fix uTorrent former volume not mounted error. Let’s check them out one by one.
6 Methods to Fix Former Volume Not Mounted Error
- Reconnect the problematic drive
- Set another download location for the problematic torrent
- Match the drive letter to the one allocated by the computer
- Change drive letter
- Re-check your torrents
- Modify the resume.dat file
Fix 1: Reconnect the Problematic Drive
As mentioned before, the problem is typically caused by the external drive like a USB drive being used as the storage directory of your downloaded torrents.
If you are using such a drive and frequently disconnect it from your computer, it is possible that its drive letter allocated by the computer changes and thus your uTorrent cannot recognize the drive. Besides, if the drive is not properly connected, you could also encounter the former volume not mounted error.
Therefore, you had better disconnect the problematic drive and then properly reconnect it to your computer. This will force your operating system to reassign a drive letter to the external drive and may fix the problem automatically.
Fix 2: Set Another Download Location for the Problematic Torrent
In some cases, this problem just happens to one specific torrent which is referencing a download path that no longer exists. According to the reports, this commonly occurs when you perform downloads on a removable drive but then decide to remove it while the file is downloading or seeding.
If you are in the same situation, perhaps you can try setting another download location for the problematic torrent to fix the issue. Here’s a simple guide for you.
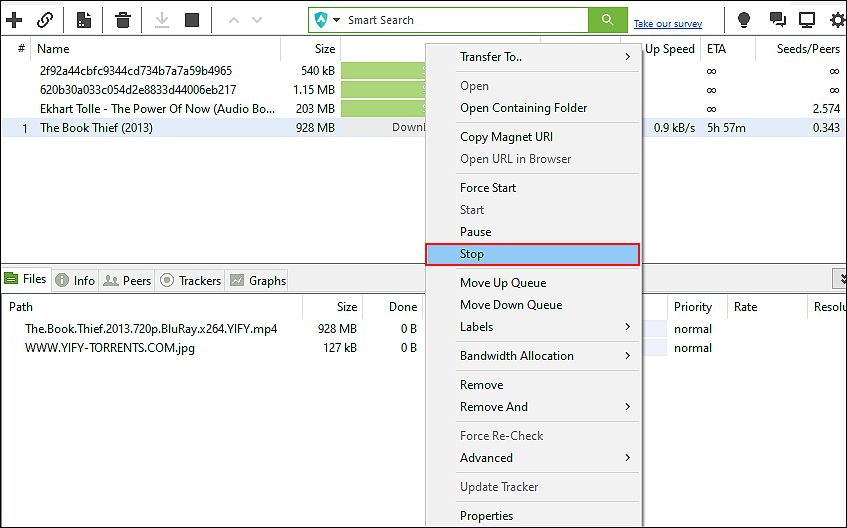
Step 1: If the torrent is still under download, the first thing you need to do is stopping the current download to prevent your uTorrent from accessing or updating the file. Just right-click the torrent and choose Stop.
Step 2: Right-click the problematic torrent again and choose Advanced > Set Download Location.
Step 3: In the pop-up dialog, choose a new valid location you want to store the torrent file and click the Select Folder button.
After that, restart your torrent client and check if you can download the torrent without the former volume not mounted error.
Fix 3: Match the Drive Letter to the One Allocated by the Computer
When you reconnect the external hard drive to your computer, the operating system can still recognize it by allotting a drive letter which might be different from the one previously allotted. However, the uTorrent might remember the previous drive letter (or the path) and it gets confused once the drive letter or mount point alters, which might lead to former volume not mounted error message.
In this case, you can change the directories for your torrents to match the drive letter to the one allocated by your computer. To do that, you should:
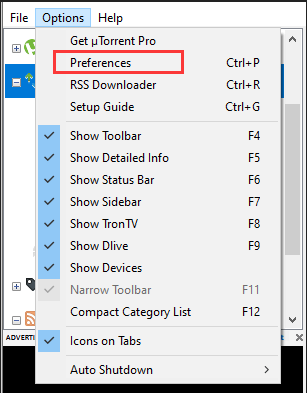
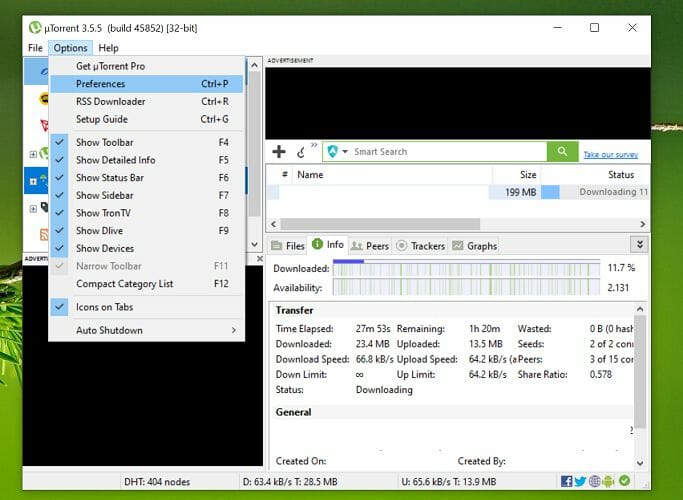
Step 1: Keep your uTorrent open and click Options from the upper ribbon bar.
Step 2: Click Preferences from the drop-down menu. You can also press Ctrl + P keys in the main interface to directly open the desired window.
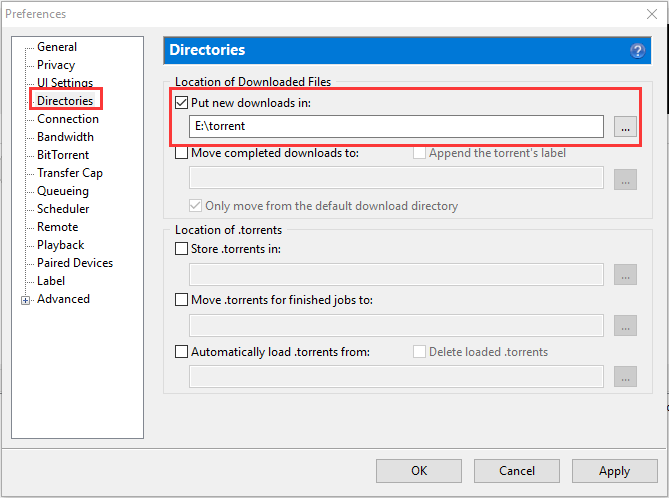
Step 3: In the left side of the Preferences window, click Directories, and then check Put new downloads in from the right pane. Here, check if the drive letter matches the current configuration. You should also make sure the drive letters of other involved locations are matched correctly.
Step 4: Click Apply and OK to save the changes you have made.
Now, you can restart your uTorrent and check if the problem is resolved. If you are still stuck with the former volume not mounted error, just move on to the next solution.
Fix 4: Change Drive Letter
If you find it troublesome to change the download location for each of affected torrents or you don’t want to make any changes for your torrent client, you can directly change the drive letter of the external drive to the one your uTorrent expects.
Here are 3 ways for you to change drive letter, and you can choose any one to complete the operation. But before that, you need to check the error message and hover your mouse over the error to see the drive letter that your uTorrent expects.
#1. Via Disk Management
Disk Management is a built-in utility in Windows computer which can help users to manage the connected disks and partitions with ease. To change the drive letter for your external storage device, just follow the steps below.
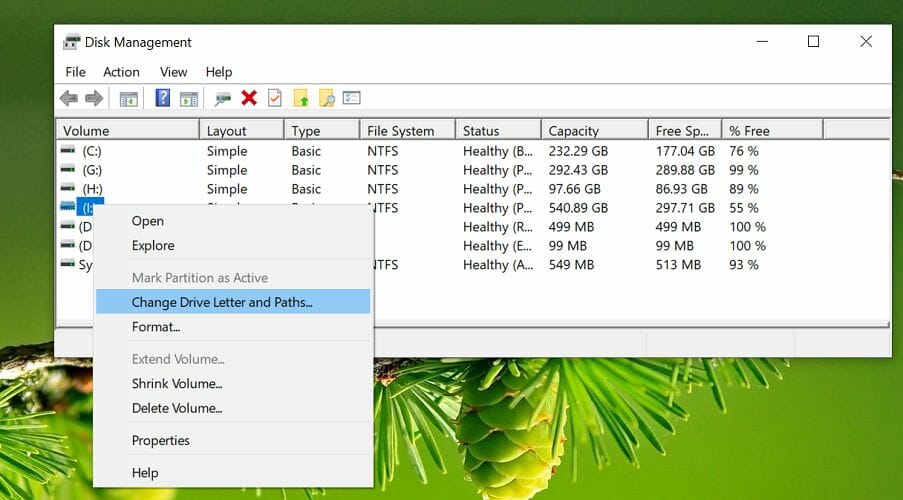
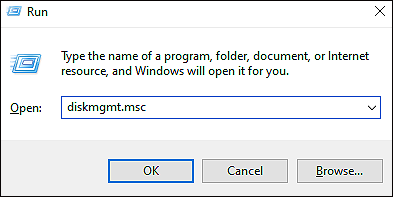
Step 1: Press Windows + R to bring up the Run window.
Step 2: Input diskmgmt.msc in the empty box and click OK to open Disk Management.
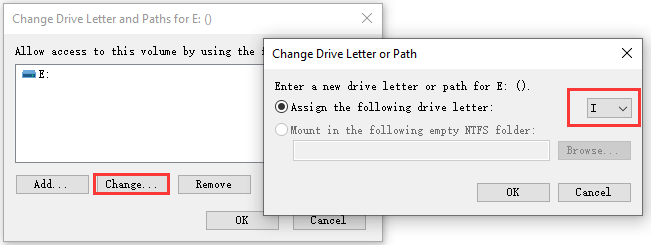
Step 3: Right-click the target drive and choose Change Drive Letter and Paths from the context menu.
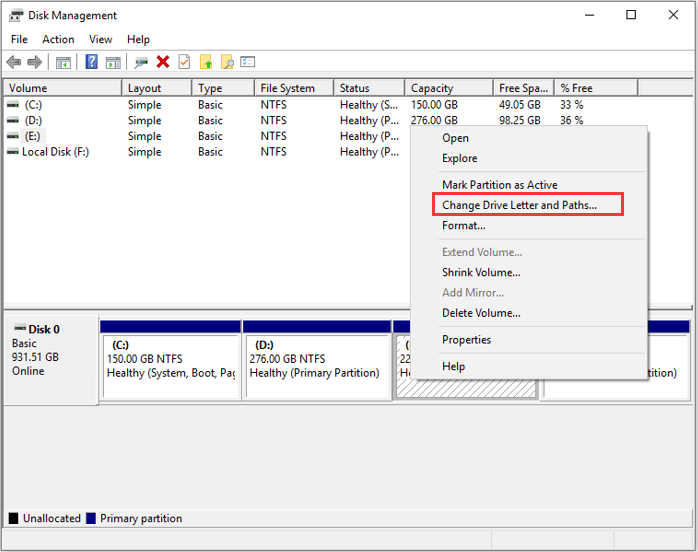
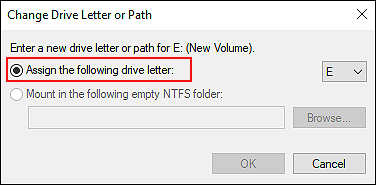
Step 4: In the pop-up window, click Change button. Then, check Assign the following drive letter options, choose the drive letter that your torrent client expects from the drop-down menu, and click OK button to save changes.
#2. Via Diskpart
If Disk Management is not loading or runs into certain problems on your computer, you can use the diskpart tool alternatively. Diskpart is a separate suite of commands that runs in the Command Prompt and helps you manage your computer’s drives. Here’s how to change drive letter via diskpart.
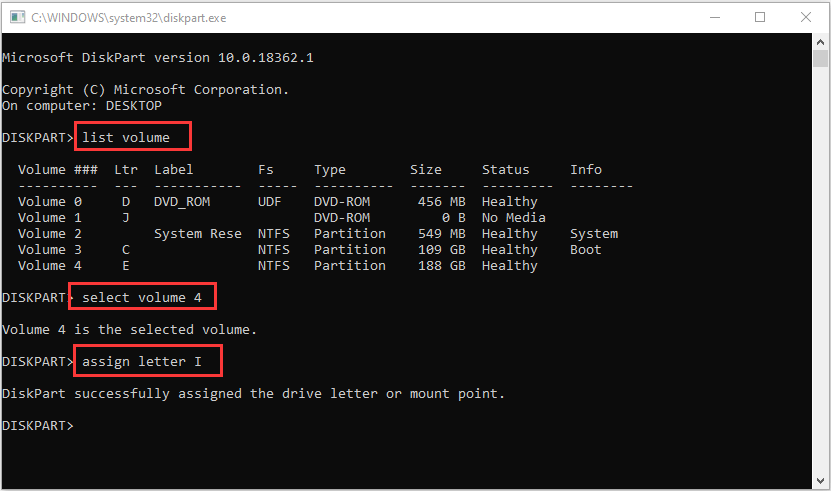
Step 1: Invoke Run window, input cmd, and click OK to open Command Prompt.
Step 2: Type diskpart in the command console and press Enter.
Step 3: Input the following commands one by one and press Enter key after each.
- list volume
- select volume * (* refers to the volume number of the target partition which can be figured out by the drive letter)
- assign letter I (replace I with the desired drive letter of your torrent client)
#3. Via Third-party Software
For users who are not so familiar with Windows built-in tools, using a professional third-party program is always a great choice. Here, MiniTool Partition Wizard is recommended for you. It can help you manage partitions and disks, restore lost data, and back up your computer easily. Here’s a simple guide on how to change drive letter using this assistant.
Step 1: Click the following button to download MiniTool Partition Wizard and install it on your computer.
MiniTool Partition Wizard FreeClick to Download100%Clean & Safe
Step 2: When you get the main interface, right-click the target drive and choose Change Letter from the pop-up menu. You can also choose Change Drive Letter from the left pane after selecting the drive.
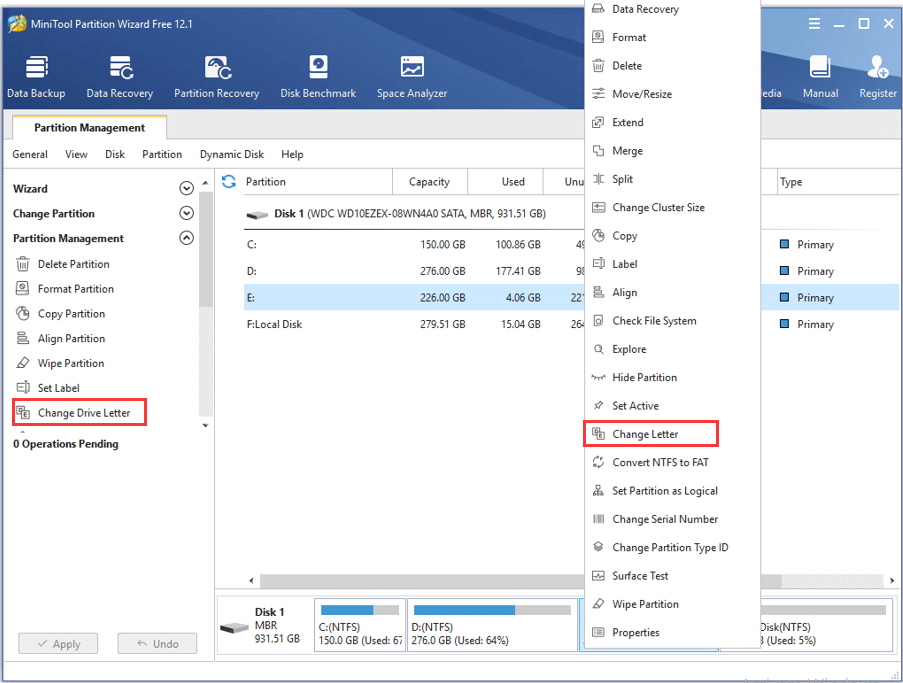
Step 3: Choose the desired drive letter from the list of New Drive Letter and click OK button.
Step 4: Click Apply button to execute the pending operation.
Fix 5: Re-Check Your Torrents
Almost all the torrent clients provide a force re-check feature that helps to troubleshoot the potential problems with the torrents. If the above methods fail to fix the problem for you, you can try this feature.
Just right-click the problematic torrent and choose Force Re-Check from the drop-down menu. After the re-check process is completed, restart your computer and see if the uTorrent former volume not mounted error is resolved.
Fix 6: Modify the Resume.dat File
Finally, you can choose to modify the resume.dat file of your uTorrent to replace the previous path that has changed due to the reconnection of the external drive. This is more complicated than the above solutions, but you can make use of a powerful text editor like Notepad++. Here’s what you need to do.
Step 1: Invoke Run window, input %AppData%uTorrent and click OK to open the uTorrent folder in File Explorer.
Step 2: Find the resume.dat file and make a backup for it in another location. Open your downloaded Notepad++ and drag the resume.dat file into the console to open it.
Step 3: Click Search tab in the ribbon bar and choose Replace. Input the incorrect path in the Find what box, input the correct one in the Replace with box, and click Replace All button.
Note: You have to keep the exact length of the path, which means that you can only change the drive letter in the path.
Once it’s done, save that file and then restart your computer. Now, the uTorrent error former volume not mounted should be removed.
How to resolve uTorrent former volume not mounted error? Here are 6 solutions for you.Click to Tweet
Bottom Line
This article has introduced 6 possible solutions to the former volume not mounted error in torrent client. If you have any better workarounds, you can share them with us by posting them in the following comment zone. We will keep improving this article.
As for any problems while using MiniTool software, you can contact us via [email protected].
Некоторые пользователи Windows сообщают, что они случайно видят значок Бывший том не смонтирован «Ошибка в их торрент-клиенте. При раскрытии ошибки появляется сообщение о том, что доступ к диску, на котором хранятся файлы, недоступен. Сообщается, что эта проблема возникает на большинстве популярных торрент-клиентов, включая BitTorrent, Utorrent и Vuse.

После изучения этой конкретной проблемы выяснилось, что эта проблема может возникать по нескольким причинам. Вот список потенциальных виновников:
- Неверная буква внешнего диска — Если вы используете внешний диск, первое, что вам нужно сделать, это отключить его от компьютера и снова подключить. Мы надеемся, что эта операция заставит вашу ОС назначить другую букву диска (ту же, которую ожидает ваш торрент-клиент).
- Неправильное место загрузки — По словам некоторых затронутых пользователей, эта проблема также может возникать в тех случаях, когда в вашем торрент-клиенте в настоящее время хранится неправильное место загрузки. В этом случае использование меню настроек для изменения позволит вам полностью решить проблему.
- Письмо в торрент-клиенте не соответствует — Если вы получаете этот код ошибки с внешним диском и продолжаете отключать его, возможно, вашему компьютеру назначена другая буква, которая вызывает ошибку в вашем торрент-клиенте. В этом случае вы можете изменить меню «Настройки», чтобы оно соответствовало букве диска.
- Неправильная буква в управлении дисками — Также возможно, что вы начали видеть эту ошибку после того, как изменили букву диска в утилите управления дисками. Если этот сценарий применим, вы сможете решить эту проблему, используя ту же утилиту, чтобы изменить букву, ожидаемую вашим торрент-клиентом.
- Частично поврежденный торрент — Если во время загрузки торрента произойдет неожиданное прерывание, ваш клиент может отказаться от возобновления загрузки из-за конфликта данных. В этом случае вы можете разрешить сообщение об ошибке, заставив свой торрент-клиент принудительно перепроверить этот конкретный торрент.
- Файл Resume.dat содержит противоречивые данные. — Если вы не боитесь редактировать файлы конфигурации, вы сможете решить проблему, отредактировав файл resume.dat с помощью расширенной утилиты текстового редактора, такой как Notepad ++.
Метод 1: повторно подключите проблемный диск
Если вы используете внешний диск и имеете привычку часто отключать его, вам следует начать с отключения и повторного подключения проблемного внешнего диска.
Эта операция заставит вашу ОС переназначить букву внешнему диску, что может решить проблему автоматически.
После того, как вы снова подключите внешний диск с помощью правильного кабеля, перезагрузите торрент-клиент и посмотрите, решена ли проблема.
Если тот же ‘ бывший том не установлен «Ошибка все еще возникает, перейдите к следующему способу ниже.
Метод 2: установка правильного места загрузки
Как выясняется, один из наиболее распространенных случаев, вызывающих эту ошибку, — это когда один (или несколько) ваших торрентов ссылается на путь загрузки, который больше не существует.
Обычно это происходит, когда пользователи начинают загрузку на съемные диски, а затем решают удалить их (во время загрузки или заполнения файла).
Если этот сценарий применим, вы можете легко решить эту проблему, определив проблемный торрент и указав правильное место загрузки в настройках торрента.
Чтобы упростить вам задачу, мы составили пошаговое руководство по настройке правильного места для загрузки:
-
Откройте торрент-клиент, который вызывает ошибку, щелкните правой кнопкой мыши торрент, вызывающий проблему, и нажмите Дополнительно> Установить место загрузки.

Image - В следующем меню перейдите к месту, где вы храните торрент-файлы, и нажмите Выберите папку после выбора правильного местоположения.
- Перезагрузите торрент-клиент и посмотрите, решена ли проблема.

Если проблема не устранена, перейдите к следующему потенциальному исправлению ниже.
Метод 3: сопоставьте букву диска с диском, выделенным компьютером (только uTorrent)
Если вы используете внешний привод и вы регулярно отключаете его от компьютера, возможно, что при повторном подключении буква диска, назначенная вашим компьютером, изменится.
В Utorrent это, скорее всего, произойдет из-за настройки на вкладке «Настройки».
Это гораздо чаще, чем вы думаете. К счастью, это очень легко исправить — вам просто нужно изменить каталоги на экране «Настройки», чтобы они соответствовали букве диска, присвоенному компьютеру.
Вот краткое пошаговое руководство, которое поможет вам сделать это:
-
Откройте Utorrent и используйте ленточную панель вверху, чтобы щелкнуть Параметры, затем нажмите на Предпочтения из появившегося контекстного меню.
Image -
Как только вы окажетесь внутри Предпочтения окно, нажмите на Справочники с левой стороны, затем перейдите к правой части и проверьте, соответствуют ли буквы дисков вашей текущей конфигурации.
Image - Ударить Применять чтобы сохранить изменения, перезапустите клиент uTorrent и посмотрите, решена ли проблема.


Если вы все еще видите то же самое бывший том не установлен ‘Ошибка, перейдите к следующему потенциальному исправлению ниже.
Метод 4: изменить букву диска из управления дисками
Если эта ошибка затронула много разных торрентов или вы не хотите ничего менять в своем торрент-клиенте, вы можете решить эту проблему другим способом.
другой способ исправить бывший том не установлен Ошибка заключается в том, чтобы выяснить, с какой буквой диска ожидается ваш торрент-клиент, и изменить букву диска, содержащую торрент-файл, на соответствующую с помощью управления дисками.
Если вы ищете пошаговые пояснения, следуйте приведенным ниже инструкциям, чтобы изменить букву диска viDisk Management:
- Начните с открытия торрент-клиента и проверьте сообщение об ошибке. Если вы наведете указатель мыши на ошибку, вы должны увидеть букву диска, которую ожидает ваш торрент-клиент.
-
Как только вы узнаете, какую букву ожидает ваш торрент-клиент, закройте его, затем нажмите Клавиша Windows + R открыться Запустить команда. Внутри текстового поля Запустить окно, тип ‘Diskmgmt.msc’ и нажмите Входить открыть Управление диском полезность.
Image -
Как только вы окажетесь внутри Управление диском, щелкните правой кнопкой мыши букву диска, которая не соответствует эквиваленту торрент-клиента, и выберите Изменить буквы дисков и пути из появившегося контекстного меню.
Image -
От Изменить букву диска и пути экран, нажмите на Изменять кнопка.
Image - От Изменить букву диска или путь, Выбрать Назначьте следующую букву диска, затем используйте раскрывающееся меню, чтобы выбрать ту же букву диска, которую ожидает ваш торрент-клиент.
- Нажмите ОК чтобы сохранить изменения, затем перезагрузите компьютер, чтобы изменения вступили в силу.
- После завершения следующего запуска откройте торрент-клиент и посмотрите, решена ли проблема.


Если вы все еще сталкиваетесь с тем же бывший том не установлен ‘Ошибка, перейдите к следующему потенциальному исправлению ниже.
Метод 5: перепроверьте проблемные торренты
Если ни одно из возможных исправлений, описанных выше, не помогло вам, вы можете попробовать заставить свой торрент-клиент повторно проверить проблемный торрент. Эта операция была подтверждена как пользователями uTorrent, так и BitTorrent как успешная.
Но дело не только в этих двух торрент-клиентах — у каждого подобного клиента такого типа есть Принудительная повторная проверка функция, которую можно запустить, щелкнув правой кнопкой мыши проблемный торрент и выбрав соответствующий параметр в контекстном меню.

После завершения процедуры повторной проверки перезагрузите компьютер и посмотрите, исчезнет ли ошибка при следующем запуске торрент-клиента.
Если та же проблема все еще возникает, перейдите к следующему потенциальному исправлению ниже.
Метод 6: изменение файла resume.dat (только uTorrent)
Если вы не возражаете против изменения файлов конфигурации, еще одним способом решения этой конкретной ошибки является использование расширенного текстового редактора, такого как Notepad ++, для замены всех экземпляров неправильной буквы диска из файла resume.dat uTorrent.
Важный: Файл resume.dat имеет смысл в том смысле, что после его изменения вам необходимо сохранить точную длину (можно изменить только букву пути)
Несколько затронутых пользователей, которые также сталкивались с бывший том не установлен ‘Error подтвердили, что им удалось исправить ошибку с помощью используя Notepad ++ чтобы заменить все неправильные экземпляры из файлов resume.dat.
Вот несколько пошаговых инструкций, как это сделать:
- Начните с того, что убедитесь, что все экземпляры uTorrent закрыты и ни один процесс не работает в фоновом режиме.
-
Затем посетите официальная страница загрузки Notepad ++ и загрузите установщик самой последней версии текстового редактора.
Загрузка текстового редактора Notepad ++ Примечание: Вы потенциально можете внести следующие изменения в текстовый редактор по умолчанию (Блокнот), но это не рекомендуется, поскольку вы рискуете изменить неверную информацию.
-
После завершения загрузки откройте установщик Notepad ++ и следуйте инструкциям на экране, чтобы установить программное обеспечение на свой компьютер.
Image -
После завершения установки нажмите Клавиша Windows + R открыться Запустить чат. Внутри текстового поля введите ‘% AppData% / uTorrent \’ и нажмите Входить чтобы перейти прямо к тому месту, где resume.dat хранится.
Image -
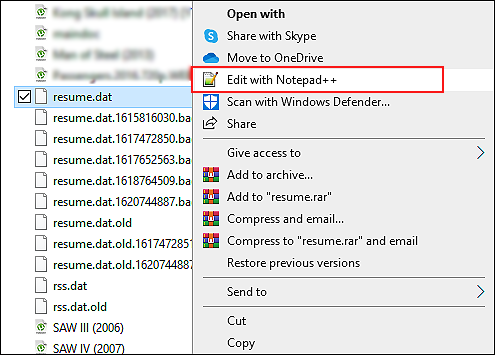
Внутри папки uTorrent из Данные приложения, щелкните правой кнопкой мыши на resume.dat и выберите Редактировать с помощью Notepad ++ из появившегося контекстного меню.
Image Примечание: На этом этапе было бы неплохо скопировать файл resume.dat на тот случай, если вы в конечном итоге внесете модификацию, которая его нарушит. Вы можете создать резервную копию этого файла, просто скопировав файл и вставив его на другой диск или в другую папку.
-
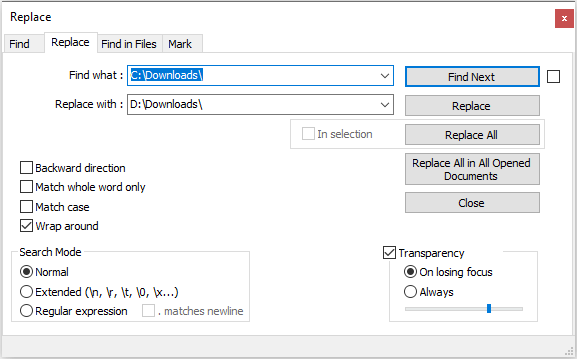
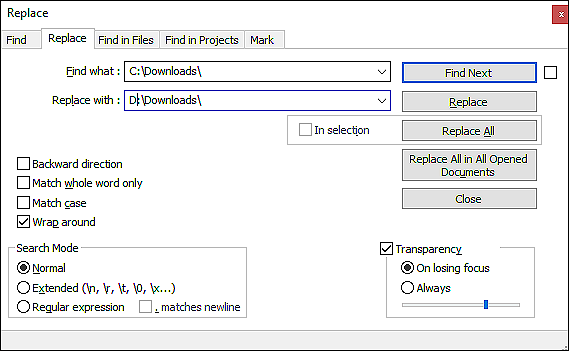
После открытия файла в Блокнот ++, используйте ленту вверху, чтобы получить доступ Поиск, затем нажмите «Заменить».
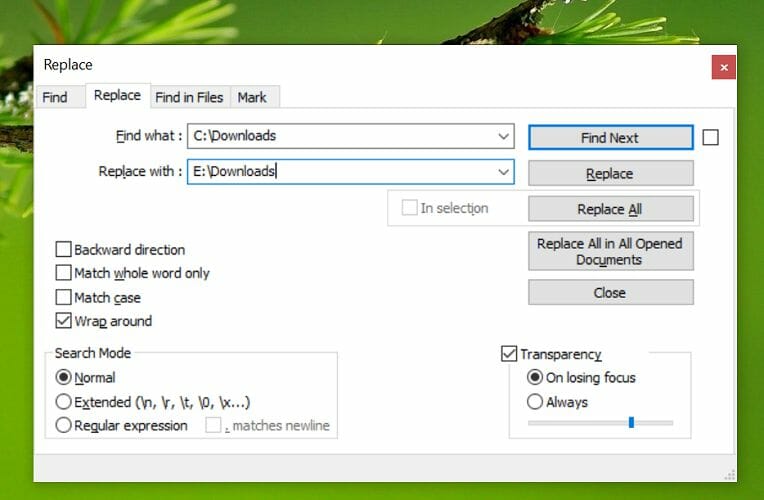
Image - Как только вы окажетесь внутри Заменять окно, установите Найти то, что поле на неправильный путь (например, C: / Загрузки \), затем установите Заменять с полем с правильным путем (например, D: / Загрузки \).
-
Затем запустите операцию замены, щелкнув значок Заменить все кнопка.
Image - Затем сохраните изменения, внесенные вами в файл, и убедитесь, что вы сохранили имя точно так же.
- Наконец, перезагрузите компьютер и посмотрите, решена ли проблема, открыв uTorrent после завершения следующего запуска.


by Tashreef Shareef
Tashreef Shareef is a software developer turned tech writer. He discovered his interest in technology after reading a tech magazine accidentally. Now he writes about everything tech from… read more
Updated on
- When trying to access a downloaded or in progress torrent, you encounter the Former volume not mounted error.
- A quick way to fix this error is to disconnect and reconnect the external drive used as the storage device for the torrents.
- Alternatively, try configuring the download location to fix the error.
- On uTorrent, you can fix the former volume not mounted error by matching the drive letter to the computer allocated drive.

You may encounter the error former volume not mounted or error files missing from job message on popular torrent clients when trying to move or rename the downloaded files.
As a result, the users are unable to access their downloaded files. The error can occur on all the major torrent clients, including BitTorrent, Utorrent, and Vuse.
Reading through different user experiences with similar error suggests that the error can occur due to several reasons.
Bad external driver letter, incorrect download location, wrong letter in disk management, and corrupted content are some of the reasons.
In this article, we have listed a few easy ways to fix the Former volume not mounted error in Windows 10.
How do I fix former volume not mounted error?
1. Remove and reconnect the external storage device
- Turn off your computer and disconnect the external hard drive.
- Restart your PC and reconnect the drive.
- Launch the torrent client and check if the drive is detected by the app.
Reconnecting the storage device will force Windows OS to reassign a letter to the external drive.
This may resolve the issue if triggered due to an incorrect drive letter. If the error persists, proceed with the other steps below.
2. Reconfigure the download location
- Launch the Torrent client that is causing the error and right-click on the torrent file.
- Go to Advanced and select Set Download Location.
- Next, navigate to the directory where the torrent files are stored.
- Click on Select Folder once you are in the correct directory.
- Restart your torrent client and check for any improvements.
Installing a Windows update can trigger the error if the torrents is referencing a download path that does not exist.
It can also occur if you have abruptly removed an external drive that was saving the in-progress downloads.
To fix the problem, simply relocate the original download location of the existing torrent files and set it as the torrent’s download location.
Repeat the steps if the error is triggered on multiple torrent files.
3. Match the download drive letter
- Launch the uTorrent client on your PC.
- Click Options from the menu and select Preferences.
- In the Preferences window, click on the Directory tab from the left pane.
- On the right pane, check if the drive letter matches your current configuration. If you are using an external drive, make sure the drive letter matches.
- If necessary, change the drive letter and click Apply to save the changes. Click OK to close the Preferences window.
- Restart uTorrent and check if the error torrent error former volume not mounted is resolved.
Your PC may alter the drive letter allocated to an external hard drive that is used to save the downloads and regularly disconnected from your PC.
Make sure the drive letter is matching by going into the uTorrent Preference settings.
4. Change driver letter using Disk Management
- Open the torrent client, hover over the error message and check the drive letter mentioned.
- Close the torrent client and open the Disk Management tool.
- Press the Windows key + R to open Run.
- Type diskmgmt.msc and click OK.
- In the Disk Management window, right-click on the drive letter that doesn’t match the one mentioned in the error message.
- Select Change Drive Letter and Paths.
- Click the Change button in the Change Drive Letter and Paths window.
- Click the drop-down menu and select the drive letter that was mentioned in the error message.
- Next, click OK to save the changes and restart your computer to apply the changes.
- After the restart, open your torrent client and check if the uTorrent former volume not mounted.
5. Edit the Resume.dat file
Note: Skip these steps if you are not using uTorrent. To edit the resume.dat file, you need a file editor. Download and install Notepad++ if you don’t have it installed already.
- Once installed, press the Windows key + R to open Run.
- Type the following and click OK:
%AppData%\uTorrent\ - Locate the Resume.dat file, create a copy and save it in a different folder as a backup.
- Go back to the AppData\uTorrent folder and right-click on the Resume.dat file.
- Select the Edit with Notepad++ option from the context menu, and press Ctrl + F.
- Click the Replace tab, and in the Find What field, enter the incorrect path, for example C:\Downloads.
- In the Replace With field, enter the correct path for your drive.
- Click the Replace All button to replace all the instances of the incorrect path with the correct one.
- Click Close, and press the Ctrl + S button to save the changes.
- Restart your computer and launch the app to see if the error is resolved.
By modifying the Resume.dat file, many users have reportedly fixed the error. Just make sure to fill the incorrect and correct path and then proceed with the replacement process.
If anything goes wrong, replace the edited Resume.dat file with the backup file saved in step 4 above.
The Former volume not mounted error in torrent clients can occur due to incorrect storage drive letter or if the computer is unable to detect the drive.
Follow the steps in the article to fix the problem and complete the torrent downloads.
![]()
Wondering how to fix the ‘Former volume not mounted’ error on Windows?
Torrent clients are a great way to download and manage large files such as movies and games faster. They save you from the frustration you would have faced while downloading files directly from the busy and crowded servers.
However, several users recently reported that their screens display the error code ‘Former volume not mounted’ error upon their attempt to move or rename the downloaded files. We had a look into this matter and found out that the error at hand can be caused by a number of reasons including a bad external drive letter, corrupt torrent, and incorrect download location.
If you are facing a similar issue, you are in the right place.
In this guide, we have listed some of the most effective solutions that can resolve the issue and will try to walk you through each of them in detail.
Let’s get started.
1. Reconnect the External Hard Drive.
The error at hand is commonly caused by external hard drives connected to your PC like a USB. When you connect an external device to your PC, Windows assigns a drive letter to it. So for instance, if you have connected a USB flash drive with your PC, Windows may assign it the letter Z.
There are times when these drive letters change upon disconnecting the device from your PC, and as a result, applications using the device fail to recognize it upon reconnecting.
If your screen is displaying the ‘Former volume not mounted’ error in uTorrent on your PC, then the first thing you should do is disconnect the external hard drive and reconnect it. Doing so will allow your operating system to reassign a drive letter to the device, and hopefully, the issue will be resolved.
2. Change the Download Location.
If uTorrent was downloading a file on an external drive and you removed the drive during installation, then that is why your screen displays the ‘Former volume not mounted’ error.
A simple solution to this issue is to change the download location in uTorrent from the external drive to another valid location.
Here is what you need to do:
- Open uTorrent and check if the problematic file is still under download. If it is, simply right-click on it and click on Stop.
- Now right-click on it again and select Advanced from the list of options available.
- Then click on Set Download Location and select another location for your Torrent file.
- Finally, restart the Torrent client and check if the issue is resolved.
If an invalid download location was causing the issue, switching to another location will resolve it.
3. Change the Drive Letter
If you find it difficult to change the files’ download location and want them to be downloaded on your external drive only, you can do this by changing the drive letter.
As we mentioned earlier, there are times when the operating system appoints a new drive letter to an external device when you reconnect it. Applications like Torrent do not recognize the newly appointed drive letter and thus fail to perform operations properly.
In this method, we will be changing the newly appointed drive letter to the one Torrent expects. This way, Torrent will complete the installation on your external drive without any issues.
Here is all that you need to do:
- Open a Run dialogue by pressing Windows + R keys simultaneously.
- Type ‘diskmgmt.msc’ in the text field and hit Enter. Doing so will launch the Disk Management window.
- Right-click on the targeted drive and click on Change Drive Letter and Paths from the list of options available.

- Click on the Change button on the pop-up window and then select Assign the following drive letter option. You can now select the drive letter that Torrent expects by using the drop-down menu.
- Finally, click on OK to save the changes.
That’s it. The file will now successfully download on your external drive.
4. Try Using CleanMyPC.
When was the last time you deep cleaned your PC and eliminated all the junk files that have been occupying space for months? If that did not happen recently, then now might be a good time to do so as there is a fair chance that a corrupt file is causing the issue at hand within your system that is preventing Torrent from installing new files.
If this scenario is applicable, the easiest way to identify and eliminate corrupt junk files is by using a reliable PC cleaning tool. In case you are looking for a recommendation, then we highly recommend using CleanMyPC.
CleanMyPC is a one-stop shop for all your PC-related needs. It comes with a wide range of system maintenance tools that can take care of everything, from eliminating the corrupt files to increasing your PC’s speed and boosting its overall performance. All that you need to do is run a scan using CleanMyPC, and it will take care of the rest with little to no user input.
Install CleanMyPC now and give your PC a much-needed performance boost!
Try CleanMyPC Now!
5. Modify the Resume.dat File.
If none of the methods mentioned above works for you, then try replacing the changed path by modifying the resume.dat file.
The resume.dat file is where uTorrent saves information about a session.
This method is a bit complicated, which is why we recommend following it step-by-step for successful execution.
Here is what you need to do:
- Open a Run dialogue box by pressing Windows + R keys simultaneously.
- Type ‘%AppData%\uTorrent\’ in the text field of the dialogue box and hit Enter. Doing so will open uTorrent in File Folder.
- Locate the resume.dat file in the list of files available on your screen. Copy the file and paste it into a different folder to create a backup.
- Once the backup is created, right-click on the original resume.dat file and select the Edit with Notepad++ option from the context menu.
- Now press Ctrl + F and click on the Replace tab.
- Enter the incorrect path in the text field against Find what.
- Now enter the correct path in the text field against Replace with.
- Finally, click on the Replace All button and hit the Close button. Also, press Ctrl + S before closing the save the changes made.
- Once done, restart your PC.
This should resolve the issue once and for all.
This wraps up our guide on fixing the ‘Former volume not mounted’ error on your PC. We hope that one of the troubleshooting methods helped you resolve the issue on your device. If you have any questions, please let us know in the comment section below.
If this guide helped you, please share it. 🙂
-

Zainab Falak is a staff writer for Saint and an expert in Microsoft Windows, having authored more than 200 posts. She has a Bachelors in Actuarial Sciences and her passion for computers extends to exploring various aspects, from UI customization to the Windows registry and exploring error codes. Twitter
LinkedIn

Join 50,000+ subscribers
Stay updated on the latest discounts, exclusive promos, and news articles from Saint.