Using Backup and Restore to back up your system or files for computer protection but receive a Volume Shadow Copy Service error? This post shows you some specific Windows VSS errors and the corresponding solutions, and an easy way to keep PC safe so that you can easily restore the computer to its previous state in case of system accidents.
What Is Volume Shadow Copy Service (VSS)
Shadow Copy is a technology in Microsoft Windows, allowing users to make manual or automatic backups/snapshots of computer volumes or files. It is also known as Volume Snapshot Service, Volume Shadow Copy Service or VSS.
What is VSS? Microsoft defines it as follows:
“The Volume Shadow Copy Service (VSS) is a set of COM interfaces that implements a framework to allow volume backups to be performed while applications on a system continue to write to the volumes.”
This service requires the file system to be NTFS so as to create and store shadow copies. And the copies can be created by any Windows component using this technology on local, external and removable volumes or network locations, such as when creating a scheduled Windows backup or automatic system restore point.
If this service is stopped, all components depending on the service are still not working. And you may encounter some Volume Shadow Copy service errors in Windows 10/8/7 when backing up or restoring OS. Besides, VSS errors may also happen on Windows Server 2008, Server SBS 2011, Server 2012, etc.
In the following paragraphs, we will walk you through some specific errors as well as the solutions in Windows PCs.
Fix Volume Shadow Copy Service Errors Windows 10/8/7
VSS errors are various according to different Windows operating systems (PC OS and Server) and situations. Here we will show you some common errors in Windows 10/8/7 when creating a Windows system image and doing a system restore.
Case 1: Volume Shadow Copy Service Not Working Well When Backing up Windows
Volume Shadow Copy Service Error 0x80042302 during Backup
Recently we received the feedback saying backing up Windows to a new external hard drive but failed with error message 0x80042302. The details are as follows:
“The backup application could not start due to an internal error:
A Volume Shadow Copy Service component encountered an unexpected error. Check the Application event log for more information. (0x80042302).”
Solution
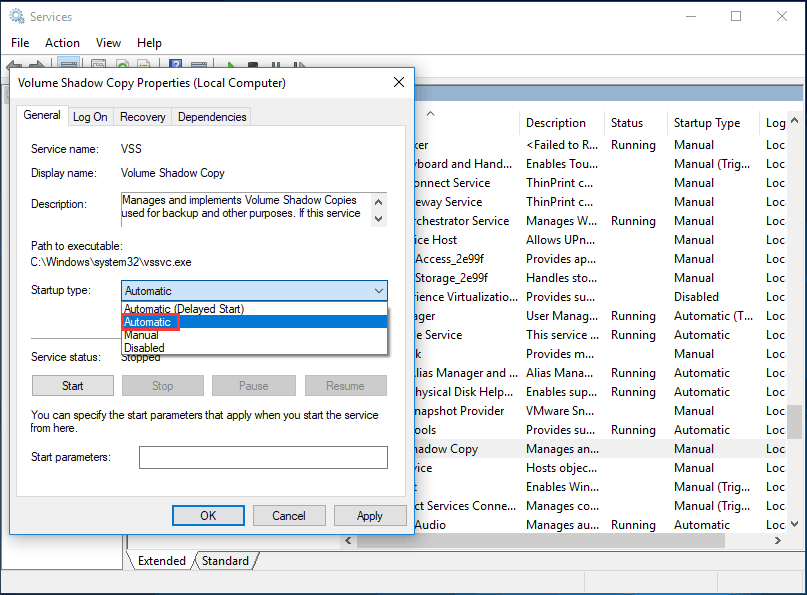
In this case, the problem is that the Volume Shadow Copy Service is disabled. Thus, the best solution is to set this service to Automatic.
Step 1: Press “Win + R” keys to open the Run Window.
Step 2: Type msc to enter service interface.
Step 3: Find Volume Shadow Copy and choose Properties from the right-click menu.
Step 4: Change the Startup type to Automatic.
Step 5: Click Start, Apply, and OK to enable Volume Shadow Copy and make it run on your PC.
After that, you can try to back up your Windows 10/8/7 computer to check whether Volume Shadow Copy Service error 0x80042302 still exists.
A Volume Shadow Copy Service Operation Failed
Sometimes Shadow Copy issue happens with errors like 0x807800A1 & 0X800423F4 when creating a system image backup. The information is as shown below:
“A Volume Shadow Copy Service operation failed. Please check “VSS” and “SPP” application event logs for more information. (0x807800A1).
Additional Information:
The writer experienced a non-transient error. If the backup process is retried, the error is likely to reoccur. (0X800423F4).”
This issue often happens on Windows 10/8/7 computer due to some reasons, for example, VSS service may be stopped, antivirus or Windows firewall is enabled or hard drive has errors. Well then, what’re the solutions to this problem? Three ways are offered.
Solutions
Way 1: Check and Enable Volume Shadow Copy Service
Step 1: Similarly, you need to enter Services page by inputting services.msc in the Run window.
Step 2: Find Volume Shadow Copy to set the startup type to Automatic.
Step 3: If the Service Status is stopped or paused, click Start.
Step 4: Enter the Dependencies tab, check the dependency services that are required for Volume Shadows Copy Service to run.
Step 5: Go back to General, click Apply and OK
Way 2: Disable Antivirus and Windows Firewall
For antivirus, right click this program to choose Disable.
Note: In most cases, you shouldn’t disable the antivirus for the protection against viruses and security. To fix Volume Shadow Copy Service error, you can disable it temporarily. Then check whether the issue still occurs and re-enable it as soon as you’ve done.
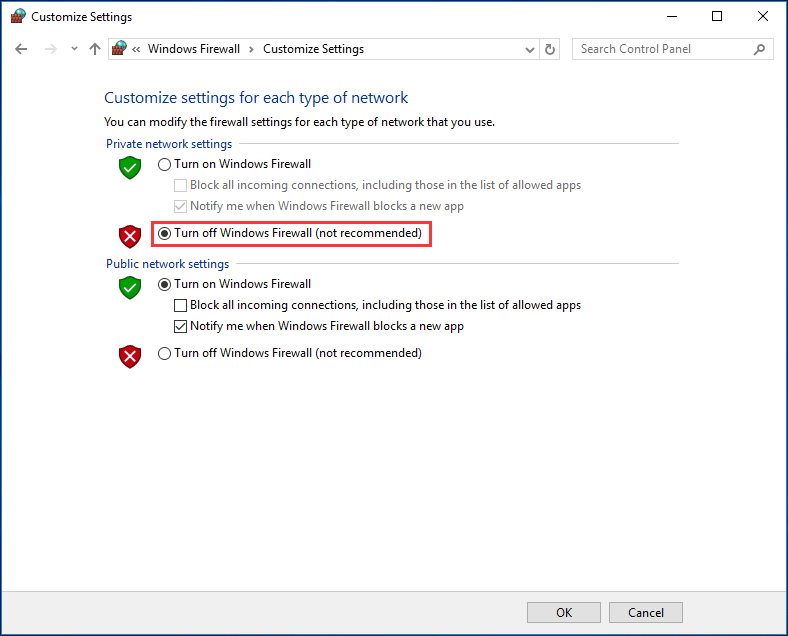
For Windows firewall, go to Control Panel > System and Security > Windows Firewall. Then, click Turn Windows firewall on or off option and choose Turn off Windows Firewall (not recommended) from Private/Public network settings. Finally, click OK.
Way 3: Check Hard Drive Errors
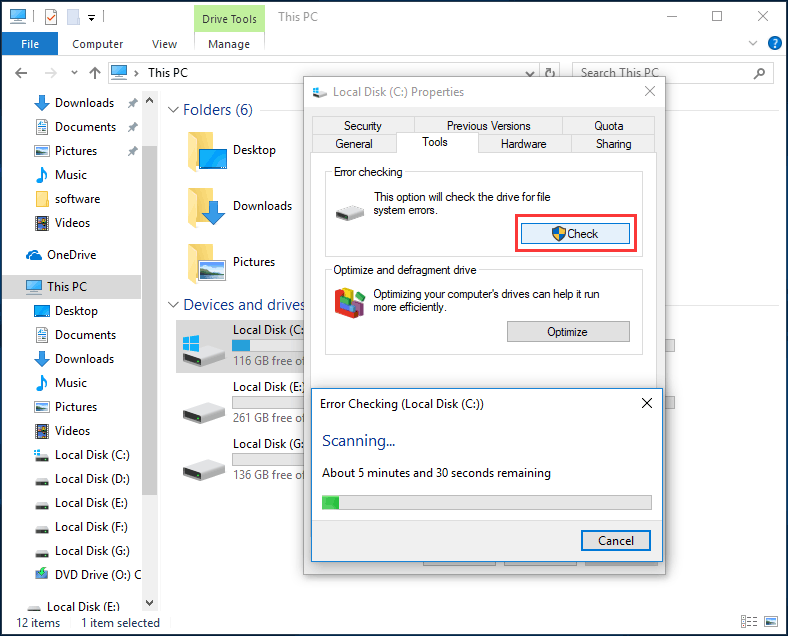
- To do this, you can enter Windows Explorer, right-click one partition you want to check for errors (usually C) to choose Properties.
- Under the Tools tab, click the Check(Windows 10/8) or Check Now (Windows 7) button followed by Scan drive.
- Then, follow the instructions to perform a check.
Also, use the command prompt “chkdsk” to do this work.
Tip: Besides, the third-party partition management software named MiniTool Partition Wizard has offered two features – Check File System and Surface Test, respectively enabling you to check & fix file system errors and check bad errors.
MiniTool Partition Wizard FreeClick to Download100%Clean & Safe
If you are getting the message – a Volume Shadow Copy Service operation failed, just try these three solutions to fix this Windows VSS error.
Case 2: Volume Shadow Copy Service Not Working Well When Restoring System
In addition to Windows 7/8 or Windows 10 VSS errors during backup, sometimes you might find the Volume Shadow Copy Service is not working with an error code like 0x81000202 or 0x80042302 during system restore although you have created a system image successfully beforehand.
Volume Shadow Copy Service Error 0x81000202
Here is the common error code 0x81000202:
“There was an unexpected error in the property page:
The Volume Shadow Copy service used by System Restore is not working. For more information view the event log…”
If you close the property page and try again, this system restore error 0x81000202 will appear again. Is there any way to fix it? Of course, here are three possible ways.
Solutions
Way 1: Change System Restore Setting
- Input msc in the Run window.
- Go to Computer ConfigurationAdministrative TemplateSystemSystem Restore.
- In the right pane, set the Turn off System Restore policy to Not configured.

Way 2: Enable Volume Shadow Copy
The steps are simple and we have mentioned this solution which is the same as the above Volume Shadow Copy Service errors. Thus, here we won’t repeat it.
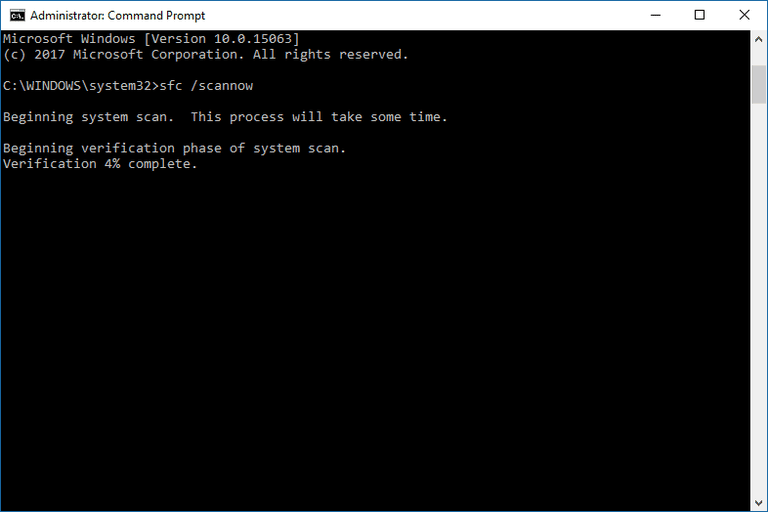
Way 3: Perform a System File Checker Scan(SFC) on Your Computer.
SFC tool can help you to scan system files, and replace incorrect versions of the system files with the correct versions. To perform a system file check can be helpful to fix Shadow Copy Service error 0x81000202.
- Run CMD as administrator.
- Type sfc /scannow.
Volume Shadow Copy Service Error 0x80042302 during System Restore
In addition to the Volume Shadow Copy service used by system restore is not working error, sometimes you fail to restore the system with the error message “System Restore does not appear to be functioning correctly on this system. A Volume Shadow Copy Service component encountered an unexpected error…(0x80042302)”
Related article: 4 Solutions to System Restore Does Not Appear to Be Functioning
When encountering system image restore failed volume shadow copy service issue, you can still fix it.
Solutions:
Way 1: Set Volume Shadow Copy Service to Automatic
Way 2: Run SFC
These two ways are the same as the methods to error code 0x81000202 in Windows 7/8/10, thus, we won’t repeat them.
Way 3: Perform a Clean Boot
If the 0x80042302 error is triggered when opening the System Restore utility, it can be fixed by a clean boot. Follow these steps:
Step 1: Open the Run window, and type msconfig.exe.
Step 2: Under the General tab, uncheck the Load startup items from the Selective startup menu.
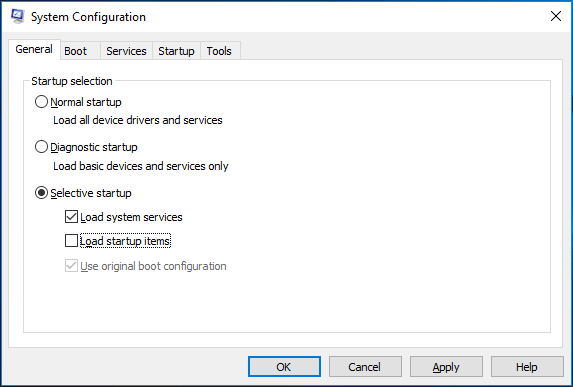
Step 3: In the Service tab, check Hide all Microsoft services and then click Disable all.
Step 4: Click OK and Restart.
In this part, we have shown you four VSS errors which happen when you are creating a system image or performing a system restore with the Windows built-in backup and restore utility. By following the corresponding solution, probably you can fix it.
Click to Tweet
Tip: Additionally, Microsoft Volume Shadow Copy Service might be not working with other error messages such as access is denied, unexpected error deviceiocontrol, etc. You can view the VSS logs to analyze the issues. Of course, the solutions are different based on different errors. Here, we won’t show you them.
But recently some of you turn to us for help, saying “is there anyone alternative to Windows Backup and Restore so as to effectively create a system image and restore the image“. The answer is yes. Here, we will show you one free backup software from MiniTool Solution Ltd.
Shadow Copy Service Alternative Software for Windows 10/8/7
MiniTool ShadowMaker, the reliable and free backup software, is specialized in backing up Windows operating system, partition and the entire disk for Windows 10/8/7 users.
As an excellent backup solution, this freeware lets you not only create scheduled backups by setting the specific time point but also set incremental and differential backups for the only changed or newly added data.
In the event of system accidents, the image file is available to restore the system to its previous state with simple clicks.
As the alternative to Windows built-in backup utility using Volume Shadow Copy Service, MiniTool ShadowMaker is worth recommending.
Want to quickly and successfully back up your OS without Volume Shadow Copy Service error? Now, get the Trial Edition of this backup software for 30-days free trial.
MiniTool ShadowMaker TrialClick to Download100%Clean & Safe
Back up Windows 10/8/7
Step 1: After completing the installation of this tool on your computer, open it to the main interface.
Tip: This free backup software only backs up the computer in the same LAN via remote control.
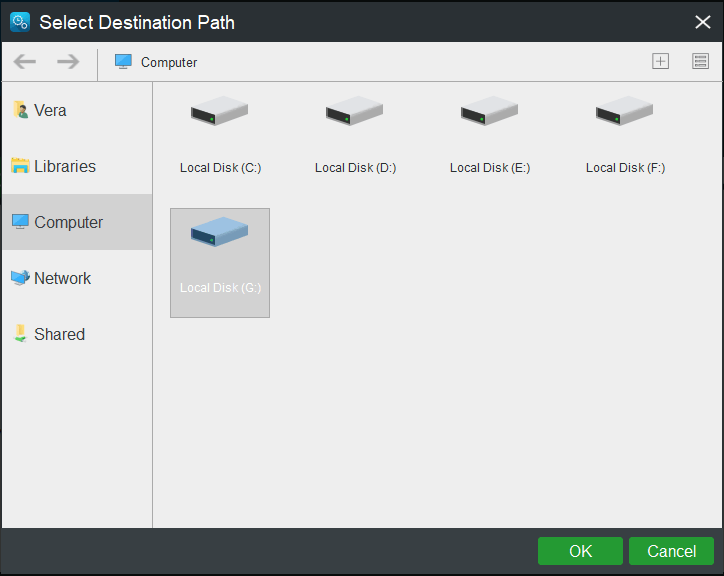
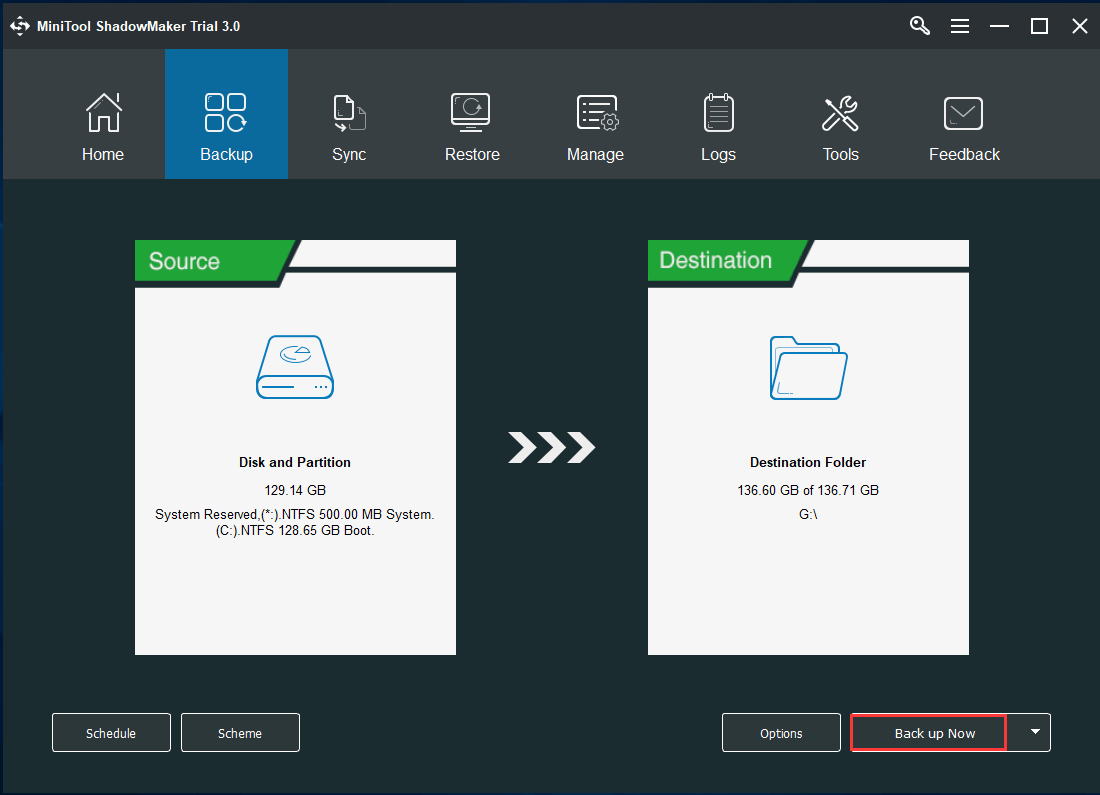
Step 2: It’s the time to choose the partitions you want to backup and decide the location you want to save the image to.
Just enter the Backup tab, and you can view this free backup software has checked the drives required for Windows to run. If you need to create a system disk image, enter the Source section to select all system partitions.
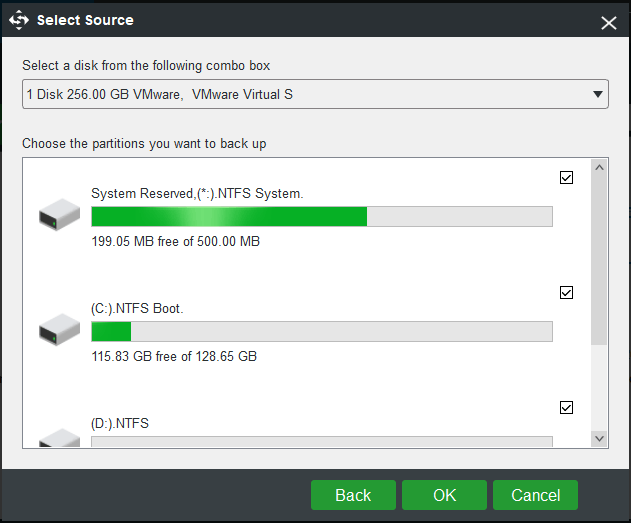
As to the destination storage path, an external hard drive, USB flash drive, or NAS can be available. Usually, we choose to create image files on the external drive.
Hot article: The Best Practice: 3-2-1 Backup Strategy for Home Computers
Step 3: Go back to the Backup interface, and click Back up Now button finally.
Tip:
1. Automatic backup is supported by MiniTool ShadowMaker. If you want to back up your computer on a regular basis, just use its Edit Schedule feature in Manage page after a full backup is completed.
2. In addition, the incremental and differential backup can also be created in Manage page by this free backup software. For more information, read 3 Types of Backup: Full, Incremental, Differential – MiniTool.
Restore System from an External Hard Drive
MiniTool ShadowMaker is helpful to restore your computer in case of unexpected disaster, which can avoid Volume Shadow Copy Service error 0x81000202 or 0x80042302 during system restore. How to do this job?
Tip: First of all, please use the Media Builder feature of MiniTool ShadowMaker to create a bootable disc to boot your computer. Then, you can start a system recovery in WinPE.
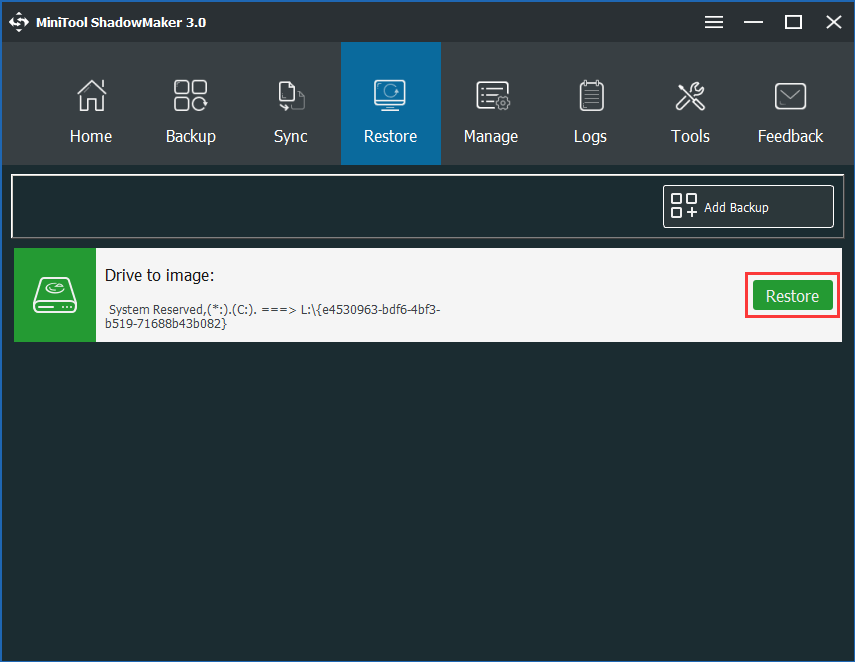
Step 1: In the Restore page, find the system image or system disk image you have created and click Restore button.
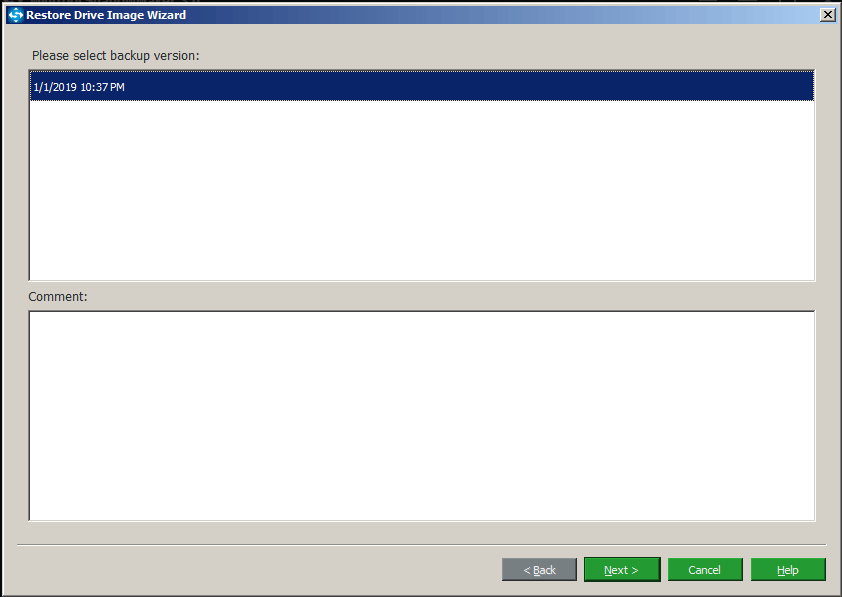
Step 2: The backup time will be shown, choose the backup version and click Next to continue.
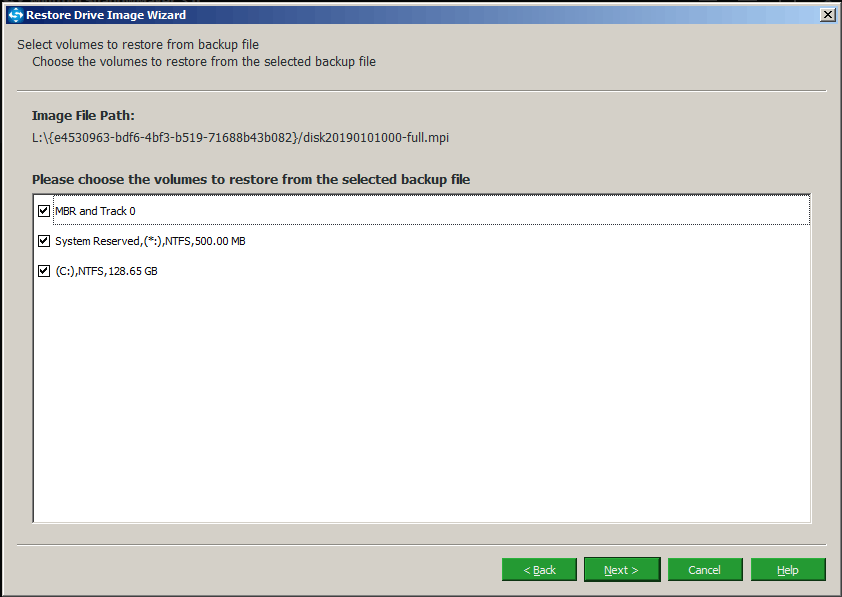
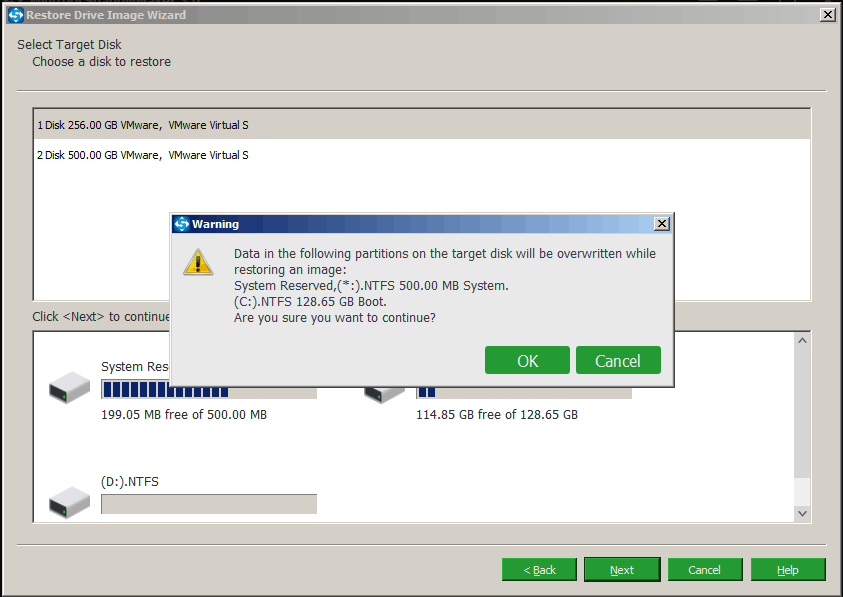
Step 3: Next, choose all system partitions as well as MBR and Track 0 to restore. Or else, the computer won’t be bootable.
Step 4: Choose the disk you want to restore the image file to and this freeware will tell you the drives that will be overwritten during restoration. Click OK to the next step.
Step 5: Now the software is performing the system image recovery process. After the operation, restart your computer and it can run properly.
“Windows 10 Shadow Copy error is common. To avoid it, I need free backup software to back up OS. Finally, I find MiniTool ShadowMaker and it is really worth using. “Click to Tweet
Conclusion
Having a Volume Shadow Copy Service error in Windows 10/8/7 during system backup or system restore using the built-in backup and restore utility? Try the solutions as mentioned above based on the specific error code to fix your problem.
To avoid Microsoft Volume Shadow Copy errors during PC backup and restore using Windows built-in tool, use MiniTool ShadowMaker to back up your PC! Now, free download this backup software.
MiniTool ShadowMaker TrialClick to Download100%Clean & Safe
Have some suggestions for the VSS errors? Or encounter some problems when using our backup software? Now, tell us by leaving your idea in the following zone or sending it to [email protected].
-
#1
Привет коллеги, на одном из контроллеров домена в логах появляется ошибка с event id 12289 источник vss :
Код:
Ошибка теневого копирования тома: Непредвиденная ошибка DeviceIoControl(\\?\fdc#generic_floppy_drive#6&2bc 13940&0&0#{53f5630d-b6bf-11d0-94f2-00a0c91efb8b} - 0000000000000274,0x00560000,0000000000000000,0,000 000000041D340,4096,[0]).. hr = 0x80070001, Неверная функция.
Операция:
Предоставление восстановленных томов
Поиск LUN теневых копий
Событие PostSnapshot
Выполнение асинхронной операции

Контекст:
Устройство: \\?\fdc#generic_floppy_drive#6&2bc13940&0&0#{53f56 30d-b6bf-11d0-94f2-00a0c91efb8b}
Проверка обнаруженного тома: Existing - \\?\fdc#generic_floppy_drive#6&2bc13940&0&0#{53f56 30d-b6bf-11d0-94f2-00a0c91efb8b}
Контекст выполнения: Provider
Имя поставщика: VMware Snapshot Provider
Версия поставщика: 1.0.0
Код поставщика: {564d7761-7265-2056-5353-2050726f7669}
Текущее состояние: DoSnapshotSet
Возможно это как то связано с плановым резервным копированием, если у кого было подскажите как победить проблему.
-
#2
Это известный косяк, могут так же проскакивать в журналах и такие ошибки:
Код:
   Event ID: 50 NTFS Warning
    {delayed write failed} Windows was unable to save all the data for the file. The data has been lost. This error may be caused by a failure of your computer hardware or network connection. Please try to save this file elsewhere
    Event ID: 57 NTFS Warning
    The system failed to flush data to the transaction log. Corruption may occur.
    Event ID: 137 NTFS Error
    The default transaction resource manager on volume \\?\Volume{806289e8-6088-11e0-a168-005056ae003d} encountered a non-retryable error and could not start. The data contains the error code.
    Event ID: 140 NTFS Warning
    The system failed to flush data to the transaction log. Corruption may occur in VolumeId:<> DeviceName: \Device\HarddiskVolume<>.(A device which does not exist was specified.).
    Event ID: 157 Disk Warning
    Disk x has been surprise removed.
Проверьте что служба теневого копирования работает, через services.msc.
Вмваре говорит что пока решения нет, но в качестве временного решения адресует на статьи http://support.microsoft.com/kb/2853247 и http://support.microsoft.com/kb/885688
Посмотрите так же логи на сервере бэкапов, скорее всего это из за бэкапа.
I ran into an interesting problem that took a bit of digging around to both find the root cause and also to find the final fix. When running backups on Vmware 5.5 running on NetApp storage I could see some, but not all VMs, failing and throwing up the below errors in the event logs
Event ID 57 ntfs Warning
The system failed to flush data to the transaction log. Corruption may occur.

Event ID: 137 ntfs Error
The default transaction resource manager on volume \?Volume{806289e8-6088-11e0-a168-005056ae003d} encountered a non-retryable error and could not start. The data contains the error code.

Event ID: 12289 VSS Error
Volume Shadow Copy Service error: Unexpected error DeviceIoControl(\?fdc#generic_floppy_drive#6&2bc13940&0&0#{53f5630d-b6bf-11d0-94f2-00a0c91efb8b} - 00000000000004A0,0x00560000,0000000000000000,0,0000000000353B50,4096,[0]). hr = 0x80070001, Incorrect function.
The key alert here is Event ID 12289. It was also the most off-putting. It initially looked like a floppy drive issue but there was no floppy drive attached to the VM nor were there any floppy drivers installed on the VM. A look around the VMware community forums led me to this posting – https://communities.vmware.com/thread/309844?start=0&tstart=0 It was focused more on vSphere 4.1 however and most of the advice was around installing an older version of VMware Tools. Comment 27 was the jackpot winner. The System Reserved partition was causing the issue.
So what does the System Reserved partition do?
The System Reserved partition contains the Boot Manager and Boot Configuration data that are read on start up of the virtual machine. The VM boots from the boot loader n the System Reserved partition and then boots Windows from the System drive. It is also used as a location for the start up files for BitLocker Drive Encryption. If you need BitLocker then you’ll need to have a System Reserved partition. For Windows client OS’s then that’s a great feature to have but from a server OS perspective where BitLocker just isn’t used then it’s superfluous. The System Reserved partition is created by default on OS installation so there’s two options to remediate.
- Remove the partition manually post installation
- Remove the partition from your Windows OS templates
I won’t go into the details on how to remove the partition from your templates here but you can find more information over on mydigitallife.info which can be used. I ran through the steps myself to do this for all of our Windows templates following finding the root cause of the initial error.
As per one of the links mentioned in Comment 27 in the VMware communities post it’s possible to change the location of the boot files so that the partition can be removed. This information can be found over on geekshangout.com. However the steps didn’t include how to re-claim that partition so that there isn’t an unallocated disk partition sitting in front of the C drive (disk 0). While I haven’t tested backups in this configuration I wouldn’t be surprised if it cause other issues during backup. So below I’ve listed the steps to follow so you can successfully remove the partition as per the steps on geekshangout and then re-claim the space on gparted.
Delete System Reserved partition and reclaim space
The first preparation step in this whole process is to download the gparted software and upload it to your ISO datastore. Gparted can be downloaded from here –http://gparted.org/download.php. Next you’ll need to take a snapshot of the server you are going to modify within vCenter. This is your fallback should there be any issues. Modifying the System Reserved partition and moving the boot records is a very disruptive procedure and can render your virtual machine unusable afterwards so make sure you have had a successful recent backup that resides within your Recovery Point Objective (RPO) and that you have a snapshot of the virtual machine.
Step 1 -Deactivate and delete parition
1.1 Log into the VM as the local administrator or an account that has local admin access or domain admin account

1.2 Open a command prompt with admin privileges
1.3 Type the command bcdboot c:windows /s c:

1.4 You should get a message similar to: Boot files successfully created.
1.5 Open the Disk Management GUI (you could use diskpart for scripts), locate the C: partition right-click and select “Mark Partition as Active”, select yes to the “do you want to continue message”

1.6 Reboot the server and confirm that it can reboot successfully.
1.7 Log into the server again and open the System Manager console. In Disk Management right-click on the System Reserved partition and select Delete Volume. Click Yes on the warning.

1.8 Now comes the fun part, using GParted to re-claim the space. Shut down the server again.
Step 2 – Re-claim unallocated space using GParted
2.1 Edit the settings of the VM and attached the GParted ISO to the CD drive

2.2 You will also need to edit the BIOS Options under VM Options so there is a wait period where you can select to boot from the CD. I’ve set it to 3000 ms. There is a bit of cat and mouse that can take place on boot up so you might find that you have to restart the VM a couple of times so you can catch the boot delay and hit ESC.

2.3 Boot the VM and press ESC at the prompt and select to boot from CD-ROM. If prompted to press any key please do so. This will bring up the gparted screen. Leave the default settings and click enter.

2.4 Select Don’t touch keymap

2.5 Move down to Ok and press enter. Press enter for the language

2.6 Press enter again to leave the defaults for the mode

2.7 You will now see the GParted console with the unallocated 101MiB disk in front of the primary disk. There is also another 2Mib unallocated but don’t worry about this one.

2.8 Select the primary disk and click on Resize/Move. Drag the highlighted green bar to the left. You will see a slight grey box to the left of the green one, this is the system reserved partition removed earlier.

2.9 You cannot have 0 Mib leading in front of the disk so this needs to be set to 1. The free space following size will most likely become 102Mib. Add this to the New Size space, i.e. change New size from 102207 to 102399 and the free following will become 0. Then click on Resize/Move

2.10 It will then show you the new disk layout

2.11 Nothing has really been committed yet so click on Apply and in the pop-up click on Apply also

2.12 The reconfiguration of the partitions will now run and can take anywhere between 5 and 30 minutes depending on the size of the disk.

2.13 Once the action has completed you can now power down the server.

Step 3 – Recreating boot records
At this stage the server will not boot. It will give a message that the boot files are missing or that the required device isn’t connected. At this point we need to use diskpart to recreate the boot records. In this environment the SCSI controllers are set to Paravirtual but when running diskpart as part of the boot up the server cannot see those disks are the driver for Paravirtual is only loaded on boot up time. In order to get around this problem the SCSI controller needs to temporarily set to Paravirtual. If the server already has LSI Logic SAS already then you can ignore the steps to convert the controller and change it back afterwards.
3.1 Once the server has been shutdown from the previous step Edit the Settings and change the attached CD drive to the Windows OS ISO file.

3.2 Next the SCSI Controller needs to be set to LSI Logic SAS. Click on SCSI Controller and select Change Type. Select the LSI Logic SAS and click Ok

3.3 Normally this is fine but in this instance I got an error message as I was modifying the vCenter server itself. For all other servers I didn’t get the below error message or need to perform any addition steps. If you don’t get an error that “Access to resource settings on the host is restricted to the server that is managing it” then you can move onto step 3.4. This issue is caused by a lock being on the ESXi host to vCenter and is reset by restarting the required services.

3.3.1 Enable SSH on the host. You can do this from Configuration-> Software -> Security Profiles -> Services. SSH into the ESXi host Restart the hostd service and the vpxa service by running the commands below. You will need to log into the vSphere client again once completed.
/etc/init.d/vpxa stop
/etc/init.d/hostd restart

3.3.2 Log into vCenter and now edit the settings again and change the controller type to LSI Logic SAS and the error should go away

3.4 Press ESC on boot up and select CD-ROM from the boot options

3.5 At the initial Windows screen press Shift+F10. This will open a command prompt. Type diskpart to begin the procedure and then type LIS DIS to get a list of disks

3.6 Note down the Disk number and then type SEL DIS <Disk#> in this case SEL DIS 0. Then type LIS PAR to get a listing of the partitions

3.7 Note down the Partition Number and then enter SEL PAR <Partition#> in this case SEL PAR 1 and then type ACTIVE, when you get a result as shown below, type EXIT to leave Diskpart.

3.8 We must rebuild the BCD because it was stored on the partition we just deleted. At the command prompt type BOOTREC /REBUILDBCD. Press Y when requested. If this option doesn’t appear then the server will need to be recovered from backup or snapshot.

3.9 Once that is completed you can shut down the server again and for those that need to change the SCSI controller type backup to Paravirtual. Also set the boot delay to 0 and set the CD drive to Client Device.


3.10 Now boot the VM. You may get a notification that the drive required a CHKDSK to be run, let it run to completion and it will reboot the server automatically.

3.11 Log into the server when it boots, go to the System Manager and check Disk Management. The Disk 0 should now appear as one drive without any partitions.

Next time you run the backup you won’t get those errors anymore. It can take some time to retro-fit these changes to all servers in your infrastructure. My recommendation would be to gather a full list of VMs that exhibit this issue and space the changes out over a course of months following your local change processes.
Windows 8.1 Windows 8.1 Enterprise Windows 8.1 Pro Windows RT 8.1 Windows Server 2012 R2 Datacenter Windows Server 2012 R2 Essentials Windows Server 2012 R2 Foundation Windows Server 2012 R2 Standard Еще…Меньше
Симптомы
Предположим, что вы используете Windows Server 2012 R2 сервера manager (DPM) защиты данных. Если на сервере есть отключения хранения, не может выполнять задания DPM. Ошибка поставщика теневого копирования (томов VSS) тома программного обеспечения возникает, это означает, что доступ запрещен. Кроме того появляется следующее сообщение об ошибке:
Модуль записи VSS приложение или службу VSS находится в некорректном состоянии. Он уже находится в некорректном состоянии, либо она введена неправильная состояние во время текущей операции. (Код детали 30111: VssError: поставщик теневого копирования содержит ошибку. Проверьте журналы событий системы и приложений для получения дополнительных сведений (0x80042306)).
Решение
Для решения этой проблемы установите набор обновлений 2928680.
Сведения об обновлении
Дополнительные сведения о получении накопительного пакета обновления 2928680 щелкните следующий номер статьи, чтобы перейти к статье базы знаний Майкрософт:
2928680 Windows RT 8.1, Windows 8.1 и Windows Server 2012 R2 накопительный пакет обновления: март 2014
Статус
Корпорация Майкрософт подтверждает, что это проблема продуктов Майкрософт, перечисленных в разделе «Относится к».
Дополнительные сведения
Для получения дополнительных сведений о терминологии обновлений программного обеспечения щелкните следующий номер статьи базы знаний Майкрософт:
Описание 824684 Стандартные термины, используемые при описании обновлений программных продуктов МайкрософтТакже могут найти множество 12289 ошибка код события VSS было зарегистрировано в журнале событий приложений:
Код события: 12289
Источник: VSS
Тип: ошибка
Описание: «ошибка службы теневого копирования тома: непредвиденная ошибка DeviceIoControl (\\?\Volume {xxx}-000000000000015C,0x0053c06c,000000CF9DD000F0,0,000000CF9DD05140,4096,[0]). hr = 0x80070005, отказано в доступе.
Можно также увидеть следующую ошибку в VSS трассировки:
6216 [13:57:37.769 P:04AC T:1460 INCICHLH(0521) SWPRV] [CVssDiffArea::SetExplicit] THROW непредвиденная ошибка при вызове подпрограмме поставщика: DeviceIoControl (\\?\Volume {xxx} — 00000000000003C4,0x0053c06c,0000006732E109E0,0,0000006732E119F0,4096,[0]) [hr = 0x80070005]
Нужна дополнительная помощь?
Нужны дополнительные параметры?
Изучите преимущества подписки, просмотрите учебные курсы, узнайте, как защитить свое устройство и т. д.
В сообществах можно задавать вопросы и отвечать на них, отправлять отзывы и консультироваться с экспертами разных профилей.
Using Backup and Restore to back up your system or files for computer protection but receive a Volume Shadow Copy Service error? This post shows you some specific Windows VSS errors and the corresponding solutions, and an easy way to keep PC safe so that you can easily restore the computer to its previous state in case of system accidents.
What Is Volume Shadow Copy Service (VSS)
Shadow Copy is a technology in Microsoft Windows, allowing users to make manual or automatic backups/snapshots of computer volumes or files. It is also known as Volume Snapshot Service, Volume Shadow Copy Service or VSS.
What is VSS? Microsoft defines it as follows:
“The Volume Shadow Copy Service (VSS) is a set of COM interfaces that implements a framework to allow volume backups to be performed while applications on a system continue to write to the volumes.”
This service requires the file system to be NTFS so as to create and store shadow copies. And the copies can be created by any Windows component using this technology on local, external and removable volumes or network locations, such as when creating a scheduled Windows backup or automatic system restore point.
If this service is stopped, all components depending on the service are still not working. And you may encounter some Volume Shadow Copy service errors in Windows 10/8/7 when backing up or restoring OS. Besides, VSS errors may also happen on Windows Server 2008, Server SBS 2011, Server 2012, etc.
In the following paragraphs, we will walk you through some specific errors as well as the solutions in Windows PCs.
Fix Volume Shadow Copy Service Errors Windows 10/8/7
VSS errors are various according to different Windows operating systems (PC OS and Server) and situations. Here we will show you some common errors in Windows 10/8/7 when creating a Windows system image and doing a system restore.
Case 1: Volume Shadow Copy Service Not Working Well When Backing up Windows
Volume Shadow Copy Service Error 0x80042302 during Backup
Recently we received the feedback saying backing up Windows to a new external hard drive but failed with error message 0x80042302. The details are as follows:
«The backup application could not start due to an internal error:
A Volume Shadow Copy Service component encountered an unexpected error. Check the Application event log for more information. (0x80042302).»
Solution
In this case, the problem is that the Volume Shadow Copy Service is disabled. Thus, the best solution is to set this service to Automatic.
Step 1: Press «Win + R» keys to open the Run Window.
Step 2: Type msc to enter service interface.
Step 3: Find Volume Shadow Copy and choose Properties from the right-click menu.
Step 4: Change the Startup type to Automatic.
Step 5: Click Start, Apply, and OK to enable Volume Shadow Copy and make it run on your PC.
After that, you can try to back up your Windows 10/8/7 computer to check whether Volume Shadow Copy Service error 0x80042302 still exists.
A Volume Shadow Copy Service Operation Failed
Sometimes Shadow Copy issue happens with errors like 0x807800A1 & 0X800423F4 when creating a system image backup. The information is as shown below:
“A Volume Shadow Copy Service operation failed. Please check “VSS” and “SPP” application event logs for more information. (0x807800A1).
Additional Information:
The writer experienced a non-transient error. If the backup process is retried, the error is likely to reoccur. (0X800423F4).»
This issue often happens on Windows 10/8/7 computer due to some reasons, for example, VSS service may be stopped, antivirus or Windows firewall is enabled or hard drive has errors. Well then, what’re the solutions to this problem? Three ways are offered.
Solutions
Way 1: Check and Enable Volume Shadow Copy Service
Step 1: Similarly, you need to enter Services page by inputting msc in the Run window.
Step 2: Find Volume Shadow Copy to set the startup type to Automatic.
Step 3: If the Service Status is stopped or paused, click Start.
Step 4: Enter the Dependencies tab, check the dependency services that are required for Volume Shadows Copy Service to run.
Step 5: Go back to General, click Apply and OK
Way 2: Disable Antivirus and Windows Firewall
For antivirus, right click this program to choose Disable.
Note: In most cases, you shouldn’t disable the antivirus for the protection against viruses and security. To fix Volume Shadow Copy Service error, you can disable it temporarily. Then check whether the issue still occurs and re-enable it as soon as you’ve done.
For Windows firewall, go to Control Panel > System and Security > Windows Firewall. Then, click Turn Windows firewall on or off option and choose Turn off Windows Firewall (not recommended) from Private/Public network settings. Finally, click OK.
Way 3: Check Hard Drive Errors
- To do this, you can enter Windows Explorer, right-click one partition you want to check for errors (usually C) to choose Properties.
- Under the Tools tab, click the Check(Windows 10/8) or Check Now (Windows 7) button followed by Scan drive.
- Then, follow the instructions to perform a check.
Also, use the command prompt «chkdsk» to do this work.
Tip: Besides, the third-party partition management software named MiniTool Partition Wizard has offered two features — Check File System and Surface Test, respectively enabling you to check & fix file system errors and check bad errors.
Free Download
If you are getting the message — a Volume Shadow Copy Service operation failed, just try these three solutions to fix this Windows VSS error.
Case 2: Volume Shadow Copy Service Not Working Well When Restoring System
In addition to Windows 7/8 or Windows 10 VSS errors during backup, sometimes you might find the Volume Shadow Copy Service is not working with an error code like 0x81000202 or 0x80042302 during system restore although you have created a system image successfully beforehand.
Volume Shadow Copy Service Error 0x81000202
Here is the common error code 0x81000202:
«There was an unexpected error in the property page:
The Volume Shadow Copy service used by System Restore is not working. For more information view the event log…»
If you close the property page and try again, this system restore error 0x81000202 will appear again. Is there any way to fix it? Of course, here are three possible ways.
Solutions
Way 1: Change System Restore Setting
- Input msc in the Run window.
- Go to Computer ConfigurationAdministrative TemplateSystemSystem Restore.
- In the right pane, set the Turn off System Restore policy to Not configured.
Way 2: Enable Volume Shadow Copy
The steps are simple and we have mentioned this solution which is the same as the above Volume Shadow Copy Service errors. Thus, here we won’t repeat it.
Way 3: Perform a System File Checker Scan(SFC) on Your Computer.
SFC tool can help you to scan system files, and replace incorrect versions of the system files with the correct versions. To perform a system file check can be helpful to fix Shadow Copy Service error 0x81000202.
- Run CMD as administrator.
- Type sfc /scannow.
Volume Shadow Copy Service Error 0x80042302 during System Restore
In addition to the Volume Shadow Copy service used by system restore is not working error, sometimes you fail to restore the system with the error message «System Restore does not appear to be functioning correctly on this system. A Volume Shadow Copy Service component encountered an unexpected error…(0x80042302)«
Related article: 4 Solutions to System Restore Does Not Appear to Be Functioning
When encountering system image restore failed volume shadow copy service issue, you can still fix it.
Solutions:
Way 1: Set Volume Shadow Copy Service to Automatic
Way 2: Run SFC
These two ways are the same as the methods to error code 0x81000202 in Windows 7/8/10, thus, we won’t repeat them.
Way 3: Perform a Clean Boot
If the 0x80042302 error is triggered when opening the System Restore utility, it can be fixed by a clean boot. Follow these steps:
Step 1: Open the Run window, and type msconfig.exe.
Step 2: Under the General tab, uncheck the Load startup items from the Selective startup menu.
Step 3: In the Service tab, check Hide all Microsoft services and then click Disable all.
Step 4: Click OK and Restart.
In this part, we have shown you four VSS errors which happen when you are creating a system image or performing a system restore with the Windows built-in backup and restore utility. By following the corresponding solution, probably you can fix it.
Click to Tweet
Tip: Additionally, Microsoft Volume Shadow Copy Service might be not working with other error messages such as access is denied, unexpected error deviceiocontrol, etc. You can view the VSS logs to analyze the issues. Of course, the solutions are different based on different errors. Here, we won’t show you them.
But recently some of you turn to us for help, saying «is there anyone alternative to Windows Backup and Restore so as to effectively create a system image and restore the image«. The answer is yes. Here, we will show you one free backup software from MiniTool Solution Ltd.
Shadow Copy Service Alternative Software for Windows 10/8/7
MiniTool ShadowMaker, the reliable and free backup software, is specialized in backing up Windows operating system, partition and the entire disk for Windows 10/8/7 users.
As an excellent backup solution, this freeware lets you not only create scheduled backups by setting the specific time point but also set incremental and differential backups for the only changed or newly added data.
In the event of system accidents, the image file is available to restore the system to its previous state with simple clicks.
As the alternative to Windows built-in backup utility using Volume Shadow Copy Service, MiniTool ShadowMaker is worth recommending.
Want to quickly and successfully back up your OS without Volume Shadow Copy Service error? Now, get the Trial Edition of this backup software for 30-days free trial.
Free Download
Back up Windows 10/8/7
Step 1: After completing the installation of this tool on your computer, open it to the main interface.
Tip: This free backup software only backs up the computer in the same LAN via remote control.
Step 2: It’s the time to choose the partitions you want to backup and decide the location you want to save the image to.
Just enter the Backup tab, and you can view this free backup software has checked the drives required for Windows to run. If you need to create a system disk image, enter the Source section to select all system partitions.
As to the destination storage path, an external hard drive, USB flash drive, or NAS can be available. Usually, we choose to create image files on the external drive.
Hot article: The Best Practice: 3-2-1 Backup Strategy for Home Computers
Step 3: Go back to the Backup interface, and click Back up Now button finally.
Tip:
1. Automatic backup is supported by MiniTool ShadowMaker. If you want to back up your computer on a regular basis, just use its Edit Schedule feature in Manage page after a full backup is completed.
2. In addition, the incremental and differential backup can also be created in Manage page by this free backup software. For more information, read 3 Types of Backup: Full, Incremental, Differential — MiniTool.
Restore System from an External Hard Drive
MiniTool ShadowMaker is helpful to restore your computer in case of unexpected disaster, which can avoid Volume Shadow Copy Service error 0x81000202 or 0x80042302 during system restore. How to do this job?
Tip: First of all, please use the Media Builder feature of MiniTool ShadowMaker to create a bootable disc to boot your computer. Then, you can start a system recovery in WinPE.
Step 1: In the Restore page, find the system image or system disk image you have created and click Restore button.
Step 2: The backup time will be shown, choose the backup version and click Next to continue.
Step 3: Next, choose all system partitions as well as MBR and Track 0 to restore. Or else, the computer won’t be bootable.
Step 4: Choose the disk you want to restore the image file to and this freeware will tell you the drives that will be overwritten during restoration. Click OK to the next step.
Step 5: Now the software is performing the system image recovery process. After the operation, restart your computer and it can run properly.
«Windows 10 Shadow Copy error is common. To avoid it, I need free backup software to back up OS. Finally, I find MiniTool ShadowMaker and it is really worth using. «Click to Tweet
Conclusion
Having a Volume Shadow Copy Service error in Windows 10/8/7 during system backup or system restore using the built-in backup and restore utility? Try the solutions as mentioned above based on the specific error code to fix your problem.
To avoid Microsoft Volume Shadow Copy errors during PC backup and restore using Windows built-in tool, use MiniTool ShadowMaker to back up your PC! Now, free download this backup software.
Free Download
Have some suggestions for the VSS errors? Or encounter some problems when using our backup software? Now, tell us by leaving your idea in the following zone or sending it to [email protected].
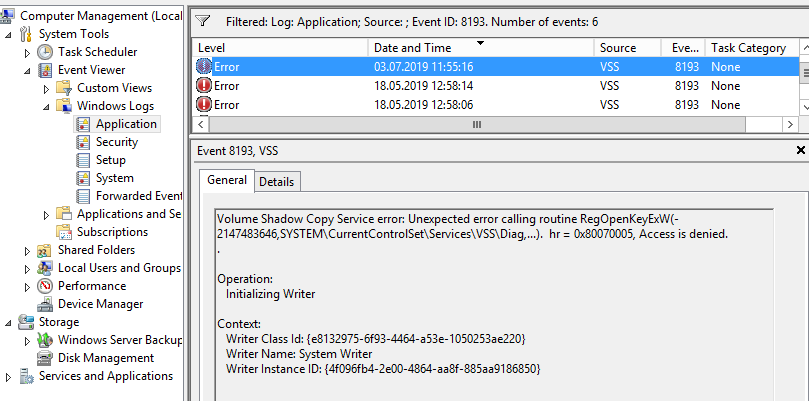
Система мониторинга с одного из серверов с Windows Server 2016 при каждой загрузке сервера стала слать события с ошибкой службы теневого копирования томов в журнале Application с EventID 8193 от источника VSS:
Volume Shadow Copy Service error: Unexpected error calling routine RegOpenKeyExW (-2147483646, SYSTEMCurrentControlSetServicesVSSDiag,...).  hr = 0x80070005, Access is denied.
Operation:
Initializing Writer
Context:
 Writer Class Id: {e8132975-6f93-4464-a53e-1050253ae220}
Writer Name: System Writer
Writer Instance ID: {4f096fb4-2e00-4864-aa8f-885aa9186850}
На русском:
Ошибка теневого копирования тома: Непредвиденная ошибка при вызове подпрограммы RegOpenKeyExW (-2147483646,SYSTEMCurrentControlSetServicesVSSDiag,...).. hr = 0x80070005, Отказано в доступе.
Операция:
Инициализация модуля записи
Контекст:
Код класса модуля записи: {e8132975-6f93-4464-a53e-1050253ae220}
 Имя модуля записи: System Writer
Код экземпляра модуля записи: {4f096fb4-2e00-4864-aa8f-885aa9186850}
При этом сервер работает нормально, каких-то видимых проблем со службами нет. В списке модулей VSS также нет ошибок для ID этого экземпляра VSS Writer:
vss list writers

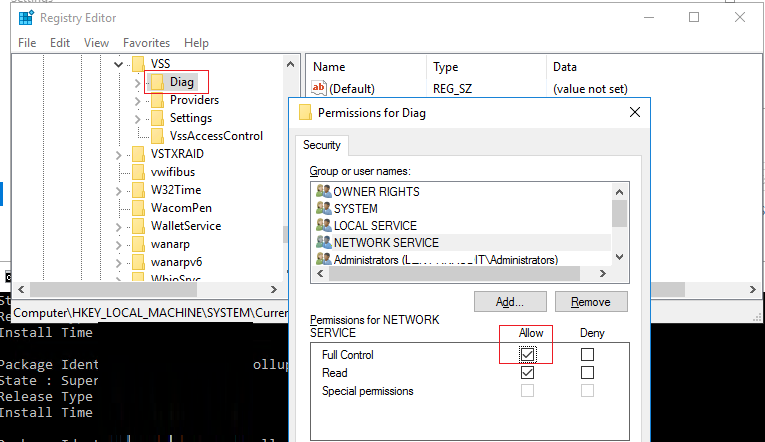
Данная ошибка довольно старая и обычно связана с установкой DHCP роли на сервер Windows Server 2008 (и выше), после которого у учетной записи Network Service пропадают права на ветку реестра HKEY_LOCAL_MACHINESYSTEMCurrentControlSetServicesVSSDiag.
Проблема связана с установкой модуля теневого копирования VSS — DHCP Jet Writer, отвечающего за корректное создание теневых копий DHCP службы, который изменяет права на ветку.
Чтобы исправить ошибку нужно вручную с помощью редактора реестра предоставить полные права для Network Service на указанную ветку.
- Запустите regedit.exe;
- Перейдите к ветке HKLMSYSTEMCurrentControlSetservicesVSSDiag и откройте окно с правами на ветку реестра (пункт Permissions в контекстном меню);
- В списке разрешений найдите Network Service и в разрешениях предоставьте полный доступ (Full Control).

Вместо ручной правки реестра более правильнее было бы восстановить стандартные права на нее с помощью утилиты командной строки SubInACL. Скачайте и установите утилиту, (если это еще не сделано) и выполните следующие команды:
cd “C:Program Files (x86)Windows Resource KitsTools”
subinacl.exe /Subkeyreg SystemCurrentControlSetServicesVSSDiag /sddl=D:PAI(A;;KA;;;BA)(A;;KA;;;SY)(A;;CCDCLCSWRPSDRC;;;BO)(A;;CCDCLCSWRPSDRC;;;LS)(A;;CCDCLCSWRPSDRC;;;NS)(A;CIIO;RC;;;OW)(A;;KR;;;BU)(A;CIIO;GR;;;BU)(A;CIIO;GA;;;BA)(A;CIIO;GA;;;BO)(A;CIIO;GA;;;LS)(A;CIIO;GA;;;NS)(A;CIIO;GA;;;SY)(A;CI;CCDCLCSW;;;S-1-5-80-3273805168-4048181553-3172130058-210131473-390205191)(A;ID;KR;;;AC)(A;CIIOID;GR;;;AC)S:ARAI
В Windows Server 2008 R2 команда будет такая (согласно KB Microsoft):
subinacl.exe /Subkeyreg SystemCurrentControlSetServicesVSSDiag /sddl=O:SYG:SYD:PAI(A;;KA;;;BA)(A;;KA;;;SY)(A;;SDGRGW;;;BO)(A;;SDGRGW;;;LS)(A;;SDGRGW;;;NS)(A;CIIO;RC;;;S-1-3-4)(A;;KR;;;BU)(A;CIIO;GR;;;BU)(A;CIIO;GA;;;BA)(A;CIIO;GA;;;BO)(A;CIIO;GA;;;LS)(A;CIIO;GA;;;NS)(A;CIIO;GA;;;SY)(A;CI;CCDCLCSW;;;S-1-5-80-3273805168-4048181553-3172130058-210131473-390205191)
Затем в редакторе реестра нужно выполнить замену разрешений на вложенные объекты. Для этого откройте свойства ключа Diag и выполните “Permissions” -> “Advanced” -> “Replace all child object permissions ….».
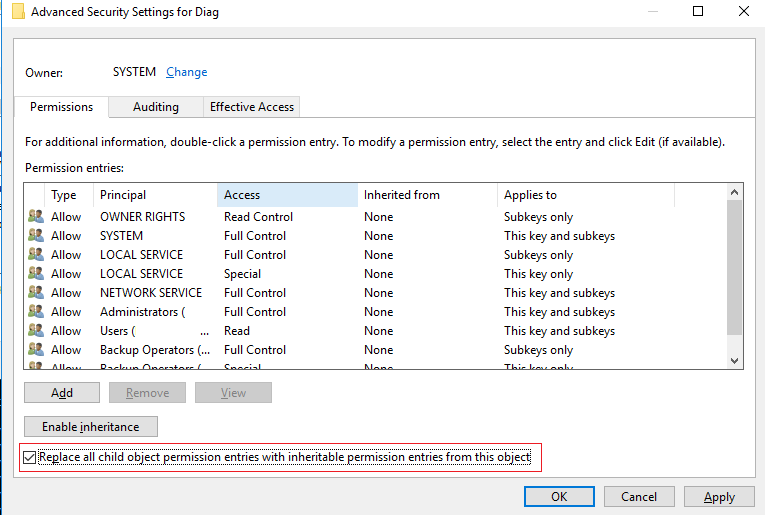
Осталось перезагрузить Windows.
PS. Уже в процесса написания статьи обнаружил что существует еще одна ошибка VSS с таким же (!!!) EventID 8193 с описанием:
Volume Shadow Copy Service error: Unexpected error calling routine ConvertStringSidToSid(S-1-5-21-2470146651-3958396388-212345117-21232.bak).  hr = 0x80070539,The security ID structure is invalid.
Operation:
OnIdentify event
Gathering Writer Data

Context:
Execution Context: Shadow Copy Optimization Writer
Writer Class Id: {4dc3bdd4-ab48-4d07-adb0-3bee2926fd7f}
Writer Name: Shadow Copy Optimization Writer
Writer Instance ID: {5e5d68e6-9c97-4af6-a09f-bb2db4c65058}
Русский:
Ошибка теневого копирования тома: Непредвиденная ошибка при вызове подпрограммы ConvertStringSidToSid(S-1-5-21-2470146651-3958396388-212345117-21232.bak, Идентификатор безопасности имеет неверную структуру.
Чтобы статья была более полной, оставлю тут метод решения и этой ошибки.
Данная ошибка препятствует выполнению резервному копирования системы (System State Backup) с помощь Windows Server Backup, который завершается с ошибкой
“0x80042308: The specified object was not found
».
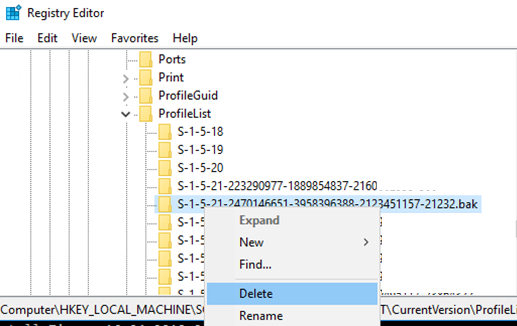
Проблема решается по другому и связана с наличием некорректной записи в ветке реестра с профилями пользователей HKLMSoftwareMicrosoftWindows NTCurrentVersionProfileList. Связано с тем, что служба VSS (компонент Shadow Copy Optimization Writer ) не может найти профиль пользователя с SID, оканчивающимся на .bak и выпадает в ошибку. Нужно удалить ключ реестра, который указан в описании события ConvertStringSidToSid(S-1-5-21-2470146651-3958396388-212345117-21232.bak).
- Откройте regedit.exe;
- Перейдите в ветку HKLMSoftwareMicrosoftWindows NTCurrentVersionProfileList;
- Найдите и удалите ветку реестра с суффиксом .bak;
- Перезагрузите сервер и попробуйте выполнить резервное копирование.