Как исправить эту ошибку?

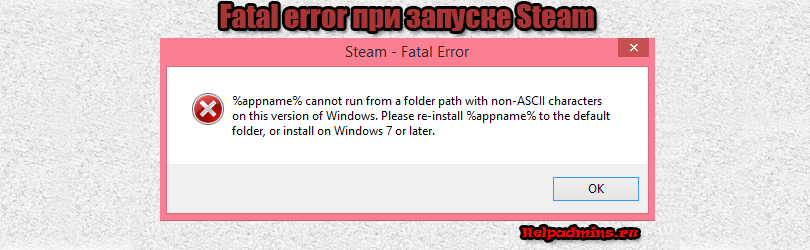
Steam — Fatal Error
Appname cannot run from a folder path with non-ASCII characters on this version of Windows. Please re-install %appname% to the default folder, or install on Windows 7 or later.
Steam
спросил
1 Ответ
Steam на твоей версии винды не может запуститься из папки, содержащей не английские символы.
Возможные решения
- Заменить\убрать все не латинские символы из пути установки.
- Удалить и установить Стим заново, но по стандартному пути, который предлагает сама программа.
- Сменить уже наконец версию Windows! 2020-й год на дворе, а у тебя какое-то старье и даже не Windows 7.
Вольный перевод ошибки
Программа не может быть запущена из папки, содержащей не ASCII символы на этой версии Windows. Пожалуйста, переустановите приложение в папку по умолчанию или на Windows 7 или более поздней версии.
Что такое ACSII символы?
ASCII расшифровывается как American Standard Code for Information Interchange — это разработанная в США таблица символов для стандартизации обмена информацией.
Выглядит она так:
Если в названии папки присутствует символ не из этой таблицы — будет выскакивать ошибка.
![]()
gameMaster
ответил
Друг, помоги остальным игрокам, зайди на страницу вопросы без ответов.
Может именно ты знаешь ответ, который кто-то ждёт.
How to Fix “Failed to load steamui.dll” Steam Error on Windows 11
Steam “Fatal Error. Failed to load steamui.dll” error that appears when you try to start Steam or launch certain Steam games. This error usually occurs when Steam installation is corrupted.

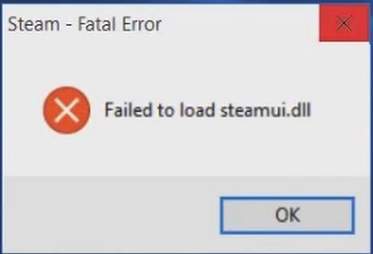
Steam — Fatal Error. Failed to load steamui.dll
What Causes “Failed to load steamui.dll” Error in Steam?
The “Failed to load steamui.dll” error window appears if your Steam installation is corrupted somehow. The steam.dll failing to load indicates that essential Steam or Windows file(s) is missing, corrupted, or infected with malware, making Steam unable to load SteamUI.dll.
Here’s a list of the most common causes of this error:
- Corrupted Steam installation files. If your Steam installation files have been corrupted, try to Reinstall Steam. Try installing Steam on another hard drive. Some users reported fixing this error by reinstalling steam on another hard drive.
- Corrupted or missing SteamUI.dll file. If the SteamUI.dll file has been corrupted, you can delete it and then run Steam. It will detect the missing file and redownload it from its servers.
- Interrupted Steam client updates. An interrupted Steam update may result in corrupted files. Reinstalling Steam should fix the“Failed to load steamui.dll” error.
- Corrupted Windows system files. If your Windows files have been corrupted, run DISM and SFC scans to repair them.
- Malware infection. Malware on your PC may have infected your Steam or system files. In addition, malware may delete SteamUI.dll. Try scanning your PC with Combo Cleaner to remove it.
- Anti-virus software interference. Sometimes, this error occurs due to an anti-virus program interfering with Steam. Your anti-virus program may identify SteamUI.dll as malicious and delete it. Therefore, try to temporarily disable your anti-virus program and try to launch Steam.
Before trying any of our fixes, here are some tips:
- Update your Windows operating system to the latest version.
- Update your graphics card drivers.
Video Tutorial on How to Fix «Failed to load steamui.dll» Error
Table of Contents:
- Introduction
- Method 1. Delete SteamUI.dll and libswscale-3.dll
- Method 2. Delete Steam Cache Folder
- Method 3. Run the Deployment Image & Servicing Management (DISM) and System File Checker (SFC) Scans
- Method 4. Re-Register SteamUI.dll
- Method 5. Run the steam://flushconfig Command
- Video Tutorial on How to Fix «Failed to load steamui.dll» Error
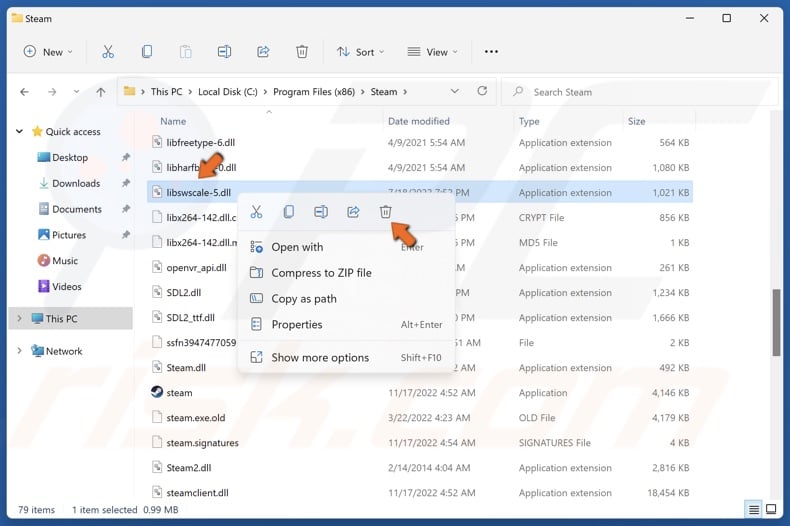
Method 1. Delete SteamUI.dll and libswscale-3.dll
Some users have found that deleting SteamUI.dll can fix the “Failed to load steamui.dll” error. In addition, others have found that deleting bin and package folders can fix it as well. Steam will download new versions of the deleted files when you launch it.
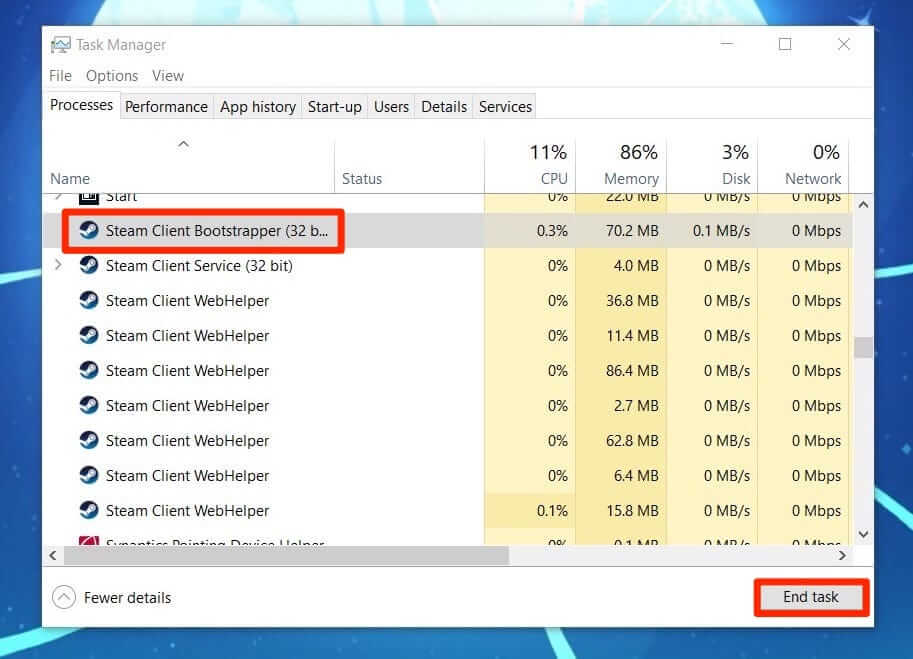
1. Hold down Ctrl+Shift+Esc keys to open Task Manager.

2. In the Processes tab, right-click each Steam-related process and click End task. Make sure that no Steam processes are running.
3. Hold down Windows+E keys to open File Explorer.
4. Navigate to C:\Program Files (x86)\Steam.
5. Right-click libswscale-3.dll (alternatively libswscale-4.dll, libswscale-5.dll) and click Delete.
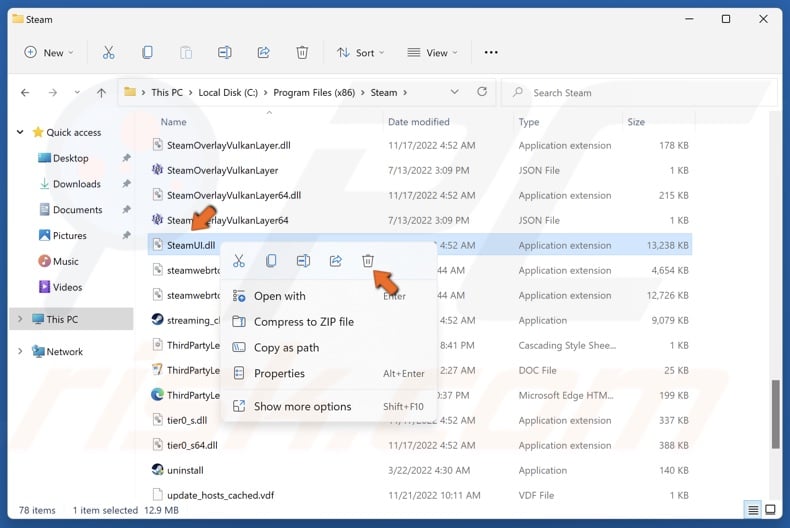
6. Then, right-click SteamUI.dll and click Delete.
7. Launch Steam and check if deleting SteamUI.dll and libswscale-3.dll fixed the issue.

8. If the issue was not fixed, right-click the bin folder and click Delete.
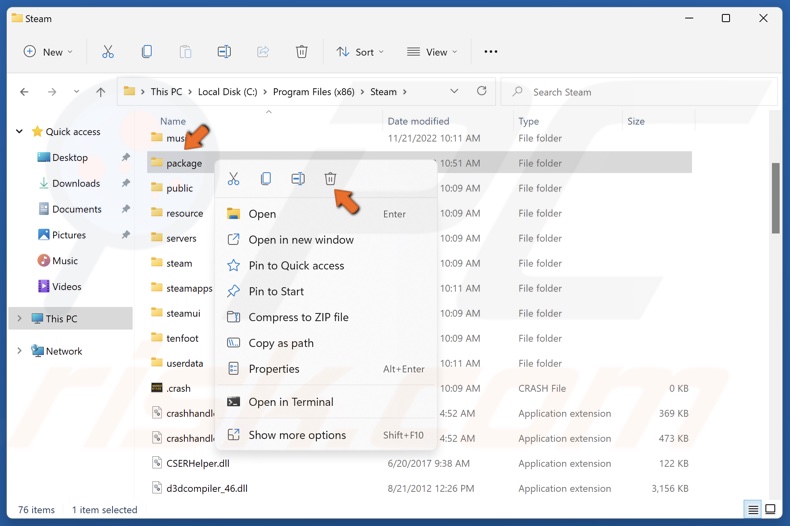
9. Right-click the package folder and click Delete.
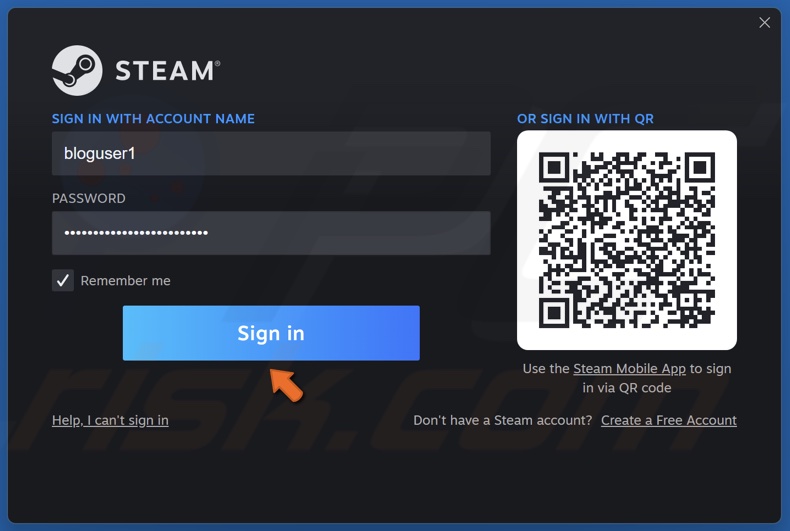
10. Launch Steam, enter your password, and click Sign in. Check if deleting the bin and package folders fixed the error.
[Back to Table of Contents]
Method 2. Delete Steam Cache Folder
Deleting the Steam cache folder is a proven way to fix the “Failed to load steamui.dll” error. Deleting the folder is safe because Steam will create another chase folder when you launch it. Note that you will have to enter your username and password when you launch Steam.
1. Hold down Ctrl+Shift+Esc keys to open Task Manager.
2. In the Processes tab, right-click each Steam-related process and click End task. Make sure that no Steam processes are running.
3. Hold down Windows+R keys to open Run.
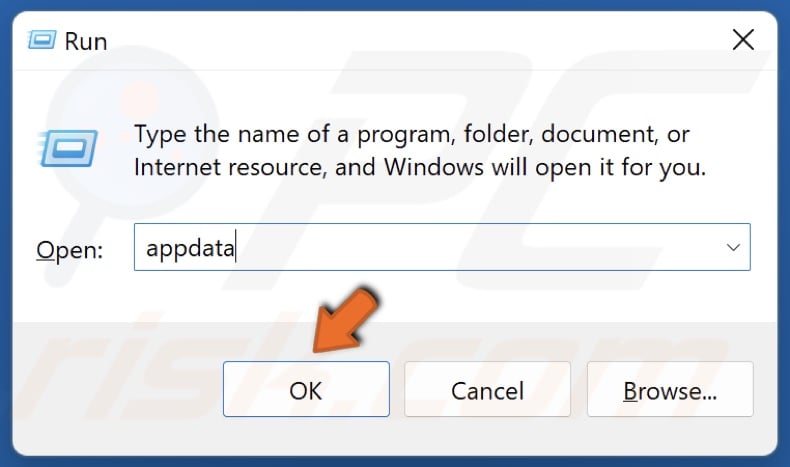
4. In the Run dialog box, type in appdata and click OK.
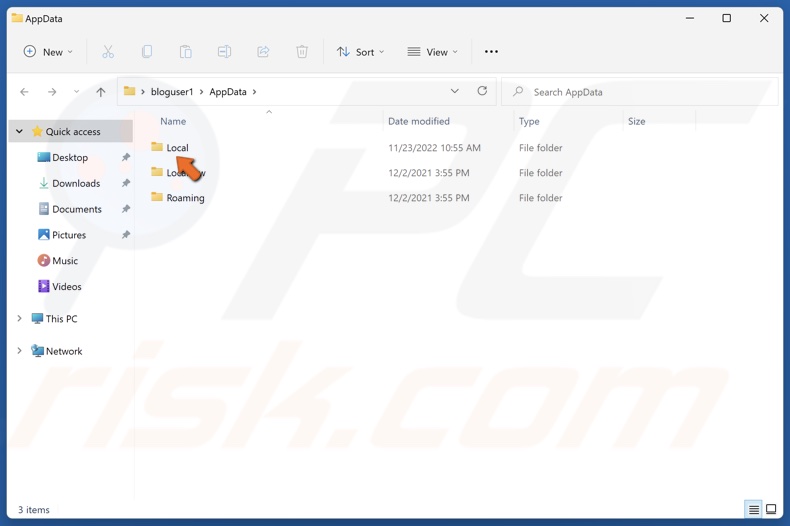
5. Access the Local folder.
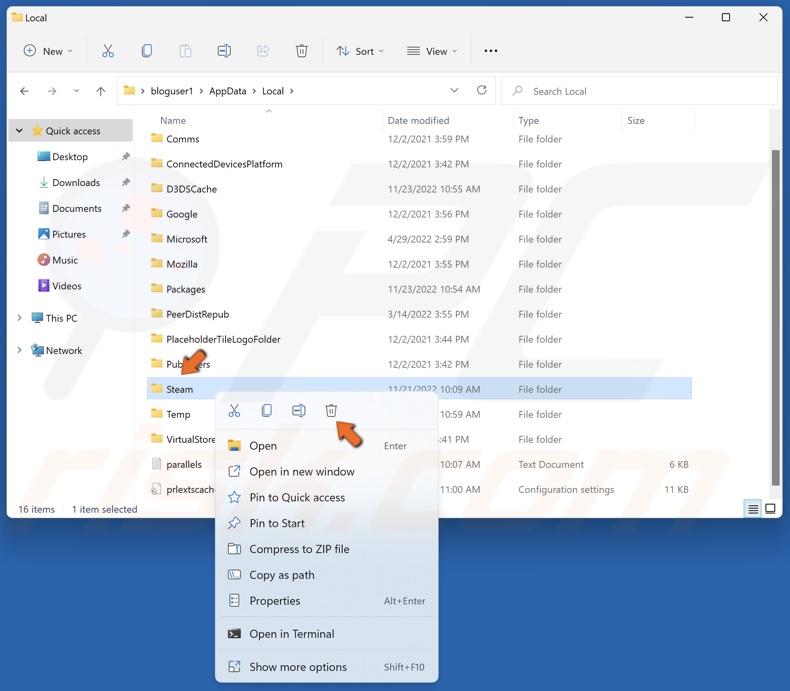
6. Find the Steam folder, right-click it and click Delete.
7. Launch Steam, enter your password, and click Sign in.
[Back to Table of Contents]
Method 3. Run the Deployment Image & Servicing Management (DISM) and System File Checker (SFC) Scans
Deployment Image Servicing and Management (DISM) is a command-line tool that can repair your Windows image if it has been corrupted. The System File Checker (SFC) is a utility that can repair corrupted Windows system files by downloading new files from Microsoft’s servers.
1. Hold down Windows+R keys to open Run.
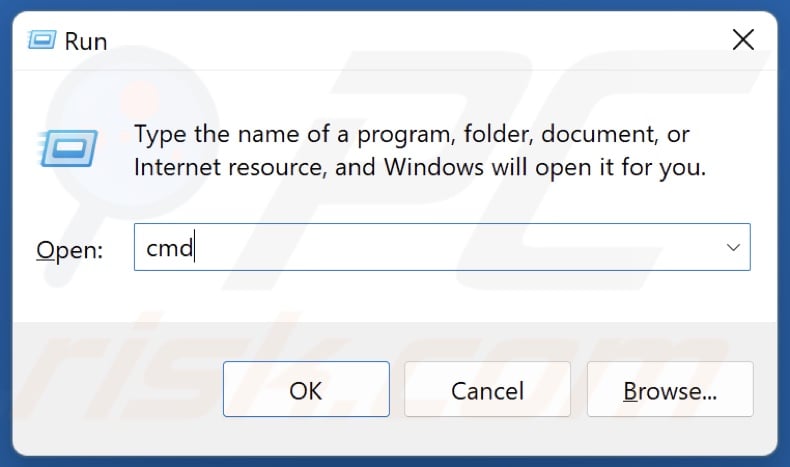
2. In the Run dialog box, type in CMD and hold down Ctrl+Shift+Enter keys to open the Command Prompt as an administrator.
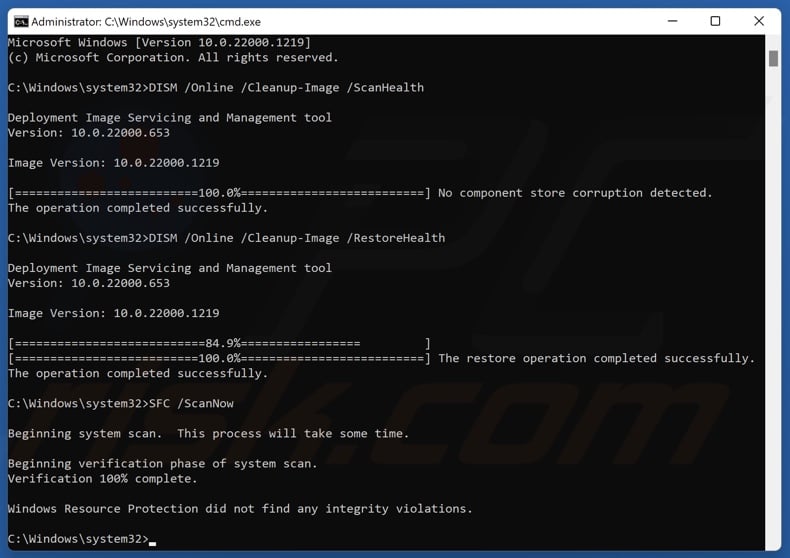
3. In the Command Prompt window, type in DISM /Online /Cleanup-Image /ScanHealth and press Enter.
4. Type in DISM /Online /Cleanup-Image /RestoreHealth and press Enter.
5. Then, type in SFC /ScanNow and press Enter.
6. Close the Command Prompt and restart your PC.
[Back to Table of Contents]
Method 4. Re-Register SteamUI.dll
1. Hold down Windows+R keys to open Run.
2. In the Run dialog box, type in CMD and hold down Ctrl+Shift+Enter keys to open the Command Prompt as an administrator.
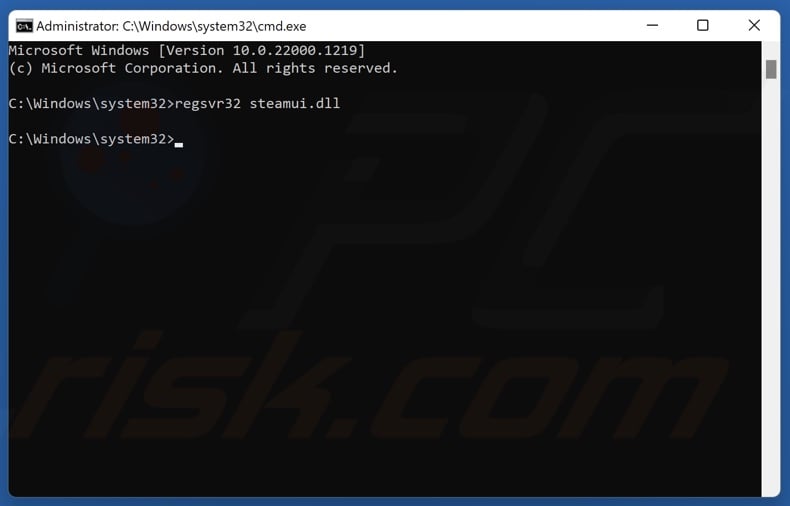
3. In the Comand Prompt window, type in regsvr32 steamui.dll and press Enter.
4. Close the Command Prompt and restart your PC.
[Back to Table of Contents]
Method 5. Run the steam://flushconfig Command
The purpose of this command is to refresh Steam’s installation. Before executing the steam://flushconfig command, make sure that Steam isn’t running.
1. Hold down Ctrl+Shift+Esc keys to open Task Manager.
2. In the Processes tab, right-click each Steam-related process and click End task.
3. Hold down Windows+R keys to open Run.
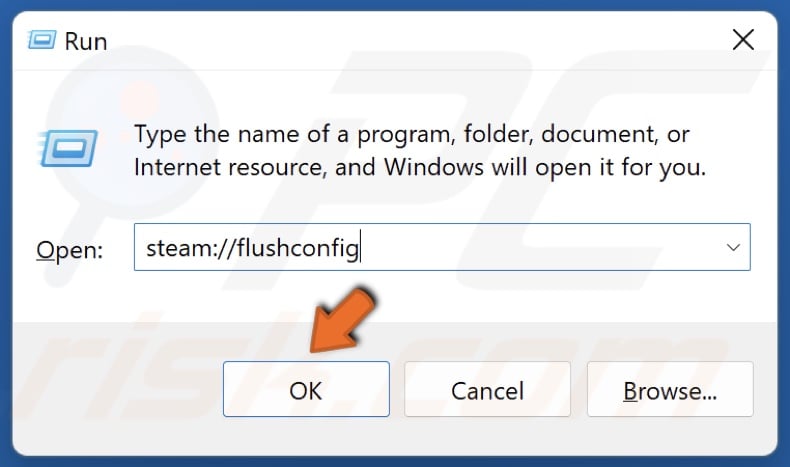
4. In the Run dialog box, type steam://flushconfig and click OK.
5. Enter your login credentials, and click Sign in.
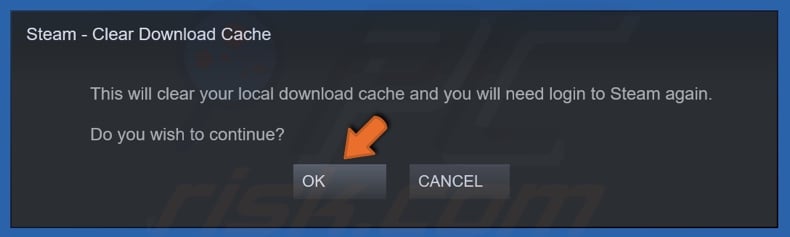
6. A “Clear Download Cache” dialog box will appear. Click OK. Wait a few seconds.
7. Steam will relaunch and will start with the Sign In window. Enter your login credentials and click Sign in.
Did this article help you fix “Steam — Fatal Error. Failed to load steamui.dll” on your PC? Let us know in the comments section below.
If none of the methods in this article helped you fix the error, try reinstalling Steam if you haven’t tried that already.
[Back to Top]
Steam is the one-stop-shop for all gamers, worldwide. You can not only purchase games from Steam but also, add non-Steam games to your account. Moreover, you can chat with friends and enjoy the gameplay. Despite being a hugely popular app, Steam games generate various types of errors each day. The Application Load Error 3:0000065432 was reported by many users in recent weeks. When you face this error, you will not be able to launch a few specific games on Steam. The error occurred more often while playing online games developed by Bethesda Software, but with games by other creators too. The most common games being Doom, Nioh 2, Skyrim, and Fallout 4. Sadly, Application Load Error 3:0000065432 persisted even after the Steam client was updated. Thus, we bring the perfect guide to help you fix Application Load Error 3:0000065432 in your Windows 10 PC.

Table of Contents
There are several reasons behind the Application Load Error 3:0000065432; the most significant ones being:
- Conflict with Third-Party Antivirus: Third-party antivirus software installed on your system helps prevent potentially harmful programs from being accessed or downloaded. Often, trustworthy apps may also get blocked. It may not allow your game to establish a connection with the server resulting in Application Load Error 3:0000065432.
- Game installation in a different Directory: If you install your game in some other directory instead of the original Steam directory, you will face this error especially, with Bethesda games.
- Game Crash by DeepGuard: DeepGuard is a cloud service that keeps your device safe from harmful virus and malware attacks by allowing only those applications to run that are deemed to be safe. For example, F-Secure Internet Security sometimes interferes with Steam gaming programs and triggers said error, when you try to access multiplayer components.
- Game File Integrity Unverified: It is essential to verify the integrity of game files and game cache to ensure that the game runs on the latest version and all its features are up to date. It is a time-consuming process, but a suitable fix to this problem.
- Improper Installation of Steam: When the data files, folders, and launchers get corrupt, they will trigger the said issue.
Method 1: Verify Integrity of Game Files
Always ensure you launch the game in its latest version to avoid Application Load Error 3:0000065432 in your system. Also, using the Verify Integrity of Steam is a good idea. Here, the game files in your system will be compared with the game files in the Steam server. The difference, if found, will be repaired. The game settings saved in your system will not be affected. To verify the integrity of game files, follow the below-mentioned steps.
1. Launch Steam and navigate to LIBRARY, as shown.

2. In the HOME tab, search for the game triggering Application Load Error 3:0000065432.
3. Then, right-click on the game and select the Properties… option.

4. Now, switch to the LOCAL FILES tab and click on VERIFY INTEGRITY OF GAME FILES… as depicted below.

5. Wait for Steam to complete the verification process. Then, download the necessary files to resolve Application Load Error 3:0000065432.
Method 2: Resolve Third-Party Antivirus Interference (If Applicable)
If you have a third-party antivirus program installed on your system, it might hamper the proper loading of your game. Hence, it is suggested to either disable it or uninstall it as you may see fit.
Note: We have explained the steps for Avast Free Antivirus as an example.
Method 2A: Disable Avast Free Antivirus temporarily
1. Navigate to the Avast Free Antivirus icon in the Taskbar and right-click on it.
2. Select Avast shields control from this menu.

3. You will be given these options:
- Disable for 10 minutes
- Disable for 1 hour
- Disable until computer is restarted
- Disable permanently
4. Click on an option according to your convenience to disable it for the time period selected.
Method 2B: Uninstall Avast Free Antivirus permanently
If disabling it doesn’t help, you might need to uninstall the said antivirus program, as explained below:
1. Open Avast Free Antivirus program.
2. Click Menu > Settings, as highlighted below.

3. Under the General tab, uncheck the Enable Self-Defense box, as depicted.
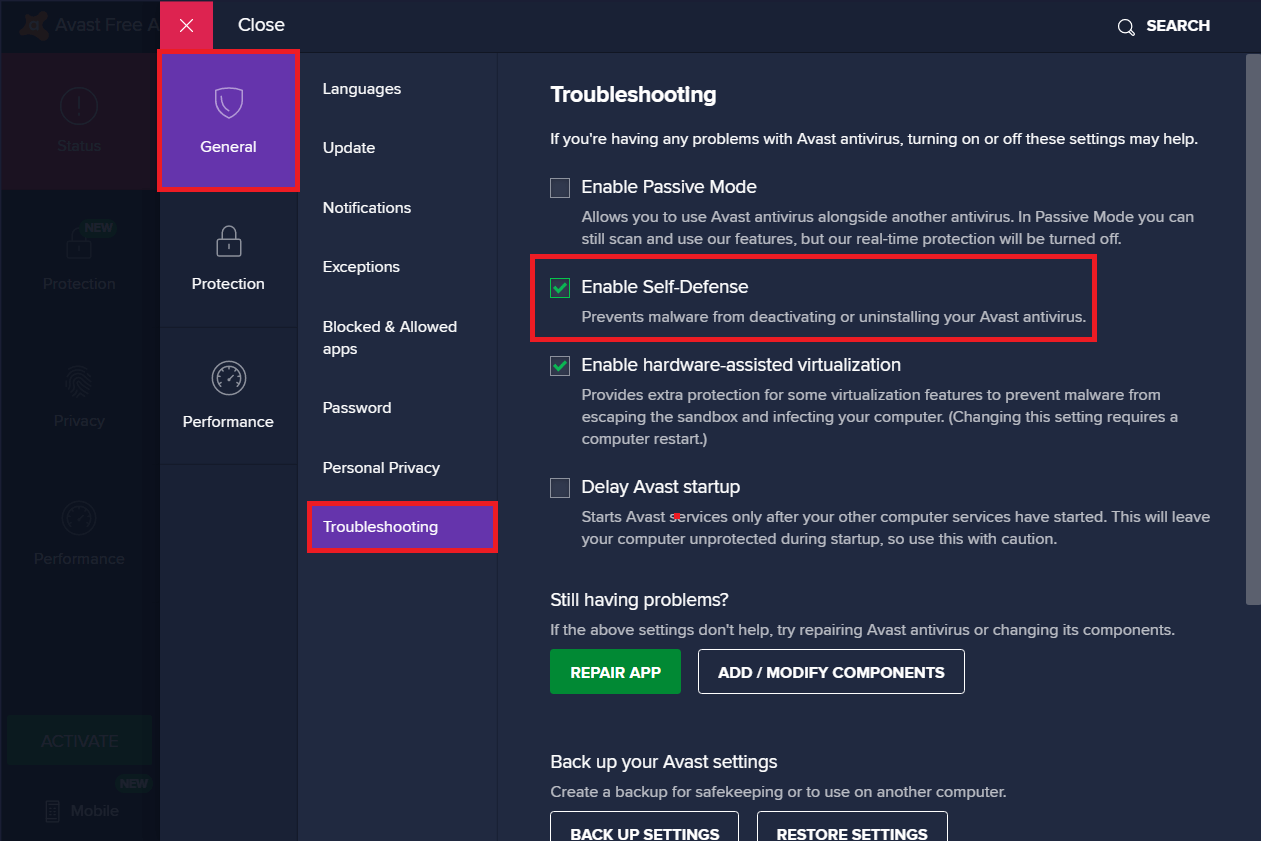
4. Click on OK in the confirmation prompt to disable Avast.
5. Exit Avast Free Antivirus.
6. Next, launch Control Panel by searching for it, as shown.

7. Select View by > Small icons and then, click on Programs and Features, as highlighted.

8. Right-click on Avast Free Antivirus and then, click on Uninstall, as illustrated.

9. Restart your Windows 10 PC and check if the issue is resolved. If not, try the next fix.
Also Read: 5 Ways to Completely Uninstall Avast Antivirus in Windows 10
Method 3: Move the Game to its Original Directory
If you installed the game in a directory other than the original, you might encounter this error code. Here’s how to fix Steam Application Load Error 3:0000065432 by moving the game to the original Steam directory:
1. Launch the Steam application.
2. Click on Steam and then, select Settings from the drop-down list.

3. Now, click on Downloads from the left panel. Click STEAM LIBRARY FOLDERS, as shown.

4. Now, click on ADD LIBRARY FOLDER and ensure the Steam folder location is C:\Program Files (x86)\Steam.

5A. If the Steam folder location is already set to C:\Program Files (x86)\Steam, exit this window by clicking on CLOSE. Move to the next method.
5B. If your games are installed elsewhere, then you will see two different directories on the screen.
6. Now, navigate to LIBRARY.

7. Right-click on the game that triggers Application Load Error 3:0000065432 in your system in the library. Select Properties… option, as shown.

8. Switch to the LOCAL FILES tab and click on MOVE INSTALL FOLDER…

9. Here, select Install under C:\Program Files (x86)\Steam under Choose location for install option and click on Next.
Wait for the move to be completed. Launch the game that was causing issues and check if this could fix Steam Application Load Error 3:0000065432.
Method 4: Disable DeepGuard Feature (If applicable)
As discussed earlier, the DeepGuard feature of F-Secure Internet Security blocks various programs and applications to ensure the safety of the system. Furthermore, it continuously monitors all applications to look for abnormal changes. Therefore, to prevent it from interfering with the games and avoid Application Load Error 3:0000065432, we will disable the DeepGuard feature in this method.
1. Launch F-Secure Internet Security in your system.
2. Click on the Computer Security icon, as shown.
![]()
3. Now, click on Settings > Computer > DeepGuard.
4. Uncheck the box next to the Turn on the DeepGuard option.
5. Finally, close the window and Exit the application.
Also Read: How to View Hidden Games on Steam
Method 5: Run Steam as Administrator
Few users suggested that launching Steam with administrator privileges, helped fix Steam Application Load Error 3:0000065432. Here’s how you can do the same:
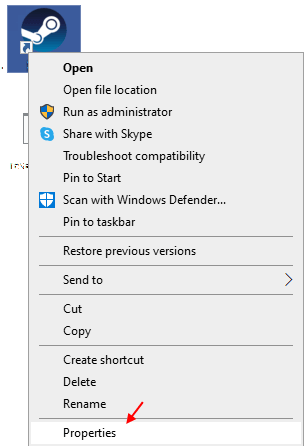
1. Right-click on the Steam shortcut icon and click on Properties.

2. In the Properties window, switch to the Compatibility tab.
3. Now, check the box marked Run this program as an administrator.

4. Finally, click on Apply > OK to save the changes.
Here onwards, Steam will run with administrative privileges and be glitch-free.
Method 6: Reinstall Steam
Any glitches associated with the software are resolved when you uninstall the application entirely from your system and reinstall it again. Here is how to Re-install Steam to resolve Application Load Error 3:0000065432:
1. Launch Control Panel and navigate to Programs and Features as instructed in Method 2B.
2. Click on Steam and select Uninstall, as depicted.

3. Confirm the uninstallation in the prompt by clicking on Uninstall, as shown.

4. Restart your PC once the program has been uninstalled.
5. Then, click here to install Steam on your system.

6. Go to the Downloads folder and double-click on SteamSetup to run it.
7. Follow the on-screen instructions bu make sure to choose the Destination Folder by using Browse… option as C:\Program Files (x86) \Steam.

8. Click on Install and wait for the installation to be completed. Then, click on Finish, as shown.

9. Wait for all Steam packages to be installed and it will be launched soon after.

Also Read: How to Fix Steam Not Downloading Games
Method 7: Clear Steam Application Cache
Sometimes cache files get corrupt as well and they too may lead to Application Load Error 3:0000065432. Hence, clearing the app cache should help.
1. Click the Windows Search box and type %appdata%.

2. Click on the AppData Roaming folder to open it.
3. Here, right-click on Steam and select Delete.

4. Next, type %LocalAppData% in the search bar and open the Local App Data folder.

5. Find Steam here and Delete it, as you did previously.
6. Restart your Windows PC to implement these changes.
Method 8: Delete Game Folder from Documents
You can also resolve Application Load Error 3:0000065432 by deleting the game folder from Documents, as explained below:
1. Press Windows+ E keys together to open File Explorer.
2. Navigate the given path- C:\Users\Username\Documents\My Games

3. Delete the game folder of the game which faces this error.
4. Restart your system. Now, launch Steam and re-run the game. It should run without errors.
Method 9: Close Background Tasks
There are plenty of applications that run in the background in all systems. This increases the overall CPU and memory usage, and thereby, reduces the performance of the system during gameplay. Closing background tasks can help resolve Application Load Error 3:0000065432. Follow these steps to close background processes using Task Manager in Windows 10 PC:
1. Launch Task Manager by pressing Ctrl + Shift + Esc keys together.
2. In the Processes tab, search and select unrequired tasks, preferably third-party apps.
Note: Refrain from selecting Windows and Microsoft-related processes.

3. Click on the End Task button displayed at the bottom of the screen.
4. Repeat the same for all such unwanted, resource-consuming tasks and reboot the system.
Recommended:
- Fix Play Store DF-DFERH-01 Error
- How To Fix No Sound On Steam Games
- Fix ARK Unable to Query Server Info for Invite
- Fix io.netty.channel.AbstractChannel$AnnotatedConnectException Error in Minecraft
We hope that this guide was helpful and you were able to fix Steam Application Load Error 3:0000065432. Let us know which method worked for you the best. If you have any queries regarding this article, then feel free to drop them in the comments section.
Что значит «appname cannot run from a folder path with non-ascii» при запуске steam и как это исправить?
Steam является одним из самых поплуярных онлайн магазинов, которым пользуются геймеры всего мира. Данное приложение позволяет приобрести самую свежую навинку мира игровой индустрии по довольно выгодным ценам.
Довольно частой проблемой при попытке запуска этой программы сразу после установки является фотальная ошибка “appname cannot run from a folder path with non-ascii”.
В данной статье мы расскажем почему она появляется, а также как ее можно устранить.
Причины появления
Перевод текста сообщения об ошибке на русский язык может натолкнуть более опытных пользователей на правильный источник проблемы. В тексте ошибки говорится о невозможности запуска по указанному пути, состоящему не из ascii символов.
ascii – это специальная таблица символов, используемая в среде программирования. Все, что вам нужно о ней знать – в нее не входят русские буквы.
Говоря более простым языком – Steam не запускается из-за того, что он установлен в папку, путь к которой содержит русские буквы или другие знаки, не входящие в таблицу ascii.
Исправление ошибки
Для того, чтобы избавиться от ошибки “Fatal error appname cannot run from a folder path with non-ascii” при запуске Steam, нужно переустановить программу в папку, путь к которой состоит только из английских символов.
Например в корень диска D или C. В утом слуачае путь будет выглядеть так:
D:\\Steam
или
C:\\Steam
А вот пример неправильного пути для установки Steam, в случае которого появляется вышеописанная ошибка:
D:\\программы\steam
Вывод
Из всего вышеописанного можно сделать вывод, что ошибка Fatal error appname cannot run from a folder path with non-ascii возникает при запуске Steam в том случае, если он установлен в папку, путь к которой содержит русские буквы или другие символы, которых нет в таблице ascii.
Решение проблемы является переустановка Steam в папку, путь к которой не будет содержать только английские буквы, например D:\\Steam.

Frequently receiving failed to load steamui.dll error messages on Windows 10 PC? Curiously looking for some best fixes to resolve Steam fatal error failed to load steamui.dll? Then your search ends here.
Rated Excellent on Trustpilot
Free DLL Repair Tool
Fix failed to load steamui.dll error by repairing corrupted or missing system files, & install the latest DLL file by replacing the damaged/corrupted DLL file.
You can try fixes like restoring the missing steamui.Dll file from recycle bin, deleting the Steam folder from %appdata%\ local, deleting steamui.Dll And Libswscale-3.Dll File, uninstall/reinstalling Steam etc.
To know how to apply these fixes to resolve the Steam failed to load steamui.dll error you need to go through this post completely.
What is the Steam Failed To Load Steamui.dll Error?
Failed to Load steamui.dll error mainly arises when Steam application faces difficulty in loading the DLL file having name steamui.dll.
Here is the screenshot of the error:
As we all know how important DLL files are for the proper functioning of any program on a Windows PC.
DLL files are also considered as the startup action which is important for the execution or opening of any program. Apart from this DLL files also help applications in the proper loading of the user interface.
Similarly, Steamui.dll is also one integral part of the Steam application which is essential for its proper functioning.
Thus if your Windows system fails to load the Steamui.dll file, it can’t open the Steam app.
Some Steamui.dll Related Error Messages
Steamui.dll errors come wrapped in different messages. So here I have listed down some of its most commonly encountered forms.
- Failed to load steamui.dll
- steamui.dll Not Found
- Cannot find [PATH]\steamui.dll
- This application failed to start because steamui.dll was not found. Re-installing the application may fix this problem.
- The file steamui.dll is missing.
- Cannot start [APPLICATION]. A required component is missing: steamui.dll. Please install [APPLICATION] again.
All these errors mainly arise when Windows takes a start or when the program opens or when the program is been executed or nearly any time during the Windows sessions.
What Causes Steam Failed to Load Steamui.dll?
As per the report, it is found that Steam failed to load steamui.dll error may occur in any program which requires a file goes missing on OS including Windows 7/8/10.
Here have a look at the possible causes
- When the steamui.dll file got deleted accidentally.
- Steam requires device drivers for execution. So chances are high that your device driver got outdated and thus you are getting this dll error.
- Hardware failure such as RAM or hard disk also cause the error
- The presence of malware or virus on the PC may have damaged the steamui.dll file.
Table of Contents
Fix 1 – Recover Your Missing Steamui.Dll File
Remember: This solution is only applicable if in case you have accidentally or mistakenly deleted your steamui.dll file.
If mistakenly you have deleted the steamui.dll file, in that case, the easiest trick is to get it back from your system Recycle Bin.
- Hit the Recycle Bin icon present on your PC’s desktop. After that search for the deleted DLL file in this recycle bin folder.
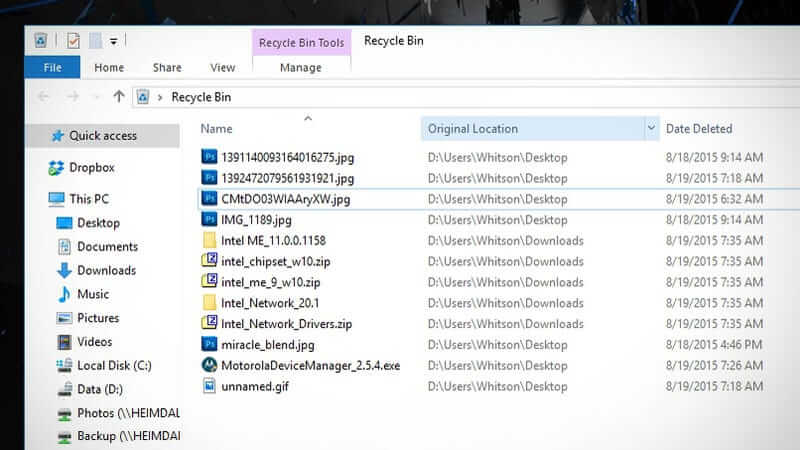
- Once you get it, make a right-click on your deleted file and after that hit the restore option.
Fix 2 – Delete Steam Folder From %appdata%\ local
- In the start, menu search box, type %appdata% and hit the enter button.
- Now in the opened AppData folder window hit the Appdata tab which is present on the address bar.
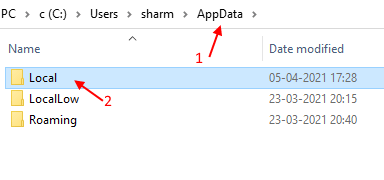
- After that choose the Local folder and tap to open it.
- Within this there is a Steam folder, choose it and make a right-click over it.
- From the list of options choose the delete button.
- Restart your PC and execute the Steam application again.
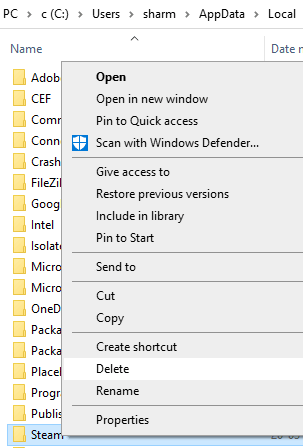
Fix 3 – Delete Libswscale-3.Dll And Steamui.Dll File
Failed to load steamui.dll Steam fatal error also comes when files like steamui.dll and libswscale-3.dll get crashed.
To fix this, you have the option to delete these files completely and when you open the Steam next time, you will see files are been replaced with some new ones.
Here are the steps that you need to perform:
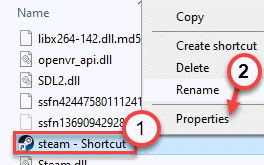
- Make a right-click on the Steam app and then from the options list choose Properties.
- On the opened Properties window, go to the Shortcut tab. At the bottom, there is an option Open File Location so make a tap over it.
- Open the Steam folder, and search for the steamUI.dll and libswscale-3.dll files. Hit the Delete key from your keyboard.

- Restart the Steam app to check whether you are still getting the same steamui.dll error or not.
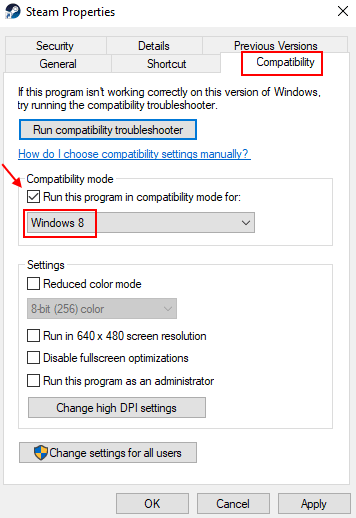
Fix 4 – Try To Run Steam In Compatibility Mode
- Make a right-click on the Steam app icon and then hit the properties option.
Note: If the steam icon is not present on the desktop, then search it in the search box of Windows 10.
- Go to the compatibility tab.
- Put a check across the option “Run this program in compatibility mode”.
- Now from the dropdown, you have to choose windows 8.
- Tap the apply > OK button.
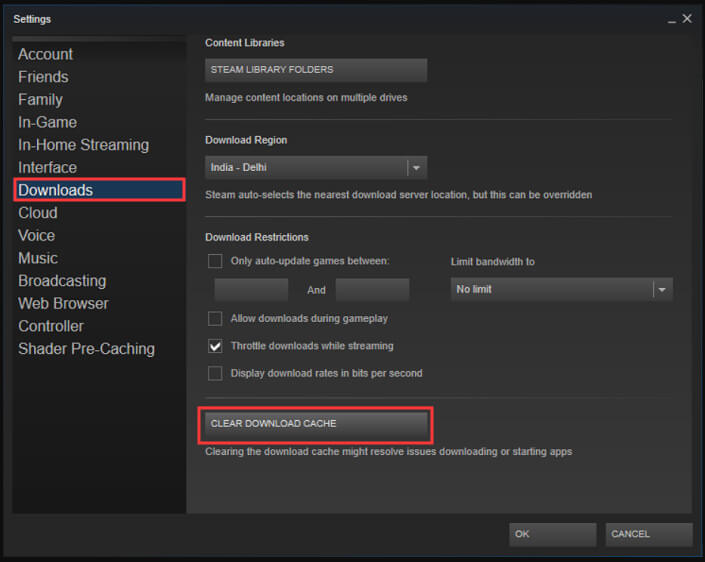
Fix 5 – Clear The Steam File’s Download Cache
Another option through which you can fix the error is by cleaning up the downloaded cache.
As it is seen that clearing the downloaded cache fixes the problem that occurred in downloading or starting up the game.
No need to get worried because it won’t affect any of your previously installed games after you log in to your Steam application.
So try this method without any worry:
- At first, open the Steam client after that on the top-left section of the menu search for Steam > Settings.
- Now in the opened Setting window, go to the Download option. Tap the Clear Download Cache button present on your left pane.
- Press the OK button to make confirmation about clearing the download cache.
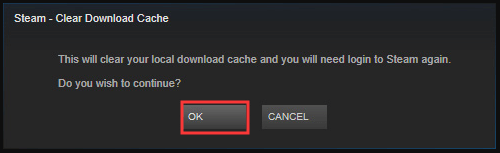
- Now login one more time to Steam.
- Restart your PC to check whether the changes done by you have fixed the Steam fatal error or not.
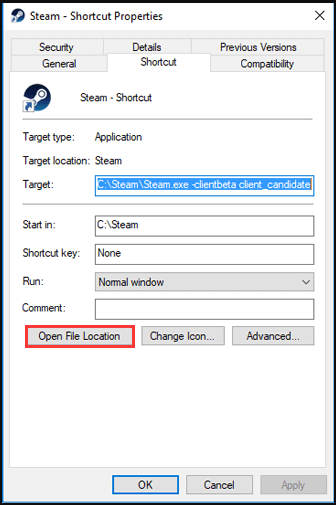
Fix 6 – Modify The Steam Exe
- You can try changing the Steam shortcut using some cmd line arguments. For this follow the below-given steps:
- First, you need to go to the place where Steam is already installed on your PC. Usually, it is present in this location.
C:\Program Files (x86)\Steam\
Note- if you are unable to fetch the actual Steam directory then try out these steps:
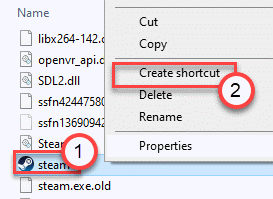
- In the search box type “Steam” and search. Now make a right-click on the “Steam” application and hit the option “Open file location“.
- After getting the directory, make a right-click on the “steam.exe”. Now from the list of options choose the “Create Shortcut“option.
- Now hit the “Steam-shortcut” and then make right-click over it. Again from the menu list hit the “Properties“ option.
- On the opened Properties window, go to the “Shortcut” tab.
- In the target box, put the following argument at the path end.
-clientbeta client_candidate
Complete Target will appear like this:
“C:\Program Files (x86)\Steam\Steam.exe” -clientbeta client_candidate

- Hit the Apply> OK button for saving up all the changes that you have done.
After performing all these steps, run the Steam app from the shortcut which you have created now.
Fix 7 – Re-register Your Steamui.dll File
Re-registering the Steamui.dll file also fixes the corruption issue. But keep in mind that registering the files has some potential risks too. So it’s highly recommended to keep a proper backup of the complete partition having the Steam folder.
- Make a right-click on the system Start button after that from the appearing contextual menu choose the Command Prompt (Admin).
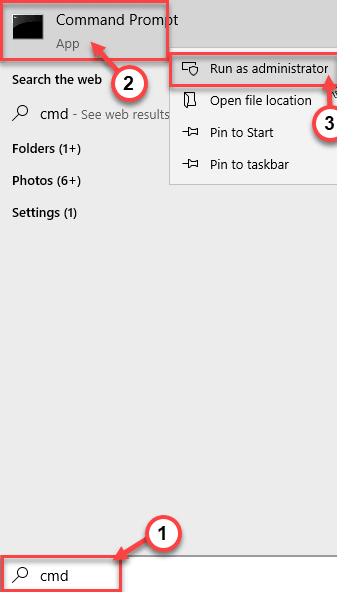
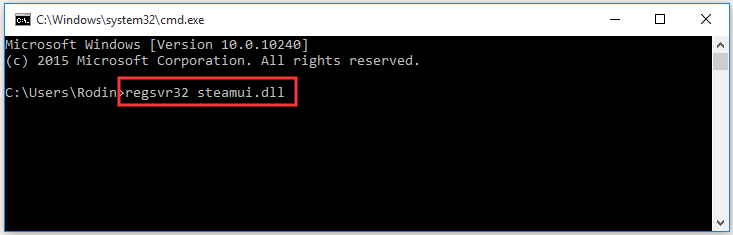
- In the opened command prompt window type the following command: “regsvr32 steamui.dll” and then press the Enter button.
- Now restart your PC and check whether the error persists.
Fix 8 – Remove Steam’s Default Configuration
Removing Steam’s original configuration will definitely fix the error.
- Hit theWindows key+ “R” key.
- now paste the following code in the opened Run window and then hit the “OK“ button.
steam://flushconfig
- After completing all this, restart Steam on your PC.
Fix 9 – Delete The Steam’s Beta Version
It’s common to encounter failed to load steamui.dll error in the Steam Beta version. So immediately delete the Steam beta version if in case you are using it.
Here is how it is to be done:
- Open the File Explorer and then go to the Steam directory to look for the Package folder.
- Now within this Package folder, make a right-click on the file name called Beta. After that choose the Delete option.

- Reboot the PC and then restart the Steam application. Doing this will automatically download all the important Steam files.
Fix 10 – Update Or Rollback Device Driver Version
Outdated device driver triggers many problems like explorer.exe system call failed or steamui.dll error etc.
To fix this issue, you need to keep the device driver updated. Here is the guide to follow:
- In the search box type Device Manager and search for it.
- Within the newly opened window, you need to make a tap over the Display adapters option. as this will expand the list of device drivers, in which you can search for your device.
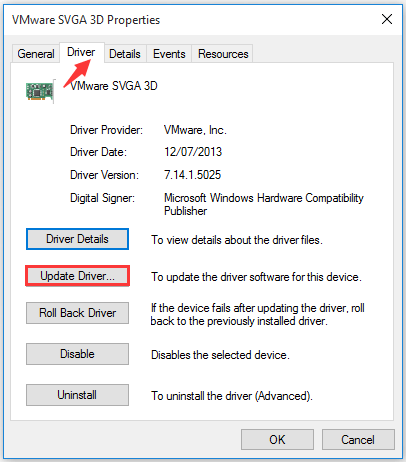
- Make a double tap on the device driver as this will open the Properties window.
- Now from the opened window go to the “Driver” tab. After that hit the button “Update Driver”.
- You will get two options for updating the device driver i.e manually or automatically. You can choose anyone from it as per your need.

After completing the update procedure, make a check whether the problem has been resolved or not.
If in case steamui.dll error is raised after updating any specific device driver. Then you can make a tap over the Roll Back Driver option to revert to the older installed version.
You can also update the drivers easily with Driver Updater. This is just by scanning once detect and updating the entire system driver.
Get Driver Updater to Update Device Driver Automatically
Fix 11 – End The Running Steam Processes
Sometimes Steam processes that are running in the background also cause the error in question. So you need to end the already running Steam processes.
- Make a right-click on your system taskbar.
- After that make a click over the Start Task Manager.
- On the opened task manager screen, check out Steam services such as Steam Web Helper, Steam Client Service, etc.
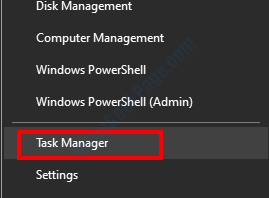
- Now make a right-click over each “Steam” service. After that hit the “End task” option to close the process completely from the background.
- After ending the entire Steam process, you need to close the “Task Manager”.
- Now you can start your Steam again.
Fix 12 – Run The System Restore Point
It is noticed that in some cases, users find this fails to load Steam error after windows update.
So the reason can be that the updated configurations or features are not well supported by Steam.
You have the option to restore the system back version state before the changes and this is possible only if you have created the System Restore point.
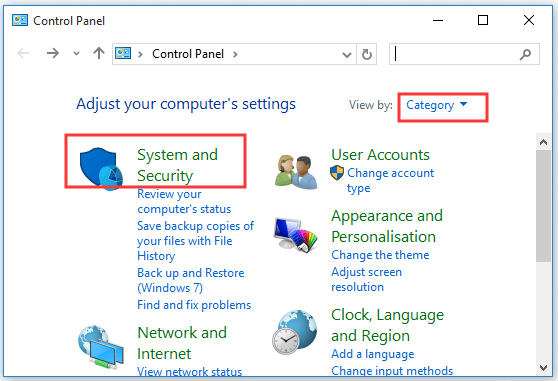
- Open the System’s Control Panel and then go to the option of View by. From the drop-down menu choose the Category option.
- Now hit the System and Security option.
- In the opened system and security window, choose the System tab.
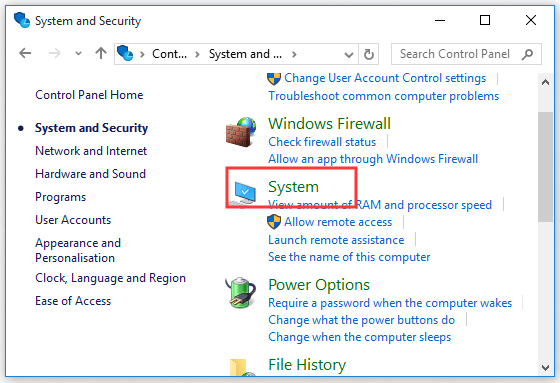
- Now from the left side pane choose System protection. This opens the “System Properties” window. On this, you need to go to the system properties tab and hit the System Restore button.
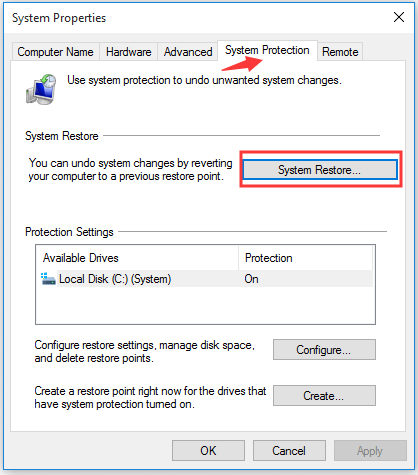
- Put a checkmark across the Show more restore points option.
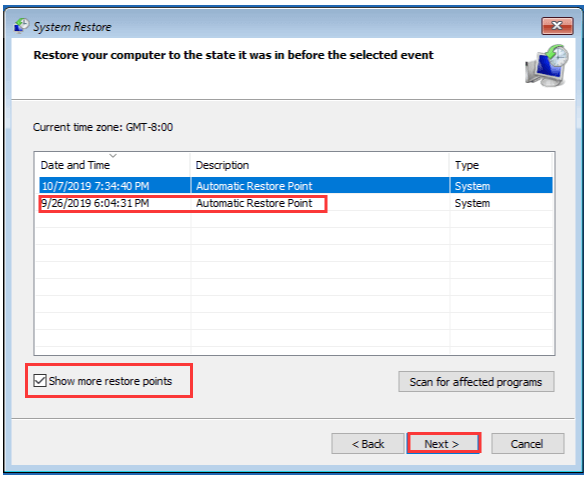
- Choose the “Restore point” which you want to select for restoring the system to an earlier date and then hit the Next button.
- Hit the Finish button to make confirmation about restoration.
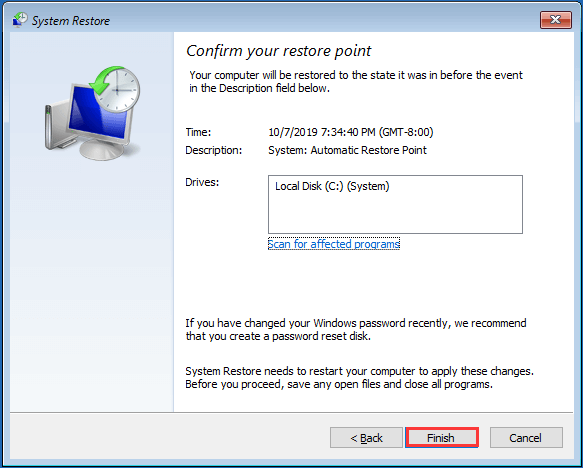
Make a quick check whether the Steamui.dll File fails to load the problem persists.
Fix 13 – Perform Malware Scan On Your System
Chances are also that malware or virus has damaged the steamui.dll file. So to fix this, you can make use of the Windows Defender virus scanning tool.
- In the start menu search box, type Windows Defender and search.
- On the opened Windows Defender Security Center window, search for the Virus & threat protection from the left side pane.
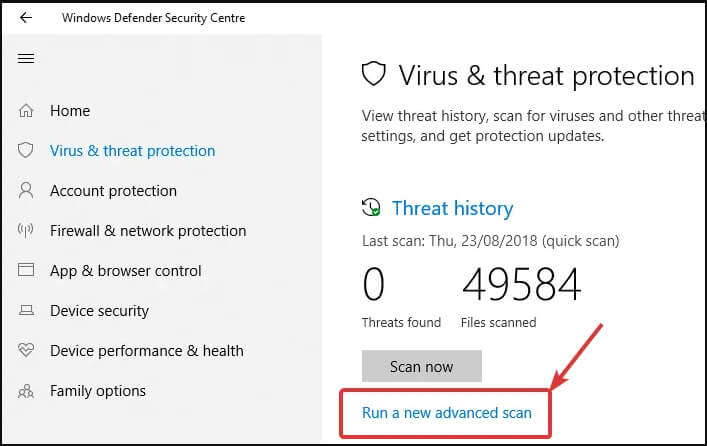
- Now from the right section choose “Run a new advanced scan”.
- From the listed types of scans, choose the Full scan option and tap the button Scan now.

- The whole scanning process will take time to get complete, so be patient.
Sometimes scanning your PC with the inbuilt security program won’t detect malicious programs or viruses, so make sure to scan your system with a good third-party antivirus program to completely scan detect and remove the virus infection.
Get SpyHunter to Remove Virus or Malware Infection Completely
Fix 14 – Uninstall/Reinstall Steam
If in case you are receiving Steam fatal error failed to load steamui.dll at the time of Steam application startup. In that case, uninstall and again reinstall the steam application.
After doing this, you will see that your corrupted steamui.dll file easily gets replaced with the new one.
Here it is suggested to uninstall the Steam app using the third party uninstaller as this completely removes the program without leaving any junk files or traces behind.
Get Revo Uninstaller to Remove Steam Application Completely
Note: Before applying this method, maintain a proper backup of the Steam apps folder because later on, you will need it.
Here is the location from where you can get this Steamapps folder: C:\Program Files (x86)\Steam\Steamapps.
- Hit the Win + R keys from your keyboard, this will open the Run box. Type the “appwiz.cpl” in the opened box and then press the Enter button.

- From the opened list choose the Steam app and then make a right-click over it. Hit the Uninstall option.
- After the completion of the uninstallation process, download the steam latest version and then reinstall it again on your PC.
- Now keep the backup copy of the Steam apps folder in the Steam directory. After that run Steam again to check whether the error persists or it has been fixed.
Fix 15 – Best & Easy Solution To Fix Failed to load Steamui.dll Error
The above-given solutions are very effective for fixing steamui.dll errors. But still, if you want to go with some easy fixes to resolve DLL errors then use the DLL Repair Tool.
This utility software scans your complete PC, detect errors and then solve them automatically. It can easily fix errors like update errors, DLL errors, BSOD, game errors, registry errors, etc.
Apart from this the tool is well efficient one to repair corrupted, damaged, inaccessible system files and prevents your PC’s sluggish performance.
Get DLL Repair Tool, to Fix Failed To Load Steamui.Dll Error
FAQ: Learn More About Steamui.Dll File
How To install any DLL File?
- Copy your original .dll file in the following location: C: WindowsSystem32.
- Hit the Win + R button from the keyboard to open your Run window.
- Now in the opened run window type cmd and press the Enter In the opened command prompt window type regsvr32 filename.dll command
- Hit the Enter button.
So in this way automatically the DLL file will get installed in your system.
How To Fix Missing Dll File?
Many users get troubled by dll errors like missing D3DCOMPILER_47.dll, missing or steamui.dll missing physxloader.dll, etc. here are some common ways to find it. Restart your PC. After that go to the recycle bin and restore the missing or deleted .dll file from there. Apart from this, you can make use of the file recovery tool. Undo all the recent changes done by you with System Restore point.
Where Does The DLL Files Get Stored In Windows 7 PC?
Users of the Windows 7 32-bit version can easily find .dll files in C:WindowsSystem32 directory location. Whereas, the 64-bit version windows 7 users should search their dll files in the following location: C:WindowsSysWOW64 directory.
How To Locate the Steam ID?
- Open the Steam application and after that make a click on the View tab which is present in the top-left corner.
- Choose the settings option and make a click on the Interface which is present over the left side pane.
- Put a checkmark across the “Display Steam URL address bar” option if it is available and tap the OK button.
- Hit the Steam username to know the Steam ID.
Final Words
Now you know how to fix failed to load steamui.dll fatal error. So try the given fixes by following the step-by-step instructions and fix the error in no time.
Also, we love to hear from our readers, do let us know which option has helped you to resolve the missing steamui.dll error, by commenting on our Facebook page.
Good Luck..!

Always up to help others with their PC-related issues, Jack loves to write on subjects such as Windows 10, Xbox, and numerous technical things. In his free time, he loves to play with his dog “Bruno” and hang out with his friends.