If an NMS cannot use SNMP to manage a switch, SNMP interconnection between them fails. This is usually caused by an incorrect network or SNMP configuration. You can locate and rectify the fault according to the following procedure:
- Checking Network Connectivity
- Checking Whether an ACL Is Applied to SNMP
- Checking Whether the undo snmp-agent protocol source-status all-interface Command Configuration Exists on the Switch
- Checking Whether SNMP Authentication Failure Logs Exist on the Switch
- Checking Whether the SNMP Versions Used by the Switch and NMS Are the Same
- For SNMPv2c: Checking Whether the Community Names on the Switch and NMS Are the Same
- For SNMPv3: Checking Whether the User Security Level Is Correctly Set
- For SNMPv3: Checking Whether the Authentication Mode, Encryption Mode, and Passwords on the Switch Are the Same as Those on the NMS
- Checking Whether the Firewall Allows SNMP Packets to Pass Through
- Checking Whether Duplicate SNMP Engine IDs Exist on the Network
Checking Network Connectivity
Network connectivity is the prerequisite for SNMP interconnection. You can run the ping command to check whether the NMS and switch can communicate with each other. If not, verify the route configuration on the switch, intermediate network, and NMS to ensure that the switch and NMS can ping each other.
Note that even if the switch and NMS can ping each other, it does not mean that they can receive SNMP packets from each other. This is because a ping test and SNMP interconnection use different types of packets, that is, ICMP packets and UDP packets respectively. SNMP packets may be filtered out by an ACL or firewall, causing a forwarding failure on the network.
To check whether SNMP packets are sent and received properly, collect traffic statistics or obtain packet information using the mirroring function on network devices. For details, see the product documentation of a specific device model.
Checking Whether an ACL Is Applied to SNMP
If an ACL is applied to SNMP on the switch, the ACL must permit the IP address of the NMS. If this requirement is not met, modify the ACL.
#
acl number 2001
 rule 5 permit source 192.168.1.0 0.0.0.255   // The NMS IP address must be in the permitted IP address list.
#
snmp-agent community write cipher xxx acl 2001   // This configuration indicates that an ACL is applied to SNMPv2c.
#
snmp-agent group v3 huawei_group privacy write-view alliso acl 2001    // This configuration indicates that an ACL is applied to SNMPv3.
#
Checking Whether the undo snmp-agent protocol source-status all-interface Command Configuration Exists on the Switch
In V200R019C10 and later versions, the function of allowing SNMP to use any interface to respond to NMS requests is disabled on a CloudEngine switch by default. That is, the switch has the following configurations:
#
undo snmp-agent protocol source-status all-interface
undo snmp-agent protocol source-status ipv6 all-interface
#
If these configurations are found on the switch, you need to enable SNMP to use any interface or a specified interface on the switch to respond to requests from the NMS.
- Enable SNMP to use any interface to respond to requests from the NMS.
[~HUAWEI] snmp-agent protocol source-status all-interface
[~HUAWEI] snmp-agent protocol source-status ipv6 all-interface
- Enable SNMP to use a specified interface to respond to requests from the NMS.
[~HUAWEI] snmp-agent protocol source-interface meth 0/0/0
Checking Whether SNMP Authentication Failure Logs Exist on the Switch
If SNMP interconnection between the NMS and switch fails, the switch may generate SNMP exception logs, for example, SNMP/3/SNMP_AUTHEN_FAILED. You can run the display logbuffer command to check whether there are SNMP exception logs on the switch, and rectify the fault based on the causes recorded in the logs.
SNMP/3/SNMP_AUTHEN_FAILED: Failed to login through SNMP. (Version=[Version], UserName=[UserName], Ip=[Ip], VpnName=[VpnName], RequestID=[RequestID], PduType=[PduType], Reason=[Reason])
For details about the causes and troubleshooting methods of common SNMP interconnection exceptions, see Common Causes and Handling Suggestions for the SNMP_AUTHEN_FAILED Log.
Checking Whether the SNMP Versions Used by the Switch and NMS Are the Same
SNMP is available in SNMPv1, SNMPv2c, and SNMPv3. The switch and NMS must use the same SNMP version. Otherwise, they cannot interoperate with each other through SNMP.
By default, a switch uses SNMPv3. You can view the SNMP version used by the switch by checking the configuration file or running the display snmp-agent sys-info version command. If the SNMP versions used by the switch and NMS are different, change the SNMP version on the switch or NMS to ensure consistency.
For example, configure the switch to use SNMPv2c.
[~HUAWEI] snmp-agent sys-info version v2c
For SNMPv2c: Checking Whether the Community Names on the Switch and NMS Are the Same
Community names include read-only community names and read-write community names. The community names configured on the switch and NMS must be the same.
The SNMP community name configured on the switch is stored in cipher text. If you forget the configured community name, you are advised to reconfigure a community name, which is the same as that on the NMS.
#
snmp-agent sys-info version v2c
snmp-agent community read cipher xxx    // Read-only community name
snmp-agent community write cipher xxx   // Read-write community name
#
For SNMPv3: Checking Whether the User Security Level Is Correctly Set
There are three security levels for SNMPv3 users, which are listed in descending order as follows:
- privacy: authentication and encryption
- authentication: authentication and no encryption
- none: no authentication and no encryption
According to the requirements of the SNMPv3 protocol, the security level of an SNMP user or trap host must be higher than or equal to that of the user group to which the user or host belongs. Otherwise, the NMS cannot communicate with the switch through SNMP. If the user group is at the privacy level, the user and trap host must be at the privacy level. If the user group is at the authentication level, the user and trap host must be at the privacy or authentication level.
#
snmp-agent sys-info version v3
snmp-agent group v3 dc-admin privacy read-view rd write-view wt notify-view nt   // The user group name is dc-admin, and its security level is privacy.
#
snmp-agent usm-user v3 uhmroot
snmp-agent usm-user v3 uhmroot group dc-admin    // The user is named uhmroot and belongs to the user group dc-admin.
snmp-agent usm-user v3 uhmroot authentication-mode sha cipher xxx     // Authentication mode and password.
snmp-agent usm-user v3 uhmroot privacy-mode aes128 cipher xxx         // Encryption mode and password. If the security level of the user group is privacy, authentication-mode and privacy-mode must be both configured for the user.
#
For SNMPv3: Checking Whether the Authentication Mode, Encryption Mode, and Passwords on the Switch Are the Same as Those on the NMS
The authentication mode, encryption mode, and passwords of the SNMPv3 user on the switch must be the same as those on the NMS. Otherwise, the switch cannot communicate with the NMS through SNMP.
The SNMP passwords configured on the switch are stored in cipher text. If you forget the configured password, you are advised to reconfigure the authentication mode, encryption mode, and passwords, which must be the same as those on the NMS.
#
snmp-agent usm-user v3 uhmroot
snmp-agent usm-user v3 uhmroot group dc-admin
snmp-agent usm-user v3 uhmroot authentication-mode sha cipher xxx    // The authentication mode and password must be the same as those on the NMS.
snmp-agent usm-user v3 uhmroot privacy-mode aes128 cipher xxx        // The encryption mode and password must be the same as those on the NMS.
#
Checking Whether the Firewall Allows SNMP Packets to Pass Through
If a firewall is deployed between the switch and NMS, SNMP packets may fail to pass through the firewall due to a filtering policy on the firewall. Use a Huawei firewall as an example. The firewall discards all packets by default, and forwards only the packets permitted by policies.
When checking security policies on a firewall, pay attention to the following points:
- Inter-zone policies must permit traffic between the switch and NMS in bidirectional directions.
- The SNMP service must be enabled on the firewall interfaces connected to the switch and NMS.
#
security-policy
 rule name policy1      // Inter-zone policy
  source-zone trust      // Source zone
  destination-zone untrust      // Destination zone
  source-address 10.1.1.0 mask 255.255.255.0      // Source IP address. Ensure that the switch (or NMS) IP address is within the specified address range.
  destination-address 10.1.2.0 mask 255.255.255.0      // Destination IP address. Ensure that the NMS (or switch) IP address is within the specified address range.
  action permit
 rule name policy2
  source-zone untrust
  destination-zone trust
  source-address 10.1.2.0 mask 255.255.255.0
  destination-address 10.1.1.0 mask 255.255.255.0
  action permit
#
interface GigabitEthernet1/0/0      // Interface connected to the switch or NMS
 undo shutdown
 ip address 10.1.2.1 255.255.255.0
 service-manage snmp permit      // The SNMP service is enabled. By default, this service is disabled.
#
Checking Whether Duplicate SNMP Engine IDs Exist on the Network
In normal cases, each switch on the network has a unique SNMP engine ID to identify an SNMP entity. If two switches on the network have the same SNMP engine ID, the switch added later cannot communicate with the NMS.
#
snmp-agent
snmp-agent local-engineid 800007DB03D0C65B9E5D01    // SNMP engine ID
#
Duplicate SNMP engine IDs usually occur when the configuration file of a switch is copied and modified as the configuration file of another switch, but the SNMP engine ID is not modified. If this problem occurs, run the undo snmp-agent local-engineid command on the switch to restore the default SNMP engine ID.
[~HUAWEI] undo snmp-agent local-engineid
Description
This article describes basic steps to troubleshoot SNMP Communication Issues.
Solution
Version 8.x: Navigate to Network Devices — > Topology
Version 9.x: Navigate to Network — > Inventory
1) Confirm community string is correct. Select Validate Credentials button under the Credentials tab for the device model in Topology.
2) Confirm SNMP credentials used has read-write permissions. Read-only permissions will still pass credential validation, yet will be unable to change configurations.
SNMP v1 — community string
SNMP v3 —
SNMP Protocol (SNMPv3-AuthPriv or SNMPv3-AuthNoPriv)
User Name
Authentication Protocol (MD5 or SHA1)
Authentication Password
Privacy Protocol (DES or AES-128. Used only for AuthPriv)
Privacy Password (Used only for AuthPriv)
3) Determine the nature of the failure by looking for SNMP errors using one or both of the following methods:
snmpwalk:
Perform snmpwalk of the System OID in the CLI of NAC (or some other device with this SNMP tool). Linux syntax to use in NAC CLI:
v1
snmpwalk -v 1 -c <Read/Write Community string> <ip address> system
v3
snmpwalk -v3 -u <username> -l <AuthPriv or authNoPriv> -a <MD5 or SHA> -A <password> -x <DES or AES> -X <password> <ip_address> system
If the following response is returned, NAC does not have all the required permissions:
SNMPv2-SMI::mib-x.x.x.x.x.x.= No more variables left in this MIB View (It is past the end of the MIB tree)
Administration UI:
Check for ‘SNMP Failure’ and ‘SNMP Read Error’ events and review details for cause of failure. To view events, either right click on the device in Topology/Inventory and select Show Events, or navigate to
Version 8.x: Logs — > Events
Version 9.x: Logs — > Events & Alarms
v3 Errors
- SNMP Failure event result when Engine ID doesn’t match NAC’s cache would contain the message ‘Received engine Id <id string> is not correct’.
- SNMP Failure event result when device is not responding to SNMP would contain the message ‘<ip address> Timed out’. Refer to related KB article below.
- SNMP Failure event result would contain ‘Error reading Snmp object’. This can occur when the account used by FortiNAC does not have all the required SNMP server group permissions. For tips on configuring and validating Cisco SNMP v3, refer to related KB article below.
Important: Switches using SNMP v3 must have unique Engine IDs (msgAuthoritativeEngineID). SNMP v3 are used to identify the device. If multiple switches have the same Engine ID, sporadic unpredictable results may occur.
Managing Cisco using SNMP v3:
Cisco wired switches (and potentially other switches using VLAN contexts) must define SNMPv3 context values for every VLAN created in the switch. If this is not done, NAC may not be able to switch VLANs consistently. For tips on configuring and validating Cisco SNMP v3, refer to related KB article below.
If the above steps do not resolve the behavior, then there may be an issue with the SNMP stack. Refer to related KB article below.
Related KB Articles
Technical Note: Troubleshooting SNMP Timeout Errors
Technical Tip: Configure and validate Cisco SNMPv3
Technical Note: SNMPv3 Communication Fails for Certain Devices
Technical Note: Cannot discover device in Topology due to SNMP failure
Technical Note: SNMP OID access requirements for management of Juniper switches
SNMP is a common and most used network protocol for monitoring SNMP-enabled network hosts; including Windows and Windows Servers. You can use it for monitoring different metrics, such as CPU load, RAM, Disk, system uptime, and much more.
It acts as a Windows service and it is prone to different problems. If it doesn’t work, you will not be able to use it for monitoring the performance of your Windows machines. The problem can occur on any Windows and Windows Server version or edition. Why does the problem occur?
For writing this article, I run my workloads on powerful mini PC - Intel NUC powered with the CPU i7 the latest generation, 64 GB RAM DDR4, 256 M.2 SSD. Intel® NUC Mini PCs are fully complete and ready to work out of the box. You can learn more here Intel® NUC Products.There are different reasons for that. In this article, I’ll cover common issues you might see and potential solutions to fix them.
And Yes…I’d love to hear your feedback. Please let me know if any, and what solution helped you to solve SNMP problems on your Windows. You can do it by adding your comment at the end of this article.
#1 Test SNMP connectivity
SNMP doesn’t work! Well, we know that, but it sounds generic. Firstly, we need to identify where is the root cause of the problem. Is there a problem with the destination Windows machine, network monitoring solution (NMS), or communication between Windows and NMS?
You can verify if the SNMP service is running using free SNMP Tester tools. The SNMP Tester tool can be run on the source (NMS) or destination machine (Windows). I’ll do it on the destination Windows machine which doesn’t respond to SNMP queries. You can do it on your NMS machine, as well. Based on the results we get, we can make some conclusions.
What tool should you use? I advocate for Paessler SNMP Tester.
- Download Paessler SNMP Tester from this LINK.
- Extract it, run Setup.exe to install it.
- Run the Paessler SNMP Tester.
- Under 1. Set SNMP Tester add the IP/Port, choose SNMP Version and Community. Under 2. Select Request Type select Read Device Uptime.
- Under 3. Run Test click Start. In the case below, you can see there is no response from Windows. Considering I use the correct paraments, my SNMP doesn’t work.
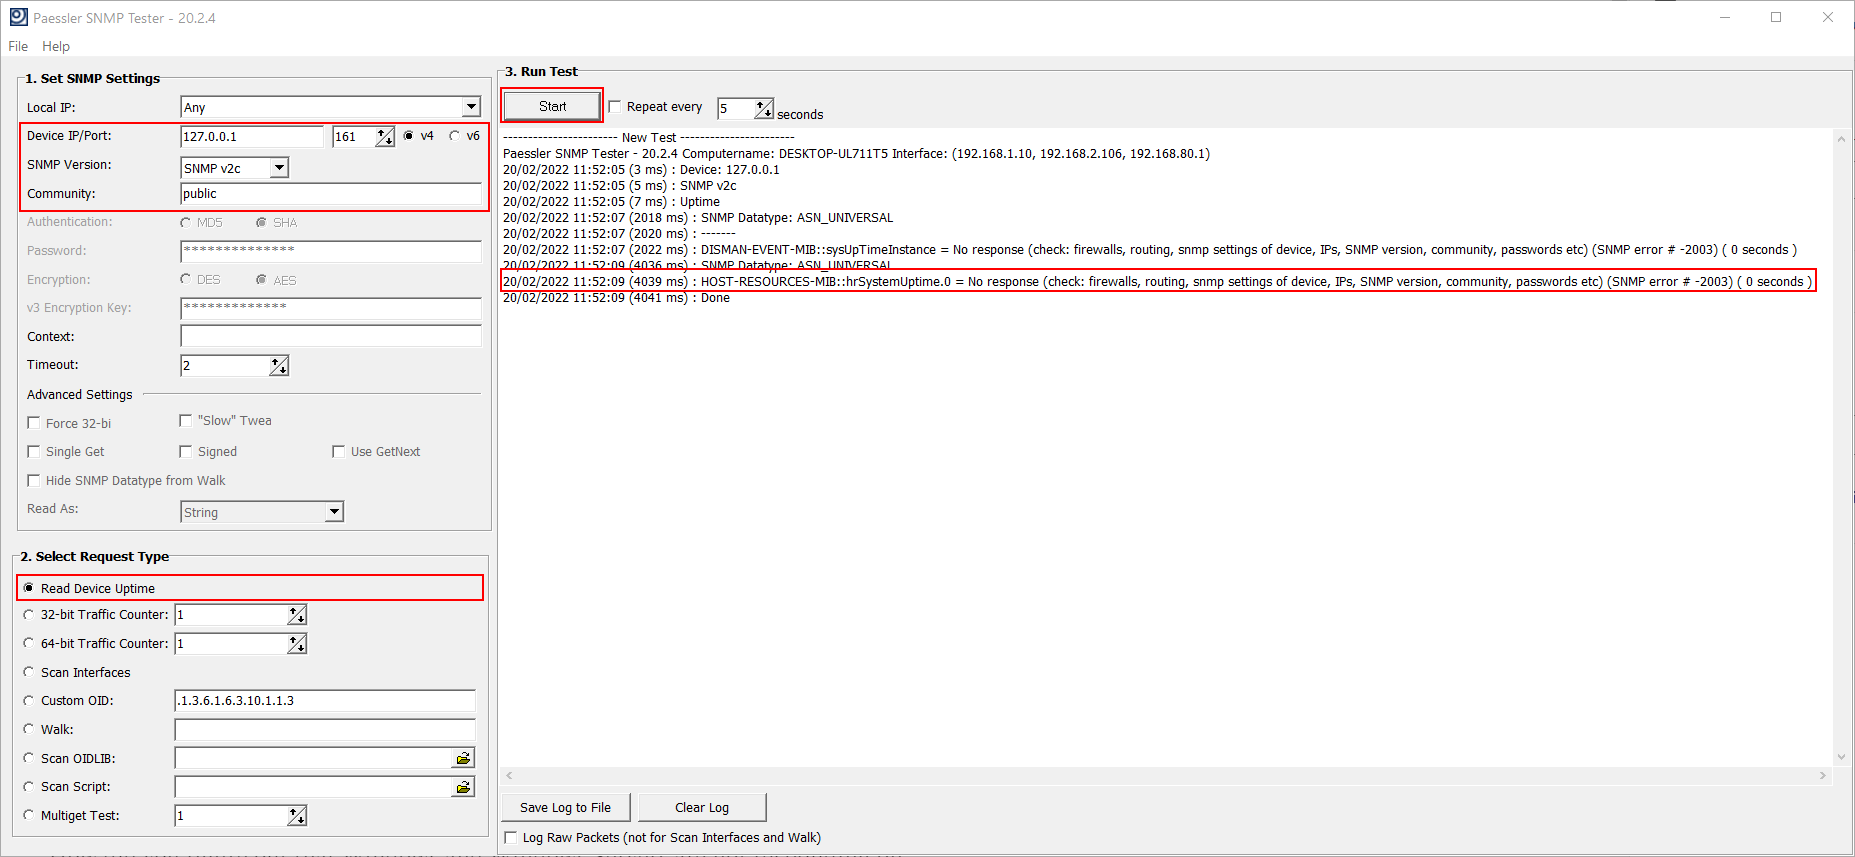
If you run SNMP Tester on the destination Windows machine, and it doesn’t respond to SNMP: SNMP is not enabled. Please check #2.
If you run SNMP Tester on the destination Windows machine, and it responds to SNMP but doesn’t respond to SNMP from NMS: you need to check if SNMP settings are matched with your NMS. Please check #3 and #4.
#2 Check SNMP service
SNMP service is not enabled by default. Regardless you are running Windows or Windows Server, you need to enable it. If you are unsure, you need to check the SNMP services status using the Services tool or PowerShell.
In Windows and Windows Server with Desktop Experience (GUI), you can check the SNMP status using Services.msc. Services is a tool in the Windows operating system to get a list of all the services on the computer. msc stands for the management console.
In order to do it, you need to open the Services tool and navigate to SNMP Service.
1. Hold Windows logo + R
2. Type services.msc and press Enter
Navigate to SNMP Service and check if it is running. If SNMP service is available, but not running, change the startup type and run it by clicking on Properties > General > Startup type > Start.

You don’t see SNMP service? That means it is disabled, and you need to enable it. You can check the details on how to do it on different operating systems in the following articles:
- How to install deprecated SNMP in Windows 10 1803 and onwards
- Can you still monitor your Windows 11 with SNMP
- Install and Configure SNMP in Windows Server 2019
- Can you still monitor your Windows Server 2022 with SNMP
What if you are running Windows Server Core or Hyper-V Server Core? In that case, you can check the status using PowerShell by executing the following command:
Get-WindowsFeature SNMP*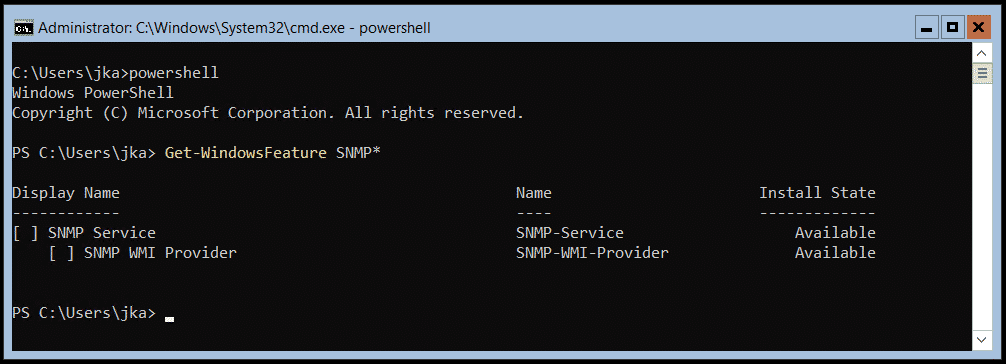
I’ve got you covered with the complete procedure in these two articles:
- Install and configure SNMP on Windows Server Core
- Install and configure SNMP on Hyper-V Server Core
SNMP service is enabled, but I still can’t monitor target Windows machines using SNMP. Well, check the next step(s).
#3 Check SNMP settings
It is not only enough to enable SNMP on your Windows, you also need to configure it. It could happen that settings are not matched, and Windows and NMS can’t exchange SNMP messages. It could also happen that someone intentionally and accidentally made some changes. So, it always makes sense to check if the settings are matched or not.
There are four important parameters you need to match. It is an SNMP version, community string, port (explained in #4), and SNMP access list.
What SNMP versions are available? Windows only supports v1 and v2c. You need to check if v1 or v2c are configured within your NMS. If in any case, you use v3 in your NMS; Windows will not be able to respond to it.
What is the community string? A community string is some kind of key that is shared between NMS and Windows machines. The default one is public. You can keep the default one or change it (recommended).
What is the default port? SNMP uses UDP ports 161 and 162. For more information please refer to #4.
What is an SNMP access list? It is a list of IP addresses that are allowed to send SNMP queries to target Windows machines. This setting can be only configured on Windows machines.
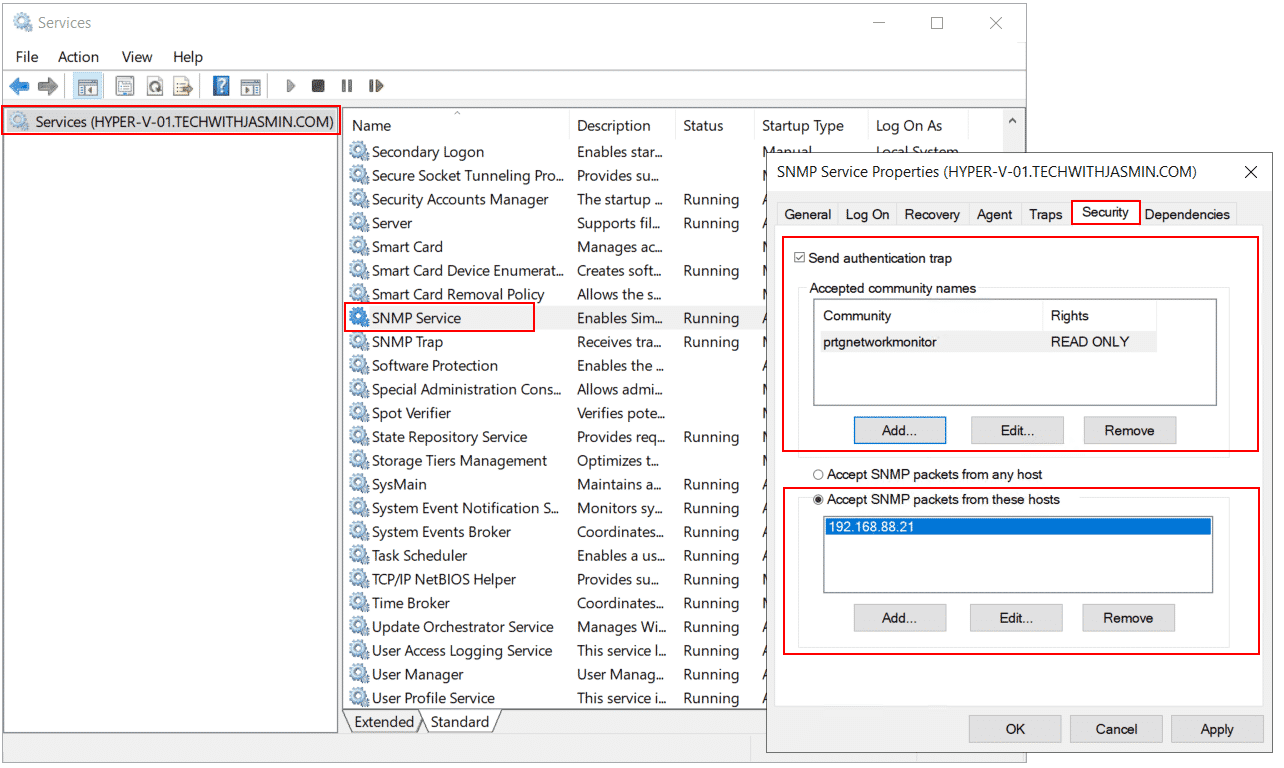
Both, the community string and SNMP access list can be configured within the SNMP service itself. In order to do it, you need to open the Services tool and navigate to SNMP Service.
1. Hold Windows logo + R
2. Type services.msc and press Enter
3. Right click on SNMP Service and click Properties
4. Click on Security tab
Check the community string and match it with the NMS. You can add, edit or remove it.
The second option you need to configure is the SNMP access list. There are two options available, Accept SNMP packets from any hosts or Accept SNMP Packets from these hosts. If you select Accept SNMP packets from any hosts or Accept SNMP Packets from these hosts, you also need to add the IP address of your NMS. In my case below, the community string is prtgnetworkmonitor and my Windows machines only accept SNMP queries from 192.168.88.21 which is PRTG Network Monitor.
Navigate to your NMS, in my case PRTG Network Monitor and verify if the SNMP version and community string are matched. In my case, they are.

I know there is one thing missing, a port. Please refer to the next step.
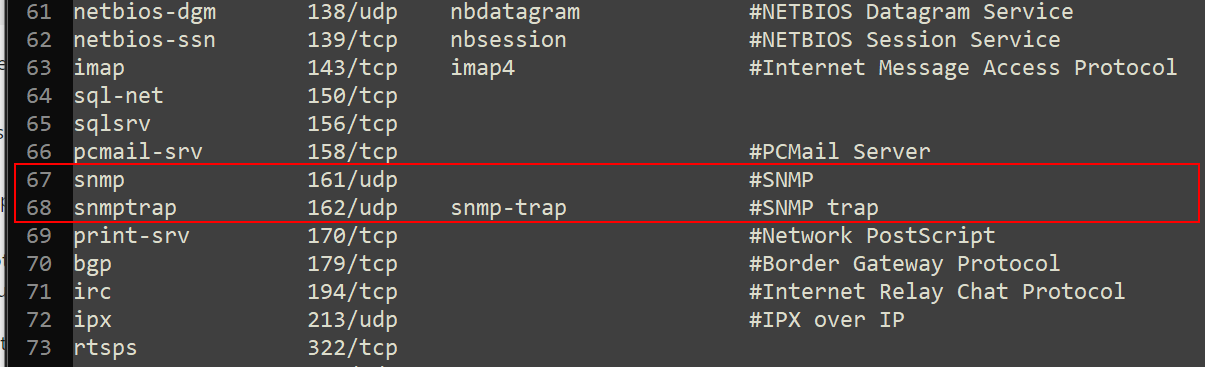
#4 Check SNMP port(s)
SNMP uses the UDP port 161 for general SNMP messages. It uses UDP port 162 for SNMP Traps. These ports (if not changed on the Windows), must be matched with the port on your NMS.
If you are unsure what SNMP post is used, you can check it by navigating to your Windows machine and opening %systemroot%\System32\Drivers\Etc. Open file services with a text editor (e.g. Notepad++) and navigate to SNMP.
#5 Check firewall rules
This is not really a common situation, but it might be the case in certain situations. No harm to look at it. Windows provides you with a native firewall that can control inbound and outbound traffic. You can open Windows Firewall Advanced Settings and check if there are any rules blocking SNMP. The newest version of Windows and Windows Server, it is called Windows Defender Firewall with Advanced Security.
Once you open it, on the left side of the device tree, you can find Inbound and Outbound rules. Go through them and see if there are any rules that are blocking SNMP.
In my case, Windows 10 has the rule to block SNMP. What can I do in that case? I can disable the rule, modify it or delete it.

What can you do in your case? Please advise your IT department if you are allowed to modify it. In centralized environments dependent on the Active Directory, you can perform this change on hundreds or thousands of Windows machines by running a single group policy.
#6 SNMP stopped working after Windows Update
Well, this might happen with any Windows features. Windows Update is a must to do, but sometimes it just breaks things. We as IT professionals need to have a mechanism for how to mitigate or minimize potential problems.
If you noticed that SNMP stopped working after Windows Update, you can try to revert the update to the previous version (if possible). If you can’t do it, search for potential fixes on the Internet.
#7 Repair your Windows
Malware infected your Windows and SNMP files. You tried all of the potential solutions, but they didn’t work.
You can try to repair system files by running the sfc /scannow. The sfc /scannow command will scan all protected system files, and replace corrupted files with a cached copy that is located in a compressed folder at %WinDir%\System32\dllcache.
Open PowerShell or Command Prompt as Administrator and run the following command.
sfc /scannow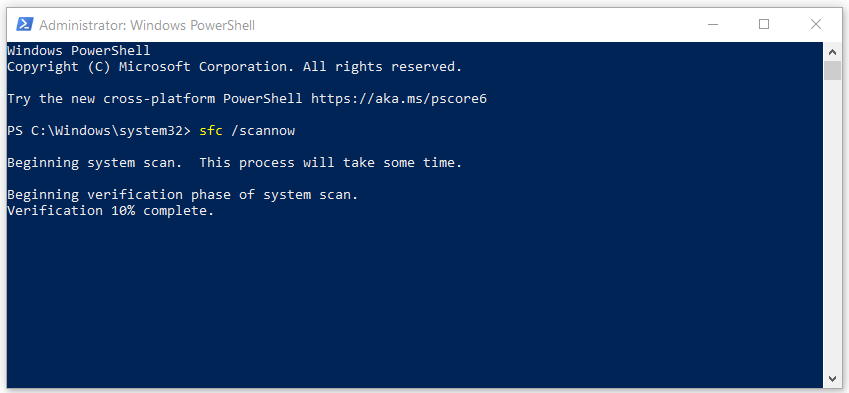
#8 Check your NMS
If SNMP works fine on your Windows machine, but NMS has some difficulties sending SNMP queries, you should check with the vendors if there are any known problems with SNMP. Open a ticket and read the release notes.
#9 Wireshark knows where the packet goes
Considering your Windows and NMS are working properly and your SNMP packets are somewhere lost; try to analyze your network traffic using Wireshark. Wireshark is a super powerful tool for that kind of job.
And Yes…I’d love to hear your feedback. Please let me know if any, and what solution helped you to solve SNMP problems on your Windows. You can do it by adding your comment at the end of this article.
If you find this article helpful, you can share it with your network by using the social media buttons below.
Introduction
This document describes the Simple Network Management Protocol (SNMP) and how to test its functionality on a device.
Requirements
Prerequisites
Cisco recommends that you have knowledge of SNMP protocol and its communications with the Network Management System (NMS) server.
Components Used
The information in this document is based on these software and hardware versions:
-
SNMP
-
Cisco WS-C3650-12X48UZ
The information in this document was created from the devices in a specific lab environment. All of the devices used in this document started with a cleared (default) configuration. If your network is live, ensure that you understand the potential impact of any command.
Conventions
Refer to Cisco Technical Tips Conventions for more information on document conventions.
Troubleshoot Most Common Errors
1. Error Message: «%SNMP-3-RESPONSE_DELAYED: processing GetNext of «Any OID».»
GetNext of ciscoMgmt.810.1.2.1.1 (24004 msecs)*May 24 01:30:48.463: %SNMP-3-RESPONSE_DELAYED: processing GetNext of ciscoMgmt.810.1.2.1.1 (24008 msecs)
---> In this scenario ciscoMgmt.810.1.2.1.1 is the OID causes the issue.*May 24 01:31:12.477: %SNMP-3-RESPONSE_DELAYED: processing GetNext of ciscoMgmt.810.1.2.1.1 (24012 msecs)
*May 24 01:31:36.486: %SNMP-3-RESPONSE_DELAYED: processing GetNext of ciscoMgmt.810.1.2.1.1 (24008 msecs)
*May 24 01:32:00.503: %SNMP-3-RESPONSE_DELAYED: processing GetNext of ciscoMgmt.810.1.3.1.1 (24016 msecs)
*May 24 01:32:24.515: %SNMP-3-RESPONSE_DELAYED: processing GetNext of ciscoMgmt.810.1.3.1.1 (24012 msecs)
*May 24 01:32:48.528: %SNMP-3-RESPONSE_DELAYED: processing GetNext of ciscoMgmt.810.1.3.1.1 (24012 msecs)
*May 24 01:33:12.537: %SNMP-3-RESPONSE_DELAYED: processing GetNext of ciscoMgmt.810.1.3.1.1 (24008 msecs)
To troubleshoot:
Check SNMP configuration on the device. For SNMPv2, it needs to look like this:
snmp-server community TAC1 ROsnmp-server community TAC2 RO --> If multiple communities are added to device.
For SNMPv3:
snmp-server view TESTV3 iso include#snmp-server group TestGroupV3 v3 auth read TESTV3
#snmp-server user cisco TestGroupV3 v3 auth md5 ciscorules priv des56 cisco123
Enter the configuration mode of the device and add a view to the SNMP configuration to change it.
For SNMPv2:
snmp-server community TAC1 RO view cutdown ROsnmp-server community TAC2 RO view cutdown RO
Some lines from the configuration mode:
snmp-server view cutdown iso includedsnmp-server view cutdown ciscoMgmt.810 excluded -->>>
The Idea is to exclude the OID causes the issue, however,
please read out what is the function of the OID that that is excluded.
For SNMPv3:
#snmp-server view TESTV3 internet included#snmp-server view TESTV3 ciscoMgmt.810 excluded
#snmp-server group TestGroupV3 v3 priv write TESTV3
2. Error Message «High CPU Utilization due to SNMP Flash Cache».
#show processes cpu sortedCPU utilization for five seconds: 99%/0%; one minute: 22%; five minutes: 18%
PID Runtime(ms) Invoked uSecs 5Sec 1Min 5Min TTY Process
447 561399 143012 3925 0.00% 1.58% 1.83% 0 Snmp Flash Cache
SNMP Logs:
%SYS-2-SIGPENDING: Multiple Signals are sent to a process 91 -Process= «Snmp Flash Cache», ipl= 0, pid= 91.
888888888888888888888888888888888888888888888898878889625424254283314655456532533533772205363424335694492379
100 * *
90 * * * * *** *** * * ** * * *** **
80 ******************************************************
70 ******************************************************
60 ******************************************************
50 ******************************************************
40 ######################################################
30 ######################################################
20 ######################################################
10 ######################################################
0....5....1....1....2....2....3....3....4....4....5....5....6....6....7..
The Flash MIB data collection process is disabled by default. If it is enabled with the use of snmp mib flash cache command (possibly after a reload), it can cause a high CPU in some cases.
Instead, use the #no snmp mib flash cache command in the configuration mode.
Or install this EEM script:
event manager applet SNMP authorization bypass event syslog pattern "SYS-5-RESTART" action 11 cli command "enable" action 12 cli command "conf t" action 13 cli command "no snmp mib flash cache" action 14 cli command "end"
3. Error Message: «%SNMP-3-INPUT_QFULL_ERR:Packet dropped due to input queue full»
A possible reason for a queue full error can be heavy polling on the device or a specific OID that causes the issue. To mitigate this, first, check if the device is heavily polled.
In order to do so, execute this command:
B02#show snmp stats oidtime-stamp #of times requested OID
15:40:19 BKK Dec 27 2019 11180008 ifAlias
15:40:19 BKK Dec 27 2019 44018183 dot1dBasePortEntry.4
15:40:19 BKK Dec 27 2019 44018212 dot1dBasePortEntry.3
15:40:19 BKK Dec 27 2019 45216156 ipNetToPhysicalEntry.4
15:40:19 BKK Dec 27 2019 44018059 dot1dBasePortEntry.5
15:40:19 BKK Dec 27 2019 44578303 dot1dBasePortEntry.1
15:40:19 BKK Dec 27 2019 6011756 dot3StatsEntry.19
15:40:19 BKK Dec 27 2019 11095925 ifSpeed
15:40:19 BKK Dec 27 2019 12879927 dot1dTpFdbEntry.3
15:40:19 BKK Dec 27 2019 84535 vmMembershipSummaryEntry.2
15:40:19 BKK Dec 27 2019 3241107 vmMembershipSummaryEntry.3
15:40:19 BKK Dec 27 2019 45208908 ipNetToMediaEntry.2
15:40:19 BKK Dec 27 2019 45223410 ipNetToPhysicalEntry.6
15:40:19 BKK Dec 27 2019 44018324 dot1dBasePortEntry.2
To troubleshoot:
You need to change the settings on your NMS and reduce the polling intervals for the device. Once the polling interval is reduced, queue full error must be mitigated. If not, then you need to check for the OID that causes the issue. To find the OID that causes the issue and to troubleshoot on the same, please refer to the previously mentioned Error Message 1.
4. Error Message: «High CPU utilization due to SNMP ENGINE».
Identify the issue:
The router suffers a high CPU at the time it is polled by a client, and this can be checked with the #show process cpu <sorted> command at the time of the high CPU. You can see that the SNMP Engine process takes all the CPU resources:
#show processes cpu sortedCPU utilization for five seconds: 99%/0%; one minute: 22%; five minutes: 18%
PID Runtime(ms) Invoked uSecs 5Sec 1Min 5Min TTY Process
189 1535478456 697105815 2202 88.15% 13.40% 8.74% 0 SNMP ENGINE
The problematic OID causes the high CPU to be slower than the others, which could also cause some timeout when the client requests this OID. Most of the methods attempt to find the OID that provides a slower answer. That is because they are the most likely to cause the high CPU. Once the OID is identified, you can lock that respective OID in order to mitigate the errors.
Note: If none of the methods listed here help to identify an OID that causes the issue, please open a case with TAC.
Method 1. Use show snmp stats oid command.
The show snmp stats oid command displays the last OID that was polled. It displays the timestamp in order, the goal is to identify the OID that did respond slowly. This command is also helpful if you want to find what MIBs are polled more often by the client.
#show snmp stats oidtime-stamp #of times requested OI
14:34:38 CET Oct 25 2020 24 atEntry.2
14:34:29 CET Oct 25 2020 40 atEntry.1
14:34:11 CET Oct 25 2020 11 ifOutErrors
14:34:07 CET Oct 25 2020 10 ifOutDiscards
14:34:06 CET Oct 25 2020 10 ifOutUcastPkts
14:34:06 CET Oct 25 2020 10 ifOutOctets
14:34:05 CET Oct 25 2020 10 ifInUnknownProtos
You can see that Entry.1 took 18 seconds to get computed, this suggests that the CPU was busy in order to compute this data.
Method 2. Observe the SNMP client.
In order to fiind the OID that is responsible for the high CPU usage on the device, you can initiate a snmpwalk to a device from an NMS server and observe the output. The OIDs that respond slower than the other OIDs can be the ones responsible for high CPU utilization.
To troubleshoot:
Check SNMP configuration on the device. For SNMPv2, it needs to look like:
snmp-server community TAC1 ROsnmp-server community TAC2 RO --> If multiple communities are added to snmp.
- For SNMPv3
snmp-server view TESTV3 iso include#snmp-server group TestGroupV3 v3 auth read TESTV3
#snmp-server user cisco TestGroupV3 v3 auth md5 ciscorules priv des56 cisco123
Enter the configuration mode of the device and add a view to the SNMP configuration to change it.
- For SNMPv2
snmp-server community TAC1 RO view cutdown ROsnmp-server community TAC2 RO view cutdown RO
Add these lines in the configuration mode:
snmp-server view cutdown iso includedsnmp-server view cutdown OID _causes_the issue_is _to_excluded  excluded
  -->>> The Idea is to exclude the OID causes the issue, however,
        please read out what is the function of the OID that  we are about to exclude.
Related Information
- SNMP
- Cisco Technical Support & Downloads