hp-concentra-wrapper-portlet
![]()
Actions
This document is for HP Photosmart B209, B210, C309, C310, C410, C5300, C5500, and C6300 All-in-One printers.
When you try to scan from the control panel of the HP product, the ‘Scan Problem. Try starting scan from computer’ error message displays on the touch screen. If you cancel the scan and try to scan again, the error message displays again.
Windows
Follow these steps in the order presented to resolve the issue for printers connected to a computer with Windows.
Solution one: Download and run a HP Print and Scan Doctor
The tool diagnoses and resolves common scanning problems and communication problems. Follow these steps to download, and then run the tool.
Step one: Download the tool
Step two: Run the tool
-
Turn on the printer and load plain paper in the main tray.
-
On the Print and Scan Doctor welcome screen, click Start to locate your printer.
note:
If your printer is not found, click My product is not listed, and then follow the instructions to troubleshoot the connection.
-
Select your printer, click Next, and then follow the instructions to begin the troubleshooter.
Step three: Resolve diagnosed scanning problems
-
Review the status of each test result.
-
 : The printer passed the test.
 -
: An issue was discovered and automatically repaired.
-
: The test failed and required user action, but the step was skipped.
-
: An issue was found. Follow the instructions to resolve the issue.
-
-
Load an item on the scanner glass, and then click Test Scan to confirm the scanner is working.
 : The printer passed the test.
 : An issue was discovered and automatically repaired.
 : The test failed and required user action, but the step was skipped.
 : An issue was found. Follow the instructions to resolve the issue.
Step four: Try to scan again
-
If these steps resolved the issue, you do not need to continue troubleshooting.
-
If the issue persists, see the next solution.
Solution two: Reset the product
Follow these steps to reset the product, and then try to scan again.
-
With the printer turned on, disconnect the power cord from the rear of the printer.
-
Unplug the power cord from the wall outlet.
-
Wait at least 15 seconds.
-
Plug the power cord back into the wall outlet.
-
Reconnect the power cord to the printer.
-
Turn the printer on.
-
If these steps resolved the issue, you do not need to continue troubleshooting.
-
If the issue persists, see the next solution.
Solution three: Check the HP product status
Follow these steps to check the product status with HP Solution Center.
note:
Do not try to scan again until you are instructed to do so.
-
Search Windows for ‘Solution Center’ to open HP Solution Center software.
-
Make sure that a green check mark displays under the name of your HP product in HP Solution Center.
note:
If you have more than one HP printer connected to your computer, select the model with the error from the sidebar.
-
If a green check mark displays under the name of your HP product, try to scan to see if the issue is resolved.
-
If a green check mark does not display under the name of your HP product, continue to the solution to Make sure the full feature software is installed on your computer.
-
Solution four: Make sure the full feature software is installed on your computer
The full feature software must be installed on your computer to scan from the control panel of your HP product. Follow these steps to make sure the full feature software is installed on your computer.
Step one: Check for the HP Digital Imaging icon
Check the lower right notification area of your computer screen for the HP Digital Imaging icon ( ).
).
-
If the HP Digital Imaging icon displays in the notification area, the full feature software is installed. Continue to the next solution.
-
If the HP Digital Imaging icon does not display in the notification area, the full feature software is not installed. Continue to the step to Install the full feature software.
Step two: Install the full feature software
-
Turn on the printer.
-
Disconnect the USB cable from the printer, if necessary. The software installation prompts you to connect the cable if needed.
-
If a Let’s identify your product to get started page displays, click Printer, type your printer model number, and then click Submit.
-
If you need to change the operating system, click Change, select your version, and then click Change.
-
Under the Driver heading, click Download for the full software package, or click Basic Drivers for other driver options.
Step three: Try to scan again
Try to scan from the printer control panel.
-
If these steps resolved the issue, you do not need to continue troubleshooting.
-
If the issue persists, start scans from HP Solution Center software.
Mac
Follow these steps in the order presented to resolve the issue for printers connected to a Mac computer
Solution one: Reset the product
Follow these steps to reset the product, and then try to scan again.
-
With the printer turned on, disconnect the power cord from the rear of the printer.
-
Unplug the power cord from the wall outlet.
-
Wait at least 15 seconds.
-
Plug the power cord back into the wall outlet.
-
Reconnect the power cord to the printer.
-
Turn the printer on.
-
If these steps resolved the issue, you do not need to continue troubleshooting.
-
If the issue persists, see the next solution.
Solution two: Check the HP product status
Follow these steps to check the status of the HP product, and then try to scan again.
-
From the Apple menu, choose System Preferences.
-
Click Print & Fax to open the Printers list.
Figure : Example of a Printers list in the Print & Fax folder
-
Find the colored circle next to your product in the Printers list.
-
A green circle indicates your product is online and ready to print. Continue to the next step.
-
A red circle indicates a possible issue with the connection. Continue to the solution to Make sure the full feature software is installed on your computer.
-
-
Try to scan again.

-
If these steps resolved the issue, you do not need to continue troubleshooting.
-
If the issue persists, see the next solution.
Solution three: Make sure the full feature software is installed on your computer
The full feature software must be installed on your computer to scan from the control panel of your HP product. Follow these steps to make sure the full feature software is installed on your computer.
Step one: Check for the HP Utility in the dock
Check the dock for the HP Utility.
-
If the HP Utility displays in the dock, the full feature software is installed. Continue to the next solution.
-
If the HP Utility does not display in the dock, the full feature software is not installed. Continue to the step to the next step.
Step two: Install the full feature software
-
Turn on the printer.
-
Disconnect the USB cable from the printer, if necessary. The software installation prompts you to connect the cable if needed.
-
If a Let’s identify your product to get started page displays, click Printer, type your printer model number, and then click Submit.
-
If you need to change the operating system, click Change, select your version, and then click Change.
-
Under the Driver heading, click Download for the full software package, or click Basic Drivers for other driver options.
Step three: Try to scan again
-
If these steps resolved the issue, you do not need to continue troubleshooting.
-
If the issue persists, see the next solution.
Solution four: Check your connection
A functioning connection is required to complete a scan. Follow these steps to check for Ethernet and wireless connection issues.
note:
Some of the following solutions require you to restart the computer. Consider bookmarking this page on your Web browser, so that you can reference it after restarting the computer.
Step one: Restart the computer, HP product, and network router
-
If you just installed the HP software, make sure that the software installation completed. Click Next or Finish on any remaining setup screens.
If you do not see any software setup screens, the software installation completed.
-
Restart your computer.
-
Press the Power button to turn off the product.
note:
If the product does not turn off, disconnect the power cord from the rear of the product, wait for it to turn off completely, and then reconnect the power cord.
-
Press the Power button to turn on the product.
-
If you use a network router or access point, disconnect the power cable from the router or access point, wait 60 seconds, and then reconnect the cable.
Step two: Try to scan again
Try to scan again.
-
If these steps resolved the issue, you do not need to continue troubleshooting.
-
If the issue persists, continue to the next step.
Step three: Check your connection
Follow these steps to make sure that the product properly connects to your computer.
USB
-
Turn on the computer.
-
Check the USB connection in the following ways:
-
Make sure that the USB cable is connected to the computer and to the product.
-
Make sure that the USB cable is no more than 3 m (10 ft) long. Replace the cable if necessary.
-
Make sure that the USB cable is working correctly by connecting it to another product. Connect the cable to another USB port on the computer. If necessary, replace the cable.
-
If you use a USB hub or a USB docking station, it may be defective. Try connecting the USB cable directly to the computer.
Figure : Example of a USB connection
-

Wired network
-
On the Home screen of the product control panel, touch the right arrow to view more options.
-
Touch Setup (
). The Setup Menu displays. -
Touch Network. The Network screen displays.
-
Touch View Network Settings. The View Network Settings screen displays.
-
Touch Print Network Configuration Page.
The network configuration page prints, which includes the IP address.
Figure : Example network configuration page
-
Check the network configuration page for a valid product IP address. A valid IP address looks something like this: 192.68.xx.xxx
note:
The IP address might also be labeled as the URL for Embedded Web Server.
-
If the network configuration page lists a valid product IP address, continue to the next step.
-
If network configuration page does not list a valid product IP address, the product is not on a network. View the steps to check the network connection.
-
 ). The Setup Menu displays.
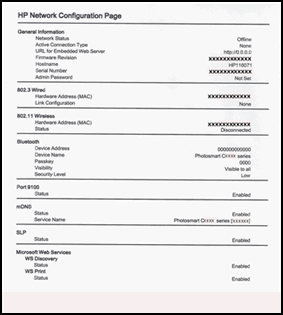
Show me how to check the network connection
-
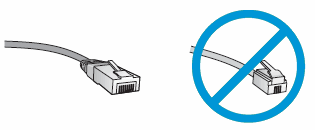
Examine the Ethernet cable attached to the rear of the product.
Make sure that it is not a phone cable (Ethernet cables and phone cables look similar).
Figure : Do not use a phone cable
-
Make sure that the cable connects to the product Ethernet jack. The Ethernet icon (
) marks the correct jack. -
Check that the cable plugs into a live network router.
-
Print another network configuration page, and then locate the product IP address.
-
If the network configuration page lists a valid product IP address, continue to the next step.
-
If the network configuration page still does not list a valid product IP address, see your user manual to troubleshoot network connectivity issues.
-
 ) marks the correct jack.
Wireless network
-
On the Home screen of the product control panel, touch the right arrow to view more options.
-
Touch Setup (
). The Setup Menu displays. -
Touch Network. The Network screen displays.
-
Touch View Network Settings. The View Network Settings screen displays.
-
Touch Print Network Configuration Page.
The network configuration page prints, which includes the IP address.
Figure : Example of a network configuration page
-
Check the network configuration page for a valid product IP address. A valid IP address looks something like this: 192.68.xx.xxx
note:
The IP address might also be labeled as the URL for Embedded Web Server.
-
If the network configuration page lists a valid product IP address, continue to the next step.
-
If the network configuration page does not list a valid product IP address, the product is not on a network. View the steps to reconnect to the wireless network with the Wireless Setup Wizard.
-
Show me how to reconnect to the wireless network with the Wireless Setup Wizard
Before you start the Wireless Setup Wizard, complete the following troubleshooting suggestions:
-
Move the product and the router closer together.
-
Remove any metal objects between the product and the router. Objects such as refrigerators or metal bookcases can interfere with wireless transmission.
-
Move any device that emits radio signals farther away from the product. Devices such as microwave ovens and cordless telephones can interfere with wireless transmission.
-
Make sure that you connect to the correct SSID/network profile for your network.
-
Check with the router manufacturer to make sure that the router functions properly.
-
Try changing the network channel.
Follow these steps to reconnect the product to your network with the Wireless Setup Wizard.
note:
To use the Wireless Setup Wizard, you must have a wireless network set up and running.
-
On the Home screen of the product control panel, touch the right arrow to view more options.
-
Touch Setup (
). The Setup Menu displays. -
Touch Network. The Network screen displays.
-
Touch Wireless. The Wireless screen displays.
-
Touch Wireless Setup Wizard, and then touch Continue.
-
Wait while the product searches for routers within range of the product. The Select Network (SSID) menu displays.
-
Scroll down the list of network names until you find the name of your network.
note:
Your network name does not display on the Select Network (SSID) menu if your network settings have SSID broadcasting turned off, or if a network problem exists.
If the list does not contain your network name, follow these steps to enter your network name manually:
-
On the Select Network (SSID) screen, scroll to and select Enter New Network Name. An on-screen keyboard displays.
-
Using the on-screen keyboard, touch the appropriate letters and numbers to enter the network name (SSID).
note:
Make sure that you type the uppercase (capital) and lowercase (small) letters exactly. Otherwise, the wireless connection fails.
-
When you finish entering the new network name, touch Done. The product searches for that specific SSID.
note:
If the SSID is not found after manually typing the network name, contact your network administrator or the person who set up the wireless network to confirm the network’s SSID/network settings. Once the SSID is found, the product determines if the network has a security key and what type of key it is.
-
-
Touch the name of your network.
-
If prompted, enter the WEP or WPA key:
-
Touch the on-screen keyboard to enter the appropriate letters or numbers of the key.
note:
You must type the exact uppercase (capital) and lowercase (small) letters. Otherwise, the wireless connection fails.
-
When you finish entering the WEP key or WPA key, touch Done, and then touch OK. The product attempts to connect to the network.
-
-
Wait for the product to connect to the network, and then continue to the next step.
note:
If a connection error message displays, make sure that the network name and security key are correct. Follow the prompts to enter the information again.
-
Print another network configuration page, and then locate the product IP address.
-
If the network configuration page lists a valid product IP address, continue to the next step.
-
If the network configuration page still does not list a valid product IP address, see your user manual to troubleshoot network connectivity issues.
-
Step four: Try to scan
Try again to scan from the product control panel.
-
If these steps resolved the issue, you do not need to continue troubleshooting.
-
If the issue persists, start scans from the HP Scan software or with Apple Image Capture.

Create an account on the HP Community to personalize your profile and ask a question
Your account also allows you to connect with HP support faster, access a personal dashboard to manage all of your devices in one place, view warranty information, case status and more.
Common problems HP Solution Center not working : Adobe Flash Player Error and Unable to scan

08-23-2010
12:36 PM

HP Recommended
- Mark as New
- Bookmark
- Subscribe
- Permalink
- Flag Post
In trying to scan a document, I pushed the «scan/reprint» button on the printer’s controls.
I then pushed «scan to PC»
«scan error. Try scan from computer or see documentation. Press OK» comes up on the printer’s screen.
It scans to print just fine, but won’t scan to my computer.
I’m not sure if this is a printer issue or my USB cord isnt working.
I tried to use HP scan pro, but it came up with a box saying » scanner not available.»
The computer can print documents just fine from the computer itself, with the same USB cord.
Scan to PC isn’t working, and this appears to be the only option that isnt.
I’m running Snow Leopard on an iMac 3.06 GHz Intel Core 2 Duo, 4 GB 800 MHz DDr2 SDRAM.
Any ideas on whats going on here ? ?
9 REPLIES 9
01-11-2011
04:42 PM
HP Recommended
- Mark as New
- Bookmark
- Subscribe
- Permalink
- Flag Post
I came on the board because I was having the same exact problem. Another thread provided a suggestion and it worked for me.
-Download the HP Photosmart Aio Full Feature Software for Mac OS X. This is the HP Suite for Mac. It will probably look a bit different from the one you currently have installed (it was for me). It can be found here: http://h10025.www1.hp.com/ewfrf/wc/softwareDownloadIndex?lc=en&cc=us&destPage=softwareDownloadIndex&…
-Once installed, unplug the power cord from the back of the C4480 for a full minute.
-Plug it back in.
-Run HP Scan and try to scan a document or photo.
Was this reply helpful?
Yes
No

meco
1
1
0
19,576
New member
09-29-2012
09:23 AM
HP Recommended
- Mark as New
- Bookmark
- Subscribe
- Permalink
- Flag Post
Thanks so much for your advice and link. This is the first time something has finally worked in the 4 years I have had my Photosmart C4480 hooked to my MacBook!! Nothing else I tried to install ever worked. What a thrill to be able to FINALLY scan to my computer — thanks again!
Was this reply helpful?
Yes
No
12-20-2012
09:47 AM
HP Recommended
- Mark as New
- Bookmark
- Subscribe
- Permalink
- Flag Post
Thanks for the great advice! I had the same trouble and I was able to scan for the first time in months! I’m excited! THANK YOU ovalnez !
Was this reply helpful?
Yes
No
tp23
1
0
0
10,719
New member
07-18-2014
07:44 AM
HP Recommended
- Mark as New
- Bookmark
- Subscribe
- Permalink
- Flag Post
I am having trouble scanning to my computer.
Was this reply helpful?
Yes
No
Leashy
1
0
0
10,489
New member
08-15-2014
04:43 PM
HP Recommended
- Mark as New
- Bookmark
- Subscribe
- Permalink
- Flag Post
Thank you, «Top Student»! I took a chance, downloaded the link you provided, and voila, I can now scan! Thank you for the tip about unpluging my printer, waiting for 60 seconds, etc. Worked like a charm!
Was this reply helpful?
Yes
No
JoScan
2
0
0
10,470
New member
08-16-2014
07:05 AM
HP Recommended
- Mark as New
- Bookmark
- Subscribe
- Permalink
- Flag Post
i had a similar issue with my hp photosmart c4480 which is old. i don’t know how old yours is but the updates/fixes aren’t there for my model. HP helped me bypass the whole issue by using the apple software on my computer instead. go to your finder->applications->image capture & scan that way instead. If that doesn’t help then search the hp support site for info on scanning using apple software
Was this reply helpful?
Yes
No
06-08-2015
08:13 AM
HP Recommended
- Mark as New
- Bookmark
- Subscribe
- Permalink
- Flag Post
When I try to scan a document on my computer (HP Photosmart C4480), I put the document under the lid and press Scan to PC. A message (Scan Error, try scan from computer or see documentation) after a short period and I don’t know how to do this or really what to do and my manual does not list this error?
@smithywonder04 wrote:
In trying to scan a document, I pushed the «scan/reprint» button on the printer’s controls.
I then pushed «scan to PC»
«scan error. Try scan from computer or see documentation. Press OK» comes up on the printer’s screen.
It scans to print just fine, but won’t scan to my computer.
I’m not sure if this is a printer issue or my USB cord isnt working.
I tried to use HP scan pro, but it came up with a box saying » scanner not available.»
The computer can print documents just fine from the computer itself, with the same USB cord.
Scan to PC isn’t working, and this appears to be the only option that isnt.
I’m running Snow Leopard on an iMac 3.06 GHz Intel Core 2 Duo, 4 GB 800 MHz DDr2 SDRAM.
Any ideas on whats going on here ? ?
?
Was this reply helpful?
Yes
No
12-01-2016
06:53 AM
HP Recommended
- Mark as New
- Bookmark
- Subscribe
- Permalink
- Flag Post
I am having the same issues with a scanner error. I am using Windows 10 32bit. I’m not sure if the link on here just works on mac, and don’t want to risk it. Please can you provide a link for a windows 10 32bit.
Thanks
Was this reply helpful?
Yes
No
04-13-2018
12:31 PM
HP Recommended
- Mark as New
- Bookmark
- Subscribe
- Permalink
- Flag Post
I have the same issue. C4480 printer would state error message when trying to scan from printer to computer. Would tell me to try and scan from computer to printer. Was able to do this but can not scan multiple pages to the same document. The way to put multiple scanned pages onto the same document and scan from your computer without downloading anything or going to any websites for fixes. click start button on computer screen, type printers, select devices and printers, click once one the printer/scanner you want to use, click start scan at top of page, next pop up screen on bottom right click scan (a lot of my items on this pop up are grayed out that would normally let you scan multiple pages to the same document), once item is scanned click import, once import is complete replace document on scanner and repeat this process. When all documents are scanned and imported — select the items that you want in the document (do this by clicking the box, top left, next to each imported item, this will put a checkmark top left next to each item you selected), right click over one of the pages, select print, under printer select PDF, save the document. all of the pages that you selected will be in this one PDF file. Hope this helps.
Was this reply helpful?
Yes
No
![]()
Be alert for scammers posting fake support phone numbers and/or email addresses on the community.
If you think you have received a fake HP Support message, please report it to us by clicking on «Flag Post».
† The opinions expressed above are the personal opinions of the authors, not of HP. By using this site, you accept the Terms of Use and Rules of Participation.

-
English
Open Menu

Автоматический перевод этой страницы выполнен Microsoft Translator
При попытке сканирования, копирования или отправки факса возникает сообщение об ошибке Ошибка сканера. Невозможно сканировать, копировать или отправить факс или Системная ошибка сканера.
Отображается ошибка, свидетельствующая о проблемах с оборудованием сканера или питанием, например: застревание планки сканера или проблема с калибровкой, низкая температура лампы сканера или проблема с внутренней
или внешней электропроводкой. Это не связано проблемами подключения по сети или USB.
Выполните следующие процедуры в указанном порядке. Используйте принтер после каждой процедуры, чтобы проверить, удалось ли
устранить проблему.
Сброс настроек принтера
Выполните сброс настроек принтера для восстановления после ошибок и сбоев.
-
Если в принтере есть перезаряжаемый аккумулятор, извлеките его.
-
Когда принтер включен, отсоедините от него кабель питания.
-
Отсоедините кабель питания от источника питания.
-
Подождите 60 секунд.
-
Снова подключите кабель питания к электрической розетке и принтеру.
Прим.:
Компания HP рекомендует подключать принтер напрямую к электрической розетке.
-
Включите принтер, чтобы завершить сброс настроек.
Использование HP Print and Scan Doctor (Windows)
Используйте HP Print and Scan Doctor на своем компьютере с ОС Windows для диагностики и устранения проблем с печатью и сканированием.
-
Убедитесь, что бумага загружена в основной лоток, затем включите принтер.
-
На экране приветствия нажмите Пуск, чтобы выбрать принтер и запустить диагностику.
-
Если принтер не найден, нажмите Мое устройство не указано и следуйте инструкциям по устранению проблем с подключением.
Проверка функциональных возможностей панели сканера
Если вы используете планшетный сканер, отслеживайте панель сканера во время сканирования, чтобы контролировать его работоспособность.
-
Уберите любые оригиналы документов или фотографий со стекла сканера.
-
Немного поднимите крышку сканера, затем нажмите кнопку Копировать или щелкните соответствующий значок.
-
Посмотри на сканер. Панель сканера должна быть подсвечиваться и двигаться по всей длине стекла.
Если подсветка сканера не загорается или панель не перемещается, изучите документ Обратиться в службу поддержки клиентов HP, чтобы отдать принтер в сервисное обслуживание.
Переустановите программное обеспечение принтера
Переустановка программного обеспечения принтера может устранить проблемы, связанные с печатью и сканированием.
Удаление драйвера печати HP и использование HP Smart (Windows)
Удалите драйвер печати HP и установите HP Smart на компьютере под управлением Windows.
-
Отсоедините от принтера все кабели USB.
-
В Windows выполните поиск и откройте раздел Установка и удаление программ.
-
Найдите в списке программ название вашего принтера HP.
-
Если вы нашли свой принтер, выберите имя принтера, затем нажмите Удалить.
-
Если вам не удалось найти свой принтер, найдите и откройте раздел Принтеры и сканеры, выберите свой принтер, затем нажмите Удалить устройство.
-
-
Если отображается сообщение Контроль учетных записей пользователей, нажмите Да.
-
Следуйте инструкциям, чтобы завершить удаление программного обеспечения, затем перезагрузите компьютер.
-
Перейдите на сайт 123.hp.com, чтобы загрузить и установить HP Smart.
Удалите ПРОГРАММНОЕ обеспечение HP и используйте HP Smart (Mac)
Удалите драйвер печати HP, затем установите приложение HP Smart для настройки и использования принтера.
-
В раскрывающемся меню HP Easy Start выберите «Удалить ПО HP».
-
Следуйте инструкциям, чтобы удалить все программное обеспечение HP.
Дополнительное устранение неполадок, связанных со сбоем сканера
В зависимости от модели принтера выполнение одной или нескольких из приведенных ниже задач позволят устранить проблему со
сканером.
-
Для принтеров с сенсорным экраном или панелями управления на основном меню восстановите заводские настройки. Найдите пункт Восстановить заводские настройки по умолчанию или аналогичный пункт меню Настройки или Инструменты.
-
Для подключений по USB убедитесь, что длина кабеля не превышает 3 м (9 футов 10 дюймов) и устройства подключены к компьютеру, а не к концентратору
USB или док-станции.
Сервисное обслуживание принтера
Проведите сервисное обслуживание или замените устройство HP, если выполнение всех вышеуказанных действий не помогло устранить
проблему.
Перейдите на веб-страницу Обратиться в службу поддержки клиентов HP, чтобы запланировать ремонт или замену устройства. Если вы находитесь в Азиатско-Тихоокеанской стране/регионе, вы будете
направлены в местный сервисный центр в вашей стране/регионе.
Для проверки состояния гарантии перейдите на веб-страницу Проверка гарантии на устройство HP. За ремонт устройств после окончания гарантийного срока может взиматься плата.
Сканеры и многофункциональные устройства (МФУ со встроенным сканером) HP являются высоконадежным оборудованием. Но, как в случае с любой электроникой, даже высокотехнологичная техника рано или поздно начинает давать сбои. Далее будут рассмотрены наиболее распространенные ошибки, возникающие при попытке сканирования документов при помощи сканера или МФУ.
Основные ошибки сканирования
Встроенный в многофункциональное устройство сканер дает сбои чаще, чем аналогичное отдельное оборудование для сканирования. При возникновении каких-либо аппаратно-программных неполадок МФУ в большинстве случаев самостоятельно определяет их, выводя на информационную панель или на экран компьютера соответствующее сообщение. И чаще всего данное сообщение содержит лишь код ошибки без какой-либо дополнительной информации. Расскажем и расшифруем наиболее распространенные ошибки сканеров HP.

Ошибка сканера 12 и 13
Эти и все последующие ошибки могут отображаться в виде сообщения — «Ошибка сканера XX» или кода — «30.ХХ», где «ХХ» — набор цифр.
Возникновение ошибок 12 и 13 сигнализирует о неисправности электромотора, отвечающего за передвижение каретки сканирования. Ошибка может носить, как электронный, так и механический характер. В первом случае помогает простое выключение МФУ на несколько минут. Если это не помогает, печатно-сканирующую машину придется отвезти в сервисный центр, т.к. скорее всего придется перепаивать один из электронных компонентов или даже заменить сам мотор. При механических неисправностях (например, физические повреждения подвижных узлов и механизмов) решение такое же — ремонт.
Ошибка сканера 16
Ошибка, сигнализирующая об отсутствии электронного контакта между датчиком изображения сканирующего узла с платой управления МФУ. Подобная неисправность может возникнуть по причине выхода из строя самого датчика и/или физико-механических повреждений кабелей, обеспечивающих обмен данными между сканером и основной платой. Если перезагрузка МФУ не помогает, возможно, оборудование требует ремонта или профилактики.

Ошибка сканера 17
Ошибка, аналогичная 12 и 13, но возникает она по другой причине — при застревании сканирующей каретки во время движения из-за наличия препятствия на пути ее следования. Т.е. сама каретка и движущие механизмы не имеют никаких повреждений, скорее всего, внутрь сканера попал посторонний предмет или движению каретки мешает один из гибких кабелей. В большинстве случаев проблему удается решить путем разборки сканера и устранения лишних предметов и/или установки кабелей на свои места с последующей их фиксацией.
Данную процедуру несложно выполнить при наличии элементарных навыков в разборке-сборке электронных устройств. Если таковых не имеется, лучше отдать МФУ в ремонт.
Ошибка сканера 22
Ошибка также возникает при затруднении движения (слишком медленное передвижение) сканирующей каретки, но не сигнализирует о наличии каких-либо неисправностей. В основном это происходит по причине высокой физической нагрузки на стекло сканера (например, при сканировании тяжелой книги). Также неисправность возникает вследствие физического смещения стекла сканера вниз. Если ошибка появляется даже при сканировании одного листа или фотографии, возможно, сканирующий модуль МФУ требует ремонта или профилактики.
Ошибка сканера 5 и 23
Могут возникнуть по нескольким причинам — при смещении/загрязнении калибровочной полоски сканера, повреждении гибкого шлейфа передачи данных, нарушениях в работе или выходе из строя моторчика сканирующей каретки. Если калибровочная полоска, расположенная на крышке сканера, не скошена в сторону и не имеет сильных загрязнений, без проведения ремонта устранить ошибку не получится.

Ошибка сканера 79
Данная ошибка сигнализирует о неисправностях в блоке сканера. Чаще всего это происходит по причине перегорания или потускнения сканирующей лампы. Также ошибки может возникнуть при наличии сильного загрязнения на поверхности самой лампы или стекла сканера. Если перезапуск МФУ и тщательная очистка стекла не дают никакого результата, остается только заменить сканирующую лампу. Не каждая модель многофункциональных устройств HP имеет такую конструкцию, которая позволяет заменить отдельно лампу. В таких случаях придется заменить весь сканирующий блок.
Ошибки сканера 100, 200 и 300
Возникновение любой из этих ошибок может быть связано как с аппаратными, так и программными неисправностями. В первом случае МФУ придется отвезти в сервисный центр, потому что с большой долй вероятности из строя вышел один из важных электронных или механических узлов машины. В случае с программными неисправностями можно попробовать устранить их самостоятельно путем обновления встроенной в устройство микропрограммы. Для этого:
- Перейдите на официальный сайт центра поддержки HP — https://support.hp.com.
- Перейдите по ссылке «ПО и драйверы».
- Внесите требуемые сайтом данные в поисковую строку «Введите серийный номер, название продукта или номер продукта HP» (например, HP LaserJet Pro 200 M251).
- Откроется новая страница со списком всего доступного программного обеспечения для выбранной модели устройства.
- В списке доступного ПО найдите и откройте раздел «Встроенное ПО».
- Скачайте последнюю версию утилиты «Программа обновления микропрограммы принтера» путем нажатия кнопки «Загрузить» напротив надписи.
- Установите обновление согласно инструкциям на экране, последующими при запуске скачанной программы.
Если обновление встроенной микропрограммы не привело к должному результату, можно следом скачать и установить свежую версию драйвера МФУ. Найти их и скачать можно по этой же схеме. Сам драйвер будет располагаться в разделе «Драйвер установочный комплект программного обеспечения устройства» списка доступного ПО.

Прочие ошибки сканирования
В зависимости от модели сканера или МФУ и версии их драйверов при возникновении неполадок сканирования на экране компьютера или табло устройства могут отображаться и другие коды ошибок.
Ошибка 41.х
Вместо «Х» может присутствовать определенная цифра. Любой код ошибки, кроме «41.3», сигнализирует о наличии аппаратных неисправностей модуля лазер-сканера. Неполадки могут наблюдаться с любым электронно-механическим компонентом данного модуля, начиная от шлейфов и лазерного диода и заканчивая платой управления лазер-сканера. В любом случае потребуется ремонт.
Ошибка 51.х
Ошибка, также возникающая при неполадках модуля лазер-сканера. В коде вместо «х» может присутствовать цифра 1 или 2. Код «51.1» сигнализирует об ошибке определения луча лазерного диода — либо он не светит, либо из строя вышел датчик, определяющий факт его свечения. Код «51.2» сигнализирует о неопределенной ошибке модуля лазер-сканера в целом. Если ошибки не удается устранить путем выключения МФУ на несколько минут, единственное решение — ремонт.

Ошибка 52.х
Здесь существует три варианта ошибок:
- Код «52.1» аналогичен «41.х», т.е. свидетельствует о совокупной ошибке модуля лазер-сканера.
- Ошибка «52.2» возникает при замедлении вращения моторчика лазерной каретки. Причина — попадание предмета внутрь сканирующего модуля, сильное загрязнения движущих механизмов каретки, высокая нагрузка на стекло сканера или его смещение и т.д.
- Ошибка «52.3» сигнализирует о полной неисправности моторчика лазерной каретки — либо он перегорел, либо на него не подается питание, либо имеются физические повреждения движущих механизмов.
Устранение ошибок «52.1» и «52.3» невозможно без замены электронно-механических узлов сканера. Ошибку «52.2» можно попробовать устранить путем проведения профилактики модуля лазер-сканера.
Ошибка 57.3 FAN FAILURE
Возникновение данной ошибки говорит о неисправности вентилятора охлаждения лазер-сканера. Кулер не подает никаких признаков жизни или значительно снизилась его скорость вращения. В последнем случае вентилятор может продолжать медленно вращаться, но ввиду того, что снизилась эффективность охлаждения лазер-сканера, на экран будет выводиться данная ошибка. Решение — или заменить кулер (если не вращается вообще), или очистить его от грязи и затем смазать машинным маслом.
Ошибки подключения к сканеру
Существует ряд ошибок, сигнализирующих об отсутствии связи МФУ или сканера с компьютером. В большинстве случаев такие ошибки не сопровождаются кодом, а только текстовыми сообщениями в виде — «Ошибка при соединении со сканером», «Сканер не обнаружен», «Сканирование на компьютер в настоящее время недоступно» и т.д. Приводим наиболее вероятные причины возникновения подобных ошибок.

Аппаратные неисправности
Вероятней всего из строя вышел USB-кабель. Если его замена не помогает, возможно, из строя вышел USB-порт на компьютере или печатно-сканирующей машине. Для проверки порта ПК можно воспользоваться любым другим USB-устройством. Проверка USB-порта МФУ/сканера может быть осуществлена путем его подключения к другому ПК. Также следует проверить наличие драйверов на USB-интерфейс компьютера.

Программные неисправности
Ошибки, возникающие по причине программных сбоев, обычно легко устраняются путем переустановки драйверов на сканер или МФУ. Также проблема может быть и в настройках операционной системы. Многие программные неисправности в автоматическом режиме помогает устранить утилита HP Print and Scan Doctor, которую можно скачать на официальном сайте HP.
Работа с утилитой предельно проста. После ее запуска достаточно выбрать в отобразившемся списке «проблемный» МФУ или сканер, а затем нажать на кнопку тестирования. Программа автоматически определит и устранит все имеющиеся программные неисправности.
- Sign up
- Sign in
- HP Community
- Printers
- Scanning, Faxing, and Copying
- photosmart 5510 won’t scan
![]()
Create an account on the HP Community to personalize your profile and ask a question
Your account also allows you to connect with HP support faster, access a personal dashboard to manage all of your devices in one place, view warranty information, case status and more.
Common problems HP Solution Center not working : Adobe Flash Player Error and Unable to scan
06-16-2016
12:06 AM
— edited
06-16-2016
12:07 AM
HP Recommended
- Mark as New
- Bookmark
- Subscribe
- Permalink
- Flag Post
Product: photosmart 5510
Operating System: Microsoft Windows 7 (64-bit)
My Photosmart 5510 has quit scanning to computer( HP Pavilion using wireless connection). i get a scan unsuccessfull msg on the printer and a HP 5510d series was not found msg on my computer. It will still print. I have restarted everything. When i open printer from Start I get a Priinter Setup and Software box with Connect new printer and add more software options. Ran the Full Feature Software and Driver and get msg that I need to insert the disc and the older version cannot be removed. Ran Print and Scan Doctor and it says full software not installed get installer. I don’t know what else to try.
1 ACCEPTED SOLUTION

![]()
rb011
2,702
247
191
5,185
Retired
06-22-2016
11:55 AM
HP Recommended
- Mark as New
- Bookmark
- Subscribe
- Permalink
- Flag Post
Hi @dmorfy,
There is a utility called Microsoft Fit it that might be able to help uninstall the older version of the HP Photosmart software from your PC. It is pretty strait forward to run.
Once it is done try installing the software again.
Please let me know how it goes.
Thanks!
Please click “Accept as Solution ” if you feel my post solved your issue, it will help others find the solution.
Click the “Kudos, Thumbs Up» on the bottom to say “Thanks” for helping.
rb011
I work on behalf of HP
Was this reply helpful?
Yes
No
11 REPLIES 11
06-16-2016
10:09 AM
HP Recommended
- Mark as New
- Bookmark
- Subscribe
- Permalink
- Flag Post
Hey @dmorfy,
Welcome to the HP Support Forums!
I understand that you are having some issues with scanning from your Windows 7 PC to your Photosmart 5510 e-All-in-One Printer. I can help you with that.
To start, make sure the printer is plugged directly into a wall outlet and not a surge protector. Once done, download and install the latest drivers by clicking on this link.
Please let me know the results after installing the latest drivers. If you can scan, please click on Accept Solution. if you appreciate my help, please click on the thumbs up icon. Both icons are below this post.
~DocCottle
I work on behalf of HP
Please click “Accept as Solution ” below the post that solves your issue to help others find the solution.
Please click the Thumbs up icon below to say “Thanks” for helping!
Was this reply helpful?
Yes
No
dmorfy
Author
4
0
0
5,277
New member
06-17-2016
05:12 PM
HP Recommended
- Mark as New
- Bookmark
- Subscribe
- Permalink
- Flag Post
Thank you for your reply and offer to help. I followed your instructions. It is plugged into a wall outlet. It shows that the wifi is working.
I clicked the link and ended with the message that it is unable to find the printer.
The printer shows as the default printer in my devices. i tried scanning again and got the msg that
»’the HP photosmart 5510 series was not found » again on my computer.
‘
Was this reply helpful?
Yes
No
![]()
rb011
2,702
247
191
5,276
Retired
06-17-2016
05:54 PM
HP Recommended
- Mark as New
- Bookmark
- Subscribe
- Permalink
- Flag Post
Hi @dmorfy,
@DocCottle is out of the office, but I can continue to help.
I see that you have an HP Photosmart 5510 e-All-in-One Printer that is not being found by he computer when trying to scan.
Here is the support document intended for use with this issue — Network Scanner Connection is Lost (Windows).
Please let me know if this resolves the issue, or if you require further assistance.
In fact, if this helps you to reach a solution please click the «Accept as Solution», and the «thumbs up» buttons down below in this message. 
Thanks!
Please click “Accept as Solution ” if you feel my post solved your issue, it will help others find the solution.
Click the “Kudos, Thumbs Up» on the bottom to say “Thanks” for helping.
rb011
I work on behalf of HP
Was this reply helpful?
Yes
No
dmorfy
Author
4
0
0
5,252
New member
06-19-2016
02:57 PM
HP Recommended
- Mark as New
- Bookmark
- Subscribe
- Permalink
- Flag Post
I followed the steps in the link.
Step 1. got printer set up. Went through the steps but was unable to connect
Step 2. All connections are OK.
Step 3.. Full software not installed. The feature is on a CD. Installation error. The older version cannot be removed. No suggestions for driver update.
Step 4 and 5 unable to perform
Step 6. Image aquisition = started and automatic
Was this reply helpful?
Yes
No
![]()
rb011
2,702
247
191
5,235
Retired
06-20-2016
12:02 PM
HP Recommended
- Mark as New
- Bookmark
- Subscribe
- Permalink
- Flag Post
Hi @dmorfy,
Thanks for getting back to me.
Try performing a level-three uninstall to get rid of the old software. Here is a document that was created originally for Windows XP but the steps should be similar for Windows 7 — Perform a level-three uninstall.
Restart the computer after that.
Once the computer is ready, try downloading and running the HP Printer Install Wizard. This tool will find the most recent version of the printer’s software and help with the installation.
Please let me know how it goes.
Thanks.
Please click “Accept as Solution ” if you feel my post solved your issue, it will help others find the solution.
Click the “Kudos, Thumbs Up» on the bottom to say “Thanks” for helping.
rb011
I work on behalf of HP
Was this reply helpful?
Yes
No
dmorfy
Author
4
0
0
5,230
New member
06-20-2016
06:06 PM
HP Recommended
- Mark as New
- Bookmark
- Subscribe
- Permalink
- Flag Post
I downloaded the print driver and went to the file where it was and double clicked it. I got the extracting box but after it hit 100% nothing else happened.
Was this reply helpful?
Yes
No
![]()
rb011
2,702
247
191
5,227
Retired
06-20-2016
06:55 PM
HP Recommended
- Mark as New
- Bookmark
- Subscribe
- Permalink
- Flag Post
Hi @dmorfy,
Thanks for getting back to me.
You might need to try to open the install software manually.
1. On the Windows taskbar, click Start.
2. Click Computer, and then double-click the disc drive where the printer software is located. Usually the C: Drive.
3. Look for Setup.exe and double-click it to start the installation.
If it not there try the download again.
If this helps you to reach a solution please click the «Accept as Solution», and the «thumbs up» buttons down below in this message.
Thanks!
Please click “Accept as Solution ” if you feel my post solved your issue, it will help others find the solution.
Click the “Kudos, Thumbs Up» on the bottom to say “Thanks” for helping.
rb011
I work on behalf of HP
Was this reply helpful?
Yes
No
dmorfy
Author
4
0
0
5,206
New member
06-21-2016
07:56 PM
HP Recommended
- Mark as New
- Bookmark
- Subscribe
- Permalink
- Flag Post
Thank you so much for your continued help.
Setup.exe was not there so I tried the download again.
Got the msg «the feature you are trying to use is on a CO»
Clicked on details, it said the older version of HP 5510 cannot be removed
Was this reply helpful?
Yes
No
![]()
rb011
2,702
247
191
5,186
Retired
06-22-2016
11:55 AM
HP Recommended
- Mark as New
- Bookmark
- Subscribe
- Permalink
- Flag Post
Hi @dmorfy,
There is a utility called Microsoft Fit it that might be able to help uninstall the older version of the HP Photosmart software from your PC. It is pretty strait forward to run.
Once it is done try installing the software again.
Please let me know how it goes.
Thanks!
Please click “Accept as Solution ” if you feel my post solved your issue, it will help others find the solution.
Click the “Kudos, Thumbs Up» on the bottom to say “Thanks” for helping.
rb011
I work on behalf of HP
Was this reply helpful?
Yes
No
-
- 1
- 2
-
Next
![]()
Be alert for scammers posting fake support phone numbers and/or email addresses on the community.
If you think you have received a fake HP Support message, please report it to us by clicking on «Flag Post».
† The opinions expressed above are the personal opinions of the authors, not of HP. By using this site, you accept the Terms of Use and Rules of Participation.
-
English
Open Menu

- Sign up
- Sign in
- HP Community
- Printers
- Scanning, Faxing, and Copying
- photosmart 5510 won’t scan
![]()
Create an account on the HP Community to personalize your profile and ask a question
Your account also allows you to connect with HP support faster, access a personal dashboard to manage all of your devices in one place, view warranty information, case status and more.
Common problems HP Solution Center not working : Adobe Flash Player Error and Unable to scan
06-16-2016
12:06 AM
— edited
06-16-2016
12:07 AM
HP Recommended
- Mark as New
- Bookmark
- Subscribe
- Permalink
- Flag Post
Product: photosmart 5510
Operating System: Microsoft Windows 7 (64-bit)
My Photosmart 5510 has quit scanning to computer( HP Pavilion using wireless connection). i get a scan unsuccessfull msg on the printer and a HP 5510d series was not found msg on my computer. It will still print. I have restarted everything. When i open printer from Start I get a Priinter Setup and Software box with Connect new printer and add more software options. Ran the Full Feature Software and Driver and get msg that I need to insert the disc and the older version cannot be removed. Ran Print and Scan Doctor and it says full software not installed get installer. I don’t know what else to try.
1 ACCEPTED SOLUTION
![]()
rb011
2,702
247
191
5,185
Retired
06-22-2016
11:55 AM
HP Recommended
- Mark as New
- Bookmark
- Subscribe
- Permalink
- Flag Post
Hi @dmorfy,
There is a utility called Microsoft Fit it that might be able to help uninstall the older version of the HP Photosmart software from your PC. It is pretty strait forward to run.
Once it is done try installing the software again.
Please let me know how it goes.
Thanks!
Please click “Accept as Solution ” if you feel my post solved your issue, it will help others find the solution.
Click the “Kudos, Thumbs Up» on the bottom to say “Thanks” for helping.
rb011
I work on behalf of HP
Was this reply helpful?
Yes
No
11 REPLIES 11
06-16-2016
10:09 AM
HP Recommended
- Mark as New
- Bookmark
- Subscribe
- Permalink
- Flag Post
Hey @dmorfy,
Welcome to the HP Support Forums!
I understand that you are having some issues with scanning from your Windows 7 PC to your Photosmart 5510 e-All-in-One Printer. I can help you with that.
To start, make sure the printer is plugged directly into a wall outlet and not a surge protector. Once done, download and install the latest drivers by clicking on this link.
Please let me know the results after installing the latest drivers. If you can scan, please click on Accept Solution. if you appreciate my help, please click on the thumbs up icon. Both icons are below this post.
~DocCottle
I work on behalf of HP
Please click “Accept as Solution ” below the post that solves your issue to help others find the solution.
Please click the Thumbs up icon below to say “Thanks” for helping!
Was this reply helpful?
Yes
No
dmorfy
Author
4
0
0
5,277
New member
06-17-2016
05:12 PM
HP Recommended
- Mark as New
- Bookmark
- Subscribe
- Permalink
- Flag Post
Thank you for your reply and offer to help. I followed your instructions. It is plugged into a wall outlet. It shows that the wifi is working.
I clicked the link and ended with the message that it is unable to find the printer.
The printer shows as the default printer in my devices. i tried scanning again and got the msg that
»’the HP photosmart 5510 series was not found » again on my computer.
‘
Was this reply helpful?
Yes
No
![]()
rb011
2,702
247
191
5,276
Retired
06-17-2016
05:54 PM
HP Recommended
- Mark as New
- Bookmark
- Subscribe
- Permalink
- Flag Post
Hi @dmorfy,
@DocCottle is out of the office, but I can continue to help.
I see that you have an HP Photosmart 5510 e-All-in-One Printer that is not being found by he computer when trying to scan.
Here is the support document intended for use with this issue — Network Scanner Connection is Lost (Windows).
Please let me know if this resolves the issue, or if you require further assistance.
In fact, if this helps you to reach a solution please click the «Accept as Solution», and the «thumbs up» buttons down below in this message. 
Thanks!
Please click “Accept as Solution ” if you feel my post solved your issue, it will help others find the solution.
Click the “Kudos, Thumbs Up» on the bottom to say “Thanks” for helping.
rb011
I work on behalf of HP
Was this reply helpful?
Yes
No
dmorfy
Author
4
0
0
5,252
New member
06-19-2016
02:57 PM
HP Recommended
- Mark as New
- Bookmark
- Subscribe
- Permalink
- Flag Post
I followed the steps in the link.
Step 1. got printer set up. Went through the steps but was unable to connect
Step 2. All connections are OK.
Step 3.. Full software not installed. The feature is on a CD. Installation error. The older version cannot be removed. No suggestions for driver update.
Step 4 and 5 unable to perform
Step 6. Image aquisition = started and automatic
Was this reply helpful?
Yes
No
![]()
rb011
2,702
247
191
5,235
Retired
06-20-2016
12:02 PM
HP Recommended
- Mark as New
- Bookmark
- Subscribe
- Permalink
- Flag Post
Hi @dmorfy,
Thanks for getting back to me.
Try performing a level-three uninstall to get rid of the old software. Here is a document that was created originally for Windows XP but the steps should be similar for Windows 7 — Perform a level-three uninstall.
Restart the computer after that.
Once the computer is ready, try downloading and running the HP Printer Install Wizard. This tool will find the most recent version of the printer’s software and help with the installation.
Please let me know how it goes.
Thanks.
Please click “Accept as Solution ” if you feel my post solved your issue, it will help others find the solution.
Click the “Kudos, Thumbs Up» on the bottom to say “Thanks” for helping.
rb011
I work on behalf of HP
Was this reply helpful?
Yes
No
dmorfy
Author
4
0
0
5,230
New member
06-20-2016
06:06 PM
HP Recommended
- Mark as New
- Bookmark
- Subscribe
- Permalink
- Flag Post
I downloaded the print driver and went to the file where it was and double clicked it. I got the extracting box but after it hit 100% nothing else happened.
Was this reply helpful?
Yes
No
![]()
rb011
2,702
247
191
5,227
Retired
06-20-2016
06:55 PM
HP Recommended
- Mark as New
- Bookmark
- Subscribe
- Permalink
- Flag Post
Hi @dmorfy,
Thanks for getting back to me.
You might need to try to open the install software manually.
1. On the Windows taskbar, click Start.
2. Click Computer, and then double-click the disc drive where the printer software is located. Usually the C: Drive.
3. Look for Setup.exe and double-click it to start the installation.
If it not there try the download again.
If this helps you to reach a solution please click the «Accept as Solution», and the «thumbs up» buttons down below in this message.
Thanks!
Please click “Accept as Solution ” if you feel my post solved your issue, it will help others find the solution.
Click the “Kudos, Thumbs Up» on the bottom to say “Thanks” for helping.
rb011
I work on behalf of HP
Was this reply helpful?
Yes
No
dmorfy
Author
4
0
0
5,206
New member
06-21-2016
07:56 PM
HP Recommended
- Mark as New
- Bookmark
- Subscribe
- Permalink
- Flag Post
Thank you so much for your continued help.
Setup.exe was not there so I tried the download again.
Got the msg «the feature you are trying to use is on a CO»
Clicked on details, it said the older version of HP 5510 cannot be removed
Was this reply helpful?
Yes
No
![]()
rb011
2,702
247
191
5,186
Retired
06-22-2016
11:55 AM
HP Recommended
- Mark as New
- Bookmark
- Subscribe
- Permalink
- Flag Post
Hi @dmorfy,
There is a utility called Microsoft Fit it that might be able to help uninstall the older version of the HP Photosmart software from your PC. It is pretty strait forward to run.
Once it is done try installing the software again.
Please let me know how it goes.
Thanks!
Please click “Accept as Solution ” if you feel my post solved your issue, it will help others find the solution.
Click the “Kudos, Thumbs Up» on the bottom to say “Thanks” for helping.
rb011
I work on behalf of HP
Was this reply helpful?
Yes
No
-
- 1
- 2
-
Next
![]()
Be alert for scammers posting fake support phone numbers and/or email addresses on the community.
If you think you have received a fake HP Support message, please report it to us by clicking on «Flag Post».
† The opinions expressed above are the personal opinions of the authors, not of HP. By using this site, you accept the Terms of Use and Rules of Participation.
-
English
Open Menu

Попробуйте удалить или переустановить сканер.Разрешить сканеры через брандмауэр Windows.Недостаток связи между компьютером и сканером HP.Замените фактический USB-кабель сканера.Обновите свои драйверы.Запустите утилиту Scannow.Запустите службу Windows Image Capture.
Если у вас есть брандмауэр стороннего производителя, установленный на вашем Mac, все может упростить решение проблем с кодировкой. Брандмауэр, входящий в состав macOS OS, то X не влияет на сканирование и текстовые сообщения.
Убедитесь, что следующий порт в надежном стороннем брандмауэре обычно правильный. Требования для проверки см. В разделе «Порты» в каждой документации по поддержке для вашего конкретного программного обеспечения брандмауэра.
-
Анализ на основе SOAP: передача (8289, tcp 8989)
-
Анализ LEDM: TCP-порт 8080
-
Анализ ORBLite: TCP-порт 9500
-
Сканирование на основе HDT: веб-сайты TCP (9290, 8290) и для PML / SNMP TCP (161, 162) AirScan (uscan) – TCP 8080 Secure AirScan vent (uscans) – TCP city 443 IPP (AirScan также использует IPP) – Входной сигнал TCP 631
-
Bonjour Discovery: порты UDP (5350, 5351, 5353)
Попробуйте заняться серфингом. Если ошибка повторяется, перейдите к шагу.
|
0 / 0 / 0 Регистрация: 30.11.2012 Сообщений: 5 |
|
|
1 |
|
|
30.11.2012, 21:12. Показов 6585. Ответов 10
ребята помогите(( МФУ HP Photosmart b010b, сканер отказывается работать. либо начинает сканирование и потом сам делает отмену(оригинальной программой), либо выдает ошибку 0х8021000е при сканировании виндовской прогой, либо вобще виснет. стоит винда7. дрова ставила и оригинальные и с сайта. перерыла весь инет, тысячу раз. вроде бы можно сделать сброс ошибок, но для своей версии не нашла как.
0 |

|
1765 / 443 / 44 Регистрация: 09.04.2009 Сообщений: 2,599 |
|
|
02.12.2012, 08:42 |
2 |
|
Попробуйте поменять USB-порт.
1 |
|
0 / 0 / 0 Регистрация: 30.11.2012 Сообщений: 5 |
|
|
03.12.2012, 21:26 [ТС] |
3 |
|
все этот перепробывала, дрова ставила всевозможные, и с сайта изготовителя, и с диска который с ним шел, как я поняла ему не нравится винда 7. хотя с официального сайта качала специальные дрова на семерку
0 |

|
1765 / 443 / 44 Регистрация: 09.04.2009 Сообщений: 2,599 |
|
|
03.12.2012, 21:29 |
4 |
|
Ещё можно попробовать поменять USB-кабель.
0 |
|
0 / 0 / 0 Регистрация: 30.11.2012 Сообщений: 5 |
|
|
04.12.2012, 19:01 [ТС] |
5 |
|
да, на другом стоит ХР и все работает,сканирует, т.е кабель в порядке выходит… Принтер, копир на висте работает вот в чем дело Добавлено через 1 минуту
0 |
|
1765 / 443 / 44 Регистрация: 09.04.2009 Сообщений: 2,599 |
|
|
04.12.2012, 20:03 |
6 |
|
Там, на сайте две Win7, Вы для используемой устанавливали?
0 |
|
0 / 0 / 0 Регистрация: 30.11.2012 Сообщений: 5 |
|
|
06.12.2012, 20:16 [ТС] |
7 |
|
винда 64 бита, я и дрова соответственные поставила, даже не подумала о 32… надо попробовать.спасибо))
0 |
|
1765 / 443 / 44 Регистрация: 09.04.2009 Сообщений: 2,599 |
|
|
06.12.2012, 20:24 |
8 |
|
Попробуйте сначала удалить всё установленное для Вашего МФУ, перезагрузите компьютер, и установите драйвер.
0 |
|
0 / 0 / 0 Регистрация: 30.11.2012 Сообщений: 5 |
|
|
06.12.2012, 20:32 [ТС] |
9 |
|
раз пять)) психую уже
0 |
|
1765 / 443 / 44 Регистрация: 09.04.2009 Сообщений: 2,599 |
|
|
06.12.2012, 20:44 |
10 |
|
Ещё можно попробовать так: сначала установить драйвер, перезагрузить, потом подключить МФУ.
1 |
|
eminent |
|
|
11.12.2012, 15:50 |
11 |
|
alloria, а Вы не пробовали сканировать другой программой, не оригинальной, а через ABBYY Fine Reader или Paint? Добавлено через 4 минуты |