![]()
level 1
u/Professional_Lunch51, if you’re still having issues installing NGENUITY from the Microsoft Store, please first make sure your Windows installation is the latest build and with no pending updates, and also that you meet all the system requirements for the app (you can see them in the Microsoft Store on the NGENUITY page).
If you still can’t install it, try one of the potential Microsoft Store fixes outlined over at https://hyperx.gg/3ovJNmW.

-
#1
I own several peripherals from HyperX — keyboard, mouse and headset. And while I like them a great deal, a major issue has cropped up and has begun to ruin my whole HyperX experience. You see, HyperX’ software, NGENUITY (via the Microsoft Store) no longer lists ANY of my peripherals upon loading of the program, even though it used to, several months ago when I still had my 10700K platform. Was able to change lighting on my keyboard and mouse, set profiles and all that other good stuff. But now, for whatever reason — and there could be many — everytime I load up NGENUITY, I get this popup notification that says, «Alloy Origins Core Keyboard is found but it could not be connected!» Not only that, it doesn’t even list my mouse nor my headset anymore.
It’s kinda pointless to have a keyboard with RGB lighting if I can’t even change the color to something easier on my eyes, or that ISN’T obnoxious rainbow puke, know what I mean? 
So, I guess what I’m trying to ask is, what the hell can be done to fix this problem?
-
#2
I own several peripherals from HyperX — keyboard, mouse and headset. And while I like them a great deal, a major issue has cropped up and has begun to ruin my whole HyperX experience. You see, HyperX’ software, NGENUITY (via the Microsoft Store) no longer lists ANY of my peripherals upon loading of the program, even though it used to, several months ago when I still had my 10700K platform. Was able to change lighting on my keyboard and mouse, set profiles and all that other good stuff. But now, for whatever reason — and there could be many — everytime I load up NGENUITY, I get this popup notification that says, «Alloy Origins Core Keyboard is found but it could not be connected!» Not only that, it doesn’t even list my mouse nor my headset anymore.
It’s kinda pointless to have a keyboard with RGB lighting if I can’t even change the color to something easier on my eyes, or that ISN’T obnoxious rainbow puke, know what I mean?
So, I guess what I’m trying to ask is, what the hell can be done to fix this problem?
That message, looks like a pairing failure. Reminds me of wireless, when I don’t send a passphrase. (or press a tiny button to make it sync)
-
#3
What’s a «pairing failure»?
-
#4
What’s a «pairing failure»?
Pairing, is when you have a device connected with the software. The term is more often used with connecting a smart phone to an automotive player.
The error message is more worrying in this case, it makes me think a software bug, because of a transition, because Hyper X is expected to be sold to HP, IIRC.
-
#5
Pairing, is when you have a device connected with the software. The term is more often used with connecting a smart phone to an automotive player.
The error message is more worrying in this case, it makes me think a software bug, because of a transition, because Hyper X is expected to be sold to HP, IIRC.
You’d be right. HP acquired the gaming peripheral division of HyperX, but they are still going to be making memory, apparently.
Would a clean install of Windows help? As much as I’d hate to do that…
-
#6
You’d be right. HP acquired the gaming peripheral division of HyperX, but they are still going to be making memory, apparently.
Would a clean install of Windows help? As much as I’d hate to do that…
I dunno. But it’s a pain, to do that correctly, you will need to wipe the drive so that no OS sees any data traces. Then after that, put the USB stick with Windows 10 and boot from it.
-
#7
I dunno. But it’s a pain, to do that correctly, you will need to wipe the drive so that no OS sees any data traces. Then after that, put the USB stick with Windows 10 and boot from it.
You’re right, that DOES sound like a pain in the butt.

-
#8
are you able to install a previous version of the software and turn off updates?
-
#9
I was able to download the pre-Microsoft store version, but that one ended up screwing with my mouse
-
#11
The current version (as of January 2021) is beta, yes
-
#12
AFAIK all of the versions found in the store have carried the beta moniker.
Honestly, it sounds to me like you have a ghosted peripheral issue, or bits of software from old peripherals hanging about in app data that are keeping registers over ngenuity.
-
#13
AFAIK all of the versions found in the store have carries the beta moniker.
Honestly, it sounds to me like you have a ghosted peripheral issue, or bits of software from old peripherals hanging about in app data that are keeping registers over ngenuity.
Could be…I know it was working when I had my 10700K build, and I don’t *think* I did a clean install of Windows 10 when I went back to Ryzen and the B550 PG Velocita, and now the X370 Crosshair VI Hero… Is there any way to clean things up?
-
#14
Could be…I know it was working when I had my 10700K build, and I don’t *think* I did a clean install of Windows 10 when I went back to Ryzen and the B550 PG Velocita, and now the X370 Crosshair VI Hero… Is there any way to clean things up?
An X370 motherboard? You will be lucky to even get a Matisse to work. Looked like the BIOS was flashed already. I dunno about the clean-up, because I don’t even know where that stuff in the registry is.
10 doesn’t seem problematic with merely changing things, unlike 7 and earlier. The only problem I see, is going back-and-forth. (From an Intel build to an AMD build then to an early-gen AMD chipset for Ryzen)
(There’s a problem that I know to watch out for, which is if you go back to Intel, or an earlier AMD chipset, is a likely BSOD, of «SYSTEM_THREAD_EXCEPTION_NOT_HANDLED», in likely the driver, RyzenMaster.sys, possibly even when not using Ryzen Master!) (I thought that’s what the BSOD mentioned!) (That was when I tried and failed at first to wipe the Crucial MX500 500 GB SSD on my MSI Z490 Tomahawk & Core i5 10600K build, because the UEFI BIOS went ahead and booted the Windows 10 that’s for my MSI B450 Tomahawk & Ryzen 7 3700X build, when I had that SSD plugged in to wipe it, then I finally got it wiped! Yess!)
Last edited: Apr 17, 2021
-
#15
My 3600 is working on the board as I type this 
-
#16
My 3600 is working on the board as I type this

That board looks solid, so it would be infuriating, if it failed to boot.
-
#17
Oh, it definitely didn’t fail to boot. I made sure to flash the BIOS using my OG Ryzen 1600 first.
-
#18
Oh, it definitely didn’t fail to boot. I made sure to flash the BIOS using my OG Ryzen 1600 first.
There was a time, when I thought I heard about Ryzen, when it was at the first gen and wished I could get a new build based on that, (back in 2017) but I found an old system with the socket 1366 platform and was very happy with that. I skipped a gen of Ryzen and went to what would be at least the 2nd gen, with Ryzen 3 3200G (Picasso) on January 3, 2020, when I also got the MSI B450 Tomahawk.
I got my 3700X in June of last year. The UEFI BIOS included, was compliant. Was using a Radeon RX 580 8 GB then switched to a Radeon RX 5600XT in November.
More recently, I felt like I narrowly avoided the video card «price-mageddon».
Last edited: Apr 17, 2021
-
#19
So, since the software has basically been rendered useless, and has subsequently also rendered part of my Keyboard and mouse useless (the lighting and such) would it be fair to demand a refund for both products, either through Amazon (where I bought both items from) or Kingston/HyperX themselves? Though the return window for both items has closed, this is complete bullshit, to be honest. What’s worse is I REALLY like this keyboard and mouse. 

-
#20
This is most likely a software issue, I’d suggest uninstalling, removing traces of it from %APPDATA% and registry, then installing again. What was the last time you used the software before the issue started? Maybe you had some Windows Updates in the mean time that broke it.
-
#21
So, since the software has basically been rendered useless, and has subsequently also rendered part of my Keyboard and mouse useless (the lighting and such) would it be fair to demand a refund for both products, either through Amazon (where I bought both items from) or Kingston/HyperX themselves? Though the return window for both items has closed, this is complete bullshit, to be honest. What’s worse is I REALLY like this keyboard and mouse.
Whatever you do, dont pull your hair out!
-
#22
This is most likely a software issue, I’d suggest uninstalling, removing traces of it from %APPDATA% and registry, then installing again. What was the last time you used the software before the issue started? Maybe you had some Windows Updates in the mean time that broke it.
The uninstall part I can do but…err…how do I remove traces of it from %APPDATA% and registry? 
As far as I can remember, it seemed to be working fine in the time I had my 10700K, so from about May 2020 to December of the same year, thereabouts. I sold the 10700K after Christmas and bought the Ryzen 5 3600 + B550 PG Velocita in January. Did a clean install of Windows at the time. A lot of the complaints I’ve been reading about the software being unable to recognize/connect supported peripherals mention January being when the issues started.
-
#24
Turns out things were a bit more of a clusterf#ck than I thought. So much so that, in the end, I just decided that a proper cleaning of Windows was in order, so I did a complete re-install, wiped all of my drives so they’re all squeaky clean, and went from there.
I was worried as hell that a complete re-install wouldn’t resolve my issues but… IT DID! I GOT IT WORKING AGAIN! Rainbow puke be gone!
I’m mostly up to date with Windows Updates, but I have yet to install the latest one, 20H2. The question is, what ultimately borked the software? my nasty rig, or the 20H2 update?

-
#25
Could be…I know it was working when I had my 10700K build, and I don’t *think* I did a clean install of Windows 10 when I went back to Ryzen and the B550 PG Velocita, and now the X370 Crosshair VI Hero… Is there any way to clean things up?
theres a few driver cleanup tools i’ve used in the past when moving my test OS drive between systems (lots of USB 3.0 issues doing that)
I use ghostbuster, this page has has a few good suggestions
Are the devices *working* fine just without the software seeing them? that sounds like a service or process to see them is missing
You can also be interested in these:
- HP Pavilion gaming desktop TG01-2170M PC
- How to fix “HPDM.framework” will damage your computer on Mac?
- HP acquires HyperX for 425Mil
- HP X24i gaming monitor full review
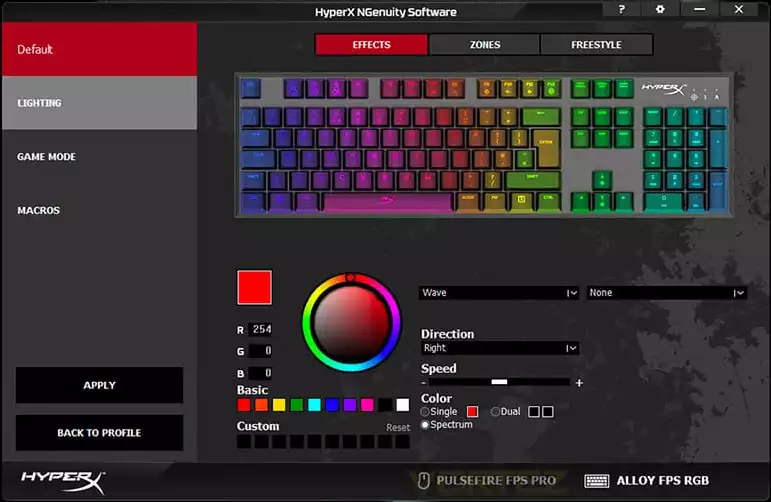
Your Hyperx Ngenuity software should allow you to customize the lighting on all of your compatible Hyperx products. If it’s not allowing you to make adjustments, save profiles, or there are other issues, then what’s the point in having a customizable product in the first place.
You want to get the most of your Hyperx products and create cool lighting shows, designs, and be able to switch between whatever you want, whenever you want. Unfortunately, in some situations, the Hyperx Ngenuity software isn’t working as expected or at all, so we’re going to run through how to fix it right now.
Is your Hyperx Ngenuity software not working? Fix it here and get back to enjoying the products.
Start with basic troubleshooting
Sometimes you need to start with the basics of troubleshooting to make sure it’s not something easy to fix when your hyperx keyboard software is not working or other Hyperx product:
- Use a different USB port; check if the device now shows up. If possible, use a USB 3.0 port.
- Remove any USB hubs or KVM switches that you may be using to see if that is causing issues.
- Reboot the system so everything starts fresh and anything that has failed gets a restart.
- Verify if other peripheral device software is interfering or registering the device, it may need to be disabled.
- Update your HyperX Ngenuity software to the latest version from the Microsoft store.
If none of this helps, then it’s time to move on to other troubleshooting steps.
Is your product compatible with Hyperx Ngenuity?
If you upgraded your Hyperx Ngenuity software or it auto-updated, then maybe you’re using hardware that is no longer supported by the newest software. Check the compatibility list here.
If you can’t find your device on that list, you may need to downgrade to an older version of the software and consider upgrading your hardware at some point.
Only install this older version if you can’t find your product; if you use this version with newer software, then you may miss out on newer bug fixes or enhancements.
Have you installed an incompatible software package?
One of the first things to check is whether you’ve installed an incompatible software package that is interfering with the operation of the Hyperx Ngenuity software.
- NGenuity (legacy release)
- Gigabyte RGB Fusion 2.0
- MSI Afterburner 2
- Valorant (Game)
- Windows 10 App Defender Smartscreen
- Software that blocks cheating in games can interfere in general.
- Check any other software you have installed that manages your hardware devices.
If you need to run these programs, then you may need to disable them when not in use.
Check recent changes in hardware and software
Have you recently installed any new hardware or software? If something new is in your system, then it may be interfering with your HyperX Ngenuity software and causing it not to work, so you should consider uninstalling it to see if the issue is fixed.
Then you’ll need to review online to see if there are any fixes or any updated software/patches to resolve the issue with the incompatible software or hardware.
Uninstall Hyperx Ngenuity software
Instead of upgrading your Hyperx Ngenuity software to get it working, you can perform a full uninstall and get rid of any %AppData% that is being left behind. The benefit of this over an upgrade is that you’re starting fresh; there are no leftover files interfering or %AppData% that could be a problem with leftover and old configuration that is causing problems.
Uninstall HyperX Ngenuity Software by right-clicking on it and selecting uninstall, following the prompts, and completing the process.
Go to your search bar, type %AppData%, then look for anything to do with Ngenuity or Hyperx and delete all the folders containing those names.
To remove any Hyperx Ngenuity registry entries, you can go to the same search bar, type regedit, go into the HKLMSoftware path, and remove anything that says Hyperx and Ngenuity.
Once fully uninstalled, reboot your computer and then reinstall the latest version of Hyperx Ngenuity software that supports your hardware.
Total failure and nothing worked
Unfortunately, in some situations, you’ve just gotten yourself into too big of a mess with installing software, modifying components, upgrading software, and making changes, then the Hyperx Ngenuity software STILL doesn’t work. It’s time to consider a complete reinstall of your OS and reinstall your software.
Hopefully, you’ve split your OS onto a separate drive, so a reinstall doesn’t require much effort or backups of any of your files not specifically related to your OS.
Many customers have found that after too many modifications, especially hardware and software upgrades, the Hyperx Ngenuity software breaks, which is a failure in the software to handle changes, but you need to work around it.
So is your Hyperx Ngenuity software not working still? If all else fails and your hyperx ngenuity software is not working, you can contact the support team by email or calling them. Details to contact the support team can be found here.
They’ll run through some further troubleshooting and walk you through getting your system and hardware set up as expected. If there is a bug or other issue, then they can log that with their development team to be released in a future software release.
If they’re unable to get the Hyperx Ngenuinity software working, then it may be time to consider returning your hardware for a refund, as it’s a little pointless to have it when it’s not working.
Conclusion
The Hyperx Ngenuity software allows you to perform some fun and entertaining actions with your hardware, but the software does not have a great reputation at the moment due to the number of issues that people find with poor interactions with other software and upgrades requiring a complete reinstall.
The software is still considered beta after almost a year, so making any changes can break the software. Consider setting restore points on your system or making reinstalls fast and easy.
More stories like this
- HP Pavilion gaming desktop TG01-2170M PC
- How to fix “HPDM.framework” will damage your computer on Mac?
- HP acquires HyperX for 425Mil
- HP X24i gaming monitor full review
- How to connect Airpods to HP laptop
- Full honest HP OfficeJet 3830 review
HyperX’s NGenuity software provides an easy way to get the most out of your HyperX gaming headset and make audio tweaks on the fly.
However, if you’re having trouble getting the software to detect your headset, you might need to do some troubleshooting in order to get things working properly again.
This guide will help you fix HyperX NGenuity not detecting headset so that you can get back to gaming and chatting with friends.
Hope you will be able to solve the problem by the end of the article. If you don’t, you will probably need to change your headset.
Uninstall and reinstall
This is normally a simple fix, but you may have to uninstall it more than once. If that’s the case, simply delete anything involving HyperX from your computer and device manager, restart your computer and try again.
After uninstalling and reinstalling the software solves the issue, then you do not need to go through the article. This should solve any issues with detecting your headset. If it does not, then you need to follow the steps below.
Disconnect everything and try again
This will also eliminate possible problems with a cluttered system. For example, if you’re using an external hard drive that is connected to your PC, disconnect it and try again. If it still doesn’t work, then you may need to replace that hard drive.
Also, make sure any firewalls or security programs aren’t stopping any of your headsets from working properly on your computer.
You can temporarily disable them to see if they are interfering with other programs on your computer but only do so for troubleshooting purposes.
While you have some things disconnected from your PC, open up Device Manager by going to Control Panel and then Device Manager. Check to see if there are any yellow exclamation points next to any devices.
If there are, right-click on those devices and select Update Driver Software… Next, select Search automatically for updated driver software.
Reboot your computer after installing new drivers. Run HyperX NGenuity again and check if your headset works now.
Update your drivers
This step is not always necessary but can still be done. To find out which drivers you need to update, go to Device Manager. Look for the Sound, Video, and Game Controllers category and expand it.
Right-click on any one of them and select Update Driver Software. Follow on-screen instructions until you are told that the driver is up to date or further action is required.
Go back and right-click again on Audio Device (if available) or Motherboard Integrated Audio Device (in case of no audio device) then select Uninstall.
Once uninstalled reboot your computer, and reinstall the driver downloaded from the official site of the hardware manufacturer.
Reboot your computer
Sometimes, it’s easier to reboot than go through all of your settings. When you turn your computer back on, Windows may automatically detect and install new hardware. If not, press F8 when you see Starting Windows and select Safe Mode with Networking.
Once your system boots into Safe Mode, restart again normally and plug in your headset to ensure that Windows recognizes it as an input device. You can also try uninstalling and reinstalling your audio drivers if nothing else works.
Plug the headset into another port
If you have an external device (flash drive, etc.) plugged into your computer via a USB port, remove it and try plugging in your headset to another USB port.
If it works with a different port, then you know that one of your ports isn’t working correctly. Make sure you update drivers for any devices and switch out suspect ports for new ones if possible.
If the headset still doesn’t work after trying all of these things, Use a dedicated USB port on the computer: This can be a tricky fix but worth a shot if nothing else is working.
Connect the headset to another computer
If you’re still unable to connect your headset with NGenuity, try connecting it to another computer.
If you’re able to use your headset without any problems on another computer, there may be a problem with your software.
You can try updating those or contacting customer support for assistance. If using another computer doesn’t work either, contact customer support and they should be able to help you troubleshoot further.
Also read: PS4 USB Headset No Sound Issue Solved
Conclusion
You may be facing the problem of HyperX NGenuity Not Detecting Headset. You should try these various fixes mentioned above and hopefully trying these, you can make your headset work again.
The most significant one will be restarting your computer and it will solve the issue in most cases. But if it does not and as well as trying the above fixes does not work for you.
Then you probably need to get your headsets changed.
Let me know if you got your issue resolved. If you really did, do let me know in the comments section.
This article will explain how to Fix HyperX Ngenuity Not Detecting Keyboard so that you can get back to gaming and typing.
If your keyboard isn’t being detected by Ngenuity, check the connection at both ends to make sure it’s plugged in securely, and then follow the steps below.
There are 2 ways to Fix HyperX Ngenuity Not Detecting Keyboard, do whichever one works best for you. The first way is simply uninstalling the program and reinstalling it and this should work in most cases but if it doesn’t try method 2 below.
Check Device Manager
Before trying anything else, open Device Manager and make sure your keyboard is not detected. To do so, follow these steps:
1) Open Device Manager
2) Expand Keyboards
3) Right-click on each keyboard listed under Keyboards and choose Uninstall/Modify to remove them from your system
Then restart your computer and try connecting your keyboard again before proceeding with any of these fixes (if you had previously been unable to use it at all).
Repeat these steps for every item listed under Keyboards in Device Manager until you find one that allows you to use your keyboard.
Check BIOS settings
First, check your BIOS settings. Open your computer’s BIOS interface and be sure that USB legacy support is turned on. Some BIOS interfaces have additional steps you need to take; if so, look for an option labeled USB keyboard support or something similar.
If you don’t see anything like that, just make sure to check under Input/Output Devices for a setting that reads something like USB keyboard support (this will vary from manufacturer to manufacturer).
Once you’ve ensured that there is a setting for USB keyboard support and that it is set to Enabled, save and exit your BIOS and try connecting your keyboard again. If it still isn’t working, follow these next steps.
Update USB
First, make sure your keyboard is fully charged. Next, be sure to update your USB by going to Control Panel > Hardware and Sound > Devices and Printers > Right-click on ‘USB Root Hub’ (might be titled differently depending on your OS) and select ‘Update driver software.
From there select ‘Search automatically for updated driver software. This will ensure your USB is up-to-date with Windows. If you are still having issues after updating your USB drivers please contact HyperX support.
Reinstall the Software
If you are on a Windows machine, you can reinstall your drivers. Navigate to your Control Panel and then search for Device Manager (or find it using Windows Search.)
Once there, expand Keyboards and Mouse. The first two items should be listed as HID Keyboard Device and USB Input Device. Right-click these two entries and choose Update Drivers Software from the context menu.
Next, click the Browse my computer for driver software option in the next window and then select Let me pick from a list of device drivers on my computer.
Now select Microsoft Common Controller for USB after which point the only option left is HID keyboard device for keyboard selection dialog box will appear.
Change USB port
If your keyboard is not detecting, one thing you can do is change your USB port. Most keyboards connect to a computer via a USB port located on a back of a desktop computer or laptop. Check that your keyboard is connected properly to another USB port and see if it works.
If not, then you’ll need to contact your manufacturer for help. Try looking online for troubleshooting guides or forums. You can also try connecting your keyboard to another computer, if possible.
Sometimes all it takes is trying out different cables, ports, and computers to fix any issues with detecting or connecting your peripheral devices like keyboards.
Run the software in administrator mode
In order to get your keyboard working with HyperX Ngenuity, you will need to run it in administrator mode. To do so, right-click on HyperX NGenuity and select Run as Administrator.
This will allow you to calibrate your keyboard correctly. Here’s how
Open up HyperX NGenuity by double-clicking on it. You should see a new window pop up that says Keyboard not detected. If you don’t see that window, close out of everything and try again.
If you still don’t see anything then make sure you’re running in administrator mode (see above). Once you’ve got a blank screen that says Keyboard not detected, go ahead and close out of everything again.
Also read: Change Redragon Keyboard S101 Colors Fixed
Conclusion
To fix your HyperX Ngenuity not detecting keyboard issue, simply unplug and re-plug your device. After doing this, you need to follow the steps mentioned in the article. If you followed the steps as written, you would get the problem solved.
Hope you will be able to connect your keyboard again after going through the article. If you really did, do let me know in the comments section.
You can also be interested in these:
- HP Pavilion gaming desktop TG01-2170M PC
- How to fix “HPDM.framework” will damage your computer on Mac?
- HP acquires HyperX for 425Mil
- HP X24i gaming monitor full review
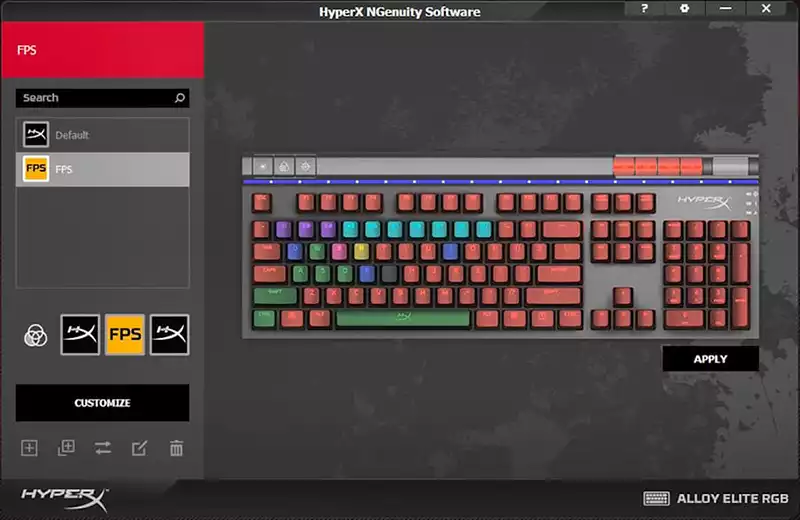
Your Hyperx Ngenuity software should allow you to customize the lighting on all of your compatible Hyperx products. If it’s not allowing you to make adjustments, save profiles, or there are other issues, then what’s the point in having a customizable product in the first place.
You want to get the most of your Hyperx products and create cool lighting shows, designs, and be able to switch between whatever you want, whenever you want. Unfortunately, in some situations, the Hyperx Ngenuity software isn’t working as expected or at all, so we’re going to run through how to fix it right now.
Is your Hyperx Ngenuity software not working? Fix it here and get back to enjoying the products.
Start with basic troubleshooting
Sometimes you need to start with the basics of troubleshooting to make sure it’s not something easy to fix when your hyperx keyboard software is not working or other Hyperx product:
- Use a different USB port; check if the device now shows up. If possible, use a USB 3.0 port.
- Remove any USB hubs or KVM switches that you may be using to see if that is causing issues.
- Reboot the system so everything starts fresh and anything that has failed gets a restart.
- Verify if other peripheral device software is interfering or registering the device, it may need to be disabled.
- Update your HyperX Ngenuity software to the latest version from the Microsoft store.
If none of this helps, then it’s time to move on to other troubleshooting steps.
Is your product compatible with Hyperx Ngenuity?
If you upgraded your Hyperx Ngenuity software or it auto-updated, then maybe you’re using hardware that is no longer supported by the newest software. Check the compatibility list here.
If you can’t find your device on that list, you may need to downgrade to an older version of the software and consider upgrading your hardware at some point.
Only install this older version if you can’t find your product; if you use this version with newer software, then you may miss out on newer bug fixes or enhancements.
Have you installed an incompatible software package?
One of the first things to check is whether you’ve installed an incompatible software package that is interfering with the operation of the Hyperx Ngenuity software.
- NGenuity (legacy release)
- Gigabyte RGB Fusion 2.0
- MSI Afterburner 2
- Valorant (Game)
- Windows 10 App Defender Smartscreen
- Software that blocks cheating in games can interfere in general.
- Check any other software you have installed that manages your hardware devices.
If you need to run these programs, then you may need to disable them when not in use.
Check recent changes in hardware and software
Have you recently installed any new hardware or software? If something new is in your system, then it may be interfering with your HyperX Ngenuity software and causing it not to work, so you should consider uninstalling it to see if the issue is fixed.
Then you’ll need to review online to see if there are any fixes or any updated software/patches to resolve the issue with the incompatible software or hardware.
Uninstall Hyperx Ngenuity software
Instead of upgrading your Hyperx Ngenuity software to get it working, you can perform a full uninstall and get rid of any %AppData% that is being left behind. The benefit of this over an upgrade is that you’re starting fresh; there are no leftover files interfering or %AppData% that could be a problem with leftover and old configuration that is causing problems.
Uninstall HyperX Ngenuity Software by right-clicking on it and selecting uninstall, following the prompts, and completing the process.
Go to your search bar, type %AppData%, then look for anything to do with Ngenuity or Hyperx and delete all the folders containing those names.
To remove any Hyperx Ngenuity registry entries, you can go to the same search bar, type regedit, go into the HKLM\Software path, and remove anything that says Hyperx and Ngenuity.
Once fully uninstalled, reboot your computer and then reinstall the latest version of Hyperx Ngenuity software that supports your hardware.
Total failure and nothing worked
Unfortunately, in some situations, you’ve just gotten yourself into too big of a mess with installing software, modifying components, upgrading software, and making changes, then the Hyperx Ngenuity software STILL doesn’t work. It’s time to consider a complete reinstall of your OS and reinstall your software.
Hopefully, you’ve split your OS onto a separate drive, so a reinstall doesn’t require much effort or backups of any of your files not specifically related to your OS.
Many customers have found that after too many modifications, especially hardware and software upgrades, the Hyperx Ngenuity software breaks, which is a failure in the software to handle changes, but you need to work around it.
So is your Hyperx Ngenuity software not working still? If all else fails and your hyperx ngenuity software is not working, you can contact the support team by email or calling them. Details to contact the support team can be found here.
They’ll run through some further troubleshooting and walk you through getting your system and hardware set up as expected. If there is a bug or other issue, then they can log that with their development team to be released in a future software release.
If they’re unable to get the Hyperx Ngenuinity software working, then it may be time to consider returning your hardware for a refund, as it’s a little pointless to have it when it’s not working.
Conclusion
The Hyperx Ngenuity software allows you to perform some fun and entertaining actions with your hardware, but the software does not have a great reputation at the moment due to the number of issues that people find with poor interactions with other software and upgrades requiring a complete reinstall.
The software is still considered beta after almost a year, so making any changes can break the software. Consider setting restore points on your system or making reinstalls fast and easy.
More stories like this
- HP Pavilion gaming desktop TG01-2170M PC
- How to fix “HPDM.framework” will damage your computer on Mac?
- HP acquires HyperX for 425Mil
- HP X24i gaming monitor full review
- How to connect Airpods to HP laptop
- Full honest HP OfficeJet 3830 review
Ngenuity HyperX — это программа, разработанная компанией HyperX для управления периферийными устройствами вроде наушников. Однако, некоторые пользователи сталкиваются с проблемой: программа не обнаруживает наушники, что может привести к неудобству при использовании.
Если вы столкнулись с этой проблемой, вам не стоит волноваться, в следующих пунктах я описываю ряд действий, которые могут помочь вам решить проблему.
Проверьте настройки звука на компьютере
Первым делом, убедитесь, что настройки звука на вашем компьютере настроены корректно. Возможно, программное обеспечение не обнаруживает наушники из-за неправильных настроек звука.
Нажмите на значок громкости в правом углу панели задач, далее выберите «Настройки звука». В корректных настройках звука, должен присутствовать ваш Ngenuity HyperX как воспроизводящее и записывающее устройство.
Обновите драйверы для наушников
Если ваш компьютер не обращает внимание на наушники, вам может помочь обновление драйверов для них. Драйверы работают как связующее звено между устройством и компьютером. Старые драйверы могут вызвать конфликт с программным обеспечением, в результате чего оно не сможет определить ваше устройство.
Вы можете получить драйверы с официального сайта HyperX.
Переустановите программу
Если проблема не решена после проверки настроек звука и обновления драйверов, попробуйте переустановить Ngenuity HyperX. Возможно, битые или поврежденные файлы программы могут привести к проблемам распознавания наушников.
Перейдите на сайт HyperX, скачайте последнюю версию программы и переустановите её.
Заключение
Ngenuity HyperX не обнаруживает наушники при использовании — довольно неприятная ситуация. Однако, вызывать панику не стоит. Попробуйте вышеперечисленные методы по очереди и возможно, один из них поможет решить проблему. Если же никакой из перечисленных методов не помог, общайтесь с представителями технической поддержки HyperX.
Last updated on February 26th, 2022 at 01:05 am
HyperX NGENUITY is a feature-rich and easy-to-use program for customizing your appropriate HyperX software.
Configure button bindings, script and save macros, and tweak lighting; HyperX NGENUITY offers you as much flexibility as you desire. The software additionally includes a collection of presets, so you can simply select one to install and hop right into the action.
You should really be able to change the lights on every one of your supported Hyperx items using your Hyperx Ngenuity software.
If it’s not enabling you to make tweaks, store profiles, or there are other concerns, then what’s the sense in having a customized product in the first place.
When using Hyperx products, you really would like to get the most from them and be able to change amongst different lighting displays and patterns at any time.
Regrettably, in certain cases, the Hyperx Ngenuity software isn’t operating as intended or at all, therefore we’re going to go over how to fix that right now.
Article Contents
HyperX Ngenuity not detecting keyboard because the software isn’t optimized well and has yet to support all the available HyperX devices in the market.
Well, the HyperX ngenuity software is not the best-optimized software out there.
Time and again customers have become angry with the program not detecting their devices and frequently spoiling the entire experience of using a HyperX device.
Similarly, to no surprise, the ngenuity software is now not detecting the keyboard as hoards of people take to social media platform to share their problems and issues.
We realize how frustrating it may be. That is why this section will focus on how to fix the HyperX ngenuity not detecting keyboard problems.
Fix: HyperX ngenuity not detecting keyboard
Method 1: Troubleshooting
Occasionally users need to begin with the fundamentals of troubleshooting to ensure it’s not anything simple to repair when your hyperx keyboard software is not functioning or other Hyperx product:
- Step 1: Different USB port
Try connecting the device to a different USB port and seeing whether it now appears. If feasible, utilize a USB 3.0 port.
- Step 2: Check USB Hubs
Check to determine if any USB hubs or KVM switches are creating problems.
- Step 3: Restart the system
Restart the system so it all begins afresh and everything that has crashed receives a reset.
Inspect whether other peripheral device programs are conflicting or detecting the device, it may have to be deactivated.
It is recommended that you use the Microsoft shop to get the most recent version of HyperX Ngenuity software.
Method 2: Check Product Compatibility
If you updated your Hyperx Ngenuity software or it auto-updated, then perhaps you’re utilizing equipment that is no longer covered by the latest software. See whether your device is supported by this list.
https://hyperx.com/pages/ngenuity
If your device isn’t listed, you’ll need to go back to a previous edition of the program and think about replacing your hardware in the near future.
Always download this older version if you can’t locate your product; if you are using this edition with the latest software, then you may lose out on updated bug patches or upgrades.
Method 3: Check for incompatible software
Make sure you don’t have any incompatible software packages installed that are interfering with Hyperx Ngenuity’s software.
Software that inhibits cheating in games may meddle in general.
Examine any additional program you had downloaded that handles your hardware devices. If you really need to run these apps, then you might have to deactivate them while not in use.
Method 4: Verify newly added Hardware and Software
Have you lately downloaded any fresh hardware or software? If you have anything new on your system, it could be conflicting with your HyperX Ngenuity software and leading it to stop working, therefore you should remove it to see if the problem is resolved.
Then you’ll have to study online and see if there are some patches or any new software/patches to remedy the problem with the mismatched software or hardware.
Method 5: Uninstall Hyperx Ngenuity software
Rather than updating your Hyperx Ngenuity software to get it functioning, users could indeed perform a complete uninstall and also get rid of any %AppData% that is being left behind.
By utilizing this method rather to upgrading, you can be sure that no old files or % AppData % are conflicting with your new installation and that no previous configuration is creating issues.
The easiest way to remove HyperX Ngenuity Software is to right-click on it, choose “uninstall,” and then proceed to follow the on-screen instructions.
Go over to your search box, enter %AppData%, then seek anything to do with Ngenuity or Hyperx and remove all the folders containing those names.
Any Hyperx Ngenuity registry items may be removed by typing regedit into the same search box, then going to the HKLMSoftware directory and deleting anything that says Hyperx and/or Ngenuity.
When completely removed, restart your pc and then install the newest version of the Hyperx Ngenuity application that matches your hardware.
Method 6: Reinstall Operating System
Hyperx Ngenuity software may not operate if you’ve made too many modifications or messed up the installation process by upgrading or removing software components or performing software upgrades.
It’s time to contemplate a full reset of your OS and reinstall all software.
If you’ve partitioned your hard drive and installed your operating system on a separate partition, a reinstall should be simple and not need the creation of any additional backups.
Many users have noticed that after too many alterations, notably hardware and software updates, the Hyperx Ngenuity software fails, which would be a lack in the software to manage modifications, but users have to get around it.
Method 7: Reach out to Customer Support
If your software is still not functioning, then we believe it is time to call in the backup;
The Hyperx Ngenuity software support staff may be reached through email or phone if all else fails. Information to contact the support staff may be found on their official website.
Further troubleshooting will be performed, and you’ll be guided through the process of getting your system and hardware back up and running properly.
If there is a problem or other issue, then they may record it with their research team to be distributed in a future software update.
Hyperx Ngenuity software may not operate, therefore you should return your hardware for a refund if they can’t. It’s wasteful to own anything that doesn’t work.
Conclusion
That is all there is to know the HyperX Ngenuity not detecting keyboard issues.
Be sure to follow the steps and methods mentioned above to resolve the issue temporarily while the developers work to make the software better and remove all bugs and glitches.
Follow us on Twitter & like our Facebook page for more post-updates

Abhigyan identifies himself as a tech geek, gaming cognoscenti, and also a connoisseur of music. Unidentified and mysterious phenomena never fail to gather his undivided attention. When not reading about bizarre and perplexing entities across the Universe, he can often be found cheering for his favorite teams in Football.