Turn on suggestions
Auto-suggest helps you quickly narrow down your search results by suggesting possible matches as you type.
Showing results for
Show only
|
Search instead for
Did you mean:
- Home
- Windows
- Windows Insider Program
- Download error — 0xca00a009
Aug 07 2021
12:00 AM
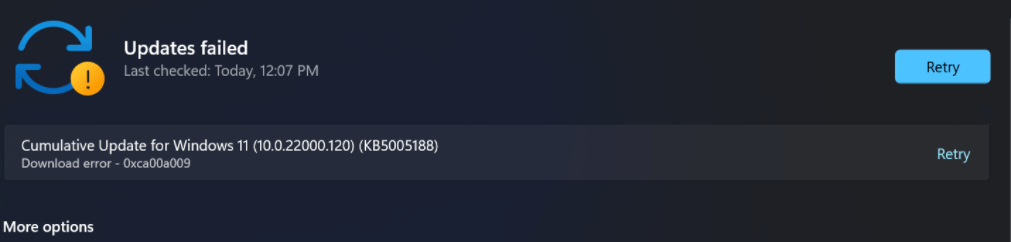
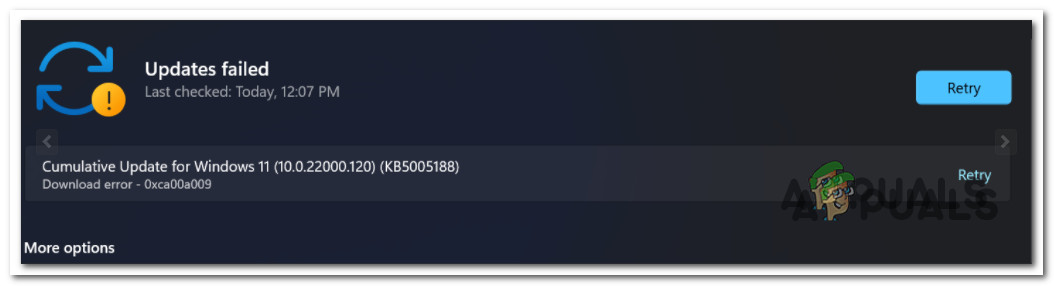
getting error while updating — version Windows 11 (10.0.22000.120) (KB5005188)
Download Error- 0xca00a009 , anyone have fix?

-
All Discussions -
Previous Discussion -
Next Discussion
4 Replies
Aug 21 2021
10:56 PM
@aditraaz
go to C:\Windows\SoftwareDistribution
select all and delete.
reboot your computer
update.
Sep 02 2021
05:20 AM
@MazenTahan
This did not work. Same error. Even with all subdirectories deleted.
Oct 08 2021
06:10 AM
You can easily fix this error. It occurs due to corrupted Windows 11 update files.
1. Restart Windows Update Service
2. Update Group Policies.
3. Delete SoftwareDistribution Files
If you don’t know how to do all that, then follow this article. Personally, I resolved this error by following this article.
https://geekbullet.com/windows-11-updates-failed-download-error-solved/
-
Home
-
Partition Manager
- How to Fix Update Failed Error 0xca00a009 on Windows 11
By Linda | Follow |
Last Updated
Have you encountered the Windows update failed-download error-0xca00a009 when you updating Windows 11 or upgrading to Windows 11? This post from MiniTool Partition Wizard offers 5 methods to solve this problem.
Windows 11 Update Error 0xca00a009
Windows 11 has been released for months and Microsoft has released many updates for Windows 11 users. However, some people report that they have encountered download error 0xca00a009 when updating Windows 11.
In addition, some people also report that this error will occur when they get the Windows 11 installation update.
This error means that the Windows update failed. Then, why does this error happen? Possible reasons are as follows:
- Disabled Windows update service.
- Corrupted updates file in the SoftwareDistribution folder.
- Corrupted Windows system files.
- Conflicting Group policies.
To fix these problems, you can refer to the following methods.
7 Solutions to Fix Windows 10 Won’t Update. #6 Is Fantastic
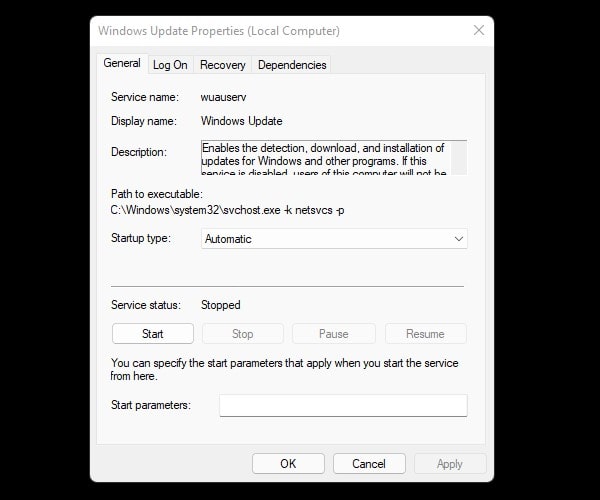
Fix 1. Restart Windows Update Service
Have you ever disabled the Windows update service? If so, please restart it. In addition, some third-party software may also disable this service. Please follow the steps below to make sure it’s on:
- Press Windows + R key to open the Run box.
- In the Run box, type “services.msc” and press Enter.
- In the Services window, scroll down to find Windows Update, right-click it, and choose Properties.
- Find Startup type, expand the drop-down menu next to it and choose Automatic.
- Click the Apply button and then the OK button.
Then, you can try updating Windows 11 again.
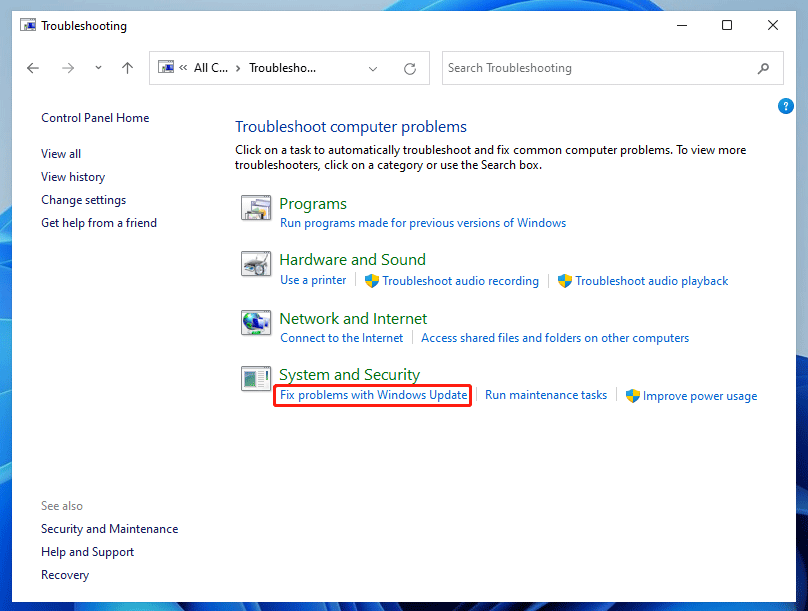
Fix 2. Run Windows Update Troubleshooter
This tool can deal with common Windows Update glitches. Please follow the steps below to run it:
- Open the Run box, type “control”, and then press Enter.
- In the Search box, type “Troubleshoot” and press Enter.
- Click Troubleshooting.
- Under System and Security, click Fix problems with Windows Update.
- Click Next.
- Once problems are detected, click Apply this fix.
- After the fix is done, restart the PC and update Windows again.
[7 Fixes] Windows 11 Not Showing up in Windows Update
Fix 3. Delete Files in the SoftwareDistribution Folder
SoftwareDistribution folder stores update files. If the update files become corrupt and cause the Windows 11 update error 0xca00a009, you can delete them and then update Windows again. Here is the guide:
- Open Windows File Explorer and go to C:\Windows\SoftwareDistribution.
- Press Ctrl + A to select all files inside this folder and then delete them.
Fix 4. Repair System Files
- In the Search box, type “cmd”.
- Right-click on Command Prompt and choose Run as administrator.
- In the cmd tool, type “sfc /scan” and press Enter.
If the SFC tool find corrupted files but it’s unable to repair them. You can then try the DISM tool. In the cmd tool, run the following commands one by one:
- DISM /Online /Cleanup-Image /CheckHealth
- DISM /Online /Cleanup-Image /ScanHealth
- DISM /Online /Cleanup-Image /RestoreHealth
- DISM /Online /Cleanup-Image /RestoreHealth /Source:repairSource\install.wim
Fix 5. Update Group Policy
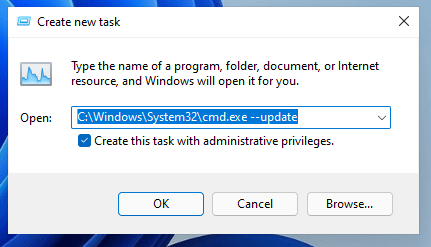
If you have upgraded to Windows 11, the group policies on Windows 10 may conflict with Windows 11. Updating it may be a good choice.
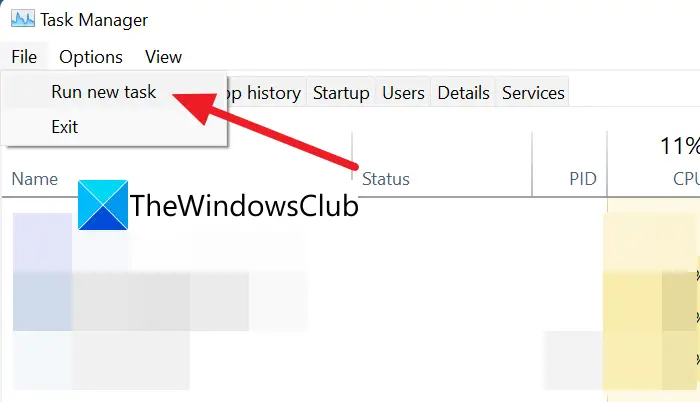
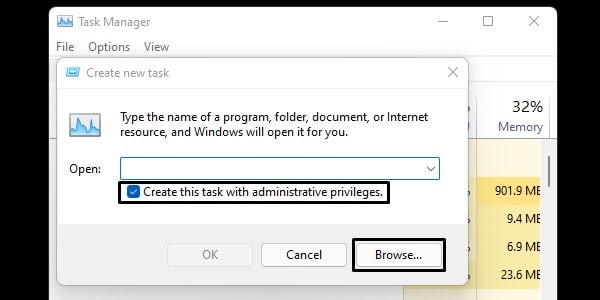
- Press Ctrl + Shift + Esc to open Task Manager. Click More details to get the complete interface.
- Click File > Run new task.
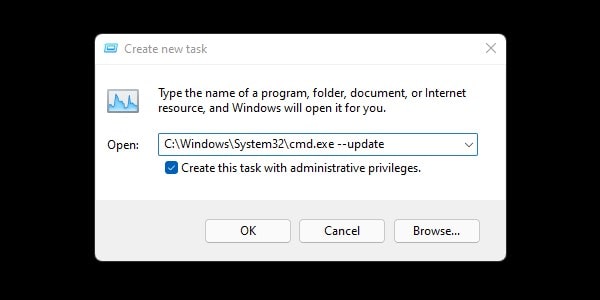
- In the Create new task window, check the box before Create this task with administrative privileges.
- Type “C:\Windows\System32\cmd.exe –update” in the box, and then click the OK
- The Command Prompt will open. In the window, type “gpupdate /force” and press Enter.
- Wait until the update process completes. Then, you can try updating Windows again.
How to Upgrade Windows 10 to Windows 11? See a Detailed Guide!
About The Author

Position: Columnist
Linda has been working as an editor at MiniTool for 5 years. She is always curious about computer knowledge and learns it crazily. Her articles are simple and easy to understand. Even people who do not understand computer can gain something. By the way, her special focuses are disk management, data recovery and PDF editing.
По словам некоторых пользователей Windows 11 и Windows 10, они не могут обновить свою ОС. Когда они идут в Настройки> Центр обновления Windows и попробуйте сделать то же самое, они увидят код ошибки загрузки 0xCA00A009. Если вы один из этих пользователей и хотите исправить ошибку Windows Update 0xCA00A009, то это ваш пункт назначения. В этой статье мы увидим, почему вы видите этот код ошибки и как его решить.
Почему я вижу ошибку Центра обновления Windows 0xCA00A009?
Ошибка обновления может быть вызвана множеством причин. Чаще всего это довольно распространенная ошибка, и если вы опытный пользователь, то, возможно, уже знаете, что это печально известные проблемы. Помимо этого, проблема может возникать из-за поврежденных системных файлов или данных папки SoftwareDistribution и Catroot2. Файлы могут быть повреждены ожидающими перезагрузками или неправильной загрузкой пакета Windows Update. Мы увидим, как их восстановить, позже в этой статье. Проблема также может быть из-за конфликтующих групповых политик или неисправных компонентов WU. Их довольно легко исправить, и вы сможете сделать это с помощью этого руководства.
Если вы видите ошибку Центра обновления Windows 0xCA00A009 в Windows 11 и Windows 10, то вам необходимо сделать следующее:
- Используйте средство устранения неполадок Центра обновления Windows
- Удалите папку SoftwareDistribution и Catroot 2
- Обновить групповые политики
- Запустить SFC
- Восстановление ОС с установочного носителя
Поговорим о них подробнее.
1]Используйте средство устранения неполадок Центра обновления Windows
Начнем с самого простого решения. Использование средства устранения неполадок Центра обновления Windows — отличный способ решить некоторые простые проблемы с Центром обновления Windows, и вы можете запустить их с помощью следующих шагов.
Для Windows 11
- Открыть настройки.
- Перейти к Система> Устранение неполадок> Другие средства устранения неполадок.
- Запустите средство устранения неполадок Центра обновления Windows.
Для Windows 10
- Открыть настройки.
- Перейдите в Обновление и безопасность> Устранение неполадок> Дополнительные средства устранения неполадок.
- Теперь выберите Центр обновления Windows и нажмите Запустите средство устранения неполадок.
После запуска средства устранения неполадок проверьте, сохраняется ли проблема.
2]Удалите папку SoftwareDistribution и Catroot 2.
Как упоминалось ранее, эти две папки могут вызвать рассматриваемый код ошибки. Итак, лучший способ решить их — переименовать их. Это не повлияет на ваш компьютер, и Windows автоматически создаст новые папки, как только они будут переименованы.
Перед переименованием папок нам нужно остановить некоторые процессы. Итак, откройте командную строку от имени администратора и выполните следующие команды.
net stop wuauserv net stop cryptSvc чистые стоповые биты net stop msiserver
Теперь выполните эти команды, чтобы переименовать обе папки.
ren C: Windows SoftwareDistribution SoftwareDistribution.old ren C: Windows System32 catroot2 catroot2.old
Как только вы закончите с этим, пора перезапустить службы, которые мы остановили.
net start wuauserv net start cryptSvc чистые стартовые биты net start msiserver
Наконец, перезагрузите компьютер и проверьте, сохраняется ли проблема.
3]Обновить групповые политики
Если у вас возникла эта проблема после обновления до Windows 11 из более старой версии Windows, возможно, ваши групповые политики устарели, и вам придется сделать это вручную. Следуйте приведенным ниже инструкциям, чтобы сделать то же самое.
- Открыть диспетчер задач Win + X> Диспетчер задач.
- Нажмите Параметры> Запустить новую задачу.
- Галочка Создайте эту задачу с правами администратора и нажмите Просматривать.
- Теперь перейдите к «C: Windows System32».
- Найдите CMD.exe и откройте его.
- Ваш каталог будет зарегистрирован. Теперь добавьте пробел, добавьте ‘-Обновить’, и нажмите ОК.
- Наконец, выполните следующую команду в окне командной строки.
gpupdate / force
Подождите, пока процесс будет завершен, и, надеюсь, проблема будет решена.
4]Запустите SFC
Проблема может быть из-за поврежденного образа системы, и лучший способ решить ее — запустить команду. Итак, откройте командную строку администратора из меню «Пуск» и выполните следующую команду.
sfc / scannow
Это займет некоторое время, поэтому подождите несколько минут, затем перезагрузите компьютер и проверьте, сохраняется ли проблема.
5]Восстановление ОС с установочного носителя
Если ничего не работает, вам необходимо восстановить Windows с помощью установочного носителя. Это особенно полезно, если проблема связана с поврежденным образом Windows. Итак, сделайте это и проверьте, сохраняется ли проблема.
Надеюсь, вы сможете решить проблему с помощью данных решений.
.
According to some Windows 11 and Windows 10 users, they are not able to update their OS. When they go to Settings > Windows Update and try to do the same they see download error code 0xCA00A009. If you are one of those users and want to fix Windows Update Error 0xCA00A009 then this is your destination. In this article, we are going to see why you are seeing this error code and how to resolve it.
Why am I seeing Windows Update Error 0xCA00A009?
There are many reasons that can cause the update error. More often than not, this is a glitch that is pretty common and if you are a veteran user then you may already know notorious they are. Other than that, the issue can occur because of corrupted system files or data of SoftwareDistribution and Catroot2 folder. The files can be corrupted by pending restarts or improper downloading of the Windows Update package. We will see how to recover them later in this article. The issue can also be because of conflicting Group Policies or broken WU components. There are pretty easy to fix and you will be able to do that with this guide.
If you are seeing Windows Update Error 0xCA00A009 on Windows 11 and Windows 10, then these are the things you need to do:
- Use Windows Update Troubleshooter
- Delete SoftwareDistribution and Catroot 2 folder
- Update Group Policies
- Run SFC
- Repair OS with Installation Media
Let us talk about them in detail.
1] Use Windows Update Troubleshooter
Let us start with the most basic solution. Using Windows Update Troubleshooter is a great way to fix some simple problems with Windows Update and you can run them with the help of the following steps.
For Windows 11
- Open Settings.
- Go to System > Troubleshoot > Other troubleshooters.
- The run Windows Update troubleshooter.
For Windows 10
- Open Settings.
- Go to Update & Security > Troubleshoot > Additional troubleshooters.
- Now, select Windows Update and click Run the troubleshooter.
After running the troubleshooter check if the issue persists.
2] Delete SoftwareDistribution and Catroot 2 folder
As mentioned earlier, these two folders can cause the error code in question. So, the best way to resolve them is by renaming them. This won’t affect your computer and Windows will automatically create new folders as soon as they are renamed.
Before renaming the folders, we need to stop some processes. So, open Command Prompt as an admin and execute the following commands.
net stop wuauserv
net stop cryptSvc
net stop bits
net stop msiserver
Now, execute these commands to rename both the folders.
ren C:WindowsSoftwareDistribution SoftwareDistribution.old
ren C:WindowsSystem32catroot2 catroot2.old
Once, you are done with that, it is time to restart the services that we have stopped.
net start wuauserv
net start cryptSvc
net start bits
net start msiserver
Finally, restart your computer and check if the issue persists.
3] Update Group Policies
If you are experiencing this issue after updating to Windows 11 from an older version of Windows then probably, your Group Policies are not up-to-date and you have to do it manually. Follow the given steps to do the same.
- Open Task Manager by Win + X > Task Manager.
- Click Options > Run new task.
- Tick Create this task with administrative privileges and click Browse.
- Now, go to “C:WindowsSystem32”.
- Look for CMD.exe and open it.
- Your directory will be registered. Now, add a space, append ‘-update’, and click Ok.
- Finally, run the following command in the Command Prompt window.
gpupdate /force
Wait for the process to be completed and hopefully, the issue will be resolved.
4] Run SFC
The issue can be because of a corrupted system image and the best way to solve it is by running a command. So, open Command Prompt an administrator from the Start Menu and execute the following command.
sfc /scannow
It will take some time, so, wait for a few minutes, then restart your computer and check if the issue persists.
5] Repair OS with Installation Media
If nothing works then you need to repair your Windows with Installation Media. This is especially useful if the issue is because of a corrupted Windows image. So, do that and check if the issue persists.
Hopefully, you are able to resolve the issue with the given solutions.
Read: How to delete Downloaded, Failed & Pending Windows Updates.
Windows 11 update failed to install on my computer?
If you want to troubleshoot this Windows Update failed issue then, first of all, you need to check which error code you are getting. Your error code will come with an error message as well, to troubleshoot the issue you need to have those two in order to identify the problem your system is facing. Then you can search on our site with your Error Code and you will find suitable solutions. You can even try the solutions mentioned here, to get started, but it is better to know the exact error message and the error code to begin troubleshooting.
Read Next: Fix Windows Update Error 0x8007065e; Feature Update failed to install.
Turn on suggestions
Auto-suggest helps you quickly narrow down your search results by suggesting possible matches as you type.
Showing results for
Show only
|
Search instead for
Did you mean:
- Home
- Windows
- Windows Insider Program
- Download error — 0xca00a009
Aug 07 2021
12:00 AM
getting error while updating — version Windows 11 (10.0.22000.120) (KB5005188)
Download Error- 0xca00a009 , anyone have fix?
-
All Discussions -
Previous Discussion -
Next Discussion
4 Replies
Aug 21 2021
10:56 PM
@aditraaz
go to C:WindowsSoftwareDistribution
select all and delete.
reboot your computer
update.
Sep 02 2021
05:20 AM
@MazenTahan
This did not work. Same error. Even with all subdirectories deleted.
Oct 08 2021
06:10 AM
You can easily fix this error. It occurs due to corrupted Windows 11 update files.
1. Restart Windows Update Service
2. Update Group Policies.
3. Delete SoftwareDistribution Files
If you don’t know how to do all that, then follow this article. Personally, I resolved this error by following this article.
https://geekbullet.com/windows-11-updates-failed-download-error-solved/
По словам некоторых пользователей Windows 11 и Windows 10, они не могут обновить свою ОС. Когда они переходят в «Настройки»> «Центр обновления Windows» и пытаются сделать то же самое, они видят код ошибки загрузки 0xCA00A009 . Если вы один из этих пользователей и хотите исправить ошибку Windows Update 0xCA00A009, то это ваш пункт назначения. В этой статье мы узнаем, почему вы видите этот код ошибки и как его устранить.
Почему я вижу ошибку Windows Update 0xCA00A009?
Есть много причин, по которым может вызвать ошибку обновления. Чаще всего это довольно распространенная ошибка, и если вы опытный пользователь, то, возможно, уже знаете, что это печально известные проблемы. Помимо этого, проблема может возникать из-за поврежденных системных файлов или данных папки SoftwareDistribution и Catroot2. Файлы могут быть повреждены ожидающими перезагрузками или неправильной загрузкой пакета Windows Update. Мы увидим, как их восстановить, позже в этой статье. Проблема также может быть из-за конфликтующих групповых политик или неисправных компонентов WU. Их довольно легко исправить, и вы сможете сделать это с помощью этого руководства.
Если вы видите ошибку Windows Update 0xCA00A009 в Windows 11 и Windows 10, то вам нужно сделать следующее:
Использовать средство устранения неполадок Центра обновления Windows Удалить SoftwareDistribution и папку Catroot 2 Обновить групповые политики Запустить SFCRepair OS с установочного носителя
Давайте поговорим о них подробнее.
1] Используйте средство устранения неполадок Центра обновления Windows
Начнем с самого простого решения. Использование средства устранения неполадок Центра обновления Windows-отличный способ решить некоторые простые проблемы с Центром обновления Windows, и вы можете запустить их, выполнив следующие действия.
Для Windows 11
Откройте Настройки . Выберите Система> Устранение неполадок> Другие средства устранения неполадок. Запустите средство устранения неполадок Центра обновления Windows .
Для Windows 10
Открыть Настройки . Выберите Обновление и безопасность> Устранение неполадок> Дополнительные средства устранения неполадок. Теперь выберите Центр обновления Windows и нажмите Запустить средство устранения неполадок.
После запуска средства устранения неполадок проверьте, сохраняется ли проблема..
2] Удалить папку SoftwareDistribution и Catroot 2
Как упоминалось ранее, эти две папки могут вызвать рассматриваемый код ошибки. Итак, лучший способ решить их-переименовать их. Это не повлияет на ваш компьютер, и Windows автоматически создаст новые папки, как только они будут переименованы.
Перед переименованием папок нам необходимо остановить некоторые процессы. Итак, откройте командную строку от имени администратора и выполните следующие команды.
net stop wuauserv net stop cryptSvc net stop bit net stop msiserver
Теперь выполните эти команды, чтобы переименовать обе папки.
ren C: Windows SoftwareDistribution SoftwareDistribution.old ren C: Windows System32 catroot2 catroot2.old
Как только вы закончите с этим, пора перезапустить службы, которые мы остановили.
net start wuauserv net start cryptSvc net start bits net start msiserver
Наконец, перезагрузите компьютер и проверьте, сохраняется ли проблема.
3] Обновите групповые политики
Если у вас возникла эта проблема после обновления до Windows 11 из более старой версии Windows, возможно, ваши групповые политики устарели, и вам нужно сделать это вручную. Выполните указанные шаги, чтобы сделать то же самое.
Откройте диспетчер задач с помощью Win + X> Диспетчер задач. Щелкните Параметры> Запустить новую задачу. Установите флажок «Создать эту задачу с правами администратора» и нажмите кнопку «Обзор». Теперь перейдите к «C: Windows System32 ». Найдите файл CMD.exe и откройте его. Ваш каталог будет зарегистрирован. Теперь добавьте пробел, добавьте «-update» и нажмите «ОК». Наконец, выполните следующую команду в окне командной строки. Gpupdate/force
Дождитесь завершения процесса и, надеюсь, проблема будет решена.
4] Запустите SFC
Проблема может быть из-за поврежденного образа системы, и лучший способ решить ее-запустить команду. Итак, откройте Командную строку администратора из меню «Пуск» и выполните следующую команду.
sfc/scannow
Это займет некоторое время, поэтому подождите несколько минут, а затем перезапустите ваш компьютер и проверьте, сохраняется ли проблема.
5] Восстановите ОС с установочного носителя
Если ничего не работает, вам нужно восстановить Windows с установочного носителя. Это особенно полезно, если проблема связана с повреждением образа Windows. Итак, сделайте это и проверьте, сохраняется ли проблема.
Надеюсь, вы сможете решить проблему с помощью данных решений.
Прочтите: Как решить удалить загруженные, неудачные и ожидающие обновления Windows.
Не удалось установить обновление Windows 11 на мой компьютер?
Если вы хотите устранить эту проблему с ошибкой Центра обновления Windows, то, прежде всего, вы необходимо проверить, какой код ошибки вы получаете. Ваш код ошибки также будет сопровождаться сообщением об ошибке, чтобы устранить проблему, вам необходимо иметь эти два, чтобы определить проблему, с которой сталкивается ваша система. Затем вы можете выполнить поиск на нашем сайте, указав свой код ошибки, и вы найдете подходящие решения. Вы даже можете попробовать решения, упомянутые здесь, чтобы начать работу, но лучше знать точное сообщение об ошибке и код ошибки, чтобы начать устранение неполадок.
Читать далее: Исправьте Windows Ошибка обновления 0x8007065e; Не удалось установить обновление функции.

Microsoft is currently testing Windows 11 in beta form. It will be released soon as a stable version. Though, if you’ve recently installed Windows 11 on your main PC. Then, you might have encountered an Updates Failed error while updating Windows. Updates failed error message usually comes with an error code. For instance download error – 0xca00a009. I got this error while downloading the cumulative update. No matter, which error code or error message you’re getting while updating Windows 11. This article will help you to fix Windows 11 updates failed problem completely.
Why Windows 11 Updates download and installation gets failed.
Well, there isn’t any single cause behind this problem. But, here are some possible causes.
- Windows update services got stopped.
- Updates file got corrupted in the SoftwareDistribution folder.
- Some important Windows 11 files got corrupted.
- Windows 11 is not been properly got installed.
SOLUTIONS: Windows 11 Updates Failed – Download Error
Do follow all solutions one by one and the download error will get resolved.
Restart Windows Update Service
The Windows Update Service may stop due to third-party services. Updates cannot be installed, if the Windows update service is stopped. Well no worries, you can easily restart it.
- Press Windows + R key to open Run Windows. Type services.msc in it and press enter. Alternatively, you can search for services App.

- Once the Services window gets open, look for Windows Update service.
- Right-click on the Windows Update service and then click on properties.

- Now, do select startup type as automatic.
- After that, click on Apply and then click on start. Once service gets started click on ok.
- If the Windows update service is already running, then right-click on Windows update service and after that, click on restart.
Update Group Policies.
- Right-Click on Windows 11 start button and then click on Task Manager.
- Once Task Manager gets open, click on File > Run new task.
- Mark the “Create this task with administrator privileges” option.
- Click on Browse. By default, the System32 folder will get open. Select CMD from this folder and then click on Open.

- Now, give a space after cmd directory and type –update and click on ok.
C:WindowsSystem32cmd.exe --updateAlternatively, you can copy-paste the above line in Create new task window.
- Command Prompt will now get open, type the following command and do press enter.
gpupdate /force
- Once you update group policy type exit in cmd and press enter.
Enable Advanced Options
- Press Windows + I key to open the Settings app.
- In Windows 11 settings app, from the left pane, click on Windows update.
- Click on Advanced options.
- Now, enable “Receive updates for other Microsoft products”.

That’s it, leave all other options disabled in advanced settings.
Delete SoftwareDistribution Files
In the SoftwareDistribution folder, Microsoft Windows 11 stores update files. So, it may be possible that during the update download process some files got corrupted. And, that’s why Windows 11 Updates Failed Download error is occurring. By deleting these files, you can fix this error.
- Open File Explorer in Windows 11 and do open the following directory.
C:WindowsSoftwareDistribution- Select all files inside the SoftwareDistribution folder. And, right-click and then click on delete.

- Sometimes files might not get deleted so no worries about it.
- That’s it, now restart your system. And, once the system gets restarted try to update Windows 11. Hopefully, any download error will not occur.
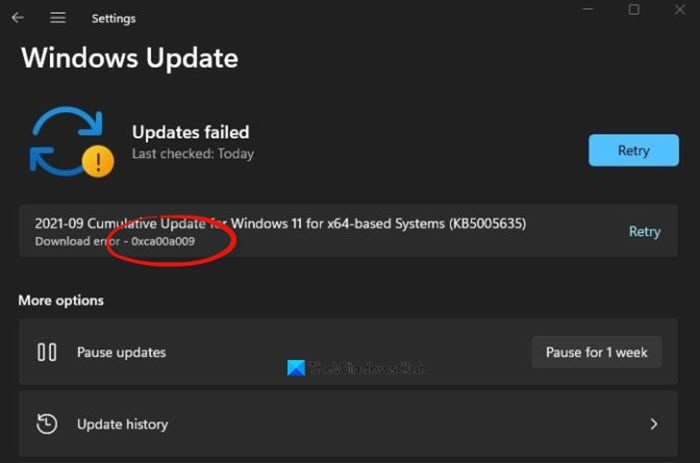
In my case, I was getting Download error – 0xca00a009 while installing the cumulative update for Windows 11 for x64-based systems (KB5005635). By following all the above solutions one by one, the error got resolved. If you’re getting download errors with any other error code, still I suggest you follow all the above-mentioned solutions.
Solutions: Some update files are missing or have problems.
After fixing the download error, you might get a “Some update files are missing or have problems((0x8007000d))” error while installing Windows updates. This error occurs when Windows is not installed properly or files got corrupted. Well, by using Windows inbuilt file scanner and repair tool, you can fix this error permanently.

Run SFC Scan.
The SFC (System File Checker) Scan in Windows 11 helps users to scan and restore corrupted system files.
- Search for CMD in Windows 11 and click on “Run as administrator”.
- UAC Window will get open click on Yes.
- Once CMD gets open, do type the following command to run SFC Scan. sfc /scannow
- If an SFC scan finds out some corrupted files and is unable to repair then you have run some DISM Command.
Use DISM Command tool to repair Windows 11.
Deployment Image Servicing and Management tool are known as DISM tool. It helps Microsoft users to repair Windows 11 completely.

Open Command Prompt again. And, run the following commands one by one. Wait for each command to execute completely don’t close the CMD window between the repair process.
DISM /Online /Cleanup-Image /CheckHealth
DISM /Online /Cleanup-Image /ScanHealth
DISM /Online /Cleanup-Image /RestoreHealthDISM /Online /Cleanup-Image /RestoreHealth /Source:repairSourceinstall.wimOnce you successfully repair Windows 11. Do open the Software Distribution folder and delete all files. After that, restart Windows, and, try to install Window 11 updates. And, Windows 11 updates failed error will not occur now. You will now not receive any error, and you will be able to install any Windows update. If you’re still facing any errors in Windows 11 updates installation let me know in the comment section.
Центр обновления Windows — это встроенная служба, которая управляет установкой обновлений Windows. Microsoft использует эту службу для выпуска обновлений функций и исправлений безопасности. Однако в некоторых случаях обновления Windows могут работать не так, как должны, и вместо этого отображается сообщение об ошибке с пользовательским кодом, один из кодов ошибки 0xCA00A009.
Вы можете столкнуться с этой проблемой, если вы обновили Windows до последней версии. Эта статья проведет вас через некоторые действия по устранению неполадок, чтобы снова получать обновления Windows. Проверять Лучшие способы исправить ошибки Центра обновления Windows в Windows 11.
Существует множество факторов, вызывающих ошибки Центра обновления Windows, но наиболее распространенными являются поврежденные, дефектные или отсутствующие системные файлы. Эта проблема также может возникнуть, если вы обновили более старую версию Windows 11.
Другие возможные причины, которые могут привести к появлению этого кода ошибки, перечислены ниже.
- Поврежденные системные файлы или данные в папке SoftwareDistribution могут вызвать эту проблему.
- Если вы обновили операционную систему со старой версии Windows до Windows 11.
- Запускаемая программа или служба, конфликтующая с Центром обновления Windows, также может вызывать ошибку.
Теперь перейдем к решениям.
1. Перезагрузите компьютер.
Если у вас возникли проблемы с обновлением Windows и вы получаете сообщение об ошибке 0xCA00A009, возможно, поврежден или отсутствует файл, который требуется для работы Центра обновления Windows.
В этом случае все, что вам нужно сделать, это перезагрузить компьютер, а затем снова обновить Windows. Это может показаться простым, но иногда это все, что вам нужно.
Вот шаги, которые необходимо предпринять:
- Нажмите кнопку меню «Пуск», затем щелкните значок «Питание».
- Нажмите Перезагрузить.
- Ваш компьютер перезагрузится, и, надеюсь, ошибка 0xCA00A009 будет исправлена.
Следующее основное решение — запустить средство устранения неполадок Центра обновления Windows. Это встроенный параметр, который можно использовать для устранения некоторых незначительных проблем с Центром обновления Windows. Эти шаги покажут вам, как его использовать.
- Нажмите на Win + X чтобы открыть меню быстрой ссылки.
- Найдите Настройки из списка меню.
- Нажмите Система на правой панели меню настроек.
- Далее коснитесь Устранение неполадок -> Другие средства устранения неполадок.
- Нажмите кнопку трудоустройство рядом с Центром обновления Windows.
Если процесс обнаружит какие-либо проблемы, он попытается исправить их автоматически. Выполнив вышеуказанные шаги, перезагрузите компьютер, а затем снова обновите Windows, чтобы посмотреть, решит ли это проблему.
3. Запустите сканирование SFC и DISM
Если вы все еще видите ошибку, это может быть связано с повреждением системного файла. Попробуйте запустить средство проверки системных файлов, чтобы устранить проблему. Вот краткое руководство о том, как это сделать:
- Запустите командную строку от имени администратора. Для этого найдите «cmd» и выберите Запустить от имени администратора.
- Введите командную строку ниже и нажмите Enter:
sfc /scannow
- Процесс займет некоторое время. После завершения процесса перезагрузите компьютер и снова попробуйте обновить Windows.
Если обновление по-прежнему не удается, запустите сканирование DISM, чтобы восстановить системные файлы и восстановить поврежденные образы. Вот как:
- Откройте командную строку.
- Скопируйте и вставьте следующую команду и нажмите Enter:
Dism.exe /online /cleanup-image /scanhealth

Dism.exe /online /cleanup-image /restorehealth
Возможно, вам придется подождать некоторое время, пока процесс завершится. Перезагрузите компьютер после запуска команды DISM и проверьте, устранена ли ошибка. Проверять В чем разница между CHKDSK, SFC и DISM в Windows 10?
4. Обновите групповую политику.
Если вы обновились до Windows 11 с более старой версии Windows, вам может потребоваться обновить групповую политику. Вот шаги, которые необходимо выполнить:
- Нажмите на Win + X И выберите «Выполнить» из списка меню.
- Введите «cmd» в текстовое поле и нажмите Shift + Ctrl + Enter.
- Когда на экране появится окно UAC, нажмите «Да», чтобы продолжить.
- Теперь выполните каждую из следующих команд одну за другой:
gpupdate

gpupdate /force
Когда вышеуказанные команды будут выполнены, закройте окно командной строки и снова обновите Windows, чтобы увидеть, решена ли проблема. Проверять Как обновить настройки групповой политики в Windows.
5. Сотрите папку SoftwareDistribution.
В папке SoftwareDistribution хранятся временные файлы, которые могут понадобиться для запуска обновлений Windows. И когда эти файлы повреждаются, могут возникать ошибки такого типа. В этом случае вы можете стереть содержимое папки и посмотреть, работает ли она.
Чтобы удалить папку SoftwareDistribution, выполните следующие действия:
- Откройте командную строку с правами администратора.
- Введите следующие команды в командной строке и нажмите Enter После каждого заказа:
net stop wuauserv
net stop bits
net stop cryptSvc
net stop msiserver
- После выполнения вышеуказанных команд откройте проводник Windows и перейдите в папку «C:WindowsSoftwareDistribution».
- В папке SoftwareDistribution коснитесь Ctrl + чтобы выбрать все содержимое и нажмите удалять на клавиатуре.
- Если будет предложено предоставить разрешение во всплывающем меню, коснитесь Продолжить следовать.
При удалении содержимого папки SoftwareDistribution потребуется перезапустить все службы, которые ранее были остановлены. Для этого:
- Снова откройте командную строку от имени администратора и выполните следующие команды:
net start wuauserv
net start bits
net start cryptSvc
net start msiserver
- написать сейчас выход И нажмите Enter Чтобы закрыть окно командной строки.
Когда вы выполните все вышеперечисленные шаги, перезагрузите компьютер и попробуйте снова обновить Windows после выполнения всех шагов. Проверять Стоит ли обновлять, сбрасывать, восстанавливать или переустанавливать Windows?
6. Чистая загрузка.
Эта проблема также может возникать, когда запускаемая служба или приложение конфликтуют с Центром обновления Windows. В этом случае следует выполнить чистую загрузку, как показано ниже:
- Откройте диалоговое окно «Выполнить».
- Введите «msconfig» в текстовое поле и нажмите «ОК», чтобы открыть окно «Конфигурация системы».
- В окне «Конфигурация системы» выберите вкладку год.
- Установите флажок рядом с Дополнительный запуск.
- Снимите флажок рядом с Загрузить элементы автозагрузки.
- Теперь переключитесь на вкладку الخدمات.
- Найдите Скрыть все службы Microsoft , затем коснитесь отключить все.
- Нажмите تطبيق чтобы сохранить изменения.
- Перейдите на вкладку «Автозагрузка» и выберите Открыть диспетчер задач. Это приведет вас на вкладку «Автозагрузка» в диспетчере задач.
- Щелкните правой кнопкой мыши каждую службу на вкладке «Автозагрузка» и отключите ее.
- Нажмите OK, когда закончите изменять конфигурацию системы.
Обязательно перезагрузите компьютер после выполнения вышеуказанных действий и продолжите обновление Windows. Если вы обнаружите, что этот метод решает вашу проблему, вы должны отключить конфликтующую службу обновления Windows. Чтобы узнать, какая служба вызывает ошибку, включите их одну за другой. Проверять Как исправить ошибку Центра обновления Windows 0x80070057
Теперь легко исправить ошибку Центра обновления Windows 0xCA00A009.
Мы надеемся, что это руководство помогло вам исправить ошибку Центра обновления Windows 0xCA00A009. Если ни одно из этих решений не работает для вас, вам может потребоваться перезагрузить компьютер с Windows. Вы можете просмотреть сейчас Как вернуть компьютер в исходное состояние (без переустановки Windows).
Some Windows 11 that have just upgraded to the new operating system are reporting that they’re experiencing a weird issue where a cumulative update always fails with the 0xCA00A009 error code. Almost always, this problem is linked with the KB5005188 update.
We’ve investigated this issue thoroughly, and we realized that several different underlying causes might be responsible for producing this error code when attempting to install certain updates on Windows 11. Here’s a list of potential causes that might be causing this issue:
- Common Windows Update glitch – There are a lot of scenarios with the potential of glitching your Windows 11 Update component. Fortunately, most of these situations are already covered by a repair strategy that you can enforce automatically via the Windows Update Troubleshooter. So before trying anything else, you should start by running the Windows Update Troubleshooter and deploying the recommended fix.
- Corrupted data inside SoftwareDistribution and Catroot 2 folders – An interrupted update or some system file corruption can also lead to file corruption infiltration inside the two folders responsible for hosting temporary Windows Update files. In this case, you can fix the issue by forcing your OS to create new equivalents for the two folders (since you can’t delete them conventionally).
- Broken WU Component – There are a lot of issues that can potentially plague the Windows Update component. But since most of them cannot be resolved without a clean install/repair install procedure, the best course of action in some cases is to bypass the WU component entirely and install the failing update from the Microsoft Update Catalog.
- Conflicting Group policies – If you’re coming to Windows 11 after upgrading from an older Windows version, another viable culprit that you should investigate is a lousy group policy. Keep in mind that not every procedure available on Windows 10 is a good thing on WIndows 11. The best course of action is to perform a policy update procedure to make sure a lousy group policy is not causing this issue.
- System file corruption – If your Windows Update component is severely damaged and every Windows update ends up failing with the same 0xca00a009, you won’t get very far with any fix other than clean installing or repairing installing your entire fleet of Windows files. If you want to avoid data loss, repair install is recommended.
Now that you are familiar with every potential culprit responsible for the update error 0xca00a009 error on Windows 11, let’s go over a series of fixes that other affected users have successfully used to fix this issue.
Run the Windows Update Troubleshooter
Before you move on to more advanced troubleshooting guides, our recommendation is to start by deploying the Windows Update troubleshooter and see if it’s capable of fixing the issue automatically.
Note: Keep in mind that the troubleshooting utility on Windows 11 is much more capable than it was on previous Windows versions. Microsoft has added dozens of new automated repair strategies that can be applied if a recognizable scenario is identified with a single click.
If you haven’t tried this fix yet, follow the instructions below to run the Windows Update Troubleshooter and apply the recommended fix automatically:
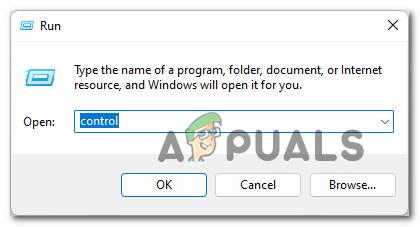
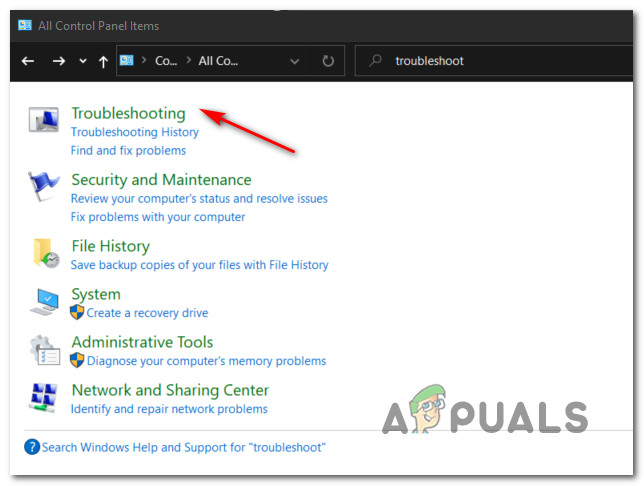
- Press Windows key + R to open up a Run dialog box. Next, type ‘control’ inside the text box and press Enter to open the classic Control Panel interface.

Open the Control Panel interface. Note: If the User Account Control prompts you, click Yes to grant admin access.
- Once you’re inside the classic Control Panel window, use the search function (top-right corner of the screen) to search for ‘troubleshoot.’
- From the list of results, click on Troubleshooting.

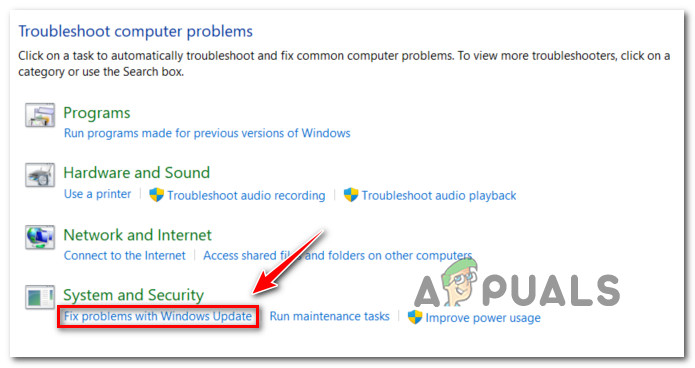
Accessing the Troubleshooting tab - Once you’re inside the Troubleshooting tab, go under System and Security and click on Fix problems with Windows Updates.

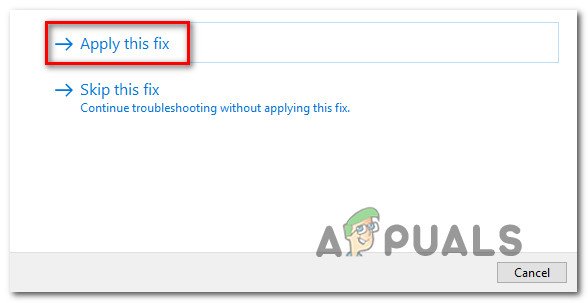
Accessing the Windows Update troubleshooter - Once you get to the first Windows Update troubleshooter prompt, click Next and wait for the initial scan to complete.

Applying the recommended fix Note: Keep in mind that with some fixes that get recommended, you might ve required to perform a series of automated steps.
- After the fix is successfully applied, restart your PC, install the failing update once again, and see if the next startup is complete.


If you already ran the Windows Update troubleshooter and applied the recommended fix and you’re still seeing the same 0xca00a009, move down to the next potential fix below.
Clear SoftwareDistribution and Catroot 2 folders
The majority of scenarios that will break the Windows Update component are rooted in one of these two folders: SoftwareDistribution and Catroot 2.
Note: These two folders are responsible for temporary holding files and folders used during the installation of pending Windows Updates and system driver updates. An unexpected interruption when an update is being actively installed can reportedly produce the 0xca00a009 on Windows 11.
However, clearing the SoftwareDistribution and Catroot 2 folders is not as easy as navigating to the folders and emptying their contents. Both of these folders are system-protected, which means you can’t delete them conventionally.
Fortunately, there is one workaround to this constraint; you can rename these two folders with the .old extension – this will force your Windows installation to disregard them and create new, healthy equivalents.
But before you can do this, you will first need to disable every used service WU dependency.
For complete steps on how to disable every used Windows Update dependency and renaming the SoftwareDistribution and Catroot 2 folders, follow the instructions below:
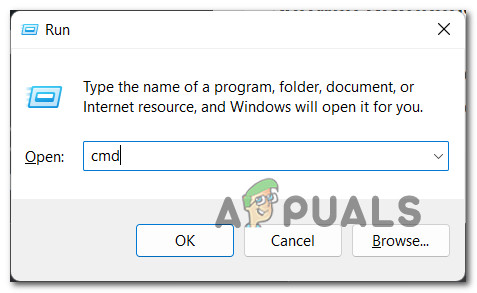
- Press Windows key + R to open up a Run dialog box. Next, type ‘cmd’ inside the text box and press Ctrl + Shift + Enter to open an elevated Command Prompt with admin access.

Opening up an elevated CMD prompt Note: If the User Account Control prompts you, click Yes to grant admin access.
- Once you’re finally inside the elevated CMD prompt, type the following commands and press Enter after each one to effectively disable every service dependency of Windows Update:
net stop wuauserv
net stop cryptSvc
net stop bits
net stop msiserver
Note: These commands will effectively stop the Windows Update Service, the Cryptographic Services, the Background Intelligent Transfer Service, and the Microsoft Installer Service – all of these are dependencies that will keep you from running the following command if actively running.
- Once very service dependency is disabled, type (or paste) the following commands and press Enter after each one to effectively rename the SoftwareDistribution and Catroot2 folders:
ren C:WindowsSoftwareDistribution SoftwareDistribution.old
ren C:WindowsSystem32catroot2 catroot2.old
- Once both of the commands above have been processed successfully, run the following commands to restart the services that you previously stopped (at step 2):
net start wuauserv
net start cryptSvc
net start bits
net start msiserver
- Next, you can safely close the elevated CMD prompt and install the same Windows Update that was previously failing with the 0xca00a009.
If the problem is still not fixed and you’re trying to avoid a clean install or repair install procedure, move down to the next potential fix below.
Install the Failing Update via the Microsoft Update Catalog
If your Windows Update component is broken and cannot be fixed automatically via WU Troubleshooter and you’re trying to avoid doing something drastic like clean installing or repair installing, one way that should allow you to bypass the 0xca00a009 is to install the failing update manually by using the Microsoft Update Catalog.
You can use this directory to download the compatible update version that’s failing on your PC, then install it manually by using the .ini file that comes with it.
In case you’re looking for specific instructions on how to do this, follow the steps below:
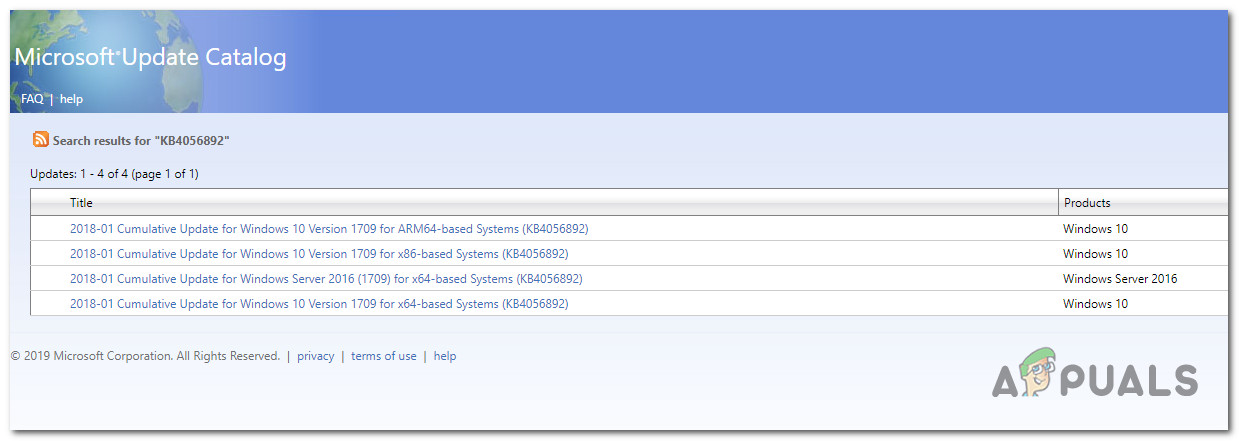
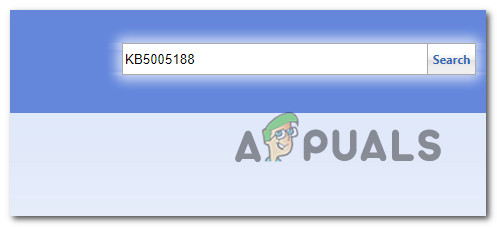
- Open your default browser and visit the home page of the Microsoft Update Catalog (MUC) directory.
- Once you’re inside the root directory of MUC, use the search function (top-right corner of the screen) to search for the update that’s failing (most likely KB5005188).

Searching for updates on MUC - Once the results are generated, cycle through the results and decide the appropriate update versions you need to install while keeping in mind your current OS architecture and the Windows versions you’re using.

Downloading the correct Windows update from MUC - Once you decide which update is fully compatible with your machine, click on the Download button associated with the correct driver.
- Next, open File Explorer and navigate manually to the folder where the update folder was downloaded (most likely in the Download folder).
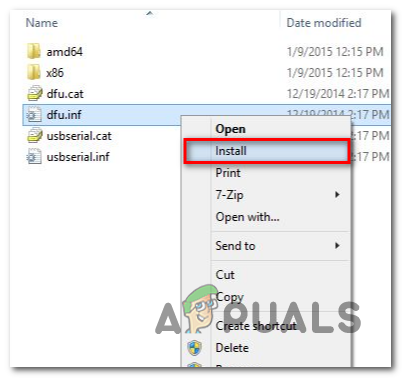
- Once you locate the correct folder, look for the .ini file and right-click on it before clicking on Install from the context menu.

Installing updates from the .INI file - Follow the on-screen instructions to complete the Windows update installation, then reboot your PC.

If this method doesn’t allow you to circumvent the error, or you’re looking for a permanent fix that will permanently fix the WU component, move down to the next fix below.
Update Group policies
Suppose you’re starting to experience this issue after upgrading to Windows 11 from an older Windows version. In that case, this issue might occur due to a local group policy glitch – this is much more common than you’d expect.
In case this scenario seems applicable and you’re experiencing the 0xca00a009 error with every Windows Update that you attempt to install, you might be able to fix the problem by forcing your OS to update all your group policies.
But to ensure that the issue will not resurface later, you will need to create a recurring CMD task via Task Manager. Follow the instructions below for steps on updating the group policies via a regular task:
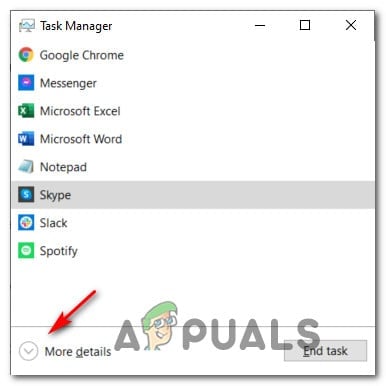
- Press Ctrl + Shift + Esc to open up Task Manager. If you see the simple interface opening up, click on the More details icon.

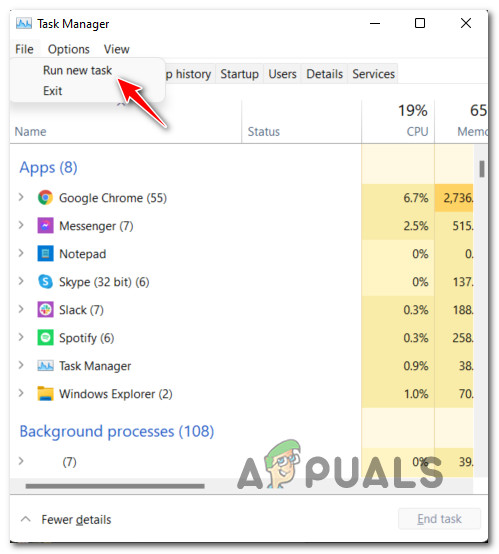
More details for Task Manager - Next, click on File (from the ribbon menu at the top), then click on Run new task from selecting options.

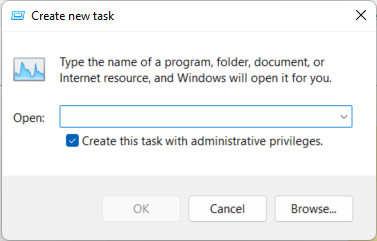
Running a new task - Once you’re inside the Create new task window, start by checking the box associated with Create this task with administrative privileges.

Running the new task with admin privileges. - Next, click on the Browse button and navigate C:WindowsSystem32, select CMD from the list of options and click on Open.
- After adding the directory, hit the space key once, add ‘–update’ and press the Ok button.
- Once you’re inside the elevated CMD prompt, type the following command and press Enter to process it:
gpupdate /force
- After the command is processed, type exit and press Enter to exit the utility.

Exiting the CMD prompt - Repeat your attempt at installing the pending update and see if the problem is now fixed.

If the same issue is still occurring even after updating all your local policies, move down to the final potential fix below.
Repair install or clean Install
If you come this far without a result, chances are you’re dealing with some kind of inconsistency that you won’t be able to fix conventionally.
Since tens of thousands of potential culprits might be responsible for this issue, the best course of action would be to make sure that you refresh every Windows file – this will ensure that every potentially corrupted Windows Update dependency is replaced with a healthy equivalent.
When it comes to doing this, there are two available options:
- Repair install (in-place repair) – This procedure will only touch your system files while leaving everything else intact. This should be your first approach if you have essential personal data that you can’t afford to lose. But keep in mind that you’ll need compatible installation media.
- Clean Install – This is the most uncomplicated procedure out of the bunch. You can deploy this operation without compatible installation media, but keep in mind that you’ll lose any personal files, documents, and media present on the operating system partition.

Kamil Anwar
Kamil is a certified MCITP, CCNA (W), CCNA (S) and a former British Computer Society Member with over 9 years of experience Configuring, Deploying and Managing Switches, Firewalls and Domain Controllers also an old-school still active on FreeNode.
Несколько пользователей жаловались, что столкнулись с кодом ошибки 0xCA00A009 при попытке установить новую операционную систему, то есть Windows 11. В большинстве случаев они сталкиваются с этой ошибкой из-за отсутствия системных файлов, поврежденных компонентов обновления или несовместимых групповых политик.
В этой статье мы узнаем, почему возникает эта ошибка и как ее исправить на ПК с Windows 11/10. Давайте подробно рассмотрим известные проблемы —

Если вы не можете установить или обновить до Windows 11 из Windows 10, попробуйте эти обходные пути и проверьте, решает ли какой-либо проблему, с которой вы имеете дело —
1]Устранение неполадок с обновлением Windows
В случае возникновения каких-либо проблем, связанных с обновлением, пользователям следует попробовать запустить средство устранения неполадок обновления Windows. По сути, это встроенный инструмент, который может диагностировать основные причины и устранять их. Чтобы устранить неполадки с обновлением Windows, выполните следующие действия:
- Нажмите Win + I, чтобы запустить приложение «Настройки».
- Нажмите Система> Устранение неполадок> Другие средства устранения неполадок.
- Оказавшись там, вы можете найти параметр «Выполнить» помимо обновления Windows.

- Нажмите эту кнопку, и система принудительно откроет средство устранения неполадок.
- Щелкните Далее и следуйте инструкциям на экране, чтобы выполнить оставшиеся шаги.
2]Сбросить компоненты Центра обновления Windows
Для плавного обновления до Windows 11 все службы, связанные с обновлением, должны быть включены и запущены на вашем компьютере. Если какая-либо из этих служб отключена, это будет препятствовать обновлению до Windows 11 или даже иногда новой установке новой ОС.
Вы можете открыть окно «Службы» и проверить, работают ли на вашем компьютере следующие службы:
- Центр обновления Windows
- Криптографический
- Фоновая интеллектуальная служба и служба передачи
Еще одна вещь, которая также может вызвать эту ошибку 0xCA00A009, — это полностью заполненные папки кэша Windows, а именно SoftwareDistribution и Catroot2. Очистите обе эти папки и проверьте, решает ли это проблему или нет. Мы написали полную статью о том, как сбросить компоненты обновления, вы также можете следить за ней.
3]Запустите сканирование SFC и DISM
Повреждение образа системы или системных файлов / папок также может вызывать различные проблемы на ПК с Windows 11, включая код ошибки 0xCA00A009. Есть два отдельных инструмента, которые вы можете запустить, чтобы исправить такие проблемы за один раз. Вот как это сделать —
- Щелкните правой кнопкой мыши в любом месте экрана рабочего стола и выберите «Создать»> «Текстовый документ».
- Когда блокнот появится в представлении, скопируйте / вставьте в него приведенный ниже набор команд.
эхо выключено
дата / t и время / t
echo Dism / Online / Cleanup-Image / StartComponentCleanup
Dism / Online / Cleanup-Image / StartComponentCleanup
эхо …
дата / t и время / t
echo Dism / Online / Cleanup-Image / RestoreHealth
Dism / Online / Cleanup-Image / RestoreHealth
эхо …
дата / t и время / t
эхо SFC / scannow
SFC / scannow
дата / t и время / t
Пауза
- Перейдите в «Файл» и нажмите «Сохранить как…».
- Введите «SFC / DISM.bat» рядом с «Имя файла» и используйте раскрывающееся меню «Тип файла», чтобы выбрать «Все файлы».
- Нажмите «Сохранить», чтобы сохранить этот файл на экране рабочего стола.
- Затем перейдите на экран рабочего стола, щелкните правой кнопкой мыши только что созданный командный файл и выберите параметр — Запуск от имени администратора.
Пусть оба этих сканирования запустятся автоматически. По окончании сканирования обязательно перезагрузите компьютер.
Я надеюсь, что код ошибки 0xCA00A009 разрешится автоматически при следующем входе в систему. В случае, если не последует следующий набор решений.
4]Обновить групповые политики
Если вы недавно перешли на Windows 11 и столкнулись с этой ошибкой, мы рекомендуем хотя бы раз проверить все групповые политики. Это связано с тем, что эти групповые политики должны быть повреждены или устарели из-за отсутствия каких-либо последних обновлений безопасности для Windows.
gpupdate / force
Наберитесь терпения, пока приведенный выше код работает успешно. Когда это закончится, вы можете перезагрузить компьютер.
5]Чистая установка Windows 11
Если ни одно из вышеперечисленных решений не работает в вашем случае, вы можете загрузить ISO-файл Windows 11 и вручную установить его на свой компьютер.
Надеюсь, это руководство поможет исправить ошибку 0xCA00A009 при установке новой ОС на ваш компьютер. Если у вас есть какие-либо вопросы или предложения, дайте знать в разделе комментариев.
Post Views: 376
- Partition Wizard
- Partition Manager
- How to Fix Update Failed Error 0xca00a009 on Windows 11
By Linda | Follow |
Last Updated December 13, 2022
Have you encountered the Windows update failed-download error-0xca00a009 when you updating Windows 11 or upgrading to Windows 11? This post from MiniTool Partition Wizard offers 5 methods to solve this problem.
Windows 11 Update Error 0xca00a009
Windows 11 has been released for months and Microsoft has released many updates for Windows 11 users. However, some people report that they have encountered download error 0xca00a009 when updating Windows 11.
In addition, some people also report that this error will occur when they get the Windows 11 installation update.
This error means that the Windows update failed. Then, why does this error happen? Possible reasons are as follows:
- Disabled Windows update service.
- Corrupted updates file in the SoftwareDistribution folder.
- Corrupted Windows system files.
- Conflicting Group policies.
To fix these problems, you can refer to the following methods.
7 Solutions to Fix Windows 10 Won’t Update. #6 Is Fantastic
Fix 1. Restart Windows Update Service
Have you ever disabled the Windows update service? If so, please restart it. In addition, some third-party software may also disable this service. Please follow the steps below to make sure it’s on:
- Press Windows + R key to open the Run box.
- In the Run box, type “services.msc” and press Enter.
- In the Services window, scroll down to find Windows Update, right-click it, and choose Properties.
- Find Startup type, expand the drop-down menu next to it and choose Automatic.
- Click the Apply button and then the OK button.
Then, you can try updating Windows 11 again.
Fix 2. Run Windows Update Troubleshooter
This tool can deal with common Windows Update glitches. Please follow the steps below to run it:
- Open the Run box, type “control”, and then press Enter.
- In the Search box, type “Troubleshoot” and press Enter.
- Click Troubleshooting.
- Under System and Security, click Fix problems with Windows Update.
- Click Next.
- Once problems are detected, click Apply this fix.
- After the fix is done, restart the PC and update Windows again.
[7 Fixes] Windows 11 Not Showing up in Windows Update
Fix 3. Delete Files in the SoftwareDistribution Folder
SoftwareDistribution folder stores update files. If the update files become corrupt and cause the Windows 11 update error 0xca00a009, you can delete them and then update Windows again. Here is the guide:
- Open Windows File Explorer and go to C:WindowsSoftwareDistribution.
- Press Ctrl + A to select all files inside this folder and then delete them.
Fix 4. Repair System Files
- In the Search box, type “cmd”.
- Right-click on Command Prompt and choose Run as administrator.
- In the cmd tool, type “sfc /scan” and press Enter.
If the SFC tool find corrupted files but it’s unable to repair them. You can then try the DISM tool. In the cmd tool, run the following commands one by one:
- DISM /Online /Cleanup-Image /CheckHealth
- DISM /Online /Cleanup-Image /ScanHealth
- DISM /Online /Cleanup-Image /RestoreHealth
- DISM /Online /Cleanup-Image /RestoreHealth /Source:repairSourceinstall.wim
Fix 5. Update Group Policy
If you have upgraded to Windows 11, the group policies on Windows 10 may conflict with Windows 11. Updating it may be a good choice.
- Press Ctrl + Shift + Esc to open Task Manager. Click More details to get the complete interface.
- Click File > Run new task.
- In the Create new task window, check the box before Create this task with administrative privileges.
- Type “C:WindowsSystem32cmd.exe —update” in the box, and then click the OK
- The Command Prompt will open. In the window, type “gpupdate /force” and press Enter.
- Wait until the update process completes. Then, you can try updating Windows again.
How to Upgrade Windows 10 to Windows 11? See a Detailed Guide!
About The Author
Position: Columnist
Author Linda has been working as an editor at MiniTool for 1 year. As a fresh man in IT field, she is curious about computer knowledge and learns it crazily. Maybe due to this point, her articles are simple and easy to understand. Even people who do not understand computer can gain something.
By the way, her special focuses are data recovery, partition management, disk clone, and OS migration.
Some Windows 11 that have just upgraded to the new operating system are reporting that they’re experiencing a weird issue where a cumulative update always fails with the 0xCA00A009 error code. Almost always, this problem is linked with the KB5005188 update.

We’ve investigated this issue thoroughly, and we realized that several different underlying causes might be responsible for producing this error code when attempting to install certain updates on Windows 11. Here’s a list of potential causes that might be causing this issue:
- Common Windows Update glitch – There are a lot of scenarios with the potential of glitching your Windows 11 Update component. Fortunately, most of these situations are already covered by a repair strategy that you can enforce automatically via the Windows Update Troubleshooter. So before trying anything else, you should start by running the Windows Update Troubleshooter and deploying the recommended fix.
- Corrupted data inside SoftwareDistribution and Catroot 2 folders – An interrupted update or some system file corruption can also lead to file corruption infiltration inside the two folders responsible for hosting temporary Windows Update files. In this case, you can fix the issue by forcing your OS to create new equivalents for the two folders (since you can’t delete them conventionally).
- Broken WU Component – There are a lot of issues that can potentially plague the Windows Update component. But since most of them cannot be resolved without a clean install/repair install procedure, the best course of action in some cases is to bypass the WU component entirely and install the failing update from the Microsoft Update Catalog.
- Conflicting Group policies – If you’re coming to Windows 11 after upgrading from an older Windows version, another viable culprit that you should investigate is a lousy group policy. Keep in mind that not every procedure available on Windows 10 is a good thing on WIndows 11. The best course of action is to perform a policy update procedure to make sure a lousy group policy is not causing this issue.
- System file corruption – If your Windows Update component is severely damaged and every Windows update ends up failing with the same 0xca00a009, you won’t get very far with any fix other than clean installing or repairing installing your entire fleet of Windows files. If you want to avoid data loss, repair install is recommended.
Now that you are familiar with every potential culprit responsible for the update error 0xca00a009 error on Windows 11, let’s go over a series of fixes that other affected users have successfully used to fix this issue.
Run the Windows Update Troubleshooter
Before you move on to more advanced troubleshooting guides, our recommendation is to start by deploying the Windows Update troubleshooter and see if it’s capable of fixing the issue automatically.
Note: Keep in mind that the troubleshooting utility on Windows 11 is much more capable than it was on previous Windows versions. Microsoft has added dozens of new automated repair strategies that can be applied if a recognizable scenario is identified with a single click.
If you haven’t tried this fix yet, follow the instructions below to run the Windows Update Troubleshooter and apply the recommended fix automatically:
- Press Windows key + R to open up a Run dialog box. Next, type ‘control’ inside the text box and press Enter to open the classic Control Panel interface.
Open the Control Panel interface. Note: If the User Account Control prompts you, click Yes to grant admin access.
- Once you’re inside the classic Control Panel window, use the search function (top-right corner of the screen) to search for ‘troubleshoot.’
- From the list of results, click on Troubleshooting.
Accessing the Troubleshooting tab - Once you’re inside the Troubleshooting tab, go under System and Security and click on Fix problems with Windows Updates.
Accessing the Windows Update troubleshooter - Once you get to the first Windows Update troubleshooter prompt, click Next and wait for the initial scan to complete.
Applying the recommended fix Note: Keep in mind that with some fixes that get recommended, you might ve required to perform a series of automated steps.
- After the fix is successfully applied, restart your PC, install the failing update once again, and see if the next startup is complete.

If you already ran the Windows Update troubleshooter and applied the recommended fix and you’re still seeing the same 0xca00a009, move down to the next potential fix below.
Clear SoftwareDistribution and Catroot 2 folders
The majority of scenarios that will break the Windows Update component are rooted in one of these two folders: SoftwareDistribution and Catroot 2.
Note: These two folders are responsible for temporary holding files and folders used during the installation of pending Windows Updates and system driver updates. An unexpected interruption when an update is being actively installed can reportedly produce the 0xca00a009 on Windows 11.
However, clearing the SoftwareDistribution and Catroot 2 folders is not as easy as navigating to the folders and emptying their contents. Both of these folders are system-protected, which means you can’t delete them conventionally.
Fortunately, there is one workaround to this constraint; you can rename these two folders with the .old extension – this will force your Windows installation to disregard them and create new, healthy equivalents.
But before you can do this, you will first need to disable every used service WU dependency.
For complete steps on how to disable every used Windows Update dependency and renaming the SoftwareDistribution and Catroot 2 folders, follow the instructions below:
- Press Windows key + R to open up a Run dialog box. Next, type ‘cmd’ inside the text box and press Ctrl + Shift + Enter to open an elevated Command Prompt with admin access.
Opening up an elevated CMD prompt Note: If the User Account Control prompts you, click Yes to grant admin access.
- Once you’re finally inside the elevated CMD prompt, type the following commands and press Enter after each one to effectively disable every service dependency of Windows Update:
net stop wuauserv
net stop cryptSvc
net stop bits
net stop msiserver
Note: These commands will effectively stop the Windows Update Service, the Cryptographic Services, the Background Intelligent Transfer Service, and the Microsoft Installer Service – all of these are dependencies that will keep you from running the following command if actively running.
- Once very service dependency is disabled, type (or paste) the following commands and press Enter after each one to effectively rename the SoftwareDistribution and Catroot2 folders:
ren C:\Windows\SoftwareDistribution SoftwareDistribution.old
ren C:\Windows\System32\catroot2 catroot2.old
- Once both of the commands above have been processed successfully, run the following commands to restart the services that you previously stopped (at step 2):
net start wuauserv
net start cryptSvc
net start bits
net start msiserver
- Next, you can safely close the elevated CMD prompt and install the same Windows Update that was previously failing with the 0xca00a009.

If the problem is still not fixed and you’re trying to avoid a clean install or repair install procedure, move down to the next potential fix below.
Install the Failing Update via the Microsoft Update Catalog
If your Windows Update component is broken and cannot be fixed automatically via WU Troubleshooter and you’re trying to avoid doing something drastic like clean installing or repair installing, one way that should allow you to bypass the 0xca00a009 is to install the failing update manually by using the Microsoft Update Catalog.
You can use this directory to download the compatible update version that’s failing on your PC, then install it manually by using the .ini file that comes with it.
In case you’re looking for specific instructions on how to do this, follow the steps below:
- Open your default browser and visit the home page of the Microsoft Update Catalog (MUC) directory.
- Once you’re inside the root directory of MUC, use the search function (top-right corner of the screen) to search for the update that’s failing (most likely KB5005188).
Searching for updates on MUC - Once the results are generated, cycle through the results and decide the appropriate update versions you need to install while keeping in mind your current OS architecture and the Windows versions you’re using.
Downloading the correct Windows update from MUC - Once you decide which update is fully compatible with your machine, click on the Download button associated with the correct driver.
- Next, open File Explorer and navigate manually to the folder where the update folder was downloaded (most likely in the Download folder).
- Once you locate the correct folder, look for the .ini file and right-click on it before clicking on Install from the context menu.
Installing updates from the .INI file - Follow the on-screen instructions to complete the Windows update installation, then reboot your PC.


If this method doesn’t allow you to circumvent the error, or you’re looking for a permanent fix that will permanently fix the WU component, move down to the next fix below.
Update Group policies
Suppose you’re starting to experience this issue after upgrading to Windows 11 from an older Windows version. In that case, this issue might occur due to a local group policy glitch – this is much more common than you’d expect.
In case this scenario seems applicable and you’re experiencing the 0xca00a009 error with every Windows Update that you attempt to install, you might be able to fix the problem by forcing your OS to update all your group policies.
But to ensure that the issue will not resurface later, you will need to create a recurring CMD task via Task Manager. Follow the instructions below for steps on updating the group policies via a regular task:
- Press Ctrl + Shift + Esc to open up Task Manager. If you see the simple interface opening up, click on the More details icon.
More details for Task Manager - Next, click on File (from the ribbon menu at the top), then click on Run new task from selecting options.
Running a new task - Once you’re inside the Create new task window, start by checking the box associated with Create this task with administrative privileges.
Running the new task with admin privileges. - Next, click on the Browse button and navigate C:\Windows\System32, select CMD from the list of options and click on Open.
- After adding the directory, hit the space key once, add ‘–update’ and press the Ok button.
- Once you’re inside the elevated CMD prompt, type the following command and press Enter to process it:
gpupdate /force
- After the command is processed, type exit and press Enter to exit the utility.
Exiting the CMD prompt - Repeat your attempt at installing the pending update and see if the problem is now fixed.


If the same issue is still occurring even after updating all your local policies, move down to the final potential fix below.
Repair install or clean Install
If you come this far without a result, chances are you’re dealing with some kind of inconsistency that you won’t be able to fix conventionally.
Since tens of thousands of potential culprits might be responsible for this issue, the best course of action would be to make sure that you refresh every Windows file – this will ensure that every potentially corrupted Windows Update dependency is replaced with a healthy equivalent.
When it comes to doing this, there are two available options:
- Repair install (in-place repair) – This procedure will only touch your system files while leaving everything else intact. This should be your first approach if you have essential personal data that you can’t afford to lose. But keep in mind that you’ll need compatible installation media.
- Clean Install – This is the most uncomplicated procedure out of the bunch. You can deploy this operation without compatible installation media, but keep in mind that you’ll lose any personal files, documents, and media present on the operating system partition.

Kamil Anwar
Kamil is a certified MCITP, CCNA (W), CCNA (S) and a former British Computer Society Member with over 9 years of experience Configuring, Deploying and Managing Switches, Firewalls and Domain Controllers also an old-school still active on FreeNode.
Несколько пользователей жаловались, что столкнулись с кодом ошибки 0xCA00A009 при попытке установить новую операционную систему, то есть Windows 11. В большинстве случаев они сталкиваются с этой ошибкой из-за отсутствия системных файлов, поврежденных компонентов обновления или несовместимых групповых политик.
В этой статье мы узнаем, почему возникает эта ошибка и как ее исправить на ПК с Windows 11/10. Давайте подробно рассмотрим известные проблемы –
Если вы не можете установить или обновить до Windows 11 из Windows 10, попробуйте эти обходные пути и проверьте, решает ли какой-либо проблему, с которой вы имеете дело –
1]Устранение неполадок с обновлением Windows
В случае возникновения каких-либо проблем, связанных с обновлением, пользователям следует попробовать запустить средство устранения неполадок обновления Windows. По сути, это встроенный инструмент, который может диагностировать основные причины и устранять их. Чтобы устранить неполадки с обновлением Windows, выполните следующие действия:
- Нажмите Win + I, чтобы запустить приложение «Настройки».
- Нажмите Система> Устранение неполадок> Другие средства устранения неполадок.
- Оказавшись там, вы можете найти параметр «Выполнить» помимо обновления Windows.
- Нажмите эту кнопку, и система принудительно откроет средство устранения неполадок.
- Щелкните Далее и следуйте инструкциям на экране, чтобы выполнить оставшиеся шаги.
2]Сбросить компоненты Центра обновления Windows
Для плавного обновления до Windows 11 все службы, связанные с обновлением, должны быть включены и запущены на вашем компьютере. Если какая-либо из этих служб отключена, это будет препятствовать обновлению до Windows 11 или даже иногда новой установке новой ОС.
Вы можете открыть окно «Службы» и проверить, работают ли на вашем компьютере следующие службы:
- Центр обновления Windows
- Криптографический
- Фоновая интеллектуальная служба и служба передачи
Еще одна вещь, которая также может вызвать эту ошибку 0xCA00A009, – это полностью заполненные папки кэша Windows, а именно SoftwareDistribution и Catroot2. Очистите обе эти папки и проверьте, решает ли это проблему или нет. Мы написали полную статью о том, как сбросить компоненты обновления, вы также можете следить за ней.
3]Запустите сканирование SFC и DISM
Повреждение образа системы или системных файлов / папок также может вызывать различные проблемы на ПК с Windows 11, включая код ошибки 0xCA00A009. Есть два отдельных инструмента, которые вы можете запустить, чтобы исправить такие проблемы за один раз. Вот как это сделать –
- Щелкните правой кнопкой мыши в любом месте экрана рабочего стола и выберите «Создать»> «Текстовый документ».
- Когда блокнот появится в представлении, скопируйте / вставьте в него приведенный ниже набор команд.
эхо выключено
дата / t и время / t
echo Dism / Online / Cleanup-Image / StartComponentCleanup
Dism / Online / Cleanup-Image / StartComponentCleanup
эхо …
дата / t и время / t
echo Dism / Online / Cleanup-Image / RestoreHealth
Dism / Online / Cleanup-Image / RestoreHealth
эхо …
дата / t и время / t
эхо SFC / scannow
SFC / scannow
дата / t и время / t
Пауза
- Перейдите в «Файл» и нажмите «Сохранить как…».
- Введите «SFC / DISM.bat» рядом с «Имя файла» и используйте раскрывающееся меню «Тип файла», чтобы выбрать «Все файлы».
- Нажмите «Сохранить», чтобы сохранить этот файл на экране рабочего стола.
- Затем перейдите на экран рабочего стола, щелкните правой кнопкой мыши только что созданный командный файл и выберите параметр – Запуск от имени администратора.
Пусть оба этих сканирования запустятся автоматически. По окончании сканирования обязательно перезагрузите компьютер.
Я надеюсь, что код ошибки 0xCA00A009 разрешится автоматически при следующем входе в систему. В случае, если не последует следующий набор решений.
4]Обновить групповые политики
Если вы недавно перешли на Windows 11 и столкнулись с этой ошибкой, мы рекомендуем хотя бы раз проверить все групповые политики. Это связано с тем, что эти групповые политики должны быть повреждены или устарели из-за отсутствия каких-либо последних обновлений безопасности для Windows.
gpupdate / force
Наберитесь терпения, пока приведенный выше код работает успешно. Когда это закончится, вы можете перезагрузить компьютер.
5]Чистая установка Windows 11
Если ни одно из вышеперечисленных решений не работает в вашем случае, вы можете загрузить ISO-файл Windows 11 и вручную установить его на свой компьютер.
Надеюсь, это руководство поможет исправить ошибку 0xCA00A009 при установке новой ОС на ваш компьютер. Если у вас есть какие-либо вопросы или предложения, дайте знать в разделе комментариев.