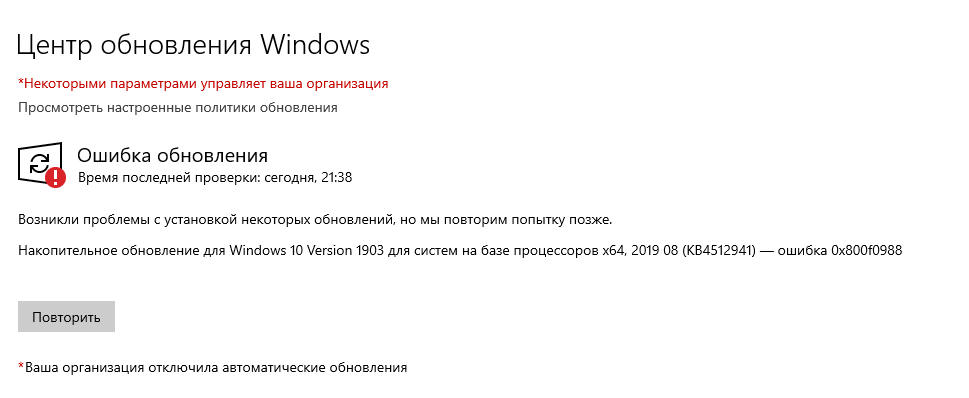
Ошибка с кодом 0x800f0988 в Windows 10 может появиться при установке некоторых компонентов обновлений. Я рассмотрю причины возникновения данной проблемы и опишу способы ее устранения.
Причины появления неполадки
Корень ошибки 0x800f0988 в Windows 10 может крыться в:
- повреждении файлов обновления,
- появлении ошибок в работе «Центра обновления».
Способы исправления
Выяснить причину появления данной ошибки не получится. Поэтому для исправления ошибки рекомендую следовать указанной ниже последовательности.
Запуск средства устранения неполадок
Для начала необходимо запустить средство устранения неполадок, перейти к нему можно через «Параметры». Жму на комбинацию Win + I, затем открываю раздел «Обновление и безопасность» и перехожу ко вкладке «Устранение неполадок».
В списке элементов, доступных для диагностики, выбираю пункт «Центр обновления Windows», после кликаю по кнопке «Запустить средство устранения неполадок».
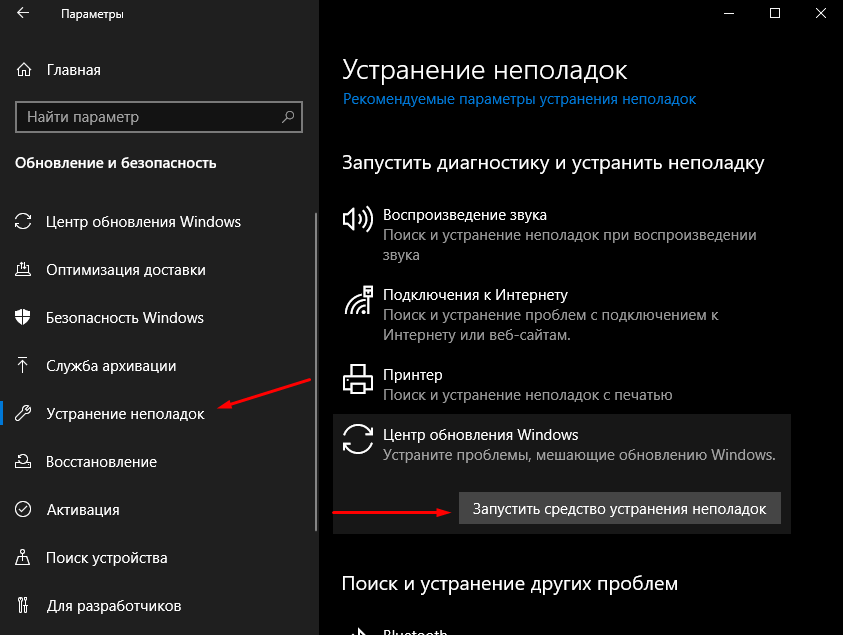
Попробую исправить ошибку, запустив средство устранения неполадок центра обновлений
В результате откроется новое окно и начнется сканирование системы. Если неполадки и будут найдены, утилита предложит несколько способов исправления проблемы, а также отправку отчета. Выбираю оптимальный метод и жду, когда процедура завершится.
Если это средство не нашло в работе «Центра обновлений» никаких проблем, нужно перейти к следующему способу.
Очистка хранилища компонентов
Скачанные компоненты располагаются в специальном хранилище. Чтобы устранить ошибку 0x800f0988, необходимо очистить его. А сделать подобную операцию можно двумя способами – через «Планировщик заданий» и с помощью команды DISM.
Через планировщик заданий
Сначала я запускаю «Планировщик заданий» — жму на комбинацию Win + R, ввожу в поле «Открыть» запрос taskschd.msc и кликаю по кнопке ОК. В результате откроется нужная программа. В левой части будет папка с «Библиотека планировщика задач» — перехожу к ней, а потом следую такому пути: Microsoft⇒Windows⇒Servicing.
В указанной папке будет задача «StartComponentCleanup», ее нужно запустить. Кликаю по ней правой кнопкой мыши, после выбираю опцию «Выполнить». Жду, когда процедура будет выполнена и хранилище очистится. И уже после я могу приступать к повторному скачиванию обновлений.
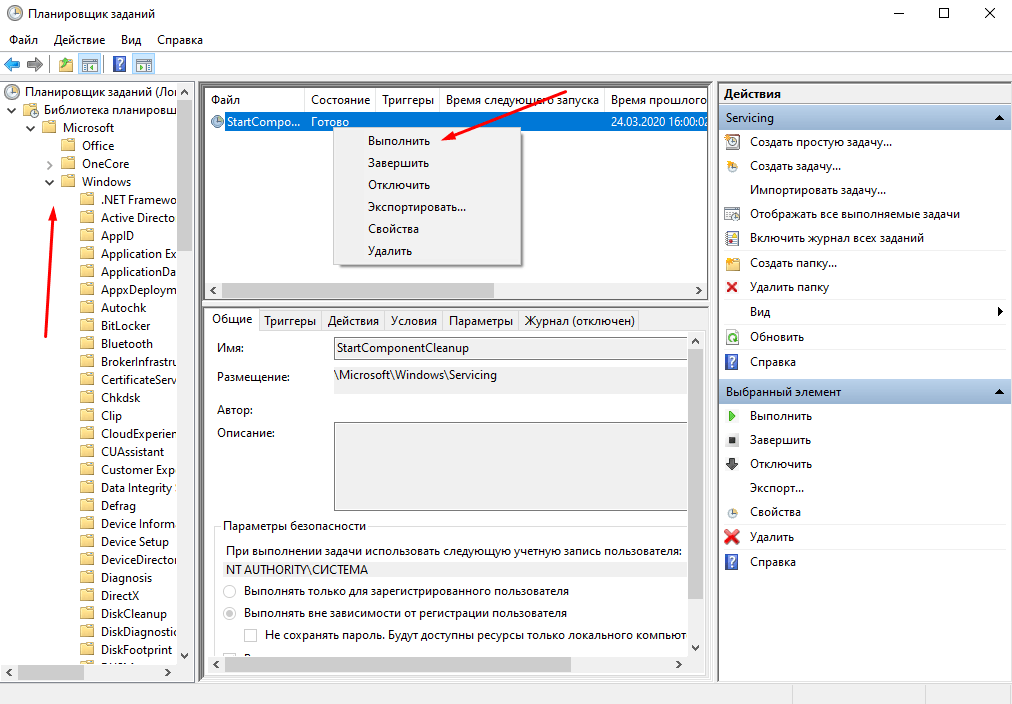
В планировщике есть специальная задача, с помощью которой можно очистить хранилище компонентов — запускаю ее
Через DISM
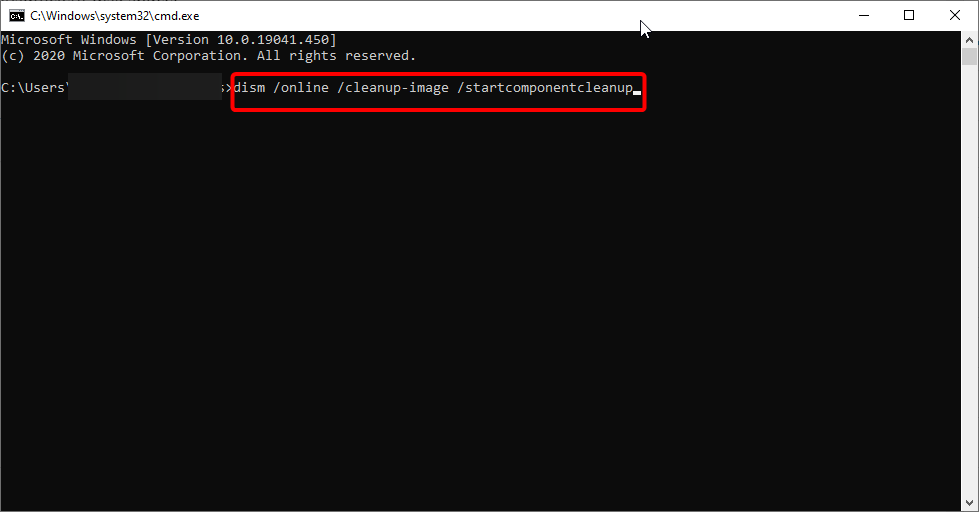
Для запуска данной утилиты нужно открыть «Командную строку» с правами администратора. Открываю поисковик в панели задач, ввожу в строке соответствующий запрос и выбираю пункт «Запуск с правами администратора». В новом открывшемся окне ввожу запрос dism /online /cleanup-image /startcomponentcleanup и активирую его нажатием на кнопку Enter. Жду, когда процесс завершится, чтобы вновь приступать к скачиванию апдейта системы.
Заключение
Исправить ошибку с кодом 0x800f0988 в Windows 10 можно либо с помощью средства устранения неполадок, либо очисткой хранилища компонентов. Средство запускается через раздел «Параметры», а очистку можно произвести двумя разными способами.
![]() Загрузка …
Загрузка …
Post Views: 5 424
Broken system files might prevent you from getting the latest updates
by Matthew Adams
Matthew is a freelancer who has produced a variety of articles on various topics related to technology. His main focus is the Windows OS and all the things… read more
Updated on
- If you are seeing the Windows update error 0x800f0988, it might be caused by corrupt system files.
- A quick yet effective way to fix the issue is to run the DISM scan to repair some files.
- Another proven fix for this error code is to reset the Windows Update components.

XINSTALL BY CLICKING THE DOWNLOAD FILE
Repair all Windows Updates Errors with Fortect:
SPONSORED
Windows update failures can be annoying! With Fortect, you will get rid of errors caused by missing or corrupted files after an update. The utility maintains a repository of the original Windows system file versions, and it uses a reverse algorithm to swap out the damaged ones for good ones.
- Download Fortect and install it on your PC
- Start the tool’s scanning process to look for corrupt files that are the source of the issues
- Right-click on Start Repair to resolve security and performance issues with your computer
- Fortect has been downloaded by 0 readers this month, rated 4.4 on TrustPilot
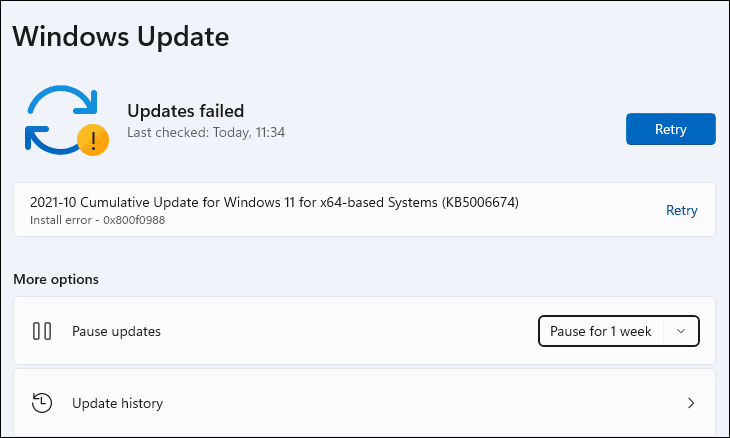
Sometimes, when users try to download and install new cumulative updates, their computers might display the following error message: Updates Failed. There were problems installing some updates, but we’ll try again later, followed by install error 0x800f0988.
Consequently, Windows 11 can’t install the latest patch updates. No matter how frustrating the issue may be, several methods can help you fix it.
In this guide, we will show you how to fix the update error 0x800f0988, as we did with the Windows 10 error 0x800f0900.
Why does Windows 11 update get stuck with error 0x800f0988?
Many issues can appear when installing updates, and many reported 0x800f0831 update errors on Windows 11.
This usually happens if your update files are corrupted, so removing and recreating them might help. As for Update error 0x800f0986, this one can be fixed by running the built-in troubleshooter.
Many users reported there were some problems installing updates message on their PCs, and this issue can be fixed by following the steps from this guide.
If the Microsoft Windows Update tool is not working on your PC, you will likely miss out on essential updates frequently. Some causes of the Update error are network failure, hardware issues, and insufficient disk space.
You can fix the issue by running the Windows troubleshooter to find and fix the possible causes of the problem. For more detailed ways to overcome this issue, check our guide on fixing Windows Update error on Windows 11.
How do I fix error 0x800f0988?
- Why does Windows 11 update get stuck with error 0x800f0988?
- How do I fix error 0x800f0988?
- 1. Clean up the WinSxS folder
- 2. Run the Windows Update Troubleshooter
- 3. Reset the Windows Update Components
- 4. Reset Windows 11
- How do I force Windows to update?
1. Clean up the WinSxS folder
- Press the Windows key + S and type cmd in the search box.
- Right-click on Command Prompt to select Run as administrator.
- Now type the command below and press Enter:
dism /online /cleanup-image /startcomponentcleanup
- Restart your computer after the command has cleared the WinSxS folder. The install error – 0x800f0988 will be fixed.
In Windows 10, you have several ways to perform the cleanup of the WinSxS folder. We’ve selected the easiest one and described the procedure above, so don’t hesitate to apply the given steps.
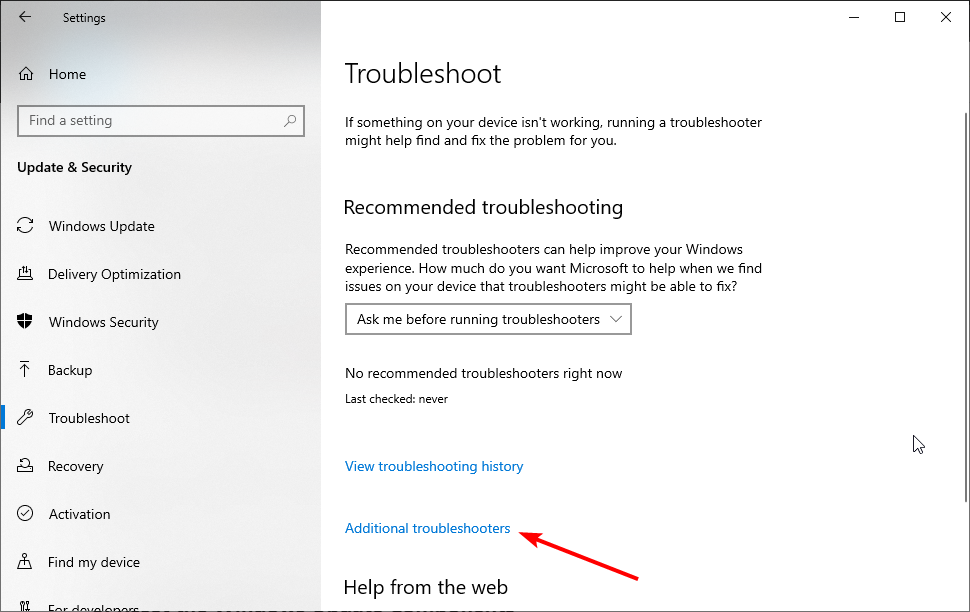
2. Run the Windows Update Troubleshooter
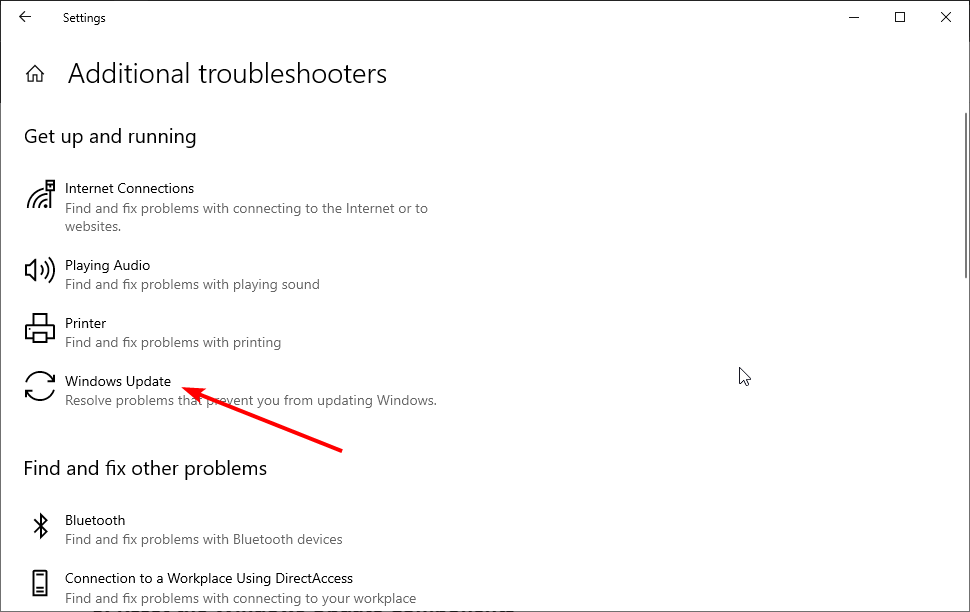
- Type troubleshoot in the Windows search box.
- Click Troubleshoot settings to open the Windows troubleshooter.
- Select the Additional troubleshooters option.

- Click on Windows Update.
- Finally, click the Run the troubleshooter button.

If you encounter the 0x800f0988 Windows update error, the dedicated troubleshooter might come in handy for fixing it. This is the official Microsoft tool to help Windows users in resolving all problems related to updates, so it will hopefully do the trick for you too.
If the troubleshooter stops before completing the process, fix it with the help of this complete guide.
3. Reset the Windows Update Components
- Open the Command Prompt as an administrator.
- Type the commands below and press Enter after each:
net stop wuauservnet stop cryptSvcnet stop bitsnet stop msiserver - Now, enter the commands below and press Enter after each:
ren C:WindowsSoftwareDistribution SoftwareDistribution.oldren C:WindowsSystem32catroot2 Catroot2.old - Finally, run the commands below to restart the services:
net start wuauservnet start cryptSvcnet start bitsnet start msiserver
Resetting update components can also fix cumulative update errors. Thus, don’t postpone applying the given steps to get rid of install error 0x800f0988.
- Fix: We couldn’t complete the Updates/Undoing changes
- How to fix the 0x80071AB1 error code in Windows 11
- Windows 11 23H2: Top Features, coming September 26
- Adding layers in Windows 11’s Paint greatly increases RAM usage
- How to copy texts from images with Snipping Tool’s Text Action
4. Reset Windows 11
This procedure will take your PC back to a state similar to when you first turned it on, removing or keeping programs and personal files, depending on which option you choose. That should fix update error 0x800f0988 instantly.
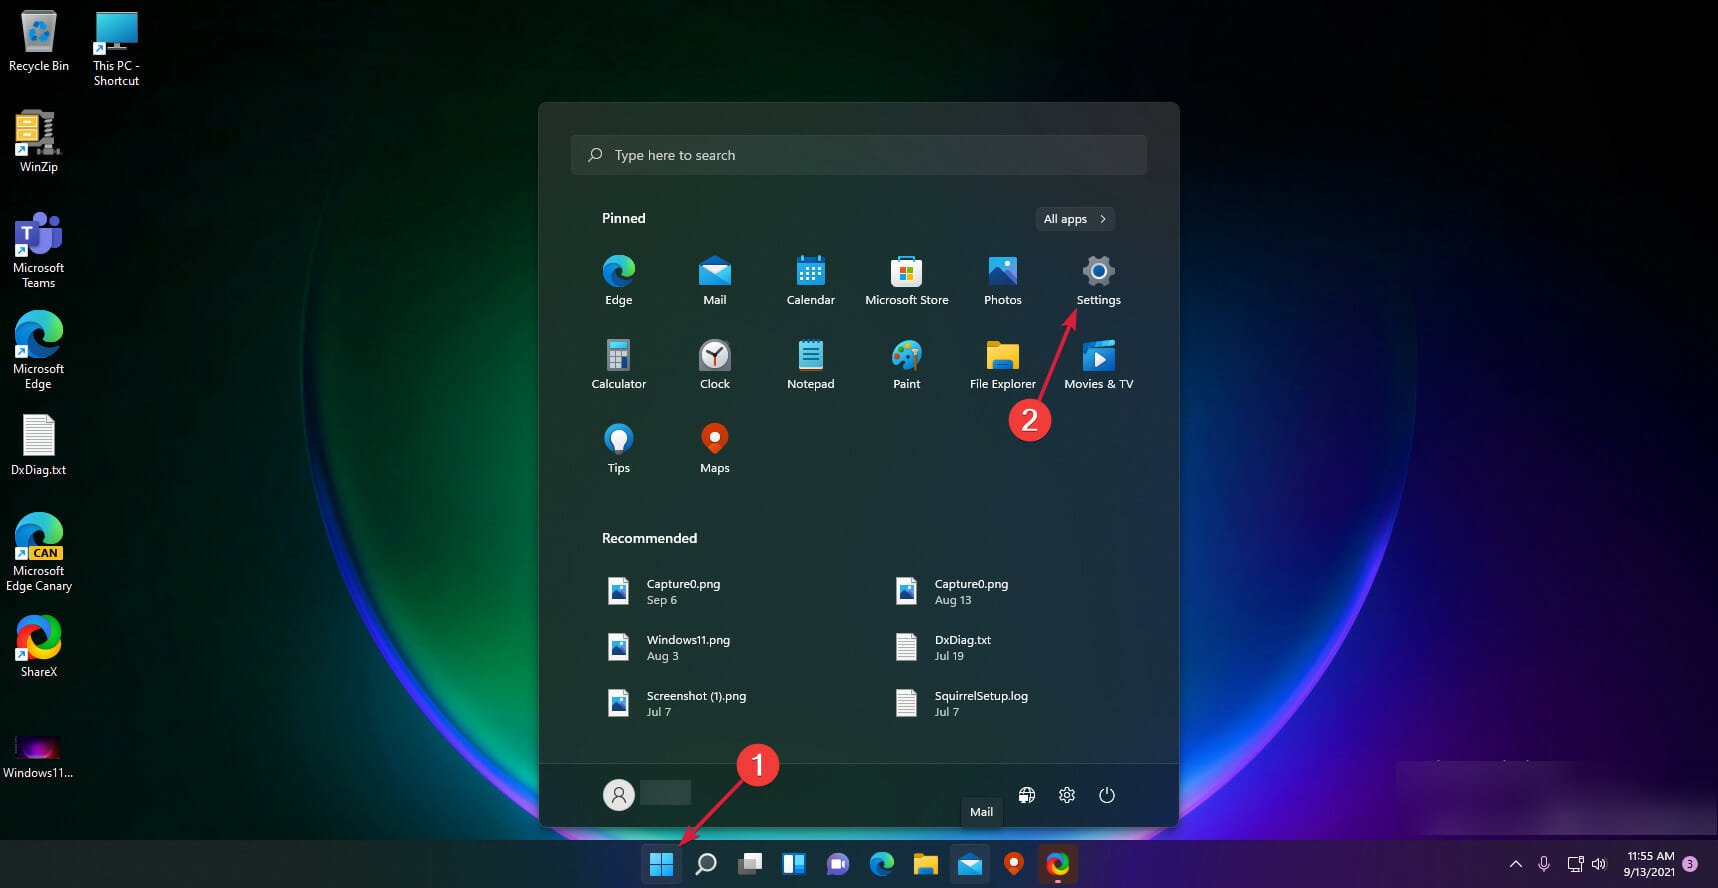
1. Click the Windows button and open Settings.
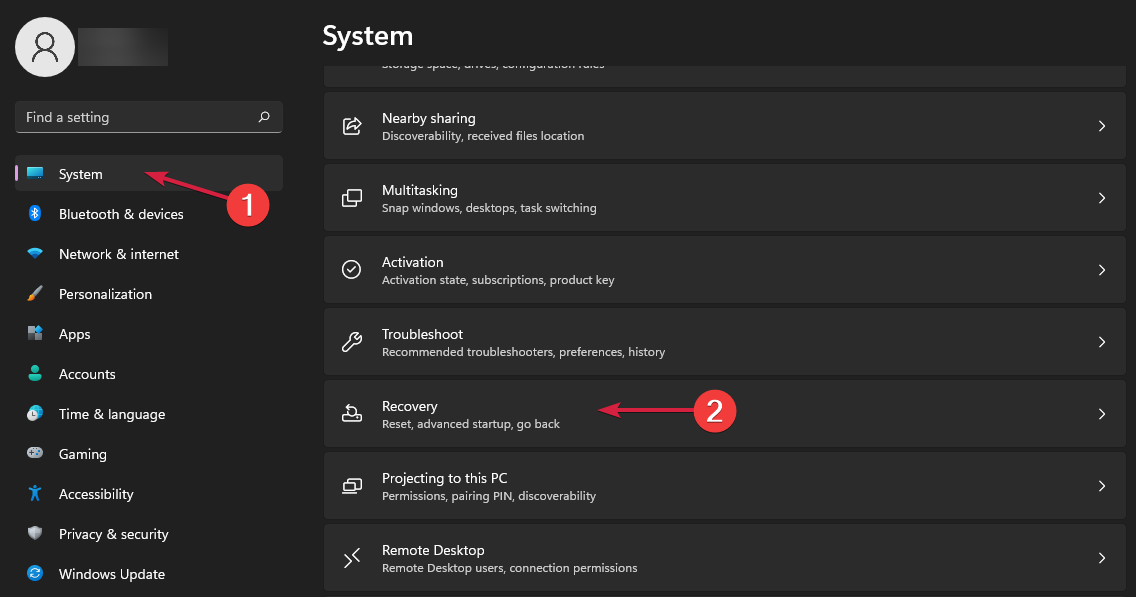
2. Click on System, then select Recovery.
3. Here, click the Reset PC button then choose to keep your files and proceed with the resetting process. The Windows 11 update error 0x800f0988 will be fixed.
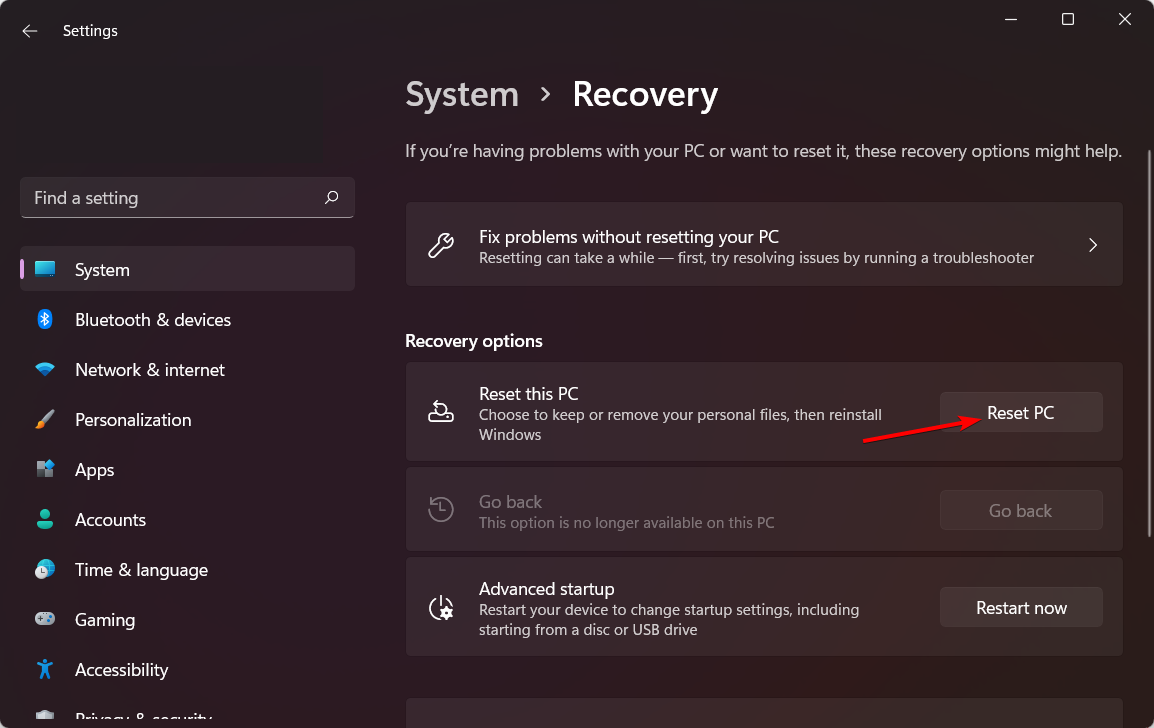
Since Windows will handle everything automatically, it does not require much effort. So, it’s a procedure worth trying. Plus, users have confirmed they’ve fixed error 0x800f0988 by resetting their computers.
How do I force Windows to update?
There are several ways to force Windows to search and install updates. You can use the settings app, PowerShell, and other built-in tools.
However, the easiest way is to run the command below in Command Prompt: control update
This command starts the Windows Update feature, and it will search for possible updates to install.
These are a few resolutions that might fix error 0x800f0988. If they all fail, you may also manually install cumulative updates by downloading them from the Microsoft Update Catalog.
Still, on update errors, you can go through our guide for detailed fixes if you face the update error 0x8007042B on Windows 10/11.
The update error 0x800f0988 on Windows 11 can be caused by broken or missing system files. In this case, you only need to run the DISM scan as admin in the Windows Terminal.
Another known cause of the issue is corrupt update data. This can be fixed by clearing the Windows Update component. We have shown the steps for these solutions in this guide.
Are things any better now? Don’t hesitate to share your experience with us in the comments below.
![]()
Если вы натыкаетесь на Ошибки 0x800f0988 при попытке обновить систему, тогда этот пост поможет вам решить эту проблему. Пользователи сообщают, что проблема возникает при установке накопительного обновления KB4512508 для Windows 10. Иногда код ошибки может отличаться 0x800f0988; 0x0xc1900223223; 0x80240034; 0x8007000E. Однако все они имеют одну и ту же причину возникновения. Обычно неудачные обновления Windows происходят из-за поврежденных / отсутствующих файлов или неправильных настроек (особенно из-за вредоносных программ), которые влияют на службы обновления. В этой статье мы представили набор шагов, которые помогут устранить эту досадную ошибку.

Автоматическое восстановление
Скачать утилиту восстановления Windows
Скачать средство восстановления Windows

Существуют специальные утилиты для восстановления Windows, которые могут решить проблемы, связанные с повреждением реестра, неисправностью файловой системы, нестабильностью драйверов Windows. Мы рекомендуем вам использовать Advanced System Repair Pro, чтобы исправить «Ошибка Центра обновления Windows 0x800f0988» в Windows 10.
1. Освободите место на диске
На первый взгляд этот метод может показаться нелепым, однако, если на вашем локальном диске заканчивается память, есть вероятность, что в Windows недостаточно места для установки обновления. Наверное вы когда-нибудь замечали, что ваш диск отдает пару гигабайт после обновления. Именно поэтому следует почистить свой диск, удалив ненужные файлы (изображения, видео, приложения и т. д.) или загрузив IObit Uninstaller утилиту, которая удалит файлы длительного хранения, такие как кэш, остатки нежелательной почты и другие элементы, которые могут занимать много места. После этого попробуйте запустить обновление еще раз. Если этот способ не помог, то переходите к следующему.
2. Запустите средство устранения неполадок Windows
Windows предоставляет множество встроенных инструментов для решения проблем. Одним из них является TroubleShooter, который позволяет автоматически сканировать сбои и исправлять их в результате обнаружения. Вот как:
- Щелкните левой кнопкой мыши на Меню Пуск в левом нижнем углу экрана и выберите Настройки, Вы также можете использовать Windows Key + I сочетания клавиш.
- Затем выберите Обновление и безопасность.
- В открывшейся вкладке перейдите в меню левой панели, найдите и нажмите Устранение неполадок.
- После этого найдите Центр обновления Windows и нажмите на него.
- В раскрывшемся меню нажмите на Запустить средство устранения неполадок кнопку.
- Подождите, пока Windows найдет проблемы и исправит их. После завершения перезагрузите компьютер и попробуйте установить обновление снова.
3. Загрузите обновления стека обслуживания.
Если ни один из предыдущих методов вам не помог, вы можете попробовать загрузить обновления стека обслуживания (SSU). SSU нужен для установки последнего стека обслуживания, чтобы ваш компьютер мог правильно получать и устанавливать обновления Microsoft. Вы можете безопасно скачать их из каталога обновлений Майкрософт.
4. Запустите сканирование System File Checker (SFC).
Когда дело доходит до поврежденных или отсутствующих файлов, в Windows есть встроенный инструмент восстановления, который позволяет восстановить потерянные или поврежденные файлы всего за пару шагов, перечисленных ниже:
- Открытые Командная строка , введя
cmdв поле поиска рядом с Меню Пуск кнопку. - Щелкните правой кнопкой мыши по Командная строка , а затем выбрать Запуск от имени администратора.
- После открытия консоли введите
sfc /scannowкоманду и нажмите Enter. - Когда процесс восстановления будет завершен, перезагрузите компьютер.
5. Остановите автоматические обновления.
Нет сомнений в том, что обновление вашего ПК обеспечит более стабильную и безопасную работу (не всегда), однако ваш компьютер по-прежнему может работать и без них. Если вы устали постоянно получать новые обновления, которые загружают вашу систему, вы можете отключить их на некоторое время, выполнив следующие действия:
- Открытые Настройки как и раньше.
- Затем нажмите Обновление и безопасность.
- Выберите Центр обновления Windows на левой панели.
- И нажмите Дополнительные параметры кнопку.
- Прокрутите вниз до Приостановка обновлений и выберите временной диапазон для задержки автоматических обновлений под Приостановить до.
Наконец, обновления Windows не будут беспокоить вас в течение выбранного периода времени.
6. Очистите компоненты Windows.
Перегруженная база данных компонентов также может препятствовать установке обновлений. Поэтому следует попробовать выполнить команду StartComponentCleanup через диспетчер задач или DISM. Оба метода приведены ниже:
Через Диспетчер задач
- Нажмите Windows Key + R сочетание клавиш, чтобы открыть строку «Выполнить», затем вставьте
taskschd.mscи нажмите OK. - На левой панели перейдите в
Library\Microsoft\Windows\Servicing\. - После этого щелкните правой кнопкой мыши на StartComponentCleanup , а затем выбрать Run.
- Дождитесь завершения процесса, перезагрузите компьютер и попробуйте еще раз установить конфликтующее обновление.
Через DISM
Этот метод делает то же самое, поэтому вы можете выбрать любой из них.
- Открытые Командная строка как мы уже делали раньше.
- Теперь вставьте эту команду
dism /online /cleanup-image /startcomponentcleanupи нажмите Enter. - После завершения перезагрузите компьютер и проверьте, появляется ли ошибка.
7. Сбросьте службы обновления Windows.
В этом конкретном методе вы можете попробовать сбросить службу Центра обновления Windows, поскольку она может работать неправильно. Не волнуйтесь, эти манипуляции не причинят никакого вреда, а наоборот, возможно, решат ошибку 0x800f0988.
- Открытые Командная строка как и раньше.
- Затем введите следующие команды одну за другой и нажмите Enter после каждой команды.
- Подождите, пока Windows сбросит ваши настройки, и закройте консоль. Теперь попробуйте еще раз установить обновление.
net stop wuauserv

net stop cryptSvc

net stop bits

net stop msiserver

Ren C:\Windows\SoftwareDistribution SoftwareDistribution.old

Ren C:\Windows\System32\catroot2 Catroot2.old

net start wuauserv

net start cryptSvc

net start bits

net start msiserver
8. Установите обновления вручную.
Не исключено, что Windows не сможет установить обновление, потому что жизненно важные компоненты были повреждены или отсутствовали во время загрузки. Иногда причиной этого может быть плохая конфигурация сети. Таким образом, вам следует проверить количество конфликтующих обновлений и загрузить их с этого каталога.
9. Просканируйте ПК на наличие вредоносных программ
И последнее, но не менее важное — это поддержание вашей системы в чистоте и без вирусов. Различные инфекции могут стать причиной множественных ошибок, поскольку они могут повредить важные файлы и изменить настройки, что приведет к различным проблемам, таким как 0x800f0988. Мы рекомендуем регулярно проверять ваше устройство на наличие угроз с помощью какой-либо антивирусной утилиты, которая защитит вас от кибератак. Чтобы узнать, заражен ваш компьютер или нет, вы можете воспользоваться SpyHunter 5 — бесплатная программа, которая поможет в обнаружении потенциально нежелательных программ и других вирусов, повреждающих ваши компоненты.
Скачать антивирус Norton
В заключение, проблемы с обновлениям появились очень давно и до сих пор затрагивают большое количество пользователей. Однако с помощью правильных и современных инструментов решение ошибки 0x800f0988 не является большой проблемой. Мы надеемся, что вы больше не сталкиваетесь с этой проблемой и продолжаете пользоваться компьютером без дискомфорта.
Like clockwork, Microsoft releases subsequent updates for Windows. However, reportedly, many Windows users have been experiencing a failure to update their Windows 11 machine with a specific install error code — ‘0x800f0988’.
Usually, an update failure is easily fixable by Windows itself, and very rarely it requires human intervention. But that is not the case with this particular error code.
Since there can be a number of issues preventing your system from getting updated, you might need to perform more than one fix listed below.
1. Download and Install the Update Manually
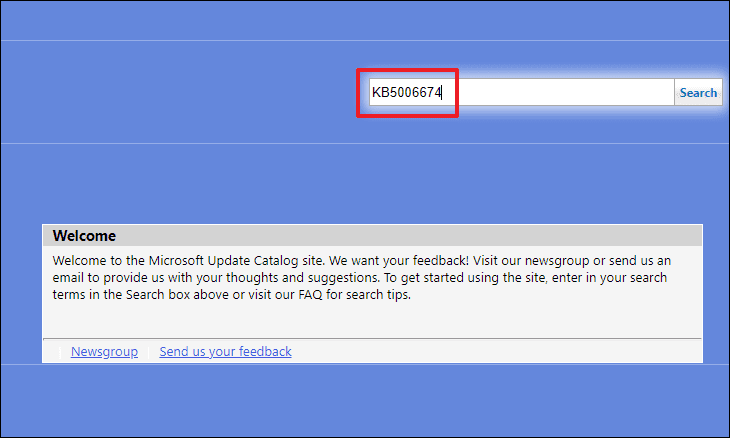
Microsoft also provides a way to manually install an update for your Windows machine. Given that, you know the knowledge base number of the update, which can be easily found on the ‘Windows Update’ screen from the Settings app on your machine.
To download an update manually, head to the official Microsoft Update Catalog website catalog.update.microsoft.com using your preferred browser.
Then, enter the KB number of the update you want to download in the search bar situated to the right of the webpage and hit Enter to perform a search.
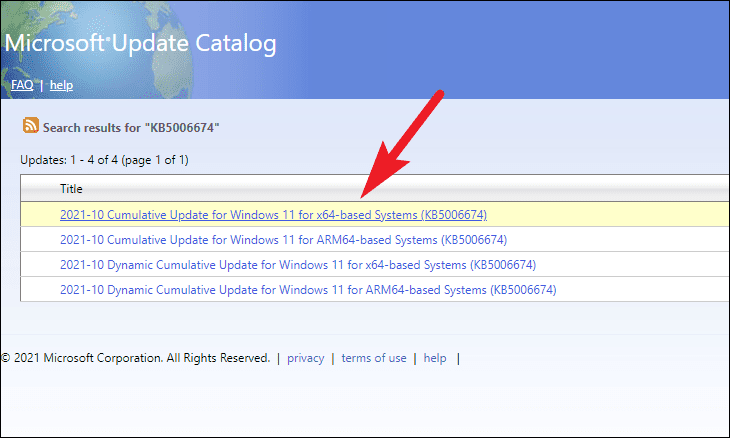
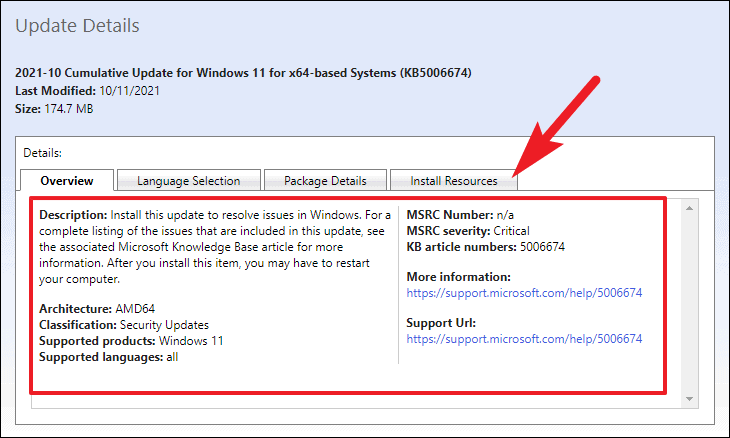
Now, a list of the available updates corresponding to the KB number will be populated. To know more information about the update package, click on its title. This will open a separate browser window on your screen.
You can learn more about the update, its classification, products supported, and also the languages supported by the update package. You can also head to the respective tab to learn more about Install resources, Package details, and more.
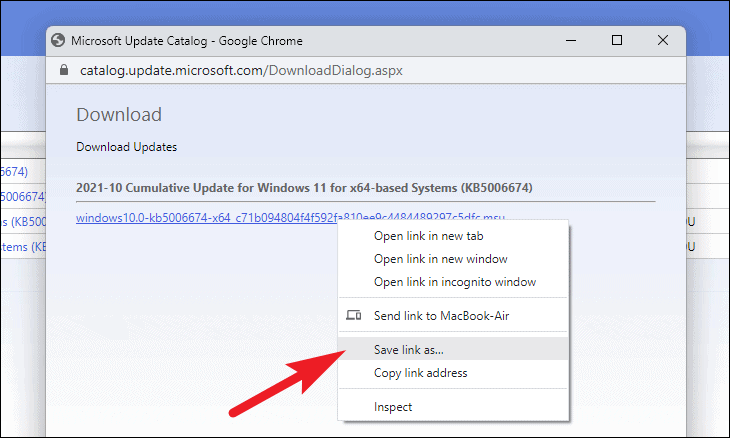
To download a particular update package, click the ‘Download’ button present on the far right edge of the individual row. This will open a separate browser window on your screen.

Next, right-click on the link present on the window, and choose the ‘Save link as’ option from the context menu.
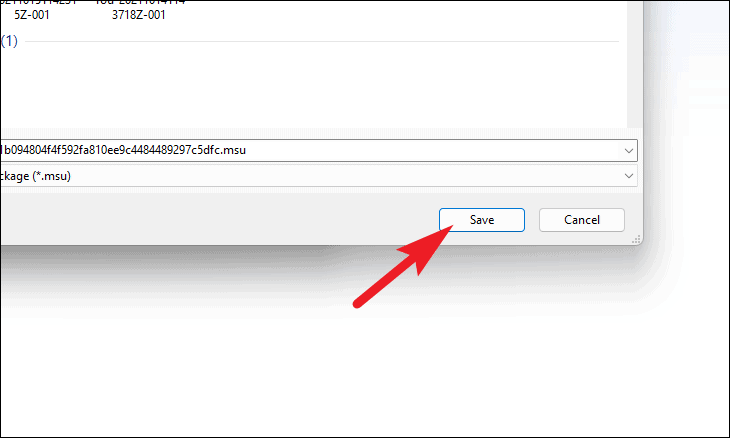
Then, choose your desired directory and click on the ‘Save’ button to download the Windows Update Package on your computer. Once chosen, Your download should begin in a moment.
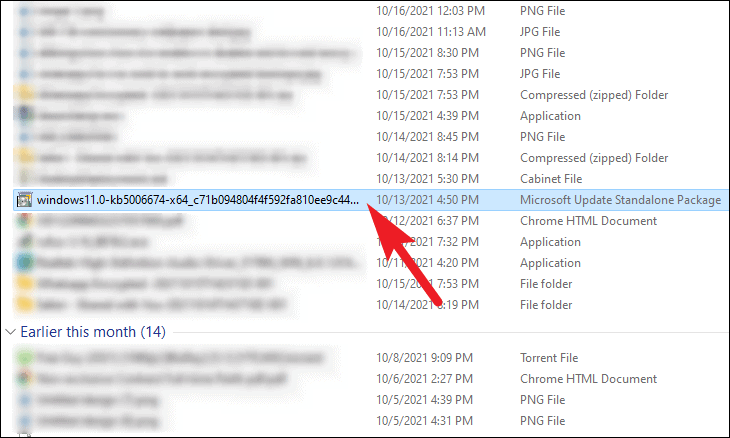
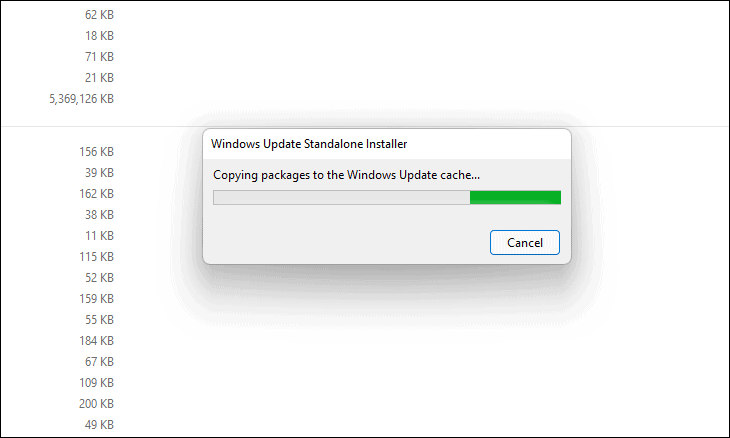
Once downloaded, head to your default downloads directory and double-click on the package file to run it.
Next, the Windows Update Standalone Installer will prepare the system for installation and that might take a few minutes or so. Once the update is ready to install, a prompt will appear on the screen to confirm the installation; click on the ‘Yes’ button to proceed.
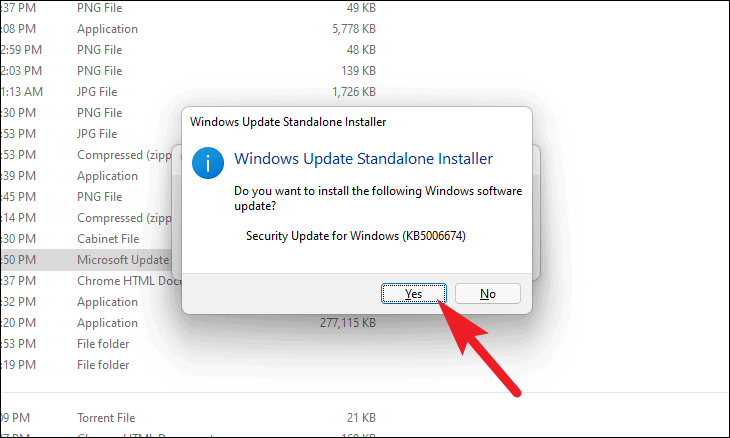
Package Installer will now start installing the Windows update on your PC, wait while the installation completes.
Once the installation completes, depending on the type of update, you might be prompted to restart the machine. Do so to complete the update.
DISM stands for Deployment Image Servicing and Management. It is a command-line tool used to service Windows images. It has a plethora of applications, however, in this case, will be used to restore the health of the currently deployed Windows image on your system.
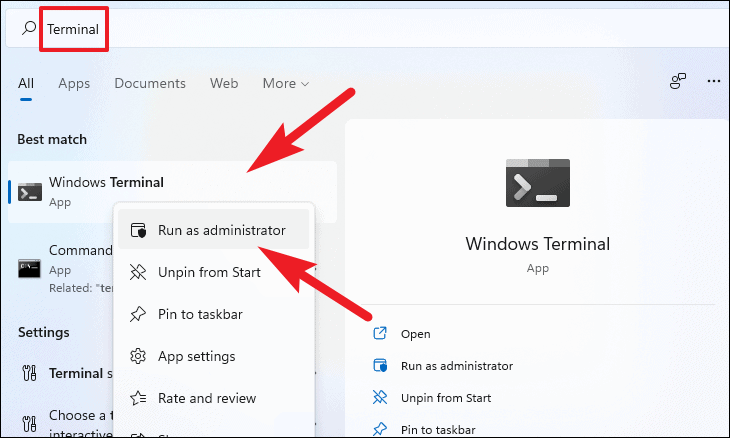
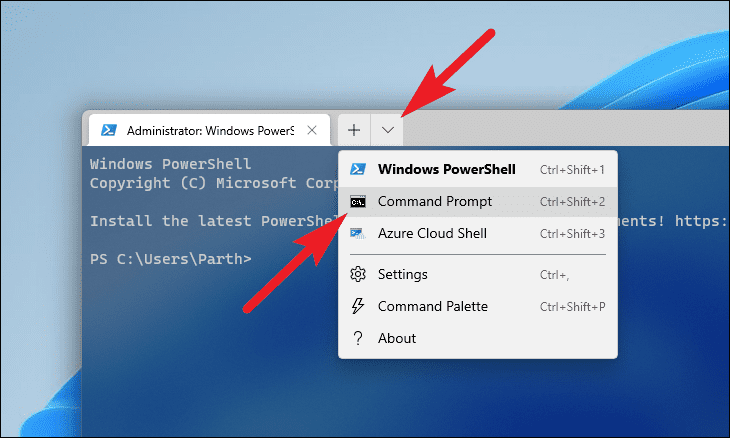
To do so, open Windows Search present on the taskbar of your machine and then type Terminal. Then, right-click on the ‘Windows Terminal’ tile and choose ‘Run as administrator’ option from the context menu.
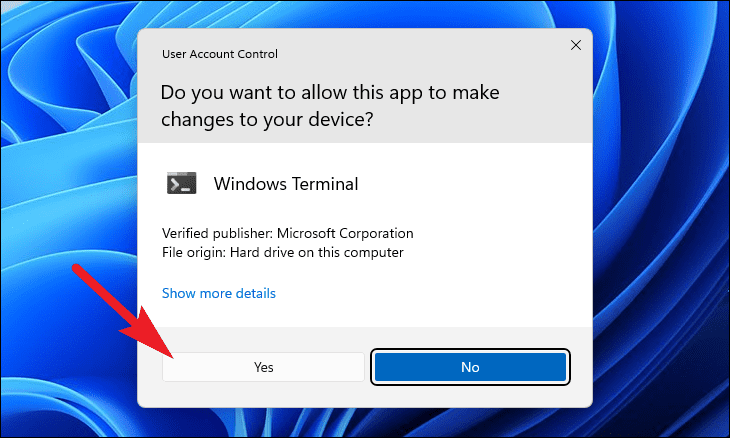
After that, an UAC (User Account Control) window will appear on your screen. If you are not logged in with an admin account, provide credentials for one. Otherwise, click on the ‘Yes’ button.
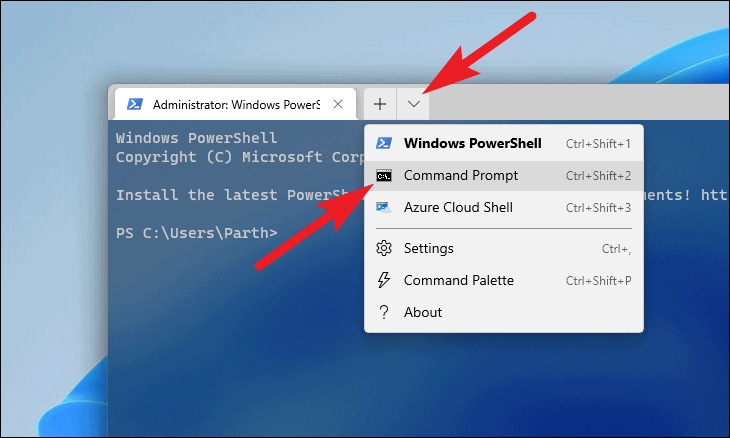
Next, from the Terminal window, click on the carat icon (downward arrow) and choose the ‘Command Prompt’ option. Alternatively, you can also press the Ctrl+Shift+2 shortcut to open a Command prompt tab.
Now, type or copy/paste the following command and hit Enter on your keyboard.
dism /online /cleanup-image /startcomponentcleanup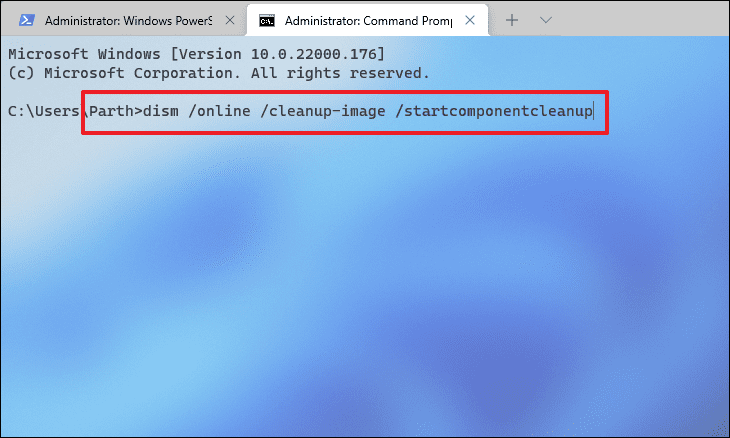
The process may take a few minutes to complete. It is recommended that you do not interrupt the process. Once completed, you will receive a message stating so.
3. Uninstall Additional Languages
Due to the humongous user base of Windows, the operating system supports a variety of languages for users’ ease of convenience. However, there might be a possibility that default/ additional language is the culprit behind the issue.
To uninstall a language pack, head to the Settings app from the Start Menu. Alternatively, you can also press the Windows+I shortcut on your keyboard to open the Settings window.
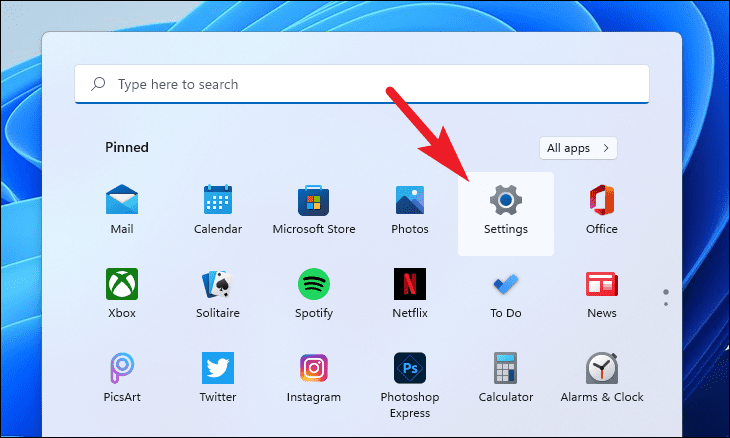
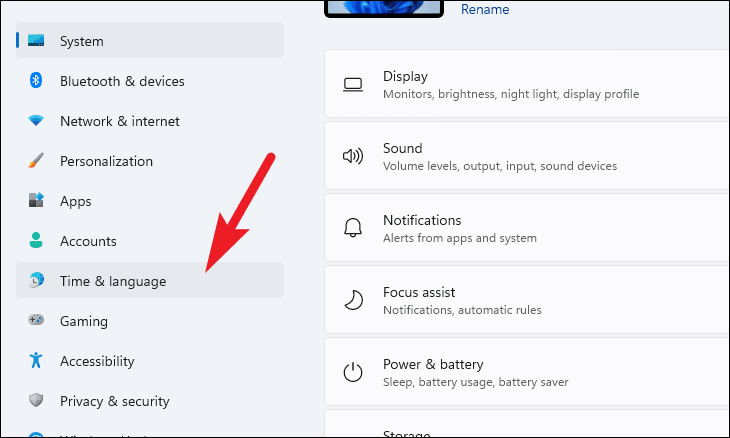
Next, click on the ‘Time & Language’ tab situated on the left panel of the Settings window.
After that, click on the ‘Language & region’ tile present to the right of the window.
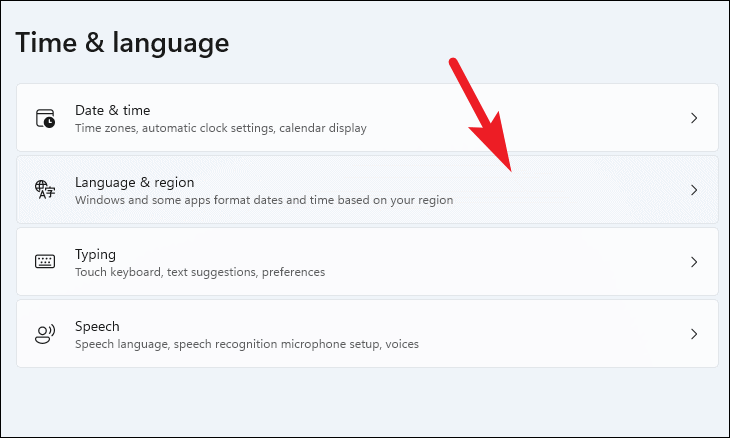
Then, locate the additional language tile under the ‘Language’ section and click on the ellipsis icon (three horizontal dots). Next, choose the ‘Remove’ option from the overflow menu.
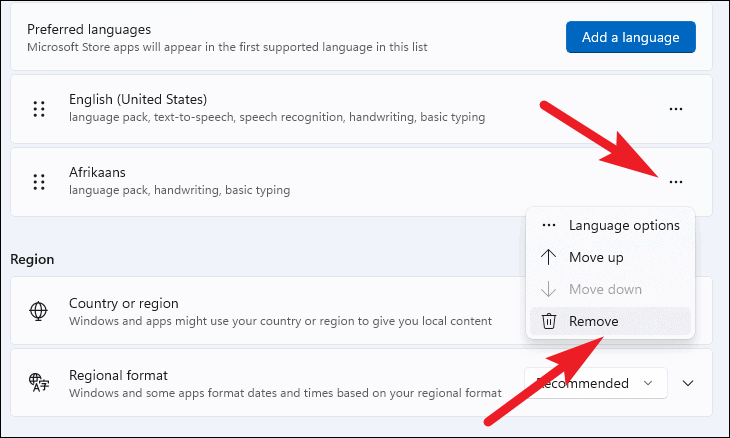
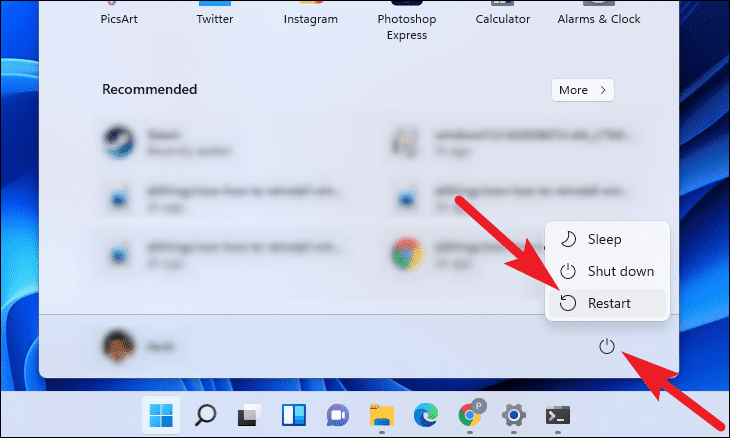
Once uninstalled, restart your PC from the Start Menu and try installing the update package once again.
5. Empty the Windows Update Cache
Emptying the Windows Update cache can also resolve issues emerging due to a damaged or corrupted update file. Though the solution is a tad bit generic, it can prove to be very effective.
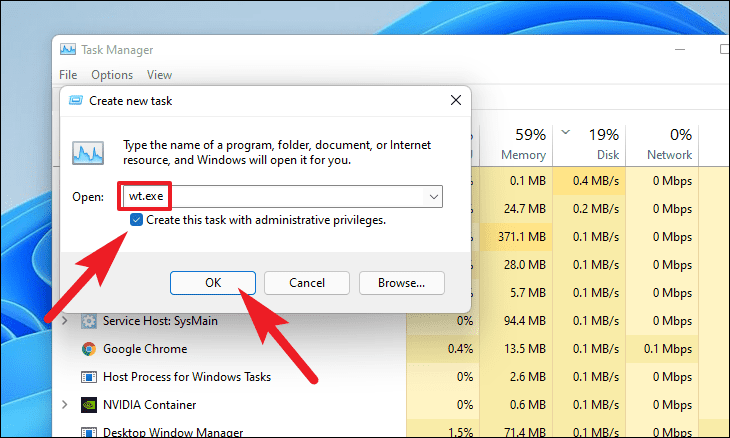
To do so, press the Ctrl+Shift+Esc shortcut on your computer to bring up the Task Manager. Next, click on the ‘File’ tab present on the top left corner of the window. Then, click on the ‘Run new task’ option.
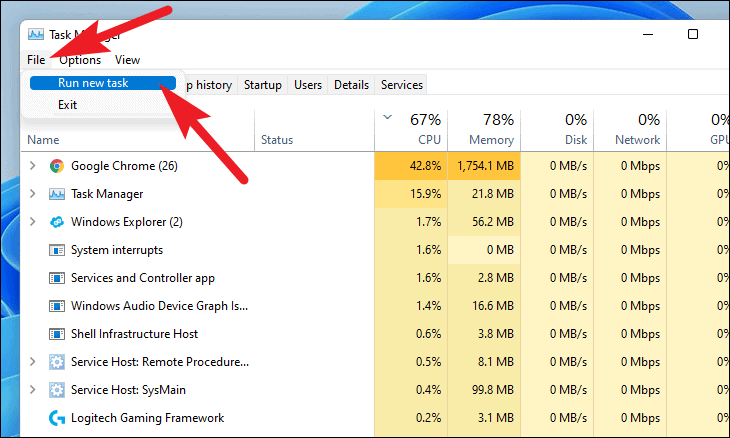
After that, from the ‘Create new task window’, type wt.exe and click the checkbox preceding the ‘Create this task with administrative privileges’ field. Now, click on ‘OK’ to open Windows Terminal.
Now, from the Terminal window, click on the carat icon (downward arrow) and choose the ‘Command Prompt’ option. Alternatively, you can also press the Ctrl+Shift+2 shortcut on your keyboard to open it.
Next, type or copy+paste the following command one by one and hit Enter to stop the services associated with Windows Update.
net stop bits
net stop wuauserv
net stop cryptsvc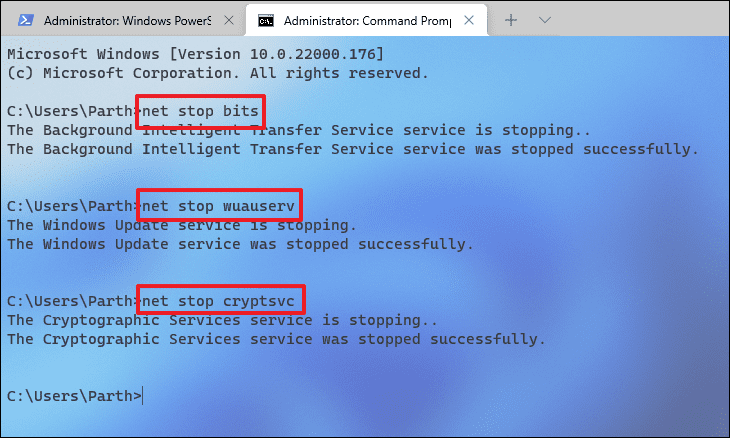
Once the services have been stopped, bring up the Run Command utility by pressing the Windows+R shortcut on your keyboard and type or copy+paste the following directory, and hit Enter on your keyboard.
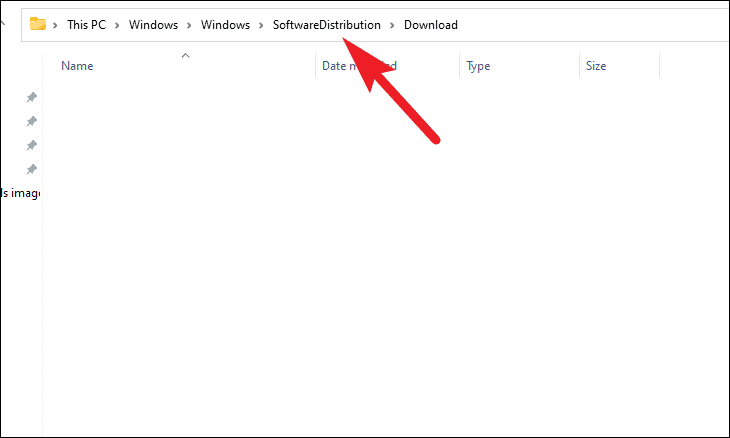
C:\Windows\SoftwareDistribution\Download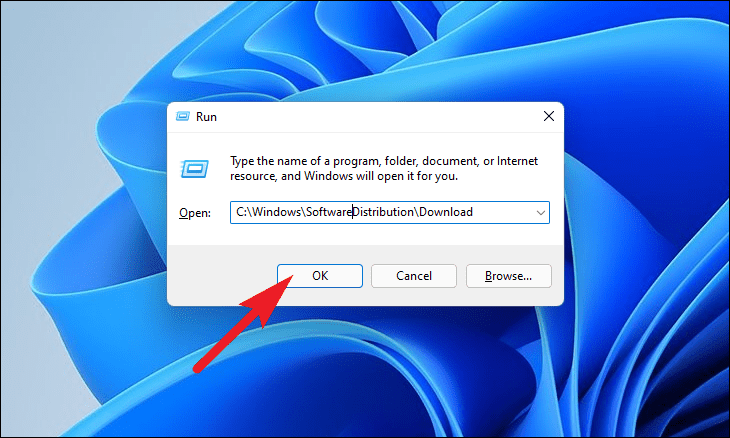
After that, from the explorer window, select all files by pressing Ctrl+A and then permanently delete them by pressing the Shift+Delete shortcut on your keyboard.
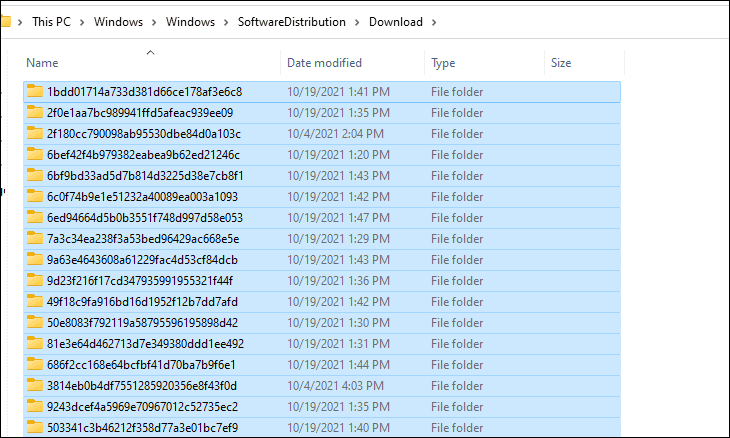
Then, click on the ‘SoftwareDistribution’ directory from the address bar.
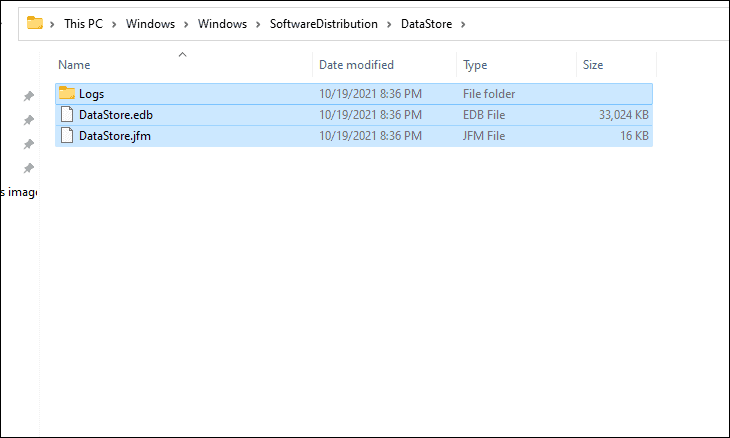
After that, click on the ‘DataStore’ folder.
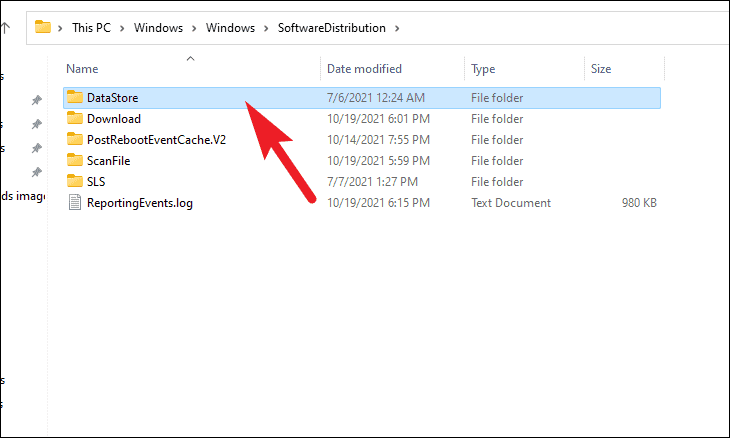
Now, select all files and folders by pressing Ctrl+A on your keyboard and permanently delete them by pressing Shift+Delete on your keyboard.
Finally, head back to the elevated Command Prompt window, and type or copy+paste the following command one-by-one and hit Enter to start the services you disabled earlier.
net start bits
net start wuauserv
net start cryptsvc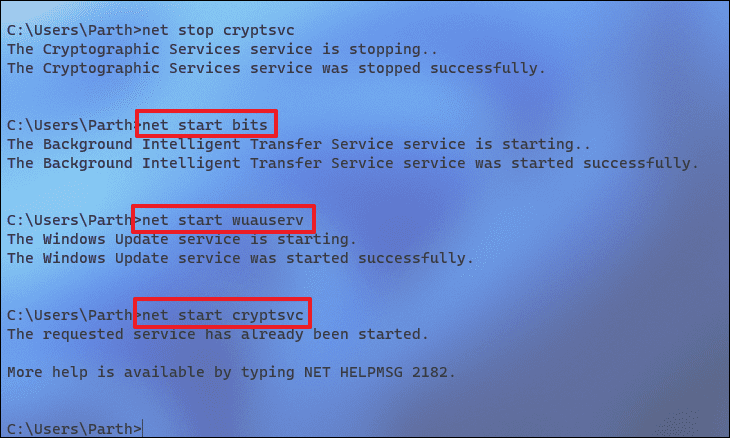
Next, restart your Windows PC from the Start Menu and try to install the update again to check if the issue has been resolved or not.
6. Perform an In-place Upgrade
If all else fails, you can always do an in-place upgrade to the latest version of Windows without affecting your personal files and folders. However, in order to do so, you will need the latest Windows 11 ISO.
Read: How to Download Windows 11 ISO File
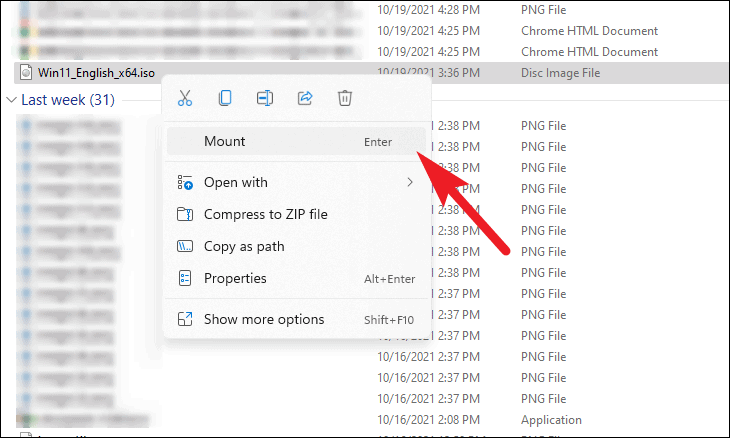
After acquiring the Windows 11 ISO file, right-click on the ISO file and choose the ‘Mount disk’ option from the context menu.
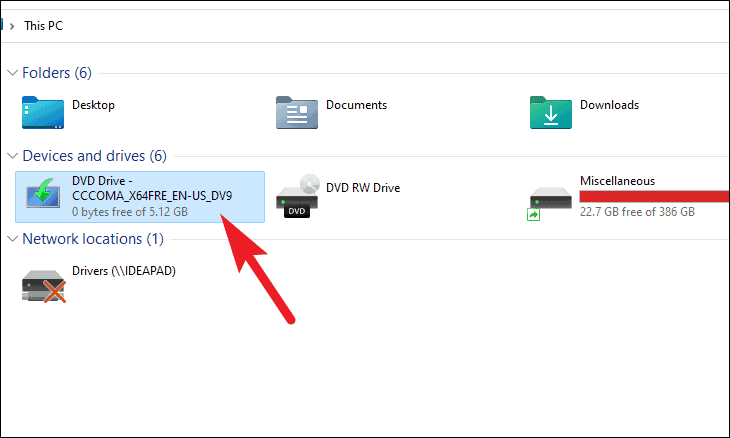
Now, head to ‘This PC’ and double-click on the mounted drive to run the Windows 11 setup.
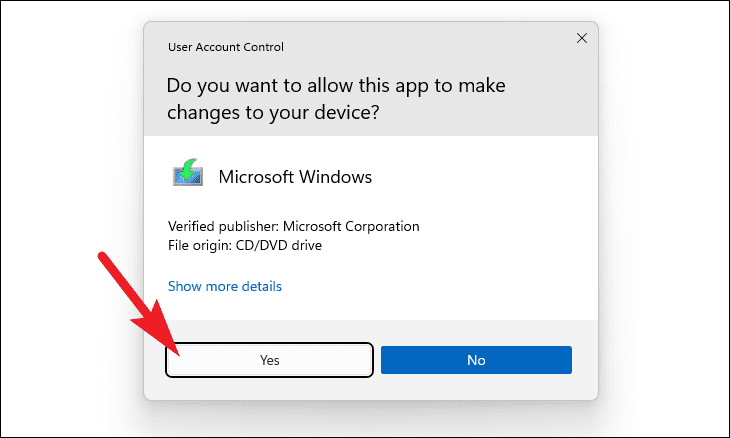
Next, a UAC (User Account Control) window will appear on your screen. Enter the admin credentials if you are not logged in with an admin account currently. Otherwise, simply click the ‘Yes’ button to proceed.
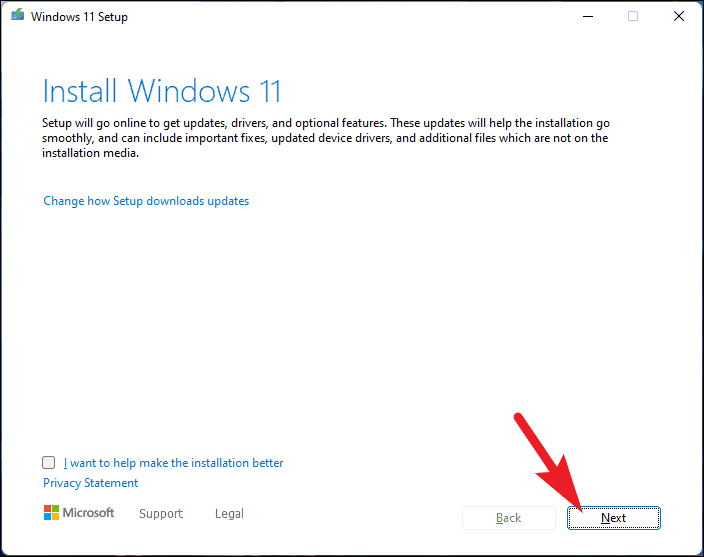
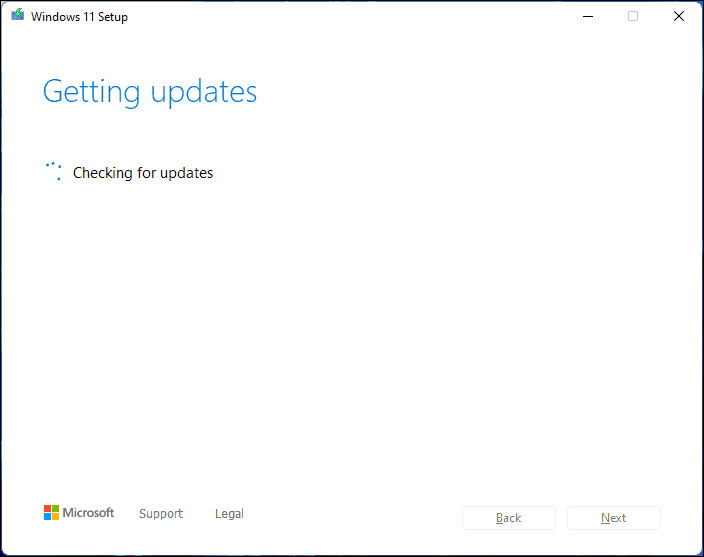
Then, from the Windows 11 setup window, click on the ‘Next’ button present at the bottom right corner.
After that, the setup will check for updates. It may take some time, wait while the setup downloads the latest resources from Microsoft servers.
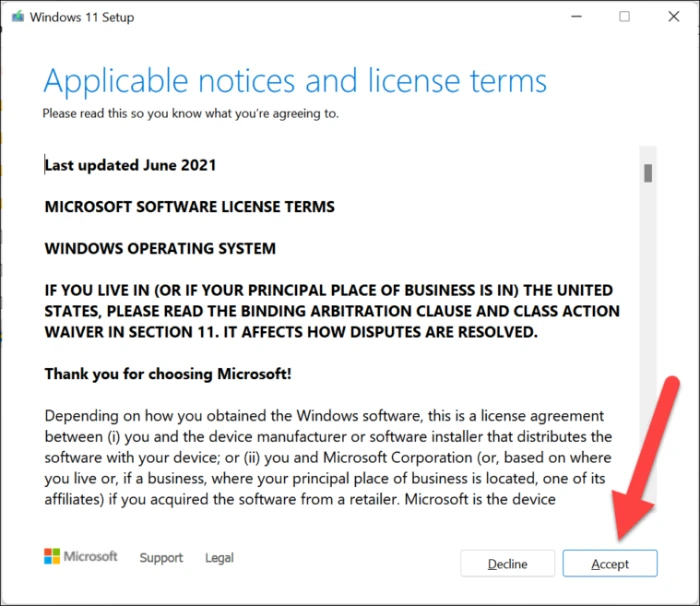
Next, read the ‘End User License Agreement’ from Microsoft and click on the ‘Accept’ button.
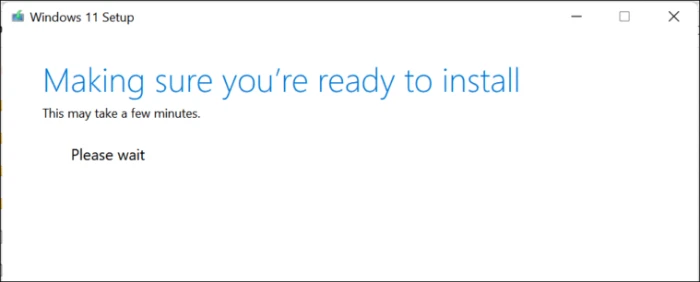
After that, the Windows installation wizard will now configure itself to install the latest build of the OS on your machine. Please wait while the process runs in the background.
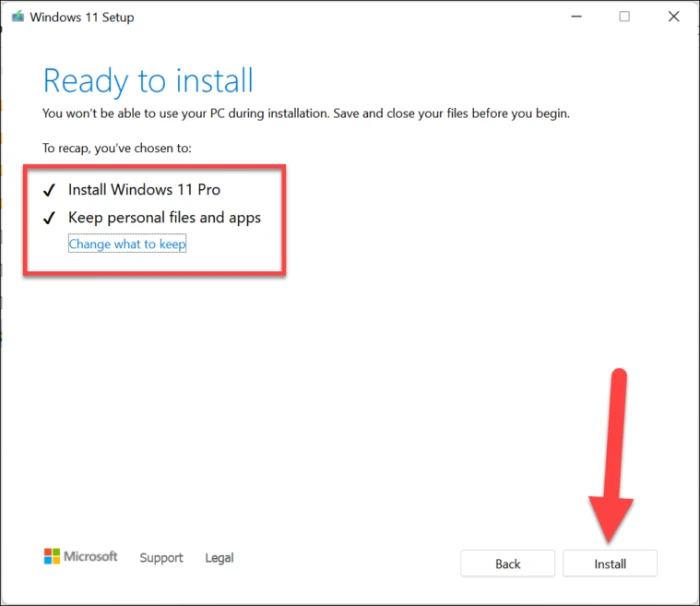
Finally, on the next screen, the setup wizard will list down the Windows version to be installed on your PC along with the default selection of keeping the personal files and apps. Click on the ‘Install’ button to commence the installation.
That’s it folks, one of these solutions will definitely work on your machine to fix the update error and you will be back to receiving and installing updates on your PC normally in no time.
Во время обновления ОС Windows 10 можно получить ошибку с кодом 0x800f0988. К счастью, данная проблема легко лечится при помощи парочки проверенных методов.
Устраняем ошибку 0x800f0988
Метод №1 Запуск средства устранения неполадок
Мы советуем начать вам с чего-то полегче, а именно — использование средства устранения неполадок Центра обновления Windows. Это системное средство, которое просканирует вашу ОС Windows и автоматически подберет подходящее решение.
Нажмите Windows+R на своей клавиатуре, чтобы вызвать окно «Выполнить». Далее пропишите в этом окошке значение ms-settings:troubleshoot и нажмите Enter. Найдите пункт «Центр обновления Windows» и выберите его, нажав левой кнопкой мыши, после чего кликните на кнопку «Запустить средство устранения неполадок».
Подождите, пока средство завершит проверять Windows, после чего примените решение, которое предложит оно вам предложит. Это могут быть какие-то специфические действия либо просто нажатие на кнопку «Применить это исправление». Как только закончите работать со средством, перезагрузите компьютер и проверьте наличие ошибки 0x800f0988.
Метод №2 Запуск очистки хранилища компонентов
В «десятке» можно найти папку под названием WinSxS (хранилище компонентов), в которой располагаются бэкап-копии системных файлов Windows до ее обновления. Делается это для того, чтобы у пользователя была возможность удалить последнее обновление и откатиться до предыдущей версии ОС.
Тем не менее в некоторых случаях эти бэкап-файлы могут препятствовать нормальной работе Windows 10, а поэтому в системе существует задача под названием «StartComponentCleanup», что в переводе будет звучать как «Начать очистку хранилища компонентов». Выполнить данную задачу можно двумя способами: через планировщик задач или же через DISM. Давайте посмотрим на оба этих способа.
Очистка хранилища компонентов через планировщик задач
- Нажмите комбинацию Windows+R;
- пропишите значение taskschd.msc и нажмите Enter;
- открыв перед собой окошко планировщика задач, пройдите следующим путем:
- ↓Библиотека планировщика заданий;
- ↓Microsoft;
- ↓Windows;
- ↓Servicing;
- нажмите правой кнопкой мыши на задачу «StartComponentCleanup» и выберите опцию «Выполнить»;
- подождите окончания выполнения задачи и попытайтесь обновить свою Windows еще раз.
Очистка хранилища компонентов через DISM
- Нажмите ПКМ на Пуск и выберите пункт «Командная строка (администратор)»;
- пропишите команду dism /online /cleanup-image /startcomponentcleanup и нажмите Enter;
- перезагрузите компьютер и попытайтесь обновиться.
Мы надеемся, что данная статья была полезна в решении ошибки 0x800f0988.