Содержание
- Способ 1: Запуск средства устранения неполадок
- Способ 2: Очистка кеша обновлений
- Способ 3: Восстановление системных файлов
- Способ 4: Отключение антивируса
- Вопросы и ответы
Ошибка с кодом 0x800f0984 может возникнуть при установке накопительных обновлений Windows 10, основной ее причиной является повреждение кеша обновления. Также она может быть вызвана конфликтом в работе программного обеспечения.
Способ 1: Запуск средства устранения неполадок
Столкнувшись с ошибкой 0x800f0984, попробуйте для начала воспользоваться встроенным в операционную систему «Средством устранения неполадок», в частности, неполадок работы «Центра обновления».
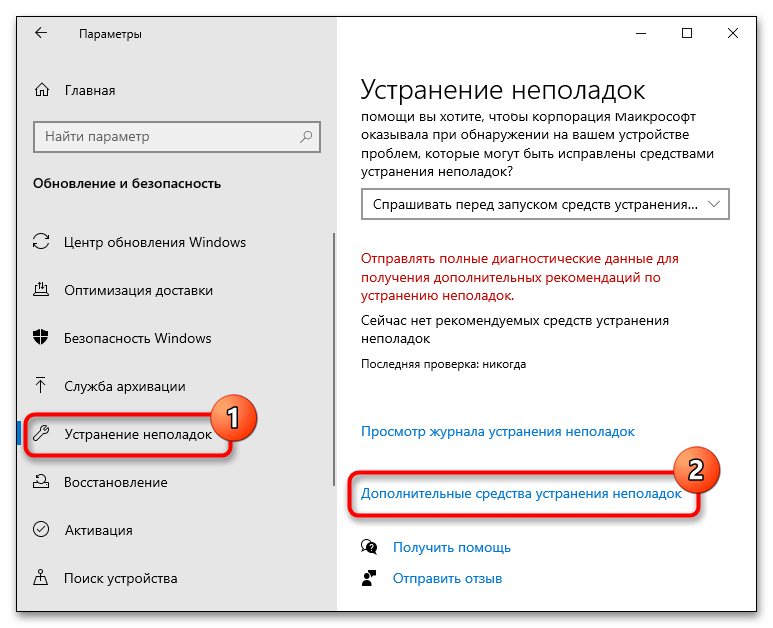
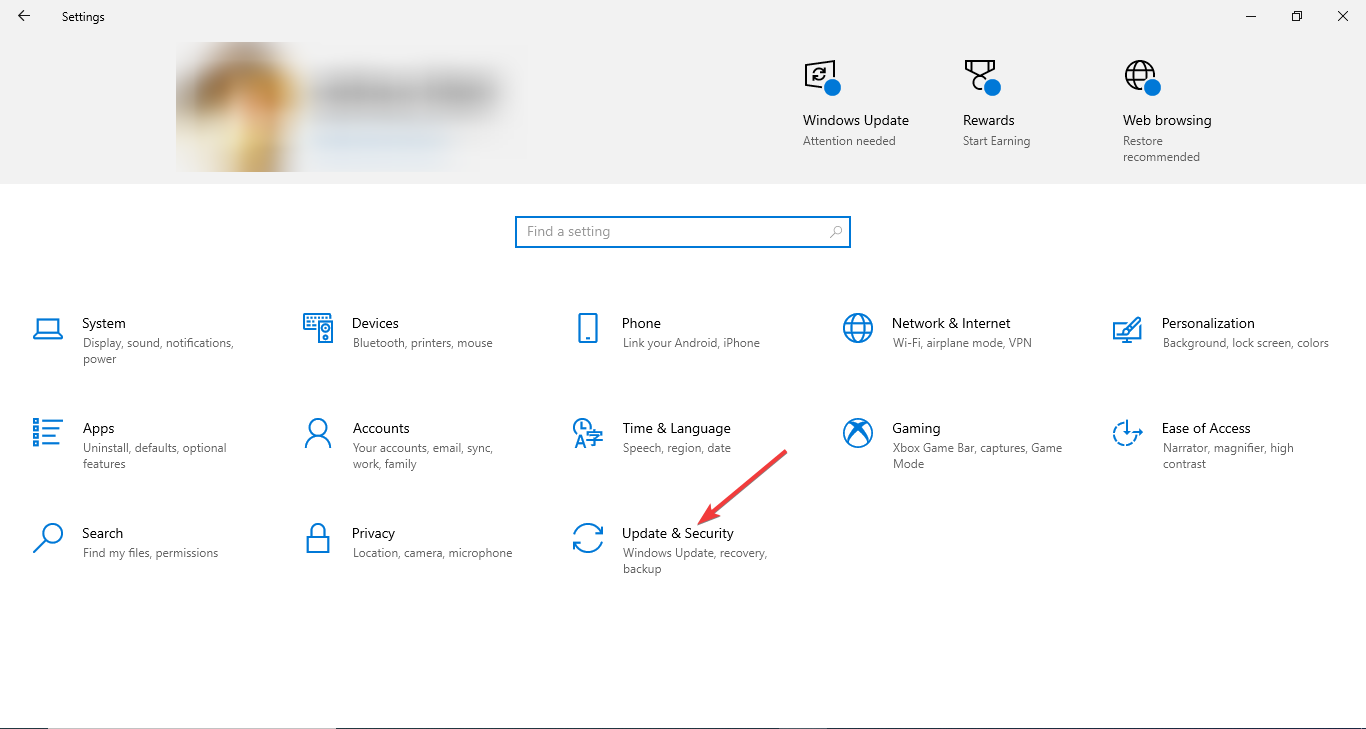
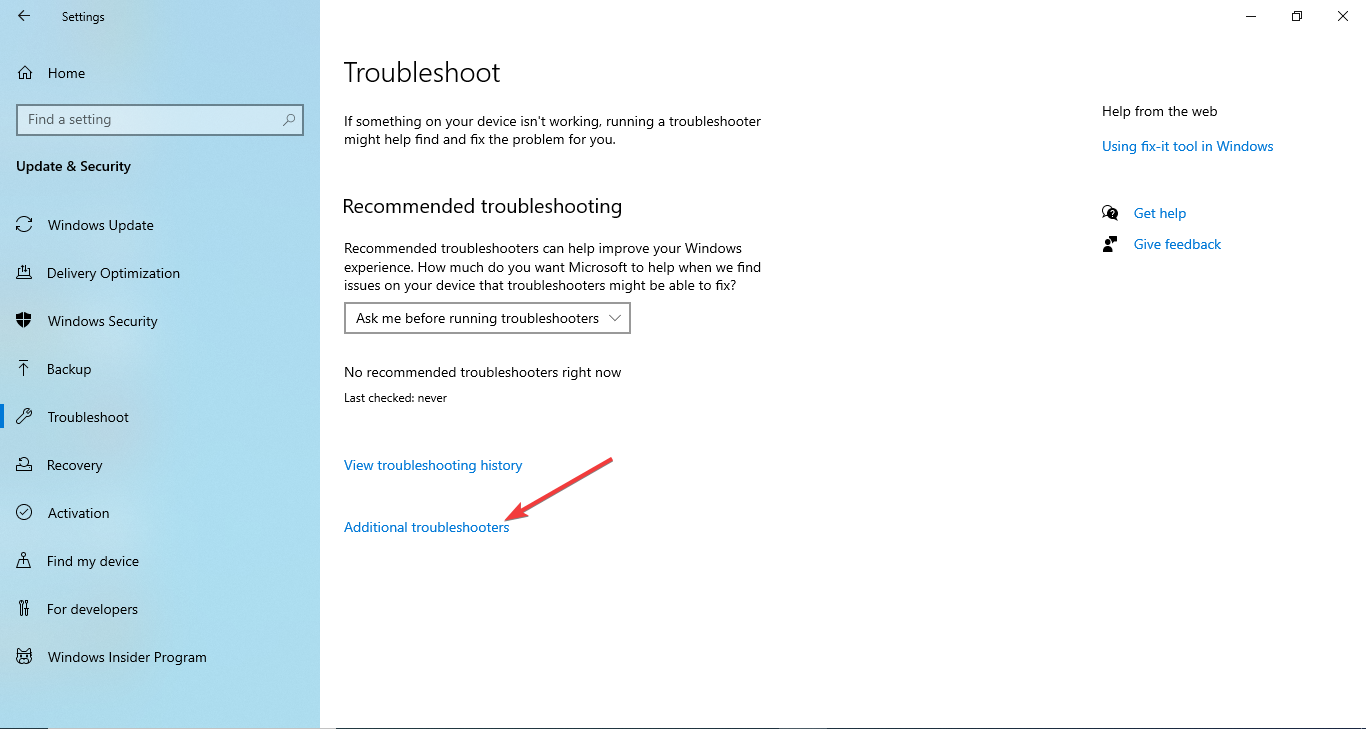
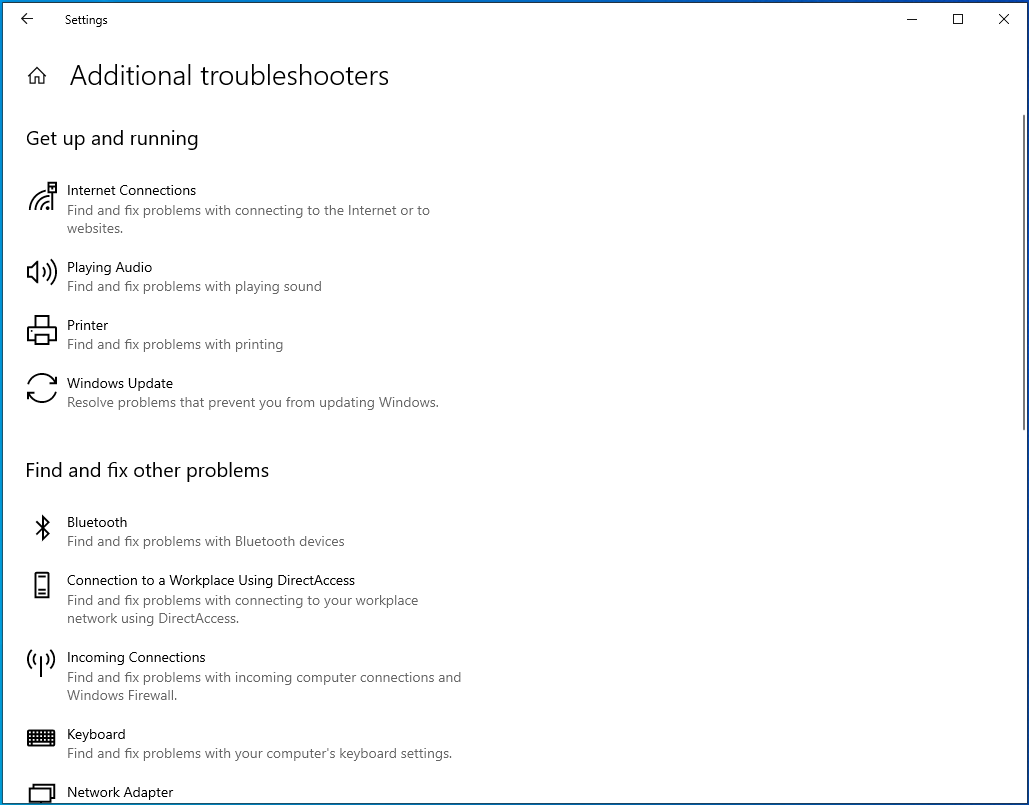
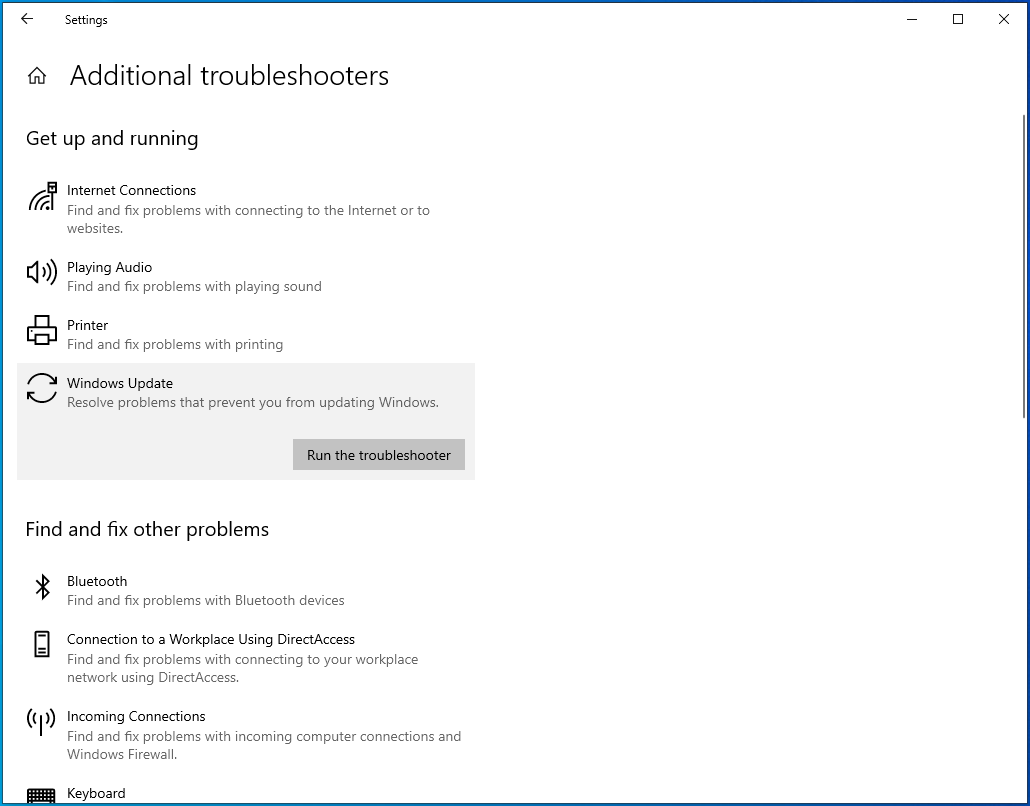
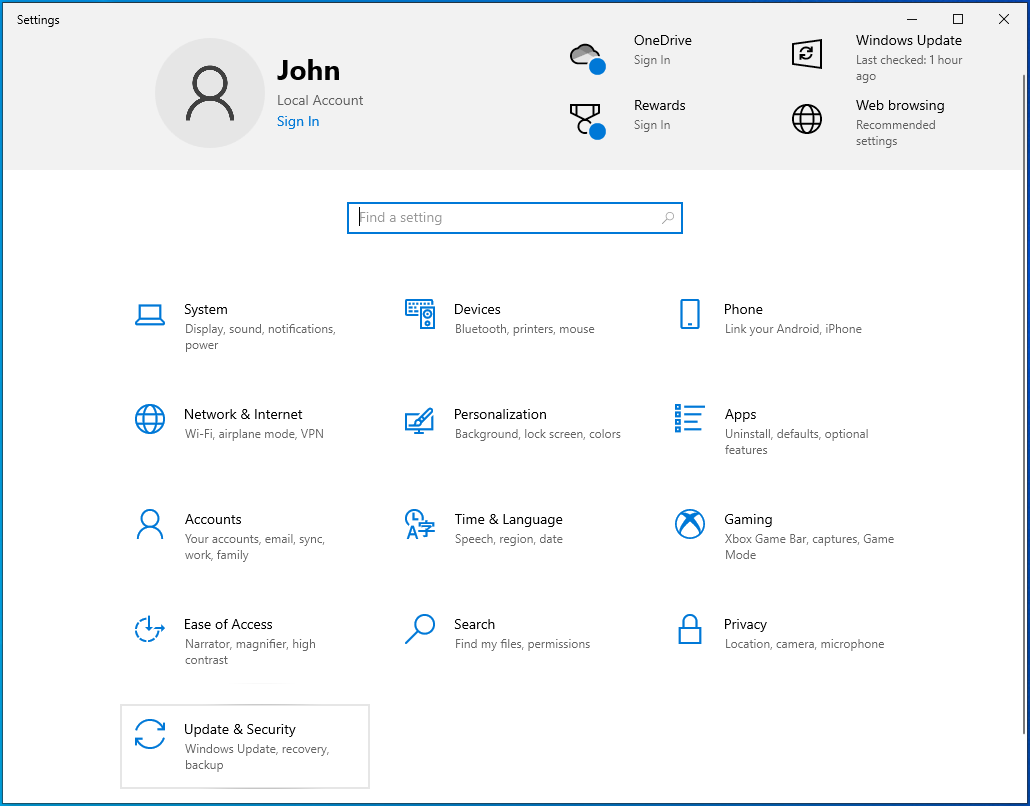
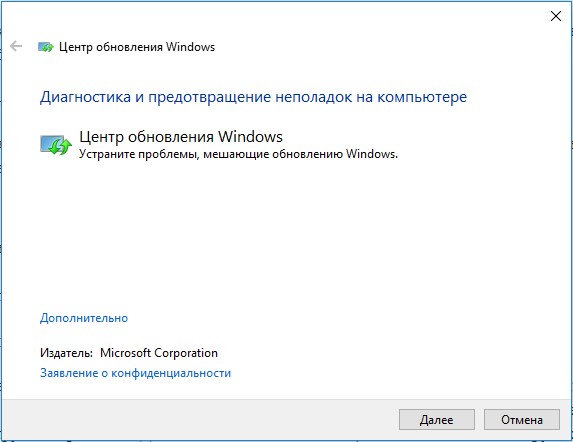
- Откройте приложение «Параметры», зайдите в раздел «Обновление и безопасность» → «Устранение неполадок» и нажмите ссылку «Дополнительные средства устранения неполадок».
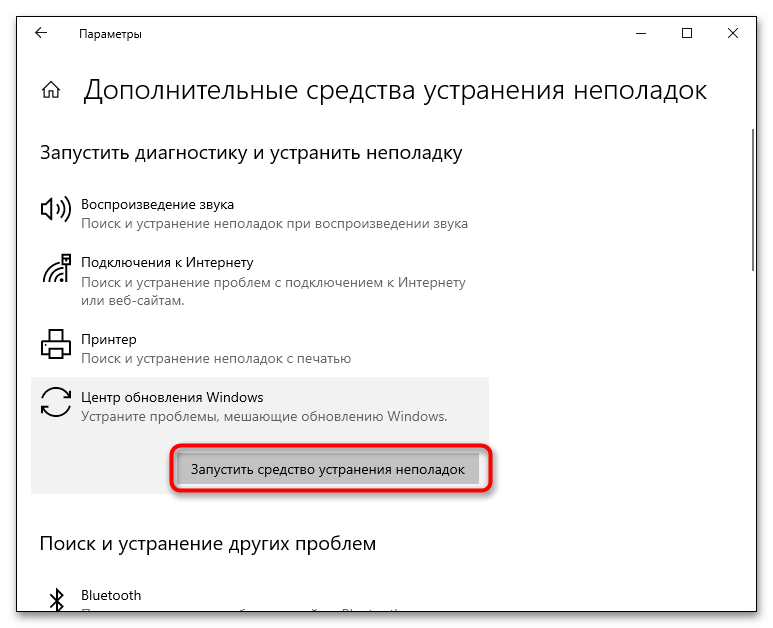
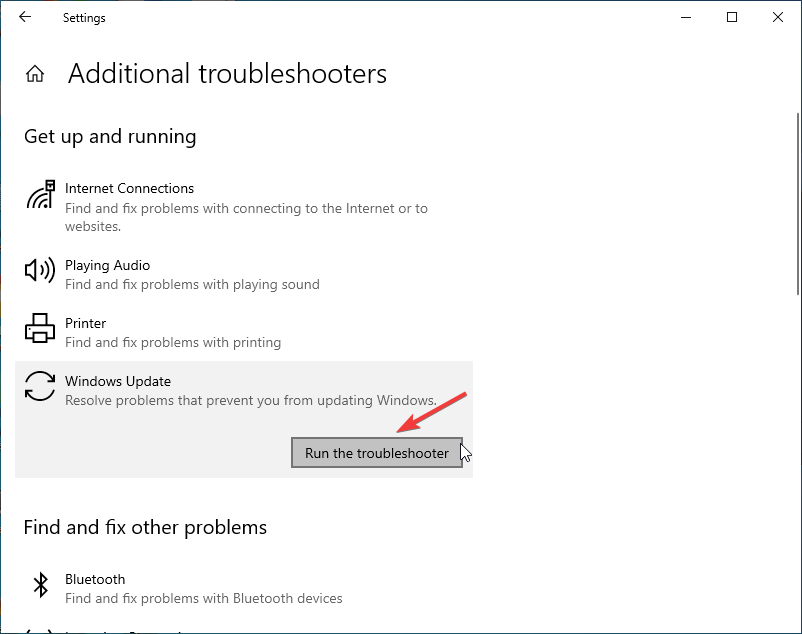
- Откроется окно со списком модулей исправления, выберите в нем модуль «Центр обновления Windows» и нажмите кнопку запуска инструмента.
- Будет запущена служебная утилита, которая проверит работу «Центра обновления» и постарается устранить причины сбоя в автоматическом режиме.
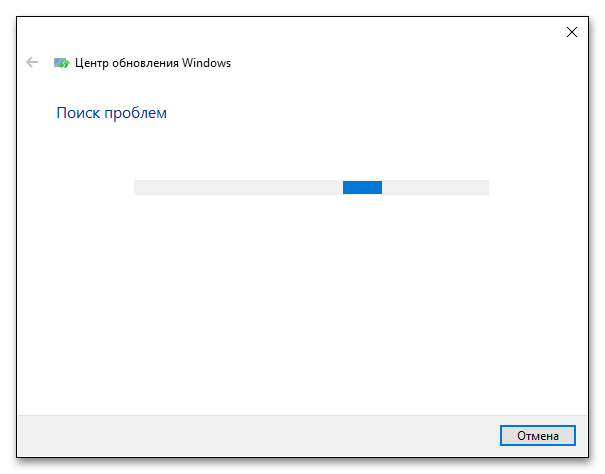
Если ошибки найдены не будут или предложенное утилитой решение не даст положительного результата, переходите к следующему решению.
Способ 2: Очистка кеша обновлений
Решение эффективно, если причиной ошибки стало повреждение загруженных в кеш файлов обновлений. Выполнить такую очистку можно как средствами самой операционной системы, так и с помощью сторонних утилит. Здесь будет рассмотрен первый вариант.
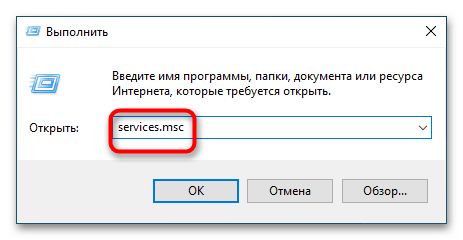
- Вызовите нажатием Win + R диалоговое окошко быстрого выполнения команд, введите в него команду
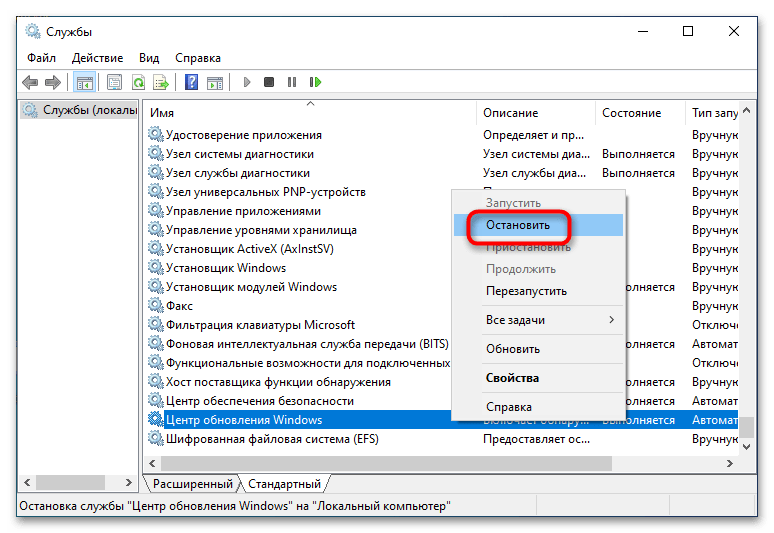
services.mscи нажмите клавишу Enter. - Откроется окно оснастки управления службами, найдите в нем службу с названием «Центр обновлений Windows», нажмите по ней правой кнопкой мыши и выберите в контекстном меню опцию «Остановить».
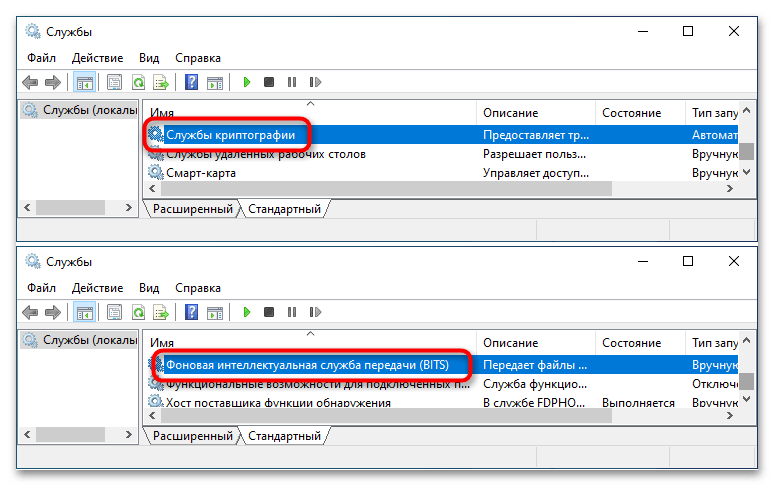
- Точно так же найдите службы «Службы криптографии» и «Фоновая интеллектуальная передача» и остановите их.
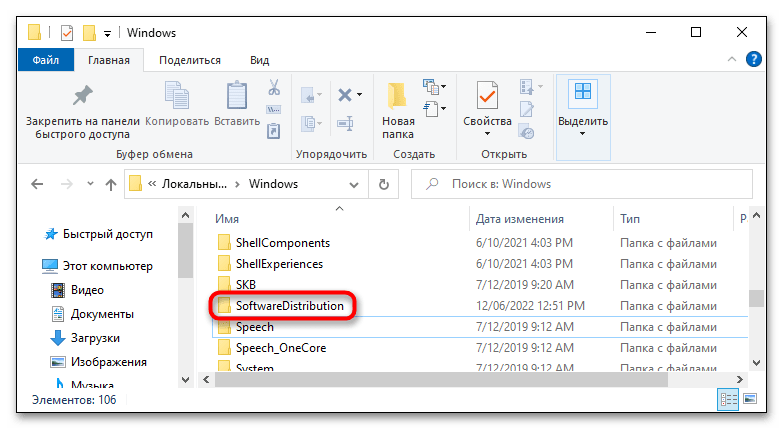
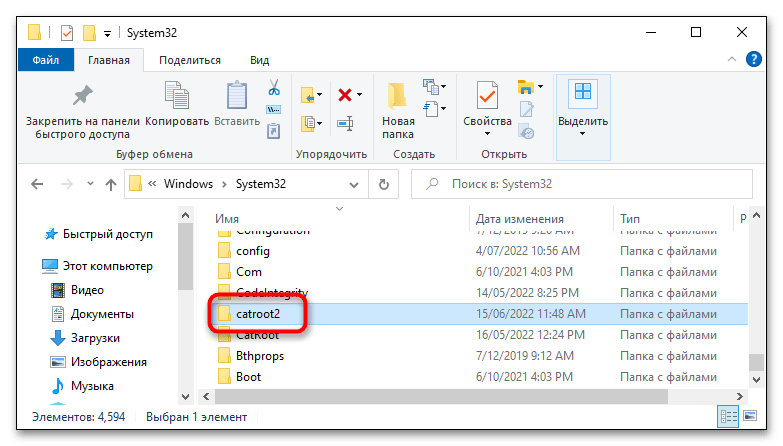
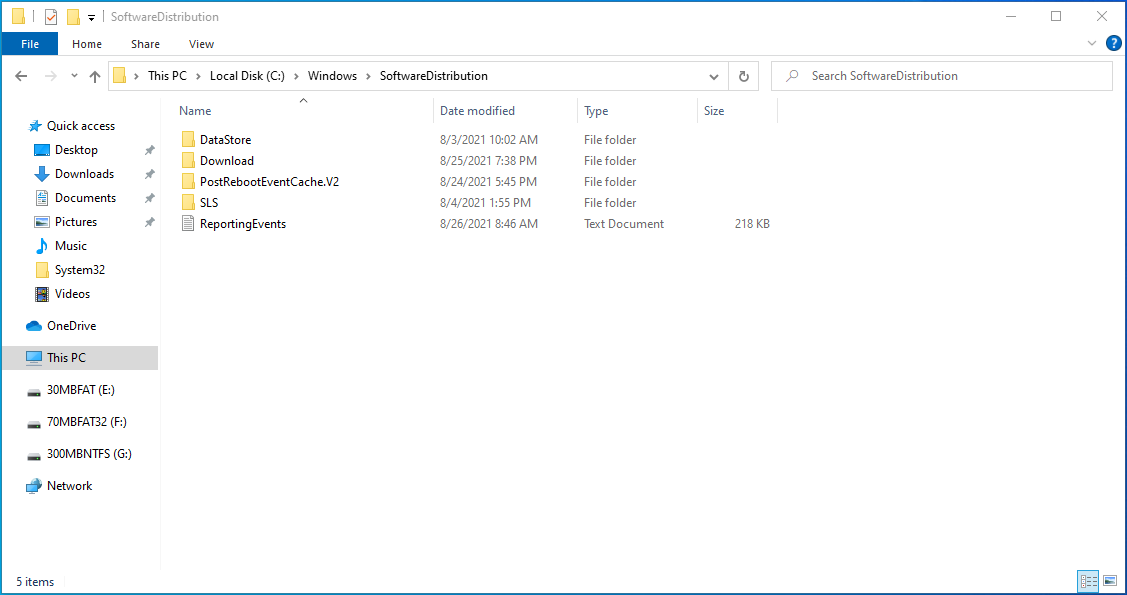
- Перейдите в расположение
C:\Windowsи удалите либо переименуйте директорию «SoftwareDistribution». - Затем зайдите в папку
C:\Windows\System32и удалите или переименуйте папку «catroot2».
Удалив временное содержимое каталогов, вернитесь в окно управления службами и запустите ранее остановленные службы. После того как Windows 10 повторно скачает пакеты, попробуйте выполнить обновление в обычном режиме.
Способ 3: Восстановление системных файлов
Поскольку причиной ошибки 0x800f0984 может быть повреждение отвечающих за процедуру обновления системных файлов, следует проверить систему на предмет таких повреждений.
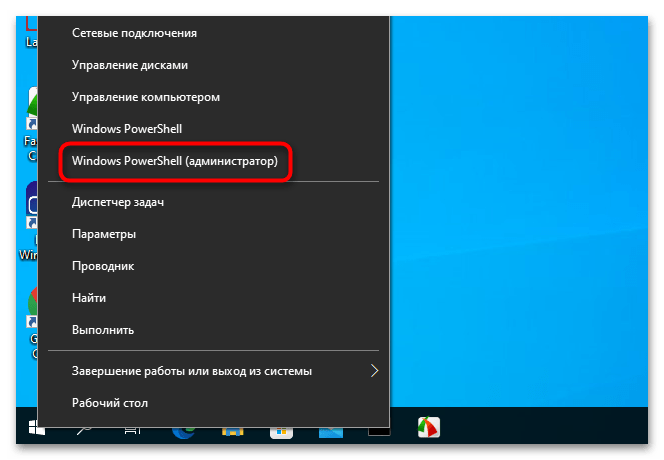
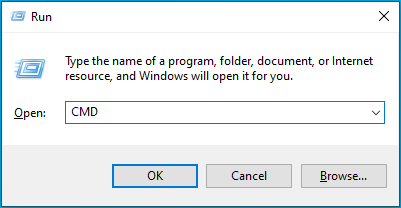
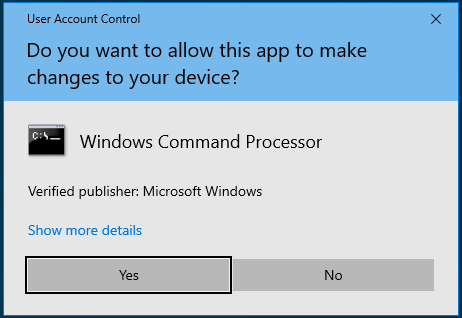
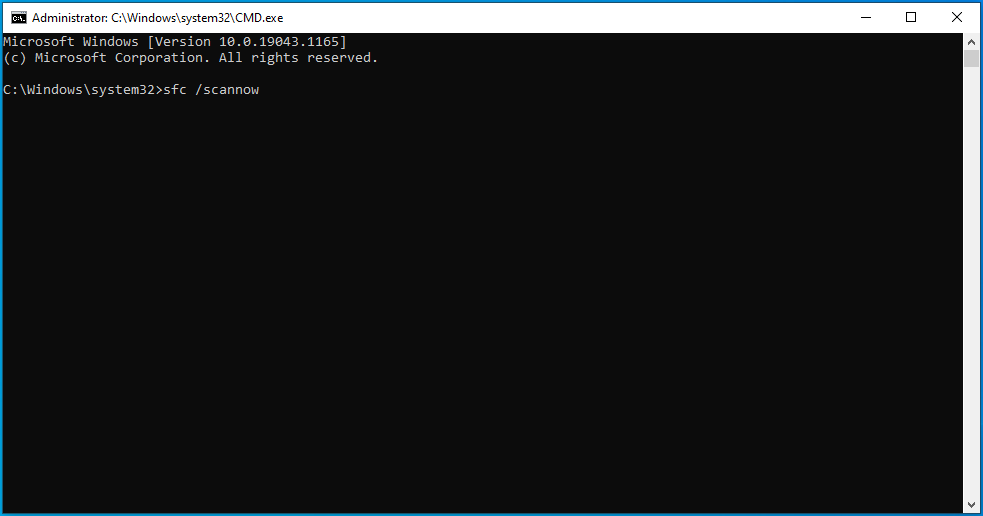
- Запустите от имени администратора «Командную строку» или «Windows PowerShell» любым удобным вам способом, например из контекстного меню кнопки «Пуск».
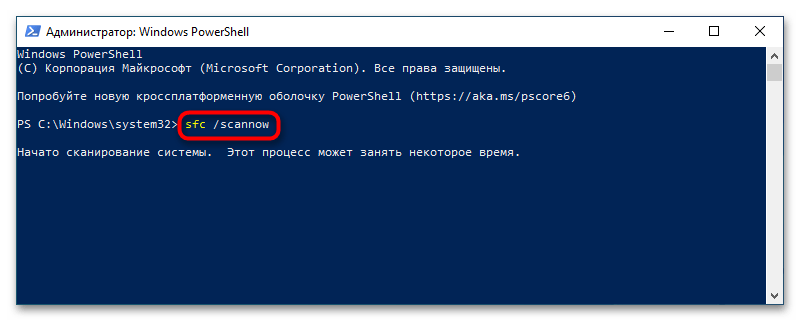
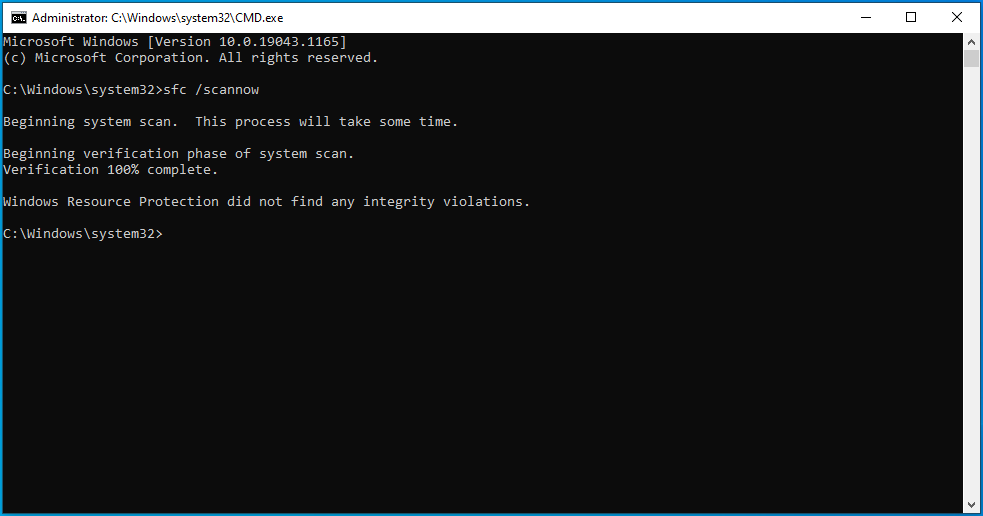
- Выполните в консоли
sfc /scannowи дождитесь завершения процедуры сканирования.
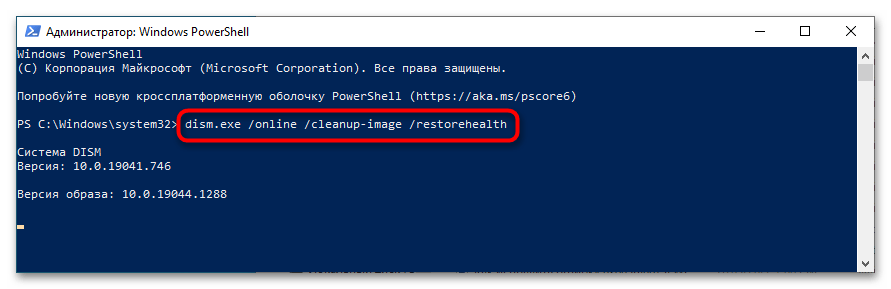
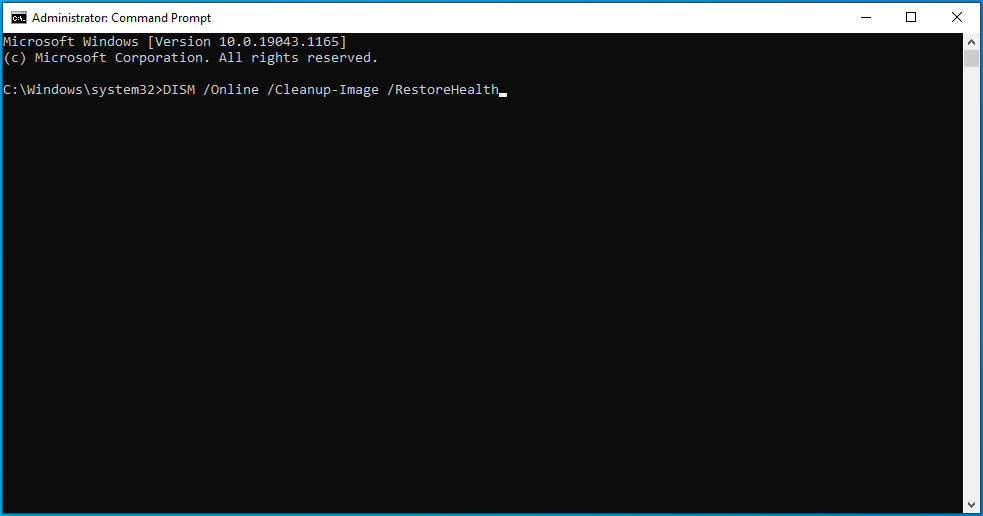
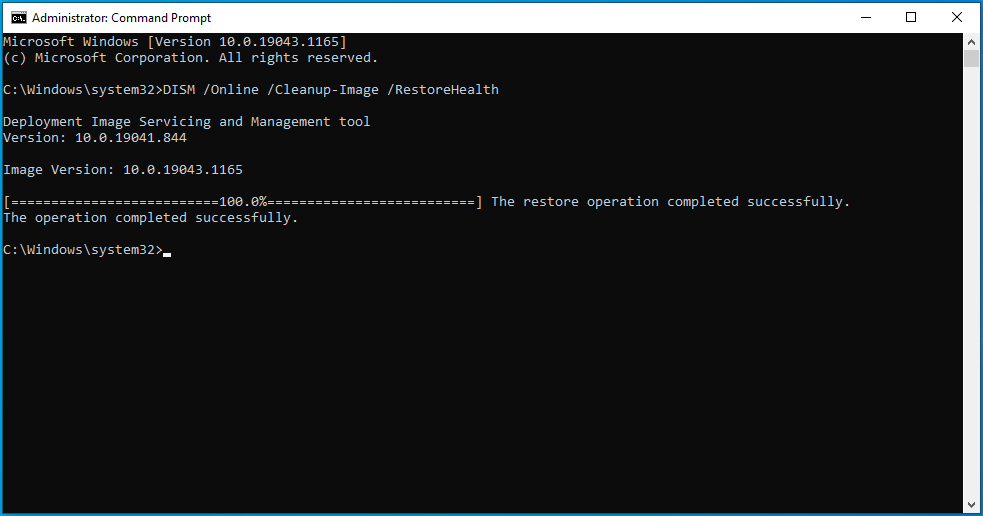
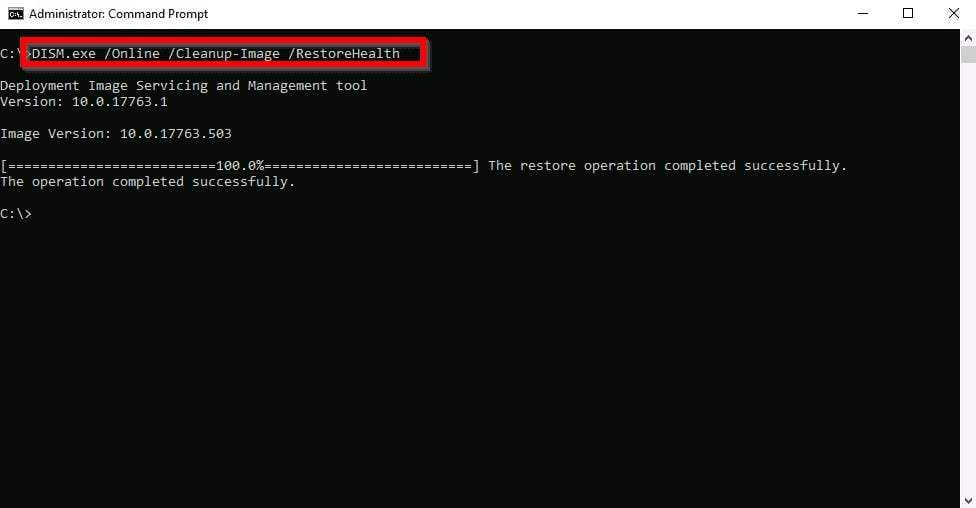
В случае обнаружения утилитой повреждений или отсутствия важных для работы Windows 10 файлов последние будут восстановлены из встроенного хранилища компонентов. Если указанная команда вернет ошибку, нужно будет восстановить само хранилище компонентов, выполнив команду dism.exe /online /cleanup-image /restorehealth. После этого можно снова попробовать выполнить команду sfc /scannow.
Способ 4: Отключение антивируса
Данное решение является дополнительным, оно исключает влияние сторонних программ для обеспечения безопасности на процесс обновления операционной системы. Если вы используете антивирус, брандмауэр или антишпион от стороннего разработчика, отключите эти программы на время обновления. Также рекомендуется отключить VPN-клиенты и другие приложения, изменяющие конфигурацию интернет-соединения.
Читайте также: Отключение антивируса
Еще статьи по данной теме:
Помогла ли Вам статья?
You can run SFC and DISM scan to fix it
by Srishti Sisodia
Srishti Sisodia is an electronics engineer and writer with a passion for technology. She has extensive experience exploring the latest technological advancements and sharing her insights through informative… read more
Updated on
- The Windows update error could occur due to corrupted system files or damaged Windows update components.
- This guide will cover all the available fixes to resolve the issue.

If you have encountered error code 0x800f0984 while updating your Windows 10 computer, this guide can help! We will discuss some available methods to resolve the problem right after examining the causes. Let’s start!
What causes the Windows update error 0x800f0984?
There could be several reasons for this update error; some of the common ones are mentioned here:
- Your PC is on a Power saving plan – If your computer is on a power-saving plan to conserve battery and timing, this could make some system components perform less.
- Corrupted system files – If the system files are missing, deleted, or damaged, you might get this update error. You need to repair system files using Command Prompt.
- Damaged Windows update components – If any of the Windows update folders, including Catroot2, and Software Distribution, you might not be able to update Windows.
What can I do to fix the Windows update error 0x800f0984?
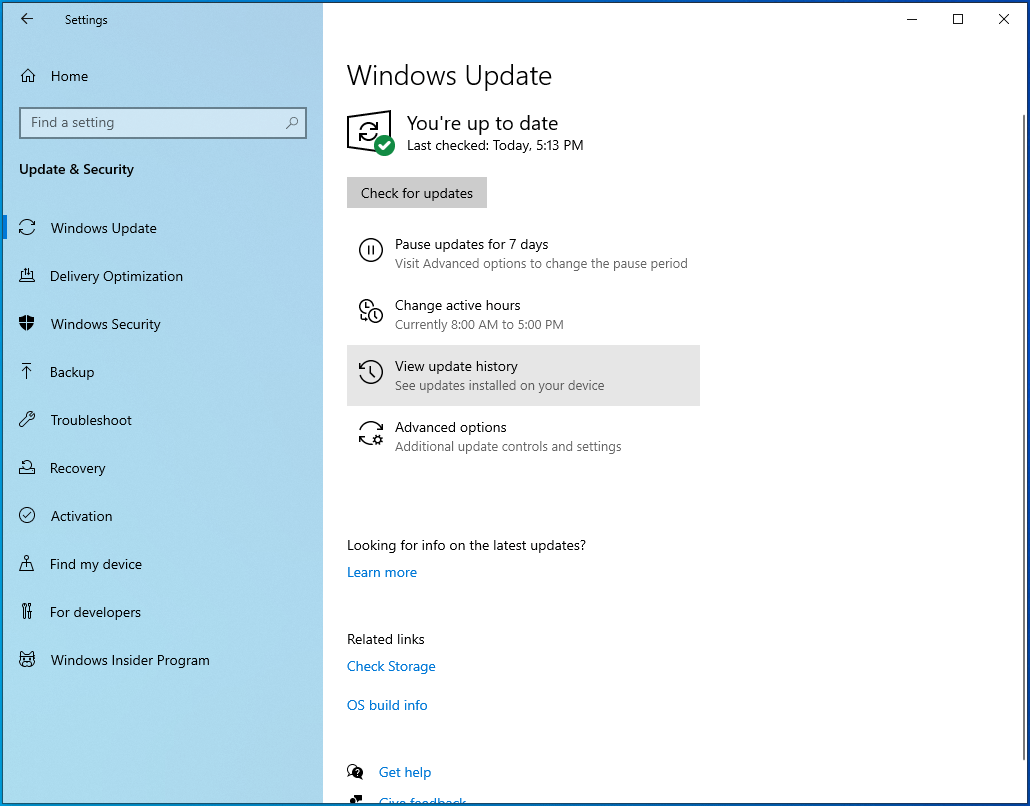
1. Run a Windows troubleshooter
- Press Windows + I to open the Settings app.
- Go to Update & Security.

- Select Troubleshoot from the left pane and click Additional troubleshooters.
- Now select Windows update and click Run the troubleshooter.

- Follow the on-screen instructions to complete the process.
2. Install update manually
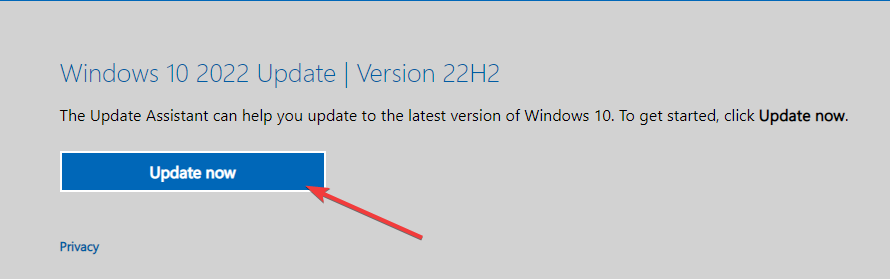
- Open the preferred browser and visit the Microsoft website Windows 10 section.
- Go to the latest Windows update section and click Update now.

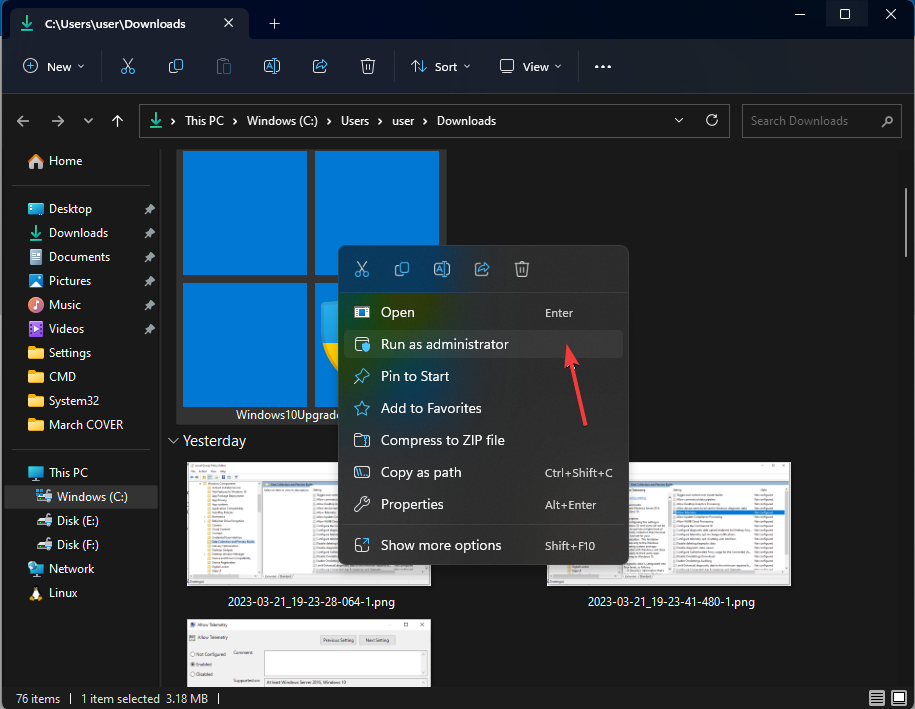
- The update will get downloaded. Once done, right-click the file and select Run as administrator.

- Now follow the on-screen instructions to install the update.
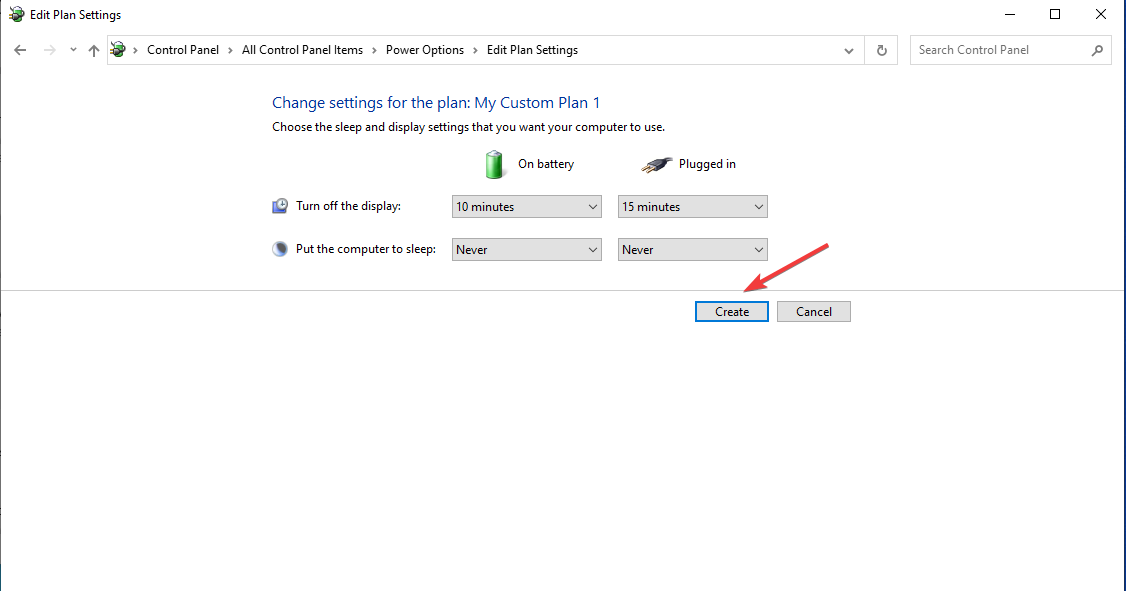
3. Modify the power plan
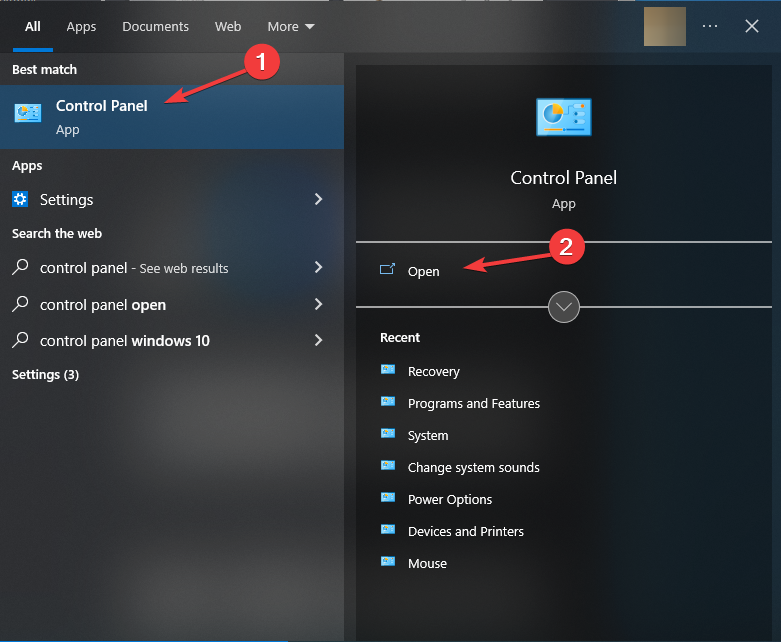
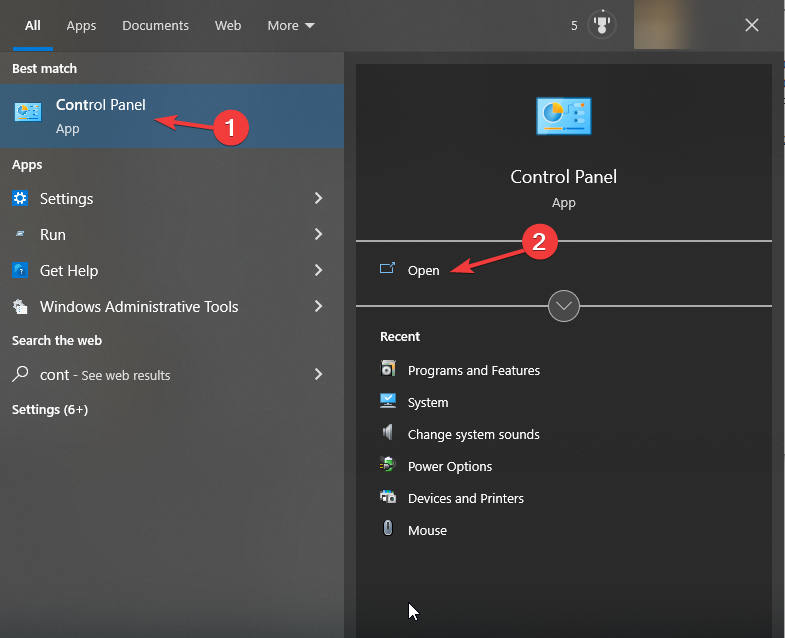
- Go to the Search bar, type Control Panel, and click Open.

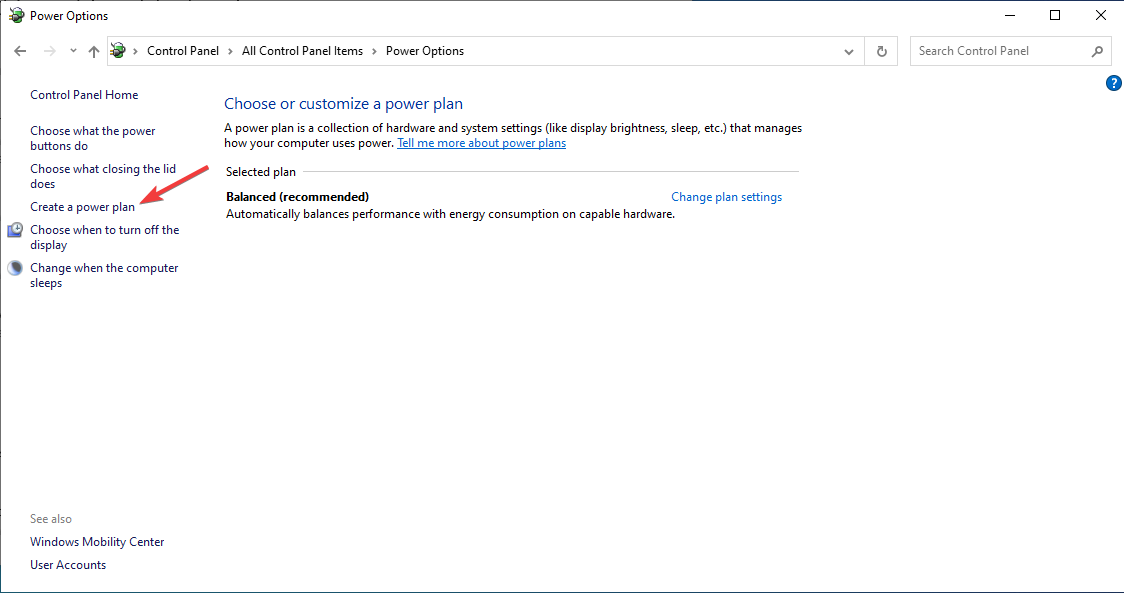
- Select Large icons as View by and click Power options.

- Click Create a power plan.

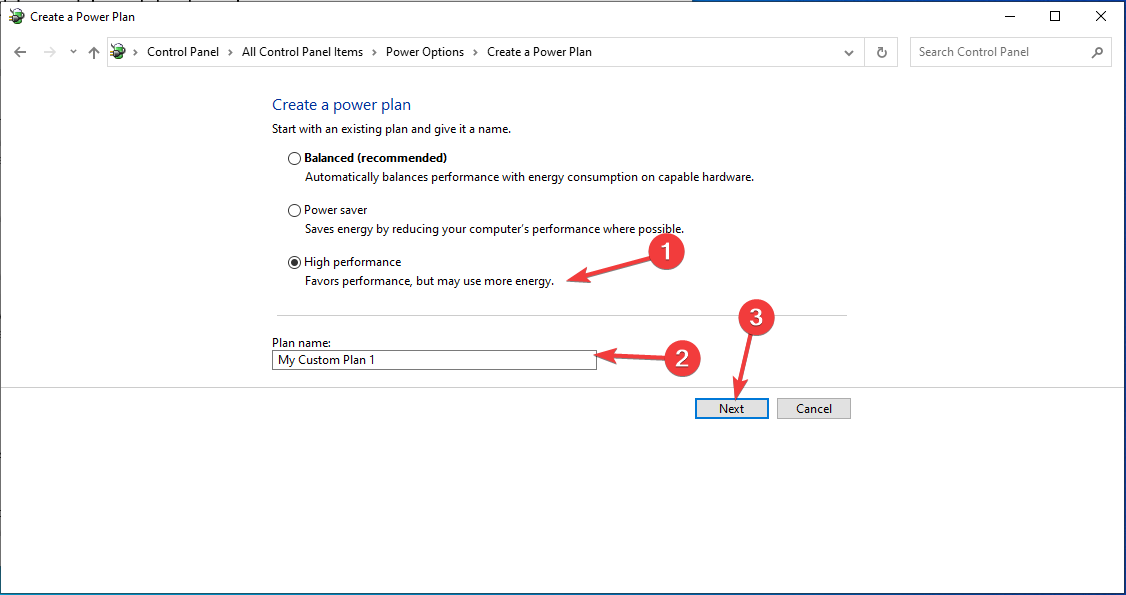
- Next, choose High Performance; under Plan name, enter a name if you want and click Next.

- Now click Create, and you will have a new power plan. Try to update Windows now.


- How to Report Amazon Phishing Scams
- How to Safely Power Limit Your GPU in MSI Afterburner
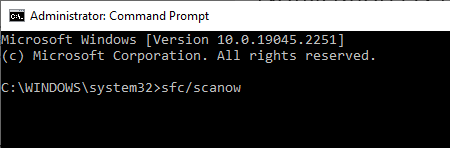
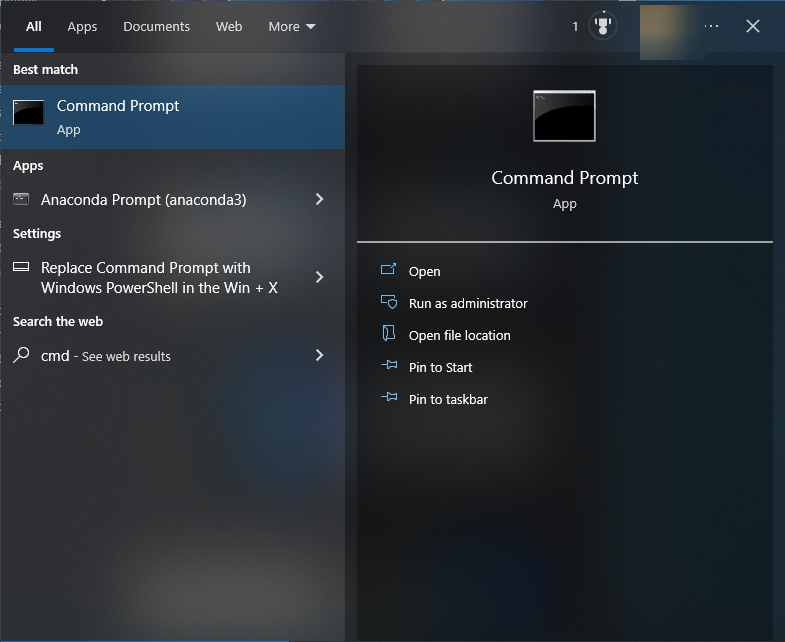
4. Use the Command Prompt
- Go to the Search bar, type CMD, and click Run as administrator.
- Type the following command to repair system files and press Enter:
sfc\scannow
- Next, copy
and paste the following commands one by one to repair your Windows image,and press Enter after every command:DISM /Online /Cleanup-Image /CheckHealthDISM /Online /Cleanup-Image /ScanHealthDISM /Online /Cleanup-Image /RestoreHealth - Restart your computer.
5. Reset Windows components
- Go to the Search bar, type CMD, and click Run as administrator.

- Copy and paste the following commands one by one and press Enter after every command:
net stop bitsnet stop wuauservnet stop appidsvcnet stop cryptsvcDel "%ALLUSERSPROFILE%\Application Data\Microsoft\Network\Downloader*.*"rmdir %systemroot%\SoftwareDistribution /S /Qrmdir %systemroot%\system32\catroot2 /S /Qregsvr32.exe /s atl.dllregsvr32.exe /s urlmon.dllregsvr32.exe /s mshtml.dllnetsh winsock resetnetsh winsock reset proxynet start bitsnet start wuauservnet start appidsvcnet start cryptsvc - Restart your computer to let the changes take effect.
6. Perform System Restore
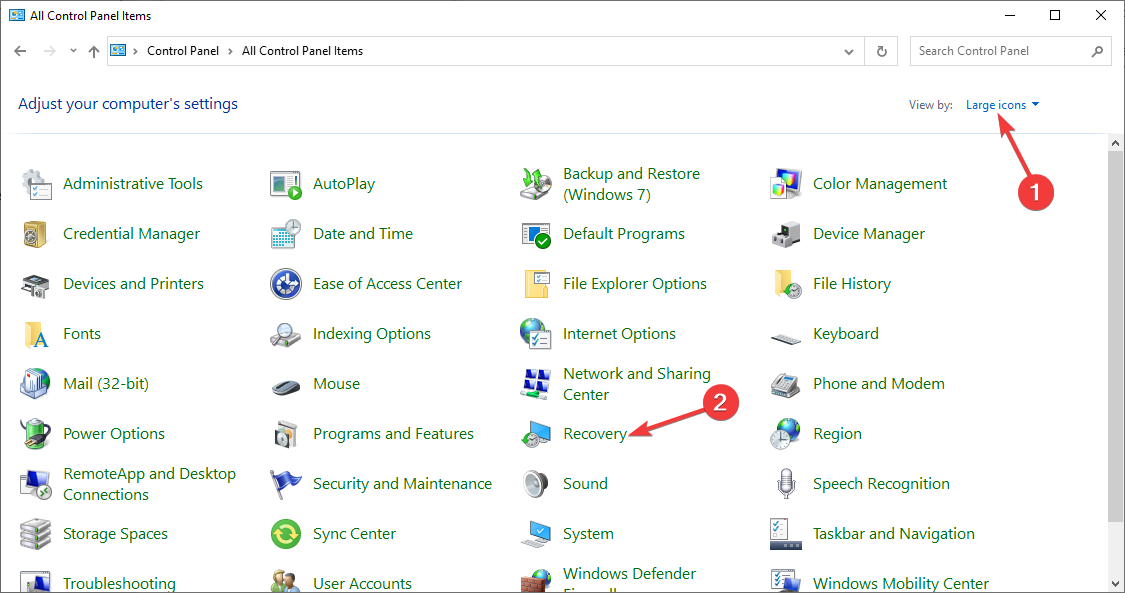
- Press the Windows key, type Control Panel, and click Open.

- Select Category as View by and click Recovery.

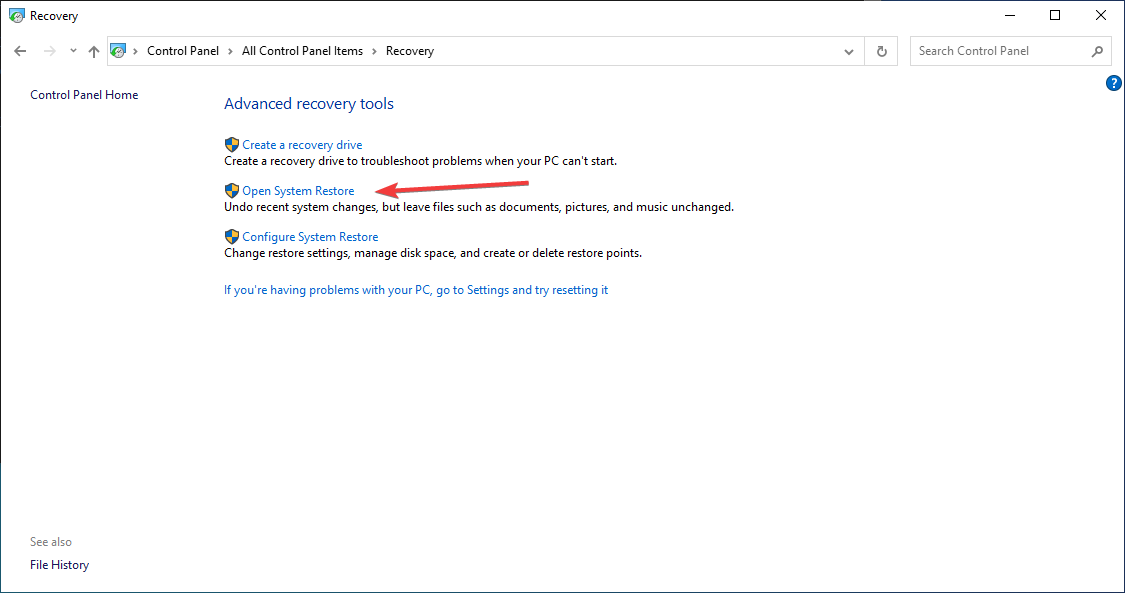
- Click Open System Restore.
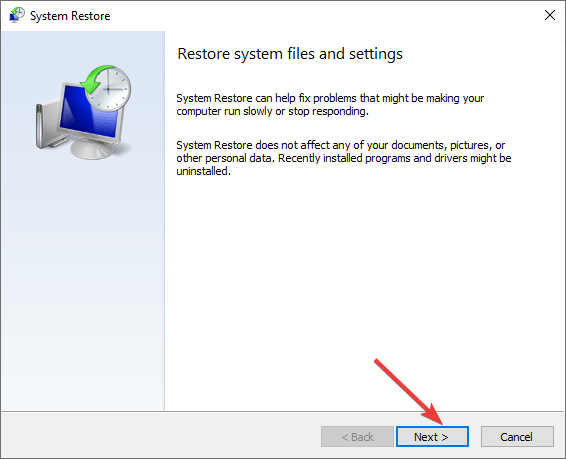
- On the System Restore window, click Next.

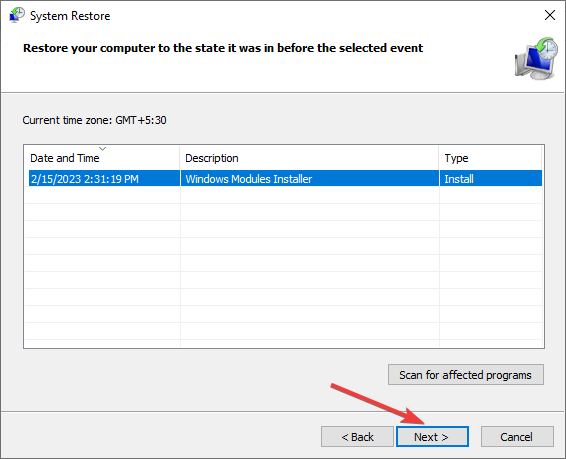
- Select the restore point and click Next.
- Click Finish, and your computer will be restored to the chosen point.
7. Perform in-place upgrade
- Go to the Windows 10 website.
- Under Create Windows 10 installation media, select Download tool now.

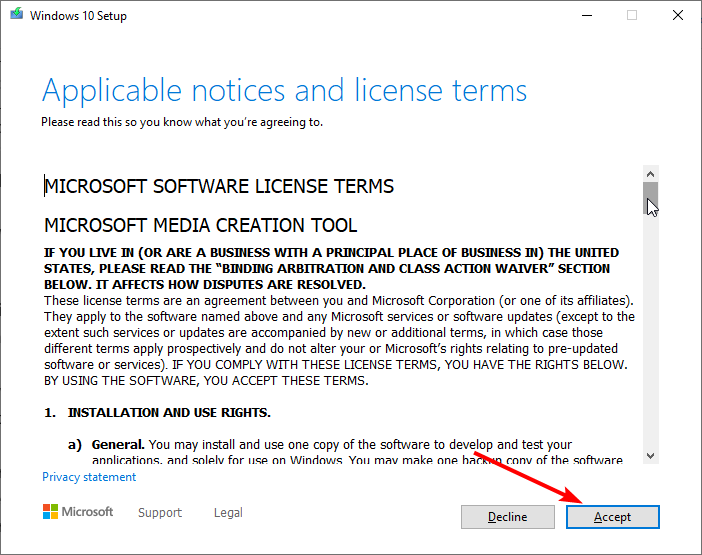
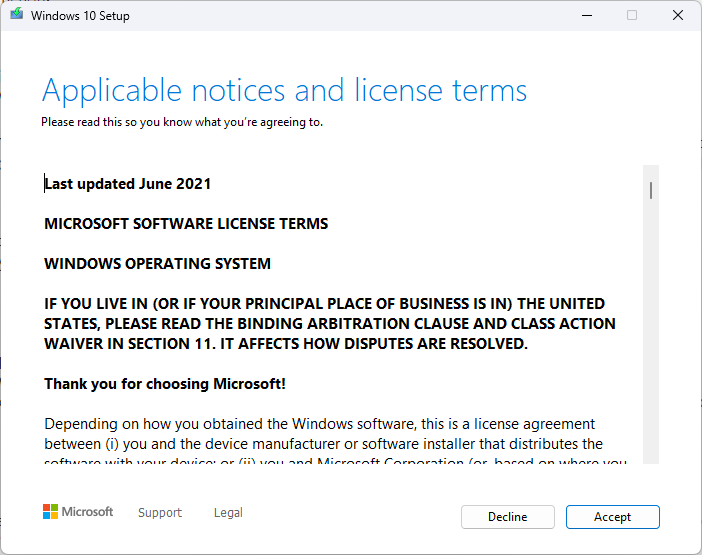
- Right-click the setup file that you downloaded, and select Run as administrator. On the setup page, click the Accept button on the license.

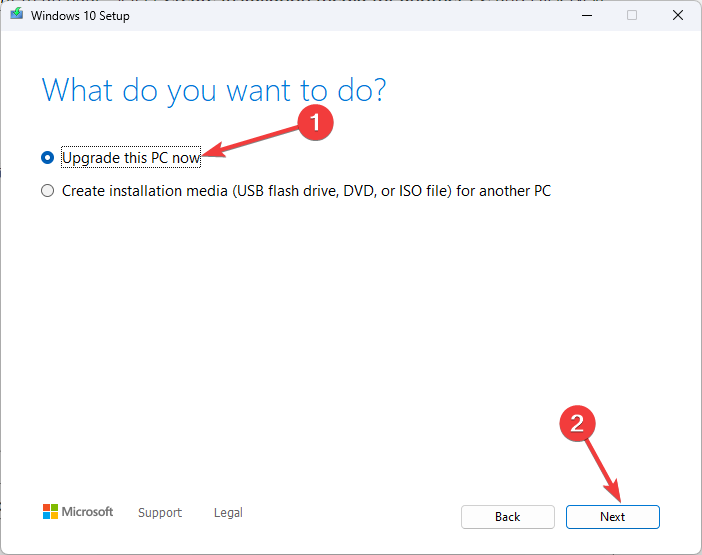
- On the What do you want to do page, select Upgrade this PC now and click Next.
- Now setup will download Windows 10. On the next page, click Accept.
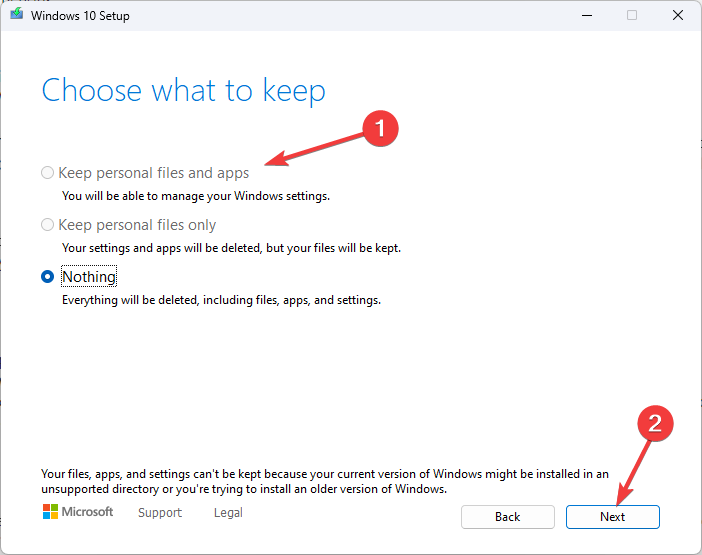
- Select the Keep personal files and apps option and click Next.
- Now, save and close any open apps and files you may be running, and when you’re ready, select Install.
So, these are methods you need to follow to fix the Windows update error 0x800f0984. Try them and let us know what worked for you in the comments section below.
![]()
0x800f0984 (PSFX_E_MATCHING_BINARY_MISSING) — это ошибка обновлений, которая появляется в Windows 10. Такие проблемы возникают довольно часто при попытке установить новые патчы от Microsoft. Как показывает статистика, проблемы такого рода возникают из-за поврежденных файлов или сбитых настроек, несовместимого программного обеспечения и множества других причин, вызывающих конфликт с центром обновлений Windows. Ниже мы рассмотрим все шаги, которые с большей вероятностью решат проблему 0x800f0984.

Скачать средство восстановления Windows
Скачать средство восстановления Windows

Существуют специальные утилиты для восстановления Windows, которые могут решить проблемы, связанные с повреждением реестра, неисправностью файловой системы, нестабильностью драйверов Windows. Мы рекомендуем вам использовать Advanced System Repair Pro, чтобы исправить «Ошибка Центра обновления Windows 0x800f0984» в Windows 10.
1. Воспользуйтесь средством устранения неполадок Центра обновления Windows
Всякий раз, когда вы сталкиваетесь с проблемами обновлений, первое, что стоит попробовать, — это средство устранения неполадок Windows — то бишь специальная утилита, которая встроена в вашу систему. Вот простые шаги для запуска утилиты.
- Открытые Настройки , а затем перейдите в Обновление и безопасность > Устранение неполадок.
- На правой панели найдите Центр обновления Windows и нажмите Запустить средство устранения неполадок.
- Завершите процесс, следуя инструкциям на экране, и перезагрузите компьютер.
2. Запустите сканирование с помощью средства проверки системных файлов (SFC).
Как мы упоминали во введении к этой статье, некоторые проблемы с обновлением могут быть вызваны отсутствующими или поврежденными файлами. Обычно эти файлы являются важными компонентами системы, обеспечивающими надлежащую связь между различными процессами в системе. Если некоторые из этих файлов отсутствуют, то скорее всего, это вызовет ошибку. Ниже воспользуемся средством проверки системных файлов (SFC) и DISM, которые помогут обнаружить и восстановить отсутствующие компоненты. Вот как:
- Открытые Командная строка , введя
cmdв поле поиска рядом с Меню Пуск кнопку. - Щелкните правой кнопкой мыши по Командная строка , а затем выбрать Запуск от имени администратора.
- После открытия консоли введите
sfc /scannowкоманду и нажмите Enter. - Когда процесс восстановления будет завершен, перезагрузите компьютер.
После того, как вы закончите этот шаг, попробуйте снова установить обновление. Если ошибка по-прежнему напоминает о себе, попробуйте сканирование DISM ниже.
3. Запустите DISM
Обслуживание образов развертывания и управление ими (DISM) аналогично запуску сканирования SFC. Однако оно использует разные алгоритмы для поиска проблемы и исправления поврежденных данных, которые SFC может пропустить. Поэтому давайте попробуем запустить этуо сканирование с помощью командной строки, как мы это уже делали.
- Открытые Командная строка как мы это делали на предыдущем шаге.
- Скопируйте и вставьте эту команду
DISM.exe /Online /Cleanup-image /Restorehealth. - Нажмите Enter и подождите, пока Windows закончит сканирование и исправление.
- После этого перезагрузите компьютер и снова установите обновление.
4. Отключите / удалите стороннее ПО.
Стороннее ПО, такое как антивирус, склонно вызывать сбои в работе некоторых служб. Оно может заподозрить и ошибочно принять какой-то процесс за нечто подозрительное. По какой-то причине даже службы Windows могут быть занесены в черный список и ограничены антивирусным ПО. Поскольку мы не знаем, так ли это на самом деле, попробуйте отключить сторонний антивирус, если он у вас установлен. Помимо того, что антивирус является виновником таких ошибок, нежелательные или вредоносные программы также могут привести к тем же последствиям. Если вы помните, как недавно устанавливали что-то новое, попробуйте удалить это и посмотреть изменилось ли что-то. Возможно, это решит проблему. Если вы не знаете, как правильно удалять вредоносные программы, рекомендуем вам загрузить отличный и проверенный антивирус от MalwareBytes (используйте кнопку ниже).
Скачать Malwarebytes
5. Установите необходимое обновление в безопасном режиме.
Вместо удаления стороннего ПО, которое вызывает конфликт с обновлениями Windows, вы можете запустить свой компьютер в безопасном режиме. Эта функция загрузит вашу систему только с настройками конфигурации по умолчанию, что предотвратит взаимодействие сторонних программ с процессами Windows. Вот как:
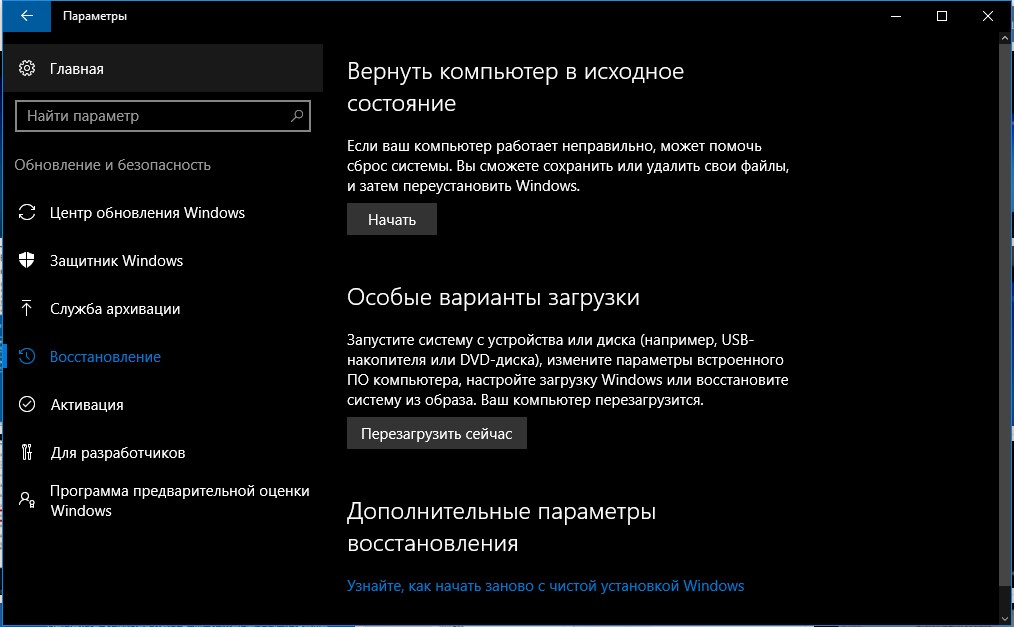
- Откройте Настройки через меню Пуск или нажмите Windows key + I вместе.
- Откройте Обновление и безопасность > Восстановление > Особые варианты загрузки.
- Затем нажмите Перезагрузить сейчас.
- Ваша система будет перезагружена и запустится в Среда восстановления Windows.
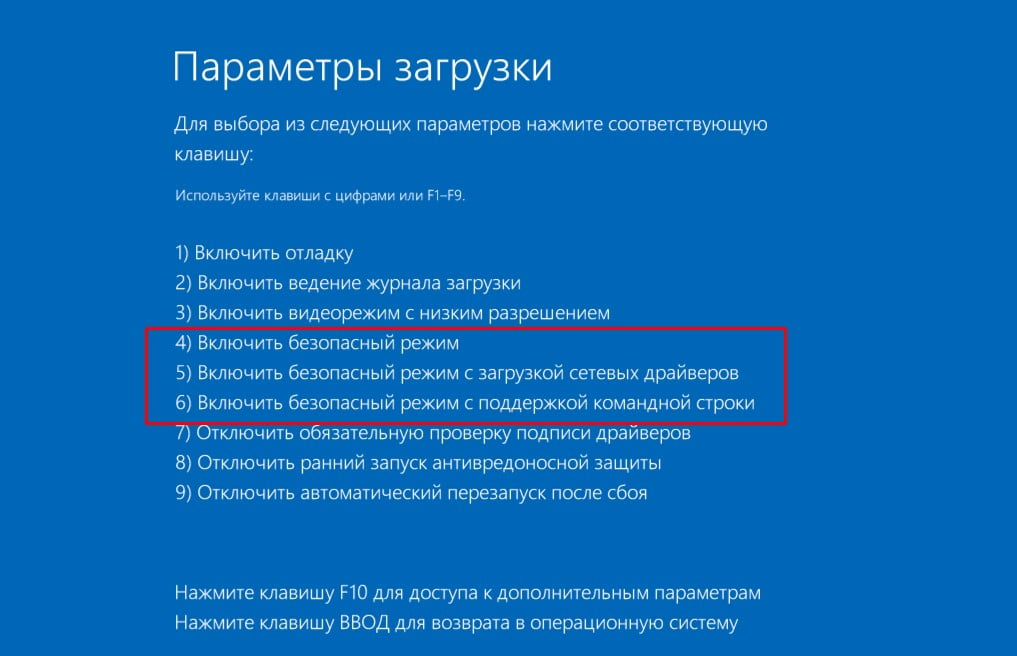
- Находясь там, выберите Устранение неполадок > Дополнительные параметры > Параметры загрузки.
- Теперь нажмите Restart , а затем выбрать Включить безопасный режим с загрузкой сетевых драйверов после перезагрузки.
- Находясь в Безопасный режим, попробуйте установить конфликтующее обновление еще раз.
6. Перезапустите компоненты и Службу обновления Windows.
Этот метод поможет вам сбросить настройки Центра обновления Windows. Вся процедура включает перезапуск служб BITS, Cryptographic, MSI Installer и Windows Update, а также переименование некоторых папок обновлений (SoftwareDistribution и Catroot2). Эти папки содержат специальные подписи для обновлений Windows. Исходя из этого, мы заставим Windows удалить поврежденные элементы и создать компоненты обновления с нуля. Для этого мы воспользуемся консолью, чтобы выполнить необходимые нам команды. Это более сложный вариант, но для его выполнения не потребуется много времени и знаний. Просто следуйте инструкциям ниже:
- Открытые Командная строка , введя
cmdв поле поиска рядом с Меню Пуск кнопку. - Щелкните правой кнопкой мыши по Командная строка , а затем выбрать Запуск от имени администратора.
- Скопируйте и вставьте этот список команд одну за другой, нажимая Enter после каждой из них. (Это действие отключит службы, отвечающие за обновления Windows)
- Затем мы должны переименовать вышеупомянутые папки. Просто вставьте эти команды, нажимая Enter после каждой.
- Наконец, все, что осталось сделать, это вернуть отключенные службы. Введите эти команды так же, как мы делали ранее.
- На этом все. Перейдите в Центр обновления Windows и попробуйте установить обновление снова.
net stop wuauserv

net stop cryptSvc

net stop bits

net stop msiserver
ren C:\Windows\SoftwareDistribution SoftwareDistribution.old

ren C:\Windows\System32\catroot2 Catroot2.old
net start wuauserv

net start cryptSvc

net start bits

net start msiserver
7. Попробуйте загрузить конфликтующее обновление из каталога Microsoft.
Если у вас возникла проблема с получением КБ обновлений, то вы можете попробовать установить их вручную. Перед тем как это сделать, нам нужно будет запомнить, какое обновление вам необходимо установить. Для этого:
- Нажмите Windows key + I одновременно.
- Затем перейдите в Обновление и безопасность.
- В правой части окна выберите Просмотр журнала обновлений.
- После этого найдите и запишите самое последнее обновление КБ (вверху списка).
- Затем загрузите записанное обновление из Microsoft Update Catalog.
8. Используйте Media Creation Tool.
Другой вариант установки обновлений — через Media Creation Tool. Этот способ позволяет пользователям обновлять систему до последней существующей версии. Эта процедура не коснется ваших личных данных, а просто обновит компьютер. Для этого выполните следующие действия:
- Для начала, вам нужно скачать утилиту с веб-сайта Microsoft.
- Затем запустите загруженный файл.
- После того, как вы согласитесь с Условиями использования, вам будет предложено два варианта на выбор. Выберите Обновить этот компьютер сейчас.
- Выберите Сохранить личные файлы чтобы они не пострадали.
- Наконец, запустите процесс и дождитесь его завершения.
- Надеемся, этот метод помог вам избавиться от ошибки 0x800f0984.
Итоги
Мы рады сообщить, что вы подошли к кону данного руководства. Уверенны, что по крайней мере одно из перечисленных решений помогло решить возникающую проблему. Надеемся, что это так, и вас больше не беспокоят навязчивые предупреждения об ошибках. На нашем веб-сайте вы также можете найти статьи, помогающие бороться с вредоносным ПО, потенциально нежелательными программами и другими ошибками, связанными с Windows, которые появляются у множества пользователей.
Contents
- What Is the Windows 10 Error Code 0x800f0984?
- How to Get Rid of the Error Code 0x800f0984 When Updating Windows 10
- Fix 1: Use the Windows Update Troubleshooter
- Here’s how to use the troubleshooter:
- Fix 2: Run the DISM and SFC Tools
- Fix 3: Perform a Clean Boot
- Fix 4: Delete the Contents of the SoftwareDistribution Folder
- Here are the steps:
- Fix 5: Perform a System Restore
- To perform a system restore, follow these guidelines:
- Fix 6: Remove the Problematic Windows Update
- Here’s how:
- Fix 7: Reset Your PC
- Here is how to proceed:
- If you can’t get to your desktop, follow the instructions below:
- Optimize Your PC’s Performance

Are you looking for information on how to resolve the Windows 10 Update error code 0x800f0984? We are here to help.
Many Windows users are running into this Windows Update error, which is preventing them from accessing their systems. According to several users, the Windows Update error 0x800f0984 occurred after installing the recent KB5001330 update for Windows 10 version 20H2 and 2004. It’s the same error users encountered when trying to install Windows 10 Cumulative Update KB5000842.
The KB5001330 update was a mandatory download intended to patch the problems caused by the previous update, including the long-running problems with printers. In this article, we’ll show you how to fix the Windows 10 Update error code 0x800f0984.
What Is the Windows 10 Error Code 0x800f0984?
The Windows Update service simplifies the entire process of updating your Windows PC. Usually, the updating process is automatic, meaning Windows automatically downloads and installs any available updates to your PC. These updates improve certain functionalities and security features to protect your computer from threats.
The Windows Update error code 0x800f0984 occurs when trying to install updates. The error code means “PSFX_E_MATCHING_BINARY_MISSING (Matching component directory exists but binary missing)”.
Some users on Reddit were furious when their update process got stuck at 20%, then again at 73%, then at 100%, and then finally failed.
So, what’s causing the Windows Update error code 0x800f0984? Well, if the Windows Update service fails to function correctly, you’ll likely run into issues trying to install updates. Additionally, the error code 0x800f0984 could be a result of corrupted system files. This may occur due to software conflicts.
In other cases, your antivirus program could be blocking the files from getting installed on your computer. If so, try temporarily disabling your antivirus software and check if the updates go through.
The good news is that there are fixes that you can apply to resolve the Windows 10 Update error code 0x800f0984.
How to Get Rid of the Error Code 0x800f0984 When Updating Windows 10
Fix 1: Use the Windows Update Troubleshooter
Windows machines come with in-built troubleshooters that help to detect problems and fix them automatically. The Windows Update troubleshooter will scan for and repair any update-related issues on your computer.
Here’s how to use the troubleshooter:
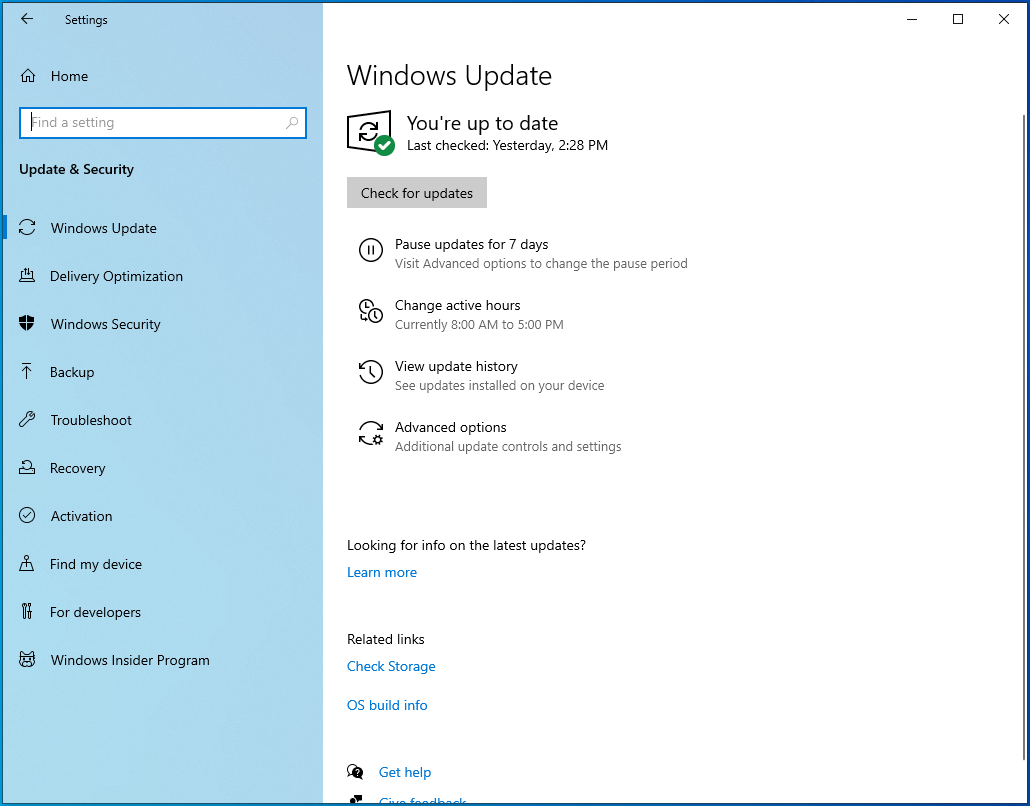
- Open your Settings app (Win + I).

- Go to Update & Security.

- Select Troubleshoot.

- Navigate to the “Additional troubleshooters” link on the right sidebar and select it.
- On the next page, find the “Windows Update” option, left-click on it once, and click on “Run the troubleshooter”.
- Follow the on-screen instructions to try and resolve the Windows Update error code 0x800f0984.
- Let the process run uninterrupted, and restart your PC once it completes.

The DISM (Deployment Image Servicing and Management) tool is a Windows built-in utility that helps to repair and replace corrupt Windows images. The SFC (System File Checker) tool, on the other hand, is a Windows utility that scans and restores corrupted Windows system files. These tools come in handy when faced with various PC problems, like failed Windows updates.
We’ll start by running an SFC scan to resolve any corruption in the system files. Here’s how to run SFC:
- Launch an elevated command prompt. To do that, press the Win + R keyboard shortcut, type CMD into the “Run” dialog box, and press the Ctrl + Shift + Enter keyboard shortcut.

- Click “Yes” if you get a UAC prompt.

- Once the “Administrator Command Prompt” window comes up, type or paste the command sfc /scannow and press “Enter”.

- The SFC tool will run for a while, attempting to fix corrupted system files by replacing them with good copies.
Once the process completes successfully, restart your computer and check if the issue has been resolved.
If you run into the “Windows Resource Protection could not start the repair service” error message, the Windows Modules Installer service could be disabled. To check this and enable it if need be, follow the instructions below:
- Press the Windows logo on your keyboard, type “Services” (without quotes), and hit “Enter”.
- In the “Services” window, locate the Windows Modules Installer service and double-click on it.
- Under “Startup type”, set it to “Manual” and click on Apply > OK.
- Now, go back to the command prompt and execute the sfc / scannow command.
If the SFC tool doesn’t find any errors, try repairing Windows 10 image files using the DISM tool. Here’s the procedure:
- Open an elevated command prompt as outlined above and execute the following command: DISM/ Online/ Cleanup-Image/ RestoreHealth.
- This process may take a while depending on the level of corruption. Therefore, wait patiently while the tool is repairing corrupt Windows image files.
- After it’s done, restart your computer and try installing Windows updates.
Fix 3: Perform a Clean Boot
Performing a clean boot makes it easier to identify if there are any software conflicts on your PC. If no errors occur in this state, then it means the issue is caused by external factors. In a clean boot environment, your PC starts with a minimal set of drivers and startup programs. This may help get rid of software conflicts that may occur when you install a third-party application in Windows.
To perform a clean boot, follow these instructions:
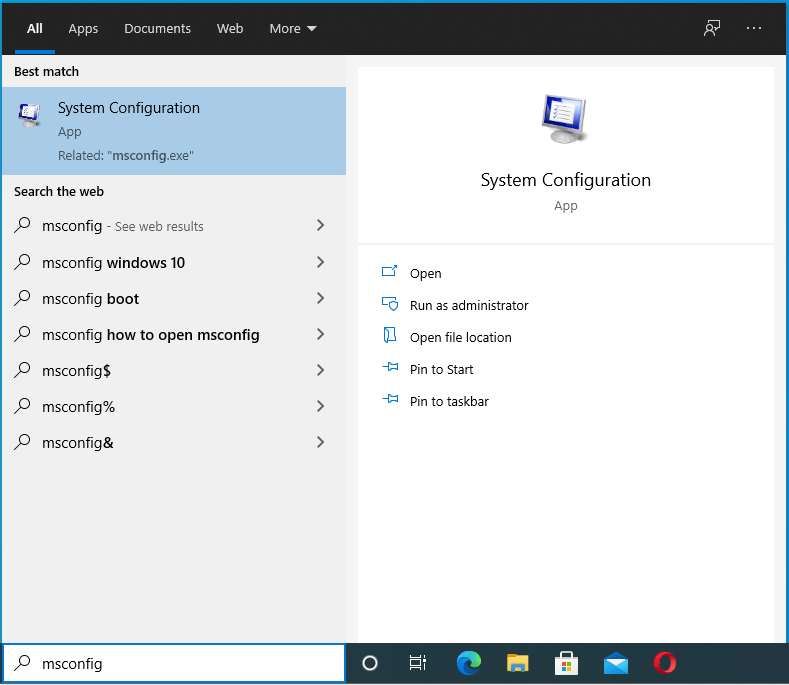
- Press the Windows logo on your keyboard, type msconfig into the Windows Search box, and hit “Enter” to launch System Configuration.

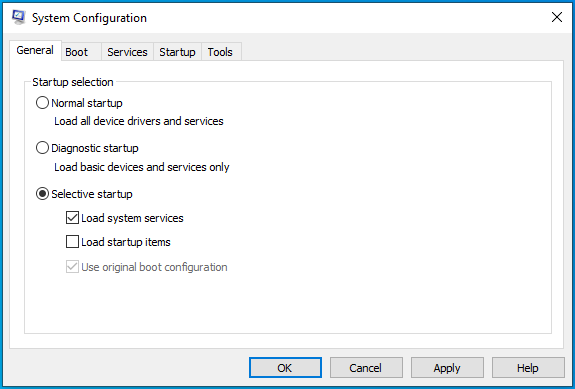
- Under the “General” tab, uncheck the “Load startup items” box, but leave the “Load system services” and “Use original boot configuration” options checked.

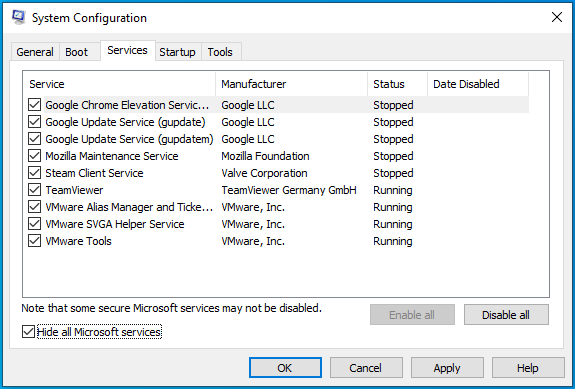
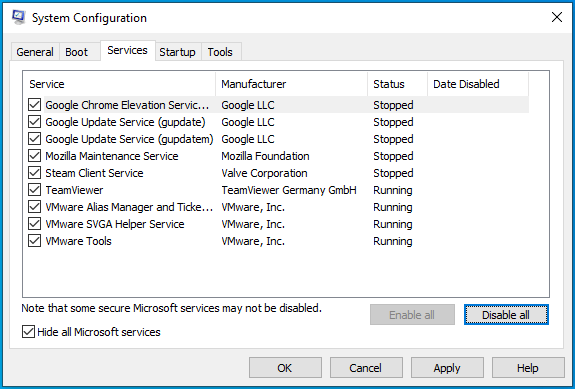
- Go to the “Services” tab and click on the “Hide all Microsoft services” checkbox.
- Click the “Disable all” button. This disables all non-Microsoft services.
- Next, under the “Startup” tab, click on “Open Task Manager” and disable all items set to start up when you boot the computer. Once you’re done, exit the Task Manager and go back to the System Configuration window.
- Click on Apply > OK and restart your PC.
If all goes well, then one of your third-party applications is to blame for the Windows Update error code 0x800f0984. To find the culprit, enable the applications one by one and restart your PC every time you do so.
Once you find the culprit, consider removing it from your machine or leave it disabled. To go back to the normal Windows environment, simply undo the changes you performed while following the steps from the list above.
Fix 4: Delete the Contents of the SoftwareDistribution Folder
The SoftwareDistribution folder is where Windows Update files are temporarily stored. These files are needed to install new updates that keep your device secure and the latest improvements.
The folder is maintained by the Windows Update Agent (WUAgent) and normally shouldn’t be deleted. However, when faced with issues while trying to install Windows updates, clearing this folder may be the best option.
Windows will redownload all the required files or recreate the folder and redownload all the necessary components. If you don’t want to clear the folder and simply want to test if its contents are preventing the updates from being applied, you can rename it using the following steps:
- Run an elevated command prompt. To do that, press the Win + R shortcut, type cmd into the text box, and press the Ctrl + Shift + Enter combination.

- Click “Yes” if you get a UAC prompt.

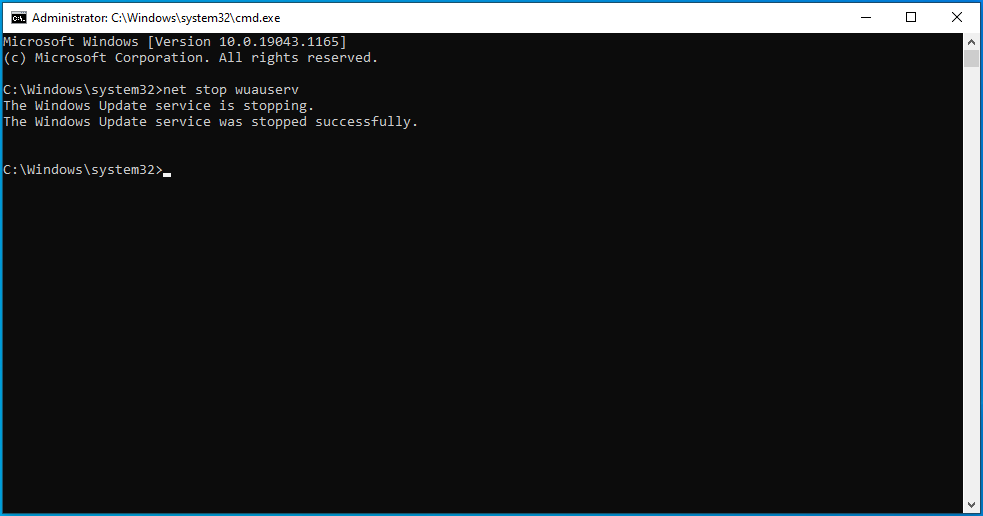
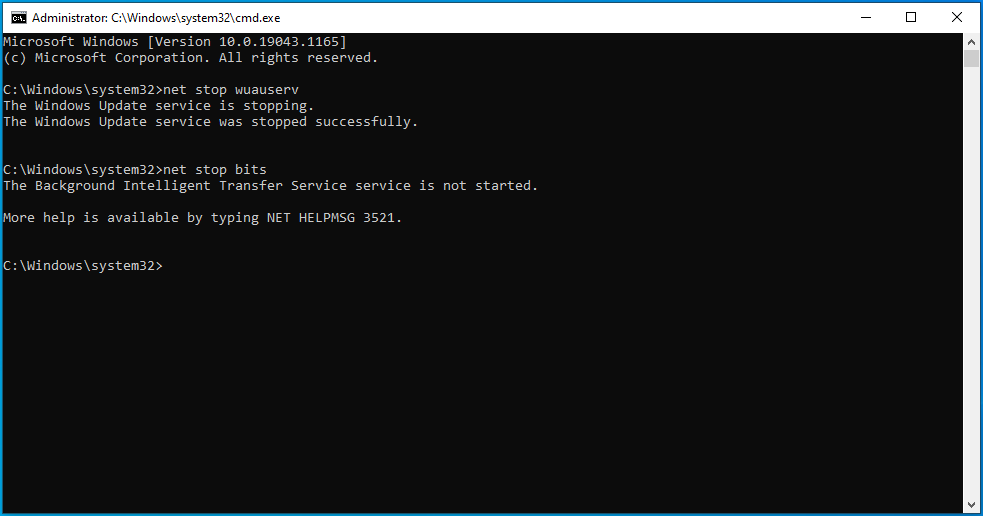
- In the Command Prompt window with administrator rights, type the command net stop wuauserv and press “Enter”. This will stop the Windows Update service.
- Next, you’ll need to stop the Background Intelligent Transfer Service by executing the command: net stop bits.
- Now, enter the command rename %windir%\SoftwareDistribution SoftwareDistribution.bak to rename the folder. If the command doesn’t go through the first time, repeat Steps 3 and 4 above and try renaming the folder again.
- If you manage to rename the folder, restart the services you stopped earlier. To do that, execute the following commands one after the other:
- net start wuauserv
- net start bits
Renaming the SoftwareDistribution folder will trigger Windows to recreate it and redownload all the required components. If you see that the Windows Update error code 0x800f0984 is triggered by that, the best course of action is to clear the SoftwareDistribution folder.
Here are the steps:
- Press the Windows logo key and search for Command Prompt. Be sure to run it as an administrator.
- In the elevated command prompt window, type or paste the following commands one after the other and press “Enter” after each action:
- net stop wuauserv
- net stop bits
- Next, open File Explorer by pressing the Win + E shortcut and navigate to the C:\Windows\SoftwareDistribution\ folder. Alternatively, open the “Run” window using the Win + R keyboard shortcut, type or paste the path C:\Windows\SoftwareDistribution\ and press “OK”.

- In this folder, select all the contents using the Ctrl + A shortcut and hit the “Delete” key. If you run into problems deleting the items, restart your PC and try again.
- Once done, launch the Command Prompt with elevated rights as shown above and execute the following commands one after the other:
- net start wuauserv
- net start bits
Once you finish applying these steps, Windows will reconfigure the folder and redownload all the necessary components.
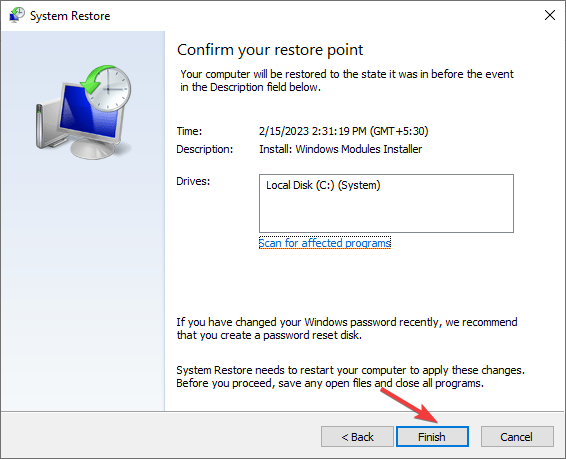
Fix 5: Perform a System Restore
The System Restore feature is useful in situations where you run into PC errors but can’t find the source of the problem. You see, your Windows system creates system restore points periodically, and this can come in handy when trying to resolve PC issues.
System Restore takes your computer back to a state before the error first occurred. For this step to be successful, it’s crucial to recall when you first encountered the error.
To perform a system restore, follow these guidelines:
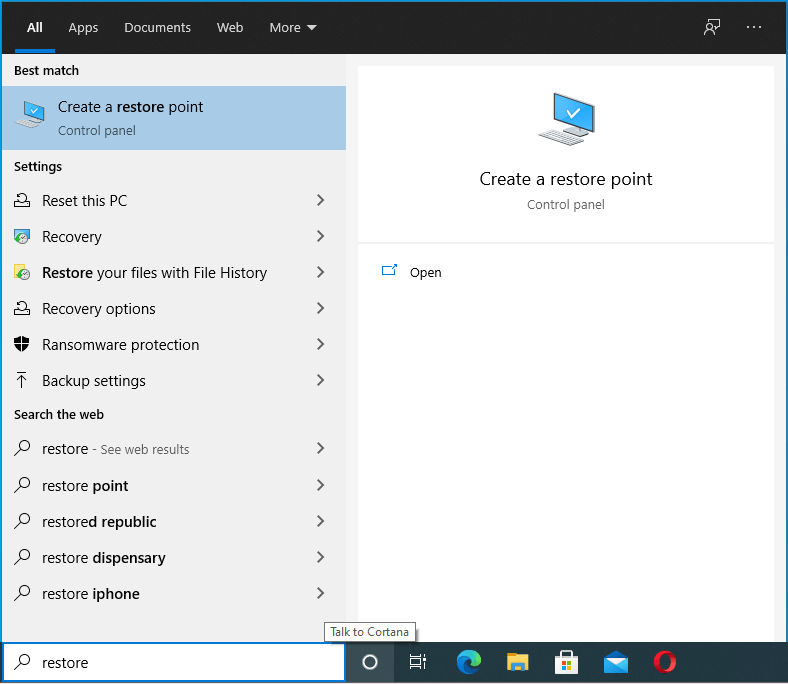
- Go to your “Start” menu, type “Restore” (without quotes) and select “Create a restore point”.

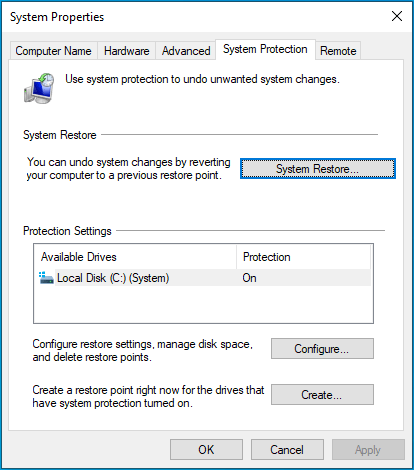
- Click on the “System Restore” button and then select “Next”.

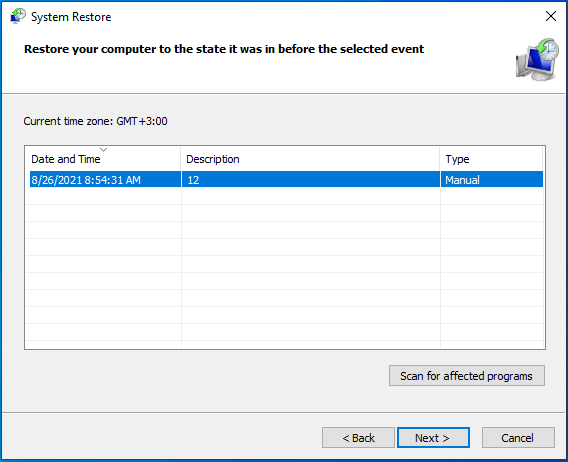
- Find the most appropriate restore point from the list. If you can’t find the relevant restore point, click on the “Show more restore points” option.

- Once you find the restore point you need, select it and click on “Next”.

- Confirm everything on the next page, and if satisfied with the selection you made, click on the “Finish” button.

Keep in mind that for your system to be restored, your PC will need to restart. So, be sure to save all your work before proceeding. Restoring the system should get rid of the error code 0x800f0984 when updating Windows 10.
Fix 6: Remove the Problematic Windows Update
As noted, users encountered the Windows Update error code 0x800f0984 after installing the KB5001330 update. You can try uninstalling it to check if the error goes away.
Here’s how:
- Press the Win + I keyboard shortcut.
- Open Update & Security > Windows Update.
- Click on the “View update history” option in the right sidebar and select “Uninstall updates”. This action takes you to the “Installed updates” page in the Control Panel.
- Search for the KB5001330 update, select it and click on “Uninstall”.

If it’s the update that triggered the system malfunction, then removing it should fix the problem.
Fix 7: Reset Your PC
If nothing seems to work, you can choose to reset your PC. What this process does is reinstall Windows, giving your machine a new breath of life. You can reset your PC via several methods, the easiest one being from “Settings”.
Here is how to proceed:
- Go to “Start”.

- Click on the gear icon to launch the “Settings” app.

- Select Update & Security.
- Navigate to Recovery.
- “Reset this PC” should be the first option. Click on the “Get started” button and select one of the options presented to you. If you choose to keep your files, Windows will be reinstalled, but your files will remain intact. All the apps and drivers you installed will be removed, and the configured settings will be reset to the factory defaults. If you choose to remove everything, Windows will be reinstalled, and everything else, including your personal files, apps, drivers, and settings, will be removed.

If you can’t get to your desktop, follow the instructions below:
- Restart your PC. If the PC is stuck or frozen on the update screen, hold down the power button to force it to shut down and then power it up. On the sign-in screen, press the Shift key while you click on the “Power” button. Your PC will restart into WinRE (Windows Recovery Environment).
- On the “Choose an options” page, click on Troubleshoot > Reset this PC, and choose one of the options in Step 2 above.
Resetting your PC should fix the Windows 10 Update error code 0x800f0984, and all the updates should install without any further issues.
Optimize Your PC’s Performance
At the end of the day, it’s advisable to keep your PC optimized. The thing is, every time you do something on your PC, whether it’s installing a program, using Word, or deleting applications, you leave behind a trail of files. These junk PC files accumulate over time and may start affecting your system.
Since it’s not easy to track all these changes and delete the files each time you use your computer, we recommend taking advantage of a PC optimization tool like Auslogics BoostSpeed. Not only does the program clean junk files, but it also scans the entire system, tweaking your settings to enhance system performance.
BoostSpeed gives you access to a variety of useful features that help boost your Windows PC. Among them are tools to clean your registry, remove unnecessary applications, defragment your drives, get rid of file duplicates, tweak internet settings, and delete traces of your activity to protect your privacy.
The entire process is automated, meaning with a single click of a button, the tool performs all the hard work for you. To ensure continuous smooth performance, there is an option to schedule automatic system maintenance at a frequency of your choosing. This will keep your Windows system slim, clean, and always functioning at peak levels. Don’t let slow PC performance slow you down – speed up your PC with Auslogics BoostSpeed.
При попытке обновить Windows 10 в окне «Центра обновления Windows» может появиться сообщение об ошибке, в котором в конце указан код 0x800f0984. Это довольно распространенная проблема, которая в целом поддается исправлению вручную. Преимущественно она возникает из-за каких-то сбоев в операционной системе или конфликта программ, не позволяющих произвести или закончить процесс апгрейда Windows 10. Быстрая инструкция по исправлению проблемы описана ниже.
Как исправить ошибку 0x800f0984?
Нам известно о 4 способах решения проблемы, которые уже помогли ряду пользователей. На основании того, что они выполняют, можем сделать вывод о причинах неполадки. Среди них главными первоисточниками можем считать: сбой в самом «Центре обновлений», ошибка в системных файлах, негативное влияние программного обеспечения.
Способ 1: используем средство устранения неполадок
Это самый очевидный и все же действенный способ. Так как в Windows много ошибок связаны с центром обновлений, Microsoft встроила специальную утилиту, которая автоматически сканирует основные места и исправляет все найденные баги.
Инструкция:
- Открываем Пуск, в поиск вводим «Поиск и устранение неполадок Центра обновления Windows» и нажимаем на этот пункт.
- Кликаем «Далее» и ждем.
- Если удастся найти ошибку, выдаем разрешение программному мастеру на ее автоматическое исправление.
Способ 2: используем сканирование системных файлов
Если запустить инструмент SFC или DISM, скорее всего удастся избавиться от разного рода системных сбоев. Все работает предельно просто – нужно в командную строку ввести sfc /scannow. Аналог данной процедуры, который может сработать там, где не помог SFC — Dism /Online /Cleanup-Image /RestoreHealth. Рекомендуем воспользоваться обеими командами, высока вероятность, что какой-то инструмент сработает. Даже если ошибка останется, это может помочь от других проблем.
Способ 3: обновляем Windows в безопасном режиме
Важнейшее преимущество безопасного режима – в нем не запускаются все второстепенные программы, работает только операционное ядро и ничего лишнего. Таким образом можем исключить или подтвердить проблемы в программном обеспечении. Если удастся открыть «Центр обновления Windows» и с помощью него произвести апгрейд, значит какой-то софт мешал это сделать. Сперва стоит «грешить» на антивирус, брандмауэр, но также может быть VPN, прокси и т. п. В противном случае, остается только последний способ.
Способ 4: сбрасываем Windows
Это последний вариант, к которому имеет смысл прибегать только в том случае, если ничего ранее не помогло. Мы делаем вывод, что обычные способы исправления не могут решить столько серьезную системную неполадку, поэтому ничего не остается, кроме как сбросить Windows к заводским настройкам.
Инструкция:
- Нажимаем Win + I и переходим в «Обновление и безопасность».
- Открываем опцию «Восстановление» и выбираем «Вернуть компьютер в исходное состояние».
- Выбираем параметр «Сохранить мои файлы», если есть место на облаке. В противном случае можем заранее сохранить нужные файлы отдельно.
- Жмем на кнопку «Сбросить».
Все возможные исправления ошибки 0x800f0984 в Windows 10 позади, а значит, скорее всего, вам удалось достичь желаемого результата, и ваша ОС обновилась до актуального состояния. Если у вас сработал какой-то другой способ или остались вопросы, оставляйте их в комментариях.