AndrUd писал(а): ↑13 мар 2023, 19:56
то ищи мелкосхему 24Схх (не та которая в кроватке) и меняй
не нашел, сейчас еще пройдусь по форматтеру. Есть 8ми ногая на Sub PWB, но что за память — не знаю.

- ShareX_20230314094954AM.jpg (49.42 КБ) 707 просмотров
Думаю в ней всё самое основное, к которому привязывается main/eng PWB, не зря её запихали в глубину души аппарата.
[/quote]
Отправлено спустя 38 секунд:
AndrUd писал(а): ↑13 мар 2023, 19:56
еще один путь шитье флэшки, но нужен дамп.
найдешь донора — слей с него дамп 24Qxxx да и 24Схх тоже и залей в нерабочую, так точно рабочего донора не угробишь.
Нет ни донора, ни дампа ((((
Отправлено спустя 3 минуты 49 секунд:
serg-serg писал(а): ↑13 мар 2023, 20:01
Вы пробовали поправить серийник энжина, пункт которого доступен в данный момент?
Руками не правится, только нажатием OK или Старт заставляет аппарат задуматься, сказать что всё хорошо и попросить выкл/вкл. Только результата не даёт эта процедура.
Отправлено спустя 1 минуту 56 секунд:
И серийник на дисплее соответствует шильдику на корпусе.
Отправлено спустя 6 минут 52 секунды:
AndrUd писал(а): ↑13 мар 2023, 19:56
то ищи мелкосхему 24Схх (не та которая в кроватке)
не могу найти, только в панельке


 Здравствуйте. TA-1801 при включении загружается до 6 делений и зависает. Если вытащить eeprom, то выдает ошибку 0180, при этом можно в сервисное меню зайти. из сервисного пробовал initial memory, — зависает, сброс на заводские — зависает, reset disable func — проходит норм, но при ребуте опять зависает на 6 делении. Хозяева говорят что прошивать пробовали, после прошивки все так же. Отключал штекер проявки, тогда при включении выдаёт ошибку, и можно зайти в сервисное меню, и в этом варианте все сбросы делаются нормально(сброс на заводские параметры, инит мемори). Но при включении все равно виснет. Было на форумах несколько таких тем, но не одна решением проблемы не завершена. Так что вот снова. Если кто решил такую проблему, на намекните хоть, как?
-
pilot511
- Осматривается
-
![]()
![]() mironosec » Чт окт 24, 2019 5:23 pm
mironosec » Чт окт 24, 2019 5:23 pm
Тоже зависает при включении, народ помогите, как с этим справится? Предполагаю, что нужно шить какую то микросхему, есть ли у кого дамп?
sps-838p@mail.ru
-
mironosec
- Разобрал струйный принтер
-
![]()
![]() mironosec » Пт окт 25, 2019 10:16 am
mironosec » Пт окт 25, 2019 10:16 am
Он зависает прямо при включении, там полоска бегает и в один момент она останавливается и все, соответственно в сервисный режим войти нельзя, видимо нужно выпаивать микросхему 25Q128 и шить ее через программатор, но дамп найти не могу, если есть у кого, буду очень признателен.
Аппарат Kyocera Taskalfa 1801, почта
sps-838p@mail.ru
-
mironosec
- Разобрал струйный принтер
-
![]()
-
-
Taskalfa 180 ошибка «Е» и «Встряхните картр. с тонером»
manik.76 в форуме Принтеры, МФУ, копиры формата A3
- 3
- 9944
dviz

Пн фев 20, 2017 1:35 pm
-
Taskalfa 180 ошибка «Е» и «Встряхните картр. с тонером»
-
-
Kyosera TASKalfa 221 — приоритет «MP tray» в режиме копира
Bujhm666 в форуме Принтеры, МФУ, копиры формата A3
- 4
- 3129
Bujhm666
Вт окт 29, 2013 3:11 pm
-
Kyosera TASKalfa 221 — приоритет «MP tray» в режиме копира
-
-
Kyocera taskalfa 3501 «открыта крышка основного блока»
Юрий Яраскин в форуме Принтеры, МФУ, копиры формата A3
- 3
- 3071
Goldwater
Пт сен 10, 2021 1:31 pm
-
Kyocera taskalfa 3501 «открыта крышка основного блока»
-
-
Черная заливка после смены барабана kyocera taskalfa 1800
djo-1 в форуме Принтеры, МФУ, копиры формата A3
- 4
- 3163
info@printercart.ru
Пт авг 07, 2020 11:29 pm
-
Черная заливка после смены барабана kyocera taskalfa 1800
-
-
Kyocera taskalfa 1800 ошибка с0060 помогите кто может
gridima2007 в форуме Принтеры, МФУ, копиры формата A3
- 15
- 3198
Goldwater
Ср сен 08, 2021 4:51 pm
-
Kyocera taskalfa 1800 ошибка с0060 помогите кто может
Вернуться в Принтеры, МФУ, копиры формата A3
Кто сейчас на форуме
Сейчас этот форум просматривают: нет зарегистрированных пользователей и гости: 8
- Code: 0030
- Description: FAX control PWB system error
Processing with the fax software was disabled due to a software problem. - Causes: FAX control PWB
- Remedy: 1. Turn the main power swtch off and after 5 seconds, re-mount the FAX controller PWB, then turn power on. 2. Reinstall the fax software. 3. Replace the FAX control PWB.
- Code: 0060
- Description: Main/Engine PWB mismatch
Unmatching engine and engine sub boards. Defective engine subboard - Causes: Main/Engine PWB
- Remedy: 1. Turn the main power swtch off and after 5 seconds, then turn power on. 2. Replace the main/engine PWB.
- Code: 0100
- Description: Backup memory device error
- Causes: EEPROM (Main/Engine PWB)
- Remedy: 1. Turn the main power swtch off and after 5 seconds, then turn power on. 2. Check that the EEPROM on the main circuit PWB is peroperly installed on the main circuit PWB and, if not, re-install it. 3. Replace the main/engine PWB.
- Code: 0120
- Description: MAC address data error
For data in which the MAC address is invalid. - Causes: EEPROM (Main/Engine PWB)
- Remedy: 1. Turn the main power swtch off and after 5 seconds, then turn power on. 2. Check the MAC address on the network status page. 3. If it is blank, obtain an EEPROM with its MAC address written from the service support and install. 4. Replace the main/engine PWB.
- Code: 0150
- Description: Backup memory read/write error (main/engine PWB)
No response is issued from the device in reading/writing for 5 ms or more and this problem is repeated 5 times successively. Mismatch of reading data from 2 locations occurs 8 times successively. Mismatch between writing data and reading data occurs 8 times successively. - Causes: EEPROM (Main/Engine PWB)
- Remedy: 1. Turn the main power swtch off and after 5 seconds, then turn power on. 2. Check that the EEPROM is peroperly installed on the main/engine PWB and re-install it. 3. Replace the main/engine PWB. 4. Check the EEPROM and if the data are currupted, contact the service support.
- Code: 0160
- Description: Backup memory data error (main/engine PWB)
Reading data from EEPROM is abnormal. - Causes: EEPROM
- Remedy: 1. Turn the main power swtch off and after 5 seconds, then turn power on. 2. Execute U021 — memory initializing.(see page 1-3-19) 3. If the EEPROM data are currupted, contact the service support.
- Code: 0170
- Description: Billing counting error
The values on the main circuit PWB and on the engine do not match for any of charging counter, life counter, and scanner counter. - Causes: EEPROM. Main/Engine PWB.
- Remedy: EEPROM 1. Check that the EEPROMs installed in the main/engine PWB are correct and, if not, use the correct EEPROM for the model. 2. If the EEPROM data are currupted, contact the service support.
Main/Engine PWB Replace the main/engine PWB.
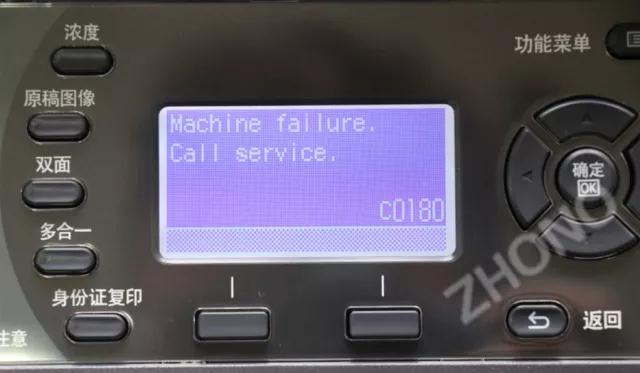
- Code: 0180
- Description: Machine number mismatch
Machine number of main/ engine does not match. - Causes: Data damage of EEPROM.
- Remedy: 1. Confirm the machine data for the main/ engine units by using U004. 2. If the serial number data of different models is alternately displayed, install the correct EEPROM in the PWB of the wrong serial number data. 3. Contact the Service Support.
- Code: 0190
- Description: Backup memory device error (main/engine PWB)
- Causes: Main/Engine PWB
- Remedy: Replace the main/engine PWB.
- Code: 0630
- Description: DMA error
DMA transmission of image data does not complete within the specified period of time. - Causes: Main/Engine PWB
- Remedy: 1. Confirm that the wiring connector is firmly connected and, if necessary, connect the connector all the way in. 2. If the wiring is disconnected, shorted or grounded, replace the wiring. 3. Replace the main/engine PWB.
- Code: 0800
- Description: Image processing error
JAM010X is detected twice. - Causes: Main/Engine PWB
- Remedy: Replace the main/engine PWB.
- Code: 0840
- Description: Faults of RTC
(“Time for maintenance T” is displayed) [Check at power up] The RTC setting has reverted to a previous state. The machine has not been powered for 5 years (compared to the settings stored periodically in the EEPROM). The RTC setting is older than 00:01 on January 1, 2000. [Checked periodically (in 5- minute interval) after powered up] The RTC setting has reverted to a state older than the last time it was checked. 10 minutes have been passed since the previous check. - Causes: Battery ( main PWB). Main/Engine PWB.
- Remedy: Battery ( main PWB) 1. Make sure that the back-up batteries on the main/engine PWB are not shortcircuited. 2. Reset Maintenance T by executing U906. 3. If the same C call is displayed when power is switched on and off, replace the back up battery. 4. If communication error (due to a noise, etc.) is present with the RTC on the main/engine PWB, check the PWB is properly grounded.
Main/Engine PWB Replace the main/engine PWB.
- Code: 1810
- Description: Paper feeder unit 2 communication error
A communication error from paper feeder is detected 10 times in succession. - Causes: Paper feeder. PF main PWB. Main/Engine PWB.
- Remedy: Paper feeder Check the wiring connection status with the main unit and, if necessary, try connecting it again.
PF main PWB 1. Confirm that the wiring connector is firmly connected and, if necessary, connect the connector all the way in. PF main PWB (YC1) and main/engine PWB (YC18) 2. If the wiring is disconnected, shorted or grounded, replace the wiring. 3. Replace the PFMain/Engine PWB 1. Check the main/engine software and upgrade to the latest, if necessary. 2. Replace the main/engine PWB. main PWB.
- Code: 1820
- Description: Paper feeder unit 3 communication error
A communication error from paper feeder is detected 10 times in succession. - Causes: Paper feeder. PF main PWB. Main/Engine PWB
- Remedy: Paper feeder Check the wiring connection status with paper feeder unit 2 and, if necessary, try connecting it again.
PF main PWB 1. Confirm that the wiring connector is firmly connected and, if necessary, connect the connector all the way in. PF main PWB (YC1) and PF main PWB (YC2). 2. If the wiring is disconnected, shorted or grounded, replace the wiring. 3. Replace the PF main PWB.
Main/Engine PWB 1. Check the main/engine software and upgrade to the latest, if necessary. 2. Replace the main/engine PWB.
- Code: 1830
- Description: Paper feeder unit 4 communication error
A communication error from paper feeder is detected 10 times in succession. - Causes: Paper feeder. PF main PWB. Main/Engine PWB.
- Remedy: Paper feeder Check the wiring connection status with paper feeder unit 3 and, if necessary, try connecting it again.
PF main PWB 1. Confirm that the wiring connector is firmly connected and, if necessary, connect the connector all the way in. PF main PWB (YC1) and PF main PWB (YC2). 2. If the wiring is disconnected, shorted or grounded, replace the wiring. 3. Replace the PF main PWB.
Main/Engine PWB 1. Check the main/engine software and upgrade to the latest, if necessary. 2. Replace the main/engine PWB.
- Code: 1900
- Description: Paper feeder unit 2 EEPROM error
When writing the data, read and write data does not match 4 times in succession. - Causes: PF main PWB (EEPROM)
- Remedy: 1. Confirm that the wiring connector is firmly connected and, if necessary, connect the connector all the way in. 2. Replace the PF main PWB.
- Code: 1910
- Description: Paper feeder unit 3 EEPROM error
When writing the data, read and write data does not match 4 times in succession. - Causes: PF main PWB (EEPROM)
- Remedy: 1. Confirm that the wiring connector is firmly connected and, if necessary, connect the connector all the way in. 2. Replace the PF main PWB.
- Code: 1920
- Description: Paper feeder unit 4 EEPROM error
When writing the data, read and write data does not match 4 times in succession. - Causes: PF main PWB (EEPROM)
- Remedy: 1. Confirm that the wiring connector is firmly connected and, if necessary, connect the connector all the way in. 2. Replace the PF main PWB.
- Code: 2000
- Description: Main motor steady-state error
After main motor is stabilized, the ready signal is not ready for 1 s continuously. - Causes: Main motor. Main/Engine PWB.
- Remedy: Main motor 1. Check the drive gear can rotate or they are not unusually loaded and, if necessary, replace. 2. Confirm that the wiring connector is firmly connected and, if necessary, connect the connector all the way in. main motor and main/engine PWB (YC4) 3. If the wiring is disconnected, shorted or grounded, replace the wiring. 4. Replace the main motor.
Main/Engine PWB 1. Check the main/engine software and upgrade to the latest, if necessary. 2. Replace the main/engine PWB.
- Code: 2010
- Description: Main motor startup error
Main motor is not stabilized within 3 s since the motor is activated. - Causes: Main motor. Main/Engine PWB.
- Remedy: Main motor 1. Confirm that the wiring connector is firmly connected and, if necessary, connect the connector all the way in. main motor and main/engine PWB (YC4) 2. If the wiring is disconnected, shorted or grounded, replace the wiring. 3. Replace the main motor.
Main/Engine PWB 1. Check the main/engine software and upgrade to the latest, if necessary. 2. Replace the main/engine PWB.
- Code: 3100
- Description: Scanner carriage error
The home position is not correct when the power is turned on, at the end of a reading process of the table and document processor. - Causes: Scanner motor. Home position sensor. Main/Engine PWB.
- Remedy: Scanner motor 1. Move the scanner by the hand to check whether it is unusually difficult to move. 2. Check that the scanner driving belt is not disengaged. 3. Confirm that the wiring connector is firmly connected and, if necessary, connect the connector all the way in. Scanner motor and main/engine PWB (YC1) 4. If the wiring is disconnected, shorted or grounded, replace the wiring. 5. Replace the scanner motor.
Home position sensor 1. Check that the sensor is correctly positioned. 2. Confirm that the wiring connector is firmly connected and, if necessary, connect the connector all the way in. Home position sensor and main/engine PWB (YC7) 3. Replace the home position sensor.
Main/Engine PWB Replace the main/engine PWB.
- Code: 3200
- Description: Exposure lamp error
When a lamp is made to turn on one side at a time, the white standard data at the time of an initial is lower than a rated value. - Causes: CIS. Main/Engine PWB.
- Remedy: CIS Reinsert the connector. Also check for continuity within the connector cable. If none, replace the cable. CIS and main/engine PWB (YC2011) Replace the image scanner unit.
Main/Engine PWB Replace the main/engine PWB and check for correct operation.
- Code: 3210
- Description: CIS lamp error
When a lamp is made both to turn on, the white standard data at the time of an initial is lower than a rated value - Causes: CIS. Main/Engine PWB.
- Remedy: CIS 1. Execute U906 Separating Operation Release. 2. Confirm that the wiring connector is firmly connected and, if necessary, connect the connector all the way in. CIS and main/engine PWB (YC2011) 3. If the wiring is disconnected, shorted or grounded, replace the wiring. 4. Replace the CIS and execute U411.
Main/Engine PWB Replace the main/engine PWB and check for correct operation.
- Code: 3300
- Description: Optical system (AGC) error One of the gains is FF or 00 during the CIS lamp AGC is being processed.
- Causes: CIS. Main/Engine PWB.
- Remedy: CIS 1. Execute U906 Separating Operation Release. 2. Confirm that the wiring connector is firmly connected and, if necessary, connect the connector all the way in. CIS and main/engine PWB (YC2011) 3. If the wiring is disconnected, shorted or grounded, replace the wiring. 4. Replace the CIS and execute U411.
Main/Engine PWB Replace the main/engine PWB and check for correct operation.
- Code: 3500
- Description: Communication error between scanner and ASIC An error code is detected.
- Causes: CIS. Main/Engine PWB.
- Remedy: CIS 1. Execute U906 Separating Operation Release. 2. Confirm that the wiring connector is firmly connected and, if necessary, connect the connector all the way in. CIS and main/engine PWB (YC2011) 3. If the wiring is disconnected, shorted or grounded, replace the wiring. 4. Replace the CIS and execute U411.
Main/Engine PWB Replace the main/engine PWB and check for correct operation.
- Code: 3600
- Description: Scanner sequence error
- Causes: Main/Engine PWB.
- Remedy: 1. Execute U021 memory initializing. 2. Replace the main/engine PWB and execute U411.
- Code: 4000
- Description: Polygon motor steady-state error
After Polygon motor is stabilized, the ready signal is at the H level for 1 s continuously. - Causes: Polygon motor (LSU). Main/Engine PWB.
- Remedy: Polygon motor (LSU) 1. Confirm that the wiring connector is firmly connected and, if necessary, connect the connector all the way in. Polygon motor and main/engine PWB (YC10) 2. If the wiring is disconnected, shorted or grounded, replace the wiring. 3. Replace the laser scanner unit.
Main/Engine PWB 1. Check the main/engine software and upgrade to the latest, if necessary. 2. Replace the main/engine PWB.
- Code: 4010
- Description: Polygon motor synchronization error
After polygon motor is driven, the polygon motor speed won’t stabilize within 10 s. - Causes: Polygon motor (LSU). Main/Engine PWB.
- Remedy: Polygon motor (LSU) 1. Confirm that the wiring connector is firmly connected and, if necessary, connect the connector all the way in. Polygon motor and main/engine PWB (YC10) 2. If the wiring is disconnected, shorted or grounded, replace the wiring. 3. Replace the laser scanner unit.
Main/Engine PWB 1. Check the main/engine software and upgrade to the latest, if necessary. 2. Replace the main/engine PWB.
- Code: 4200
- Description: BD steady-state error
The BD signal is not detected. - Causes: APC PWB (LSU). Main/Engine PWB.
- Remedy: APC PWB (LSU) 1. Confirm that the FCC wiring connector is not distorted and connect the FCC wiring all the way in. Laser scanner unit and main/engine PWB (YC2010) 2. If the FCC wiring is disconnected, shorted or grounded, replace the FCC wiring. 3. Replace the laser scanner unit.
Main/Engine PWB 1. Check the main/engine software and upgrade to the latest, if necessary. 2. Replace the main/engine PWB.
- Code: 6000
- Description: Broken fuser heater wire (main)
When the fuser thermistor 1 reaches primary stable temperature after a warm-up start and the fuser thermistor 2 is less than 90 ° C/194 °F. - Causes: Fuser unit. Main/Engine PWB. Power source PWB. Fuser heater.
- Remedy: Fuser unit 1. Check that no paper jam is present. 2. Confirm that the wiring connector is firmly connected and, if necessary, connect the connector all the way in. Fuser unit and mmain/engine PWB (YC14) 3. If the wiring is disconnected, shorted or grounded, replace the wiring. 4. Replace the Fuser unit and execute U167 counter clear. (Deteriorated sensitivity due to the toner adhered to the center thermistor.)
Main/Engine PWB 1. Check the main/engine software and upgrade to the latest, if necessary. 2. Replace the main/engine PWB.
Power source PWB 1. Confirm that the wiring connector is firmly connected and, if necessary, connect the connector all the way in. Power source PWB (YC4) and main/ engine PWB (YC14) 2. Replace the power source PWB.
Fuser heater 1. Replace the Fuser unit and execute U167 counter clear.
- Code: 6020
- Description: Abnormally high fuser thermistor 2 temperature (Center)
Fuser thermistor 2 detects a temperature higher than 210°C/410°F. - Causes: Fuser unit. Main/Engine PWB.
- Remedy: Fuser unit 1. Confirm that the wiring connector is firmly connected and, if necessary, connect the connector all the way in. Fuser unit and main/engine PWB (YC14) 2. If the wiring is disconnected, shorted or grounded, replace the wiring. 3. Replace the Fuser unit.
Main/Engine PWB 1. Check the main/engine software and upgrade to the latest, if necessary. 2. Replace the main/engine PWB.
- Code: 6030
- Description: Broken fuser thermistor 2 wire (Center)
Input from fuser thermistor 2 is 1012 or more (A/D value) continuously for 5 s. Input from fuser thermistor 2 is1012 (A/D value) or more whenthe temperature at the fuser thermistor 1 is 70°C/ 158°F or more. - Causes: Fuser unit. Main/Engine PWB. Fuser thermistor 2. Fuser thermostat (triggered)
- Remedy: Fuser unit 1. Check that no paper jam is present. 2. Confirm that the wiring connector is firmly connected and, if necessary, connect the connector all the way in. Fuser unit and main/engine PWB (YC14) 3. If the wiring is disconnected, shorted or grounded, replace the wiring. 4. Replace the Fuser unit and execute U167 counter clear. (Deteriorated sensitivity due to the toner adhered to the center thermistor.)
Main/Engine PWB 1. Check the main/engine software and upgrade to the latest, if necessary. 2. Replace the main/engine PWB.
Fuser thermistor 2 1. Replace the Fuser unit and execute U167 counter clear.
Fuser thermostat (triggered) 1. Confirm that the wiring connector is firmly connected and, if necessary, connect the connector all the way in. Fuser unit and fuser heater PWB (YC1) 2. If the wiring is disconnected, shorted or grounded, replace the wiring. 3. Replace the Fuser unit and execute U167 counter clear.
- Code: 6200
- Description: Broken fuser heater wire (Sub)
Fuser thermistor 1 does not reach primary stable temperature even after 30 s during warming up. Fuser thermistor 1 detects a temperature lower than 100°C/212°F for 60 s during ready. - Causes: Fuser unit. Main/Engine PWB. Fuser thermistor 1
- Remedy: Fuser unit 1. Confirm that the wiring connector is firmly connected and, if necessary, connect the connector all the way in. Fuser unit and main/engine PWB (YC14) 2. If the wiring is disconnected, shorted or grounded, replace the wiring. 3. Replace the Fuser unit and execute U167 counter clear.
Main/Engine PWB 1. Check the main/engine software and upgrade to the latest, if necessary. 2. Replace the main/engine PWB.
Fuser thermistor 1 1. Replace the Fuser unit and execute U167 counter clear.
- Code: 6220
- Description: Abnormally high fuser thermistor 1 temperature (Edge)
Fuser thermistor 1 detects a temperature higher than 230°C/446°F. - Causes: Fuser unit. Main/Engine PWB.
- Remedy: Fuser unit 1. Confirm that the wiring connector is firmly connected and, if necessary, connect the connector all the way in. Fuser unit and main/engine PWB (YC14) 2. If the wiring is disconnected, shorted or grounded, replace the wiring. 3. Replace the Fuser unit and execute U167 counter clear.
Main/Engine PWB 1. Check the main/engine software and upgrade to the latest, if necessary. 2. Replace the main/engine PWB.
- Code: 6230
- Description: Broken fuser thermistor 1 wire (Edge)
Input from fuser thermistor 1 is 1012 or more (A/D value) continuously for 5 s. Input from fuser thermistor 1 is1012 (A/D value) or more whenthe temperature at the fuser thermistor 2 is 70°C/ 158°F or more. - Causes: Fuser unit. Main/Engine PWB.
- Remedy: Fuser unit 1. Confirm that the wiring connector is firmly connected and, if necessary, connect the connector all the way in. Fuser unit and main/engine PWB (YC14) 2. If the wiring is disconnected, shorted or grounded, replace the wiring. 3. Replace the Fuser unit and execute U167 counter clear.
Main/Engine PWB 1. Check the main/engine software and upgrade to the latest, if necessary. 2. Replace the main/engine PWB.
- Code: 6400
- Description: Zero-cross signal error
While fuser heater ON/OFF control is performed, the zerocross signal is not input within 3 s. - Causes: Fuser unit.
- Remedy: 1. Confirm that the wiring connector is firmly connected and, if necessary, connect the connector all the way in. Power source PWB (CN2) and main/ engine PWB (YC14) 2. If the wiring is disconnected, shorted or grounded, replace the wiring. 3. Replace the power source PWB.
- Code: 7100
- Description: Toner sensor error
Sensor output value of 8 or less. - Causes: Toner sensor. Toner motor. Main/Engine PWB.
- Remedy: Toner sensor 1. Check the toner sensor output by U150. 2. Confirm that the wiring connector is firmly connected and, if necessary, connect the connector all the way in. Toner sensor and main/engine PWB (YC9) 3. If the wiring is disconnected, shorted or grounded, replace the wiring. 4. Check that the gears of the Developer unit are not damaged and the spiral can rotate. 5. Replace the Developer unit.
Toner motor 1. Draw out the toner container and execute U135 to check the toner motor operation. 2. Check the drive gear can rotate or they are not unusually loaded and, if necessary, replace. 3. Confirm that the wiring connector is firmly connected and, if necessary, connect the connector all the way in. Toner motor and main/engine PWB (YC12) 4. If the wiring is disconnected, shorted or grounded, replace the wiring. 5. Replace the Toner motor.
Main/Engine PWB 1. Check the main/engine software and upgrade to the latest, if necessary. 2. Replace the main/engine PWB.
- Code: 7800
- Description: Broken temperature sensor wire
Input from temperature sensor is 0.3 V (A/D value) or less - Causes: Outer temperature sensor. Main/Engine PWB.
- Remedy: Outer temperature sensor 1. Confirm that the wiring connector is firmly connected and, if necessary, connect the connector all the way in. Temperature sensor and main/engine PWB (YC6) 2. If the wiring is disconnected, shorted or grounded, replace the wiring. 3. Replace the temperature sensor.
Main/Engine PWB 1. Check the main/engine software and upgrade to the latest, if necessary. 2. Replace the main/engine PWB.
- Code: 7810
- Description: Short-circuited temperature sensor wire
Input from temperature sensor is 0.3 V (A/D value) or more - Causes: Outer temperature sensor. Main/Engine PWB.
- Remedy: Outer temperature sensor 1. Confirm that the wiring connector is firmly connected and, if necessary, connect the connector all the way in. Temperature sensor and main/engine PWB (YC6) 2. If the wiring is disconnected, shorted or grounded, replace the wiring. 3. Replace the temperature sensor.
Main/Engine PWB 1. Check the main/engine software and upgrade to the latest, if necessary. 2. Replace the main/engine PWB.
- Code: 7900
- Description: Drum EEPROM error
No response is issued from the device in reading/writing for 5 ms or more and this problem is repeated five times successively. - Causes: DR PWB. Main/Engine PWB.
- Remedy: DR PWB 1. Confirm that the wiring connector is firmly connected and, if necessary, connect the connector all the way in. DR PWB and main/engine PWB (YC9) 2. If the wiring is disconnected, shorted or grounded, replace the wiring. 3. Replace the Drum unit.
Main/Engine PWB 1. Check the main/engine software and upgrade to the latest, if necessary. 2. Replace the main/engine PWB.
- Code: 9000
- Description: Document processor communication error
A communication error from document processor is detected 10 times in succession. - Causes: DP main PWB.
- Remedy: 1. Check that the versions of the main unit firmware and the DP firmware are identical. 2. Confirm that the wiring connector is firmly connected and, if necessary, connect the connector all the way in. DP main PWB(YC1) and main/engine PWB (YC18) 3. If the wiring is disconnected, shorted or grounded, replace the wiring. 4. Replace the DP main PWB
- Code: 9060
- Description: DP EEPROM error
Mismatch of reading data from two locations occurs 3 times successively. Mismatch between writing data and reading data occurs 3 times successively. - Causes: DP main PWB. Device damage of EEPROM.
- Remedy: 1. Execute U906 Separating Operation Release. 2. Confirm that the EEPROM has been properly installed. 3. Replace the DP main PWB
Device damage of EEPROM Contact the Service Support.
- Code: F000
- Description: Communication error between Main/Engine PWB and Operation PWB
- Causes: Main/Engine PWB. Operation PWB.
- Remedy: Main/Engine PWB 1. Turn the main power swtch off and after 5 seconds, then turn power on. 2. Check that the wirings and connetors between the main/engine PWB and the operation PWB are normal. Main/engine PWB (YC2010) and operation PWB (YC1) 3. Check that the DIMM memories in the main/engine PWB are well conducted and, if not, replace. 4. Execute U021initialize memory. 5. Replace the main/engine PWB.
Operation PWB Replace the operation PWB.
- Code: F020
- Description: Main/Engine PWB RAM check sum error
- Causes: Main memory (RAM)
- Remedy: Turn the main power switch off/on to restart the machine. If the error is not resolved, replace main/engine PWB.
- Code: F040
- Description: Communication error between Main/Engine PWB and Print engine
- Causes: Main/Engine PWB
- Remedy: 1. Turn the main power swtch off and after 5 seconds, then turn power on. 2. Repair or replace the wire from the main/ engine PWB, that may be grounded. (Check short-circuit between 5V and 3.3V.) 3. Check the main/engine software and upgrade to the latest, if necessary. 4. If not corrected, replace the main/engine PWB.
- Code: F050
- Description: Print engine ROM checksum error
- Causes: Main/Engine PWB
- Remedy: 1. Turn the main power swtch off and after 5 seconds, then turn power on. 2. Confirm that the EEPROM has been properly installed. 3. Check the main/engine software and upgrade to the latest, if necessary. 4. If not corrected, Replace the main/ engine PWB.
Kyocera FS-1800 Error c0180 Solution
Description of error: The Kyocera Kyocera FS-1800/1801/2200/2201 series printer has an abnormality or irregular operation of personnel. As a result, the data in the main board is in error or the data is initialized, and the error c0180 is reported.
Solution:
Enter maintenance mode and implement U004 (Machine No.) to restore the serial number backed up in the EEPROM.
The operation method is as follows
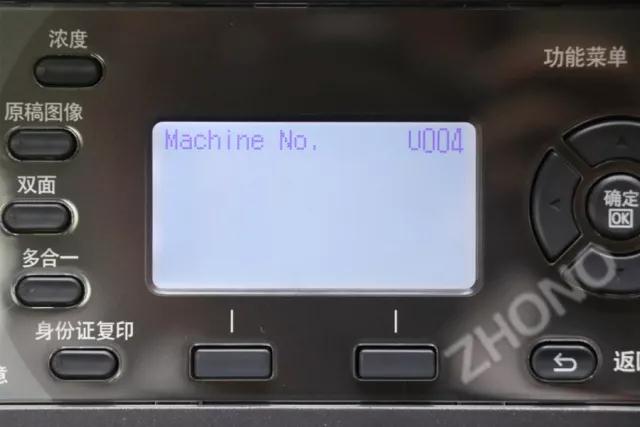
In the standby mode, press the number key: 10871087 enter the maintenance mode selection to U004
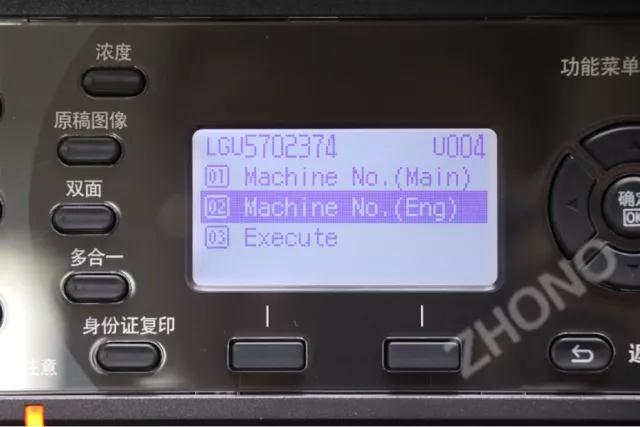
First select the second item «Machine No. (ENG)» Press OK to execute
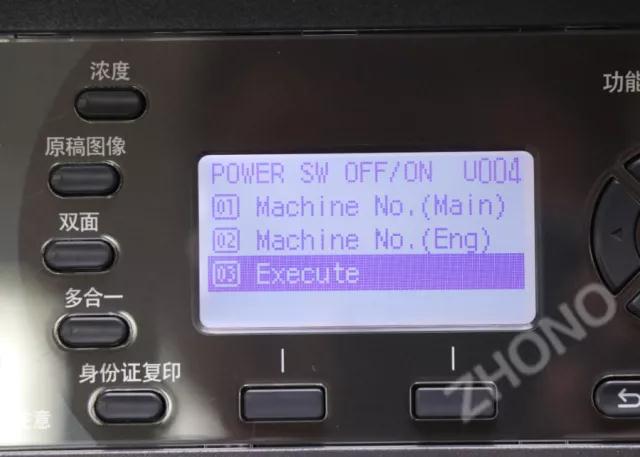
Then select the third item «Execute» and press OK to execute
Last shutdown to restart the printer back to normal
Note: The first method cannot clear the code. The machine serial number has been changed or the motherboard engine firmware has failed. The printer firmware needs to be updated.
When the power is turned off, an SD card (usually only Kyocera technicians and service personnel have firmware) is inserted into the SD card slot of the machine to update the firmware in the motherboard.
The firmware update is as follows:
Turn off the power, remove the SD card, and then turn on the power, at this time the machine will still report the code c0180, and then repeat the method described at the beginning of the article to eliminate the error code.
Popular posts from this blog
Proffisy The Office Supersore in Africa Agent

#Proffisy The Office Supersore in Africa Agent. #proffisy #ProffisyAfrica #ProffisyToner #ProffisyOffice Business Contact: Web: www.proffisytoner.com Email: marketing@proffisytoner.com Whatsapp: 0086 18938939387
Proffisy Factory New Look

Proffisy Factory New Look #proffisy #proffisyfactory Contact Us: Web: www.proffisytoner.com Email: marketing@proffisytoner.com Whatsapp: 0086 18938939387