Installing a Secure Sockets Layer (SSL) certificate on your WordPress site enables it to use HTTPS to ensure secure connections. Unfortunately, there are a variety of things that can go wrong in the process of confirming a valid SSL certificate and making a connection between your site’s server and a visitor’s browser.
If you’ve encountered an “SSL Handshake Failed” error message and are confused as to what it means, you’re not alone. It’s a common error that doesn’t tell you much on its own. While this can be a frustrating experience, the good news is that there are simple steps you can take to resolve the issue.
In this post, we’ll explain what the SSL Handshake Failed error is and what causes it. Then we’ll provide you with several methods you can use to fix it.
Let’s get started!
An Introduction to the SSL Handshake
Before we dig deeper into what causes a TLS or SSL handshake failure, it’s helpful to understand what the TLS/SSL handshake is. Secure Sockets Layer (SSL) and Transport Layer Security (TLS) are protocols used to authenticate data transfers between servers and external systems such as browsers.
SSL certificates are needed in order to secure your website using HTTPS. We won’t get too in-depth about the difference between TLS vs SSL since it’s a minor one. The terms are often used interchangeably, so for simplicity’s sake, we’ll use “SSL” to refer to both.
With that out of the way, an SSL handshake is the first step in the process of establishing an HTTPS connection. To authenticate and establish the connection, the user’s browser and the website’s server must go through a series of checks (the handshake), which establish the HTTPS connection parameters.
Let us explain: the client (typically the browser) sends a request for a secure connection to the server. After the request is sent, the server sends a public key to your computer and checks that key against a list of certificates. The computer then generates a key and encrypts it, using the public key sent from the server.
To make a long story short, without the SSL handshake, a secure connection won’t be made. This can pose a significant security risk. Plus, there are a lot of moving parts involved in the process.
That means there are many different opportunities for something to go wrong and cause a handshake failure, or even lead to the “your connection is not private” error, causing visitors to leave.
Confronted with the ‘SSL Handshake Failed’ error? 🤝 Get a grip on how to solve it with these 5 methods ⤵️Click to Tweet
Understanding What Causes SSL Handshake Failures
An SSL Handshake Failure or Error 525 means that the server and browser were unable to establish a secure connection. This can happen for a variety of reasons.
Generally, an Error 525 means that the SSL handshake between a domain using Cloudflare and the origin web server failed:

However, it’s also important to understand that SSL errors can happen on the client-side or the server-side. Common causes of SSL errors on the client-side include:
- The wrong date or time on the client device.
- An error with the browser configuration.
- A connection that is being intercepted by a third party.
Some server-side causes include:
- A cipher suite mismatch.
- A protocol used by the client that isn’t supported by the server.
- A certificate that is incomplete, invalid, or expired.
Typically, if the SSL handshake fails, the issue can be attributed to something wrong with the website or server and their SSL configurations.
How to Fix the SSL Handshake Failed Error (5 Methods)
There are several potential causes behind the “SSL Handshake Failed” error. So there’s no simple answer when it comes to how you should fix it.
Fortunately, there are a handful of methods you can use to begin exploring potential issues and resolving them one by one. Let’s take a look at five strategies you can use to try and fix the SSL Handshake Failed error.
1. Update Your System Date and Time
Let’s start with one of the more unlikely causes, but one that is incredibly easy to correct if it is the problem: your computer’s clock.
If your system is using the wrong date and time, that may interrupt the SSL handshake. When the system clock is different than the actual time, for example, if it’s set too far into the future, it can interfere with the SSL certificate verification.
Your computer’s clock might have been set incorrectly due to human error or simply due to a glitch in your settings. Whatever the reason, it’s a good idea to check and make sure your system time is correct, and update it if it’s not.
Of course, if your clock is showing the correct information, it’s safe to assume that this isn’t the source of the “SSL Handshake Failed” issue.
2. Check to See If Your SSL Certificate Is Valid
Expiration dates are placed on SSL certificates, to help make sure their validation information remains accurate. Generally, the validity of these certificates lasts for anywhere between six months and two years.
If an SSL certificate is revoked or expired, the browser will detect this and be unable to complete the SSL handshake. If it’s been more than a year or so since you installed an SSL certificate on your website, it might be time to reissue it.
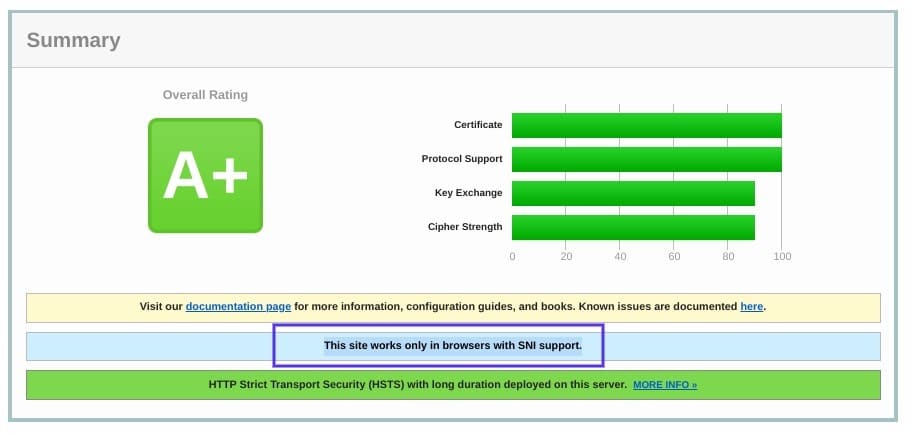
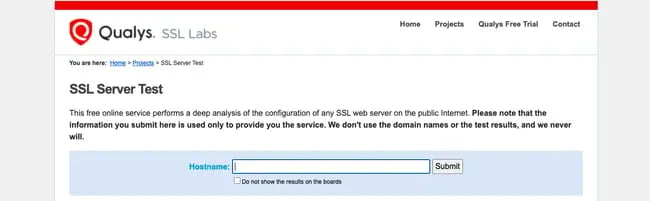
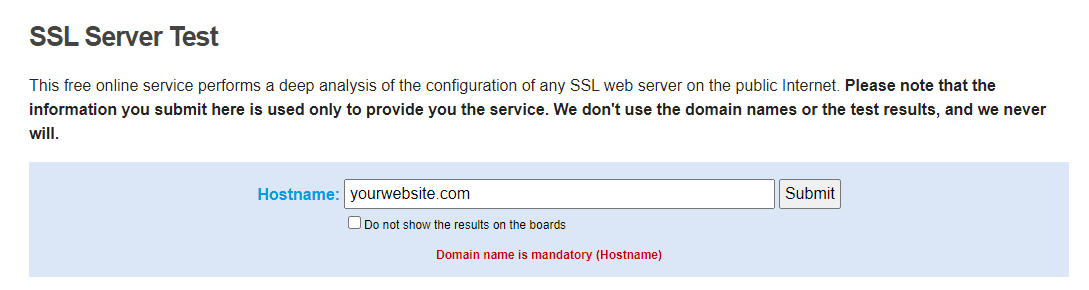
To view the status of your SSL certificate, you can use an SSL certificate checker tool such as the one offered by Qualys:
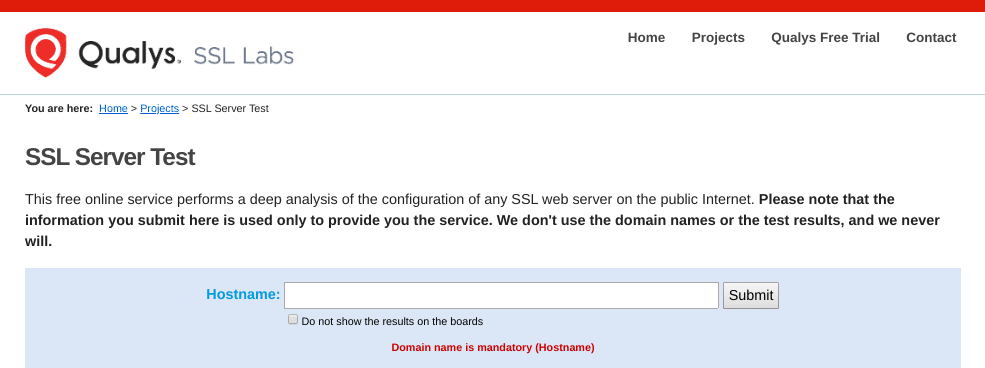
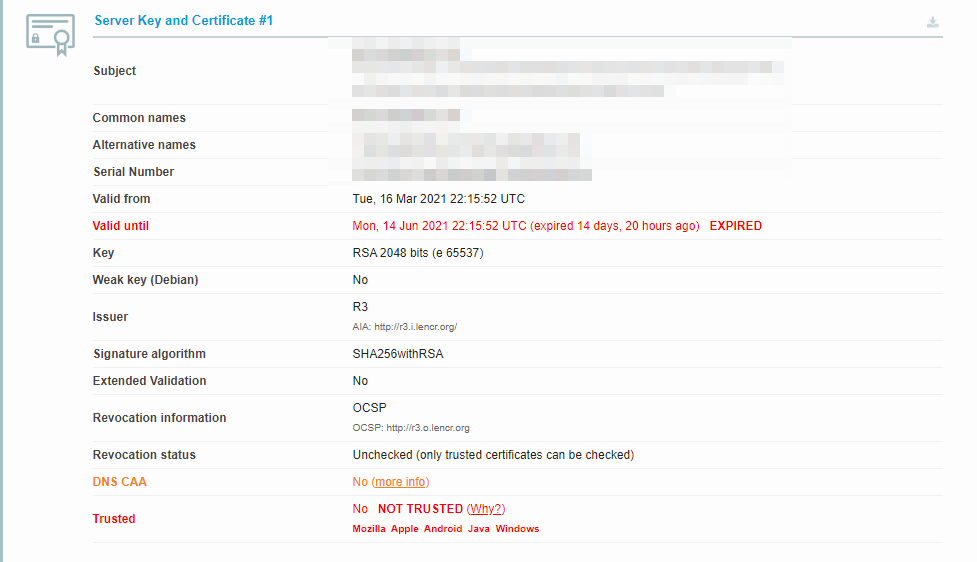
This tool is both reliable and free to use. All you need to do is input your domain name into the Hostname field, and then click on Submit. Once the checker is done analyzing your site’s SSL configuration, it will present you with some results:
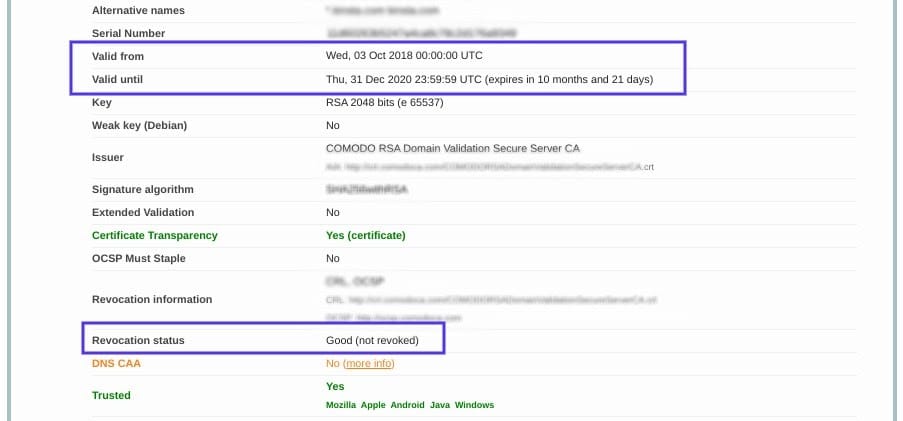
On this page, you can find out if your certificate is still valid and see if it has been revoked for any reason.
In either case, updating your SSL certificate should resolve the handshake error (and is vital for keeping your site and your WooCommerce store secure).
3. Configure Your Browser for the Latest SSL/TLS Protocol Support
Sometimes the best way to determine the root cause of an issue is by process of elimination. As we mentioned earlier, the SSL handshake failure can often occur due to a browser misconfiguration.
The quickest way to determine whether a particular browser is the problem is to try switching to a different one. This can at least help narrow down the problem. You may also try disabling any plugins and resetting your browser back to its default settings.
Another potential browser-related issue is a protocol mismatch. For example, if the server only supports TLS 1.2, but the browser is only configured for TLS 1.0 or TLS 1.1, there’s no mutually-supported protocol available. This will inevitably lead to an SSL handshake failure.
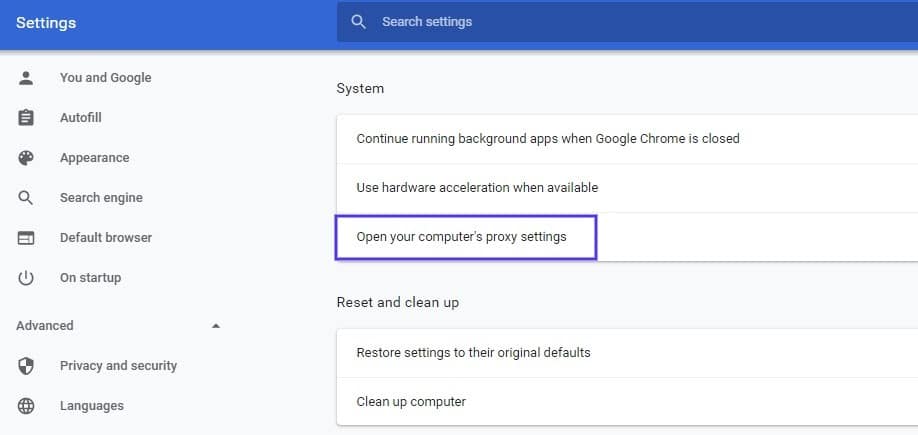
How you can check to see if this problem is occurring varies based on the browser you’re using. As an example, we’ll look at how the process works in Chrome. First, open your browser and go to Settings > Advanced. This will expand a number of menu options.
Under the System section, click on Open your computer’s proxy settings:
This will open up a new window. Next, select the Advanced tab. Under the Security section, check to see if the box next to Use TLS 1.2 is selected. If not, check that option:
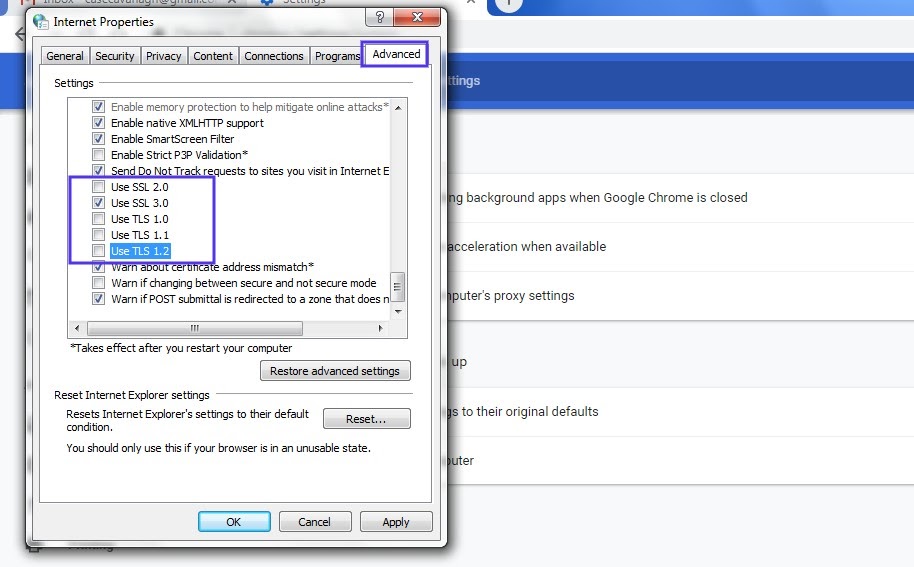
It’s also recommended that you uncheck the boxes for SSL 2.0 and SSL 3.0.
The same applies to TLS 1.0 and TLS 1.1 since they are being phased out. When you’re done, click on the OK button, and check to see if the handshake error has been resolved.
Note that if you’re using Apple Safari or Mac OS there isn’t an option to enable or disable SSL protocols. TLS 1.2 is automatically enabled by default. If you’re using Linux, you can refer to the Red Hat guide on TLS hardening.
4. Verify That Your Server Is Properly Configured to Support SNI
It’s also possible that the SSL handshake failure is being caused by improper Server Name Indication (SNI) configuration. The SNI is what enables a web server to securely host several TLS certificates for one IP address.
Each website on a server has its own certificate. However, if the server isn’t SNI-enabled, that can result in an SSL handshake failure, because the server may not know which certificate to present.
There are a few ways to check and see whether a site requires SNI. One option is to use Qualys’ SSL Server Test, which we discussed in the previous section. Input your site’s domain name, and then click on the Submit button.
On the results page, look for a message that reads “This site works only in browsers with SNI support”:
Another approach for detecting if a server is using SNI is to browse the server names in the ‘ClientHello’ message. This is a more technical process, but it can offer a lot of information.
It involves checking the extended hello header for a ‘server_name’ field, to see if the correct certifications are presented.
If you’re familiar with using tools such as the OpenSSL toolkit and Wireshark, you might find this method preferable. You can use openssl s_client with and without the -servername option:
# without SNI
 $ openssl s_client -connect host:port

 # use SNI
 $ openssl s_client -connect host:port -servername host
If you get two different certificates with the same name, it means that the SNI is supported and properly configured.
However, if the output in the returned certificates is different, or the call without SNI cannot establish an SSL connection, it indicates that SNI is required but not correctly configured. Resolving this issue may require switching to a dedicated IP address.
5. Make Sure the Cipher Suites Match
If you still haven’t been able to identify the cause of the SSL handshake failure, it might be due to a cipher suite mismatch. In case you’re unfamiliar with the term, ‘cipher suites’ refer to a set of algorithms, including ones for key exchange, bulk encryption, and message authentication code, that can be used for securing SSL and TLS network connections.
If the cipher suites that a server uses don’t support or match what’s used by Cloudflare, that can result in an “SSL Handshake Failed” error.
When it comes to figuring out whether there is a cipher suite mismatch, Qualys’ SSL Server Test proves yet again to be a useful tool.
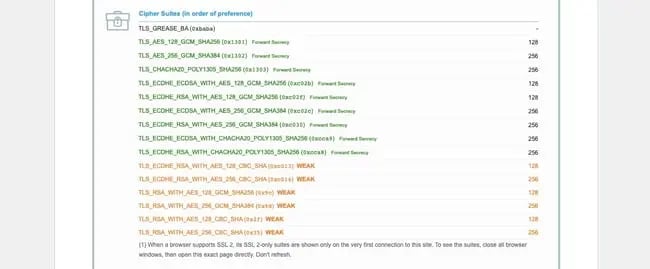
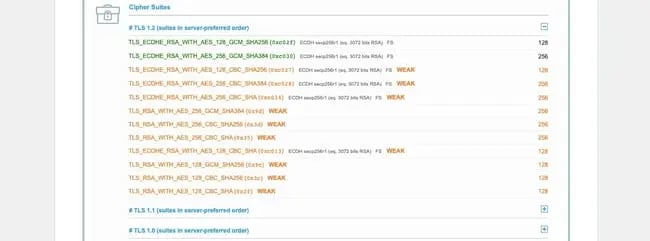
When you input your domain and click on Submit, you’ll see a summary analysis page. You can find the cipher information under the Cipher Suites section:
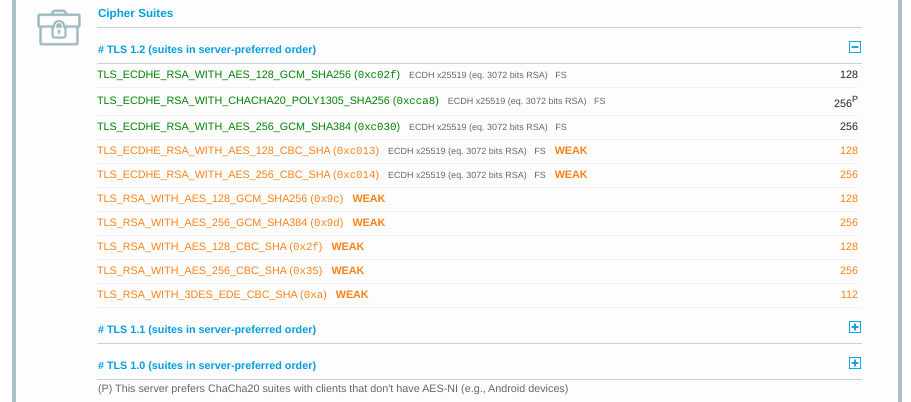
You can use this page to discover which ciphers and protocols the server supports. You’ll want to look out for any that display the ‘weak’ status. In addition, this section also details the specific algorithms for the cipher suites.
To correct this issue, you can compare the results against what your browser supports by using the Qualys SSL/TLS Capabilities of Your Browser tool. For more extensive information and guidance about cipher suites, we also recommend checking out the ComodoSSLStore guide.
Confused by the ‘SSL Handshake Failed’ error message? This guide explains what it is and, most importantly, 5 ways to fix it 🙌Click to Tweet
Summary
One of the most perplexing yet common types of SSL-related problems is the “SSL Handshake Failed” error. Dealing with this error can be stressful since it has many potential causes, including both client- and server-side issues.
However, there are some reliable solutions you can use to identify the problem and resolve it. Here are five ways you can use to fix the SSL Handshake Failed error:
- Update your system date and time.
- Check to see if your SSL certificate is valid (and reissue it if necessary).
- Configure your browser to support the latest TLS/SSL versions.
- Verify that your server is properly configured to support SNI.
- Make sure the cipher suites match.
In person, a handshake can be used to greet someone or finalize an agreement with them. The same is true online.

When devices on a network — say, a browser and a web server — share encryption algorithms, keys, and other details about their connection before finally agreeing to exchange data, it’s called an SSL handshake. During this handshake, the browser and server might ask to see each other’s SSL certificates to verify them.
This handshake is essential for establishing a secure connection before transferring data, so it’s important to understand what an SSL handshake is and what to do if it fails.

The SSL handshake is the process in which a client and server establish the encryption algorithms and secret keys they will use to communicate with each other securely, and exchange and validate each other’s digital certificates.
Note: SSL and TLS are both cryptographic protocols that enable clients and servers operating over a network to communicate with each other securely. TLS has replaced SSL, but SSL is still a more commonly used term so we’ll continue to use it in this post.
SSL Handshake Steps
The exact steps in an SSL handshake vary depending on the version of SSL the client and server decide to use, but the general process is outlined below.
- The client says hello. This “client hello” message lists cryptographic information, including the SSL version to use to communicate with each other. It also lists which encryption algorithms it supports, which are known as Cipher Suites.
- The server responds hello. This “server hello” message contains important information, like which CipherSuite it chose, and its digital certificate. It might also request the client’s certificate.
- The client verifies the server’s certificate. It also sends several byte strings, including one for allowing both the client and the server to compute a secret key for encrypting subsequent messages, including the “finished” messages. If the server sends a client certificate request, it will also send a byte string encrypted with its own private key and digital certificate.
- The server verifies the client’s certificate. This step only takes place if client authentication is required.
- The client says “I’m finished.” This “finished” message indicates that the client has completed its part of the handshake.
- The server says “I’m finished, too.” This “finished” message indicates that the sever has completed its part of the handshake.
For the remainder of the session, the server and client can now exchange messages that are encrypted with the same secret key, which was shared in step three. This is known as symmetric encryption. You can learn more about symmetric encryption, and how it differs from asymmetric encryption, in this post.
The steps above will occur if the process goes smoothly. But what if it doesn’t? Below we’ll walk through how to resolve an “SSL Handshake Failed” error message.
What is SSL Handshake Failed?
SSL Handshake Failed is an error message that occurs when the client or server wasn’t able to establish a secure connection.
This might occur if:
- The client is using the wrong date or time.
- The client is a browser and its specific configuration is causing the error.
- The connection is being intercepted by a third party on the client-side.
- The client and server do not support the same SSL version.
- The client and server are using different Cipher Suites.
- The client or server’s certificate is invalid.
The SSL Handshake Failed error message may appear differently, depending on the client application you’re using or server you’re trying to communicate with. For example, in GitHub, it will look something like this:
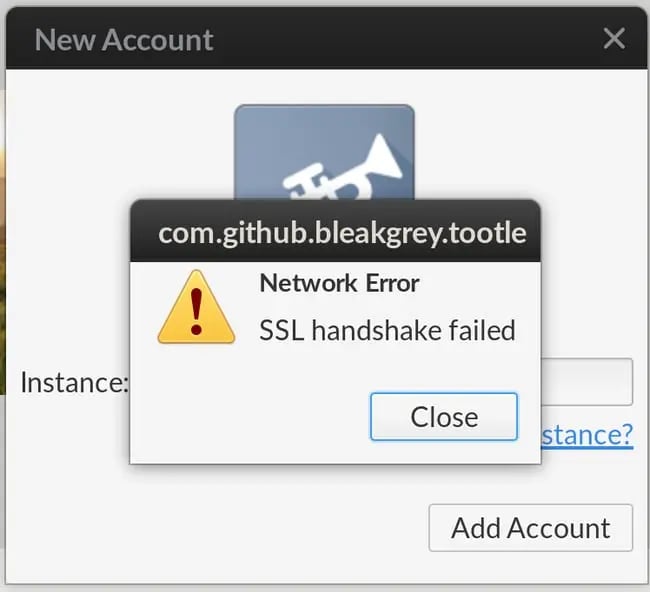
Image Source
If you’re using Cloudflare, on the other hand, an SSL Handshake Failed will appear as a 525 error that looks something like this:
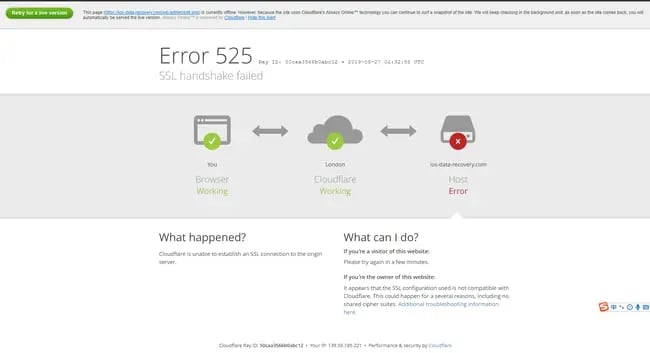
Image Source
Now that you know some of the causes of the SSL Handshake Failed error, let’s look at some solutions.
How to Fix SSL Handshake Failed
- Correct the time and date on the client device.
- Try another browser.
- Add website to allowlist.
- Update browser to use the latest SSL protocol.
- Check browser and server support for Cipher Suites.
- Verify your SSL certificate is accurate and valid.
1. Correct the time and date on the client device.
Let’s start with the easiest fix. If the system time and date is incorrect on your computer or device, then it can cause the SSL Handshake Failed error. That’s because time is essential when it comes to SSL certificates: they have finite lifespans and become invalid past their expiration date.
If you check your system time and date and it’s correct, then move on to the next step.
2. Try another browser.
It’s possible that the browser you’re using is causing the SSL Handshake Failed error. It could be your settings, browser plugins, or another issue. To see if this is the problem, just switch to another browser.
Let’s say you were trying to connect to a website using Google Chrome, and it works just fine in Safari. In that case, you’ll have to narrow down what the problem is. Go back and reset Google Chrome (or whatever browser you were using) to its default settings and disable all your plugins. Then re-configure your settings and enable your plugins one-by-one, testing your ability to connect to the website each time. You should be able to isolate the specific setting or plugin that caused the SSL Handshake Failed that way.
If you try another browser and you still see the SSL Handshake Failed error, then move on to the next step.
3. Add website to allowlist.
It’s also possible that your firewall is causing the SSL Handshake Failed error by intercepting your request for inspection. To rule it out as the cause, you can temporarily deactivate your firewall —but that can leave you vulnerable to attack.
Instead, try adding the website to your allowlist. Here’s the process for Google Chrome:
- On your admin console homepage, go to Devices > Chrome.
- Click Settings> Users & browsers.
- Leave the top organizational unit selected (it’s selected by default). This will apply the setting to all users and enrolled browsers.
- Scroll to URL Blocking and enter the website you are trying to access under Blocked URL exceptions.
- Click Save.
If you try visiting that site again and you still see the SSL Handshake Failed error, then move on to the next step.
4. Update browser to use the latest SSL protocol.
It’s possible that you’re getting the SSL Handshake Failed error because your device (the client) and server do not support the same SSL version, which is resulting in a protocol mismatch. For example, let’s say your browser only supports TLS 1.1 and your server only supports TLS 1.2 or 1.3 (the latest version). If these two try to establish a secure connection, then it will likely result in an SSL Handshake Failed error.
In that case, you’ll need to update your browser. Most updated versions of major browsers like Google Chrome have TLS 1.2 automatically enabled. However, even if it is updated, it’s important to make sure it’s configured to to support the latest TLS version.
Here’s the easiest way to check:
- Visit SSL Labs.
- Navigate to Projects.

- Click SSL Client Test.
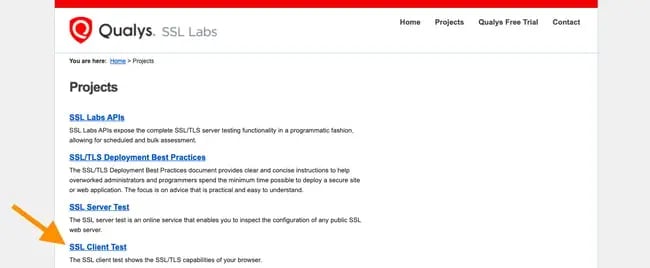
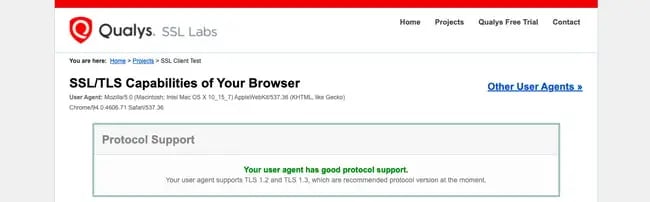
- Under Protocol Support, it will tell you whether your browser supports the latest versions of TLS.
If you verify that your browser and server are using the same protocol, then move on to the next step.
5. Check browser and server support for Cipher Suites.
Another reason you could be getting the SSL Handshake Failed error is that the client and server are using different Cipher Suites. Just like a protocol mismatch, a client and server who do not have mutual support for the same CipherSuite will not be able to establish a secure connection.
You can compare which Cipher Suites your browser support to which the server of the website you’re trying to visit supports by once again visiting SSL Labs.
- First, navigate to Projects.
- Click SSL Client Test.
- Scroll down to Protocol Features, where it will list which Cipher Suites your browser supports, in order of preference.
- Now, open SSL Labs in another tab, and navigate to Projects.
- Click SSL Server Test.
- Type in the domain name you are trying to visit that is resulting in the SSL Handshake Failed error.
- Scroll down to Configuration, where it will list which Cipher Suites the server supports, in order of preference.
If you verify that your browser and server are using the same CipherSuite, then move on to the next step.
6. Verify your SSL certificate is accurate and valid.
Any number of issues on an SSL certificate can prevent an SSL handshake from being completed. This may result in an SSL Handshake Failed error or another error message that ultimately means the handshake failed. For example, you might see something like this:
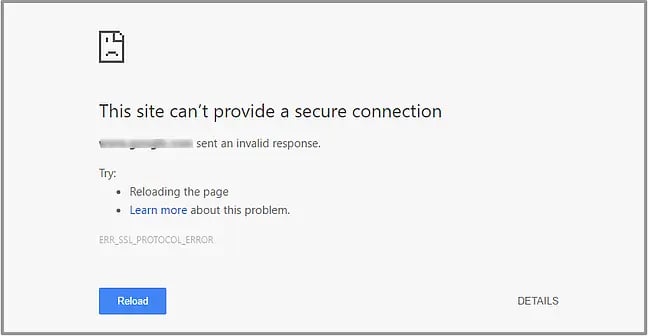
Image Source
If the SSL certificate has an incorrect host name, for example, or it’s past its expiration date, then the handshake will likely fail. So it’s important to ensure your SSL certificate is installed correctly and renewed when needed.
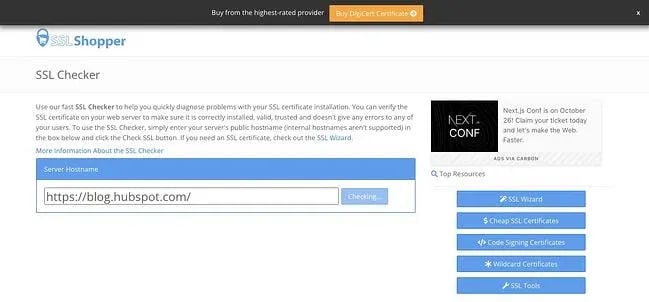
You can use an online tool like the above-mentioned SSL Server Test or SSL Shopper to test that your SSL configuration is installed, valid, and trusted in just a few minutes.
When a Client and Server Don’t Want to Shake Hands
Since an SSL handshake is an essential step in keeping data transferred over the internet secure, it’s important that users understand what the SSL Handshake Failed error means and how to fix it. By following the steps above, you should be able to resolve the issue and establish a secure connection between your device and the server you’re trying to connect to.

SSL/TLS Handshake Failed error or error code 525 occurs when the client or server fails to establish a secure connection.
Has your SSL handshake failed? For someone who isn’t quite adept in technology, the term ‘SSL handshake’ might seem cryptic or out of the context. If you are in that zone and know nothing about why this error is popping up on your system, then read until the end.

In this article, we shall not only discuss what an SSL handshake is, but we shall also delve deeper into why this error shows up and what you can do to fix it.
What is an SSL/TLS handshake?
The SSL handshake involves algorithm agreement, certificate exchange, and the exchange of keys using the shared algorithm. So, the ‘SSL handshake’ is the name given to a securely devised process that helps encrypt client-server communication through cryptographic keys. These keys are exchanged between the server and the client using one out of the two shared algorithms that both the server and the client mutually agreed upon. So, if any glitch occurs during this process, then the ‘SSL handshake failed’ error shows up.
Why does the ‘SSL/TLS handshake failed’ error occur?
An SSL handshake error, also known as error 525 occurs when the two endpoints (server and client) are unable to establish a secure connection. This can happen due to several issues, which might be on the server side or the client side. If you are experiencing this error, there is not much to worry about and no matter what’s causing it, we’ll help you fix it in no time. Let us now discuss some ways in which you can fix the SSL handshake error.
How to Fix the “SSL/TLS Handshake Failed” Error?
#1. Check your system’s time and date
Before you try any other fix for your SSL handshake error, we strongly recommend that you try correcting your system’s date and time. Silly as it may seem, this works for most people experiencing this sort of error. So, don’t undermine the power of your system’s date and time setting, which might be wrong due to many reasons.
It could be wrong due to pure neglect, a software glitch caused by malware, or simply because you are using a server located in another time zone through a VPN. If you are using a VPN, then it is recommended that you configure the date and time according to the server’s time zone. This refers to the date and time of the location in which the server is located, and not your physical location.
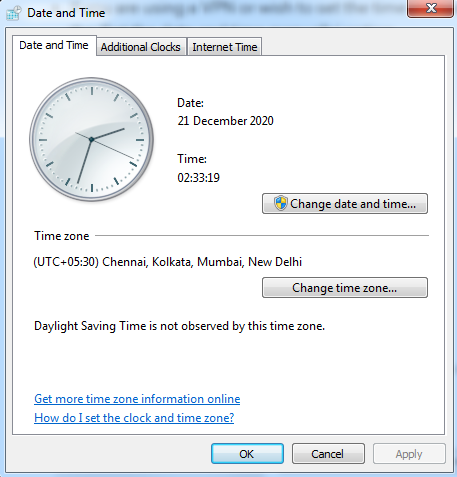
Windows user can reset the date and time in the following manner:
- Click on the ‘Windows’ button.
- Type ‘Date and Time Settings’ and choose the relevant option.
- If you wish to set the time automatically, toggle the ‘set time automatically’ button.
- If you are using a VPN or wish to set the time manually for any other reason, click on the ‘Set the date and time manually’ option.
On Mac, the same can be done by navigating to ‘Menu’ and then to ‘System Preferences’. You will find similar settings for all other Operating Systems.
#2. Update your Web Browser
At all times, you must keep your Operating System and applications up to date. This alone can prevent many errors, including the ‘SSL handshake failed’ error. Chrome users can check that by opening the Chrome browser and clicking on the three vertical dots in the top-right hand corner. Next, click on ‘More Tools’ and if your Chrome browser needs an update, then you’ll find one here. If you don’t, it only means that your Chrome browser is up to date.
#3. Deactivate recently installed plugins or extensions
Most browser plugins and extensions come from unknown developers and could very well be packed with malicious code. So, if you recently installed one of those and have been experiencing the SSL handshake error, then try uninstalling it and clearing your cache and cookies. After you’ve done that, try reconnecting to the same website and check if you can now establish a secure connection.
Chrome users can uninstall the extension by following the below mentioned steps:
- Click on the three vertical dots on the top-right corner
- Click on ‘Settings’
- Select ‘Extensions’
- Choose the extension you recently installed and click on remove

#4. Protocol Mismatch
Many people face the SSL handshake issue due to a protocol mismatch between the server and the client. Basically, there are multiple versions of the SSL/TLS protocol available and for a successful handshake, it is essential that the web server and the browser support the same version.
Often, the SSL handshake error shows up when the server runs on a protocol version that is much higher than that of the client computer. For instance, if the server uses the TLS 1.3 version but the browser’s using the TLS 1.1, then the SSL handshake is likely to fail because servers do not support previous versions. You can fix this by resetting your browser to its default settings and using it without any extensions.
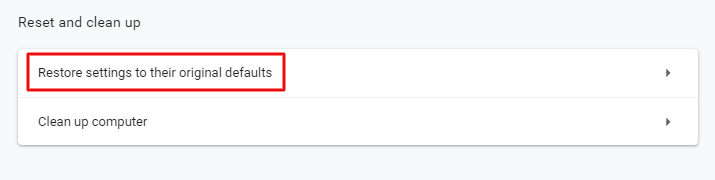
To reset the browser settings to default on your Chrome browser, click on the three vertical dots on the top-right hand corner, choose ‘Settings’ and then ‘System’. Finally, click on the ‘reset settings to original default’ option and you are done.
#5. Expired Certificate
You could be facing the handshake issue simply because you are trying to access a website that does not have a valid SSL certificate. Use our free SSL Certificate checker tool to validate your SSL certificate.
Conclusion:
We have discussed some of the most effective solutions for the SSL handshake problem, which might occur due to the browser or the system settings. In most cases, correcting the time and date settings or removing the trouble-causing extensions from the browser solves the issue.
For server-related concerns, it is only the website owner or administrator who can fix the ‘SSL handshake failed’ problem. Some of the common server-side issues are an invalid SSL certificate, a free SSL certificate from a fraudulent website, problems with the cipher suite, and incorrect installation of the SSL Certificate. In that case, it is recommended that you contact the website owner or administrator for an effective resolution.
Recommended Reading:
- ERR_SSL_PROTOCOL_ERROR
- NET::ERR_CERT_COMMON_NAME_INVALID
- ERR_SSL_VERSION_OR_CIPHER_MISMATCH
- ERR_SSL_VERSION_INTERFERENCE
- ERR_BAD_SSL_CLIENT_AUTH_CERT

List of content you will read in this article:
Do you know what is SSL handshake and how to fix SSL handshake errors?
SSL handshake request is initiated for a secure connection to a web server. After the request is made, a public key is sent to your computer by the server. Your computer is then tasked to check the certificate against other certificate authorities. If the certificate is accepted, a key is created and encrypted with the server’s public key. At this point, the handshake is considered successful.
In another case, however, the handshake fails when the server or client fails to establish a connection through the protocol. When the handshake fails, the connection to the server is rendered insecure. This may affect your communication.
The role of the SSL handshake is to create secure connections for web users providing a safe space for website transactions.
Causes of SSL Handshake Failed Error
An «SSL Handshake Failed» error indicates that the browser and server could not establish a secure connection, and the error may appear on both the server and client sides.
The error occurs when:
- There is an interception of the client-side connection by a third party.
- The client is using the wrong time and date.
- The client’s browser configuration is incorrect.
- The server and the client do not support a similar SSL version.
- Different Cipher Suites are being used by the client and server, creating a mismatch.
- The certificate is invalid, expired, or unfinished.
How to Fix SSL Handshake Error?
There are multiple ways through which we can fix SSL handshake failure. The remedies for the error are often based on the error’s cause.
1. Invalid certificate
The SSL handshake failure will occur if you have an expired, invalid or incomplete certificate, issues on an SSL certificate will impede the completion of a handshake causing the error. Some of the certificate issues to look out for include the wrong hostname, the certificate having passed its expiration date, and not being installed correctly.
It is essential to check and ensure that the SSL certificate is renewed and installed correctly. The hostname used in the URL must match the hostname on the certificate. You can also use SSL checker tools to check if the certificate is correct and if the installation has been done properly.
2. Fix the time and date
Updating your system’s time and date is one of the easiest fixes for the error and probably one you should check first. If the time and date on your computer are incorrect, the handshake will not be complete. While this may seem unimportant, it is critical as SSL certificates are time-bound and become invalid after their expiration.
Therefore, your computer’s time and date should match the actual date to avoid interrupting the handshake. Due to human error, your time and date may be incorrect, so this should be the first stop. If everything looks good, it is a sign that this is not the cause, and you can move to other options.
3. Ensure the Cipher Suites Match
Cipher Suite mismatch is one of the common causes of a failed SSL handshake. It occurs when your browser fails to establish a secure connection with a server that uses SSL or HTTPS.
When the Cipher Suites used by a server do not match or support the one used by a browser, an SSL Handshake Failed error will occur.
How do you establish if there is a mismatch? It will help if you compare your browser’s Cipher Suites and the server support in the SSL Labs. Here are the steps.
- Click on «Projects.»
- Select «SSL Client Test.»
- Under SSL Client Test, scroll to «Protocol Features» and open it. You will get a list of the Cipher Suites your browser supports.
- In a different tab, open SSL Labs and select «Projects.»
- Click on the «SSL Server Test» option and populate the provided field with the domain name resulting in the error.
- Confirm that the server and your browser use the same Cipher Suites.
4. Try another browser
Your browser could be why you are getting the SSL Handshake Failed error. This could be due to your browser plugins and settings, among other issues. If you have ruled out the other cause, you could check if your browser is the cause of the error.
Switch to another browser and see if you are getting the same error. If you are using Google Chrome, for instance, and getting the error, try a different browser like Microsoft Edge to confirm if your browser is the problem.
If the handshake does not fail in Microsoft Edge, you need to reset your Google Chrome browser to default and disable your plugins. It is recommended that you disable the plugins one by one as you test the website to make it possible to identify which plugin is causing the issue.
If you are still getting the error with a different browser, the problem is not your browser configuration.
5. Update your browser
If your browser and server do not support the same SSL version, you will get the error, and the remedy would be updating your browser.
Updating your browser will fix the current protocol mismatch and allow it to use the latest SSL protocol. Note that the server will always support the latest SSL version, but your browser may need an update.
After updating your browser, it is expected that the browser will have Transport Layer Security (TLS) 1.2 automatically enabled. You have to ensure the configuration supports the latest TLS version in instances where it is not.
You can confirm if the configuration is okay using the following steps.
- Open SSL Labs
- Go to «Projects.»
- Select «SSL Client Test.»
- Under SSL Client Test, select «Protocol Support,» Here, you will establish whether your browser supports the latest TLS version.
If your browser and server are using the same protocol, it is a sign that your browser version is not the issue.
Take Away
A successful SSL Handshake is essential for data to be transferred securely over the internet. However, sometimes the handshake may be unsuccessful, and the server will fail to establish a secure connection.
The good news is that the causes of the SSL Handshake Failed error can be fixed easily with the steps listed above. If you fill any other methods available to solve this, please comment via the comment section.
People also read:
- What is data encryption?
- How to install Sectigo SSL on cPanel
- How to install a free SSL on shared web host
Setting up a Secure Sockets Layer (SSL) certificate for your website has never been easier. You can generate certificates for free, and many hosting providers will even set them up for you. However, if you don’t configure your certificate properly, you may encounter errors such as “SSL handshake failed”.
The “SSL handshake failed” error shows up when your browser and the server can’t establish a secure connection. This article will explain what an SSL handshake is and what to do if you fail to establish one.
Let’s get to it!
-
1
What Is an SSL Handshake? -
2
What Causes the “SSL Handshake Failed” Error -
3
How to Fix the “SSL Handshake Failed” Error (5 Ways)-
3.1
1. Update Your Local Device’s Date and Time -
3.2
2. Ensure That Your Browser Supports the Latest TLS Protocol -
3.3
3. Make Sure Your SSL Certificate Is Valid -
3.4
4. Check Your Server’s Server Name Identification (SNI) Configuration -
3.5
5. Pause Cloudflare to Test Your SSL Certificate
-
3.1
-
4
Conclusion
What Is an SSL Handshake?
As you may know, an SSL certificate validates your website’s “identity”. It does that using a cryptographic key that your browser checks to make sure the certificate is valid. Once you establish a connection, your browser can decrypt the content that the server sends it.
This process is called a “handshake”. Here’s how it works in more detail:
- You visit a website with an SSL certificate and your browser sends a request for data.
- The server sends the browser an encrypted public key.
- Your browser checks that key and sends its encrypted key back to the server.
- The server decrypts the key and sends encrypted content back to your browser.
- Your browser decrypts the content (hence completing the handshake).
All of this happens in seconds. SSL certificates and the HTTPS protocol enable your website to transmit data securely, without negatively impacting performance. That makes an SSL certificate vital for any website. However, like any element of your site, it can occasionally create unique problems.
What Causes the “SSL Handshake Failed” Error
The “SSL handshake failed” error tells you precisely what the problem is. It shows up when your browser fails to establish a connection with a website that has an SSL certificate:
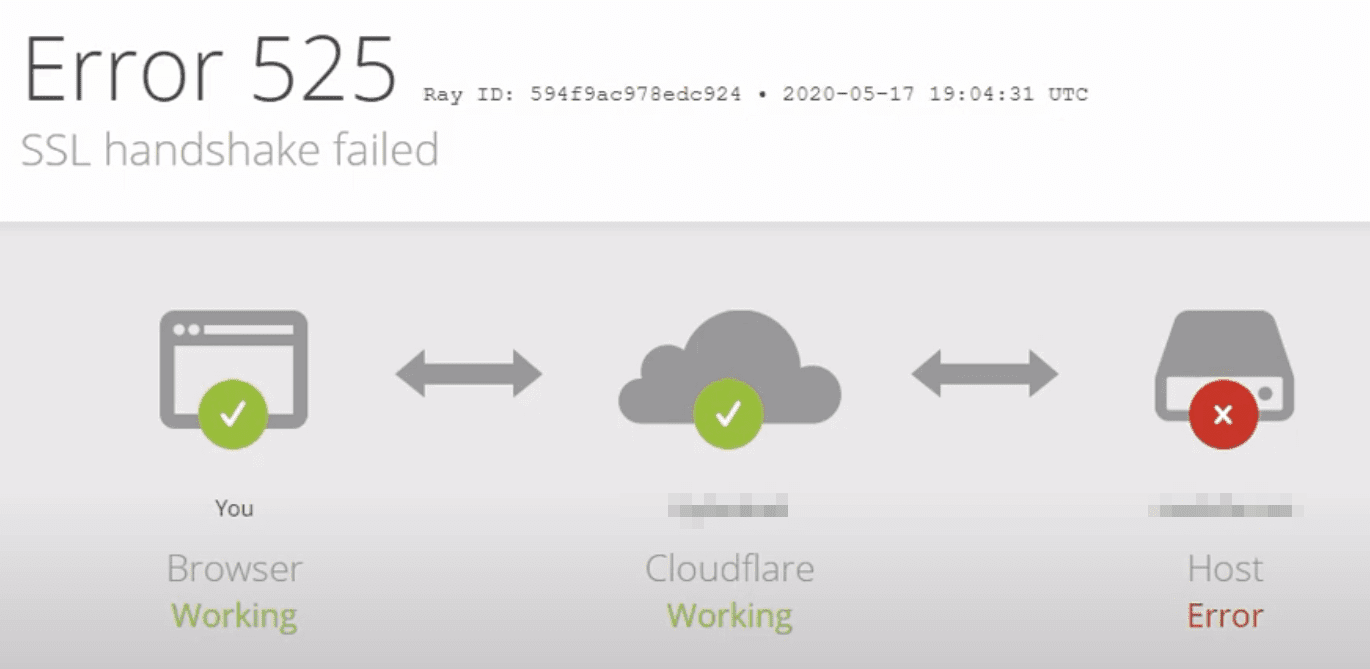
In this example from a website using Cloudflare, you can see that the “SSL handshake failed” error corresponds to the “525” code. Thus, the error can stem from both server- and client-side problems.
The most common causes of the “SSL handshake failed” error include:
- Your local device has the wrong date or time
- The browser doesn’t support the latest SSL protocol
- Your SSL certificate is invalid
- There’s a problem with your Server Name Identification (SNI) configuration
- There’s an issue with your Content Delivery Network (CDN), such as Cloudflare
That list includes two local issues, two that are related to your website’s server, and one that’s specific to a third-party service. In the next sections, we’ll explore how to tackle each of them.
How to Fix the “SSL Handshake Failed” Error (5 Ways)
Here, we’re going to start by showing you how to fix the client-side issues that can cause the “SSL handshake failed” error. Those solutions are pretty simple. In case they don’t work, however, we’ll then move on to more technical solutions you can try.
1. Update Your Local Device’s Date and Time
When your browser tries to establish an SSL handshake, it verifies the certificate against your computer’s date and time. It does this to verify that the SSL certificate is still valid.
If your local device’s date and time are off, that can lead to errors during the verification process (i.e., no handshake). Fortunately, this is an issue with a simple fix.
On a Windows device, open the Start menu and type in Date & Time settings. Select the option that appears, and a new window will pop up. Enable the setting Set time automatically, and ensure that your time zone is correct:
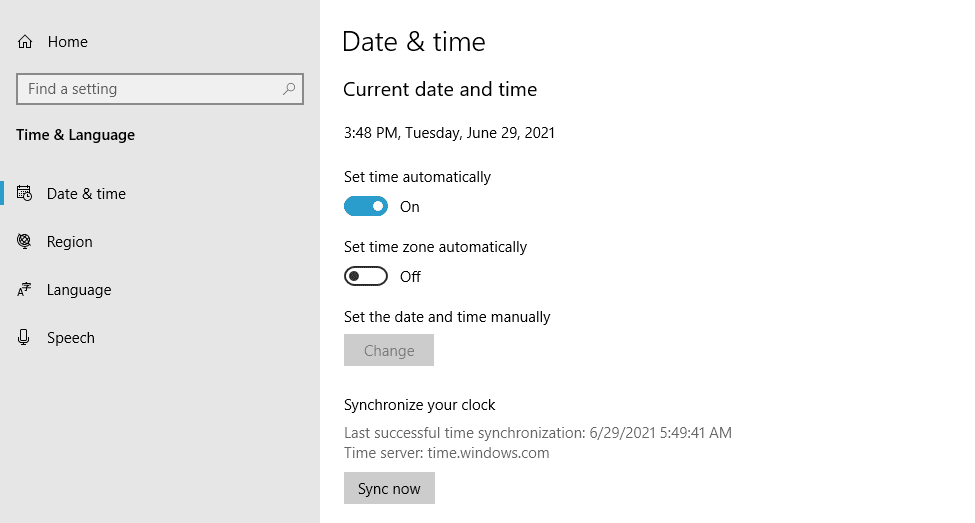
Verify that your date is now correct, and then try to reload the website.
Here’s how to fix your date and time on other Operating Systems (OSs):
- macOS
- iOS
- Android
If fixing the date and time on your local device doesn’t do the trick, you can move on to the next fix.
2. Ensure That Your Browser Supports the Latest TLS Protocol
In some cases, you may run into the “SSL handshake failed” error due to problems with your browser. The most common issue is that your browser doesn’t support the Transport Layer Security (TLS) protocol that your certificate uses.
To put it simply, both SSL and TLS are authentication protocols, and your certificate may use either one. Modern browsers support both protocols, but their older versions might not.
The easiest way to determine whether your browser is causing the issue is to use another one. If the “SSL handshake failed” error doesn’t appear in other browsers, the original one may be the problem.
To fix this issue in Windows, open the Start menu and type in Internet Options. Select the option that appears and go to the Advanced tab. Scroll down the list of settings until you find the options that correspond to SSL and TLS settings:
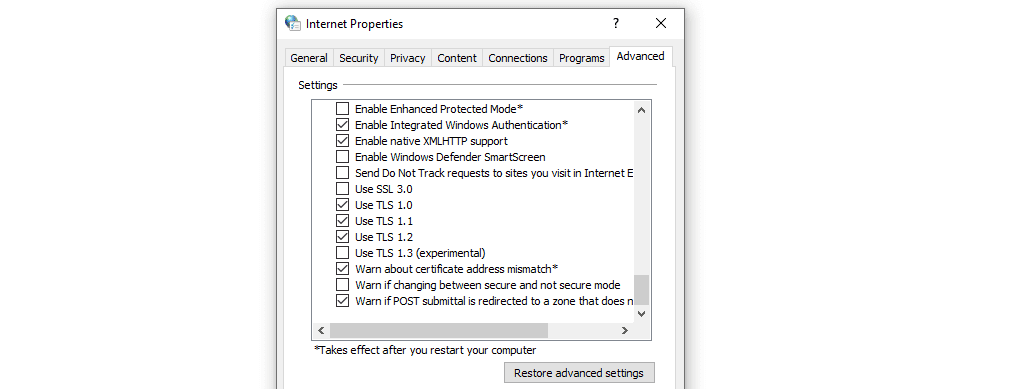
Ideally, you should un-check the box for SSL 3 and 2 (if you see those options). You only need to check the boxes for TLS 1, 1.1, and 1.2.
Then save the changes to your internet options and try re-accessing the website. Note that if you’re using macOS or iOS, TLS 1.2 should be enabled by default.
3. Make Sure Your SSL Certificate Is Valid
SSL certificates have expiration dates. That’s a built-in function that forces you to renew the certificate at some point, and validate your domain ownership.
If your SSL certificate expires, your browser won’t be able to establish a handshake. Depending on who your SSL certificate provider is, you’ll probably receive notifications well before it expires so you can renew it.
Even so, it doesn’t hurt to check if you’re not sure about your certificate’s expiration date. You can use a tool such as SSL Server Test to do so:
The service will return a lot of information about your website’s SSL certificate. If the certificate expired, you’ll see when its validity ran out:
In this case, you’ll need to re-issue and install the SSL certificate on your website. Depending on who your hosting provider is, they might be able to help with that process.
4. Check Your Server’s Server Name Identification (SNI) Configuration
If you’re using a shared server to host your website, you can run into issues with multiple SSL certificates. Hosting providers use proper Server Name Identification (SNI) configuration to ensure that when visitors try to access your site, they get the correct SSL certificate (and not one from another property).
Generally speaking, most reputable hosting providers won’t present any issues with SNI configuration. Additionally, if you’re not using a shared server, you can move on to the next fix.
If you want to be 100% sure that your hosting provider isn’t presenting any issues with SNI configuration, you can contact its support for help. On a shared server, you won’t be able to access this configuration directly. If this turns out to be the problem, you may want to consider upgrading to a more robust hosting plan.
5. Pause Cloudflare to Test Your SSL Certificate
If you’re using Cloudflare, the “SSL handshake failed” error can be due to a problem with its connection to your website. The easiest way to test this is by temporarily disabling it.
Fortunately, Cloudflare offers a “pausing” feature you can use to disable the service at any time. Once you do this, we recommend clearing your browser’s cache before trying to access your website again.
If the SSL handshake error is gone, you’ll want to contact Cloudflare to see what the problem might be. While you wait for a response, keep the CDN disabled so other users can also access your website. On the other hand, if the SSL error persists, that means it’s probably due to an error with your server’s configuration (see above).
Conclusion
The “SSL handshake failed” error is relatively easy to fix, as long as you’re aware of what its potential causes are. The error might be due to an issue with your local device’s settings, your server’s configuration, or your CDN.
Here’s what you might need to do to fix the “SSL handshake failed” error:
- Update your local device’s date and time.
- Ensure that your browser supports the latest TLS protocol.
- Make sure your SSL certificate is valid.
- Check your server’s SNI configuration.
- Pause Cloudflare to test your SSL certificate.
Do you have any questions about how to fix the “SSL handshake failed” error? Let’s talk about them in the comments section below!
Featured Image via vladwel / shutterstock.com