Are you facing error 0xc00000e9 now? Don’t worry. This post will give you 9 solutions to solve this issue. You can adopt one of them according to your situation to boot up your computer. Please read on to get them!
What Is 0xc00000e9?
Some users may encounter error code 0xc00000e9 when they power on computers. This error will prevent the computer from booting up. They may receive messages shown like the following pictures. Sometimes, “File: Boot BCD” will appear above the error code 0xc00000e9.
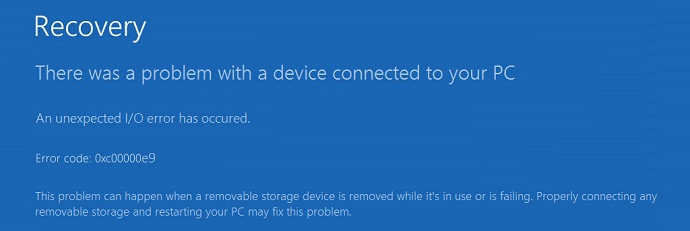
Many people will search how to fix 0xc00000e9 boot BCD in Google or seek help in forums. Fortunately, the status 0xc00000e9 will indicate the causes of the BSOD problem. The error code 0xc00000e9 may be caused by an unexpected I/O error that is related to storage devices, a missing or corrupt system registry file, or something else.
Then, how many factors will cause error code 0xc00000e9? Here are some of them:
- Loose or damaged connection of removable storage devices.
- Missing or corrupt system files such as the registry file.
- Out-of-date drivers.
- Hard drive problems such as corrupted MBR, bad sectors, hard drive failure, etc.
- Problematic Windows update.
- Virus attack.
How to fix error code 0xc00000e9 Windows 10? This may be a question for many of you. If so, please read on to get solutions.
Tip: These methods are only applied when the Automatic Repair fails to fix your computer.
Method 1. Run SFC and DISM
If 0xc00000e9 boot BCD error is caused by missing or corrupt system files, you can run SFC and DISM to replace or repair them.
SFC (System File Checker) is a Windows built-in tool used for replacing damaged, lost, or changed system files with good system files. DISM (Deployment Image Servicing and Management) is a tool used to restore system files.
Here is a tutorial for running the SFC command.
Step 1: Enter WinRE. You can enter it through two consecutive failed attempts to start Windows.
Step 2: Navigate to Troubleshoot>Advanced options>Command Prompt.
Step 3: Type “sfc /scannow” and press the Enter key. Then, wait until the procedure ends.
If SFC fails to repair system files, you can run DISM.To run DISM, you should type the following commands one by one.
- exe /Online /Cleanup-image /Scanhealth
- exe /Online /Cleanup-image /Restorehealth
Finally, you can close the Command Prompt window after the procedure ends and test whether the error is solved.
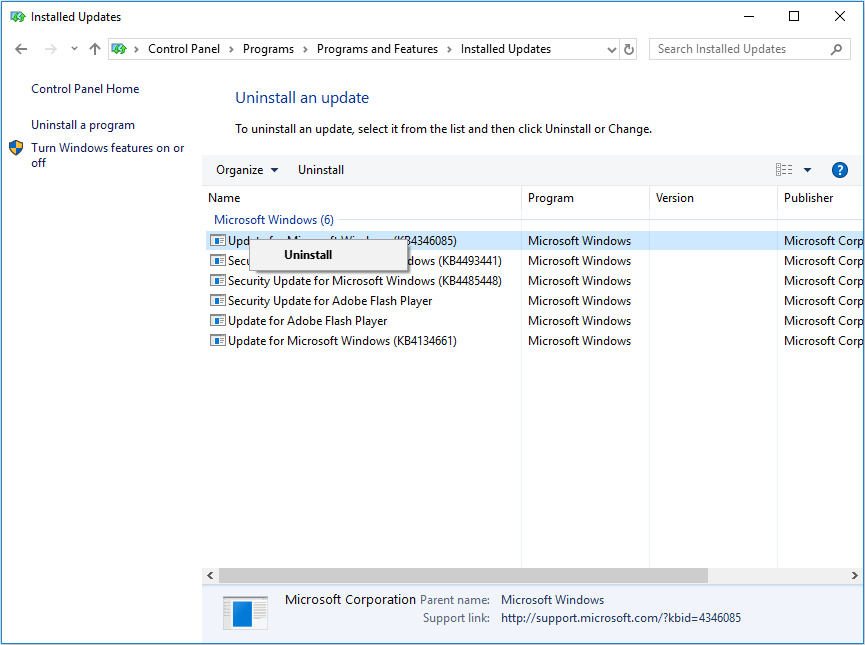
Method 2. Uninstall Incompatible Windows Update
It is possible that status 0xc00000e9 is caused by a problematic Windows update. If so, you can uninstall it in Safe Mode.
Here is the tutorial for uninstalling Windows update in Safe Mode.
Step 1: Enter WinRE and navigate to Troubleshoot>Advanced options>Startup Settings.
Step 2: Click F5 key to choose Enable Safe Mode with Networking option, thus booting into Safe Mode with networking.
Step 3: Open File Explorer. Right-click on This PC and choose Properties.
Step 4: Click Control Panel Home at upper the left corner of the pop-up window. Then, select Programs and Features in the next pop-up window.
Step 5: Click View installed updates on the program uninstalling interface.
Step 6: Right-click a problematic update to uninstall.
Method 3. Update Drivers
A device driver is a special program that allows computers and devices to communicate. The operating system can only control the operation of the hardware device through this interface. Ifdrivers of hard drivesare not properly installed, they will not work properly.
So, you can try updating disk drivers to fix 0xc00000e9 Windows 10.This method is available when users can boot in Safe Mode. You can refer to the following tutorial.
Step 1: Press “Windows + X” keys and select Device Manager in the pop-up menu.
Step 2: Expand Disk drivers directory and right-click on these hard drive drivers one by one to select Update driver.
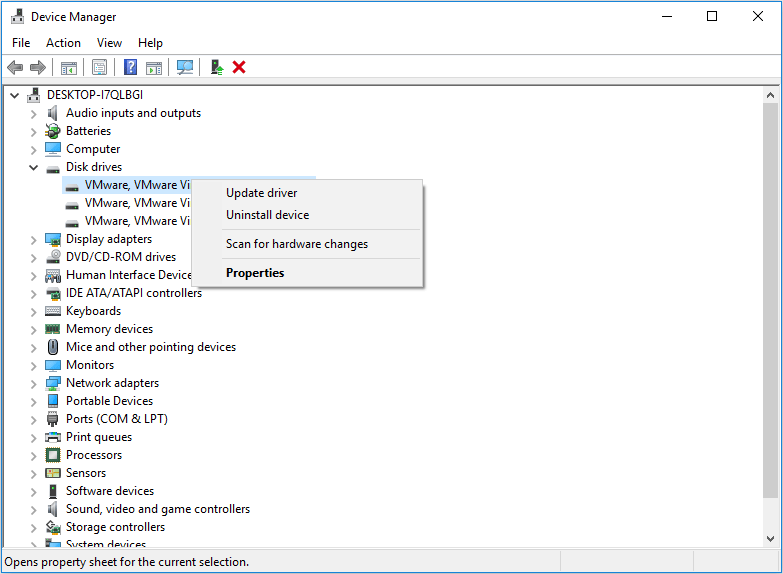
Step 3: Select Search automatically for updated driver software in the pop-up window.
Tip: If Windows can’t find a new driver, you can find a proper driver on the device manufacturer’s website and follow its instruction to perform the operation.
Method 4. System Restore
System restore can revert your computer’s state to that of a previous point in time with a restore point created before. Restore points contain Windows system files, installed applications, Windows Registry, and system settings. You can use it to delete problematic changes you have made to your computer.
This feature won’t affect your personal files, so it won’t cause data loss. If you find your data is lost after system restore, it must be caused by Windows errors.
Click How to Restore Computer to Earlier Date in Windows 10/8/7 to get a detailed tutorial.
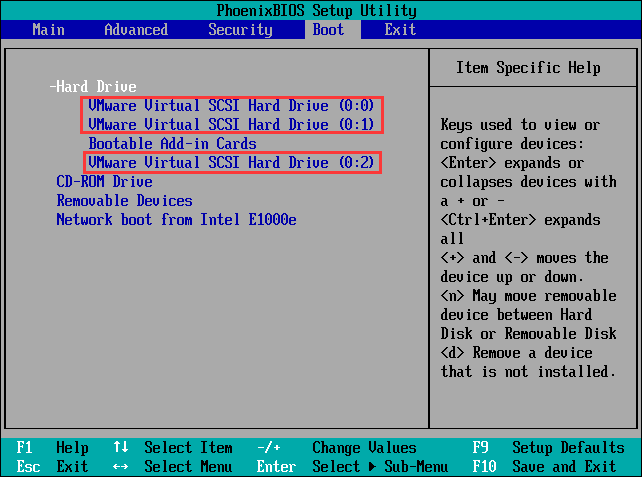
Method 5. Check the Connection of Removable Storage Devices
As mentioned above, error 0xc00000e9 may be caused by the loose or damaged connection of removable storage devices. So, you should make sure the storage devices are properly connected to your PC.
You can refer to the following tutorial.
Step 1: Remove all external storage devices like USB drives, external hard drives, RAID, etc.
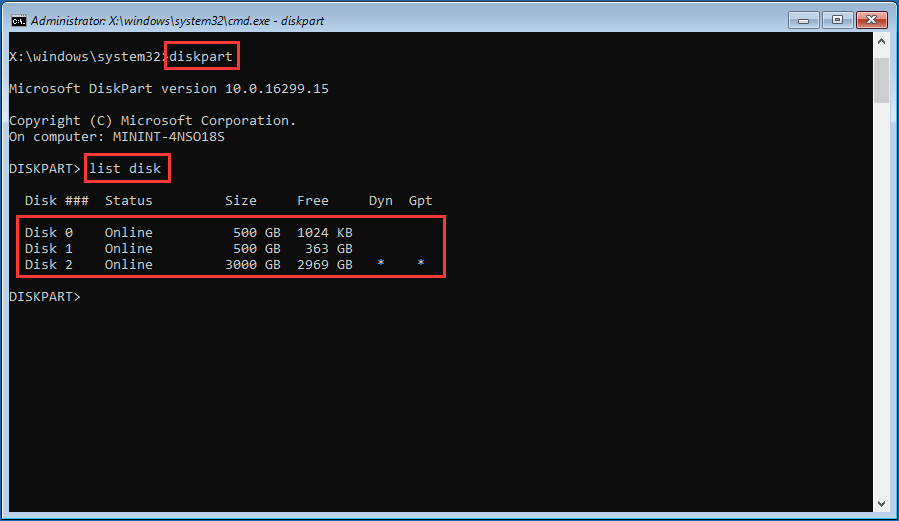
Step 2: Enter into BIOS or use the DiskPart command to check the number of hard drives connected to the PC.
Check the connection in BIOS:
- Follow the wizard that appears on the screen when you power on the system to enter BIOS.
- Skip to Boot Expand Hard Drive directory to see how many disks your PC can detect.
Check connection with DiskPart:
Open the Command Prompt window from WinRE and enter the following commands one by one. Then, you can see the number of hard drives detected by your PC.
- Diskpart
- List disk
Step 3: Remove the internal hard drives and plug them in correctly if the hard drives can’t be detected by your PC. If the hard drives still can’t be detected by your PC after you reconnect them, you should check whether there are problems with cables or the hard drives.
If there is a problem with your hard drives, but they are still detected by your computer, you can get them repaired through method 6 to 7.
Note: If the hard drive fails to be repaired, you can apply method 9 to recover data and replace the problematic disk.
If your computer can’t detect the hard drive, you should send it to a data recovery lab to get your data back.
Method 6. Rebuild MBR
MBR (Master Boot Record) is the first sector on the hard drive accessed by a computer in booting process. MBR records the relevant information about the hard disk itself and the size and location information of each partition on the hard disk.
If it is destroyed, the basic data structure information on the hard disk will be lost. Error 0xc00000e9 may happen and the computer won’t start. Fortunately, you can rebuild MBR through Bootrec.exe. This tool allows you to repair the Master Boot Record (MBR) issue, boot sector issue, and Boot Configuration Data storage issue (including 0xc00000e9 boot BCD error).
Here is the tutorial on how to rebuild MBR.
Note: This method is only applied to a bootable disk. You can make a Windows installation media or a MiniTool Partition Wizard bootable disk. However, MiniTool Partition Wizard is recommended because you need to use it to scan for bad sectors.
Step 1: Buy MiniTool Partition Wizard and launch it on a normal running computer.Click Bootable Media on the toolbar.
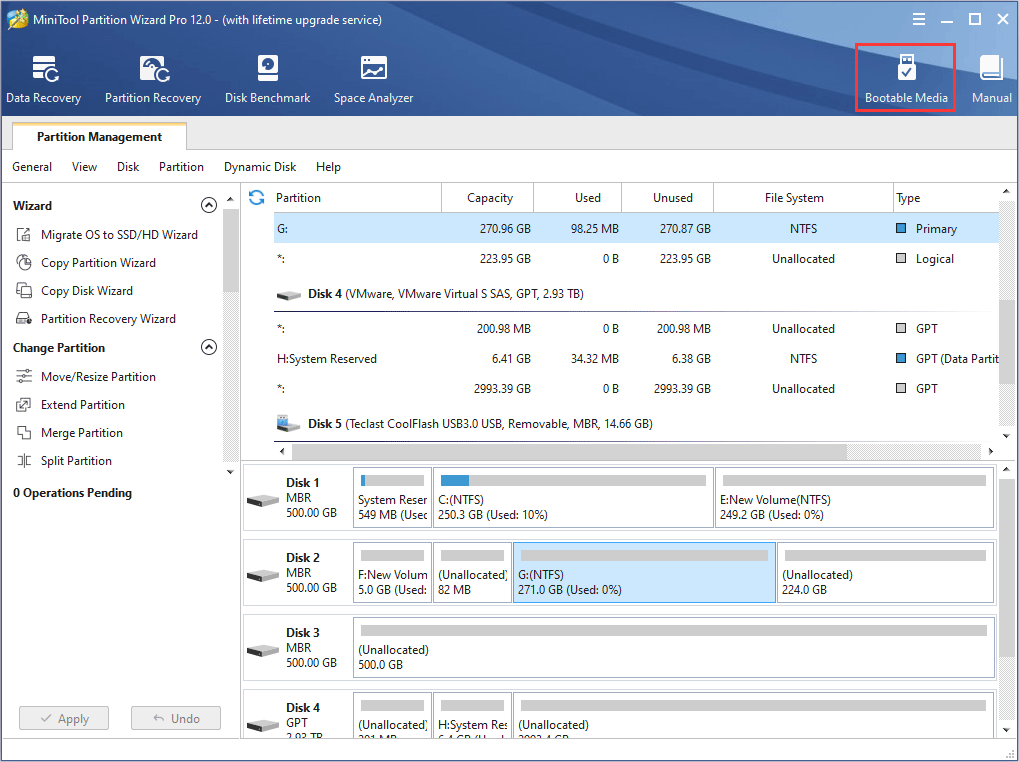
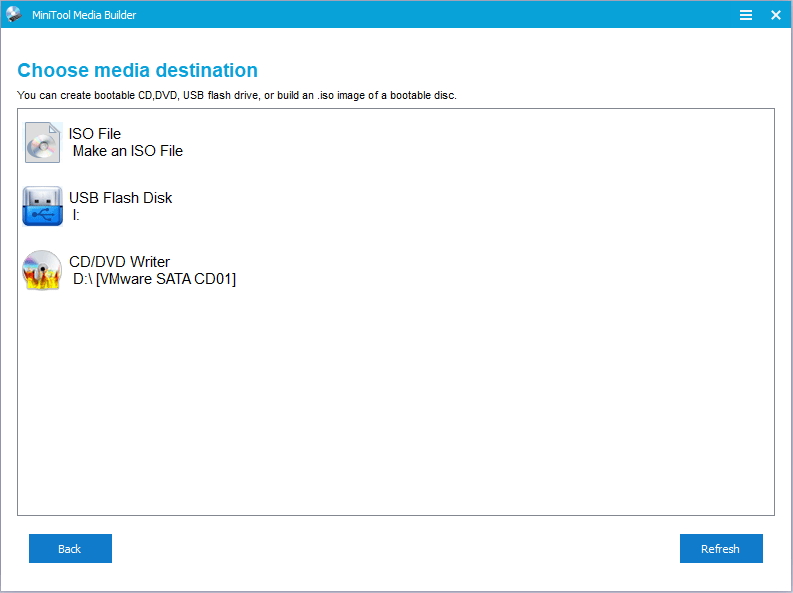
Step 2: Follow the wizard and choose USB Flash Drive as the media destination. The boot.iso file will be burnt into the USB drive directly to complete a bootable disk.
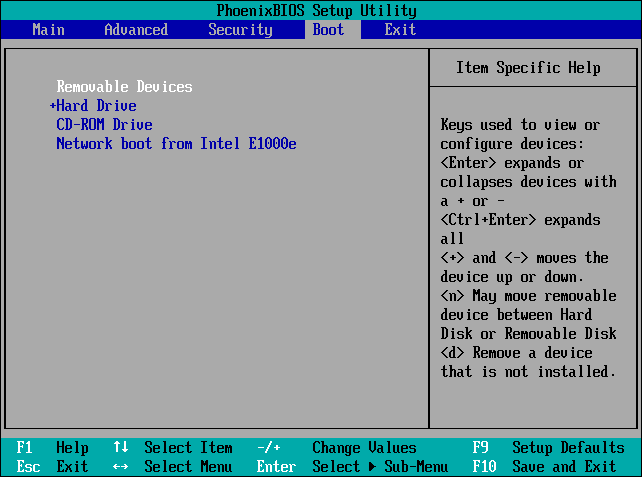
Step 3: Set the Firmware to make the computer boot from the bootable disk.
- Plug the bootable disk into the computer that can’t boot.
- Enter BIOS.
- Set Removable Devices at the first place of the boot sequence. Then, boot the computer.
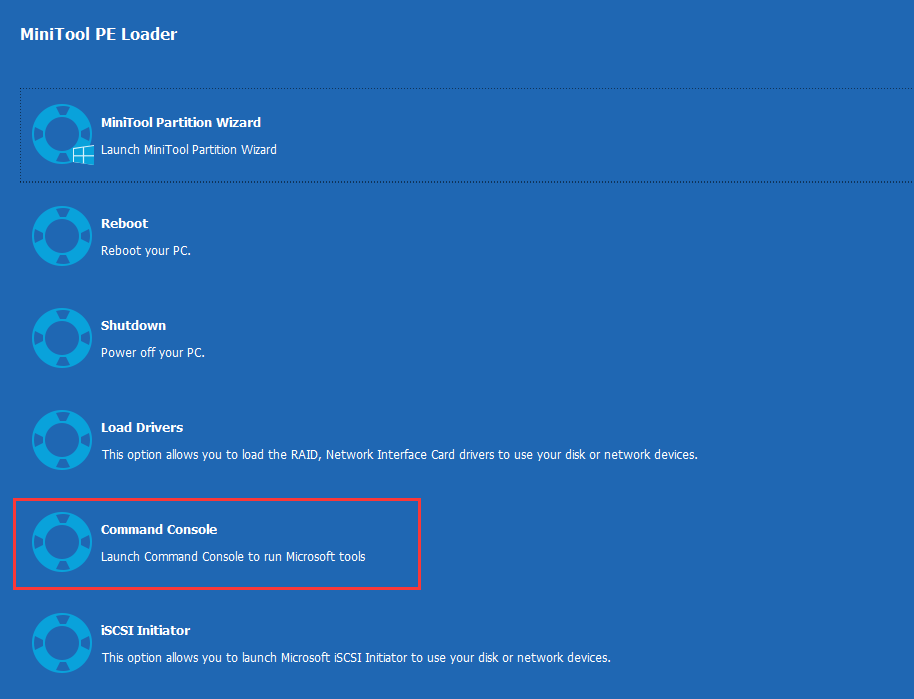
Step 4:Wait a few secondswithout any operations and go to the following interface. Click Command Console to open Command Prompt input windows.
Step 5: Execute the following command lines one by one.
- bootrec /fixmbr
- bootrec /fixboot
- bootrec /rebuildbcd
Method 7. Scan for Bad Sectors
If a hard disk serves for a long time, it may generate bad sectors, which will probably cause error 0xc00000e9, making the computer not bootable. If so, you can use MiniTool Partition Wizard to scan for bad sectors. If there are many bad sectors on the hard drive, replacing it is recommended.
Here is the tutorial on how to scan for bad sectors.
Step 1: Make a bootable disk of MiniTool Partition Wizard.
Step 2: Boot the computer with the MiniTool Partition Wizard bootable disk.
Step 3: Wait a few secondswithout any operations to make MiniTool Partition Wizard open automatically. Then, click Partition & Disk Management to go to its main interface.
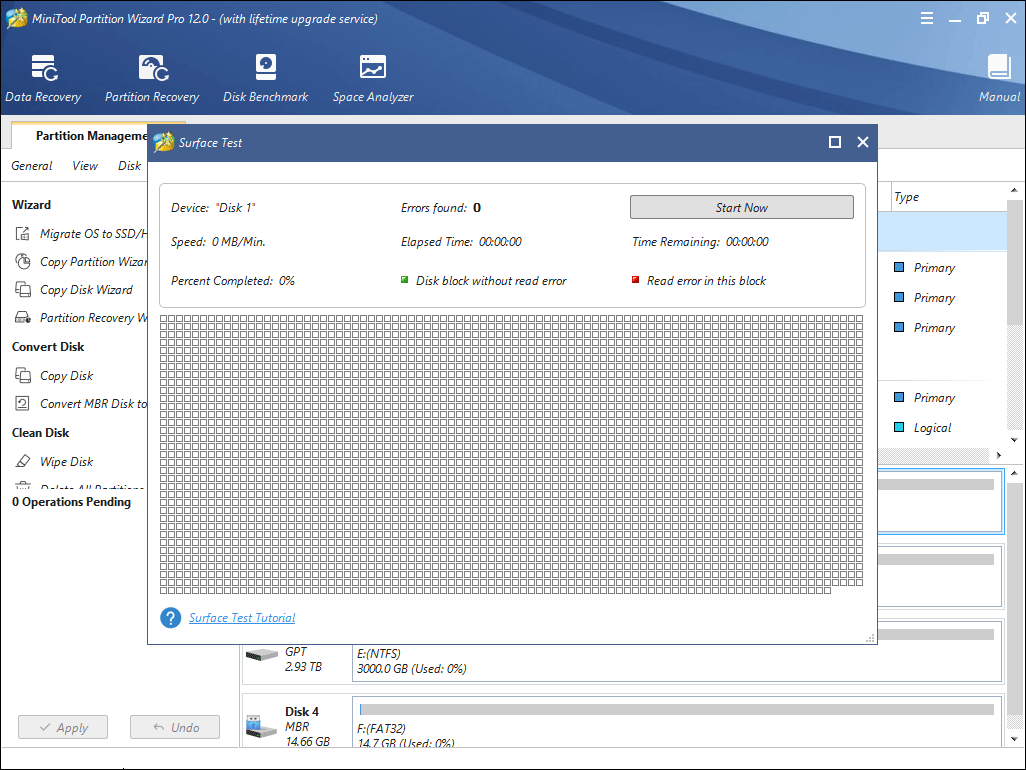
Step 4: Right-click the system disk and choose Surface Test.
Step 5: Click Start Now to begin. If there are bad sectors, they will be marked with red blocks.
Method 8. Replace Hard Drive
If the above methods can’t repair your hard drive, you should consider replacing it. Before you replace the hard drive, you may want to recover data first.
As for data recovery software, you should choose a reliable one, which also allows you to recover data when the computer fails to boot.
MiniTool Partition Wizard is such a piece of software. I will show you how to recover data with it. Of course, if there are no important files on your computer, you can skip the data recovery work.
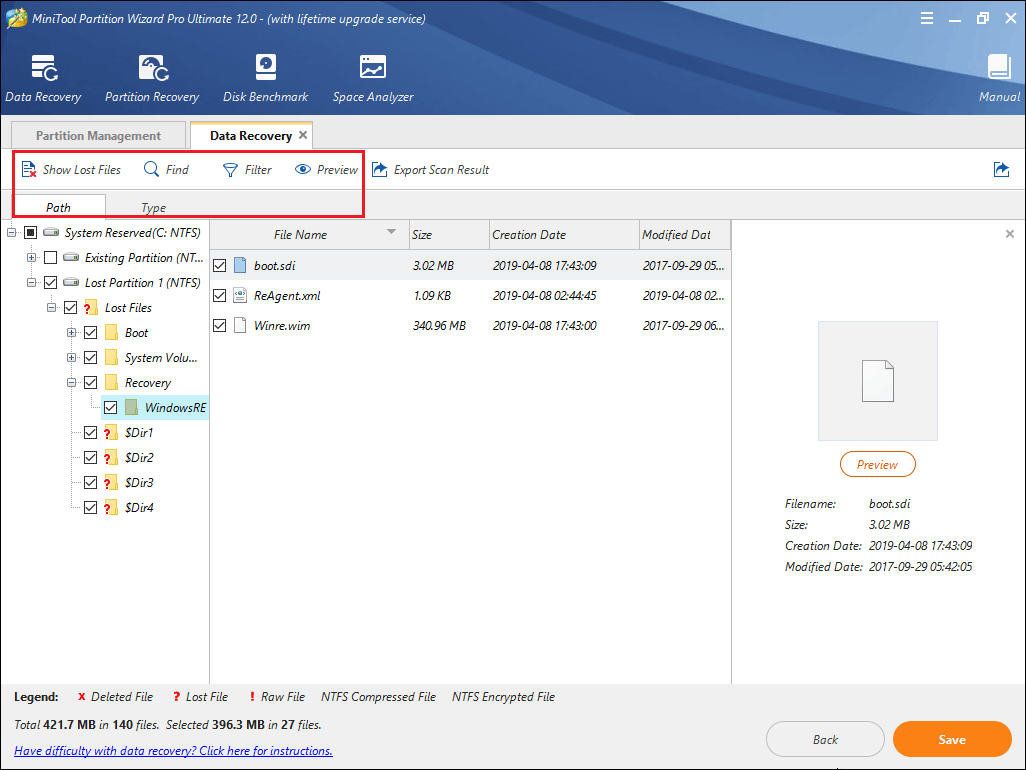
Here is the tutorial on how to recover data when the computer can’t boot.
Step 1: Boot the computer with MiniTool Partition Wizard bootable media.
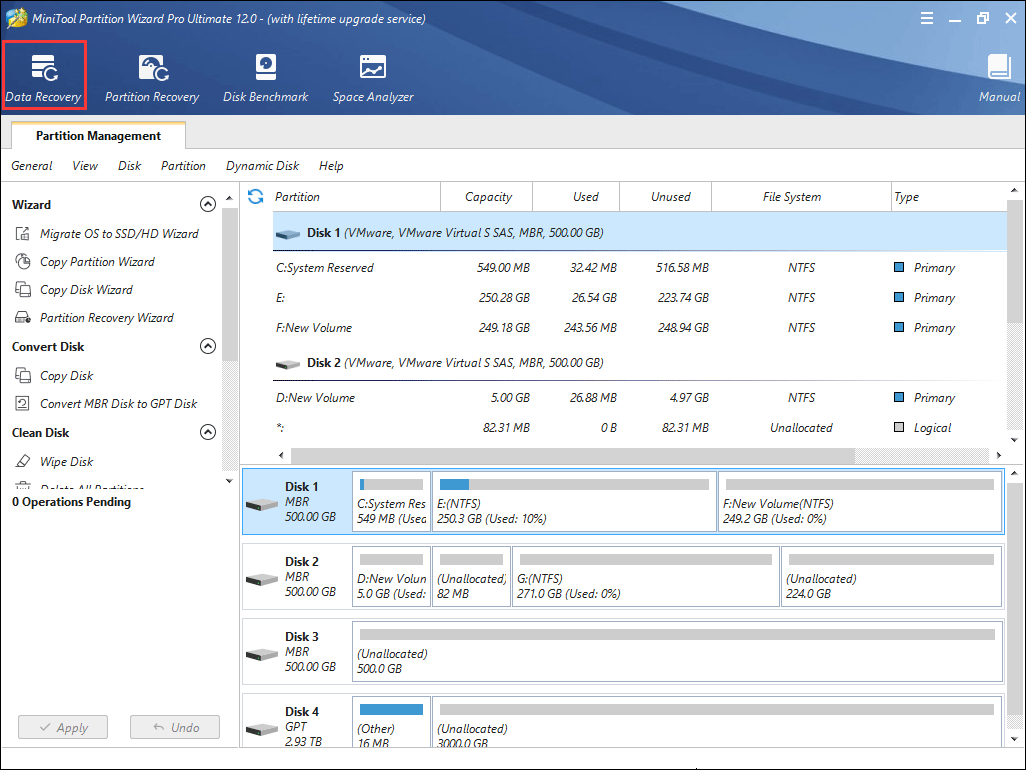
Step 2: Go to its main interface and click Data Recovery.
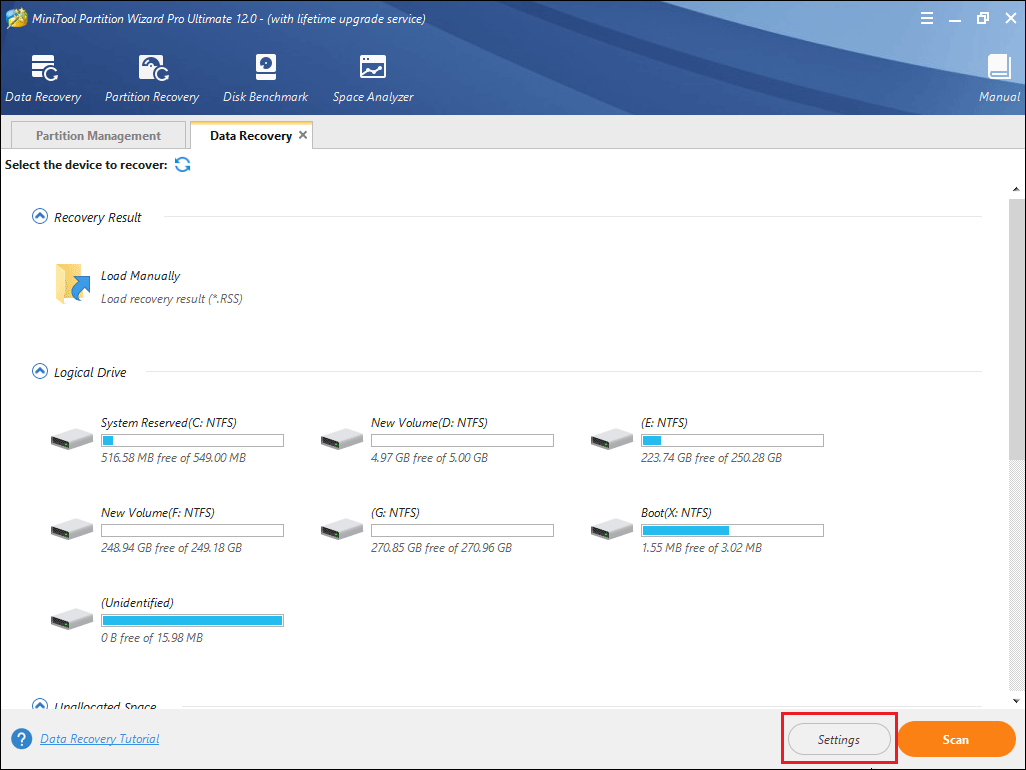
Step 3: Choose the system disk and then click Scan.
Settings: This feature allows you to limit the scanning range by selecting file systems and file types.
Step 4: Find the lost files with built-in tools.
- You can find files according to their paths, and file types.
- Show Lost Files feature only displays the lost files.
- Find feature allows you to find files by typing continuous parts of their file names.
- Filter feature allows you to find files through narrowing down the files range according to filename/extension, file size, creation/modification date, etc.
- Preview allows you to preview the files that don’t exceed 100 MB before the data is recovered.
Step 5: Select files and then Save them into a safe position.
Then, you can replace your hard drive. Please click How to Install Windows 10 on a New Hard Drive (with Picture) to get a detailed guide.
Method 9. Kill Virus
The error code 0xc00000e9 may be caused by a virus. If so, you can run an antivirus to fix this problem. But, please note that a virus attack may cause data loss. You should recover important files first. Then, you should make a bootable antivirus disk and kill the virus according to its instruction.
0xc00000e9 FAQ
What is 0xc00000e9?
0xc00000e9 is a Windows error preventing your computer from booting up. This error may be caused by loose or damaged connection of removable storage devices, missing or corrupt system files, out-of-date drivers, hard drive problems, problematic Windows update, virus attack, etc.
What is an unexpected I/O error?
An unexpected I/O error is one of the causes of the error 0xc00000e9. The error message may be shown like the following: “Windows has encountered a problem communicating with a device connected to your computer; File BootBCD; Error code: 0xc00000e9; An unexpected I/O error has occurred.”
This error is usually related to storage devices. Click What Is I/O Device Error to know more.
How do I fix error 0xc00000e9?
- Run SFC and DISM.
- Uninstall incompatible Windows update.
- Update drivers.
- Restore system.
- Check the connection of removable storage devices.
- Rebuild MBR.
- Scan for bad sectors.
- Replace hard drive.
- Kill virus.
Here are 9 solutions to error code 0xc00000e9. If your computer won’t boot due to this error, this article will help you out.Click to Tweet
Bottom Line
Has this article been helpful for you? We need your feedback. If you have problems in performing any of the above methods, you can leave a comment below or email us at [email protected]. We will reply to you as soon as possible. If you have any better solutions, please also leave a comment below to share.
Проблемы с устройством могут неожиданно возникнуть в Windows 10 из-за несовместимости оборудования или неисправных драйверов устройств, установленных на компьютере. 0xc00000e9 — это код ошибки Windows, который указывает на наличие проблем с совместимостью оборудования или драйверов устройств. В этой статье вы узнаете, как устранить ошибку 0xc00000e9 и предотвратить получение таких ошибок в будущем из-за неисправных драйверов устройств.
Вот как исправить ошибку 0xc00000e9:
Решение 1. Проверьте устройства вручную и обновите неисправные драйверы.
Решение 2. Автоматически обновляйте неисправные драйверы с помощью Driver Booster
Как я могу получить ошибку 0xc00000e9 в моем компьютере?
Как показано на скриншоте ошибки 0xc00000e9, вы можете четко знать, что эта проблема может возникать, когда съемное запоминающее устройство извлекается во время его использования или при сбое. В нем написано «Правильное подключение любого съемного хранилища и перезагрузка компьютера может решить эту проблему». Но если проблема остается после того, как вы попробовали этот метод, вы, возможно, используете неисправный драйвер для определенного устройства.

(Это примечание на снимке экрана выше показывает, что на вашем компьютере возникает ошибка 0xc00000e9.)
Решение первое, чтобы исправить ошибку 0xc00000e9
— вручную проверить устройства и обновить неисправные драйверы
Шаг 1. Удалите все внешние устройства, подключенные к вашему компьютеру, и перезагрузите компьютер.
Примечание: вам не нужно удалять мышь и клавиатуру, чтобы завершить это действие
Шаг 2. После повторной загрузки ПК необходимо подключить отключенные внешние устройства одно за другим и проверить, какое устройство вызывает конфликт.
Шаг 3. После обнаружения несовместимого устройства вы можете использовать диспетчер устройств, чтобы обновить драйвер для конкретного устройства, вызвавшего ошибку 0xc00000e9.

Если проблема не решена, вы можете перезагрузиться в безопасном режиме, чтобы продолжить исправление ошибки. Безопасный режим позволяет вам запускать Windows в базовом состоянии с ограниченным набором драйверов, необходимых для работы вашего ПК. Это поможет вам проверить, есть ли проблема с основными драйверами устройств. Или вы можете использовать Driver Booster, чтобы проверить общие ошибки на компьютере и исправить их одним кликом мыши.
Шаг 4. Перезагрузите компьютер в безопасном режиме.
> Откройте меню «Пуск» в левом нижнем углу и нажмите значок «Питание», затем, удерживая клавишу «Shift», выберите «Перезагрузка».

> После этого Windows 10 перезагрузится и предложит выбрать один из пунктов меню. Выберите Поиск и устранение неисправностей / Дополнительные параметры.

В окне Дополнительных параметров выберите Параметры загрузки

Windows 10 уведомит пользователя о том, что систему можно перезагрузить для запуска дополнительных параметров, одним из которых является Безопасный режим. Нажмите кнопку Перезагрузить


> После перезагрузки компьютера нажмите F4 или F5, когда вы увидите этот экран, чтобы запустить компьютер в безопасном режиме.
Шаг 5: Если проблема исчезнет в безопасном режиме, вы можете выйти из безопасного режима и правильно подключить внешние устройства и обновить драйверы для них. Если проблема сохраняется в безопасном режиме, настоятельно рекомендуется перезагрузить компьютер в обычном режиме и попробовать Второй способ, чтобы решить эту проблему автоматически.
Второй способ, чтобы исправить ошибку 0xc00000e9
— Автоматически обновлять неисправные драйверы с помощью Driver Booster
Ручной метод может помочь исправить ошибку 0xc00000e9 в большинстве случаев, особенно когда эта ошибка вызвана неправильным подключением или удалением внешнего устройства. Но если установка неисправного драйвера является ключевой проблемой, пользователям потребуется много времени, чтобы найти несовместимые драйверы устройств и найти наиболее подходящие драйверы для замены. Driver Booster— это мощный инструмент обновления драйверов, который может не только помочь пользователям легко обнаружить устаревшие, отсутствующие и неисправные драйверы и обновить их, но также предлагает несколько полезных инструментов для устранения распространенных проблем ПК, таких как отсутствие звука, сбой в сети и ошибки устройства.
Узнайте больше о Driver Booster
Шаг 1. Загрузите и установите Driver Booster за несколько секунд и запустите Driver Booster на своей Windows.

Шаг 2. Нажмите «ПУСК» в центре, чтобы обнаружить неисправные, устаревшие и отсутствующие драйверы, после чего вы увидите список неисправных драйверов, если вы установили их на свой ПК.

Шаг 3. Просто нажмите «Обновить сейчас», чтобы автоматически установить наиболее подходящие драйверы для ваших устройств.
| Workable Solutions | Step-by-step Troubleshooting |
|---|---|
| Boot Into Safe Mode | Restart Windows by long-pressing the Shift key on the keyboard and clicking the…Full steps |
| Perform a Startup Repair | Choose Restart from the power icon while holding the SHIFT key…Full steps |
| Scan the PC | It is simple and can take several minutes or longer to scan your PC for viruses…Full steps |
| Other Workable Methods | Change the Boot Order > Update the Volume Boot Code > Re-install Windows 10…Full steps |
Error Code 0xc00000e9: What Does It Mean
Windows error code 0xc00000e9 is a typical Windows Boot Manager error that can occur during the boot process and denotes either a hardware failure or a corrupted system file. It displays shortly after the PC turns on but before the Windows login screen: An unexpected I/O error has occurred. Error code: 0xc00000e9.
The Windows boot procedure is constantly involved with error code 0xc0000e9. When the system cannot access the drive or disk, which prevents it from reading or copying data, I/O (input/output) issues happen. Error 0xc0000e9, therefore, has a wide range of potential causes, such as:
- Damaged system files or a lack of specific files or drivers.
- The motherboard’s hard drive connector is defective or broken.
- A sudden break in communication between a computer and a removable storage device. For instance, if you attempt to install Windows and your PC unexpectedly loses contact with the installation disk.
- Faulty registry files.
- Defective installation media; a damaged hard drive or its controller. For instance, the disk itself may be faulty or specific files may be missing, corrupt, or damaged.
- Incorrect Windows 10 installation ISO.
- Malware attack.
How to Fix Windows 10 Error Code 0xc00000e9
Want to know how to fix the Windows 10 error code 0xc00000e9 on your PC? Check out these six methods given below.
- Boot Into Safe Mode and Scan Windows for Errors
- Perform a Windows Startup Repair
- Scan the PC for Malware or Other Issues
- Change the Boot Order to Fix Error 0xc00000e9
- Update the Volume Boot Code to Use BOOTMGR
- Re-install Windows 10 to Fix Error 0xc00000e9
Before explaining these methods, let us check out the video below on how to fix error code 0xc00000e9 in Windows 11 and 10.
- 0:17 Restart your PC
- 0:45 Access BIOS setting
- 2:19 Load optimize default
Now, let us explain the methods and their solutions mentioned above.
Method 1. Boot Into Safe Mode and Scan Windows for Errors
You can access Windows in safe mode when it does not boot normally. If it succeeds, you can try several troubleshooting procedures and scan Windows to check for errors. Safe Mode is also called the diagnostic startup mode.
How to start Windows in safe mode?
Restart Windows by long-pressing the Shift key on the keyboard and clicking the Restart button in the Power button in the lower-right corner.
Once Windows boots up, you will get an Advanced Recovery Screen. Here click on the following option one after the other to boot into Safe Mode.
Troubleshoot> Advanced Options> Startup Settings> Restart on the following screen.
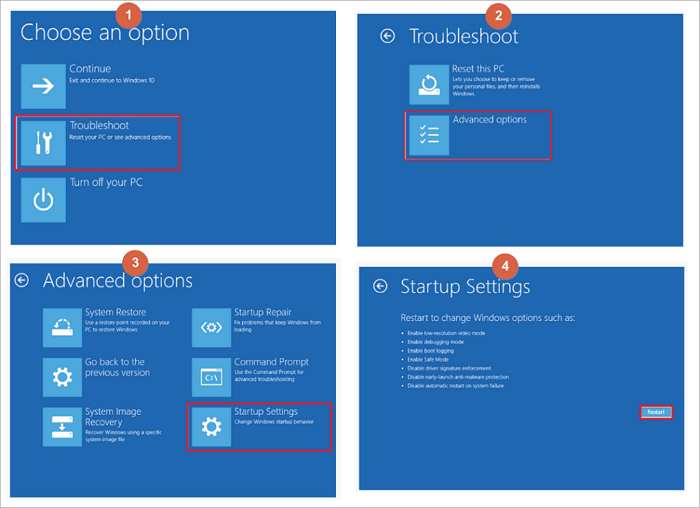
After your PC restarts, you’ll see a list of options. Select 4 or press F4 to start your PC in Safe Mode. Or if you’ll need to use the internet, select 5 or press F5 for Safe Mode with Networking.
Once Windows boots into Safe Mode, you can use the built-in Windows Error Checking tool and the SFC scannow command. It will check the hard drive and system files for issues that can cause boot issues.
Let us see how to go about it:
Step 1: On your Windows PC, right-click on the Windows logo on the bottom left corner of your screen and choose Windows Terminal (Admin).
Step 2: Press Yes on the User Account Control pop-up window.
Step 3: Type sfc /scannow and press Enter to begin scanning.
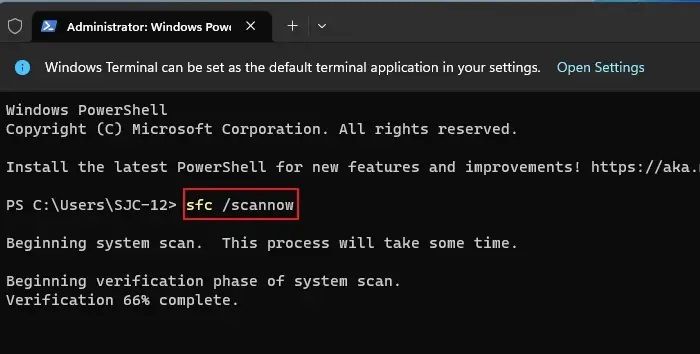
Every protected operating system file on your PC will now be checked for integrity by System File Checker. It can take some time to complete. If errors are discovered and fixed, you will get a message. You can restart your PC after that.
Method 2. Perform a Windows Startup Repair
I will explain how to perform a Windows Startup Repair in this method that may eliminate the error code. This is how you go about it:
If Windows won’t let you log in, use a Windows disk or a prepared USB device with the Windows automated repair tools. This problem might occasionally appear due to missing or corrupt system files, registry errors, or other issues that can be resolved with a startup repair.
Startup Repair is available from the Advanced Startup Options menu.
Step 1: Choose Restart from the power icon while holding the SHIFT key.
Step 2: On the Choose an option screen, click on Troubleshoot > Advanced Options
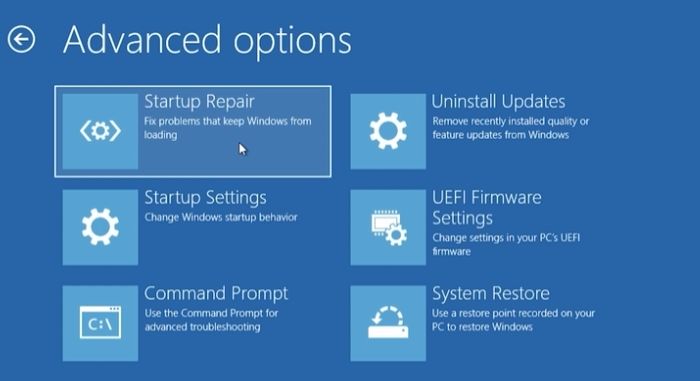
Step 3: Click on Startup Repair to begin the Windows Startup Repair.
During the process, you will need to provide your account details and other related things to help the troubleshooter fix the problem.
Method 3. Scan the PC for Malware or Other Issues
Use a bootable antivirus program if a virus stops Windows from starting. Download an antivirus program for Windows on a different PC, then copy it to a bootable drive. A bootable rescue tool that scans a system from a Windows Terminal is typically included in virus tools.
It is simple and can take several minutes or longer to scan your PC for viruses and other spyware properly. The length of the scan will increase with the number of files you have and the speed of your PC.
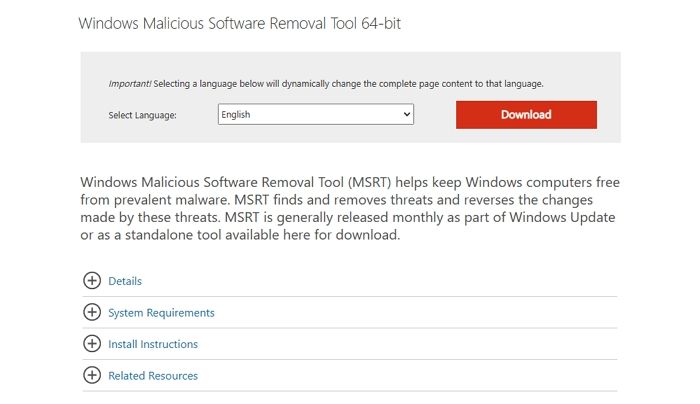
Run the Microsoft Windows Malicious Software Removal Program after downloading it. Depending on whether you are using a 32-bit or 64-bit version of Windows, there are two versions to choose from: (Check out which one your PC has) MSRT 32-bit or MSRT-64bit.
Microsoft’s free malware removal program may not find everything, but it will search for particular, prevalent malware, which is a decent place to start. Use Windows Update to update the tool if you already have it so that it can scan for the most recent threats.
Method 4. Change the Boot Order to Fix Error 0xc00000e9
If you added a new hard disk, plugged in an external drive, or attached a USB device, the boot order might have been altered. The system BIOS upgrade may also cause it. Verify that the hard disk that Windows is installed on is listed at the top of the boot sequence by accessing the PC’s BIOS or UEFI settings.
To change the BIOS boot order, follow the procedures given below. The order in which devices boot will change if the boot sequence is altered.
Step 1: As your PC turns on or restarts, watch for a notification mentioning a key (typically Del or F2) that must be pressed to enter the BIOS setup program. As soon as you see the message, press this key.
Note: The details of changing the boot order options vary from PC to PC because every BIOS setup program is unique. The menu choice or configuration setting may be identified by Boot Options, Boot, Boot Order, etc. A broad menu item like Advanced Options, Advanced BIOS Features, or Additional Options may contain the option.
Step 2: Find the option to change the boot order using the directions for accessing your BIOS tool. The modifications are made in the Boot menu of the BIOS.
The order in which the devices are listed determines the boot order or the order in which your PC will look for operating system information. The integrated hard disk that is in the PC is often what BIOS refers to as a hard drive and will attempt to boot from first from the order on your screen.
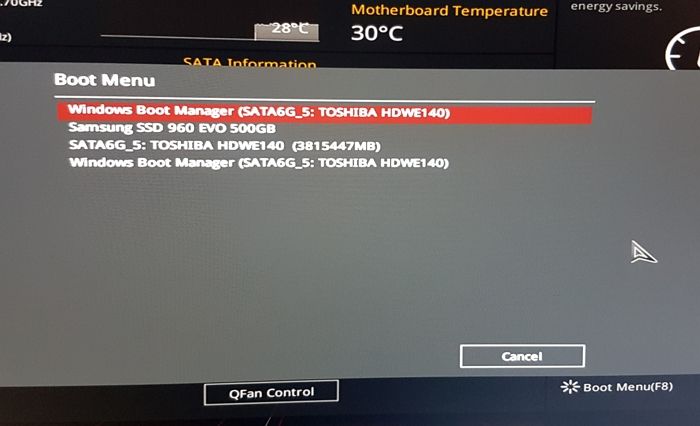
Select the right hard disk or SSD on which your Windows is installed, and press the Enter key.
Step 5: Save your BIOS settings before your option becomes effective. To accomplish that, navigate to the Exit or Save and Exit menu using the guidance provided by your BIOS utility.
Step 6: Verify your changes and then close BIOS. You should choose Yes if you get a confirmation message.
Any modifications to the boot sequence and any other BIOS settings you may have made are now saved, and your PC will restart and follow the new boot order.
Method 5. Update the Volume Boot Code to Use BOOTMGR
If a boot loader other than the Windows default BOOTMGR is used, the volume boot code may get corrupted or linked to it. This issue should be resolved by updating the volume boot code. To boot to Command Prompt and perform the required command, follow these steps:
Step 1: Go to Advanced Startup Options.
Step 2: Choose the Command Prompt.
Step 3: Type the following command and press Enter:
bootsect /nt60 SYS
This will change the volume boot code on the partition used to boot Windows to BOOTMGR, compatible with Windows operating systems.
Step 4: Remove the Windows flash drive from its USB port or the Windows disk from your optical drive before closing the Command Prompt window.
Step 5: Choose either Continue or Restart from the list of options. Windows should now launch usually.
Note: After attempting to start Windows normally once more, if you get any errors or this does not work, try the command bootsect /nt60 ALL.
The ALL option updates the boot code on volumes that can be used as Windows boot volumes, excluding any dynamic volumes not connected with an underlying disk partition.
The only catch is that if you dual boot your machine, you could unintentionally create a problem with any previous operating systems you boot to that is similar but the opposite.
Method 6. Re-install Windows 10 to Fix Error 0xc00000e9
All system modifications are wiped out when Windows is reinstalled. As a result, corrupted or missing system files are recovered and put back in working order. A clean install of Windows is achieved during the Windows setup process by removing the existing Windows installation (assuming there is one) before installing a new operating system or reinstalling the old one. Here is how to go about it:
Step 1: Navigate to the Windows Downloads page and click the Download Now button under Windows Installation Assistant.
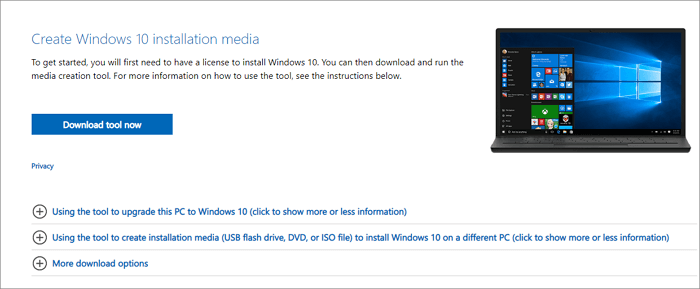
Step 2: Launch the executable file you downloaded for Windows 10 Installation Assistance.
Step 3: Click Accept and Install on the terms of the agreement window.
Note: Before continuing, you might be asked about using the PC Health Check app. Installing that will allow you to determine whether your PC qualifies for the upgrade.
Step 4: The download of Windows will begin instantly. Allow the installation time to finish.
Step 5: After downloading, your PC will restart to install Windows 10 Or, you may choose Restart now to start the installation immediately. Windows 10 will be set up and installed automatically.
How to Recover Windows 10 Data After Fixing Error 0xc00000e9
Windows users may lose data after fixing error code 0xc00000e9. So, I recommend EaseUS Data Recovery Wizard, where you can recover Windows 10 data that you lost after fixing the error code 0xc00000e9.
So, what are the highlights of using the EaseUS Data Recovery Wizard tool?
- It can recover deleted files, photos, videos, music files, documents, and other files with simple clicks.
- This software supports file recovery from a hard drive, SSD, USB flash drive, and pen drive.
- Recovery of files from a corrupted Windows operating system is possible through this tool. To boot your PC and retrieve list data, EaseUS offers a WinPE boot device.
- Attacks from viruses can make your PC malfunction, which is very frustrating. Your data can be quickly and securely recovered using this tool.
- This data recovery software makes restoring a partition’s data simple, even if it has been completely lost or the system cannot recognize it.
So these are the features of EaseUS Data Recovery Wizard, and you can easily download them from the official website.
Note: To guarantee a high data recovery chance, install EaseUS data recovery software on another disk instead of the original disk where you lost files.
Step 1. Launch EaseUS Data Recovery Wizard on your Windows 11, Windows 10, Windows 8, or Windows 7 computer. Select the disk partition or storage location where you lost data and click «Scan».

Step 2. This recovery software will start scanning the disk to find all lost and deleted files. When the scan process completes, click «Filter» > «Type» to specify lost file types.

Step 3. Preview and restore lost Windows files. You can double-click to preview the scanned files. Then, select the target data and click the «Recover» button to save them to another safe spot in the PC or an external storage device.

Conclusion
So, do not panic if your system does not start when you encounter error 0xc00000e9. By following the above instructions, you can quickly fix the unexpected error without causing any harm to your Windows PC. Reinstall Windows if nothing else works, but be aware that this will erase all the data on your system drive. Replace your drive with another if the issue reappears. A bad or damaged HDD or SSD may bring on error 0xc00000e9.
So, if you lost any data while reinstalling Windows, you can always download and use EaseUS free data recovery software to recover your lost files. So, that’s it! I hope this article helped you!
An Unexpected I/O Error Has Occurred (0xc00000e9) FAQs
Do you have more questions about the unexpected error code 0xc00000e9 showing up on your Windows PC? Check out the frequently asked questions and their answers given below:
1. What Is Problem Status 0xc000009e?
A typical Windows Boot Manager issue, Windows error code 0xc00000e9, indicates a hardware failure or a corrupt system file detected during the boot process. Before the Windows login screen, it appears immediately after the PC turns on and looks like this: An unexpected I/O error has occurred.
2. How to do Windows Startup Repair?
This is how you perform Windows Startup Repair: Click the Windows Start icon and the power button icon. Press and hold down the Shift key and then click Restart. On the blue screen, select Troubleshoot. Next, go to Advanced Options > Startup Repair. After the startup repair process is complete, reboot the computer.
3. How to repair Windows 10 without a boot?
To repair Windows 10: Launch the Windows Advanced Startup Options menu. Go to Troubleshoot > Advanced options > Startup Repair. Wait a few minutes, and Windows will fix the startup problem without boot.
4. How to fix MBR in Windows 10 without a disk?
Restart your PC, and after each time the Windows logo appears during boot, force a hard shutdown. You should enter the Windows Recovery Environment (WRE) to perform a system restore after doing this three times. Choose «Automatic Repair» from the Advanced settings menu if that does not work. If all else fails, choose Command Prompt and execute the following commands:
bootrec /fixmbr bootrec /fixboot bootrec /rebuildbcd sfc /scannow
If you find it helpful, share this post to help more people.
Ошибка 0xc00000e9 при загрузке windows 10 наиболее часто появляется при сбоях работы жестких дисков. Начиная от плохого контакта в шлейфе (разъеме) и заканчивая повреждением файлов и даже секторов. Не исключены неправильные настройки SATA в БИОСе или сбой от режима быстрого запуска, давайте разбираться по порядку.
Метод 1: Выключить «БыстрыйЗапуск»
Ошибка 0xc00000e9 появляется при сбоях режима быстрого запуска. Следует выключить его и проверить, исчезла ли ошибка. Находится он в настройке питания, для выключения сделайте так:
- Используйте кнопочки «Win+R»;
- Далее впишите в появившейся строчке «powercfg.cpl»;

- Эта команда раскрывает настройки электропитания;
- Слева кликните строчку «ДействиеКнопокПитания»;

- Откроется новое окошко, там кликните «ИзменениеПараметров…»;

- Это разблокирует подраздел «ПараметрыЗавершенияРаботы»;
- Уберите галку возле строчки «ВключитьБыстрыйЗапуск (рекомендуется)»;

Недостатком способа является замедление загрузки ОС, зато ошибка исчезает.
Метод 2: Проверить подключение диска
Когда выскочил сбой 0xc00000e9 при загрузке, следует осмотреть на ПК шлейфы идущие к жесткому диску, особенно SATA. Проверьте контакт не только шлейфа с диском, но и с материнкой. Убедитесь в сохранности разъемов на обоих концах соединения. Если есть возможность, подключите другой шлейф (дублирующий), используйте иной разъем SATA на материнке (их несколько). Пробуйте заменить шлейф.
Такой сбой часто происходит после вмешательства в устройство ПК – различные апгрейды, чистка блока питания или кулеров и радиаторов, отключения устройств или их замены. Стоит проверить соединения всех затронутых в процессе работы устройств, но особенно жесткого диска.
Метод 3: Отключить все подключенные носители
Код ошибки 0xc00000e9 может появиться по причине подключения через USB неисправного носителя. Поэтому отсоедините все флешки, внешние диски, карты памяти телефона или планшета выньте из картридера. Отсоедините любые подключенные посредством USB приборы, оставив клавиатуру либо мышку.
Метод 4: Перенастроить БИОС
Ошибка 0xc00000e9 может появиться при сбое настроек БИОСа или смене жесткого диска, который требует иных настроек. Поэтому следует переключить режим для SATA-контролеров. Либо сбросить настройки до заводских.
ВАЖНО: Учитывайте, что разные модели BIOS имеют отличающееся меню и саму опцию. Рекомендую изучить настройки для своей версии БИОСа в Интернете.
Теперь откройте БИОС на вашем устройстве, далее:
- Перейдите ко вкладочке «Main»и там найдите настройку «SATAMode» либо «ConfigureSATAas»;
- Если нет таких настроек, откройте вкладочку «Advanced»и там найдите строчку «SystemConfiguration» → «SATAControllerMode»;
- Рекомендую установить режим «AHCI» либо «Compatibility», они годятся для большинства случаев;
- Если не помогает, пробуйте включить «IDE»;

- Откройте вкладочку «Boot» либо «BootMenu»;
- Отыщите строчку «SecureBoot» и установите режим «Enabled» либо «Disabled» (нужно поменять один режим на другой, в зависимости от того, какой был включен);

- Иногда опции переключения режимов загрузки расположена в подразделе «Startup»;
- Тогда вам следует в этом подразделе найти настройку «UEFI/LegacyBoot»;
- Установить значение «LegacyOnly»;
- Нажать «F10» и перезагрузить ОС;
- Если это не помогло, выполните сброс БИОСа до заводских настроек;
Метод 5: Проверить состояние диска
Реже сбой 0xc00000e9 при загрузке windows 10 происходит из-за неполадок с дисками. Следует запустить проверку дисков, как внутренних, так и внешних на ошибки и «битые» сектора. Рекомендую (по возможности, разумеется) подключить проблемный диск к другому ПК и проверить встроенной функцией «chkdsk». Для проверки нужно:
- Запустить «КоманднуюСтроку» либо «WindowsPowerShell»с правом администратора;

- Вписать туда «chkdsk /f /r X», вместо Х вы должны указать букву поврежденного тома, с которым возникла проблема;

Если проверка на ином ПК не доступна (чаще всего так и есть), стоит попытаться выполнить загрузку ПК/ноутбука в «БезопасномРежиме». При удачном запуске выполните пункты, описанные выше в этом же параграфе.
Когда устройство загружаться в любом режиме отказывается, используйте установочный диск или флешку. Возможно, придется создать установочную флешку на другом ПК/ноутбуке. Затем:
- Вставляете флешку в USB, запускаете БИОС и в разделе «Boot» либо «BootMenu» устанавливаете первым при загрузке USB-накопитель;
- После запуска фиолетового окошка установки нажмите Shift+F10, чтобы запустить «КоманднуюСтроку»;

- Чтобы определить букву нужного раздела, последовательно наберите команды: diskpart, list volume и exit.

- Затем «chkdsk /f /r X», букву Х замените на буквы тома, который определили как проблемный;

Вы можете применить утилиту для реанимации поврежденных носителей «Victoria». Работает она не только в системе виндовс 10, но и с диска реаниматора или загрузочной флешки, если ее туда установить.
Метод 6: Откатить систему
Еще один способ борьбы с ошибкой 0xc00000e9 – попытаться выполнить откат системы на точку восстановления. Работает, если опция включена и точки периодически создаются системой. Шаги такие:
- Выполнить загрузку с установочного флеш-носителя;
- Перейти в фиолетовом окошке к «Далее» → «ВосстановлениеСистемы»;

- Кликните «ПоискИисправлениеНеисправностей»;
- Затем клик по «ВосстановлениеСистемы»;

- Выберите систему из списка (если она одна, то и будет одна);

- Остается следовать рекомендациям программы восстановления;

Когда выше перечисленные способы не помогают, остается только полная переустановка системы.
Ошибка 0xc00000e9 является в своем роде «универсальной», она может возникнуть как при установке Windows, так и в процессе эксплуатации компьютера. Текстовая информация, которая выводится на экран, сообщает пользователю о проблемах с подключением устройств ввода-вывода.
Содержание
- 1 Описание ошибки
- 2 Проблемы при установке
- 3 Проблемы в работающей системе
- 3.1 Windows 7
- 3.2 Windows 10
- 4 Маловероятные причины и кардинальные решения
- 5 В заключение
Описание ошибки
Большая часть владельцев ПК при возникновении ошибки даже не пытается вникнуть в содержимое ее описания, появившееся на мониторе. Текст на иностранном языке по умолчанию считается непереводимым или бесполезным. Хотя в данном случае Microsoft дает короткое, но емкое описание проблемы и рецепт ее устранения.

Код ошибки 0xc00000e9 означает, что у ОС проблемы с подключением устройства ввода-вывода информации. Понять это можно, использовав переводчик от Google или Яндекс. Далее приводится перечень вероятных «виновников» проблемы и стандартная рекомендация по перезагрузке.
Не будь ошибка столь «универсальной», этой информации пользователю вполне бы хватило, чтобы ее устранить. Беда в том, что причин, приводящих к ее появлению, гораздо больше, чем содержится в описании.
Проблемы при установке
Проще всего разобраться с тем, как исправить данную ошибку, можно в момент установки операционной системы. Периферия еще не подключена, следовательно, выбор устройств I/O ограничен. Status 0xc00000e9 при установке Windows 7 или 10 может быть вызван следующими причинами:
- неисправностью носителя (флешка, DVD-диск);
- проблемами в работе жесткого диска ПК;
- неисправностью разъема на материнской плате или шлейфа SATA.
Возможных источников проблем не так много, следовательно, «вычислить виновника» достаточно просто:
- попробуйте другой установочный носитель или создайте его самостоятельно. При этом желательно использовать оригинальный образ операционной системы с сайта Microsoft и утилиту Media Creation Tools. Это в равной степени относится к флешкам и DVD. Как вариант можно записать «болванку» на другом компьютере с минимальной скоростью;
- проверьте правильность подключения HDD, открыв корпус десктопа. Иногда, чтобы избавиться от этой ошибки, достаточно включить кабель SATA в другой свободный разъем на материнской плате;
- если первые два способа не помогают, высока вероятность неисправности устройства хранения данных — жесткого диска или твердотельного накопителя.
Проблемы в работающей системе
Уже установленная и работающая ОС может подкинуть «сюрприз», выдав такую ошибку в момент очередной загрузки. В этом случае первым делом следует отключить периферийные устройства, чтобы исключить возможные источники появления проблемы. Если после перезагрузки система не загрузилась в нормальном режиме, следует переходить к более серьезным действиям.
Windows 7
Ошибка 0xc00000e9 при загрузке Windows 7 говорит о возможных проблемах в работе аппаратной конфигурации. Рассмотрим методы ее исправления, сгруппированные по степени сложности и эффективности.
- Выполняем проверку HDD на наличие ошибок. Предназначенные для этой цели средства ОС запускаются в безопасном режиме. Нажимая функциональную клавишу F8 в момент старта ОС, вы откроете расширенное меню загрузки.

Выбираем безопасный режим с поддержкой командной строки, отмеченный на скриншоте. После запуска потребуется ввести команду проверки диска на ошибки и подтвердить свои действия.
Поскольку в этом режиме меню «Пуск» отсутствует, третьей командой ПК отправляется в перезагрузку. В результате Windows выполнит проверку жесткого диска на наличие ошибок и поврежденных секторов с попутным восстановлением данных. Операция выполняется в пять этапов, а скорость ее завершения зависит от состояния и объема HDD.
Если компьютер загрузится без ошибок, для очистки совести можете выполнить проверку целостности системных файлов.

Таким образом, вы дополнительно убедитесь, что ошибка не вызвана проблемами в работе самой Windows.
- Загружаемся с установочного носителя. В настройках BIOS установите приоритет загрузки, чтобы запустить режим установки с флешки или DVD.

Выбираете пункт, отмеченный на скриншоте, чтобы войти в режим восстановления системы.

Здесь можно последовательно опробовать два выделенных варианта. Если не сработает первый, второй восстановит ОС в устойчивом состоянии с использованием точек System Restore.
Windows 10
Сообщение об ошибке 0xc00000e9 при загрузке Windows 10 вызывается теми же причинами, что и в предыдущих версиях. Отличие заключается в технологии ее устранения. Быстрая загрузка исключает использование клавиши F8. Чтобы войти в режим восстановления сразу, потребуется установочный носитель. Исключением из этого правила могут стать ноутбуки. Часть производителей встраивает в свои модели механизм защиты, который при двух неудачных попытках загрузки ОС автоматически запускает режим восстановления. На десктопе такого «подарка» вам никто не сделает.

Начальное меню отличается незначительно. Режим восстановления откроет следующее окно с параметрами.

Выбираем отмеченный на скриншоте пункт и получаем полный набор инструментов, которыми мы пользовались в Windows 7.

Здесь вы можете воспользоваться командной строкой и различными режимами восстановления работоспособности, собранными в одном месте. Благодаря этому код ошибки 0xc00000e9 в Windows 10 устранить проще, чем в Windows 7.
Маловероятные причины и кардинальные решения
Незначительная часть пользователей сталкивается с этой ошибкой в результате установки обновлений, нового ПО или заражения вирусами. Если вы точно уверены, что проблемы в программном обеспечении, можете удалить «виновника» в безопасном режиме. Не выходя из Safe Mode, проведите тестирование системы автономной антивирусной утилитой, запустив ее с флешки.
Если аппаратная конфигурация полностью работоспособна, но систему не удается реанимировать ни одним из перечисленных способов, остается только крайняя мера. Придется пожертвовать несохраненными персональными данными и выполнить «чистую» установку Windows.
В заключение
Если в ходе проверки вы выявили проблемы в работе накопителя, не стоит искушать судьбу. Всевозможные утилиты, предназначенные для восстановления битых секторов жесткого диска, способны только продлить на некоторое время его «агонию». Заменить накопитель дешевле, чем оплачивать услуги по профессиональному восстановлению данных.