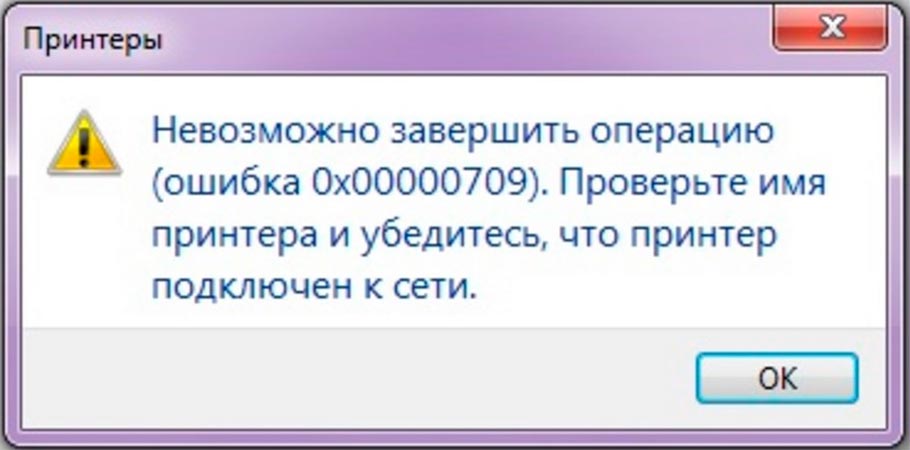
Обозначенная в заголовке ошибка возникает в нескольких ситуациях, связанных с подключением сетевого принтера или с его назначением устройством для печати по умолчанию. С проблемой периодически сталкиваются пользователи Windows 7 и 10, причем причины возникновения и способы решения ошибки в упомянутых ОС одинаковы. Сегодня мы расскажем, как быстро и грамотно исправить ошибку 0x00000709. Приведем универсальные, а главное, эффективные способы, каждый из которых уже помог множеству пользователей оргтехники.
Эта ошибка относится к категории системных, причем встречается на всех популярных версиях Windows. В возникновении проблемы нет вины пользователей, ведь указанная ошибка (предположительно) появляется при попытке системы перезаписать данные основного принтера в реестре. Если в соответствующем разделе уже есть запись об используемом печатающем устройстве, то информация о новом принтере попросту не заменяет данные о старом. В результате возникает конфликт, приводящий к невозможности выбора любого другого (кроме изначально установленного) принтера в качестве основного устройства для печати.
Основной способ исправления ошибки 0x00000709 в Windows 7 и 10
Поскольку проблема заключается в отсутствии автоматического обновления информации, то сведения понадобится прописывать вручную. Для этого потребуется внести изменения в реестр. Но для начала нужно позаботиться, чтобы случайная ошибка в выполнении нужных действий не привела к непоправимым последствиям. Поэтому в первую очередь надо создать копию реестра в текущем его состоянии.
Важно: Этот шаг можно пропустить в том случае, если вы гарантированно не будете посещать остальные ветки реестра и вносить там изменения. Мы предпочитаем перестраховываться, поэтому рекомендуем всем пользователям создавать резервные копии. Времени это занимает немного, а польза (с учетом человеческого фактора) порой просто неоценима.
Чтобы создать резервный файл с текущими данными реестра, нужно выполнить такие шаги:
- Откройте реестр. Для этого нажмите клавиши Win+R, а затем пропишите regedit и нажмите OK.
- Нажмите ПКМ на слово Компьютер, выберите Экспортировать.
- Впишите название файла (например, regedit_copy) и укажите место размещения копии (любое, на усмотрение пользователя).
- Убедитесь, что в нижней части окна выбран пункт Весь реестр и нажмите Сохранить.
Когда копия создана, можно приступать непосредственно к устранению ошибки. Этот процесс предполагает выполнение нескольких действий:
- Включите реестр (если вы его закрыли после создания копии), последовательно откройте вкладки HKEY_CURRENT_USER -> Software -> Microsoft -> Windows NT -> CurrentVersion -> Windows (проходить весь путь лучше вручную, так как поиск в реестре работает специфично, неопытный пользователь легко запутается).
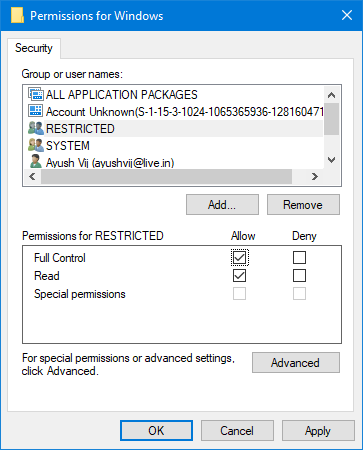
- Кликните ПКМ на Windows, затем в контекстном меню выберите опцию Разрешения…, поставьте галочку на пересечении строки Полный доступ и столбца Разрешить (сверху обязательно должна быть выделена группа пользователей ОГРАНИЧЕННЫЕ). Подтвердите действия, поочередно нажав Применить и ОК.
- В правой части окна реестра нажмите ПКМ на Device, выберите Изменить. Удалите наименование принтера (слова до первой запятой), а вместо него вставьте название принтера, на котором хотите печатать по умолчанию.
- Вернитесь к параметру (который мы рассматривали во втором пункте этого списка) Разрешения… и уберите ранее поставленную галочку.
- Перезагрузите ПК и убедитесь в получении нужного результата.
Схожий вариант решения вопроса (также связанный с редактированием реестра) представлен на видео.
Альтернативный способ исправления ошибки 0x00000709 при установке сетевого принтера
Суть метода заключается в изменении способа подключения к удаленному ПК (вместо IP-адреса надо указать имя компьютера). После выполнения этой нехитрой манипуляции доступ к сетевому принтеру будет восстановлен, а рассматриваемая ошибка 0x00000709 перестанет беспокоить. Следовательно, возможность осуществления удаленной печати также появится.
Детальное описание способа представлено в видеоинструкции. Рассмотрены порядок действий, особенности процедуры и другие нюансы, необходимые для полного понимания сути процесса.
Другие варианты избавления от ошибки 0x00000709 «Проверьте имя принтера»
Если вышеприведенные методы не привели к требуемому результату (такое иногда бывает), воспользуйтесь расположенными ниже рекомендациями:
- Обновите драйверы для проблемного принтера. Это можно сделать с помощью нажатия ПКМ на названии принтера в Диспетчере задач либо скачав драйверы с официального сайта производителя оргтехники. Второй вариант обычно эффективнее.
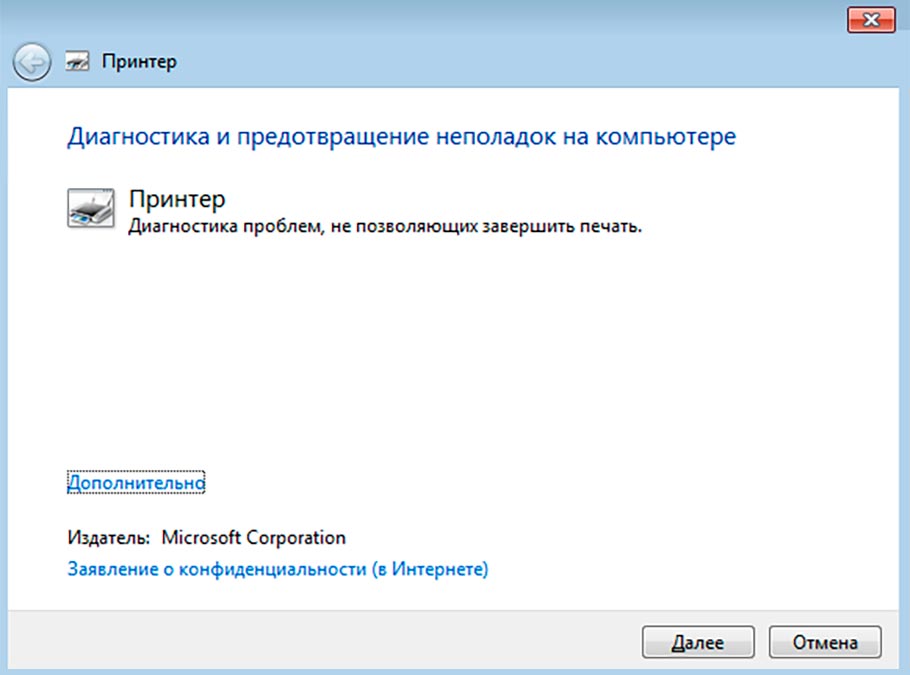
- Проведите диагностику проблем печати. Нажмите Win+R, введите msdt.exe /id PrinterDiagnostic и нажмите Enter. После появления окна службы диагностики нажмите Далее, подождите завершения сканирования, укажите в перечне требуемый принтер и следуйте инструкциям.
В идеале эти рекомендации стоило бы добавить в начало статьи. Но поскольку проблема обычно решается ранее приведенными (основным и альтернативным) способами, то необходимость выполнения действий из последнего списка возникает нечасто. Но если этого дошло, то воспользуйтесь рекомендациями. Вреда от обновления драйверов и системной диагностики точно не будет, а польза очень даже может быть.
Ваше Имя:
Ваш вопрос:
Внимание: HTML не поддерживается! Используйте обычный текст.
Оценка:
Плохо
Хорошо
Введите код, указанный на картинке:
Did you get the Printer Error 0x00000709 while attempting to set your default device accompanied by a message “Operation could not be completed”? There are many reasons that may cause this error to pop up in the first place like corrupt drivers, corrupt registry entries, etc. Sometimes, letting Windows 11/10 auto-manage the default printer can also trigger similar issues.
Recent – How to fix printer error code 6a80 in Windows 10
What does Printer Error 0x00000709 mean?
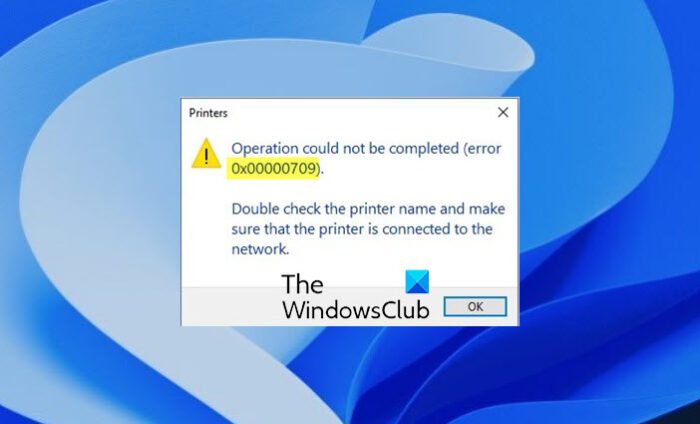
Error 0x00000709 means that there is already a printer set and configured to use on your Windows PC. If you try to add a second printer, you will encounter an error message that states the following –
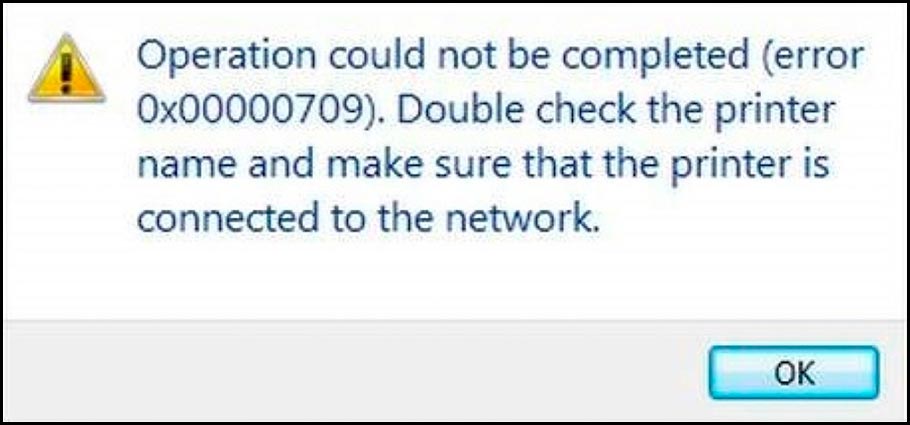
Operation could not be completed (error 0x00000709)
You should check if the printer name has been added correctly and if so, whether it is connected to the network or not. In addition to this, this error could also occur when Windows does not let you configure the new printer.
Fix Can’t connect to a network printer, Error 0x00000709
Start with hard resetting your Printer, and modifying the RPC connection settings policy. If the error persists even after this, you may try troubleshooting the Printer, Restarting the Print Spooler service, and a few other fixes.
In case the error still persists, try changing its default settings and updating printer drivers. Consider renaming your Printer name using the Registry if none of the above solutions work to address this error code on your computer.
Note: If you are getting this error code after installing a recent cumulative update, make sure to downgrade to the previous version. For all other reasons, you may follow the below workarounds –
1] Perform a hard reset to solve this 0x00000709 Error
Before you go with any solution, check if you can resolve this issue by hard resetting the Printer. To do so, follow these easy steps –
- Shut down your PC and this will result in your Printer stopping as well.
- Unplug the power cord from your printer and wait for at least 2 minutes.
- Remove any wired connection between your PC and printer as well.
- After the wait time of 2 minutes is over, re-plug the power cord and the connecting wires between your PC and printer.
- If you are on a wireless network, check if your printer is now connected to the same network.
- Launch Command Prompt as administrator next, and run these codes –
net stop spooler
del %systemroot%\System32\spool\printers* /Q
net start spooler
- The first and the last command is there to stop and then restart the Print Spooler service. Whereas, the second command runs to delete any cache files or clear any queued files on your computer.
Now that you have cleared Printer Spooler, restart your PC again. From the next login, check if you can print documents or connect to a network printer without getting into some error code.
2] Configure the RPC Connection Settings
The next possible to this problem is by modifying a group policy inside your computer titled “RPC Connection Settings”. You may attempt this solution only if you are on Windows Editions Pro, Enterprise, or other premium editions.
Note: Windows 11/10 Home users can’t use this solution. If you are on such an edition, skip this solution, and proceed to the next one.
Follow the below steps on how to configure this policy in Windows –
- Launch the Run dialog by pressing Win + R.
- Type “
gpedit.msc” without quotes on it, and hit OK. - When the group policy window opens up, navigate to the below path inside it –
Computer Configuration > Administrative Templates > Printers
- Head over to the right pane, and double-click on “Configure RPC connection settings“.
- Tick the Enabled radio button, and select the following using their respective drop-down menus –
- Protocol to use for outgoing RPC connections: RPC over named pipes
- Use Authentication for Outgoing RPC Connections: Authentication Enabled
- Click Apply and then OK to confirm the recent changes and restart your computer.
Sign back into your device again and check if this resolves the error code 0x00000709 on your PC. If you encounter this error code again, re-open Group Policy and this time select “RPC over TCP” using the drop-down menu next to Protocol to use for outgoing RPC connections.
If this doesn’t work as well, try once again with “Authentication Disabled” under the Use Authentication for Outgoing RPC Connections. Play with settings carefully, as one of these configurations should resolve this issue for your printer.
3] Rename the Printer in Registry Editor
An error 0x00000709 mostly occurs because of the presence of old files from previous printer installation(s). So, when you change the Printer name inside the registry, this might resolve this error code on your Windows PC. Here’s how to perform this task –
- Press Windows + R to launch the Run dialog.
- Type Regedit on it, and hit OK.
- When the registry launches, navigate to the below path on it –
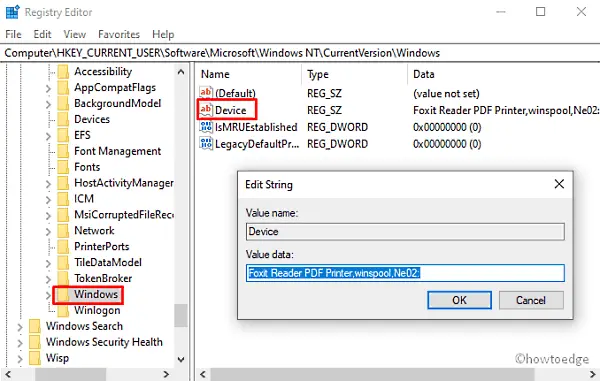
Computer\HKEY_CURRENT_USER\Software\Microsoft\Windows NT\CurrentVersion\Windows
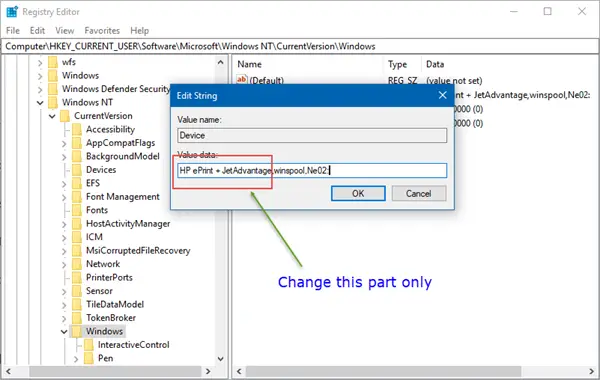
- Head over to the right pane and locate the Device entry. Right-click on this entry, and select Modify.
- A pop-up window will appear next. Add your printer name first inside the Value data field. Make sure to leave other detail as it is.
Click OK and close the registry. This might result in an error stating – “Cannot edit Device: Error writing the value’s new contents”. If that’s the case, you must set the permissions for this key. Here’s how to do that –
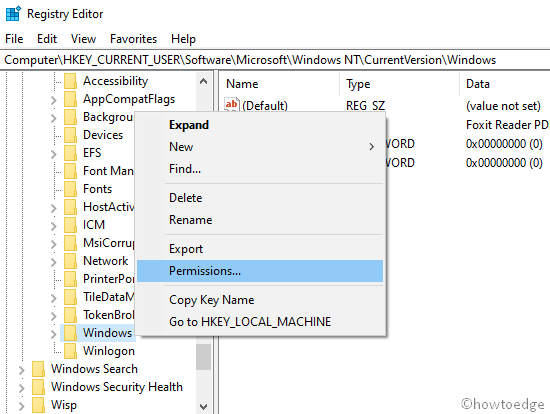
- Go to the left pane and right-click on the Windows folder and select Permissions from the context menu.
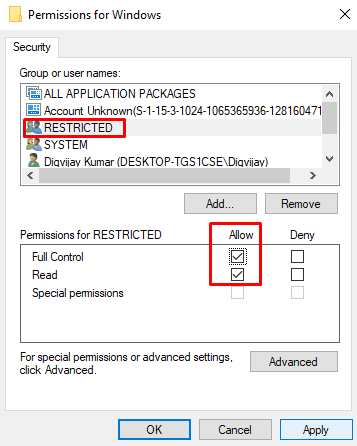
- Go to the Group or user names section, and select Restricted.
- Again, go to the Permissions for Restricted section and mark the checkbox next to the Full Control and Read option.
- Finally, click on Apply and then OK.
Now that you received permissions for the restricted users, re-follow the above steps to add your Printer name inside the Value data field of the “Device” entry.
Reboot your computer and check if this resolves the current printer issue on your Windows PC.
4] Uninstall Recently installed Cumulative update
This error once appeared after users install the latest cumulative update, Oct 2021 Security patch i.e. KB5006670 on their PCs. Microsoft has acknowledged this issue and resolved it by providing a non-security update KB5007262 on Windows 11 and KB5007253 on Windows 10.
If you received a fresh error 0x00000709, installing the above patches won’t do any good. Instead, what you can do is roll back to the previous Windows 11/10 Build version. Here’s how to remove recent cumulative updates from your computer.
Note: If you had installed some other cumulative update and started getting this error code, uninstall that update.
- Press Win + I to launch the Settings window.
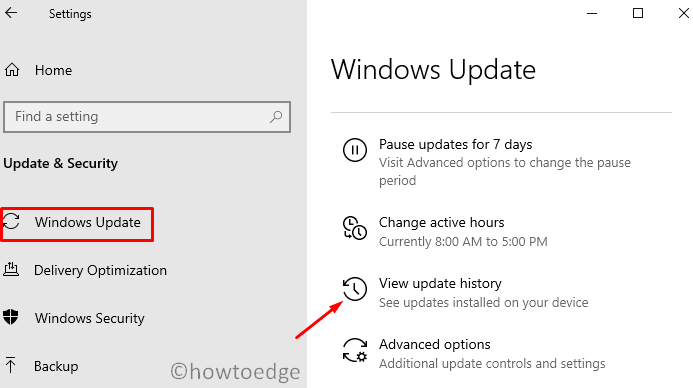
- Go to Update & Security > Windows Update next.
- Click the “View update history” option on the right pane.
- Here, you will find an option – “Uninstall updates”, click on it.
- You will be redirected to the Installed updates on Control Panel.
- Click “Uninstall a program” on the left pane. A list of all recent patch updates will appear on the right side.
- Scroll and locate “KB5006670”, right-click on it, and hit the option – Uninstall.
- When the warning message comes into the display, hit Yes.
- Your device will restart immediately afterward, and start removing the chosen update.
- Wait for this cumulative update to remove successfully.
After this cumulative update uninstalls, restart your PC again, and see if you can now connect to a network printer.
How can I remove an update using CMD?
Uninstalling a cumulative update is quite easy using the Command Prompt. However, you need to launch this tool as an administrator to make any system-level changes.
- Use Win + X and choose Windows Terminal (Admin).
- Press Ctrl + Shift + 2 to enter the CMD screen on Windows 11.
- Copy/paste the below command and press Enter –
wusa /uninstall /kb:5006670
Note: Do change “5006670” with the actual number of Cumulative Update after which you started getting into an error code 0x00000709.
Command Prompt will immediately start downgrading your device to a previous Build version. Wait for this downgrade and once it is over, check if the problem resolves.
5] Run Printer Troubleshooter
Troubleshooting is another effective solution to fix error 0x00000709 when other fixes don’t work. Here’s how to initiate this tool on Windows PC –
- Press Win + R to launch the Run dialog box.
- In the search box, type the following code and press the Enter key –
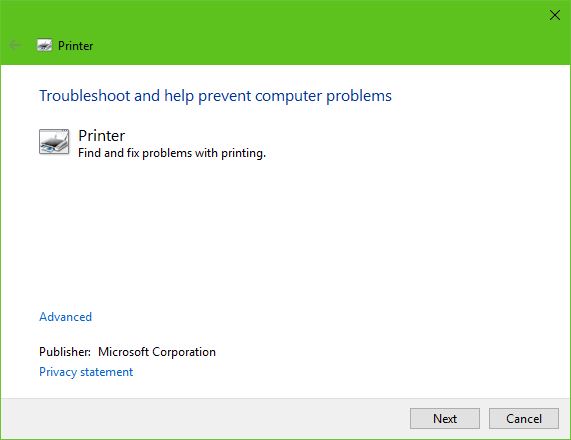
msdt.exe /id PrinterDiagnostic
- On the following page, click on the Next button as shown in the below snapshot.
- Do as this troubleshooter says, and you will overcome the Printer error in no time.
6] Disable the Windows 10 managing Printers automatically
Windows 10 works on users’ behalf and auto-manages the available printers. If you are facing the 0x00000709 error, you should disable this optional feature by opening the local settings on your PC. Here’s how to perform this task –
- Launch Settings using the Win + I key combinations.
- Select Devices thereafter Printers & Scanners.
- Switch to the right pane and unmark the checkbox against “Let Windows manage my default printer“.
- Close all running windows and Restart your PC so as to save the changes made so far.
7] Configure PointAndPrint registry
If the problem persists even after applying the above fixes, check if this is occurring because of the registry entry – PointAndPrint. You may configure this DWORD entry by opening the Command Prompt as admin. here’s how you may modify this key on the registry –
- Open CMD as an administrator.
- When the Windows console opens up, copy/paste the following –
reg add "HKEY_LOCAL_MACHINE\Software\Policies\Microsoft\Windows NT\Printers\PointAndPrint" /v RestrictDriverInstallationToAdministrators /t REG_DWORD /d 1 /f
- Press Enter and see if this command runs successfully.
- If it does, restart your PC.
The error 0x00000709 should disappear from the next login.
8] Update the Printer Drivers
The presence of obsolete printer drivers may also result in Error 0x00000709 on Windows 10 PC. To rule out this section, you must update all the Print drivers using the below steps –
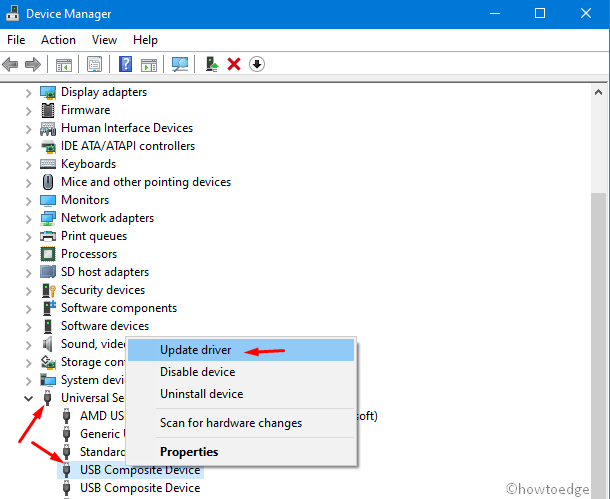
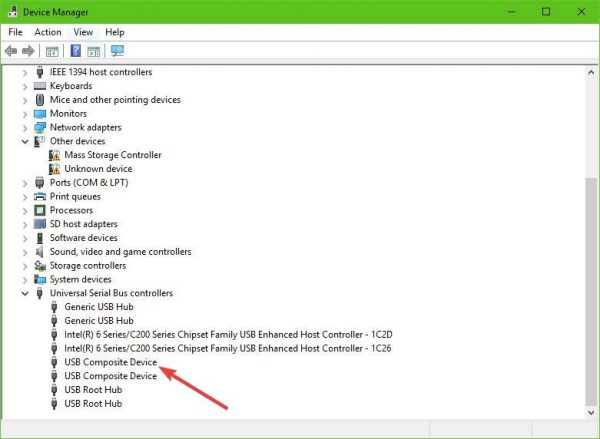
- Right-click on the Win Icon and select Device Manager.
- On the following screen, expand the arrow next to the “Universal Serial Bus Controllers”.
- When this section opens up, right-click again on the “USB composite device” and tap Update driver. See the Snapshot below –
- Next, choose “Search automatically for updated driver software”.
- The System will take care of the remaining things. Wait for a while and let the Device Manager do its task.
Conclusion
I hope the above solutions indeed help you to overcome the printer 0x00000709 on your Windows 11/10 PC. Let’s know in the comment section which solution exactly works in your case.
- Причины ошибки
- Исправление ошибки
- Внесение изменений в реестр
- Создание резервной копии реестра
- Правка реестра
- Если не помогло — более лёгкое решение
- Установка и обновление драйверов
- Диагностика неполадок
- Внесение изменений в реестр
- Изменить адрес подключения к принтеру
- Заключение
Причины ошибки
Чаще всего появляется при подключении нового принтера по сети или установки его взамен старого по умолчанию. В итоге действующие параметры реестра сбиваются – приоритет частично отдаётся предыдущим их версиям, а частично – новым драйверам.
Проще говоря, принтер пытается работать с параметрами реестра, в которых прописано имя старого устройства.
Ошибка 0x00000709 сопровождается комментарием «Невозможно завершить операцию. Проверьте имя принтера и убедитесь, что принтер подключен к сети.».
Больше других от проблемы страдает операционная система Windows 7, менее — Windows 8 и 10.
Исправление ошибки
Внесение изменений в реестр
Редактирование делают с помощью встроенной программы редактирования реестра в Windows – regedit.exe.
Создание резервной копии реестра
Крайне важно предварительно сформировать резервную копию на случай ошибочных действий.
- Зайдите в меню «Пуск».
- Нажмите комбинацию клавиш «Win+R». В строке ввода команд вбейте regedit.exe и «Enter». Запустится окно реестра.
- Сохраните существующие настройки реестра в новый файл через меню «Файл – Экспорт». Задайте имя файла и директорию для хранения. Нажмите на «Сохранить».
1
2
3
4
Для восстановления реестра просто запустите сохранённый файл двойным щелчком мышки.
Правка реестра
- В уже открытом редакторе реестра раскройте дерево по следующему пути: [HKEY_CURRENT_USER] — [Software] — [Microsoft] — [Windows NT] — [CurrentVersion] — [Windows].
- Разрешите вносить правки.
1
2
- В правой панели найдите «Device», мышью вызовите меню и выберите «Изменить».
- Первая запись в строчке – это текущий принтер по умолчанию. Ее надо стереть до запятой и вписать название нового аппарата. Запись «winspool,Ne00:» нужно оставить. Часть записи Ne00 может отличаться у вас. В нашем случае Ne04. Пример: если имя устанавливаемого печатающего устройства – HP Deskjet 2050 J510 series, то в строке должна получиться запись: «HP Deskjet 2050 J510 series,winspool,Ne04:». Нажмите «Enter» или «OK».
- Перезагрузите систему, больше ошибка не должна появляться.
Если не помогло — более лёгкое решение
Более простым вариантом устранения ошибки является полное удаление файла Device с реестра (ПКМ-удалить)
или файла устанавливаемого принтера в той же директории CurrentVersion, только не в подпапке Windows, а Devices.
Если удалить не получится и появится ошибка отказа доступа, тогда аналогично назначьте полные права доступа для всех пользователей и групп нужным директориям, где находятся файлы.
Не забываем перезагружать Windows.
Установка и обновление драйверов
Инсталляция драйверов делается через стандартный мастер установки. Запустите установочный файл драйвера и соблюдайте инструкции, появляющиеся на экране.
Обновляют драйвера через диспетчер устройств. Зайти в него можно через пункт контекстного меню ярлыка «Мой компьютер» — «Диспетчер устройств». В Windows 10 через пункт «Управление».
Диагностика неполадок
В меню «Устройства и принтеры» (заходим через Win+R и команду control printers) выбираем нужный аппарат, кликаем правой кнопкой мышки и жмём на «Устранение неполадок». Windows начнёт сканировать систему на наличие неисправностей. Если они будут обнаружены, высветится список проблем и возможность их автоматического исправления.
Изменить адрес подключения к принтеру
- Удалите действующий принтер в разделе принтеров.
- Делаете подключение к ПК не через IP, а через указание имени ПК (\\имя компьютера).
Заключение
В зависимости от причины возникновения ошибки могут помочь разные способы её устранения. В статье приведены актуальные и простые методы решения. Пробуйте разные, уверены, что они вам помогут. Остались вопросы? Спросите в комментариях.
BUError 0X00000709 is a variation of the common can’t connect to a printer error, it occurs when users try to connect to printers over their local network from their Windows machines or when setting up the default printer on their Windows.
This is a very old error message and occurs with numerous variations in all versions of the Windows operating systems (Windows 7 and Windows 10). These are the most common error messages:
Operation could not be completed (Error 0X00000709). Double check the printer name and make sure the printer is connected to the network.
Operation could not be completed (error 0x00000005). Access is denied.
What causes Error Code 0X00000709 in Printers
This 0X00000709 error message is mostly connected to the permissions of your printer. If the printer isn’t getting enough permissions to connect to your system, then Windows revokes the attempt to connect and displays this error message instead.
There are also other causes such as corrupt Network clients and bad services hindering the connection procedure. There might also be conflicting applications that don’t let the printer operation run successfully.
How to Fix Printer Error 0X00000709
Before you attempt the solid workarounds listed below, it is recommended to try and validate the following tips. These are common issues that are often overlooked and are directly related to the printer not getting connected or getting set as Default.
- Try Disabling your Antivirus Software
- Make sure the Host PC Name is less than 15 characters. If using the hostname is proving troublesome, then attempt at connecting through the IP address. If possible, rename the Host computer. This worked for numerous people.
- If you are using a shared printer, try reconnecting to the printer after removing it from your list of shared printers.
- Make sure you are logged in as an Administrator.
Reinstall the Client for Microsoft Networks
The network printer may show Error 709 if the installation of the Client for Microsoft Networks in the network adapter properties is corrupt. In this context, reinstalling the Client for Microsoft Networks may solve the problem. Before proceeding, make sure Network Discovery is enabled and Password Protected sharing is disabled.
- Right-click Windows and open Network Connections.
Network Connections – Windows - Now select Change Adapter Options, right-click on your network adapter, and select Properties.
Change adapter settings – Network Connections
Properties of Connected Network
- Then uncheck the checkbox of Client for Microsoft Networks and press Apply to save changes.
Disabling Client for Microsoft Networks - Reboot your PC completely.
- Upon reboot, navigate back to this setting and enable the option of ‘Client for Microsoft Networks‘. This will reinstall this client from scratch into your system. Now check if the issue is resolved.
Edit the Spooler Service Properties and Start its Dependencies
Error 0x00000709 may emerge if the Print Spooler Service is in an error state or one of the dependencies of the spooler service is not running. In this scenario, editing the spooler services properties or starting its dependencies may solve the problem.
- Click Windows, type Services, and right-click on it. Then select Run as Administrator.
Opening Services as an Administrator - Now double-click on the Print Spooler service and head to the Dependencies tab.
- Then make sure the services present there are running e.g., Remote Procedure Call (RPC).
- Once services present in Dependencies are started, restart the Print Spooler service and check if the printer is clear of the error 0x00000709.
- If that did not do the trick, check if setting the startup type of Print Spooler service to Delayed Start or Manual resolves the printer issue.
Changing startup type of Spooler Service
Remove Conflicting Applications
You may encounter the network printer Error 709 if there are applications on your system that are conflicting with the printer operation and removing such applications (like CutePDF Writer) may solve the problem. Before proceeding, make sure the 32-bit host machine has additional drivers for the 64-bit client.
- Right-click Windows and select Apps & Features.
Apps and Features – Windows - Now expand the problematic application (like CutePDF) and click Uninstall.
Uninstalling CutePDF - Then confirm to uninstall the application and once the application is uninstalled, reboot your PC.
- Upon reboot, check if the network printer is operating fine.
The following applications are reported by the users to create the issue:
- CutePDF
- Equitrac
- Thermal Printer (like a Star Micronics) driver
You may also check if you have installed the 32-bit application (like Equitrac) on the 64-bit machine, if so, then check if installing the 64-bit application resolves the issue.
Edit the Printer Properties
Your network printer may fail with the security checks of Windows when connecting if the user or the printer does not have the required security permissions. In this case, giving the required permissions to the user or printer may solve the problem.
Give the User Full Control of the Printer
- Click Windows, type Printers, and open Printers and Scanners.
Printer and Scanners – Windows - Now expand the problematic printer and click Manage.
Managing problematic printer - Then open Print Properties and head to the Security tab.
Printer properties - Now give all the permissions to every user (one by one) by selecting the relevant box in the Allow column.
Granting all Permissions to Printer – Windows 10 - Then reboot your system and check if printer error 709 is cleared.
Open the Printer Que as Administrator
- Open Printers and Scanners from the start menu as we did earlier.
- Now, expand your printer and select Manage again.
- Then click on the Open Print Queue button and expand the Printers menu.
Opening Print Queue - Now select Run as Administrator and click Yes (if the UAC prompt is received).
Opening as Administrator - Then check if the printer is clear of the Error 0x00000709.
Completely Reinstall the Printer
A corrupt installation of the network printer or its driver might cause it to show error 709. Here, reinstalling the printer will install fresh files from scratch. This will rule out a corrupt installation instantly.
- Firstly, clean boot your PC and make sure no process/service related to the printer is operating in the Task Manager of your system.
- Then click Windows, type Printers, and select Printers and Scanners.
- Now expand the problematic printer and click on Remove Device.
Removing Bad Printer - Then confirm to remove the device and let the device uninstall.
- Once uninstalled, right-click on Windows and select Apps & Features.
- Now expand the printer software (e.g., HP Basic Device Software) and click on Uninstall.
Uninstalling Printer Software - Then confirm to Uninstall the application and follow the prompts on the screen to uninstall the printer software.
- Now reboot your PC and right-click Windows.
- Then select Run and execute the following:
printui.exe /s
Running printui.exe /s - Then head to the Drivers tab and select the problematic printer driver.
- Now click on Remove and select ‘Remove Driver and Driver Package’.
Remove Driver and Driver Package in the Print Server Properties - Then remove all the drivers related to the problematic printer in the Print Server.
- Now click Windows, type Registry Editor, right-click on it, and select Run as Administrator.
Registry Editor as Admin - Then, on the menu bar, expand Edit and select Find.
Find – Registry Editor - Now search for the printer and delete all the entries referring to the printer (make sure you have backed up the registry before deleting the entries).
- Then reboot your PC and upon reboot, reinstall the printer application and check if it is clear of the error 709.
Edit the System’s Registry
You may encounter the error 0x00000709 with the network printer if the relevant registry keys in your computer are misconfigured. In this context, properly configuring the registry keys related to the printer may solve the problem. Before proceeding, make sure to create a backup of your system’s registry.
Warning: Advance with utmost caution and at your own risk as editing the system’s registry is a skillful task and if not done correctly, you may cause unintended and everlasting damage to your system/data.
Here are different registry values which seem to fix the issue. Try them one at a time and see if they do the trick before moving on to the other ones.
Give the User Full Permissions to the Windows Registry Key
- Click Windows, type Registry Editor, and right-click on its result. Then select Run as Administrator.
- Now navigate to the following path (copy-paste the address in the address bar of the editor):
Computer\HKEY_CURRENT_USER\SOFTWARE\Microsoft\Windows NT\CurrentVersion\Windows
Open Permissions of the Windows Key - Then, in the left pane, click on the Windows key and select Permissions.
- Now select the problematic user account and checkmark the checkbox of Allow in front of Full Control.
Allow User the Full Control of the Windows Key - Then repeat the same for the Administrators and System account.
- Now apply your changes and reboot your PC to check if the printer issue is resolved.
- If the problematic user, administrator, and system accounts do not exist in the permissions window, then you may add the same by clicking the Add button.
Set the Default Printer Value to 2
- In the Registry Editor, navigate to the following path:
Computer\HKEY_CURRENT_USER\Printers\Settings\Wizard
- Now, in the left pane, double-click on Set as Default and change its value to 2.
Change the Set as Default Value to 2 - Then exit the editor and restart your machine. Upon restart, check if the Printer Error 709 is cleared.
- If not, navigate to the following key in the following registry again:
Computer\HKEY_CURRENT_USER\Printers\Settings\Wizard
- Then create a new Dword (32-bit) Value and enter its name as Locate Type.
- Now set its value to 2 and exit the editor.
- Reboot your PC and check if the network printer is working fine.
Delete the Sub-Keys of the Windows Key
- In the Registry Editor, navigate to the following path:
Computer\HKEY_CURRENT_USER\SOFTWARE\Microsoft\Windows NT\CurrentVersion\Windows
- Now, in the left pane, delete the following keys (if present):
Device

LegacyDefaultPrinterMode

UserSelectedDefault
- Then Restart your PC after closing the Registry Editor and check if the Network printer is working fine.
Create the Printer Sub-key Under the Devices Key
- In the Registry Editor, navigate to the following path:
Computer\HKEY_CURRENT_USER\SOFTWARE\Microsoft\Windows NT\CurrentVersion\Devices
- Now, in the right pane, check if the key related to the printer you want to add is present. If not, then right-click on the Devices key (in the left pane) and select New > String Value.
Create a New String Value Under Devices - Then, in the left pane, enter the name of the new sub-key as per the printer e.g., NPIBD9538 (HP LaserJet MFP M130nw).
- Now check the Data column and check the maximum value e.g. winspool, Ne05
- Then set the value of the key created in Step 3 by adding 1 to the value found in Step 4.
Create the New Printer String Value and Set its Value - Now close the editor and reboot your machine.
- Upon reboot, check if the network printer issue is resolved.
- If not, then check if creating another printer key with its port in the following registry path and restarting the system resolves the printer issue:
Computer\HKEY_CURRENT_USER\SOFTWARE\Microsoft\Windows NT\CurrentVersion\PrinterPorts
Set the Printer Value in the Device Key
- Navigate to the following registry path:
Computer\HKEY_CURRENT_USER\SOFTWARE\Microsoft\Windows NT\CurrentVersion\Windows
- Now, in the right pane, double-click on the Device key and set its value to your printer (but only amend the part before) as per the printer name. For example NPIBD9538 (HP LaserJet MFP M130nw).
- Close the editor and reboot your machine to check if the printer is working again.
- If not, then rename the Device key in the registry path (mentioned in step 1) as per your printer, close the editor, and restart your machine. Check if the issue is resolved.
If you cannot find your printer’s name in Step 2, then you may create a local administrator account on the machine and copy the name from the same path in its registry as mentioned in Step 1.
But, if that did not do the trick, then you may add the printer with the hostname in the Hosts file to solve the issue. If the issue still persists, then consider creating a new Windows user account to solve the issue.
Conclusion
In conclusion, printer error 0X00000709 is a problematic issue that can be resolved with our easy-to-follow guide. With multiple solutions like reinstalling the client for Microsoft Networks, editing spooler service properties, removing conflicting apps, or tuning your printer properties, you can easily solve this error. Just remember to follow each step and read the instructions carefully. Hopefully, your printer regains its functionality after implementing our guide.
Further Read:
- Printer Operation Failed: Error 0x00011b
- Printer Not Activated

Shaheer is the lead troubleshooter at Computer Verge. He has over 7 years of IT experience. He has a Bachelor’s degree in Computer Science and has completed various IT programming and support certifications.
One of the most annoying issues with a Printer is the one where it refuses to get set up or configured on your computer. When it has configuration issues, one of the common errors that it throws is 0x00000709. This occurs if there is already a default printer set and configured or Windows does not want to configure the new printer at all.
Operation could not be completed (error 0x00000709), Double check the printer name and make sure that the printer is connected to the network.
Today, we will try two fixes that may help you get rid of this error.
If a Printer cannot set as default or you cannot connect a Printer, and you see error 0x00000709 in Windows 11/10, try these fixes:
- Check printer name and connection
- Run Printer Troubleshooter
- Use the Registry Editor
- Update the Printer Drivers.
1] Check printer name and connection
This error code occurs when a printer is connected to a network and the connection fails and the operation cannot be completed. So as suggested, you need to first check in the printer name is correct and if the printer is properly connected to the network.
2] Run Printer Troubleshooter
The first option to take is to run the Printer Troubleshooter.
Click on the Windows Key + R to fire up the Run dialog box, then type the following command and click Enter:
msdt.exe /id PrinterDiagnostic
From here, then, follow the instructions to fix your printer in hopes that it works well throughout.
3] Use the Registry Editor
Hit the WINKEY + R button combination to launch the Run utility, type in regedit and hit Enter. Click on Yes for the UAC or User Account Control Prompt that you get.
Once Registry Editor opens, navigate to the following key location-
HKEY_CURRENT_USER\Software\Microsoft\Windows NT\CurrentVersion\Windows
Now, under the Windows folder, double-click on the file named Device on the right-side pane.
Add the name of your printer inside the Value Data field as shown above and then click on OK.
You will get a message saying – Cannot edit Device: Error writing the value’s new contents.
Click on OK again.
Before you carry out the next step, note down the existing permissions and once you have added the Printer, remember to reverse the changes you made to the Permissions.
Next, right-click on the Windows folder on the left pane and then click on Permission. In the section labeled as Group or user names, select Restricted.
In the section labeled as Permissions for RESTRICTED, check to Allow for all the three options: Full Control, Read, Special Permissions.
Now, click on Apply and then click on OK.
Once you have done that, right-click on the file named as UserSelectedDefault and select Rename and then rename it to your printer’s name.
Reboot your computer for the changes to take effect.
Once you have added the printer, remember to reverse the Permission changes you made. This is in the interest of security.
4] Update the Printer Drivers
You should update your Printer Drivers. Locate the option that says USB Composite Device, right-click it, then select Update Driver from the menu. Restart your computer. The final thing to do here is to click on Search automatically for updated driver software, and you’re done.
We suggest visiting the official website of the brand and search for the section that allows the downloading of the latest and older drivers. Should you come across the newest driver, get it up on your computer and install it.
Read: Fix Runtime Error 482 Printing error in Windows 11/10
All the best!

