Modern games are equipped with features that improve the overall gaming experience for the users. One such feature is OpenGL, in Minecraft, it enhances the gameplay by reducing the rendering with the coordination of GPU. The users face this issue due to the out-of-date graphics cards, third-party shaders, and mods. Let us know how to solve these Minecraft OpenGL errors and get back to gaming.
Open GL (Open Graphics Library) is a default setting in Minecraft. This feature enhances the gameplay by improving the graphics, thereby running it much faster and smoother. Most players prefer to keep this setting enabled due to its advantages, even after knowing it could cause an error. Even if you are playing the game on the best processor or the latest version, there is always a possibility of errors showing up.
The Minecraft OpenGL errors are due to the involvement of third-party modules, files, and drivers. Luckily, we can eliminate or reduce the possibility of such errors using the simple fixes below.
These are some of the common OpenGL errors that halt your play:
- Minecraft was unable to start because it failed to find an accelerated OpenGL mode.
- Graphics drivers error.
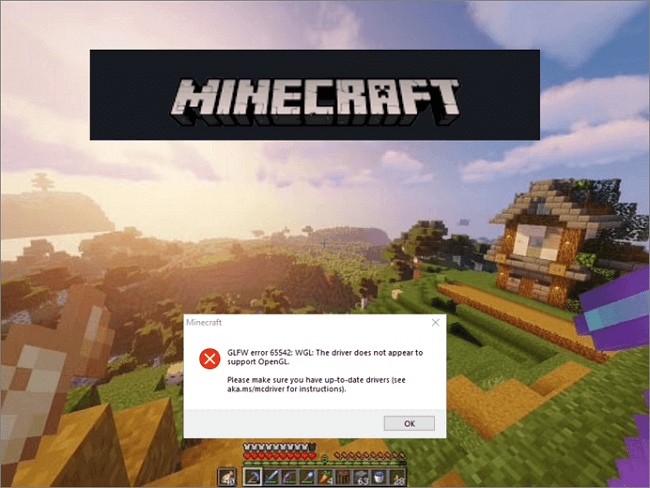
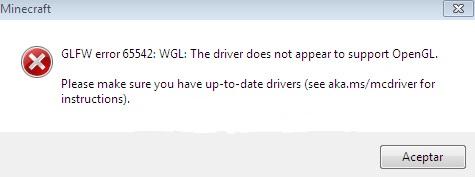
- The driver does not appear to support OpenGL.
- OpenGL profile is requested but is unavailable.
- Etc.
Solutions to fix the Minecraft OpenGL Errors
Let’s take a look at these approaches one by one.
Update the Graphic card drivers
The current generation of games requires robust graphic cards to display the player’s view with high-end graphics. The Graphic card drivers play a significant role in communicating with the GPU and hardware to make the frame rates much smoother. If the drivers of out of date, they might suppress the OpenGL feature and cause an error. In such cases, you must ensure your driver and graphic cards are up to date.
The steps to update your Graphics card driver using the Device Manager.
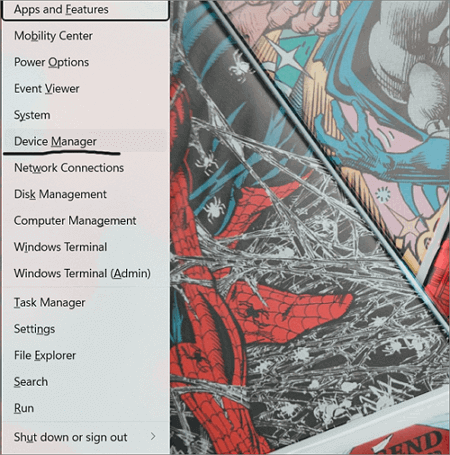
Step 1. Press the Windows + X simultaneously and click on «Device Manager» in the options.
Step 2. In the driver’s section, expand the «Display Adapters.»
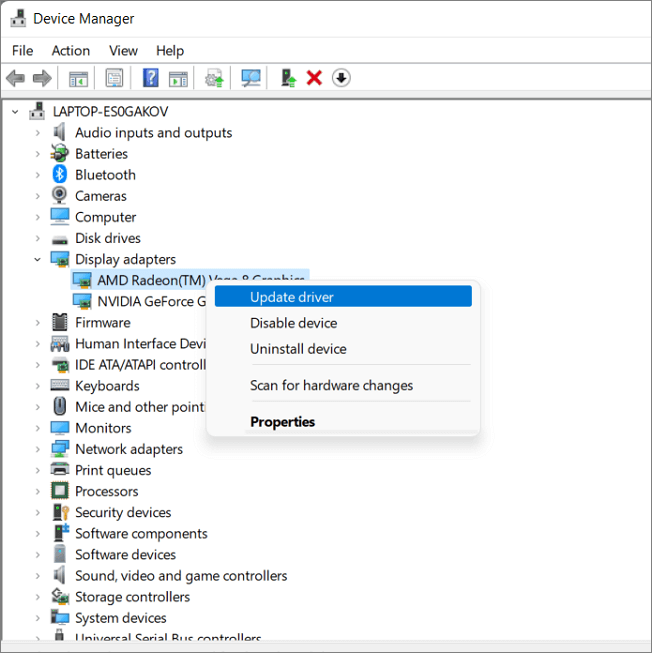
Step 3. Choose your graphic card, right-click on it and click on «Update driver».
You can also update or download the graphic card drivers from the official sites. Go to the website, choose the compatible driver which supports the game and the operating system, and download it. The links to the sites of Nvidia and AMD are here.
Disable or Remove Shaders and Mods
The Shaders are responsible for the various terrains and settings in the game. They act like mini-mods and let you tweak into the game modes like summer and winter.
When it comes to Mods, especially user-defined ones, help in extending the possibilities of the game, Minecraft hugely supports the mods to enhance the game environment and playability by adding various specs like worlds, costumes, characters, settings, rendering, and missions, and almost mods are available for every feature in the game.
However, both shaders and mods must interfere with the game’s internal software to work out all these things. Sometimes, due to this, we can see errors in the game. This could be due to one of the shaders or mods or all in some cases. To avoid glitches in the software because of shaders and mods, we must remove or manage them.
Steps to manage the Minecraft Shaders and mods:
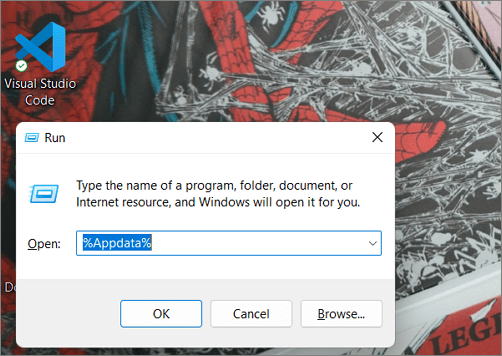
Step 1. Press Windows + R to open the Run app.
Step 2. Type %AppData% and press «Enter.»
Step 3. For Shaders:
Minecraft-> Resourcepacks->Shaderpacks
Step 4. For Mods:
Minecraft-> Mods.
Step 5. Manage the shaders and mods and try playing the game to see if any OpenGL occurs again.
If the issue is still there, continue reading to try other fixes.
Turn Off OpenGL in Minecraft
The OpenGL feature is enabled by default. If you have a good graphics card and an advanced computer to play the game, you can turn this feature off through settings. It is better not to have this feature rather than constantly facing the error.
Steps to turn off OpenGL:
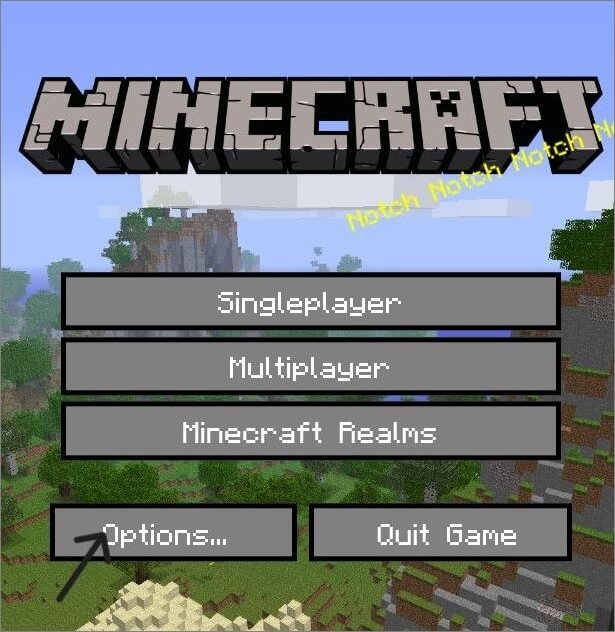
Step 1. Open Minecraft, Under Options choose «video settings.»
Step 2. Search for «Advanced OpenGL» settings and turn it off.
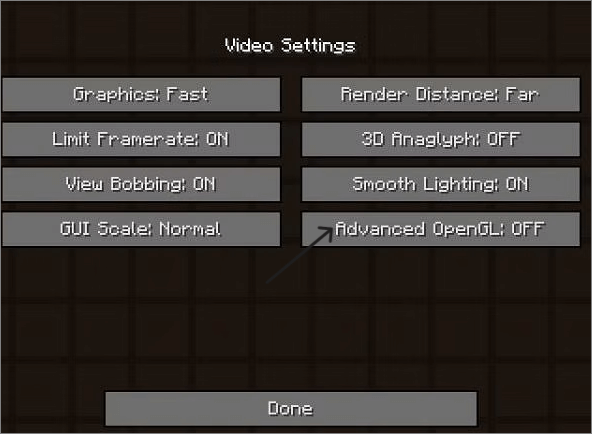
Step 3. Save the changes and restart the game.
Turn Off showing OpenGL Errors
The Minecraft video setting includes halting the game from showing the errors in the chat box. You can turn off this setting and the system won’t show the error even if it encounters the problem.
Steps to disable this feature:
Step 1. Open Minecraft, and navigate to options.
Step 2. Select the video settings and click on «others.»
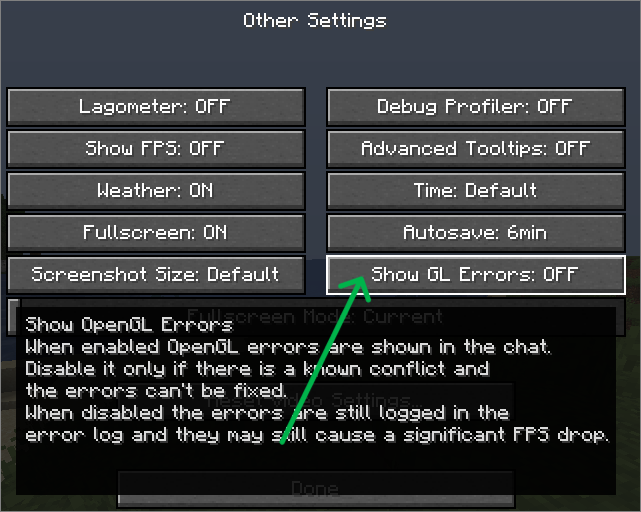
Step 3. Turn off the «Show GL Errors» feature and save changes.
Update or Rollback Windows Update
Every PC needs to meet the game’s minimum requirements to avoid interruptions while playing the game. The Windows software should be up to date to support the game, so it is essential to have the latest version to back the game.
Updating the OS on Windows 10/11:
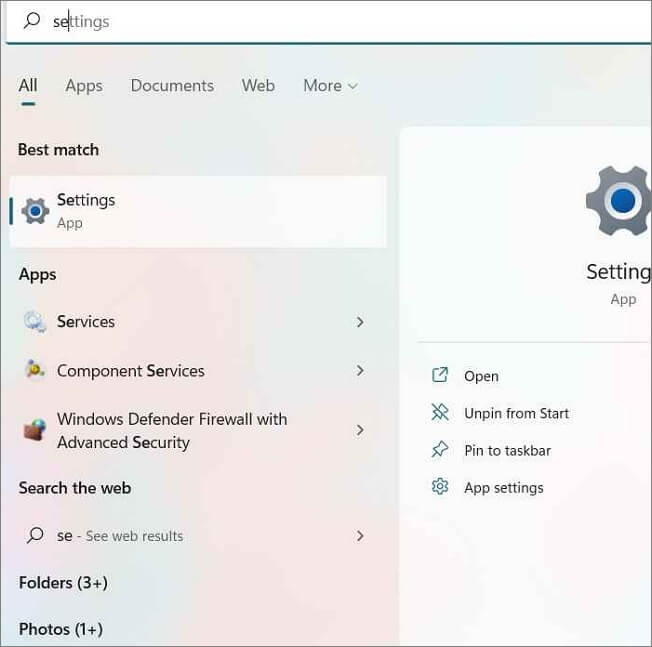
Step 1. Press Windows + I to open the «settings.»
Step 2. Navigate to «Windows Update» on Windows 11 and «Update and Security» on Windows 10.
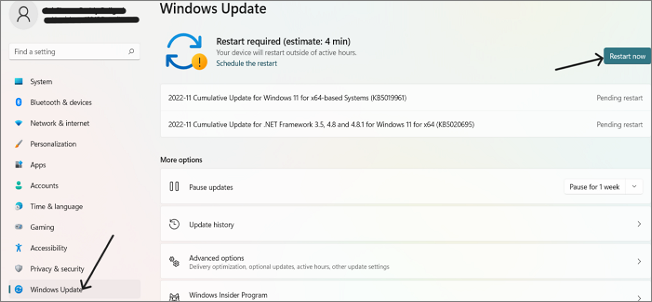
Step 3. Check for the Updates and download the available updates.
Step 4. Restart the device to see the changes.
In some cases, it is also possible that one of the recent updates might be causing the OpenGL issue. The way to notice this is if you are facing an error after recently updating your system. You may have to roll back those updates and see the changes.
To uninstall Updates:
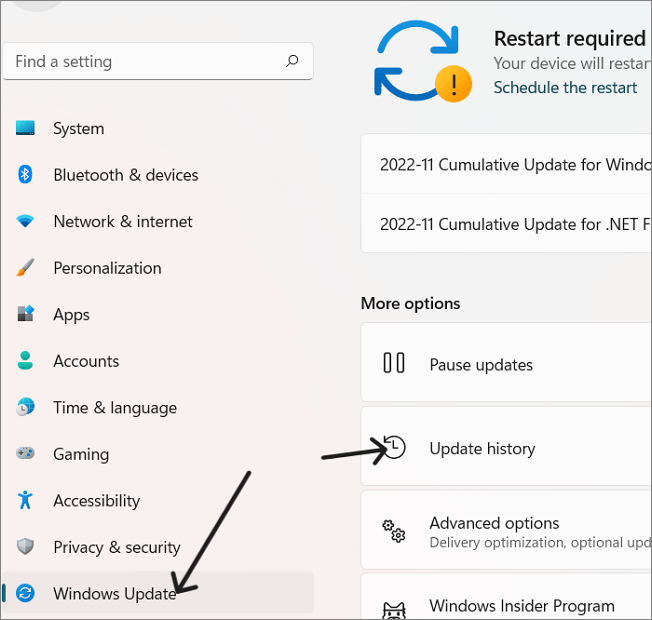
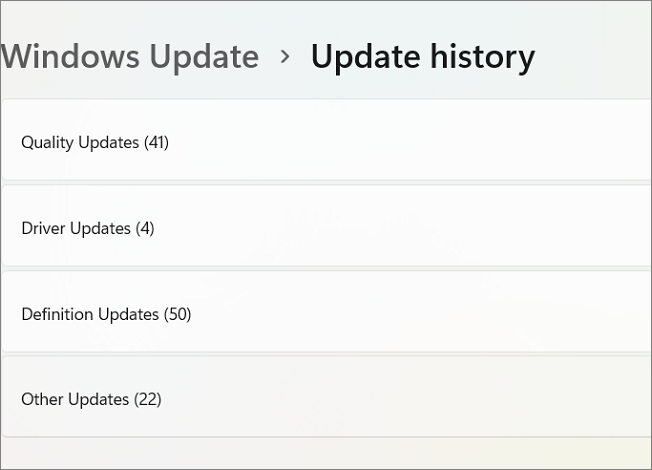
In the Windows update windows, you can see the update history. Go to that section, and navigate to «Uninstall Updates». Right-click on the recent update, and Uninstall.
If you are facing an OpenGL error with an error code, and the issue is not going away, enter the error code along with the Microsoft Community and find the solutions.
Reinstall Minecraft
The last option you would like to try is reinstalling the Minecraft game. If none of the above fixes could solve your problem, reinstalling is the last option at the cost of losing all your user data with Minecraft.
This action will remove all the game’s shaders, mods, and corrupt files, but you will have to start again as new. This might hurt a little if you have an outstanding gaming record, but it is the last viable option to continue playing without errors.
To uninstall Minecraft along with all the files belonging to it:
Step 1. Press Windows + R to open the run app.
Step 2. Type appwiz.cpl and click «OK.»
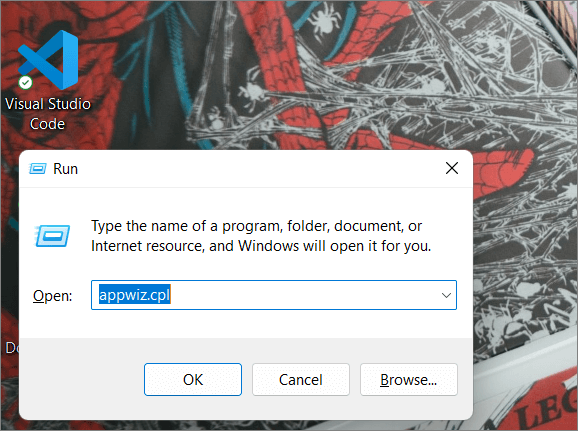
Step 3. Find Minecraft, right-click on it, and select Uninstall.
Step 4. Reinstall the game and start playing.
You can also try updating your Java files if you are using the Minecraft Java Version. Learn more about it in this article by SportsKeeda.
Final Verdict
Minecraft OpenGL errors are quite common in the game. Though the software enhances the game, it is also possible for it to cause some mistakes. The errors are mainly due to third-party mods and files. The main reason for these fixes is to eliminate or manage those mods to get back to gaming. The other causes also have with the supporting software, as it is a high-end game. I hope the fixes are helpful to you in solving the error.
If you find this helpful, share it with your friends and do leave a command below. If you have any questions, please leave them in the comment box and do share the topics you want us to write about further.
-
Home
-
Partition Manager
- How to Fix Minecraft OpenGL Error 1282 (Invalid Operation)?
By Charlotte | Follow |
Last Updated
OpenGL Error 1282 is a very common OpenGL error that appears in Minecraft and many other OpenGL games. This post form MiniTool Partition Wizard shows you how to fix Minecraft OpenGL Error 1282 (Invalid option) successfully.
Introduction to OpenGL Error 1282
Minecraft is a game that is popular around the world. There are also many different mods that you can use to customize your gaming experience.
However, there is an annoying error in the game if you have installed mods in Minecraft, such as OpenGL Error 1282 (Invalid operation).
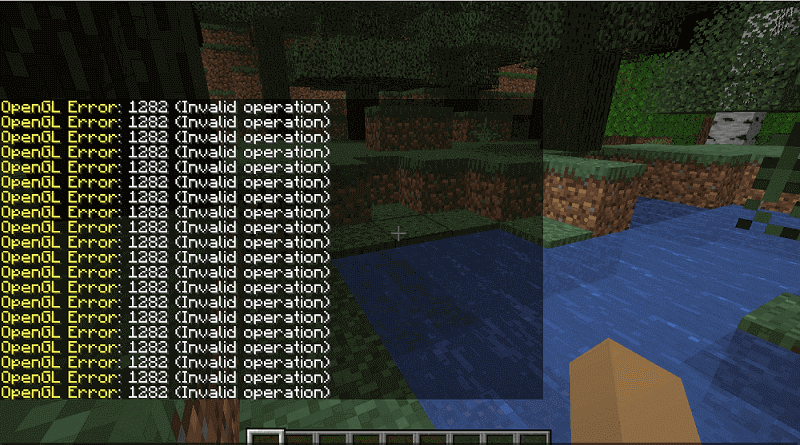
When the error occurs on your PC, you will encounter two different types of errors: One just spams a message in your game chat that says “OpenGL Error: 1282 (Invalid operation”)”, and the other is that not only does the bug spam this message in your chat, but it also makes your screen completely black.
What causes Minecraft OpenGL Error 1282 (Invalid Operation)? The OpenGL Error 1282 can be caused by various errors. Here are the main reasons:
- Outdated or corrupt graphic drive
- Corrupted shaders
- Your computer may not have the proper hardware
- Your browser may not support OpenGL
- Incompatible Mods
- Malware infection
- Outdated java program
- The opengl32.dll file is missing
- Outdated Optifine
Here are some helpful solutions for the OpenGL Error 1282. You can select the one you like to solve the Open GL Error 1282 on your PC.
Solution 1. Update Graphics Driver
If your graphics drive is outdated or corrupt, you can encounter the OpenGL Error 1282 easily. So, you can update your graphics drive to fix it. Here’s the way:
- Press the Windows and R keys at the same time.
- Type “devmgmt.msc” in the box and click OK to open the Device Manager window.
- Next, expand the Display adapters category and then right-click the drive name.
- Then select Update driver from the menu.
- In the new window, select the “Search automatically for drivers” option and then follow the on-screen instructions.
- Update all the available drivers and restart your system.
- Once done, restart your PC and check if the OpenGL Error 1282 is fixed.
Solution 2. Update Minecraft
Updating Minecraft can fix many basic errors, including OpenGL Error 1282. To update it, you can go to the Microsoft Store or the official forum of Minecraft to download and install the latest update manually.
Solution 3. Update Java
Java not only has an important effect on your system, but it also plays a crucial role in the smooth gameplay of Minecraft. If your Java program is outdated, you will see OpenGL Error 1282 (invalid operation) on your PC. You can do as follows to update it:
- Write down what system type your computer is.
- Open the browser on your PC and then go to the official Java site to download the compatible update for your OS architecture.
- Then, double-click the file to begin updating, and then follow the on-screen instructions to finish it
- Once done, copy the entire folder from the root directory.
- Next, press the Windows and E keys to open the Windows Explorer.
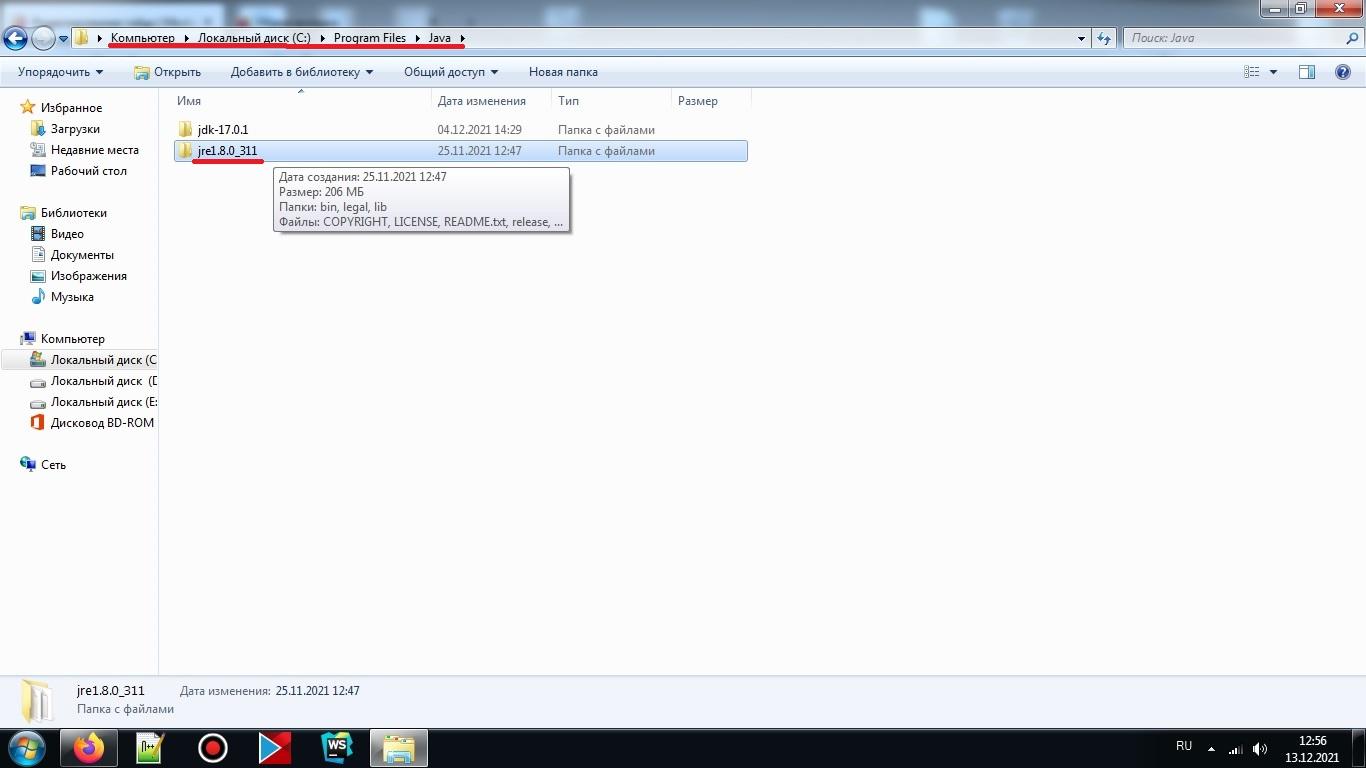
- Navigate to “C:\\Program Files\\Java” (32-bit)” or “C:\\Program Files (x86)\\Java” (64-bit) in Windows Explorer.
- Paste the folder which you have copied already and select the “Replace All” button on the pop-up window.
- Go back to your desktop and launch Minecraft.
- Then select the “Forge MOD Manager” option from the welcome screen.
- Select the “Edit Profile” option and then assign the correct Java path on your system under the “Java Settings (Advanced)” option.
- Save the settings and relaunch your game. Once done, check if the error is fixed.
Solution 4. Update OptiFine
An outdated version of Optifine can cause errors, especially if you’re using other mods. If the OpenGL Error 1282 error on your PC is caused by the outdated Optifine, you can try keeping your Optifine Mod up to date to fix it.
Solution 5. Disable Shaders
Although Shaders can change Minecraft’s entire look completely, it can use a hefty amount of your system’s resources and result in game performance issues.
In addition to this, it can also conflict with Optifine or Mods and cause errors like OpenGL Error 1282. So, if you encounter OpenGL Error 1282 (Invalid Operation) on your PC, you can try disabling Shaders to fix it.
Solution 6. Add the OpenGL32.dll File Manually
Many people have reported that by adding the opengl32.dll file manually, they were able to resolve the Minecraft OpenGL Error 1282 (Invalid Operation). You can also have a try. Here’s the guide:
- Press Windows and I keys to open the Settings
- Select System and then select About from the left panel.
- Write down your computer’s System type (either 32-bit or 64-bit).
- Open a web browser and go to the official website of DLL-Files or any other trusted third-party sites.
- Download a compatible DLL file according to your OS architecture and copy the entire file.
- Back to your desktop and then right-click the Minecraft Launcher icon.
- Select the “Open File Location” option from the menu.
- Next, find the “Runtime” folder and open the “JRE-x64” folder inside it.
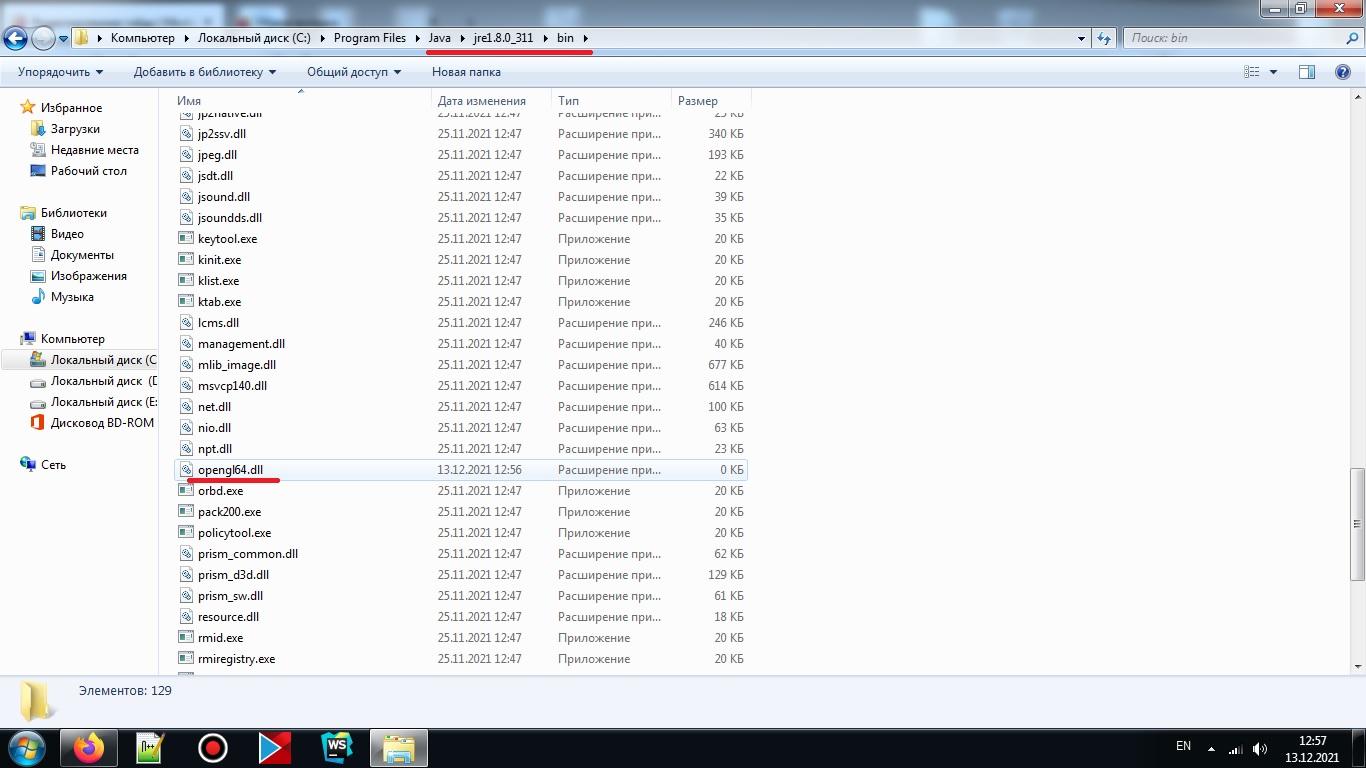
- Find and open the “bin” folder inside it and paste the DLL file which you have already copied.
- Restart your Windows system and relaunch the game to check if the error is fixed.
Solution 7. Disable the Show GL Errors Option
If the Minecraft OpenGL Error 1282 (Invalid Operation) on your PC is the first type that only shows up in your chat, and the rest of your game works fine, you can try disabling the Show GL Errors option to fix it. Here are the steps:
- Open Minecraft and then press Escape on your keyboard.
- Select Options… > Video Settings… > Other… button.
- Click on the “ShowGL Errors” option to disable it.
- Click on Done. Then you can play the game without the error message showing on the chat location.
Bottom Line
Are you interested in MiniTool Partition Wizard and want to know more about it? If you are, you can visit MiniTool Partition Wizard’s official website by clicking the hyperlink. MiniTool Partition Wizard is an all-in-one partition manager and can be used for data recovery and disk diagnosis.
About The Author

Position: Columnist
Charlotte is a columnist who loves to help others solve errors in computer use. She is good at data recovery and disk & partition management, which includes copying partitions, formatting partitions, etc. Her articles are simple and easy to understand, so even people who know little about computers can understand. In her spare time, she likes reading books, listening to music, playing badminton, etc.
Данная ошибка часто возникает у обладателей нового железа или же после переустановки Windows. Ниже рассмотрены основные способы для устранения проблемы. Они представлены в виде логичных шагов, которые идут друг за другом. Если предыдущий способ не помог, то следует переходить к следующему.
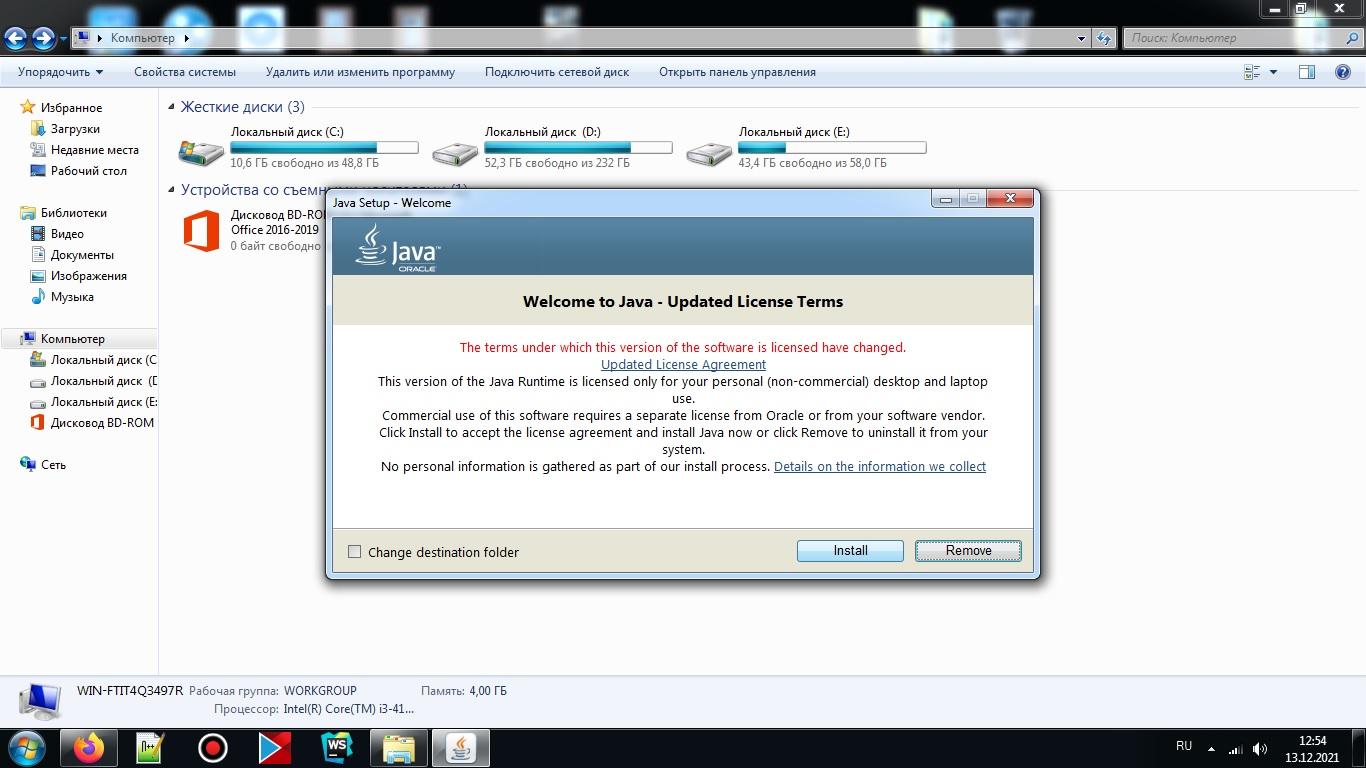
Способ 1: Установка новой Java
Одно из возможных решений проблемы. Следует перейти на официальный сайт Jav’ы (https://www.oracle.com/java/technologies/downloads/). Далее, там же нужно скачать новейшую доступную версию. Главное, чтобы она была не меньше Java 16 – ведь именно такая версия начинает поддерживаться игрой, начиная с 1.17. Скачиваем, следуем инструкциям инталлятора. Готово! Новая Java установлена.
Способ 2: Добавление OpenGL.dll вручную
Обычно при установке Java-файлов проблем не возникает. Ведь инсталлятор сам автоматически устанавливает opengl32.dll или opengl64.dll. Тем не менее, чаще всего в Windows 10, Java-установщики бывают пропускают этот шаг в установке. Именно отсутствие этого файла в директории Jav’ы вызывает ошибку.
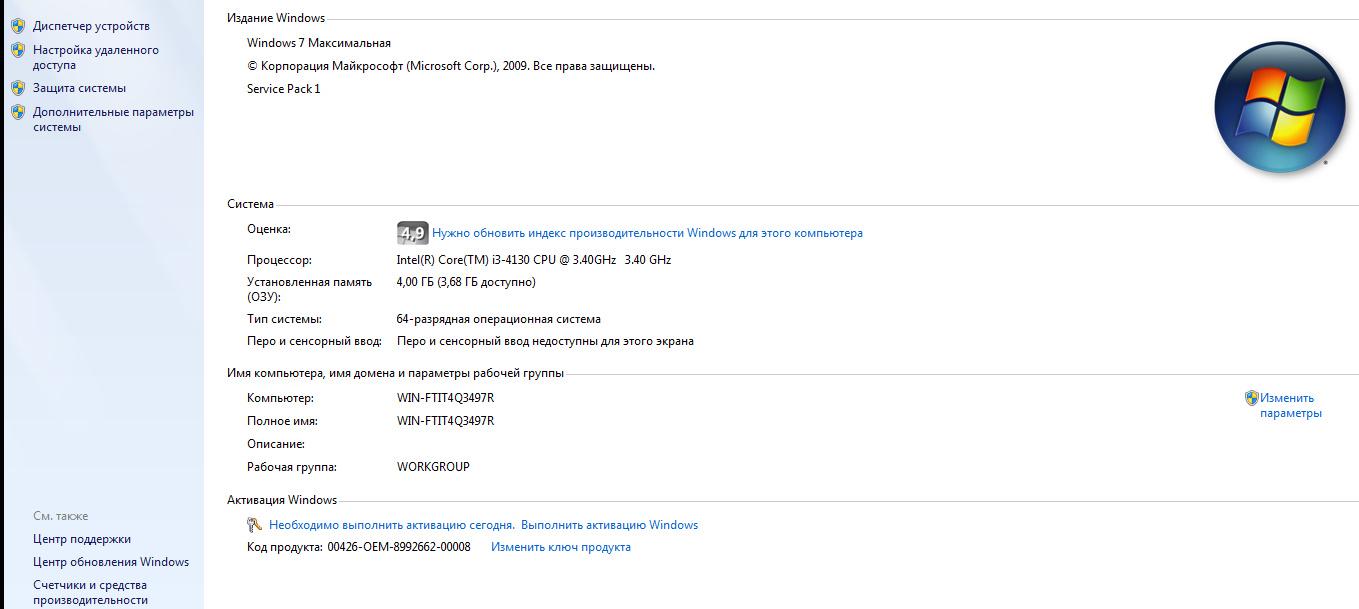
Шаг 1: Переходим на сайт https://ru.dll-files.com/opengl32.dll.html . Качаем файл, подходящий архитектуре нашей операционной системы (64-х или 32-х битная). Чтобы узнать какая стоит на определенном компьютере: нужно на рабочем столе нажать ПКМ (Правой Кнопкой Мыши) на “Мой Компьютер”, затем выбрать свойства. Там будет виден “Тип системы”. Качаем файл такой же архитектуры, как и ОС.
Шаг 2: Находим папку “bin” в Java\JRE\bin . Если Java установлена по умолчанию, то путь будет следующим:
“C:\Program files\Java\jre\bin\”
Вставляем в директорию “bin” файл opengl64.dll (или opengl32.dll). Если предлагают предоставить доступ администратору, соглашаемся.
Шаг 3: Вновь запускаем Minecraft. Если проблема не устранена, тогда переходим к следующему методу.
Способ 3: Удаление DisplayLink (выборочно)
Драйвер DisplayLink (если у вас используется именно он) иногда конфликтует с некоторыми Java-файлами. При этом его можно безбоязненно удалить.
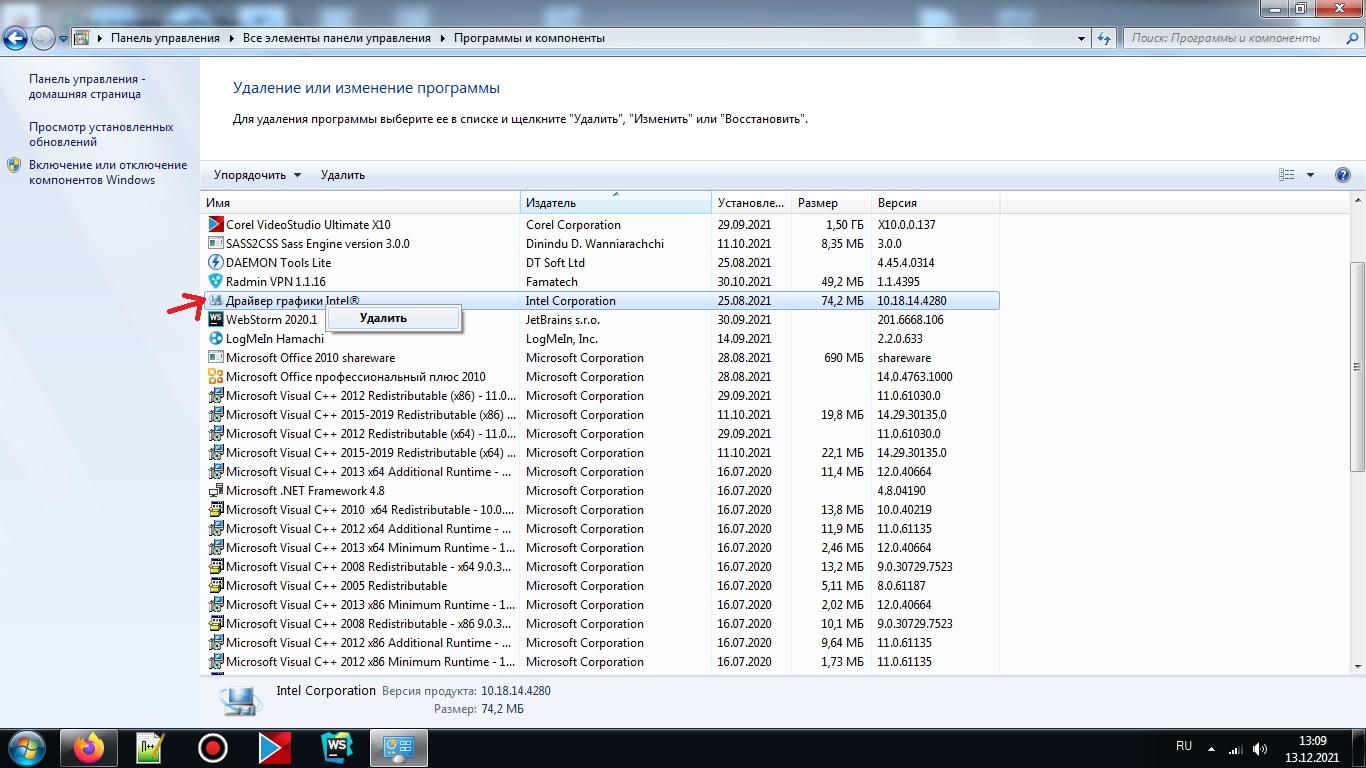
Шаг 1: Переходим в “Программы и компоненты”. Для этого можно зайти в “Пуске” в “Панель управления” и там найти нужную нам иконку. Или же можно нажать “Win + R”. Затем, вписать в окно “Выполнить” значение appwiz.cpl .
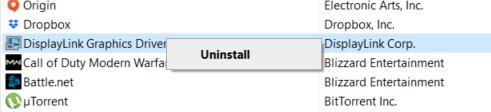
Шаг 2: Находим в списке DisplayLink Graphics Driver. Удаляем его.
Шаг 3: После завершения удаления перезагружаем компьютер. Открываем Minecraft. Проверяем устранение проблемы.
Способ 4: Переустановка драйверов видеокарты
Проблема может заключаться в слишком старых драйверах для вашего устройства. Они просто могут не понимать: каким образом взаимодействовать с OpenGL.
Шаг 1: Нажимаем “Win + R”. Появляется окно “Выполнить”. Вводим в него devmgmt.msc и переходим на “Диспетчер устройств”.
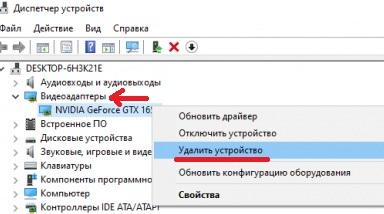
Шаг 2: Находим “Display adapters” или же “Видеоадаптеры”. Удаляем все драйвера оттуда. ВНИМАНИЕ! Экран может тускнеть, мерцать, глючить. Это все нормальные явления, ведь система возвращается к собственным драйверам по умолчанию.
Шаг 3: Далее заходим в “Программы и компоненты” . Для этого выбираем этот файл в Пуск > Панель управления. Или же нажимаем “Win + R” и вписываем appwiz.cpl , как в прошлом способе.
Шаг 4: Важный момент: у каждого разное железо, в том числе видеокарты. Поэтому необходимо самостоятельно найти компоненты определенного оборудования. Обычно это видеокарты Nvidia, AMD или Intel. Последние две являются встроенными. На определенных компьютерах могут быть сразу как встроенные видеокарты, так и дискретные. Есть еще USB-видеокарты, но для игр они не используются.
Поэтому необходимо найти + удалить ВСЕ файлы, связанные с GPU (видеокартой). При этом: важно не задеть остальные компоненты и утилиты.
Шаг 5: Перезагружаем компьютер. После перезагрузки переходим на сайт производителя оборудования и скачиваем новые драйвера для своей видеокарты. Например: внизу оставлены ссылки на сайты 3-ех уже упомянутых компаний.
Nvidia: https://www.nvidia.com/Downloa…
Intel: https://www.intel.com/content/…
AMD: https://www.amd.com/en/support
Шаг 6: Устанавливаем драйвера для своей видеокарты. Перезагружаем компьютер. Вновь заходим в Minecraft и проверяем.
Способ 5: Замена железа
Если все последующие способы были выполнены правильно и не дали никакого результата, то следует заменить видеокарту. Скорее всего, железо устарело и не поддерживает новую версию Minecraft. Правда, этот способ не касается тех людей, у которых до переустановки системы игра работала нормально.
Тем не менее, стоит еще раз убедиться в правильности предыдущих способов. Особенно, если GLFW error 65543/65542 так и не исчезла. Дополнительно можно поменять игровой лаунчер, ибо проблема порой может скрываться в нем. В любом случае проблему можно устранить. Главное – найти корень проблемы: драйвера, железо или же отсутствие файла opengl.dll .
Некоторые игроки Minecraft сталкиваются с ошибкой GLFW 65542 каждый раз, когда пытаются запустить игру. Эта проблема чаще всего возникает в Windows 10 с версией Minecraft на базе Java.
Большинство пользователей, которые боролись с этим кодом ошибки, смогли исправить ошибку GLFW 65542, скопировав отсутствующий файл opengl32.dll вручную в JRE (каталог Java). Если это не работает или вы хотите избежать каких-либо ручных изменений в каталоге JAVA, вы также можете переустановить каждый драйвер графического процессора, чтобы убедиться, что файл opengl32.dll будет переустановлен.
Однако, если вы столкнулись с этой проблемой в Java-версии Minecraft, эта проблема также может быть облегчена конфликтом с драйвером DisplayLink. В этом случае вы можете решить проблему, удалив конфликтующий драйвер и перезапустив игру.
Способ 1: добавление OpenGL.DLL вручную
Несмотря на то, что каждый необходимый файл библиотеки динамической компоновки обычно включается вашим драйвером графического процессора, это не всегда так. Более того, вы могли по ошибке удалить opengl32.dll или opengl64.dll, что в конечном итоге вызовет ошибку GLFW 65542.
Если этот сценарий применим, один из способов решить проблему – вручную скопировать отсутствующий файл .DLL в папку Java и JRE, чтобы позволить Minecraft использовать OpenGL. Это исправление было подтверждено множеством пользователей, которые в настоящее время сталкиваются с ошибкой 65542 в Minecraft.
Чтобы вручную добавить файл OpenGL.dll в путь Java, следуйте инструкциям ниже:
-
-
- Откройте эту ссылку ( здесь ), загрузите файл Minecraft_OpenGL.zip и дождитесь завершения загрузки. После завершения загрузки извлеките содержимое архива с помощью такой утилиты, как 7zip или WinZip .
- После извлечения содержимого этой утилиты скопируйте файл, совместимый с архитектурой вашей ОС, в буфер обмена, щелкнув его правой кнопкой мыши и выбрав « Копировать» или « Вырезать» .
Примечание. Если вы не знаете, какую архитектуру ОС вы используете, щелкните правой кнопкой мыши « Мой компьютер» (этот компьютер) и выберите « Свойства» в контекстном меню. На экране « Свойства» проверьте список в разделе « Тип системы» – это архитектура вашей ОС.
- Затем перейдите в следующее место и вставьте файл opengl32.dll, который вы ранее скопировали в буфер обмена:
C: \ Program Files \ Java \ * Версия JRE * \ bin
Примечание. Имейте в виду, что * JRE Version * – это просто заполнитель. Вам нужно будет заменить его своей версией JRE. Кроме того, если вы установили среду Java в произвольном месте, перейдите туда.
- Когда вам будет предложено UAC (Контроль учетных записей пользователей) , нажмите Да, чтобы предоставить доступ администратора.
- После того, как файл opengl32.dll был скопирован в правильную среду, запустите Minecraft еще раз и посмотрите, устранена ли проблема.
Если проблема не устранена, перейдите к следующему потенциальному исправлению ниже.
-
Способ 2: удаление DisplayLink (если применимо)
Если вы активно используете драйвер DisplayLink, имейте в виду, что эта технология может конфликтовать с версией Minecraft на Java.
Некоторые пользователи, с которыми мы сталкиваемся с ошибкой GLFW Error 65542 всякий раз, когда они пытались запустить Minecraft, подтвердили, что его проблема исчезла навсегда, как только они закончили удаление графического программного обеспечения USB DisplayLink.
Если этот сценарий применим к вам, следуйте приведенным ниже инструкциям, чтобы удалить программное обеспечение DisplayLink USB Graphics с вашего компьютера, чтобы устранить конфликт с Minecraft:
- Нажмите клавишу Win + R, чтобы открыть диалоговое окно «Выполнить». Затем введите appwiz.cpl и нажмите Enter, чтобы открыть меню «Программы и компоненты» .
Введите appwiz.cpl и нажмите Enter, чтобы открыть список установленных программ. - Зайдя в меню «Программы и файлы» , прокрутите список установленных приложений вниз и найдите запись с именем DisplayLink Graphics Driver.
- Когда вам удастся найти его, кликните его правой кнопкой мыши и выберите «Удалить» из контекстного меню, чтобы начать процесс удаления.
При появлении запроса на подтверждение нажмите Да, затем следуйте инструкциям на экране, чтобы завершить процесс удаления.
- После завершения операции перезагрузите компьютер и снова запустите Minecraft после завершения следующего запуска, чтобы проверить, устранен ли конфликт.
Если этот сценарий неприменим или вы уже выполнили его безуспешно, перейдите к следующему потенциальному исправлению ниже.
Способ 3: переустановка драйверов видеокарты
Как выясняется, вы также столкнетесь с ошибкой GLFW Error 65542, если используете набор устаревших графических драйверов, которые не знают, как работать с версией OpenGL, которую использует Minecraft.
Однако, если у вас недавно были проблемы с вредоносными программами, эта проблема также может быть связана с проверкой безопасности, если операция в результате изолировала некоторые файлы, необходимые для запуска OpenGL.
Если вы не обновляли драйверы GPU в течение некоторого времени, вероятно, вы сможете исправить проблему, используя Диспетчер устройств и Программы и компоненты, чтобы удалить все, что связано с вашим GPU, а затем переустановить их с официальных каналов.
Если вы не совсем уверены, как это сделать, следуйте приведенным ниже инструкциям:
- Нажмите клавишу Win + R, чтобы открыть диалоговое окно «Выполнить». Затем введите devmgmt.msc и нажмите Enter, чтобы открыть диспетчер устройств. Если вам будет предложено UAC, нажмите Да, чтобы предоставить доступ администратора.
Запуск диспетчера устройств
- Как только вы войдете в диспетчер устройств, разверните раскрывающееся меню, связанное с адаптерами дисплея, затем продолжите и удалите все графические драйверы, кликнув их правой кнопкой мыши и выбрав Удалить – сделайте это для каждой записи внутри адаптеров устройств. Если у вас есть как встроенный, так и выделенный графический процессор, удалите оба типа драйверов.
Примечание. После удаления экран может мерцать. Это происходит потому, что ваша ОС вернется к стандартным драйверам.
- После удаления всех драйверов графического процессора из диспетчера устройств закройте утилиту диспетчера устройств.
- Еще раз нажмите клавишу Win + R, чтобы открыть другое диалоговое окно «Выполнить». Затем введите appwiz.cpl и нажмите Enter, чтобы открыть экран «Программы и компоненты».
Зайдя в меню «Программы и компоненты», прокрутите список установленных приложений и начните удалять все, что связано с производителем вашего графического процессора (Nvidia AMD или Intel). Вы можете убедиться, что ничего не оставите, кликнув столбец «Издатель», чтобы расположить их один за другим. Просто щелкните правой кнопкой мыши каждый инструмент или драйвер, связанный с графическим процессором, а затем выберите Удалить в контекстном меню.
Удалите все программное обеспечение, связанное с GPU - На экране удаления следуйте инструкциям на экране, чтобы завершить процесс. После удаления всех соответствующих драйверов перезагрузите компьютер и дождитесь завершения следующего запуска.
- После завершения следующего запуска посетите страницу загрузки, связанную с вашим производителем графического процессора, и загрузите последнюю версию драйвера, доступную для вашей конкретной модели графического процессора:
Страница загрузки Nvidia
Страница загрузки AMD
Страница загрузки графики Intel - Загрузите и установите рекомендуемые драйверы в зависимости от модели вашей видеокарты, затем перезагрузите компьютер и запустите Minecraft после завершения следующего запуска, чтобы проверить, устранена ли проблема.
Not being able to launch Minecraft can be a frustrating experience, especially if you don’t know why exactly this is happening.
Unfortunately, this is the reality of most users who come across the Minecraft OpenGL error when starting the game.
Luckily, the methods listed in the guide below will help you overcome this somewhat common Minecraft problem, even if you are not a software expert.
Without further ado, let’s take a look at what you should know.
The Problem Explained
If you started experiencing the Minecraft OpenGL error (also known as the GLFW error 65542: WGL), there’s no room for panic as it is solvable using simple methods. But, before we begin, let’s take a look at the problem and what causes it.
When it comes to this error, there are a few different messages you may encounter along with it while launching the game.
- This driver does not appear to support OpenGL.
- The NVIDIA OpenGL driver lost connection with the display driver and is unable to continue.
- OpenGL profile requested but is unavailable.
The error can also show up as an in-game chat message, as shown in the image below and reported by a Reddit user in this thread.

Most of the time, users who reported this error were playing a heavily modded version of the game, so if you have active mods at the moment, chances are they’re causing the issue, so we recommend disabling them.
With that said, this error can either result in you being unable to start the game or constantly receiving spammy messages in the chat accompanied with visual glitches if you do manage to play in the first place.
Luckily, we’ll show you how to fix it in a few easy steps.
Note: Before we begin, take a look at this video that may help you solve the problem right away. It’s the most common fix for the OpenGL error, but unfortunately, it doesn’t work for every user.
Fix 1: Remove Installed Shaders
Although shaders can make your game look more aesthetic and enjoyable, installing a bunch of them in Minecraft can often be a problem.
That’s because shaders clash with the parts of other mods, and it’s uncommon to discover someone who plays Minecraft intensely without them.
With that said, we recommend disabling your shaders one by one until you notice the problem is gone. If you are unable to access the game, uninstalling or deleting the shaders from the folder in which they’re installed is what you’ll have to do.
Note: You can temporarily move the shaders to a different folder instead of removing them so that you can use them later on if the problem seems to be something else.
Fix 2: Update OptiFine
OptiFine is another tool that’s often used by Minecraft enthusiasts, but unfortunately, using an outdated version of it is known to cause the Minecraft OpenGL error.
This tool allows users to optimize the game’s performance and visuals, so it’s easily understandable why it’s so popular amongst the Minecraft community. OptiFine also allows support for specific Minecraft shaders, which further encourages users to do what we suggested might be the problem in the previous method above.
You can read more about OptiFine on the official Minecraft forum in this particular thread.
Updating OptiFine is something that helped a lot of users get rid of the Minecraft OpenGL problem, and since it’s so easy to do, we recommend doing it without hesitation.
You can download the latest OptiFine version from their official website. Upon installing it, we recommend restarting your PC before launching the game again.
Please be aware that if you think you are encountering Minecraft issues because of OptiFine, it is advised to contact the OptiFine community on Reddit, where users often assist each other with different problems related to this widely-used tool.
Fix 3: Update Your Graphics Card Drivers
As shown in one of the error messages related to this problem, updating your graphics card drivers is a viable fix that often works.
See the image below.

Having up-to-date graphics card drivers is strongly recommended even if you aren’t experiencing any errors with Minecraft or any other video game. The latest GPU driver releases provide bug fixes, better in-game performance, and a lot more, so it’s not smart to miss out on all these benefits.
Updating your graphics card drivers is easy and doesn’t take much time. If you have the right software installed, such as GeForce experience for Nvidia users, the process is fully automated.
If you aren’t sure how to update your graphics card drivers because you haven’t done it before, feel free to take a look at the informative video down below that will guide you through the entire process with ease.
After updating your drivers, we recommend restarting your computer and launching Minecraft again. The problem should no longer be there if it was caused by outdated drivers in the first place.
Fix 4: Reinstall Minecraft
If you seem stuck and you wish to start all over again, reinstalling Minecraft can give you that opportunity while also possibly solving the problem right away.
Corrupt mod files, shaders, or any other files you could possibly have installed in your game’s main directory can all be the cause of the OpenGL error.
![]()
Luckily, reinstalling the game will wipe out all potentially problematic files and allow you to start from the beginning.
This method is the most “extreme” one, but it will save you a lot of time if your game is already full of shaders and mods.
Upon reinstalling a clean version of the game, you can install your shaders and mods one by one until you run into the error. Then you’ll know what causes it and skip installing those files.
Conclusion
The OpenGL Minecraft error can be tricky to deal with, given it can be caused by many different things. The most problematic aspect of dealing with this error is having to troubleshoot thoroughly. But, once you find out the cause, solving it is easy.
Often, the cause is an excessive amount of installed mods and shaders, some of which could be corrupt or outdated game-altering tools, such as OptiFine.