Данная ошибка часто возникает у обладателей нового железа или же после переустановки Windows. Ниже рассмотрены основные способы для устранения проблемы. Они представлены в виде логичных шагов, которые идут друг за другом. Если предыдущий способ не помог, то следует переходить к следующему.
Способ 1: Установка новой Java
Одно из возможных решений проблемы. Следует перейти на официальный сайт Jav’ы (https://www.oracle.com/java/technologies/downloads/). Далее, там же нужно скачать новейшую доступную версию. Главное, чтобы она была не меньше Java 16 – ведь именно такая версия начинает поддерживаться игрой, начиная с 1.17. Скачиваем, следуем инструкциям инталлятора. Готово! Новая Java установлена.
Способ 2: Добавление OpenGL.dll вручную
Обычно при установке Java-файлов проблем не возникает. Ведь инсталлятор сам автоматически устанавливает opengl32.dll или opengl64.dll. Тем не менее, чаще всего в Windows 10, Java-установщики бывают пропускают этот шаг в установке. Именно отсутствие этого файла в директории Jav’ы вызывает ошибку.
Шаг 1: Переходим на сайт https://ru.dll-files.com/opengl32.dll.html . Качаем файл, подходящий архитектуре нашей операционной системы (64-х или 32-х битная). Чтобы узнать какая стоит на определенном компьютере: нужно на рабочем столе нажать ПКМ (Правой Кнопкой Мыши) на “Мой Компьютер”, затем выбрать свойства. Там будет виден “Тип системы”. Качаем файл такой же архитектуры, как и ОС.
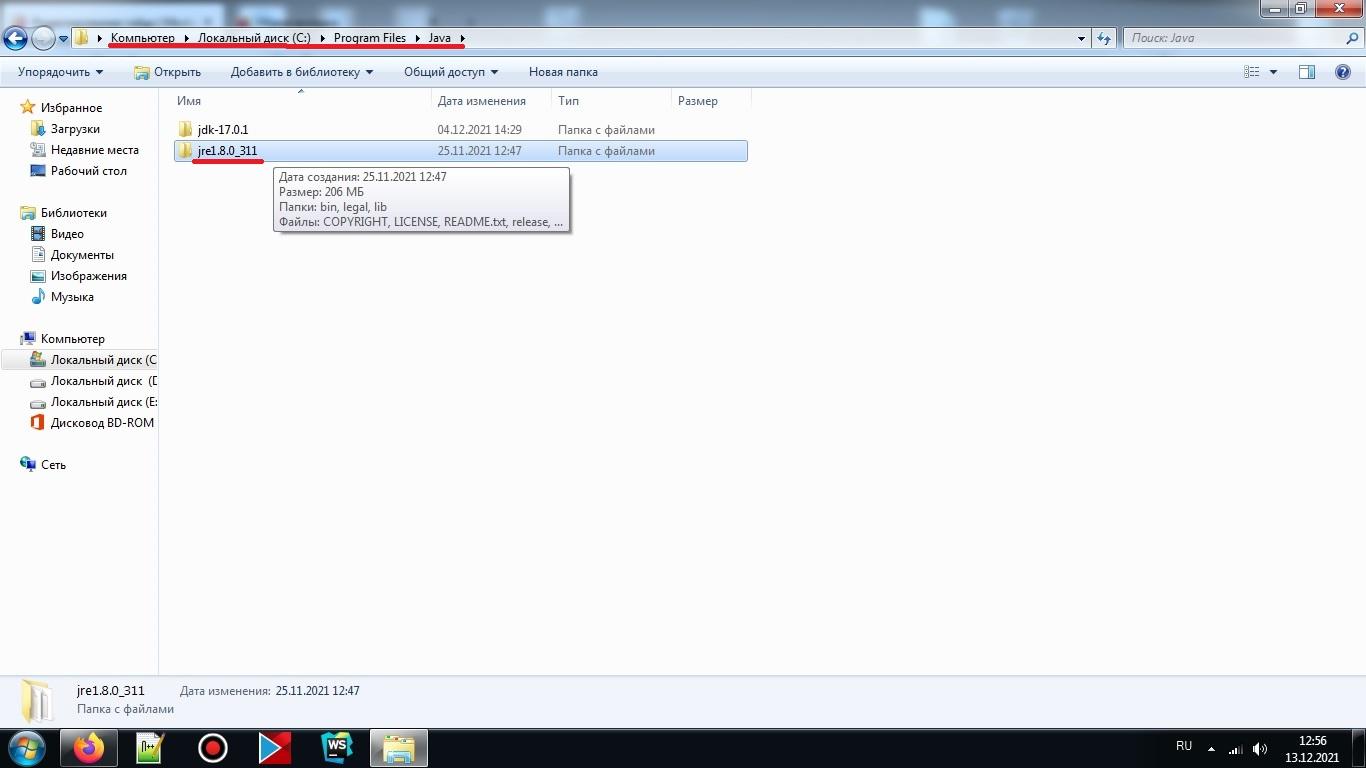
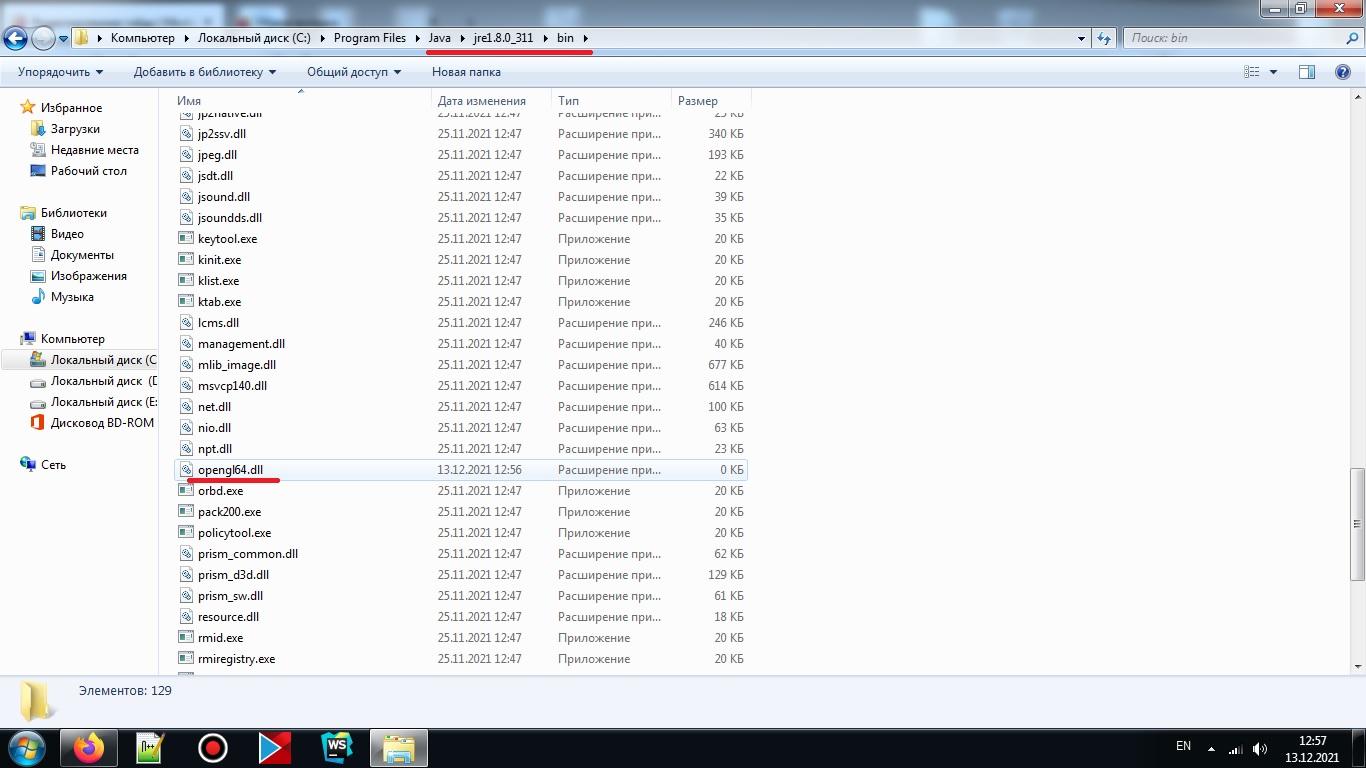
Шаг 2: Находим папку “bin” в Java\JRE\bin . Если Java установлена по умолчанию, то путь будет следующим:
“C:\Program files\Java\jre\bin\”
Вставляем в директорию “bin” файл opengl64.dll (или opengl32.dll). Если предлагают предоставить доступ администратору, соглашаемся.
Шаг 3: Вновь запускаем Minecraft. Если проблема не устранена, тогда переходим к следующему методу.
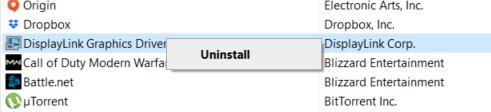
Способ 3: Удаление DisplayLink (выборочно)
Драйвер DisplayLink (если у вас используется именно он) иногда конфликтует с некоторыми Java-файлами. При этом его можно безбоязненно удалить.
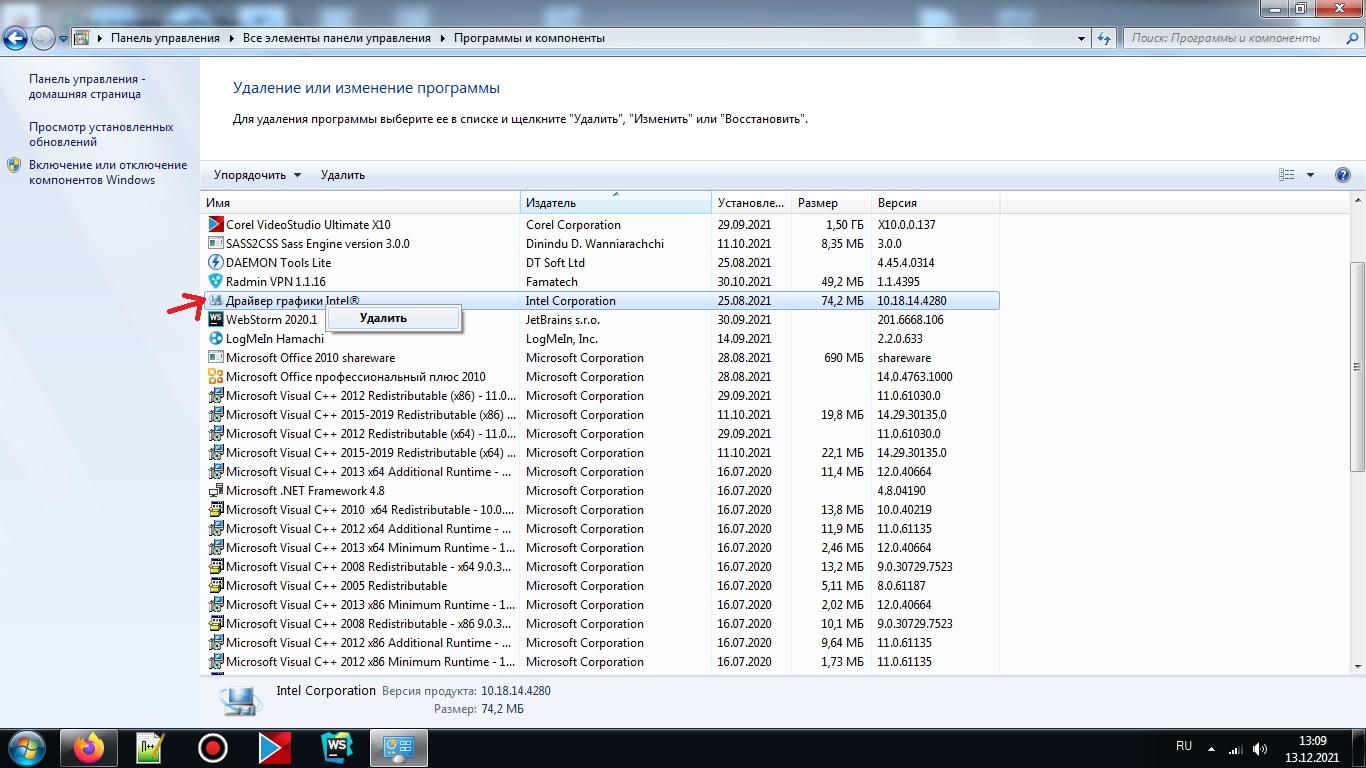
Шаг 1: Переходим в “Программы и компоненты”. Для этого можно зайти в “Пуске” в “Панель управления” и там найти нужную нам иконку. Или же можно нажать “Win + R”. Затем, вписать в окно “Выполнить” значение appwiz.cpl .
Шаг 2: Находим в списке DisplayLink Graphics Driver. Удаляем его.
Шаг 3: После завершения удаления перезагружаем компьютер. Открываем Minecraft. Проверяем устранение проблемы.
Способ 4: Переустановка драйверов видеокарты
Проблема может заключаться в слишком старых драйверах для вашего устройства. Они просто могут не понимать: каким образом взаимодействовать с OpenGL.
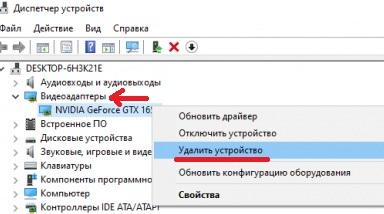
Шаг 1: Нажимаем “Win + R”. Появляется окно “Выполнить”. Вводим в него devmgmt.msc и переходим на “Диспетчер устройств”.
Шаг 2: Находим “Display adapters” или же “Видеоадаптеры”. Удаляем все драйвера оттуда. ВНИМАНИЕ! Экран может тускнеть, мерцать, глючить. Это все нормальные явления, ведь система возвращается к собственным драйверам по умолчанию.
Шаг 3: Далее заходим в “Программы и компоненты” . Для этого выбираем этот файл в Пуск > Панель управления. Или же нажимаем “Win + R” и вписываем appwiz.cpl , как в прошлом способе.
Шаг 4: Важный момент: у каждого разное железо, в том числе видеокарты. Поэтому необходимо самостоятельно найти компоненты определенного оборудования. Обычно это видеокарты Nvidia, AMD или Intel. Последние две являются встроенными. На определенных компьютерах могут быть сразу как встроенные видеокарты, так и дискретные. Есть еще USB-видеокарты, но для игр они не используются.
Поэтому необходимо найти + удалить ВСЕ файлы, связанные с GPU (видеокартой). При этом: важно не задеть остальные компоненты и утилиты.
Шаг 5: Перезагружаем компьютер. После перезагрузки переходим на сайт производителя оборудования и скачиваем новые драйвера для своей видеокарты. Например: внизу оставлены ссылки на сайты 3-ех уже упомянутых компаний.
Nvidia: https://www.nvidia.com/Downloa…
Intel: https://www.intel.com/content/…
AMD: https://www.amd.com/en/support
Шаг 6: Устанавливаем драйвера для своей видеокарты. Перезагружаем компьютер. Вновь заходим в Minecraft и проверяем.
Способ 5: Замена железа
Если все последующие способы были выполнены правильно и не дали никакого результата, то следует заменить видеокарту. Скорее всего, железо устарело и не поддерживает новую версию Minecraft. Правда, этот способ не касается тех людей, у которых до переустановки системы игра работала нормально.
Тем не менее, стоит еще раз убедиться в правильности предыдущих способов. Особенно, если GLFW error 65543/65542 так и не исчезла. Дополнительно можно поменять игровой лаунчер, ибо проблема порой может скрываться в нем. В любом случае проблему можно устранить. Главное – найти корень проблемы: драйвера, железо или же отсутствие файла opengl.dll .
Minecraft is a popular sandbox game enjoyed by millions of players worldwide. However, like any software, it can sometimes encounter errors that disrupt the gaming experience. One such error is GLFW Error 65543, which often occurs in the Minecraft launcher. In this article, we will explore the causes of this error and provide you with a step-by-step troubleshooting guide to fix it and get you back to enjoying the game.
- What does GLFW Error 65543 mean in Minecraft?
- Why should I update Java Runtime Environment (JRE) to fix GLFW Error 65543?
- Common Causes of GLFW Error 65543:
- Troubleshooting Steps to Fix GLFW Error 65543:
- Step 1: Update Graphics Drivers:
- Step 2: Check Graphics Card Compatibility:
- Step 3: Reinstall Minecraft:
- Step 4: Update Java Runtime Environment (JRE):
- Step 5: Disable Antivirus/Firewall:
- Step 6: Clear Minecraft Data:
- Step 7: Replace OpenGL32.dll Manually
- Additional Tips to Fix GLFW Error 65543
- Check System Requirements
- Disable Overclocking
- Scan for Malware
- Create a New Launcher Profile
- Try Compatibility Mode
- Seek Support from Minecraft Community
- Conclusion
- F.A.Qs
What does GLFW Error 65543 mean in Minecraft?
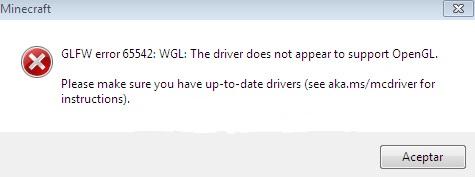
GLFW Error 65543 is an error code in the Minecraft launcher, indicating an issue with the GLFW library responsible for graphics and window management. It often results in a black or frozen window and prevents the game from launching successfully.
Why should I update Java Runtime Environment (JRE) to fix GLFW Error 65543?
Minecraft heavily relies on Java, and an outdated or incompatible version of JRE can cause conflicts and trigger the error. Updating to the latest version of JRE ensures that Minecraft can utilize the necessary Java components effectively.
Common Causes of GLFW Error 65543:
To effectively troubleshoot and fix the error, it’s essential to understand its potential causes. Here are some common factors that contribute to GLFW Error 65543:
Outdated Graphics Drivers: Obsolete or incompatible graphics drivers can conflict with Minecraft’s requirements and trigger the error.
Graphics Card Compatibility: Certain graphics cards may not be fully compatible with Minecraft or its OpenGL requirements, leading to the error.
System Configuration Issues: Configuration conflicts or inconsistencies within the operating system or launcher settings can also cause the error to occur.
Troubleshooting Steps to Fix GLFW Error 65543:
Follow these steps to resolve GLFW Error 65543 and ensure a smooth Minecraft gaming experience:
Step 1: Update Graphics Drivers:
Start by updating your graphics drivers to the latest version. Visit the official website of your graphics card manufacturer (e.g., NVIDIA, AMD, Intel) and download the appropriate drivers for your system. Install the drivers and restart your computer before launching Minecraft again.
Step 2: Check Graphics Card Compatibility:
Verify that your graphics card meets the minimum requirements specified by Minecraft. If your card falls short, consider upgrading to a more compatible model that supports OpenGL.
Step 3: Reinstall Minecraft:
Uninstall the Minecraft launcher from your system and then download and reinstall the latest version from the official Minecraft website. This helps ensure that any corrupted files or configuration issues are resolved.
Step 4: Update Java Runtime Environment (JRE):
Minecraft heavily relies on Java, so make sure you have the latest version of Java Runtime Environment installed on your system. Visit the official Java website to download and install the latest JRE version.
Step 5: Disable Antivirus/Firewall:
Temporarily disable your antivirus or firewall software and launch Minecraft again. Sometimes, these security measures can interfere with the game’s functioning and trigger the GLFW error.
Step 6: Clear Minecraft Data:
Clearing Minecraft’s temporary files and data can help resolve any conflicts or corruption issues. Navigate to the Minecraft installation folder and delete the “versions” folder, then relaunch the game.
Step 7: Replace OpenGL32.dll Manually
To replace the OpenGL32.dll file manually, follow these steps:
Locate a Compatible OpenGL32.dll File: Start by obtaining a compatible version of the OpenGL32.dll file. You can extract it from another computer with a functioning OpenGL installation, ensuring that the operating system version and architecture (32-bit or 64-bit) match your system.
Backup the Original OpenGL32.dll File: Before replacing the file, it’s essential to create a backup of the original OpenGL32.dll file to avoid any irreversible changes. Navigate to the system’s Windows directory (typically, C:\Windows\System32) and locate the existing OpenGL32.dll file. Copy it to a separate location as a precautionary measure.
Rename the Original OpenGL32.dll File: To prevent any conflicts during the replacement process, rename the original OpenGL32.dll file in the Windows directory. For example, you can add “.bak” to the end of the filename (e.g., OpenGL32.dll.bak).
Replace the OpenGL32.dll File: Take the compatible OpenGL32.dll file you obtained in Step 1 and copy it into the system’s Windows directory (C:\Windows\System32). Ensure that you’re replacing the renamed original file from Step 3.
Restart the Computer: After replacing the file, restart your computer. This step allows the changes to take effect and ensures that Minecraft and other applications can recognize the updated OpenGL library.
Test Minecraft Launcher: Launch the Minecraft launcher and check if GLFW Error 65543 is resolved. If the error no longer occurs, you have successfully replaced the OpenGL32.dll file.
Additional Tips to Fix GLFW Error 65543
- Ensure that your system meets the minimum system requirements for Minecraft.
- Verify that your operating system is up to date with the latest patches and updates.
- Consider allocating more RAM to Minecraft if you experience frequent performance issues.
Check System Requirements
- Ensure that your computer meets the minimum system requirements specified by Minecraft. Insufficient hardware specifications can cause performance issues and potentially trigger GLFW Error 65543. Check the official Minecraft website or documentation for the recommended system requirements.
Disable Overclocking
- If you have overclocked your graphics card or CPU, try reverting them to their default clock speeds. Overclocking can sometimes lead to stability issues and conflicts with certain applications, including Minecraft.
Scan for Malware
- Perform a thorough scan of your system using reliable antivirus software to check for any malware or potentially unwanted programs (PUPs). Malware infections can interfere with the proper functioning of applications, including Minecraft.
Create a New Launcher Profile
Create a new launcher profile within the Minecraft launcher. Sometimes, the error may be specific to a corrupted profile. By creating a new one, you can eliminate any profile-related issues.
Try Compatibility Mode
- Right-click on the Minecraft launcher executable or shortcut and select “Properties.” In the properties window, navigate to the “Compatibility” tab and enable the “Run this program in compatibility mode” option. Choose a compatible operating system version and apply the changes. Launch Minecraft again to see if the error persists.
Seek Support from Minecraft Community
- If the error persists despite trying the troubleshooting steps mentioned, it’s helpful to seek assistance from the Minecraft community. Visit official Minecraft forums, Reddit communities, or other online platforms where fellow players and enthusiasts can provide insights, tips, or potential solutions.
Conclusion
GLFW Error 65543 can be frustrating when you’re eager to dive into the Minecraft world. By following the troubleshooting steps outlined in this article, you should be able to resolve the issue and get back to enjoying your gaming experience. Remember to keep your drivers, Java, and Minecraft updated regularly to minimize the occurrence of such errors. Happy gaming!
F.A.Qs
Here are some frequently asked questions (FAQs) related to the topic “How to Fix GLFW Error 65543”
This error occurred following the 1.17 update, when the game stopped working for those with integrated GPUs due to updated shaders that did not support integrated Graphics Cards. So, if you have an integrated GPU and the game frequently throws the error, your only option is to reinstall the previous version. Additional causes include corrupted OpenGL and Graphics Driver. This article is about Fix GLFW error 65543 in Minecraft.
To be clear, we have detailed the causes so that you can understand how to resolve these issues. Incompatibility of System Requirements- The majority of users experienced this error as a result of incompatible system requirements after the 1.17 update. Previously, the game was fully functional. You may need to upgrade your system by purchasing a new Graphics Card, or you may need to wait for the next patch to resolve this. Below we have mention the Fix GLFW error 65543 in Minecraft.
How to Fix GLFW error 65543 in Minecraft

Uninstall DisplayLinkUSB Graphics Software
If you use Display Link, you should uninstall it if you get GLFW error 6554 on Minecraft. This occurs when the DisplayLink driver interferes with Minecraft. Now, to uninstall the Display Link USB Graphics software, follow these steps:
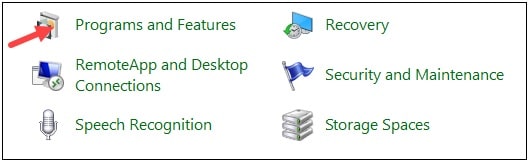
- Click the Windows Start menu and type “Control Panel” in the search bar. Select the top option.
- Click on Programs and Features.
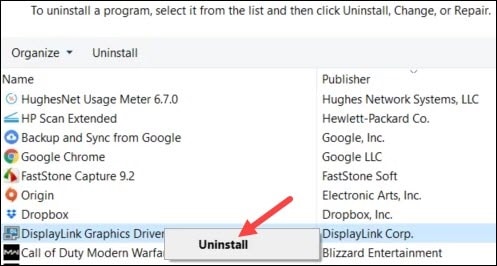
- Now scroll down the list of all installed applications and select DisplayLink Graphics Driver.
- Right-click it and select Uninstall from the context menu.
- Follow the on-screen instructions to complete the uninstallation process.
- After that, restart Windows PC and check if the Minecraft error occurs again.
Update Your GPU Drivers
Minecraft errors can also be caused by outdated GPU drivers. To maximise your gaming experience and avoid problems like these, you should always keep your graphics drivers up to date. To do so, follow these steps:
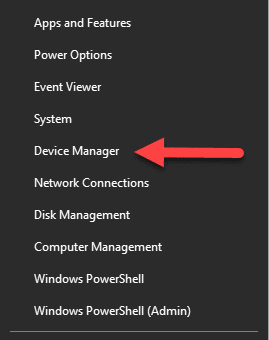
- Right-click on the Windows Start menu and select the Device Manager option.
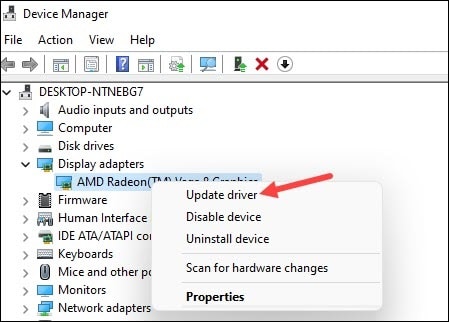
- Go to the Display Adapters section and expand it.
- Right-click your graphics card and select the Update Drivers option.
- Select the Automatically check for drivers option. Wait for Windows to finish the update process.
- If after updating the graphics drivers you still get the GLFW error 65543 on Minecraft, move on to the next solution.
Update Windows
Minecraft OpenGL errors can also be caused by outdated Windows versions. So, if you haven’t updated your windows in a while, do so now. To update your Windows, follow the steps below:
- Click the Windows Start button and select Settings. Click the Update and Security option.
- Select Updates and click Check for updates. If you find an available update, download it.
- Wait for some time and then launch Minecraft to see if it solves the problem.
Final Words
That’s it with our article on How to Fix GLFW error 65543 in Minecraft. If the problem persists and you are unable to resolve it by following the steps outlined above, the new can visit their official website and request additional information. The issue with OpenGL is that it is a library for rendering most games and applications. According to several affected users, replacing openGL32.ll will resolve the problem. Corrupted or Outdated Graphics Driver- Another possible cause in this case is outdated or corrupted Graphics drivers, which frequently cause Minecraft GLFW Error 65542.
I hope you understand this article, How to Fix GLFW error 65543 in Minecraft.
James Hogan
James Hogan is a notable content writer recognized for his contributions to Bollyinside, where he excels in crafting informative comparison-based articles on topics like laptops, phones, and software. When he’s not writing, James enjoys immersing himself in football matches and exploring the digital realm. His curiosity about the ever-evolving tech landscape drives his continuous quest for knowledge, ensuring his content remains fresh and relevant.

FOLLOW THE INSTRUCTIONS BELOW
Update Graphics Card Driver
The OpenGL launch error can be caused by an outdated graphics driver, java issues, or when Minecraft cannot use the correct OpenGL files on startup.
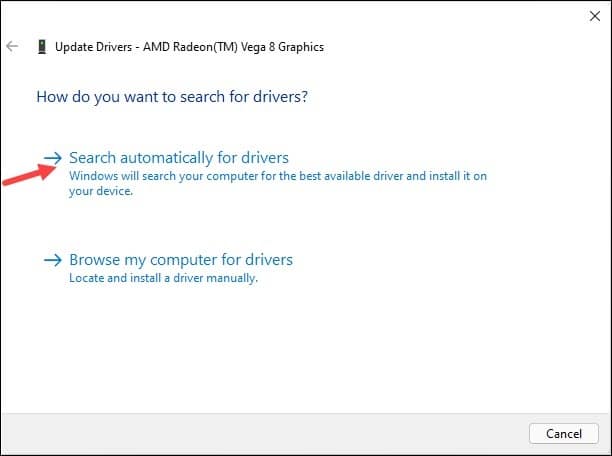
First, open up your Windows Device Manager. On this window, expand your Display adaptors. If you have to use intel integrated graphics, right-click the processor and select Update Driver. Next, select Search automatically for drivers.
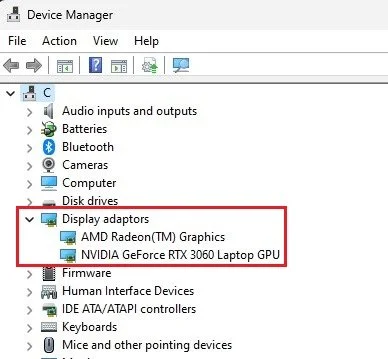
Device Manager > Display adaptors
If you are using an NVIDIA or AMD graphics card, I suggest using the GeForce Experience application for NVIDIA graphics card users and the AMD Radeon Software for AMD users. In the Drivers tab, click on Download. This will take a couple of minutes to download and automatically install the latest graphics driver to your system. After installing the driver, try to relaunch Minecraft, as this will fix the OpenGL error for most users.
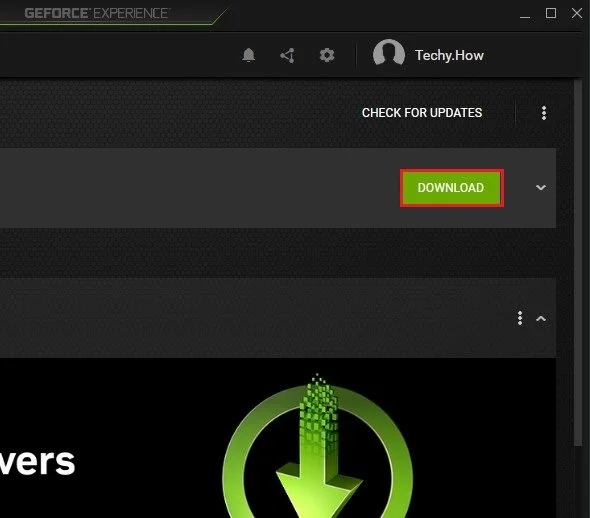
GeForce Experience > Drivers
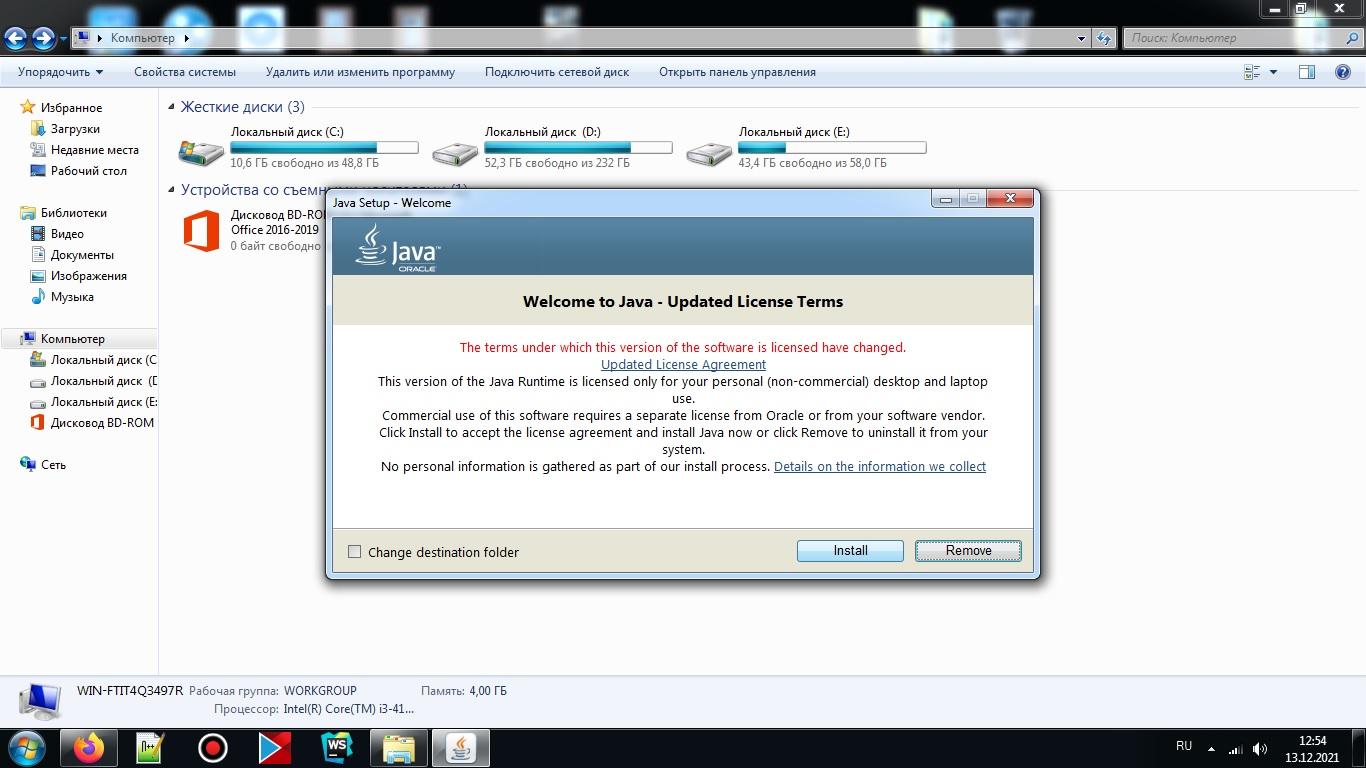
Install or Update Java on Windows
If the problem persists, then this issue is probably related to your current Java version. Open up your preferred browser and navigate to java.com/en/download to get to this page. Click on Download Java, which will take a couple of seconds to download the latest Java version to your system.

Download Java
When the download is complete, double-click the downloaded .exe file and follow the Java setup to install the latest version to your system.
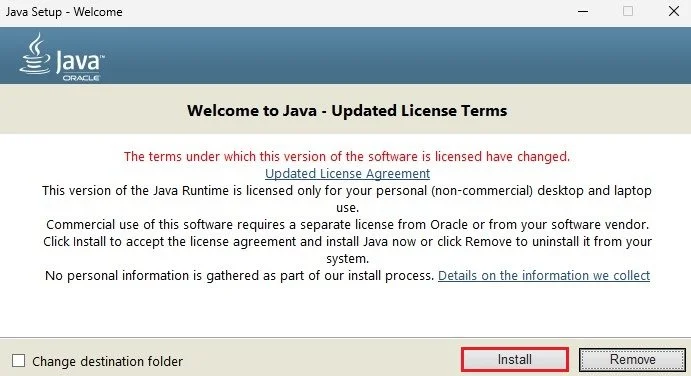
Java Setup > Install
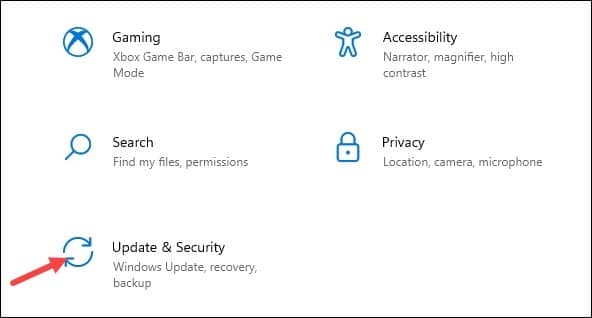
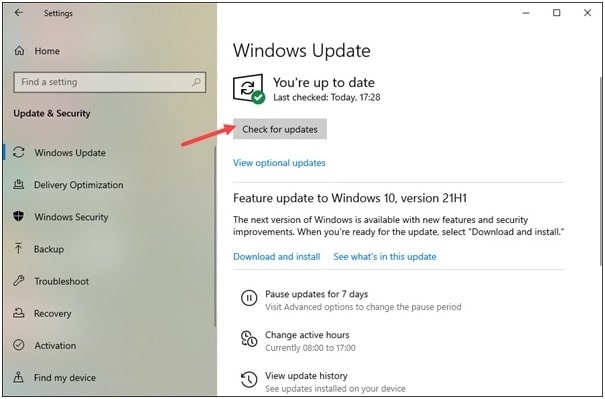
Windows Update
When this is done, open up your Windows settings. In the Windows Update section, click on Check for Updates and proceed to download the latest update before restarting your PC. Windows updates will install outdated drivers, which can help fix the OpenGL error you are getting.
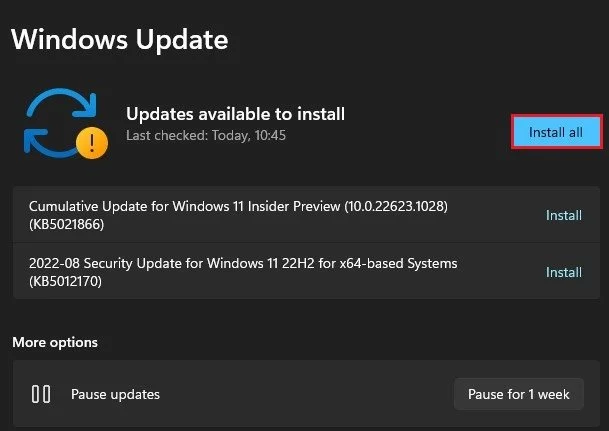
Windows Settings > Windows Update
Replace OpenGL DLL File
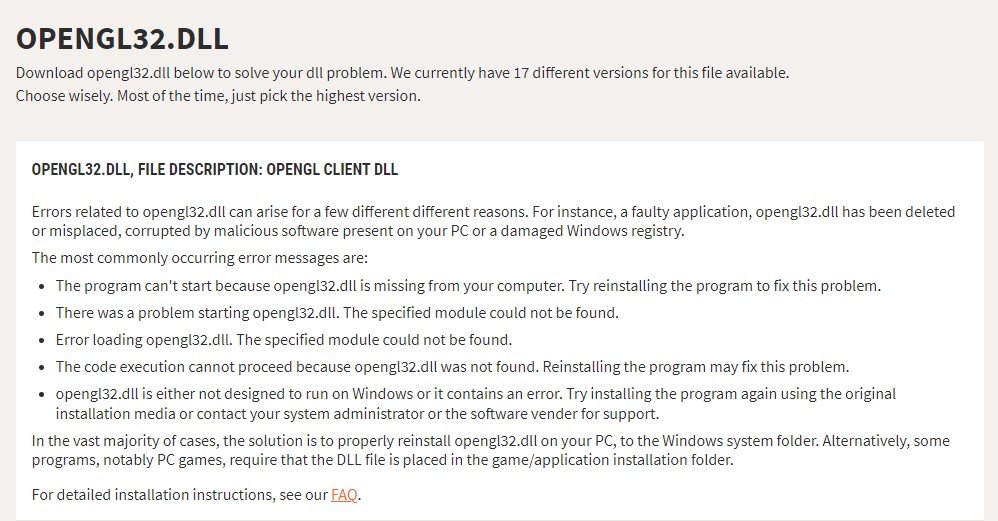
Lastly, if nothing has helped you, you will have to replace the OpenGL file in your Minecraft installation. Navigate to DLL-Files.com and look up OpenGL32.dll. Here, you can download the latest version of the OpenGL Client. It might take a second for the download to start, and your browser can help you find your downloaded files.
Download Missing OpenGL.dll File
Drag and drop the downloaded .zip file to your desktop. Here, right-click the file, select Extract All, and then unzip your download content to your desktop.
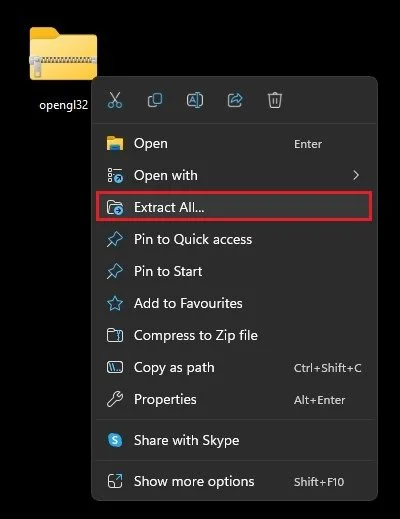
Unzip OpenGL32 File
Next, search for %AppData% and hit enter. Your file explorer will open up. Navigate to .minecraft and search for OpenGL in this folder. A list of OpenGL files and folders will show up. Right-click one of the OpenGL.dll files and select Open File Location.
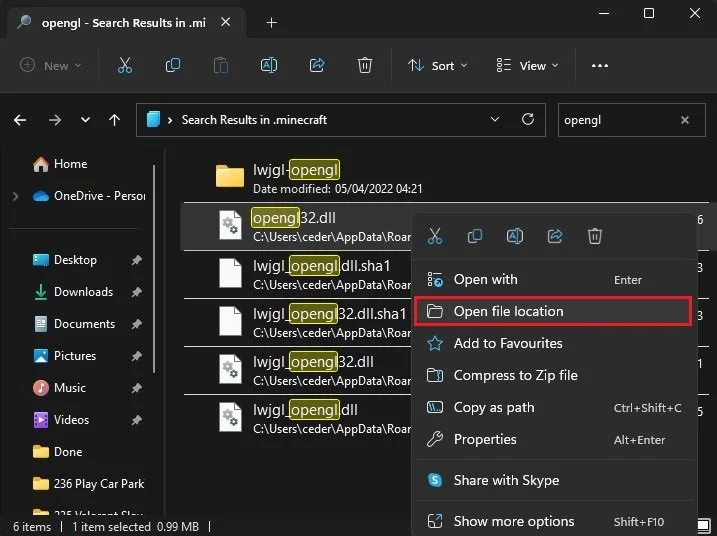
%AppData% > .minecraft > OpenGL
Finally, drag and drop the downloaded OpenGL.dll file into this folder. When done, you will be required to restart your PC before relaunching Minecraft, and the OpenGL error will be fixed.
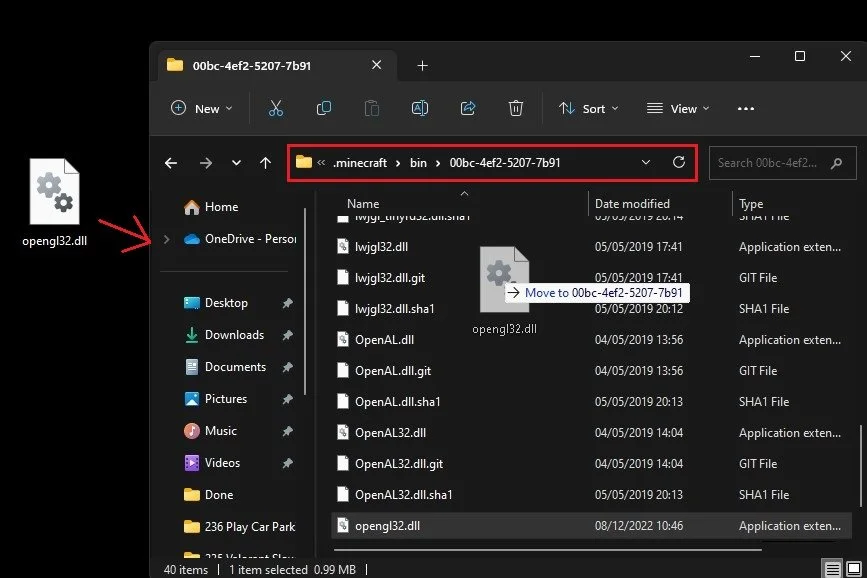
Replace OpenGL32.dll File
GLFW error 65543 on Minecraft mainly occurs while you attempt to launch the game.
Gamers having the Java version of the game are mostly reported to encounter this Minecraft OpenGL error.
So, if you are in the same boat, then read this article as here I am going to discuss the solutions to fix the error.
Follow the detailed guidelines provided below to fix GLFW error 65543 on Minecraft.
1) Uninstall DisplayLinkUSB Graphics Software
If you are a Display Link user, then you should uninstall it when you are getting GLFW error 6554 on Minecraft.
This happens when the DisplayLink driver conflicts with Minecraft.
Now follow the steps to uninstall Display Link USB Graphics software:
- Click on the Windows Start Menu and enter Control Panel in the search bar. Select the topmost option.
- Click on Programs and Features.
- Now scroll down the list of all your installed apps and select DisplayLink Graphics Driver.
- Right-click on it and from the context menu click on the Uninstall option.
- Follow the onscreen prompts to finish the uninstallation process.
- After that, restart your PC and check if you are getting the Minecraft error again.
Also read: What to do when there is no sound on Minecraft!
2) Update Your GPU Drivers
Outdated GPU drivers can also trigger Minecraft errors.
So, to maximize your gaming experience and avoid these kinds of problems, you should always keep your Graphics drivers updated.
Follow the steps to do so:
- Right-click on the Windows Start menu and select Device Manager from the option.
- Go to the Display Adapters section and expand it.
- Right-click on your graphics adapter and choose the Update driver option.
- Select Search automatically for the drivers option. Wait till Windows finish the updating process.
If after updating the graphics drivers, you are still getting GLFW error 65543 on Minecraft, move on to the next solution.
3) Update Windows
Outdated Windows versions can also trigger Minecraft OpenGL errors.
So, if you have not updated your windows for a long time, update them now.
To update your Windows follow the given steps:
- Click on the Windows Start button and select Settings. Click on Update & Security option.
- Select Updates and click on Check for updates. If you find any available update then download it.
- Wait for some time and then launch Minecraft and see if this could solve the problem.
4) Reinstall Java
If you still cannot fix the Minecraft OpenGL error, then reinstall Java.
If the Java packages installed on your PC have compatibility issues, then you will get these kinds of errors on Minecraft.
So, reinstalling Java is a good option. Here is how to fix the OpenGL error in Minecraft by reinstalling Java:
- Open Windows Control Panel and click on the Programs and Features option.
- Click on Uninstall a program option and scroll down to find Java.
- Right-click on Java and click on the Uninstall button.

Now install the latest version of Java. Launch Minecraft and see if this has settled the problem, otherwise reinstall Minecraft.
5) Reinstall Minecraft
If no other steps could fix Minecraft OpenGL error 65543 then reinstall Minecraft freshly.
To do that follow the given guidelines:
- Open Programs and Features from Control Panel.
- Find Minecraft from the installed apps and right-click on it. Select Uninstall option.
Now, reinstall Minecraft, and this should solve the problem.
Closing Up
Hope with the help of the above methods you could fix GLFW error 65543 on Minecraft.
If you have any game or tech-related issues then let us know by commenting in the section below.