18.02.2018
Просмотров: 12816
Одной из распространенных неполадок, которая возникает во время обновления Windows 7, является ошибка 8024402с. Предполагается, что основная причина, почему появляется эта неполадка – это некорректная работа «Центра обновления», а также неактуальные наладки сети. На форуме Microsoft пользователи утверждают, что ошибка обновления Windows 7 8024402c возникает из-за неправильных настроек прокси-серверов в TCP/IP. Однако избавление от этой проблемы не предусматривает изменение параметров протокола сети, так как такая неполадка может возникать, если прокси-сервер находится в нерабочем состоянии.
Читайте также: Ошибка 80070103 при обновлении Windows 7
Способы решения ошибки 8024402c при обновлении Windows 7
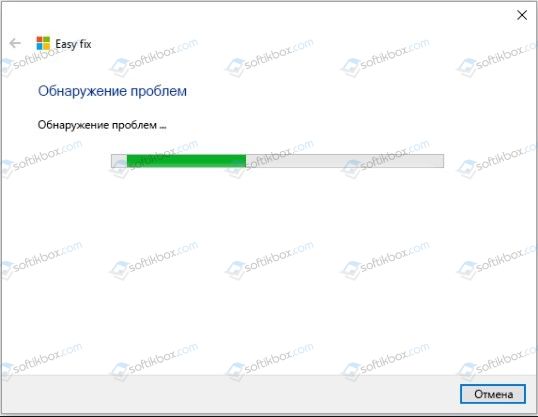
Для решения ошибки 8024402c компания Майкрософт предлагает использовать специальную утилиту EasyFix. При этом, по отзывам пользователей, только EasyFix, а не MicrosoftFixIt помогает решить проблему.
Запустив программу, нужно следовать подсказкам Мастера диагностики. Программа сама обнаружит и исправить неполадки.
Если данный инструмент не решил проблемы с обновлением Windows 7, стоит попробовать очистить настройки прокси. Для этого стоит запустить командную строку с правами Администратора и ввести следующие команды:
- proxycfg –d – удаление настроек прокси;
- netstopwuauser – отключаем доступ к интернету;
- netstartwuauserv – восстанавливаем доступ.
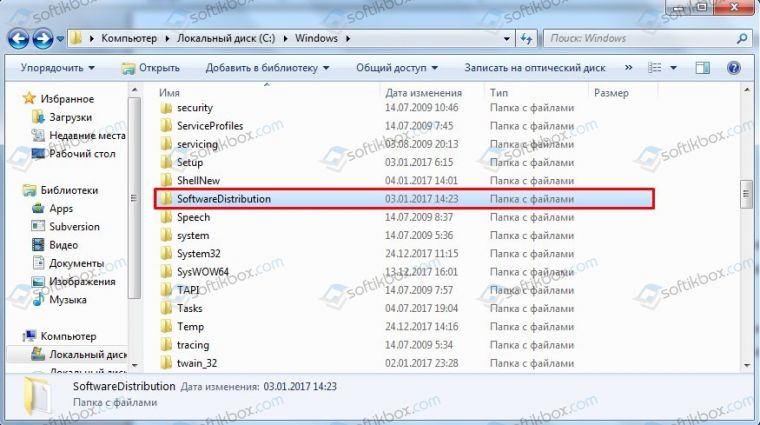
Если после всех этих действий ошибка центра обновления Windows7 0x8024402c всё ещё продолжает появляться, можно попробовать очистить папку Sofrware Distribution, которая находится в системной папке Windows.
Также устранить неполадку можно с помощью настройки автоматического получения IP либо попробовать внести адреса DNS-сервера вручную. Для этого выполняем следующее:
- Жмём «Пуск», «Панель управления», выбираем «Сеть и интернет».
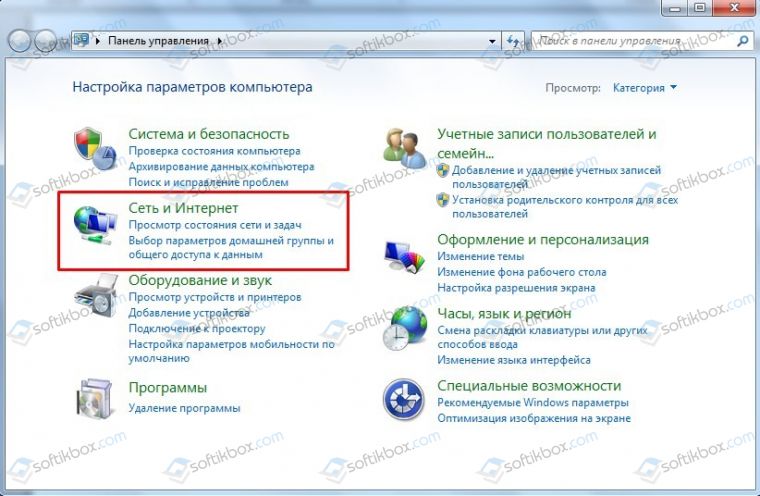
- Далее выбираем «Центр управления сетями и общим доступом».
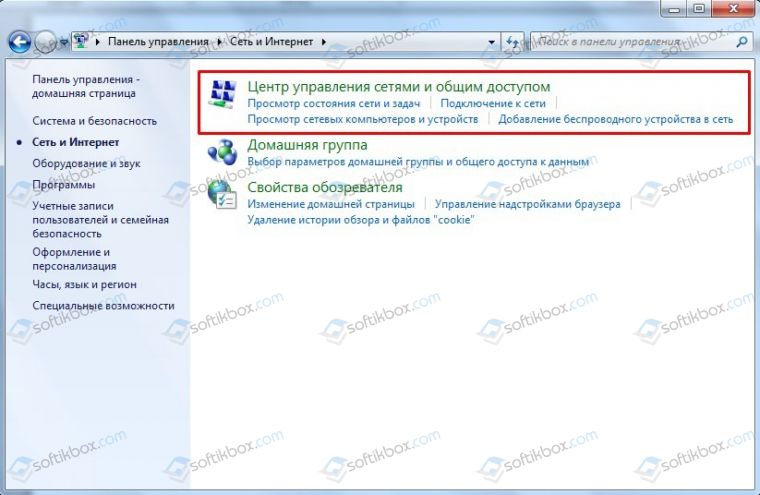
- В меню слева выбираем «Изменение параметров адаптера».
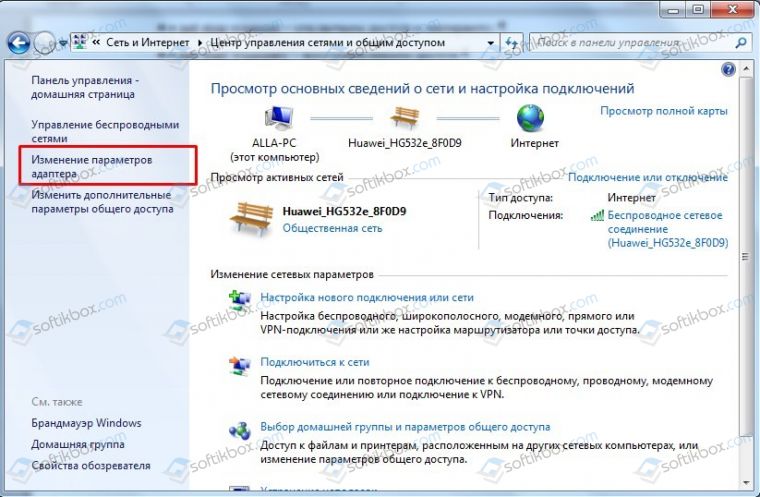
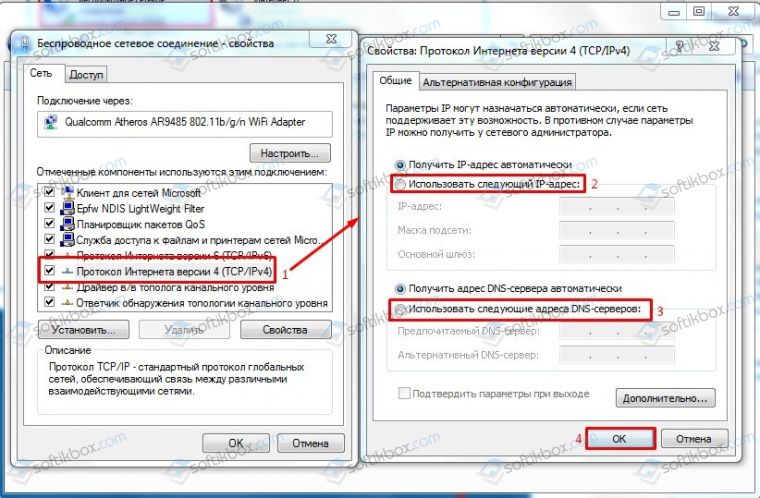
- Выбираем соединение. Нажимаем на нем правой кнопкой мыши и выбираем «Свойства».
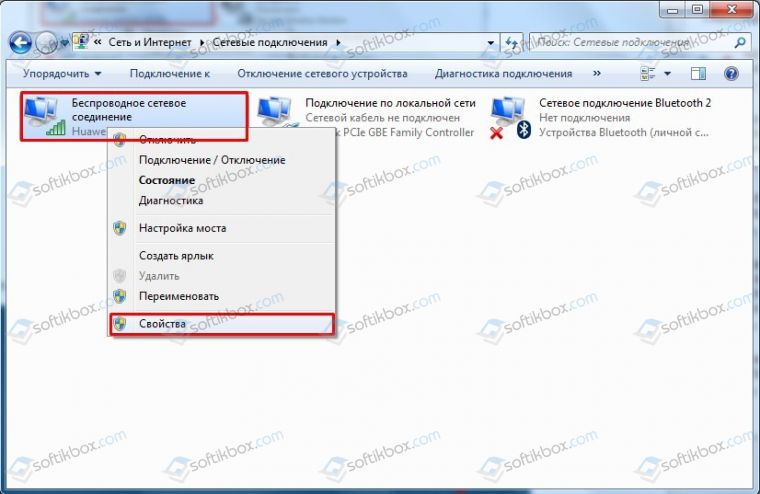
- Находим протокол 4 версии. Запускаем его двойным кликом. Ставим отметки «Использовать следующие адреса….» и 8.8.8.8 и 8.8.4.4. Сохраняем результат.
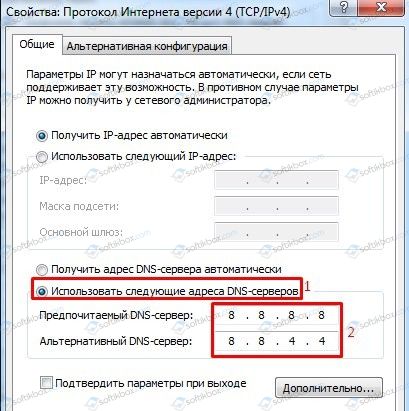
- Перезагружаем систему.
В случае, если проблема не исчезла и после данных манипуляций, стоит откатить систему до более раннего состояния и попробовать запустить обновление позже.
Windows Update error 8024402C (Windows could not search for new updates – Errors found 8024402C) while checking for updates is commonly caused by invalid network settings or invalid update settings. The problem also occurs if your computer was connected to a local network (LAN) and managed by a Windows Server Update Services (WSUS).
This tutorial contains detailed instructions on how to resolve In order to fix the Windows Update error 0x8024402C in Windows 8, 7 or Vista.
How to fix Error code 0x8024402C in Windows Update.
Solution 1. Run the Windows Update Troubleshooter.
1. Navigate to Windows Control Panel, set the ‘View By’ to Small icons and open Troubleshooting.
2. In Troubleshooting options, click View all.
3. Open the Windows Update.
4. Click Next to troubleshoot Windows update problems.
5. When the troubleshooting process is complete, close the troubleshooter.
6. Restart your computer and see if the Error code 8024402C is resolved.
Solution 2. Change the DNS servers.
Some IPS causes errors with Windows Update. So try to manually add a public DNS server (e.g. Google DNS) on your network connection.
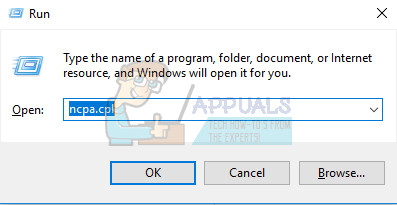
1. Press Windows + R keys to open the run command box.
2. Type ncpa.cpl and press Enter.
3. Double click at your active Network Adapter.
4. Click Properties.
5. Open ‘Internet Protocol Version 4 (TCP/IPv4)’ Properties.
6. Select «Use the following DNS server addresses:» and type the following Google’s public DNS server addresses:
- 8.8.8.8
- 8.8.4.4
7. Press OK twice to exit Network settings.
8. Restart your computer and check for updates again.
Solution 3. Configure Automatic Updates client to connect directly to the Windows Update site on the Internet.
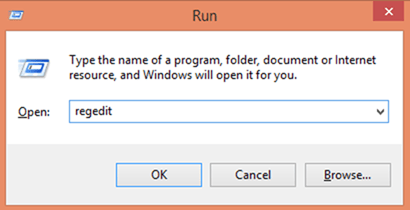
1. Press Windows + R keys to open the run command box.
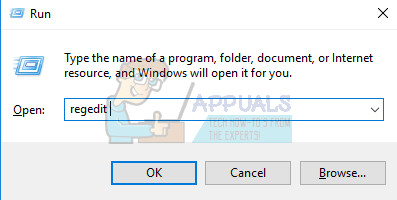
2. Type regedit and press Enter.
3. In Windows registry editor locate the following key:
HKEY_LOCAL_MACHINE\SOFTWARE\Policies\Microsoft\Windows\WindowsUpdate\AU
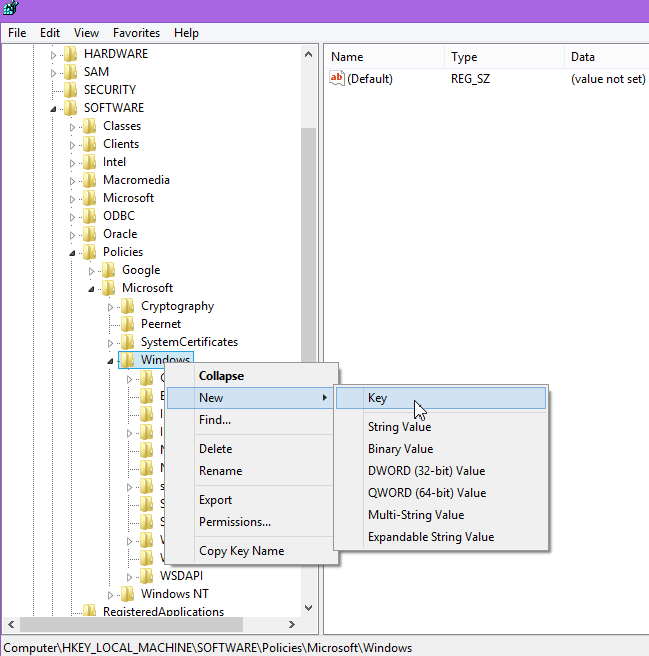
Note: If you don’t find the WindowsUpdate key you have to create it: Right click on Windows key (on the left pane) and select New > Key. Give the name: WindowsUpdate. Then right click at «WindowsUpdate’ & perform the same operation to create the AU key.
4. At the right double click to open the UseWUServer value and change the Value data from 1 to 0.
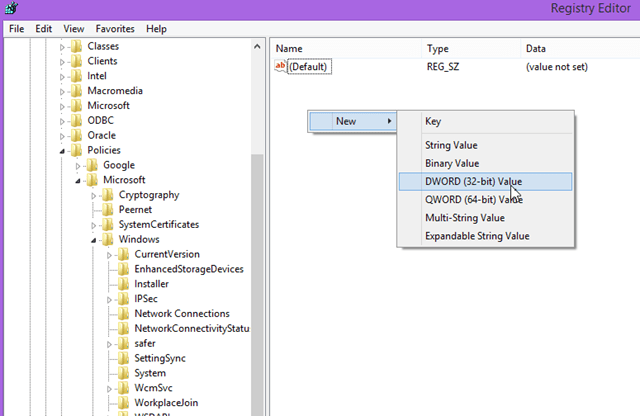
Note: If you don’t find the UseWUServer value you have to create it: Right click on the right pane and select New > DWORD (32-bit) Value. Give the name: UseWUServer.
5. Press OK to apply changes and exit from Registry Editor.
That’s all folks! Did it work for you?
Please leave a comment in the comment section below or even better: like and share this blog post in the social networks to help spread the word about this solution.
If this article was useful for you, please consider supporting us by making a donation. Even $1 can a make a huge difference for us.

Содержание
- 1 Причины возникновения ошибки 0x8024402c в Windows 7
- 2 Как исправить ошибку 0x8024402c с помощью средства устранения неполадок Windows в автоматическом режиме
- 3 Устранение ошибки вручную
С ошибкой центра обновления windows могут столкнуться как опытные пользователи ПК, так и начинающие юзеры, только познающие таинственный и загадочный мир ОС Windows. И возникает она всегда внезапно и неожиданно.
Итак, попробуем разобраться, почему возникает данная неполадка и как самостоятельно исправить ее без вреда для операционной системы.

Причины возникновения ошибки 0x8024402c в Windows 7
Основной причиной возникновения данной ошибки является неправильная настройка проски-сервера вInternet Explorer, либо в настройках сетевого подключения. Так же нельзя исключать блокирование сетевого трафика антивирусами и межсетевыми экранами.
Как исправить ошибку 0x8024402c с помощью средства устранения неполадок Windows в автоматическом режиме
На официальном сайте Microsoft для решения всех проблем связанных с ошибками Windows Update в качестве простейшего элемента их исправлений существует утилита – средство устранения неполадок центра обновления Windows.

Данная программа самостоятельно исправит все имеющиеся ошибки Центра обновления и предоставит отчет о возникающих проблемах при ее работе.
Главным недостатком данного метода является обязательное подключение к сети интернет. К сожалению, это не везде возможно. Например корпоративные сети, где в качестве Центра обновления Windows используются сервера с предустановленными на них службами WSUS (Windows Server Update Servise). К сожалению данная ошибка может распространяться и среди клиентских компьютеров корпоративной сети, что может повлечь серьезные проблемы безопасности.
Устранение ошибки вручную
Если у пользователя по каким-то причинам нет возможности скачать данное исправление (либо оно не смогло решить данную проблему в автоматическом режиме) можно самостоятельно устранить первопричину данной проблемы.

Открываем браузер Internet Explorer, после заходим в свойства браузера:

Заходим во вкладку «Подключения», подпункт «Настройка параметров локальной сети», жмем на кнопку «Настройка сети»:

Ставим галочку в пункте «Использовать прокси-сервер…», нажимаем кнопку «Дополнительно»:

Удаляем все существующие записи в данном подразделе и нажимаем кнопку «Ок»:

Но это еще не все. Чтобы ошибка окончательно исчезла нужно запустить командную строку. Для этого нужно запустить командную строку от имени администратора:

В командной строке ввести следующие команды (каждую команду нужно писать отдельно друг от друга):
- netsh winhttp reset proxy – данная команда перезагружает параметры прокси-сервера;
- net stop wuauserv – данная команда останавливает службу Центра обновления Windows;
- net start wuauserv – данная команда запускает заново службу Центра обновления Windows;

После проделанных действий стоит попробовать заново включить «Поиск обновлений» – все должно заработать.
Примечание: Если проделанные действия не возымели должного успеха, то удалите содержимое папки SoftwareDistribution, которая находиться в папке Windows системного диска (Например: C:\Windows\SoftwareDistribution). Перезагрузите ПК и попробуйте заново.
Вывод: Ошибку 0x8024402c может исправить любой посредством автоматического исправления Windowsи даже при отсутствии возможности запустить данное средство ручное исправление не требует от пользователя больших знаний. Желательно при проведении данных действий отключить все межсетевые экраны и антивирусную защиту.
- Распечатать
Оцените статью:
- 5
- 4
- 3
- 2
- 1
(7 голосов, среднее: 3.1 из 5)
Поделитесь с друзьями!
Windows update errors are one of the worst errors to experience because Windows constantly forces you to install and download new updates but when you finally decide to install them, some error pops up and prevents you from doing so. One such errors is definitely the 8024402c error which is common amongst Windows 7 and Windows 10 users.
There are quite a few different solutions to the problem and you can sometimes even blame your Internet provider as their address is sometimes not allowing your PC to connect to Microsoft’s servers. Anyway, follow the methods below in order to solve your problem.
Solution 1: Change Your DNS Address
If your Internet provider is really causing these problems, you may find other solutions quite unhelpful because they can’t fix the fact that your current DNS address is simply incompatible with Microsoft servers. Luckily, changing the DNS address is quite an easy process if you follow the instructions below carefully. You can reverse the process quite easily if something goes wrong.
- Open the Run dialog box by pressing the Windows logo key + R key together. Then type “ncpa.cpl” in it and click OK.
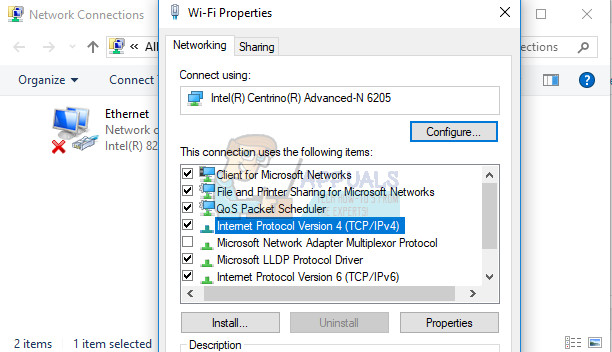
- Now that the Internet Connection window is open, double-click on your active Network Adapter.
- Then click Properties and double-click on Internet Protocol Version 4 (TCP/IPv4).
- Locate Use the following DNS server addresses option.
- Set Preferred DNS server to be 8.8.8.8
- Set Alternate DNS server to be 8.8.4.4
Note: That’s Google’s public DNS server addresses.
- Now try to install Windows Updates again and check to see if the same error code still appears.
Solution 2: Update Your HDD and SSD Drives
Some users shared their experience regarding the same error code and they said that updating their HDD or SDD drivers helped them solve many problems on their computer, including this specific Windows Update error code. We recommend you do the same, especially if you have recently added a new storage device to your computer.
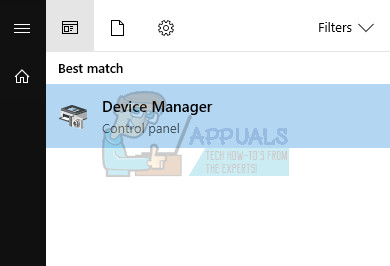
- Select the Start button, type Device Manager, and select it from the list of results.
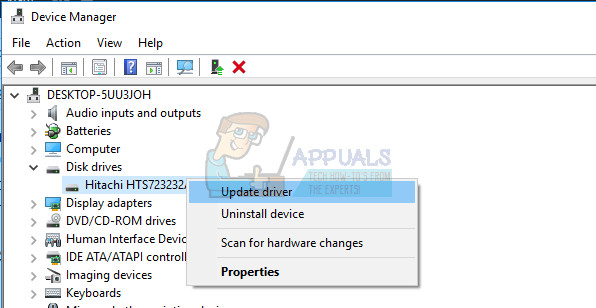
- Expand one of the categories to find the name of your device, then right-click (or tap and hold) it, and select Update Driver. For storage devices, expand the Disk drives category, right-click on the device you want to update and choose the Update option from the context menu.
- Select Search automatically for updated driver software.
- If Windows doesn’t find a new driver, you can try looking for one on the device manufacturer’s website and follow their instructions.
Note: If you are using Windows 10, the latest drivers are often installed alongside other Windows updates so make sure you keep your computer up to date. Windows Update is run automatically on Windows 10 but you can check by following the instructions below for a new update.
- Use the Windows Key + I key combination in order to open Settings on your Windows PC. Alternatively, you can search for “Settings” by using the search bar located at the taskbar.
- Locate and open the “Update & security” section in the Settings app.
- Stay in the Windows Update tab and click on the Check for updates button under the Update status in order to check whether there is a new version of Windows available.
- If there is one, Windows should proceed with the download process automatically.
Solution 3: Disable IPV6 on Your PC
This Windows Update error sometimes occurs if you have enabled IPv6 and you don’t have a local gateway that is needed to connect. There are several users who were able to solve the problem this way whereas it didn’t work for others. Your safest bet is to try and see if it’s working yourself.
- Open the Run dialog box by pressing the Windows logo key + R key together. Then type “ncpa.cpl” in it and click OK.
- Now that the Internet Connection window is open, double-click on your active Network Adapter.
- Then click Properties and locate the Internet Protocol Version 6 entry on the list. Disable the checkbox next to this entry and click OK. Restart your computer in order to confirm the changes and check to see if the error appears again.
Solution 4: Command Prompt Tweak
This solution can be quite helpful as it can be performed easily and it can solve the problem by resetting the proxy settings on your computer which may have gone corrupt since the last time you ran the update. Follow the instructions below in order to solve the problem.
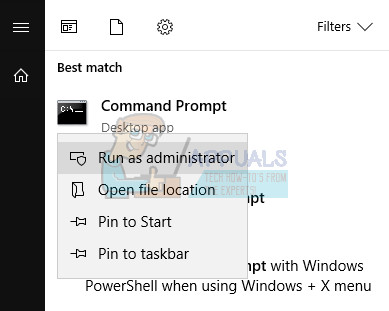
- Use the Windows Key + X key combination in order to open the menu where you should select the Command Prompt (Admin) option. Alternatively, you can right-click on the Start menu for the same effect or you can simply search for Command Prompt, right-click on it and select Run as administrator.
- Type in the commands presented below and make sure you press Enter after each one in order to run it properly.
netsh
winhttp
reset proxy
- Return to Windows Update and check to see if the problem still appears on your PC.
Solution 5: Reset Windows Update Components
This method is somewhat advanced and it takes a while to accomplish it. However, users have reported that, even when the other methods failed, resetting the components was still able to fix their issue.
Before proceeding with this solution, it’s recommended that you close all of your running programs and it’s advisable to create a backup of your registry just in case something goes terribly wrong while you edit it.
- Let’s proceed with the solution by killing the following services which are the core services related to Windows Update: Background Intelligent Transfer, Windows Update, and Cryptographic Services. Disabling them before we start is crucial if you want the remainder of the steps to perform smoothly.
- Search for “Command Prompt”, right-click on it, and select the “Run as administrator” option. Copy and paste the following commands and make sure you click Enter after each one.
net stop bits
net stop wuauserv
net stop appidsvc
net stop cryptsvc
- After this, you will have to delete some files which should be deleted if you want to continue with resetting the update components. This is also done via Command Prompt with administrative privileges.
Del “%ALLUSERSPROFILE%\Application Data\Microsoft\Network\Downloader\qmgr*.dat”
- The following step can be skipped if this is not a last resort. This step is considered to be the aggressive approach but it will definitely reset your updating process from its very core. So we can recommend that you try this out. It has been suggested by a lot of people on online forums.
- Change the name of the SoftwareDistribution and catroot2 folders. In order to do this, at an administrative command prompt, copy and paste the following commands and click Enter after copying each one.
Ren %systemroot%\SoftwareDistribution SoftwareDistribution.bak
Ren %systemroot%\system32\catroot2 catroot2.bak
- The following commands will help us reset the BITS (Background Intelligence Transfer Service) and the wuauserv (Windows Update Service) to their default security descriptors. Make sure you don’t modify the commands below so it’s for the best if you simply copy them.
exe sdset bits D:(A;;CCLCSWRPWPDTLOCRRC;;;SY)(A;;CCDCLCSWRPWPDTLOCRSDRCWDWO;;;BA)(A;;CCLCSWLOCRRC;;;AU)(A;;CCLCSWRPWPDTLOCRRC;;;PU)
exe sdset wuauserv D:(A;;CCLCSWRPWPDTLOCRRC;;;SY)(A;;CCDCLCSWRPWPDTLOCRSDRCWDWO;;;BA)(A;;CCLCSWLOCRRC;;;AU)(A;;CCLCSWRPWPDTLOCRRC;;;PU)
- Let’s navigate back to the System32 folder in order to proceed with the solution at hand.
cd /d %windir%\system32
- Since we have completely reset the BITS service, we will need to reregister all of the files necessary for the service to run and operate smoothly. However, each of the files requires a new command in order to make it reregister itself so the process may end up being lengthier than what you are used to. Copy the commands one by one and make sure you don’t leave out any of them. Here is a list of files that need to be reregistered along with the corresponding commands next to them.
- Some files may have been left behind after these processes so we are going to look for them in this step. Open the Registry Editor by typing “regedit” in either the search bar or the Run dialog box. Navigate to the following key in Registry Editor:
HKEY_LOCAL_MACHINE\COMPONENTS
- Click on the Components key and check the right side of the window for the following keys. Delete them all if you locate any of them.
PendingXmlIdentifier
NextQueueEntryIndex
AdvancedInstallersNeedResolving
- The next thing we are going to do is reset Winsock by copying and pasting the following command back into the administrative Command Prompt:
netsh winsock reset
- If you are running Windows 7, 8, 8.1, or 10, at a command prompt, copy the following command, and tap the Enter key:
netsh winhttp reset proxy
- If all of the steps above have gone through painlessly, you can now restart the services you killed in the very first step by using the commands below.
net start bits
net start wuauserv
net start appidsvc
net start cryptsvc
- Restart your computer after following through with all of the steps which are listed.
Solution 6: Edit Certain Settings in Internet Explorer
Internet Explorer is usually the first place where you should look if you encounter certain errors regarding Windows Update and your Internet Connection overall. These settings are quite easy to adjust so make sure that this solution is your first step in approaching the problem.
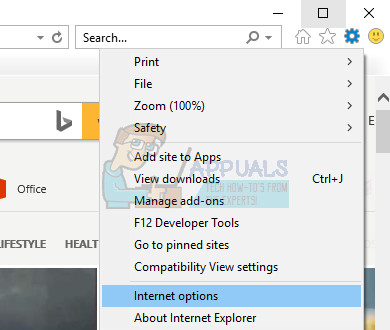
- Open Internet Explorer and click on the Gear icon located in the top right corner.
- From the menu which opens, click on Internet options.
- Navigate to the Connections tab and click on LAN Settings.
- Mark the checkbox next to Automatically Detect Settings and make sure the Proxy servers are blank unless you actively use one, which is not recommended while updating Windows.
- Make sure you apply the changes you made and restart your computer before you check to see if the update error still appears.
Solution 7: Turn off UAC until Your Update Your Computer
UAC is designed to keep you safe but it appears that there is a bug that causes this error to occur if UAC is turned on. It’s recommended that you keep it on at all times but you can disable UAC for a while until the update is installed but make sure you re-enable it as soon as possible.
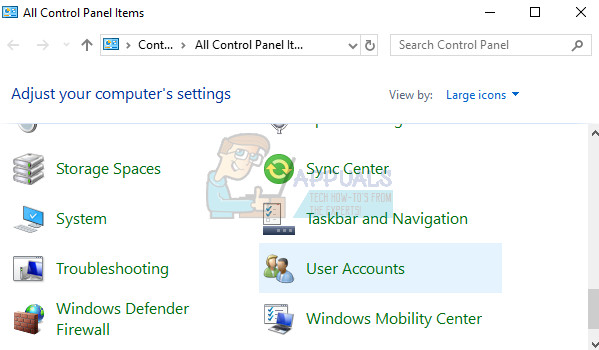
- Open Control Panel by searching for it in the Start menu.
- Switch the View by option in Control Panel to Large Icons and locate the User Accounts option.
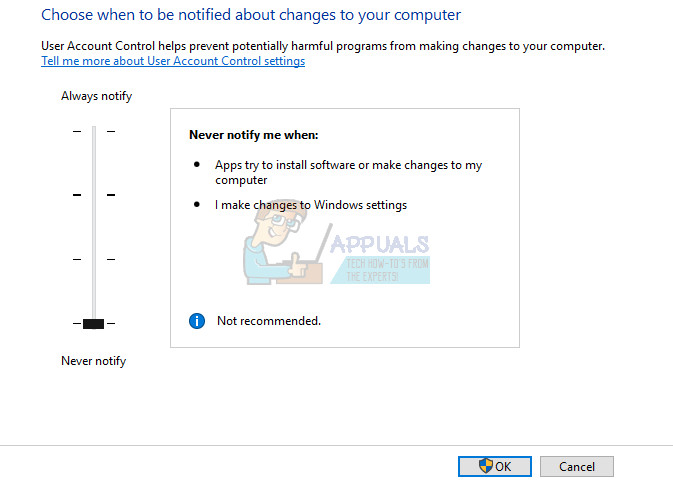
- Open it and click on “Change User Account Control Settings”.
- You will notice that there are several different options you can choose on the slider. If your slider is set at the top level, you will definitely receive more of these pop-up messages than usual. Also, the error messages similar to the one you are experiencing right now are usually caused by User Account Control.
- We recommend you turn it off for now as the update should probably install successfully. This may have helped solve your current problem but you should definitely leave it on as it serves to protect your PC.
Solution 8: A Simple Registry Hotfix
This process requires editing your registry which can be quite helpful but also dangerous. Before proceeding with this solution, it’s recommended that you close all of your running programs and it’s advisable to create a backup of your registry just in case something goes terribly wrong while you edit it.
- Open Run dialog box by pressing Windows logo key + R key together. Then type regedit in it and click OK. Click Yes when prompted by User Account Control.
- In the Registry Editor window, head to HKEY_LOCAL_MACHINE >> SOFTWARE >> Policies >> Microsoft >> Windows >> WindowsUpdate >> AU
- On the right pane of AU key, double-click on UseWUServer, change its value data into 0, and click OK.
Note: If you can’t find WindowsUpdate, you should create one. Follow the steps below.
- Right-click on the Windows folder, then choose New > Key and name the new key WindowsUpdate.
- Right-click on the WindowsUpdate folder, then choose New >> Key and name the new key AU.
- Right-click on the right pane of AU key, choose New >> DWORD (32-bit) Value. Name the new value UseWUServer. Set its value to 0.
- Now try to install Windows Updates now.
Solution 9: Install the Latest Version of .NET Framework
Having the latest version of this tool is a must if you want the updating process to proceed smoothly.
Navigate to this link and click the red download button in order to download the latest version of the Microsoft .NET Framework. After the download has finished, locate the file you downloaded and run it. Note that you will need to have constant access to the Internet.
- After installing the latest version, it’s time to check its integrity. On your keyboard, use the Windows Key + R key combination to open the Run dialog box.
- Type in Control Panel and click OK in order to open it.
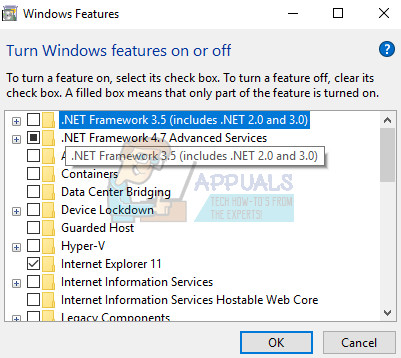
- Click the Uninstall a Program option and click Turn Windows features on or off. Make sure you locate the .NET Framework 4.6.1 entry and make sure it’s enabled.
- If the checkbox next to .NET Framework 4.6.1 is not enabled, enable it by clicking the box. Click OK to close the Windows Feature window and reboot the computer.
- If .Net Framework 4.6.1 is already enabled, you can repair .Net Framework by clearing the box and rebooting the computer. After the computer has restarted, re-enable .Net Framework and restart the computer again.
Note: If you are using a version of Windows other than Windows 10, the latest version may be different which you should also install.
Kevin Arrows
Kevin Arrows is a highly experienced and knowledgeable technology specialist with over a decade of industry experience. He holds a Microsoft Certified Technology Specialist (MCTS) certification and has a deep passion for staying up-to-date on the latest tech developments. Kevin has written extensively on a wide range of tech-related topics, showcasing his expertise and knowledge in areas such as software development, cybersecurity, and cloud computing. His contributions to the tech field have been widely recognized and respected by his peers, and he is highly regarded for his ability to explain complex technical concepts in a clear and concise manner.
There are several causes for the Error Code 8024402c. The system may throw a message like “windows could not search for new updates”.
To fix this error you can make use of the Troubleshooting tool in Control Panel. It will try to make amends to the Windows Update Database Corruption and provides a fix it solution. Let the troubleshoot tool run for a few seconds and analyze the problem.
Then finally, it will ask to apply the fix it. You just do it and the problem is resolved.
Windows update service not running in windows 7 64 bit is another cause. Then you have to check the relevant update services like BITS, WSUS etc. You must have disabled it or some other software application might have done it.
Windows 8.1 won’t find updates if code 8024402c pops up. The message will show as if this is because of unknown reason. But in many cases, this is because a third-party firewall or app is preventing the Update service from accessing the Internet.
In 2015 also, when you try to update Windows 10 this might cause you to rethink about upgrades.
If you apply the first weapon mentioned above, a progress indicator showing a green tick mark for several issues are shown. It also includes that the Windows update components must be repaired.
To resolve your issue in any Windows OS, you have to find the root cause. Once that is fixed, you can easily download the updates.
Some of the causes for this error code are –
- You can have an erroneous character in the proxy override settings.
- If you are using a third-party firewall like ZoneAlarm, Sygate, Sunbelt, Comodo, you may have wrongly configured it.
- In Windows 10, if you are using a VPN like HotSpot Shield, Zenmate, Avast Internet Security etc then the above error may occur.
- Workstation in Office that work behind a corporate ISA server can also face this issue.
- For corporate networks like Facebook, Google, Microsoft etc, if autoproxy is not enabled then also you may have this problem.
- Corrupted registry entries. If you have made any changes to the registry or did any tweaks, this can also cause Error Code 8024402c.
- Infection of Virus or Malware. If you plugged in a pen drive from a corrupted system, you can have viruses. Also, if you have downloaded too many adware programs, they can cause malware. These are also some causes for the above error code.
- General Fixes
- How to Deal with Error Code 8024402c in Windows Server 2012?
- How to Fix Error Code 8024402c in Windows Server 2008?
- How to Iron Out Error Code 8024402c in Windows 10?
- How to Work Out Error Code 8024402c in Windows 8.1?
- How to Figure Out Fix for Error Code 8024402c in Windows 7?
- Conclusion
General Fixes
The common solutions in any OS are the following –
Fix #1
First make sure you have the following websites white-listed in your Firewall.
- https://*.windowsupdate.microsoft.com
- http://download.windowsupdate.com
- http://*.windowsupdate.microsoft.com
Fix #2
For erroneous character in proxy override settings, you can do the following.
Select the LAN settings option in the “Internet Options” of Control Panel. If “Proxy Server” is enabled, then select the “Advanced” button. Delete everything in the “Exceptions” text box. Now press Win + R and in the Run window, type “proxycfg -d” and press ENTER.
- Type the command “net stop wuauserv” and press ENTER.
- Finally, type “net start wuauserv” and press ENTER.
You have cleared the proxy cache. Now try the Windows Update or Windows 10 download again. You should see success.
Fix #3
If VPN is the source of error, just disable and directly connect to the Internet. Now download Windows 10. After the update is successful, then enable your VPN again.
Fix #4
If you are behind an ISA server, you should configure the Firewall settings. Select the Firewall Client for your third-party software. Select the configure option. Now check the box that says “automatically detect firewall server”. Click on “Update Now” button. Restart your Windows 10 update or other updates.
Fix #5
First do a complete scan and cleaning of your computer using an antivirus like Kaspersky, ESET NOD32, Panda, Avast, AVG etc. You can also use Malwarebytes Anti-Malware to remove the adware.
Fix #6
Since this is an update error, you can download the update troubleshooter fix from Microsoft.
https://support.microsoft.com/en-in/instantanswers/512a5183-ffab-40c5-8a68-021e32467565/windows-update-troubleshooter
You need to download the fix file from the above link and run it as an “Adminstrator”. Accept the license and then on the next screen click on “Detect problems and apply the fixes (Recommended).”
Let the troubleshooter program complete its execution. Then restart the PC. See if this resolves the Error Code 8024402c in your Windows 7 or 8.1 or 10 computer.
Fix #7
You need to configure your proxy settings properly. Open command prompt with elevated privileges.
- Type the command “netsh winhttp import proxy source=ie” in the prompt before hitting Enter.
- Disable proxy in Network Settings unless you receive a message indicating that there is no proxy server.
Fix #8
You can also reset and re-register the Windows Update components. You can do this by following these tutorials.
- http://www.sevenforums.com/tutorials/91738-windows-update-reset.html
- https://support.microsoft.com/en-us/kb/971058
You generally keep the “Automatic Updates” on in your system. This will automatically download the updates whenever there are new updates. This is most likely to happen on every Tuesday. Sometimes, you may face this dreaded Error Code 8024402c.
There is a quick fix for it using registry settings.
First run “regedit” in the Run box (Win + R). This will open the Registry Editor. Then go to HKEY_LOCAL_MACHINE\Software\Policies\Microsoft\Windows\WindowsUpdate\AU and update the value of UseWUServer from 1 to 0.
In the second step, open “Services” and restart the Windows Update service.
This usually resolves the problem of the current error code. But it also can fix Error Code 80072EE2.
How to Fix Error Code 8024402c in Windows Server 2008?
Source: https://theorypc.ca/2013/05/
You may get this issue while applying Windows Update. The source of this error cannot be easy to diagnose. The updates can be Office updates or any other Microsoft program. Even if you check the Event Viewer – software feature of Windows and look at the BITS-client logs, it is not easy to fix it.
So you need to enable analytics and debug logs. The results are produced in a WinHTTP log file. You need to re-execute the Windows Update and check the log, to find the reason for this error – 8024402c.
The common reason would be the Update going to the wrong server – like wswsus02.YYYY.ab.ca. For example, you might have used this server earlier and later updated with a new IP. So in order that Windows Update picks the right server, you need to apply the following commands.
esentutl /p %windir%securitydatabasesecedit.sdb /o
Gpupdate /force
After this trick is applied, your Windows Update service will use the Microsoft servers instead of the WSUS server. Then reboot the server. You could also run the net stop and net start commands.
Then Windows Update will download the required updates with success.
How to Iron Out Error Code 8024402c in Windows 10?
You may have faced this error, when you try to download the Windows 10 update. It may show up a progress of 50 or 80% and then show this 8024402c error. Otherwise, you may fail in installing updates with this error.
The common reason for Error Code 8024402c is prevention of Windows Updates Services (SVCHOST) accessing the internet properly. Some of the programs that can do this are – firewalls, web accelerators, internet security, antivirus programs, anti-spyware software, proxy servers etc. Generally, Windows 10 is available as an update. So, first check if your firewall or Antivirus software is blocking access. Try to disable your default firewall or anti-spyware or anti-virus for the time-being.
You can do this in Windows 10 as follows.
Control Panel > Windows Firewall Turn Windows Firewall on or off and then select Turn off Windows Firewall:
Then try to run the Windows 10 update again. This time Windows Update will try to connect to Microsoft server. The download of Windows 10 will resume normally again, once this is done.
[alert]
Note: Be careful once you disable firewall and anti-virus or internet security. Generally, this is not recommended, but only when you have compatibility problems, this is required. So it is better you restrict your PC and Internet activities, during this weak period of disabled services.
[/alert]
Turn your security software or Windows firewall, once the Windows 10 Update process is complete.
You can also stop and restart your Windows Update service. This can be done in the following way.
Just open your command prompt with administrator privileges and type the net stop wuauserv command to stop the Windows update service and then net start wuauserv to restart the latter. You can also do using the Services program.
Press Win + R keys and type “services.msc” in the dialog box. There you will find a service called “Windows Update”. You can restart it. Otherwise, you can stop it and start again.
How to Work Out Error Code 8024402c in Windows 8.1?
You can try the above steps first to resolve the error.
But @Shivam15 on Tomshardware found a clean solution for this problem.
You just have to use Google DNS servers 8.8.8.8 and 8.8.4.4 to fix Error Code 8024402c in Windows 8.1. You just have to update the above server list in your ISP settings.
How to do this in Windows 8.1?
You can follow these steps.
- Move the mouse to the bottom right-hand corner. In the Charms bar, go to Settings > Control Panel. You can also press the Win key and type “Control Panel”. It will appear in the Search.
- From it, you can navigate to Network and Internet > Network and Sharing Center > Change adapter settings. You can also right-click the Wi-Fi or Ethernet icon at the bottom right-hand corner and select “Open Network and Sharing Center” and then select the same.
- You can select the Network Adapter. For example, it can be Wi-Fi adapter or Ethernet Adapter.
- To change the settings for an Ethernet connection, right-click Local Area Connection >Properties.
- To change the settings for a wireless connection, right-click Wireless Network Connection> Properties.
- If you are asked for administrator credentials, you need to provide them.
- Choose the “Networking” tab if it’s not selected by default.
- Under This connection uses the following items, select Internet Protocol Version 4 (TCP/IPv4) or Internet Protocol Version 6 (TCP/IPv6) and then click Properties.
- A pop-up window will open. Click Advanced and select the DNS tab. If there are any DNS server IP addresses listed there, note them for further use.
- Now give the IP addresses of the Google DNS servers:
- For IPv4: 8.8.8.8 and/or 8.8.4.4.
- For IPv6: 2001:4860:4860::8888 and/or 2001:4860:4860::8844.
- For IPv6-only: you can use Google Public DNS64 instead of the IPv6 addresses in the previous point.
- Disconnect from Internet and restart again.
- Test whether error code 8024402c is gone and updates are working fine.
How to Figure Out Fix for Error Code 8024402c in Windows 7?
A user on sevenforums @ countkenshin had a similar problem. He tried different solutions like disabling the Windows firewall and Anti-virus. He also uninstalled all the security and windows updates, hoping that Windows will automatically fix it. But there was no success.
Then he did this to fix the problem.
- Type “services.msc” in the Run window (Win + R) and find the Windows Update service. Stop it.
- Go to C:\Windows\ and find the SoftwareDistribution folder. Rename to something like SoftwareDistribution.old
- Restart the Windows Update service.
- Click the “Check for Updates” button on the Windows Update screen.
- Windows will perform the check – it may take some time, so leave it running. Eventually it will successfully complete.
- Once the updates are downloaded, you can delete the SoftwareSistribution.old folder.
Conclusion
Generally the Error Code 8024402c resolves itself when you stop and restart the Windows Update service. If not, you can try any of the solutions mentioned above. Sometimes, just cleaning the junk in your system, can also fix the problem. For this you can do a registry clean using CCleaner and fix any errors that is causing the malfunction of your updates.
You can also try the Microsoft update troubleshooter to fix this error code. You can also reset the Windows Update components as provided by Redmond itself. Other solutions are tailored for specific cases.
If you still not able to solve the problem, please leave a comment in the section below. I’ll try to find a solution, using my expertise.
Palla Sridhar is the writer and admin for WindowsTechIt.com. His primary focus is to write comprehensive how-tos and solutions guides for Windows 11, 10, Skype, Outlook, HDMI, Redmi, Facebook, Google, Tech Apps and LinkedIn.










![[Solved] How to Fix Error Code 8024402c in Windows 10 or 8.1 or 7 or Server 2012 or 2008? 1 windows update error 8024402c cause](https://www.windowstechit.com/wp-content/uploads/2016/10/windows_update_error_8024402c_cause-600x449.jpg)
![[Solved] How to Fix Error Code 8024402c in Windows 10 or 8.1 or 7 or Server 2012 or 2008? 2 windows 10 update database error detected](https://www.windowstechit.com/wp-content/uploads/2016/10/windows_10_update_database_error_detected-600x337.jpg)
![[Solved] How to Fix Error Code 8024402c in Windows 10 or 8.1 or 7 or Server 2012 or 2008? 3 error-code-8024402c-windows-7](https://www.windowstechit.com/wp-content/uploads/2016/10/error-code-8024402c-windows-7.jpg)
![[Solved] How to Fix Error Code 8024402c in Windows 10 or 8.1 or 7 or Server 2012 or 2008? 4 lan-settings-connections-internet-options-control-panel](https://www.windowstechit.com/wp-content/uploads/2016/10/lan-settings-connections-internet-options-control-panel.png)
![[Solved] How to Fix Error Code 8024402c in Windows 10 or 8.1 or 7 or Server 2012 or 2008? 5 reset-windows-update-components-fix-error-code-8024402c](https://www.windowstechit.com/wp-content/uploads/2016/10/reset-windows-update-components-fix-error-code-8024402c-1030x602.png)
![[Solved] How to Fix Error Code 8024402c in Windows 10 or 8.1 or 7 or Server 2012 or 2008? 6 windows-registry-entry-error-code-8024402c](https://www.windowstechit.com/wp-content/uploads/2016/10/windows-registry-entry-error-code-8024402c.png)
![[Solved] How to Fix Error Code 8024402c in Windows 10 or 8.1 or 7 or Server 2012 or 2008? 7 ipv4-ipv6-network-properties-error-code-8024402c-solution](https://www.windowstechit.com/wp-content/uploads/2016/10/ipv4-ipv6-network-properties-error-code-8024402c-solution.png)
![[Solved] How to Fix Error Code 8024402c in Windows 10 or 8.1 or 7 or Server 2012 or 2008? 8 set-google-dns-servers-error-code-8024402c-fix](https://www.windowstechit.com/wp-content/uploads/2016/10/set-google-dns-servers-error-code-8024402c-fix.png)