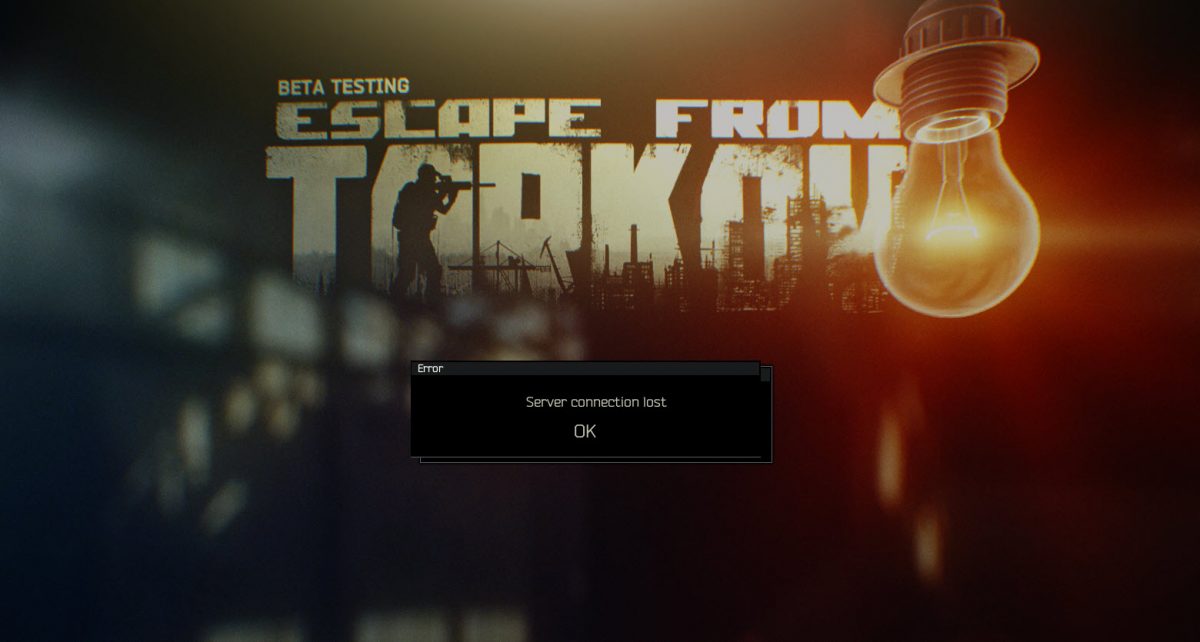
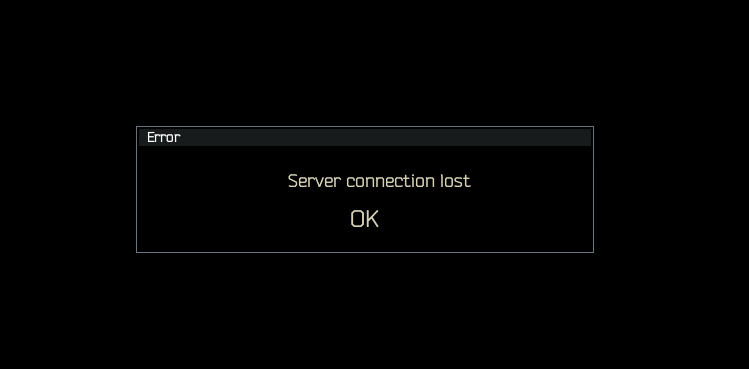
The server is down in Escape from Tarkov? Many gamers are reporting that they get kicked out with a ‘Server connection lost‘ error. This is so typical.
Generally speaking, there’s little to do on your side but just wait for Battlesate to fix their own problems. However, chances are that there are no actual server issues (check the server status). Below are quick fixes to try if you want to play it as soon as possible.
Try these fixes
- Pick a server with the best ping before playing
- Restart your router
- Use a VPN
- Disable IPv6
- Update your network drivers
- Switch to a static IP
- Change from DS-Lite to Dual-Stack
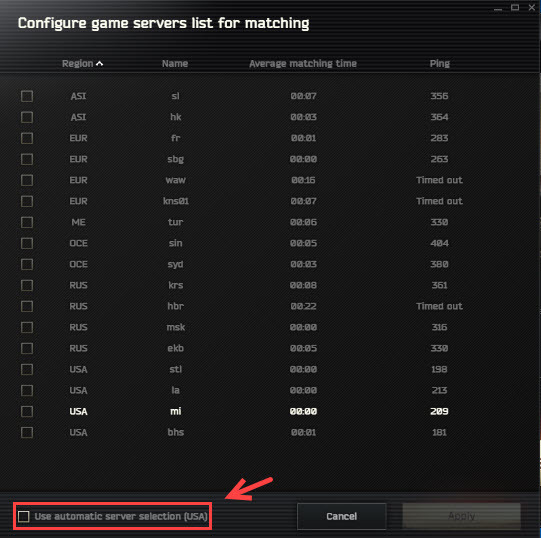
Fix 1. Pick a server with the best ping before playing
Many gamers find it helps when they choose the best server. You should uncheck automatic server selection and choose the server with the lowest ping.
Does the ‘Server Connection Lost’ error in Tarkov persist? If the manual server selection doesn’t do the trick, you can try the next fix below.
Fix 2. Restart your router
It may simply be caused by your internet connection, especially when others are not having this issue.
1) Unplug both your modem and router,
2) Leave them for at least 30 seconds.
3) Plug your modem, then your router back into the power source.
4) Test the server issues in Escape of Tarkov.
Fix 3. Use a VPN
A VPN can help establish better connections in Escape from Tarkov. Many players find it can really reduce crashes to some extent. Otherwise, they get kicked out all the time.
You can choose a reliable free VPN or a paid VPN such as Nord VPN (a 70% off coupon is available now), which comes with 24/7 customer support and a 30-day free trial.
The difference between a free VPN and a paid one is the ping. Tarkov’s servers are extremely sensitive to any latency or ping fluctuation. So be sure to choose the VPN with the lowest ping.
Fix 4. Disable IPv6
Many players fix this issue by disabling IPv6. It’s not a guaranteed fix, but still, it’s worth a shot. Here’s how:
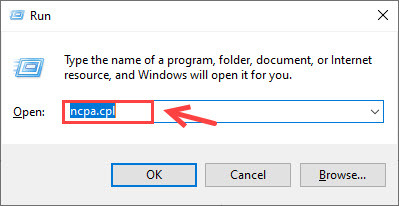
1) On your keyboard, press the Windows key + R key at the same time.
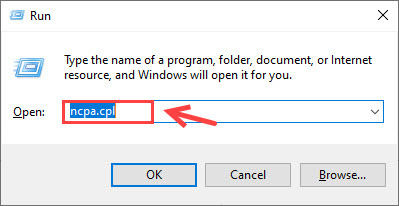
2) Enter ncpa.cpl in the Run box.
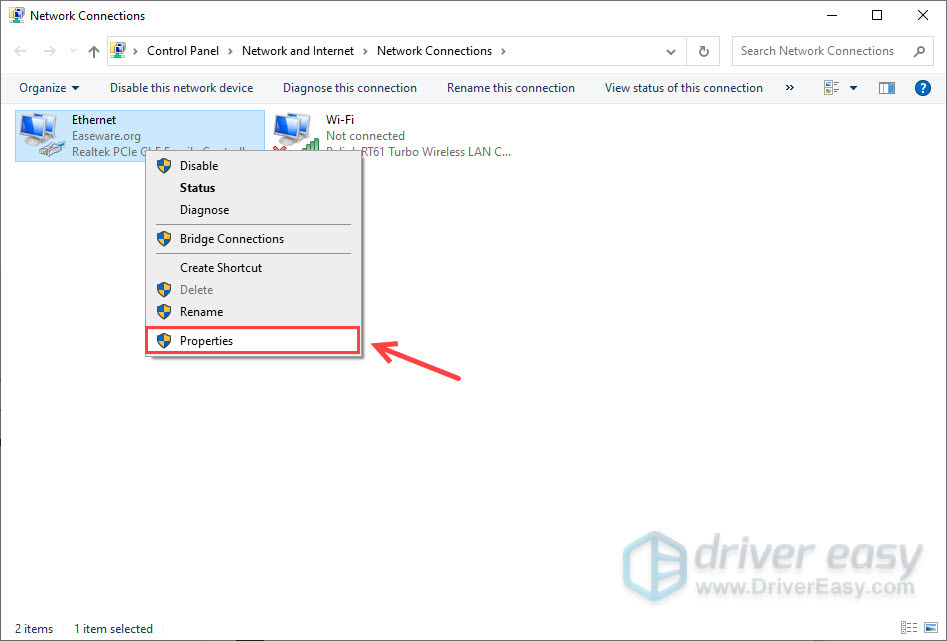
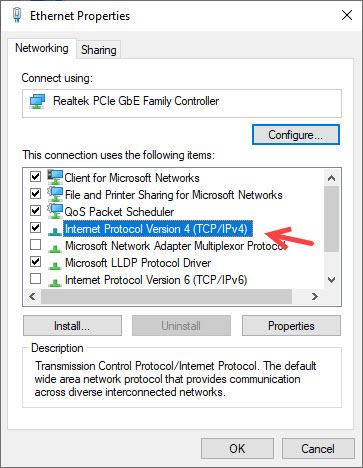
3) Right-click your active network adapter (Ethernet or Wi-Fi) and select Properties.
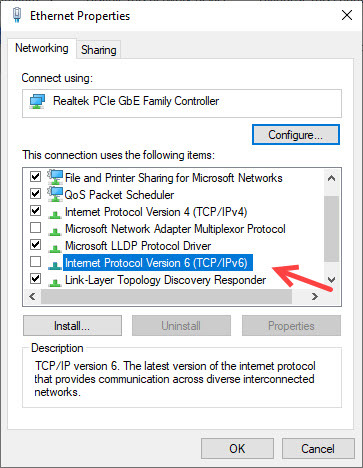
4) Scroll down and uncheck Internet Protocol Version 6 (TCP/IPv6).
5) Click OK to save the changes.
You may need to restart your computer for the setting to take effect.
Fix 5. Update your network drivers
If the network adapter driver you’re using is faulty or outdated, you will possibly encounter this ‘Server Connection Lost’ error in Escape from Tarkov. To fix the potential problems and enjoy ensure less lagging, you should install the latest network driver on your computer.
Manually – To update your network adapter driver to the latest version, you’ll need to visit the manufacturer’s website, download the exact driver, and then install it manually.
Automatically – If you don’t have the time, patience or computer skills to update your drivers manually, you can, instead, do it automatically with Driver Easy. Driver Easy will automatically recognize your system and find the correct drivers for your network adapter, and it will download and install them correctly:
1) Download and install Driver Easy.
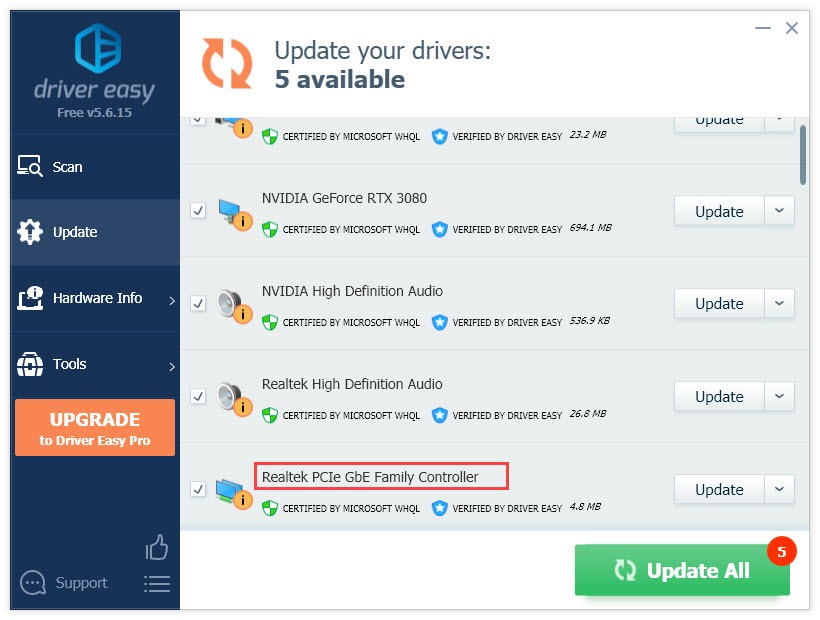
2) Run Driver Easy and click the Scan Now button. Driver Easy will then scan your computer and detect any problem drivers.
3) Click the Update button next to the flagged network adapter driver to automatically download the correct version of that driver, then you can manually install it (you can do this with the FREE version).
Or click Update All to automatically download and install the correct version of all the drivers that are missing or out of date on your system. (This requires the Pro version which comes with full support and a 30-day money back guarantee. You’ll be prompted to upgrade when you click Update All.)
4) Once the driver is updated, reboot your PC for the changes to take effect.
The Pro version of Driver Easy comes with full technical support.
If you need assistance, please contact Driver Easy’s support team at support@drivereasy.com.
Fix 6. Switch to a static IP
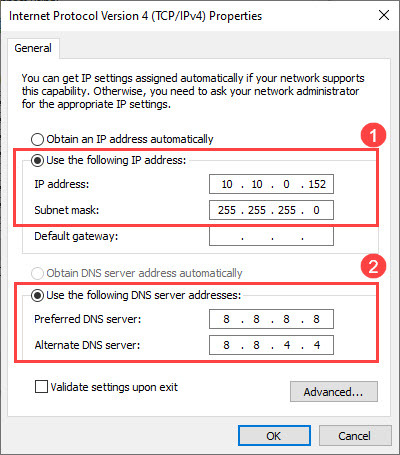
Instead of letting your router assign whatever IP address is free at any given time, you can assign specific IP addresses to the devices you access frequently. And this turns out to be a temporary fix for ‘Server Connection Lost‘ for a few Escape from Tarkov players. Here’s how to do it:
1) On your keyboard, press the Win + R at the same time and enter ncpa.cpl.
2) Right-click your active connection, and select Status.
3) Click Details.
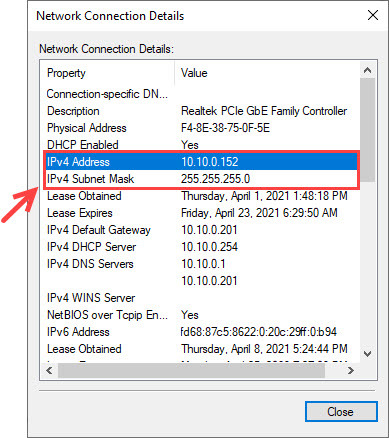
4) Note down the IPv4 Address and IPv4 Subnet Mask. You can write it down or take a screenshot because you will need this later on.
5) Now go back to the Network Connection window, right-click your active connection, and select Properties.
6) Double click the Internet Protocal Version 4 (TCP/IPv4).
7) Select the Use the following IP address option, and then type in the IP address, subnet mask you acquired earlier. Next, type in your preferred and alternate DNS server addresses.

9) You can verify your new settings by using the ipconfig command at the command prompt.
Try launching your game and test the issue. But if unfortunately, the Tarkov Server connection lost error persists, you can try the following fix.
Fix 7. Change from DS-Lite to Dual-Stack
If none of these methods above fix your issue, you can ask your Internet service provider to change from DS Lite to Dual Stack. This has been proved helpful to many players, though it has varying success.
Dual-Stack allows a device to run IPv4 and IPv6 in parallel, while DS-Lit (Dual-Stack Lite) is a technology that enables Internet service providers to move to an IPv6 network while simultaneously handling IPv4 address depletion.
Did the fixes above fix your issue? Feel free to drop us a line if you have any questions or suggestions.
Escape from Tarkov uses Battleye anti-cheat, which protects the game starting from the moment of its launch. The anti-cheat is launched before the start of the game and prevents the game from starting if it detects certain characteristics of prohibited software usage: changes in the game or critical system files, running virtual machines, etc. The anti-cheat works simultaneously during the game by detecting third-party programs running on the player’s PC that are interfering with the game.
In case of detection of any problems during its work the anti-cheat can show informational messages. The most common messages and recommendations for fixing the problem are described below.
Anti-Cheat message: «Failed to initialize BattlEye Service: Driver Load Error (numeric code)»
The numeric code in the message can vary.
An anti-cheat initialization error has occurred due to damaged game files, outdated version of the anti-cheat files or due to blocking the start of the anti-cheat by third-party software.
To solve this problem:
1. Set all available permissions for the current user for the folders with the game and the launcher (folder properties, tab «Security»).
2. Temporarily turn off all antivirus and security software such as Windows Defender, or add the launcher and the game to the white list (exclusion list) of these programs.
3. Manually update the anti-cheat:
— From the folder with the game, run uninstall anti-cheat \BattlEye\Uninstall_BattlEye
The path and name of the game folder may be different from that shown in the example.
— Find the folder «C:\Program Files (x86)\Common Files\BattlEye» and delete it along with the files.
— To install the anti-cheat from the game folder, run the file \BattlEye\Install_BattlEye
The path and name of the game folder may be different from that shown in the example.
4. This problem may be caused by a third-party application interfering with the anti-cheat. Try to run your OS in «clean» mode, following this instruction from Microsoft
5. Check the integrity of the system files. To do this, open the command line cmd on your PC as administrator: click Start, type cmd and select Run as administrator.
In the window that opens, run the command:
sfc /scannow
Wait for this program to finish and for errors, if any, to be corrected.
Description of the sfc utility on the Microsoft website
Anti-Cheat message: “Note: File blocks can be ignored if they don’t cause problems with the game.”
When running the game, the files specified in the message were blocked from being downloaded. Files that have vulnerabilities and are used to bypass game protection are blocked — even the names of OS system files or files of the game itself may be specified, if they have been changed or modified. In the example in the screenshot you can see that the file opengl32.dll is blocked from loading, while the game does not use it — a clear sign of third-party software interference.
If you are not experiencing problems in the game, you can ignore this message. But if you are having trouble starting the game, update, disable or remove the software whose files are triggering the anti-cheat.
If the message indicates system OS files, check their integrity. To do this, open the cmd command line on your PC as the administrator: click the Start button, type cmd and select Run as administrator.
In the window that will open, run the command:
sfc /scannow
Wait until this program finishes and corrects errors, if any.
Description of the sfc tool on the Microsoft website
Anti-Cheat message: “Windows Kernel modification detected. Please repair or reinstall your system.”
Modification of OS kernel files was detected.
Perform integrity check of the system files. To do this, open the cmd command line on your PC as administrator: click the Start button, type cmd and select Run as administrator.
In the window that will open, run the command: sfc /scannow
Wait until this program finishes and corrects errors, if any.
Description of the sfc tool on the Microsoft website
Anti-Cheat message: “Failed to initialize BattlEye Service: Windows Test-Signing Mode not supported.”
The use of Windows test mode is not supported and you will need to disable it. To do this, open a cmd command line on your PC as an administrator and run the command there:
bcdedit -set TESTSIGNING OFF
Then reboot your PC.
Anti-Cheat message: “Failed to initialize BattlEye Service: Kernel Debugging enabled.”
Your PC has the OS kernel debug mode enabled. To start the game you need to disable debug mode. Open the command line cmd in your PC as an administrator and run the command there:
bcdedit /DEBUG OFF
Then reboot your PC.
This article on the Microsoft website
In game
Anti-Cheat message: Anticheat connection failed
If you lose connection to the anticheat servers during the game, you may receive a message about disconnection from the game.
Check your network connection and restart the game. Try restarting your PC.
If these recommendations did not help, please contact technical support by creating a ticket through the game launcher.
Was this article helpful?
Escape from Tarkov – многопользовательский шутер от первого лица, очень популярный во всем мире. В нее играют многие любящие действия геймеры, но были определенные ошибки, такие как потеря соединения с сервером в Таркове, что вызвало много разочарований. Проблемы с сервером могут возникнуть в основном, если сервер не работает со стороны разработчика игры, и вы ничего не можете с этим поделать. Однако было замечено, что эту ошибку можно исправить, выполнив определенные действия по устранению неполадок на вашем компьютере. Это руководство представляет собой сборник лучших шагов по устранению ошибки Escape From Tarkov Server Connection Lost в Windows 10.
Другой метод решения проблемы потери соединения с сервером Tarkov
Есть несколько шагов, которые были рекомендованы многими игровыми экспертами на форумах по устранению неполадок, которые могут помочь решить проблему потери соединения с сервером в Таркове.
Метод 1: перезагрузите модем / маршрутизатор
Первый способ попробовать в случае проблем с интернетом – перезапустить модем / маршрутизатор. Нет веского объяснения, почему этот метод работает большую часть времени, но он действительно решает проблему. Вот что вам нужно сделать:
Шаг 1. Выключите все модемы и маршрутизаторы, которые вы установили, и отсоедините кабели.
Шаг 2: Подождите 60 секунд и снова подсоедините кабели.
Шаг 3. Включите питание ваших устройств и снова подключите компьютер к Интернету.
Шаг 4: Попробуйте запустить игру и проверьте, сохраняется ли проблема потери соединения с сервером Tarkov.
Метод 2: изменить игровой сервер
Есть много серверов Escape from Tarkov, к которым пользователи могут подключиться. Если вы столкнулись с ошибкой потери соединения с сервером в Таркове при выборе одного конкретного сервера, вы можете отключить его и выбрать другой. Также не забудьте отключить опцию автоматического выбора сервера при запуске игры и выбрать сервер с наименьшим пингом.
Измените пару серверов, чтобы проверить, была ли устранена ошибка потери соединения с сервером Escape From Tarkov, прежде чем переходить к следующему шагу.
Метод 3: выберите VPN
Еще один шаг, который вы можете предпринять, чтобы исправить потерянное соединение с сервером в Таркове, – это использовать виртуальную частную сеть, более известную как VPN. Эти приложения маскируют ваш IP-адрес и все запросы, отправленные и полученные на вашем компьютере. VPN позволяет вам выбрать сервер страны, и это будет полезно, поскольку любой запрос, который вы отправляете со своего ПК в Интернете, будет отображаться как запрос, отправленный из выбранной страны VPN. Это может помочь исправить многие проблемы с подключением, включая потерю соединения с сервером Tarkov.
Сегодня в мире программного обеспечения доступно множество VPN, но мы настоятельно рекомендуем использовать Systweak VPN, программное обеспечение, которое мы использовали довольно давно. Systweak VPN скрывает ваш IP-адрес и все ваши действия в Интернете, что делает невозможным отслеживание вас кем-либо. У него также есть тысячи серверов на выбор, что означает, что вы можете замаскироваться из любой страны и подключиться к игровому серверу соответствующей страны. Это основной шаг по устранению неполадок, позволяющий устранить ошибку потери соединения с сервером Escape from Tarkov на вашем компьютере.
Метод 4: отключите IPv6
Двигаясь дальше, у нас есть еще один метод устранения неполадок, который, судя по игровым форумам, сработал для многих, а именно отключение IPv6 на вашем ПК. Вот шаги для выполнения этого метода:
Шаг 1. Нажмите Windows + R на клавиатуре, чтобы вызвать окно ВЫПОЛНИТЬ.
Шаг 2: Введите ncpa.cpl в текстовое поле и нажмите клавишу Enter.
Шаг 3. В новом окне найдите сетевой адаптер, щелкните его правой кнопкой мыши и выберите «Свойства» в контекстном меню.
Шаг 4: Снова откроется новое окно, в котором вам нужно прокрутить вниз и снять отметку с поля, обозначенного как Internet Protocol Version 6 (TCP / IPv6).
Шаг 5: Нажмите ОК, закройте все открытые окна и перезагрузите компьютер.
Запустите игру и проверьте, решена ли проблема потери соединения с сервером Escape from Tarkov.
Метод 5: обновить драйверы
Окончательным решением проблемы потери соединения с сервером Tarkov является обновление драйверов вашего ПК и, в данном случае, сетевых драйверов. Эти программы помогают поддерживать связь между оборудованием и программным обеспечением, обеспечивая постоянную оптимальную производительность ПК. Для обновления драйверов вам потребуется приложение для обновления драйверов, и мы рекомендуем использовать для этой цели Smart Driver Care. Вот шаги:
Шаг 1. Загрузите Smart Driver Care на свой компьютер, используя следующую ссылку, приведенную ниже.
Шаг 2. Установите программное обеспечение, следуя инструкциям на экране и получив положительный ответ.
Шаг 3: Нажмите кнопку «Сканировать сейчас» в разделе «Драйверы сканирования», чтобы начать процесс сканирования.
Шаг 4. Список устаревших драйверов появится в интерфейсе приложения, в котором будут выделены все проблемы с драйверами в вашей системе.
Шаг 5. Найдите сетевой драйвер в списке ошибок драйвера и щелкните ссылку «Обновить драйвер» рядом с ним.
Шаг 6: Подождите некоторое время, и после завершения процесса обновления перезагрузите компьютер, чтобы внесенные изменения вступили в силу.
Запустите игру и проверьте, разрешена ли потеря соединения с сервером в Таркове.
Последнее слово о том, как исправить потерю соединения с сервером при побеге из Таркова в Windows 10?
Проблема потери соединения с сервером Escape from Tarkov не позволяет игрокам начинать игру и выполнять миссии. Если проблема с сервером исходит от разработчика игры, вы ничего не можете с этим поделать. Но если ваши друзья могут играть, и вы столкнулись с проблемами, то это ошибка вашего компьютера, и ее можно исправить, следуя методам, описанным выше.
Ошибка потери соединения с сервером Tarkov появляется у пользователей Windows, пытающихся играть в игру. Он появляется сразу после присоединения к игре Escape from Tarkov, иногда сразу после присоединения к лобби.
В большинстве случаев эта ошибка вызвана тем, что серверы находятся на обслуживании или отключены по разным причинам. Ваше подключение к Интернету и маршрутизатор также являются потенциальными виновниками, и вам следует проверить, возникает ли проблема постоянно. В зависимости от настроек вашей игры, настройки текстуры также могут вызвать сбой игры в некоторых сборках.
Вот список всех методов, которые помогут вам исправить ошибку соединения с сервером Таркова:
1. Проверьте состояние сервера
Ошибка Escape from Tarkov может возникнуть из-за того, что серверы не работают из-за основной проблемы с сервером.
Начни с официалов страница электронного платежа, который сообщает вам, как работает сервер. Вы увидите состояние сервера за последние 24 часа и состояние всех служб на этот момент.
В правой части экрана вы увидите последнее сообщение от разработчиков за последние семь дней. Посмотрите, не было ли что-нибудь сказано, и следуйте инструкциям, если они есть.
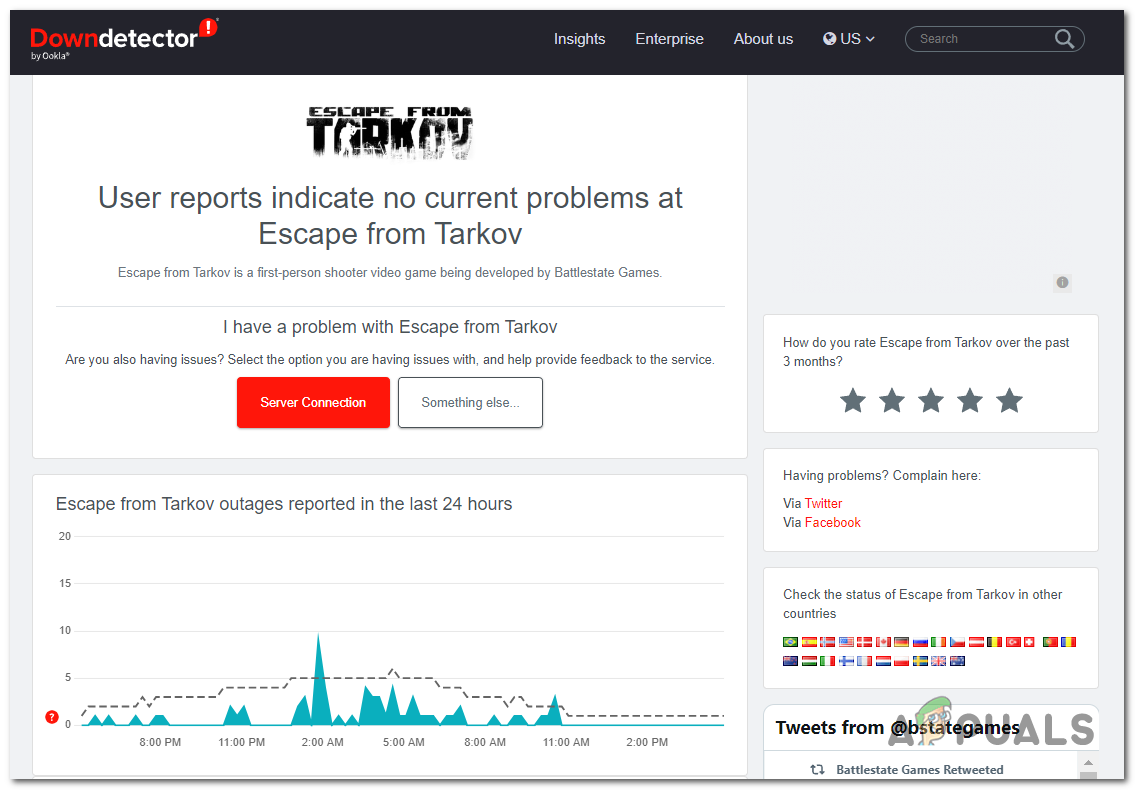
Если вы хотите узнать больше, вы также можете посетить такие сайты, как Даундетектор чтобы увидеть, сообщали ли люди о проблемах с игрой за последние 24 часа. Вы также можете отправить отчет о проблеме, если хотите.
Вы также можете посетить официальная страница Twitter Battlestate Games чтобы узнать, опубликовали ли разработчики что-нибудь о текущих проблемах с сервером. Прочитайте комментарии, чтобы узнать, что другие люди говорят об этом.
Если вы видите, что на сервере прямо сейчас есть проблемы, вам остается только ждать, пока разработчики это исправят. Но если серверы работают правильно, но вы все еще сталкиваетесь с этой проблемой, продолжайте устранение неполадок.
2. Отключите от сетевых дисков, которые вы не используете
Отключение всех сетевых драйверов, которые вы не используете, также может решить эту проблему. Если этот компьютер является частью общей сети, текущий обмен потоковыми данными с другими компьютерами или серверами может повлиять на сватовство в сети в Escape from Tarkov.
К счастью, подключения к сетевому диску можно найти с помощью проводника в разделе «Этот компьютер». Ошибка может возникнуть из-за того, что эти драйверы не позволяют сетевому соединению работать должным образом.
Вот руководство, которое покажет вам, как отключиться от этих сетевых драйверов:
- Используйте панель задач Windows, чтобы найти проводник и открыть его.
- Теперь посмотрите на левую часть экрана, и в разделе «Этот компьютер» вам нужно найти раздел «Сеть».
- Когда вы увидите его, щелкните его правой кнопкой мыши, и вы увидите все свои сетевые диски, выберите их и нажмите «ОК», чтобы отключить его.
Примечание. Если вы подключены к нескольким сетевым дискам, завершайте каждое подключение.
- Затем запустите игру, чтобы увидеть, была ли устранена ошибка потери соединения с сервером Tarkov.
3. Используйте VPN
Следующая ошибка может произойти из-за того, что ваше сетевое соединение не может подключиться к серверу из-за отказа в соединении, вызванного интернет-провайдером или неверным диапазоном IP-адресов. Если за это отвечает ваше соединение, вы можете решить эту проблему, запустив игру через VPN.
Что вам нужно сделать, так это включить VPN прямо перед запуском игры. Это позволит подключиться к другому IP-адресу из другого места и, возможно, этого будет достаточно, чтобы исправить ошибку.
Попробуйте установить VPN-клиент и посмотрите, позволит ли он подключиться к серверам Escape from Tarkov.
Примечание. Поскольку вы не знаете, сработает ли это исправление, вам следует сначала попробовать бесплатный VPN-клиент.
Вот несколько VPN-сервисов с бесплатными планами или пробными версиями:
Если вы пробовали играть в игру через VPN, и это не имело никакого значения, не забудьте отменить бесплатную пробную версию.
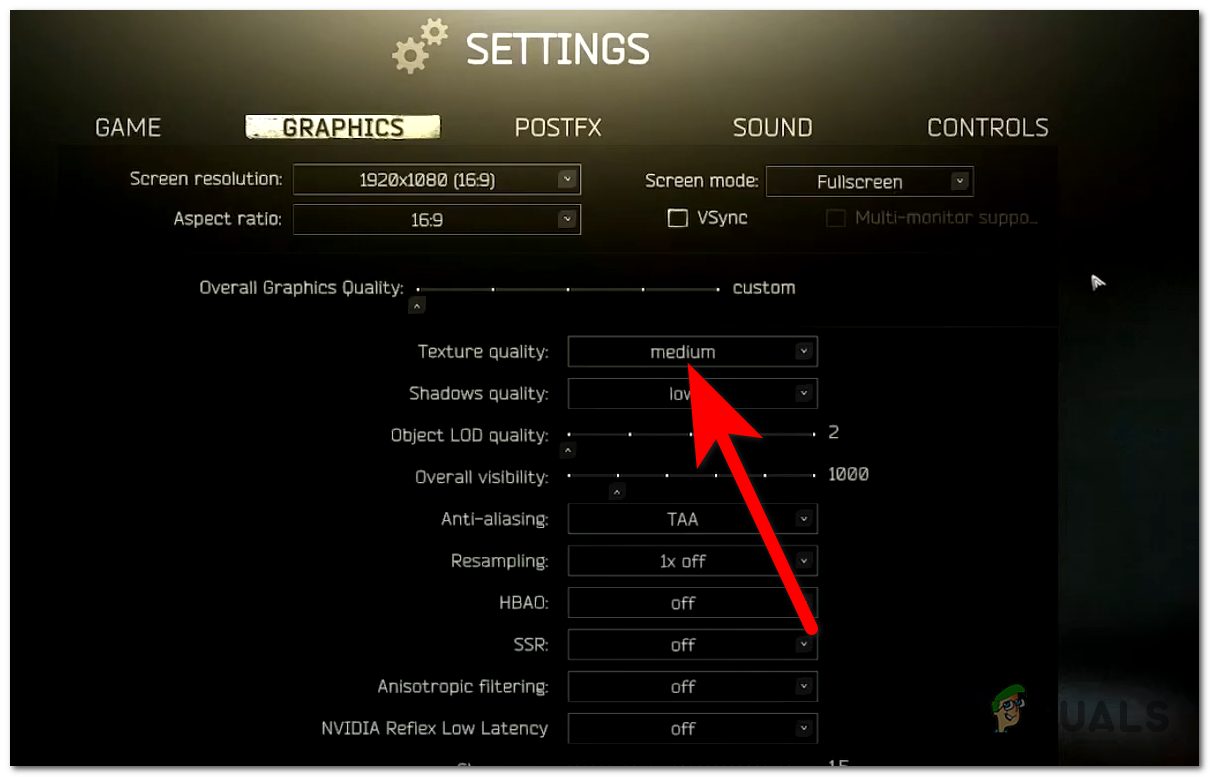
4. Установите текстуры на средний уровень и включите Auto Ram Cleaner.
Еще одна вещь, которую вы можете сделать, чтобы попытаться исправить ошибку «Потеря соединения с сервером Tarkov», — изменить качество текстуры на «Среднее» и включить автоматическую очистку ОЗУ. Это можно сделать в настройках игры.
Многие пользователи подтверждают, что эта ошибка работает с текстурами, установленными на High или Ultra.
Примечание. Помимо повышения производительности игры, эти изменения также могут решить проблемы с сервером.
Вот шаги, которые необходимо выполнить, чтобы изменить их:
- Откройте игру и перейдите в ее настройки.
- Сначала выберите вкладку «Игра» и нажмите кнопку рядом с «Автоматическая очистка ОЗУ», чтобы включить эту опцию.
- Теперь вам нужно выбрать вкладку «Графика» и качество текстуры. Щелкните раскрывающееся меню и выберите «Средний».
- Затем сохраните изменения и запустите игру, чтобы увидеть, возникает ли ошибка потери соединения с сервером Tarkov.
5. Используйте маршрутизатор, поддерживающий SQM
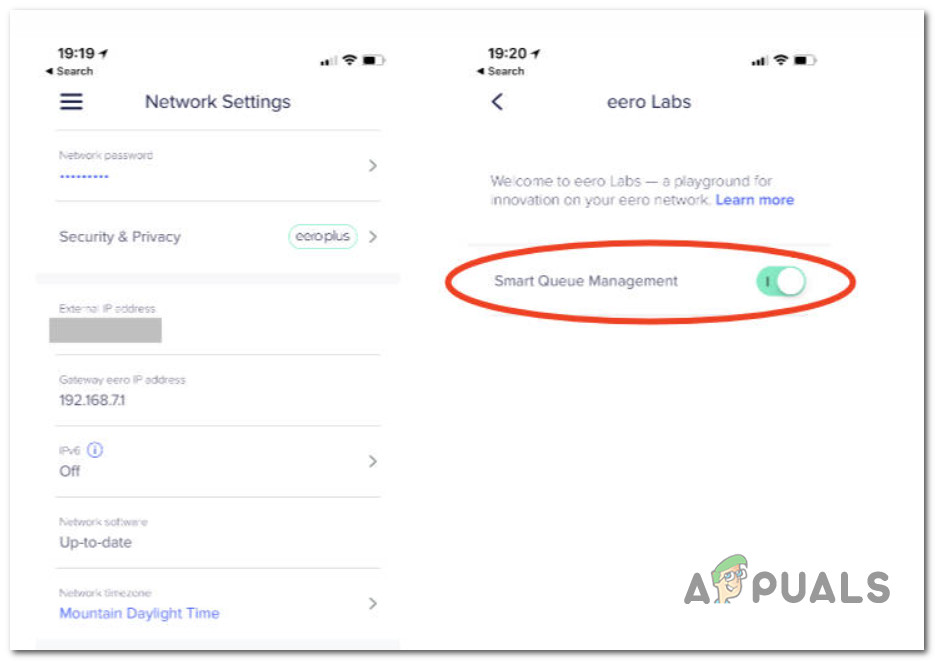
Последнее, что вы можете попробовать, чтобы уменьшить частоту получения этой ошибки, — это использовать маршрутизатор, поддерживающий Smart Queue Management.
Если к сети Wi-Fi, которую вы используете во время игры, подключено много устройств, замена текущего маршрутизатора на совместимый с SQM должна решить проблему.
Примечание. Маршрутизаторы с поддержкой SQM отлично подходят для управления несколькими беспроводными сетями с помощью веб-браузера или программного приложения. Эти устройства помогут вашей сети работать быстрее и стабильнее.
Как только вы перейдете на маршрутизатор с поддержкой SQM, запустите Escape from Tarkov, чтобы проверить, устранена ли проблема с сетью.
The Tarkov server connection lost error appears for Windows users trying to play the game. It appears immediately after joining an Escape from Tarkov game, sometimes immediately after they join a lobby.
In most cases, this error is caused by the servers being under maintenance or down for different reasons. Your internet connection and router are also potential culprits that you should consider checking if the issue is happening consistently. Depending on your game settings, texture settings might also crash the game with certain builds.
Here is a list of all the methods that will help you fix Tarkov’s server connection lost error:
1. Check the server status
The Escape from Tarkov error might occur because the servers are down because of an underlying server problem.
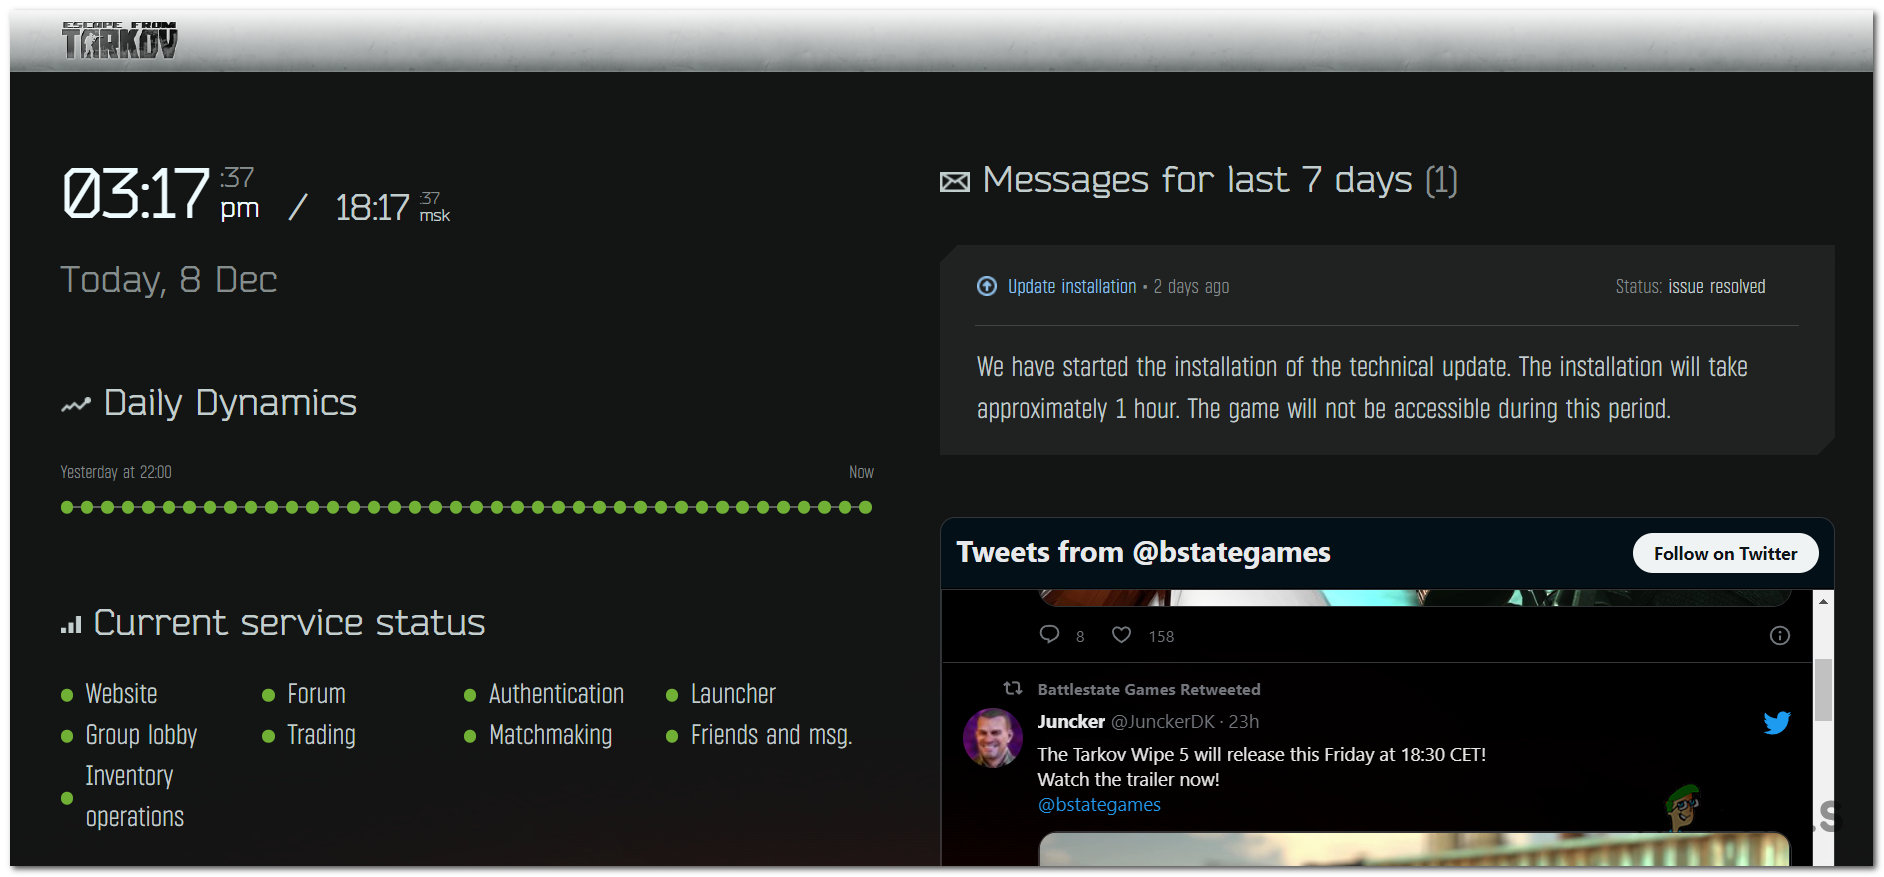
Start by looking at the official EFT page, which tells you how the server is doing. You will see the server’s status from the last 24 hours and the status of all services at that moment.
On the right side of the screen, you will see the last message from the developers in the last seven days. Look to see if anything was said and follow the instruction if there is any.
If you want to know more, you can also visit sites like Downdetector to see if people have reported problems with the game in the last 24 hours. You can also submit a report about the issue if you want to.
You can also visit the official Twitter page of Battlestate Games to see if the developers have posted anything about some ongoing server problems. Read the comments to see what other people have to say about it.
If you can see that the server is having problems right now, you can only wait until the developers fix it. But if the servers are working properly and you still encounter this issue, continue troubleshooting.
2. Disconnect from the Network drives you don’t use
Disconnecting all the Network drivers you don’t use might also fix this issue. If this PC is part of a shared network, current data streaming exchanges with other PCs or severs might actually affect online matchmaking in Escape from Tarkov.
Fortunately, Network drive connections can be found using File Explorer under This PC section. The error might occur due to these drivers not letting the network connection work properly.
Here is a guide that will show you how to disconnect from these Network drivers:
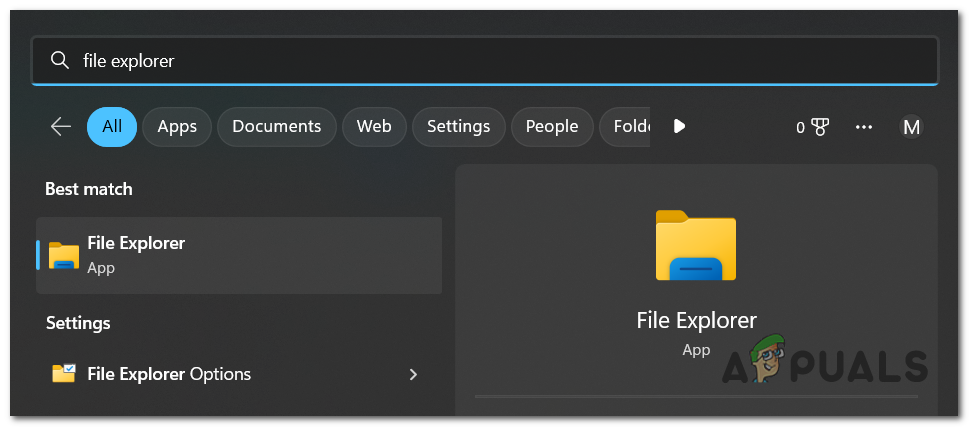
- Use the Windows taskbar to search for File Explorer and open it.
Opening the File Explorer - Now look on the left side of the screen, and under This PC, you need to locate the Network section.
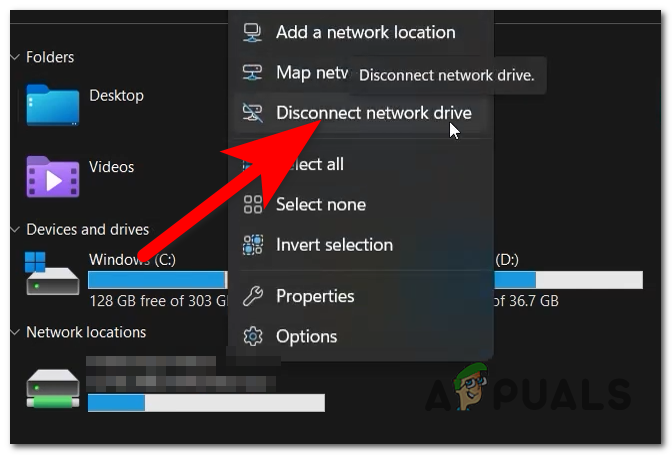
- When you see it, right-click on it, and you will see all your Network Drives, select them and click OK to disconnect it.
Disconnecting from the network drivers Note: If you are connected to multiple network drives, terminate every connection.
- Next, launch the game to see if the Tarkov server connection lost error was fixed.
3. Use a VPN
The following error could happen because your network connection can’t connect to the server due to a denied connection caused by an ISP or a bad IP range. If your connection is responsible for it, you might fix this problem by launching the game using a VPN.
What you need to do is enable a VPN right before you start the game. This will connect to a different IP from a different place and maybe be enough to fix the error.
Try installing a VPN client and see if that allows you to connect to the Escape from Tarkov servers.
Note: Since you don’t know if this fix will work, you should try a free VPN client first.
Here are a few VPN services with free plans or trials:
- Tunnelbear
- ExpressVPN
- NordVPN
- ProtonVPN
If you have tried playing the game through a VPN and it didn’t make any difference, don’t forget to cancel your free trial.
4. Set the textures to Medium and enable Auto Ram Cleaner
Another thing you can do to try and fix the Tarkov Server Connection Lost error is to go to change the Texture Quality to Medium and enable the Automatic RAM Cleaner. You can do this from the Settings of the game.
This is confirmed to work by many users who are experiencing this error with textures set to High or Ultra.
Note: Besides improving the game’s performance, these changes might also fix the server problems.
Here are the steps you need to follow to change them:
- Open the game and go to the Settings of it.
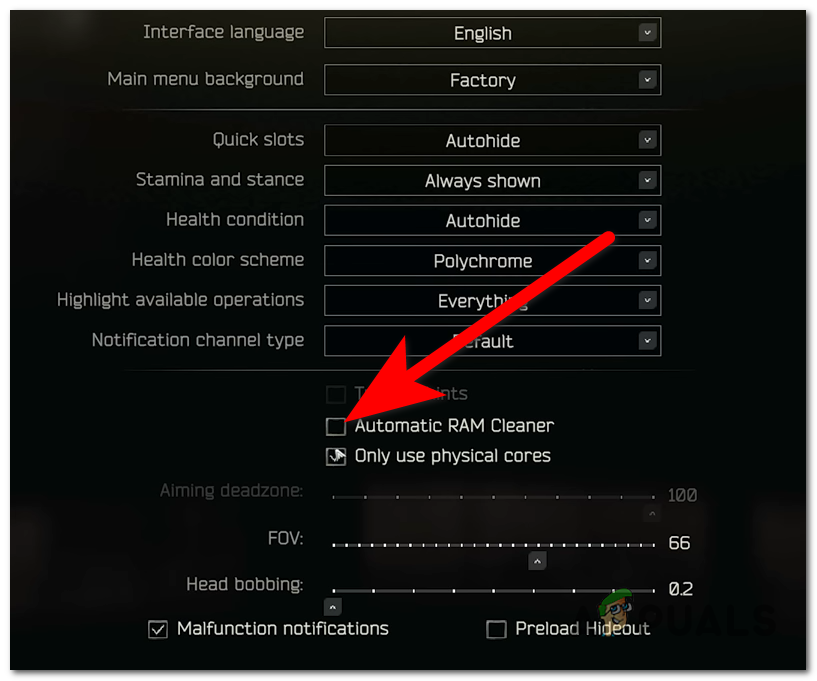
- First, select the Game tab and click on the button next to Automatic RAM Cleaner to turn on the option.
Enabling the Auto RAM Cleaner option - Now you need to select the Graphics tab and the Texture quality. Click on the drop-down menu and select Medium.
Selecting the Medium setting for Texture quality - Next, save the changes and launch the game to see if the Tarkov server connection lost error still occurs.
5. Use a router that supports SQM
The last thing you can try to lessen the frequency of getting this error is to use a router that supports Smart Queue Management.
If many devices are connected to the Wi-Fi network you use when you play the game, replacing your current router with an SQM-ready one should fix the issue.
Note: Routers with SQM support are great are managing multiple wireless networks using a web browser or a software application. These devices will help your network work faster and more stable.
Once you migrate to an SQM-ready router, launch Escape from Tarkov to see if the network issue was fixed.
Kamil Anwar
Kamil is a certified MCITP, CCNA (W), CCNA (S) and a former British Computer Society Member with over 9 years of experience Configuring, Deploying and Managing Switches, Firewalls and Domain Controllers also an old-school still active on FreeNode.

