Получили сбой в виде Access Relay Denied? Тогда срочно читайте наш гайд, чтобы узнать о причинах ошибки и методах её исправления.
Relay Access Denied — что это?
«Relay Access Denied» – это распространённая ошибка электронной почты, которая означает, что сервер не разрешает отправку писем на другой почтовый сервер.
.png)
Она может иметь вид:
EMAIL DELIVERY ERROR: the plugin WP Mail SMTP v2.8.1 logged this error during the last time it tried to send an email:
Mailer: Other SMTP SMTP Error: The following recipients failed: ivan@nic.ru: TenantAttribution; Relay Access Denied [QB1CAN01FT008.eop-CAN01.prod.protection.outlook.com]
Consider running an email test after fixing it.
Как исправить ошибку Access Relay Denied на стороне пользователя
Если вы пытаетесь отправить письмо и получаете подобное сообщение, вам стоит первым делом выполнить следующие шаги:
- Обратитесь за помощью к провайдеру электронной почты, чтобы проверить все настройки. Так вы сможете убедиться, что у вас есть правильные учётные данные, такие как почтовый сервер, имя пользователя и пароль.
- Затем узнайте, нет ли ограничений со стороны интернет-провайдера. Существует вероятность, что он блокирует порт 25 сервера исходящей почты (SMTP). В этом случае попробуйте изменить настройки, чтобы использовать порт 587 или 465 с активированным SSL.
- И, наконец, всегда существует вероятность срабатывания спам-фильтров на сервере получателя. Если это так, вам следует попросить своего провайдера электронной почты просмотреть файлы логов почтового сервера и получить из них дополнительную информацию о том, как решить эту проблему.
Как исправить ошибку Relay Access Denied на стороне провайдера
Причина 1. Сбой аутентификации
Если у всех ваших клиентов возникла подобная проблема, то скорее всего дело именно в ошибке аутентификации пользователя. В таком случае обязательно просмотрите настройки аутентификации на уровне сервера.
Например, если вы используете сервер Postfix, убедитесь, что SMTP-аутентификация включена.
Зачем это делать и почему настройки могли внезапно измениться? Иногда обновление серверного ПО может изменить конфигурацию. Поэтому, если ваш почтовый сервер всё время работал без сбоев, а затем внезапно начал выдавать ошибки, скорее всего, причина в последнем обновлении ПО.
Важно! Если вы привыкли обновлять свой сервер вручную, задумайтесь о настройке тестового сервера, аналогичного вашему основному.
Использование такого тестового сервера для проверки всех обновлений – это прекрасная возможность избежать нежелательных ошибок у ваших пользователей. Если в тестовой среде всё будет работать нормально, вы сможете уверенно продолжить и развернуть обновление уже в рабочей среде.
Причина 2. Нарушена маршрутизация почты
Ещё один из самых распространённых случаев – это проблемы с маршрутизацией почты. Мы рекомендуем воспользоваться любой панелью управления, чтобы решить ошибку Relay access denied: ISPmanager, Plesk или cPanel.
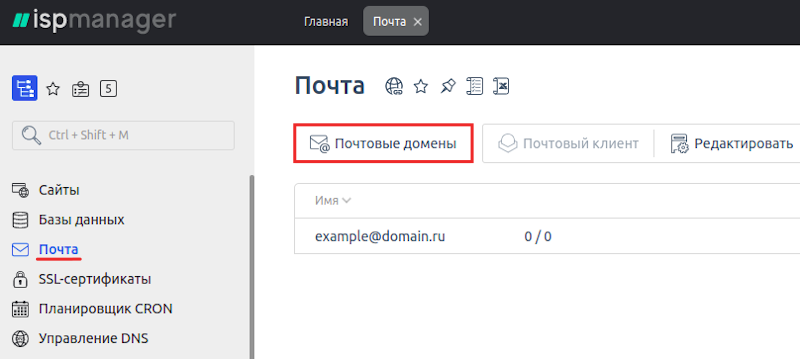
ISPmanager
- В левом меню выберите раздел Почта.
- Найдите опцию Почтовые домены и щёлкните по ней.
.png)
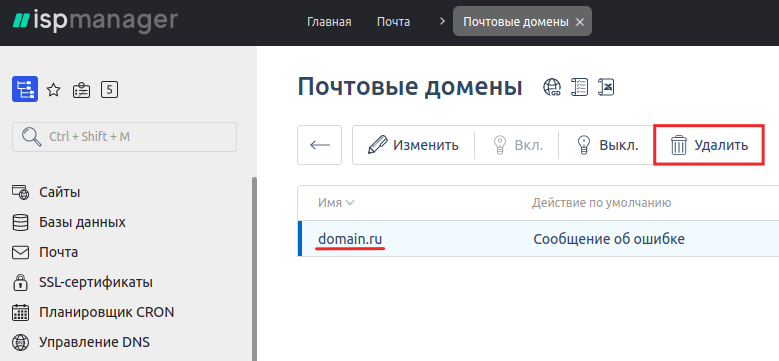
- Выберите почтовый домен и нажмите Удалить в панели выше.
.png)
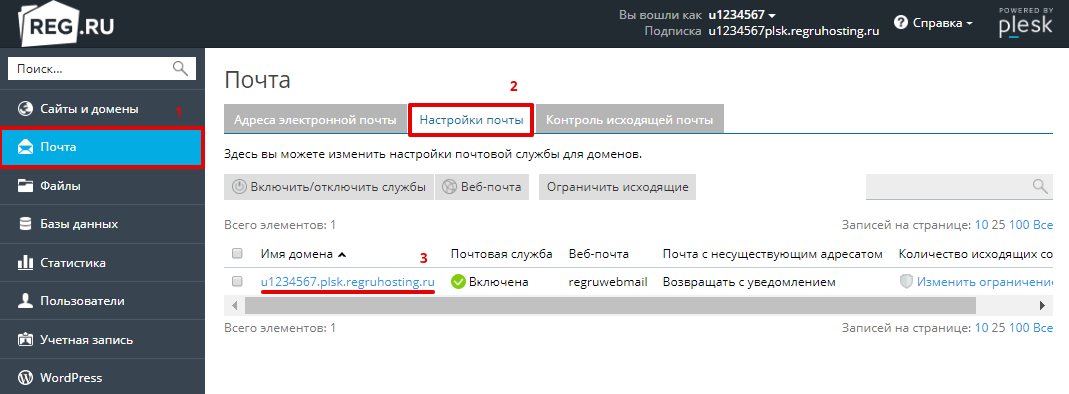
Plesk
- В левом меню выберите раздел Почта.
- Откройте раздел Настройки почты.
- Щёлкните по нужному почтовому домену.
.png)
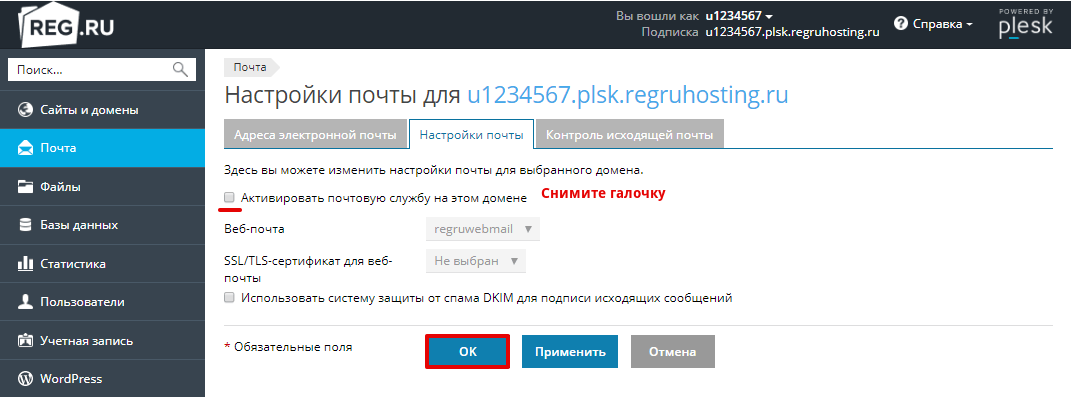
- Перед вами откроется меню, где вам необходимо снять флажок с опции «Активировать почтовую службу на этом домене».
- Подтвердите изменения, нажав Применить.
cPanel
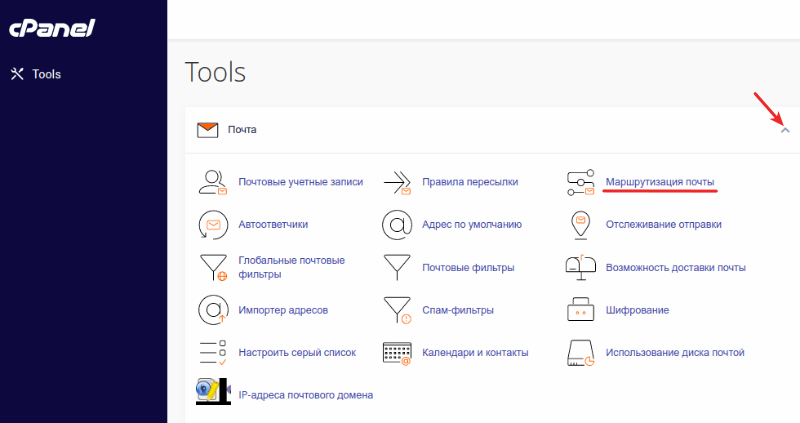
- В разделе «Почта» перейдите в меню Маршрутизация почты.
.png)
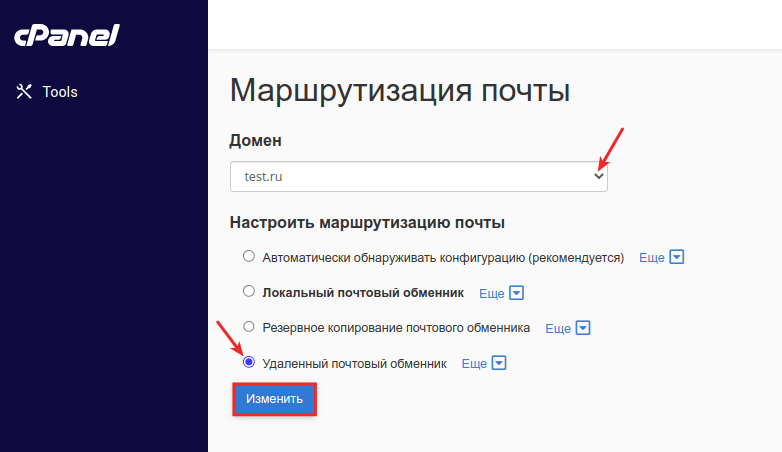
- Выберите нужный домен из списка.
- Затем обратите внимание на раздел «Настроить маршрутизацию почты». Поставьте флажок напротив опции Удаленный почтовый обменник.
- Щёлкните Изменить.
Причина 3. База данных аутентификации повреждена
На таких платформах, как Plesk, имена пользователей, пароли и аутентифицированные IP-адреса хранятся в базе данных. Как и любая другая база данных, она может быть повреждена по многим причинам. Но вы всегда можете положиться на простую командную строку для восстановления базы данных.
mysqlcheck -r psa smtp_poplocks -uadmin -p
Эта команда выполнит проверку БД и исправит сбой, если она окажется повреждена.
Причина 4. Спам-фильтр на сервере-получателе возвращают электронные письма вашего пользователя
Если ваши пользователи отправляют электронные письма и затем получают их обратно с кодом ошибки:
454 4.7.1: Relay access denied
Скорее всего, ваш сервер не проходит спам-фильтр сервера получателя. Чаще всего это случается, когда ваш сервер попадает в RBL (Realtime Blackhole List). Разобраться в этом и проверить, не находится ли ваш сервер в чёрных списках, помогут такие сайты, как:
MxToolbox
.png)
- В строке «Domain Name» введите IP-адрес сервера.
- Начните поиск, нажав MX Lookup.
MultiRBL
.png)
- Введите IP-адрес сервера, который хотите проверить.
- Щёлкните Check RBL, чтобы запустить поиск.
Эти веб-инструменты предоставят вам всю информацию о любых чёрных списках, в которых вы могли оказаться, чтобы впоследствии вы могли запросить исключение вашего сервера из этих RBL.
Однако, прежде чем просить исключить ваш сервер из списка, устраните причину попадания в него. Например, если на вашем сервере был обнаружен спамер, вы должны решить эту проблему до подачи запроса на удаление из RBL-списка.
Заключение
В данной статье мы рассмотрели, что такое ошибка Relay Access Denied, её возможные причины возникновения и способы устранения.
Если у вас ещё остались вопросы, вы можете обратиться к нашим специалистам техподдержки, чтобы окончательно решить проблему.
«Ошибка сервера: отказ в доступе к ретрансляции 554 5.7.1» в Outlook возникает по двум основным причинам. Первая причина в том, что ваш сервер исходящей почты (SMTP) не позволяет отправлять электронные письма без аутентификации пользователя, а другая причина в том, что ваш адрес электронной почты помечен в списках спама как источник спама.

Это руководство содержит инструкции по устранению следующей ошибки после отправки электронного письма: «Ваше сообщение не достигло некоторых или всех предполагаемых получателей. Следующие получатели не могут быть достигнуты. Ошибка сервера: 554 5.7.1 Relay Access Denied»
Как исправить ошибку Relay Access Denied в почте.
Чтобы точно определить причину ошибки Relay Access Denied 554 5.7.1 и устранить проблему, выполните указанные ниже действия.
Шаг 1. Проверьте настройки почтового сервера и учетные данные.
Прежде всего, убедитесь, что вы правильно ввели имя сервера исходящей электронной почты (SMTP), имя пользователя и пароль в приложении электронной почты (Outlook, Thunderbird и т. Д.). *
* Примечание. Если ошибка «Relay Access Denied» возникла без причины (например, если вы работали без проблем до вчерашнего дня), продолжите работу и включите «SMTP-аутентификацию» (шаг 2).
(Настройки учетной записи электронной почты Outlook)

Шаг 2. Включите аутентификацию пользователя SMTP Безопасное соединение.
Чтобы избежать спамеров, многие почтовые серверы запрещают ретранслировать электронные письма без предварительной аутентификации пользователя. Итак, продолжите и включите аутентификацию SMTP и безопасное соединение в настройках сервера исходящей почты.
1. От файл меню, выберите Настройки аккаунта *
* В Outlook 2007, 2003, перейдите на инструменты > учетные записи.
2. Дважды щелкните по своей учетной записи электронной почты, где вы столкнулись с ошибкой «Relay Access Denied», чтобы запустить его свойства.
")
3. щелчок Больше настроек.

4. Выберите Исходящий сервер вкладка и проверьтеМой исходящий сервер (SMTP) требует аутентификациивариант.

5. Затем выберите продвинутый и укажите следующие параметры для сервера исходящей почты.
-
- Порт исходящего сервера (SMPT): 465
- Тип шифрования: SSL

6. щелчок хорошо а потом Тестовые настройки аккаунта.

7. Если тест пройден успешно, нажмите следующий и закройте настройки учетной записи электронной почты. Наконец, попробуйте отправить электронное письмо, чтобы узнать, устранена ли ошибка «Relay Access Denied». *
* Примечание. Если тест не пройден или вы продолжаете получать сообщение об ошибке «Relay Access Denied 554 5.7.1», снова откройте дополнительные настройки, но на этот раз укажите следующие параметры. **
-
- Порт исходящего сервера (SMPT): 587
- Тип шифрования: TLS или STARTTLS

Шаг 3. Проверьте настройки электронной почты у своего провайдера электронной почты Сканирование на вирусы.
Если вы по-прежнему получаете сообщение об ошибке «Отказано в доступе к ретрансляции», после применения вышеуказанных шагов и настроек обратитесь к своему поставщику электронной почты, чтобы проверить, что информация об учетной записи ( Пароль) и настройки для зашифрованного соединения SMTP (Порт Тип шифрования) правильный.
Кроме того — но очень важно — проверьте ваш компьютер и все остальные компьютеры в сети на наличие возможных вредоносных программ. Для выполнения этой задачи выполните все шаги из этого Руководства по быстрому сканированию и удалению вредоносных программ для ПК.
Шаг 4. Проверьте, включен ли ваш почтовый сервер или домен в списки СПАМ (БЛОК). *
* Примечание: последний шаг по устранению ошибки «Relay Access Denied» в основном касается доменов компании. Владельцы почтового сервера.
A. Если у вас есть адрес электронной почты, который является частью домена компании (например, user@company.com), и вы получаете сообщение об ошибке «Relay Access Denied»:
1. Перейдите к следующему адресу электронной почты, проверяющему сайты:
-
-
- www.mxtoolbox.com/blacklists.aspx
- multi.valli.org/lookup
-
2. Введите доменное имя компании (например, «company.com») или свой полный адрес электронной почты (например, user@company.com) в поле поиска и нажмите Проверка черного списка.

B. Если вы являетесь владельцем сервера исходящей почты и ваши конечные пользователи получают ошибку «Relay Access Denied», убедитесь, что ваш почтовый сервер не занесен в черный список. Для этого:
1. Перейдите к следующему адресу электронной почты, проверяющему сайты:
-
-
- www.mxtoolbox.com/blacklists.aspx
- multi.valli.org/lookup
-
2. В поле поиска введите имя сервера исходящей почты (например, «mail.example.com») и нажмите Проверка черного списка.

Это оно! Дайте мне знать, если это руководство помогло вам, оставив свой комментарий о вашем опыте. Пожалуйста, любите и делитесь этим руководством, чтобы помочь другим.
В почтовом отбойнике фигурирует ошибка «Access relay denied (Relay access denied)».
Причины ошибки и методы её устранения:
Нарушена маршрутизация почты
Если вы пользуетесь сторонним сервисом почты (Yandex, Google Apps, Mail.ru), отключите локальную отправку почты в панели управления:
Перейдите в раздел Почта и выберите Почтовые домены:
Кликните по почтовому домену и нажмите Удалить:
Обратите внимание: если вид вашей панели управления отличается от представленного в статье, в разделе «Основная информация» переключите тему с paper_lantern на jupiter.
В разделе Электронная почта выберите Маршрутизация почты:
В выпадающем списке выберите необходимый домен и в блоке Настроить маршрутизацию почты отметьте пункт Удаленный почтовый обменник:
Нажмите Изменить.
На вкладке «Почта» перейдите в раздел Настройки почты и кликните по имени необходимого домена:
В открывшемся окне снимите галочку с «Активировать почтовую службу на этом домене» и нажмите Применить:
Готово! Вы наладили маршрутизацию почты.
Большое количество одновременных IMAP-соединений
Проблема наблюдается при отправки с почтовых клиентов, настроенных на отправку почты по протоколу IMAP. Особенно актуальной становится, если подключение происходит с нескольких клиентов одновременно. Рекомендации по устранению проблемы описаны в статье Ограничение IMAP-соединений.
IP сервера попал в спам-лист
В этом случае в отбойнике содержится информация о том, каким именно листом был заблокирован IP-адрес сервера.
Возможны два варианта:
- У вас заказана услуга виртуального хостинга сайтов. В этом случае вам необходимо сообщить о проблеме технической поддержке хостинга;
- У вас заказан VPS-сервер — вероятнее всего, с вашего сервера производится рассылка спама. В этом случае рекомендуем проверить сервер на вирусы, определить скрипты, рассылающие спам.
Вы также можете самостоятельно направить уведомление об исключении IP-адреса из спам-базы, пройдя по ссылке указанной в отбойнике.
Помогла ли вам статья?
Спасибо за оценку. Рады помочь 😊
👍
In our role as Website Support Specialists for online businesses, we resolve hundreds of email issues every day.
A commonly encountered email bounce error faced by web hosts, website owners and server owners is:
554 5.7.1 : Relay access denied
‘554 5.7.1 : Relay access denied’ error means that either the sender has failed security checks or the recipient’s mail server is misconfigured, and today, we’ll take a look at:
- What causes Relay Access Denied error
- How we fix it for server owners (eg. web hosting provider)
- How we fix it for mail users
- How we prevent this error in our customer’s (eg. web hosts) servers.
What causes Relay Access Denied Error?
When a mail is sent, it first goes to the sender’s mail server (aka MX). Then it’s RELAYED to the recipient’s MX, and from there to the recipient.
Here, TWO servers are involved – Sender’s MX and Recipient’s MX. If either one of these servers reject the mail, a Relay Access Denied error is shown to the sender.

Case 1 – Sender’s MX rejects the mail
Every mail server requires its users to provide a username and password to send mails. This is to keep spammers out. But very often valid mail users forget to turn on authentication in their mail clients, and the MX rejects their mail.
Bobcares manages the website support of several businesses. A quick look at the support tickets we handle shows that 95% of ‘Relay Access Denied’ errors are caused by incorrect SMTP settings.
So, when customers come to us facing this error, the first thing we check is their mail client settings. By guiding users with the correct settings specific to each mail client and mail server, we help them send emails without this error.

Case 2 – Recipient’s MX rejects the mail
The recipient’s mail server will accept a mail only if it can verify that the recipient is a valid user in that server. For eg. if the recipient’s account is cancelled or inactive, it won’t accept the mail.

Our Support Specialists have often traced the origin of these errors to:
- Improper sender MX configuration (eg. SMTP auth settings disabled)
- Inactive or cancelled recipient mail address
- Recipient’s DNS MX records pointing to the wrong server (often after a migration)
- Recipient’s user database errors
Help me fix this error!
We’ve seen two variations of this error in web hosting servers:
- 554 5.7.1 Relay Access Denied – The recipient’s mail server logs show this error when a mail is rejected.
- 454 4.7.1 Relay Access Denied – This error is seen in server logs when the recipient server is temporarily unable to accept mails. The mail delivery will be attempted again later.
So, if a website owner has started seeing these errors after a recent config change, or migration, or new server setup, we check the MX configuration of the domain and resolve any errors in that.
Pro Tip : If mails to several mail servers are bouncing, the mail server’s configuration could be incorrect. If mails to only a couple of recipient addresses are bouncing, the issue might be specific to those accounts.
[ Are you losing your sleep over undelivered or delayed emails? Get our professional help to fix your email errors at affordable pricing. ]
How we resolve the error for server owners
Here at Bobcares, our engineers act as the Website Support Team of web hosts, VPS hosts and dedicated server providers. These server owners see “Relay Access Denied” error in two situations:
- When a mail user tries to send a mail, and gets a bounce.
- When mails from a remote domain is rejected by the server, and mail users report it to the server owner.
In either case, we’ve seen the error recorded in mail server logs. It looks something like this:
Jan 23 03:10:57 mysev postfix/smtpd[15921]: NOQUEUE: reject: RCPT from mail-wg0-f53.google.com[74.125.82.53]: 554 5.7.1 : Relay access denied; from= to= proto=ESMTP helo=
Here are a few reasons we’ve noticed, and how we resolve them:
1. User authentication system could be broken
All modern mail servers have a way to authenticate a user before it accepts a mail to be sent. So, if we notice ALL of the mail server users getting this error, we immediately check the user authentication settings of mail server.
For example, in Postfix mail server, the below setting enables SMTP authentication. If this is disabled in the configuration file, all the users will receive “554 5.7.1 : Relay access denied“.
smtpd_recipient_restrictions = permit_sasl_authenticated
Such failures in mail server capabilities often happen as a result of mail software upgrades or operating system upgrades.
In our Website Support Services, we prevent upgrade errors or config issues by testing the upgrades in a test environment first, verifying for config conflicts and rigorously testing features post-upgrade.
2. Authentication database might be corrupt
Some servers such as Plesk servers store user login details (username & password) and authenticated IP details in databases. For instance, Plesk Qmail servers store details of authenticated IPs in a MySQL database table called smtp_poplocks.
In some cases, these databases could get partially or completely damaged due to file system errors, disk errors, etc. and multiple mail users will be unable to send mails. A quick database integrity check and repair helps us fix this issue.
Databases store critical data such as authentication information, not just for mail services, but for other services such as web, business apps, etc. So, to avoid business downtime, we monitor the database integrity round the clock.
With our 24/7 monitoring and management, we help our customers keep an eye on their servers, and quickly fix server errors any time of the day. This helps our customers maintain high service quality and business uptime.
3. External sending server failed your server’s anti-spam check
In cPanel server management, this is a case where we’ve seen that the mail server users are unable to receive mails from external parties, and the server responds with “Relay Access Denied”.
This happens when the external sending mail server fails your server’s anti-spam check. For example, this Exim mail server (myserv.com) rejected a mail from an external server (otherserver.com) because it failed a anti-spam check called “Sender Verfication Callout”.
2015-06-12 05:12:36 H=(myserv.com) [xx.xx.xx.xx] sender verify fail for : response to "RCPT TO:" from otherserv.com [yy.yy.yy.yy] was: 554 : Relay access denied
2015-06-12 05:12:36 H=(myserv.com) [xx.xx.xx.xx] F= rejected RCPT : Sender verify failed
There are three ways we resolve this:
- We examine the mail logs and if we notice repeated instances of valid mails being blocked by such an anti-spam check, we update this particular anti-spam rule.
- If the issue is specific to only one external mail server, we contact their administrator to make their servers compliant to the anti-spam check.
- In certain cases where we know that the sender is a valid and trust-worthy one, we bypass the check for that server by adding it to our white-list.
Anti-spam checks are necessary, but it can damage your business if not used judiciously. In the mail servers we maintain, we stick to RFC compliant spam checks, and implement only those systems that are validated by a majority of service providers.
For eg., there are a lot of aggressive DNS-based blacklists that frequently spam-list legitimate service providers. We make sure that only trusted, reputed lists are used in our customers’ servers.
[ Are your users complaining about email errors? Get our expert server specialists’ assistance to fix your mail servers. ]
4. The recipient mail account is inactive or misconfigured
A mail server accepts only mails that’s addressed to it’s own users. For eg. the mail server of whitehouse.gov will accept only mails to [employee-name]@whitehouse.gov.
However, we’ve seen two cases where a recipient server cannot confirm a user as valid.
- The recipient mail server’s user database gets corrupt, and it is unable lookup a user as valid.
- The recipient has set the wrong IP as their domain’s MX DNS record, and mails are attempted to be delivered to the wrong server.
This issue cannot be fixed at the sender’s mail server. However, we lookup the error details from the mail server logs and contact the recipient MX administrators to issue a quick resolution.
5. Mail user’s email client configuration wrong
This is by far the most common cause of this error. Once we check the mail logs and confirm that the mail server is working fine (that is, no clogged mail queue, not many bounced mails, etc.), we look at the mail user’s email client configuration and fix it.
More on the common issues is explained in the section below.
How we resolve the error for mail users
“Relay Access Denied” error is returned when the mail server is unable to authenticate the mail user. Here are a few common situations where this error is returned.
1. When the server’s authentication settings have changed
If there has been a recent change in your mail service, like a change in email provider, or if your mail provider migrated you to a new server, it is possible that the method of user authentication has changed.
For instance, you could have been using POP-before-SMTP before, but the new server uses “SMTP authentication” now. So, we first confirm the following details for the mail users:
- Mail server name – Eg: mail.yourserver.com
- Mail server IP – Eg: 203.0.130.20
- User name
- Password
- Whether to enable SMTP authentication or not
2. When the authenticated IP changes on mobile devices
In servers that are configured with POP before SMTP, domain owners with mobile devices report intermittent relay errors. This happens when they change the WiFi hotspot or their 4G/3G/2G network changes their IP due to a break in coverage.
The email server would be referring to the old IP as the authenticated one, while the domain owner’s mobile device would be using the new IP address.
We prevent these issues by enforcing SMTP password authentication. For example, in Parallels Plesk servers, we disable POP3 authorization and SMTP authentication is turned on by default.
3. When the domain owner tries to connect to the wrong server
This situation happens with newly registered domain owners. They would either try sending mails before the account setup is complete, use their ISP’s mail servers, or keep using their old hosting server’s host name or IP address.
Since the change needs to happen at the domain owner’s device, we focus on lightning fast resolution using step-by-step instructions customized for their mail client.
We maintain a repository of step-by-step email configuration settings for all mail clients, in all popular operating systems and mobile devices. So, we are able to usually give a resolution in as little as 10 minutes.
[ Is your business getting affected by lost or delayed mails? Get our professional help to fix your email errors. ]
4. When an external party fails your server’s spam check
If users are unable to receive mails from an external party, it is possible that their servers failed an anti-spam check. We check the details from the mail server logs and get it resolved by contacting the remote mail server administrators.
5. When the mail server is broken
It is possible that the user authentication system might be broken in the mail server, or your mail was tagged as spam. More on that is described in the section above.
Mail service is perhaps the most important online service that aids day-to-day business transactions. A contract that needs to be signed, a quote that needs to be sent, market trend data that needs to be presented – none of these can wait – We know!
That is why Bobcares engineers give high priority in resolving email errors. We use server logs, user reports and test routines to quickly identify the cause of mail errors, and fix them in as little as 10 minutes. If you’d like to know how you can better support your mail users, we’d be happy to talk to you.
В почтовом отбойнике фигурирует ошибка «Access relay denied (Relay access denied)».
Причины ошибки и методы её устранения:
Нарушена маршрутизация почты
Если вы пользуетесь сторонним сервисом почты (Yandex, Google Apps, Mail.ru), отключите локальную отправку почты в панели управления:
Перейдите в раздел Почта и выберите Почтовые домены:
Кликните по почтовому домену и нажмите Удалить:
Обратите внимание: если вид вашей панели управления отличается от представленного в статье, в разделе «Основная информация» переключите тему с paper_lantern на jupiter.
В разделе Электронная почта выберите Маршрутизация почты:
В выпадающем списке выберите необходимый домен и в блоке Настроить маршрутизацию почты отметьте пункт Удаленный почтовый обменник:
Нажмите Изменить.
На вкладке «Почта» перейдите в раздел Настройки почты и кликните по имени необходимого домена:
В открывшемся окне снимите галочку с «Активировать почтовую службу на этом домене» и нажмите Применить:
Готово! Вы наладили маршрутизацию почты.
Большое количество одновременных IMAP-соединений
Проблема наблюдается при отправки с почтовых клиентов, настроенных на отправку почты по протоколу IMAP. Особенно актуальной становится, если подключение происходит с нескольких клиентов одновременно. Рекомендации по устранению проблемы описаны в статье Ограничение IMAP-соединений.
IP сервера попал в спам-лист
В этом случае в отбойнике содержится информация о том, каким именно листом был заблокирован IP-адрес сервера.
Возможны два варианта:
- У вас заказана услуга виртуального хостинга сайтов. В этом случае вам необходимо сообщить о проблеме технической поддержке хостинга;
- У вас заказан VPS-сервер — вероятнее всего, с вашего сервера производится рассылка спама. В этом случае рекомендуем проверить сервер на вирусы, определить скрипты, рассылающие спам.
Вы также можете самостоятельно направить уведомление об исключении IP-адреса из спам-базы, пройдя по ссылке указанной в отбойнике.
The «Server Error: Relay Access Denied 554 5.7.1» in Outlook occurs for two main reasons. The first reason is that your outgoing mail server (SMTP) doesn’t allow to send emails without user authentication and the other reason is that your email address is marked at spam lists as a source of spam.

This tutorial contains instructions to solve the following error, after sending an email: «Your message did not reach some or all of the intended recipients. The following recipient(s) cannot be reached. Server error: 554 5.7.1 Relay Access Denied»
How to fix Relay Access Denied Error in Mail.
To determine the exactly reason of the Relay Access Denied 554 5.7.1 error and to resolve the problem follow the steps mentioned below.
Step 1. Verify Mail Server Settings and Account Credentials.
First of all, make sure that you have typed correctly the name of the Outgoing email server (SMTP), the User Name and your Password at your email application (Outlook, Thunderbird, etc.). *
* Note: If the «Relay Access Denied» error has appeared without a reason (e.g. if you worked without problems until yesterday), then proceed and enable the «SMTP Authentication» (Step-2).
(Outlook Email Account Settings)

Step 2. Enable SMTP User Authentication & Secure Connection.
To avoid spammers, many mail servers deny the emails to be relayed without first authenticating the user. So, proceed and enable the SMTP authentication and the secure connection at the Outgoing Mail Server settings.
1. From the File menu, choose Account Settings *
* In Outlook 2007, 2003, go to Tools > Accounts.
2. Double click at your email account where you experienced the «Relay Access Denied» error to launch its properties.
")
3. Click More Settings.

4. Select the Outgoing Server tab and check the «My outgoing server (SMTP) requires authentication» option.

5. Then select the Advanced tab and specify the following settings for the Outgoing Mail Server.
-
- Outgoing server (SMPT) Port: 465
- Encryption type: SSL

6. Click OK and then Test Account Settings.

7. If the test is successful, click Next and close the Email Account Settings. Finally, try to send an email to see if the «Relay Access Denied» error is resolved. *
* Note: If the Test fails, or you continue receiving the «Relay Access Denied 554 5.7.1» error, then open the Advanced settings again, but this time specify the following settings. **
-
- Outgoing server (SMPT) Port: 587
- Encryption type: TLS or STARTTLS

Step 3. Verify Email Settings with your Email Provider & Scan for Viruses.
If you still receive the «Relay Access Denied» error, after applying the above steps and settings, then speak with your email provider to verify that the account information (Username & Password) and the settings for the SMTP encrypted connection (Port & Encryption type) are correct.
Additionally –but very important – check your computer and all other computers on your network for possible malware infections. To accomplish this task follow all the steps from this Quick Malware Scan and Removal Guide for PC’s.
Step 4. Check if your Mail Server or your Domain is Listed at SPAM (BLOCK) lists. *
* Notice: The final step to resolve the «Relay Access Denied» error mostly concerns company domains & Mail Server owners.
A. If you own an email address, which is part of a company domain (e.g. user@company.com) and you receive the «Relay Access Denied» error:
1. Navigate to the following email blacklist checking sites:
- www.mxtoolbox.com/blacklists.aspx
- multi.valli.org/lookup
2. Type the company domain name (e.g. «company.com») or your full email address (e.g. user@company.com) at the search box and click Blacklist Check.

B. If you ‘re the owner of the Outgoing mail server and your end users receive the «Relay Access Denied» error, check that your mail server is not Blacklisted. To do that:
1. Navigate to the following email blacklist checking sites:
-
-
- www.mxtoolbox.com/blacklists.aspx
- multi.valli.org/lookup
-
2. At the search box, type the name of the Outgoing Mail Server (e.g. «mail.example.com») and click Blacklist Check.

That’s it! Let me know if this guide has helped you by leaving your comment about your experience. Please like and share this guide to help others.
If this article was useful for you, please consider supporting us by making a donation. Even $1 can a make a huge difference for us in our effort to continue to help others while keeping this site free:

If you want to stay constantly protected from malware threats, existing and future ones, we recommend that you install Malwarebytes Anti-Malware PRO by clicking below (we
do earn a commision from sales generated from this link, but at no additional cost to you. We have experience with this software and we recommend it because it is helpful and useful):
Full household PC Protection — Protect up to 3 PCs with NEW Malwarebytes Anti-Malware Premium!
Sending mail results in error «Relay access denied».
It throws «Relay access denied», whenever I tried to send mail to «other_domain» from «outside_network».
It works just fine for «myown_domain» from «outside/inside_network» and to «other_domain» from «inside_network».
Here is the list of telnet commands.
mail from:myself@mydomain.com
- 250 2.1.0 Ok
rcpt to:yourself@mydomain.com
- 250 2.1.5 Ok
rcpt to:yourself@yourdomain.com
- 554 5.7.1 <yourself@yourdomain.com>: Relay access denied.
rcpt to:yourself@gmail.com
- 554 5.7.1 <yourself@gmail.com>: Relay access denied.
rcpt to:yourself@yahoo.com
- 554 5.7.1 <yourself@yahoo.com>: Relay access denied.
I followed all the steps described in «Microsoft Support» and make sure that server configured in correct way and it do not reject any mail. I also tried to trace through using couple of blogs like this one.
While using MxToolbox also got the same result «Relay access denied».
As «Relay access denied» is very common issue.. there are lot of blogs/documentation are there.. I tried to read all, but I think I am looking in wrong place.
Does anybody have any suggestion?
«Ошибка сервера: отказ в доступе к ретрансляции 554 5.7.1» в Outlook возникает по двум основным причинам. Первая причина в том, что ваш сервер исходящей почты (SMTP) не позволяет отправлять электронные письма без аутентификации пользователя, а другая причина в том, что ваш адрес электронной почты помечен в списках спама как источник спама.
Это руководство содержит инструкции по устранению следующей ошибки после отправки электронного письма: «Ваше сообщение не достигло некоторых или всех предполагаемых получателей. Следующие получатели не могут быть достигнуты. Ошибка сервера: 554 5.7.1 Relay Access Denied»
Чтобы точно определить причину ошибки Relay Access Denied 554 5.7.1 и устранить проблему, выполните указанные ниже действия.
Шаг 1. Проверьте настройки почтового сервера и учетные данные.
Прежде всего, убедитесь, что вы правильно ввели имя сервера исходящей электронной почты (SMTP), имя пользователя и пароль в приложении электронной почты (Outlook, Thunderbird и т. Д.). *
* Примечание. Если ошибка «Relay Access Denied» возникла без причины (например, если вы работали без проблем до вчерашнего дня), продолжите работу и включите «SMTP-аутентификацию» (шаг 2).
(Настройки учетной записи электронной почты Outlook)
Шаг 2. Включите аутентификацию пользователя SMTP Безопасное соединение.
Чтобы избежать спамеров, многие почтовые серверы запрещают ретранслировать электронные письма без предварительной аутентификации пользователя. Итак, продолжите и включите аутентификацию SMTP и безопасное соединение в настройках сервера исходящей почты.
1. От файл меню, выберите Настройки аккаунта *
* В Outlook 2007, 2003, перейдите на инструменты > учетные записи.
2. Дважды щелкните по своей учетной записи электронной почты, где вы столкнулись с ошибкой «Relay Access Denied», чтобы запустить его свойства.
3. щелчок Больше настроек.
4. Выберите Исходящий сервер вкладка и проверьтеМой исходящий сервер (SMTP) требует аутентификациивариант.
5. Затем выберите продвинутый и укажите следующие параметры для сервера исходящей почты.
-
- Порт исходящего сервера (SMPT): 465
- Тип шифрования: SSL
6. щелчок хорошо а потом Тестовые настройки аккаунта.
7. Если тест пройден успешно, нажмите следующий и закройте настройки учетной записи электронной почты. Наконец, попробуйте отправить электронное письмо, чтобы узнать, устранена ли ошибка «Relay Access Denied». *
* Примечание. Если тест не пройден или вы продолжаете получать сообщение об ошибке «Relay Access Denied 554 5.7.1», снова откройте дополнительные настройки, но на этот раз укажите следующие параметры. **
-
- Порт исходящего сервера (SMPT): 587
- Тип шифрования: TLS или STARTTLS
Шаг 3. Проверьте настройки электронной почты у своего провайдера электронной почты Сканирование на вирусы.
Если вы по-прежнему получаете сообщение об ошибке «Отказано в доступе к ретрансляции», после применения вышеуказанных шагов и настроек обратитесь к своему поставщику электронной почты, чтобы проверить, что информация об учетной записи ( Пароль) и настройки для зашифрованного соединения SMTP (Порт Тип шифрования) правильный.
Кроме того — но очень важно — проверьте ваш компьютер и все остальные компьютеры в сети на наличие возможных вредоносных программ. Для выполнения этой задачи выполните все шаги из этого Руководства по быстрому сканированию и удалению вредоносных программ для ПК.
Шаг 4. Проверьте, включен ли ваш почтовый сервер или домен в списки СПАМ (БЛОК). *
* Примечание: последний шаг по устранению ошибки «Relay Access Denied» в основном касается доменов компании. Владельцы почтового сервера.
A. Если у вас есть адрес электронной почты, который является частью домена компании (например, user@company.com), и вы получаете сообщение об ошибке «Relay Access Denied»:
1. Перейдите к следующему адресу электронной почты, проверяющему сайты:
-
-
- www.mxtoolbox.com/blacklists.aspx
- multi.valli.org/lookup
-
2. Введите доменное имя компании (например, «company.com») или свой полный адрес электронной почты (например, user@company.com) в поле поиска и нажмите Проверка черного списка.
B. Если вы являетесь владельцем сервера исходящей почты и ваши конечные пользователи получают ошибку «Relay Access Denied», убедитесь, что ваш почтовый сервер не занесен в черный список. Для этого:
1. Перейдите к следующему адресу электронной почты, проверяющему сайты:
-
-
- www.mxtoolbox.com/blacklists.aspx
- multi.valli.org/lookup
-
2. В поле поиска введите имя сервера исходящей почты (например, «mail.example.com») и нажмите Проверка черного списка.
Это оно! Дайте мне знать, если это руководство помогло вам, оставив свой комментарий о вашем опыте. Пожалуйста, любите и делитесь этим руководством, чтобы помочь другим.
This morning, in order to correct a problem with a name mismatch in the security certificate, I followed the recommended steps from How to fix mail server SSL?, but now, when attempting to send an email from a client (in this case the client is Windows Mail), I receive the following error.
The rejected e-mail address was
’email@gmail.com’. Subject ‘This is a
test. ‘, Account: ‘mail.domain.com’,
Server: ‘mail.domain.com’, Protocol:
SMTP, Server Response: ‘554 5.7.1
: Relay access
denied’, Port: 25, Secure(SSL): No,
Server Error: 554, Error Number:
0x800CCC79
Edit: I can still retrieve emails from this account, and I send emails to other accounts at the same domain. I just can’t send emails to recipients outside of our domain.
I tried disabling TLS altogether but no dice, I still get the same error.
When I check file mail.log, I see the following.
Jul 18 08:24:41 company imapd: LOGIN, user=user_name@domain.com, ip=[::ffff:111.111.11.11], protocol=IMAP
Jul 18 08:24:42 company imapd: DISCONNECTED, user=user_name@domain.com, ip=[::ffff:111.111.11.11], headers=0, body=0, rcvd=83, sent=409, time=1
Jul 18 08:25:19 company postfix/smtpd[29282]: connect from company.university.edu[111.111.11.11]
Jul 18 08:25:19 company postfix/smtpd[29282]: NOQUEUE: reject: RCPT from company.university.edu[111.111.11.11]: 554 5.7.1 <email@gmail.com>: Relay access denied; from=<user_name@domain.com> to=<email@gmail.com> proto=ESMTP helo=<UserPC>
Jul 18 08:25:19 company postfix/smtpd[29282]: disconnect from company.university.edu[111.111.11.11]
Jul 18 08:25:22 company imapd: DISCONNECTED, user=user_name@domain.com, ip=[::ffff:111.111.11.11], headers=13, body=142579, rcvd=3289, sent=215892, time=79
File main.cf looks like this:
#
# Postfix MTA Manager Main Configuration File;
#
# Please do NOT edit this file manually;
#

#
# Postfix directory settings; These are critical for normal Postfix MTA functionallity;
#

command_directory = /usr/sbin
daemon_directory = /usr/lib/postfix
program_directory = /usr/lib/postfix

#
# Some common configuration parameters;
#

inet_interfaces = all
mynetworks = 127.0.0.0/8
mynetworks_style = host

myhostname = mail.domain.com
mydomain = domain.com
myorigin = $mydomain

smtpd_banner = $myhostname ESMTP 2.4.7.1 (Debian/GNU)
setgid_group = postdrop

#
# Receiving messages parameters;
#

mydestination = localhost, company
append_dot_mydomain = no
append_at_myorigin = yes
transport_maps = mysql:/etc/postfix/transport.cf

#
# Delivering local messages parameters;
#

mail_spool_directory = /var/spool/mail
mailbox_size_limit = 0
mailbox_command = procmail -a "$EXTENSION"

biff = no

alias_database = hash:/etc/aliases

local_recipient_maps =

#
# Delivering virtual messages parameters;
#
virtual_mailbox_maps=mysql:/etc/postfix/mysql_virt.cf
virtual_uid_maps=mysql:/etc/postfix/uids.cf
virtual_gid_maps=mysql:/etc/postfix/gids.cf
virtual_mailbox_base=/usr/local/virtual
virtual_maps=mysql:/etc/postfix/virtual.cf
virtual_mailbox_domains=mysql:/etc/postfix/virtual_domains.cf


#
# SASL paramters;
#
smtp_use_tls = yes
smtpd_use_tls = yes
smtpd_tls_auth_only = yes
smtpd_tls_loglevel = 1
smtpd_tls_received_header = yes
smtpd_tls_session_cache_timeout = 3600s

smtp_tls_CAfile = /etc/postfix/ssl/smptd.pem
smtp_tls_cert_file = /etc/postfix/ssl/smptd.crt
smtp_tls_key_file = /etc/postfix/ssl/smptd.key

smtpd_tls_CAfile = /etc/postfix/ssl/smptd.pem
smtpd_tls_cert_file = /etc/postfix/ssl/smptd.crt
smtpd_tls_key_file = /etc/postfix/ssl/smptd.key

smtpd_sasl_auth_enable = yes

smtpd_sasl_security_options = noanonymous

smtpd_sasl_local_domain =

broken_sasl_auth_clients = yes

smtpd_sender_restrictions =
        permit_sasl_authenticated
        permit_mynetworks

smtpd_recipient_restrictions =
        permit_sasl_authenticated
        check_recipient_access hash:/etc/postfix/filtered_domains
        permit_mynetworks
        reject_unauth_destination
As a side note, my employer wants to be able to send emails from clients (Thunderbird and Outlook) both from within our local network and outside it.